UMID MBOOKBZ M-BOOK User Manual
UMID Co., Ltd. M-BOOK
UserManual.wiki
>
UMID
>
MBOOKBZ User Manual
User Manual
Navigation menu
Upload a User Manual
Namespaces
Wiki Guide
HTML
PDF
Info
Views
User Manual
Discussion / Help
Navigation
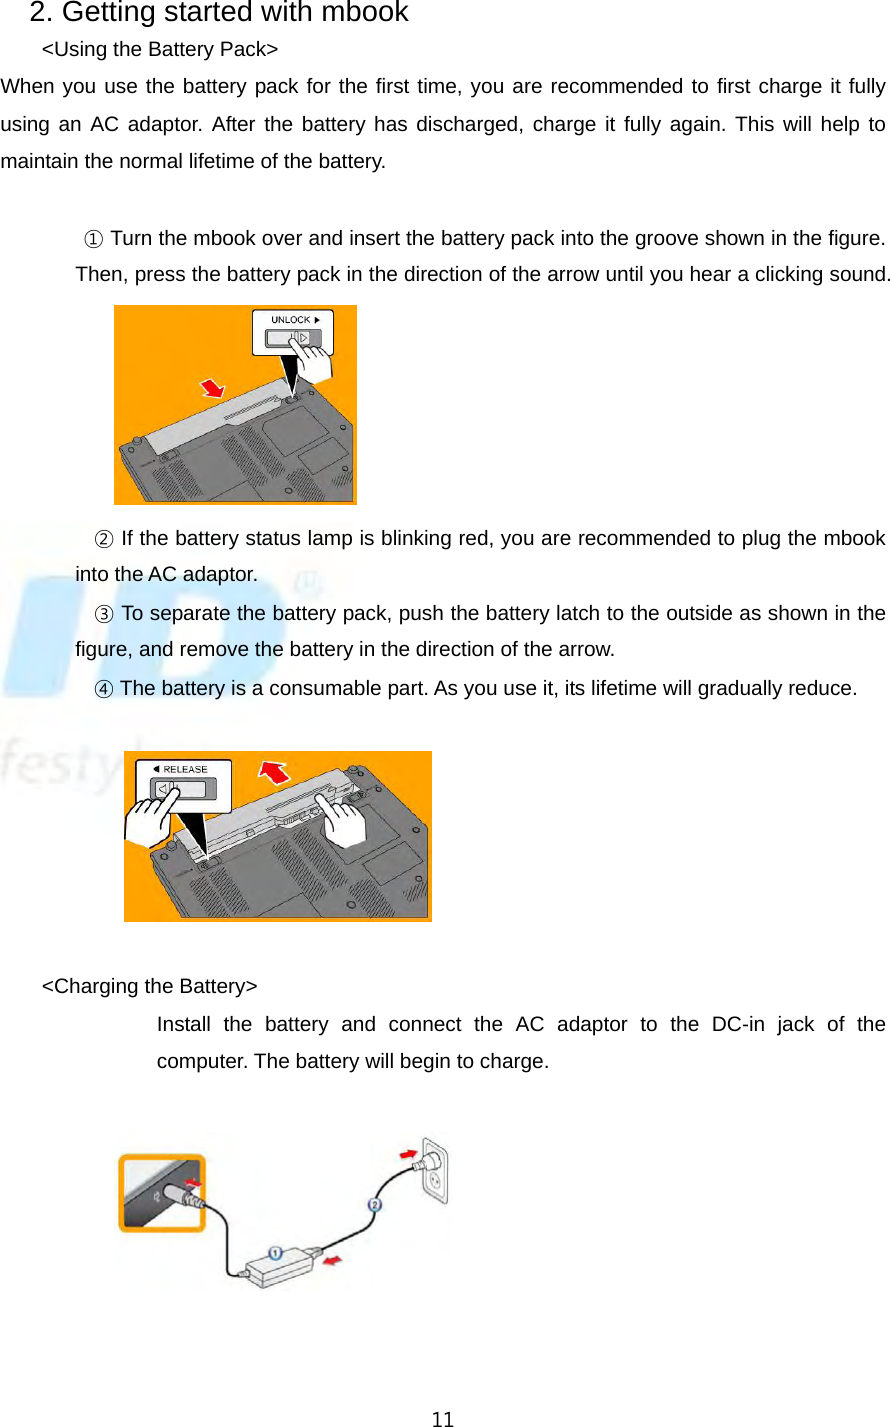
![31. Starting mbook Patent The contents of this manual are the property of UMID CO., LTD. ● This manual covers the setup and operation of the mbook. ● This manual has been written with the utmost care, with the aim of preparing you to easily use the mbook. However, from time to time upgrades may be carried out on the mbook without prior notification. Please check our website if you have any problems. ● Under copyright law, this manual and its contents shall not in any way, shape, or form, be electronically or mechanically copied. ● UMID is not responsible for nor shall be held legally liable for any data loss. ● For your own protection, we recommend that all important data be regularly backed up on another device. ● All trademarks not belonging to UMID CO., LTD are used for information only, and do not indicate an endorsement of this product by their respective owners. The rights related to the trademarks of said companies are also protected under patent law. ● All Microsoft products listed in this manual are protected by the trademarks of the Microsoft Corporation. ● All other trademarks are the property of their respective owners. <Safety Precaution> Failing to follow instructions marked with this symbol may cause personal injury and even death. Failing to follow instructions marked with this symbol may cause sight injury to yourself, and/or damage to the product. [Power Related] • Do not touch the power cord with wet hands. There is the danger of electric shock. • Take care not to exceed the standard capacity (voltage/current) of a multi-tap or power outlet extension when using it for the product.](https://usermanual.wiki/UMID/MBOOKBZ/User-Guide-1204525-Page-3.png)
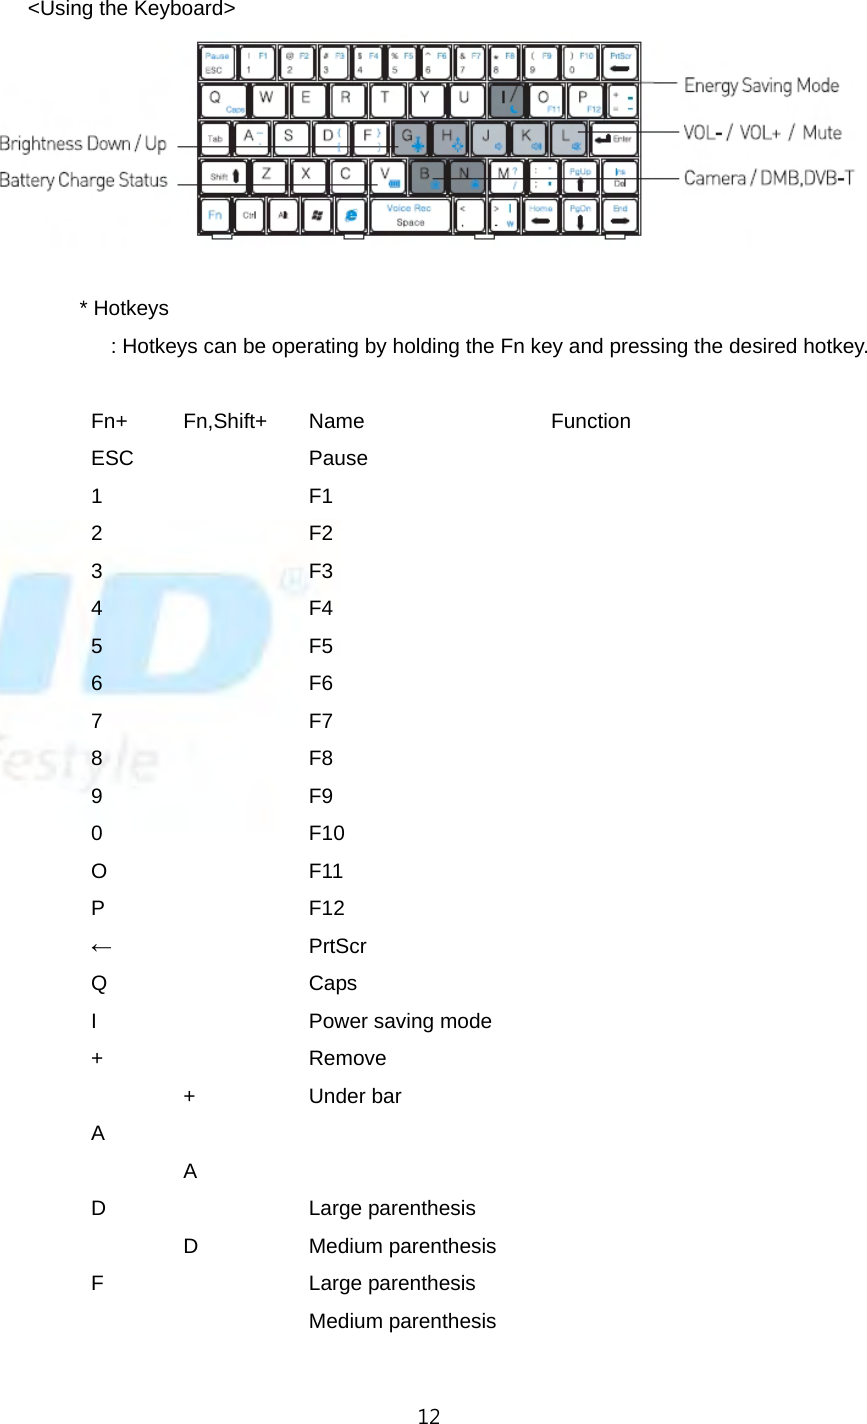
![4The leakage of electric current may cause electric shock or fire. • If the power cord or power outlet makes a noise, disconnect the power cord from the wall outlet, and contact a service center. There is the danger of electric shock or fire. • Do not use a power cord or power outlet that is loose or damaged. There is the danger of electric shock or fire. • Be sure to firmly insert the power cord into the power outlet. Failure to do so may cause a fire. • Unplug the power cord by pulling on the plug, rather than the cable. If the cord is damaged, pulling on it may cause electrical shock. [Care During Installation] ● Installation should be done on a flat surface. Do not install while holding the mbook in your hands. Furthermore, installation in a car should be done while the mbook is in its cradle. ● If you drop the device, damage to the device may result. UMID cannot be held liable for any damage incurred by dropping the device. ● We recommend that you only use the authorized UMID adaptor as your power supply. ● Please plug the mbook into a power bar that includes a surge protector. ● Before plugging the mbook into any power supply for the first time, please ensure it is the appropriate power supply. If you are unsure, please contact your local representative for confirmation, or check our website for further details. ● Please operate the mbook safely by avoiding contact of any part of the mbook with liquid, including but not limited to the power supply. ● Please check with your dealer before connecting the mbook to a power supply in your car to ensure that it is compatible. ● Vehicles such as trucks sometimes use higher than standard voltage. UMID is not responsible for any damage that results from connecting the mbook to the incorrect voltage. ● Avoid humidity. ● Do not cover the ventilation system of the mbook. ● Please follow all instructions regarding the safe use and operation of the mbook. ● To prevent shock or damage, please keep all liquids away from the mbook. ● Do not attempt to repair the mbook under any circumstances. Please call the nearest authorized dealer for service. Any unauthorized repairs shall void the](https://usermanual.wiki/UMID/MBOOKBZ/User-Guide-1204525-Page-4.png)
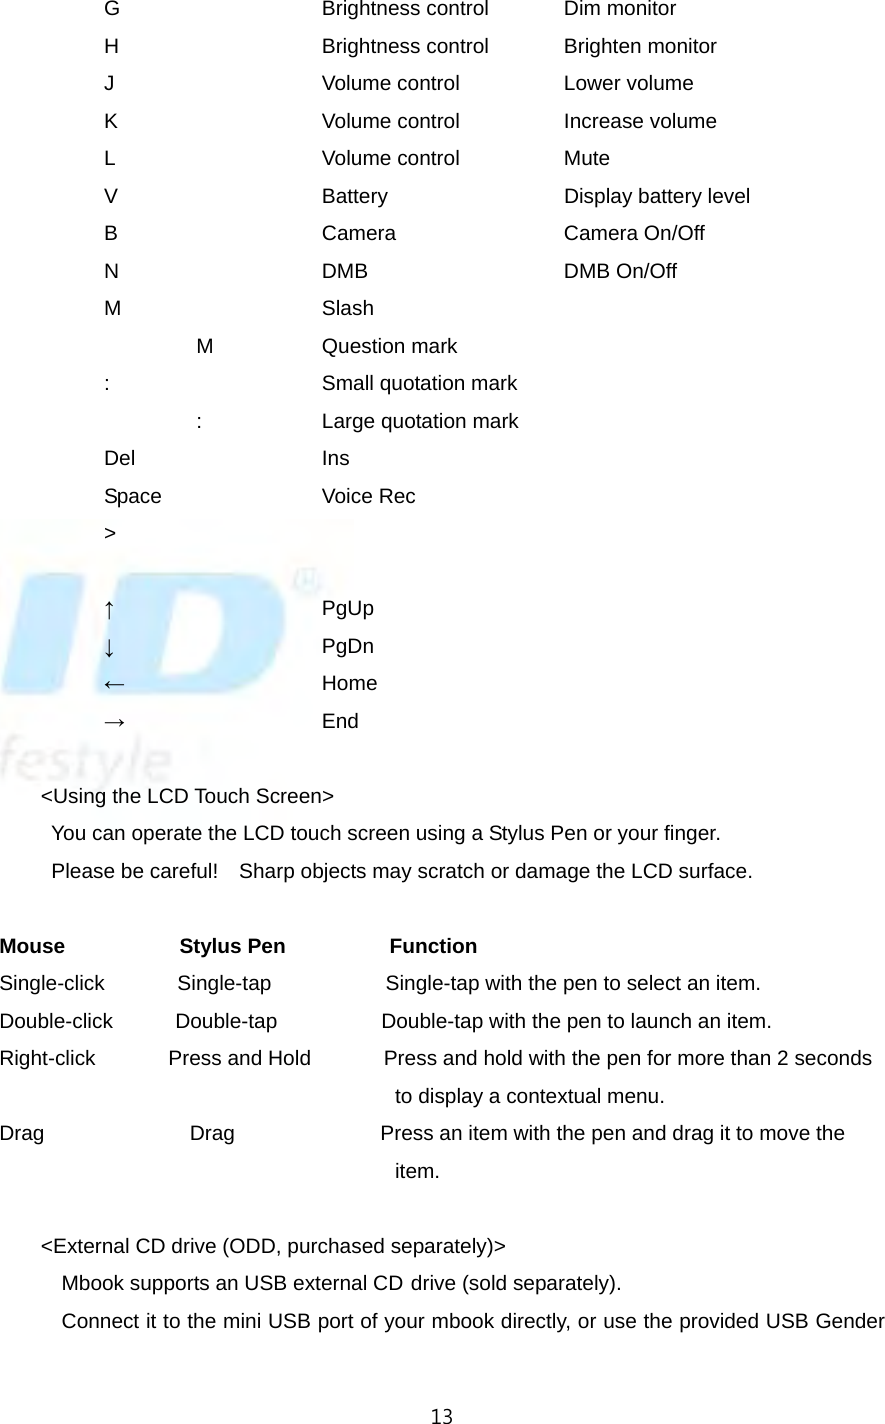
![5warranty of the mbook. [Issues Related to Battery Use] • Please dispose of the batteries correctly. Failing to dispose of batteries correctly may lead to fire or explosion. Battery disposal methods may differ according to your location. Please be sure to use the proper disposal method for your region. Dispose of a used battery in the appropriate way. • Do not throw or disassemble the battery. This may cause injury, fire or explosion. • Use only batteries authorized by UMID. Use of the wrong battery may cause an explosion. • When storing or carrying a battery, avoid contact with metal objects, such as car keys or clips. Contact with a metal part may cause an excessive current and a high temperature. This may damage the battery, or cause a fire. • Change the battery according to the instructions in the manual. Failure to do so may lead to product damage. • Do not heat the battery or place it in fire. This may lead to fire or explosion. [Customer Service] ● If the mbook fails to operate according to specifications in any way, please send it back to us for service. ● If you drop or damage the mbook, please send it to us for service. ● If the screen is not performing correctly, please send it to us for an expert evaluation of the problem. [Always keep in a safe place] ● Do not store the mbook near a heat source. ● If you do not plan to use the mbook for an extended period of time, please disconnect the power supply to prevent overcharging.](https://usermanual.wiki/UMID/MBOOKBZ/User-Guide-1204525-Page-5.png)
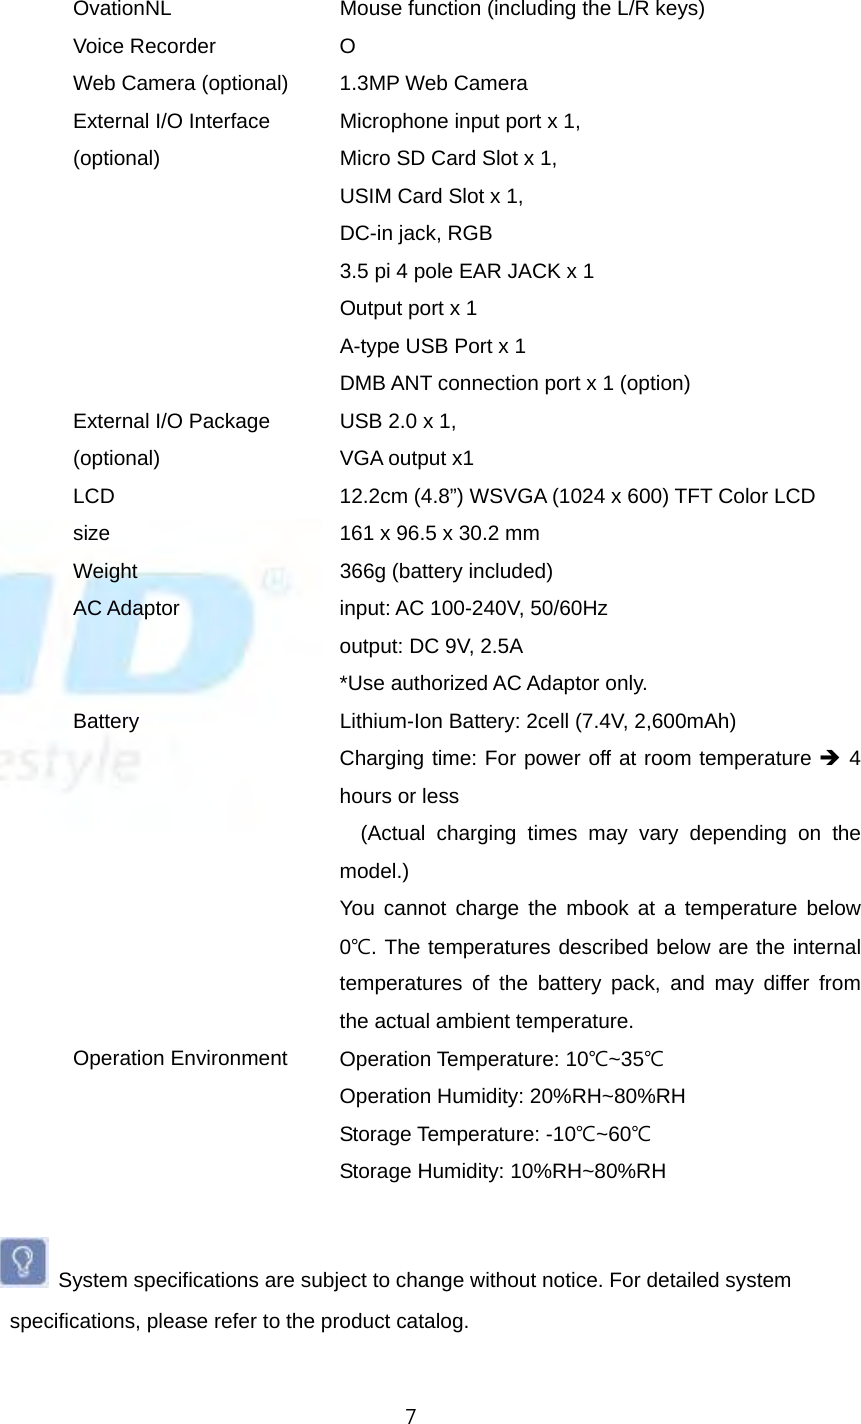
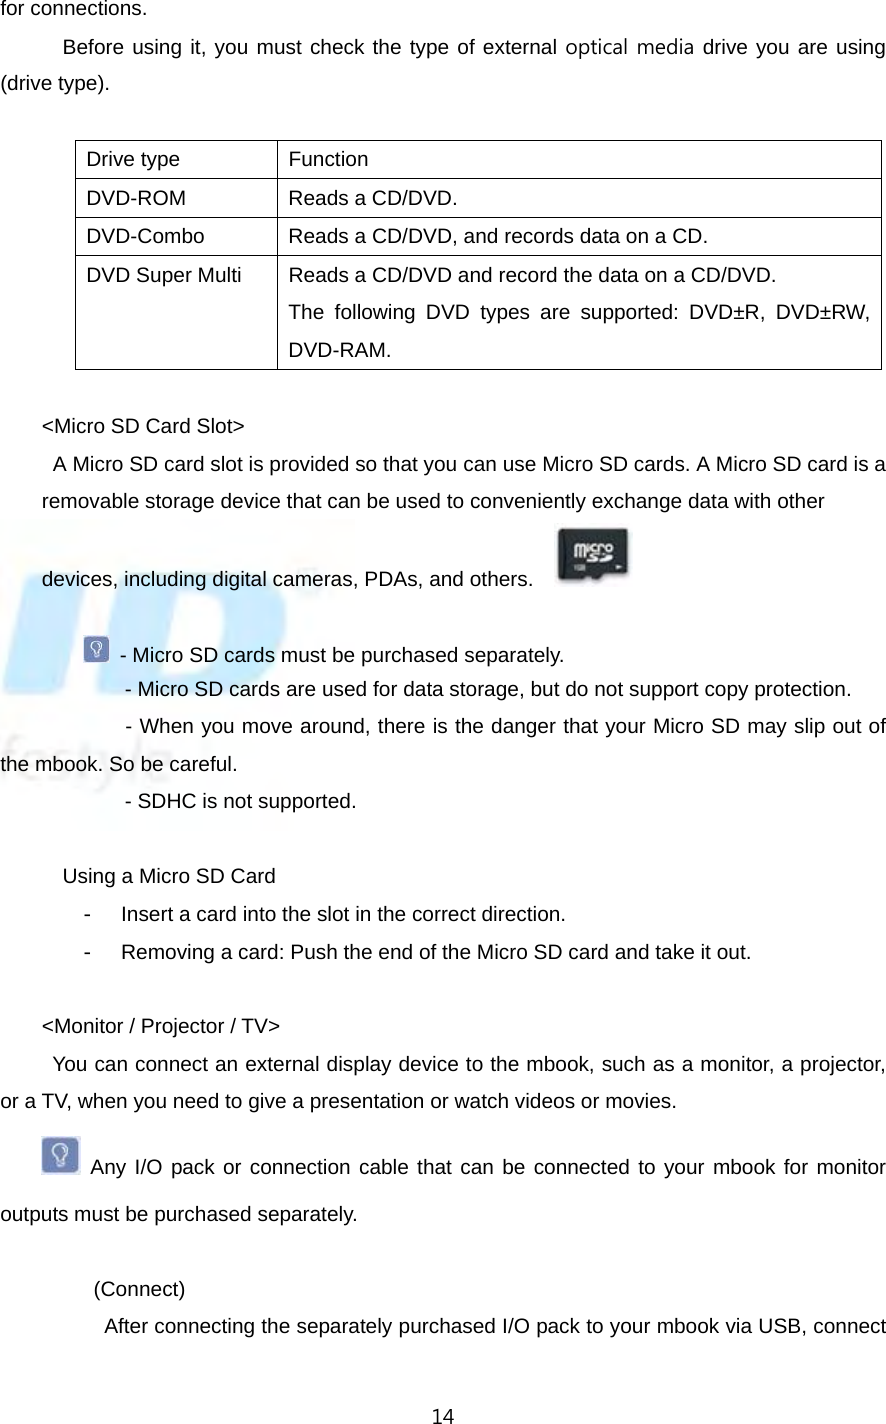
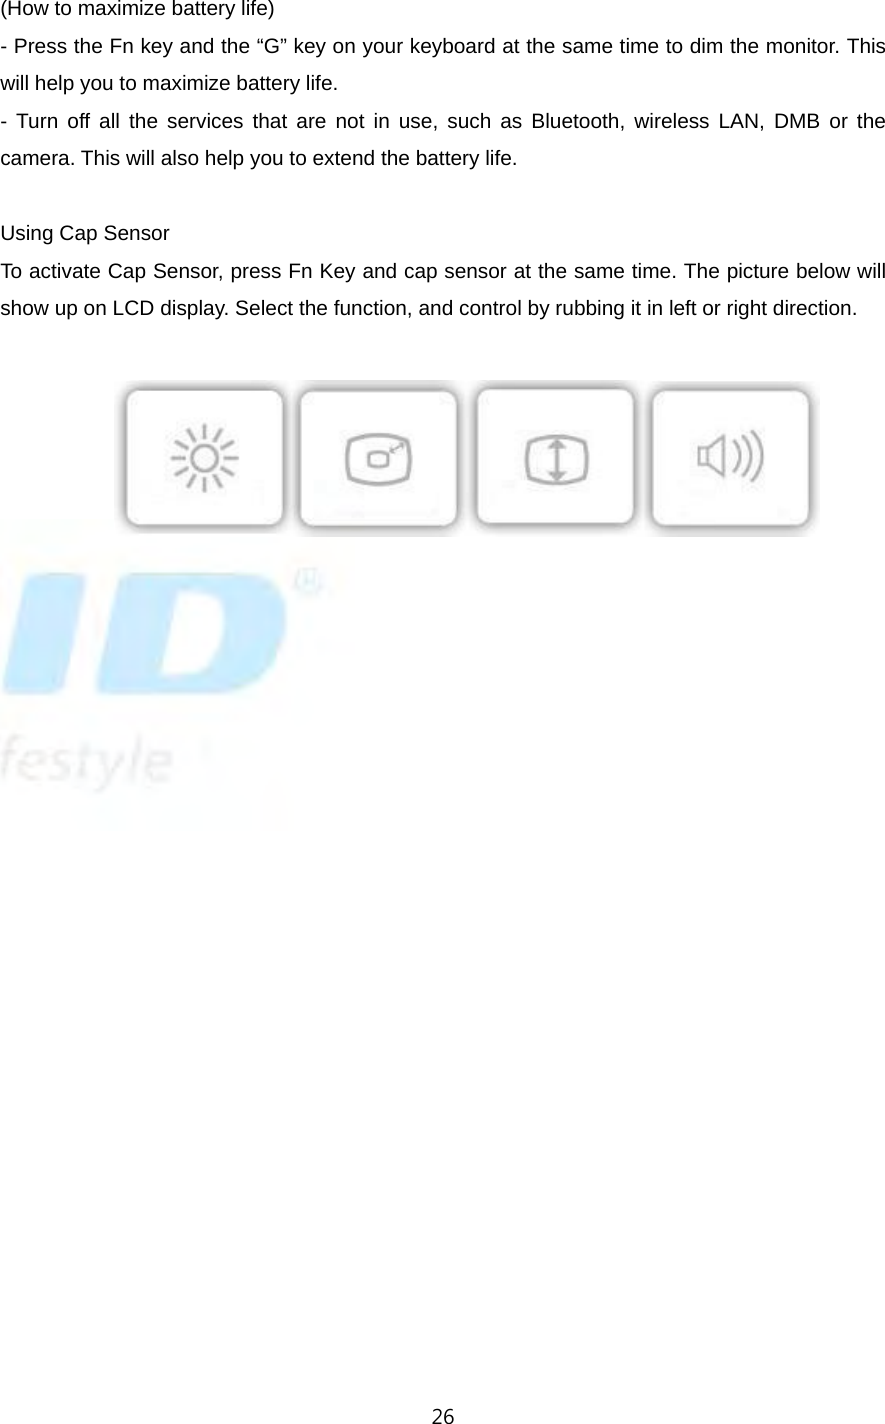
![6[Proper Maintenance] ● Before cleaning, please disconnect the power supply from the mbook, and remove the battery. ● For cleaning, please use LCD cleaning products only, or a warm DAMP cloth. ● NEVER clean the Ultra Mobile PC with alcohol, solvent, or any other chemical agent. ● Do not spray liquid directly onto the screen. ● Do not use paper products such as paper towel, tissue, etc. for cleaning, as these can damage the screen. [Cautions for Use While Traveling] ● Always back up your files before traveling. ● Always check the local power supply for suitability with the mbook before use. ● Please use carry in a case for maximum protection against data loss. All accessories are sold separately. This is handheld product. If the system halts due to static electricity, please reboot the system. If the system reboots successfully, the product is in normal condition. <Specification> Some specifications may vary depending on the model. CPU Intel ATOM Processor(Z515) 1.2GHz Cache Memory 512KB Main Memory 512MB / 1GB, Type: DDR2 SODIM Main Chipset Pulsbo SSD NAND Flash 8GB / 16GB / 32GB / 64GB Graphic Mobile Intel Graphic Media Accelerator 950 Sound Chipset Realtek High Definition Audio Codec (ALC888) Networks - Wireless LAN: 802.11b/g - Bluetooth 2.0 + EDR - WiBro, HSPA, WiMAX (option) Micro SD Card Slot SD Card DMB (optional) T-DMB, DVB-T/H, ISDB-T (1-Seg) CAP Sense Volume control, screen magnification, scrolls and other functions](https://usermanual.wiki/UMID/MBOOKBZ/User-Guide-1204525-Page-6.png)
![8<Overview> [Front] 1 LCD (12.2cm (4.8”)) This is the display of the computer. 2 Camera (optional) The camera can take still photos and movie clips. 3 Speaker The speaker produces audio. 4 Mouse L/R keys Mouse function (Left / Right Keys) 5 Optical Mouse Mouse function 6 Cap Sensor Volume control, screen magnification, scrolls and other functions. 7 Power Switch - Power On/Off - Standby Mode (Enter Standby Mode by briefly pressing the Power On button) 8 Wireless-LAN / Bluetooth On/Off Switch Wireless-LAN(802.11b/g) and Bluetooth (2.0+EDR) On/Off 9 Operating Status Displays the operating status of your mbook. 10 Wireless-LAN/Bluetooth Operating Status Displays the operating status of Wireless-LAN and Bluetooth 11 USIM Card Slot (optional) Insert USIM Card for WiBro, HSDPA, WiMax 12 Micro SD Card Slot Slot for a Micro SD card](https://usermanual.wiki/UMID/MBOOKBZ/User-Guide-1204525-Page-8.png)
![9[Operating Status] Charge Status This shows the power source and the battery charge status. ILLUMINATED GREEN: when system is operating BLINKING GREEN: when the system is in standby modeILLUMINATED RED: when the battery is being charged BLINKING RED: when the battery is low NAND Flash (SSD) This shows that NAND Flash (SSD) is working. [Side -Right] DC-in Jack Port used to connect the AC adaptor supplying power to the computer USB Port Port used to connect to a USB Client EAR Jack / Internal Microphone Jack to connect your 3.5 pi earphone. Used to record sound RGB output Jack This is where you can connect your RGB cable, which can be connected to a monitor. DMB Antenna (Left) Antenna for watching DMB, DVB-T and DVB-H](https://usermanual.wiki/UMID/MBOOKBZ/User-Guide-1204525-Page-9.png)
![10 [Back] Battery A Lithium Ion rechargeable battery that supplies power to the computer. [Bottom] Battery latch The latch used to remove or install the battery. HandStrap holder You can connect the hand strap here.](https://usermanual.wiki/UMID/MBOOKBZ/User-Guide-1204525-Page-10.png)
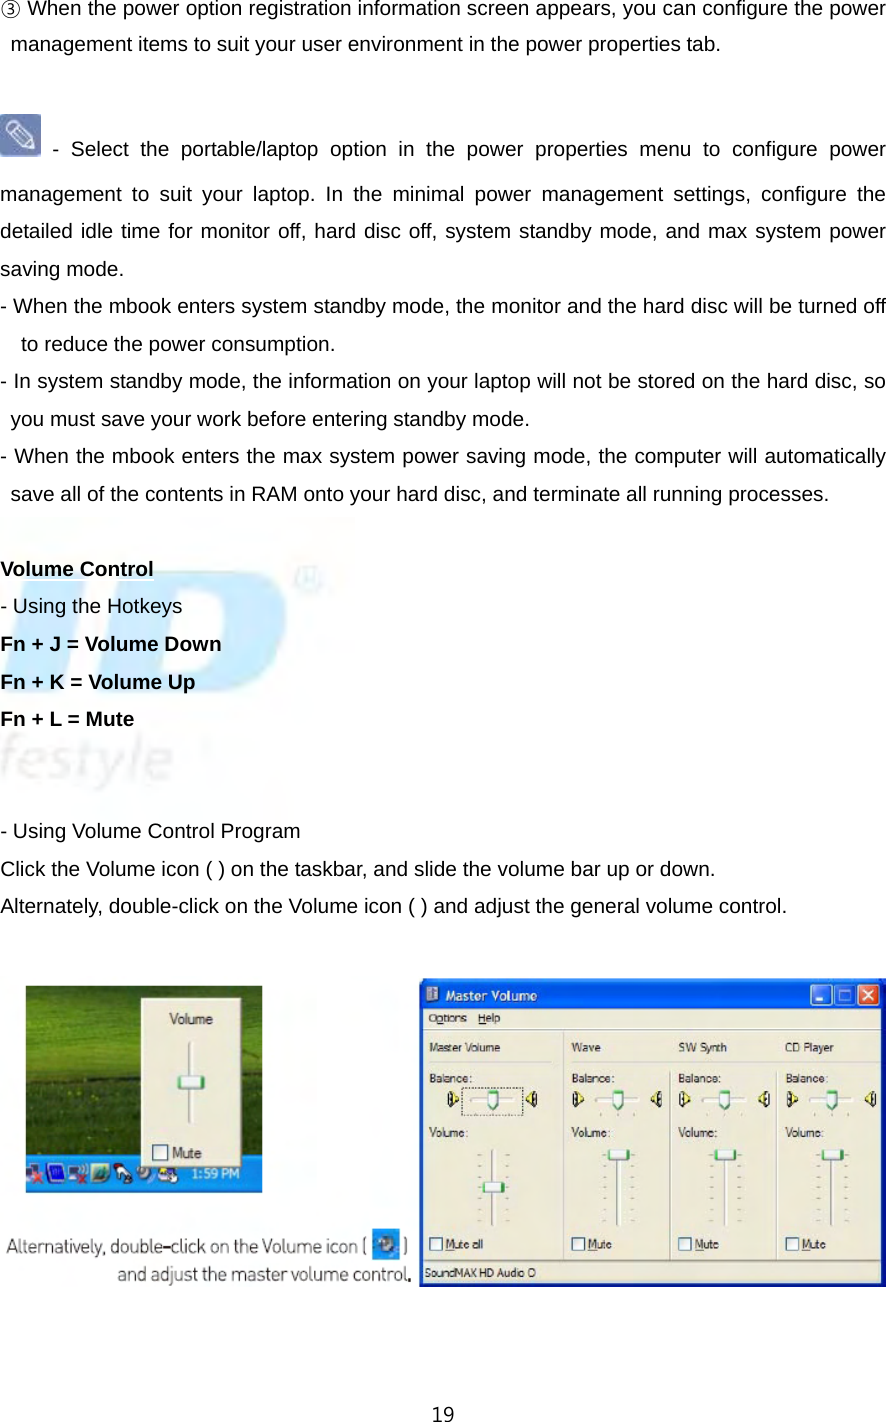
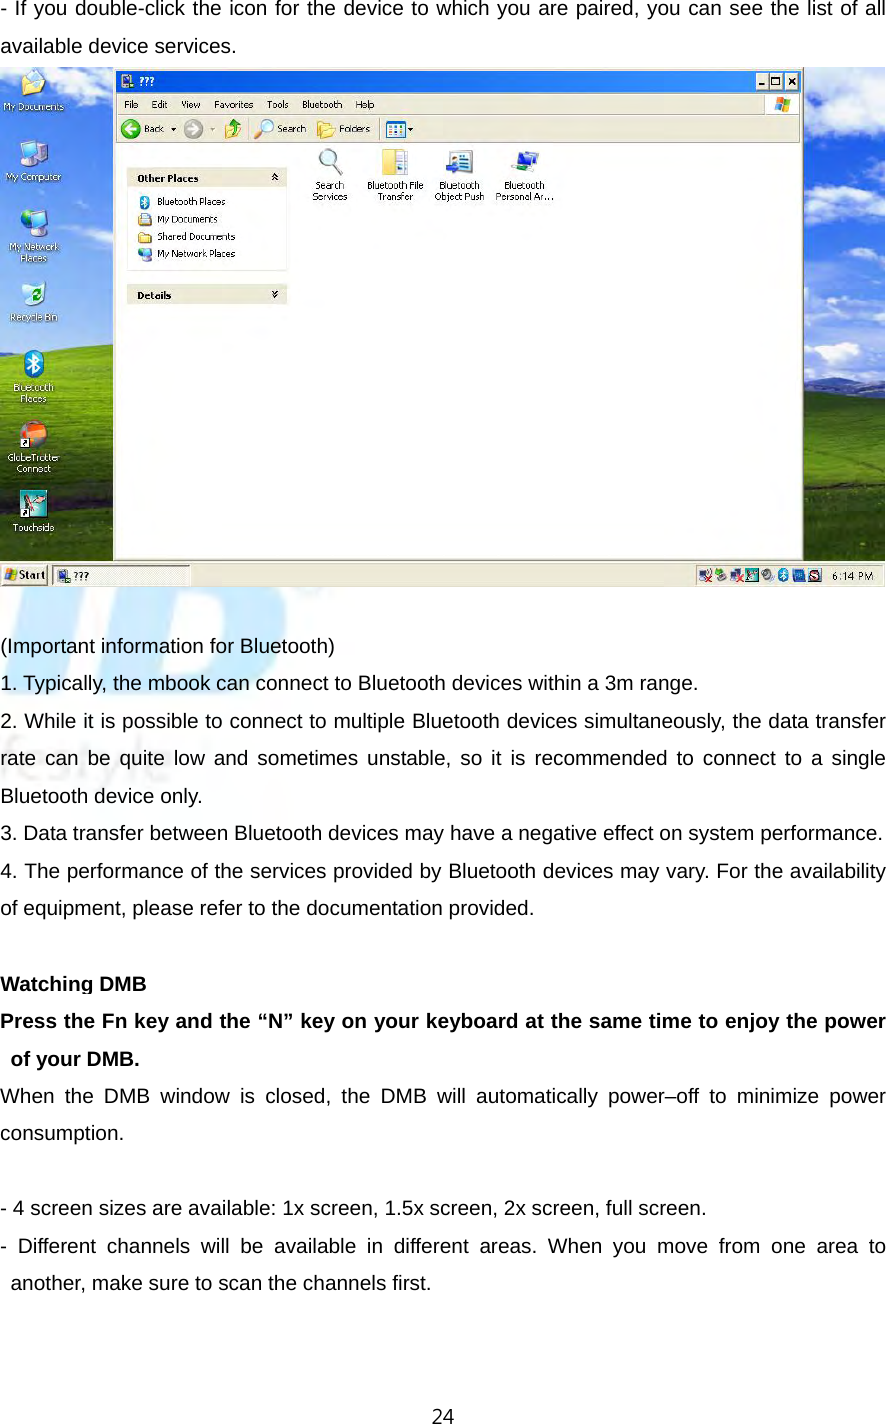
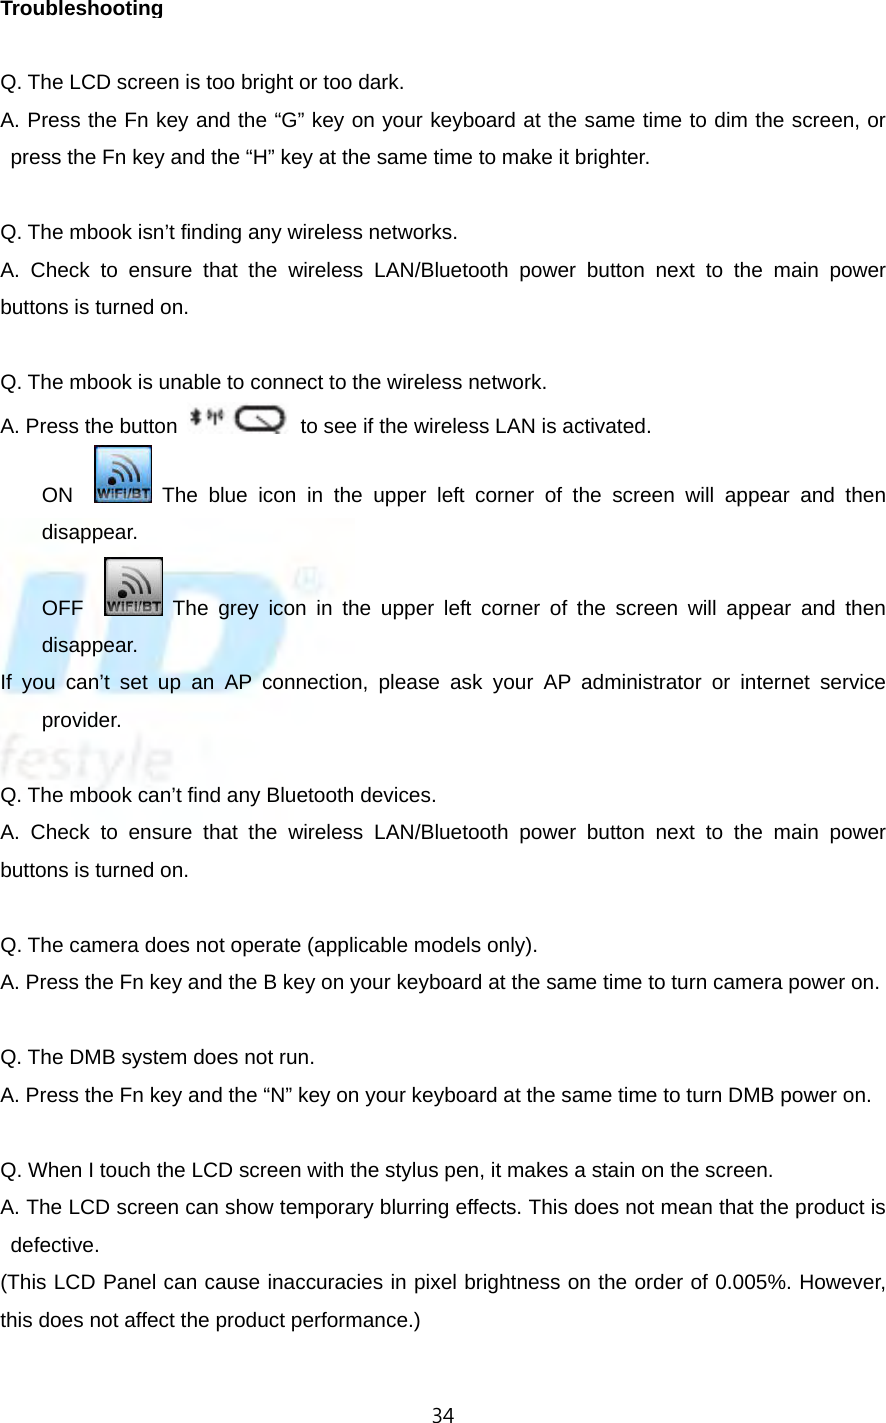
![20LCD Brightness Control Brightness can be controlled using the Hotkeys. Fn + G = Darker Fn + H = Brighter [Using Wireless-LAN] The ON button is next to the Power button. 1. Please press and hold the wireless LAN connection icon on the desktop (right-click function) using the pen. 2. Select the Access point and then click Connect. To connect to a secure wireless network, you must enter the network key. [Using Bluetooth] The ON button is next to the Power button. Bluetooth 2.0 is mounted to support the transmission of data to a Bluetooth device. Double click the Bluetooth icon (on the desktop or taskbar).](https://usermanual.wiki/UMID/MBOOKBZ/User-Guide-1204525-Page-20.png)

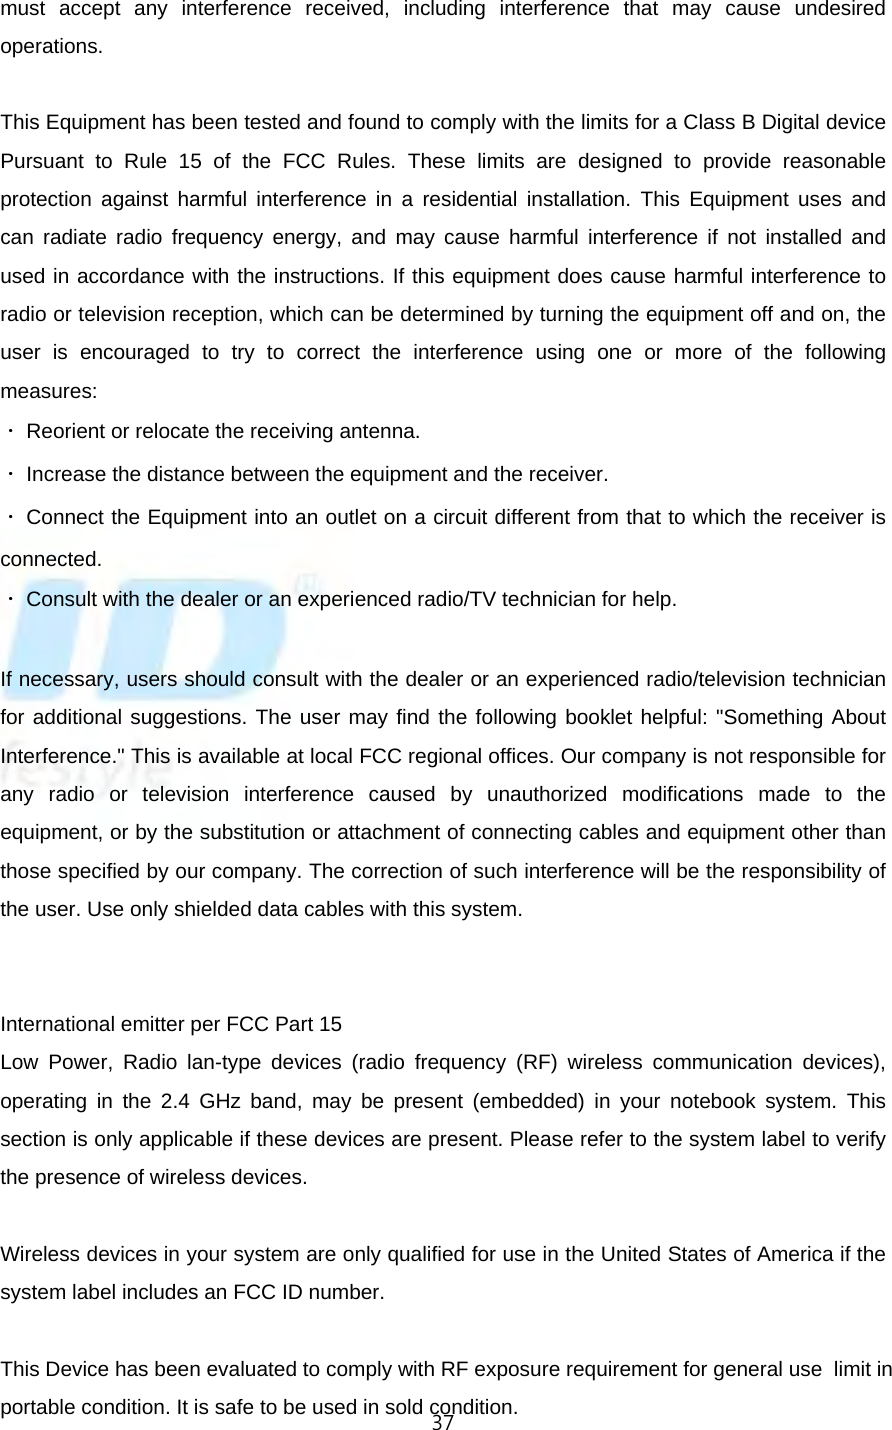
![36United States of America [USA and Canada Safety Requirements and Notices] Do not touch or move the antenna while the unit is transmitting or receiving. Do not hold the antenna in close proximity or contact with any exposed parts of the body, particularly the eyes or the face, while transmitting. Do not operate the radio or attempt to transmit data unless the antenna is connected; failure to do so may cause damage to the radio. Use in specific environments: The use of wireless devices in hazardous locations is limited by the constraints imposed by the safety directives of such environments. The use of wireless devices on airplanes is governed by the Federal Aviation Administration (FAA). The use of wireless devices in hospitals is restricted according to the limits set forth by each hospital. Explosive Device Proximity Warning Do not operate a portable transmitter (such as a wireless network device) near unshielded blasting caps or in an explosive environment, unless the device has been modified to be qualified for such use. Use On Aircraft Warning FCC and FAA regulations prohibit the airborne operation of radio frequency wireless devices, because their signals could interfere with critical aircraft instruments. Other Wireless Devices Safety Notices for Other Devices in the Wireless Network: Please refer to the documentation supplied with wireless Ethernet adaptors or other devices in the wireless network. This Part 15 radio device operates on a non-interference basis with other devices operating at this frequency. Any changes or modifications to the product not expressly made by Samsung could void the user's authority to operate this device. Unintentional Emitter per FCC Part 15 This device complies with part 15 of the FCC Rules. Operation of the device is subject to the following two conditions: (1) this device may not cause harmful interference, and (2) this device](https://usermanual.wiki/UMID/MBOOKBZ/User-Guide-1204525-Page-36.png)
![39[Product Warranty] This product is made through strict quality management and inspections. If a malfunction arises in normal use conditions, you will receive free service during the warranty period. If the warranty period has expired, or if the nature of the service is deemed to be a charged service, then you will be charged service fees. If you request repairs, please present this warranty document. This warranty will not be issued again, so keep it in a safe place. This warranty is only valid in Korea. The following warranty period shall apply. Main body Accessories 6 months Adaptor, battery 2 months Earphone, various genders, pouch, hand strip 1 year Excluded from warranty User manual, gifts Product name mbook Model name m1 Model No. Serial No. (S/N) Name Tel Customer Address Name Tel Location of purchase Address Name Date of purchase (MM/ DD/ YY) Name UMID Manufacturer (responsible for warranty) Address 412 and 413 Tech Building SKN Techno Park, 190-1 Sangdaewon-dong, Jungwon-gu, Seongnam-si, Gyeonggi-do](https://usermanual.wiki/UMID/MBOOKBZ/User-Guide-1204525-Page-39.png)