UNION COMMUNITY AC-2200 Access controller User Manual VIRDI Safe 100 200 Manual
UNION COMMUNITY Access controller VIRDI Safe 100 200 Manual
User Manual
Copyright 2000 By Union Community Co., Ltd.
AC-2200 .USER GUIDE
Version kor-1.08

AC-2200 User Guide
2
Union Community / (138-050) 5th Fl., Hyundai Topics Building, 44-3, Bangi-dong, Songpa-
gu, Seoul, Korea // Tel : 82-2-6488-3000 , Fax : 82-2-6488-3099
E-mail: sales@unioncomm.co.kr; http://www.unioncomm.co.kr
<Revison History>
Version
Date
Description
Firmware Version
1.00
2015-09-01
- Initial Release
10.61.00-000.00
1.01
2015-10-18
- Form Change
10.61.00-000.02
1.02
2015-12-28
- Modify Display
10.61.00-000.09
1.03
2015-01-18
- Error Correction
- Add Default Setting
- Add LFD Setting
- Add UDL Setting
1x.61.00-000.12
(Version Change)
1.04
2016-01-26
- Modify SN-related Information
1x.61.00-000.14
1.05
2016-01-29
- Modify Misspelling
1x.61.00-000.15
1.06
2016-02-05
- Modify Misspelling
1x.61.00-000.16
1.07
2016-03-07
- Add a reboot phrase after setting
1x.61.00-000.20
1.08
2016-03-18
- Complete a Korean version of manual
1x.61.00-000.22

AC-2200 User Guide
3
Union Community / (138-050) 5th Fl., Hyundai Topics Building, 44-3, Bangi-dong, Songpa-
gu, Seoul, Korea // Tel : 82-2-6488-3000 , Fax : 82-2-6488-3099
E-mail: sales@unioncomm.co.kr; http://www.unioncomm.co.kr
<Glossaries>
Administrator (Admin)
- The administrator can access to the terminal menu mode. He/she has the authority to
add/modify/delete terminal users and to change the operating environment by changing
settings.
- If there is no registered administrator in the terminal, anybody can access to the terminal menu
and change settings. It is recommended that more than one administrator will be
necessarily registered in the terminal.
- The administrator has the authority to change critical environmental settings of the fingerprint
reader. So, special attention is required to its registration and operation.
1:1 Authentication
- The user fingerprint is verified after entering User ID or Card.
- Only User ID or the user fingerprint registered to the card is compared. This is called One-to-
One Authentication.
1:N Authentication
- The user is identified only by the fingerprint.
- The same fingerprint as the input fingerprint is identified among the registered fingerprints
without User ID or Card entered. This is called One-to-N Identification.
Authentication Level
- As a level used for fingerprint authentication, it is displayed in Step 1 to 9. Authentication
cannot be allowed before the degree of match between two fingerprints is higher than the set
authorization level.
- The higher authentication level may ensure the higher security. But it requires the relatively
high concordance rate. When authenticating User ID, it high likely to deny authentication.
- 1:1 Level: Authentication level used for one-to-one authentication
- 1:N Level: Authentication level used for one-to-n authentication
Authentication Method
- This refers to various types of authentication methods composed of each combination of
FP(Footprint) and RF(Card) and so forth.
Ex) Card or FP: Authenticated by either card or fingerprint
Function Key
- This refers to [F1], [F2], [F3], and [F4] keys, which enable users to access the menu or change
the mode such as Attend or Leave.

AC-2200 User Guide
4
Union Community / (138-050) 5th Fl., Hyundai Topics Building, 44-3, Bangi-dong, Songpa-
gu, Seoul, Korea // Tel : 82-2-6488-3000 , Fax : 82-2-6488-3099
E-mail: sales@unioncomm.co.kr; http://www.unioncomm.co.kr
Table of Contents
<Revison History>.................................................................................................................... 2
<Glossaries> ............................................................................................................................. 3
Table of Contents ..................................................................................................................... 4
1. Before Getting Started ......................................................................................................... 6
1.1. Safety Notes ................................................................................................................. 6
1.2. Product Details ........................................................................................................... 7
1.3. Buttons displayed during operation ......................................................................... 8
1.4. ViRDI logo LED signals displayed during operation .............................................. 8
1.5. Screens displayed during operation .......................................................................... 8
1.5.1. Icon Information .............................................................................................. 9
1.5.2. Message Information ....................................................................................... 9
1.6. Voice guide announced during operation ............................................................... 13
1.7. Buzzer guide announced during operation ............................................................ 13
1.8. How to register and enter correct fingerprint ....................................................... 13
2. Product Description ........................................................................................................... 15
2.1. Product Features ...................................................................................................... 15
2.2. Configuration Diagram ........................................................................................... 17
2.2.1. Standalone Use (Access) ............................................................................... 17
2.2.2. Connecting the PC server (access, T&A, food service control) .................... 17
2.3. Product Specification ............................................................................................... 18
3. Environment Setting .......................................................................................................... 19
3.1. Checkpoints before environment setting ................................................................ 19
3.1.1. Enter the menu .............................................................................................. 19
3.1.2. Modify settings .............................................................................................. 20
3.1.3. Save after completion of environment setting............................................... 20
3.2. Menu Configuration ................................................................................................. 21
3.3. User Management .................................................................................................... 24
3.3.1. Add User ........................................................................................................ 24
3.3.2. Delete User .................................................................................................... 27
3.3.3. Modify User .................................................................................................. 28
3.3.4. Add Administrator ......................................................................................... 31
3.3.5. Delete All Users ............................................................................................ 31
3.4. Network Setting ........................................................................................................ 32
3.4.1. Terminal ID ................................................................................................... 32
3.4.2. IP Setting ....................................................................................................... 34
3.4.3. Server IP Setting ............................................................................................ 35
3.5. Option Setting ........................................................................................................... 39
3.5.1. Application Setting ........................................................................................ 39

AC-2200 User Guide
5
Union Community / (138-050) 5th Fl., Hyundai Topics Building, 44-3, Bangi-dong, Songpa-
gu, Seoul, Korea // Tel : 82-2-6488-3000 , Fax : 82-2-6488-3099
E-mail: sales@unioncomm.co.kr; http://www.unioncomm.co.kr
3.5.2. Authentication Method Setting...................................................................... 43
3.5.3. Door Setting .................................................................................................. 47
3.5.4. Volume Setting .............................................................................................. 48
3.5.5. Camera Setting .............................................................................................. 49
3.5.6. Current Time Setting ..................................................................................... 50
3.5.7. RS485 Set ...................................................................................................... 51
3.5.8. Mobile Key Setting ....................................................................................... 52
3.6. Terminal Information Inquiry ................................................................................ 53
3.7. Additional Function ................................................................................................. 54
3.7.1. Terminal Lock Setting ................................................................................... 54
3.7.2. Card Number Inquiry .................................................................................... 55
3.7.3. Monitor Input Port Setting ............................................................................ 55
3.7.4. Duress FP Setting .......................................................................................... 57
3.8. Device Setting............................................................................................................ 58
3.8.1. System Configuration .................................................................................... 58
3.8.2. Card Reader Format Setting .......................................................................... 59
3.8.3. Fingerprint Sensor Setting ............................................................................. 59
3.8.4. Wiegand Speaker Output ............................................................................... 61
3.8.5. Terminal Initialization ................................................................................... 63
3.8.6. External Device Setting ................................................................................. 65
4. How to Use Terminal ......................................................................................................... 68
4.1. When operating to [1.Access] .................................................................................. 68
4.1.1. Authentication Mode ..................................................................................... 68
4.1.2. Authentication Using Fingerprint .................................................................. 68
4.1.3. Authentication Using Card ............................................................................ 69
4.2. When operating to [2.T&A] .................................................................................... 71
4.2.1. Authentication Mode ..................................................................................... 71
4.2.2. Fingerprint Authentication ............................................................................ 71
4.2.3. Authentication Using Card ............................................................................ 71
4.3. When operating to [2.Cafeteria] ............................................................................. 71
AC-2200 User Guide
6
Union Community / (138-050) 5th Fl., Hyundai Topics Building, 44-3, Bangi-dong, Songpa-
gu, Seoul, Korea // Tel : 82-2-6488-3000 , Fax : 82-2-6488-3099
E-mail: sales@unioncomm.co.kr; http://www.unioncomm.co.kr
1. Before Getting Started
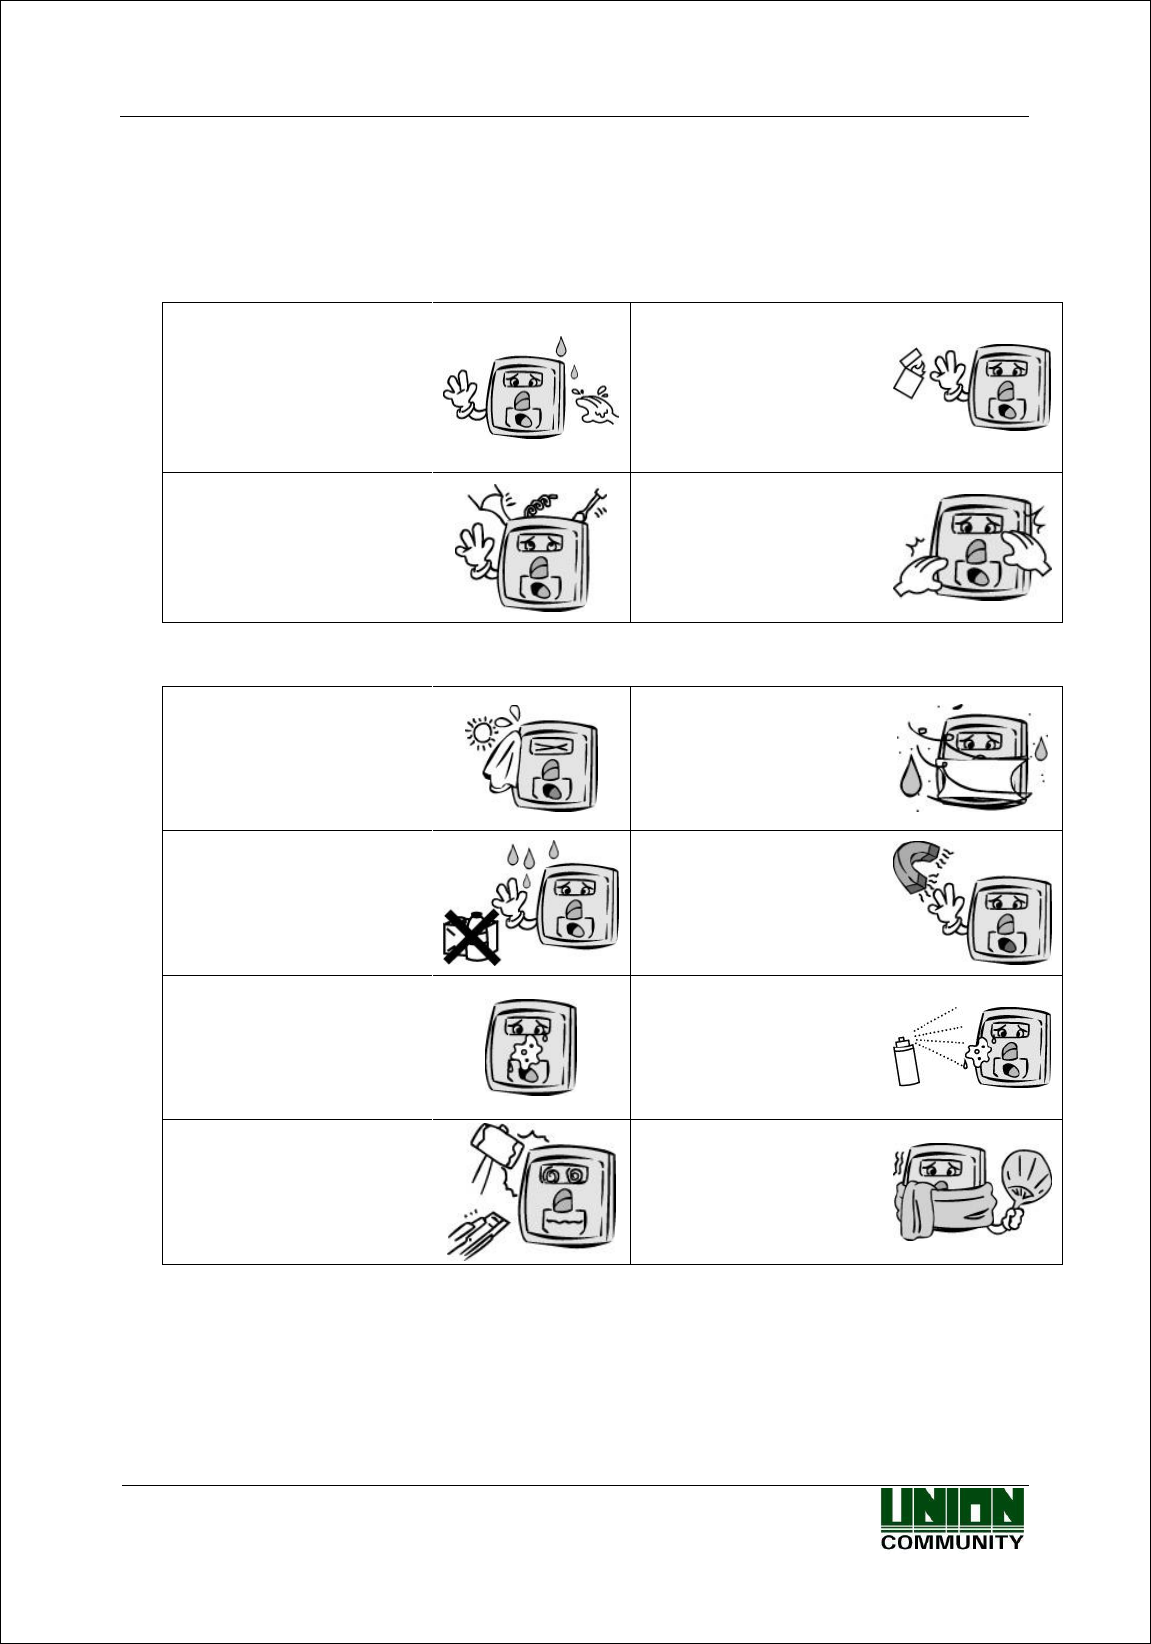
1.1. Safety Notes
Warning
Do not operate the terminal
with wet hands, and pay
attention not to let any liquid
such as water enter inside the
terminal.
→ Otherwise, malfunction or
electric shock may be caused.
Keep the terminal away from
inflammables.
→ Otherwise, it may cause a
fire.
Do not disassemble, repair or
remodel the terminal at your
disposal.
→ Otherwise, it may cause
malfunction, electric shock, or
a fire.
Do not allow children to
touch the terminal carelessly.
→ Otherwise, it may cause
safety accidents of children
or malfunction.
- Non-compliance of safety notes may cause death or serious injury for users.
Cautions
Do not install the terminal in a
place exposed to direct
sunlight.
→ Otherwise, it may cause
malfunction, deformation and
discoloration.
Do not install the terminal in
humid or dusty places.
→ Otherwise, it may cause
malfunction.
Do not clean this terminal by
sprinkling water, nor wipe it
with benzene, thinner, and
alcohol.
→ Otherwise, it may cause
electric shock or a fire.
Keep the terminal away from
magnets.
→ Otherwise, it may cause
failure and malfunction.
Keep the fingerprint input
section clean.
→ Otherwise, the fingerprint
cannot be recognized correctly.
Do not spray insecticides or
inflammables on the
terminal.
→ Otherwise, it may cause
deformation and
discoloration.
Keep the terminal away from
shock or sharp objects.
→ Otherwise, it may damage
the terminal and result in
malfunction.
Do not install the terminal in
a place where there is a
severe change in
temperature.
→ Otherwise, it may cause
malfunction.
- Non-compliance of safety notes may cause personal injury or property damage for users.
※ We are not responsible for any accidents and damage that may arise from non-compliance of
the information in this manual.
AC-2200 User Guide
8
Union Community / (138-050) 5th Fl., Hyundai Topics Building, 44-3, Bangi-dong, Songpa-
gu, Seoul, Korea // Tel : 82-2-6488-3000 , Fax : 82-2-6488-3099
E-mail: sales@unioncomm.co.kr; http://www.unioncomm.co.kr
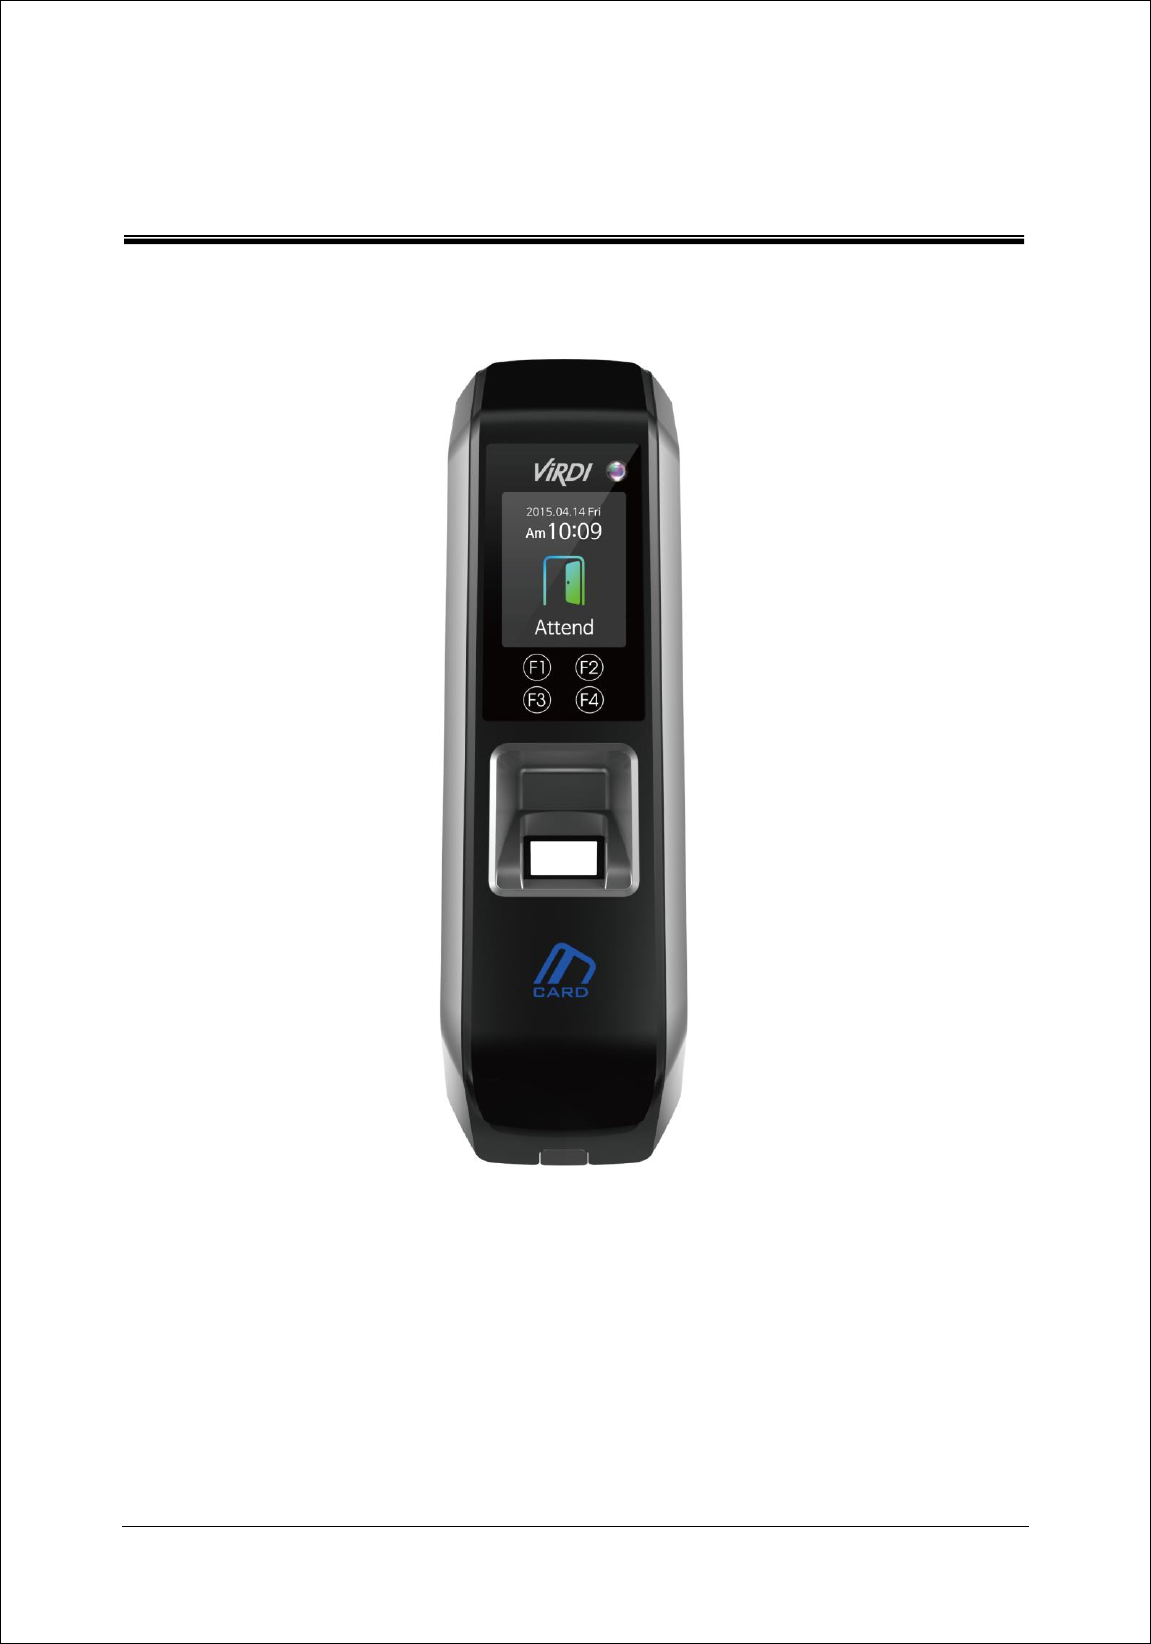
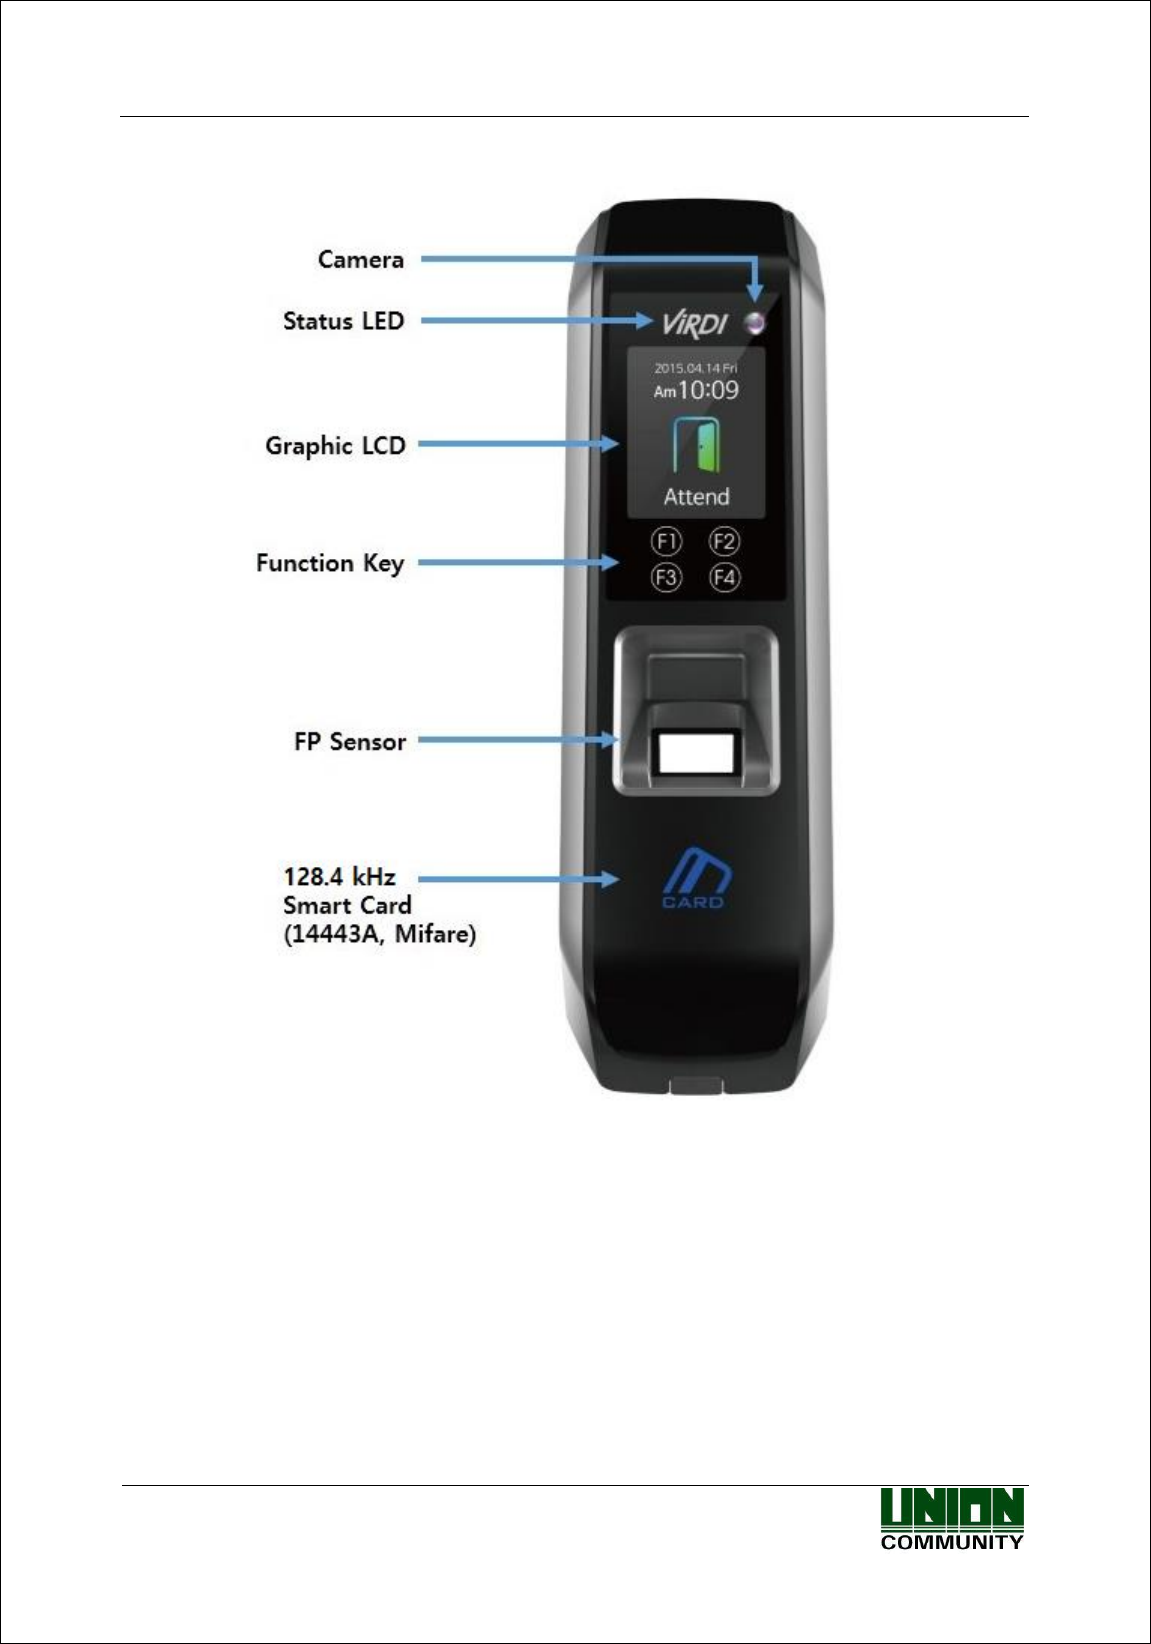
1.3. Buttons displayed during operation
F1
- Switch to ‘Attend’ mode from the default screen.
- Used to move up or increase [↑] in the menu mode
F2
- Switch to ‘Leave’ mode from the default screen.
- Used to move down or decrease [↓] in the menu mode.
F3
- Switch to ‘Outdoor’ mode from the default screen.
- When pressing for more than 2 seconds, you enter the menu mode:
[F3~]
- Used to escape [ESC] or move left [] in the menu mode.
When pressing for more than two seconds, this is used to [ESC] button:
[ESC~]
F4
- Switch to ‘Return’ mode from the default screen.
Pressing it again in the ‘Return’ mode is changed to ‘Access’ mode.
- Used to enter [ENT] or move right [] in the menu mode.
When pressing for more than two seconds, this is used to [ENT] button:
[F4~]
1.4. ViRDI logo LED signals displayed during operation
ViRDI
Power
Blue
On: Normal
Flickering: Under Bluetooth communication
ViRDI
Door
Green
On: Door Open
Off: Door Close
ViRDI
Alarm
Red
Off: Normal
Flickering: Case Open or Lock Controller Communication
Error
※ The LED may light on simultaneously in some cases. (Ex. Red and Blue flicker)
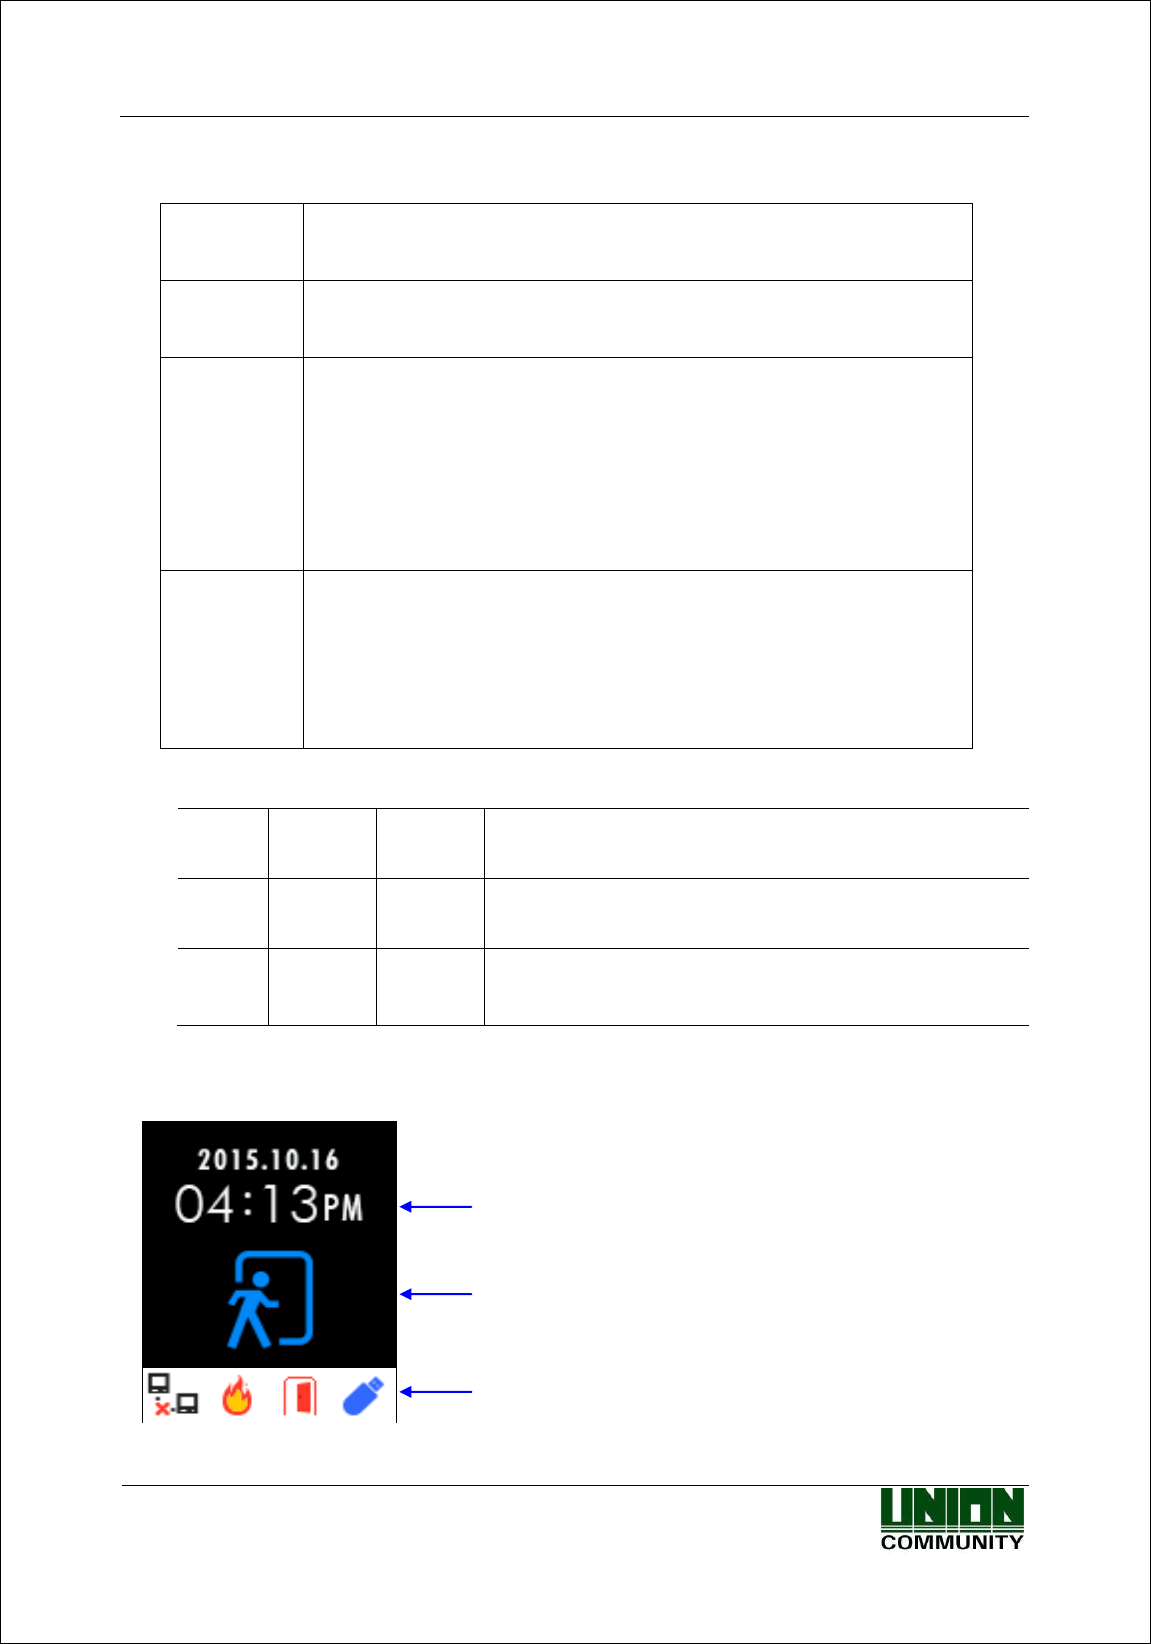
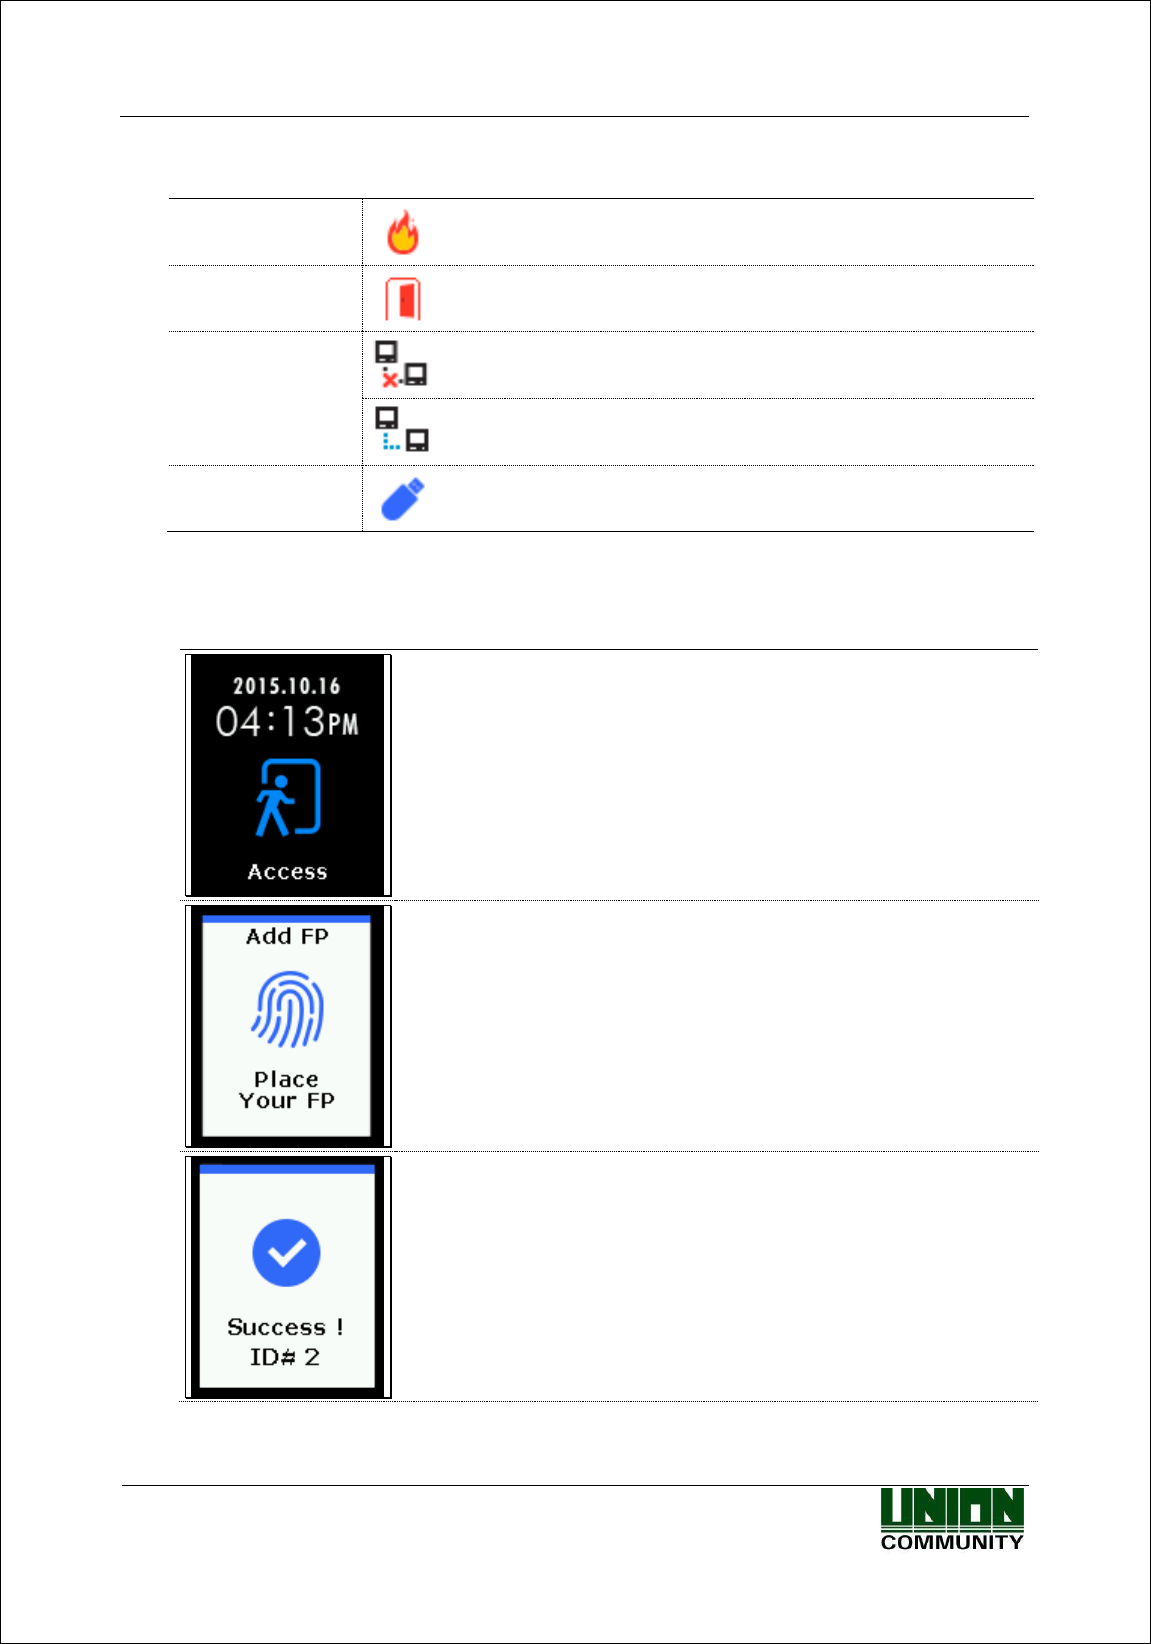
1.5. Screens displayed during operation
Displays the current time
- When access control: Displays access mode (F1, F2, F3, F4,
Access)
- When T&A control: Displays Attend/Leave mode (Attend,
Leave, Outdoor, Return)
- When food service control: Displays the menu and current
meal time countdown
Displays Status icon and Access mode
AC-2200 User Guide
9
Union Community / (138-050) 5th Fl., Hyundai Topics Building, 44-3, Bangi-dong, Songpa-
gu, Seoul, Korea // Tel : 82-2-6488-3000 , Fax : 82-2-6488-3099
E-mail: sales@unioncomm.co.kr; http://www.unioncomm.co.kr
1.5.1. Icon Information
① Fire Detection
A fire is detected by the fire detection sensor.
② Door Status
The door is open.
③ Server
Connection
Status
The LAN cable is not connected.
Only Link is connected.
④ USB
Connection
The USB is connected. (USB port is service port.)
1.5.2. Message Information
- The default screen of AC2200
- The fingerprint is being input or on standby.
- When authentication is successful
AC-2200 User Guide
10
Union Community / (138-050) 5th Fl., Hyundai Topics Building, 44-3, Bangi-dong, Songpa-
gu, Seoul, Korea // Tel : 82-2-6488-3000 , Fax : 82-2-6488-3099
E-mail: sales@unioncomm.co.kr; http://www.unioncomm.co.kr
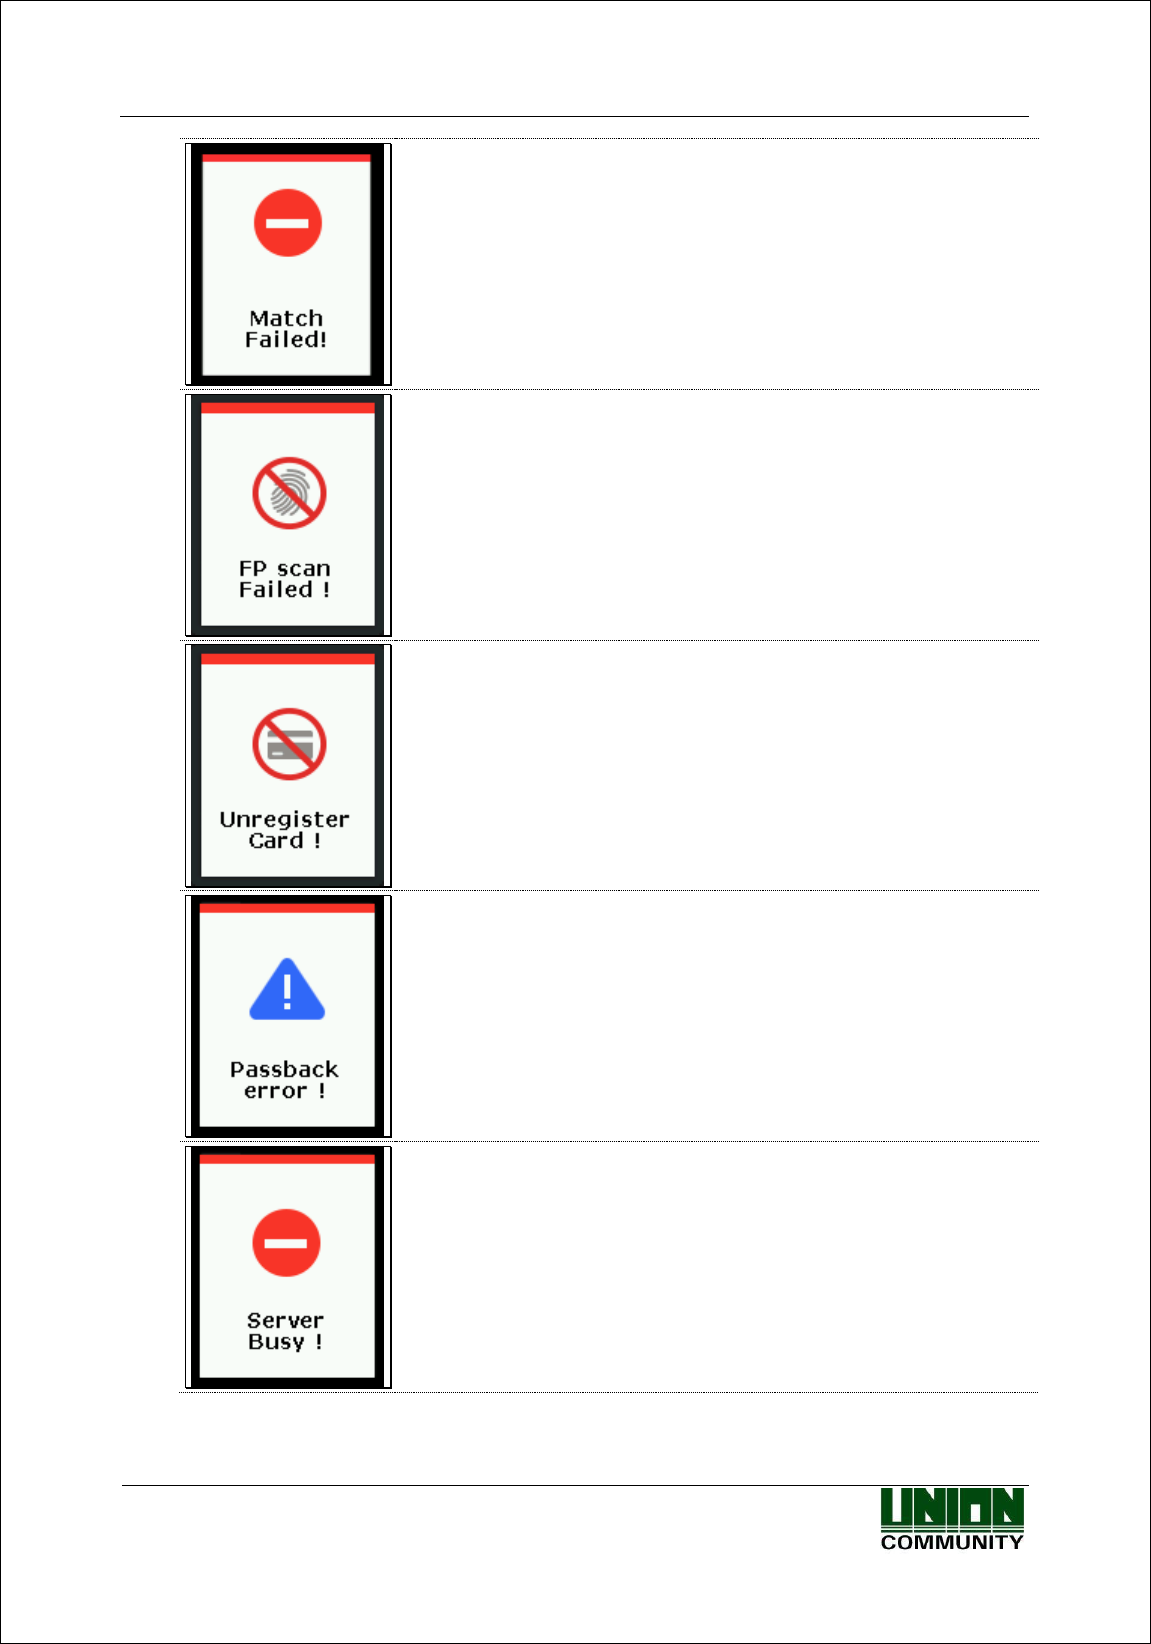
- When authentication fails
- When fingerprint input fails
- If your finger is released too early before your fingerprint is
entered
- When an unregistered card is entered
- When 1:N Authentication is attempted under the condition that
authentication priority is SN and there is no user who has been
allowed for 1:N Authentication
- When anti-passback is in error
- When the server cannot handle too many authentication requests
from the terminal
AC-2200 User Guide
11
Union Community / (138-050) 5th Fl., Hyundai Topics Building, 44-3, Bangi-dong, Songpa-
gu, Seoul, Korea // Tel : 82-2-6488-3000 , Fax : 82-2-6488-3099
E-mail: sales@unioncomm.co.kr; http://www.unioncomm.co.kr
- When the terminal is set to the food service control and users
attempt more than two times authentication in the same food time
zone
- When there is no response from the server during authentication
attempt
- When the network is disconnected during authentication attempt
to the server
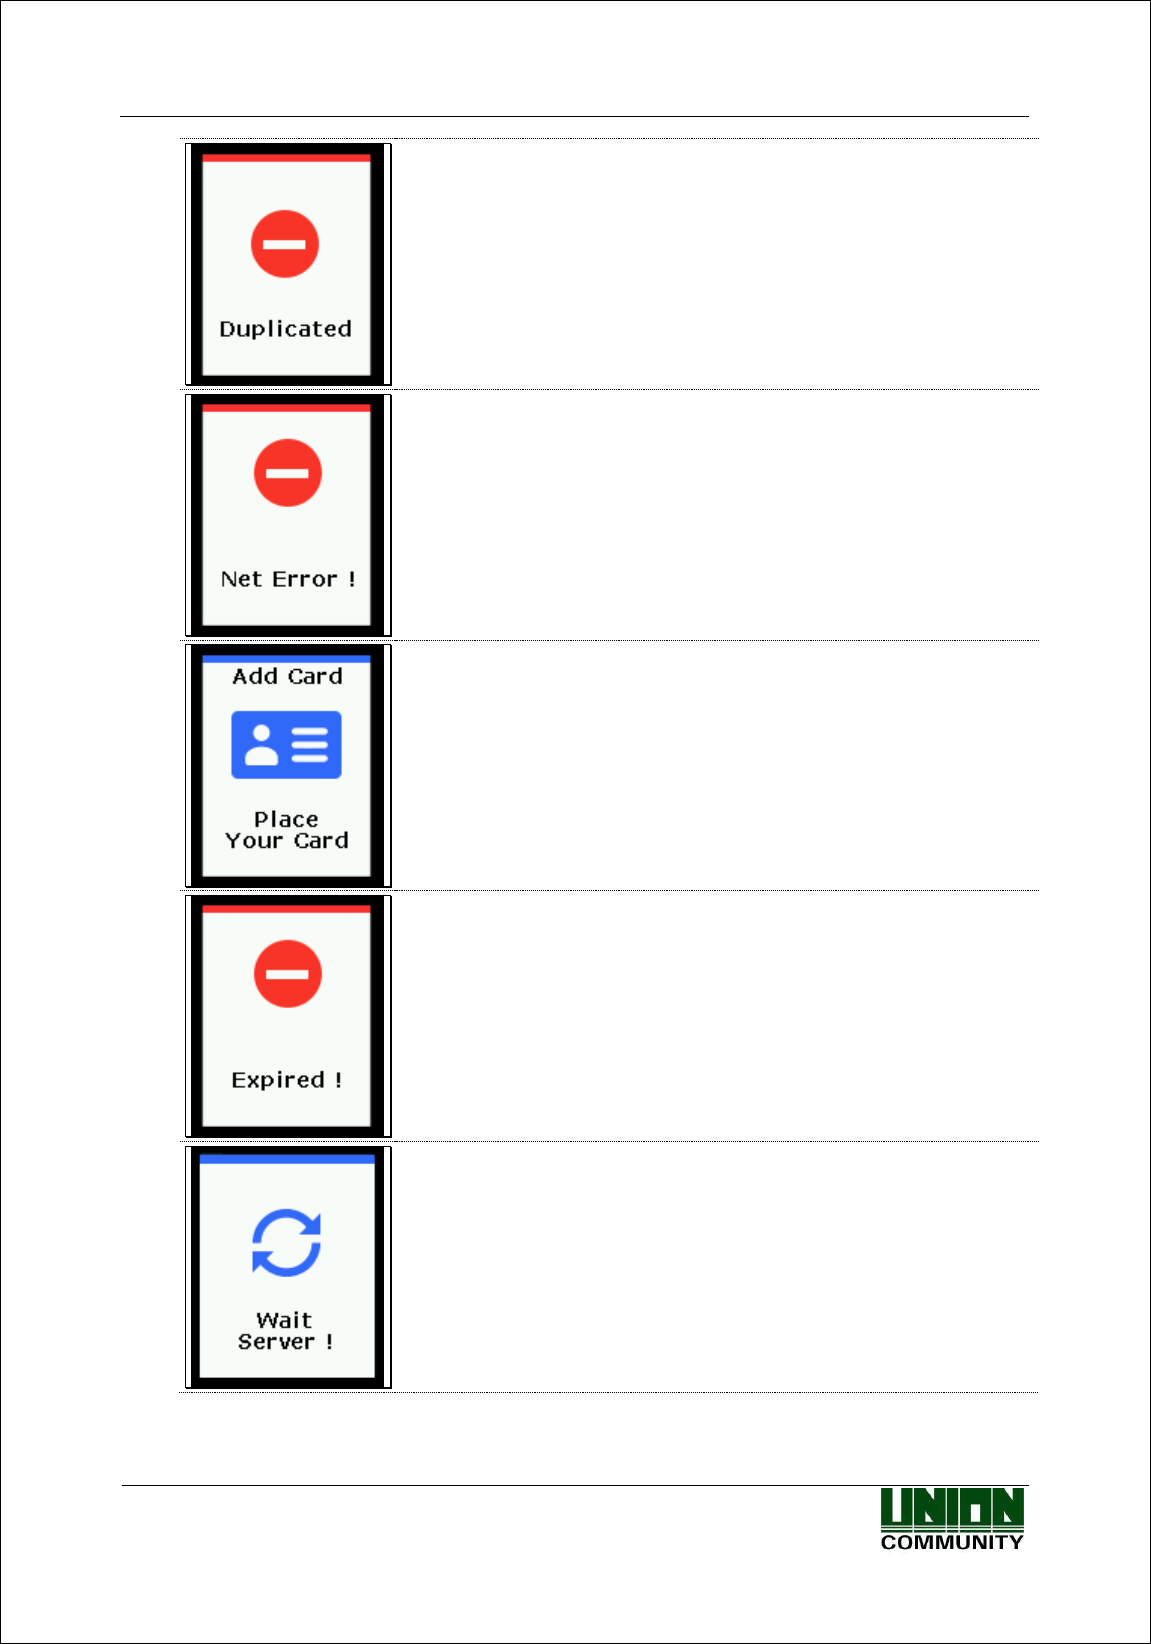
- The card input is on standby.
- When the card is registered but its authentication is attempted in
the access control time
- When you wait for a response after requesting authentication to
the server,
AC-2200 User Guide
12
Union Community / (138-050) 5th Fl., Hyundai Topics Building, 44-3, Bangi-dong, Songpa-
gu, Seoul, Korea // Tel : 82-2-6488-3000 , Fax : 82-2-6488-3099
E-mail: sales@unioncomm.co.kr; http://www.unioncomm.co.kr
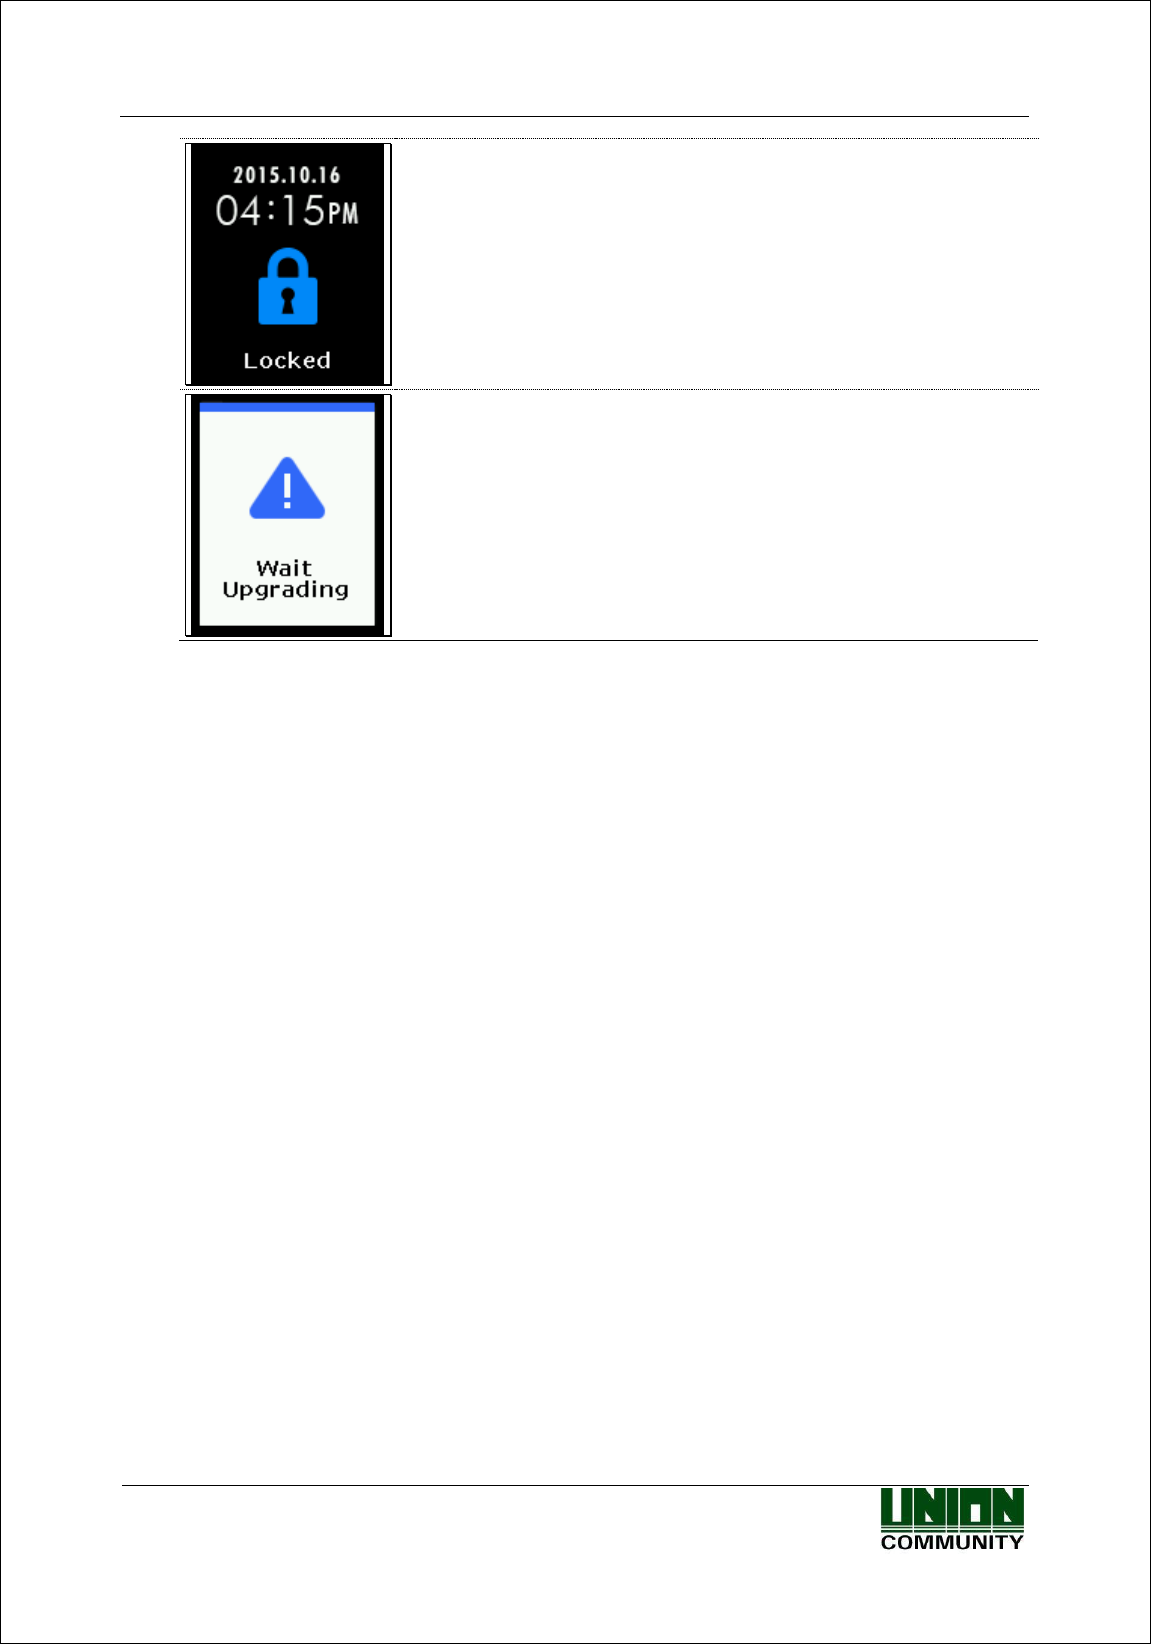
- When the terminal is locked
- When the food service control is set in the non-meal time
- When the terminal program is upgraded
(Do not power off the terminal when this message is displayed.)
AC-2200 User Guide
13
Union Community / (138-050) 5th Fl., Hyundai Topics Building, 44-3, Bangi-dong, Songpa-
gu, Seoul, Korea // Tel : 82-2-6488-3000 , Fax : 82-2-6488-3099
E-mail: sales@unioncomm.co.kr; http://www.unioncomm.co.kr
1.6. Voice guide announced during operation
Item
Voice Guide
When the fingerprint is entered
Please enter your fingerprint.
When authentication is successful
You are authorized.
When authentication fails
Please try again.
1.7. Buzzer guide announced during operation
Ppik
When button or
card is operated
- If the button is pressed or if the terminal reads the card
- If your finger may be released because your fingerprint has
been successfully entered
Ppibik
When failure
If authentication fails or the user’s input is wrong
Ppiriririk
When input
standby
When it is notified that fingerprint input is on standby
Ppiririk
When success
If authentication is successful or if the current user finishes
settings
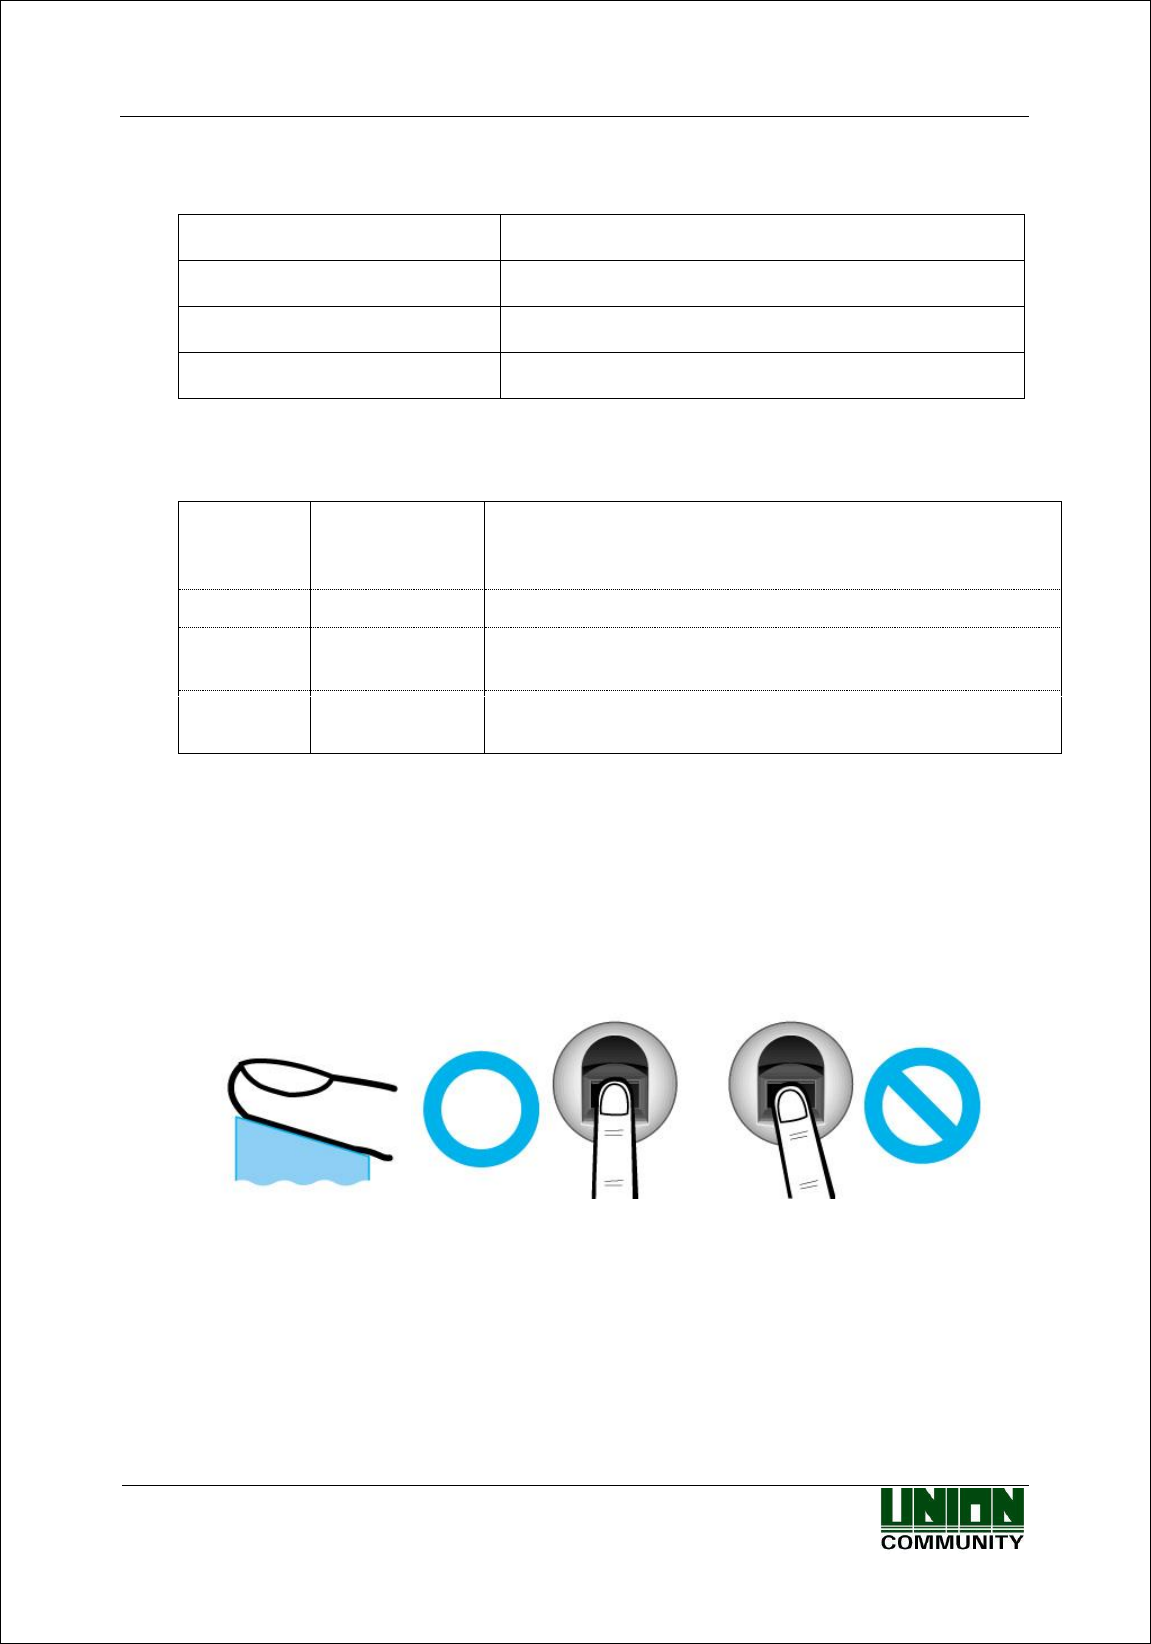
1.8. How to register and enter correct fingerprint
Correct fingerprint input method
Enter your fingerprint as if you take a thumbprint by using your forefinger if possible.
The fingerprint cannot be correctly registered and entered only by your fingertips.
The center of the fingerprint should be touched with the fingerprint input section.
Enter the fingerprint of your forefinger if possible.
When using your forefinger, you can enter your fingerprint correctly and safely.
Make sure that the fingerprint is unclear or wounded.
Too dry, wet, blurry or wounded fingerprints are difficult to recognize. In this case, the
fingerprint of another finger should be registered.

AC-2200 User Guide
14
Union Community / (138-050) 5th Fl., Hyundai Topics Building, 44-3, Bangi-dong, Songpa-
gu, Seoul, Korea // Tel : 82-2-6488-3000 , Fax : 82-2-6488-3099
E-mail: sales@unioncomm.co.kr; http://www.unioncomm.co.kr
Precautions subject to your fingerprint status
The availability of the fingerprint may vary subject to your fingerprint status.
This product consists of a fingerprint recognition system and cannot recognize the
damaged or unclear fingerprints. They should be registered using a password.
If your hands are dry, you can blow your breath on the system to operate it more
smoothly.
For children, too small or unclear fingerprints may be difficult or impossible to use.
They need to register a new fingerprint every six months.
For seniors, the fingerprint with too many lines may not be registered.
It is recommended that you will register more than two fingerprints if possible.
In order to increase the fingerprint authentication rate, it is recommended to use six of
the ten fingers as illustrated above. (Both thumbs, forefingers, middle fingers)

AC-2200 User Guide
15
Union Community / (138-050) 5th Fl., Hyundai Topics Building, 44-3, Bangi-dong, Songpa-
gu, Seoul, Korea // Tel : 82-2-6488-3000 , Fax : 82-2-6488-3099
E-mail: sales@unioncomm.co.kr; http://www.unioncomm.co.kr
2. Product Description
2.1. Product Features
Access control system using the network (LAN)
- The fingerprint reader communicates with the authentication server using a UTP cable and
TCP/IP protocol. This terminal can be applied to the existing LAN network and has easy
expandability. It ensures a fast speed by 10/100 Mbps Auto Detect and facilitates
management and monitoring via the network.
Convenient Auto Sensing function
- The authentication function can be simply operated by entering the fingerprint without
separate keys entered.
Easy to verify your ID via fingerprint
- The use of the fingerprint recognition technology (Biometrics) can prevent forgetting your
password, losing your card or key, or avoid the risk of their theft. The use of personal
fingerprints enhances the security of authentication.
Convenient information message using LCD and voice
- The information message is voiced or displayed on the LCD display for each operation to
receive certification so that you can easily input. In particular, thanks to a built-in
backlight for the LCD display, you can easily identify the screen and operate keys in the
dark room. The voice is stored in the memory and it can be changed to a desired voice
from the server.
Diverse and flexible access control function
- Easy to use it without the risk of rental, counterfeit and loss of your key or card;
- Provide the complete access control function by granting access authority according to
user groups;
- Provide the flexibility of access control by allowing the access time restrictedly;
- Economical maintenance and development costs compared to other access control devices;
- Remove the inconvenience that visitors are registered in the management office and then
separate cards are issued.
Diverse utilization for operating systems such as security, access, T&A, and food service
- Various operating methods can be supported depending on how the terminal menu is set.
Large processing capacity of server
- When the entrant information is managed using the server, it can be processed almost
infinitely.
Mobile interlocking function
- By using mobile Bluetooth, the terminal can be set to Admin App (UNIS-B Plus).
- By using mobile Bluetooth, the user can be authenticated to User App (imkey).

AC-2200 User Guide
16
Union Community / (138-050) 5th Fl., Hyundai Topics Building, 44-3, Bangi-dong, Songpa-
gu, Seoul, Korea // Tel : 82-2-6488-3000 , Fax : 82-2-6488-3099
E-mail: sales@unioncomm.co.kr; http://www.unioncomm.co.kr
Various registration and authentication methods
There are a total of four registration and authentication methods for general users. Before
registering users or administrators, you should determine how to register and authenticate.
FP
Fingerprint Registration
Fingerprint Authentication
Card
Card Registration
Card Authentication
M.Key
Mobile Key Registration
Mobile Key Authentication
Card or FP
Card or Fingerprint Registration
Card or Fingerprint Registration
Card and FP
Card and Fingerprint Registration
Card Authentication and then Fingerprint Authentication
M.Key and FP
Mobile Key and Fingerprint Registration
Mobile Key Authentication and then Fingerprint Authentication
AC-2200 User Guide
17
Union Community / (138-050) 5th Fl., Hyundai Topics Building, 44-3, Bangi-dong, Songpa-
gu, Seoul, Korea // Tel : 82-2-6488-3000 , Fax : 82-2-6488-3099
E-mail: sales@unioncomm.co.kr; http://www.unioncomm.co.kr
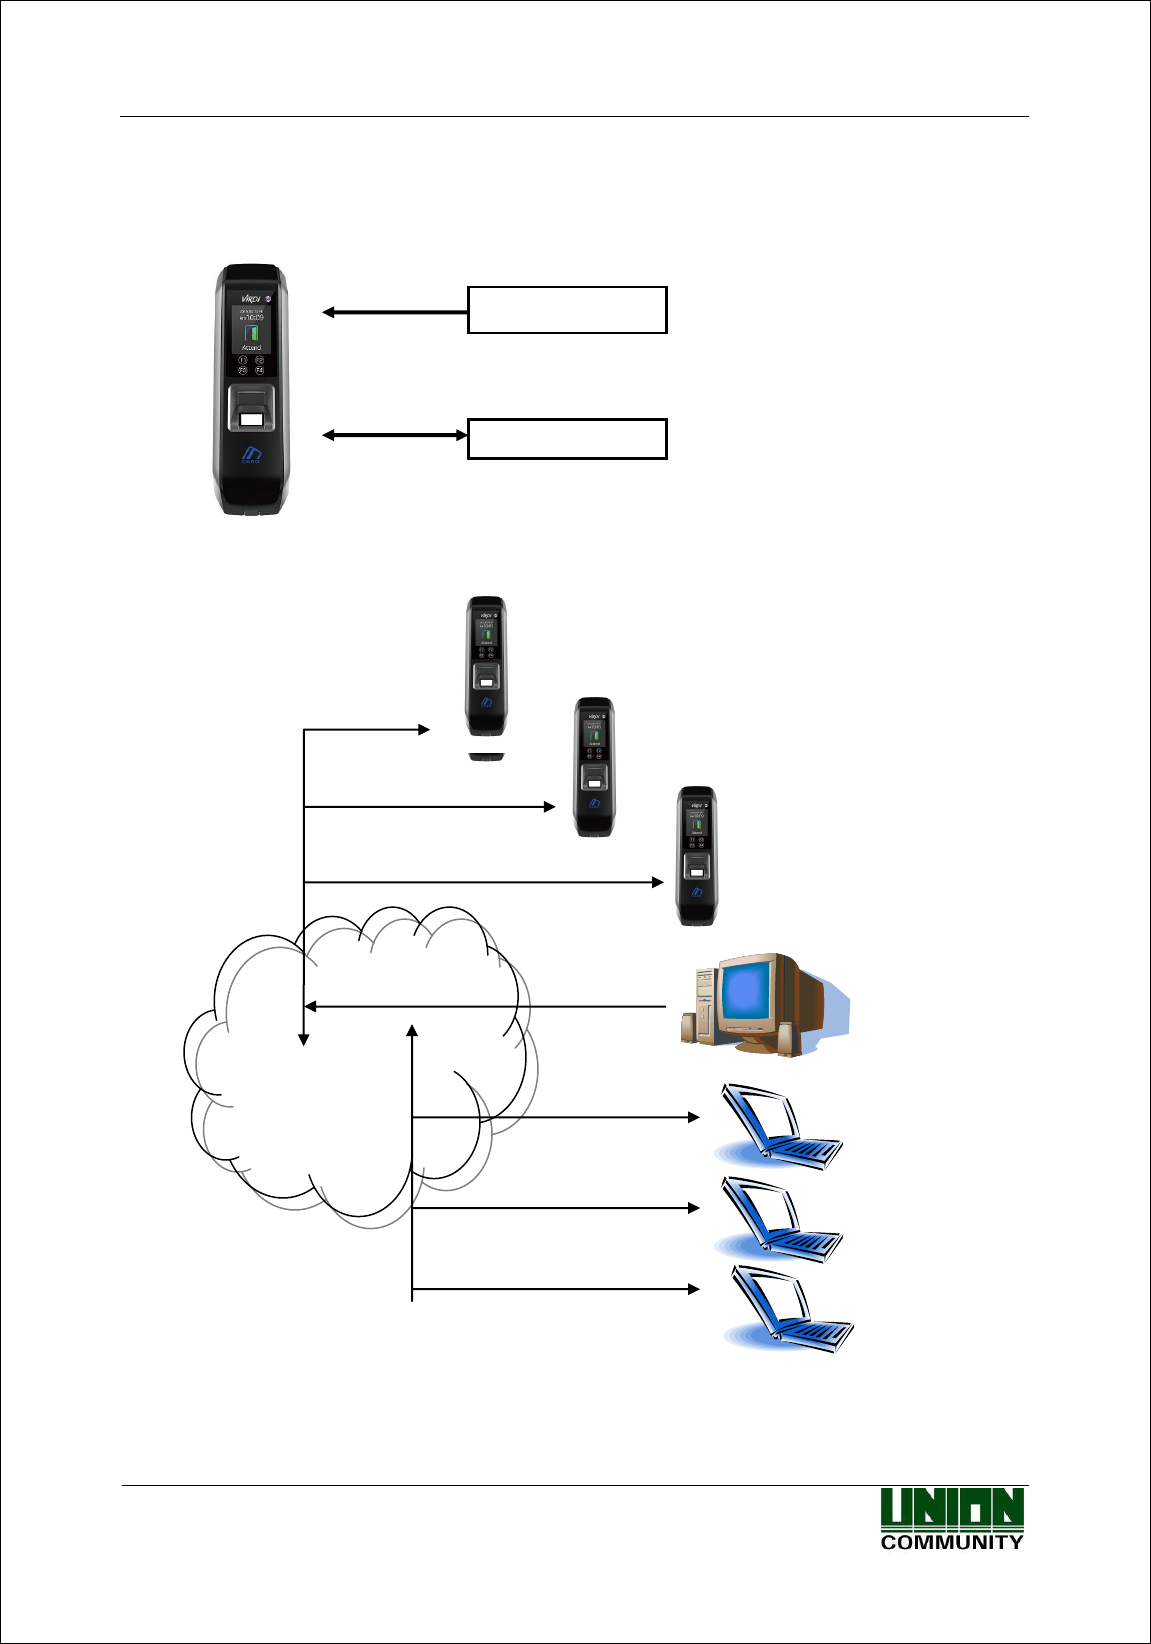
2.2. Configuration Diagram
2.2.1. Standalone Use (Access)
2.2.2. Connecting the PC server (access, T&A, food service control)
DC12V Adapter
All models
(Lock+, Lock-, Monitor)
TCP/IP
Internet /
WAN / LAN
TCP/IP
TCP/IP
TCP/IP
TCP/IP
TCP/IP
Food Service Control
Program
Attendance Control
Program
Fingerprint Authentication Server
(Static IP)
UDB Sever
Database (MDB or MSSQL)
Remote Administrator Program
(User and Terminal Setting
Management)

AC-2200 User Guide
18
Union Community / (138-050) 5th Fl., Hyundai Topics Building, 44-3, Bangi-dong, Songpa-
gu, Seoul, Korea // Tel : 82-2-6488-3000 , Fax : 82-2-6488-3099
E-mail: sales@unioncomm.co.kr; http://www.unioncomm.co.kr
2.3. Product Specification
ITEM
SPEC
REMARKS
CPU
32Bit RISC CPU(400MHz)
MEMORY
128M SDRAM
32M NOR FLASH
128M NAND FLASH
5,000/2500 User
5,000/2500 Finger
100,000 Log
10,000 Picture
Fingerprint Sensor
Optical
Authentication Speed
Less than 1 second
Scan Area / Resolution
14.8 * 17.9mm / 500 DPI
FRR / FAR
0.1% / 0.0001%
Communication Port
TCP/IP
Authentication
Server
Communication
Bluetooth
Mobile
Interlocking
RS-485
External Device
Communication
Wiegand In/Out
Card Reader or
External Device
Communication
Temperature /
Humidity
-20 ~ 50 /
Lower than 90% RH
LCD
1.77’’ Color LCD
SIZE
58mm(W) * 191mm(H) * 62mm(D)
AC / DC Adapter
INPUT : Universal AC 100 ~ 250V
OUTPUT : DC 12V
(Option : DC 24V)
UL, CSA, CE Approved
Card Reader
Smart Card Reader
14443A type,
128.4 kHz
AC-2200 User Guide
19
Union Community / (138-050) 5th Fl., Hyundai Topics Building, 44-3, Bangi-dong, Songpa-
gu, Seoul, Korea // Tel : 82-2-6488-3000 , Fax : 82-2-6488-3099
E-mail: sales@unioncomm.co.kr; http://www.unioncomm.co.kr
3. Environment Setting
3.1. Checkpoints before environment setting
3.1.1. Enter the menu
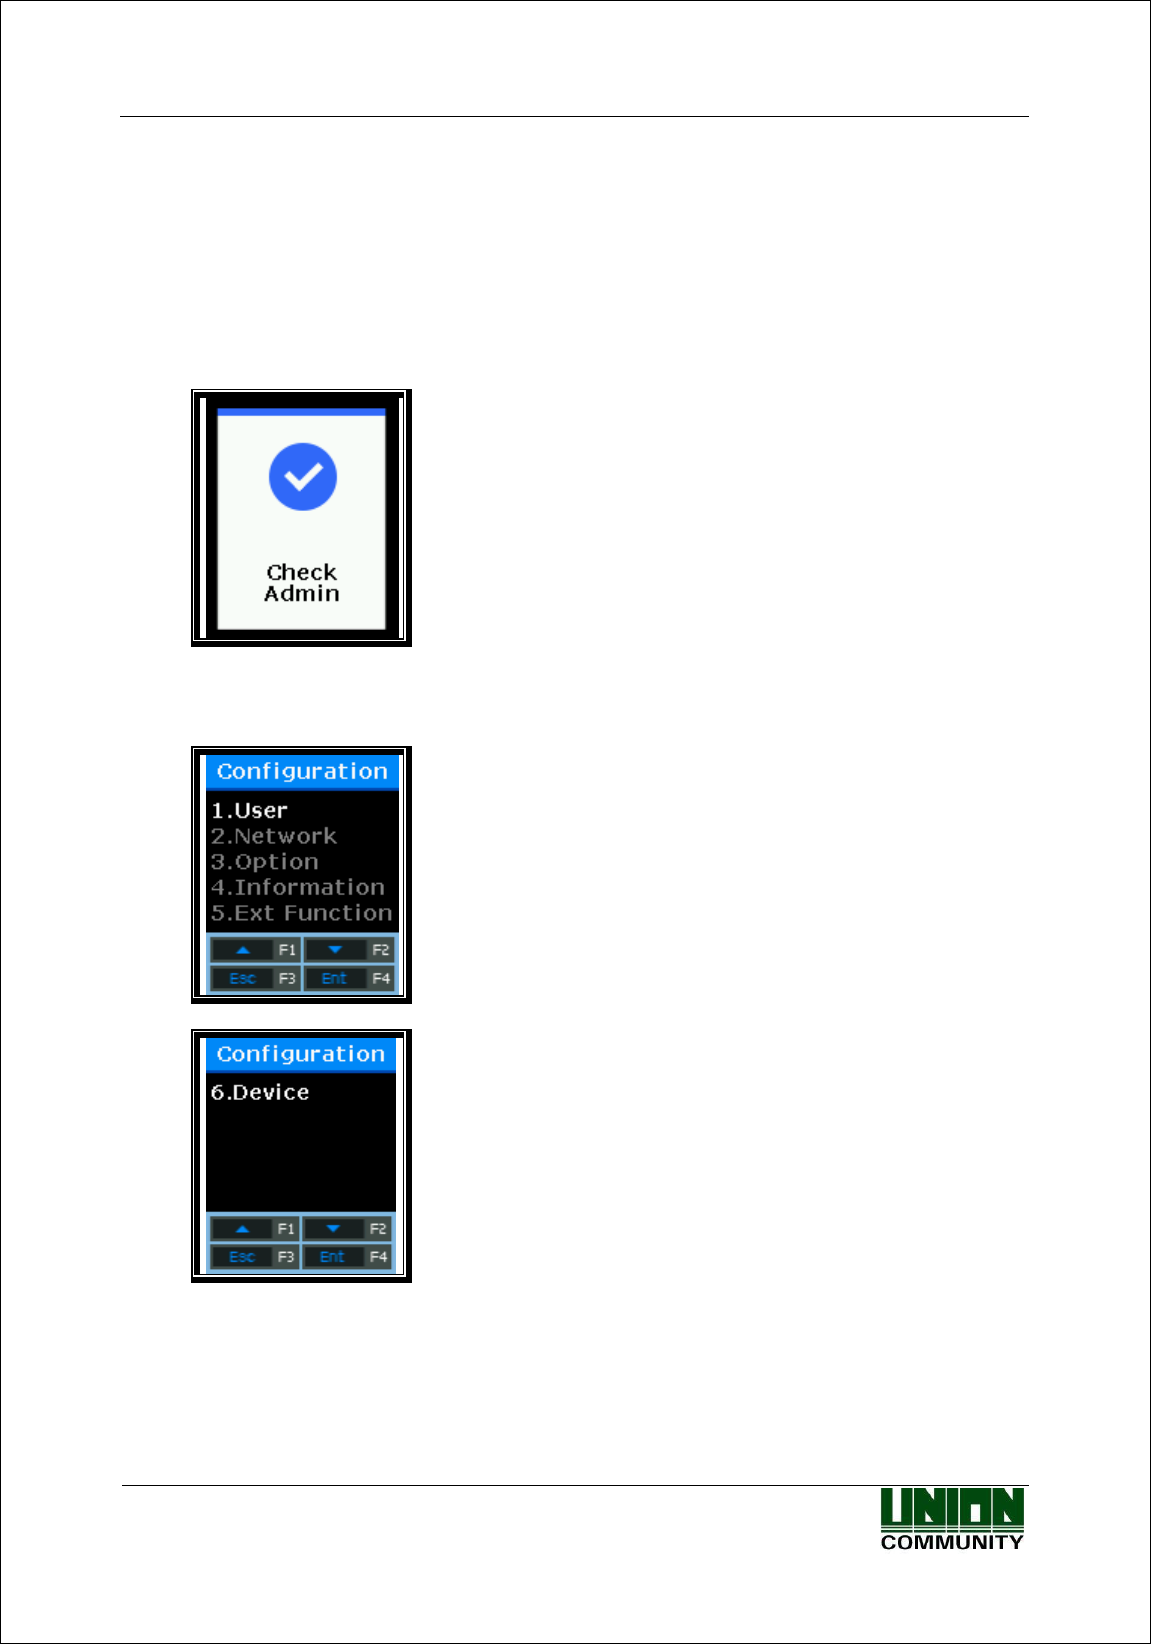
When pressing [F3] button for more than 2 seconds, the administrator authentication screen
will be displayed.
The administrator is verified by either card or fingerprint depending on the authentication
method. Upon successful authentication, the screen goes to the following menu.
Select the menu you want to change using
[↑](F1) and [↓](F2) buttons, and press [ENT]
(F4) button to go to the submenu.
The description of function buttons such as F1, F2, F3, and F4 is in numerical order on the
bottom of the screen as shown above. Go up and down the screen, you can press [ENT](F4)
button to select the desired menu, or press [ESC] (F3) for more than 2 seconds to return to the
upper menu.
AC-2200 User Guide
20
Union Community / (138-050) 5th Fl., Hyundai Topics Building, 44-3, Bangi-dong, Songpa-
gu, Seoul, Korea // Tel : 82-2-6488-3000 , Fax : 82-2-6488-3099
E-mail: sales@unioncomm.co.kr; http://www.unioncomm.co.kr
※ The administrator authentication menus is displayed only when there is any registered
administrator. Once it is authenticate to enter the menu mode, you can access to all menus
until you escape completely from the main menu.
3.1.2. Modify settings
Modify the existing settings by pressing [↑][↓] buttons.
If the set value is greater than or equal to 2 digits, press [←][→] buttons to move to the digit
you want to change, and press [↑][↓] buttons to change the value up or down.
Press [ENT] button to check the set value or go to next setting.
If you want to cancel during the setting and move to the upper menu, press [ESC] button for
more than 2 seconds.
If only [←][↑][↓][→] buttons are displayed except [ESC] and [ENT] buttons, [ESC] is enabled
by pressing [F3] for more than 2 seconds, and [ENT] by pressing [F4] for more than 2 seconds.
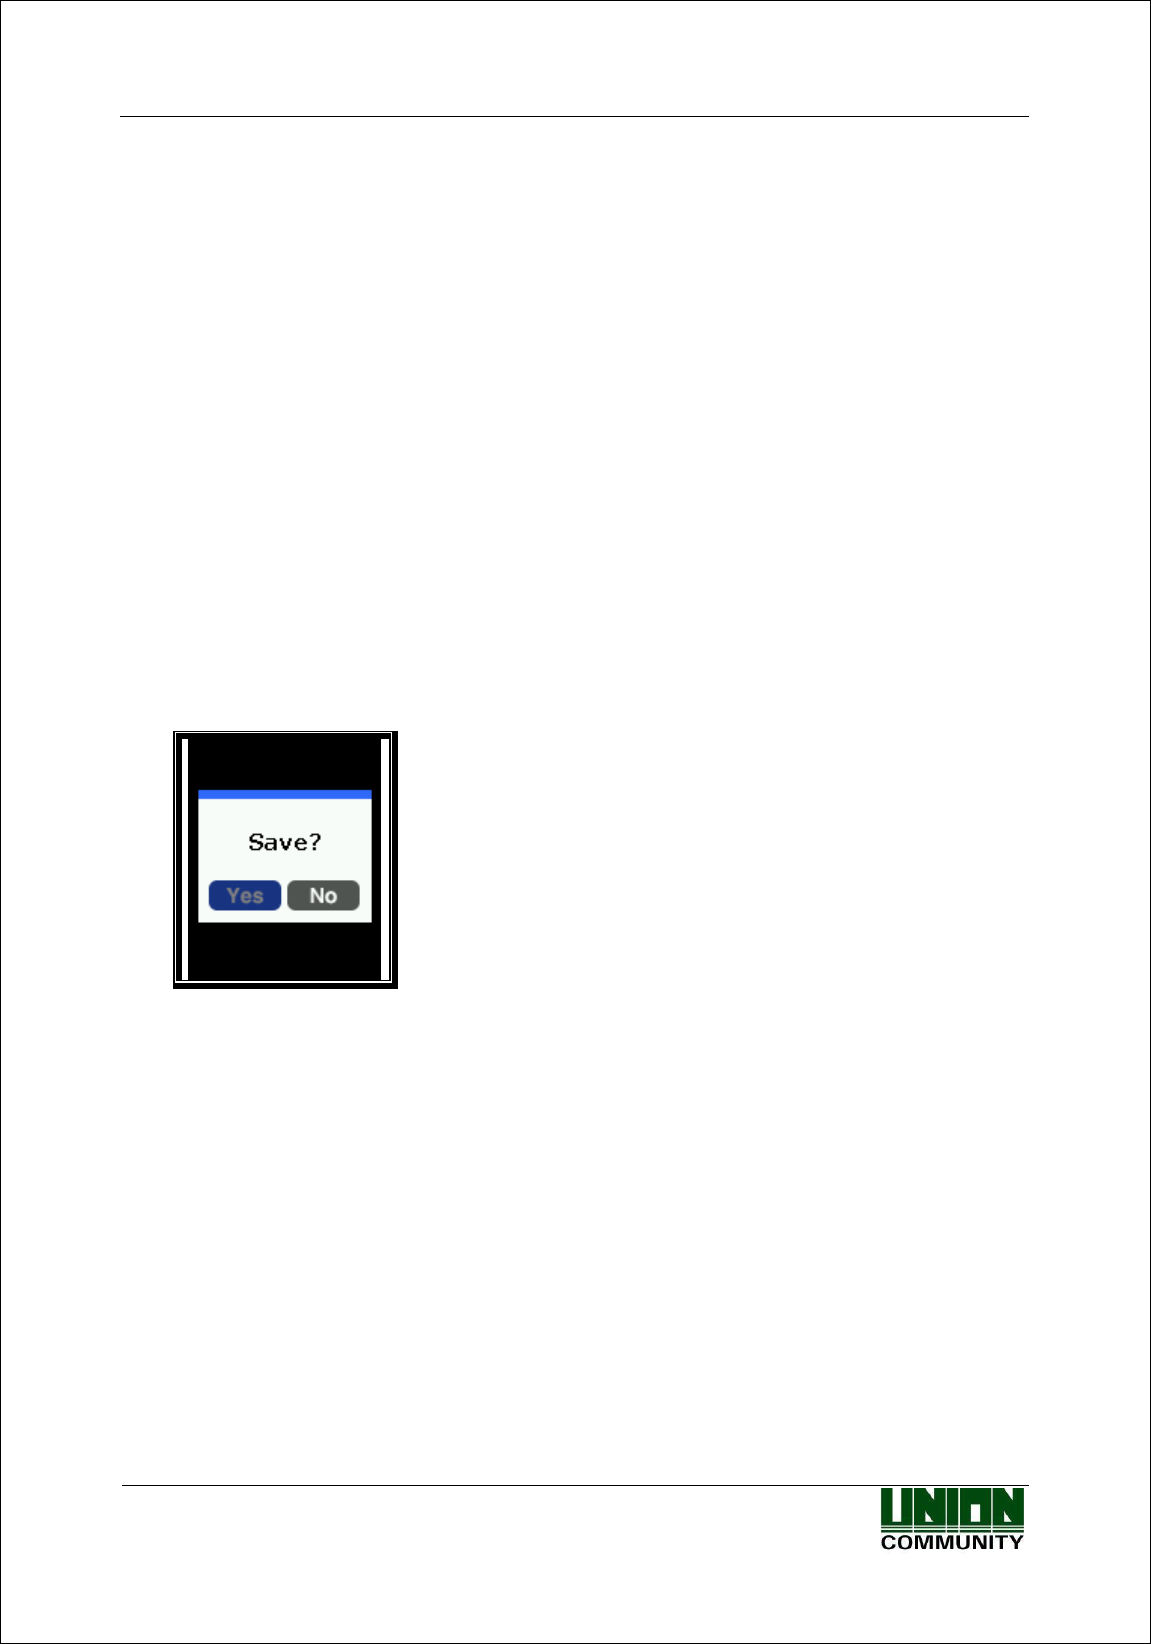
3.1.3. Save after completion of environment setting
After changing settings, press [ESC] button on the main menu screen to save the changes, and
the following screen will be displayed.
Select [Yes] button to save modifications, [No]
button to cancel modifications, and then press
[ENT] button. If there is any modified information,
the terminal will be rebooted.
If there is no change information, the screen exits from the environment setting menu
without the “Save?” process.
If no data is input in the main menu for a certain time during changing environment setting,
the screen will exit from the environment setting menu. In this case, if there is any change
in the menu, the screen performs the “Save?” process. If there is no change in the menu,
the screen goes to the main screen without saving changes.

AC-2200 User Guide
21
Union Community / (138-050) 5th Fl., Hyundai Topics Building, 44-3, Bangi-dong, Songpa-
gu, Seoul, Korea // Tel : 82-2-6488-3000 , Fax : 82-2-6488-3099
E-mail: sales@unioncomm.co.kr; http://www.unioncomm.co.kr
3.2. Menu Configuration
1. User
1. Add User
2. Delete
3. Modify
4. Add admin
5. Delete All
2. Network
1. Terminal ID
<Terminal ID>
<Auth Mode>:NS/SN/NO/SO
2. Terminal Net
<Net Type>
<Terminal IP>
<Subnet Mask>
<Gateway>
3. Server Net
<Server Type>
<Server IP>
<Server Port>
3. Option
1. Application
<WorkMode>
1. Access
2. T&A
3. Cafeteria
When setting to Access or T&A
<Start Time>
<Leave Time>
<F3 Time>
<F4 Time>
<Access Time>
<Multi Fn-Key>
When setting to Cafeteria
<Breakfast>
<Lunch>
<Dinner>
<Supper>
<Snack>
<No Limit>
2. Verify
<Show User>
<Only Card>
<Use TOC>
<Blocking Time>
<Global Block>
<NetErr TimeOut>
3. Doorlock
<Lock Type>
<Door Monitor>
<Open Duration>
<Open Alarm>
4. Sound
<Voice>
<Beep>

AC-2200 User Guide
22
Union Community / (138-050) 5th Fl., Hyundai Topics Building, 44-3, Bangi-dong, Songpa-
gu, Seoul, Korea // Tel : 82-2-6488-3000 , Fax : 82-2-6488-3099
E-mail: sales@unioncomm.co.kr; http://www.unioncomm.co.kr
<Case Open>
5. Camera
<Use Camera>
6. Time
<Sync Time>
<Calendar>
<System Time>
<Time Display>
7. RS485 Set
<RS485 ID>
8. M.Key set
<Use M.Key>
<Reg Mode>
<BLE Name>
4. Terminal Info
Version
Firmware version of the terminal
WorkMode
Terminal operating modes (T&A +
security/T&A/food service)
Language
Language setting
Auth Mode
Authentication priority
1:1 Level
Authentication level applied when 1:1
authentication
1:N Level
Authentication level applied when 1:n
authentication
BLE Name
BLE module name
BLE Ver
BLE module firmware version
Terminal Id
Terminal ID
Net Type
Network connection methods (Static IP/DHCP)
Terminal IP
Terminal IP address
Gateway
Terminal gateway address
Subnet Mask
Terminal subnet mask address
Server Type
Network server connection mode setting
Server IP
IP address of the network server connected to
the terminal
Server Port
Port number of the network server program
MAC Address
Terminal MAC address
Card Ver
Card reader module firmware version
Card Format
Card data display format
All User
The total number of users registered in the
terminal, including administrators
All Admin
The number of administrators registered in the
terminal
Max User
The maximum number of users who can be
registered in the terminal
All FP
The total number of fingerprints saved in the
terminal
Max FP
The maximum number of fingerprints that can
be registered in the terminal
All Log
The number of the authentication results saved
in the terminal

AC-2200 User Guide
23
Union Community / (138-050) 5th Fl., Hyundai Topics Building, 44-3, Bangi-dong, Songpa-
gu, Seoul, Korea // Tel : 82-2-6488-3000 , Fax : 82-2-6488-3099
E-mail: sales@unioncomm.co.kr; http://www.unioncomm.co.kr
Max Log
The maximum number of the authentication
results that can be saved in the terminal
Serial Num
Serial number notation
5. Ext Function
1. Lock Term
<Lock Term>
2. Read Card
<Read Card>
3. Monitor
<Monitor 1>
<Monitor 2>
4. Duress FP
<Duress FP>
6. Device
1. System Conf
<ID Length>
<Language>
2. Card Format
<Card Reader>
<Card Format>
3. FP-Sensor
<1:1 Level>
<1:n Level>
<Check Same FP>
4. Wiegand
<Wiegand Out>
5. Initialize
<Init Config>
<Delete Log>
<Init Terminal>
<DB Backup>
6.Ext Device
<External Device>
<Local AntiPB>
<Auth Mode>
<Lock Ctrl>
AC-2200 User Guide
24
Union Community / (138-050) 5th Fl., Hyundai Topics Building, 44-3, Bangi-dong, Songpa-
gu, Seoul, Korea // Tel : 82-2-6488-3000 , Fax : 82-2-6488-3099
E-mail: sales@unioncomm.co.kr; http://www.unioncomm.co.kr
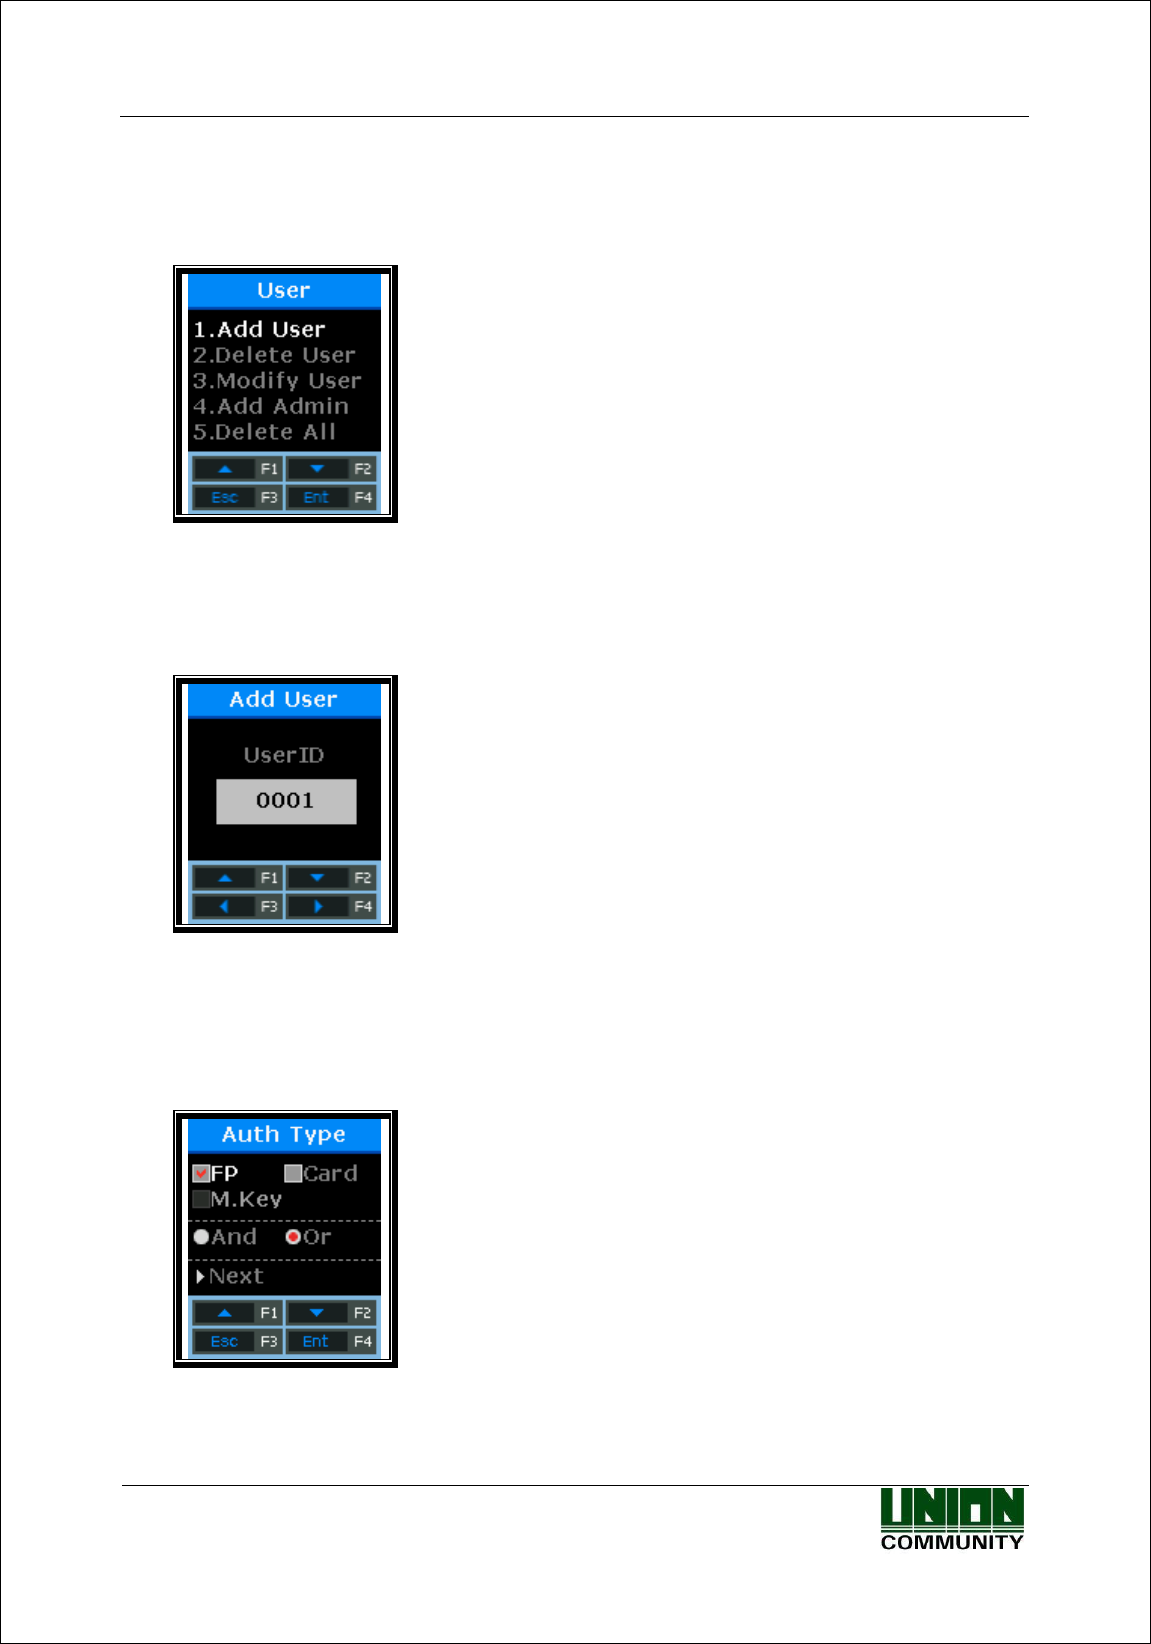
3.3. User Management
Select [1.User] on the main menu, and the following screen will appear.
Press [↑][↓] buttons to select the menu you want
to change, and press [ENT] button.
3.3.1. Add User
Select [F3~]→[1.User]→[1.Add User] on the main screen, and the following screen will appear.
Enter the ID of the new user you wish to register, and
press [F4] button long.
When registering, the available user ID is automatically displayed on the LCD so that you can
register it conveniently. If necessary, you can change the ID using function keys. If other user
has been already registered in the entered ID, the message of “Duplicated User ID” with “Fail”
buzzer is displayed on the LCD and then the screen goes to the upper menu. If the entered ID is
not registered, the following authentication type selection screen appears.
By using [↑][↓] buttons, select the authentication
method and “And” or “Or”, and press “Next” button.

AC-2200 User Guide
25
Union Community / (138-050) 5th Fl., Hyundai Topics Building, 44-3, Bangi-dong, Songpa-
gu, Seoul, Korea // Tel : 82-2-6488-3000 , Fax : 82-2-6488-3099
E-mail: sales@unioncomm.co.kr; http://www.unioncomm.co.kr
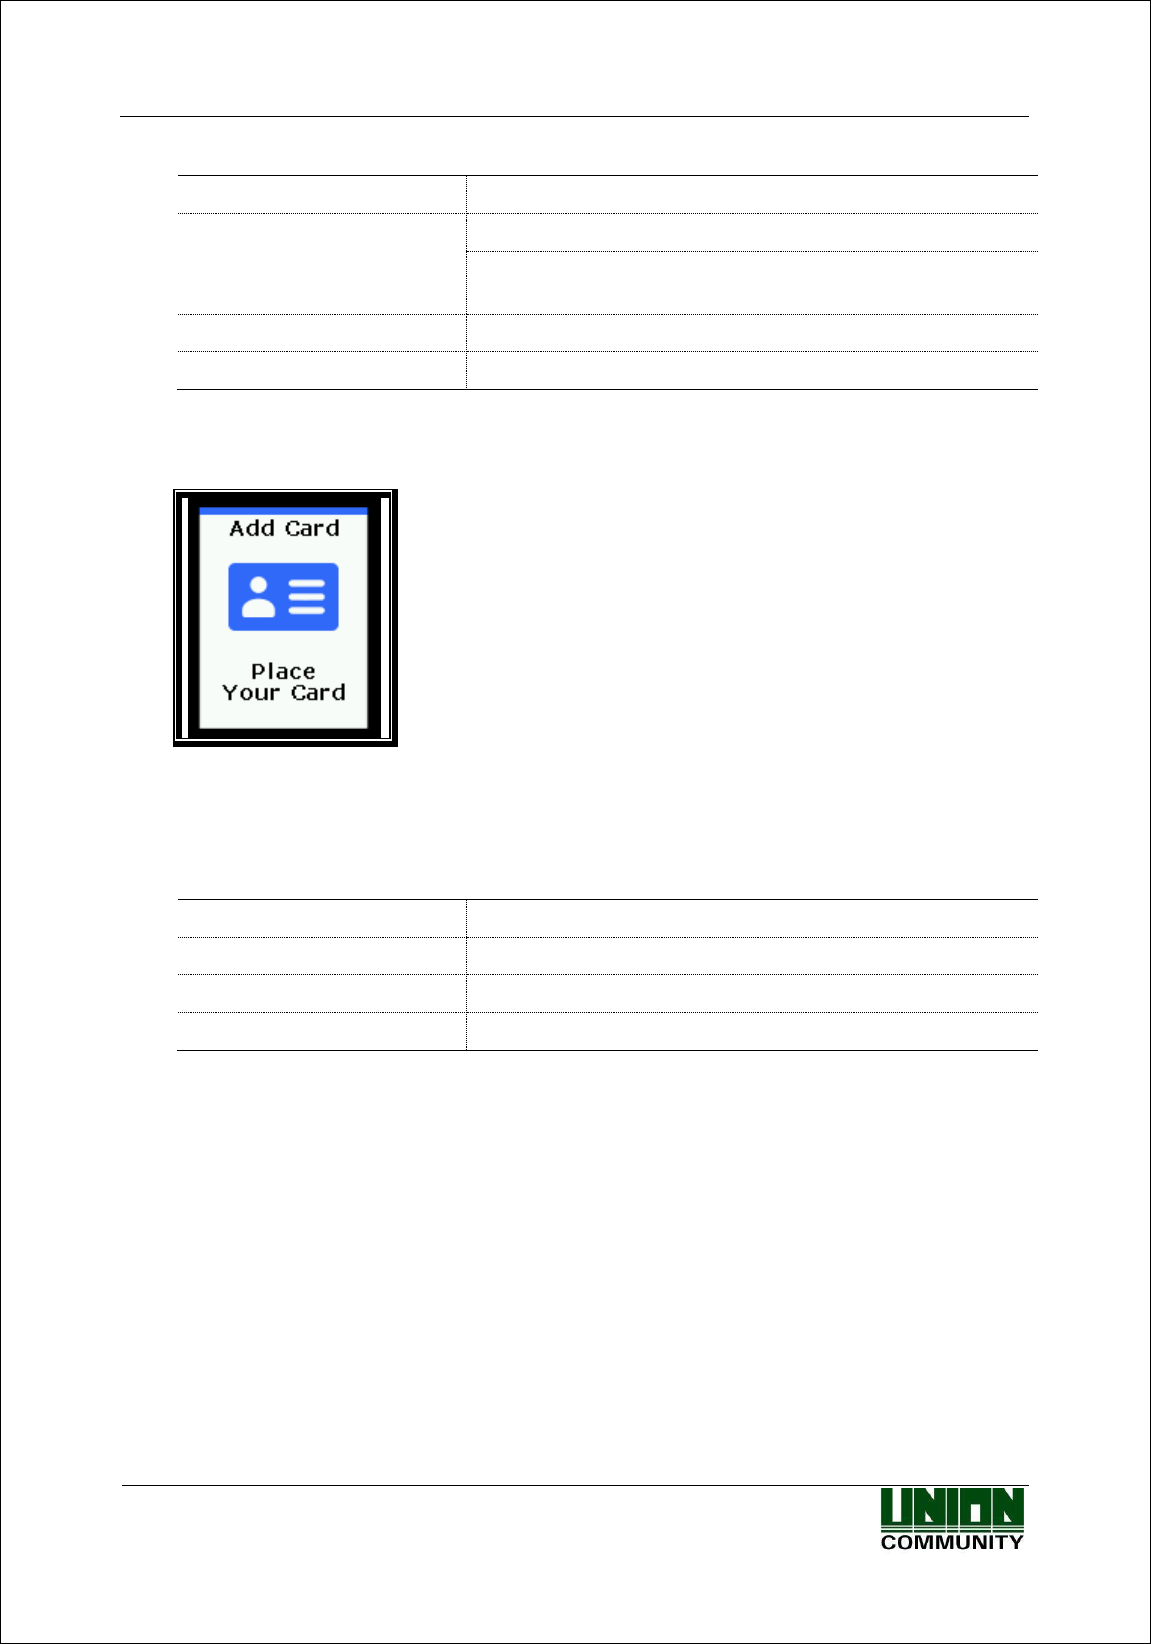
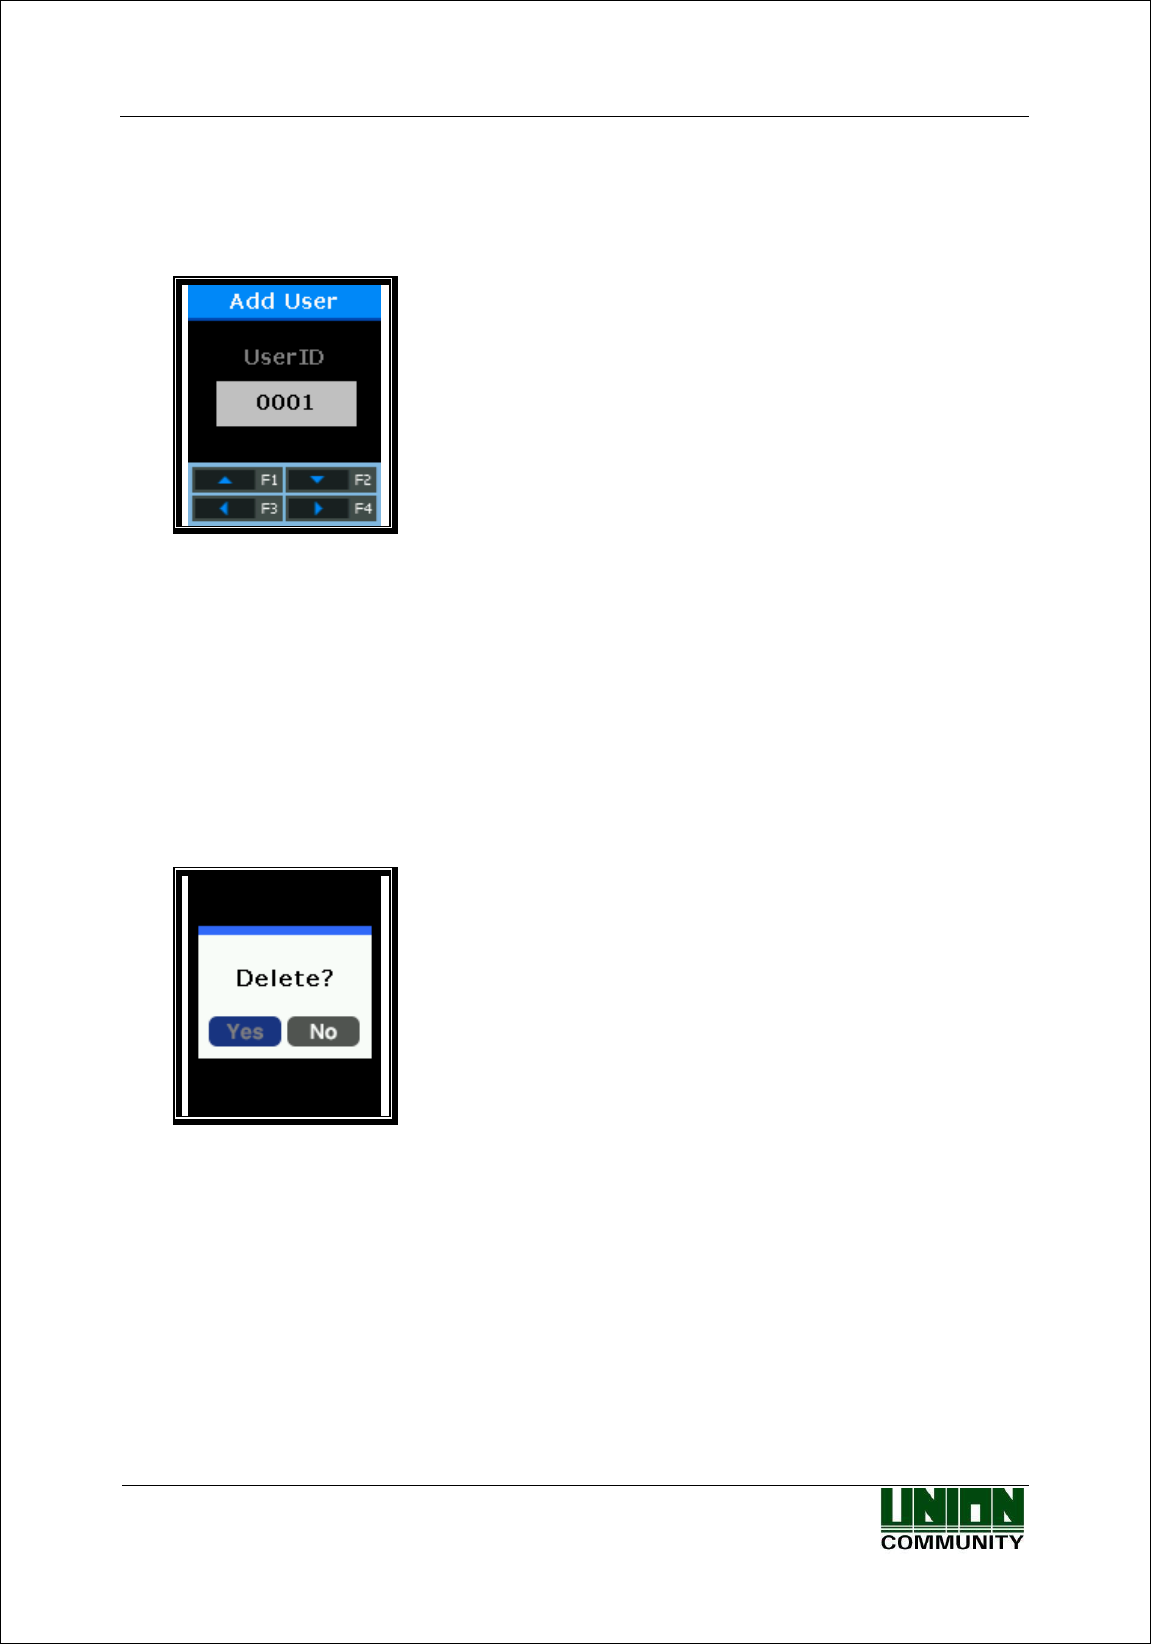
3.3.1.1. Register as “1. FP”
Register and authenticate using the fingerprint.
Default Setting: ‘4’
This screen is available to determine the authentication level for each user to be registered. By
changing this value, the different authentication level may be set for each registered user.
If this value is set to ‘1’, the 1:1 Level set in the terminal is used instead of the user-specific
authentication level.
After completion of setting, press the [ENT] button to move to the next setting.
Enter your fingerprint referring to “1.8. How to register
and enter the fingerprint” as aforesaid.
When the fingerprint sensor lights on, place your finger on the fingerprint input window. When
“Ppik” buzzer occurs, wait for about 2~3 seconds until the light turns off, and lift your finger.
When the first fingerprint is successfully entered, the message of “Please try again” is displayed.
Enter the fingerprint entered just now once again.
Enter the fingerprint entered just now once again.
AC-2200 User Guide
26
Union Community / (138-050) 5th Fl., Hyundai Topics Building, 44-3, Bangi-dong, Songpa-
gu, Seoul, Korea // Tel : 82-2-6488-3000 , Fax : 82-2-6488-3099
E-mail: sales@unioncomm.co.kr; http://www.unioncomm.co.kr
It should be noted that when entering the second fingerprint after entering the first fingerprint,
you must release your finger from the fingerprint input window and then enter the second
fingerprint again. When the registration is completed, select “Add FP”. If it fails, the screen
returns to the “1. User” screen.
The followings show LCD prompts that may appear during the registration process.
Register Success!
When registration is successful
Fail!
When registration fails
If the fingerprint image is unclear, or if no fingerprint is
entered for ten seconds after the FP sensor lights off
Duplicated FP!
If the fingerprint registered already is registered again
If registration fails even if you try to repeat 2-3 times depending on the correct fingerprint
registration method, it is recommended to authenticate using the card.
3.3.1.2. Register as “2. FP”
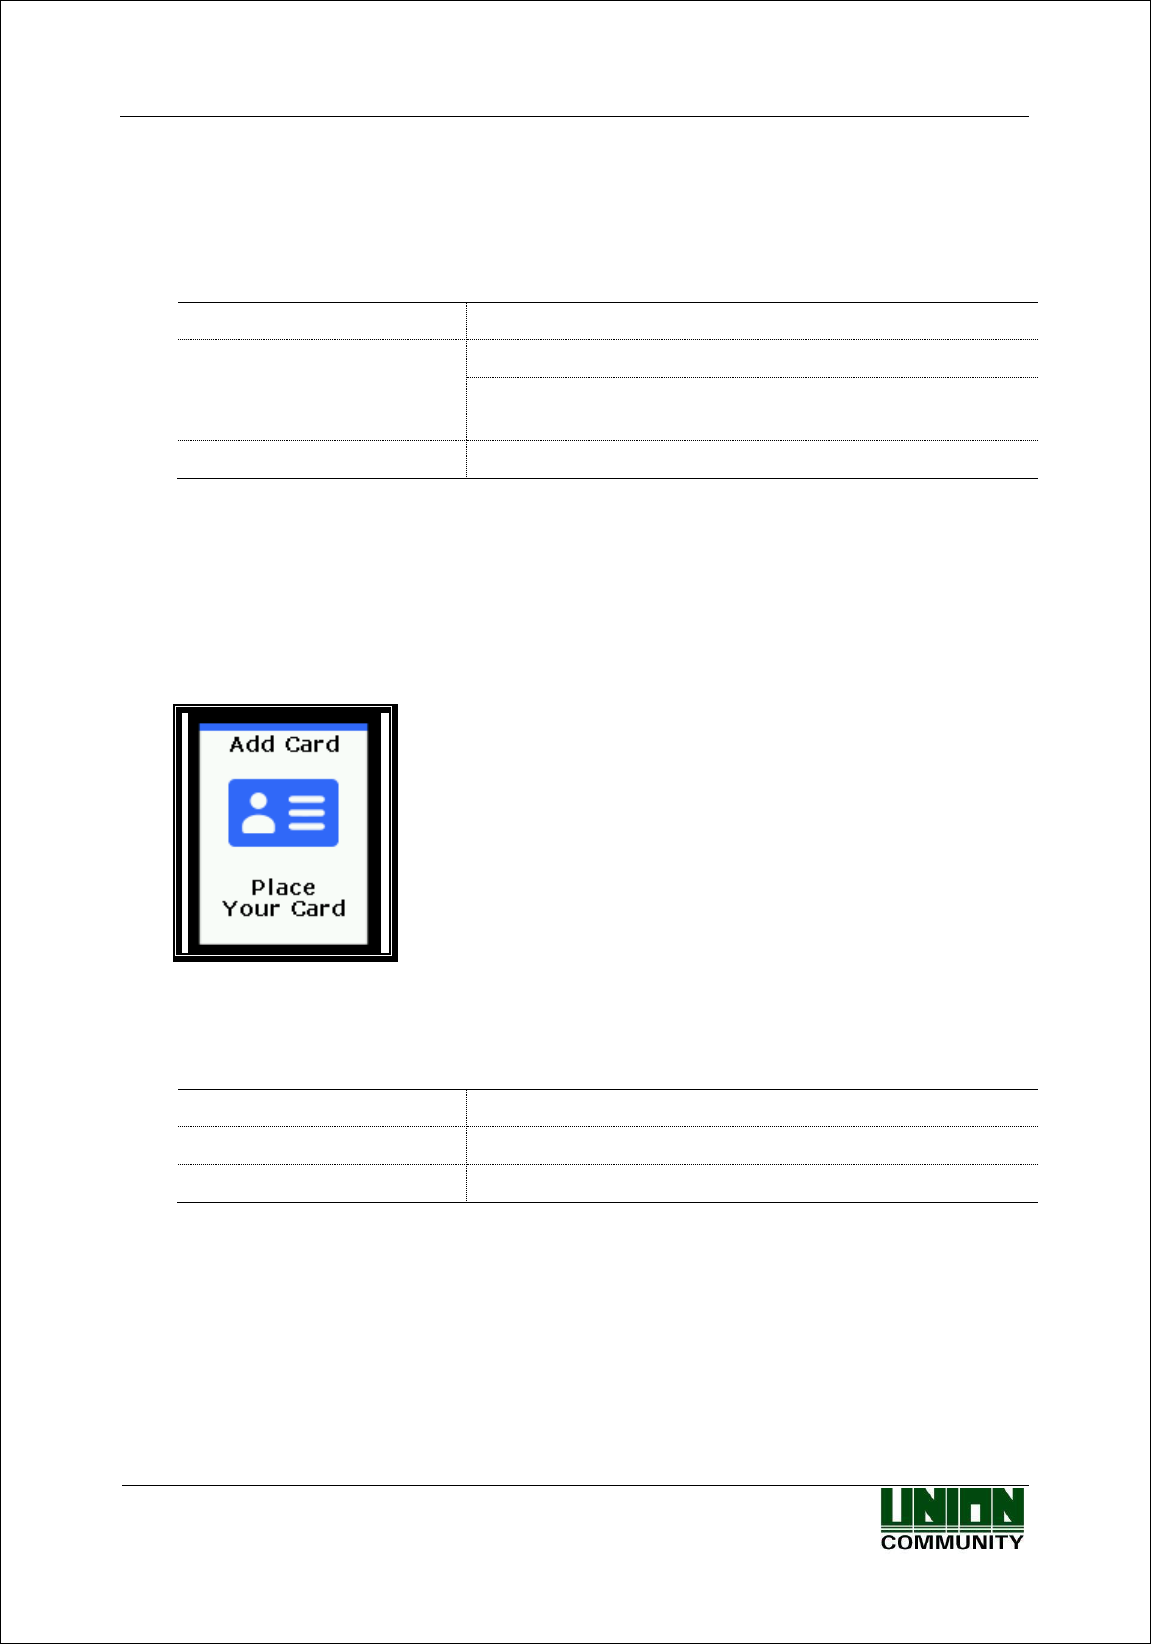
Register and authenticate using the card only.
Place the card to register on the LCD. To cancel and exit
the registration, press [ESC] button.
When the registration is completed, select “Add FP”. If it fails, the screen returns to the “1.
User” menu.
The followings show LCD prompts that may appear during the registration process.
Register Success!
When registration is successful
Fail!
When registration fails
Duplicated Card!
If the card registered already is registered again
3.3.1.3. Register as “FP or Card”
The user can be registered using both card and fingerprint and then authenticated using either
card or fingerprint.
The user should register his/her fingerprint (see Fingerprint Registration) and then his/her card
(see Card Registration).
AC-2200 User Guide
27
Union Community / (138-050) 5th Fl., Hyundai Topics Building, 44-3, Bangi-dong, Songpa-
gu, Seoul, Korea // Tel : 82-2-6488-3000 , Fax : 82-2-6488-3099
E-mail: sales@unioncomm.co.kr; http://www.unioncomm.co.kr
3.3.1.4. Register with “FP and Card”
The user can be registered using card and fingerprint. Authentication is performed for the card
and then for the fingerprint.
The user should register his/her fingerprint (see Fingerprint Registration) and then his/her card
(see Card Registration).
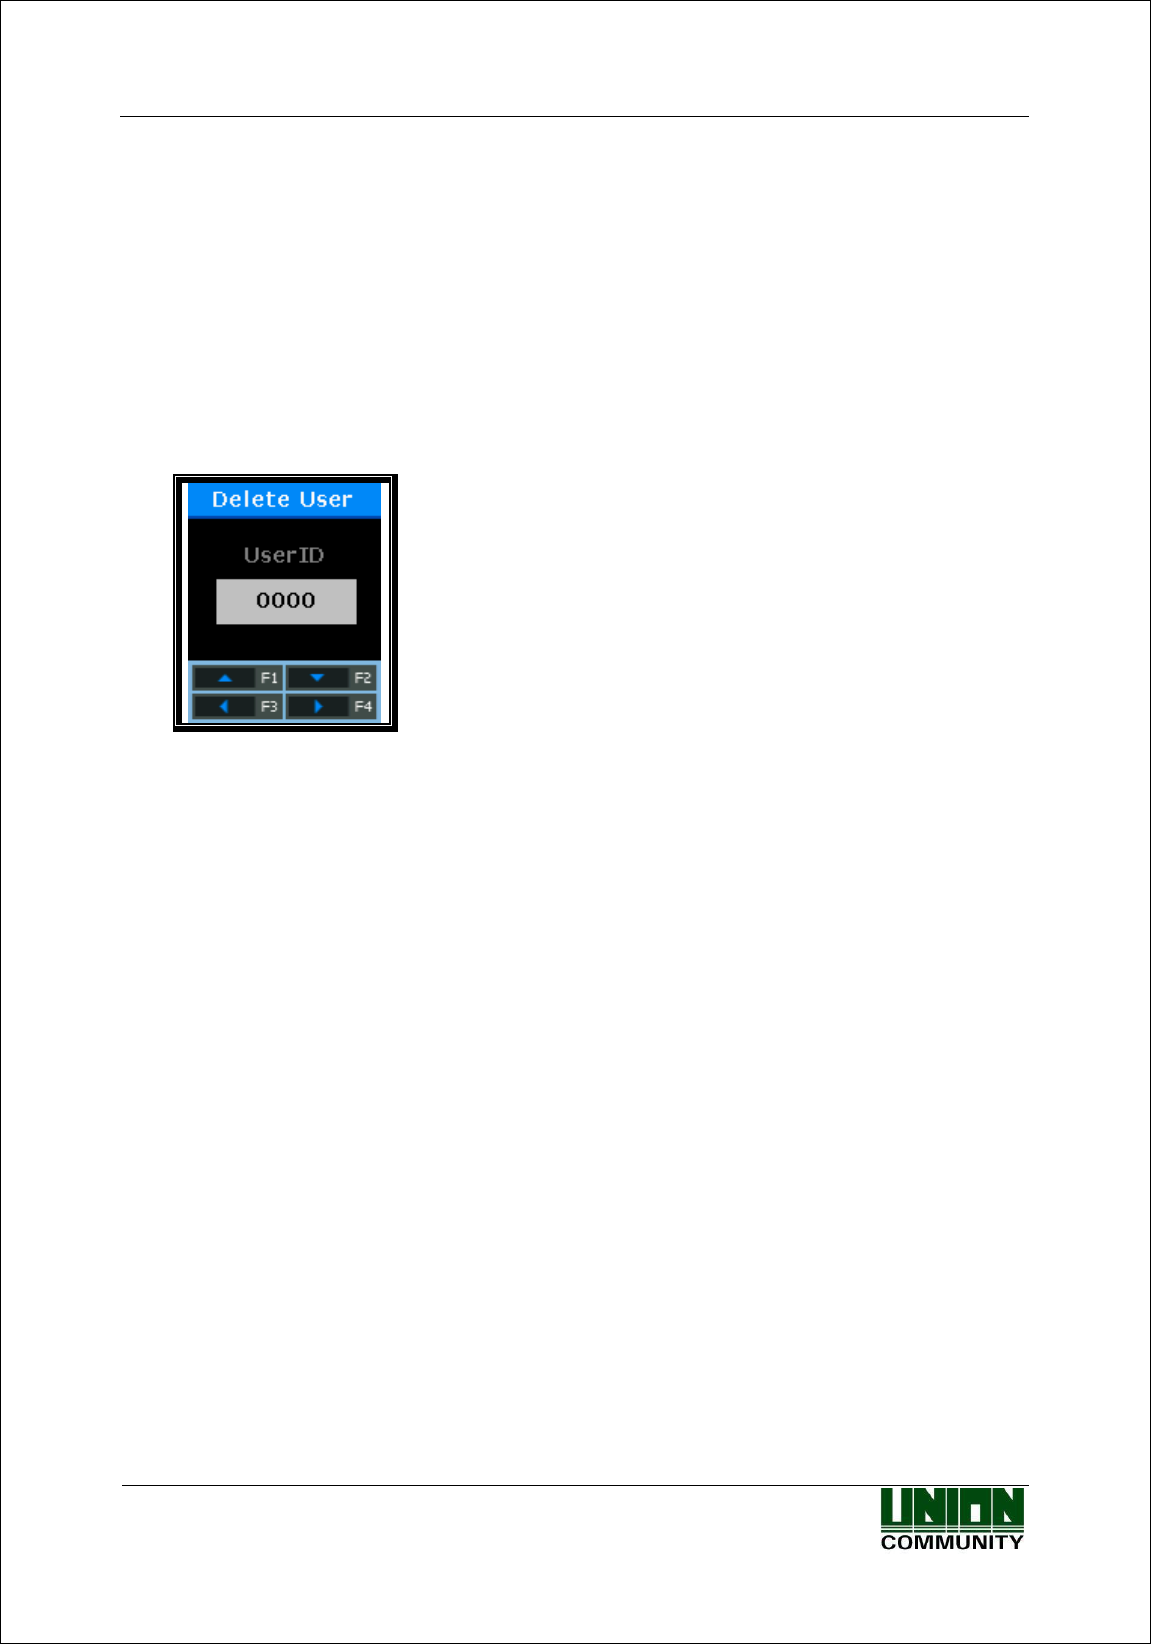
3.3.2. Delete User
Select [F3~]→[1.User]→[2.Delete] on the main screen, and the following screen will appear.
Enter the ID of the new user you wish to delete, and press
[F4] button long.
Enter the ID of the user you want to delete from the registered users of the terminal and press
[F4] button long, the successful buzzer will sound and all the information will be deleted from
the terminal. However, data deletion from the terminal does not mean data deletion from the
server. To delete the data permanently, it must be deleted from the server as well.
If the ID of an unregistered user is entered, the message of “Unregister” with “Fail” buzzer is
displayed on the LCD and then the screen goes to the “1. User” menu.
When deleting, both general users and administrators are deleted without distinction. If users
who are not exist in the network server but registered in the terminal are deleted, the data cannot
be recovered. Therefore, special cautions are required.
AC-2200 User Guide
28
Union Community / (138-050) 5th Fl., Hyundai Topics Building, 44-3, Bangi-dong, Songpa-
gu, Seoul, Korea // Tel : 82-2-6488-3000 , Fax : 82-2-6488-3099
E-mail: sales@unioncomm.co.kr; http://www.unioncomm.co.kr
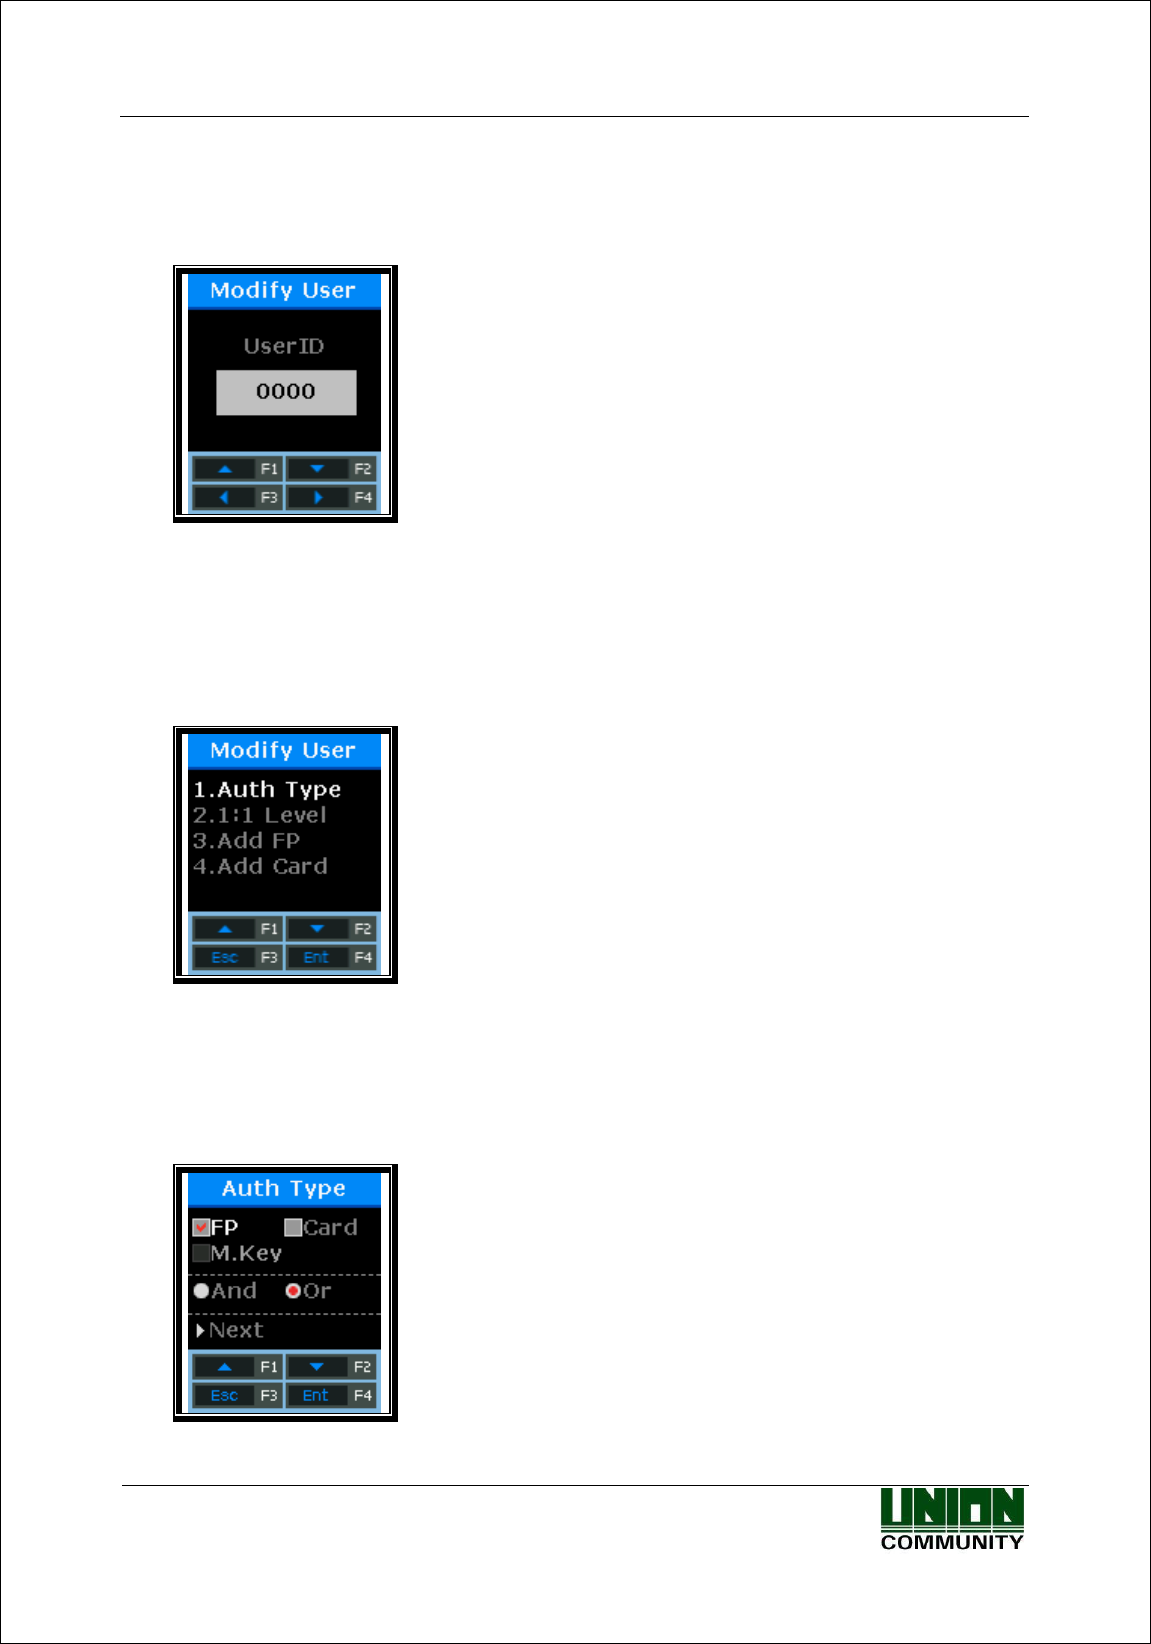
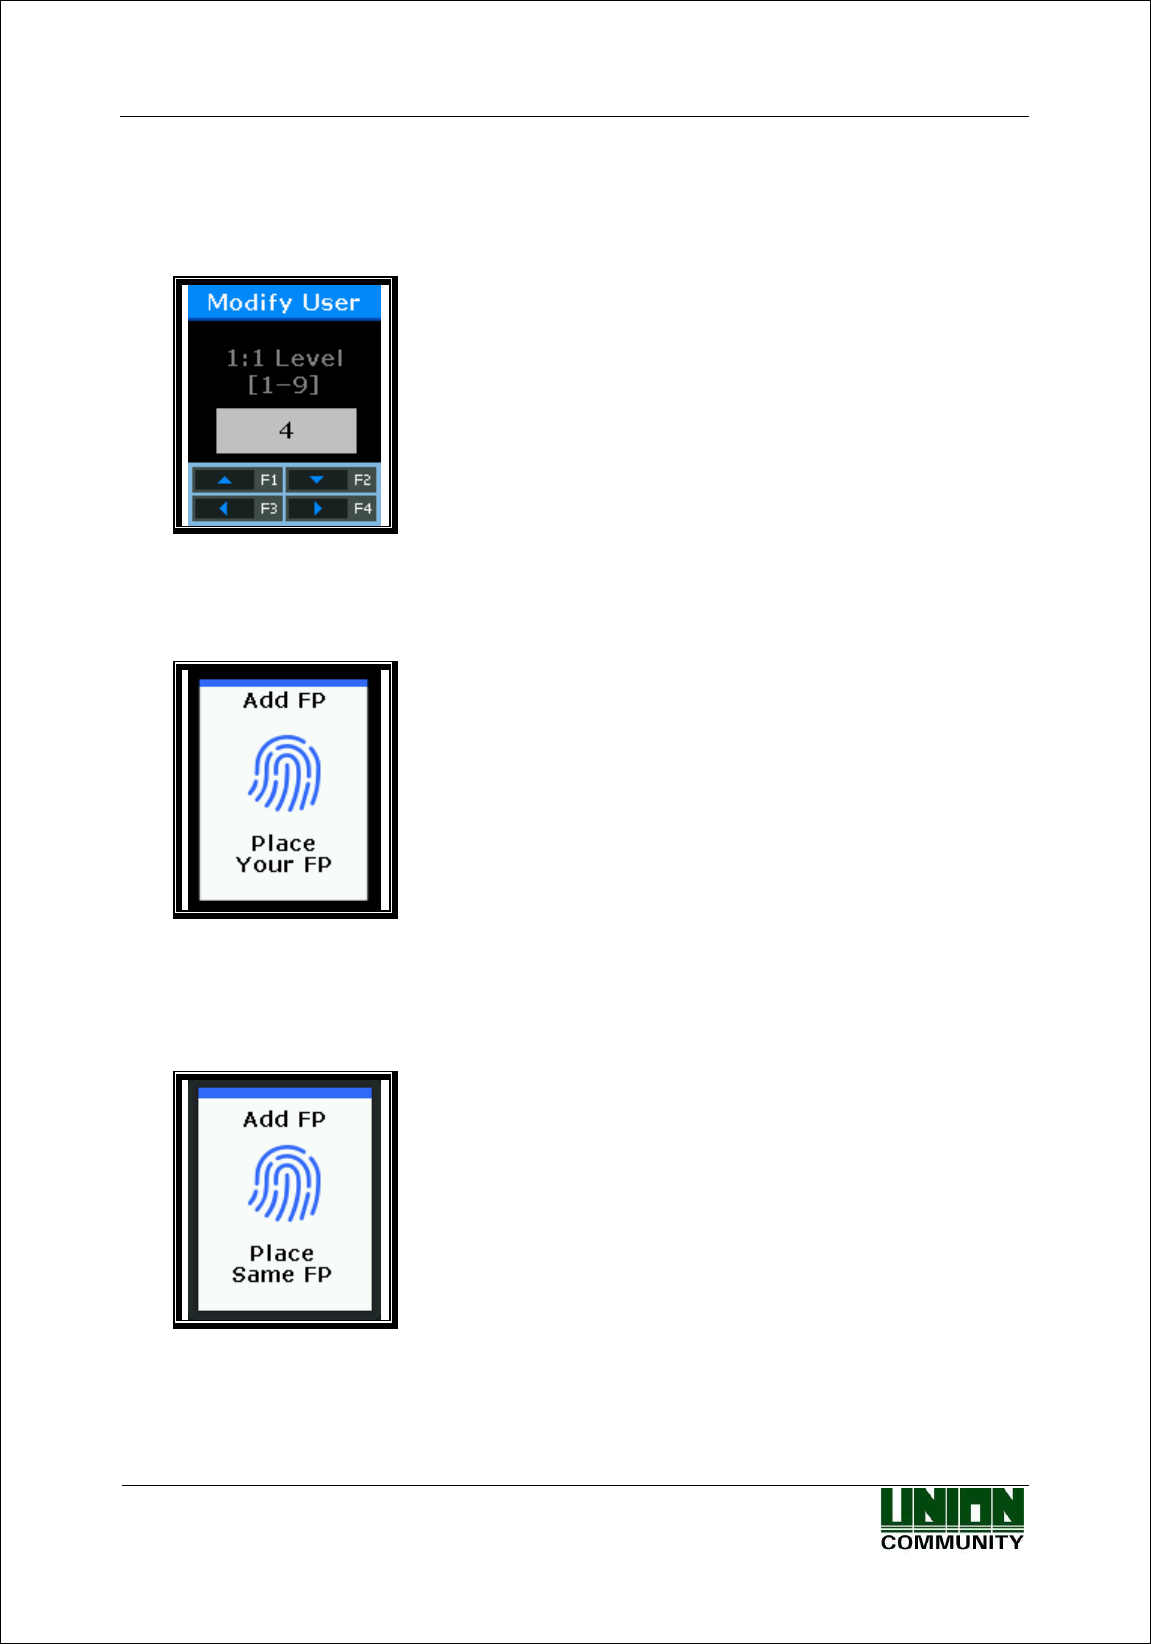
3.3.3. Modify User
Select [F3~]→[1.User]→[3.Modify] on the main screen, and the following screen will appear.
Enter the ID of the user you wish to change, and press
[ENT] button long.
Both general users and administrators can be changed without distinction. If the ID of an
unregistered user (or administrator) is entered, the message of “Unregister” with “Fail” buzzer is
displayed on the LCD and then the screen goes to the “1. User” menu.
The changeable items of users are different according to the user authentication method and are
classified as below.
Select [1] to change the authentication method; [2] to
modify the authentication level; [3] to add the fingerprint
to the relevant ID; and [4] to add the card.
※Up to 10 fingerprints/cards per ID can be registered. If you try to register more than 10
fingerprints/cards, when selecting [3] or [4], “Fail” buzzer occurs and the message of “User
FP/Card Full !” is displayed on the LCD.
[1] When selecting “Auth Type”
By using [↑][↓] buttons, select the authentication method
and “And” or “Or”, and press “Next” button.
AC-2200 User Guide
29
Union Community / (138-050) 5th Fl., Hyundai Topics Building, 44-3, Bangi-dong, Songpa-
gu, Seoul, Korea // Tel : 82-2-6488-3000 , Fax : 82-2-6488-3099
E-mail: sales@unioncomm.co.kr; http://www.unioncomm.co.kr
To modify, select the authentication methods referring to the aforementioned process of [3.3.1.1]
to [3.3.1.4].
[2] When selecting “1:1 Level”
Recommended Setting: ‘4’
To modify, the new set value should be entered.
[3] When selecting “Add FP”
Enter your fingerprint referring to “1.8. How to register
and enter the fingerprint” as aforesaid.
When the fingerprint sensor lights on, place your finger on the fingerprint input window. When
“Ppik” buzzer occurs, wait for about 2~3 seconds until the light turns off, and lift your finger.
When the first fingerprint is successfully entered, the message of “Please try again” is displayed.
Enter the fingerprint entered just now once again.
Enter the fingerprint entered just now once again.
It should be noted that when entering the second fingerprint after entering the first fingerprint,
you must release your finger from the fingerprint input window and then enter the second
fingerprint again. When the registration is completed, select “Add FP”. If it fails, the screen
returns to the “3. Modify” menu.
AC-2200 User Guide
30
Union Community / (138-050) 5th Fl., Hyundai Topics Building, 44-3, Bangi-dong, Songpa-
gu, Seoul, Korea // Tel : 82-2-6488-3000 , Fax : 82-2-6488-3099
E-mail: sales@unioncomm.co.kr; http://www.unioncomm.co.kr
The followings show LCD prompts that may appear during the registration process.
Register Success!
When registration is successful
Fail!
When registration fails
If the fingerprint image is unclear, or if no fingerprint is
entered for ten seconds after the FP sensor lights off
Duplicated FP!
If the fingerprint registered already is registered again
User FP Full!
If ten fingerprints have been registered in the relevant ID
[4] When selecting “Add CARD”
To cancel the registration, press [ESC] button.
When placing your card on the LCD, the successful buzzer occurs and the newly entered card
number is added.
If card change fails, the “Fail” buzzer occurs and the screen returns to the “3. Modify” menu.
The followings show LCD prompts that may appear during the registration process.
Register Success!
When registration is successful
Fail!
When registration fails
Duplicated Card!
If the card registered already is registered again
User Card Full!
If ten fingerprints have been registered in the relevant ID
AC-2200 User Guide
31
Union Community / (138-050) 5th Fl., Hyundai Topics Building, 44-3, Bangi-dong, Songpa-
gu, Seoul, Korea // Tel : 82-2-6488-3000 , Fax : 82-2-6488-3099
E-mail: sales@unioncomm.co.kr; http://www.unioncomm.co.kr
3.3.4. Add Administrator
Select [F3~]→[1.User]→[4.Add Admin] on the main screen, and the following screen will
appear.
Enter the ID of the administrator you wish to register,
and press [F4] button long.
※ Since then, the administrator registration process is same as the general user registration
process.
Only users registered as administrators have the authority to change the operating environment
of the terminal, and register/modify/delete all the information of users saved in the terminal.
Therefore, special attention is required for registration of terminal administrators.
3.3.5. Delete All Users
Select [F3~]→[1.User]→[5.Delete All] on the main screen, and the following screen will appear.
Select [1] to delete all users, and [2] to caner.
After requesting reconfirmation, all users including administrators are immediately deleted.
Before using this function, special attention is required.
After successful deletion, the successful buzzer occurs and then the screen returns to the “1.
User” menu.
AC-2200 User Guide
32
Union Community / (138-050) 5th Fl., Hyundai Topics Building, 44-3, Bangi-dong, Songpa-
gu, Seoul, Korea // Tel : 82-2-6488-3000 , Fax : 82-2-6488-3099
E-mail: sales@unioncomm.co.kr; http://www.unioncomm.co.kr
3.4. Network Setting
Select [2.Network] on the main menu, and the following screen will appear.
Press [↑][↓] buttons to select the menu you want to
change, and press [ENT] button.
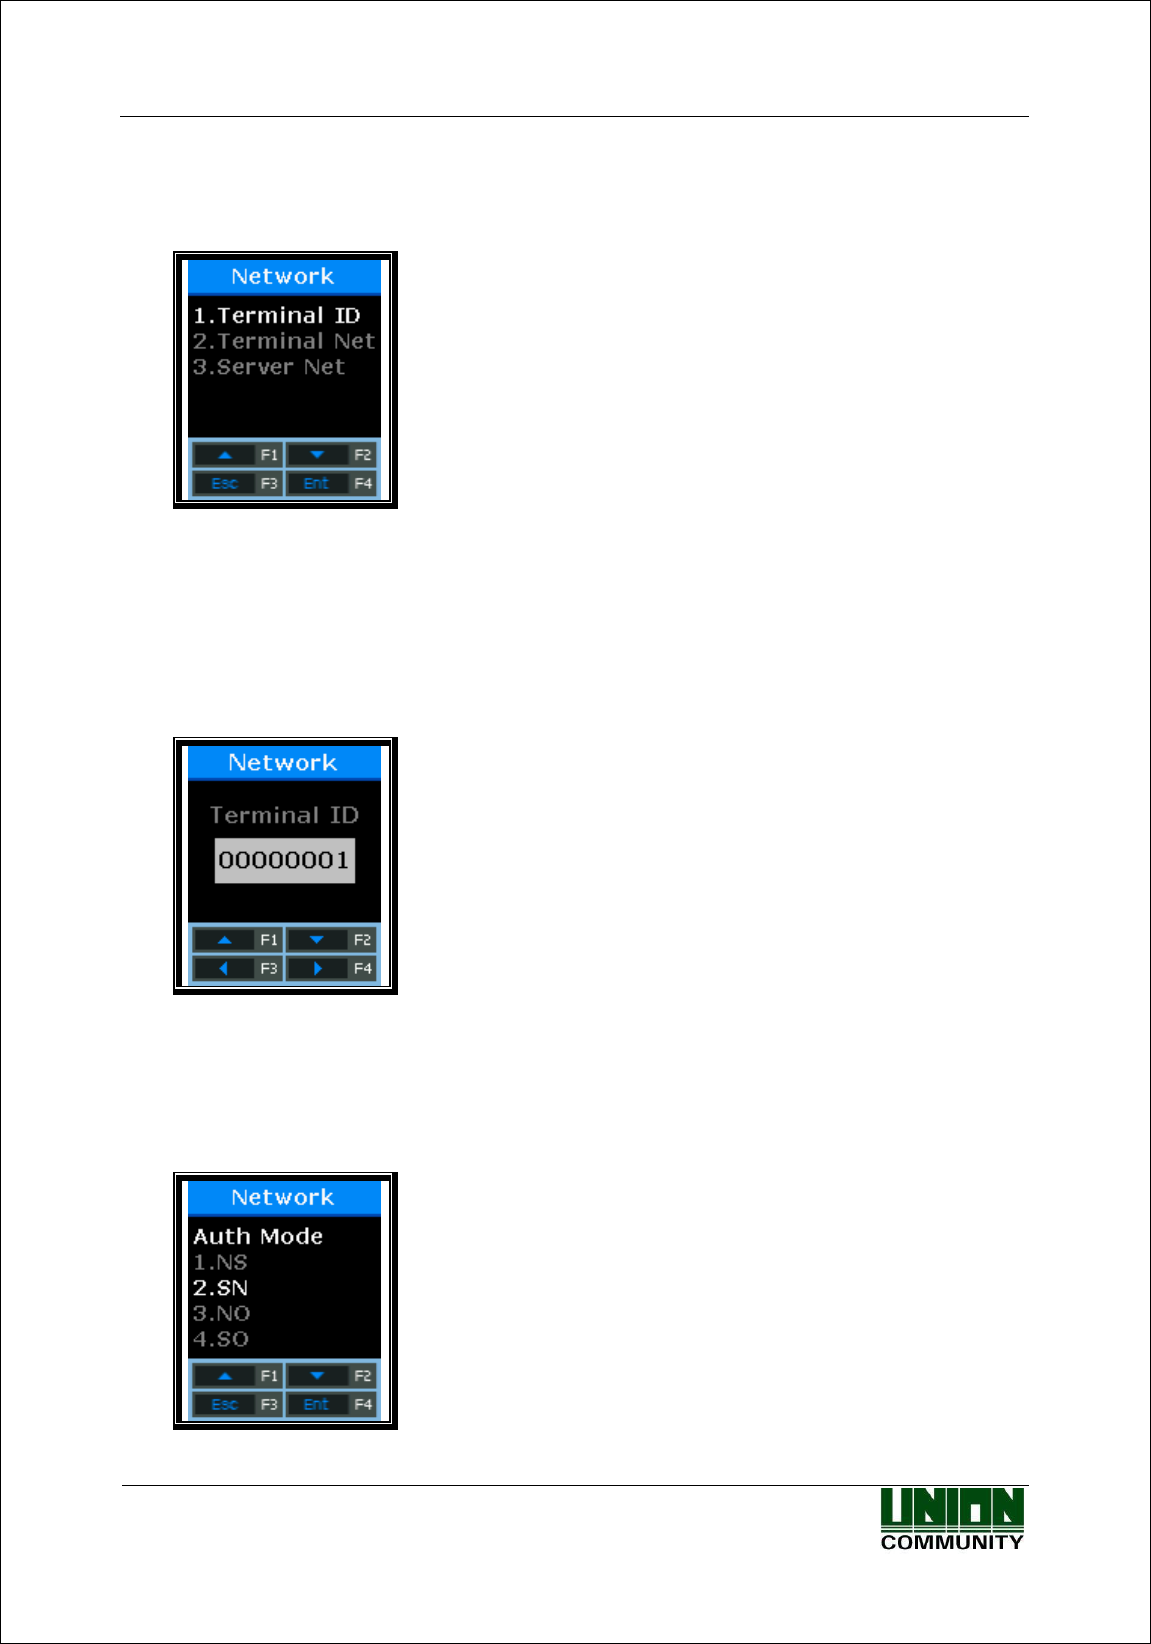
3.4.1. Terminal ID
Select [F3~]→[2.Network] → [1.Terminal ID] on the main screen, and the following screen will
appear.
3.4.1.1. Terminal ID
This ID is a unique ID used to allow the server to identify
the terminal. The default is ‘00000001’.
Default Setting: “00000001”
This ID must match the door ID set to the server program and is entered as an 8-digit number.
Press [ENT] button long, and go to the next menu.
3.4.1.2. Authentication Priority [NS / SN / NO / SO] Setting
Select [1] for NS, [2] for SN, [3] for NO, and [4] for SO.
Default Setting: ‘2.SN’

AC-2200 User Guide
33
Union Community / (138-050) 5th Fl., Hyundai Topics Building, 44-3, Bangi-dong, Songpa-
gu, Seoul, Korea // Tel : 82-2-6488-3000 , Fax : 82-2-6488-3099
E-mail: sales@unioncomm.co.kr; http://www.unioncomm.co.kr
This menu is to determine the authentication priority between the terminal and the network, the
default is ‘2. SN’, and the authentication method in each mode operates as follows.
NS
If the terminal is connected to the server, authentication is attempted from the server. If
the terminal is disconnected from the server due to a network failure, etc.,
authentication is attempted from the terminal.
SN
Even if the terminal is connected to the server, authentication is attempted from the
terminal. The authentication result is sent to the server in real time.
However, if the entered user is not registered in the terminal, authentication is
attempted from the server. (If there is any fingerprint user in the terminal, the 1:N
fingerprint authentication is not performed in the server.)
NO
Even if the user is registered in the terminal server, authentication is performed
through the server only.
SO
Only users registered in the terminal are authenticated. If the terminal is connected to
the server, the authentication result is sent to the server in real time.
The authentication priority may be set flexibly depending on the situation such as the number of
terminals connected to the server, the number of authenticated users, or network failure.
However, if more than 10 terminals are connected to the server and so concurrent authentication
is often attempted, or if network failure often occurs, it is recommended to attempt SN
authentication (set to ‘2’).
After entering correctly, press [ENT] button, and the screen will go to the upper menu.
AC-2200 User Guide
34
Union Community / (138-050) 5th Fl., Hyundai Topics Building, 44-3, Bangi-dong, Songpa-
gu, Seoul, Korea // Tel : 82-2-6488-3000 , Fax : 82-2-6488-3099
E-mail: sales@unioncomm.co.kr; http://www.unioncomm.co.kr
3.4.2. IP Setting
Select [F3~]→[2.Network] → [2.Terminal Net] on the main screen, and the following screen will
appear.
3.4.2.1. Connection Method Setting
Select [1] if Static IP is assigned, and select [2] to set IP using
DHCP.
Default Setting: ‘1.Static’
This refers to how the terminal is connected to the network. The default is ‘1’ (Static).
Select [1] when using the Static IP assigned from the connected network, and select [2] when
using the IP assigned from the DHCP server which exists in the connected network.
After entering correctly, press [ENT] button to move to the next setting.
※ If the connection method is set to ‘Static IP (1)’, the following procedures such as “3.4.2.2.
Terminal IP Setting”, “3.4.2.3. Subnet Mask Setting”, and “3.4.2.4. Gateway Setting”
should be set respectively. However, if the connection method is set to the dynamic IP
supported by DHCP, the setting is unnecessary and so omitted.
3.4.2.2. Terminal IP Setting
Press [←][→] buttons to move to the digit you want to
change, and press [↑][↓] buttons to change the numbers
Default Setting: “192.168.000.003”
Set the IP address assigned to the terminal.
After entering correctly, press [F4] button long to move to the next setting.
AC-2200 User Guide
35
Union Community / (138-050) 5th Fl., Hyundai Topics Building, 44-3, Bangi-dong, Songpa-
gu, Seoul, Korea // Tel : 82-2-6488-3000 , Fax : 82-2-6488-3099
E-mail: sales@unioncomm.co.kr; http://www.unioncomm.co.kr
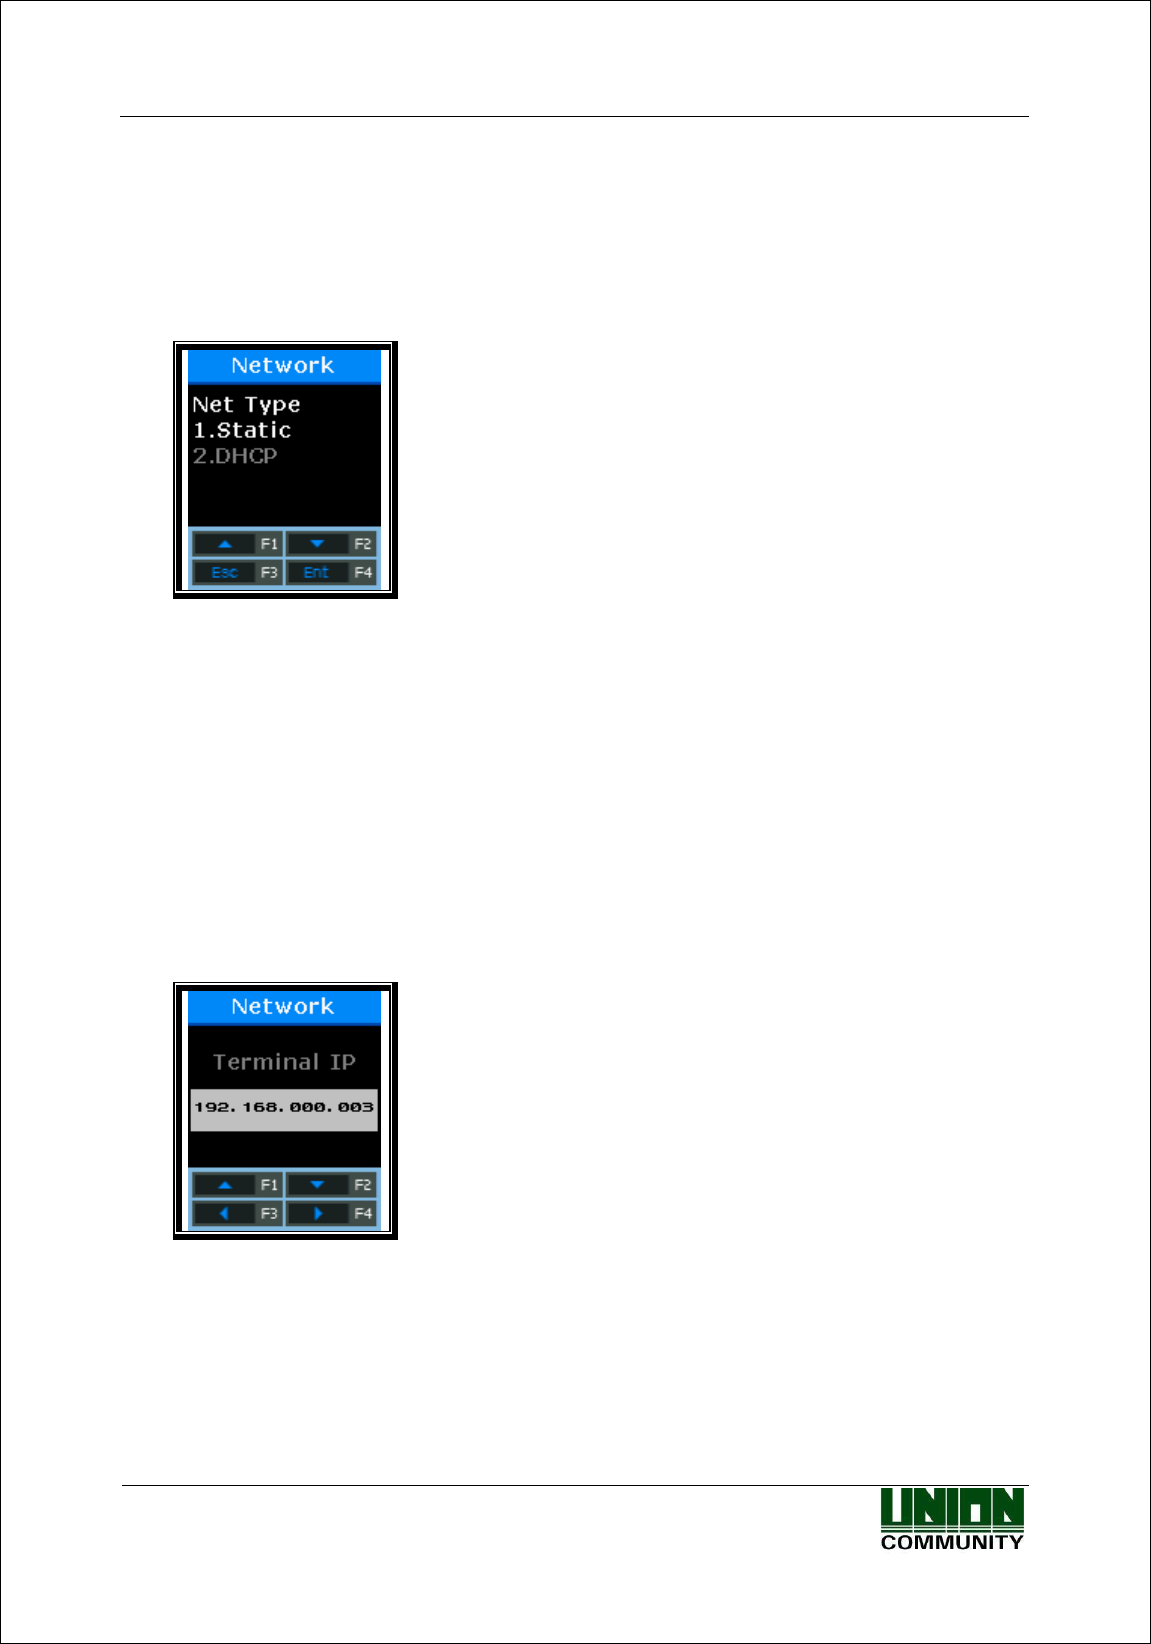
3.4.2.3. Subnet Mask Setting
Press [←][→] buttons to move to the digit you want to
change, and press [↑][↓] buttons to change the numbers.
Default Setting: “255.255.255.000”
This is to set the subnet mask of the network connected to the terminal.
After entering correctly, press [F4] button long to move to the next setting.
3.4.2.4. Gateway Setting
Press [←][→] buttons to move to the digit you want to
change, and press [↑][↓] buttons to change the numbers.
Default Setting: “192.168.000.001”
This is to set the gateway IP of the network connected to the terminal.
After entering correctly, press [ENT] button long, and the screen will go to the upper menu.
3.4.3. Server IP Setting
Select [F3~]→[2.Network] → [3.Server Net] on the main screen, and the following screen will
appear.

AC-2200 User Guide
36
Union Community / (138-050) 5th Fl., Hyundai Topics Building, 44-3, Bangi-dong, Songpa-
gu, Seoul, Korea // Tel : 82-2-6488-3000 , Fax : 82-2-6488-3099
E-mail: sales@unioncomm.co.kr; http://www.unioncomm.co.kr
3.4.3.1. Connection Method Setting
Select [1] if Static IP is assigned, and select [2] to set IP
using DDNS.
Default Setting: ‘1.Static’
This is the way that the terminal is connected to the network.
Select [1] when using the Static IP assigned from the connected network, and select [2] when
using the IP assigned from the DDNS server.
After entering correctly, press [ENT] button to move to the next setting.
※ If the connection method is set to ‘Static IP (1)’, the following procedures such as “3.4.3.2.
Sever IP Setting” and “3.4.3.3. Server Port Setting” should be set respectively. However, if
the connection method is set to ‘2. DDNS’, DDNS ID needs to be additionally set and so
“4.4.3.4. DDNS ID Setting” is added.
3.4.3.2. Sever IP Setting
Press [←][→] buttons to move to the digit you want to
change, and press [↑][↓] buttons to change the numbers.
Default Setting: “192.168.000.002”
This is to specify the IP Address of the network server connected to the terminal.
After entering correctly, press [F4] button long to move to the next setting.

AC-2200 User Guide
37
Union Community / (138-050) 5th Fl., Hyundai Topics Building, 44-3, Bangi-dong, Songpa-
gu, Seoul, Korea // Tel : 82-2-6488-3000 , Fax : 82-2-6488-3099
E-mail: sales@unioncomm.co.kr; http://www.unioncomm.co.kr
3.4.3.3. Sever Port Setting
Press [←][→] buttons to move to the digit you want to
change, and press [↑][↓] buttons to change the numbers.
Default Setting: “09870”
This is to specify the Port of the network server connected to the terminal.
After entering correctly, press [F4] button long, and the screen will go to the upper menu.
3.4.3.4. DDNS ID Setting
Press [←][→] buttons to move to the digit you want to
change, and press [↑][↓] buttons to change the numbers.
Default Setting: “000000001”
This appears only when the server connection method is set to DDNS(2).
This is to specify the DDNS ID of the DDNS server connected to the terminal.
After entering correctly, press [F4] button long to move to the next setting.
AC-2200 User Guide
38
Union Community / (138-050) 5th Fl., Hyundai Topics Building, 44-3, Bangi-dong, Songpa-
gu, Seoul, Korea // Tel : 82-2-6488-3000 , Fax : 82-2-6488-3099
E-mail: sales@unioncomm.co.kr; http://www.unioncomm.co.kr
3.4.3.5. DDNS IP Setting
Press [←][→] buttons to move to the digit you want to
change, and press [↑][↓] buttons to change the numbers.
Default Setting: “210.116.104.058”
This is to specify the IP Address of the network server connected to the terminal.
After entering correctly, press [F4] button long to move to the next setting.
3.4.3.6. DDNS Port Setting
Press [←][→] buttons to move to the digit you want to
change, and press [↑][↓] buttons to change the numbers.
Default Setting: “09880”
This is to specify the Port of the network server connected to the terminal.
After entering correctly, press [F4] button long, and the screen will go to the upper menu.
AC-2200 User Guide
39
Union Community / (138-050) 5th Fl., Hyundai Topics Building, 44-3, Bangi-dong, Songpa-
gu, Seoul, Korea // Tel : 82-2-6488-3000 , Fax : 82-2-6488-3099
E-mail: sales@unioncomm.co.kr; http://www.unioncomm.co.kr
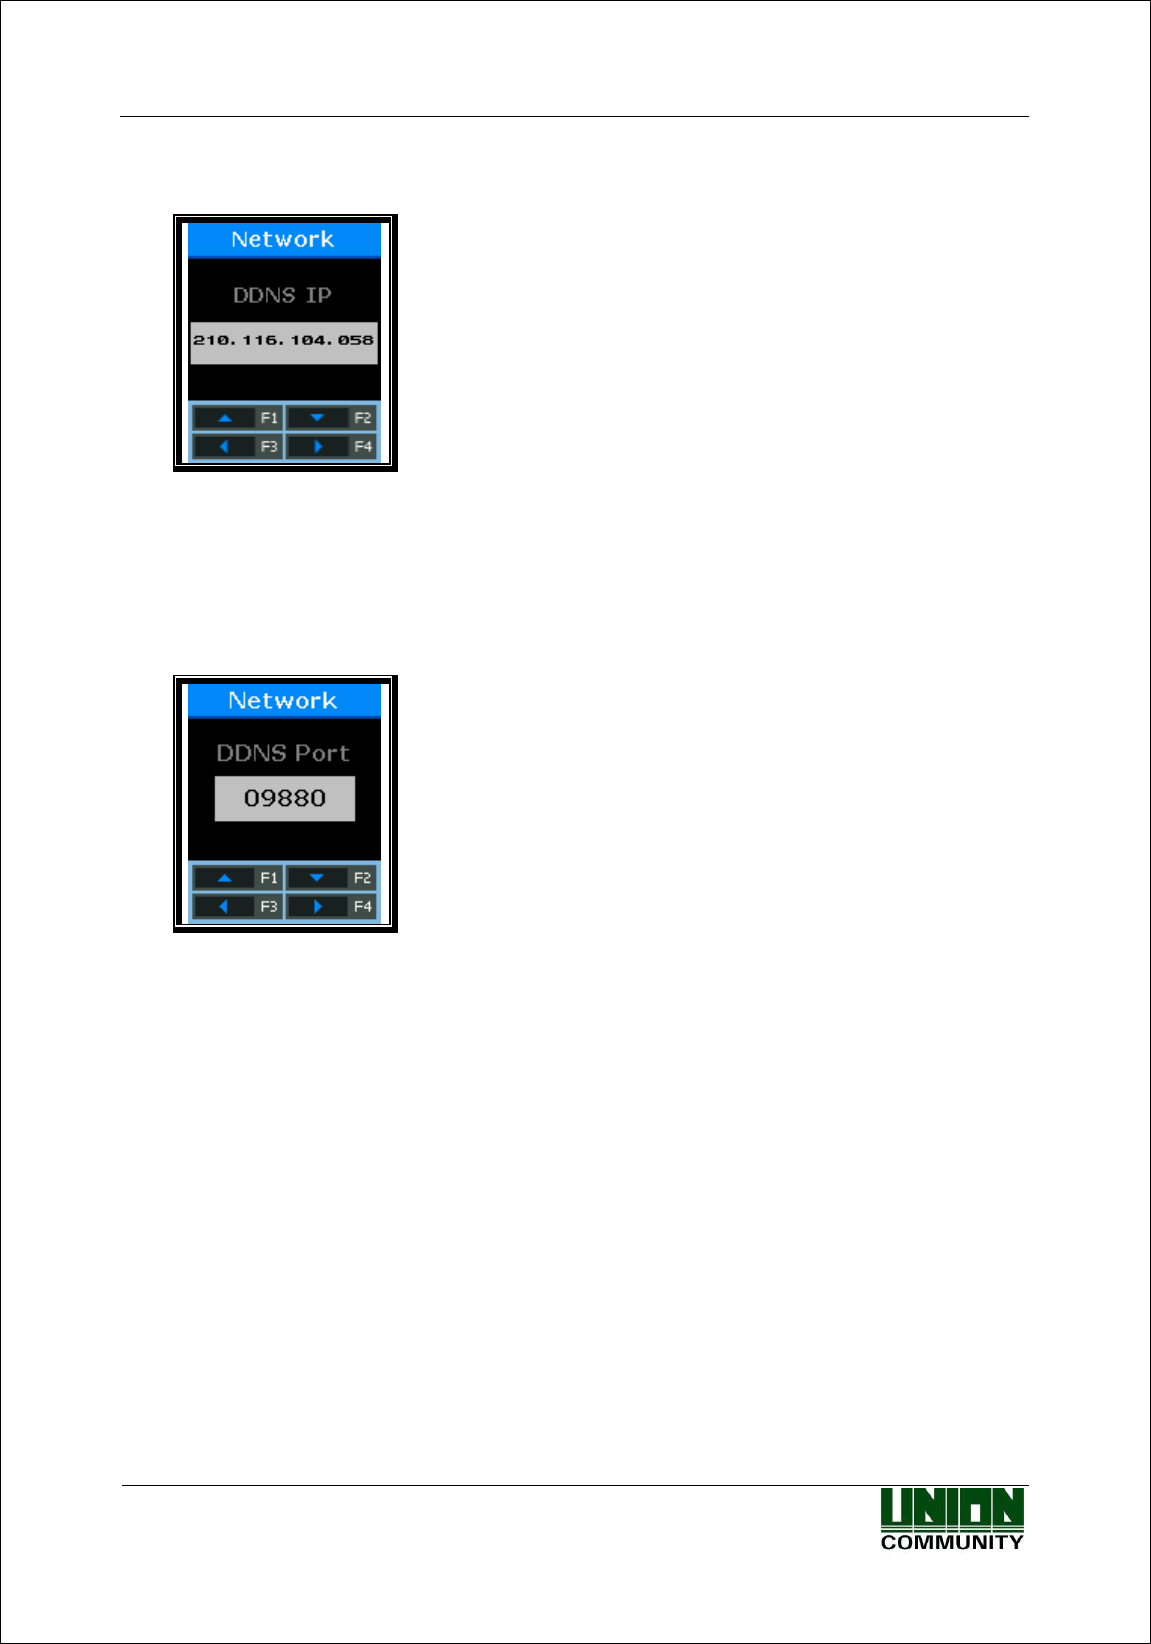
3.5. Option Setting
Select [3.Option] on the main menu, and the following screen will appear.
Press [↑][↓] buttons to select the menu you want to
change, and press [ENT] button.
3.5.1. Application Setting
Select [F3~] → [3.Option] → [1. Application] on the main screen, and the following screen will
appear.
Set the operating mode that you want to set.
Default Setting: ‘1.Access’
This is to set an operating mode of the terminal. Select ‘1’ for simple access control; ‘2’ for T&A
control; and ‘3’ for drinking water management.
After selecting, press [ENT] button to move to the detail setting menu according to each
operating system.
AC-2200 User Guide
40
Union Community / (138-050) 5th Fl., Hyundai Topics Building, 44-3, Bangi-dong, Songpa-
gu, Seoul, Korea // Tel : 82-2-6488-3000 , Fax : 82-2-6488-3099
E-mail: sales@unioncomm.co.kr; http://www.unioncomm.co.kr
3.5.1.1. When setting to “[1.Access]” or “[2.T&A]”
By setting the default time for each T&A mode, after authentication, the terminal display
mode can be turned into the automatically set T&A mode.
If time setting is unnecessary, it is set to ‘00:00-00:00’.
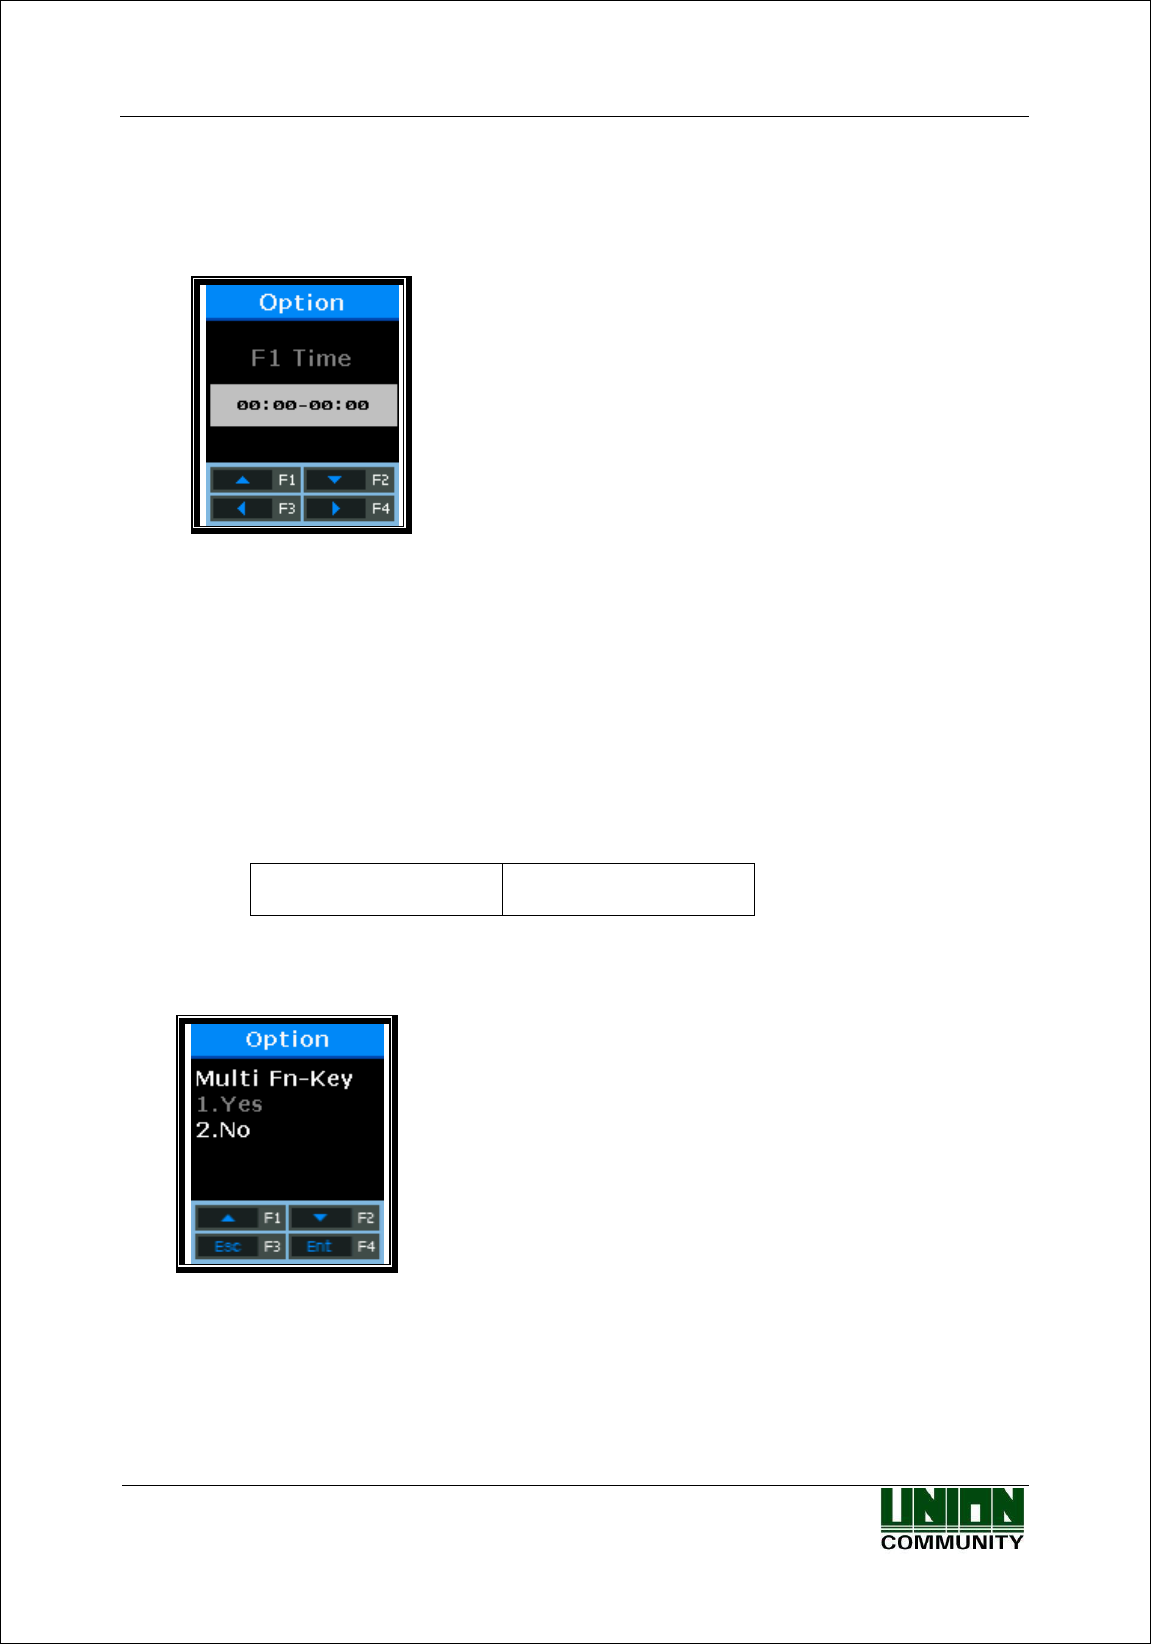
This is to set the default attendance time. Press [←][→] buttons to move to the digit you want
to change, and press [↑][↓] buttons to change the numbers.
Within the set time zone, the Attend mode is always displayed if another function key is not
pressed. Even if the Leave mode is authenticated by pressing [F2] button, the terminal display
mode is automatically turned into the Leave after authentication. Therefore, it is convenient to
manage T&A.
After <F1 Time>, set <F2 Time>, <F3 Time>, <F4 Time>, and <Access Time> in the same
way. As shown below, each time zone must be set not to overlap each other.
(Ex.) F1 Time=06:00~09:59, F2 Time=17:00~22:00
<F1 Time>
06:00~09:59
<F2 Time>
17:00~22:00
Subsequently, press [ENT] button, and the following screen will appear.
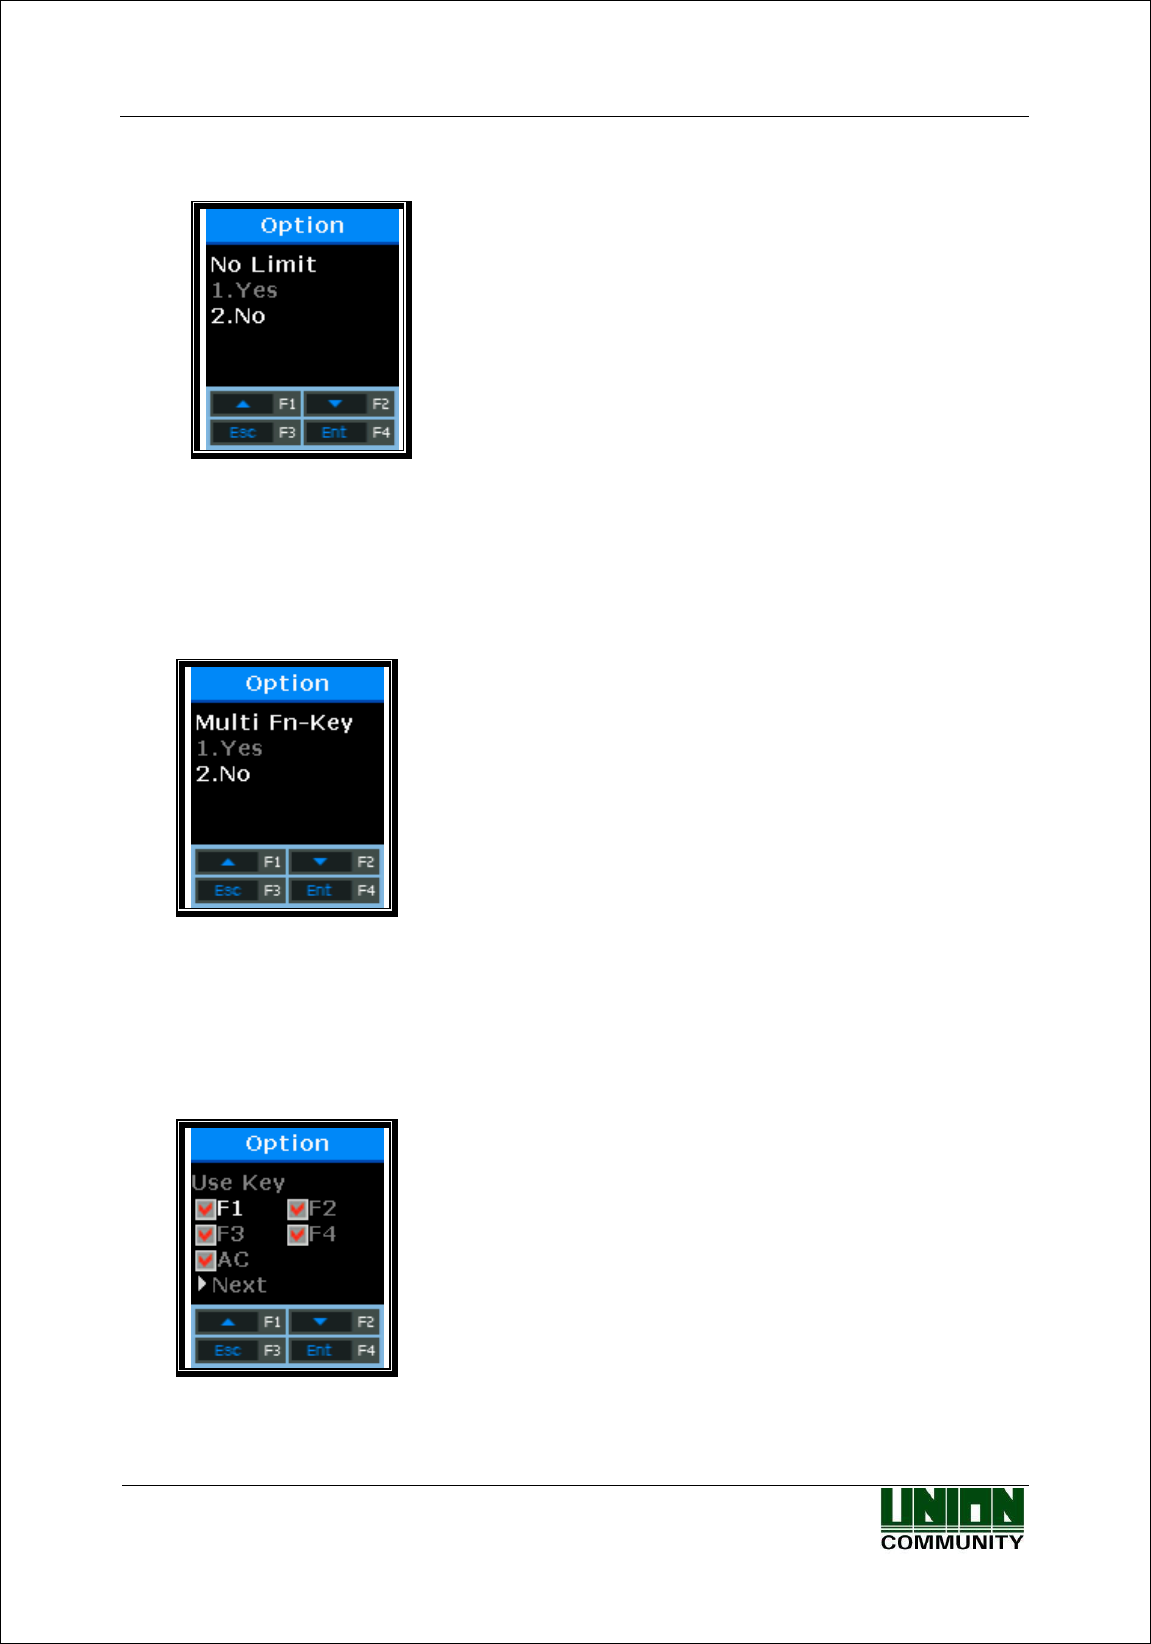
Default Setting: ‘2.No’
At least five authentication modes may be set if necessary. Whether to use function keys of
F5~F6 is determined using F1~F3 keys. When setting to ‘1.Yes’, press the F1(F2,F3) mode once
more under the F1(F2,F3) mode, and it will be changed into the F5(F6,F7) mode.
AC-2200 User Guide
41
Union Community / (138-050) 5th Fl., Hyundai Topics Building, 44-3, Bangi-dong, Songpa-
gu, Seoul, Korea // Tel : 82-2-6488-3000 , Fax : 82-2-6488-3099
E-mail: sales@unioncomm.co.kr; http://www.unioncomm.co.kr
Subsequently, press [ENT] button, and the following screen will appear.
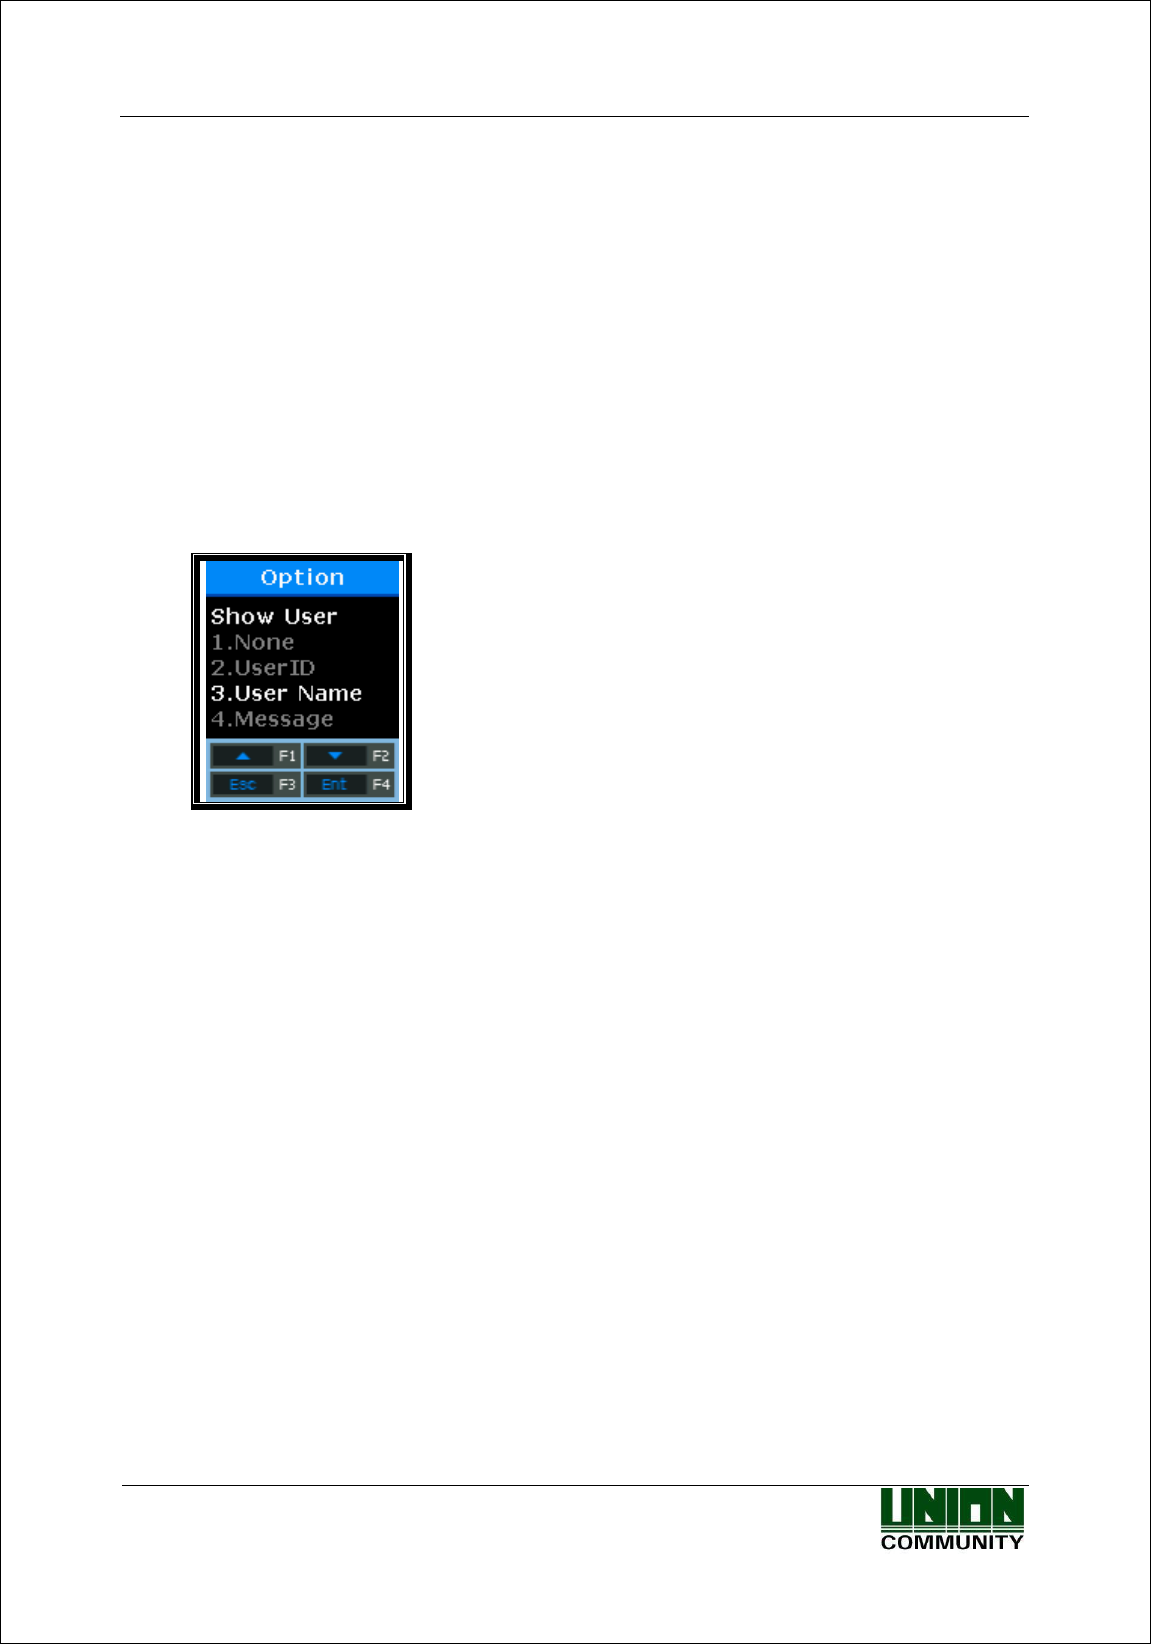
Default Setting: All ‘V’
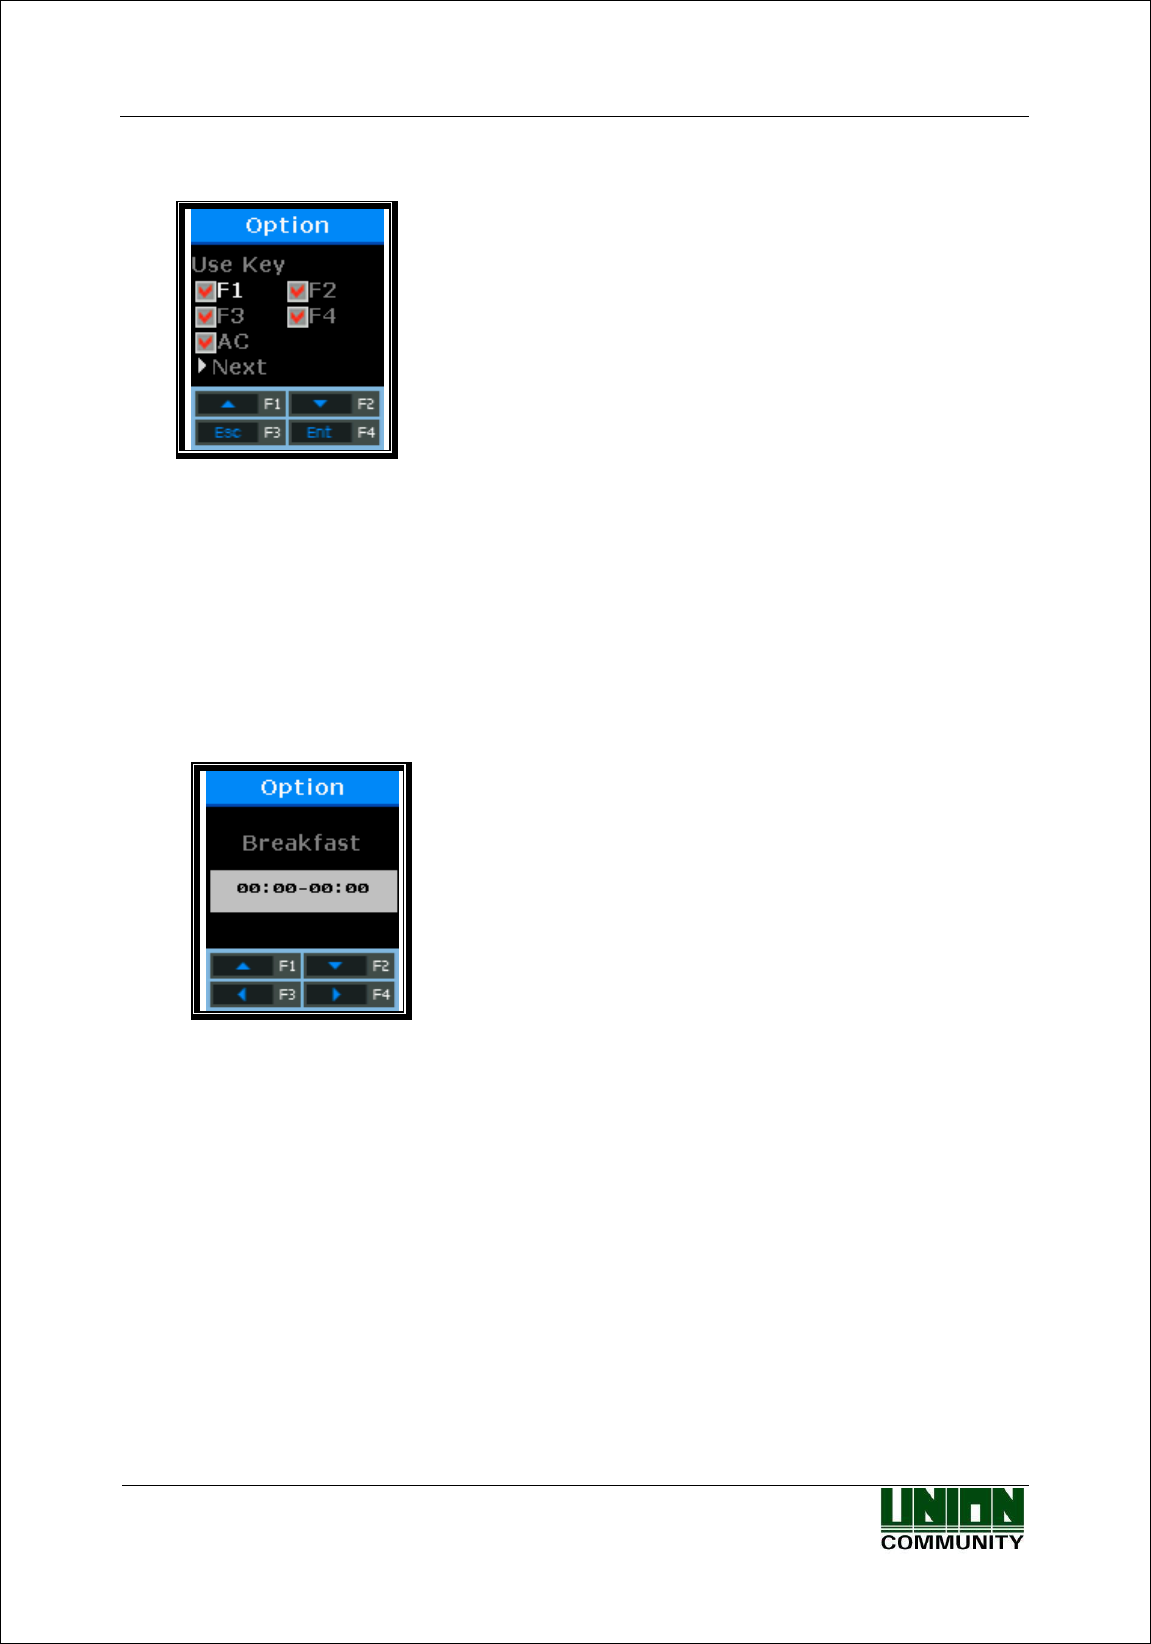
Set whether to use each function key. When setting to ‘V’, it means that the authentication mode
may be changed when pressing the function key. When setting to Blank, the authentication mode
is not changed in spite of pressing the key. When this mode is used only for Attend or Leave, it is
available by unchecking other function keys.
After selecting the set value, press [ENT] button, and all authentication settings will be finished
and the screen will move to the upper menu.
3.5.1.2. When setting to “[3.Cafeteria]”
If time setting is unnecessary, it is set to ‘00:00-00:00’.
This is to set the breakfast time. Breakfast is unconditionally authenticated within the set time
zone.
After setting the breakfast time, set <Lunch>, <Dinner>, <Supper>, and <Snack> in order in
the same way. The unused meal time is set to ‘00:00-00:00’.
Each time zone must be set not to overlap each other. When the time is not set to the food time
zone, the terminal displays “Locked!” message. As the terminal is locked, all inputs are
blocked except for access to the menu mode.
AC-2200 User Guide
42
Union Community / (138-050) 5th Fl., Hyundai Topics Building, 44-3, Bangi-dong, Songpa-
gu, Seoul, Korea // Tel : 82-2-6488-3000 , Fax : 82-2-6488-3099
E-mail: sales@unioncomm.co.kr; http://www.unioncomm.co.kr
When <Snack> is set, the menu to check whether to duplicate appears as shown below.
Default Setting: ‘2.No’
If the mode is set to ‘No’, authentication is once allowed within the same meal time zone.
When attempting authentication again, the “Duplicated!” message is displayed and the
authentication fails.
Subsequently, press [ENT] button, and the following screen will appear.
Default Setting: ‘2.No’
At least five authentication modes may be set if necessary. Whether to use function keys of
F5~F6 is determined using F1~F3 keys. When setting to ‘1.Yes’, press the F1(F2,F3) mode once
more under the F1(F2,F3) mode, and it will be changed into the F5(F6,F7) mode.
Subsequently, press [ENT] button, and the following screen will appear.
Default Setting: All ‘V’
AC-2200 User Guide
43
Union Community / (138-050) 5th Fl., Hyundai Topics Building, 44-3, Bangi-dong, Songpa-
gu, Seoul, Korea // Tel : 82-2-6488-3000 , Fax : 82-2-6488-3099
E-mail: sales@unioncomm.co.kr; http://www.unioncomm.co.kr
Set whether to use each function key. When setting to ‘V’, it means that the authentication mode
may be changed when pressing the function key. When setting to Blank, the authentication mode
is not changed in spite of pressing the key. When this mode is used only for Attend or Leave, it is
available by unchecking other function keys.
After selecting the set value, press [ENT] button, and all authentication settings will be finished
and the screen will move to the upper menu.
3.5.2. Authentication Method Setting
Select [F3~] → [3.Option] → [2. Verify] on the main screen, and the following screen will
appear.
3.5.2.1. Set whether to display ID upon successful authentication
Default Setting: ‘2.User Name’
- ‘1’: displays the authenticated user ID
- ‘2’: displays the user name on the LCD. If there is no user name, the user ID is displayed.
- ‘3’: displays the employee number entered upon user registration.
- ‘4’: displays the message entered upon user registration. In this case, however, the
message will be displayed to up to 8 characters.
(Caution)
* UserName and Message are set in the server. For output, the user information must be
downloaded.
* UserName and Message must be set to the same language as the terminal language.
(Example) OK!<0001>
Subsequently, press [ENT] button to move to the next setting.
AC-2200 User Guide
44
Union Community / (138-050) 5th Fl., Hyundai Topics Building, 44-3, Bangi-dong, Songpa-
gu, Seoul, Korea // Tel : 82-2-6488-3000 , Fax : 82-2-6488-3099
E-mail: sales@unioncomm.co.kr; http://www.unioncomm.co.kr
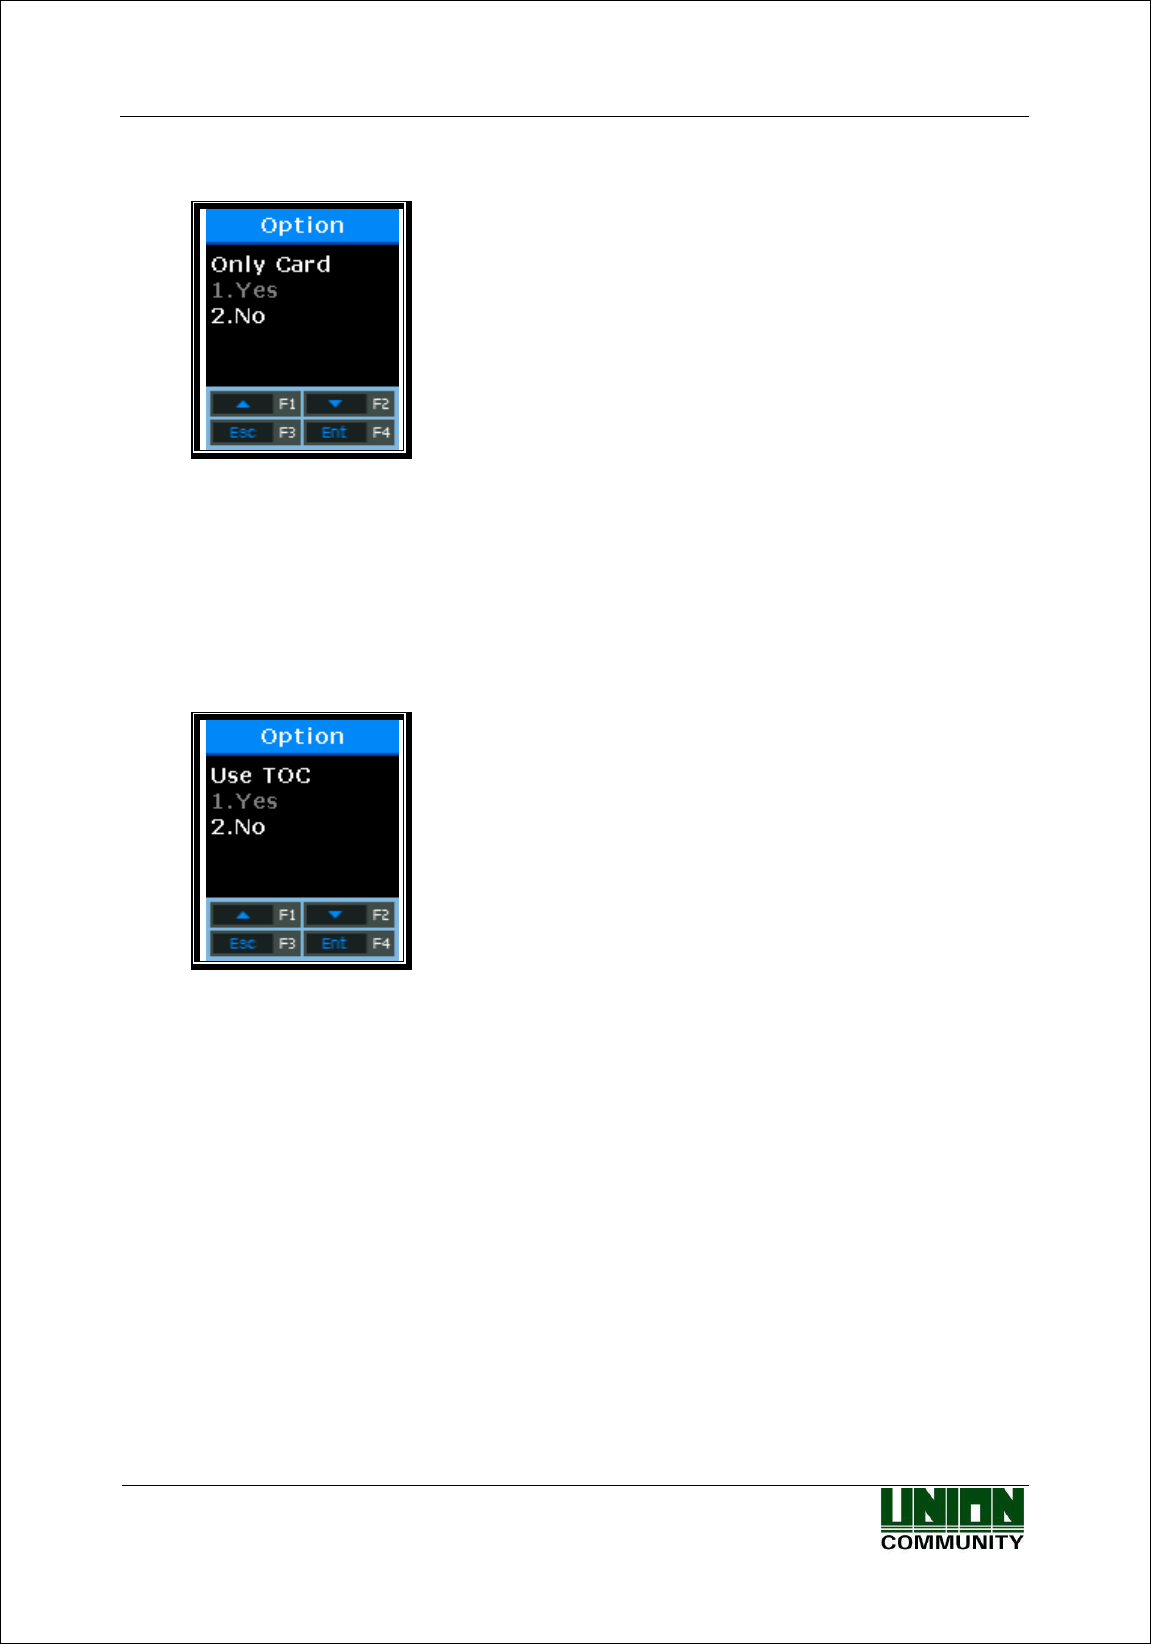
3.5.2.2. Set whether to permit authentication using card only
Default Setting: ‘2.No’
This option makes it possible to authenticate using card only without fingerprint. Even if the
user is registered in FP and Card, he/she can be authenticated using card only in the terminal
that this option is set to ‘1’.
After selecting the set value, press [ENT] button, and the screen will go to the upper menu.
3.5.2.3. To authenticate only using the information saved in the Smart Card
Default Setting: ‘2.No’
This option makes it possible to authenticate only using the user information and fingerprint
recorded in the card without downloading users in the terminal. To operate this option, the
terminal must be equipped with the SC card reader and it must be set to use the FP card.
After selecting the set value, press [ENT] button, and the screen will go to the upper menu.
AC-2200 User Guide
45
Union Community / (138-050) 5th Fl., Hyundai Topics Building, 44-3, Bangi-dong, Songpa-
gu, Seoul, Korea // Tel : 82-2-6488-3000 , Fax : 82-2-6488-3099
E-mail: sales@unioncomm.co.kr; http://www.unioncomm.co.kr
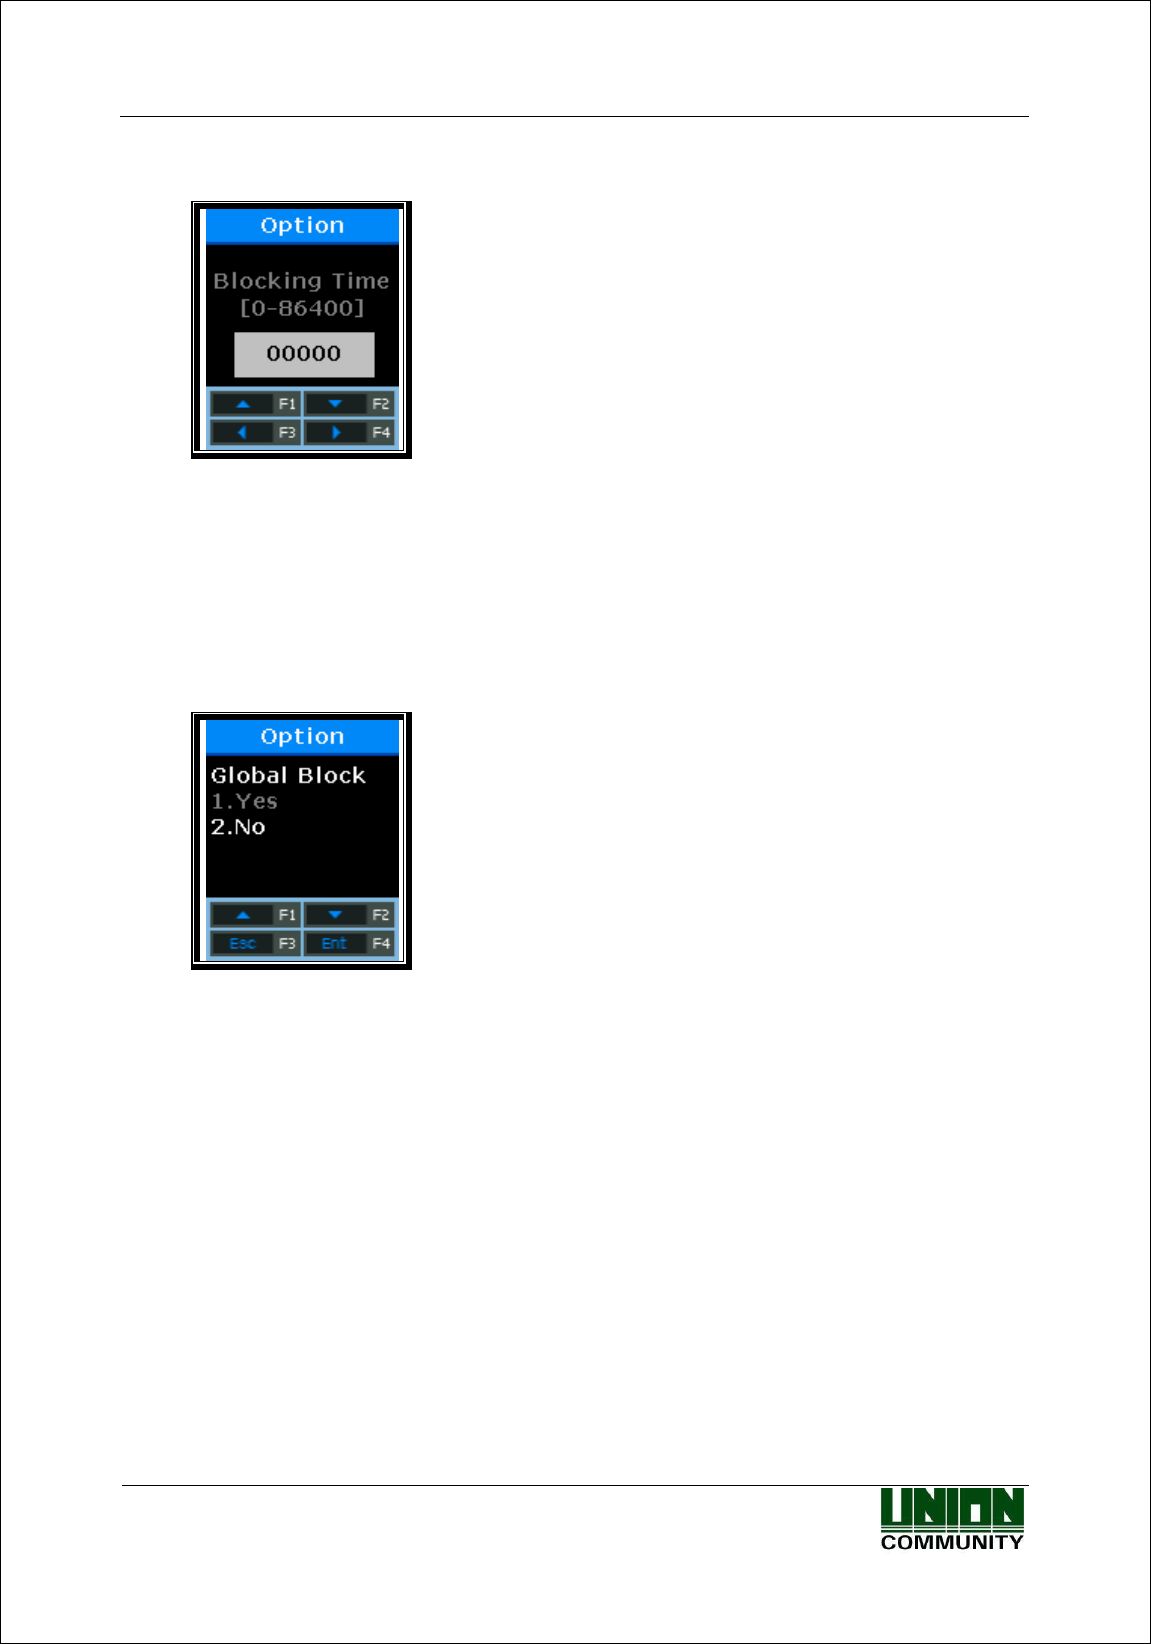
3.5.2.4. Blocking Time Setting
Default Setting: 00000 (Unit: Second)
This option is to prohibit the user from re-authenticating within the set time. There is no limit
when the mode is set to '0'. However, if it is set to the greater value than ‘0’, re-authentication
cannot be permitted until the time lapses more than the set time after successful authentication.
After selecting the set value, press [ENT] button, and the screen will go to the upper menu.
3.5.2.5. Global Block Setting
Default Setting: ‘2.No’
This option is to prohibit the user from authenticating within the short time. After successful
authentication, the terminal function is blocked during the blocking time set previously.
After selecting the set value, press [ENT] button, and the screen will go to the upper menu.
AC-2200 User Guide
46
Union Community / (138-050) 5th Fl., Hyundai Topics Building, 44-3, Bangi-dong, Songpa-
gu, Seoul, Korea // Tel : 82-2-6488-3000 , Fax : 82-2-6488-3099
E-mail: sales@unioncomm.co.kr; http://www.unioncomm.co.kr
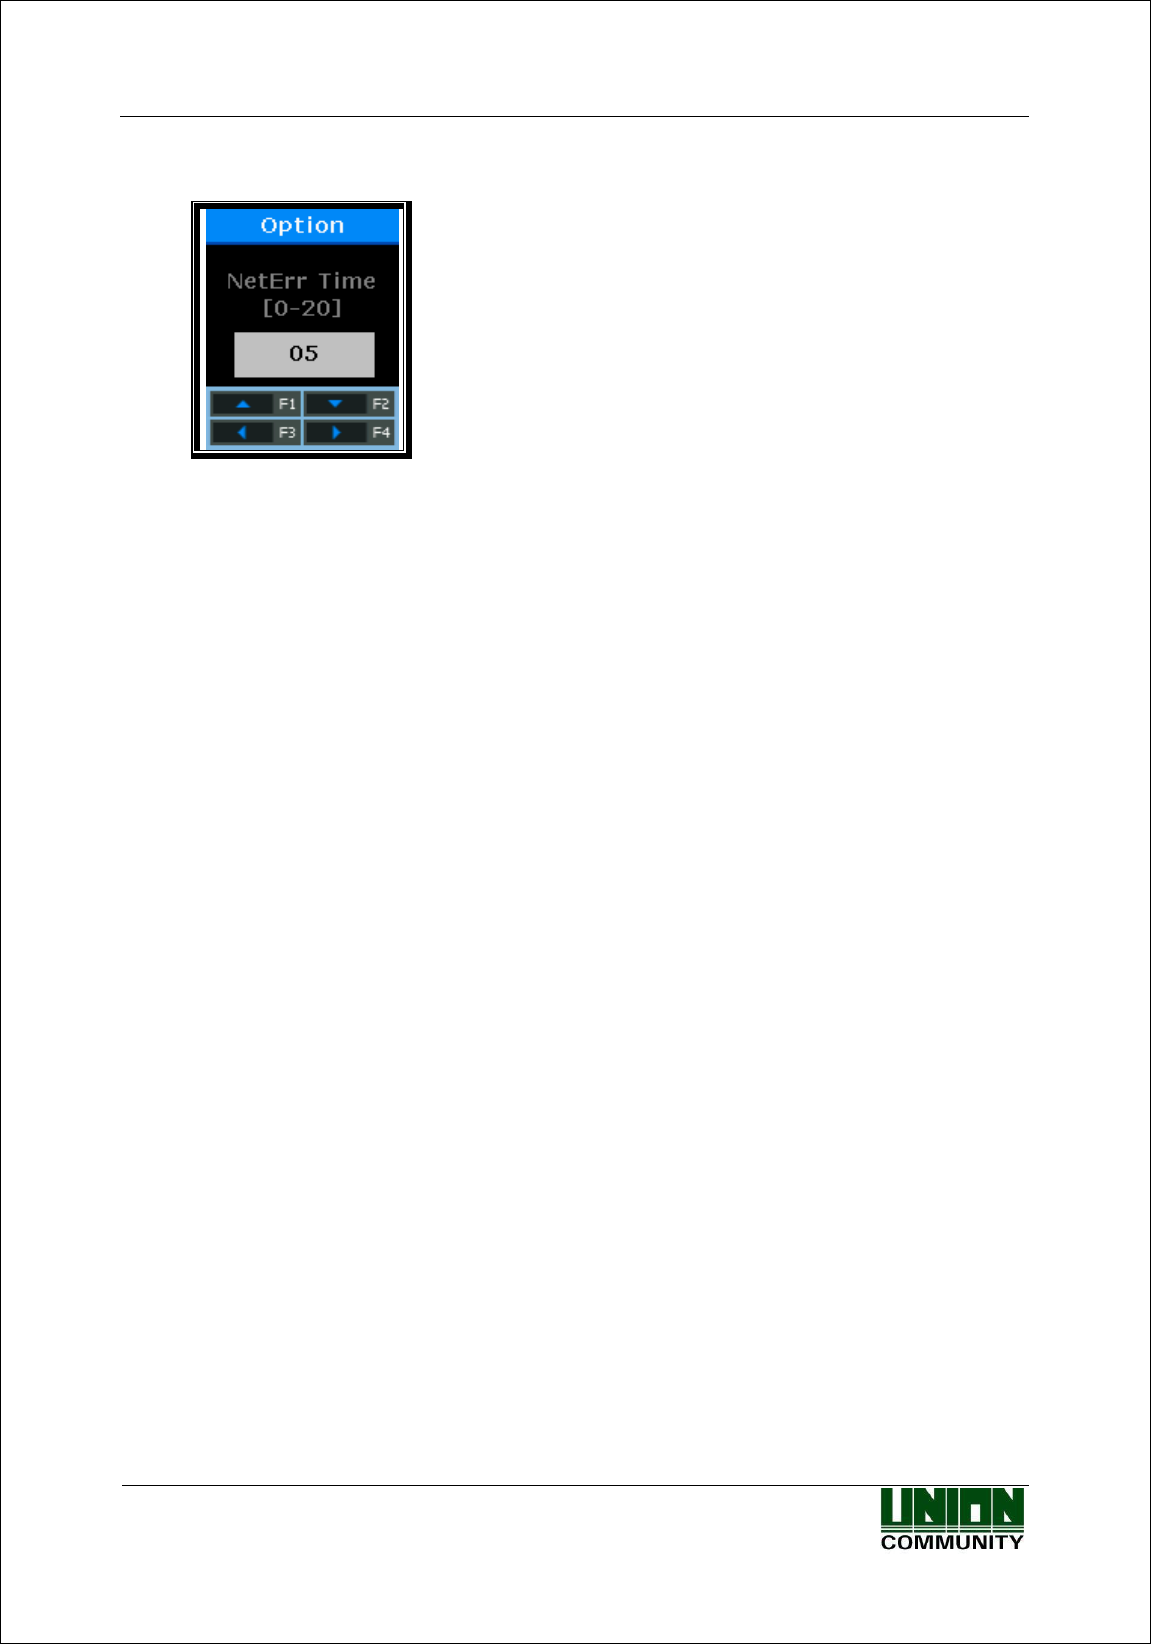
3.5.2.6. NetErr TimeOut – Network Error Time Setting (Second)
Default Setting: ‘05’
In the server authentication mode, if the network error time is set, the time to wait for
authentication can be set.
For example, if the error time is set to 5 seconds, when the user does not receive any response
from the server for 5 seconds after authentication request, an error message comes out.
(However, the user is processed as authentication failure.)
After selecting the set value, press [ENT] button, and all authentication settings will be
finished and the screen will move to the upper menu.
AC-2200 User Guide
47
Union Community / (138-050) 5th Fl., Hyundai Topics Building, 44-3, Bangi-dong, Songpa-
gu, Seoul, Korea // Tel : 82-2-6488-3000 , Fax : 82-2-6488-3099
E-mail: sales@unioncomm.co.kr; http://www.unioncomm.co.kr
3.5.3. Door Setting
Select [F3~] → [3.Option] → [3.Doorlock] on the main screen, and the following screen will
appear.
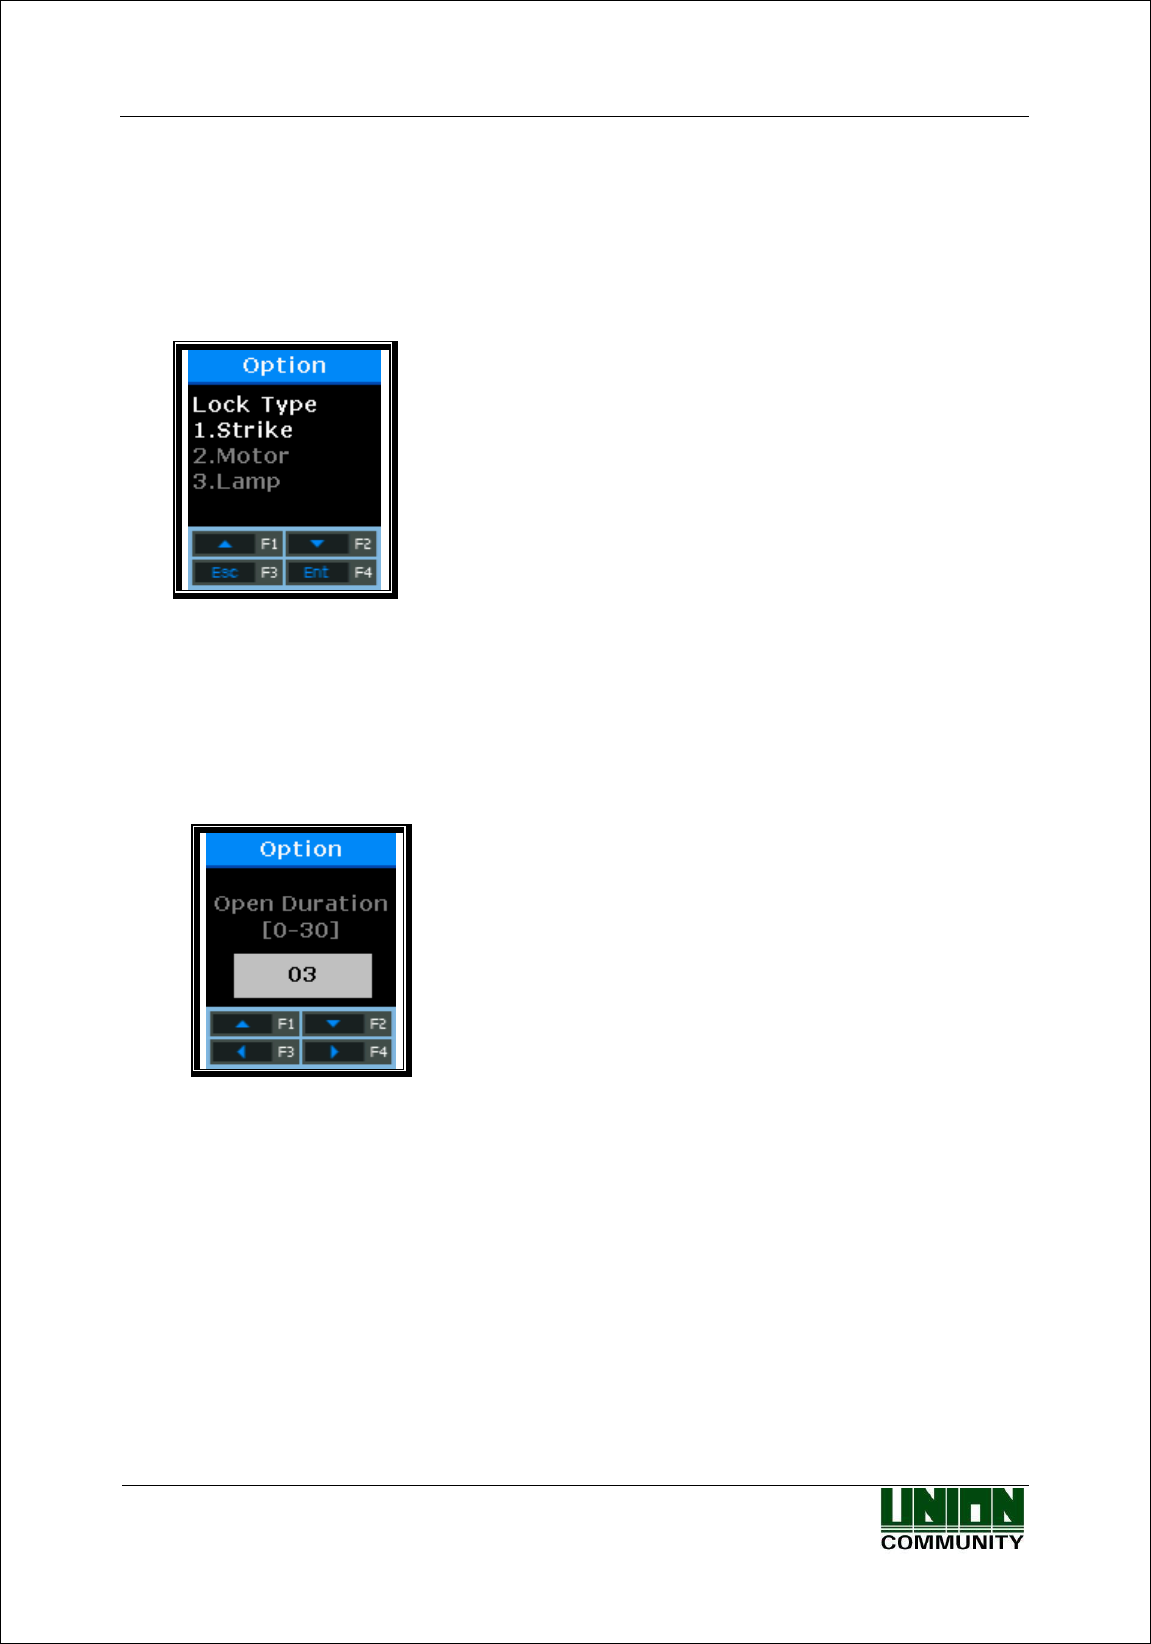
3.5.3.1. Lock Type Setting
Set to ‘1’ when the terminal is connected to the strike type
or automatic door, and ‘2’ when it is connected to the
motor lock.
Default Setting: ‘1.Strike’
Set to ‘1’ even if the door lock is not connected.
Set to ‘3’ if the lamp for displaying authentication success/failure is installed the lock port.
Press [ENT] button to move to the next setting.
3.5.3.2. Door Open Time Setting
Default Setting: ‘03’(Unit: Second)
This option is to specify the time when after authentication through the terminal, the door is
opened and then closed. Strike type means the time when if opening the door after
authentication, the door is automatically locked again. In the case of Dead Bolt type and Auto
Door, the door will work regardless of the value.
If the mode is set to ‘00’, it is impossible to control the door. '00' must be set only when the
door is not connected to Lock.
After selecting the set value, press [F4] button to move to the next setting.
AC-2200 User Guide
48
Union Community / (138-050) 5th Fl., Hyundai Topics Building, 44-3, Bangi-dong, Songpa-
gu, Seoul, Korea // Tel : 82-2-6488-3000 , Fax : 82-2-6488-3099
E-mail: sales@unioncomm.co.kr; http://www.unioncomm.co.kr
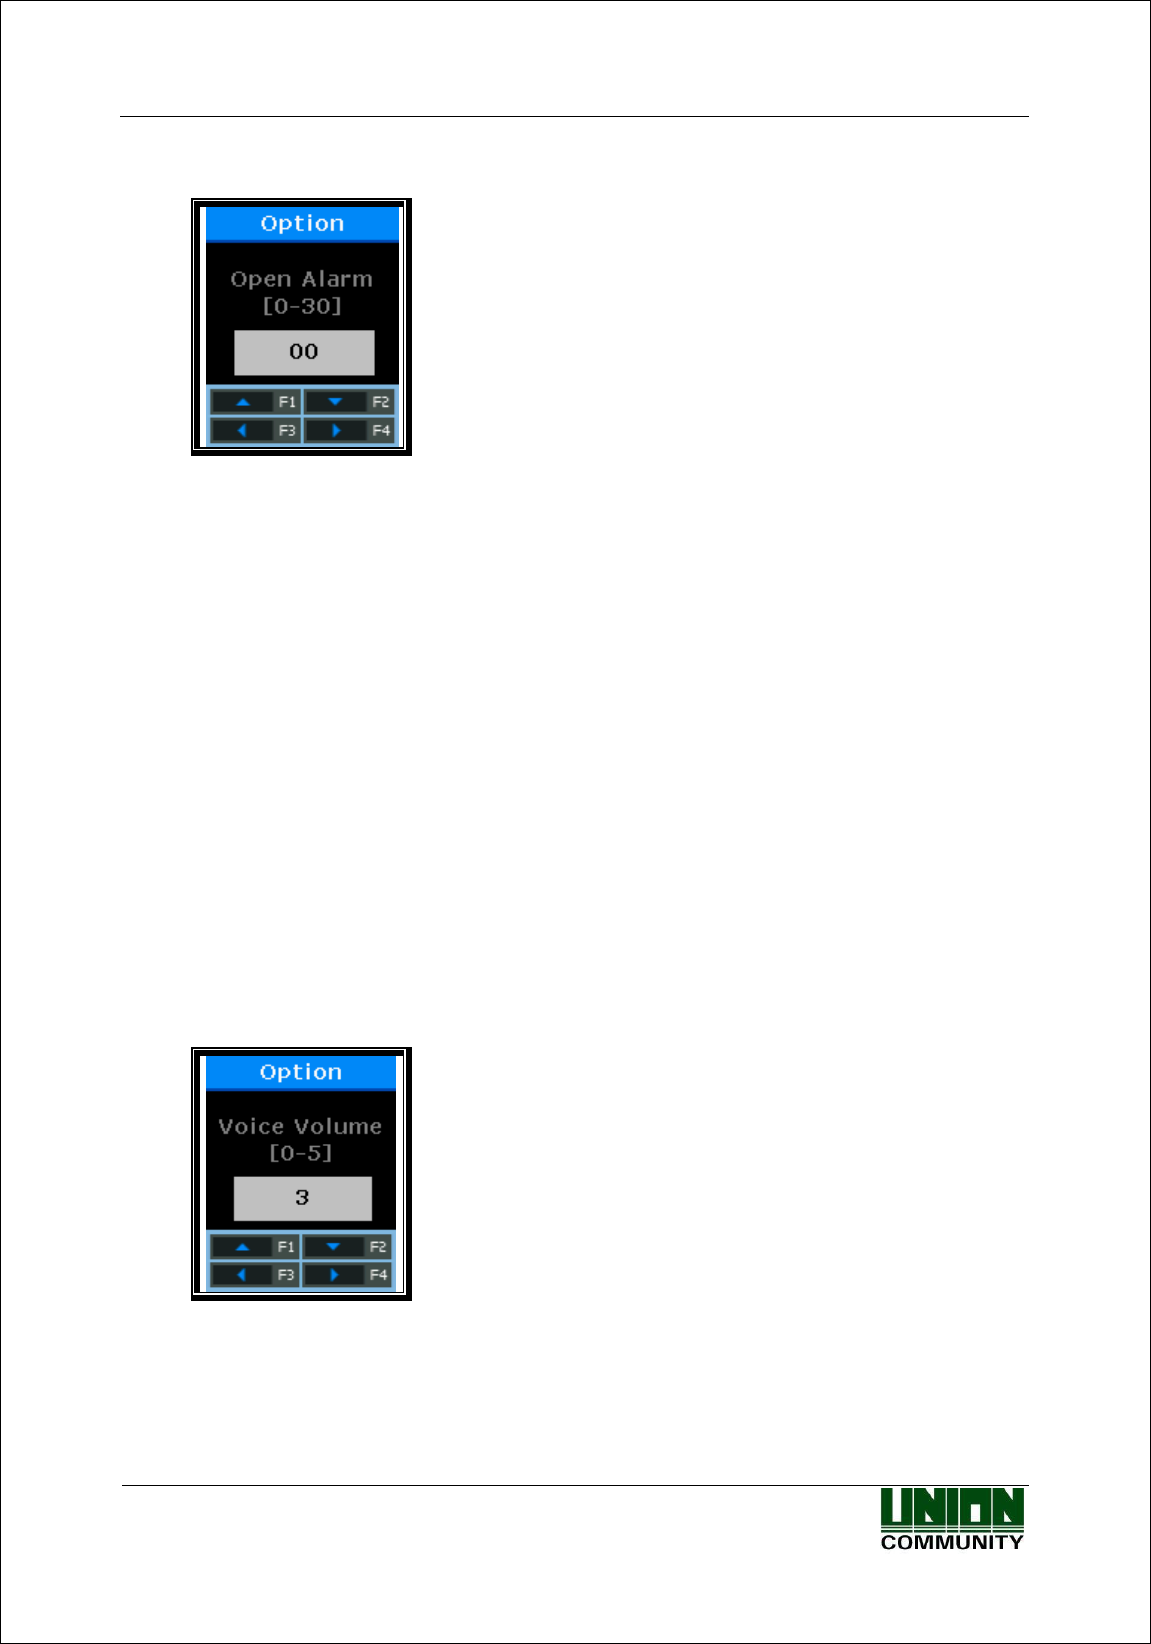
3.5.3.3. Door Open Alarm Setting
Default Setting: ‘00’
This option allows the terminal to check the time when the door is open. If the door is open
over the set time (minimum 5 seconds to maximum 30 seconds), an alarm occurs. When the
time is set to ‘00’, no alarm occurs. Even if the time is set to 01~04, an alarm starts to sound
after the lapse of at least 5 seconds.
The door must be closed within the set time. But, it may not be closed due to unforeseen
circumstances. The alarm allows users to check the cause that the door is unclosed and take
any action so that the door can be closed normally.
To use this function, the lock must have the function to monitor whether the door is open or
close. The monitoring pin of the lock must be also connected to the terminal. To check
whether the door is open or close, the mode must be set to ‘2’ or ‘3’.
After selecting the set value, press [F4] button long, and the screen will finish all the setting
of the door and move to the upper menu.
3.5.4. Volume Setting
Select [F3~] → [3.Option] → [4.Sound] on the main screen, and the following screen will appear.
3.5.4.1. Voice Volume Setting
Default Setting: ‘3’
This option is to set the volume during voice guidance. If the volume is set to ‘0’, the voice
message does not come out.
Press [ENT] button to move to the next setting.
AC-2200 User Guide
49
Union Community / (138-050) 5th Fl., Hyundai Topics Building, 44-3, Bangi-dong, Songpa-
gu, Seoul, Korea // Tel : 82-2-6488-3000 , Fax : 82-2-6488-3099
E-mail: sales@unioncomm.co.kr; http://www.unioncomm.co.kr
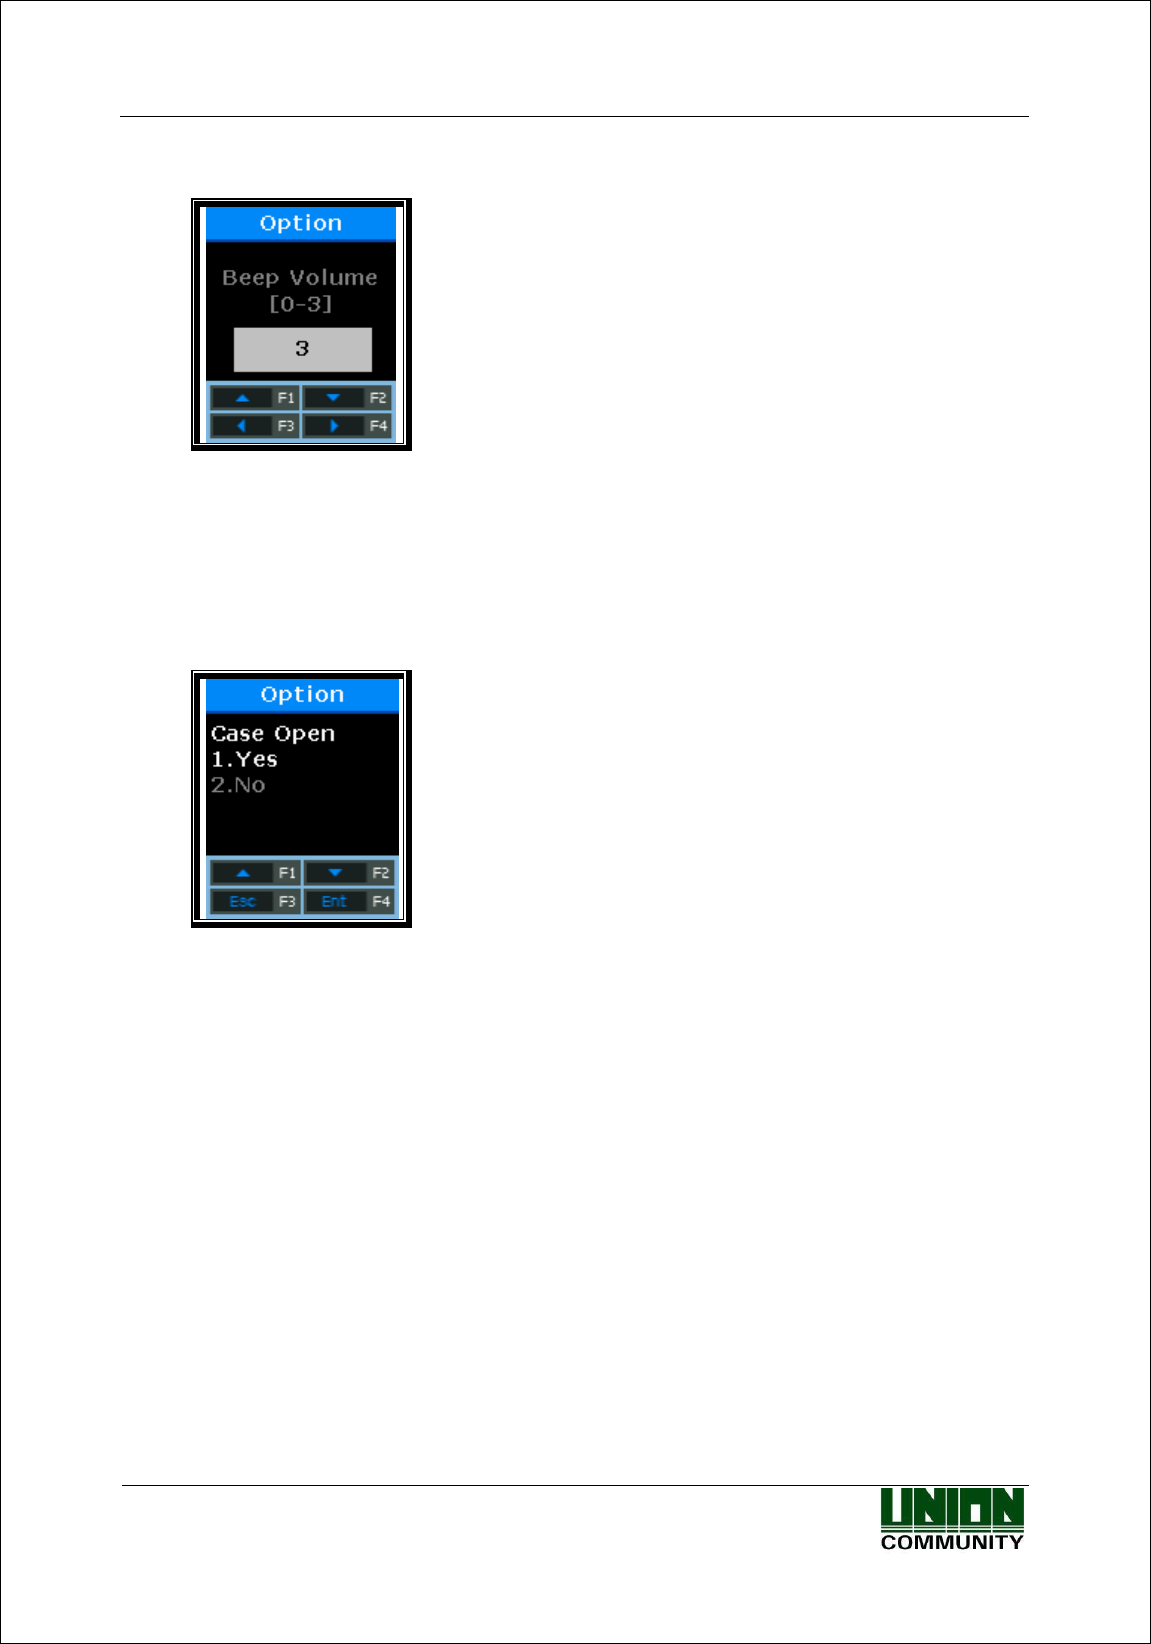
3.5.4.2. Buzzer Volume Setting
Default Setting: ‘3’
This option is to set the terminal buzzer volume. The buzzer occurs silent for ‘0’, small
volume for ‘1’, and large volume for ‘3’.
Press [ENT] button to move to the next setting.
3.5.4.3. Case Open Alarm Setting
Default Setting: ‘1.Yes’
This option is to set whether an alarm occurs when the terminal case is open. The alarm
occurs for ‘1’ and it does not occur not for ‘2’.
After selecting the set value, press [ENT] button, and the screen will go to the upper menu.
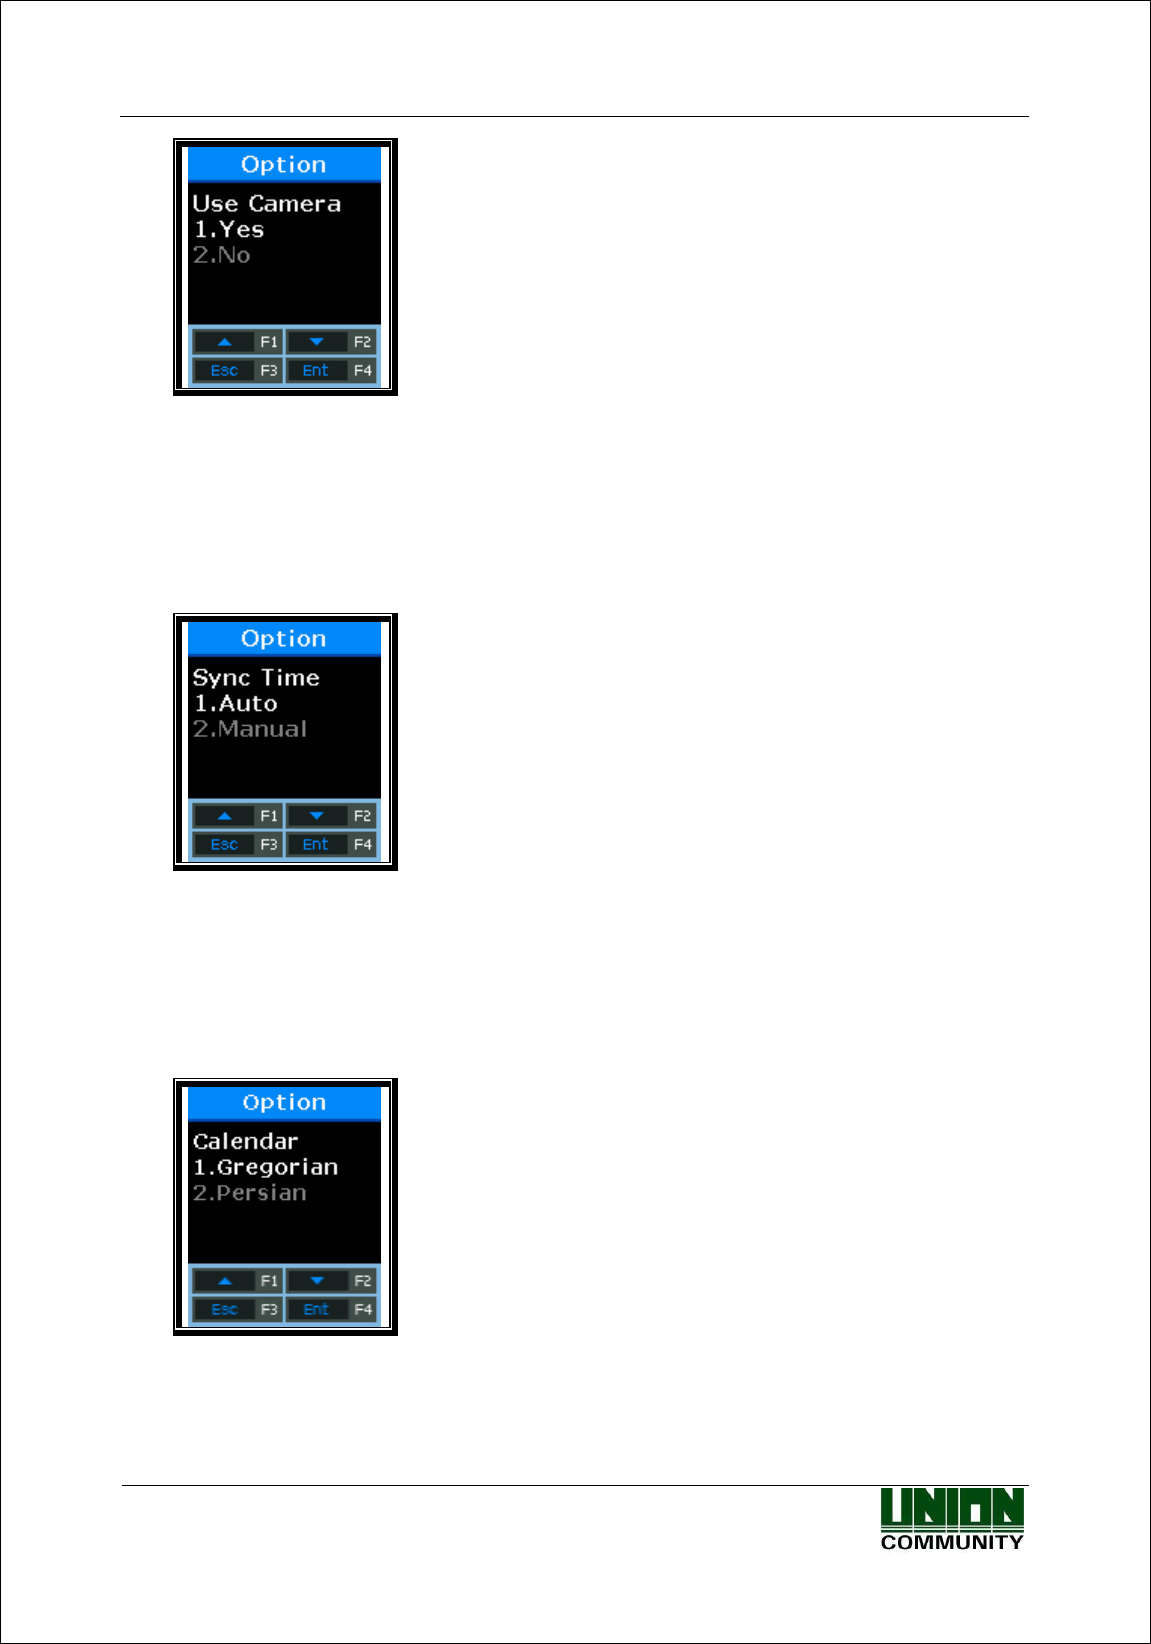
3.5.5. Camera Setting
Select [F3~] → [3.Option] → [5.Camera] on the main screen, and the following screen will
appear.
3.5.1.1. Set whether to use camera
AC-2200 User Guide
50
Union Community / (138-050) 5th Fl., Hyundai Topics Building, 44-3, Bangi-dong, Songpa-
gu, Seoul, Korea // Tel : 82-2-6488-3000 , Fax : 82-2-6488-3099
E-mail: sales@unioncomm.co.kr; http://www.unioncomm.co.kr
This menu is to set whether to use the camera.
Default Setting: ‘1.Yes’
After selecting the set value, press [ENT] button, and the screen will go to the upper menu.
3.5.6. Current Time Setting
Select [F3~]→[3.User]→[6.Time] on the main screen, and the following screen will appear.
3.5.6.1. Time Synchronization Setting
Default Setting: ‘1.Auto’
This option is to set how to synchronize the current time of the terminal with the server time. Set
to ‘1.Auto’ to automatically synchronize with server time, and set to ‘2.Manual’ to manually
synchronize with server time.
Press [ENT] button to move to the next setting.
3.5.6.2. Calendar Setting
Default Setting: ‘1.Gregorian’
This option is to set how to display the current date in the terminal. The date is generally set to
‘1. Gregorian’, but ‘2.Persian’ when using the Persian calendar specially.
Press [ENT] button to move to the next setting.
AC-2200 User Guide
51
Union Community / (138-050) 5th Fl., Hyundai Topics Building, 44-3, Bangi-dong, Songpa-
gu, Seoul, Korea // Tel : 82-2-6488-3000 , Fax : 82-2-6488-3099
E-mail: sales@unioncomm.co.kr; http://www.unioncomm.co.kr
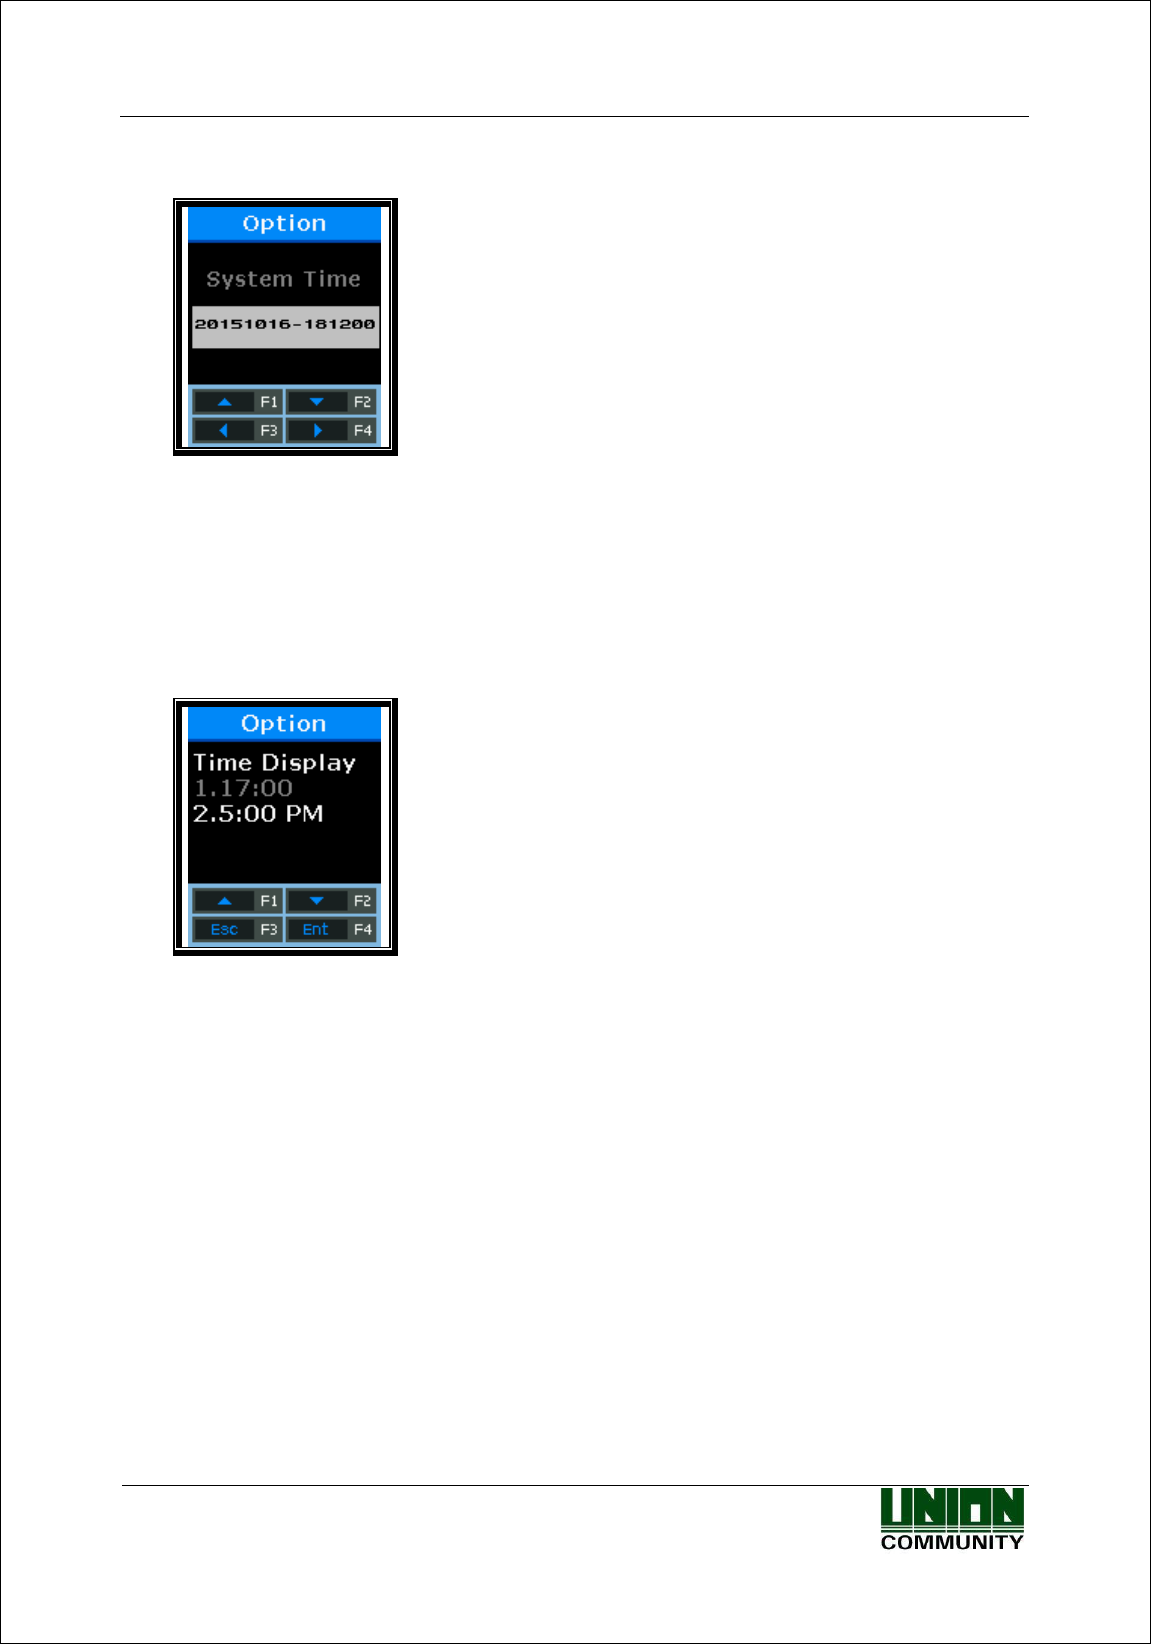
3.5.6.3. Current Time Setting
The current time of the terminal is displayed in the order of "2009:Year, 08:Month, 01:Day,
21:Hour, 18:Min, 06:Sec". To modify, move to the desired position using [←][→] buttons, and
modify the existing values using [↑][↓] buttons.
Press [ENT] button to move to the next setting.
3.5.6.4. Time Display Setting
Default Setting: ‘2.05:00 PM’
This option is how to display the current time of the terminal. When setting to ‘1’, the time is
displayed to the 24-hour time. When setting to ‘2’, the time is displayed by separating with
AM/PM.
After selecting the set value, press [ENT] button, and the screen will go to the upper menu.
3.5.7. RS485 Set
Select [F3~] → [3.Option] → [7.RS485 Set] → [ENT] on the main screen, and the following
screen will appear.
AC-2200 User Guide
52
Union Community / (138-050) 5th Fl., Hyundai Topics Building, 44-3, Bangi-dong, Songpa-
gu, Seoul, Korea // Tel : 82-2-6488-3000 , Fax : 82-2-6488-3099
E-mail: sales@unioncomm.co.kr; http://www.unioncomm.co.kr
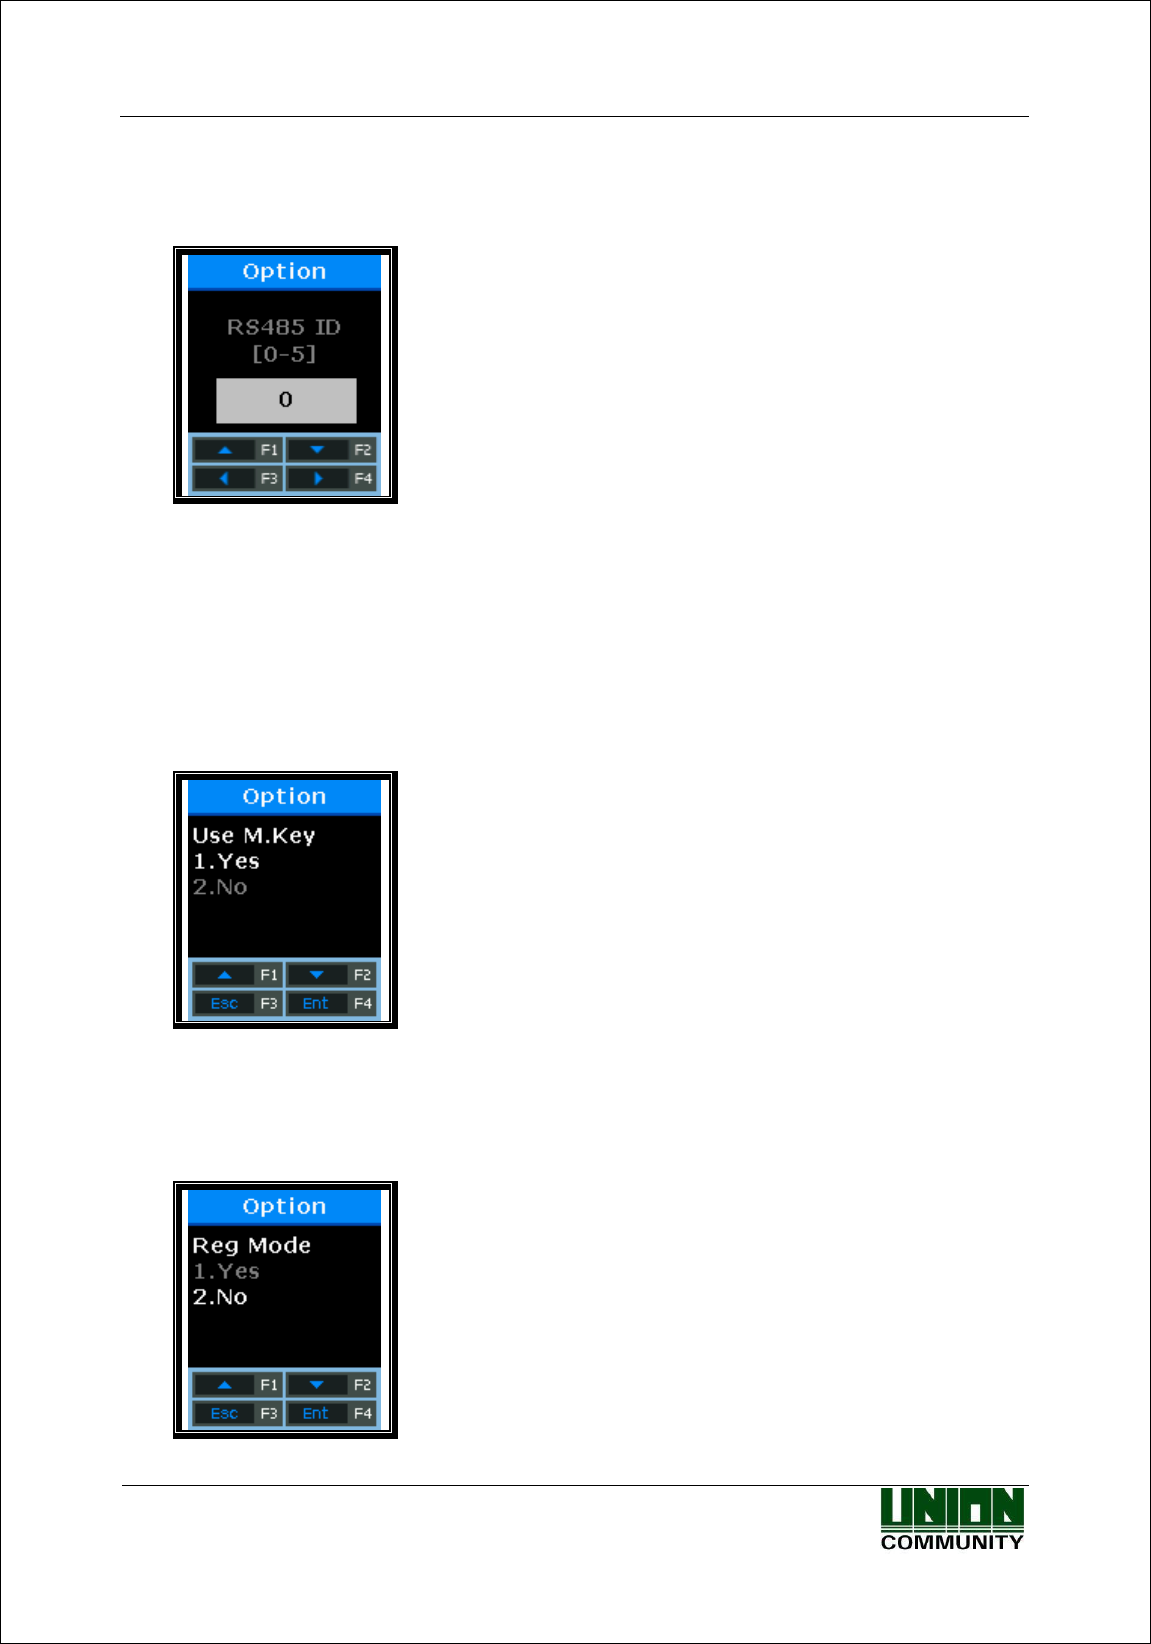
3.5.7.1. RS485 Set
This option is to set RS485 ID so that the terminal can interlocks with RS485 equipment.
Press [↑][↓] buttons to select the ID value, and press
[ENT] button.
Default Setting: ‘0’
After selecting the set value, press [ENT] button, and the screen will go to the upper menu.
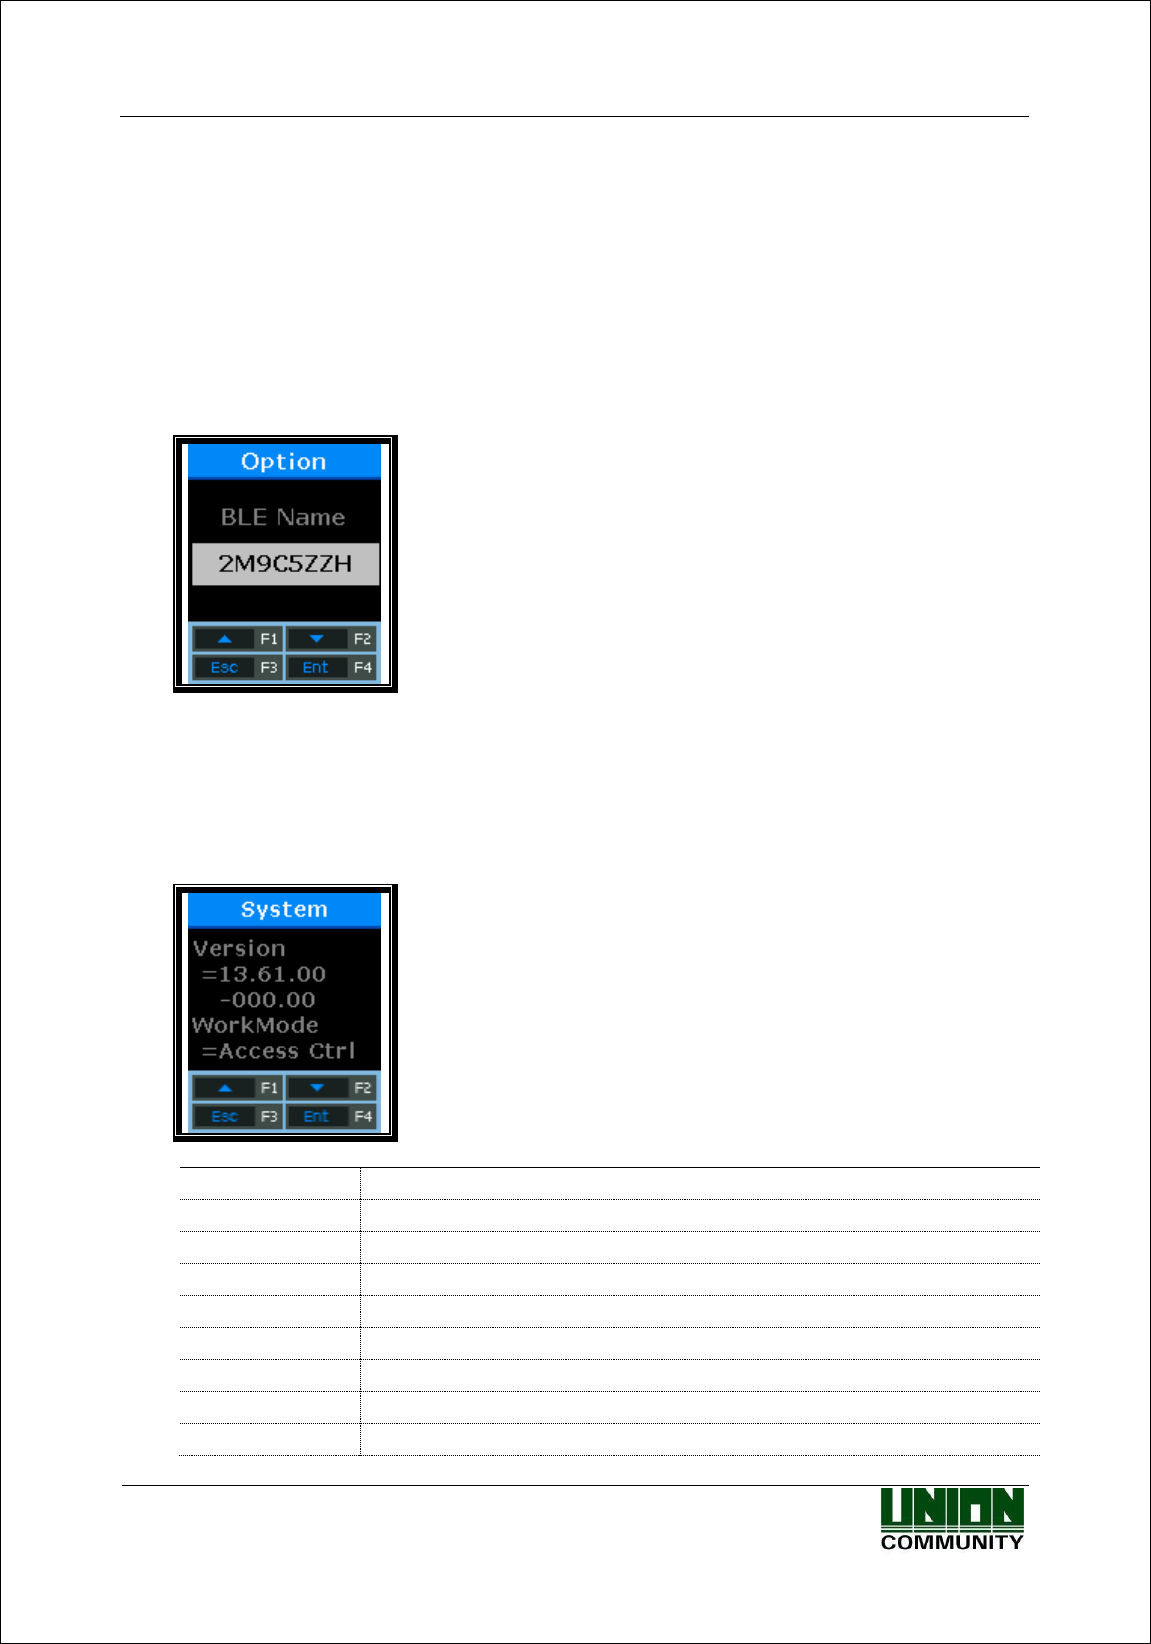
3.5.8. Mobile Key Setting
Select [F3~]→[3.Option] → [8.M.Key Set] on the main screen, and the following screen will
appear.
3.5.8.1. Set whether to use mobile key
Set whether to use the mobile key of the terminal.
Default Setting: ‘1.Yes’
Press [ENT] button to move to the next setting.
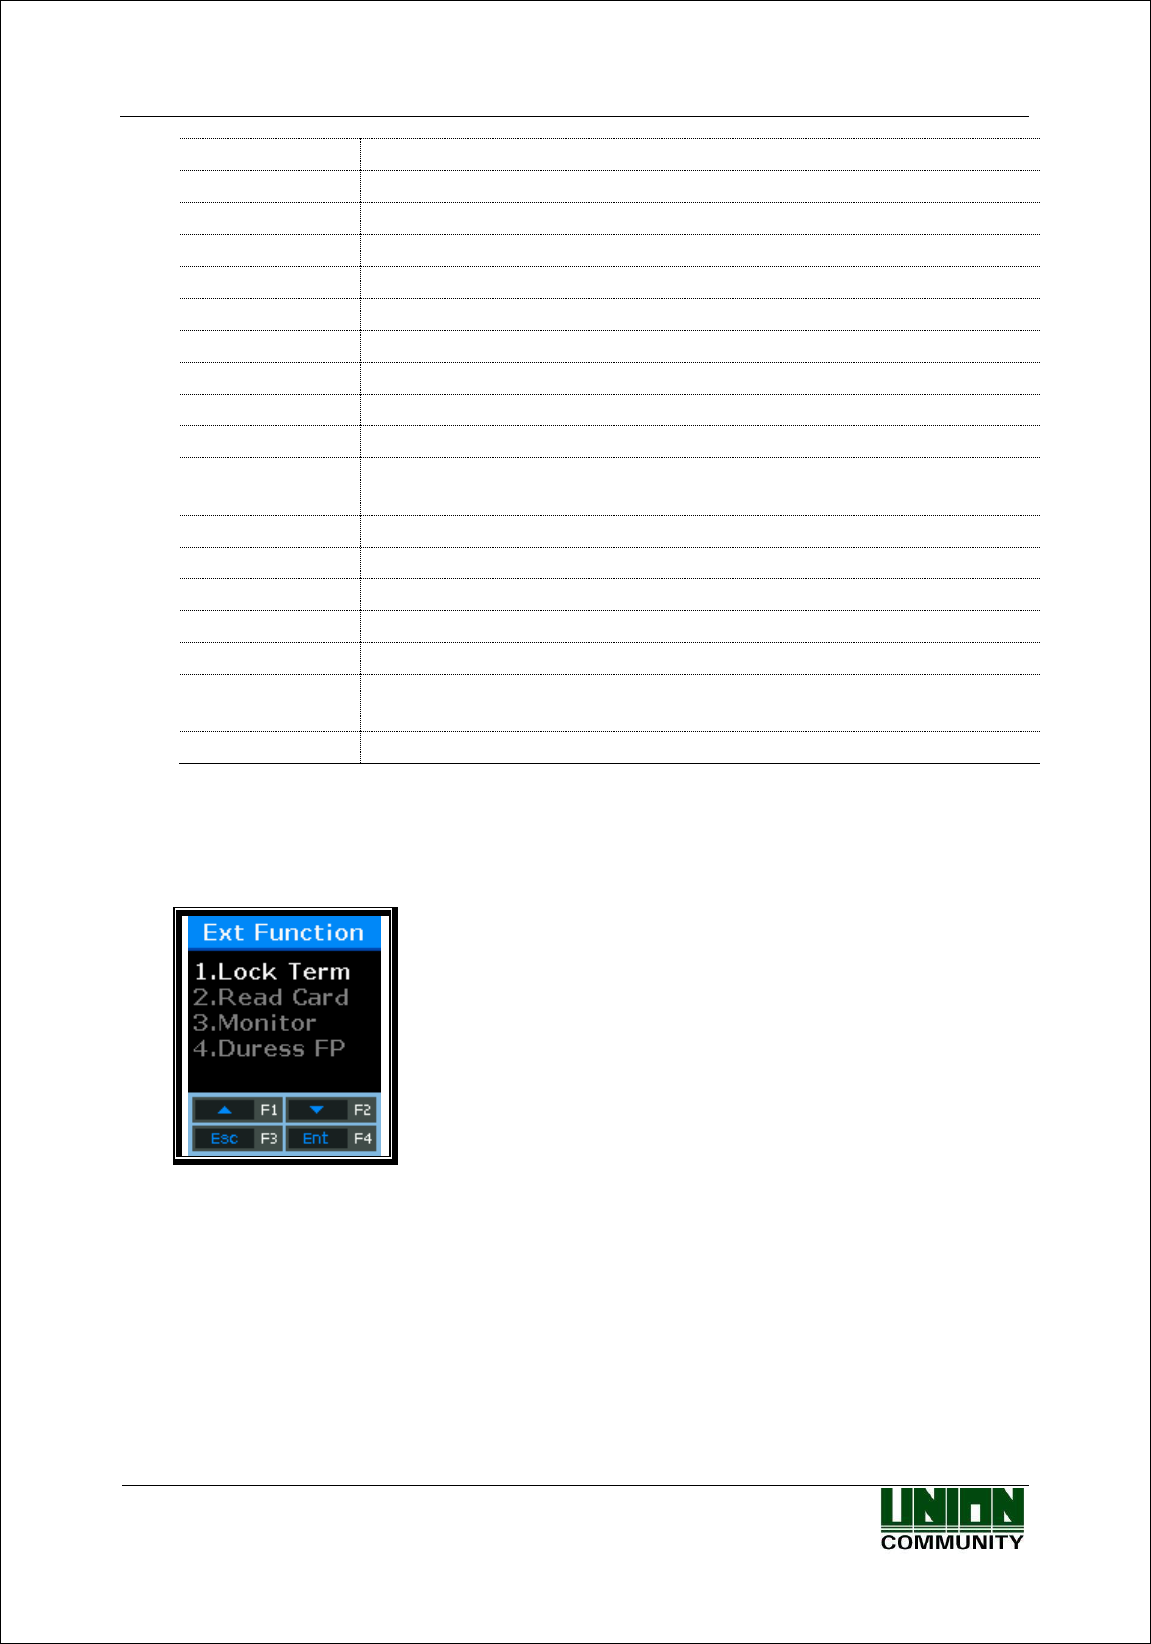
3.5.8.2. Administrator App Registration Setting
Set whether the administrator app is registered to the
terminal.
Default Setting: ‘2.No’
AC-2200 User Guide
53
Union Community / (138-050) 5th Fl., Hyundai Topics Building, 44-3, Bangi-dong, Songpa-
gu, Seoul, Korea // Tel : 82-2-6488-3000 , Fax : 82-2-6488-3099
E-mail: sales@unioncomm.co.kr; http://www.unioncomm.co.kr
When selecting ‘1.Yes’, the screen for interlocking with the administrator app via Bluetooth is
displayed.
After interlocking with the administrator app (UNIS-B Plus), the setting and authentication
mode via the terminal cannot be used. the setting mode is available in administrator app (UNIS-
B Plus).
The detail setting complies with the administrator app (UNIS-B Plus) manual.
Press [ENT] button to move to the next setting.
3.5.8.3. Bluetooth Name Setting
When selecting ‘2.No’ in the registration mode of 3.5.8.2,
the BLE name set currently is displayed.
Press [ENT] or [ESC] button to move to the upper menu.
3.6. Terminal Information Inquiry
Select [3.Information] on the main menu, and the following screen will appear.
All the environmental settings of the terminal can be
checked in order.
Press [↑][↓] buttons and scroll them up and down, and
you can in order check the settings in the following
table.
Version
Terminal firmware version
WorkMode
Terminal operating modes (T&A + security/T&A/food service)
Language
Language setting
Auth Mode
Authentication priority
1:1 Level
Authentication level applied when 1:1 authentication
1:n Level
Authentication level applied when 1:n authentication
BLE Name
BLE module name
BLE Ver
BLE module firmware version
Terminal Id
Terminal ID
AC-2200 User Guide
54
Union Community / (138-050) 5th Fl., Hyundai Topics Building, 44-3, Bangi-dong, Songpa-
gu, Seoul, Korea // Tel : 82-2-6488-3000 , Fax : 82-2-6488-3099
E-mail: sales@unioncomm.co.kr; http://www.unioncomm.co.kr
Net Type
Network connection methods (Static IP/DHCP)
Terminal IP
Terminal IP address
Gateway
Terminal gateway address
Subnet Mask
Terminal subnet mask address
Server Type
Network server connection mode setting
Server IP
IP address of the network server connected to the terminal
Server Port
Port number of the network server program
MAC Addr
Terminal MAC address
Card Ver
Card reader module firmware version
Card Format
Card data display format
All User
The total number of users registered in the terminal, including
administrators
All Admin
The number of administrators registered in the terminal
Max User
The maximum number of users who can be registered in the terminal
All FP
The total number of fingerprints saved in the terminal
Max FP
The maximum number of fingerprints that can be registered in the terminal
All Log
The number of the authentication results saved in the terminal
Max Log
The maximum number of the authentication results that can be saved in the
terminal
Serial Num
Terminal serial number
3.7. Additional Function
Select [5.Ext Function] on the main menu, and the following screen will appear.
Press [↑][↓] buttons to select the menu you want to
change, and press [ENT] button.
3.7.1. Terminal Lock Setting
Select [F3~]→[5.Ext Function]→[1.Lock Term] on the main screen, and the following screen
will appear.
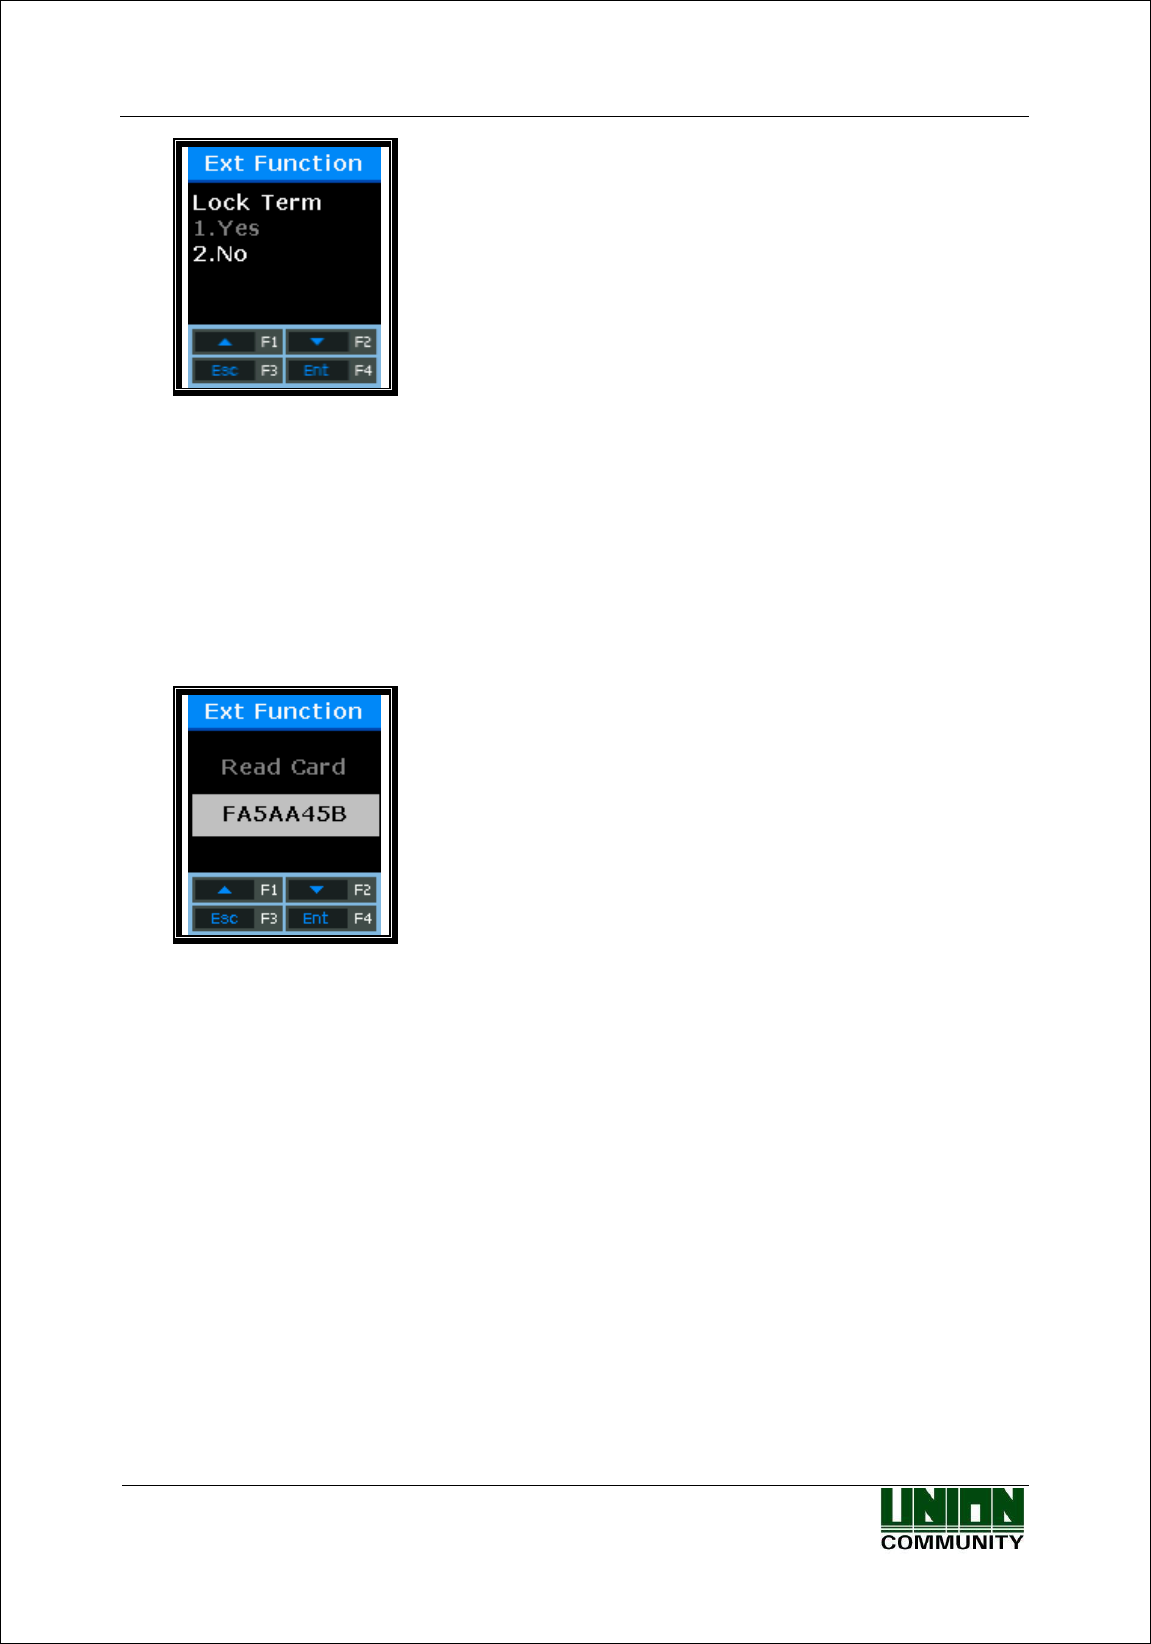
AC-2200 User Guide
55
Union Community / (138-050) 5th Fl., Hyundai Topics Building, 44-3, Bangi-dong, Songpa-
gu, Seoul, Korea // Tel : 82-2-6488-3000 , Fax : 82-2-6488-3099
E-mail: sales@unioncomm.co.kr; http://www.unioncomm.co.kr
Default Setting: ‘2’ (Unlock Terminal)
This function allows the administrator to directly lock or unlock the terminal without the server
program. If it is set to ‘1’, nobody can access the office until the administrator releases the set.
After selecting the set value, press [ENT] button, and the screen will go to the upper menu.
3.7.2. Card Number Inquiry
Select [F3~]→[5.Ext Function]→[2.Read Card] on the main screen, and the following screen will
appear.
This is an additional function regardless of the terminal environment setting. In the case of the
terminal that the card reader is added, the card number can be checked for card registration via
the server. Place the card on this screen, and the card number will be displayed on the LCD.
To exit the card read, press [ESC] button to move to the upper menu.
3.7.3. Monitor Input Port Setting
This option acts to connect the sensor to the terminal input port, and send a notice message to the
server when the status is changed.
Select [F3~]→[5.Ext Function]→[3.Monitor] on the main screen, and the following screen will
appear.
(Caution) DM2 is a currently unused spare port. Before using the relevant function, check the required
ports and install.
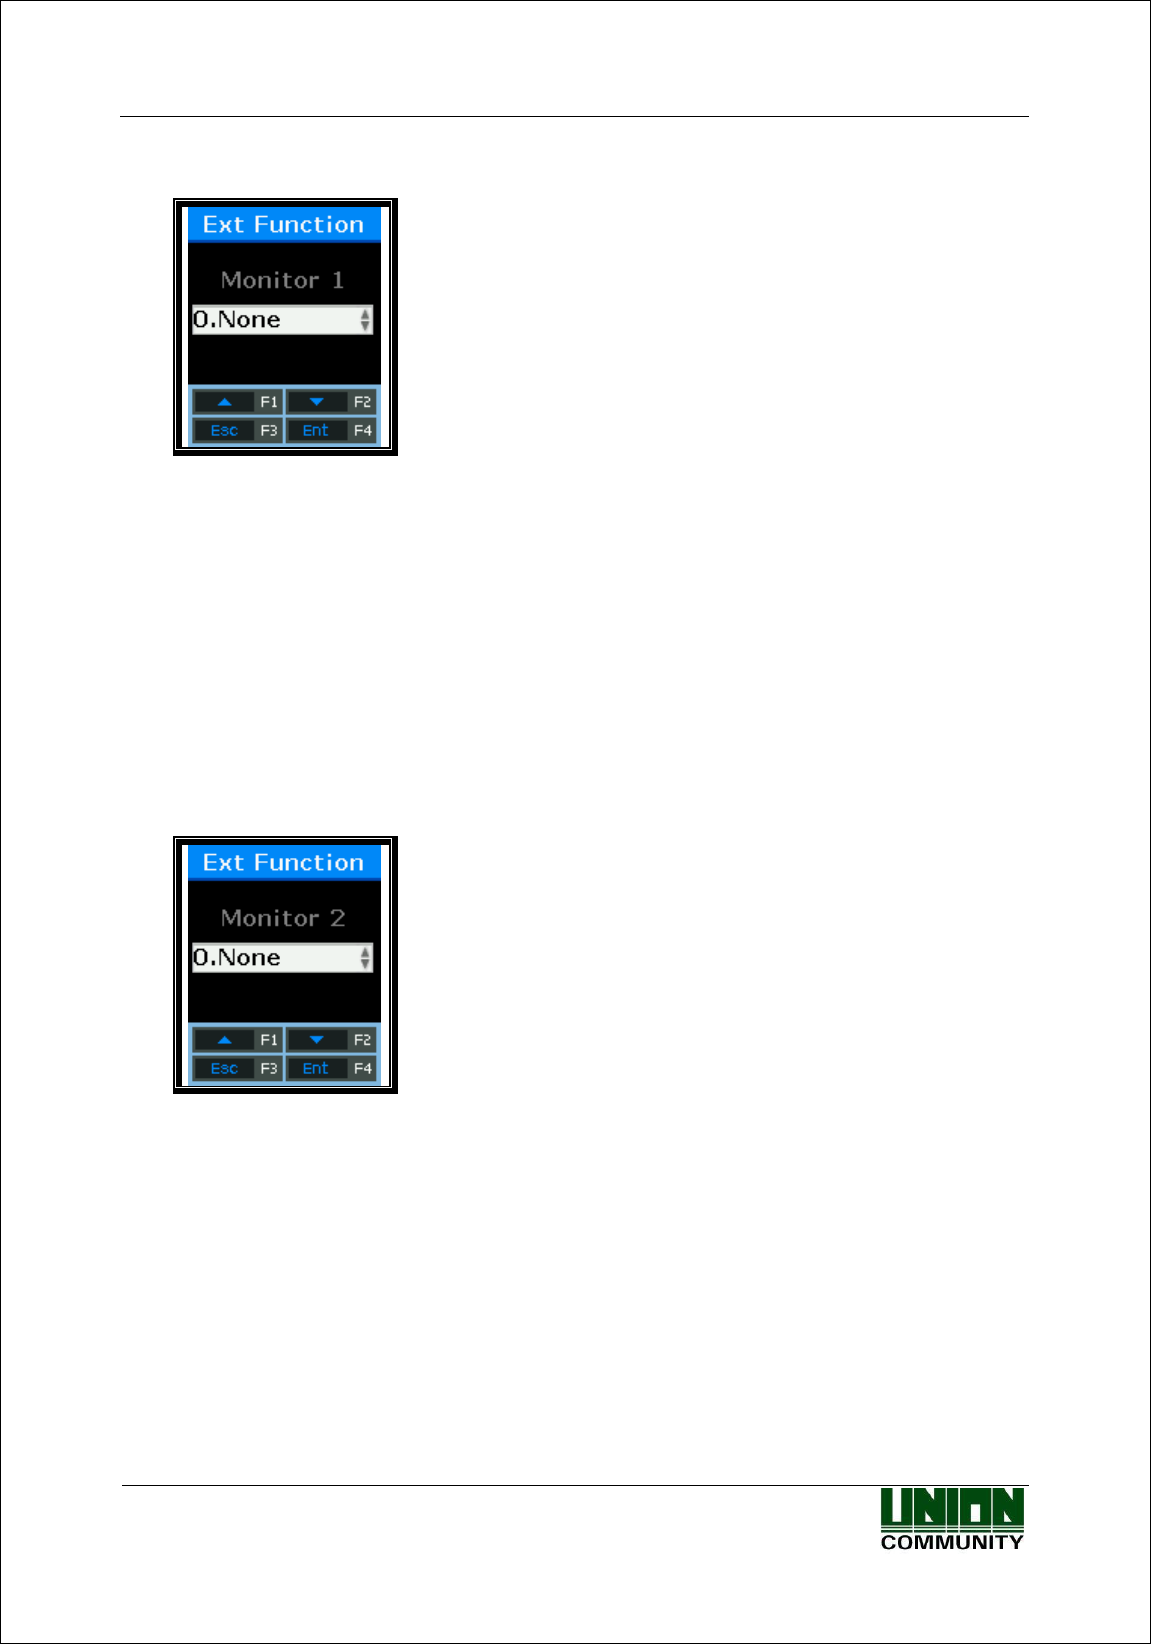
AC-2200 User Guide
56
Union Community / (138-050) 5th Fl., Hyundai Topics Building, 44-3, Bangi-dong, Songpa-
gu, Seoul, Korea // Tel : 82-2-6488-3000 , Fax : 82-2-6488-3099
E-mail: sales@unioncomm.co.kr; http://www.unioncomm.co.kr
3.7.3.1. Monitor 1 Input Port Setting
Set when connecting an external contact to DM0. (When
using a motor lock, set to 1 or 2.)
Default Setting: ‘0.None’
- ‘0.None’: When nothing is connected
- ‘1.NO’ or ‘2.NC’: When the open door status monitoring pin is connected
- ‘3.Fire NO’ or ‘4.Fire NC’: When the fire detection sensor is connected
- ‘5.Panic NO’ or ‘6.Panic NC’: When the panic situation detection sensor is connected
- ‘7.EMC NO’ or ‘8.EMC NC’: When the emergency detection sensor is connected
- ‘9.Ctrler Out’: When the authentication result is sent to the external controller
(Connect the REDled of controller to DM0 or DM1 through the board toward TR. Set the
relevant pin to ‘9.Ctrler Out’. WiegandOut must be set.)
Press [ENT] button to move to the next setting.
3.7.3.2. Monitor 2 Input Port Setting
Set when connecting an external contact to DM1. (When
using a motor lock, set to 1 or 2.)
Default Setting: ‘0.None’
- ‘0.None’: When nothing is connected
- ‘1.NO’ or ‘2.NC’: When the open door status monitoring pin is connected
- ‘3.Fire NO’ or ‘4.Fire NC’: When the fire detection sensor is connected
- ‘5.Panic NO’ or ‘6.Panic NC’: When the panic situation detection sensor is connected
- ‘7.EMC NO’ or ‘8.EMC NC’: When the emergency detection sensor is connected
- ‘9.Ctrler Out’: When the authentication result is sent to the external controller
(Connect the REDled of controller to DM0 or DM1 through the board toward TR. Set the
relevant pin to ‘9.Ctrler Out’. WiegandOut must be set.)
After selecting the set value, press [ENT] button, and the screen will go to the upper menu.
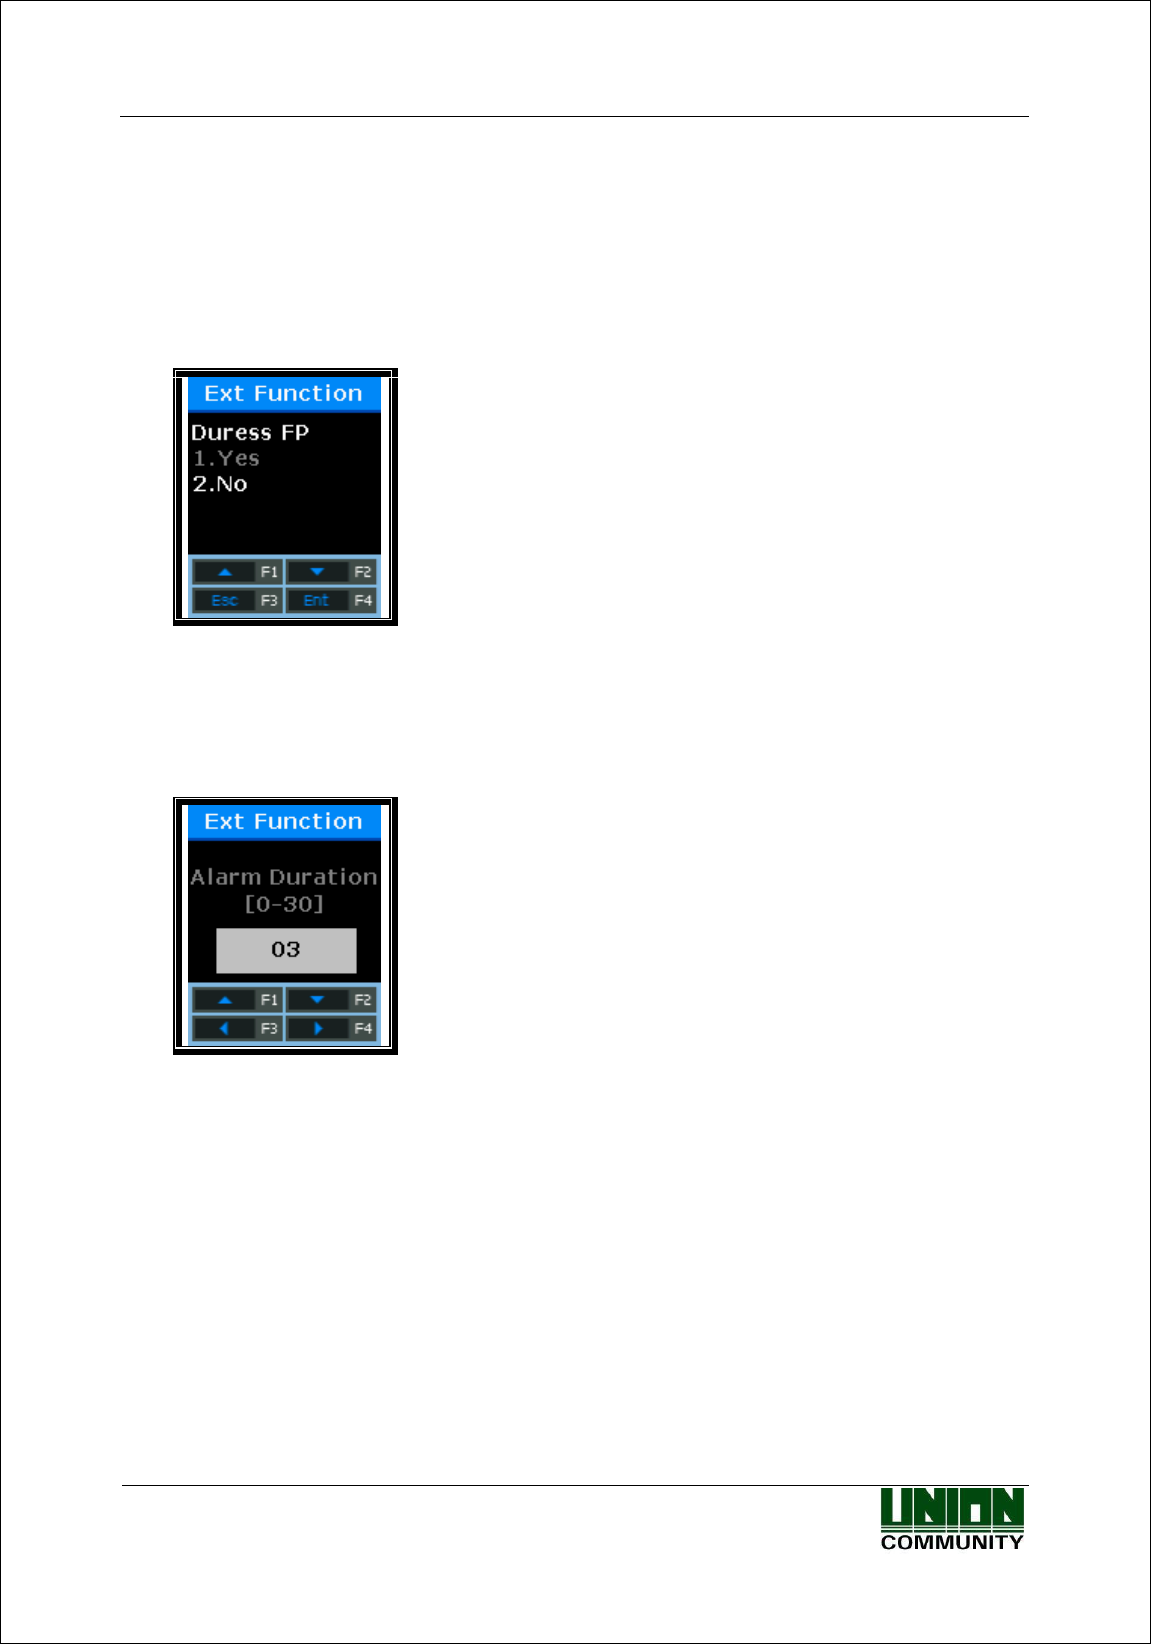
AC-2200 User Guide
57
Union Community / (138-050) 5th Fl., Hyundai Topics Building, 44-3, Bangi-dong, Songpa-
gu, Seoul, Korea // Tel : 82-2-6488-3000 , Fax : 82-2-6488-3099
E-mail: sales@unioncomm.co.kr; http://www.unioncomm.co.kr
3.7.4. Duress FP Setting
Select [F3~]→[5.Ext Function]→[4.Duress FP] on the main screen, and the following screen will
appear.
3.7.4.1 Duress FP
This function allows users to use an alarm when the duress fingerprint is entered.
Set whether to use the duress fingerprint alarm.
Default Setting: ‘2.No’
The default setting is '2.No'. When it is set to ‘1.Yes’, if the pre-registered fingerprint is
authenticated, the voltage of 12V will flow into ‘L2’ Pin. If any emergency detection device
such as a siren is connected to this Pin, it will operate.
If <Duress FP> is set to ‘1.Yes’, the menu for setting the time corresponding to 2V will appear.
Default Setting: ‘03’ (Unit: Second)
To modify, Press [←][→] buttons to move to the desired position, and press [↑][↓] buttons to
change the existing value.
After selecting the set value, press [ENT] button, and the screen will go to the upper menu.
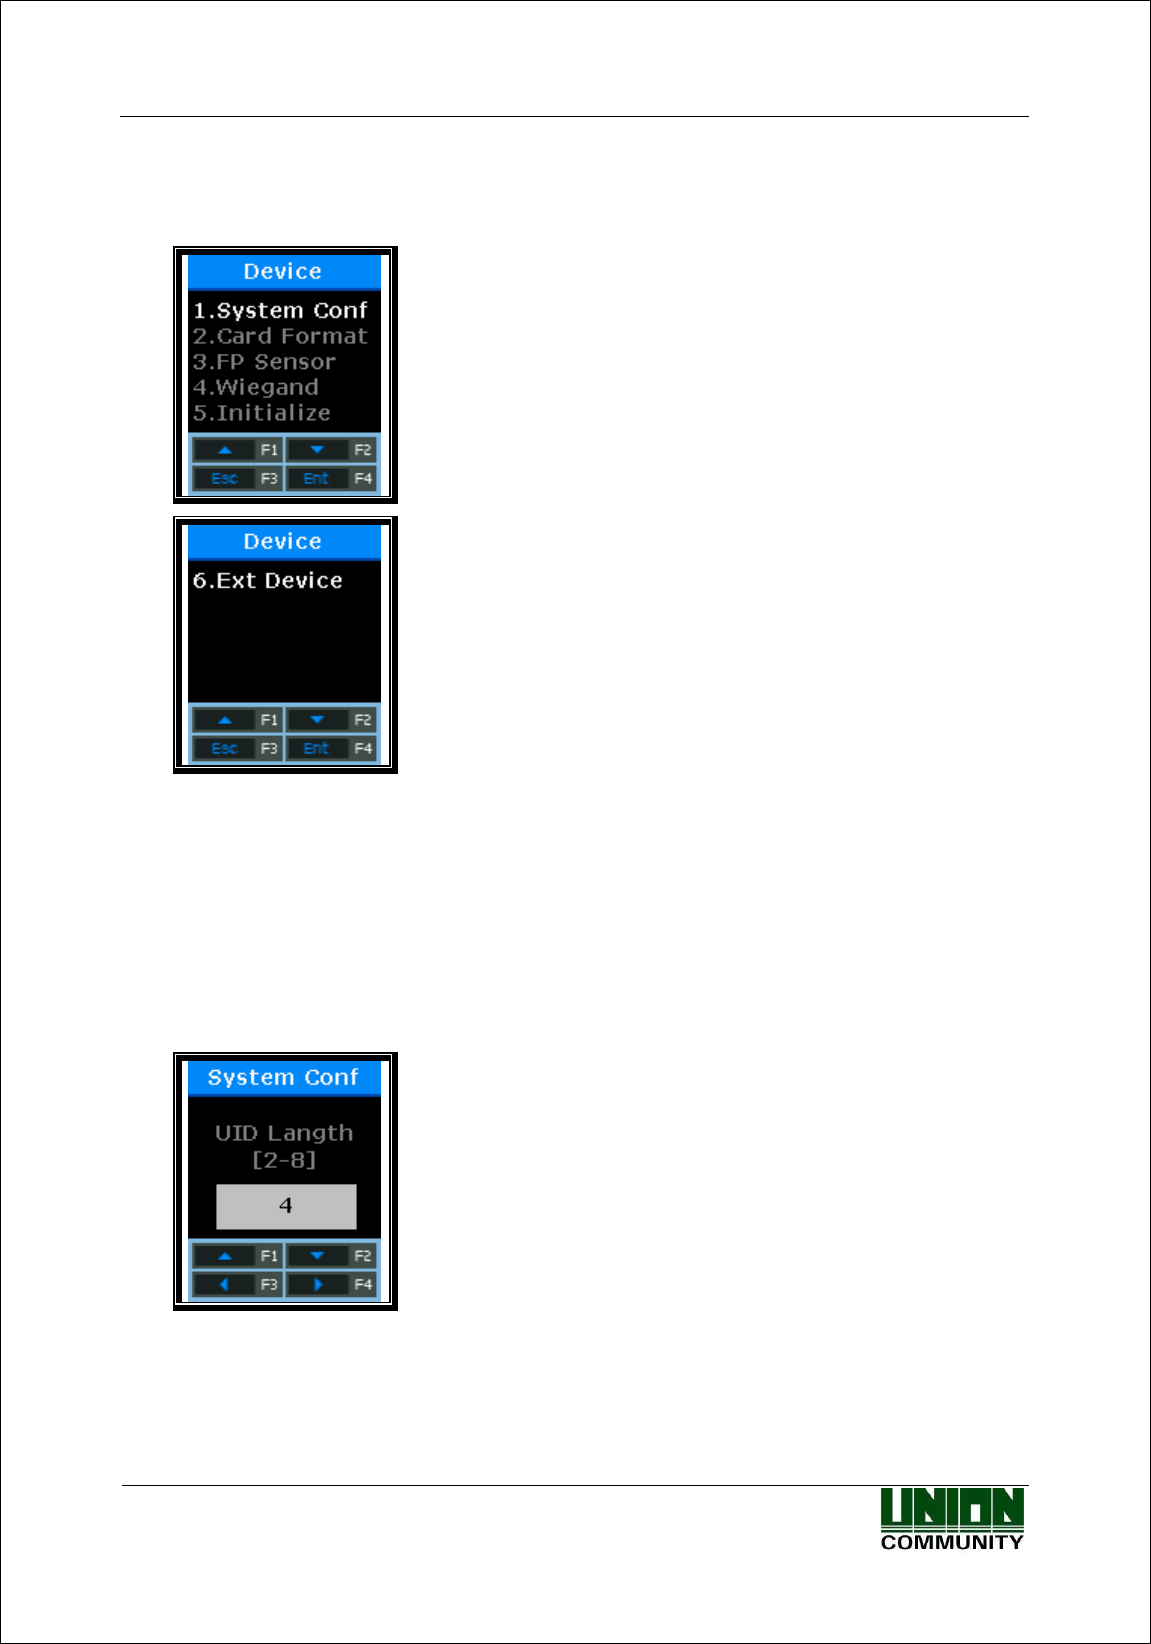
AC-2200 User Guide
58
Union Community / (138-050) 5th Fl., Hyundai Topics Building, 44-3, Bangi-dong, Songpa-
gu, Seoul, Korea // Tel : 82-2-6488-3000 , Fax : 82-2-6488-3099
E-mail: sales@unioncomm.co.kr; http://www.unioncomm.co.kr
3.8. Device Setting
Select [6.Device] on the main menu, and the following screen will appear.
Press [↑][↓] buttons to select the menu you want to
change, and press [ENT] button.
Most of device settings are the option that does not need to change after installation. It is
recommended that they are not changed unless there is any clear purpose.
3.8.1. System Configuration
Select [F3~] → [6.Device] → [1. System Conf] on the main screen, and the following screen will
appear.
3.8.1.1. User ID Digit Setting
Default Setting: ‘4’
This is a portion for setting the length of user ID. The length of user ID can be set to the 2~8
digit. It should be equal to the length of ID registered in the server program. If the 6-digit ID of
‘000075' is registered in the server program, the mode is set to ‘6’.
After setting, press [ENT] button to move to the upper menu.
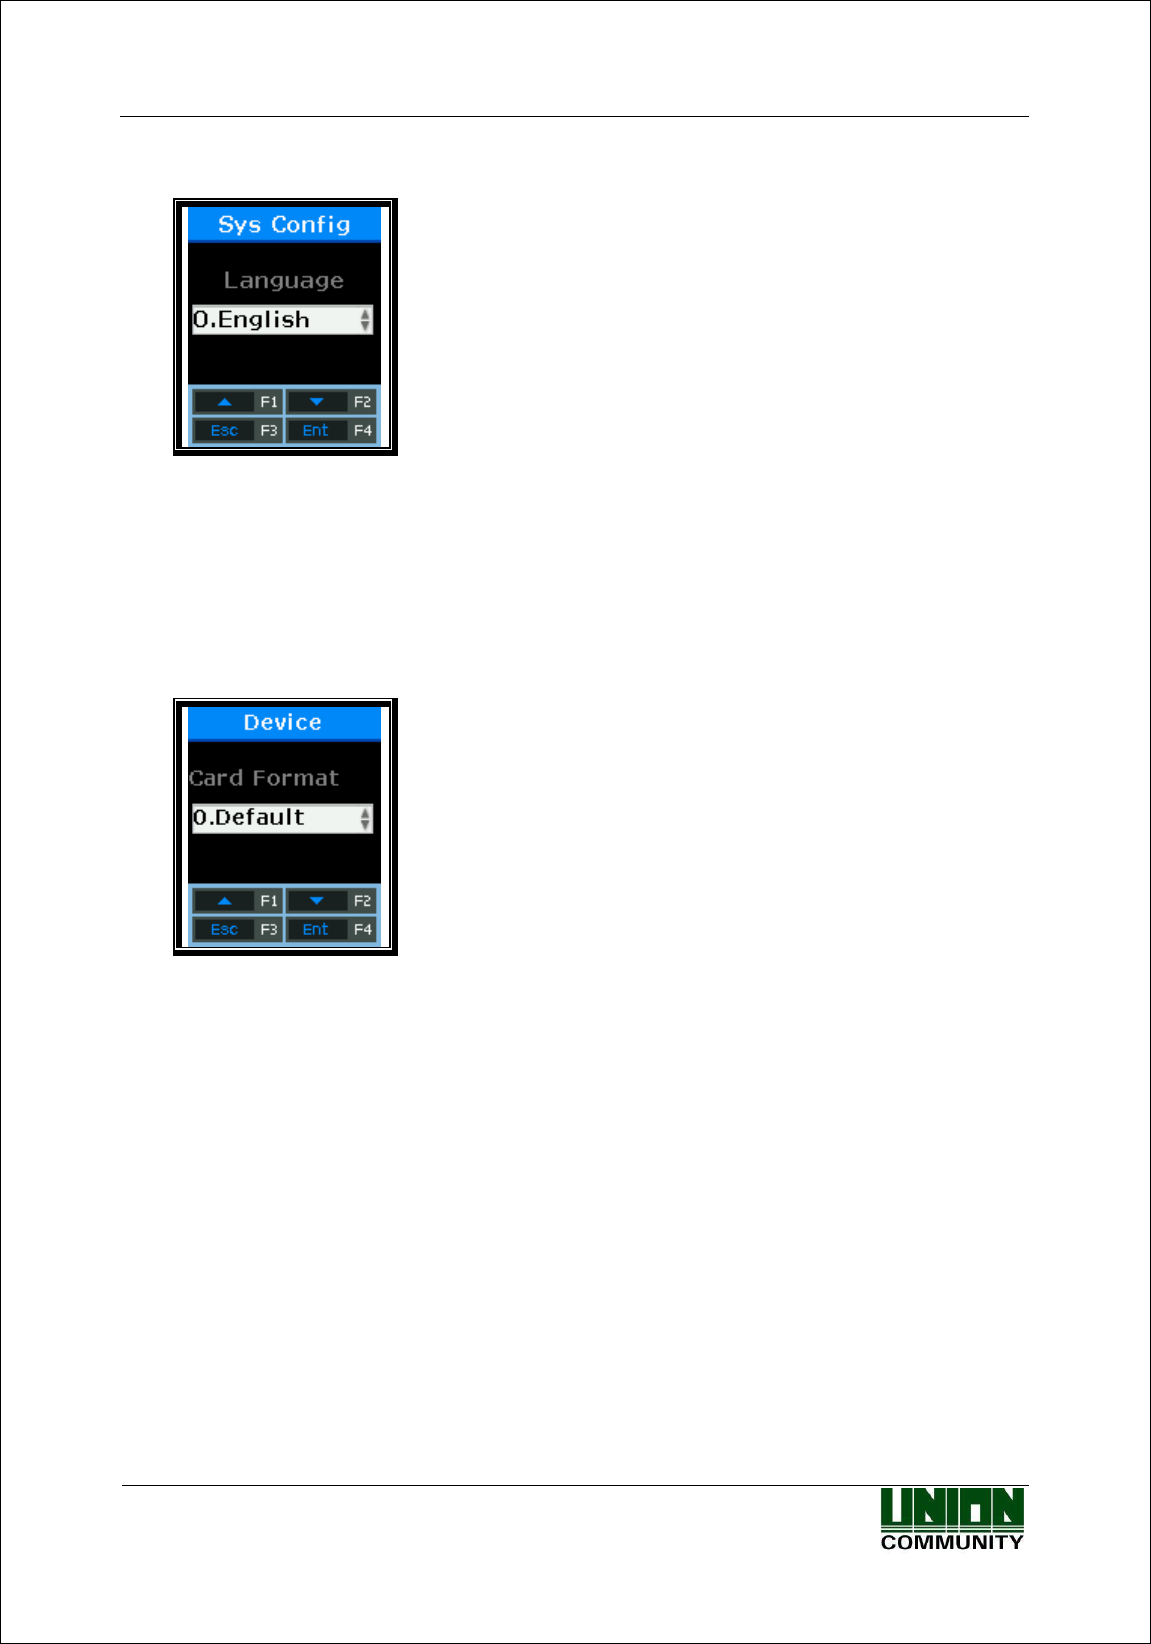
AC-2200 User Guide
59
Union Community / (138-050) 5th Fl., Hyundai Topics Building, 44-3, Bangi-dong, Songpa-
gu, Seoul, Korea // Tel : 82-2-6488-3000 , Fax : 82-2-6488-3099
E-mail: sales@unioncomm.co.kr; http://www.unioncomm.co.kr
3.8.1.2. Language Setting
Default Setting: ‘0.English’
If the language setting is changed, the voice message and the message on the LCD are changed
into the set language.
3.8.2. Card Reader Format Setting
Select [F3~] → [6.Device] → [2. Card Format] on the main screen, and the following screen will
appear.
Default Setting: ‘0.Default’
This option is to specify the format that displays the read card number. When setting to Hexa,
the format is displayed to the hexadecimal number. When setting to Decimal, the format is
displayed to the decimal number. In the device equipped with the RF (low frequency) card
reader, if the mode is set to ‘4.Format 5’ and it reads EM Card, the card number is displayed to
the hexadecimal number of 10byte.
3.8.3. Fingerprint Sensor Setting
Select [F3~] → [6.Device] → [3. FP Sensor] on the main screen, and the following screen will
appear.
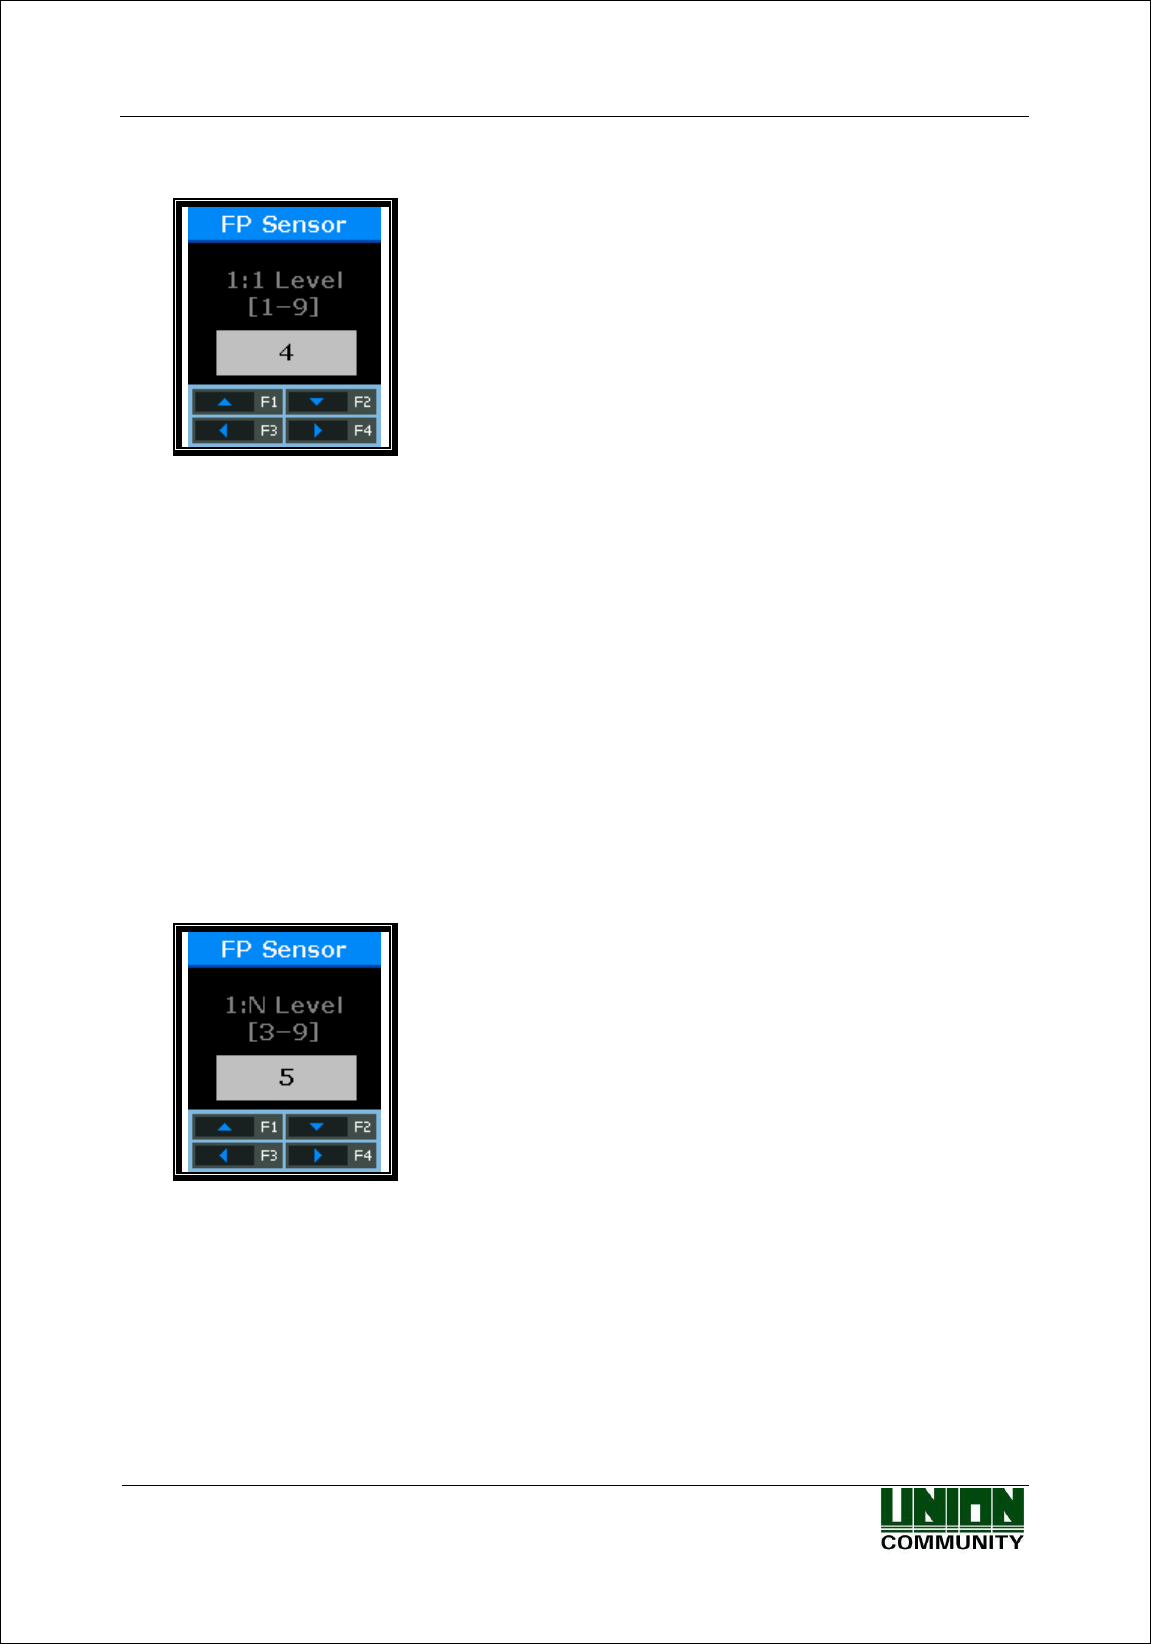
AC-2200 User Guide
60
Union Community / (138-050) 5th Fl., Hyundai Topics Building, 44-3, Bangi-dong, Songpa-
gu, Seoul, Korea // Tel : 82-2-6488-3000 , Fax : 82-2-6488-3099
E-mail: sales@unioncomm.co.kr; http://www.unioncomm.co.kr
3.8.3.1. 1:1 Level Setting
Default Setting: ‘4’
This option is to set the match degree with the same fingerprint when comparing the fingerprint
on the fingerprint input window with the user fingerprint saved in the database. The higher
authentication level may ensure the higher security. But it requires the relatively high
concordance rate. When authenticating User ID, it high likely to deny authentication.
In case of 1:1 Authentication Level, if the ID entered to the authentication level that underwent
the authentication process with the ID input is ‘1234’, this option finds the fingerprint registered
to the ID of ‘1234’ from the terminal database and compares it with the fingerprint on the
fingerprint input window.
However, in case of 1:1 authentication, if the 1:1 authentication level of users is not set to ‘0’
(using the terminal authentication level), the 1:1 authentication level of users is applied.
Press [ENT] button to move to the next setting.
3.8.3.2. 1:N Level Setting
Default Setting: ‘4’
This option is to set the authentication level using the fingerprint only without ID input.
This option is used to find the fingerprint matched by comparing the fingerprint on the fingerprint
input window with the user fingerprint saved in the database.
In case of 1:N authentication, the user-specific authentication level is not set. Therefore,
authentication is always based on the terminal authentication level.
Press [ENT] button to move to the next setting.
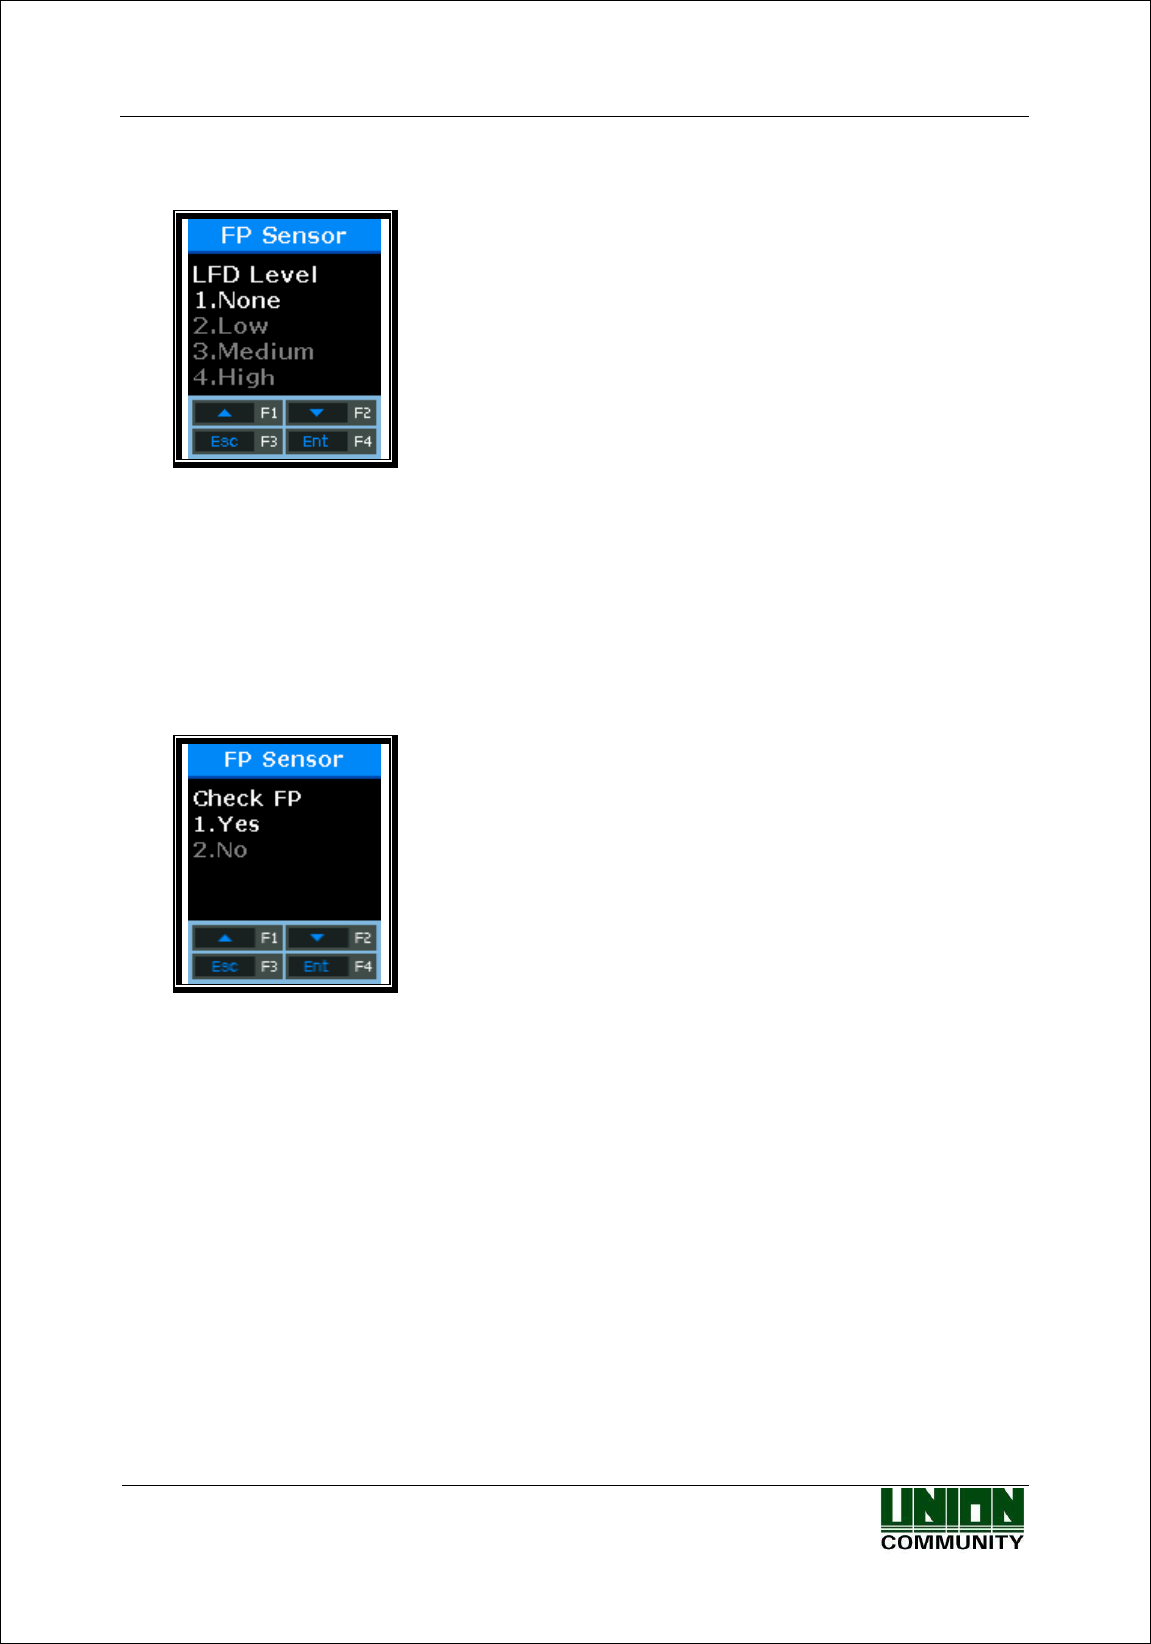
AC-2200 User Guide
61
Union Community / (138-050) 5th Fl., Hyundai Topics Building, 44-3, Bangi-dong, Songpa-
gu, Seoul, Korea // Tel : 82-2-6488-3000 , Fax : 82-2-6488-3099
E-mail: sales@unioncomm.co.kr; http://www.unioncomm.co.kr
3.8.3.3. LFD Setting
Default Setting: ‘1.None’
This option is to set the LFD level that can prevent imitation fingerprints from entering. The
higher LFD level may ensure the higher function that prevents the input of imitation fingerprints
made of rubber, paper, film, and silicon. However, too dry fingerprints may not be entered even
when entering actual fingerprints.
After selecting the set value, press [ENT] button, and the screen will go to the upper menu.
3.8.3.4. Similar fingerprint registration restriction setting
Default Setting: ‘1.Yes’
If the mode is set to ‘1.Yes', this option acts to check whether a new fingerprint is the same as the
pre-registered fingerprint, and to prevent the same fingerprint from being registered as the ID of
another user.
After selecting the set value, press [ENT] button, and the screen will go to the upper menu.
3.8.4. Wiegand Speaker Output
Select [F3~] → [6.Device] → [4.Wiegand] on the main screen, and the following screen will
appear.
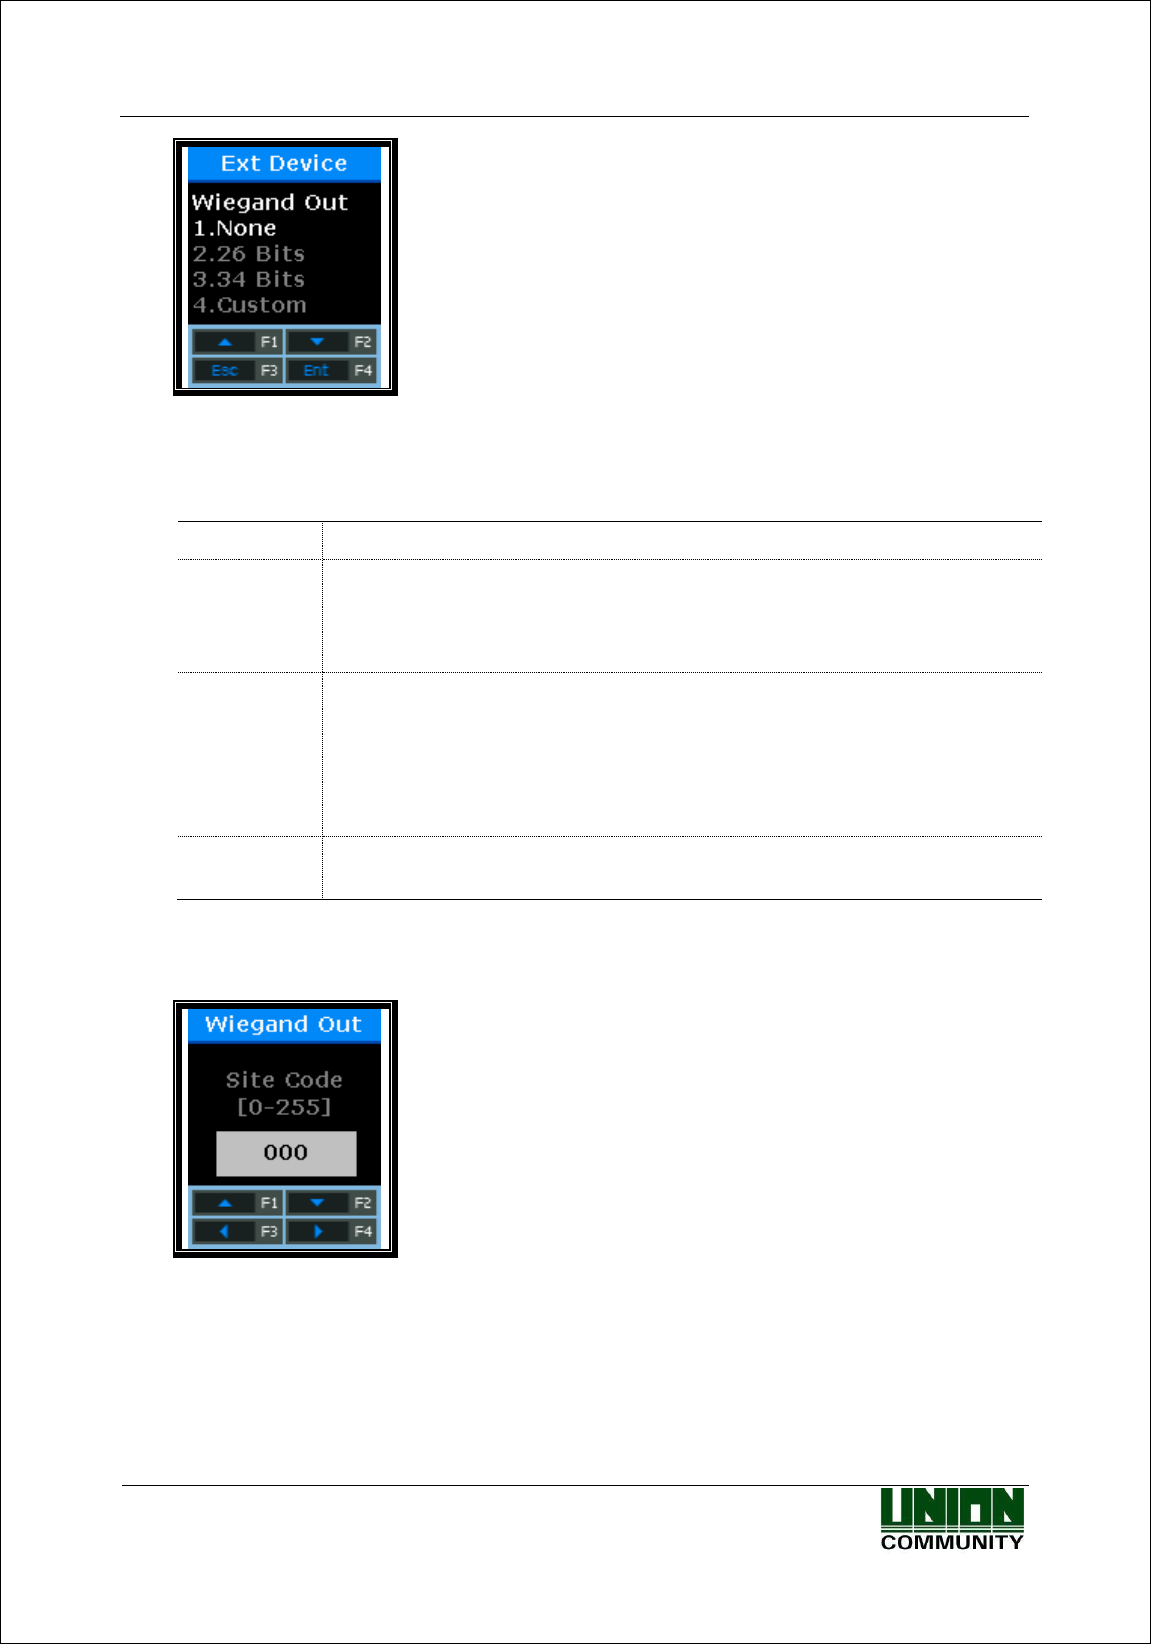
AC-2200 User Guide
62
Union Community / (138-050) 5th Fl., Hyundai Topics Building, 44-3, Bangi-dong, Songpa-
gu, Seoul, Korea // Tel : 82-2-6488-3000 , Fax : 82-2-6488-3099
E-mail: sales@unioncomm.co.kr; http://www.unioncomm.co.kr
Default Setting: ‘1’
This option is used only when the terminal is equipped with a separate controller operated by
Wiegand input. After authentication, the following types of data are sent to the Wiegand port of
the terminal.
1.None
General case. The Wiegand Out port is not used.
2.26bit
“Sitecode [1 byte] + User ID [2 bytes]” are transferred. User ID should be set
to the 4-digit or less number.
Example) SiteCode:045, UID:6543
→ 1 00101101 0001 1001 10001111 0
3.34bit
“Sitecode [1 byte] + User ID [3 bytes]” are transferred. User ID should be set
to the 7-digit or less number.
However, if User ID is 8 digits, Sitecode is ignored and only “User ID [4
bytes]” is transferred.
Example) SiteCode:001, UID:123456
→ 0 00000001 00000001 11100010 01000000 0
4.Custom
This is the user-defined setting that is available only in the server. Only
checking is possible in the terminal.
※ This option is unrelated to use the Wiegand type card reader. If the mode is set to ‘2’ or ‘3’,
the following site code is set.
Default Setting: ‘000’
This option is available only when Wiegand Out is set to ‘2’ or ‘3’. The site code to send to
Wiegand port including User ID is set to the value of 0~255.
After selecting the set value, press [F4] button, and the screen will go to the upper menu.
3.8.4.1. Bypass Setting
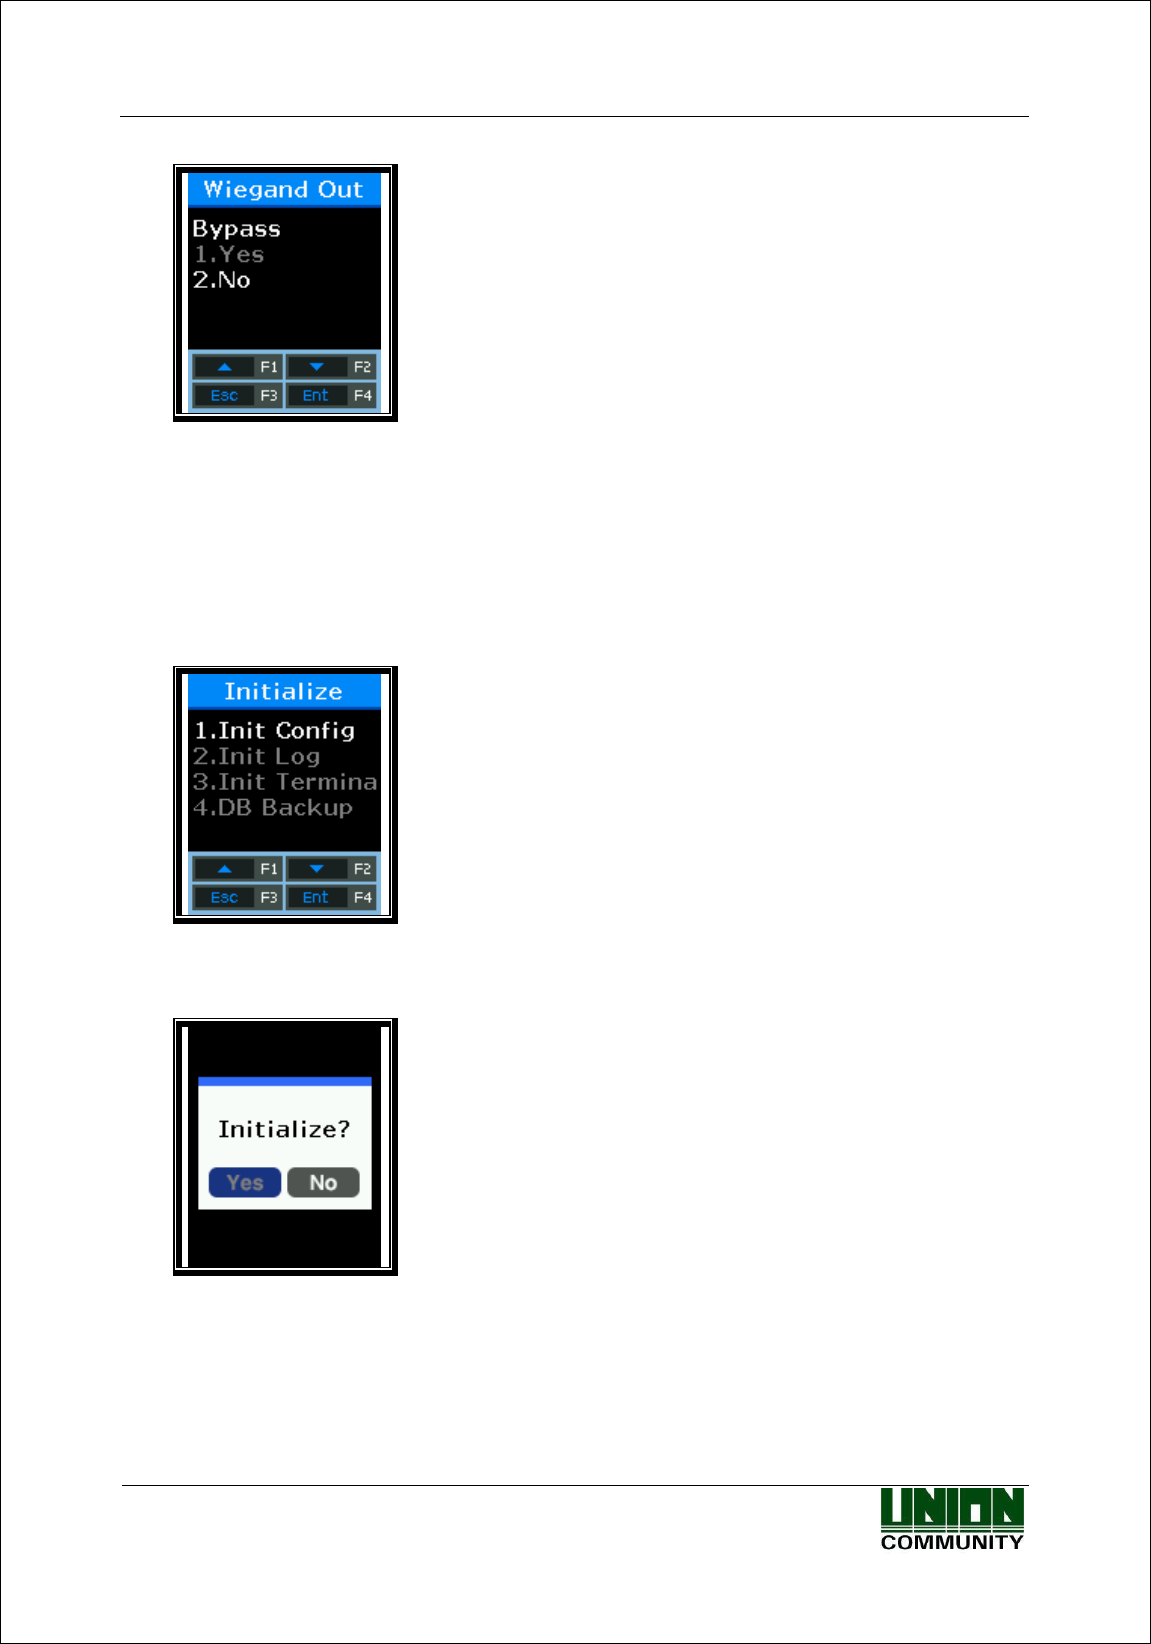
AC-2200 User Guide
63
Union Community / (138-050) 5th Fl., Hyundai Topics Building, 44-3, Bangi-dong, Songpa-
gu, Seoul, Korea // Tel : 82-2-6488-3000 , Fax : 82-2-6488-3099
E-mail: sales@unioncomm.co.kr; http://www.unioncomm.co.kr
Default Setting: ‘2.No’
This option is available when the Wiegand card reader is used.
When the mode is set to [1], the card information entering to ‘Wiegand In’ is bypassed to
‘Wiegand Out’.
3.8.5. Terminal Initialization
Select [F3~] → [6.Device] → [5.Initialize] on the main screen, and the following screen will
appear.
Select [1] to initialize the set value; [2] to initialize the
authentication records; [3] to initialize the factory; and [4]
to use the UDL.
3.8.5.1. Set Value Initialization
Select [1] to initialize, and [2] to cancel.
This option initializes all settings of the terminal except for the MAC (physical) addresses and
serial numbers saved in the terminal. But, users and authentication records are not deleted.
When initialization is successfully completed, the “Ppiririck” beep occurs and the screen moves
to the upper menu.

AC-2200 User Guide
64
Union Community / (138-050) 5th Fl., Hyundai Topics Building, 44-3, Bangi-dong, Songpa-
gu, Seoul, Korea // Tel : 82-2-6488-3000 , Fax : 82-2-6488-3099
E-mail: sales@unioncomm.co.kr; http://www.unioncomm.co.kr
3.8.5.2. Authentication Records Initialization
Select [1] to initialize, and [2] to cancel.
This option deletes all authentication related logs except for set values and users.
When initialization is successfully completed, the “Ppiririck” beep occurs and the screen moves
to the upper menu.
3.8.5.3. Factory Initialization
Select [1] to initialize, and [2] to cancel.
This option deletes all settings, users and log information except for the MAC (physical)
addresses and serial numbers saved in the terminal, and initializes the terminal to the status
shipped at a factory.
When initialization is successfully completed, the success buzzer occurs and then the terminal is
rebooted.
3.8.5.4. UDL(USB Data Loger) Backup (USB port is service port.)
- If the USB memory card is inserted, the mode moves to the sub-menu. If USB is not
inserted, the warning message of ‘Not Detected Memory’ is displayed.

AC-2200 User Guide
65
Union Community / (138-050) 5th Fl., Hyundai Topics Building, 44-3, Bangi-dong, Songpa-
gu, Seoul, Korea // Tel : 82-2-6488-3000 , Fax : 82-2-6488-3099
E-mail: sales@unioncomm.co.kr; http://www.unioncomm.co.kr
DB Backup Menu.
Export Log (USB port is service port.)
- Used when the log data saved in the AC2200 terminal is exported to USB.
- Data is saved with a file name of LOG.DAT in the place of “USB top-level folder →
AC2200 folder → 00000000 (8-digit terminal ID) folder → LOG folder”.
- Only log data can be saved, except for photos.
Export User (USB port is service port.)
- Used when the user data saved in the AC2200 terminal is exported to USB.
- Data is saved with a file name of USER.DAT in the unisuser folder.
- The number of exported users can be checked on the LCD.
Import User (USB port is service port.)
- Used when the user data (USER.DAT) saved in USB is imported into the terminal.
- The user file (USER.DAT) must be saved with a file name of USER.DAT in the unisuser
folder.
- The size of imported data can be checked on the LCD.
Upgrade (USB port is service port.)
- Used when upgrading the terminal firmware by using the firmware data (ac2200.bin)
saved in the USB.
- The firmware file is ‘ac2200.bin’. To upgrade, it must be saved with a file name of
ac2200.bin in the AC2200 folder.
- The size of imported data can be checked on the LCD.
Caution!!
When removing the USB or powering off the terminal during upgrading, the product may not
work properly. Special caution is required. (USB port is service port.)
3.8.6. External Device Setting
Select [F3~] → [6.Device] → [6.Ext Device] on the main screen, and the following screen will
appear.
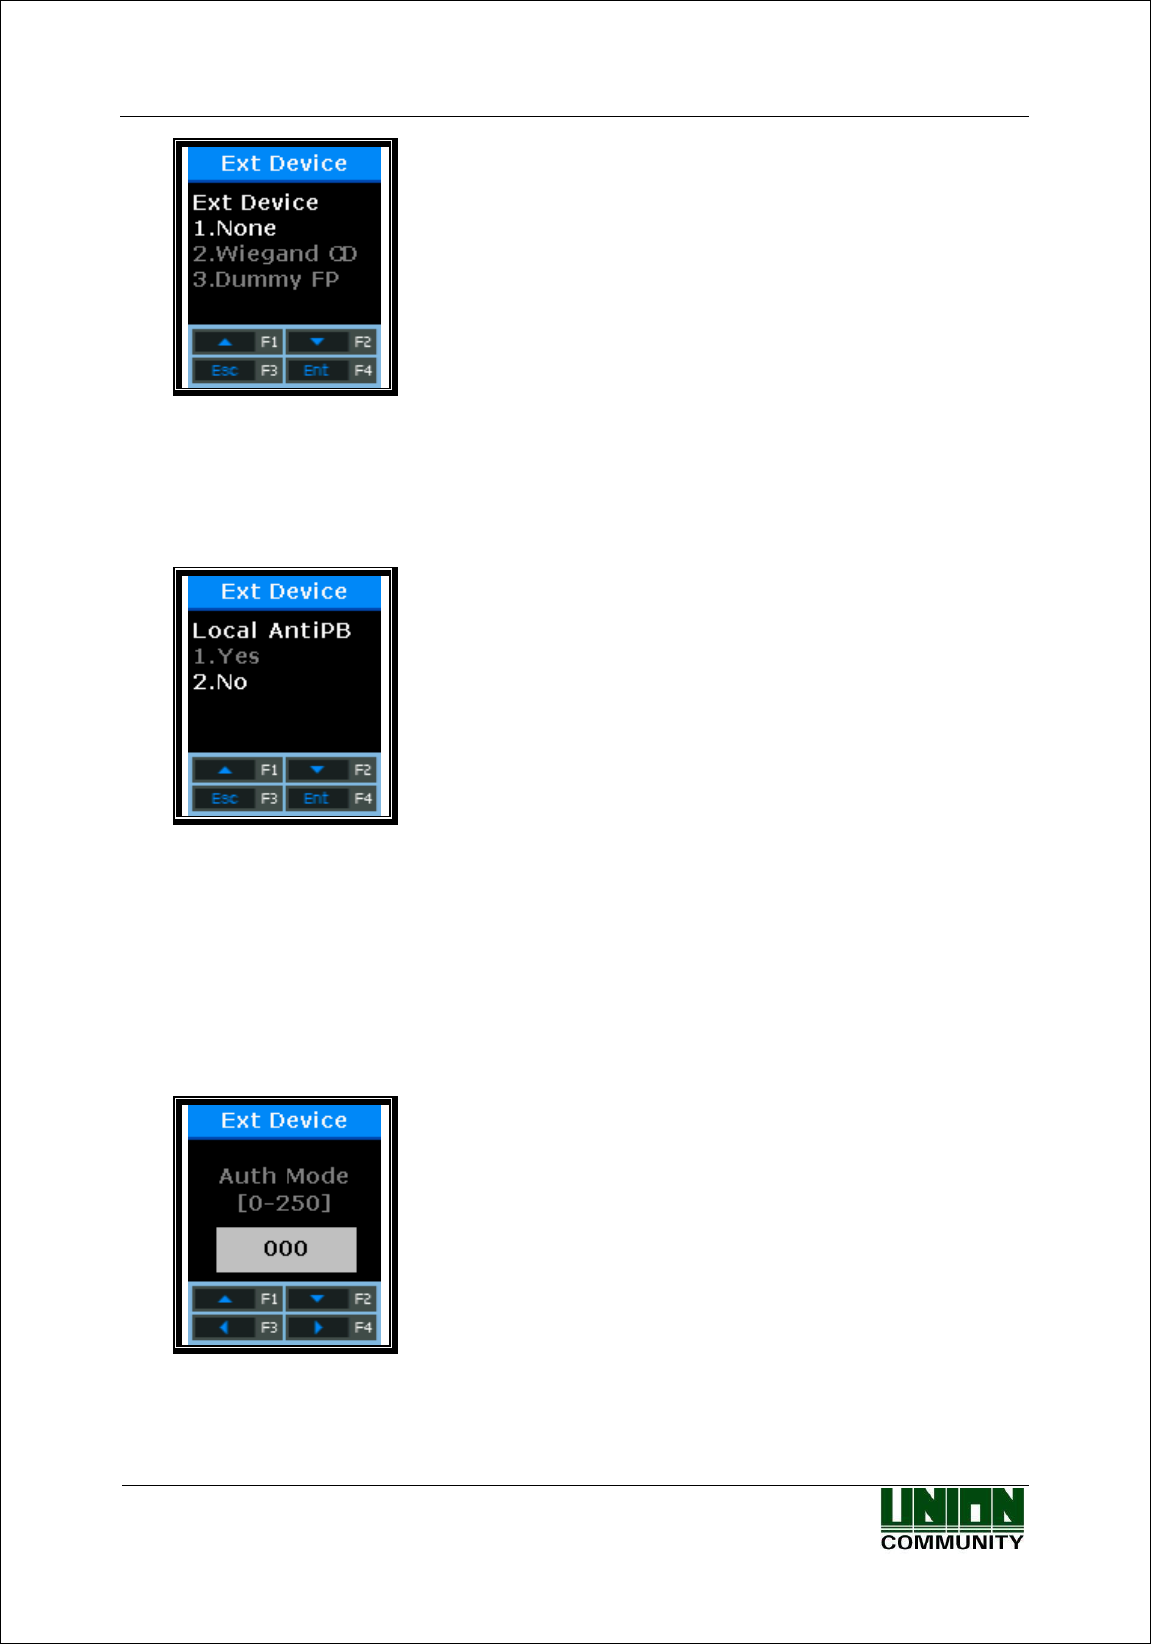
AC-2200 User Guide
66
Union Community / (138-050) 5th Fl., Hyundai Topics Building, 44-3, Bangi-dong, Songpa-
gu, Seoul, Korea // Tel : 82-2-6488-3000 , Fax : 82-2-6488-3099
E-mail: sales@unioncomm.co.kr; http://www.unioncomm.co.kr
Default Setting: ‘1.None’
This option is available when connecting the Slave Reader using the card or fingerprint to the
terminal in order to use as a secondary authentication device. The mode is set to ‘2’ when
connecting the Wiegand card reader, and ‘3’ when connecting the SR100.
Press [ENT] button to move to the next setting.
Default Setting: ‘2.No’
When setting to ‘1.Yes’, the Anti-Passback in the terminal
is checked.
This screen is displayed only when <Ext Device> is set to ‘2’ or ‘3’.
This option is used to allow only authorized users to access and leave the office. To this end, the
terminal and Slave Reader are installed to both the inside and outside of the door. Only users
who access the office by authentication via the terminal can leave the office by authentication
via the Slave Reader. When setting ‘1.Yes’, the server authentication is unavailable. The device
checks whether Passback is valid in the authentication order between the terminal and the Slave
Reader.
Press [ENT] button to move to the next setting.
Default Setting: ‘0’
This option is to set the authentication (T&A) mode saved from the Slave Reader. If the device
is set to '0', it is saved as the current authentication mode; saved to F1 when ‘1’, F2 when ‘2’,
Access when ‘3’, F3 when ‘4’, and F4 when ‘5’.

AC-2200 User Guide
67
Union Community / (138-050) 5th Fl., Hyundai Topics Building, 44-3, Bangi-dong, Songpa-
gu, Seoul, Korea // Tel : 82-2-6488-3000 , Fax : 82-2-6488-3099
E-mail: sales@unioncomm.co.kr; http://www.unioncomm.co.kr
Press [ENT] button to move to the next setting.
Default Setting: ‘1.None’
This screen is displayed only when <Ext Device> is not set to ‘3’.
When connecting an external device of LC010 to the terminal, the mode is set to ‘2.Lock Ctrl’.
When the terminal interlocks with MCP040, RS485 ID must be set.

AC-2200 User Guide
68
Union Community / (138-050) 5th Fl., Hyundai Topics Building, 44-3, Bangi-dong, Songpa-
gu, Seoul, Korea // Tel : 82-2-6488-3000 , Fax : 82-2-6488-3099
E-mail: sales@unioncomm.co.kr; http://www.unioncomm.co.kr
4. How to Use Terminal
4.1. When operating to [1.Access]
- Set to Menu → 3.Option → 1. Application → [1.Access].
4.1.1. Authentication Mode
- Press function keys, change to the desired authentication mode such as F1, F2, F3, F4, and
then perform authentication. When perform authentication without pressing function keys
specially, the mode is automatically authenticated to the access mode.
- Authentication Method
F1 Authentication: Press [F1] key to change to the F1 mode, and then perform
authentication. Authentication is performed without changing the mode within the time
zone set to the Attend time.
F2 Authentication: Press [F2] key to change to the F2 mode, and then perform
authentication. Authentication is performed without changing the mode within the time
zone set to the Leave time.
F3 Authentication: Press [F3] key to change to the F3 mode, and then perform
authentication.
F4 Authentication: Press [F4] key to change to the F4 mode, and then perform
authentication.
Access Authentication:
Press twice [F4] key or press [F4] key long to change to the access mode, and then
perform authentication. Or, perform authentication without changing the mode within
the time zone set to the access time.
4.1.2. Authentication Using Fingerprint
After changing the authentication mode by pressing function keys, place your finger on the
fingerprint sensor. Then, the authentication result receiving the fingerprint will appear on the
LCD with a voice message.
At the alert status, press [F1] key to change the authentication mode to
‘F1’.
▼
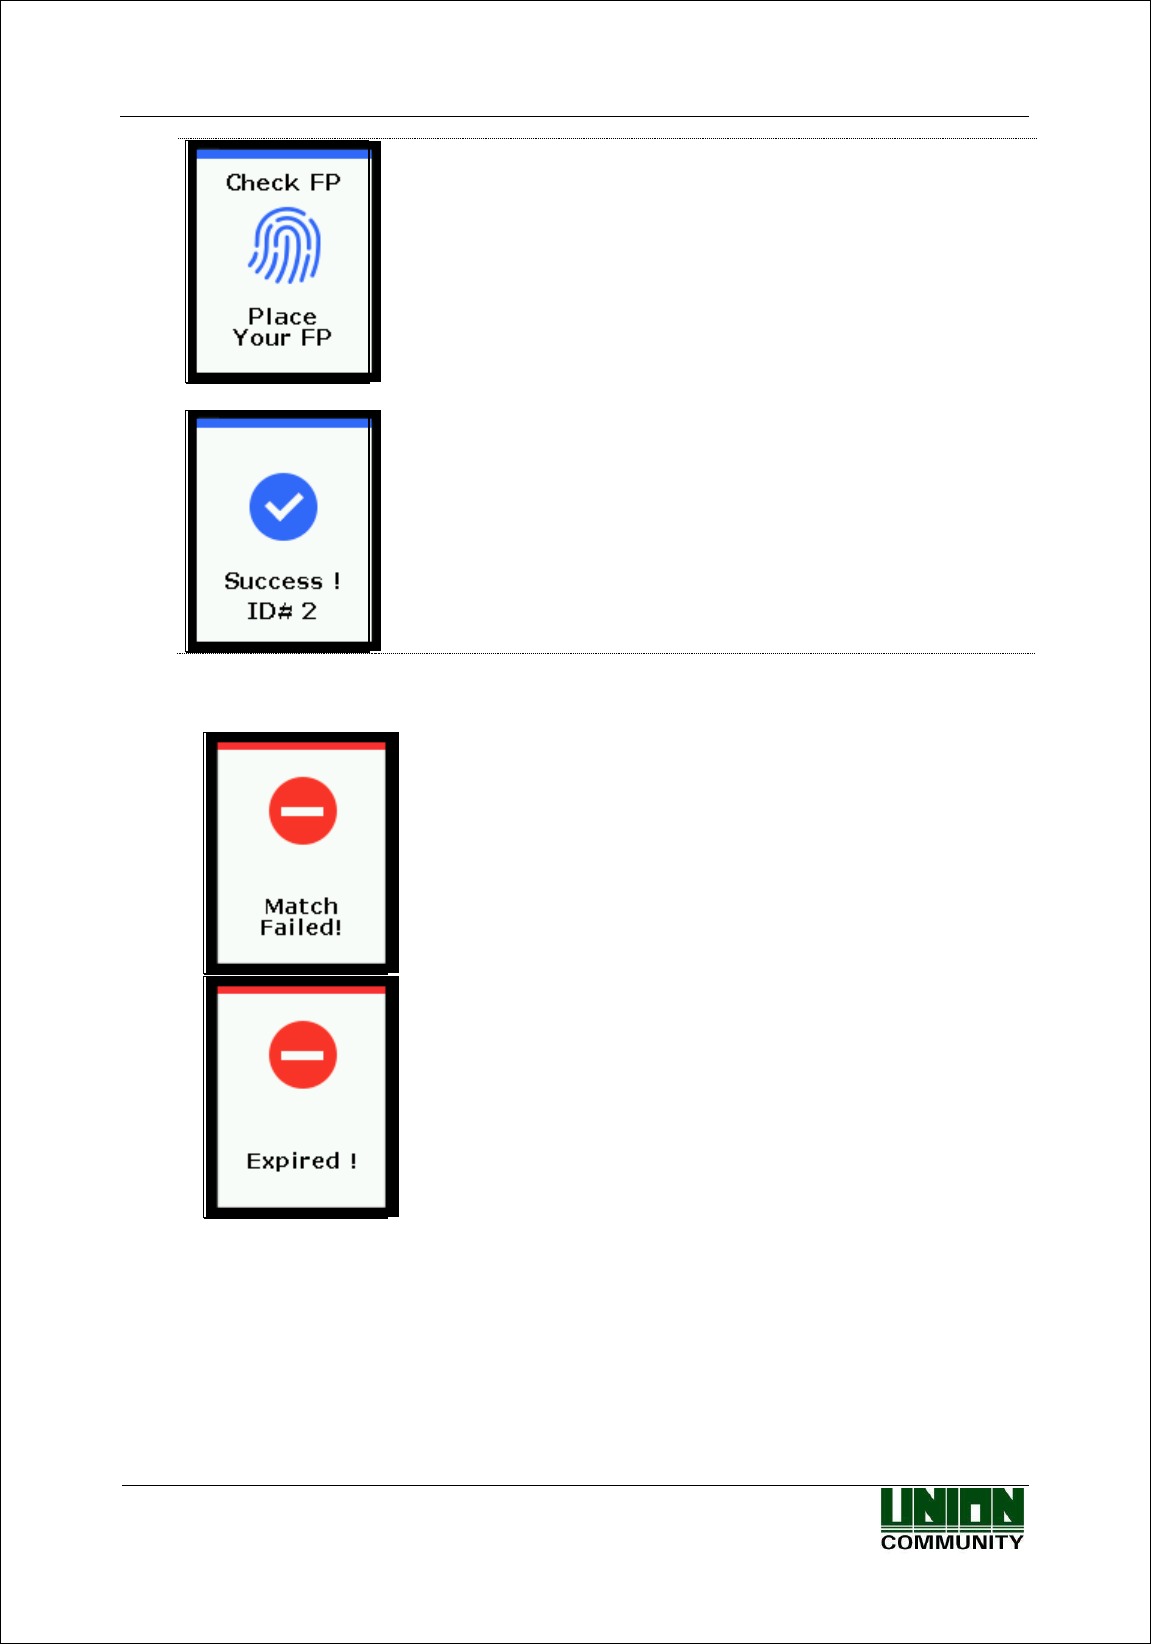
AC-2200 User Guide
69
Union Community / (138-050) 5th Fl., Hyundai Topics Building, 44-3, Bangi-dong, Songpa-
gu, Seoul, Korea // Tel : 82-2-6488-3000 , Fax : 82-2-6488-3099
E-mail: sales@unioncomm.co.kr; http://www.unioncomm.co.kr
Place your finger on the fingerprint sensor, and the red light is on the
fingerprint input window. Keep your finger until the red light is off with
a beep sound.
▼
If your fingerprint is successfully authenticated, the voice message of
“You are authorized” comes out and a success message is displayed on
the LCD.
※Error Message: The following messages will appear with the voice message of “Place Same
FP”.
When authentication fails
When the fingerprint is registered but its authentication is attempted
in the access control time
4.1.3. Authentication Using Card
▶ For users who have registered to [Card] or [FP or Card], place the card on the main screen,
and the beep sound will occur and the authentication result will displayed on the LCD.
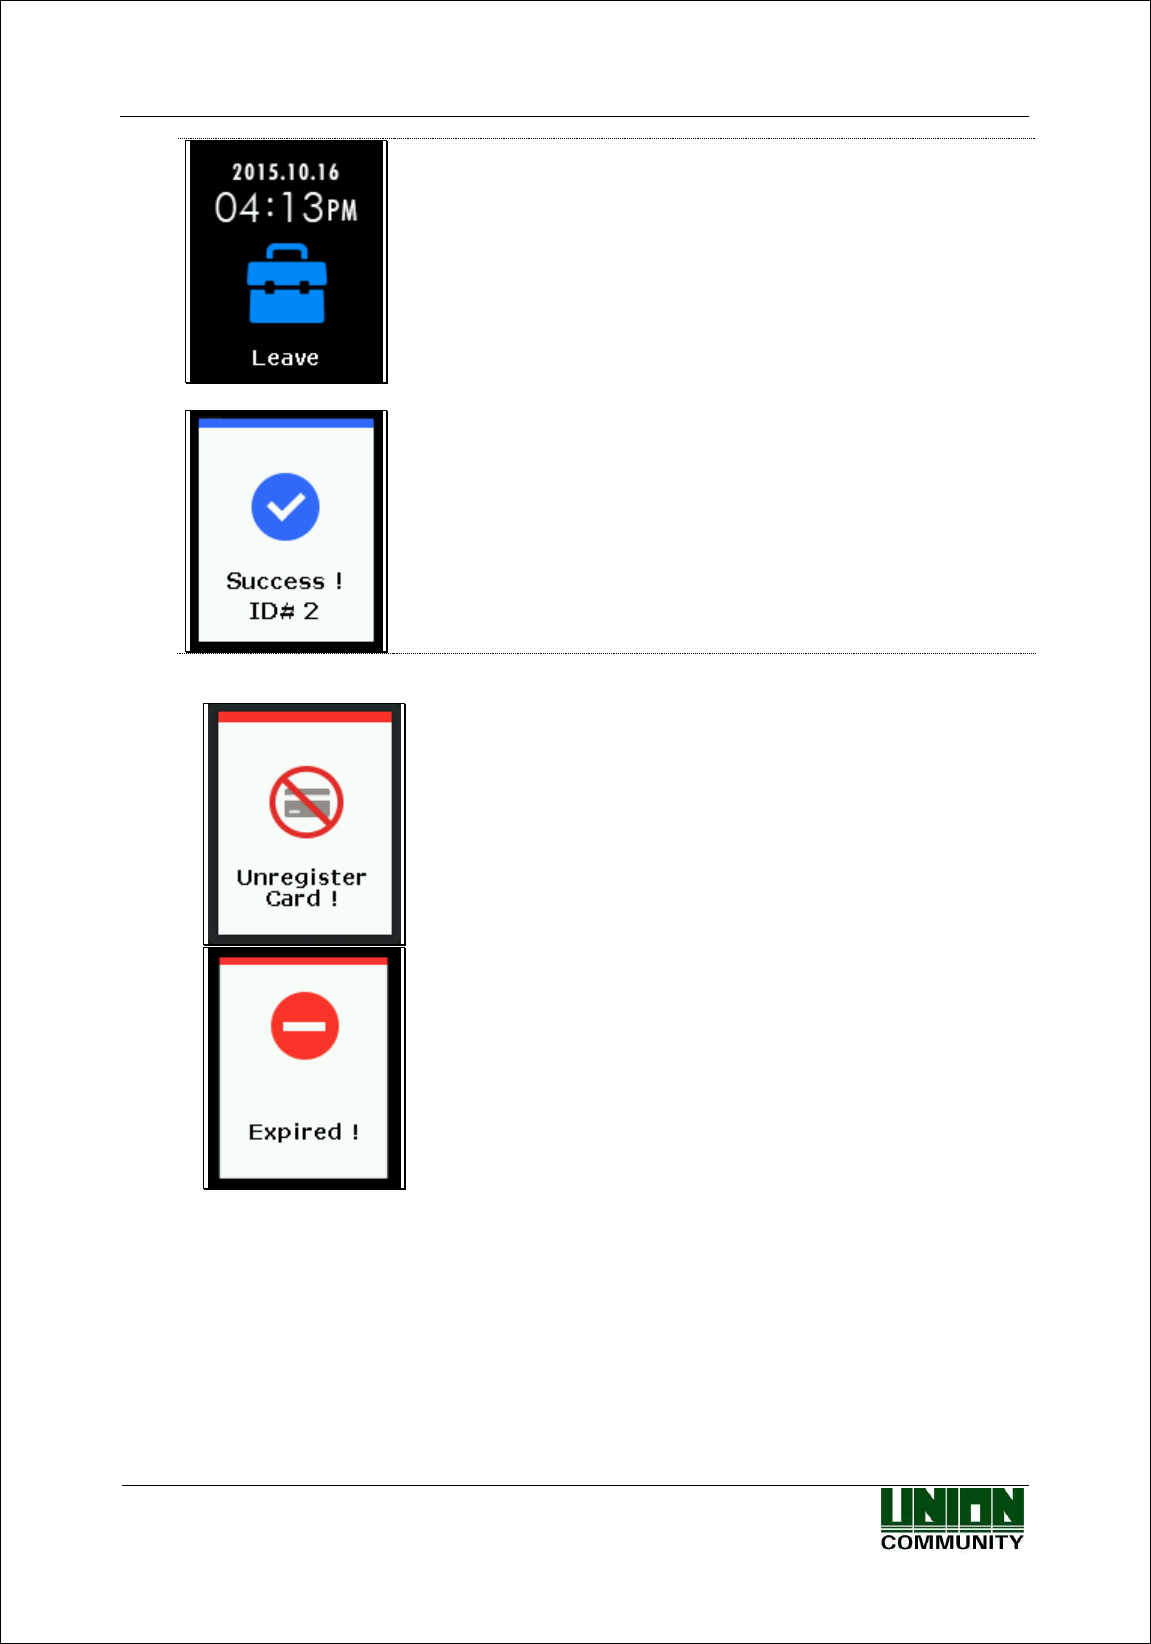
AC-2200 User Guide
70
Union Community / (138-050) 5th Fl., Hyundai Topics Building, 44-3, Bangi-dong, Songpa-
gu, Seoul, Korea // Tel : 82-2-6488-3000 , Fax : 82-2-6488-3099
E-mail: sales@unioncomm.co.kr; http://www.unioncomm.co.kr
Press [F2] key to change the authentication mode to Leave.
▼
If your fingerprint is successfully authenticated, the voice message of
“You are authorized” comes out and a success message is displayed
on the LCD.
Error Message: The following messages will appear with the voice message of “Place Same FP”.
When a unregistered card is entered
When the card is registered but its authentication is attempted in
the access control time
▶ For users who are registered with the [FP and Card]
Place the card on the main screen, and the “beep” sound occurs. The fingerprint cannot be
authorized without going through the following fingerprint input process.

AC-2200 User Guide
71
Union Community / (138-050) 5th Fl., Hyundai Topics Building, 44-3, Bangi-dong, Songpa-
gu, Seoul, Korea // Tel : 82-2-6488-3000 , Fax : 82-2-6488-3099
E-mail: sales@unioncomm.co.kr; http://www.unioncomm.co.kr
When the lamp is on the fingerprint input window with the voice
message of “Place Same FP”, enter your fingerprint and keep your
finger until the “beep” sound occurs.
4.2. When operating to [2.T&A]
- Set to Menu → 3.Option → 1. Application → [2.T&A].
- If you set <Start Time> and <Leave Time> under the condition that the attend time is
constant, even if authentication is attempted without pressing [F1] or [F2] keys, the
fingerprint is authenticated to ‘Attend’ within the time zone set to ‘Attend’ and to ‘Leave’
within the time zone set to ‘Leave’. Therefore, users can reduce the T&A input error.
4.2.1. Authentication Mode
- Press function keys to change the authentication mode to Attend, Leave, Outdoor, Return,
and Access, and then perform authentication with each authentication mode.
- Authentication Method
Attend Authentication: Press [F1] key to change to the attend mode, and then perform
authentication. Authentication is performed without changing the mode within the time
zone set to the Attend time.
Leave Authentication: Press [F2] key to change to the leave mode, and then perform
authentication. Authentication is performed without changing the mode within the time
zone set to the Leave time.
Outdoor Authentication: Press [F3] key to change to the outdoor mode, and then perform
authentication.
Return Authentication: Press [F4] key to change to the return mode, and then perform
authentication.
Access Authentication: Press twice [F4] key or press [F4] key long to change to the
access mode, and then perform authentication. Or, perform authentication without
changing the mode within the time zone set to the access time.
4.2.2. Fingerprint Authentication
- Press the function key to change the T&A mode.
- Enter your fingerprint.
4.2.3. Authentication Using Card
- Press the function key to change the T&A mode.
- Place the card on the LCD.
4.3. When operating to [2.Cafeteria]
- Set to Menu → 3.Option → 1. Application → [3.Cafeteria].
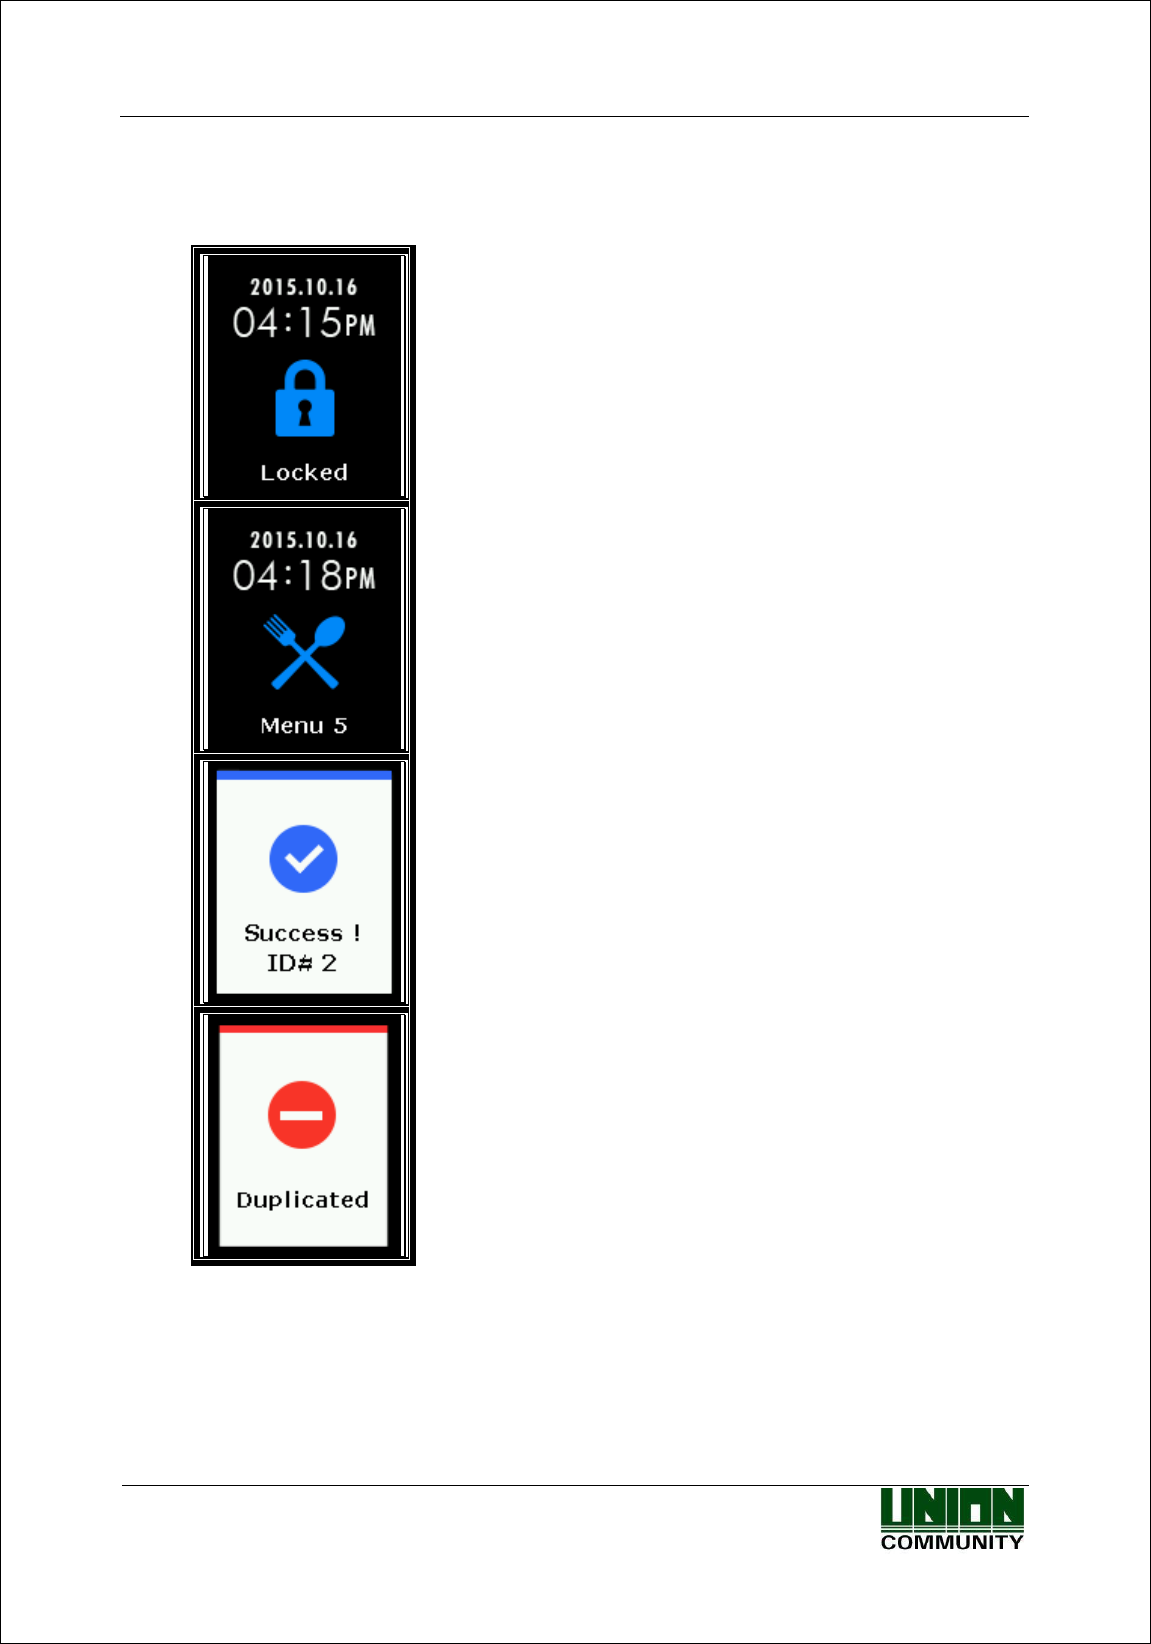
AC-2200 User Guide
72
Union Community / (138-050) 5th Fl., Hyundai Topics Building, 44-3, Bangi-dong, Songpa-
gu, Seoul, Korea // Tel : 82-2-6488-3000 , Fax : 82-2-6488-3099
E-mail: sales@unioncomm.co.kr; http://www.unioncomm.co.kr
- When the mode is set to the food service control, the terminal is locked in the time other than
meal times. The meal time must be set to more than one meal per person.
- LCD
When it is not the meal time (No authentication attempt)
The default screen during the meal time
If the authentication is successful
When the mode is set to “Not-allowed Duplicate
Authentication Unallowable”, if the authentication is again
attempted after successful authentication, a duplicate
authentication error is displayed.
- When authenticating with the fingerprint
Enter the fingerprint to receive authentication.
- When authenticating with the card
Enter the card to receive authentication.
- When attempting authentication without pressing the menu key, it is automatically
authenticated to [Menu 1].

AC-2200 User Guide
73
Union Community / (138-050) 5th Fl., Hyundai Topics Building, 44-3, Bangi-dong, Songpa-
gu, Seoul, Korea // Tel : 82-2-6488-3000 , Fax : 82-2-6488-3099
E-mail: sales@unioncomm.co.kr; http://www.unioncomm.co.kr
FCC Information
This device complies with part 15 of the FCC Results. Operation is subject to the
following two conditions :
(1) This Device may not cause harmful interface, and
(2) This device must accept any interference received, including interference that
may cause undesired operation.
Note: This equipment has been tested and found to comply with the limits for CLASS B digital
device, pursuant to Part 15 of FCC Rules. These limits are designed to provide reasonable
protection against harmful interference when the equipment is operated in a commercial
environment This equipment generates, uses and can radiate radio frequency energy and, if not
installed and used in accordance with the instructions, may cause harmful interference to radio
communications. However, there is no guarantee that interference will not occur in a particular
installation. If this equipment does cause harmful interference to radio or television reception,
which can be determined by turning the equipment off and on, the user is encouraged to try
correct the interference by one or more of the following measures:
1.1. Reorient or relocate the receiving antenna.
1.2. Increase the separation between the equipment and receiver.
1.3. Connect the equipment into an outlet on a circuit different from that to which receiver is
connected.
1.4. Consult the dealer or experienced radio/TV technician for help.
WARNING
Changes or modifications not expressly approved by the manufacturer could void the
user’s authority to operate the equipment.
“CAUTION : Exposure to Radio Frequency Radiation.
Antenna shall be mounted in such a manner to minimize the potential for human
contact during normal operation. The antenna should not be contacted during operation
to avoid the possibility of exceeding the FCC radio frequency exposure limit.
Contains FCC ID: 2AEEY-PBLN51822M