UNION COMMUNITY AC-7000 Face & Fingerprint Identification Terminal User Manual Manual
UNION COMMUNITY Face & Fingerprint Identification Terminal Manual
UserManual.wiki
>
UNION COMMUNITY
>
AC 7000 User Manual
User manual
Navigation menu
Upload a User Manual
Namespaces
Wiki Guide
HTML
PDF
Info
Views
User Manual
Discussion / Help
Navigation
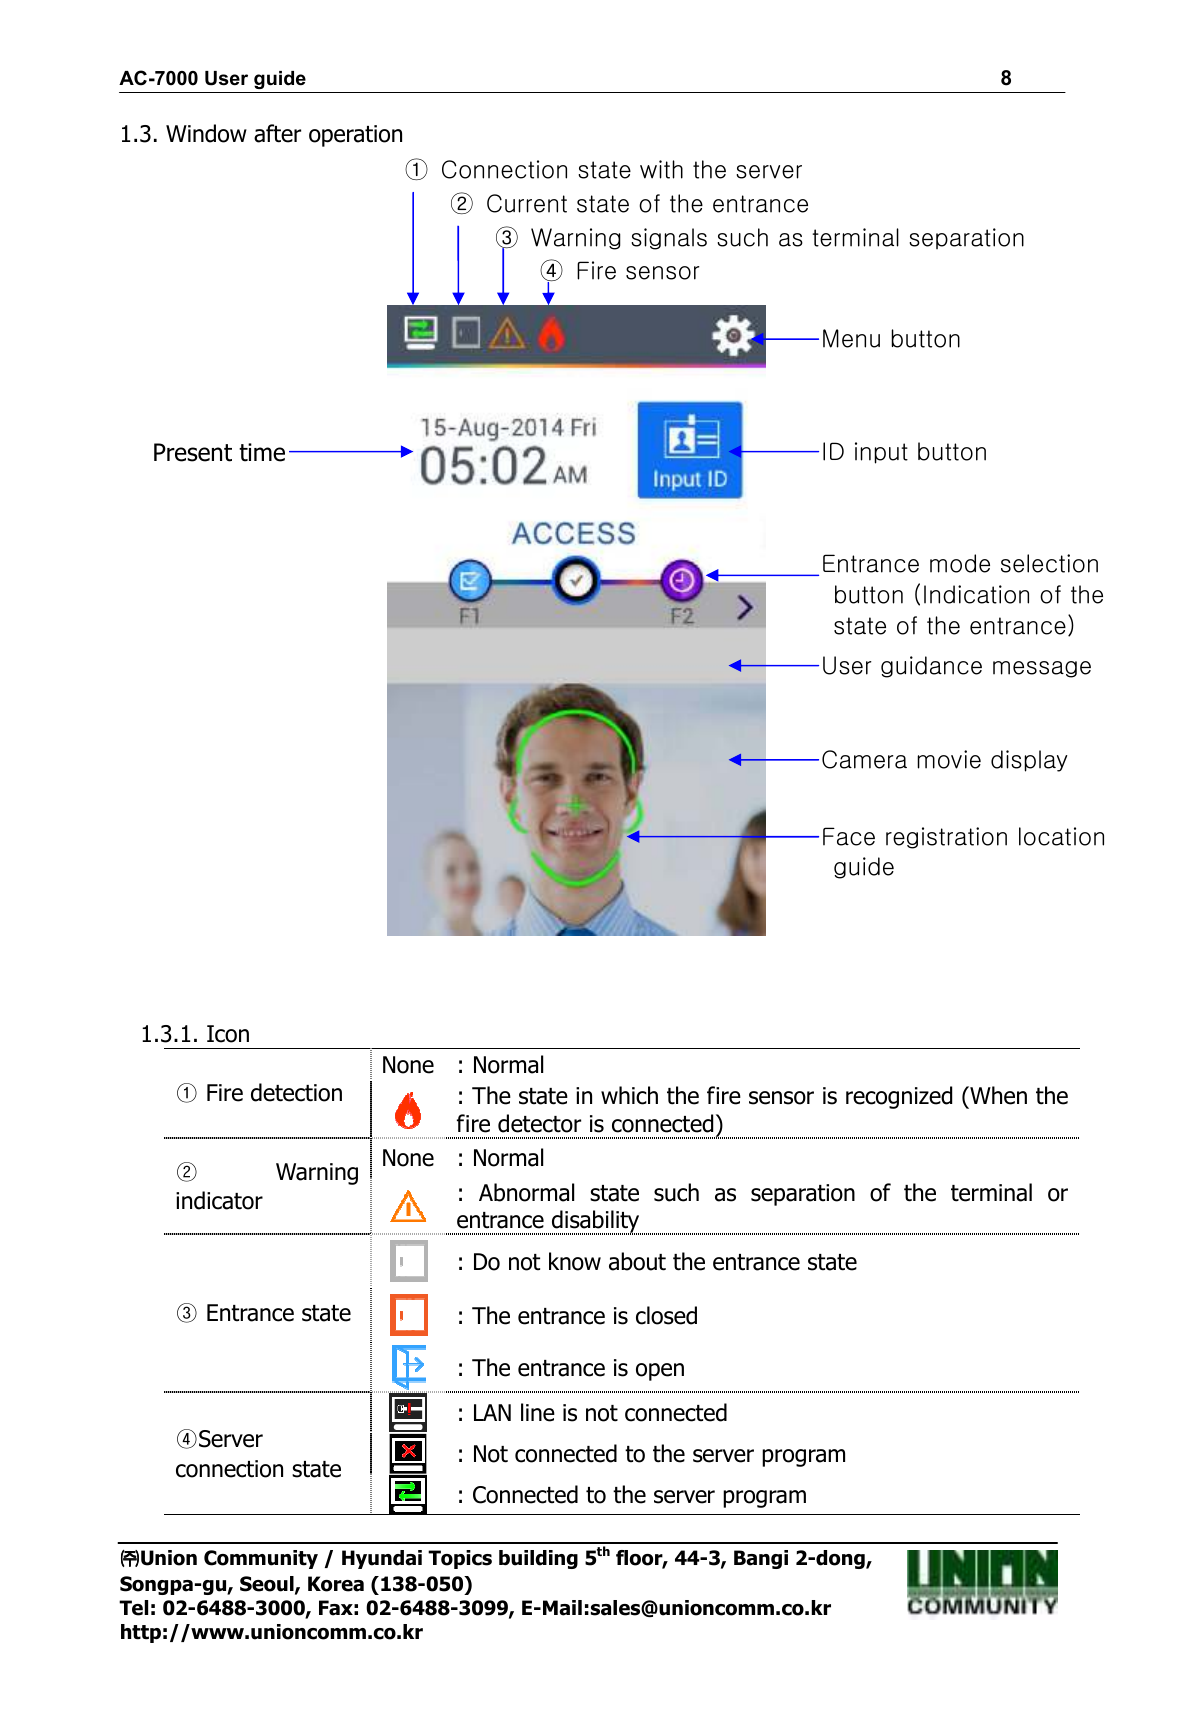
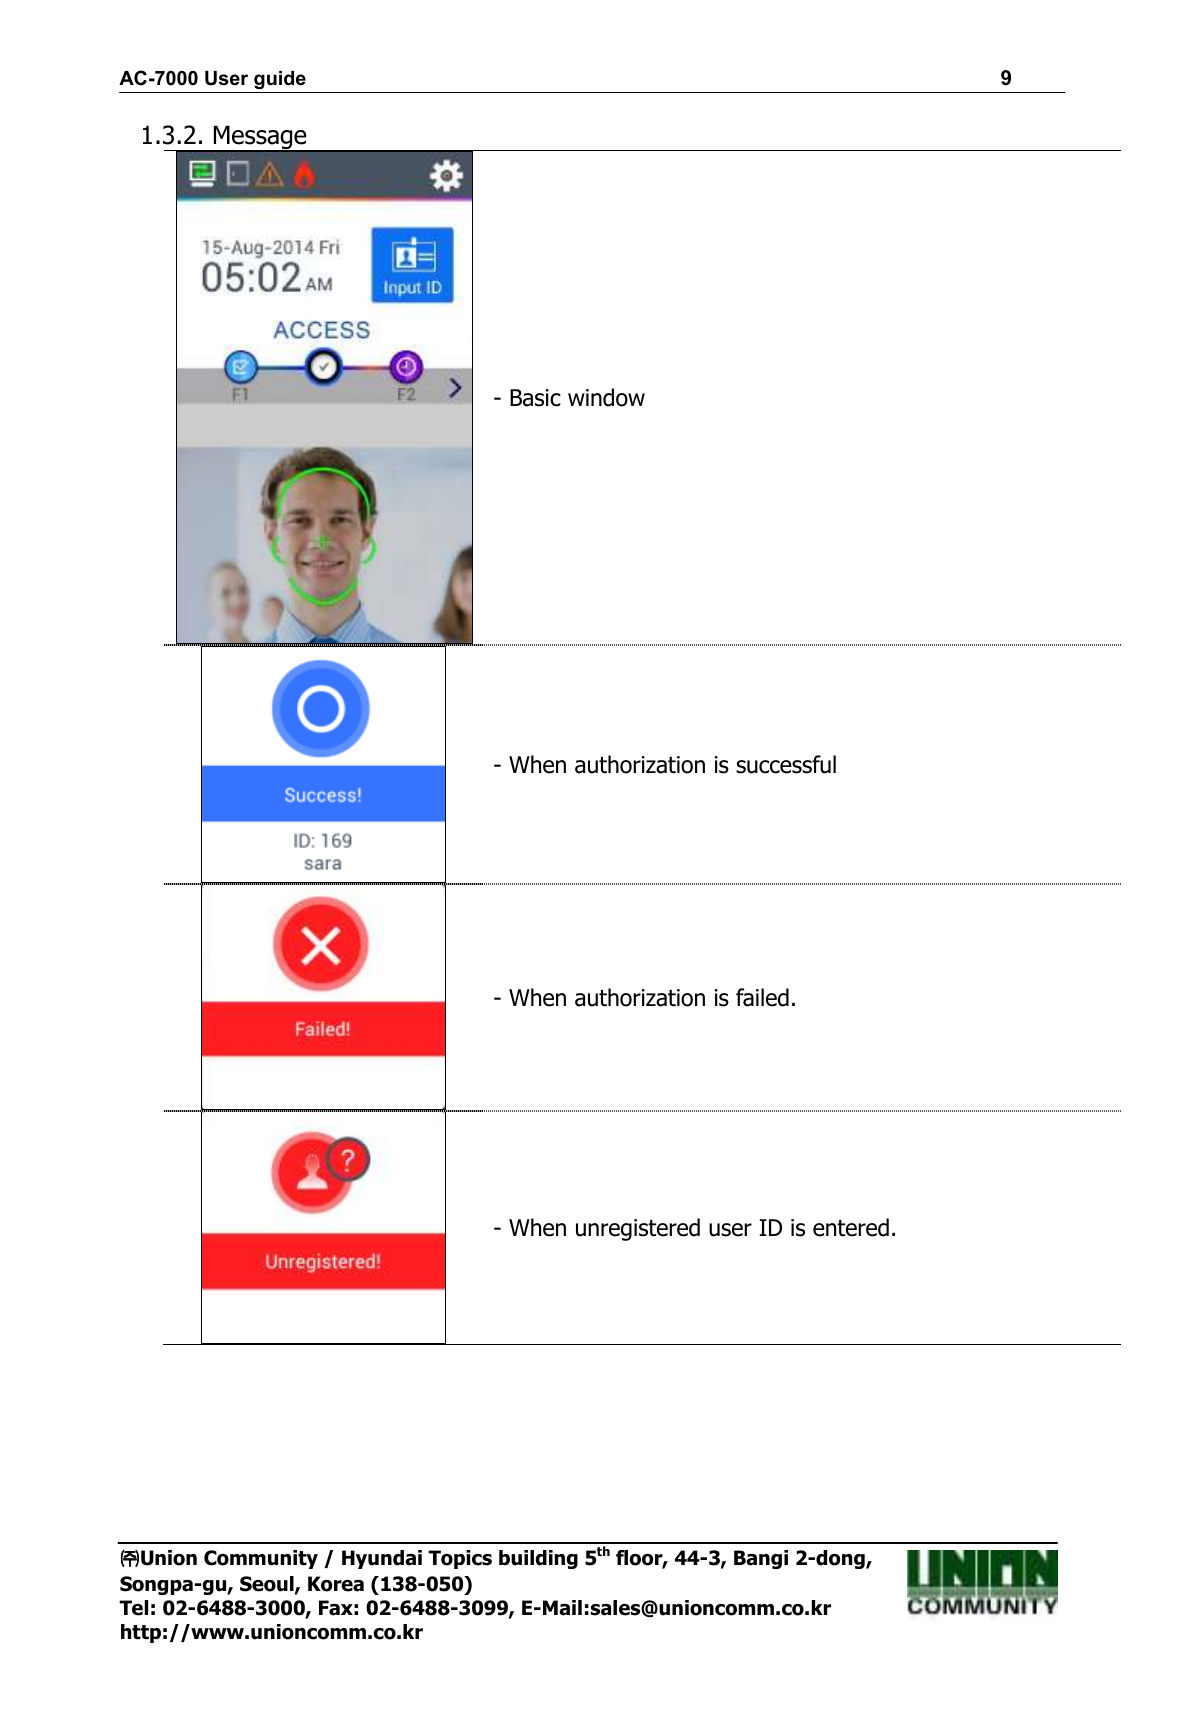
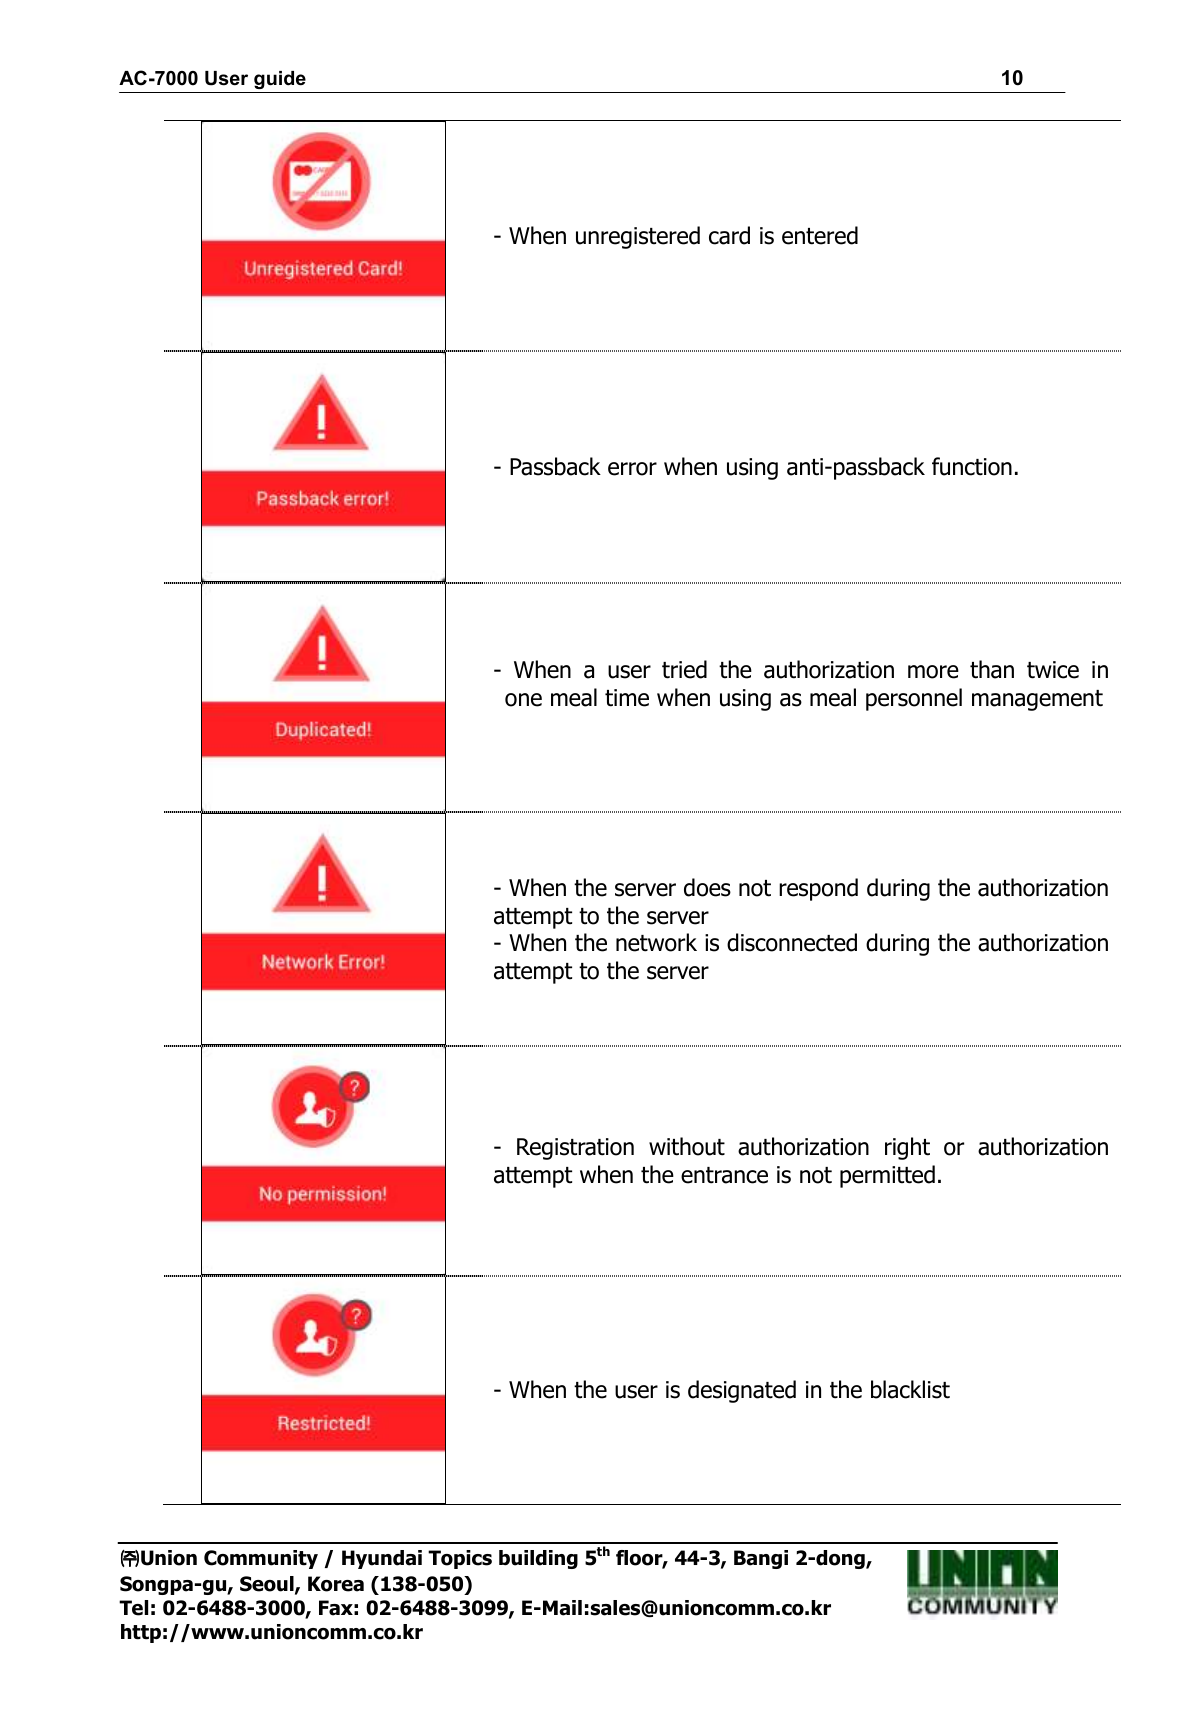
![AC-7000 User guide 20 ㈜㈜㈜㈜Union Community / Hyundai Topics building 5th floor, 44-3, Bangi 2-dong, Songpa-gu, Seoul, Korea (138-050) Tel: 02-6488-3000, Fax: 02-6488-3099, E-Mail:sales@unioncomm.co.kr http://www.unioncomm.co.kr Card Reader 125KHz RF / 13.56MHz Smart simultaneous use (1 Sam socket) HID 125K Prox card (option) HID iClass Card (option) option SIZE 88.0mm * 175.0mm * 43.4mm 3. Environment setting 3.1. Checks before setting the environment 3.1.1. Entering the menu If you click the [ ] icon at the basic window, you can enter the main menu window as follows. You can enter the subdivision menu by clicking each button. <Fig. 3-1> 3.1.2. Administrator authorization If the administrator is registered, the following administrator authorization window appears first.](https://usermanual.wiki/UNION-COMMUNITY/AC-7000/User-Guide-2446816-Page-20.png)
![AC-7000 User guide 21 ㈜㈜㈜㈜Union Community / Hyundai Topics building 5th floor, 44-3, Bangi 2-dong, Songpa-gu, Seoul, Korea (138-050) Tel: 02-6488-3000, Fax: 02-6488-3099, E-Mail:sales@unioncomm.co.kr http://www.unioncomm.co.kr ▶Administrator authorization If you enter the administrator ID, the administrator authorization is fulfilled along with the authorization method of the administrator such as card, fingerprint, face, or password. The administrator authorization only appears when the registered administrator exists. The authorization is fulfilled only once when entering the menu mode and you can access to all the menu until you quit the main menu. <Fig. 3-2> 3.1.3. How to enter the menu without administrator authorization It is how to enter the menu when the fingerprint or face authorization is impossible because the administrator card registered in the terminal was lost or there is no administrator. ① Open the cover by removing the bracket at the backside of the terminal ② With the opened cover, connect the 5pin connector number 1 with 3, and 2 with 4 at the bottom of the backside of the terminal. <Fig. 3-3> ③ Click the icon at the basic window to enter the administrator authorization window in <Fig. 3-2>, and fill the administrator ID with ‘0’ and click [ ] button, then you can enter the menu window. ▶ Be sure to remove the connection pin of the connector after modifying the setting value.](https://usermanual.wiki/UNION-COMMUNITY/AC-7000/User-Guide-2446816-Page-21.png)
![AC-7000 User guide 22 ㈜㈜㈜㈜Union Community / Hyundai Topics building 5th floor, 44-3, Bangi 2-dong, Songpa-gu, Seoul, Korea (138-050) Tel: 02-6488-3000, Fax: 02-6488-3099, E-Mail:sales@unioncomm.co.kr http://www.unioncomm.co.kr 3.1.4. How to save the set values If you click the [Complete] button at each menu to save the changed value after the change of settings, the set value of the window is saved and the following message box appears. <Fig. 3-4> ▶ If there is no changed value, the window is moved to the previous menu. ▶ If there is no signal for 30 seconds while changing the set value in the menu, the window is moved to the previous menu.](https://usermanual.wiki/UNION-COMMUNITY/AC-7000/User-Guide-2446816-Page-22.png)
![AC-7000 User guide 24 ㈜㈜㈜㈜Union Community / Hyundai Topics building 5th floor, 44-3, Bangi 2-dong, Songpa-gu, Seoul, Korea (138-050) Tel: 02-6488-3000, Fax: 02-6488-3099, E-Mail:sales@unioncomm.co.kr http://www.unioncomm.co.kr 5. Window setting ▶Background screen ▶Screen saver ▶Location of the watch 4. System 1. System ▶Length of the user ID ▶Authorization: only for terminal ▶Essential registration items □Face □Fingerprint □Card □Password □Name Registration fingerprint number[1~10] 2.Fingerprint recognition ▶1:N level [3~9] ▶1:1 level [3~9] ▶Perceiving fake fingerprint ▶Fingerprint template format □Preventing similar fingerprint registration □Multiple fingerprint authorization □1:N Authorization permission 3. Face recognition ▶Authorization level [1~4] ▶Face recognition mode ▶Camera angle 4. Authorization ▶Terminal Authorization method □Fingerprint template card 5. Date / time ▶Visual synchronization ▶Display format ▶Present date setting ▶Present time setting 6. Database 1. Delete all the users 2. Delete settings 3. Delete log data 4. Delete image log 5. Delete all 5.Terminal setting 1. Sound ▶Sound volume ▶Beep volume □User sound using 2. Terminal option ▶Card number search ▶Card format □Terminal lock setting](https://usermanual.wiki/UNION-COMMUNITY/AC-7000/User-Guide-2446816-Page-24.png)
![AC-7000 User guide 26 ㈜㈜㈜㈜Union Community / Hyundai Topics building 5th floor, 44-3, Bangi 2-dong, Songpa-gu, Seoul, Korea (138-050) Tel: 02-6488-3000, Fax: 02-6488-3099, E-Mail:sales@unioncomm.co.kr http://www.unioncomm.co.kr 6. About ▶About 8. SD card 1. Export 1. User data 2. Event log 3. System option 4. Sending out all 5. Picture data 2. Import 1. User data 2. System option 3. etc 1. Theme 2. F/W upgrade 3.3. Users management When you select the [Users management] at the main menu, the following window appears. The number of all the users is shown at the top of screen including administrator. Click [Add] button to add the new user, [Modify] button to modify the user, [Delete] button to delete the specific user, [Delete All] button to delete all the users, and [View] button to inquire the registered user list. 3.3.1. Addition If you select [User management]->[Add] in the main menu, the following screen appears](https://usermanual.wiki/UNION-COMMUNITY/AC-7000/User-Guide-2446816-Page-26.png)
![AC-7000 User guide 27 ㈜㈜㈜㈜Union Community / Hyundai Topics building 5th floor, 44-3, Bangi 2-dong, Songpa-gu, Seoul, Korea (138-050) Tel: 02-6488-3000, Fax: 02-6488-3099, E-Mail:sales@unioncomm.co.kr http://www.unioncomm.co.kr Input the user ID to be registered and click [OK] button. In this case, the ID which can be registered is shown on the screen automatically, so you can register conveniently. If you want to change ID, delete the previous value by clicking [ ] button and input the new value. Click [Back] button to cancel and go back. If you enter ID which is already registered, the failure message appears, and if the ID is not registered, the following screen appears. The icons in the left side mean as follows. : The number of registered faces : The number of registered fingerprints (X,1~10) : Existence of password registration (X:no registration, O:registration) : The number of registered cards (X,1~10) : User ID to be registered : User : Administrator button: Registration with taking a picture of the user. You can register the name with [Name], fingerprint with [Fingerprint], face with [Face], card with [Card], and password with [Password] button. The registration is basically set to be user, and it is can be changed to administrator if you click [Admin] button. Click [Save] button to save the registration, and click [Cancel] or [Back] button to cancel the registration and return. ※ Only user who is registered as administrator can change the operating method of the](https://usermanual.wiki/UNION-COMMUNITY/AC-7000/User-Guide-2446816-Page-27.png)
![AC-7000 User guide 28 ㈜㈜㈜㈜Union Community / Hyundai Topics building 5th floor, 44-3, Bangi 2-dong, Songpa-gu, Seoul, Korea (138-050) Tel: 02-6488-3000, Fax: 02-6488-3099, E-Mail:sales@unioncomm.co.kr http://www.unioncomm.co.kr terminal and can register/modify/delete the information of all the saved users, so be careful to register the administrator. 3.3.1.1. Photo registration Register by clicking [ ] button at the [Add user] screen. Click the [Save] button to register with the present camera image. Click [Cancel] or [BACK] button to cancel the registration and return. 3.3.1.2. Name registration Register by clicking [Name] button in the [Add user] window. After entering name with the under keyboard, click OK button. Click the [ ] button to cancel the registration and return.](https://usermanual.wiki/UNION-COMMUNITY/AC-7000/User-Guide-2446816-Page-28.png)
![AC-7000 User guide 29 ㈜㈜㈜㈜Union Community / Hyundai Topics building 5th floor, 44-3, Bangi 2-dong, Songpa-gu, Seoul, Korea (138-050) Tel: 02-6488-3000, Fax: 02-6488-3099, E-Mail:sales@unioncomm.co.kr http://www.unioncomm.co.kr 3.3.1.3. Fingerprint registration ①①①①Register by clicking [Fingerprint] button at the [Add user] screen. Click [ ] button to cancel the registration and return. Choose the finger to be registered when the left screen appears. ※※※※ If you register the multiple fingers, the fingers already registered are represented by blue circle ( ). If you select the finger already registered, the following message appears, and if you select the re-registration, you can register again with deleting previously registered fingerprint. ②②②② Enter the fingerprint with referring ‘1.7 Proper fingerprint registration and input methods’. Enter the fingerprint twice according to the screen instruction as follows. When the light is turned on at the fingerprint sensor with the message ‘Register FP’, put your finger on the input screen and wait for 2~3 seconds until the light is turned off. ③③③③ When the message ‘Enter the same fingerprint again’ appears, enter the same fingerprint again. ※※※※In the second fingerprint input after the first fingerprint, you should take off your finger from the screen once and input again.](https://usermanual.wiki/UNION-COMMUNITY/AC-7000/User-Guide-2446816-Page-29.png)
![AC-7000 User guide 30 ㈜㈜㈜㈜Union Community / Hyundai Topics building 5th floor, 44-3, Bangi 2-dong, Songpa-gu, Seoul, Korea (138-050) Tel: 02-6488-3000, Fax: 02-6488-3099, E-Mail:sales@unioncomm.co.kr http://www.unioncomm.co.kr ④④④④ The message of the left side appears when the input is completed. If you click [OK] button, the registration is completed and the screen is returned to the upper menu. If it is similar with the fingerprint already registered, the message “Already registered finger!” appears like the left side, and you can start again from the procedure of ②②②② if you click the [Retry] button. You can click [ ] button to cancel and return to the upper menu. ※You can register 10 fingerprints at most for one ID, and you cannot register more than 10 IDs. If the registration was failed 2~3 times despite the proper fingerprint registration method, it is recommended to use face, password, or card.](https://usermanual.wiki/UNION-COMMUNITY/AC-7000/User-Guide-2446816-Page-30.png)
![AC-7000 User guide 31 ㈜㈜㈜㈜Union Community / Hyundai Topics building 5th floor, 44-3, Bangi 2-dong, Songpa-gu, Seoul, Korea (138-050) Tel: 02-6488-3000, Fax: 02-6488-3099, E-Mail:sales@unioncomm.co.kr http://www.unioncomm.co.kr 3.3.1.4. Face registration Register with referring ‘1.6. How to register and authorize the face properly ‘ ①①①① If you press [face] button on the [Add user] page, you can select either [Regular Registration] or [Quick Registration] If you wish to cancel the enrollment, press the [BACK] button *Registration follows the guideline which enrolls the face in 5 steps after the face and the posture is fixed. *Quick Registration enrolls the face in 3 steps using the auto face search function, which enrolls the face when the face area is detected. ②②②② Locate your face to be fitted to the face lines like the left picture, and look directly at the screen according to the guidance of the screen.](https://usermanual.wiki/UNION-COMMUNITY/AC-7000/User-Guide-2446816-Page-31.png)
![AC-7000 User guide 32 ㈜㈜㈜㈜Union Community / Hyundai Topics building 5th floor, 44-3, Bangi 2-dong, Songpa-gu, Seoul, Korea (138-050) Tel: 02-6488-3000, Fax: 02-6488-3099, E-Mail:sales@unioncomm.co.kr http://www.unioncomm.co.kr ③③③③ If the face was recognized properly like the left picture, the guide is turned green and the face registration begins. At this point, you should maintain the stopped state without moving face for the better registration. ④④④④ Move your face slightly directly, upward, or downward according to the direction of the screen. At this point, please do not move more than 15˚. When the registration is ended, the message [Completed!] appears like the left screen, and if you click the [OK] button, the face registration is completed and the screen is moved to the previous screen. If you want to register again, click the [OK] button to start from the procedure of ②②②②](https://usermanual.wiki/UNION-COMMUNITY/AC-7000/User-Guide-2446816-Page-32.png)
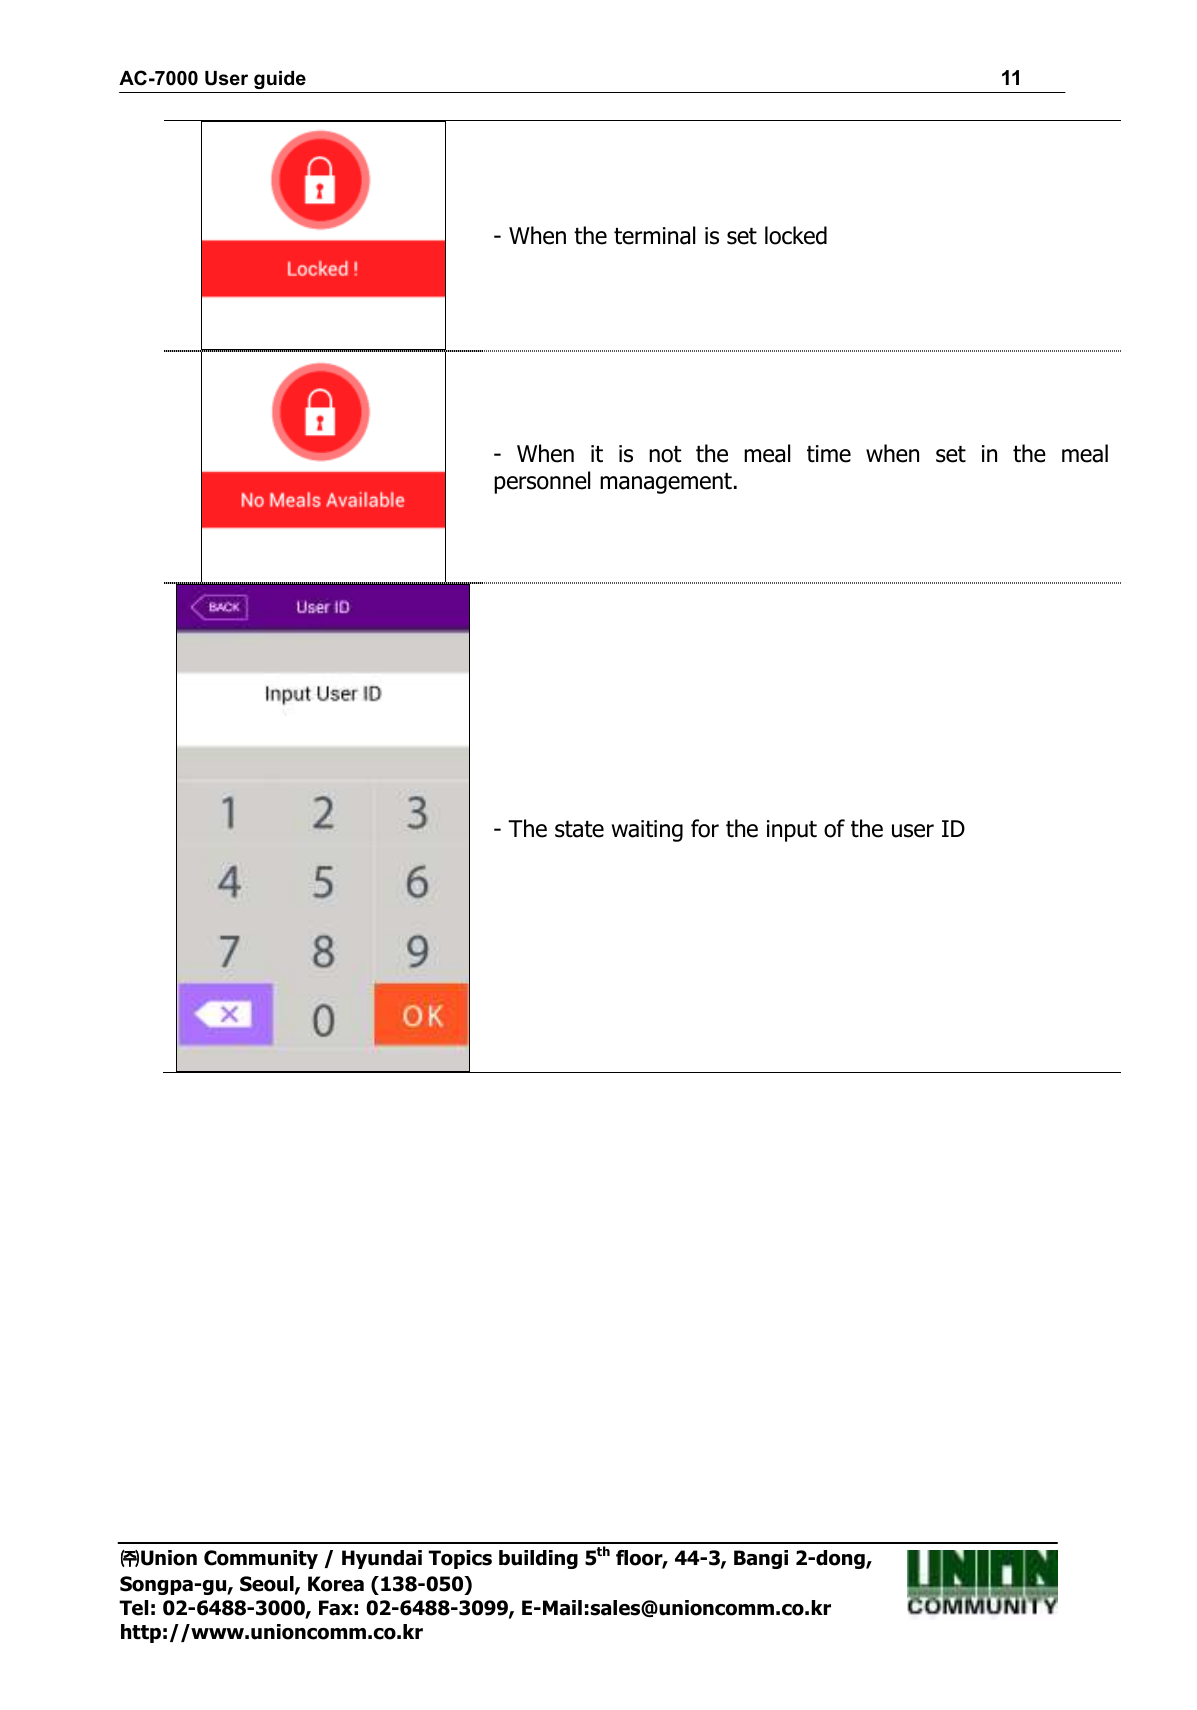
![AC-7000 User guide 33 ㈜㈜㈜㈜Union Community / Hyundai Topics building 5th floor, 44-3, Bangi 2-dong, Songpa-gu, Seoul, Korea (138-050) Tel: 02-6488-3000, Fax: 02-6488-3099, E-Mail:sales@unioncomm.co.kr http://www.unioncomm.co.kr 3.3.1.5. Password registration If you enter the password in 1~8 characters into the password input window and click [OK] button, the input focus is moved to the ‘password confirm’ window at below. Enter the same password again and click [OK] button. Click [ ] button to cancel and return. ※※※※ If you enter the different password in the confirm window, the message “Wrong input!” appears as follows. 3.3.1.6. Card registration RRRRegister with clicking [card] button in the [Add egister with clicking [card] button in the [Add egister with clicking [card] button in the [Add egister with clicking [card] button in the [Add user] button. Click user] button. Click user] button. Click user] button. Click [ ] button to cancel and return. ※※※※ If you entered the card already registered, If you entered the card already registered, If you entered the card already registered, If you entered the card already registered, the following message appearsthe following message appearsthe following message appearsthe following message appears ※※※※If a user tried over than 10 registrations, If a user tried over than 10 registrations, If a user tried over than 10 registrations, If a user tried over than 10 registrations, the followithe followithe followithe following message appears.ng message appears.ng message appears.ng message appears.](https://usermanual.wiki/UNION-COMMUNITY/AC-7000/User-Guide-2446816-Page-33.png)
![AC-7000 User guide 34 ㈜㈜㈜㈜Union Community / Hyundai Topics building 5th floor, 44-3, Bangi 2-dong, Songpa-gu, Seoul, Korea (138-050) Tel: 02-6488-3000, Fax: 02-6488-3099, E-Mail:sales@unioncomm.co.kr http://www.unioncomm.co.kr 3.3.1.7. Authorization option ▶’Fingerprint authorization level’ (basic setting:’0’) It decides the fingerprint authorization level of each user, and the registered users can have different authorization level by modifying this value. If you set ‘0’, the authorization uses the level of fingerprint authorization. ▶Enable 1:N Fingerprint authorization (basic setting: when the fingerprint is registered, [v]) If this option is checked, you can authorize only with fingerprint without user ID or card. ▶ Enable 1:N face authorization (basic setting: when the face is registered, [v]) If this option is checked, you can authorize only with face without user ID or card. 3.3.1.8. Authorization method Set by clicking [Auth type] at the [Add user] window. (But, it can be set when there are more than 2 authorization methods registered) Click [BACK] button to cancel and return. At the left picture, “▶Auth Type” at the upper side shows all the authorization methods already registered, and the buttons at the lower side shows the methods which can be selected. Present authorization method is distinguished with different color. If you click the button you want to change to, the authorization method is changed and the screen moves to the previous window. The authorization method icons are represented as follows. : Fingerprint : face : card : password ※※※※In case of authorization method, if it is not set, the authorization methods In case of authorization method, if it is not set, the authorization methods In case of authorization method, if it is not set, the authorization methods In case of authorization method, if it is not set, the authorization methods previously registered are set automatically. (But, if there are more than 3 previously registered are set automatically. (But, if there are more than 3 previously registered are set automatically. (But, if there are more than 3 previously registered are set automatically. (But, if there are more than 3 authorization methods registered, the password is excluded).authorization methods registered, the password is excluded).authorization methods registered, the password is excluded).authorization methods registered, the password is excluded).](https://usermanual.wiki/UNION-COMMUNITY/AC-7000/User-Guide-2446816-Page-34.png)
![AC-7000 User guide 35 ㈜㈜㈜㈜Union Community / Hyundai Topics building 5th floor, 44-3, Bangi 2-dong, Songpa-gu, Seoul, Korea (138-050) Tel: 02-6488-3000, Fax: 02-6488-3099, E-Mail:sales@unioncomm.co.kr http://www.unioncomm.co.kr 3.3.1.9. Save Click the [Save] button to save when all the registration procedure is finished. At this point, if you click [Cancel] or [BACK] button to return, the user is not saved. Next is the LCD messages which can appear at the registration procedure. When you clicked the [Save] button, the case registration was successful When you clicked the [Save] button, the case registration was failed : The case none of authorization methods such as fingerprint, face, card, and password is registered. When you clicked the [Auth method] button, the case none of the authorization method was registered. In [Register FP], the case you input the different fingerprint at the fingerprint registration.](https://usermanual.wiki/UNION-COMMUNITY/AC-7000/User-Guide-2446816-Page-35.png)
![AC-7000 User guide 36 ㈜㈜㈜㈜Union Community / Hyundai Topics building 5th floor, 44-3, Bangi 2-dong, Songpa-gu, Seoul, Korea (138-050) Tel: 02-6488-3000, Fax: 02-6488-3099, E-Mail:sales@unioncomm.co.kr http://www.unioncomm.co.kr In [Register FP], The case you tried to registered the fingerprint already registered. (But, you can input the same fingerprint with the same user ID). ※ If you want to register the same fingerprint in the different ID, you should uncheck the ‘System Fingerprint recognition preventing the similar fingerprint registration’. But, in this case, because the same fingerprint can be authorized as different ID, it is not suitable for the attendance management. 3.3.2. Deletion The following window appears if you click [User management]->[Delete] at the main menu. Input the user ID to be deleted and click [OK] button. Click [BACK] button to cancel and return. If you input the unregistered ID, the failure message “Unregistered user” appears, and if you input the registered ID, success message “Deleted” appears. But, the deletion in the terminal is not led to the deletion in the server, so if you want to delete completely, you should delete it also in the server. The deletion delete both user and admin, so you should be cautious, and the user registered only in the terminal is cannot be recovered. The followings are LCD guidance which can appear at the deletion procedure.](https://usermanual.wiki/UNION-COMMUNITY/AC-7000/User-Guide-2446816-Page-36.png)
![AC-7000 User guide 37 ㈜㈜㈜㈜Union Community / Hyundai Topics building 5th floor, 44-3, Bangi 2-dong, Songpa-gu, Seoul, Korea (138-050) Tel: 02-6488-3000, Fax: 02-6488-3099, E-Mail:sales@unioncomm.co.kr http://www.unioncomm.co.kr When it is deleted normally. When unregistered ID was entered 3.3.3. Modification The following window appears if you click the [User management]->[Modification] in the main menu. Input the user ID to be modified and click [OK] button. Click [BACK] button to cancel and return. The failure message appears if you input the unregistered ID, and if you input the registered ID, the information of registered user is represented as follows.](https://usermanual.wiki/UNION-COMMUNITY/AC-7000/User-Guide-2446816-Page-37.png)
![AC-7000 User guide 38 ㈜㈜㈜㈜Union Community / Hyundai Topics building 5th floor, 44-3, Bangi 2-dong, Songpa-gu, Seoul, Korea (138-050) Tel: 02-6488-3000, Fax: 02-6488-3099, E-Mail:sales@unioncomm.co.kr http://www.unioncomm.co.kr The icons at the left side means as follows. : The number of registered faces : The number of registered fingerprints (X,1~10) : Existence of password registration (O:registration/X:미registration) : The number of registered cards (X,1~10) : User ID to be registered : User : Administrator If you touch the picture, you can register with re-taken picture. The modification method of each item is the same with the user addition, so refer to the ‘3.3.1. Addition’ 3.3.4. Delete all If you click the [User management]->[Delete all] in the main menu, the following window appears. If you want to delete all the users, click [YES], and if you want to cancel, click [NO]. If you click [YES], the users and admin are deleted, and the restoration is impossible once they are deleted, so be careful. 3.3.5. Search](https://usermanual.wiki/UNION-COMMUNITY/AC-7000/User-Guide-2446816-Page-38.png)
![AC-7000 User guide 39 ㈜㈜㈜㈜Union Community / Hyundai Topics building 5th floor, 44-3, Bangi 2-dong, Songpa-gu, Seoul, Korea (138-050) Tel: 02-6488-3000, Fax: 02-6488-3099, E-Mail:sales@unioncomm.co.kr http://www.unioncomm.co.kr If you click the [User management]->[Search] in the main menu, all the users registered can be searched as follows. The user list appears by the order of ID, and if you slide the screen upward, you can search the additional user list. The list appears in the unit of 100 people and if the list is more than 100 people, you can see the previous or next list by clicking [BACK] or [NEXT] button. ▶[ID]: If you click the ID of specific user, you can directly move to the modification window of the user. ▶[Delete]: If you check the box of the right side and click the [Delete] button, you can delete all the checked users at once. If you click [BACK] button on the top, you can move to the previous ‘3.3 User management] menu. ▶If you input the User ID by clicking [ID search] button, the user is searched like in the left picture. If you click [BACK] button in this window, you can move to the ‘3.3. User management’ menu.](https://usermanual.wiki/UNION-COMMUNITY/AC-7000/User-Guide-2446816-Page-39.png)
![AC-7000 User guide 40 ㈜㈜㈜㈜Union Community / Hyundai Topics building 5th floor, 44-3, Bangi 2-dong, Songpa-gu, Seoul, Korea (138-050) Tel: 02-6488-3000, Fax: 02-6488-3099, E-Mail:sales@unioncomm.co.kr http://www.unioncomm.co.kr ▶If you input the user name by clicking [Search name] button, the registered user list including the characters is shown. If you click [BACK] button in this window, you can move to the ‘3.3. User management’ menu. Ex) If you searched with “ma”, all the users who contain “ma” in their name are searched. 3.4. Network setting If you select [Network] in the main menu, the following window appears. ▶Basic setting : Same with the window at the left side. Select the method [Static IP] if the static IP is allocated from the connected network, and select [DHCP] if the IP is allocated from the DHCP server in the connected network. If you selected [Static IP], set the IP address, subnet mask, and gateway. And if you selected [DHCP], you don’t have to set them. DNS entry is possible instead of IP in the [Server IP], and if you use specific DNS server, input the IP address of [DNS] server together. You can designate the DNS servers up to two. ▶[Port]: The basic port value of the authorization server (UNIS server) is ‘9870’, and if you change the value, you should change the server program with the same value, so be cautious. ▶[Terminal ID]: It is unique ID used by the terminal to distinguish the terminals and the default value is ‘1’. It should be the same with the ID of the terminal registered, and](https://usermanual.wiki/UNION-COMMUNITY/AC-7000/User-Guide-2446816-Page-40.png)
![AC-7000 User guide 41 ㈜㈜㈜㈜Union Community / Hyundai Topics building 5th floor, 44-3, Bangi 2-dong, Songpa-gu, Seoul, Korea (138-050) Tel: 02-6488-3000, Fax: 02-6488-3099, E-Mail:sales@unioncomm.co.kr http://www.unioncomm.co.kr the characters can be up to 9 digits. If you touch the item you want to change, the keypad appears at the bottom. If the input is finished with the keypad, continue the input by touching [ ] button or the next input window. If you touch the background window which is not the input window, the keypad disappears. If you want to apply the changes, click [Complete] button, and return to the previous menu by clicking [BACK] button. 3.5. Application mode 3.5.1. Application mode If you select the [Application mode] in the main menu, the following window appears. In the application mode, you can select the [Entrance control/ Attendance management/ Meal personnel management] according to the purpose. 3.5.1.1. Entrance control or attendance management setting](https://usermanual.wiki/UNION-COMMUNITY/AC-7000/User-Guide-2446816-Page-41.png)
![AC-7000 User guide 42 ㈜㈜㈜㈜Union Community / Hyundai Topics building 5th floor, 44-3, Bangi 2-dong, Songpa-gu, Seoul, Korea (138-050) Tel: 02-6488-3000, Fax: 02-6488-3099, E-Mail:sales@unioncomm.co.kr http://www.unioncomm.co.kr It is the screen appearing when you select the Access. Click [OK] button to apply the changes, and click [BACK] button to cancel and return. ▶ Basic setting : Same with the window at the left side It is the screen appearing when you select the [TnA]. Click the [OK] button to apply the changes, and click [BACK] button to cancel and return. ▶Schedule setting (00:00~23:59): You can set the time for each authorization mode and if you do not need the function, set ’00:00-00:00’. During the set time, the set mode is always shown unless clicking another function button, and it is convenient for the TnA management because the indication mode is changed to the set authorization mode automatically though another mode was authorized by clicking another function key. The time periods should not be overlapped, but if they are overlapped, the application order is Attend->Leave->Out->In->Access. ▶Blocking time: This function prevents the same user to authorize again in the set time. There is no restriction if it is set 0, but if it is set bigger than 0, the user can authorize again when the set time (sec) is passed from the previous authorization. It can be set](https://usermanual.wiki/UNION-COMMUNITY/AC-7000/User-Guide-2446816-Page-42.png)
![AC-7000 User guide 43 ㈜㈜㈜㈜Union Community / Hyundai Topics building 5th floor, 44-3, Bangi 2-dong, Songpa-gu, Seoul, Korea (138-050) Tel: 02-6488-3000, Fax: 02-6488-3099, E-Mail:sales@unioncomm.co.kr http://www.unioncomm.co.kr up to 86,400 seconds (24 hours). 3.5.1.2. Meal personnel management setting It is the screen appearing when selecting the meal management. You can set the time period of each meal type. And if the setting is not needed, set ‘00:00-00:00’. ▶Allow duplicate: If it is unchecked( ), each user can authorize once in the one meal, but if it is checked( ), the multiple authorization is possible regardless of the previous authorizations. Click the [OK] button to apply the changes, and click [BACK] button to cancel and return. 3.5.2. Function keys The following window appears if you select the [Application mode] -> [Function key] in the main menu. ▶ Basic setting : Same with the window at the left side ▶Fn key It means the [F1]~[F4], Access button used to change the authorization mode such as attendance and leaving, and if you click the fn key, the authorization mode is changed to the mode. Because only the checked buttons are represented on the basic window, you can use with unchecking other function keys when using as device only for the attendance or leaving. ▶ The expended key is the function by which you can expend the keys when you need the additional authorization mode besides the basic function keys ([F1]~[F4], [Access]). Check the [number of the extension function key] to use the extended key, and the number can be set 4, 8, 12, 16, 20, 24, 28, 32, 36, and 40. Click [OK] to apply the set value, and click [BACK] button to move to the previous menu.](https://usermanual.wiki/UNION-COMMUNITY/AC-7000/User-Guide-2446816-Page-43.png)
![AC-7000 User guide 44 ㈜㈜㈜㈜Union Community / Hyundai Topics building 5th floor, 44-3, Bangi 2-dong, Songpa-gu, Seoul, Korea (138-050) Tel: 02-6488-3000, Fax: 02-6488-3099, E-Mail:sales@unioncomm.co.kr http://www.unioncomm.co.kr 3.6. System 3.6.1. System The following window appears if you select the [System]->[System] in the main menu. ▶ Basic setting : Same with the window at the left side ▶User ID Length It sets the length of the user ID, and it can be 2~9 characters and should be the same with the length of the registered ID of the server program. If the ID registered in the server program uses ‘000075’ as a 6 digits ID, set 6. ▶Authentication It determines the priority of the authorization between the terminal and network server, and AC7000 only supports the terminal authorization method. It only authorizes the user registered in the terminal, and the authorization result is sent to the server in real time if connected with the server. ▶Mandatory registration items It determines the items which should be entered in the user registration, and the user can be registered when all the checked items are entered. The number of registered fingerprints is only valid when the [Fingerprint] is checked. Click [OK] button to apply the set value, and click [BACK] button to cancel and return. If you click the OK button without changing the set value, it is moved to the upper menu directly. Click the menu button at the left side to set additionally. 3.6.2. Fingerprint recognition The following screen appears if you select the [System]->[Fingerprint recognition] in the main menu.](https://usermanual.wiki/UNION-COMMUNITY/AC-7000/User-Guide-2446816-Page-44.png)
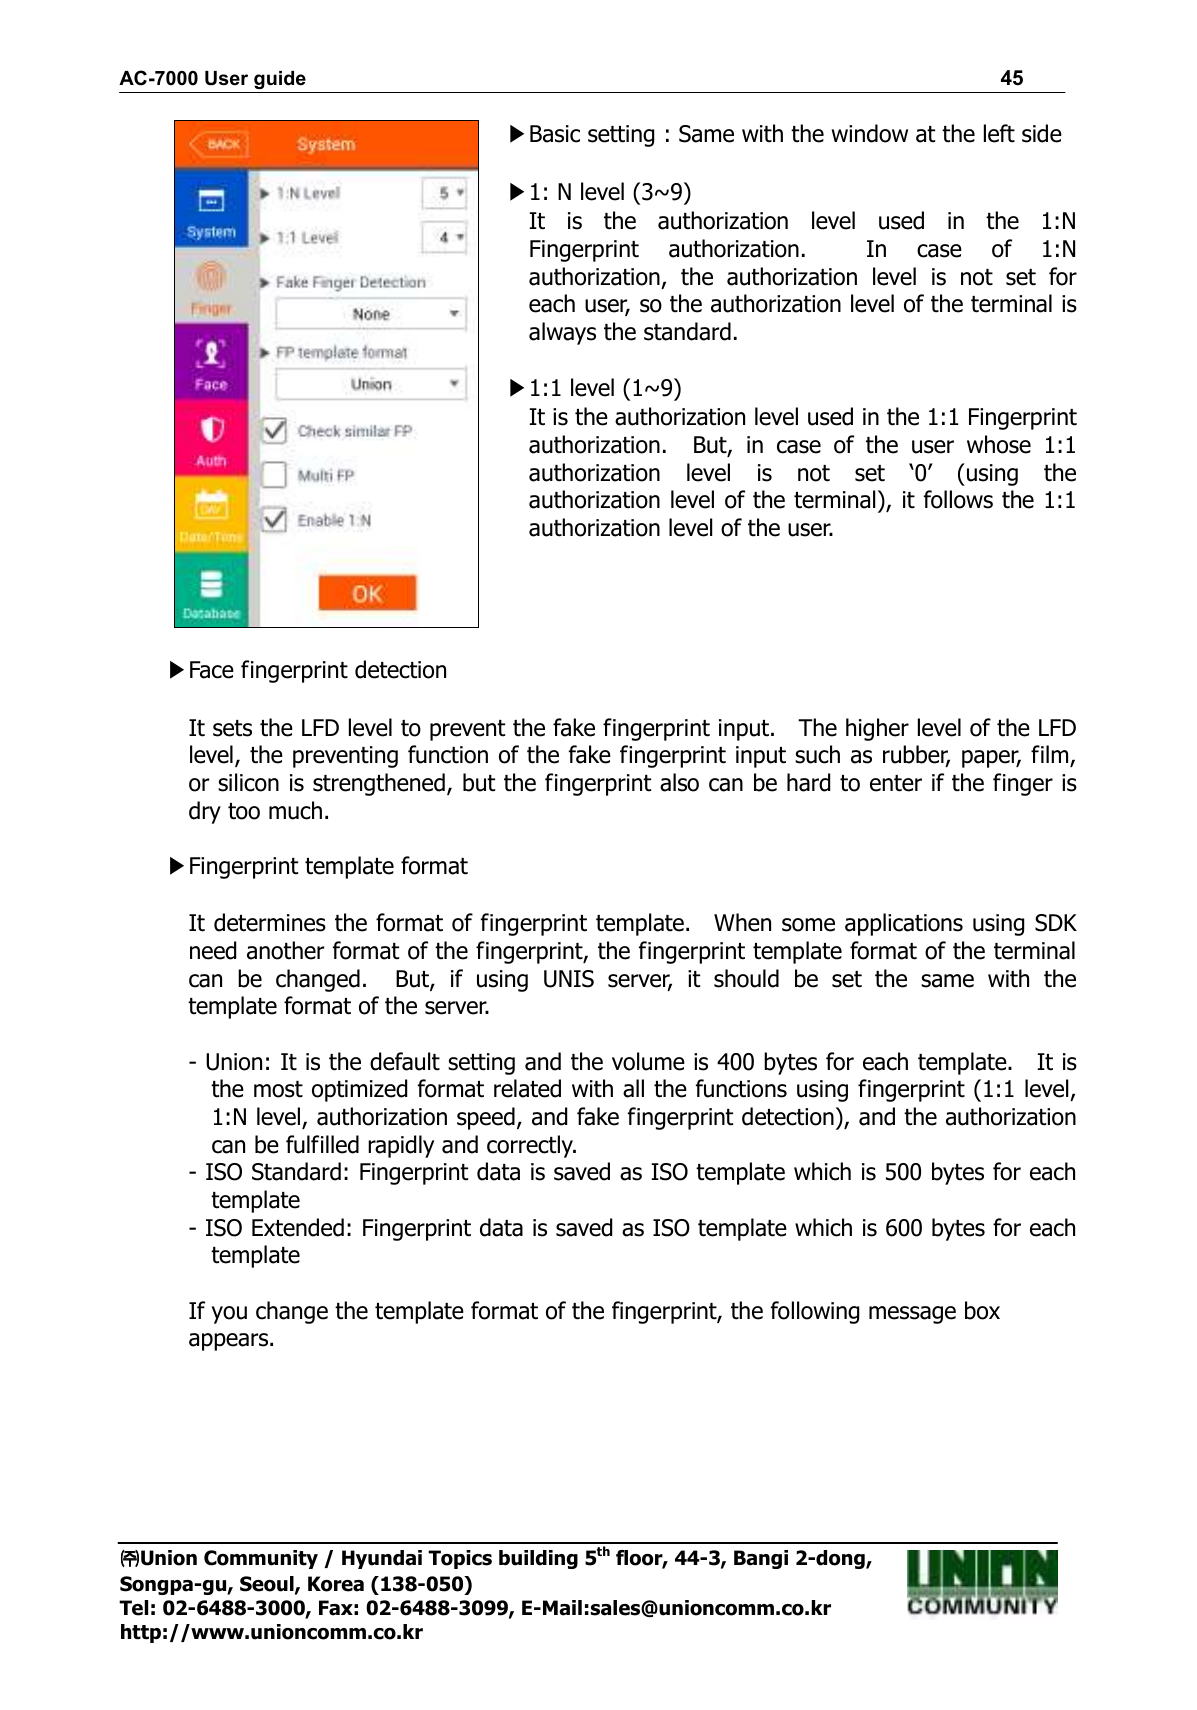
![AC-7000 User guide 46 ㈜㈜㈜㈜Union Community / Hyundai Topics building 5th floor, 44-3, Bangi 2-dong, Songpa-gu, Seoul, Korea (138-050) Tel: 02-6488-3000, Fax: 02-6488-3099, E-Mail:sales@unioncomm.co.kr http://www.unioncomm.co.kr If you click the [OK] button, the new format is applied, and if you click the [Cancel] button, the format value before the change is maintained. ※※※※ Cautions: If you change the fingerprint template format, all the Cautions: If you change the fingerprint template format, all the Cautions: If you change the fingerprint template format, all the Cautions: If you change the fingerprint template format, all the registered fingerprints are deleted, so be cautions.registered fingerprints are deleted, so be cautions.registered fingerprints are deleted, so be cautions.registered fingerprints are deleted, so be cautions. ▶Preventing similar Fingerprint registration If it is checked( ), the re-recognition as another user ID is prevented by checking if the fingerprint is already registered. ▶Multiple fingerprint authorization If it is checked ( ), all the registered fingerprints should be authorized after the ID (or card) input. If it is checked, the user should input the user ID or card, [Enable 1:N Authorization] is unchecked automatically. It is the function used when managing the access control of the special area strictly. For example, if the user with ID ‘0001’ has three fingerprints registered, the user should be authorized with all three fingerprints after entering ID. In this case, the order of three fingerprints is not important, but if one of the fingerprints is failed to be authorized, the authorization is failed. ▶1:N Authorization permission If it is checked ( ), the user can be authorized only with the fingerprint without user ID or card. Though the user is registered by enabling 1:N authorization, in the terminal where the option is not checked, only the 1:1 authorization is possible. Click [OK] button to apply the set value, and click [BACK] button to cancel and return. If you click [OK] button without changing the set value, it is moved to the upper menu automatically. 3.6.3. Face recognition](https://usermanual.wiki/UNION-COMMUNITY/AC-7000/User-Guide-2446816-Page-46.png)
![AC-7000 User guide 47 ㈜㈜㈜㈜Union Community / Hyundai Topics building 5th floor, 44-3, Bangi 2-dong, Songpa-gu, Seoul, Korea (138-050) Tel: 02-6488-3000, Fax: 02-6488-3099, E-Mail:sales@unioncomm.co.kr http://www.unioncomm.co.kr ▶ Basic setting : Same with the window at the left side ▶Authorization level It is the level used in face authorization, and it can be set 1~4 stages according to the accordance degree with the registered face. And the authorization is successful when the accordance degree is higher than set authorization level. If the authorization level is higher, the security level will be higher, but you also can fail to authorize easily due to the high requirement for the accordance level. ▶Face recognition mode It determines the face authorization method, and you can set along with the using condition. The specific explanation about each set method can be referred in ‘1.6. How to register and certify the face properly’. Click [OK] button to apply the set value, and click [BACK] button to cancel and return. If you click [OK] button without changing the set value, it is moved to the upper menu automatically. 3.6.4. Authorization If you select the [System]->[Authorization] in the main menu, the following window appears.](https://usermanual.wiki/UNION-COMMUNITY/AC-7000/User-Guide-2446816-Page-47.png)
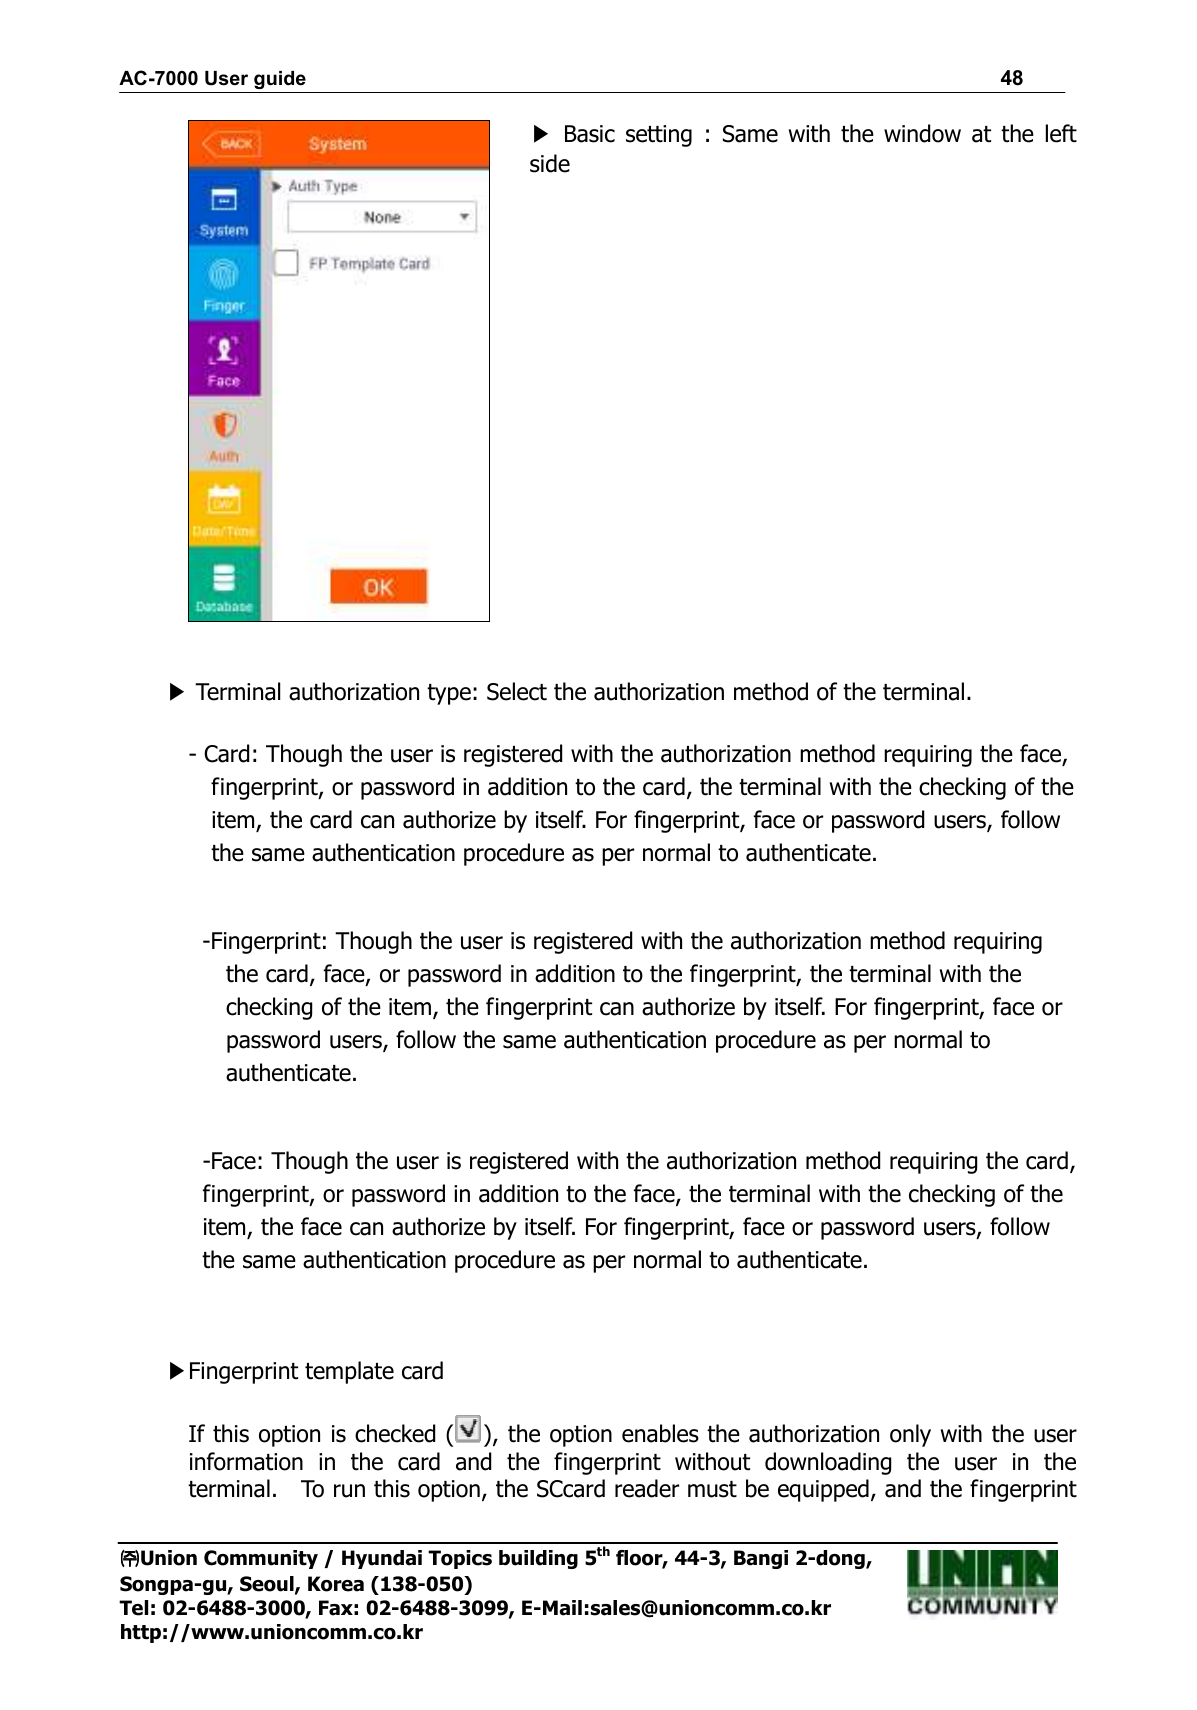
![AC-7000 User guide 49 ㈜㈜㈜㈜Union Community / Hyundai Topics building 5th floor, 44-3, Bangi 2-dong, Songpa-gu, Seoul, Korea (138-050) Tel: 02-6488-3000, Fax: 02-6488-3099, E-Mail:sales@unioncomm.co.kr http://www.unioncomm.co.kr card layout should be set in the server and applied to the terminal. Click [OK] button to apply the set value, and click [BACK] button to cancel and return 3.6.5. Present time setting If you select the [System]->[Date/Time] in the main menu, the following window appears. ▶ Basic setting : Same with the window at the left side ▶Time synchronization It determines the synchronization method between the present time of terminal and server. If you want automatic synchronization, set [Auto], and if you want manual synchronization, set [Manual]. ▶Display format The present time indicating method of the terminal -yyyy-mm-dd: Order of year, month, and date. -dd-mmm-yyyy: Order of date, month (English), and year ▶Present date setting/present time setting It changes the present time of the terminal. If the server is connected and the [Time synchronization] is set [Auto], you don’t have to change because it is synchronized with the server time. Click [OK] button to apply the set value, and click [BACK] button to cancel and return. 3.6.6. Database If you select the [System]->[Database] in the main menu, the following window](https://usermanual.wiki/UNION-COMMUNITY/AC-7000/User-Guide-2446816-Page-49.png)
![AC-7000 User guide 50 ㈜㈜㈜㈜Union Community / Hyundai Topics building 5th floor, 44-3, Bangi 2-dong, Songpa-gu, Seoul, Korea (138-050) Tel: 02-6488-3000, Fax: 02-6488-3099, E-Mail:sales@unioncomm.co.kr http://www.unioncomm.co.kr appears. If you want to delete all the users, click [Delete all users] button. If you want to initialize the settings, click [Delete setting] button. If you want to initialize the authorization record, click [Delete Log] button. If you want to delete image log only, click [Delete image log] button. If you want to delete all the data and initialize with the factory setting, click [Factory init] button. If you want to move to the upper menu, click [Close] or [BACK] button. 3.6.6.1. Delete all the users If you select the [System]->[Database]->[Delete all the users] in the main menu, the following window appears. If you want to delete all users, click [YES] button, and if you want to cancel, click [NO] or [X] button. If there is no signal for 5 seconds in this state, the message box disappears without deletion. If deletion is successful by click [YES], the following success message box appears. <Fig.3-5>](https://usermanual.wiki/UNION-COMMUNITY/AC-7000/User-Guide-2446816-Page-50.png)
![AC-7000 User guide 51 ㈜㈜㈜㈜Union Community / Hyundai Topics building 5th floor, 44-3, Bangi 2-dong, Songpa-gu, Seoul, Korea (138-050) Tel: 02-6488-3000, Fax: 02-6488-3099, E-Mail:sales@unioncomm.co.kr http://www.unioncomm.co.kr In this case, both the users and administrator are deleted, and the restoration is impossible once the data is deleted. 3.6.6.2. Delete settings If you select the [System]->[Database]->[Delete setting] in the main menu, the following screen appears. Click [YES] button to initialize all the set values, and click [NO] or [ ] button to cancel. If there is no signal for 5 seconds in this state, the message box disappears without initialization. If the deletion is successful by clicking [YES], the success message in <Fig. 3-5> is displayed and the display language and voice is changed to the default value English. All the set value of the terminal besides the MAC address, but the record of the users and authorizations is not deleted. 3.6.6.3. Delete logs data If you select the [System]->[Database]->[Delete log data] in the main menu, the following window appears. If you want to delete all the authorization record in the terminal, click [YES] button, and if you want to cancel, click the [NO] or [ ] button. If there is no signal for five seconds in this state, the message box disappears without deletion. If it is deleted successfully by clicking [YES], the success message in [Fig. 3-5] is displayed. All the authorization log is deleted including image log, and the restoration after the deletion is impossible. 3.6.6.4. Delete image logs If you select the [System]->[Database]->[Delete image logs] in the main menu, the following window appears.](https://usermanual.wiki/UNION-COMMUNITY/AC-7000/User-Guide-2446816-Page-51.png)
![AC-7000 User guide 52 ㈜㈜㈜㈜Union Community / Hyundai Topics building 5th floor, 44-3, Bangi 2-dong, Songpa-gu, Seoul, Korea (138-050) Tel: 02-6488-3000, Fax: 02-6488-3099, E-Mail:sales@unioncomm.co.kr http://www.unioncomm.co.kr If you want to delete all the image log in the terminal, click [YES], and if you want to cancel, click [NO] or [ ] button. If there is no signal for five seconds in this state, the message box disappears without deletion. If it is deleted successfully by clicking [YES], the success message in the <Fig. 3-5> is displayed. The images saved as logs are only deleted and the authorization logs are not deleted. 3.6.6.5. Delete all If you select the [System]->[Database management]->[Delete all] in the main menu, the following window appears. If you want to initialize the terminal in the factory setting, click [YES] button, and if you want to cancel, click [NO] or [ ] button. If there is no signal for five seconds in this state, the message box disappears without initialization. If it is deleted successfully by clicking [YES], the success message in <Fig. 3-5> appears, and the display language and voice is changed to the default value English. All the set value, users and log information besides the MAC address in the terminal to make the terminal in the factory setting. The restoration after the deletion is impossible, so be careful. 3.7. Terminal settings 3.7.1. Sounds If you select the [Terminal]->[Sound] in the main menu, the following window appears.](https://usermanual.wiki/UNION-COMMUNITY/AC-7000/User-Guide-2446816-Page-52.png)
![AC-7000 User guide 53 ㈜㈜㈜㈜Union Community / Hyundai Topics building 5th floor, 44-3, Bangi 2-dong, Songpa-gu, Seoul, Korea (138-050) Tel: 02-6488-3000, Fax: 02-6488-3099, E-Mail:sales@unioncomm.co.kr http://www.unioncomm.co.kr ▶ Basic setting : Same with the window at the left side. ▶Voice volume Scroll from side to side in 0~15 degrees to set the voice volume. If you click the [ ] button at the right side, the voice is played to check the volume. ▶Beep volume Scroll from side to side in 0~3 degrees to set the beep volume. If you click the [ ] button at the right side, the beep sound is played to check the volume. ▶User voice If the user wants to change the voice played when the authorization is successful or failed, the user voice can be played if the user copy the sound into terminal and check the option. The method to copy the sound into the terminal can be referred in [3.10. SDcard]->[Theme] or [3.11.2 voice message modification]. Click [OK] button to apply the set value, and click [BACK] button to cancel and return. If you want to set another items, click the menu you want to change at the left side. 3.7.2. Terminal option If you select the [Terminal]->[Terminal option] in the main menu, the following window appears.](https://usermanual.wiki/UNION-COMMUNITY/AC-7000/User-Guide-2446816-Page-53.png)
![AC-7000 User guide 54 ㈜㈜㈜㈜Union Community / Hyundai Topics building 5th floor, 44-3, Bangi 2-dong, Songpa-gu, Seoul, Korea (138-050) Tel: 02-6488-3000, Fax: 02-6488-3099, E-Mail:sales@unioncomm.co.kr http://www.unioncomm.co.kr ▶ Basic setting : Same with the window at the left side. ▶ Read card number If the user put the card on the screen, the card number is displayed on the LCD. you can change the [Card format] to check the card number according to the set value. ▶ Lock terminal This function enables the administrator to lock or unlock the terminal directly on the terminal, not on the server program. If it is checked ( ), none can access due to the lock until the administrator unlock the setting. ▶Card format It determines the representation method of the card number. The card number is changed according to the following settings. So if you have to change the card expression method, you should register the card again. RFcard EX) Card number(5byte): 08h 01h 16h 1Dh D6h Card format Card number Expression Standard 02207638 (3+5)digits decimal [022(16h)+07638(1DD6h)] Hexadecimal 0801161DD6 10digits hexadecimal 10 Digit Decimal 0018226646 Posterior 4byte: 10digits decimal (01161DD6h) 3,5 Digit Decimal 02207638 Same with [Standard] 6 Digit Hexadecimal 161DD6 Posterior 3byte: 6digits hexadecimal SCcard example) card number(4byte): 52h 9Dh 06h E3h Card format Card number Expression Standard 529D06E3 8 digits hexadecimal Hexadecimal E3069D52 8 digits hexadecimal with changing the order of byte 10 Digit Decimal 1386022627 hexadecimal 529D06E3: 10 digits decimal 3,5 Digit Decimal 3808861522 hexadecimal E3069D52: 10 digits decimal 6 Digit Hexadecimal 069D52 Locate the foremost 3bytes backwards. Click [OK] button to apply the set value, and click [BACK] button to cancel and return.](https://usermanual.wiki/UNION-COMMUNITY/AC-7000/User-Guide-2446816-Page-54.png)
![AC-7000 User guide 55 ㈜㈜㈜㈜Union Community / Hyundai Topics building 5th floor, 44-3, Bangi 2-dong, Songpa-gu, Seoul, Korea (138-050) Tel: 02-6488-3000, Fax: 02-6488-3099, E-Mail:sales@unioncomm.co.kr http://www.unioncomm.co.kr 3.7.3. Input settings If you select the [Terminal]->[Input] in the main menu, the following window appears. ▶ Basic setting : Same with the window at the left side. ▶M0: It is set when connecting the external access point to the DM0 (When using motor lock, set [Door open NO] or [Door open NC].) -None: When nothing is connected. -Door open NO or Door open NC: When the door open monitoring pin was connected. -Fire detection NO or Fire detection NC: When the fire detection sensor is connected. -Panic detection NO or panic detection NC’: When the panic situation detection sensor is connected. -Emergency detection NO or emergency detection NC’: When the emergency situation detection sensor is connected. -> Set NO/NC according to the state of pin input in detection. ▶ M1/M2: Set when connecting the external access point to DM1/DM2 (When using motor lock, set [Lock NO] or [Lock NC].) -None: When nothing is connected. - Lock NO or Lock NC: When the lock monitoring pin was connected. -Fire detection NO or Fire detection NC: When the fire detection sensor is connected. -Panic detection NO or panic detection NC’: When the panic situation detection sensor is connected. -Emergency detection NO or emergency detection NC’: When the emergency situation detection sensor is connected. -> Set NO/NC according to the state of pin input in detection. ▶IO: Set when connecting the external access point to the Exit pin -None: When nothing is connected](https://usermanual.wiki/UNION-COMMUNITY/AC-7000/User-Guide-2446816-Page-55.png)
![AC-7000 User guide 56 ㈜㈜㈜㈜Union Community / Hyundai Topics building 5th floor, 44-3, Bangi 2-dong, Songpa-gu, Seoul, Korea (138-050) Tel: 02-6488-3000, Fax: 02-6488-3099, E-Mail:sales@unioncomm.co.kr http://www.unioncomm.co.kr -Inside Open NO or Inside Open NC: When the exit button was connected -Fire detection NO or Fire detection NC: When the fire detection sensor is connected. -Panic detection NO or panic detection NC’: When the panic situation detection sensor is connected. -Emergency detection NO or emergency detection NC’: When the emergency situation detection sensor is connected. -> Set NO/NC according to the state of pin input in detection ▶Warn door open (sec) This function alarms when set time for door open (5~30 seconds) is passed with the opened door. If it is set [0], no alarm is ringing, and though you set [01~04], the alarm will ring after 5 seconds. This function enables the appropriate action to close the door when someone could know that the door is not closed properly by alarming when the door is not closed for specific time. To use the function, the lock must be able to be monitored if it is opened or closed, and the monitoring pin of the lock also should be connected with M0. In addition, the previous M0 also should be set [Door open NO] or [Door open NC]. ▶단말기 해체 경고음 체크( )시 단말기가 해체된 경우 경고음을 울립니다 Click [OK] button to apply the set value, and click [BACK] button to cancel and return. 3.7.4. Lock settings If you select the [Terminal]->[Lock settings] in the main menu, the following windows appears.](https://usermanual.wiki/UNION-COMMUNITY/AC-7000/User-Guide-2446816-Page-56.png)
![AC-7000 User guide 57 ㈜㈜㈜㈜Union Community / Hyundai Topics building 5th floor, 44-3, Bangi 2-dong, Songpa-gu, Seoul, Korea (138-050) Tel: 02-6488-3000, Fax: 02-6488-3099, E-Mail:sales@unioncomm.co.kr http://www.unioncomm.co.kr ▶ Basic setting : Same with the window at the left side. ▶Lock1 option - None: When it is not used - Strike/Auto/OK: When the warning light is connected to indicate the strike type, auto door, or authorization success/failure on Lock1. - Motor lock 1: When the motor lock is connected. - Regular notification: When the siren setting of the terminal option was sent to the terminal, it sends the operating signal about it. ▶Lock2 option - None: When it is not used - Authorization fail notification: When the warning light was connected to indicate the authorization failure on Lock2. - Motor lock 2: When the motor lock is connected - Regular notification: When the siren setting of the terminal option was sent to the terminal, it sends the operating signal about it. ▶Lock 1 time (ms unit) When Lock 1 is set ‘Strike/Auto/OK’, it determines the signaling time. Because it is set in ms unit, if you want to set 3 seconds, you should set 3000. The strike type means the time until the door is locked again when opening the door after authorization. ▶Lock 2 time (ms unit) It sets the signaling time when Lock 2 is set ‘Authorization failure notification’. Click [OK] button to apply the set value, and click [BACK] button to cancel and return. Because it is set in ms unit, if you want to set 3 seconds, you should set 3000. 3.7.5. External terminal setup If you select the [Terminal]->[External device] in the main menu, the following](https://usermanual.wiki/UNION-COMMUNITY/AC-7000/User-Guide-2446816-Page-57.png)
![AC-7000 User guide 58 ㈜㈜㈜㈜Union Community / Hyundai Topics building 5th floor, 44-3, Bangi 2-dong, Songpa-gu, Seoul, Korea (138-050) Tel: 02-6488-3000, Fax: 02-6488-3099, E-Mail:sales@unioncomm.co.kr http://www.unioncomm.co.kr window appears. ▶ Basic setting : Same with the window at the left side. ▶RS232 option: It sets the device connected to RS232 port -None: When there is no device connected to the RS232 port -Attendance ticket/Meal ticket: The authorization result is printed when the authorization is successful. The terminal ID, user ID, authorization time, and authorization mode are printed by the printer connected to the RS232 port. The printing format differs from the setting, and the terminal name becomes the title on the top side when setting as [Meal ticket]. The printer used to print ticket is “SRP-350} serial type model. ▶RS485 option: It sets the connecting device to RS485 port. -None: When there is no device connected to RS485. -LC010: When LC010 is connected. -LC015: When LC015 is connected. -SR100: When SR100 is connected. ▶Site code It sets the sitecode value sent in Wiegand output below. ▶Wiegand Output It is used only when the special controller is equipped running by the Wiegand input. When the authorization is finished, the data of the following format is sent to the Wiegand port of the terminal. None General case. It does not use Wiegand out port.](https://usermanual.wiki/UNION-COMMUNITY/AC-7000/User-Guide-2446816-Page-58.png)
![AC-7000 User guide 59 ㈜㈜㈜㈜Union Community / Hyundai Topics building 5th floor, 44-3, Bangi 2-dong, Songpa-gu, Seoul, Korea (138-050) Tel: 02-6488-3000, Fax: 02-6488-3099, E-Mail:sales@unioncomm.co.kr http://www.unioncomm.co.kr 26bit Because it sends “Sitecode[1byte] + User ID[2 byte]”, set the user ID less or equal than 4 digits. Send example) In case of SiteCode:045(2Dh), UID:6543(198Fh) 1 00101101 0001 1001 10001111 0 l34bit Because it sends “Sitecode[1 byte] + User ID[3 byte]”, set the user ID less or equal than 7 digits. But, if the user ID is 8 digits, ignore sitecode and send only the “User ID[4byte]”. Send example) SiteCode:001(1h), UID:123456(1E240h) 0 00000001 00000001 11100010 01000000 0 User definition It is set by the user definition, which only can be set in the server, and the setting type only can be inquired in the terminal. Click [OK] button to apply the set value, and click [BACK] button to cancel and return. 3.8.Display settings 3.8.1. Theme If you select [Display]->[Theme] in the main menu, the following window appears. ▶ Basic setting : Same with the window at the left side. ▶The main background. It sets the background of the basic window. You can inquire the next image by clicking [ ] button. Click [OK] button to apply the set value, and click [BACK] button to cancel and return. If you want to set another items, click the menu you want to change at the left side. 3.8.2. Camera](https://usermanual.wiki/UNION-COMMUNITY/AC-7000/User-Guide-2446816-Page-59.png)
![AC-7000 User guide 60 ㈜㈜㈜㈜Union Community / Hyundai Topics building 5th floor, 44-3, Bangi 2-dong, Songpa-gu, Seoul, Korea (138-050) Tel: 02-6488-3000, Fax: 02-6488-3099, E-Mail:sales@unioncomm.co.kr http://www.unioncomm.co.kr If you select the [Display]->[Camera] in the main menu, the following window appears. ▶ Basic setting : Same with the window at the left side. ▶Display option Choose the image displayed in the message window of authorization success - None - Registered user’s picture. ▶Save success log If it is checked ( ), the camera image is captured as image log when the authorization was successful. ▶Save failed log When it is checked( ), the camera image is captured as image log when the authorization was failed. Click [OK] button to apply the set value, and click [BACK] button to cancel and return. 3.8.3. Language If you select the [Display]->[Language] in the main menu, the following window appears. ▶Basic setting: ‘English’ ▶Language If you change the language and click ‘OK’ button, the voice message and language are changed to the set language. If you want to cancel and move to the upper menu, click [BACK] button. ※※※※Supporting languages English, Korean, and Japanese](https://usermanual.wiki/UNION-COMMUNITY/AC-7000/User-Guide-2446816-Page-60.png)
![AC-7000 User guide 61 ㈜㈜㈜㈜Union Community / Hyundai Topics building 5th floor, 44-3, Bangi 2-dong, Songpa-gu, Seoul, Korea (138-050) Tel: 02-6488-3000, Fax: 02-6488-3099, E-Mail:sales@unioncomm.co.kr http://www.unioncomm.co.kr 3.8.4. LCD option If you select [Display]->[LCD option] in the main menu, the following window appears. ▶ Basic setting : Same with the window at the left side. ▶Screen saver setting (10 seconds~ 10minutes) If there is no input for set duration, the LCD screen is turned off automatically. But, if you set ‘None’ the LCD is always turned on. ▶User display option It sets what will be shown at the LCD screen when the authorization is successful. -None: The authorization result [Success/Failure] is only represented. -User ID -User name: Representing user ID if it is not registered. - Personnel number: Representing user ID if it is not registered. Click [OK] button to apply the set value, and click [BACK] button to cancel and return. 3.8.5. Message time settings If you select the [Display]->[Message time setting] in the main menu, the following window appears.](https://usermanual.wiki/UNION-COMMUNITY/AC-7000/User-Guide-2446816-Page-61.png)
![AC-7000 User guide 62 ㈜㈜㈜㈜Union Community / Hyundai Topics building 5th floor, 44-3, Bangi 2-dong, Songpa-gu, Seoul, Korea (138-050) Tel: 02-6488-3000, Fax: 02-6488-3099, E-Mail:sales@unioncomm.co.kr http://www.unioncomm.co.kr ▶ Basic setting : Same with the window at the left side. ▶Message display (ms unit) It sets the time for which the authorization result window to be displayed. 0~5000 is available for the value, and the authorization result window appeared and disappear for the duration. Because it is set in ms unit, if you want to set 2 seconds, you should set 2000 Click [OK] button to apply the set value, and click [BACK] button to cancel and return. 3.9. Terminal information 3.9.1. System information If you select the [Terminal info]->[System] in the main menu, the following window appears. ▶System info The hardware and firmware version of the terminal is shown. ▶Hard disk (using/all) It shows the using amount of the hard disk. If the using amount is high, it is represented in red. ▶Ram (using/all) The using amount of Ram among the all amount is represented. If the using amount is high, it is represented in red.](https://usermanual.wiki/UNION-COMMUNITY/AC-7000/User-Guide-2446816-Page-62.png)
![AC-7000 User guide 63 ㈜㈜㈜㈜Union Community / Hyundai Topics building 5th floor, 44-3, Bangi 2-dong, Songpa-gu, Seoul, Korea (138-050) Tel: 02-6488-3000, Fax: 02-6488-3099, E-Mail:sales@unioncomm.co.kr http://www.unioncomm.co.kr Click [BACK] button to finish the inquiry and move to the upper menu. Click the menu on the left side to inquire additional item. 3.9.2. Terminal information If you click the [Terminal information] -> [Terminal] in the main menu, the following window appears. ▶Terminal information It represents the option setting value of the terminal. Click [Close] or [BACK] button to finish the inquiry and move to the upper menu. 3.9.3. Network information If you select the [Terminal information]->[Network] in the main menu, the following window appears.](https://usermanual.wiki/UNION-COMMUNITY/AC-7000/User-Guide-2446816-Page-63.png)
![AC-7000 User guide 64 ㈜㈜㈜㈜Union Community / Hyundai Topics building 5th floor, 44-3, Bangi 2-dong, Songpa-gu, Seoul, Korea (138-050) Tel: 02-6488-3000, Fax: 02-6488-3099, E-Mail:sales@unioncomm.co.kr http://www.unioncomm.co.kr ▶Network information It shows the network setting value of the terminal If you want to finish the inquiry and move to the upper menu, click [CLOSE] or [BACK] button. 3.9.4. User information If you select the [Terminal information]->[User] in the main menu, the following window appears. ▶User information - User: The number of users registered (including administrator) - Admin: The number of the administrators registered. - FP: The number of all the fingerprints registered. - FP1 to N: The number of fingerprints which can be authorized by 1:N. - Face: The number of the users who registered the face - Face1 to N: The number of users who can be authorized by 1:N - Card: The number of cards registered - Photo: The number of users who registered the picture (Max means the maximum number of registrations for each item.) Click the [Close] or [BACK] button to finish the inquiry and move to the upper menu. 3.9.5. Log information](https://usermanual.wiki/UNION-COMMUNITY/AC-7000/User-Guide-2446816-Page-64.png)
![AC-7000 User guide 65 ㈜㈜㈜㈜Union Community / Hyundai Topics building 5th floor, 44-3, Bangi 2-dong, Songpa-gu, Seoul, Korea (138-050) Tel: 02-6488-3000, Fax: 02-6488-3099, E-Mail:sales@unioncomm.co.kr http://www.unioncomm.co.kr If you select the [Terminal information] -> [Log] in the main menu, the following window appears. ▶Log information Log: The number of logs saved in the terminal Image Log: The number of image logs saved in the terminal. (Max means the maximum number of items which can be saved in each item. If you want to finish the inquiry and move to the upper menu, click [Close] or [BACK] button. 3.9.6. About If you select the [Terminal information] -> [About] in the main menu, the following window appears. ▶About It shows the license information of the Korean font applied to the terminal. If you want to finish the inquiry and move to the upper menu, click [Close] or [BACK] button.](https://usermanual.wiki/UNION-COMMUNITY/AC-7000/User-Guide-2446816-Page-65.png)
![AC-7000 User guide 66 ㈜㈜㈜㈜Union Community / Hyundai Topics building 5th floor, 44-3, Bangi 2-dong, Songpa-gu, Seoul, Korea (138-050) Tel: 02-6488-3000, Fax: 02-6488-3099, E-Mail:sales@unioncomm.co.kr http://www.unioncomm.co.kr 3.10. SD card If you select the [SD card] at the main menu, the following screen appears. <When the SDcard was inserted> < When the SDcard was not inserted > ※※※※ It works only if the SDcard is inserted, and it should be inserted with the It works only if the SDcard is inserted, and it should be inserted with the It works only if the SDcard is inserted, and it should be inserted with the It works only if the SDcard is inserted, and it should be inserted with the back side face forward like the figure. (The side of the SD card should not back side face forward like the figure. (The side of the SD card should not back side face forward like the figure. (The side of the SD card should not back side face forward like the figure. (The side of the SD card should not exceed 32G.) exceed 32G.) exceed 32G.) exceed 32G.)](https://usermanual.wiki/UNION-COMMUNITY/AC-7000/User-Guide-2446816-Page-66.png)
![AC-7000 User guide 67 ㈜㈜㈜㈜Union Community / Hyundai Topics building 5th floor, 44-3, Bangi 2-dong, Songpa-gu, Seoul, Korea (138-050) Tel: 02-6488-3000, Fax: 02-6488-3099, E-Mail:sales@unioncomm.co.kr http://www.unioncomm.co.kr It is the function used for data backup of the terminal by [Export], and you can copy the backup data from the [Export] into the terminal again. ▶Export It copies the data from the terminal to the external SDcard. -User data: It copies the user DB to the ‘AC7000/db’ folder of the SDcard. -System option: The option setting value of the terminal is copied to the ‘AC7000/config’ folder. -Event log: It copies the authorization log DB to the ‘AC7000/db’ folder of the SDcard. -Export all: It copies all the user’s data and event log to the ‘AC7000/db’ folder of the SDcard. -Photo data: The image log data is saved in the ‘AC7000/logimage’ folder of the SDcard, and the photo data of the user is saved in the ‘AC7000/userphoto’ folder of the SDcard as jpg file. ▶Import It copies the data from the SDcard to the terminal - User data: The user’s DB saved in the SDcard(‘AC7000/db’ folder) by export is copied to the terminal - System option: The option setting values of the terminal saved in the SDcard(‘AC7000/config’ folder) by export is copied to the terminal. If you fulfilled the import and if you want to apply the new DB or setting value, you should reboot the terminal ETC. -Theme: The voice file in the ‘AC7000/audio’ folder in the SDcard is copied to the terminal. If you want to replace the authorization success (user_ok.mp3) and the authorization fail (user_fail.mp3) message with the user voice, you can play the user voice by copying with](https://usermanual.wiki/UNION-COMMUNITY/AC-7000/User-Guide-2446816-Page-67.png)
![AC-7000 User guide 68 ㈜㈜㈜㈜Union Community / Hyundai Topics building 5th floor, 44-3, Bangi 2-dong, Songpa-gu, Seoul, Korea (138-050) Tel: 02-6488-3000, Fax: 02-6488-3099, E-Mail:sales@unioncomm.co.kr http://www.unioncomm.co.kr changing the file name to the user voice sound. -F/W upgrade: It upgrades the firmware from the SDcard. (The firmware should be in the ‘AC7000’ folder of the SDcard.) If you want to finish working and move to the upper menu, click the [OK] or [BACK] button. 3.11. User file download If necessary, the user can change the background screen or voice message with this function. It can be fulfilled by copy with SDcard or downloading the user file from the UNIS server program. 3.11.1. Background screen change If you select the ‘User file send’ in the UNIS program, the following window appears. If you select the file type as ‘Background image file(.jpg)’, select the image file (.jpg), and click the ‘Send’ button, the terminal selection window appears. If you select the terminal in the terminal list window and click the ‘Send’ button again, the file is sent and the download result is represented. At this point, the file name should not exceed 15 characters, and the jpg file whose size is 480*800 is only can be sent. If the data with different format is downloaded, the version error is shown in the send result. If you want to change the background screen to the basic screen, you can select it by yourself in the [3.8.1. Screen setting] -> [Theme]. 3.11.2. Voice message change If you select the ‘User file sending’ at the UNIS program, the following window appears.](https://usermanual.wiki/UNION-COMMUNITY/AC-7000/User-Guide-2446816-Page-68.png)
![AC-7000 User guide 69 ㈜㈜㈜㈜Union Community / Hyundai Topics building 5th floor, 44-3, Bangi 2-dong, Songpa-gu, Seoul, Korea (138-050) Tel: 02-6488-3000, Fax: 02-6488-3099, E-Mail:sales@unioncomm.co.kr http://www.unioncomm.co.kr If you select ‘Sound file in success (.wav)’ as the file type and click ‘Send’ button after selecting the sound file (.wav or mp3), the terminal selecting window appears. If you select the terminal in the terminal list window and click the ‘Send’ button again, the file is sended and the result of download appears. In this time, the file name should be less than 15 characters including extension and mp3 format. In case of sound in failure also can be changed by selecting ‘Sound file in failure(.wav)’ with the same manner. If you want to change to the basic sound from the user’s sound, remove the check of the [Using the user sound] at the [3.7.1 Terminal setting] -> [Sound].](https://usermanual.wiki/UNION-COMMUNITY/AC-7000/User-Guide-2446816-Page-69.png)
![AC-7000 User guide 70 ㈜㈜㈜㈜Union Community / Hyundai Topics building 5th floor, 44-3, Bangi 2-dong, Songpa-gu, Seoul, Korea (138-050) Tel: 02-6488-3000, Fax: 02-6488-3099, E-Mail:sales@unioncomm.co.kr http://www.unioncomm.co.kr 4. How to use terminal The background image and composition of the basic window can be changed according to the administrator’s setting. In addition, if the administrator set the screen saver time, the LCD screen is turned off automatically if there is no action for set time, and when the user accessed to the terminal, tried the authorization with fingerprint/card, or touched the main screen, the LCD screen is turned on automatically. 4.1. Authorization mode change <Fig. 4-1> Change to the desired authorization mode by clicking the attendance [F1], leaving [F2], going out [F3], coming back [F4], and entrance [Access] button in the screen. 4.2. ID input If you click the [ID input] button at the basic window, following ID input window appears as follows. Card Input part](https://usermanual.wiki/UNION-COMMUNITY/AC-7000/User-Guide-2446816-Page-70.png)
![AC-7000 User guide 71 ㈜㈜㈜㈜Union Community / Hyundai Topics building 5th floor, 44-3, Bangi 2-dong, Songpa-gu, Seoul, Korea (138-050) Tel: 02-6488-3000, Fax: 02-6488-3099, E-Mail:sales@unioncomm.co.kr http://www.unioncomm.co.kr Enter the user ID to be certified and click [OK] button, then the input screen of fingerprint, face, card, or password according to the authorization method of the user. <Fig. 4-2> 4.3. Authorization 4.3.1. Face authorization ▶1:N Authorization Set the location of your face at the LCD guideline until the guideline is changed green, and gaze the camera and stop moving to try authorization. ▶1:1 Authorization As shown in the following figure, enter your ID first by clicking [Input ID] button, and when the face input message appears, locate your face until the LCD guideline is turned green, and gaze the camera and stop moving.](https://usermanual.wiki/UNION-COMMUNITY/AC-7000/User-Guide-2446816-Page-71.png)
![AC-7000 User guide 72 ㈜㈜㈜㈜Union Community / Hyundai Topics building 5th floor, 44-3, Bangi 2-dong, Songpa-gu, Seoul, Korea (138-050) Tel: 02-6488-3000, Fax: 02-6488-3099, E-Mail:sales@unioncomm.co.kr http://www.unioncomm.co.kr 4.3.2. Fingerprint authorization ▶1: N Authorization If you put your fingerprint at the fingerprint sensor at the basic window, the fingerprint is entered with the light on the sensor. Do not take off your finger until the light of the sensor turns off completely. ▶1:1 Authorization As shown in the following figure, enter your ID first by clicking the [Input ID] button, and input your fingerprint when the fingerprint entering window appears and the light is turned on at the fingerprint sensor.](https://usermanual.wiki/UNION-COMMUNITY/AC-7000/User-Guide-2446816-Page-72.png)
![AC-7000 User guide 73 ㈜㈜㈜㈜Union Community / Hyundai Topics building 5th floor, 44-3, Bangi 2-dong, Songpa-gu, Seoul, Korea (138-050) Tel: 02-6488-3000, Fax: 02-6488-3099, E-Mail:sales@unioncomm.co.kr http://www.unioncomm.co.kr 4.3.3. Card authorization Put the card on the card picture in <Fig. 4-1) 4.3.4. Password authorization Input your ID by clicking [ID input] button as follows and input password when the password input window appears. ](https://usermanual.wiki/UNION-COMMUNITY/AC-7000/User-Guide-2446816-Page-73.png)