UTC Fire and Security Americas MS7016 Tablet PC User Manual 10 Tablet PC ANDROID
UTC Fire & Security Americas Corporation, Inc. Tablet PC 10 Tablet PC ANDROID
User Manual
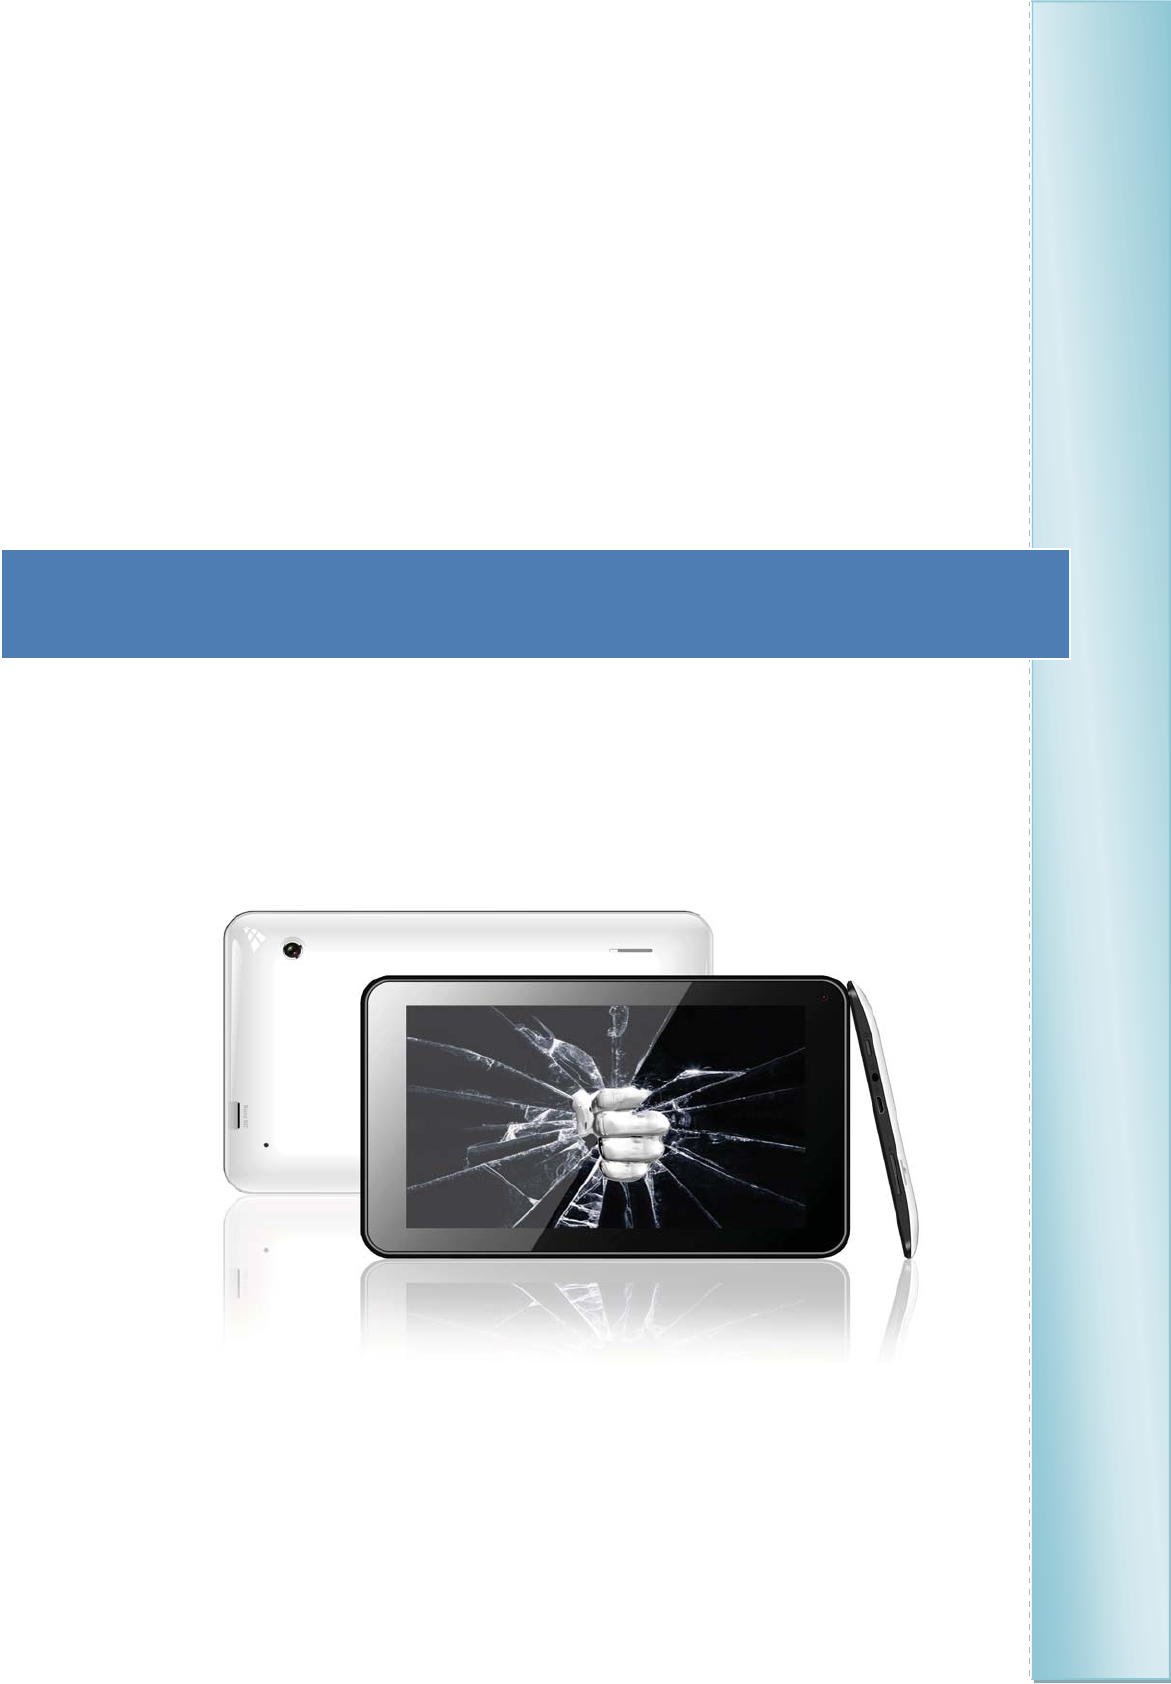
MS7016
User Manual
7” TABLET PC ANDROID
2
FCC Class B:
Note: This equipment has been tested and found to comply with the limits for a Class B digital device, pursuant to part
15 of the FCC Rules. These limits are designed to provide reasonable protection against harmful interference in a
residential installation. This equipment generates uses and can radiate radio frequency energy and, if not installed
and used in accordance with the instructions, may cause harmful interference to radio communications. However,
there is no guarantee that interference will not occur in a particular installation. If this equipment does cause harmful
interference to radio or television reception, which can be determined by turning the equipment off and on, the user is
encouraged to try to correct the interference by one or more of the following measures:
- Reorient or relocate the receiving antenna.
- Increase the separation between the equipment and receiver.
- Connect the equipment into an outlet on a circuit different from that to which the receiver is connected.
- Consult the dealer or an experienced radio/TV technician for help.
NOTICE:
1. The changes or modifications not expressly approved by the party responsible for compliance could void the user’s
authority to operate the equipment.
2. Shielded interface cables and AC power cord, if any, must be used in order to comply with the
Emission limits.
3. The manufacture is not responsible for any radio or TV interference caused by unauthorized modification to the
equipment. It is the responsibilities of the user to correct such interference.
This device complies with Part 15 of the FCC Rules. Operation is subject to the following two conditions: (1) this
device may not cause harmful interference, and (2) this device must accept any interference received, including
interference that may cause undesired operation.
3
xDo not subject the device to severe impact or drop it from heights.
SAFETY PRECAUTIONS
xDo not use the device in extreme hot or cold, dusty or damp conditions. Do not expose it to direct sunlight.
xAvoid using the device near strong magnetic fields.
xNormal functioning of the product may be disturbed by ESD. If so, simply reset and restart the device following the instruction manual. During file
transmission, please handle with care and operate in a static-free environment.
xKeep the device away from water and other liquids. In the event that water or other liquids enter the device, power off the product immediately and
clean the device.
xDo not use chemicals to clean the device in order to avoid corrosion. Clean it with a dry cloth.
xDo not install this equipment in a confined space such as a book case or similar unit. The ventilation should not be impeded by covering the
ventilation openings with items such as newspaper, table-cloths, curtains etc.
xNo naked flame sources, such as lighted candles, should be placed on the apparatus.
xAttention should be drawn to environmental aspects of battery disposal.
xUse the apparatus in moderate climates.
xWe are not responsible for damage or lost data caused by malfunction, misuse, modification of the device or battery replacement.
xDo not attempt to disassemble, repair or modify the product. This will invalidate the warranty.
xIf the device will not be used for an extended period of time, please charge the battery at least once per month to maintain battery life.
xCharge the battery if: a) The battery level icon displays
x(An empty battery) b) The device powers off automatically when restarted. c) There is no response when pressing keys with keys unlocked and
battery full.
xDo not interrupt the connection when the device is being formatted or transferring files. Otherwise, data may be corrupted or lost.
xWhen the device is used as a portable HD, please use only per the instructions. Otherwise, permanent data loss could occur.
xPlease use and install data using the attachments/accessories provided and only according to the manufacturer’s instruction.
xPlease refer to the information on the bottom of the device for electrical and safety information before installing data or operating the device.
xTo reduce the risk of fire or electric shock, do not expose this device to rain or moisture. The device should not be exposed to dripping or
splashing. Never place objects filled with liquids, such as vases, on the device.
xThere is danger of explosion if the battery is replaced incorrectly. Replace only with the same or equivalent type.
xThe battery (battery or batteries or battery pack) should not be exposed to excessive heat such as sunlight, fire or the like.
xPlease follow responsible procedures for battery disposal.
xIf the power adaptor disconnected from the device, the device will remain operable as long as the battery has sufficient charge.
xThe power adaptor is a CLASS II apparatus with double insulation, and no external ground is provided.
xSafety Symbol Explanation:
4
-The lightning flash with arrowhead symbol within an equilateral triangle is intended to alert the user to the presence of non-insulated “dangerous
voltage” within the product’s enclosure that may be of sufficient magnitude to constitute a risk of electric shock.
-To reduce the risk of electric shock, do not remove the cover (or back) as there are no user-serviceable parts inside. Refer servicing to qualified
personnel.
-The exclamation point within an equilateral triangle is intended to alert the user to the presence of important operating and maintenance instructions in
the literature accompanying the device.
-Correct Disposal of this product. This marking indicates that this product should not be disposed of with other household waste
in the EU. To prevent possible harm to the environment or human health from uncontrolled waste disposal, recycle it
responsibly to promote the sustainable reuse of material resources. To dispose of your used device, please use the return
and collection systems available in your area or contact the retailer where the product was purchased. They can take this product for safe
environmental recycling.
This equipment should be installed and operated with minimum distance 20cm between the radiator & your body.
CE in which countries where the product may be used freely: Germany, UK, Italy, Spain, Belgium, Netherlands, Portugal, Greece, Ireland, Denmark,
Luxembourg, Austria, Finland, Sweden, Norway and Iceland. In France, except the channel 10 through 13, law prohibits the use of other channels.
The NS7016 respects the current regulations for limiting the output volume of consumer audio devices to a safe level. By listening to your
with headphones or ear
device
buds at high volumes, you run the risk of permanent damage to your ears. Even if you get used to listening at high
volumes and it seems normal to you, you still risk the possibility of damaging your hearing. Reduce the volume of your device to a reasonable
level to avoid permanent hearing damage. If you hear ringing in your ears, reduce the volume or shut off your device. This device has been tested
with the supplied earphones. In order to preserve your hearing, it is advised that you use only the following headphone models: the earphones
supplied with your device, or any other headphones that respect the current regulations. Other types of headphones may produce higher volume
levels. At full power ,the prolonged listening of the walk man can damage the ear of the user
Cautions
Maximum output voltage<=150mv
Do not use while operating a motorized vehicle. It may create a traffic hazard and is illegal in many areas.
You should use extreme caution or temporarily discontinue use in potentially hazardous situations created by obstructed hearing.
Even if your headphones or earphones are the open-air type designed to let you hear outside sounds, don’t turn up the volume so high that you can’t
hear what’s around you.
Sound can be deceiving. Over time your hearing “comfort level” adapts to higher volumes of sound. What sounds “normal” can actually be loud and
harmful to your hearing. Guard against this by setting the volume of your device at a safe level BEFORE your hearing adapts.
To establish a safe volume level:
a. Start your volume control at a low setting.
b. Slowly increase the sound until you can hear it comfortably and clearly, and without distortion. Once you have established a comfortable sound
level, leave it there.
This manual may not reflect your actual device’s operation. All information is subject to change without prior notification. Please follow your actual device’s operational
procedures
5
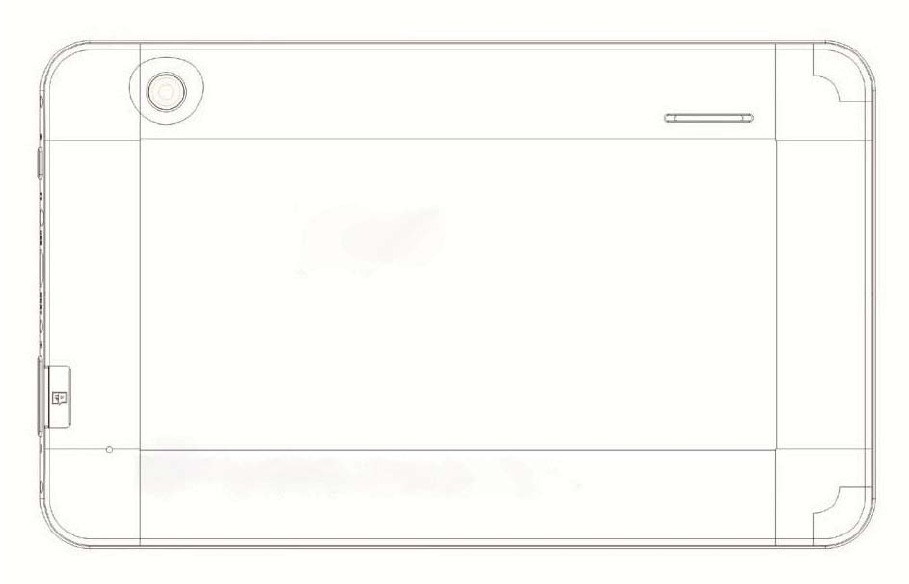
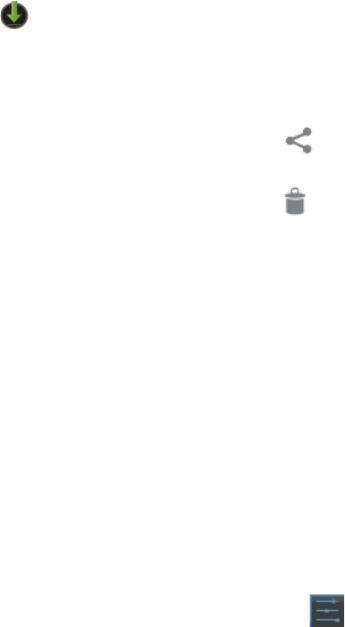
BƵƩons & Ports
6
MS7016 User’s Guide
Contents
Get started 9
Get around 8
Touch & type 9
Use the lock screen 11
Make yourself at home 11
Change the wallpaper 11
Arrange & work with apps 12
Use folders 12
Add widgets 13
Try some apps 13
Find People 14
Manage your Calendar 15
Use your Camera 15
Viewing Photos 16
Manage downloads 17
Tune performance 17
Op mize ba ery life 17
Op mize data usage 18
Op mize memory usage 19
Use the Apps screen 20
7
Enter & edit text 21
Use the keyboard 21
Basic edi ng 22
Tips & shortcuts 22
Connect to Wi-Fi networks 23
Connect to keyboards, mice, and other devices 26
Connect to a Windows computer via USB 27
Manage accounts 27
Add or remove accounts 27
ConĮgure account sync op ons 28
ConĮgure general sync se ngs 29
Change an account’s sync se ngs 30
Secure your tablet 30
Accessories Included: User Manual, AC Power Charger and USB Cable for data transfer.
8
Get Started
Get around
Ar you enter into the systems, at the bo om of the screen, you'll Įnd three Naviga on bu ons. They're always
available. No ma er what you're doing with your MS7016 , you can always get back to the main Home screen
or return to previous screens:
Icon Name Description
Ar a short me without ge ng used, these bu ons may shrink to dots or fade away, depending on the current
app. To bring them back, touch their loca on.
The All Apps icon in the right upper corner is permanent. Touch it to see all your apps and widgets.
The middle of your Home screen can hold app and widget icons, plus folders.
zTo open an app, folders, or widget, touch its icon.
zTo see addi onal Home screens, swipe your Įnger quickly le or right.
Back Open the previous screen you were
working in, even if it was in a
diīerent app. Once you back up to
the Home screen, you can’t go back
any further in your history.
Home Open Home. If you’re viewing a le
or right Home screen, opens the
central home screen.
Recent Apps Opens a list of thumbnail images of
apps you’ve worked with recently.
Top open an app, touch it. To
remove a thumbnail from the list,
swipe it left or right.
9
Status icons: on the leŌ tell you which apps have sent you noƟĮcaƟons; for example, that a message has arrived, or
it's Ɵme for a meeƟng.
System icons: touch and slide down on the right up display the current wireless and network connecƟon strength,
baƩĞry level, Ɵme, and more.
Touch & type
Use your Įngers to manipulate icons, buƩons, menus, the onscreen keyboard,
and other items on the touch screen. You can also change the screen's orientaƟon.
To select or acƟvate something, touch it.
To type something, such as a name, password, or search terms, just touch where you want to type. A keyboard pops
up that lets you type into the Įeld.
Other common gestures include:
zTouch & hold: Touch & hold an item on the screen by touching it and not liŌing your Įnger unƟů an acƟon
occurs.
zDrag: Touch & hold an item for a moment and then, without liŌing your Įnger, move your Įnger on the screen
10
unƟů you reach the target posiƟon. For exampůe, you can drag to reposiƟon shortcuts on the Home screen.
zSwipe or slide: Quickůy move your Įnger across the surface of the screen, without pausing when you Įrst touch
(so you don't drag something instead). For exampůe, you can sůŝde a Home screen ůeŌ or right to view the other
Home screens.
zPinch: In some apps (such as Maps, Browser, and Gaůůery), you can zoom in and out by půĂcing two Įngers on
the screen at once and pinching them together (to zoom out) or spreading them apart (to zoom in).
zRotate the screen: On most screens, the orientaƟon of the screen rotates with your device as you turn it. You
can change this Dispůay seƫng.
Related seƫngs
Seƫngs > Device > Sound
Seƫngs > Device > Dispůay

11
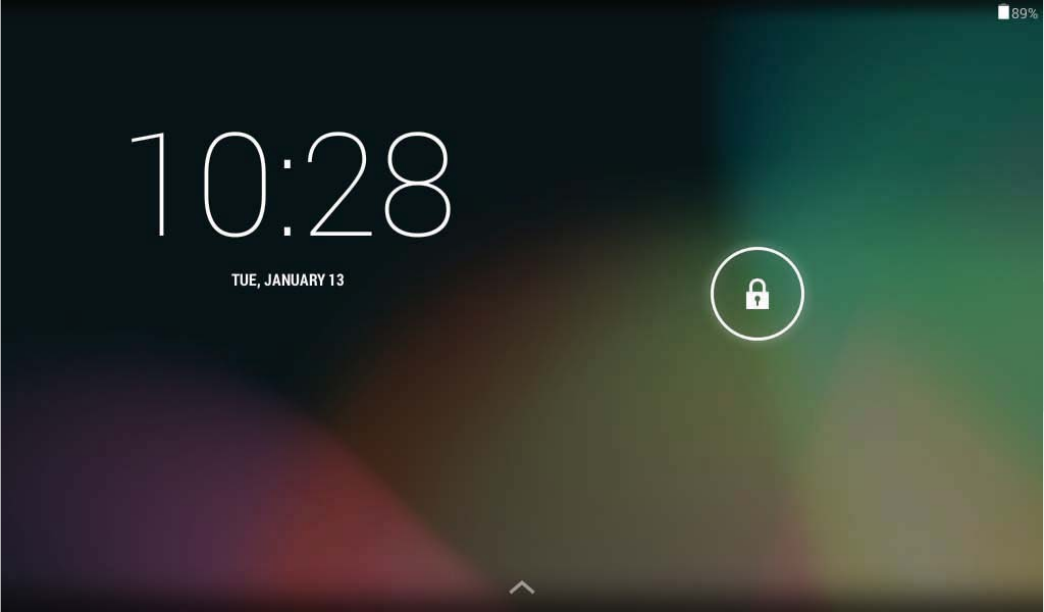
Use the lock screen
To protect personal informaƟon, you can adjust your phone's lock seƫngs:
1. From the Home or All Apps screen, touch the Seƫngs icon
2. Scroll down and touch Security.
3. Touch Screen lock.
4. Touch the type of lock you'd like to use.
AŌĞr you set a lock here, a lock screen displays whenever your screen wakes up, requesƟng the paƩern, PIN, or
other specŝĮed key.
Important Screen lock opƟons are listed in the approximate order of the strength of their security, starƟng with None and Slide, which provide
no security. Face Unlock and PaƩern provide minimal security, although they can be more convenient than the stronger opƟons.
If your tablet's playing music when the screen locks, you can conƟnue listening or pause the selecƟon
without unlocking.
Make yourself at home
Change the wallpaper
Wallpapers are images from Video Player (pictures you shot with Camera, synced from Picasa, and so on), sƟůl
images included with the system, and live images (such as an animaƟon or a map that centers on your locaƟon).
They take the place of the default background for your Home screens.
1. Touch & hold anywhere on a Home screen that's not occupied. A list of opƟons appears.
2. Touch a wallpaper source:
Video Player. Choose from pictures that you've taken with Camera or downloaded to your device.
Live Wallpapers. Choose from a scrolling list of animated wallpapers.
Wallpapers. Choose from thumbnails of default images, or touch a thumbnail for a larger version.
You can download addiƟonal wallpapers from Android Market.
3. To set wallpaper, touch “set wallpaper” under the Gallery images or Set wallpaper.

12
Related seƫngs
Seƫngs > Device > Display > Wallpaper
Arrange & work with apps
To see all your apps, touch the All Apps icon on any Home screen.
The main All Apps screen opens. This is where you can see all your apps, including those downloaded from Android
Market. You can move app icons to any of your Home screens.
From All Apps, you can
zMove between screens: Swipe leŌ or right.
zLaunch an app: Touch its icon.
zPlace an app icon on a Home screen: Touch & hold the app icon, slide your Įnger, and liŌ your Įnger to drop
the icon in place.
zPlace an app icon in the Favorites tray: Touch, hold, & slide to move one of the Favorites icons out of the tray.
Then use the same technique to move another one into the same posiƟon.
zExplore your widgets: Touch the Widgets tab at the top of any All Apps screen.
zGet more apps. Touch the Market icon.
To remove an app icon from the Home screen, touch and hold it, slide your Įnger toward the top of the screen, and
drop the app over the Remove icon .
Note The All Apps icon in the Favorites tray is permanent. You can't move it.
Use folders
You can combine several app icons in a folder. Drop one app icon over another on a Home screen, and the two icons
will be combined.
From any Home screen, you can
zOpen a folder: Touch it. The folder opens:
zRename a folder: Touch its name.

13
zMove icons around your Home screens: Touch, hold, and slide.
Tips
zTo can see a smaller collecƟon of frequently used apps, touch the Google Apps folder near the boƩom of the
screen. As with any folder, you can customize its contents.
zAŌĞr you open an app, you can usually adjust its seƫngs by choosing items from its Menu icon near the top or
boƩom of the screen .
Add widgets
Widgets are like windows into your apps. They're available from an All Apps tab for you to move onto your
Home screens.
To see your widgets:
1. Touch the All Apps icon on your Home screen.
2. Touch Widgets at the top of the screen.
From the main Widgets screen, you can
zMove between screens: Swipe leŌ or right.
zDrag a widget to a Home screen: Touch and hold the widget's icon, slide your Įnger where you want to place it,
and liŌ your Įnger.
You may be asked to make further choices before the widget acƟvates. If there isn't room where you dropped it, the
widget won't get added to the Home screen.
Try some apps
Start Gmail
You can use Gmail to read and write email from any mobile device or browser. All your email is always up to date
and available no maƩer where you check it from.
But Gmail is not just about email. Your Gmail name and password signs you into to all Google apps and services,
including Calendar; People, for keeping track of your contacts; Google Reader, for keeping up with your online
reading; and many more.
14
zTo launch Gmail, touch the Gmail icon on a Home or All Apps screen.
The Įrst Ɵme you launch Gmail, you're asked to sign in or create an account, if you didn't already do so when you
Įrst set up your device. Then Gmail opens to the Inbox. From here, you can
zRead email. Touch a message to read it. Unread messages are bold.
zOrganize email. Check the box beside a message to select it. Then use the icons and menu along the boƩom of
the screen to manage the selected messages.
zChange your seƫngs. Touch the Menu icon to change your preferences, add an account, or get help.
Find People
The People app gives you quick and easy access to everyone you want to reach. When you Įrst turn on your Tablet
and sign into a Google Account, any exisƟng contacts from that account are synced with your People app. AŌĞr that,
all your contacts stay in sync automaƟcally, whether you make changes on your Tablet, from another device, or from
any Web browser.
If you belong to Google+ or use Exchange, you can also sync that contact informaƟon with People.
All your People informaƟon is available from Gmail, Google Talk, Messenger, Tablet, and other apps where it's
useful. As you add contacts from dŝīerent sources, they are synced automaƟcally across all the places you need
them.
zTo view your contacts, touch the People icon on a Home or All Apps screen.
The Įrst Ɵme you launch People, you're asked to sign in or create an account. Then the app opens to the main list of
your contacts. You can view them in three ways from the tabs at the top of the screen: Groups, All, and Favorites:
From any of the main views, you can
zRead details. Touch a name to see details for a contact or group.
zEdit details. While viewing a contact, touch the Menu icon and choose opƟons to edit or share contact
details, and so on. You can also touch the star beside the Menu icon to add a contact to your Favorites list.
zChange your seƫngs. While viewing the main list screen, touch the Menu icon to import or export contacts,
choose display opƟons for the Groups and All tabs, and add or edit accounts.
No maƩer where you are within People, you can always get back to the main lists by touching the icon in the top leŌ
corner of the screen.
15
Manage your Calendar
The Calendar app lets you view and edit your schedule.
When you Įrst set up your Tablet, you conĮgured it to use an exisƟng Google Account (such as Gmail), or you
created a new one. The Įrst Ɵme you open the Calendar applicaƟon on your Tablet, it displays any exisƟng calendar
events from that Google Account on the web. As you edit events from any mobile device or web browser, they are
synced automaƟcally across all the places you need them.
To view your Calendar, touch on a Home or App screen.
To change the Calendar view, touch the date at the top and choose Day, Week, Month, or Agenda.
Swipe to scroll verƟcally or horizontally. In the Day or Week views, spread your Įngers apart or pinch them together
to zoom in or out.
From any of these views, you can
zRead or edit event details. Touch an event to view its details.
zManage events and calendars. Touch icons across the top or Menu to search or create events, return to today,
or adjust seƫngs.
Use your Camera
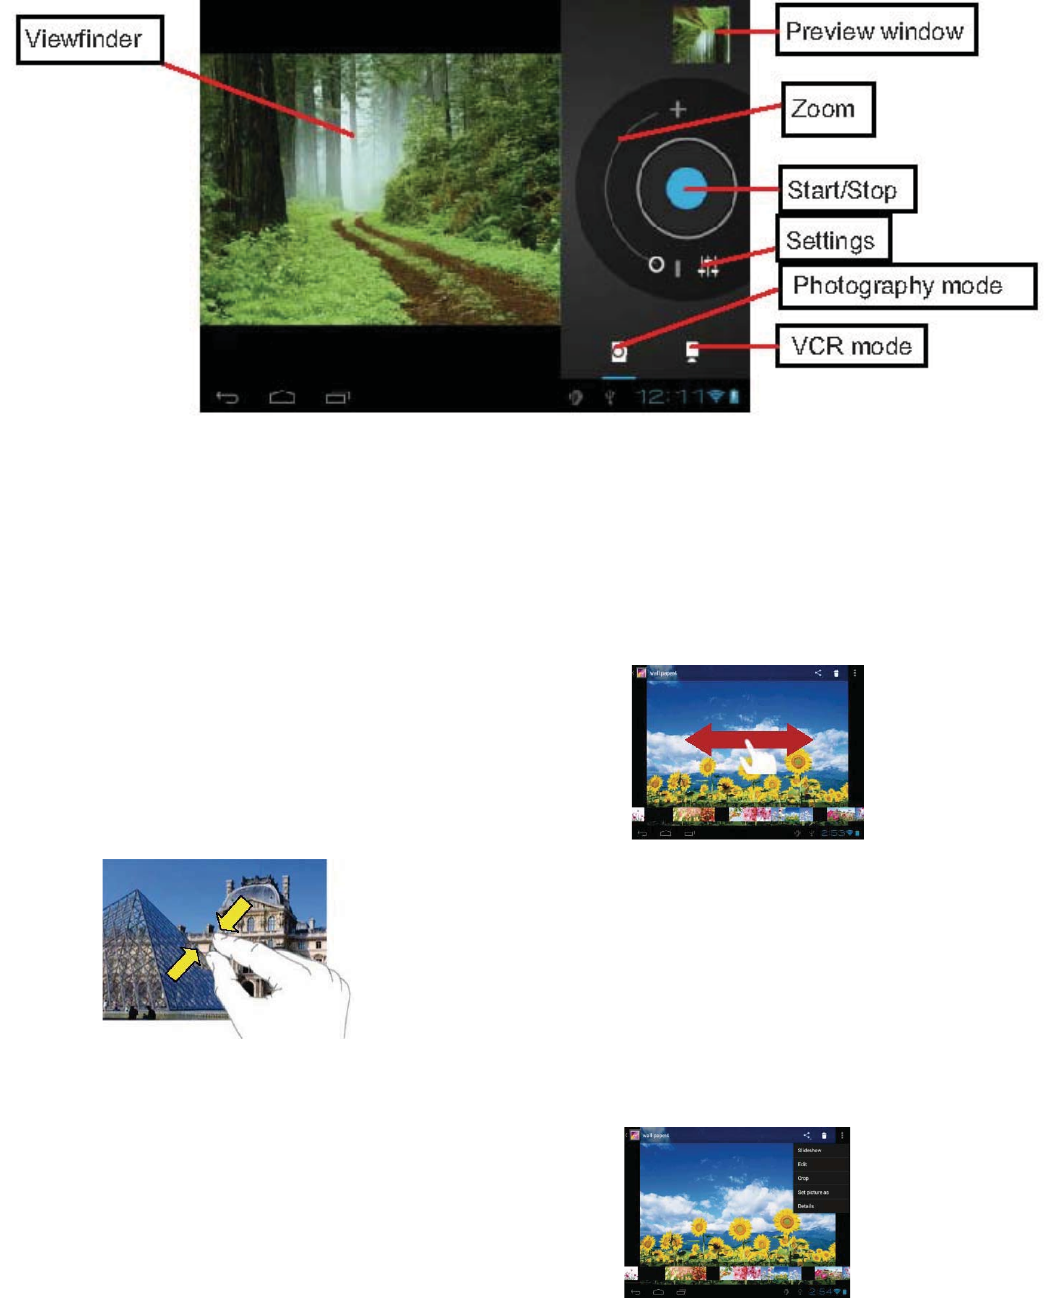
The Camera app is a combinaƟon camera and camcorder.
You can view photos and videos you take with Camera in the Play app along with movies that you rent or download.
To take pictures and videos, Įrst touch the Camera icon on a Home or All Apps screen.
When Camera opens, you can
zTake a picture: Touch the blue buƩon.
zView the most recently taken picture: Touch the thumbnail near the blue buƩon.
16
You can now share the picture by touching the Gmail, Google+, Messenger, or other icons displayed along one side
of the image.
To view this picture and others in the Gallery app, touch the picture.
Viewing Photos
1 Photos should be listed in thumbnail. You can slide your finger on the screen left or right to
browse photos.
2 Tap a photo thumbnail to view the photo in full screen.
3 To display the previous/next picture, slide your Įnger on the screen horizontally.
4 To zoom in or out the picture, pinch your Įnger on the picture.
Display Menu
When you are viewing the picture, you can tap on the screen or the Menu icon to show
Menu
17
Manage downloads
Files, apps, and other items you download from Gmail, Email, Android Market, or in other ways are stored in your
device's internal storage. You can use the Downloads app to view, reopen, or delete what you've downloaded.
Some mobile networks restrict the size of the Įůes you can download, to manage the demands on their networks or
to help you avoid unexpected charges. When you try to download an oversized-Įůe when connected to such
networks, you may be required to delay downloading unƟů your device is connected to a Wi-Fi network, when the
download will resume automaƟcally. You can view and manage these queued Įles in the Downloads app as well.
Downloaded Įůes are stored in the Download directory that's visible when your device is connected to a computer.
You can view and copy Įůes from this directory.
Open Downloads and manage downloaded Įůes
zTouch the Downloads icon from a Home or All Apps screen.
zTouch an item to open it.
zTouch headings for earlier downloads to view them.
zCheck items you want to share. Then touch the Share icon and choose a sharing method from the list.
zCheck items you want to delete. Then touch the Trash icon .
zAt the boƩom of the screen, touch Sort by size or Sort by date to switch back and forth.
Tune performance
OpƟmize baƩery life
You can extend your baƩĞry's life between charges by turning oī features that you don't need. You can also
monitor how apps and system resources consume baƩĞry power.
To adjust the seƫngs described here, Įrst touch the Seƫngs icon on a Home or All Apps screen.
Extend the life of your baƩery
zIf you aren't using Wi-Fi, or GPS, use the Seƫngs app to turn them oī. The GPS seƫng is located in Seƫngs >

18
Personal > Loca on services.
zDon't leave the Maps or Naviga on apps open on the screen when you're not using them. They use GPS (and
thus more power) only when they're running.
zTurn down screen brightness and set a shorter Sleep meout: Se ngs > Device > Display.
zIf you don't need it, turn oī automa c syncing for all apps: Se ngs > Personal > Accounts & sync. Note that
this means you need to sync manually to collect messages, email, and other recent informa on, and won't
receive no ca ons when updates occur.
zIf you know you won't be near a mobile or Wi-Fi network for a while, switch to Airplane mode:
Press and hold the power switch un the Tablet op ons dialog appears. Then touch Airplane Mode.
Check ba ery level and usage details
zOpen Se ngs > Device > Ba ery.
The list at the bo om of the screen shows the breakdown of ba ry usage for individual apps and services. Touch a
graph for more details. The details screen for some apps includes bu ons that allow you to adjust se ngs aīec ng
power usage, or stop the app completely.
Warning!
If you stop some apps or services, your device may not work correctly.
Ba ry status (charging, discharging) and level (as a percentage of fully charged) are displayed at the top of the
screen.
ClassiĮĐa on of storage MS7016
Depend of model number the device can have 4, 8 or 16 GB storage spaces: Inner storage 1, Inner storage
2, USB type external storage, TF card.
Example 4GB : The storage available for end user is divided into two parts: local par ons and user data.
When you browsing the internet, pictures etc are downloaded into local par ons 1.51GB. When you
downloading applica ons from applica ns (APKs) are saved to user data area. The size of user data you
could check with: Se ngs->SD card & device storage -> Available space. For example, available space for
user data is 0.78GB. The total available internal storage is Local Par ons + User data area =
1.51GB+0.78GB = 2.29GB, the android system and data take about the other 1.71GB = 4GB Internal
Memory.
1 Micro USB type storage and 1 Micro SD card support max up to 32GB
19
View or restrict data usage by app
Some apps transfer data in the background; that is, when you're not actually using the app, it may
download data for future reference. RestricƟng background data usage for individual apps can someƟmes
be a useful way to reduce your overall data usage. However, this is a drasƟc measure that may also aīect
the app's performance or cause it to malfuncƟon. Check whether data usage can be restricted from the
app's own seƫngs (available from within the app) before restricƟng it here.
1. Make sure you're viewing the network for which you want to view or restrict app data usage.
2. Scroll down to Įnd the app whose data usage you want to view.
3. To see more details for an app, touch its name.
4. To stop background data usage for this app, check Restrict background data.
5. Read the message that appears. If you're willing to proceed, click OK.
Advanced data usage seƫngs
Two other seƫngs available from the Menu icon can have dramaƟc eīects, but may someƟmes be useful:
zData roaming can result in steep addiƟonal charges. However, in some locaƟons this may be the only
way to connect to the Internet.
zRestrict background data aīects all your apps across all available networks, and may cause some
features to stop working. This is an extreme step that should be used with cauƟon.
OpƟmize memory usage
You typically don't need to worry about managing apps beyond installing, opening, and using them. But
there may be Ɵmes when you want to know more about what's happening behind the scenes.
Apps use two kinds of memory: internal storage and RAM. They use internal storage for themselves and
any Įůes, seƫngs, and other data they use. They also use RAM (memory designed for temporary storage and fast
access) when they're running.
Android manages and carefully guards the porƟon of internal storage where the system, apps, and most data for
those apps are stored, because this area may contain your private informaƟon. It's not possible to view this porƟon
of internal storage when you connect your device to a computer with a USB cable. The other porƟon of internal
storage, where music, downloaded Įůes, and so on are stored, remains visible for your convenience.
Android also manages how apps use RAM. It may cache some things you've been using recently, for quicker access if
you need them again, but it will erase the cache if it needs the RAM for new acƟviƟes. You Ăīect the way apps use
internal storage directly and indirectly in many ways; for example, by:

20
භ Installing or uninstalling apps.
භ Downloading Įůes in Browser, Gmail, and other apps.
භ CreaƟng Įles (for example, by taking pictures).
භ DeleƟng downloaded Įles or Įůes you created.
භCopying Įles between your device and a computer via USB.
You rarely need to manage the way apps use RAM. But you can monitor apps' RAM usage and stop them if they
misbehave.
Use the Apps screen
The Apps screen allows you to adjust several aspects of the way your device uses memory. To view these seƫngs:
1 From a Home or All Apps screen, touch the Seƫngs icon .
2 Under Device touch Apps.
You'll see three tabs at the top of the screen, each displaying a list of apps or their components:
භ Downloaded. Displays apps you've downloaded from Market or other sources.
භ Running. Displays all apps, processes, and services that are currently running or that have cached processes, and
how much RAM they are using.
The graph at the boƩom of the Running tab shows the total RAM in use and the amount free. Below the graph,
touch Show cached processes or Show running services to switch back and forth.
භ All. Displays all apps that came with Android and all apps you downloaded from Android Market or other sources.
To switch the order of the lists displayed in the Downloaded or All tabs, touch Menu icon > Sort by name or Sort
by size.
To view details about an app or other item listed under any tab, touch its name. The informaƟon and controls
available vary among dŝīerent types of apps, but commonly include:
භ Force stop buƩon: Stops an app that is misbehaving. Stopping an app, process, or service may cause your device
to stop working correctly. You may need to restart your device aŌer doing this.
21
භ Uninstall buƩon: Deletes the app and all of its data and seƫngs.
භ Disable buƩon: Prevents the app from running, but does not uninstall it. This opƟon is available for some apps
and services that can't be uninstalled.
භ Clear data buƩon: Delete an app's seƫngs and other data without removing the app itself.
භ Clear cache: If the app stores data in a temporary area of the tablet's memory, lists how much informaƟon is
stored, and includes a buƩon for clearing it.
භ Launch by default: If you have conĮgured an app to launch certain Įle types by default, you can clear that seƫng
here.
භ Permissions: Lists the kinds of informaƟon about your tablet and data the app has access to.
Enter & edit text
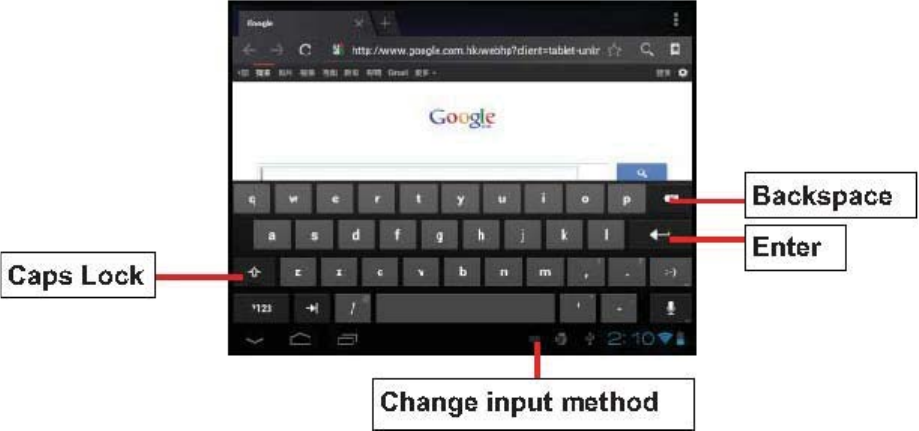
Use the keyboard
You can enter text using the onscreen keyboard. Some apps open it automaƟcally. In others, you open it by touching
where you want to type.
As you type, the keyboard displays suggesƟons above the top row of keys. To accept a suggesƟon, touch it.
Basic ediƟng
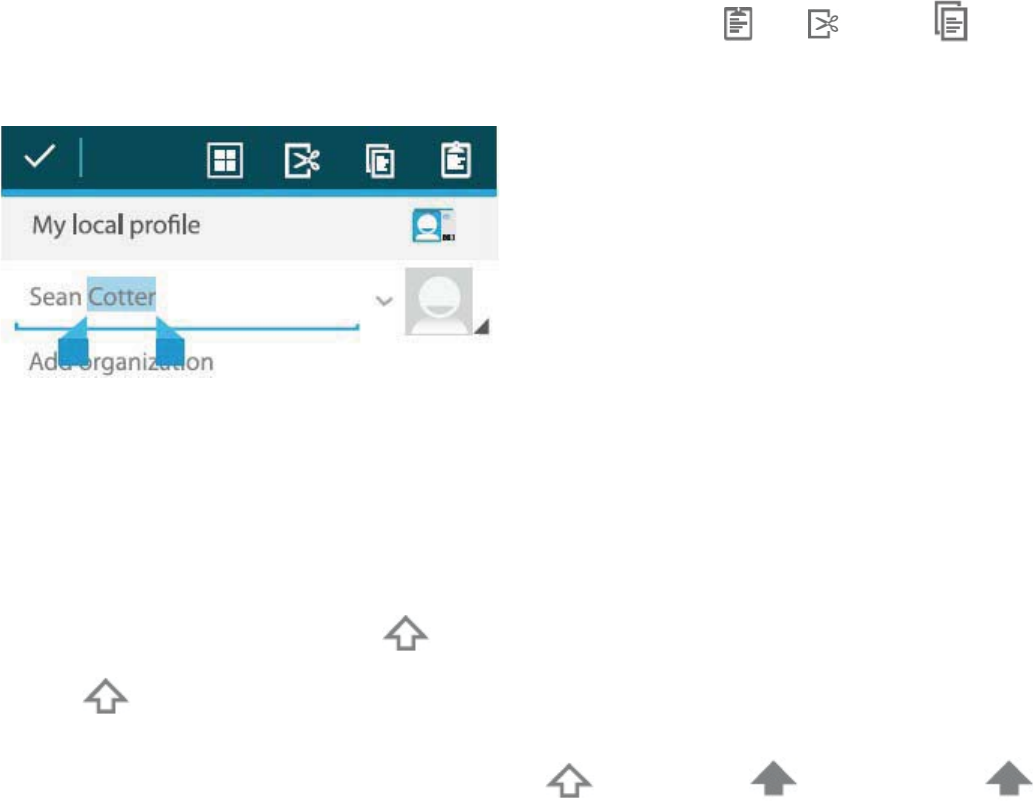
22
භ Move the inserƟon point: Touch where you want to type. The cursor blinks in the new posiƟon, and a green tab
appears below it. Drag the tab to move the cursor.
භ Select text: Touch & hold or double-tap within the text.
The nearest word highlights, with a tab at each end of the selecƟon. Drag the tabs to change the selecƟon.
The tab disappears aŌer a few moments, to get out of your way. To make it reappear, touch the text again.
භ Delete text: Touch to delete selected text or the characters before the cursor.
භ Cut, copy, paste: Select the text you want to manipulate. Then touch the Paste , Cut , or Copy buƩon
:
To make the keyboard go away, touch Done.
Tips & shortcuts
භ Type capital leƩers: Touch the ShiŌ key once to switch to capital leƩers for one leƩĞr. Or touch & hold the
ShiŌ key while you type. When you release the key, the lower case leƩĞrs reappear.
භTurn caps lock on: Double-tap or touch & hold the ShiŌ key , so it changes to . Touch the ShiŌ key
again to return to lowercase.
භ Show numbers or symbols: Touch the ?123 key. To see more choices, touch the = \ < key.
භ Quickly access common punctuaƟon and symbols: Touch & hold the key to the right of the space bar (period
key).
23
භ Type special characters: Touch & hold the ShiŌ key while you touch a key with a small gray character in its
corner to enter the gray character.
Touch & hold any key to see alternaƟve leƩĞrs, symbols, or numbers, which you can then touch to type.
භ Change input language or keyboard: Touch & hold the key to the leŌ of the space bar (with ... In the lower-right
corner), and then release it.
The Input opƟons menu appears. Choose the opƟon
you want to adjust.
Related seƫngs
Seƫngs > Personal > Language & input
Connect to Wi-Fi networks
Wi-Fi is a wireless networking technology that can
provide Internet access at distances of up to 100
meters, depending on the Wi-Fi router and your
surroundings.
To use Wi-Fi, you connect to a wireless access point, or
"hotspot." Some hotspots are open and you can simply connect to them. Others implement security features that
require other steps to set up, such as digital cerƟĮcates or other ways to ensure that only authorized users can
connect.
To extend the life of your baƩĞry between charges, turn oī Wi-Fi when you're not using it. You can also set your
device to disconnect automaƟcally from Wi-Fi networks when it's sleeping.
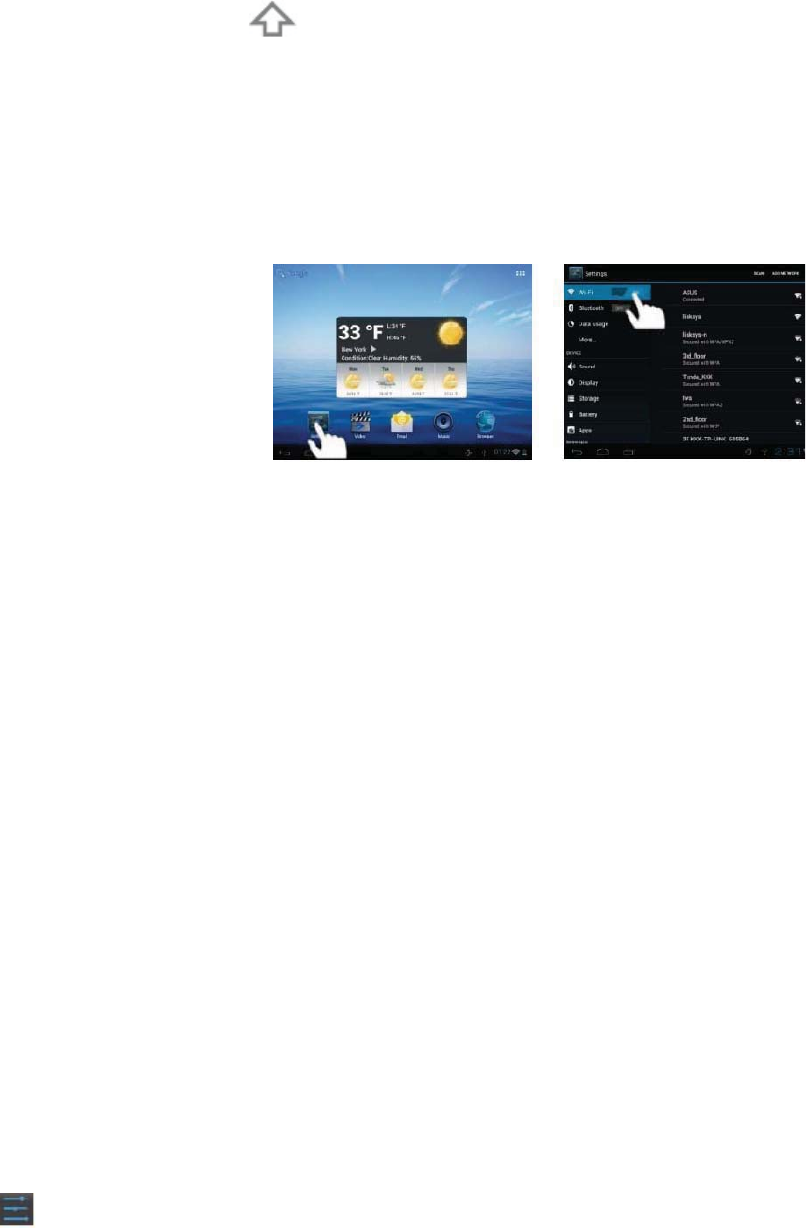
Turn Wi-Fi on and connect to a Wi-Fi network
If you're adding a Wi-Fi network when Įrst seƫng up your device, Wi-Fi is turned on automaƟcally.
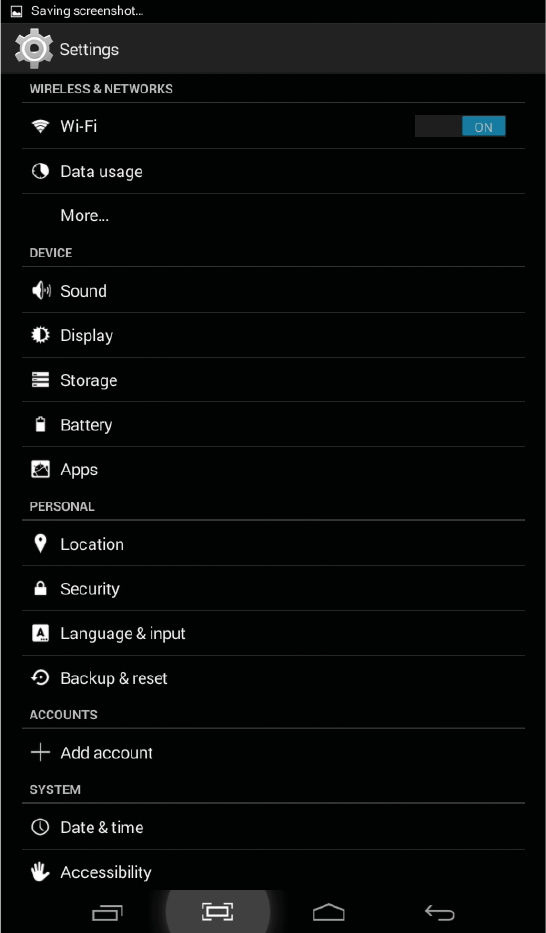
1 Touch the Seƫngs icon on a Home or All Apps screen.
2 Touch Wireless & networks > Wi-Fi.
3 Slide the Wi-Fi switch to the On posiƟon.
24
The device scans for available Wi-Fi networks and displays the names of those it Įnds. Secured networks are
indicated with a Lock icon. If the device Įnds a network that you connected to previously, it connects to it.
4 Touch a network name to see more details or connect to it.
If the network is secured, you're prompted to enter a password or other credenƟals. (Ask your network
administrator for details.)
To modify a network's seƫngs, touch & hold the network name.
Add a Wi-Fi network
You can add a Wi-Fi network so your device will remember it, along with any security credenƟĂůs, and connect to it
automaƟcally when it's in range. You must also add a Wi-Fi network if the network does not broadcast its name
(SSID), or to add a Wi-Fi network when you are out of range.
To join a secured network, you Įrst need to learn security details from the network's administrator.
1 Turn on Wi-Fi, if it's not already on.
2 In the Wi-Fi seƩings screen, touch Add Network.
3 Enter the SSID (name) of the network. If necessary, enter security or other network conĮguraƟon details.
4 Touch Save.
The informaƟon about the network is saved. Your device will connect to this network automaƟcally the next Ɵme
you come within range.
Forget a Wi-Fi network
You can make the device forget about the details of a Wi-Fi network that you added; for example, if you don't want
the tablet to connect to it automaƟcally or if it's a network that you no longer use.
1 Turn on Wi-Fi, if it's not already on.
2 In the Wi-Fi seƫngs screen, touch the name of the network.
3 Touch Forget in the dialog that opens.
ConĮgure proxy seƫngs for a Wi-Fi network

25
Some network administrators require you to connect to internal or external network resources via a proxy server. By
default, the Wi-Fi networks you add are not conĮgured to connect via a proxy, but you can change that for each Wi-
Fi network you've added.
Proxy seƫngs are used by Browser but may not be used by other apps.
1 Touch & hold a network in the list of Wi-Fi networks you've added.
2 Touch Modify network in the dialog that opens.
3 Select Show advanced opƟons.
4 If the network has no proxy seƫngs, touch None under Proxy Seƫngs, then touch Manual in the menu that
opens.
5 Enter the proxy seƫngs supplied by your network administrator.
6 Touch Save.
The proxy seƫngs apply only to the Wi-Fi network you modŝĮed. To change the proxy seƫngs for other Wi-Fi
networks, modify them individually.
Set Wi-Fi noƟĮcaƟons, disconnect policy, and other advanced opƟons
To work with advanced Wi-Fi seƫngs:
1 Turn on Wi-Fi, if it's not already on.
2 In the Wi-Fi seƫngs screen, touch the Menu icon and choose Advanced.
These are the seƫngs you can adjust:
භ Network noƟĮcaƟon: By default, when Wi-Fi is on, you receive noƟĮcaƟons in the Status bar when your device
detects an open Wi-Fi network. Uncheck this opƟon to turn oī noƟĮcaƟons
භ Avoid poor connecƟons: Check to automaƟcally avoid using networks with a low-quality or intermiƩĞnt Internet
connecƟon.
භ Keep Wi-Fi during sleep: To conserve mobile data usage, your device stays connected to Wi-Fi when the screen
goes to sleep.
Touch this opƟon to change this default behavior: either to stay connected to Wi-Fi only when the device is
connected to a charger (when baƩĞry life isn't a problem), or never to stay connected to
26
Wi-Fi during sleep. The laƩer choice is likely to increase mobile data usage. You may want to revisit this seƫng if you
receive a noƟĮcaƟon that you're approaching your specŝĮed mobile data limit.
භ Wi-Fi frequency band: 2.4 GHz Band
This screen also displays the following informaƟon:
භ MAC address: The Media Access Control (MAC) address of your device when connected to a Wi-Fi network.
භ IP address: The Internet Protocol (IP) address assigned to the device by the Wi-Fi network you are connected to
(unless you used the IP seƫngs to assign it a staƟc IP address).
Related seƫngs
Seƫngs > Wireless & networks > Wi-Fi
Seƫngs > Wireless & networks > Data usage
Connect to keyboards, mice, and other devices
You can connect a keyboard, mouse, or even a joysƟck or other input device to your tablet via USB and use it just as
you would with a PC.
You may need an adapter to connect the keyboard or other device to your tablet's USB port. To connect more than
one USB device at a Ɵme, use a powered USB hub to reduce the drain on your tablet's baƩery.
Keyboards
In addiƟon to entering text, you can use your keyboard to navigate your tablet's features:
භ Use the arrow keys to select items on screen.
භ Pressing Return when an item is selected is equivalent to touching that item.
භ Pressing Escape is equivalent to touching Back.
භ Press Tab or ShiŌ-Tab to move from Įeld to Įeld in a form or other screen with mulƟple text Įelds.
Mice
When you connect a mouse to your tablet and move the mouse, an arrow-shaped cursor appears, just as on a
computer:

27
භ Use the mouse to move the cursor.
භ Clicking, pressing, and dragging with the mouse buƩon is equivalent to touching, touching & holding, and dragging
with your Įnger.
භ Only one mouse buƩon is supported.
Other input devices
You can other input devices to your phone. However, games and other apps must be designed to support any
special features of an input device, such as dedicated buƩons or other controls, to take full advantage of them.
Connect to a Windows computer via USB
You can use a USB cable to connect your phone to a Windows computer and transfer music, pictures, and other Įůes
in both direcƟons.
When you connect your tablet to the USB port on your computer, its USB storage is mounted as a drive and appears
on your computer screen. You can now copy Įles back and forth as you would using any other external device.
When you're Įnished, simply disconnect the tablet by unplugging the USB cable.
Seƫngs > Device > Storage > Menu > USB computer connecƟon
Manage accounts
Add or remove accounts
You can use mulƟple Google Accounts and MicrosoŌ Exchange AcƟveSync accounts on your device.
You may also be able to add other kinds of accounts, depending on your apps. Some you can add in the Accounts &
Sync screen, as described here. Others you add using an app that works with those kinds of accounts. For example,
you can add IMAP and POP3 email accounts with the Email app.
To view the Accounts & sync seƫngs screen described here:
1 From a Home or All Apps screen, touch the Seƫngs icon .
28
2 Under Personal, touch Accounts & sync.
Add an account
To add some accounts, you may need to obtain details from system administrator about the service to which the
account connects. For example, you may need to know the account's domain or server address.
1 Go to Seƫngs > Personal > Accounts & sync.
2 Touch Add account.
3 Touch the kind of account to add.
4 Follow the onscreen steps to enter informaƟon about the account.
Most accounts require a username and password, but the details depend on the kind of account and the
conĮguraƟon of the service you're connecƟng to.
Depending on the kind of account, you may be asked to conĮgure what kinds of data you want to sync, name the
account, and other details.
When you're Įnished, the account is added to the list in Accounts & sync. Depending how you conĮgured the
account, email, contacts, and other informaƟon start syncing to your device.
Remove an account
You can remove an account to delete it and all informaƟon associated with it from your device, including
E-mail, contacts, seƫngs, and so on.
1 Go to Seƫngs > Personal > Accounts & sync.
2 Touch the account to delete.
3 Touch Menu icon > Remove account.
Related topics
ConĮgure account sync opƟons
Why use a Google Account?
ConĮgure account sync opƟons
29
You can conĮgure synchronizaƟon opƟons for any of your apps. You can also conĮgure what kinds of data you
synchronize for each account. Some apps, such as Gmail and Calendar, have separate synchronizaƟon seƫngs that
provide more Įne-grained control. In such cases, the seƫngs you select at the account level are sƟůů valid.
For some accounts, syncing is two-direcƟonal; changes that you make to the information on your device are made to
the copy of that informaƟon on the web. Your Google Account works this way. Other accounts support only one-way
sync: the informaƟon on your mobile device is read-only.
To view the Accounts & sync seƫngs screen described here:
1 From a Home or All Apps screen, touch the Seƫngs icon .
2 Under Personal, touch Accounts & sync.
Some apps also have their own seƫngs related to syncing. For example, to control message syncing in the Gmail
app, touch Menu icon > Label seƫngs > Sync messages.
ConĮgure general sync seƫngs
1 Go to Seƫngs > Personal > Accounts & sync.
Indicates that some or all of an account's informaƟon is conĮgured to sync automaƟcally.
Indicates that none of an account's informaƟon is conĮgured to sync automaƟcally.
2 Check or uncheck Menu icon > Auto-sync app data to control whether changes you make to informaƟon on your
device or on the web are automaƟcally synced with each other.
If you turn oī Auto-sync, you need to sync manually to collect messages, email, and other recent informaƟon, and
won't receive noƟĮcaƟons when updates occur.
For example, when this opƟon is checked, changes that you make in your People app are automaƟcally made to
your Google contacts on the web.
If this opƟon is not checked, you may be able to use an applicaƟon's tools to sync data manually. You can also sync
manually to collect messages, email, and other recent informaƟon. Leaving Auto-sync oī can help extend your
baƩĞry life, but will prevent you from receiving noƟĮcaƟons when updates occur.
Sync informaƟon manually
1 Go to Seƫngs > Personal > Accounts & sync.
2 Touch the account whose data you want to sync.
3 Touch Menu icon > Sync now.
30
Change an account's sync se ngs
1 Go to Se ngs > Personal > Accounts & sync.
2 Touch the account whose sync se ngs you want to change.
The Sync Se ngs screen opens, displaying a list of the kinds of informa on the account can sync.
3 Check or uncheck items as needed.
Unchecking an op on does not remove the informa on from your device; it simply stops it from being kept in sync
with the version on the web.
Secure your tablet
Set screen lock
Depending how you use your phone, you may want to set some form of automa c screen lock to prevent
unauthorized access. If a screen lock has been set, the screen locks when your phone's display goes to sleep.
To adjust your tablet lock se ngs:
1 From a Home or All Apps screen, touch the Se ngs icon.
2 Touch Personal > Security > Screen lock.
3 Touch the type of lock you want and follow the onscreen instruc ons.
You can choose among these lock op ons, listed in approximate order of strength:
zSlide provides no protec on, but lets you get to the Home screen quickly, or open Camera and start taking
pictures immediately.
zPa ern lets you draw a simple pa rn with your Įnger to unlock the phone.
zPassword requires four or more le rs or numbers. This is the most secure op on, as long as you create a
strong password. Important For best security, specify a password that is
zA least 8 characters long.
zContains a mixture of numbers, le rs, and special symbols
zDoesn't contain any recognizable words or phrases.
Related se ngs
Se ngs > Device > Display > Sleep
Se ngs > Personal > Security > Make pa rn visible
Special attention᧶
The power input is 5V/2A; please do not use other spec!