UTC Fire and Security Americas WEDGEIP Camera User Manual ii
UTC FIRE & SECURITY AMERICAS CORPORATION, INC Camera ii
Contents
- 1. User Manual ii
- 2. Users Manual i
User Manual ii
Network Bullet CameragQuick Start Guide
22
5. Tear off the protection film softly to complete the installation.
l Do not tear off the protection film until the installation is
completed.
l Do not touch the inside face of the bubble with your hands.
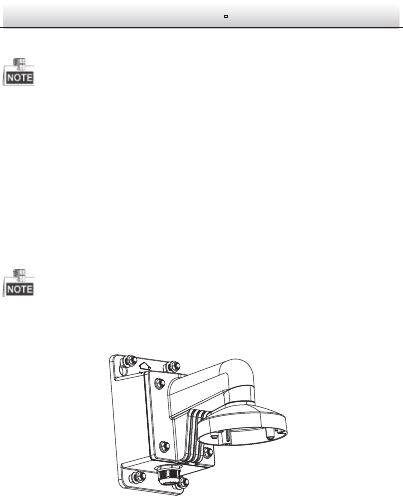
Wall Mounting 2.4
Steps:
1. Install the wall bracket to the wall with the supplied screws in
the wall bracket package.
You need to purchases a wall bracket separately if wall mounting is
adopted.
Install Wall Bracket Figure 2-12
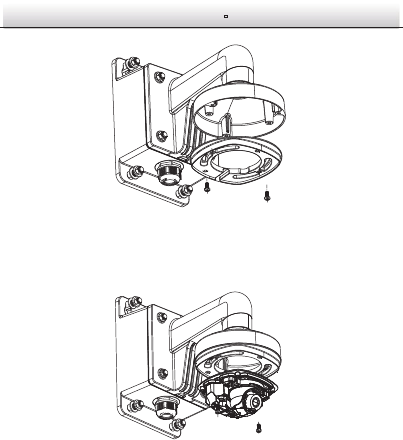
2. Fix the adapter plate to the wall bracket.
Network Bullet CameragQuick Start Guide
23
Fix the Adapter Plate Figure 2-13
3. Fix the dome drive to the wall bracket with the supplied screws.
Install the Camera
Figure 2-14
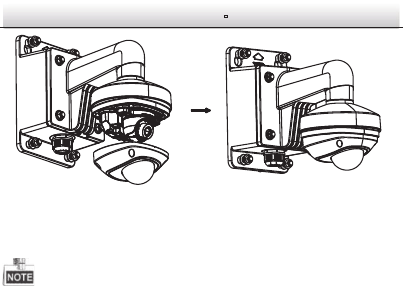
4. Align the front cover to the dome drive and tighten the set
screws on the front cover to complete the installation.
Network Bullet CameragQuick Start Guide
24
Install the Front Cover Figure 2-15
5. Tear off the protection film softly to complete the installation.
l Do not tear off the protection film until the installation is
completed.
l Do not touch the inside face of the bubble with your hands.
Install the Micro SD Card 2.5
This series of camera supports local storage, please refer to the
following steps to install the micro SD card.
Steps:
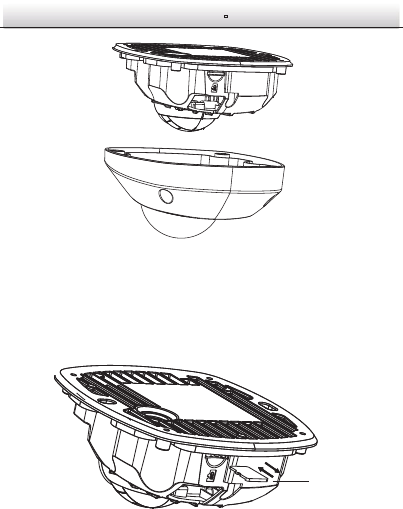
1. Remove the front cover by loosening the set screws on it.
Network Bullet CameragQuick Start Guide
25
Remove the Front Cover Figure 2-16
2. Insert the micro SD card to the card slot until you hear a click.
3. (Optional)Slightly push the inserted micro SD card to uninstall it
from the camera.
Figure 2-17 Install and Uninstall Micro SD Card
Mirco SD Card
Network Bullet CameragQuick Start Guide
26
3 Setting the Network Camera over the
LAN
Note:
You shall acknowledge that the use of the product with Internet
access might be under network security risks. For avoidance of any
network attacks and information leakage, please strengthen your
own protection. If the product does not work properly, please
contact with your dealer or the nearest service center.
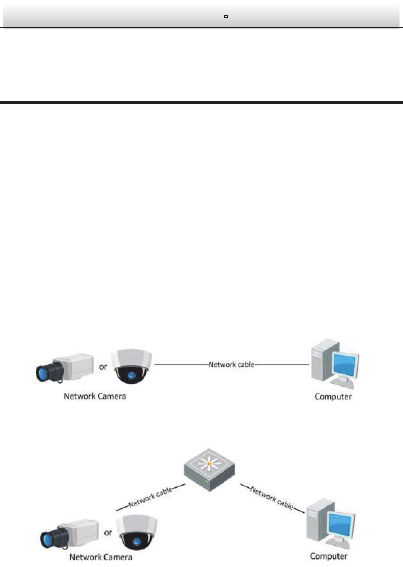
Wiring 3.1
Please connect to the camera to the network according to the
following figures
Connecting Directly Figure 3-1
Connecting via a Switch or a Router Figure 3-2

Network Bullet CameragQuick Start Guide
27
Activating the Camera 3.2
You are required to activate the camera first by setting a strong
password for it before you can use the camera.
Activation via Web Browser, Activation via SADP, and Activation via
Client Software are all supported. We will take activation via SADP
software and Activation via Web Browser as examples to introduce
the camera activation. Please refer to the User Manual of Network
Camera for Activation via Client Software.
Activation via Web Browser 3.2.1
Steps:
1. Power on the camera, and connect the camera to the network.
2. Input the IP address into the address bar of the web browser, and
click Enter to enter the activation interface.
Notes:
l The default IP address of the camera is 192.168.1.64.
l For the camera enables the DHCP by default, you need to
activate the camera via SADP software and search the IP
address.
Network Bullet CameragQuick Start Guide
28
Activation Interface(Web) Figure 3-3
3. Create a password and input the password into the password
field.
STRONG PASSWORD RECOMMENDED– We highly
recommend you create a strong password of your own
choosing (using a minimum of 8 characters, including
upper case letters, lower case letters, numbers, and
special characters) in order to increase the security of
your product. And we recommend you reset your
password regularly, especially in the high security
system, resetting the password monthly or weekly can
better protect your product.
4. Confirm the password.
5. Click OK to save the password and enter the live view interface.
Network Bullet CameragQuick Start Guide
29
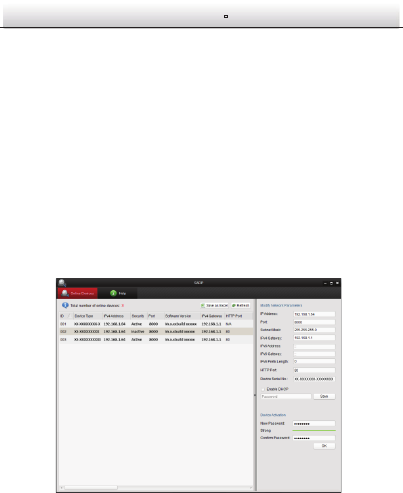
Activation via SADP Software 3.2.2
SADP software is used for detecting the online device, activating the
camera, and resetting the password.
Get the SADP software from the supplied disk or the official website,
and install the SADP according to the prompts. Follow the steps to
activate the camera, please refer to the User Manual of Network
Camera for other two activation methods.
Steps:
1. Run the SADP software to search the online devices.
2. Check the device status from the device list, and select the
inactive device.
SADP Interface Figure 3-4
Note:
The SADP software supports activating the camera in batch. Please
refer to the user manual of SADP software for details.
Network Bullet CameragQuick Start Guide
30
3. Create a password and input the password in the password field,
and confirm the password.
STRONG PASSWORD RECOMMENDED– We highly
recommend you create a strong password of your own
choosing (using a minimum of 8 characters, including
upper case letters, lower case letters, numbers, and
special characters) in order to increase the security of
your product. And we recommend you reset your
password regularly, especially in the high security
system, resetting the password monthly or weekly can
better protect your product.
4. Click OK to save the password.
You can check whether the activation is completed on the popup
window. If activation failed, please make sure that the password
meets the requirement and try again.
Modifying the IP Address 3.3
Purpose:
To view and configure the camera via LAN (Local Area Network), you
need to connect the network camera in the same subnet with your
PC. Then, install the SADP software or client software to search and
change the IP of network camera. We will take modifying the IP
Address via SADP software as an example to introduce the IP address
modification.
Steps:
1. Run the SADP software.
2. Select an active device.
Network Bullet CameragQuick Start Guide
31
Note:
Please refer to Chapter 3.2 to activate the camera if the camera is
inactive.
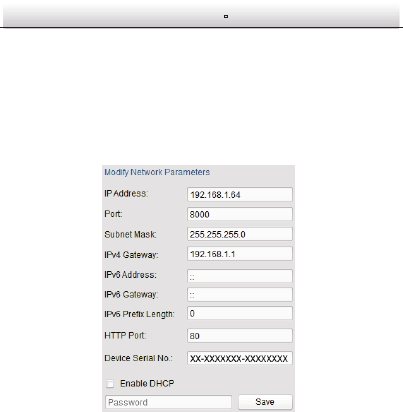
3. Change the device IP address to the same subnet with your
computer by either modifying the IP address manually or checking
the checkbox of Enable DHCP.
Modify the IP Address Figure 3-5
4. Input the password to activate your IP address modification.
The batch IP address modification is supported by the SADP; please
refer to the User Manual of SADP for details.

Network Bullet CameragQuick Start Guide
32
4 Accessing via Web Browser
System Requirement:
Operating System: Microsoft Windows XP SP1 and above version
CPU: 2.0 GHz or higher
RAM: 1G or higher
Display: 1024×768 resolution or higher
Web Browser: Internet Explorer 8.0 and above version, Apple Safari
5.0.2 and above version, Mozilla Firefox 5.0 and above version and
Google Chrome 18 and above version
Steps:
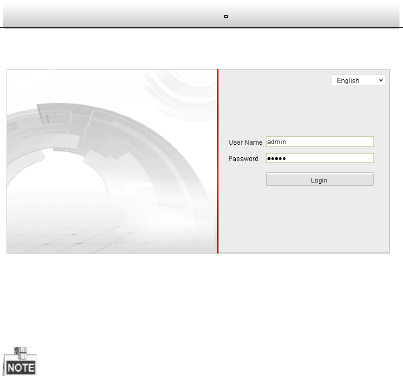
1. Open the web browser.
2. In the browser address bar, input the IP address of the network
camera, and press the Enter key to enter the login interface.
Note:
l The default IP address is 192.168.1.64.
l If the camera is not activated, please activate the camera first
according to Chapter 3.2.
3. Input the user name and password.
The admin user should configure the device accounts and
user/operator permissions properly. Delete the unnecessary
accounts and user/operator permissions.
Note:
The device IP address gets locked if the admin user performs 7
failed password attempts (5 attempts for the user/operator).
Network Bullet CameragQuick Start Guide
33
4. Click Login.
Login Interface Figure 4-1
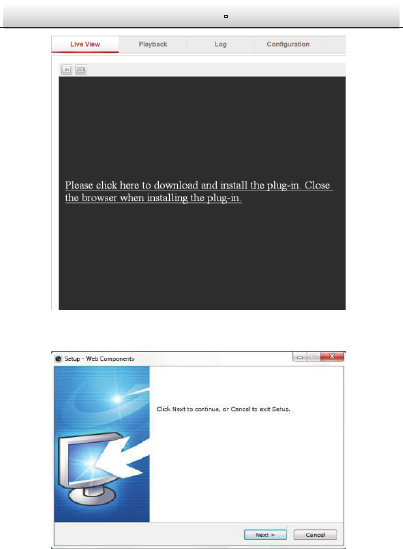
5. Install the plug-in before viewing the live video and managing
the camera. Please follow the installation prompts to install the
plug-in.
You may have to close the web browser to finish the installation of
the plug-in.
Network Bullet CameragQuick Start Guide
34
Download Plug-in Figure 4-2
Install Plug-in (1) Figure 4-3
Network Bullet CameragQuick Start Guide
35
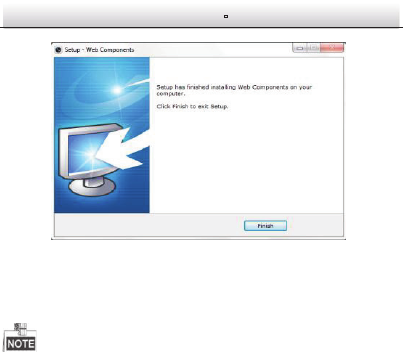
Install Plug-in (2) Figure 4-4
6. Reopen the web browser after the installation of the plug-in and
repeat steps 2~4 to login.
For detailed instructions of further configuration, please refer to the
user manual of network camera.