UTStarcom Korea Technologies CDM7025 Dual-Band CDMA Phone User Manual
UTStarcom Korea Technologies Ltd. Dual-Band CDMA Phone Users Manual
UserManual.wiki
>
UTStarcom Korea Technologies
>
CDM7025 User Manual
Users Manual
Navigation menu
Upload a User Manual
Namespaces
Wiki Guide
HTML
PDF
Info
Views
User Manual
Discussion / Help
Navigation
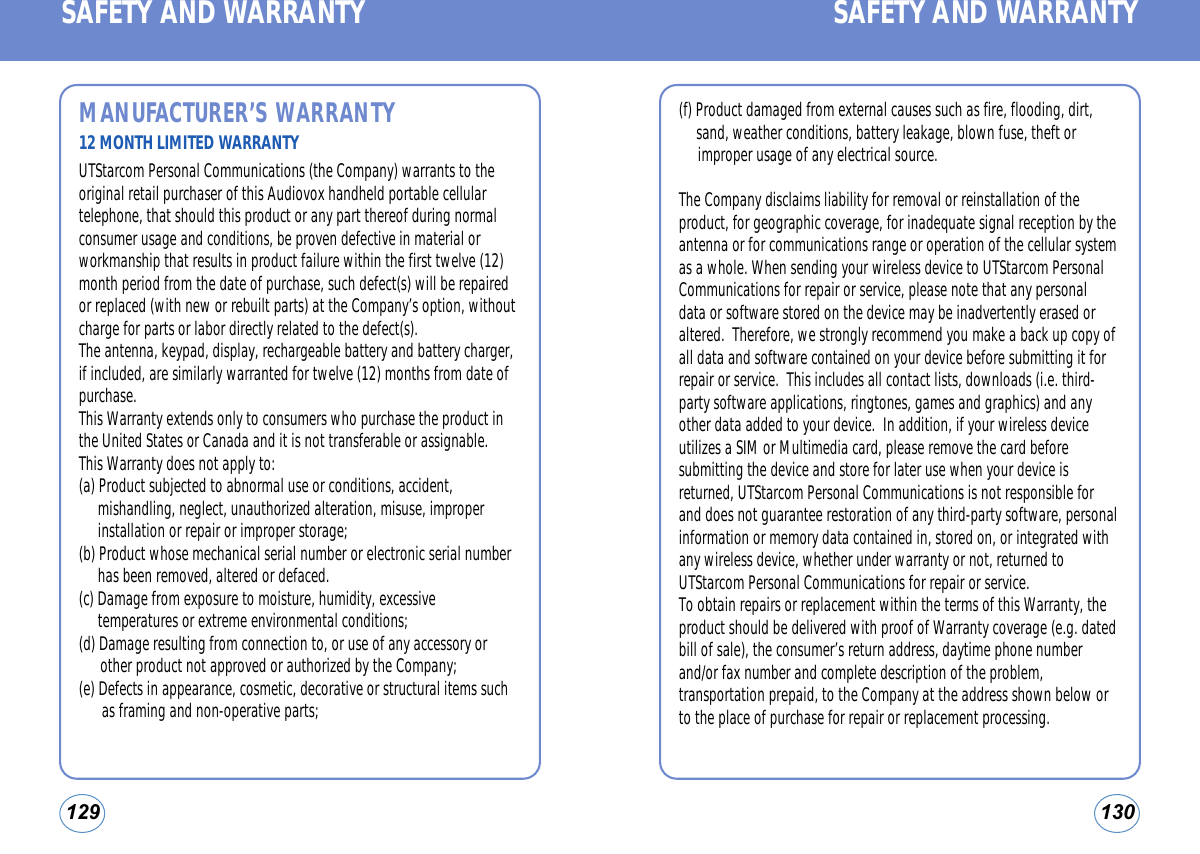
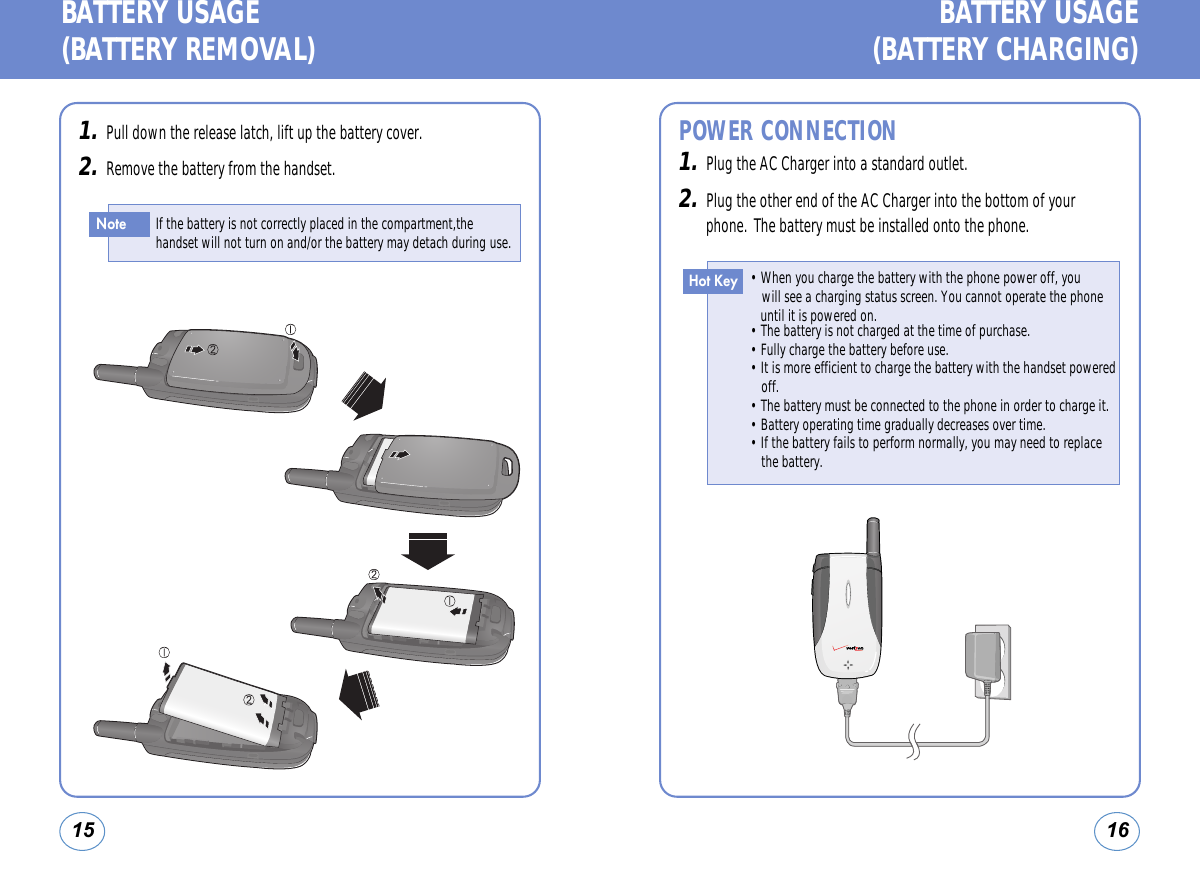
![1211HANDSET DESCRIPTION (THE FUNCTION KEYS) HANDSET DESCRIPTION (DISPLAY INDICATORS)Send Key Press to make or receive a call.End Key Press to turn the phone on/off, to terminate a call or to return to the initialpage.Left Soft Key Press to access the message menu or function displayed on bottom line.In Idle ModePress Up for VR, Down for Shortcut, Right for Fun &Games and Left for Setting & Tools.In Idle ModeWithin a menu, use to scroll through menu options, or toselect a function displayed on the screen.CLR Key Press to clear a digit from the display or to return to the previous page.Shift Key Enters the asterisk [*] character for calling features. In text entry mode,press to change the character input type. A twice press shall display a plus“+” (International key).Right Soft Key Press to access contacts menu or function displayed on bottom line.Space Key Enters the pound [#] character for calling features. In text entry mode, pressto enter a space.Side Volume Key Allows you to adjust the ringer volume in standby mode (with the flip open)or adjust the voice volume during a call. The volume key can also be usedto scroll up or down to navigate through the different menu options. Tomute the ringer during an incoming call, press the volume key up or down.Text & Graphic areaSoft Key IndicatorsShows the functions currently assigned to each soft key and displays some icons.Display IndicatorsDisplay various icons.The idle display appears when you are not on a call or using the menu.You must be in the idle display to dial a phone number.Roaming Phone is out of home area.Voice Privacy Indicates Voice Privacy mode.Signal Strength Current signal strength: the more lines, the stronger the signal (1XMode/Digital Mode).DormantIndicates your phone is in a dormant state during a data call. Your phonegoes to Dormant mode when you have not had any activity on a page forsome time - your connection is still active and you can make and receivecalls.No ServiceIndicates the phone cannot receive a signal from the system.TTY Indicates your phone is active in TTY mode.GPS IconIndicates the Location Service of your phone is disabled/enabled.](https://usermanual.wiki/UTStarcom-Korea-Technologies/CDM7025/User-Guide-607056-Page-6.png)
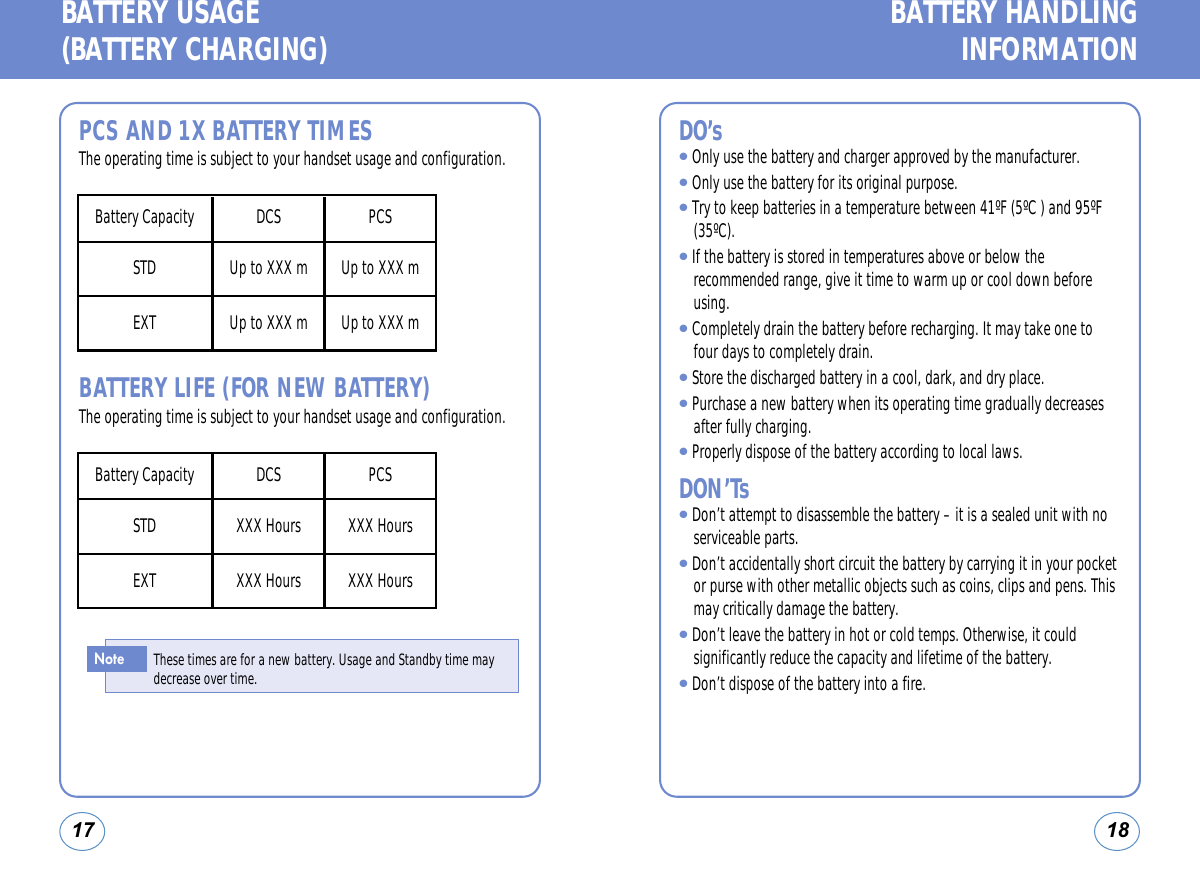

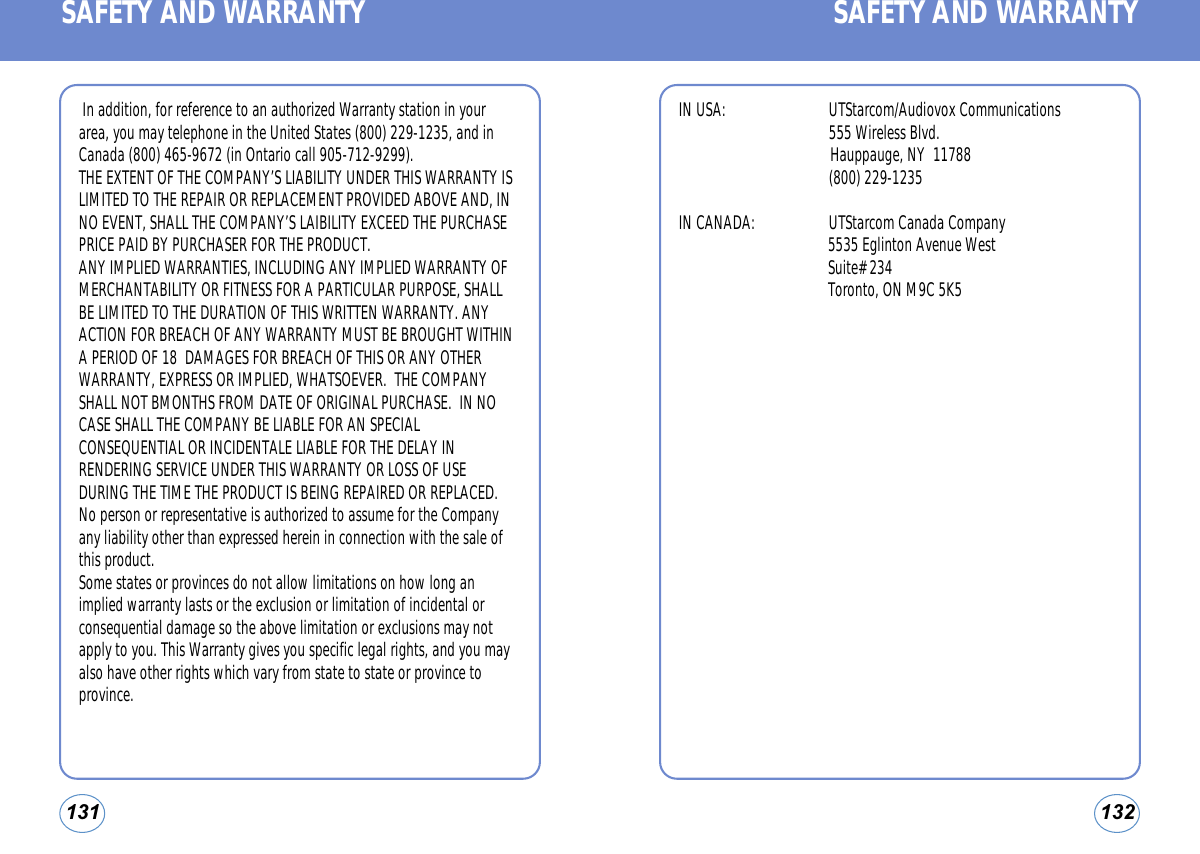
![Your phone can be customized via the menu. Each function can beaccessed by scrolling with the Navigation Key or by pressing the numberthat corresponds with the menu item.1.To access the menu in the idle mode, press OK KEY [MENU].2.Use the Navigation Key to scroll through the menu.2221TURNING THE PHONE ON / OFFTURNING THE PHONE ON1.Press and hold END KEY until your “Power On” logo appears andthe tone sounds.TURNING THE PHONE OFF1.Press and hold END KEY until your “Power Off” logo appears.• If “Password” appears on the display enter your 4-digit passwordto unlock your phone. • The default password is the last 4 digit of your phone number.Note• Immediately change or recharge the battery when “LOW BATTERY!! PHONE IS TURNING OFF!”appears on the display. Memory may possibly be damaged if the phone turns off due to the battery completely draining.• Turn the phone off before removing or replacing the battery. If the phone is on, unsaved data may be lost.NoteIn idle mode, move the Navigation Key as follows to access thesefunctions:• Upward movement : VR• Downward movement : Shortcut• Rightward movement : Fun & Games• Leftward movement : Setting & ToolsHot KeyACCESSING THE MENUTo search through the menu in numerical order, press the Navigation Key.3.To return to the previous page, press CLR KEY. To exit the current menu and return to the idle mode, press END KEY.4.Press the Navigation Key to enter a function when its main page isdisplayed or press its assigned number to have direct access to thefunction.](https://usermanual.wiki/UTStarcom-Korea-Technologies/CDM7025/User-Guide-607056-Page-11.png)
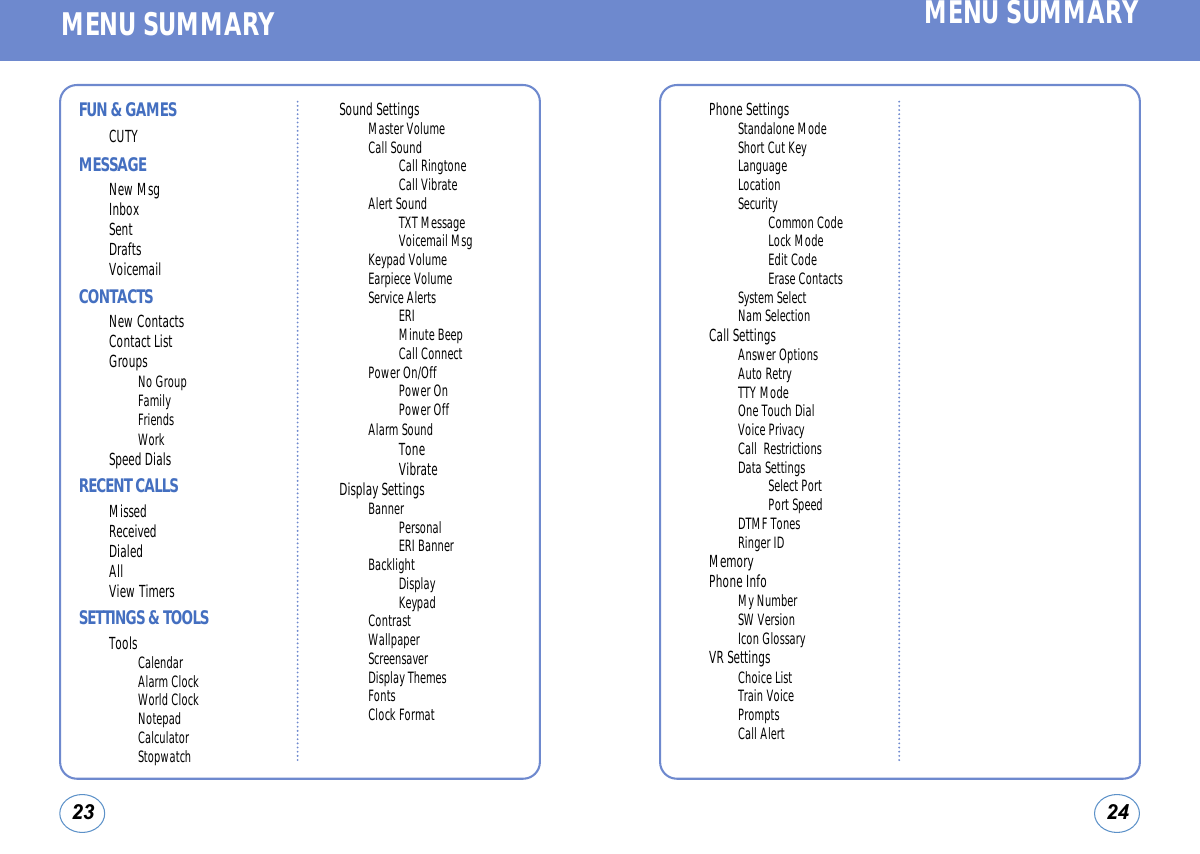
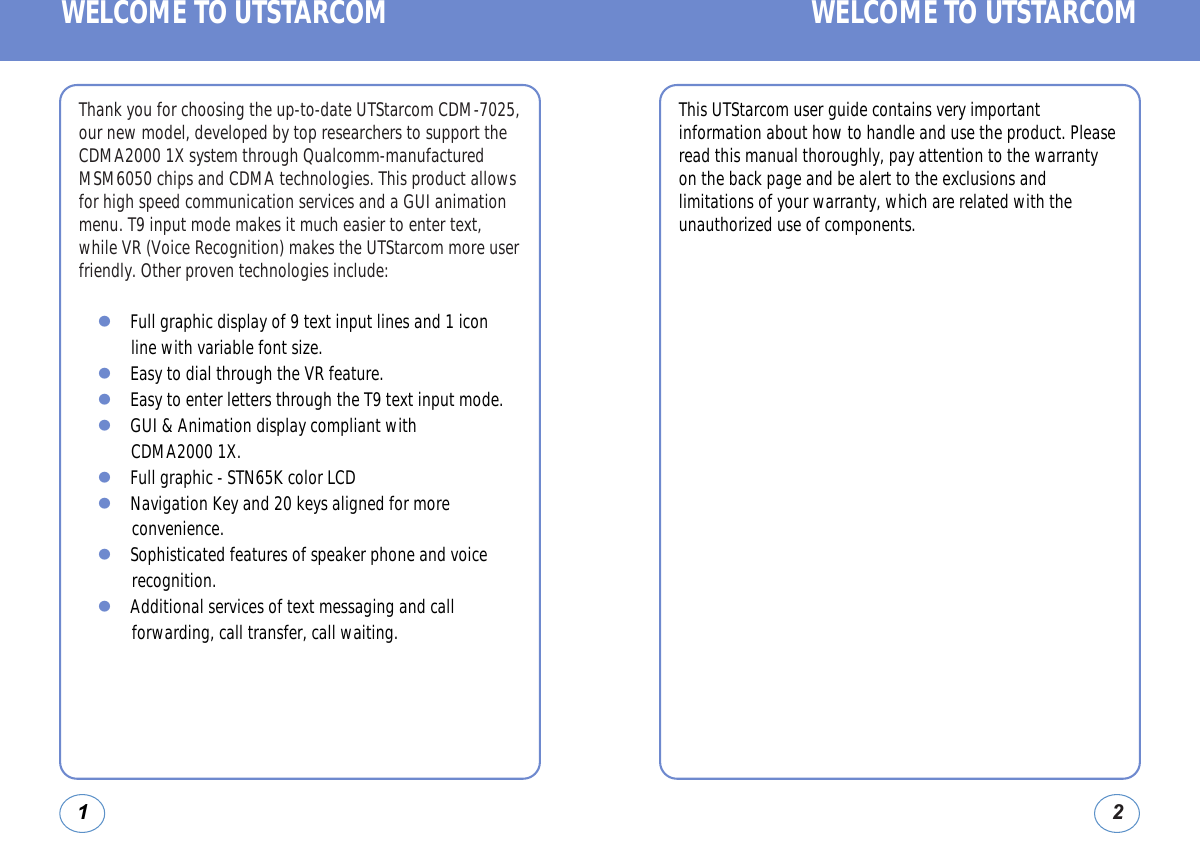
![MAKING A CALL1.Enter a phone number.2.Press SEND KEY.3.To end a call, press END KEY.2625BASIC FUNCTIONS BASIC FUNCTIONSANSWERING CALLS1.When your phone rings or vibrates, press SEND KEY to answer theincoming call. (Depending on your phone’s settings, you may alsoanswer incoming calls by opening the phone or by pressing anydigit key.)2.To end a call, press END KEY.WAIT/PAUSE FEATUREPauses are used for automated systems (i.e., voice mail, calling cards).Insert a pause after a phone number then enter another group ofnumbers. The second set of numbers is dialed automatically after thepause. This feature is useful for dialing into systems that require a code. 1.To insert a wait/pause, enter a phone number then press RIGHT S.KEY [OPTIONS]. Select either a 2.Sec Pause(“P” appears) or a Wait (“W” appears).2.Press SEND KEY to dial or press LEFT S.KEY [SAVE] to savephone number.To modify the phone number you have entered :• To erase one digit at a time press CLR KEY.• To erase the entire number, press and hold CLR KEY.Phone number display in contact list :If contact’s name field empty, then highest priority phone numberdisplayed. If any phone number and name is not exist then emailaddress diaplay. Referece “Contact display order”. All matching entries will be displayed. To call the selected number,press SEND KEY.To send the txt with phone number :• To enter a part of the phone number, then press RIGHT S.KEY[OPTIONS], select “New TXT Msg” . Note• If “CALL FAILED” appears on the display or the line is busy,press or . • If you activate the “AUTO RETRY” function, the phone willautomatically retry for the number of times you have selected. • When you place or receive a call from stored phone numbers,only the name will be displayed. • If “Enter Lock Code” appears on the display enter your 4-digitpassword to unlock your phone. NoteTo ignore incoming calls, press RIGHT S.KEY [IGNORE].](https://usermanual.wiki/UTStarcom-Korea-Technologies/CDM7025/User-Guide-607056-Page-13.png)
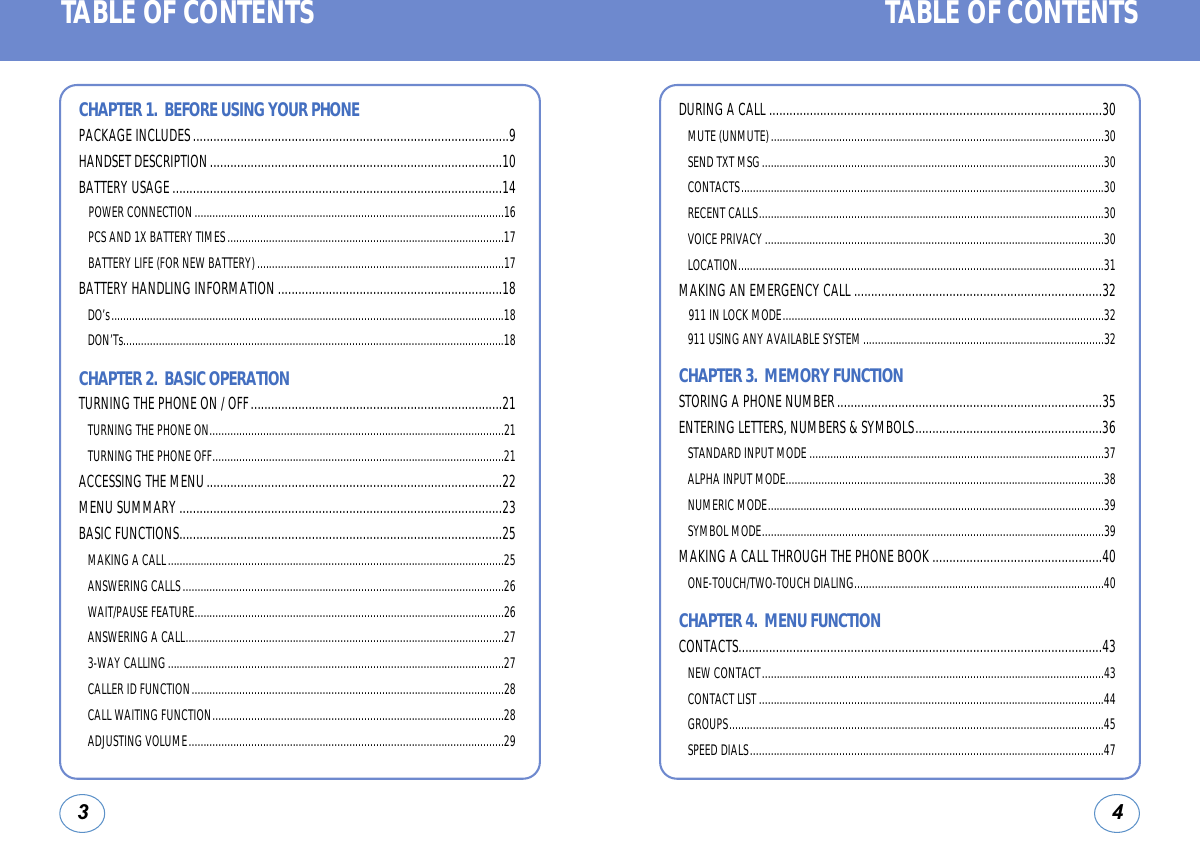
![2827BASIC FUNCTIONS BASIC FUNCTIONSANSWERING A CALL1.To answer a call, press any key except END KEY, LEFT S.KEY,RIGHT S.KEY, CLR KEY, VOLUME KEY or NAVIGATION KEY.3-WAY CALLINGWith 3-Way Calling, you can talk to two people at the same time. Whenusing this feature, the normal airtime rates will be applied for each ofthe two calls. 1.Enter a number you wish to call then press SEND KEY.2.Once you have established the connection, enter the secondnumber you wish to call then press SEND KEY.3.When you’re connected to the second party, press SEND KEYagain to begin your 3-Way call.CALLER ID FUNCTIONIdentifies caller by displaying their phone number. If the caller’s name and number are already stored in your phone book,they name will appear. The caller ID is stored in the recent calls.CALL WAITING FUNCTIONNotifies you of an incoming call when you are already on a call bysounding a beep tone and displaying the caller’s phone number. 1.To answer another call while on the phone, press SEND KEY. Thisplaces the first call on hold. To switch back to the first caller, pressSEND KEY again.By pressing OK KEY [MENU] then select “Settings & Tools” menu, press 5KEY,1 KEY, you can select either “Flip Open”, “Any Key”, “Send Only”or “Auto Answer” to answer a call. lf “Send Only” is selected, the phone can only be answered by pressingSEND KEY.In Auto Answer Mode a call is automatically answered after fiveseconds of ring tones.NoteIf one of the people you called hangs up during your call, you andthe remaining caller stay connected. If you initiated the call and are the first to hang up, all three callers are disconnected.NoteCall Waiting is a system dependent feature. Please contact your service provider for details.Note2.To end the call, press END KEY.](https://usermanual.wiki/UTStarcom-Korea-Technologies/CDM7025/User-Guide-607056-Page-14.png)
![3029BASIC FUNCTIONS DURING A CALLADJUSTING VOLUMEAdjusts the volume of the ringer, key beep and earpiece.1.Press OK KEY [MENU], then select “Settings & Tools” menu, press 2 KEY then select one of the following.2.Adjust volume then press OK KEY to save it.MUTE (UNMUTE)The caller cannot hear you or any sounds from your side but you can stillhear them.1.Press LEFT S.KEY [MUTE].SEND TXT MSGEnables you to send a TXT message (SMS) during a call.1.Press RIGHT S.KEY [OPTIONS], press 1 KEY.CONTACTSTo select the phone number in your internal Contact List.1.Press RIGHT S.KEY [OPTIONS], press 2 KEY.RECENT CALLSTo select the phone number in your recent calls List.1.Press RIGHT S.KEY [OPTIONS], press 3 KEY.VOICE PRIVACYIncreases security during a call.1.Press RIGHT S.KEY [OPTIONS], press 4 KEY.Master Volume: Controls the ringer volume.Keypad Volume: Controls the keypad volume.Earpiece Volume: Controls the earpiece volume.• To adjust earpiece volume during a call, press the Side Key up or down.• To adjust master volume, press short side up/ down key.• Side Volume Up key Long Press: Volume key shall bring device Normal Mode.• Side Volume Down key Long Press: To setting a sounds off.Note• To deactivate, press LEFT S.KEY[UNMUTE].• The phone will automatically unmute in Emergency Call or Callbackmode.](https://usermanual.wiki/UTStarcom-Korea-Technologies/CDM7025/User-Guide-607056-Page-15.png)
![3231DURING A CALL MAKING AN EMERGENCY CALLLOCATIONEnables the network to locate your current location through GlobalPositioning System (GPS).1.Press RIGHT S.KEY [OPTIONS], press 5 KEY.The 911 feature puts the phone in the Emergency Call Modewhen you dial the preprogrammed emergency number, 911.It also operates in the lock mode and out of the service area.911 IN LOCK MODEThe 911 call service is available even in the lock mode.1.Enter “911”, then press SEND KEY.2.The call connects.3.When the call ends, the phone returns to the Lock Mode.911 USING ANY AVAILABLE SYSTEM1.Enter “911”, then press SEND KEY.2.The call connects.3.The phone maintains the Emergency Mode and the phone canreceive an incoming call from any available system. However, itcan’t make a call.The 911 call is not recorded in the recent call list.Note](https://usermanual.wiki/UTStarcom-Korea-Technologies/CDM7025/User-Guide-607056-Page-16.png)

![3635STORING A PHONE NUMBER ENTERING LETTERS,NUMBERS & SYMBOLSThe phone book stores up to 500 entries.1.Enter phone # then press LEFT S.KEY [SAVE] then choose “CreateNew” or “Update Existing”. Press OK KEY to select.2.If “Create New” is selected, the phone number will appear above alist. Press the Navigation Key up or down to choose the type ofnumber you’re adding, as indicated by the icon. Press OK KEY toselect. If “Update Existing” is selected, your contact list isdisplayed. Choose the entry to add the phone number to, then pressOK KEY. You will then see the phone number listed about a list.Press OK KEY to select.3.Enter a name.To change the input mode, press LEFT S.KEY [Abc].Press the Navigation Key down to select other options (Mobile1.2,E-mail1.2, etc...). If entered phone number, press RIGHT S.KEY[OPTIONS] to select one of the following options:4.To store the entry, press OK KEY [SAVE]. “CONTACT SAVED” willbe displayed.The input mode (Alpha editor) will automatically be activated whennecessary to enter letters and numbers. As shown below, there are 5available modes ; Standard input mode (Abc), Input mode (Alpha),Numeric mode (123), and Symbol mode (Symbols). The input modeindicator appears on the upper right of the display when letters andnumbers are entered. To select the desired input mode among the 5modes below, press LEFT S.KEY [Abc], then enter letters and numbers.Set Speed DialSet Voice DialSet As DefaultAdd PauseKEYKEYLEFT S.KEY 0 KEY SPACE KEYCLR KEY OK KEY SHIFT KEYPress to select aletter case of thestandard text inputor Alpha text inputmode. [Abc], [ABC]and [abc] indicatethe standard textinput. [Alpha],[ALPHA] and [alpha]indicate thepredictive text input.Press to changemode.[Alpha][Abc][ABC][123][Symbols]Press to view thenext matching wordif the highlightedword is not the wordyou intended.Press to accept aword and add aspace.Send the letters andnumbers you enter.Press to deletea character tothe left of thecursor.](https://usermanual.wiki/UTStarcom-Korea-Technologies/CDM7025/User-Guide-607056-Page-18.png)
![3837ENTERING LETTERS, NUMBERS & SYMBOLS ENTERING LETTERS, NUMBERS & SYMBOLSSTANDARD INPUT MODEUse the digit keys to enter letters, numbers and characters.1.Enter letters using the key pad, to change the input mode, press LEFT S.KEY [Abc].2.To enter a space, press SPACE KEY. The cursor will automaticallymove to the next column.3.Repeat until letters are entered.4.To delete one digit, press CLR KEY. To delete the entire entry, press and hold CLR KEY.5.To change from lowercase to uppercase, press SHIFT KEY.ALPHA INPUT MODEThe input mode incorporates a built-in-dictionary to determine a alphabased on the entered characters. A alpha can be entered more quicklyby pressing a key once per character.1.Select the Alpha mode by pressing LEFT S.KEY [Abc].2.Press a digit key once to enter the character you want then enter allthe characters to input the word you want.3.To view the next matching word, press 0 KEY.4.To accept the matching word then enter a space, press SPACE KEY.Select Abc mode by pressing LEFT S.KEY [Abc].When you select this mode, the Abc icon appears as a visualconfirmation.- Find the key that corresponds to the letter you want to enter.- Press it as many times as needed for the letter to appear on the screen.- To enter the name “John”:Press [5 KEY] JPress [6 KEY, 6 KEY, 6 KEY] oPress [4 KEY, 4 KEY] hPress [6 KEY, 6 KEY] nE.G.To enter “Fun fare” in the Alpha input mode:- After you enter the 1stletter, press LEFT S.KEY [Abc] to select Alpha mode and SHIFT KEY to choose the lower case (Alpha).- Press 3 KEY, 8 KEY, 6 KEY and you will see “Fun”highlighted. Press SPACE KEY to select it.- Press 3 KEY, 2 KEY, 7 KEY, 3 KEY and until you see “ease” highlighted. Press 0 KEY to select the next matching word, you will see “fare” then enter a space.E.G.To enter a compound word:• Enter the first part of the word then pressRIGHT NAVIGATION KEY to accept it.• Enter the last part of the word then press SPACE KEY to enter the word.Note](https://usermanual.wiki/UTStarcom-Korea-Technologies/CDM7025/User-Guide-607056-Page-19.png)
![4039ENTERING LETTERS, NUMBERS & SYMBOLS MAKING A CALL THROUGH THE PHONE BOOKNUMERIC MODEAllows you to enter numbers.1.Press LEFT S.KEY [Abc] and scroll to the input mode to changes to“123 (Numeric mode)”.2.To enter a number, press a digit key.SYMBOL MODEAllows you to enter symbols.1.Press LEFT S.KEY [Abc] and scroll to the input mode to changes to“Symbols (Symbol mode)”.2.Select symbol you want to enter with the Navigation Key.ONE-TOUCH/TWO-TOUCH DIALINGIdeal for frequently dialed numbers, this feature allows phone bookentries to be dialed via the keypad with only one or two key presses.ONE-TOUCH DIALING2-9 : Press and hold the corresponding memory number for more than 1 second.TWO-TOUCH DIALING10-22 : Press the first digit and second digits of the memory numbershort and long respectively.Use the Navigation Key to view a different line of symbols.NoteIf no phone number is stored in the location entered,“Unssignedlocation” will appear on the screen.Note](https://usermanual.wiki/UTStarcom-Korea-Technologies/CDM7025/User-Guide-607056-Page-20.png)
![4443CONTACTS CONTACTSStores up to 500 entries, each of which can be assigned to a group.Entries can be retrieved by name or group.NEW CONTACTAdds a new entry.1.Press OK KEY [MENU], press 1 KEY “New Contact”.2.To enter a name or number, use the Navigation Key to select thephone book field.3.To save the entry, press OK KEY [SAVE].To return to the previous page, press CLR KEY.CONTACT LISTRetrieves an entry by name and calls by simply pressing SEND KEY.You can review all the entries stored in your phone book list or quicklyfind an entry by entering a name or its character string.1.Press OK KEY [MENU], press 2 KEY “Contact List” or press RIGHT S.KEY [CONTACTS].2.The list of names in your phone book is displayed alphabetically.3.Enter a name or its character string or scroll through the list withthe Navigation Key.4.To edit the entry, press LEFT S.KEY [EDIT].To show detail the entry, press OK KEY [VIEW].Press RIGHT S.KEY [OPTIONS] to 1. New Contact, 2. Erase, 3. Send TXT Msg or 4. Call.5.To call the selected number, press RIGHT S.KEY [OPTIONS] then select “Call” or press SEND KEY.• If user not input at least one field among number, e-mail then display “NO DATA ENTERED” in dialogue box.•If name field is empty in edit contact but one of phone number field inserted then saved so display phone number in contacts list.NotePHONE BOOK FIELDS : Name/Mobile1/Home/Work/E-Mail1/Group/Ringtone/Mobile2/Fax/E-Mail2.](https://usermanual.wiki/UTStarcom-Korea-Technologies/CDM7025/User-Guide-607056-Page-22.png)
![4645CONTACTS CONTACTSGROUPSAllows you to classify phone entries into groups. Existing groups include No Group, Family, Friends, Work. A maximum of 30 groups is allowed. User can add group max 30 group(except “No Group”). Allows the user to add group up to 10 phonenumber or E-mail1, E-mail2. The user can add, change, and erase Group.ADD NEW GROUP1.Press OK KEY [MENU], press 3 KEY “Groups”.2.To select “New”, press LEFT S.KEY [NEW]. 3.Input a new group name.4.To save it, press OK KEY [SAVE].ASSIGN PHONE NUMBER TO GROUP1.Press OK KEY [MENU], press 3 KEY “Groups”.2.To assign phone numbers to a Group, select “Add”, press RIGHT S.KEY [OPTIONS]. 3.Select a location and press OK KEY. Your phone book entries will be displayed in alphabetical order.4.Select the contact for the group then press LEFT S.KEY [DONE].“CONTACT ADDED TO GROUP” will be displayed. Repeat for eachlocation for the Group.CHANGE GROUP NAME1.Press OK KEY [MENU], press 3 KEY “Groups”.2.Select an existing group name that you have added with theNavigation Key. 3.To select “Rename”, press RIGHT S.KEY [OPTIONS].4.Input a new group name.5.To save it, press OK KEY [SAVE].SEND TXT MSG. GROUP1.Press OK KEY [MENU], press 3 KEY “Groups”.2.Select an existing group name with the Navigation Key.3.To select “Send TXT Msg.”, press RIGHT S.KEY [OPTIONS].4.Input a “Message”, press RIGHT S.KEY [OPTIONS] to select“Add”, then select “Graphics”, “Sounds” and “Quick Text”.5.To send the text message, press OK KEY [SEND].To save the text message, press RIGHT S.KEY [OPTIONS], thenselect “Save As Draft”, then press OK KEY.Press RIGHT S.KEY [OPTIONS], then select “Priority Level”, select“High” or “Normal”, then press OK KEY.](https://usermanual.wiki/UTStarcom-Korea-Technologies/CDM7025/User-Guide-607056-Page-23.png)
![4847CONTACTS RECENT CALLSERASE GROUP1.Press OK KEY [MENU], press 3 KEY “Groups”.2.Select an existing group name with the Navigation Key. 3.To select “Erase”, press RIGHT S.KEY [OPTIONS].4.Select “Yes” to erase it, press OK KEY.SPEED DIALSIn idle mode, calls can be placed to numbers stored in speed dial bypressing & holding the location number on the key pad. For a 2-digitlocation number, press the first number, then press and hold the secondnumber.1.Press OK KEY [MENU], press 4 KEY “Speed Dials”.2.To assign a phone number to a location, select the location thenpress OK KEY [SET]. 3.Select the contact with the Navigation Key then press OK KEY.4.To select “Yes”, press OK KEY.5.“SPEED DIAL SET” will be displayed.MISSEDDisplays information about the 90 most recently missed calls.Place a call to a missed call number by simply pressing SEND KEY.1.To see a list of the 90 most recently missed calls, press OK KEY[MENU], then select “Recent Calls” menu, press 1 KEY “Missed”.If the number is already stored in your phone book, only the nameappears. If the number is not stored, only the phone numberappears.2.To view missed call details, press OK KEY [OPEN].3.Press RIGHT S.KEY [OPTIONS] and select “SAVE” to save it orselect “Erase” to delete it.“Unassigned” appears if the location is available.NoteCall details include date, time and phone number.Note• Save: To store the phone number in your phone book.• Details: To view the caller’s information.• Erase: To erase a missed calls list.• Lock/Unlock: To lock or unlock missed calls list.• Erase All: To erase all missed calls list.• View Timers: To display usage time.• After 90 missed calls, the oldest call will automatically be erased from the history.• Press LEFT S.KEY [MESSAGE], to send the Txt message.Note](https://usermanual.wiki/UTStarcom-Korea-Technologies/CDM7025/User-Guide-607056-Page-24.png)
![5049RECENT CALLS RECENT CALLSRECEIVEDDisplays information about the 90 most recently answered calls. Place acall to a received call by simply pressing SEND KEY.1.To see a list of the 90 most recently answered calls, press OK KEY[MENU], then select “Recent Calls” menu, press 2 KEY“Received”. If the number is already stored in your phone book,only the name appears. If the number is not stored, only the phonenumber appears.2.To view incoming call details, press OK KEY [OPEN].3.Press RIGHT S.KEY [OPTIONS] and select “SAVE” to save it orselect “Erase” to delete it.DIALEDDisplays information about the 30 most recently dialed numbers. Place acall to a dialed call by simply pressing SEND KEY.1.To see a list of the 30 most recently dialed numbers, press OK KEY[MENU], then select “Recent Calls” menu, press 3 KEY “Dialed”. If the number is already stored in your phone book, only the nameappears. If the number is not stored, only the phone numberappears.2.To view dialed call details, press OK KEY [OPEN].3.Press RIGHT S.KEY [OPTIONS] and select “SAVE” to save it orselect “Erase” to delete it.Call details include date, time and phone number.Note• Save: To store the phone number in your phone book.• Details: To view the caller’s information.• Erase: To erase a received calls list.• Lock/Unlock: To lock or unlock received calls list.• Erase All: To erase all received calls list.• View Timers: To display usage time.• After 90 received calls, the oldest call will automatically be erased from the history.• Press LEFT S.KEY [MESSAGE], to send the Txt message.NoteCall details include type of call, date, time and phone number.Note• Save: To store the phone number in your phone book.• Details: To view the caller’s information.• Erase: To erase a dialed calls list.• Lock/Unlock: To lock or unlock dialed calls list.• Erase All: To erase all dialed calls list.• View Timers: To display usage time.• After 30 dialed calls, the oldest call will automatically be erased from the history.• Press LEFT S.KEY [MESSAGE], to send the Txt message.Note](https://usermanual.wiki/UTStarcom-Korea-Technologies/CDM7025/User-Guide-607056-Page-25.png)
![5251RECENT CALLS RECENT CALLSALLDisplays information about the most recent incoming, outgoing andmissed calls.1.To see a list of the 210 most recent incoming, outgoing and missedcalls, press OK KEY [MENU], then select “Recent Calls” menu,press 4 KEY “All”. If the number is already stored in your phonebook, only the name appears. If the number is not stored, only thephone number appears.2.To view details, press OK KEY [OPEN].3.Press RIGHT S.KEY [OPTIONS] and select “SAVE” to save it orselect “Erase” to delete it.VIEW TIMERSChecks the usage time and manages your calls within the limit you set.The 11 timers include (Last Call, All Calls, Received Calls, Dialed Calls,Roaming Calls, Transmit KB, Received KB, Total KB, Last Reset, LifetimeCalls, Lifetime Data Counter):1.Press OK KEY [MENU], then select “Recent Calls” menu,press 5 KEY “View Timers”.2.To reset the timer, press LEFT S.KEY [RESET], then select“Yes”,press OK KEY.To reset all timer, press RIGHT S.KEY [RESET ALL], then select“Yes”, press OK KEY.3.To return to the previous page, press OK KEY.Call details include type of call, date, time and phone number.Note• Save: To store the phone number in your phone book.• Details: To view the caller’s information.• Erase: To erase a recent calls list.• Lock/Unlock: To lock or unlock recent calls list.• Erase All: To erase all recent calls list.• View Timers: To display usage time.• After the 210 received, dialed or missed calls, the oldest call will automatically be erased from the history.• Press LEFT S.KEY [MESSAGE], to send the Txt message.Note](https://usermanual.wiki/UTStarcom-Korea-Technologies/CDM7025/User-Guide-607056-Page-26.png)
![5453SETTINGS SETTINGSCustomizes your phone and optimizes performance through a variety ofsettings.SOUND SETTINGSMASTER VOUMEControls the Ringer volume and alerts you to in the modes listed in thegray box below (except Keypad Volume, Earpiece Volume).1.Press OK KEY [MENU], then select “Settings & Tools” menu, press 2 KEY “Sound Settings” then select 1 KEY “MasterVolume”.2.Select one of the following options by pressing the Navigation Keyto the right.3.Select one of the available ring types. To confirm, press OK KEY [SET].CALL SOUNDTo select a ringer type for incoming calls:Call Ringtone1.Press OK KEY [MENU], then select “Settings & Tools” menu, press 2 KEY “Sound Settings” then select 2 KEY “Call Sound”,press 1 KEY “Call Ringtone”.2.Select your desired ringer type.3.Select one of the available ring types.To confirm, press OK KEY.Call Vibrate1.Press OK KEY [MENU], then select “Settings & Tools” menu, press 2 KEY “Sound Settings” then select 2 KEY “Call Sound”,press 2 KEY “Call Vibrate”.2.Select “On” or “Off” with the Navigation Key then press OK KEYto save it.• All Sounds Off• Alarm Only• Vibrate Only• Vib + Bell• Low, Med Low, Med, Med High, High.• Press LEFT S.KEY to play sound.• Up or Down key: Select “Ringer”.• Press LEFT S.KEY to Play/Stop the ringer.](https://usermanual.wiki/UTStarcom-Korea-Technologies/CDM7025/User-Guide-607056-Page-27.png)
![5655SETTINGS SETTINGSALERT SOUNDWhen selected, this setting alerts you to the following handset changes:TXT Message1.Press OK KEY [MENU], then select “Settings & Tools” menu, press 2 KEY “Sound Settings” then select 3 KEY “Alert Sound”,press 1 KEY “TXT Message”.2.Select “Tone”, “Vibrate” or “Reminder” with the Navigation Keythen select one of the following options by pressing the NavigationKey.3.To save, press OK KEY.Voicemail Msg1.Press OK KEY [MENU], then select “Settings & Tools” menu, press 2 KEY “Sound Settings” then select 3 KEY “Alert Sound”,press 2 KEY “Voicemail Msg”.2.Select “Tone”, “Vibrate” or “Reminder” with the Navigation Keythen select one of the following options by pressing the NavigationKey.3.To save, press OK KEY.KEYPAD VOLUMETo adjust key pad tone:1.Press OK KEY [MENU], then select “Settings & Tools” menu, press 2 KEY “Sound Settings” then select 4 KEY “Keypad Volume”.2.Select one of the following options by pressing the Navigation Keyto the right.3.Select one of the available ring types. To confirm, press OK KEY [SET].• Tone: Select your desired ringer type.• Vibrate: Select “On” or “Off”.• Reminder: Select “Once”, “Every 2 Minutes”, “Every 15 Minutes” or “Off”.• Tone: Select your desired ringer type.• Vibrate: Select “On” or “Off”.• Reminder: Select “Once”, “Every 2 Minutes”, “Every 15 Minutes” or “Off”.• Off• Low, Med Low, Med, Med High, High](https://usermanual.wiki/UTStarcom-Korea-Technologies/CDM7025/User-Guide-607056-Page-28.png)
![5857SETTINGS SETTINGSEARPIECE VOLUMETo adjust earpiece volume:1.Press OK KEY [MENU], then select “Settings & Tools” menu, press2 KEY “Sound Settings” then select 5 KEY “Earpiece Volume”.2.Select one of the following options by pressing the Navigation Keyto the right.3.Select one of the available ring types. To confirm, press OK KEY [SET].SERVICE ALERTSERI (Enhanced Roaming Indicator)Sounds an alert when leaving a service area and entering a roamingservice area.1.Press OK KEY [MENU], then select “Settings & Tools” menu, press 2 KEY “Sound Settings” then select 6 KEY “Service Alerts”,press 1 KEY “ERI”.2.Select “On” or “Off” with the Navigation Key then press OK KEYto save it.Minute BeepSounds an alert every minute during a call.1.Press OK KEY [MENU], then select “Settings & Tools” menu, press 2 KEY “Sound Settings” then select 6 KEY “Service Alerts”,press 2 KEY “Minute Beep”.2.Select “On” or “Off” with the Navigation Key then press OK KEYto save it.Call ConnectNotifies you that a call has been successfully placed.1.Press OK KEY [MENU], then select “Settings & Tools” menu, press 2 KEY “Sound Settings” then select 6 KEY “Service Alerts”,press 3 KEY “Call Connect”.2.Select “On” or “Off” with the Navigation Key then press OK KEYto save it.• Low, Med Low, Med, Med High, High](https://usermanual.wiki/UTStarcom-Korea-Technologies/CDM7025/User-Guide-607056-Page-29.png)
![6059SETTINGS SETTINGSPOWER ON/OFFPower OnAllows you to activate/deactivate the power on tones.1.Press OK KEY [MENU], then select “Settings & Tools” menu, press 2 KEY “Sound Settings” then select 7 KEY “Power On/Off”, press 1 KEY “Power On”.2.Select “On” or “Off” with the Navigation Key then press OK KEYto save it.Power OffAllows you to activate/deactivate the power off tones.1.Press OK KEY [MENU], then select “Settings & Tools” menu, press 2 KEY “Sound Settings” then select 7 KEY “Power On/Off”,press 2 KEY “Power Off”.2.Select “On” or “Off” with the Navigation Key then press OK KEYto save it.ALARM SOUNDTo select a ringer type for alarm sound:Tone1.Press OK KEY [MENU], then select “Settings & Tools” menu, press 2 KEY “Sound Settings” then select 8 KEY “Alarm Sound”,press 1 KEY “Tone”.2.Select your desired ringer type.3.Select one of the available ring types. To confirm, press OK KEY.Vibrate1.Press OK KEY [MENU], then select “Settings & Tools” menu,press 2 KEY “Sound Settings” then select 8 KEY “Alarm Sound”,press 2 KEY “Vibrate”.2.Select “On” or “Off” with the Navigation Key and then press OK KEY to save it.• Up or Down key: Select your desired ringer type.• Press LEFT S.KEY Play/Stop to the ringer.](https://usermanual.wiki/UTStarcom-Korea-Technologies/CDM7025/User-Guide-607056-Page-30.png)
![6261SETTINGS SETTINGSDISPLAY SETTINGSAllows you to customize the display.BANNERTo input a personal/ERI banner greeting:PersonalThe text greeting can be up to 16 characters and is displayed on your phone’s screen in standby mode.1.Press OK KEY [MENU], then select “Settings & Tools” menu,press 3 KEY “Display Settings” then select 1 KEY “Banner”, press 1 KEY “Personal”.2.Enter a new personal greeting.To change the input mode, press LEFT S.KEY [Abc].3.Press OK KEY [SAVE] to save it.ERI Banner1.Press OK KEY [MENU], then select “Settings & Tools” menu, press 3 KEY “Display Settings” then select 1 KEY “Banner”, press 2 KEY “ERI Banner”.2.Select “On” or “Off” with the Navigation Key then press OK KEYto save it.BACKLIGHTBacklights the display and key pad for easy viewing in dark places.Display1.Press OK KEY [MENU], then select “Settings & Tools” menu, press 3 KEY “Display Settings” then select 2 KEY “Backlight”,press 1 KEY “Display”.2.Select one of the following options with the Navigation Key.3.Press OK KEY to save it. Keypad1.Press OK KEY [MENU], then select “Settings & Tools” menu, press 3 KEY “Display Settings” then select 2 KEY “Backlight”,press 2 KEY “Keypad”.2.Select one of the following options with the Navigation Key.3.Press OK KEY to save it. • 5 Seconds, 15 Seconds, 30 Seconds, Always On, Always Off.• 5 Seconds, 15 Seconds, 30 Seconds, Always On, Always Off.](https://usermanual.wiki/UTStarcom-Korea-Technologies/CDM7025/User-Guide-607056-Page-31.png)
![6463SETTINGS SETTINGSCONTRASTTo adjust the display contrast:1.Press OK KEY [MENU], then select “Settings & Tools” menu, press 3 KEY “Display Settings” then select 3 KEY “Contrast”.2.Select one of the following options with the Navigation Key.3.Press OK KEY to save it. WALLPAPERTo adjust the display contrast:1.Press OK KEY [MENU], then select “Settings & Tools” menu, press 3 KEY “Display Settings” then select 4 KEY “Wallpaper”.2.Select Default to choose a pre-installed display,press LEFT S.KEY [VIEW].3.Select a display from the Graphic list using the Navigation Key andpress OK KEY to save it. SCREENSAVERTo adjust the display contrast:1.Press OK KEY [MENU], then select “Settings & Tools” menu, press 3 KEY “Display Settings” then select 5 KEY “Screensaver”.2.Select “On” or “Off” with the Navigation Key.If “On” is selected, to select Default to choose a pre-installeddisplay, press LEFT S.KEY [VIEW].3.Select a display from the Graphic list using the Navigation Key andpress OK KEY to save it. DISPLAY THEMES1.Press OK KEY [MENU], then select “Settings & Tools” menu, press 3 KEY “Display Settings” then select 2 KEY “Backlight”, press 6 KEY “Display Themes”.2.Select one of the following options with the Navigation Key.3.Press OK KEY to save it. • Level 0 • Level 1 • Level 2• Level 3• Level 4• Level 5• Default, Business, Tropical, Blue](https://usermanual.wiki/UTStarcom-Korea-Technologies/CDM7025/User-Guide-607056-Page-32.png)
![6665SETTINGS SETTINGSFONTS1.Press OK KEY [MENU], then select “Settings & Tools” menu, press 3 KEY “Display Settings” then select 7 KEY “Fonts”.2.Select “Normal” or “Large” with the Navigation Key then press OK KEY to save it. CLOCK FORMATTo change the clock’s appearance on the standby screen:1.Press OK KEY [MENU], then select “Settings & Tools” menu, press 3 KEY “Display Settings” then select 8 KEY “Clock Format”.2.Select one of the following options with the Navigation Key.3.Press OK KEY to save it. PHONE SETTINGSSTANDALONE MODEThe device shall provide the ability for the user to turn off all radios inorder to utilize the native or downloaded capability within the devicewhen in areas where radio transmission is restricted.1.Press OK KEY [MENU], then select “Settings & Tools” menu, press 4 KEY “Phone Settings” then select 1 KEY “StandaloneMode”.2.Select “On” or “Off” with the Navigation Key and then press OK KEY to save it.SHORT CUT KEYYour phone offers you the option of assigning a short cut key(Down Navigation Key) to a favorite or often-used function.To assign a shortcut to the key:1.Press OK KEY [MENU], then select “Settings & Tools” menu, press 4 KEY “Phone Settings” then select 2 KEY “Short Cut Key”.2.Select your desired menu option then press OK KEY.3.In Idle Mode, the Shortcut can now be accessed by pressing the“Down Navigation Key”.• Digital • Analog • Off• Inbox/Settings & Tools/Alarm Clock/Calculator/Calendar](https://usermanual.wiki/UTStarcom-Korea-Technologies/CDM7025/User-Guide-607056-Page-33.png)
![6867SETTINGS SETTINGSLANGUAGESelects the language in which letters are displayed on the screen.1.Press OK KEY [MENU], then select “Settings & Tools” menu, press 4 KEY “Phone Settings” then select 3 KEY “Language”.2.Select “English” or “Spanish” with the Navigation Key.3.Press OK KEY to save it. LOCATIONTo determine whether or not the network system can detect yourposition:1.Press OK KEY [MENU], then select “Settings & Tools” menu, press 4 KEY “Phone Settings” then select 4 KEY “Location”.2.Select “Location On” or “E911 Only” with the Navigation Key.3.Press OK KEY to save it. SECURITYPrevents unauthorized use of your phone. The following settings can berestricted:Common Code1.Press OK KEY [MENU], then select “Settings & Tools” menu, press 4 KEY “Phone Settings” then select 5 KEY “Security”, thenenter your password, press OK KEY.2.Press 1 KEY “Common Code”.3.Select “On” or “Off” with the Navigation Key and then press OK KEY to save it.Lock ModePrevents the phone from being used without entering the password first.1.Press OK KEY [MENU], then select “Settings & Tools” menu, press 4 KEY “Phone Settings” then select 5 KEY “Security”, thenenter your password, press OK KEY.2.Press 2 KEY “Lock Mode”.• The default password is the last 4 digit of your phone number.• The default password is the last 4 digit of your phone number.If the setting value of “Lock Mode -> Location” of the Securitymenu is “Lock”, you must input the location lock code when entering the menu. The default value is the last 4-digit number of the phone number. Note](https://usermanual.wiki/UTStarcom-Korea-Technologies/CDM7025/User-Guide-607056-Page-34.png)
![7069SETTINGS SETTINGSErase ContactsTo erase all the names and phone numbers in your internal Phone Book:1.Press OK KEY [MENU], then select “Settings & Tools” menu, press 4 KEY “Phone Settings” then select 5 KEY “Security”, thenenter your password, press OK KEY.2.Press 4 KEY “Erase Contacts”.3.Read the message (Erase all Contacts?)4.Select “Yes” or “No” with the Navigation Key and thenpress OK KEY to erase it.SYSTEM SELECTSelects the Preferred System.1.Press OK KEY [MENU], then select “Settings & Tools” menu, press 4 KEY “Phone Settings” then select 6 KEY “System Select”.2.Select one of the following options with the Navigation Key.3.Press OK KEY to save it. • Home Only• Automatic - A• Automatic - B• Home Only• Automatic(or)3.Select “Device” or “Location” then select one of the followingoptions with the Navigation Key.4.Press OK KEY to save it. Edit CodeChanges your Device/Location 4-digit password.1.Press OK KEY [MENU], then select “Settings & Tools” menu, press 4 KEY “Phone Settings” then select 5 KEY “Security”, thenenter your password, press OK KEY.2.Press 3 KEY “Edit Code”.3.Select “Device” or “Location” then select one of the followingoptions with the Navigation Key.4.Enter a “New Lock Code” then press OK KEY. 5.Enter a “Confirm Lock Code” then press OK KEY to save it.• Device: Lock, Unlock, On Power Up• Location: Lock, Unlock• The default password is the last 4 digit of your phone number.• The default password is the last 4 digit of your phone number.If the common code is “Off”, you must input the location lock codewhen entering the location mode. The default value is the last 4-digit number of the phone number. Note](https://usermanual.wiki/UTStarcom-Korea-Technologies/CDM7025/User-Guide-607056-Page-35.png)
![7271SETTINGS SETTINGSNAM SELECTIONEnables Auto NAM (Number Assignment Modules) or manually selects aNAM.Auto NAMAutomatically switches phone to proper NAM when you have multipleNAM registrations.1.Press OK KEY [MENU], then select “Settings & Tools” menu, press 4 KEY “Phone Settings” then select 7 KEY “Nam Selection”,press 1 KEY “Auto NAM”.2.Select “On” or “Off” with the Navigation Key and then press OK KEY to save it.Change NAMChanges the NAM used by the phone when you have multipleregistrations.1.Press OK KEY [MENU], then select “Settings & Tools” menu, press 4 KEY “Phone Settings” then select 7 KEY “Nam Selection”,press 2 KEY “Change NAM”.2.Select “NAM 1” or “NAM 2” with the Navigation Key and then press OK KEY to save it.CALL SETTINGSANSWER OPTIONSTo select an answer mode:1.Press OK KEY [MENU], then select “Settings & Tools” menu, press 5 KEY “Call Settings” then select 1 KEY “Answer Options”.2.Select one of the following options with the Navigation Key.3.Press OK KEY to save it. AUTO RETRYAutomatically redials a call up to 5 times after a set time interval.1.Press OK KEY [MENU], then select “Settings & Tools” menu, press 5 KEY “Call Settings” then select 2 KEY “Auto Retry”.2.Select “On” or “Off” with the Navigation Key and then press OK KEY to save it.• Flip Open• Any Key• Send Only• Auto Answer](https://usermanual.wiki/UTStarcom-Korea-Technologies/CDM7025/User-Guide-607056-Page-36.png)
![7473SETTINGS SETTINGSTTY MODEYour phone is able to operate with a TTY (Teletypewriter) device indigital modes. This feature is system dependent and may not beavailable in all areas.1.Press OK KEY [MENU], then select “Settings & Tools” menu, press 5 KEY “Call Settings” then select 3 KEY “TTY Mode”.2.Select one of the following options with the Navigation Key.3.Press OK KEY to save it. ONE TOUCH DIAL1.Press OK KEY [MENU], then select “Settings & Tools” menu, press 5 KEY “Call Settings” then select 4 KEY “One Touch Dial”.2.Select “On” or “Off” with the Navigation Key and then press OK KEY to save it.VOICE PRIVACYEnhances voice privacy and avoids tapping during a call.1.Press OK KEY [MENU], then select “Settings & Tools” menu, press 5 KEY “Call Settings” then select 5 KEY “Voice Privacy”.2.Select “On” or “Off” with the Navigation Key and then press OK KEY to save it.CALL RESTRICTIONS1.Press OK KEY [MENU], then select “Settings & Tools” menu, press 5 KEY “Call Settings” then select 6 KEY “Call Restrictions”.2.Press LEFT S.KEY [ADD], to input restrict phone number. (There is a 30-phone number limit).3.Press OK KEY to save it.DATA SETTINGSSelect PortChoose the select data port for the usage of your phone.1.Press OK KEY [MENU], then select “Settings & Tools” menu, press 5 KEY “Call Settings” then select 7 KEY “Data Setting”, press 1 KEY “Select Port”.2.Select one of the following options with the Navigation Key.3.Press OK KEY to save it. • USB• UART 1• TTY Full• TTY + Talk• TTY + Hear• TTY Off](https://usermanual.wiki/UTStarcom-Korea-Technologies/CDM7025/User-Guide-607056-Page-37.png)
![7675SETTINGS SETTINGSPort SpeedChoose the select data port speed for the usage of your phone.1.Press OK KEY [MENU], then select “Settings & Tools” menu, press 5 KEY “Call Settings” then select 7 KEY “Data Setting”,press 2 KEY “Select Port”.2.Select one of the following options with the Navigation Key.3.Press OK KEY to save it. DTMF TONESTo adjust tone length:1.Press OK KEY [MENU], then select “Settings & Tools” menu, press 5 KEY “Call Settings” then select 8 KEY “DTMF Tones”.2.Select “Normal” or “Long” with the Navigation Key and then press OK KEY to save it.RINGER ID1.Press OK KEY [MENU], then select “Settings & Tools” menu, press 5 KEY “Call Settings” then select 9 KEY “Ringer ID”.2.Select “On” or “Off” with the Navigation Key and then press OK KEY to save it.MEMORYTo display total or available memory usage.1.Press OK KEY [MENU], then select “Settings & Tools” menu, press 6 KEY “Memory”.2.To see the “Total Used”, “Available Use” memory size.3.To return to the previous page, press OK KEY.• 19200 bps• 115200 bps• 230400 bps• AUTO (USB)](https://usermanual.wiki/UTStarcom-Korea-Technologies/CDM7025/User-Guide-607056-Page-38.png)
![7877SETTINGSPHONE INFODisplays the information of your phone:MY NUMBERDisplays the your phone number (MDN/MIN number):1.Press OK KEY [MENU], then select “Settings & Tools” menu, press 7 KEY “Phone Info” then select 1 KEY “My Number”.2.You are to see the MDN/MIN number.3.To return to the previous page, press OK KEY.SW VERSIONDisplays the (Software/PRL/ERI) version:1.Press OK KEY [MENU], then select “Settings & Tools” menu, press 7 KEY “Phone Info” then select 2 KEY “SW Version”.2.You are to see the version of software, hardware and others.3.To return to the previous page, press OK KEY.ICON GLOSSARYDisplays the Indicator Icons of your cellular telephone:1.Press OK KEY [MENU], then select “Settings & Tools” menu, press 7 KEY “Phone Info” then select 3 KEY “Icon Glossary”.2.You are to see the Indicator Icons of your phone.3.To return to the previous page, press OK KEY.CHAPTER 5 PERSONAL ORGANIZERThis section shows you how to use these features to turnyour phone into a time management planner that helps you keep up with your contacts, schedules, ommitments,and games.TOOLSFUN & GAMESCHAPTER 5 PERSONAL ORGANIZER](https://usermanual.wiki/UTStarcom-Korea-Technologies/CDM7025/User-Guide-607056-Page-39.png)
![8079TOOLS TOOLSCALENDARSets an event and reminds you of that event.ADD NEW CALENDARDisplays the your phone number (MDN/MIN number):1.Press OK KEY [MENU], then select “Settings & Tools” menu, press 1 KEY “Tools” then select 1 KEY “Calendar”.2.Move the Navigation Key left, right, up or down to choose a date inthe calendar then press OK KEY. Press RIGHT S.KEY [OPTIONS] to 1. Erase or 2. Erase All. 3.Press LEFT S.KEY [ADD] to name field is highlighted. Press theNavigation Key down to set the schedule options.4.Press OK KEY [SAVE] to save it or CLR KEY to return to thecalendar.5.The date of the event will be marked on your calendar.VIEW ADDED CALENDAR1.Press OK KEY [MENU], then select “Settings & Tools” menu, press 1 KEY “Tools” then select 1 KEY “Calendar”.2.To view the Calendar List.3.Move the Navigation Key to choose an event then press OK KEY[VIEW], to view detail schedule event. Press RIGHT S.KEY[OPTIONS], to erase event, then select “Yes”, press OK KEY.ALARM CLOCK1.Press OK KEY [MENU], then select “Settings & Tools” menu, press 1 KEY “Tools” then select 2 KEY “Alarm Clock”.2.Select one of the entries using the Navigation Key. To set a new alarm, choose alarm 1, 2, 3.To edit an existing alarm, select that alarm. Press OK KEY.3.The setting field will be highlighted. Press the Navigation Key downto select alarm options.4.To save an alarm setting press OK KEY [SAVE].](https://usermanual.wiki/UTStarcom-Korea-Technologies/CDM7025/User-Guide-607056-Page-40.png)
![8281TOOLS TOOLSWORLD CLOCK1.Press OK KEY [MENU], then select “Settings & Tools” menu, press 1 KEY “Tools” then select 3 KEY “World Clock”.2.Select a city with the RIGHT S.KEY [CITIES].3.The world map appears with the city, its date and time. Use theNavigation Key to select another city.4.To return to the previous page and save current view city’s timeinformation, press OK KEY.NOTEPADYour phone includes an internal notepad that can be used tocompose and store reminders and notes.ADD NEW MEMOTo compose a memo (there is an 80-letter limit):1.Press OK KEY [MENU], then select “Settings & Tools” menu, press 1 KEY “Tools” then select 4 KEY “Notepad”.2.To add a new memo, press LEFT S.KEY [ADD]. Input a new text memo.3.To save memo, press OK KEY [SAVE].VIEW MEMOTo view a saved memo:1.Press OK KEY [MENU], then select “Settings & Tools” menu, press 1 KEY “Tools” then select 4 KEY “Notepad”.2.The list of all memos, in saved order, is displayed. Select a memothen press OK KEY [VIEW].3.The selected memo will appear. To edit it, press OK KEY [EDIT] andinput a new text memo, then press OK KEY [SAVE] to save it.4.To add a new memo, press LEFT S.KEY [ADD]. To erase a memo, press RIGHT S.KEY [OPTIONS] “Erase?”. To erase all memos, press RIGHT S.KEY [OPTIONS] “Erase All?”.If user press LEFT S.KEY [DST], then all DST supporting cities DSTturn on/off.Note](https://usermanual.wiki/UTStarcom-Korea-Technologies/CDM7025/User-Guide-607056-Page-41.png)
![8483TOOLS TOOLSCALCULATORTo access the calculator:1.Press OK KEY [MENU], then select “Settings & Tools” menu, press 1 KEY “Tools” then select 5 KEY “Calculator”.2.Enter the number using your keypad and perform one of thefollowing functions:3.Enter the numerical formula and press OK KEY for Equals (=).4.To reset, press RIGHT S.KEY [CLEAR].STOPWATCHSimultaneously times up to ten different events. To operate thestop watch:1.Press OK KEY [MENU], then select “Settings & Tools” menu, press 1 KEY “Tools” then select 6 KEY “Stopwatch”.2.To measure a time period:• Press the navigation key right Multiplication (x).• Press the navigation key left for Division (÷).• Press the navigation key down for Subtraction (-).• Press the navigation key up for Addition (+).• Press * KEYfor a decimal point.• Press # KEY for change the displayed number from positive (+) to negative (-) and vice versa.• Press RIGHT S.KEY to clear all numbers.• Press LEFT S.KEY to select left parenthesis or right parenthesis.• To start, press LEFT S.KEY [START].• To stop a time period and continue measuring another one, press RIGHT S.KEY [LAP].• To stop the second and continue measuring a third one, press RIGHT S.KEY [LAP].• To measure up to ten time periods, repeat the above steps.• To stop the stop/continue watch, press LEFT S.KEY [STOP/CONTINUE].• To review the results, press NAVIGATION UP/DOWN.KEY.• To reset it, press RIGHT S.KEY [RESET].](https://usermanual.wiki/UTStarcom-Korea-Technologies/CDM7025/User-Guide-607056-Page-42.png)
![8685FUN & GAMES CHAPTER 6 VOICE SIGNAL COMMANDSThis chapter addresses Voice signal commands functions including:VOICE SIGNAL COMMANDSCHAPTER 6 VOICE SIGNAL COMMANDSCUTY1.Press OK KEY [MENU], then select “Fun & Games” menu, press 1 KEY “Cuty”.Game Menu• Start: Lets start “Cuty” game.• Easy/Normal/Hard: Select the desired difficulty.• Rank: Lets you view score lank list.• Help: Lets you view game control keys.(NAVIGATION LEFT.KEY/NAVIGATION RIGHT.KEY)](https://usermanual.wiki/UTStarcom-Korea-Technologies/CDM7025/User-Guide-607056-Page-43.png)
![8887VOICE SIGNAL COMMANDS VOICE SIGNAL COMMANDSVoice Signal commands allow you to dial numbers, lookup contactinformation, and open applications using your voice.1.In standby mode, press NAVIGATION UP.KEY, After a briefpause, “Please Say a Command” appears in the display and ispronounced through the speaker.2.After the phone beeps, say the name of the command that youwant to perform.VR SETTINGSCHOICE LISTThe “Choice List” setting option will allow you to choose if theCommand System prompts you with a list of potential matches. “On” will always present you with a best match list of names ornumbers. When multiple matches are found, the system will prompt you to choose from a list of matches. If the Choice List is set to “Off”,the voice command system will select the best match.1.Press OK KEY [MENU], then select “Settings & Tools” menu, press 8 KEY “VR Settings”.2.Select 1 KEY “Choice List”.3.Select “1 match” or “4 match” with the Navigation Key.4.Press OK KEY to save it.The Voice Signal commands listed in the following table are available.• Contacts/Look up: Lets you retrieve contact information for any entryin your contacts list.• Digit Dial: Lets you dial a phone number by saying a name saved in your contact list or by saying the digits in the phone number.• Redial/Last Number: Lets you dial a phone number by last dial phone number.• Driving: Lets activating driving mode. • Missed Calls: Lets you view missed calls list.• Voice Mail: Lets access Voice Mail.• Battery: Lets you view your phone’s current battery level.](https://usermanual.wiki/UTStarcom-Korea-Technologies/CDM7025/User-Guide-607056-Page-44.png)
![9089VOICE SIGNAL COMMANDS VOICE SIGNAL COMMANDSTRAIN VOICETrain Voice is the process of optimizing the voice recognition softwareto your voice. Train Voice requires that you make recordings of yourvoice, which are then used to customize the voice recognition system.This will take a few minutes and you should be in a quiet environmentfor optimum training.1.Press OK KEY [MENU], then select “Settings & Tools” menu, press 8 KEY “VR Settings”.2.Select 2 KEY “Train Voice”.3.Select “Train Words” or “Train Digits” with the Navigation Key.4.Press OK KEY to save it.PROMPTThe prompts settings, “Mode”, “Timeout’, and “Speed” settings willallow you to set how you are notified by the voice command system, the duration in which you can respond, and how fast the System willplay the prompts to you, when in Prompts or Readout mode.1.Press OK KEY [MENU], then select “Settings & Tools” menu, press 8 KEY “VR Settings”.2.Select 3 KEY ”Prompt”.3.Select “Mode” or “Timeout” with the Navigation Key.4.Press OK KEY to save it.• Mode: Select “Prompts” or “Ring Only”.• Timeout: Select “5 seconds” or “10 seconds”.](https://usermanual.wiki/UTStarcom-Korea-Technologies/CDM7025/User-Guide-607056-Page-45.png)
![9291VOICE SIGNAL COMMANDS CHAPTER 7 MESSAGECALL ALERTThe “Call Alert” setting control how you are notified when receiving acall. “Name + Ring” will first announce the name and then play the setring tone. “Ring only” will play the set ring tone only. “Name Repeat”continuously, states the name or number until the call is answered orincoming call alert ends.1.Press OK KEY [MENU], then select “Settings & Tools” menu, press 8 KEY “VR Settings”.3.Select 4 KEY ”Call Alert”.4.Select “Ring Only”, “Name+Ring” or “Name Repeat” with theNavigation Key.5.Press OK KEY to save it.INFORMATION1.In standby mode, press NAVIGATION UP.KEY, After a briefpause, “Please Say a Command” appears in the display and ispronounced through the speaker.2.Press LEFT S.KEY [INFO].3.Your phone displays the information requested above and plays itthrough your speaker.This chapter addresses Voice Mail, TXT Messaging functions including:NEW MSGINBOXSENTDRAFTSVOICE MAILERASE ALLSETTINGSCHAPTER 7 MESSAGE](https://usermanual.wiki/UTStarcom-Korea-Technologies/CDM7025/User-Guide-607056-Page-46.png)
![9493MESSAGE MESSAGENEW MSGTo send a new txt message:1.Press OK KEY [MENU], then select “Message” menu, press 1 KEY“New Msg” or press LEFT S.KEY [MESSAGE], press 1 KEY “NewMsg”.2.Under “TO”, input the phone number.3.Press DOWN NAVIGATION KEY, under “Message”, input a newTXT message.4.Press RIGHT S.KEY [OPTIONS], then select “ADD”.5.To save the TXT Message, press RIGHT S.KEY [OPTIONS], thenselect “Save As Draft”.Press RIGHT S.KEY [OPTIONS], then select “Priority Level”, select“High” or “Normal”, then press OK KEY. To add to phonebook, press RIGHT S.KEY [OPTIONS], then select“Add to Contacts”.6.To send the TXT Message, press OK KEY [SEND].By pressing LEFT S.KEY [ADD], you can choose from the following:• Contacts: Search the phone number which is stored in the contacts list.• Groups: Search the group which is stored in the contacts list.• Recent Calls: Search the phone number which is stored in the recent calls list.• Graphics: Inserts simple graphic image in TXT Msg.• Sound: Inserts EMS sound in TXT Msg.• Quick Text: Inserts already written sentences in TXT Msg.• Signature: Inserts a signature that can be automatically inserted at the end of a message.If one of field is inserted in txt msg field, message save at draft box.Note](https://usermanual.wiki/UTStarcom-Korea-Technologies/CDM7025/User-Guide-607056-Page-47.png)
![9695MESSAGE MESSAGEINBOXThe Inbox manages received TXT/Web Alert messages. To access:1.Press OK KEY [MENU], then select “Message” menu, press 2 KEY “Inbox” or press LEFT S.KEY [MESSAGE], press 2 KEY “Inbox”.2.Select a message, then press OK KEY [OPEN]. The message is displayed. To delete a message, press LEFT S.KEY [ERASE], then select “Yes” or “No”,press OK KEY.SENTManages sent TXT messages waiting to be sent.1.Press OK KEFY [MENU], then select “Message” menu, press 3 KEY “Sent” or press LEFT S.KEY [MESSAGE], press 3 KEY“Sent”.2.Select a message, then press OK KEY [OPEN].The message is displayed. To delete a message, press LEFT S.KEY [ERASE], then select “Yes” or “No”, press OK KEY.Resend a message, then press OK KEY [RESEND].By pressing RIGHT S.KEY [OPTONS], you can choose from the following:• Forward: To forward the TXT message.• Reply with Copy: To reply to a received message and include the received message into the message.• Save Graphics: To save a picture.• Save Sound: To save a sound• Save Quick Text: Select to save received text msg.• Lock/Unlock: To lock or unlock the TXT.• Add to Contacts: Select to save number to contacts.• Message Info: To show received message information.By pressing RIGHT S.KEY [OPTONS], you can choose from the following:• Forward: To forward the TXT message.• Lock/Unlock: To lock or unlock the TXT.• Save Quick Text: Select to save received text msg.• Add to Contacts: Select to save number to contacts.• Message Info: To show received message information.](https://usermanual.wiki/UTStarcom-Korea-Technologies/CDM7025/User-Guide-607056-Page-48.png)
![9897MESSAGE MESSAGEDRAFTSDraft Folder contains any draft messages or saved messages.If message composition is interrupted by a voice call or otherinterrupting event, the text of the current composition is automaticallysaved in the drafts folder.1.Press OK KEY [MENU], then select “Message” menu, press 4 KEY“Drafts” or press LEFT S.KEY [MESSAGE], press 4 KEY “Drafts”.2.Select a message then press OK KEY [EDIT]. (To move “New Msg” mode).3.Press RIGHT S.KEY [OPTIONS].VOICEMAILDisplays the number of voice mails and accesses them by pressingSEND KEY.FIRST TIME USER1.Dial *86 then press SEND KEY [SEND].2.At the recording, press SPACE KEY.3.To set up your account follow the voice tutorial.FIRST TIME USER1.Dial *86 then press SEND KEY [SEND].2.At the recording, enter your 4 digit password, then press SPACE KEY.3.To listen to new messages, press 1 KEY.By pressing RIGHT S.KEY [OPTONS], you can choose from the following:• Send: To send a selected message.• Lock/Unlock: To lock or unlock the TXT.• Add to Contacts: Select to save number to contacts.](https://usermanual.wiki/UTStarcom-Korea-Technologies/CDM7025/User-Guide-607056-Page-49.png)
![10099MESSAGE MESSAGEERASE ALL1.Press OK KEY [MENU], then select “Messaging” menu, press RIGHT S.KEY [OPTIONS] or press LEFT S.KEY [MESSAGE],press RIGHT S.KEY [OPTIONS].2.To erase all the inbox messages, press 1 KEY [ERASE INBOX].To erase all the drafts messages, press 2 KEY [ERASE DRAFTS].To erase the sent messages, press 3 KEY [ERASE SENT]. To erase all messages, press 4 KEY [ERASE All].3.Select “Yes”, then press OK KEY.SETTINGSManages messaging features through various features.ALL MSGAuto.save1.Press OK KEY [MENU], then select “Messaging” menu, press LEFT S.KEY [SETTINGS] or press LEFT S.KEY [MESSAGE], press LEFT S.KEY [SETTINGS], then select 1 KEY [ALL MSG].2.Press 1 KEY [AUTO.SAVE]. Select “On”, “Off” or “Prompt” withthe Navigation Key.3.Press OK KEY to save it. Auto.eraseAutomatically erases inbox messages when new messages arrived.1.Press OK KEY [MENU], then select “Messaging” menu, press LEFT S.KEY [SETTINGS] or press LEFT S.KEY [MESSAGE],press LEFT S.KEY [SETTINGS], then select 1 KEY [ALL MSG].2.Press 2 KEY [AUTO.ERASE]. Select “On” or “Off” with theNavigation Key.• On: All sent messages saved in the Sent box.• Off: All sent messages not saved in the Sent box.• Prompt: “Yes”, “No” dialogue box displayed after sent message.• On: Oldest message erased frm inbox automatically when message is full.• Off: Oldest message not erased frm inbox automatically when message is full.](https://usermanual.wiki/UTStarcom-Korea-Technologies/CDM7025/User-Guide-607056-Page-50.png)
![102101MESSAGE MESSAGE3.Press OK KEY to save it. Quick.textTo edit the Quick Text message you have saved:1.Press OK KEY [MENU], then select “Messaging” menu, press LEFT S.KEY [SETTINGS] or press LEFT S.KEY [MESSAGE], press LEFT S.KEY [SETTINGS], then select 1 KEY [ALL MSG].2.Press 3 KEY [QUICK TEXT]. Select a message from the list. PressOK KEY. To add a new Quick Text message, press RIGHT S.KEY[OPTIONS] to select “Add New”. To edit the Quick Text message you have selected, press RIGHT S.KEY [OPTIONS] to select “Edit”, then enter text,press OK KEY.3.To erase the saved Quick Text message, press LEFT S.KEY [ERASE].Voicemail #Automatically erases inbox messages when new messages arrived.1.Press OK KEY [MENU], then select “Messaging” menu, press LEFT S.KEY [SETTINGS] or press LEFT S.KEY [MESSAGE], press LEFT S.KEY [SETTINGS], then select 1 KEY [ALL MSG].2.Press 4 KEY [VOICEMAIL#]. Input a new voice mail number or editvoice call back number.3.Press OK KEY to save it. Entry modeSets an Entry Mode as a default. For example, if T9 Mode is the default,its icon will appear.1.Press OK KEY [MENU], then select “Messaging” menu, press LEFT S.KEY [SETTINGS] or press LEFT S.KEY [MESSAGE], press LEFT S.KEY [SETTINGS], then select 1 KEY [ALL MSG].2.Press 5 KEY [ENTRY MODE]. Select “Alpha”, “ABC”, “Abc”,“123”, “Symbols” with the Navigation Key.3.Press OK KEY to save it. Pre-defined quick text as below:1. What’s up? / 2. Let’s meet. / 3. Check this out! / 4. Whacha doing? / 5.Thanks / 6. What do you think? / 7. You’ve gotta be here to enjoy this. / 8.Would you like to join me for a date tonight? / 9. On my way. / 10. Yes /11. You’re the best! / 12. Call me.](https://usermanual.wiki/UTStarcom-Korea-Technologies/CDM7025/User-Guide-607056-Page-51.png)
![104103MESSAGE MESSAGECallback #Edits a default callback number so that the recipient can callback orreply.1.Press OK KEY [MENU], then select “Messaging” menu, press LEFT S.KEY [SETTINGS] or press LEFT S.KEY [MESSAGE], press LEFT S.KEY [SETTINGS], then select 1 KEY [ALL MSG].2.Press 6 KEY [CALLBACK#]. Input a new callback number.3.Press OK KEY to save it. SignatureCreate a signature that can be automatically inserted at the end of amessage.1.Press OK KEY [MENU], then select “Messaging” menu, press LEFT S.KEY [SETTINGS] or press LEFT S.KEY [MESSAGE], press LEFT S.KEY [SETTINGS].2.Press 7 KEY [SIGNATURE]. Input a Signature edit window.3.Press OK KEY to save it. TXT MSGAuto viewIf the “Auto View” is set to on, the user will be able to view themessage. If the “Auto View” is set to off, the user can view themessage by entering SMS Menu-> Inbox.1.Press OK KEY [MENU], then select “Messaging” menu, press LEFT S.KEY [SETTINGS] or press LEFT S.KEY [MESSAGE], press LEFT S.KEY [SETTINGS], then select 2 KEY [TXT MSG].2.Press 1 KEY [AUTO VIEW]. Select “On” or “Off” with theNavigation Key.3.Press OK KEY to save it. • On: Text message displayed automatically.• Off: Text message displayed by going to the inbox or responding to interactive notification.](https://usermanual.wiki/UTStarcom-Korea-Technologies/CDM7025/User-Guide-607056-Page-52.png)
![106105MESSAGE CHAPTER 8 SAFETY AND WARRANTYBlock/unblock1.Press OK KEY [MENU], then select “Messaging” menu, press LEFT S.KEY [SETTINGS] or press LEFT S.KEY [MESSAGE], press LEFT S.KEY [SETTINGS], then select 2 KEY [TXT MSG].2.Press 2 KEY [BLOCK/UNBLOCK]. Select “Block”, “Unblock” or“View List of Blocked Addresses” with the Navigation Key.3.Press OK KEY to save it. SignatureCreate a signature that can be automatically inserted at the end of amessage.1.Press OK KEY [MENU], then select “Messaging” menu, press LEFT S.KEY [SETTINGS] or press LEFT S.KEY [MESSAGE], press LEFT S.KEY [SETTINGS], then select 2 KEY [TXT MSG].2.Press 3 KEY [SIGNATURE]. Input a Signature edit window.3.Press OK KEY to save it. This chapter addresses the safety guidelines and precautions to follow when operating your phone. Before operating your phone, please be aware of all the safety details. This chapter contains the terms and conditions of services and the warranty for your phone. Please review them thoroughly.SAFETY INFORMATION FOR WIRELESS HANDHELD PHONESSAFETY INFORMATION FOR FCC RF EXPOSURESAR INFORMATIONFCC HEARING-AID COMPATIBILITY (HAC) REGULATIONS FOR WIRELESS DEVICESFDA CONSUMER UPDATEMANUFACTURER’S WARRANTYCHAPTER 8 SAFETY ANDWARRANTY• Block: Enter the address to block.• Unblock: Enter the address to remove from block.• VIEW LIST OF BLOCKED ADDRESSES: Display the blocked.](https://usermanual.wiki/UTStarcom-Korea-Technologies/CDM7025/User-Guide-607056-Page-53.png)
![118For information about hearing aids and digital wireless phone:• Fcc Hearing Aid Compatibility and Volume Control http://www.fcc.gov/cgb/dro/hearing.html•GallaudetUniversity,RERChttp://tap.gallaudet.edu/DigWireless.KS/DigWireless.htm• Self Help for Hard of Hearing People Inc. [SHHH] www.hearingloss.org/hat/TipsWirelessPhones.htm• The Hearing Aid Compatibility FCC Order http://hraunfoss.fcc.gov/edocs_public/attachmatch/ FCC-03-168A1.pdf117SAFETY AND WARRANTYM-Ratings: Phones rated M3 or M4 meet FCC requirements and arelikely to generate less interference to hearingdevices than phones that are not labeled. M4 is the better/higher of the two ratings.Hearing devices may also be rated. Your hearingdevice manufacturer or hearing health professionalmay help you find this rating. Higher ratings mean that the hearingdevice is relatively immune to interference noise. The hearing aid andwireless phone rating values are then added together. A sum of 5 isconsidered acceptable for normal use. A sum of 6 is considered for bestuse. In the above example, if a hearing aid meets the M2 level ratingand the wireless phone meets the M3 level rating, the sum of the twovalues equal M5. This should provide the hearing aid user with “normalusage” while using their hearing aid with the particular wireless phone.“Normal usage” in this context is defined as a signal quality that isacceptable for normal operation. The M mark is intended to besynonymous with the U mark. The T mark is intended to be synonymouswith the UT mark. The M and T marks are recommended by the Alliancefor Telecommunications Industries Solutions (ATIS). The U and UT marksare referenced in Section 20.19 of the FCC Rules. The HAC rating andmeasurement procedure are described in the American NationalStandards Institute (ANSI) C63.19 standard.SAFETY AND WARRANTY](https://usermanual.wiki/UTStarcom-Korea-Technologies/CDM7025/User-Guide-607056-Page-59.png)