UTStarcom Korea Technologies CDM7075A Tri-Mode Dual-Band Analog/ PCS Phone (AMPS/ CDMA) User Manual Sprint QX Phone Guide 5a 082805
UTStarcom Korea Technologies Ltd. Tri-Mode Dual-Band Analog/ PCS Phone (AMPS/ CDMA) Sprint QX Phone Guide 5a 082805
Users Manual


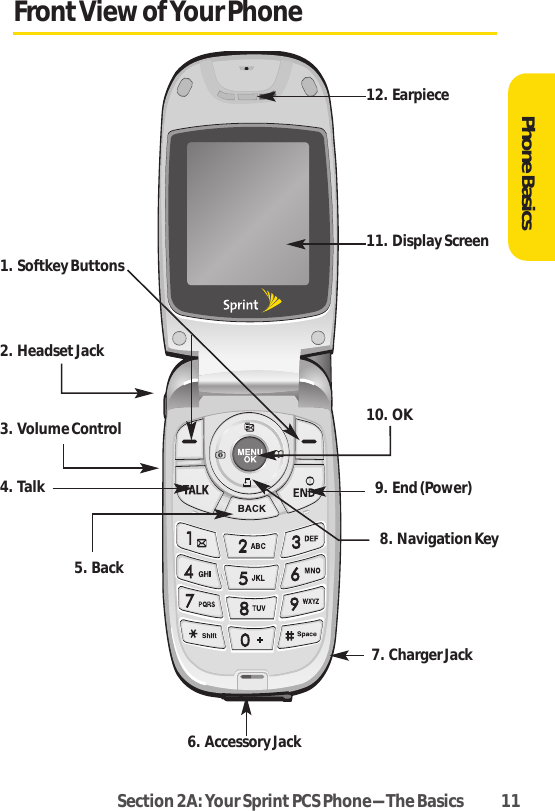


![Section 2A: Your SprintPCS Phone-The Basics 232. Enter a phone number from standby mode. (If you makea mistake while dialing, press to erase one digit ata time. Press and hold to erase the entirenumber.)3. Press . (To make a call when you are roaming and Call Guard is enabled, highlight Roam Call and press. See "Call Guard" on page 73.)4. Press or close the phone when you are finished.Tip: To redial your last outgoing call, press twice.Tip: When making calls off the Nationwide Sprint PCS Network, always dialusing 11 digits (1 + area code + phone number).You can also place calls from your Sprint PCS Phone by usingSprintPCS Voice CommandSM (page 164), Speed Dialingnumbers from your Contacts (page 87), and using your CallHistory listings (page 75).Dialing OptionsWhen you enter numbers in standby mode, you will see avariety of dialing options appear as softkeys on the phone’sdisplay screen.To initiate an option, press the corresponding softkey button.ⅷSpeed Dial: Enter a number (1-99) to display the entrycontained in the speed dial location you entered (ifapplicable). Press to dial the speed dial number.Tip: To speed dial a phone number from standby mode, press and hold thespeed dial number. If the speed dial number is two digits, enter the firstdigit, then press and hold the second digit. (For information on setting upspeed dial numbers, see "Assigning Speed Dial Numbers" on page 80.)(This feature will not work when you are roaming off the NationwideSprint PCS Network; when roaming you must dial using eleven digits [1 +the area code + the seven-digit phone number.])Phone Basics](https://usermanual.wiki/UTStarcom-Korea-Technologies/CDM7075A/User-Guide-642164-Page-35.png)
![26 Section 2A: Your SprintPCS Phone-The BasicsMissed Call NotificationWhen an incoming call is not answered, the Missed Call log isdisplayed on your screen.To display the Missed Call entry from the notification screen:ᮣHighlight the entry and press View( ) or . (To dial the phone number, press Call[ ] or ).To display a Missed Call entry from standby mode:1. SelectMenu > Call History > Missed Calls.2. Highlight the entry you wish to view and press .Calling Emergency NumbersYou can place calls to 911 (dial ), evenif your phone is locked or your account is restricted.Note: When you place an emergency call, your phone automatically entersEmergency mode.During the call press Options( ) to display your options. To selectan option, highlight it and press .ⅷSpeaker On to activate speakerphone mode. (If you are inspeakerphone mode, the option will appear as Speaker Offto deactivate.)ⅷUnlock Phone to unlock your phone (appears only if thephone is locked).ⅷClose Menu to close the pop-up menu (appears only if thephone is unlocked).Tip: Press My Phone ( ) to display your phone number during anemergency call.](https://usermanual.wiki/UTStarcom-Korea-Technologies/CDM7075A/User-Guide-642164-Page-38.png)
![Section 2A: Your SprintPCS Phone-The Basics 27To exit Emergency mode:1. Press to end a 911 call.2. Press Options( ) to display the options menu.3. HighlightExitEmergencyand press .Note: When you are in Emergency mode, you can only exit from the options menu.To select Emergency mode options:1. Press to end a 911 call.2. Press Options[].ⅢCall 911 to call 911.ⅢCall 911: Speaker to call 911 in speakerphone mode.ⅢExitEmergencyto exit Emergency mode.3. Highlight an option and press .Phone Basics](https://usermanual.wiki/UTStarcom-Korea-Technologies/CDM7075A/User-Guide-642164-Page-39.png)

![44 Section 2B: Controlling Your Phone’s SettingsDisplay SettingsChanging the ScreensaverChoose whether you want your phone’s Screensaver.To change the Screensaver on the standby screen:1. SelectMenu > Settings > Display > Screensaver.2. SelectImageor Decoration and press .ⅢImage to select a PresetImage, Download or MyPicture , then select Screensaver image. ⅢTime Set to select a Digital Clock, Analog Clock,Calendar, or Dual Time (Press City[ ] to selectanother city with using navigation key). 3. Press Done( ) to apply the Screensaver setting.Changing the Backlight Time LengthThe backlight setting lets you select how long the displayscreen and keypad are backlit after any key press is made.To change the backlight setting:1. SelectMenu > Settings > Display > Backlight.2. SelectLCDor Keypad.3. Select a time setting and press Done().ⅢTime Setting : 10 seconds, 20 seconds, 30 seconds,Always On, Always OffNote: Long backlight settings affect the battery's talk and standby times.](https://usermanual.wiki/UTStarcom-Korea-Technologies/CDM7075A/User-Guide-642164-Page-56.png)


![Section 2I: Using Your Phone’s Built-in Camera 107Taking PicturesTaking pictures with your phones built-in camera is as simple aschoosing a subject, pointing the lens, then pressing a button.You can activate the camera mode and take pictures when thephone is open.To take a picture from the menu:1. SelectMenu > Pictures > Camera. (Your phone will enterCamera Mode.)2. Point the camera lens at your subject. (You can check thepicture framing through the main display screen.)3. To take the picture, press Captures(), or theSide Camera button.4. To save the picture, press Accept( ). (To take anotherpicture without saving the picture you just took, pressCancel[ ]).5. Press Next() for more options:ⅢSend Picture to send the picture to up to 10 contactsat one time.ⅢUpload to Albums to upload the picture you just tookto the Sprint PCS Picture Mail Web site(www.sprint.com/picturemail). Depending on yoursettings, you may be prompted to accept a Sprint PCSVision connection.ⅢAdd TextCaption to add text caption.ⅢAdd Voice Caption to add voice caption.ⅢAssignto assign picture, to selectPicture ID,Screen Saveror Incoming Call.ⅢTake a Pictures to return to camera mode to takeanother picture.Camera](https://usermanual.wiki/UTStarcom-Korea-Technologies/CDM7075A/User-Guide-642164-Page-119.png)
![108 Section 2I: Using Your Phone’sBuilt-in CameraⅢThumbnailto go to the In Camera folder to reviewyour saved pictures.ⅢEraseto erase selected pictures.Note: If you receive an incoming call while taking a picture, the cameramode will turn off. You may not receive a warning before the incoming call.To take a picture in standby mode:1. Press the Side Camera button to activate camera modeor press , then select Camera().2. Point the camera lens at your subject. (You can check thepicture framing through the main display screen.)3. To take the picture, press Captures(), or theSide Camera button.4. To save the picture, press Accept( ). (To take anotherpicture without saving the picture you just took, pressCancel[ ]).To take a picture with the phone closed:1. Press and hold the Side Camera key to activate Cameramode.2. Point the camera lens at your subject. (You can check thepicture framing through the main display screen.)3. Press the Side Camera key to take the picture. (Yourpicture will be saved automatically in your phone.)](https://usermanual.wiki/UTStarcom-Korea-Technologies/CDM7075A/User-Guide-642164-Page-120.png)

![2. Under "Recipients", input the phone number, press Next( ) to save the recipient. (To include additionalrecipients, select Enter Addr 2, Enter Addr 3, etc., aftereach entry. You may include up to 10 recipients permessage.). Pressing Option ( ), you can choose fromthe following:ⅢFind: Search the phone number which is stored in thecontacts list.ⅢRecentCalls: Search the phone number which is storedin the recent calls list.ⅢErase:To erase a phone number.3. SelectEnter Msg and compose a message or use thepreset messages or emoticons and press Next().ⅢTo type a message, use your keypad to enter yourmessage. Use the right softkey to select a characterinputmode. (See "Entering Text" on page 34.)ⅢTo use a preset message or a smiley, press the rightsoftkey, select Emoticonor PresetMsgs, thenhighlight your desired message or emoticon andpress .4. Review your message and press Send( ). (You mayalso select additional messaging options by pressingOptions [] to save the text message to draft folder.)134 Section 3A: Sprint PCS Service Features-The Basics](https://usermanual.wiki/UTStarcom-Korea-Technologies/CDM7075A/User-Guide-642164-Page-146.png)
![Accessing TextSMS Messages (Inbox)To read a Text SMS message:ᮣWhen you receive a text message, itwill automaticallyappear on your phone’s main display screen. Use yournavigation key to scroll down and view the entiremessage.To reply to a Text SMS message:1. While the message is open, select Reply().Pressing Options ( ), you can choose from thefollowing:ⅢCall: Place a call to a received message number.ⅢForward: To forward the TXT message.ⅢLock/Unlock:To lock or unlock the text message.ⅢSave #: To save the phone number which is stored in therecent received message list.ⅢSave Email: To save the email address which is stored inthe recentreceived message list.ⅢErase:To erase a message.ⅢErase All:To erase all message.2. Compose your reply or use the pre-set messages oricons.ⅢTo type a message, use your keypad to enter yourmessage. Use the right softkey to select a characterinput mode. (See "Entering Text" on page 34.)ⅢTo use a preset message or a smiley, press the rightsoftkey, select Emoticonor PresetMsgs, highlightyour desired message or emoticon, and press .3. Review your message and press Send( ). (You mayalso select additional messaging options by pressingOptions [] to save the text message to draft folder.)SprintPCS ServiceSection 3A: Sprint PCS Service Features-The Basics 135](https://usermanual.wiki/UTStarcom-Korea-Technologies/CDM7075A/User-Guide-642164-Page-147.png)
![Accessing TextSMS Messages (Outbox)To forward to a TextSMS message:1. While the message is open, select Send().Pressing Options ( ), you can choose from thefollowing:ⅢCall: Place a call to a send message number.ⅢEdit: To edit a already sended message.ⅢLock/Unlock:To lock or unlock the text message.ⅢCompose New: To write new textmessage.ⅢErase:To erase a message.2. Compose your reply or use the pre-set messages oricons.ⅢTo type a message, use your keypad to enter yourmessage. Use the right softkey to select a characterinput mode. (See "Entering Text" on page 34.)ⅢTo use a preset message or a smiley, press the rightsoftkey, select Emoticonor PresetMsgs, highlightyour desired message or emoticon, and press .3. Review your message and press Send( ). (You mayalso select additional messaging options by pressingOptions [] to save the text message to draft folder.)136 Section 3A: Sprint PCS Service Features-The Basics](https://usermanual.wiki/UTStarcom-Korea-Technologies/CDM7075A/User-Guide-642164-Page-148.png)
![Accessing TextSMS Messages (Drafts)To editto a saved Text SMS message:1. While the message is open, select Edit().Pressing Options ( ), you can choose from thefollowing:ⅢCall: Place a call to a draft message number.ⅢSend: To send a draft message.ⅢAdd Recipient:To add recipient phone number.ⅢCompose New: To write new textmessage.ⅢErase:To erase a draft message.ⅢErase All:To erase all draft message.2. Compose your reply or use the pre-set messages oricons.ⅢTo type a message, use your keypad to enter yourmessage. Use the right softkey to select a characterinput mode. (See "Entering Text" on page 34.)ⅢTo use a preset message or a smiley, press the rightsoftkey, select Emoticonor PresetMsgs, highlightyour desired message or emoticon, and press .3. Review your message and press Send( ). (You mayalso select additional messaging options by pressingOptions [ ] to save the text message to draftfolder.)SprintPCS ServiceSection 3A: Sprint PCS Service Features-The Basics 137](https://usermanual.wiki/UTStarcom-Korea-Technologies/CDM7075A/User-Guide-642164-Page-149.png)

![146 Section 3B: Sprint PCS VisionNavigatingthe WebNavigating through menus and Web sites during a Sprint PCS Vision session is easy once youve learned a fewbasics. Here are some tips for getting around:SoftkeysDuring a Sprint PCS Vision session, the bottom line of yourphones display contains one or more softkeys. These keys areshortcutcontrols for navigating around the Web, and theycorrespond to the softkey buttons directly below the phonesdisplay screen.Tip: Depending on which Web sites you visit, the labels on the softkeys maychange to indicate their function.To use softkeys:ᮣPress the desired softkey button. (If an additional pop-up menu appears when you press the softkey button,selectthe menu items using your keypad [if theyrenumbered] or by highlighting the option and pressing.)ScrollingAs with other parts of your phones menu, youll have to scrollup and down to see everything on some Web sites.To scroll line by line through Web sites:ᮣPress the navigation key up and down.To scroll page by page through Web sites:ᮣPress the volume buttons on the side of the phone.](https://usermanual.wiki/UTStarcom-Korea-Technologies/CDM7075A/User-Guide-642164-Page-158.png)