UTStarcom Korea Technologies CDM7126 Tri Band CDMA Phone with Bluetooth User Manual 071227 7126C EN indd
UTStarcom Korea Technologies Ltd. Tri Band CDMA Phone with Bluetooth 071227 7126C EN indd
UserManual.wiki
>
UTStarcom Korea Technologies
>
CDM7126 User Manual
Users Manual
Navigation menu
Upload a User Manual
Namespaces
Wiki Guide
HTML
PDF
Info
Views
User Manual
Discussion / Help
Navigation
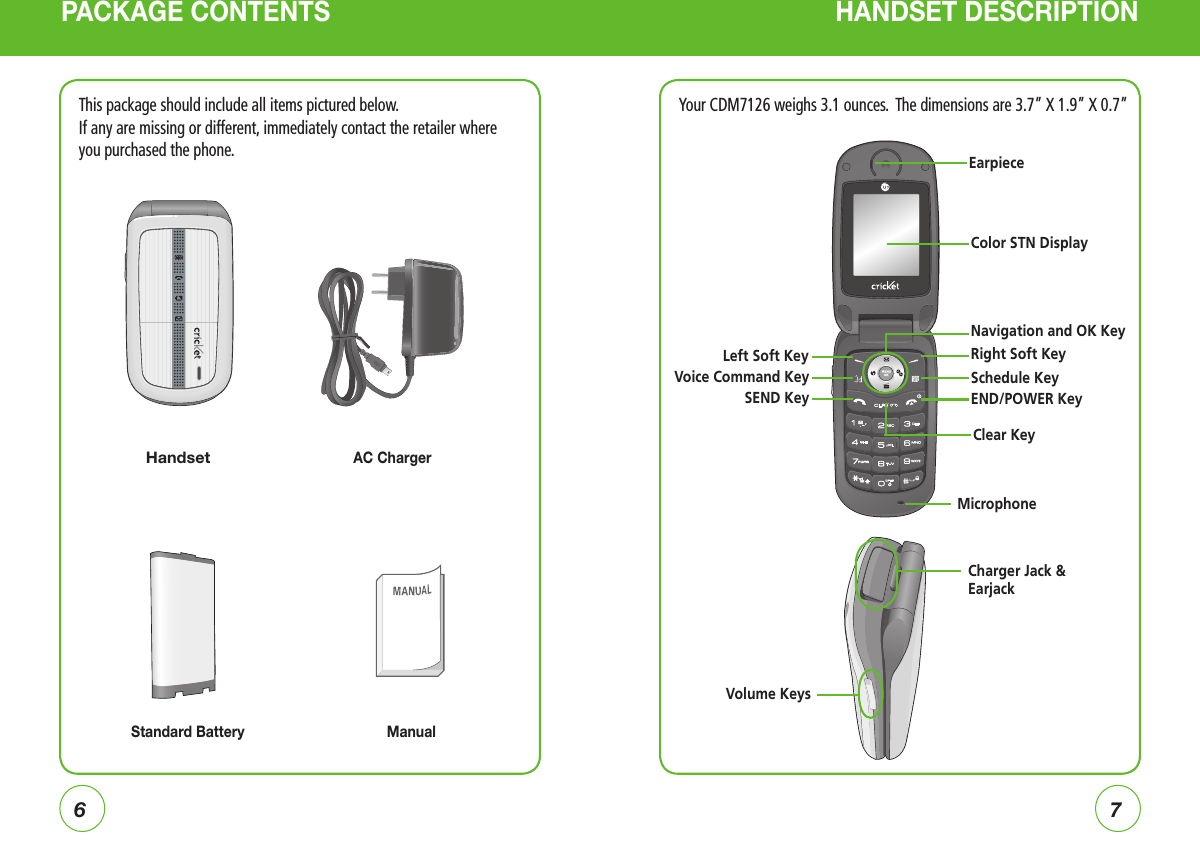
![890 Key In T9 Mode, press to see other word choices.Side Volume Key Allows you to adjust the ringer volume in standby mode (with the flip open) or adjust the voice volume during a call. The volume key can also be used to scroll up or down to navigate through the different menu options. Press to ignore an incoming call and mute the ringer.DISPLAY INDICATORSThe idle mode display appears when you are not on a call or using the menu. You must be in the idle mode display to dial a phone number.Signal StrengthCurrent signal strength: the more lines, the stronger the signal.Call inuseIndicates call is in progress or the phone cannot receive a signal from the system.No serviceIndicates the phone cannot receive a signal from the system.Emergency CallBlinks when an emergency call is in progress.HANDSET DESCRIPTION HANDSET DESCRIPTION Text & Graphic areaSoft Key IndicatorsShows the functions currently assigned to each Option Button and displays some icons.Display IndicatorsDisplay various icons.THE FUNCTION KEYSNAVIGATION KEY In Idle Mode: Press the Navigation Key up for Messages, Navigation Key right for Games & Apps, Navigation Key down for Media Gallery and Navigation Key left for Browser.Within a Menu: Within a menu, use to scroll through menu or to select a function displayed on the screen.Send Key Press to make or receive a call or in idle mode, press to access the All Calls list.Left Option ButtonPress to access the Settings Menu or function displayed on bottom line.Right Option ButtonPress to access the Contacts Menu or function displayed on bottom line.Voice Command ButtonPress to access the Voice Command Menu.Schedule ButtonPress to access the Schedule Menu.CLR Key Press to clear a digit or press and hold to clear all digits from the display.Press during a call to record a voice note. Press to return to the previous page.Shift Key Enters the asterisk [*] character for calling features. In text entry mode, press to change the character input type. Press twice to display a plus sign (+) for international dialing. Press and hold to turn on/off Vibrate mode.Space Key In text entry mode, press to accept the word and add a space. Press and hold to lock/unlock the phone.](https://usermanual.wiki/UTStarcom-Korea-Technologies/CDM7126/User-Guide-890431-Page-5.png)
![1819Your phone can be customized via the menu. Each function can be accessed by scrolling with the Navigation Key or by pressing the number that corresponds with the menu item.1. To access the menu in the idle mode, press the OK Key [Menu].2. Press the Navigation Key left or right to scroll through the menu items. Press the Navigation Key up or down to scroll through the submenus for each menu item.3. To return to the previous page, press the Clear Key . To exit the current menu and return to the idle mode, press the END Key .4. Press the OK Key to enter a function when its main page is displayed or press its assigned number to have direct access to the function.TURNING THE PHONE ON / OFFTURNING THE PHONE ON1. Press the END Key until your “Cricket” logo appears and the tone sounds.TURNING THE PHONE OFF1. Press and hold the END Key until your “Cricket” logo appears.• If “Password” appears on the display enter your 4-digit password to unlock your phone.• The default password is the last 4 digit of your phone number.Note • Immediately change or recharge the battery when “LOW BATTERY!! PHONE IS TURNING OFF!”appears on the display. Memory may possibly be damaged if the phone turns off due to the battery completely draining. • Turn the phone off before removing or replacing the battery. If the phone is on, unsaved data may be lost.NoteMessagesMedia GalleryGames & AppsBrowserACCESSING THE MENU](https://usermanual.wiki/UTStarcom-Korea-Technologies/CDM7126/User-Guide-890431-Page-10.png)
![2223MAKING A CALL1. Enter a phone number.2. Press the SEND Key .3. To end a call, press the END Key .ANSWERING CALLS1. When your phone rings or vibrates, press the SEND Key to answer the incoming call. (Depending on your phone’s settings, you may also answer incoming calls by opening the phone or by pressing any digit key. See page 63 for details.)2. To end a call, press the END Key .BASIC FUNCTIONS BASIC FUNCTIONSSPEAKERPHONEThe speakerphone feature lets you hear audio through the speaker and talk without holding the phone.1. To activate the speakerphone while in answering or calling modes, press the Right Soft Key [Options], then press .2. The phone returns to normal (Speakerphone Off) after ending a call or when the phone is turned off and back on.WAIT/PAUSE FEATUREPauses are used for automated systems (i.e., Voicemail, calling cards). Insert a pause after a phone number then enter another group of numbers. The second set of numbers is dialed automatically after the pause. This feature is useful for dialing into systems that require a code. 1. To insert a wait/pause, enter a phone number then press the Right Soft Key [Options]. Select either a Type ‘P‘ (“P” appears) or a Type ‘T‘ (“T” appears).2. Press the SEND Key to dial or Right Soft Key then “Save” to save the number. To modify the phone number you have entered : • To erase one digit at a time press the Clear Key . • To erase the entire number, press and hold the Clear Key . NoteIn Auto Answer Mode, a call is automatically answered after ringing for five seconds.Note • If “CALL FAILED” appears on the display or the line is busy, press the SEND Key or the END Key . • If you activate the “AUTO RETRY” function, the phone will automatically retry for the number of times you have selected. • When you place or receive a call from stored phone numbers, only the name will be displayed. • If “Enter Lock Code” appears on the display enter your 4-digit password to unlock your phone. • Your default password is the last 4 digits of your phone number.NoteTo ignore incoming calls, press the Right Soft Key [Ignore].](https://usermanual.wiki/UTStarcom-Korea-Technologies/CDM7126/User-Guide-890431-Page-12.png)
![2425BASIC FUNCTIONS BASIC FUNCTIONS3-WAY CALLINGWith 3-Way Calling, you can talk to two people at the same time. When using this feature, the normal airtime rates will be applied for each of the two calls. 1. Enter a number you wish to call then press the SEND Key .2. Once you have established the connection, enter the second number you wish to call then press the SEND Key .3. When you’re connected to the second party, press the SEND Key again to begin your 3-Way call.CALLER ID FUNCTIONIdentifies caller by displaying their phone number. If the caller’s name and number are already stored in your phone book, their name will appear. This is a system dependent feature. Please contact your service provider for details.CALL WAITING FUNCTIONNotifies you of an incoming call when you are already on a call by sounding a beep tone and displaying the caller’s phone number. 1. To answer another call while on the phone, press the SEND Key . This places the first call on hold. To switch back to the first caller, press the SEND Key again.Call Waiting is a system dependent feature. Please contact your service provider for details.NoteADJUSTING VOLUMEAdjusts the volume of the ringer, key beep and earpiece.1. Press the OK Key [Menu] then press for the “Settings” menu. Press “Sounds“ then press “Volume“. Select one of the following options:2. Adjust the volume by pressing the Volume Key or press the Navigation Key left or right , then press Left Soft Key [Save] to save the setting.• Call Ringer: Controls the ringer volume.• Key Tone: Controls the keypad volume.• Speakerphone: Controls the speakerphone volume.• Headset: Controls the earpiece volume.• Advanced: Controls the volume for Messaging alert, Voicemail alert, Alarms, and Power On/Off. • To adjust earpiece volume during a call, press the Volume Key up or down. • Press and hold the Volume Key down to turn off all sounds. • Press and hold the Volume Key up to return to normal mode. • In idle mode, press the Volume Key up/down to adjust the master volume. • Press and hold the key to turn Vibrate Mode on/off.Note](https://usermanual.wiki/UTStarcom-Korea-Technologies/CDM7126/User-Guide-890431-Page-13.png)
![2627DURING A CALL DURING A CALLMUTE (UNMUTE)If you press Mute during a call, the person you are speaking with cannot hear you or any sounds from your side of the conversation. However, you can still hear them. To activate Mute during a call, press the Left Soft Key [Mute].SPEAKER ONTo activate speakerphone during a call:1. Press the Right Soft Key [Options], then press .VOICE MEMOTo record a voice memo during a call:1. Press the Right Soft Key [Options], then press to activate voice memo mode.2. Press the Left Soft Key [Start] to start recording your memo. Press the Left Soft Key [Stop] to stop the recording. CONTACTSTo view a phone number from your Contact list during a call:1. Press the Right Soft Key [Options], then press .RECENT CALLSTo select a phone number from your Recent Calls List during a call:1. Press the Right Soft Key [Options], then press .MESSAGINGTo send a text message (SMS) during a call:1. Press the Right Soft Key [Options], then press .• To deactivate, press the Left Soft Key [Unmute].• The phone will automatically unmute in Emergency Call or Callback Mode.You can also press the Clear Key to activate the voice memo mode.NoteThis feature only records your voice. It will not record the other party.Note](https://usermanual.wiki/UTStarcom-Korea-Technologies/CDM7126/User-Guide-890431-Page-14.png)
![3031STORING A PHONE NUMBER STORING A PHONE NUMBERThe phone book stores up to 500 entries.1. Enter phone number then press the Left Soft Key [Save].2. Select “New entry“ or “Existing entry“. If “Existing entry” is selected, your contact list is displayed. Choose the entry to add the number, then press Left Soft Key [Done]. Select the type of number you are adding from the icon list, then press Left Soft Key [Select]. Press Left Soft Key [Save]. Press the Navigation Key up or down to select primary phone number, then press Left Soft Key [Select] to save contact.3. If “New entry“ is selected, the New entry icon list appears. Press the Navigation Key up or down to choose the type of number you are adding. Press Left Soft Key [Select] to select. Enter a name. To change the input mode, press Right Soft Key [Options]. Press the Navigation Key down to enter information in other fields for the contact. Fields include “Name”, “Mobile”, “Phone number”, “Email address”, “URL”, “Group”, “Ringtone”, “Vibration”, “Msg alert”, “Secret”, “Memo”.4. To store the entry in your contact list, press the Left Soft Key [Save]. Select Yes and press the OK Key . “Entery is saved.“ will be displayed.• Group: To set a group for the contact, highlight the Group Name. Press the Navigation Key left or right to select No Group, Family, Friends or Work.• Ringtone: To set a ringtone for the contact, highlight a Ringtone. Select Preset Sounds or My Sounds. Press the Navigation Key up or down to select Use phone ring, Party, Answer your phone, Siren, UT Neumonic, UT Ring or My Sounds.• Vibration: To set a vibration for the contact, highlight the Vibration. Press the Navigation Key left or right to select Use phone vib. or Vibration 1 ~ Vibration 6.• Msg alert: To set a msg alert for the contact, highlight the Msg alert. Select Preset Sounds or My Sounds. Press the Navigation Key up or down to select Use phone alert, Msg Alert 1, Msg Alert 2, Msg Alert 3 or My Sounds.• Secret: To set a secret for the contact, highlight a Secret. Press the Navigation Key left or right to select Lock or Unlock.• Memo: To add a memo for a contact, highlight the memo field and press the OK Key . The Memo screen will appear. Enter your Memo and press Left Soft Key [OK].](https://usermanual.wiki/UTStarcom-Korea-Technologies/CDM7126/User-Guide-890431-Page-16.png)
![3233ENTERING LETTERS, NUMBERS & SYMBOLSENTERING LETTERS, NUMBERS & SYMBOLSSTANDARD INPUT MODEUse the digit keys to enter letters, numbers and characters.1. Enter letters using the keypad. To change the input mode, press the Right Soft Key [Options]. Standard input mode is listed as ABC.2. To enter a space, press . The cursor will automatically move to the next column.3. Press each key until the desired letter appears.4. To delete one character, press the Clear Key . To delete the entire entry, press and hold the Clear Key .5. To change from lowercase to uppercase, press . Select Abc mode by pressing the Right Soft Key [Options], then “Entry Mode“, then “ABC“.When you select this mode, the Abc icon appears as a visual confirmation. - Find the key that corresponds to the letter you want to enter. - Press it as many times as needed for the letter to appear on the screen. - To enter the name “JOHN”: Press [ ] J Press [ , , ] O Press [ , ] H Press [ , ] NE.G.The input mode will automatically be activated when it is necessary to enter letters and numbers. There are 5 available modes: Standard Alphabet mode (Abc), T9 Mode (T9Word), Numeric mode (123), Symbol mode (Symbols) and Smileys mode (Smileys). The input mode indicator appears on the lower portion of the display when letters and numbers are entered. To select the desired input mode, press the Right Soft Key [Options], then choose from the list on screen.KEYKEYPress to select the letter case: [ABC], [abc], [Abc] / [T9W], [t9w], [T9w].Select Entry Mode. Press to change mode.[T9 Word] [ABC] [Abc] [123] [Symbol]In T9 mode, press to view the next matching word if the highlighted word is not the word you intended. Press to accept a word and add a space.Press to delete a character to the left of the cursor.](https://usermanual.wiki/UTStarcom-Korea-Technologies/CDM7126/User-Guide-890431-Page-17.png)
![3435ENTERING LETTERS, NUMBERS & SYMBOLSENTERING LETTERS, NUMBERS & SYMBOLSNUMERIC MODEAllows you to enter numbers.1. Press the Right Soft Key [Options], then select “123”.2. To enter a number, press its digit key.SYMBOL MODEAllows you to enter symbols.1. Press the Right Soft Key [Options], then select “Symbol”.2. Select the symbol you want to enter with the Navigation Key , then press the OK Key .EMOTICON MODEAllows you to enter Emoticon.1. Press the Right Soft Key [Options], then select “Emoticon”.2. Select the Emoticon you want to enter by pressing the Navigation Key , then press the OK Key .SMILEYS MODEAllows you to enter smileys.1. Press the Right Soft Key [Options], then select “Smileys”.2. Select the Smileys Icon you want to enter by pressing the Navigation Key , then press the OK Key .T9 INPUT MODET9 mode incorporates a built-in-dictionary to determine a word based on the entered characters. A word can be entered more quickly by pressing each key once per character.1. Select T9 mode by pressing the Right Soft Key [Options], then select “T9 Word.”2. Press a digit key once to enter the character you want, then enter all the characters to input the word you want.3. To view the next matching word, press .4. To accept the matching word then enter a space, press .To enter “Funfare” in T9 mode: - Press the Right Soft Key [Options] to select T9 mode, “Entry Mode,” then “T9 Word.” - Press , , until you see “Fun” highlighted. - Press to select “Fun”. - Press , , , and you will see “ease” highlighted. Press until you see “fare“ highlighted. Press to select and add a space.E.G.To enter a compound word: • Enter the first part of the word then press to accept it without adding a space after it. • Enter the last part of the word then press to accept the word.Note](https://usermanual.wiki/UTStarcom-Korea-Technologies/CDM7126/User-Guide-890431-Page-18.png)
![3637MAKING A CALL THROUGH THE CONTACT LIST CONTACTSStores up to 500 entries, each of which can be assigned to a group. Entries can be retrieved by name or group.FINDRetrieves an entry by name and calls the primary number by simply pressing the SEND Key . You can review all the entries stored in your contacts list or quickly find an entry by entering a name or its character string.1. Press the OK Key [Menu], then press “Contacts”, then “Find”.2. The list of names in your contacts is displayed alphabetically.3. Enter a name or its character string or scroll through the list by pressing the Navigation Key up or down .4. To edit the entry, press the Left Soft Key [Send Msg]. Press the Right Soft Key [Options] to “Abc“, “ABC“, “123“, “Symbols“, “Cancel“, “Add new“, “Prepend”, “Edit”, “Assign speed dial” or “Erase”.5. To show the entry details, press the OK Key . From the View Contacts screen press the Right Soft Key [Options] to “Send Msg.”, “Prepend”, “Edit”, “Assign speed dial” or “Erase”.To edit the entry, press the Left Soft Key [Edit].6. To call the selected number, press the SEND Key .You can also access Contacts menu by pressing the Right Soft Key .NoteONE-TOUCH/TWO-TOUCH DIALINGIdeal for frequently dialed numbers, this feature allows entries in your contact list to be dialed via the keypad with only one or two key presses. In order for One-Touch/Two-Touch Dialing to properly work, it must be enabled.ONE-TOUCH DIALING2-9: Press and hold the corresponding memory number for more than 1 second.TWO-TOUCH DIALING10-99: Press and the first digit and second digits of the memory number short and long respectively. • If no phone number is stored in the location entered, “Location is empty“ will appear on the screen. • If One Touch Dial is set to Off: Enter the speed dial location number then press the SEND Key . • Location 1 is reserved for voicemail. Location 2-99 are unassigned. To assign a speed dial location, please see page 36.Note](https://usermanual.wiki/UTStarcom-Korea-Technologies/CDM7126/User-Guide-890431-Page-19.png)
![3839CONTACTSGROUPAllows you to classify phone entries into groups. Existing groups include No Group, Family, Friends, Work. A maximum of 30 groups is allowed.ADD NEW GROUP1. Press the OK Key [Menu], then press “Contacts”, then “Group”.2. Press the Left Soft Key [Add] to add a new group name. 3. Input a new group name.4. To save it, press the Left Soft Key [OK].5. From the group list, press the Right Soft Key [Options] to “Ringtone”, “Vibration”, ”Add member”, ”Rename”, ”Remove member”, ”Remove all” or “Erase”.CHANGE GROUP NAME1. Press the OK Key [Menu], then press “Contacts”, then “Group”.2. Select an existing group name. The only group name that cannot be changed is No Group.3. Press the Right Soft Key [Options], then scroll to ”Rename,” press the OK Key .4. Input a new group name.5. Press the Left Soft Key [OK] to save the setting.CONTACTSCREATE NEWAdds a new entry.1. Press the OK Key [Menu], then press “Contacts”, then “Create New“.2. Fill in the fields as they are selected. Press the Navigation Key up or down to select a field.3. To save the entry, press the Left Soft Key [Save]. To return to the previous page, press the Clear Key .See page 30 for more detailed information about storing a number.If no name is saved for the contact, the primary phone number will be displayed in the contact list.NotePHONE BOOK FIELDS: Name / Mobile / Office / Home / Pager / Other / Phone number / Email address / URL / Group / Ringtone / Vibration / Msg alert / Secret / Memo](https://usermanual.wiki/UTStarcom-Korea-Technologies/CDM7126/User-Guide-890431-Page-20.png)
![CONTACTS CONTACTSSETTING A RINGER TYPE FOR A GROUP1. Press the OK Key [Menu], then press “Contacts”, then “Group”.2. Select an existing group name.3. Press the Right Soft Key [Options], then scroll to “Ringtone“ and press the OK Key . Select Preset Sounds or My Sounds. Press the Navigation Key up or down to select Use phone ring, Party, Answer your phone, Siren, UT Neumonic, UT Ring or My Sounds.4. Press Right Soft Key [Play] to play ringtone. Select ringtone and press Left Soft Key [Select].SETTING A VIBRATION TYPE FOR A GROUP1. Press the OK Key [Menu], then press “Contacts”, then “Group”.2. Select an existing group name.3. Press the Right Soft Key [Options], then scroll to “Vibration“ and press the OK Key . Press the Navigation Key up or down to select Use phone vib. or Vibration 1 ~ Vibration 6.4. Press Right Soft Key [Play] to play ringtone. Select ringtone and press Left Soft Key [Select].ADD PHONE NUMBER TO GROUP1. Press the OK Key [Menu], then press “Contacts”, then “Group”.2. Select an existing group name.3. Press the Right Soft Key [Options], then scroll to “Add member“ and press the OK Key . Your contact entries appear in alphabetical order. Select the contact you want to add by pressing the Navigation Key up or down , then press the OK Key to check or uncheck.4. Press Left Soft Key [Done]. “Done” will be displayed. Repeat for each location for the Group.REMOVE PHONE NUMBER TO GROUP1. Press the OK Key [Menu], then press “Contacts”, then “Group”.2. Select an existing group name.3. Press the Right Soft Key [Options], then scroll to “Remove member“ and press the OK Key . Group entries appear in alphabetical order. Select the contact you want to remove by pressing the Navigation Key up or down , then press the OK Key to check or uncheck.4. Press Left Soft Key [Done]. “Remove” will be displayed. Repeat for each location for the Group.4140](https://usermanual.wiki/UTStarcom-Korea-Technologies/CDM7126/User-Guide-890431-Page-21.png)
![4243CONTACTS CONTACTSSPEED DIALSIn idle mode, calls can be placed to numbers stored in speed dial by pressing & holding the location number on the key pad. For a 2-digit location number, press the first number, then press and hold the second number.1. Press the OK Key [Menu], then press “Contacts”, then “Speed Dials”.2. To assign a phone number to a location, select the location then press the Left Soft Key [Assign].3. Scroll to the contact in the list.4. If more than one number exists for the contact, press the Navigation Key up or down to select the phone number for the speed dial location. The numbers will be displayed above the contact list.5. Press the Left Soft Key [Assign] to set the speed dial location. “Speed dial is Empty” appears if the location is available.NoteSpeed Dial must be activated.NoteREMOVE ALL PHONE NUMBER TO GROUP1. Press the OK Key [Menu], then press “Contacts”, then “Group”.2. Select an existing group name.3. Press the Right Soft Key [Options], then scroll to “Remove all“ and press the OK Key . 4. Press Left Soft Key [Done]. “Remove” will be displayed. Repeat for each location for the Group.ERASE GROUP1. Press the OK Key [Menu], then press “Contacts”, then “Group”.2. Select an existing group name. 3. Select an existing group name. Only new groups you added can be changed. The default groups Personal, Family and Business cannot be deleted.4. Press the Right Soft Key [Options], then scroll to “Erase“ and press the OK Key . 5. “Erase?” will be displayed. Select ”Yes” and then press the OK Key to erase the group.](https://usermanual.wiki/UTStarcom-Korea-Technologies/CDM7126/User-Guide-890431-Page-22.png)
![4445CONTACTS CHAPTER 4 MENU FUNCTIONSERVICE NUMBERSYour Contacts list is preprogrammed with contact numbers for various services.1. Press the OK Key [Menu], then press ”Contacts”.2. Press ”Service Numbers”.3. Select the number then press the OK Key .4. Press the SEND Key to call.MY PHONE NUMBERDisplays your phone number.1. Press the OK Key [Menu], then press ”Contacts”.2. Press ”My Phone Number”. Your phone number will be displayed.This chapter addresses accessing the menu and using its functions and features to customize your phone.Recent CallsSettingsMoreCHAPTER 4 MENU FUNCTION](https://usermanual.wiki/UTStarcom-Korea-Technologies/CDM7126/User-Guide-890431-Page-23.png)
![4647RECENT CALLS RECENT CALLSMISSED CALLSDisplays information about the 90 most recently missed calls. Place a call to a missed call number by simply pressing the SEND Key .1. Press the OK Key [Menu], then press for the “Recent Calls” menu. Press “Missed Calls”. If the number is already stored in your contact list, only the name appears. If the number is not stored, the phone number appears.2. To view missed call details, press the OK Key .3. Press the Right Soft Key [Options] and select “Save” to save it to your contact list or select “Erase” to delete it.Call details include date, time and phone number.Note• Contact Info.: To view the caller's information.• Lock/Unlock: To lock or unlock the highlighted phone number.• Erase: To erase the highlighted phone number.• Erase All: To erase all the phone numbers in the list.After 90 missed calls, the oldest call will be automatically erased from the history.NoteALL CALLSDisplays information about the most recently received, dialed and missed calls.1. Press the OK Key [Menu], then press for the “Recent Calls” menu. Press “All Calls”. If the number is already stored in your contact list, only the name appears. If the number is not stored, the number appears.2. To view details, press the OK Key .3. Press the Right Soft Key [Options] and select “Save“ to save it to your contact list or select “Erase“ to delete it.Call details include type of call, date, time and phone number.Note• Contact Info.: To view the caller's information.• Lock/Unlock: To lock or unlock the highlighted phone number.• Erase: To erase the highlighted phone number.• Erase All: To erase all the phone numbers in the list.After the 270th received, dialed or missed calls, the oldest call will automatically be erased from the history.Note](https://usermanual.wiki/UTStarcom-Korea-Technologies/CDM7126/User-Guide-890431-Page-24.png)
![4849RECENT CALLS RECENT CALLSOUTGOING CALLSDisplays information about the 90 most recently dialed numbers. Place a call to a outgoing call by simply pressing the SEND Key .1. Press the OK Key [Menu], then press for the “Recent Calls” menu. Press “Outgoing Calls“. If the number is already stored in your contact list, only the name appears. If the number is not stored, the number appears.2. To view dialed call details, press the OK Key .3. Press the Right Soft Key [Options] and select “Save” to save it to your contact list or select “Erase” to delete it.Call details include type of call, date, time and phone number.NoteINCOMING CALLSDisplays information about the 90 most recently received calls. Place a call to a incoming call number by simply pressing the SEND Key .1. Press the OK Key [Menu], then press for the “Recent Calls” menu. Press “Incoming Calls“. If the number is already stored in your contact list, only the name appears. If the number is not stored, the number appears.2. To view incoming call details, press the OK Key .3. Press the Right Soft Key [Options] and select “Save” to save it to your contact list or select “Erase” to delete it.Call details include date, time and phone number.Note• Contact Info.: To view the caller's information.• Lock/Unlock: To lock or unlock the highlighted phone number.• Erase: To erase the highlighted phone number.• Erase All: To erase all the phone numbers in the list.After 90 incoming calls, the oldest call will automatically be erased from the history.Note• Contact Info.: To view the caller's information.• Lock/Unlock: To lock or unlock the highlighted phone number.• Erase: To erase the highlighted phone number.• Erase All: To erase all the phone numbers in the list.After 90 dialed calls, the oldest call will automatically be erased from the history.Note](https://usermanual.wiki/UTStarcom-Korea-Technologies/CDM7126/User-Guide-890431-Page-25.png)
![5051RECENT CALLS SETTINGSCustomizes your phone and optimizes performance through a variety of settings.SOUNDSRINGER TYPETo select a ringer type for:1. Press the OK Key [Menu], then press for the “Settings” menu. Press “Sounds”, “Ringer Type”.2. Select “With Caller ID”, “No Caller ID”, “Message” or “Voicemail” then press the OK Key .3. Select your desired ringer type by pressing the Navigation Key up or down .CALL TIMERSChecks the usage time and manages your calls within the limit you set. The 11 timers include (Last Call, Dialed Calls, Received Calls, Home Calls, Roam Calls, All Calls, Transmit Kb, Received Kb, Total Kb, Lifetime, Lifetime Data Counter, Last Reset):1. Press the OK Key [Menu], then press for the “Recent Calls” menu. Press “Call Timers”.2. To reset all timers, press the Right Soft Key [Options], then select “Reset All”. “Reset All?” will be displayed. Select ”Yes” and press the OK Key .3. To return to the previous page, press the OK Key .You can also access Settings menu by pressing the Left Soft Key .Note• With Caller ID: Set ringtone for any incoming call from a saved contact phone number, unless the contact was saved with a specific ringtone.• No Caller ID: Set ringtone for any incoming call from someone not saved to your contact list.• Message: Sounds a different ringer when you are receiving text message. • Voicemail: Sounds a different ringer when you are receiving voicemail.• Roam ringer: Sounds a different ringer when you are in a roaming service area. Select ”Normal” or ”Distinctive”.](https://usermanual.wiki/UTStarcom-Korea-Technologies/CDM7126/User-Guide-890431-Page-26.png)
![5253SETTINGS SETTINGS4. Press the Left Soft Key [Select] to save the setting.VOLUMECall RingerTo adjust Ringer volume:1. Press the OK Key [Menu], then press for the “Settings” menu. 2. Press “Sounds”, “Volume,” then “Call Ringer”.3. Select one of the following settings by pressing the Navigation Key left or right .4. Press the Left Soft Key [Save] to save the setting.Key ToneTo adjust Key tone volume:1. Press the OK Key [Menu], then press for the “Settings” menu. 2. Press “Sounds”, “Volume,” then “Key Tone”.3. Select one of the following settings by pressing the Navigation Key left or right .4. Press the Left Soft Key [Save] to save the setting.SpeakerphoneTo adjust Speakerphone volume:1. Press the OK Key [Menu], then press for the “Settings” menu. 2. Press “Sounds”, “Volume,” then “Speakerphone”.3. Select one of the following settings by pressing the Navigation Key left or right .4. Press the Left Soft Key [Save] to save the setting.Press the Right Soft Key [Play/Stop] to play/stop the ringer.• Preset Sounds: Select Use phone ring, Party, Answer your phone, Siren, UT Neumonic, UT Ring. • My Sounds: Select download Ringer.• Vibration: Select Use phone vib. or Vibration 1 ~ Vibration 6.Silence All, Vibrate All, Level 0~5. Press to Always Vibrate.Level 0~5Level 1~5](https://usermanual.wiki/UTStarcom-Korea-Technologies/CDM7126/User-Guide-890431-Page-27.png)
![5455SETTINGS SETTINGSReceiverTo adjust Receiver volume:1. Press the OK Key [Menu], then press for the “Settings” menu. 2. Press “Sounds”, “Volume,” then “Receiver”.3. Select one of the following settings by pressing the Navigation Key left or right .4. Press the Left Soft Key [Save] to save the setting.HeadsetTo adjust Headset volume:1. Press the OK Key [Menu], then press for the “Settings” menu. 2. Press “Sounds”, “Volume,” then “Headset”.3. Select one of the following settings by pressing the Navigation Key left or right .4. Press the Left Soft Key [Save] to save the setting.Applications1. Press the OK Key [Menu], then press for the “Settings” menu.2. Press “Sounds”, “Volume,” then “Applications”.3. Highlight “Use ringer” or “Separate” and press the OK Key to select. If Separate is selected, press the Navigation Key down to highlight the volume level. Press the Navigation Key left or right to adjust the volume level.5. Press the Left Soft Key [Save] to save the setting.Advanced1. Press the OK Key [Menu], then press for the “Settings” menu.2. Press “Sounds”, “Volume,” then “Advanced”.3. Select one of the following settings by pressing the Navigation Key left or right .Level 1~5Level 1~5• Use Ringer• Separate: Level 0~5• Messaging • Voicemail• Alarms & Schedule• Power On/Off](https://usermanual.wiki/UTStarcom-Korea-Technologies/CDM7126/User-Guide-890431-Page-28.png)
![5657SETTINGS SETTINGS4. Press to highlight volume section. Then press the Navigation Key left or right to adjust the volume level.5. Press the Left Soft Key [Save] to save the setting.ALERTSMinute BeepSounds an alert every minute during a call.1. Press the OK Key [Menu], then press for the “Settings” menu.2. Press “Sounds”, “Alerts,” then “Minute Beep”.3. Select “On” or “Off”, then press the Left Soft Key [Select] to save the setting.RoamingSounds an alert when leaving a service area and entering a roaming service area.1. Press the OK Key [Menu], then press for the “Settings” menu.2. Press “Sounds”, “Alerts,” then “Roaming”.3. Select “On” or “Off”, then press the Left Soft Key [Select] to save the setting.ConnectNotifies you that a call has been successfully placed.1. Press the OK Key [Menu], then press for the “Settings” menu. Press “Sounds,” “Alerts,”, then “Connect”.2. Select “On” or “Off”, then press the Left Soft Key [Select] to save the setting.Fade1. Press the OK Key [Menu], then press for the “Settings” menu. Press “Sounds,” “Alerts,”, then “Fade”.2. Select “On” or “Off”, then press the Left Soft Key [Select] to save the setting.TONE LENGTH1. Press the OK Key [Menu], then press for the “Settings” menu. Press “Sounds, then ”Tone Length”. 2. Select “Normal” or “Long”, then press the Left Soft Key [Select] to save the setting.• Use Ringer: • Separate - Level 0~5 - Press the OK Key to Always Vibrate.](https://usermanual.wiki/UTStarcom-Korea-Technologies/CDM7126/User-Guide-890431-Page-29.png)
![5859SETTINGS SETTINGSDISPLAYAllows you to customize the display.WALLPAPERImage1. Press the OK Key [Menu], then press for the “Settings” menu. Press “Display”, “Wallpaper”.2. Select “Preset Images” or “My Images”.3. Press the Navigation Key up or down to scroll through the images.4. Press the Right Soft Key [View] to view the image full screen. Press the Left Soft Key [Select] to save the image as your wallpaper.CLOCK FORMAT1. Press the OK Key [Menu], then press for the “Settings” menu. Press “Display”, “Clock Format”.2. Select one of the following settings by pressing the Navigation Key left or right .3. Press the Left Soft Key [Select] to save the setting.SCREENSAVERPreset Images1. Press the OK Key [Menu], then press for the “Settings” menu. Press “Display”, “Screensaver,” then “Preset Images”.2. Press the Navigation Key up or down to scroll through the images.3. Press the Right Soft Key [View] to view the image full screen. Press the Left Soft Key [Select] to save the image as your images.My Images1. Press the OK Key [Menu], then press for the “Settings” menu. Press “Display”, “Screensaver,” then “My Images”.2. Press the Navigation Key up or down to scroll through the images.3. Press the Right Soft Key [View] to view the image full screen. Press the Left Soft Key [Select] to save the image as your Preset Images.Digital Clock, Calendar, Dual Time Clock, Analog Clock](https://usermanual.wiki/UTStarcom-Korea-Technologies/CDM7126/User-Guide-890431-Page-30.png)
![6061SETTINGS SETTINGSTime SettingTo select how much time lapses before the screensaver activates:1. Press the OK Key [Menu], then press for the “Settings” menu. Press “Display”, “Screensaver,” then “Time Setting”.2. Select one of the following options:3. Press the Left Soft Key [Select] to save the time setting.INCOMING CALLSTo Select an image for Incoming Calls:1. Press the OK Key [Menu], then press for the “Settings” menu. Press “Display”, “Incoming Calls”.2. Select “Preset Images” or “My Images”.3. Press the Navigation Key up or down to scroll through the images.4. Press the Right Soft Key [View] to view the image full screen. Press the Left Soft Key [Select] to save the image as your images.BACKLIGHTBacklights the display and key pad for easy viewing in dark places.Display1. Press the OK Key [Menu], then press for the “Settings” menu. Press “Display”, “Backlight”, then press “Display”.2. Select one of the following options:3. Press the Left Soft Key [Select] to save the setting.Keypad1. Press the OK Key [Menu], then press for the “Settings” menu. Press “Display”, “Backlight”, then press “Keypad”.2. Select one of the following options:3. Press the Left Soft Key [Select] to save the setting.Off, 5Sec, 10Sec, 20Sec, 30Sec7Sec, 15Sec, 30Sec, Always On, Always Off7Sec, 15Sec, 30Sec, Always On, Always Off](https://usermanual.wiki/UTStarcom-Korea-Technologies/CDM7126/User-Guide-890431-Page-31.png)
![SETTINGS SETTINGSSERVICE LAMPTo adjust the display Service Lamp:1. Press the OK Key [Menu], then press for the “Settings” menu. Press “Display”, then “Service Lamp”.2. Select “On” or “Off”, then press the Left Soft Key [Select] to save the setting.GREETINGThe greeting can be up to 16 characters and is displayed on your phone’s screen in idle mode.1. Press the OK Key [Menu], then press for the “Settings” menu. Press “Display”, then “Greeting”.2. Select “On” or “Off”.3. If you select ”On”, the current greeting text is displayed. Press the Clear Key to delete the greeting, then enter your new greeting. Press Right Soft Key [Options] to change the input mode.4. Press the Left Soft Key [Select] to save the Greeting.MENU STYLETo select how the Menu appears on your phone:1. Press the OK Key [Menu], then press for the “Settings” menu. Press “Display”, then “Menu Style”.2. Select “Graphic” or “List”.3. Press the Left Soft Key [Select] to save the menu style.CALLCONTACTS MATCHThis function will match your abbreviated dialed number with an entry from your phone's contact list. So when you dial the 4 digits, your phone will show the name of the contact you are dialing as well as the phone number.1. Press the OK Key [Menu], then press for the “Settings” menu. Press “Call“, then “Contacts Match”.2. Select “On” or “Off”, then press [Select] to save the setting. ANSWER MODETo select an answer mode:1. Press the OK Key [Menu], then press for the “Settings” menu. Press “Call“, then “Answer Mode”.2. Select one of the following options:3. Press the Left Soft Key [Select] to save the setting.6362• SEND Key: Answers an incoming call by pressing the SEND Key only.• Any Key: Answers an incoming call by pressing any key except the Left Soft Key , the Right Soft Key or the END Key .• Folder Open: Answers an incoming calls by simply opening the phone.](https://usermanual.wiki/UTStarcom-Korea-Technologies/CDM7126/User-Guide-890431-Page-32.png)
![6465SETTINGS SETTINGSAUTO RETRYAutomatically redials a call up to 5 times after a set time interval.1. Press the OK Key [Menu], then press for the “Settings” menu. Press “Call“, then “Auto Retry”.2. Select “On” or “Off”, then press the Left Soft Key [Select] to save the setting.TTY MODEYour phone is able to operate with a TTY (Teletypewriter) device in digital modes. This feature is system dependent and may not be available in all areas.1. Press the OK Key [Menu], then press for the “Settings” menu. Press “Call“, then “TTY Mode”.2. Read the message, then press the Left Soft Key [Next].3. Select one of the following options:4. Press the Left Soft Key [Select] to save the setting.VOICE PRIVACYEnhances voice privacy and avoids tapping during a call.1. Press the OK Key [Menu], then press for the “Settings” menu. Press “Call“, thenn “Voice Privacy”.• TTY + Full• TTY + Talk• TTY + Hear• TTY Off2. Select “On” or “Off”, then press the Left Soft Key [Select] to save the setting.SECURITY Prevents unauthorized use of your phone. The following settings can be restricted:LOCK PHONE Prevents the phone from being used without entering the password first.1. Press the OK Key [Menu], then press for the “Settings” menu. Press “Security”. Enter your password.2. Press “Lock Phone”.3. Select “Lock Now”, ”Power Up”, “Power Up”or “Unlock.”. When the phone is locked, will appear in the top row of the display.4. Press the Left Soft key [Select] to save the setting.The default Lock code is the last 4 digits of your phone number.• Lock Now: Lock the phone now.• Power Up: Do not lock the phone now, but automatically lock when power is recycled.• Unlock: Do not lock the phone.](https://usermanual.wiki/UTStarcom-Korea-Technologies/CDM7126/User-Guide-890431-Page-33.png)
![6667SETTINGS SETTINGSCHANGE LOCK CODEChanges your 4-digit password.1. Press the OK Key [Menu], then press for the “Settings” menu. Press “Security”. Enter your password.2. Press “Change Lock Code”.3. Enter your lock code. 4. “Create your new lock code” screen appears. Enter your new lock code. 5. “Re-enter your new lock code” screen appears. Enter your new lock code again.SPECIAL NUMBERThis features allows you to set 3 phone numbers that can be called even when the phone is locked.1. Press the OK Key [Menu], then press for the “Settings” menu. Press “Security”. Enter your password.2. Press “Special Number”.3. Select a location and press the Left Soft Key [Edit]. Enter the phone number and press Left Soft Key [Save] to save it to that location.4. Press the Right Soft Key [Erase] to erase the Special Number. Select “Yes“ and press the OK Key .RESTRICTResets setting.1. Press the OK Key [Menu], then press for the “Settings” menu. Press “Security”. Enter your password.2. Press “Restrict”.3. Select “Allow All” or ”Restricted All”, then press the Left Soft Key [Select] to save the setting.ERASE To erase all data in your phone:1. Press the OK Key [Menu], then press for the “Settings” menu. Press “Security”. Enter your password.2. Press “Erase”.3. Select “Contacts”, “Message”, “Voice Memo” and “Downloads”, then press the OK Key .4. Select “Yes“ and press the OK Key .The default Lock code is the last 4 digits of your phone number.The default Lock code is the last 4 digits of your phone number.The default Lock code is the last 4 digits of your phone number.The default Lock code is the last 4 digits of your phone number.](https://usermanual.wiki/UTStarcom-Korea-Technologies/CDM7126/User-Guide-890431-Page-34.png)
![6869SETTINGS SETTINGSPHONE INFODisplays the information of your phone:MY PHONE NUMBERDisplays your MDN and MSID. 1. Press the Left Soft Key [Menu], then press for the “Settings” menu. Press “Phone Info“, then “My Phone Number“.2. The MDN and MSID will be displayed along with your service provider’s name.3. To return to the previous page, press the Right Soft Key [Close] or OK Key .VERSIONDisplays the PRL, S/W Version, H/W Version, Browser Name, Browser Version, PRI:1. Press the Left Soft Key [Menu], then press for the “Settings” menu. Press “Phone Info“, then ”Version”.2. The PRL, software and hardware version information is displayed.3. To return to the previous page, press the Right Soft Key [Close] or OK Key .DEFAULT SETTINGSPreference setting will be set to factory defaults. To reset the phone settings to the factory defaults:1. Press the OK Key [Menu], then press for the “Settings” menu. Press “Security”. Enter your password.2. Press “Default Settings”.3. Select “Yes“ and press the OK Key .RESET PHONEAll saved contents and preference setting will be reset to factory defaults.1. Press the OK Key [Menu], then press for the “Settings” menu. Press “Security”. Enter your password.2. Press “Reset Phone”.3. Select “Yes“ and press the OK Key .The default Lock code is the last 4 digit of your phone number.The default Lock code is the last 4 digits of your phone number.](https://usermanual.wiki/UTStarcom-Korea-Technologies/CDM7126/User-Guide-890431-Page-35.png)
![7071SETTINGS SETTINGSADVANCEDDisplays your phone’s SID, Channel, Technology and Frequency information.1. Press the Left Soft Key [Menu], then press for the “Settings” menu. Press “Phone Info“, then ”Advanced”.2. The SID, Channel, Technology and Frequency information is displayed.3. To return to the previous page, press the Right Soft Key [Close] or OK Key .ESNDisplays your ESN(Hex) and ESN(Dec).1. Press the Left Soft Key [Menu], then press for the “Settings” menu. Press “Phone Info“, then ”ESN”.2. The ESN(Hex) and ESN(Dec) information is displayed.3. To return to the previous page, press the Right Soft Key [Close] or OK Key .HELP1. Press the Left Soft Key [Menu], then press for the “Settings” menu. Press “Phone Info“, then ”Help”.2. The indicator icons are displayed.3. To return to the previous page, press the Right Soft Key [Close] or OK Key .OTHERSLANGUAGESelects the language in which letters are displayed on the screen.1. Press the Left Soft Key [Menu], then press “Settings” menu. Press “Others”, then “Language”.2. Select “English” or “Spanish”.3. Press the Left Soft Key [Select] to save the language setting. AIRPLANE MODEAirplane Mode deactivates the wireless connectivity of your phone but allows you to continue using non-network functions like the Calendar and games.1. Press the Left Soft Key [Menu], then press “Settings” menu. Press “Others”, then “Airplane Mode”.2. Select “On”, “Off” or “Power Up”.3. Press the Left Soft Key [Select] to save the setting.• You cannot make or receive calls or text messages when Airplane Mode is On.Note](https://usermanual.wiki/UTStarcom-Korea-Technologies/CDM7126/User-Guide-890431-Page-36.png)
![7273SETTINGS MOREVR SETTINGSVR RESULTSThe “VR Results” option will allow you to choose if the Command System prompts you with a list of potential matches.1. Press the OK Key [Menu], then press for the “More” menu. Press “VR Settings”.2. Press “VR Results”.3. Select “One” or “Three Best”. Press Left Soft Key [Select] to save the setting.VOICE CALIBRATIONVoice Calibration is the process of optimizing the voice recognition software to your voice. Voice Calibration requires that you make recordings of your voice, which are then used to customize the voice recognition system. This will take a few minutes and you should be in a quiet environment for optimum training.1. Press the OK Key [Menu], then press for the “More” menu. Press “VR Settings”.2. Press “Voice calibration”.3. Select “Words calibration” or “Digits calibration”. You will be prompted to speak the words listed on the screen. Say each word as you are prompted.LOCATIONTo set the location function:1. Press the Left Soft Key [Menu], then press “Settings” menu. Press “Others”, then “Location”.2. Select “Location On” or “E911 Only”.3. Press the Left Soft Key [Select] to save the setting.SET MODETo set the mode function:1. Press the Left Soft Key [Menu], then press “Settings” menu. Press “Others”, then “Set Mode”.2. Select “Home Only” or “Automatic.”3. Press the Left Soft Key [Select] to save the setting.• If you have set Lock Mode for Location to “Lock”, you will need to enter your location lock code before you can enter this menu. The default value is the last 4-digits number of your the phone number. Note• Location On: Your location is now available to the network.• E911 Only: Your location will be hidden from network & application except 911.• Home Only: Only within your home area or home affiliated area.• Automatic: Scan the radio channels based on the Automatic setting.](https://usermanual.wiki/UTStarcom-Korea-Technologies/CDM7126/User-Guide-890431-Page-37.png)
![7475MOREPROMPTSThe prompts settings, “Mode” or “Timeout”, will allow you to set how you are notified by the voice command system and the duration in which you can respond. To access “Prompts:”1. Press the OK Key [Menu], then press for the “More” menu. Press “VR Settings”.2. Press “Prompts“.3. Select “Mode“ or “Timeout”.4. Press the Left Soft Key [Select] to save it.NUMBER FORMATThe prompts settings, “Mode” or “Timeout”, will allow you to set how you are notified by the voice command system and the duration in which you can respond. To access “Prompts:”1. Press the OK Key [Menu], then press for the “More” menu. Press “VR Settings”.2. Press “Prompts“.3. Select “Accept Any“ or “North America”.• Mode: Select ”Prompt” or “Tones Only”.• Timeout: Select “5 sec.” or “10 sec.”.• Accept Any: Processes phone numbers matching any numbering plan (a specification of the number of digits and other phone-number parameters).• North America: Processes only those phone numbers that are valid for the numbering plan of the specified region. Specifying the numbering plan improves the recognition rate.CHAPTER 5PERSONAL ORGANIZERThis section shows you how to use these features to turn your phone into a time management planner that helps you keep up with your contacts, schedules and appointments.CHAPTER 5 PERSONAL ORGANIZER](https://usermanual.wiki/UTStarcom-Korea-Technologies/CDM7126/User-Guide-890431-Page-38.png)
![7677TOOLS TOOLSVOICE MEMOVoice Memo allows you to record a reminder message that can be up to 60 seconds. To record a memo:1. Press the OK Key [Menu], then press for the “Tools” menu. Press ”Voice”, ”Voice Memo”.2. To record a voice memo, press the Left Soft Key [Record].3. To stop recording a voice memo, press the Left Soft Key [Stop]. Stopping the recording will automatically save the entry. The list is sorted by the date of the recording.4. To play voice memo, select the voice tag you want to play then press the Left Soft Key . To erase one or all voice memos, press the Right Soft Key [Options] to select one of the following options:VOICE COMMANDTo use Voice Command:1. Press the OK Key [Menu], then press for the “Tools” menu. Press ”Voice”, ”Voice Command”.ORIn Idle Mode, press the Voice Command Key to access the Voice Command menu. You will hear “Please Say a Command”.2. When prompted,say one of the following commands:3. To return to the previous page, press .• Rename• Erase• Erase All• InformationCall, Digit Dial, Voicemail, My Phone #, Status, Help. When it recognizes one of these commands,the phone launches the associated application. You may be asked to repeat a command if the command is not recognized by voice recognition.Tip](https://usermanual.wiki/UTStarcom-Korea-Technologies/CDM7126/User-Guide-890431-Page-39.png)
![7879TOOLSBLUETOOTHMY DEVICE1. Press the OK Key [Menu], then press for the “Tools” menu. Press ”Bluetooth”.2. Press ”My Device”.SETTINGS1. Press the OK Key [Menu], then press for the “Tools” menu. Press ”Bluetooth”.2. Press ”Settings”.3. Press Left Soft Key [Save] to save the settings.SUPPORT SERVICE1. Press the OK Key [Menu], then press for the “Tools” menu. Press ”Bluetooth”.2. Press ”Support Service”.INFORMATION1. Press the OK Key [Menu], then press for the “Tools” menu. Press ”Bluetooth”.2. Press ”Information”.3. View information. To return preview to the previous page, press Right Soft Key [Close].TOOLSPress Right Soft Key [Options] to choose from:• Add New: Searches for Bluetooth devices in possible range.• Assign Short Name: To assign short name.• Information: Displays information about a Bluetooth device.• Erase: To erase a selected Bluetooth device.• Erase All: To erase all Bluetooth devices.• Set: Turn Bluetooth ”On” or ”Off”.• Handset’s Visibility: Select “Hidden” or “Shown to all”.• Handset’s Name: Edit the name of the device.• Headset serivce: This is providing support for the popular Bluetooth headsets to be used with mobile phones. When connected and configured, the headset can act as the remote device an audio input and output interface.• Hand free service: This is used to allow car hands-free kits to communicate with mobile phones in the car. In the car, the stereo is used for the phone audio and a microphone is installed in the car for sending outgoing audio.](https://usermanual.wiki/UTStarcom-Korea-Technologies/CDM7126/User-Guide-890431-Page-40.png)
![TOOLS TOOLSSCHEDULESets an event and reminds you of that event.ADD NEW CALENDAR1. Press the Schedule Key ”Schedule”.2. Press the Navigation Key to choose a date in the calendar, then press the Left Soft Key [Add]. 3. The New Event screen will be displayed. Enter the event name. Press the Navigation Key down to move to the next fields. In the ”Start time” field and ”End time” field, enter the time. Press the Right Soft Key for ”am” or ”pm”. In the ”Start date” field and the ”End date” field, you can edit the date for the event. In the ”Contents” field, enter any notes for the event. In the ”Notice” field, enter when the alert should sound for the event (On time, Before 10 min, Before 20 min, Before 1 hour, Before one day). In the ”Snooze” field, set the snooze time (5 min, 10 min, 15 min, 20 min). In the ”Ring type” field, press the OK Key to select a ringer for the event. Press the Right Soft Key [Save] when the ringer is selected.4. Press the Left Soft Key [Save] to save the event or the Clear Key to return to the calendar.5. The date of the event will be marked on your calendar.VIEW ADDED CALENDAR1. Press the Schedule Key ”Schedule”.2. Scroll to a date in the calendar and press the OK Key [View] to view the event for that day.3. Press the Right Soft Key [Options] to erase one event or all events in the calendar. “Erase” and “Erase all?” will be displayed. Select “Yes”, then press the OK Key .Press the Left Soft Key [View] to see the details for the event and to edit or erase the event.ALARM CLOCK1. Press the OK Key [Menu], then press for the “Tools” menu. Press “Alarm Clock”.2. Select Alarm #1, 2 or 3 to set a new alarm. To edit an existing alarm, select the alarm name. Press the OK Key .3. To save an alarm setting press the Left Soft Key [Save].8180 You can also access this menu by pressing the OK Key [MENU]. Press ”Tools”, then ”Schedule”.Note• Set: Press the Navigation Key left or right to select alarm ”On” or ”Off”.• Time: Use the keypad to set a time for the alarm and the Right Soft Key to select “am” or “pm”.• Repeat: Press the Navigation Key left or right to select “Daily“, “Once“, “Mon to Fri“, “Sat to Sun“. • Snooze: Press the Navigation Key left or right to select “5min“, “10min“, “15min“, “20min“.• Ringer type: Press the OK Key to select a ringtone for the alarm sound.](https://usermanual.wiki/UTStarcom-Korea-Technologies/CDM7126/User-Guide-890431-Page-41.png)
![8283TOOLS TOOLSWORLD CLOCK1. Press the OK Key [Menu], then press for the “Tools” menu. Press “World Clock”.2. The world map appears with the city, its date and time. Use the Navigation Key left or right to select another city.NOTEPADYour phone includes an internal notepad that can be used to compose and store reminders and notes.ADD NEW MEMOTo compose a memo (there is an 80-letter limit):1. Press the OK Key [Menu], then press for the “Tools” menu. Press “Notepad”.2. To add a new memo, press the Left Soft Key [Add]. Input a new text memo.3. To save memo, press the Left Soft Key [Save].VIEW MEMOTo view a saved memo:1. Press the OK Key [Menu], then press for the “Tools” menu. Press “Notepad”.2. The Notepad list of memos is displayed in the order they were saved. To add a new memo, press the Left Soft Key [Add]. Highlight a memo and press the Right Soft Key [Options] to 1. Erase, or 2. Erase All.3. To view a memo, highlight it and press the OK Key . Press the Right Soft Key [Erase] to erase the memo or press the Left Soft Key [Edit] to edit the text, then press the Left Soft Key [Save] to save the changes. TIP CALCULATOR To access the Tip calculator:1. Press the OK Key [Menu], then press for the “Tools” menu. Press “Tip Calculator”.2. Input numbers using your keypad, then press the Navigation Key down . Press the to enter a decimal point.3. Input Rate numbers using your keypad. Press [Point(.)] for to enter a decimal point.4. Press the Clear Key [Clear] for clear tip calculator. Press the Right Soft Key [Erase] to clear the tip calculator. Press the OK Key to calculate the result.• DST: Specifies whether the current time of the selected place is adjusted to Daylight Savings Time.• Dual: To set dual time.](https://usermanual.wiki/UTStarcom-Korea-Technologies/CDM7126/User-Guide-890431-Page-42.png)
![8485TOOLS TOOLSCALCULATOR To access the calculator:1. Press the OK Key [Menu], then press for the “Tools” menu. Press “Calculator”.2. Enter the number using your keypad and perform one of the following functions:3. Enter the numerical formula and then press the OK Key for Equals (=).4. To reset, press the Clear Key .STOPWATCHSimultaneously times up to ten different events. To operate the stop watch:1. Press the OK Key [Menu], then press for the “Tools” menu. Press “Stopwatch”.2. To measure a time period:• Press the Navigation Key left for Multiplication (x).• Press the Navigation Key right for Division (÷).• Press the Navigation Key down for Subtraction (-).• Press the Navigation Key up for Addition (+).• Press [Operator] for a decimal point.• Press for change the displayed number from positive (+) to negative (-) and vice versa.• Press the Right Soft Key to clear all numbers.• Press the Left Soft Key to select left parenthesis or right parenthesis.• To start, press the Left Soft Key [Start].• To stop a time period and continue measuring another one, press the Left Soft Key [Lap].• To stop the second and continue measuring a third one, press the Left Soft Key [Lap].• To measure up to ten time periods, repeat the above steps.• To stop the stop watch, press the Right Soft Key [Stop].• To review the results, press the Navigation Key up or down .• To reset it, press the Right Soft Key [Reset].](https://usermanual.wiki/UTStarcom-Korea-Technologies/CDM7126/User-Guide-890431-Page-43.png)
![8687TOOLS CHAPTER 6 MESSAGESCONVERT UNITTo access the conversion tool:1. Press the OK Key [Menu], then press for the “Tools” menu. Press “Convert Unit”.2. Select the desired type of measurement, and then press the OK Key .3. To change the unit type (for example: m, cm), press the Navigation Key left or right and use the keypad to enter the unit to convert. If you need to change the lower unit of measure (the unit you are converting into), press the Navigation Key down to highlight that area.MEMORY MANAGERLets you quickly and easily review and manage your device memory usage.1. Press the OK Key [Menu], then press for the “Tools” menu. Press “Memory manager”.2. View total, used and free memory information.Length / Weight / Volume / Area / Temperature / SpeedThis chapter addresses voicemail and text messaging.CHAPTER 6 MESSAGES](https://usermanual.wiki/UTStarcom-Korea-Technologies/CDM7126/User-Guide-890431-Page-44.png)
![8889MESSAGES MESSAGESNEW MSG.To send a new message:1. Press the OK Key [Menu], then press for the “Messages” menu. Press “New Msg.”.2. Under “Send to”, input the phone number.3. Press the Left Soft Key [Next] . Under “Enter msg”, input your message.4. To send the message, press the Left Soft Key [Send].INBOXThe Inbox manages received text/web alert messages. To access:1. Press the OK Key [Menu], then press for the “Messages” menu. Press “Inbox”.2. Select a message, then press the OK Key . The message is displayed. To delete a message, press the Right Soft Key [Erase], then select “Yes” or “No”and press the OK Key .By pressing the Right Soft Key [Options], you can choose from the following:• Recent Calls: Search for a phone number stored in the recent calls list.• Contacts: Search for a phone number stored in the contacts list.• Group Lists: Search for a group stored in the contacts list.• Entry Mode: Change the text input mode for this field.By pressing [Options], you can choose from the following:• Edit: To edit the message.• Resend: To resend the text message.• Lock/Unlock: To lock or unlock the message.• Add to Contacts: Select to save the number to contacts.• Erase: To erase the message.You can also access Messages menu by pressing the Navigation Key up .NoteBy pressing the Right Soft Key [Options], you can choose from the following:• Preset Msg.: Inserts already written sentences in message.• Entry Mode: Change the text input mode for this field.• Save as Draft: To save the message.• Save as Preset: To save the preset message.• Add to Contacts: Select to save the number to contacts.• Delivery1. Msg Receipt: Select ”On” or ”Off”.2. Priority: Select ”Urgent” or ”Normal”.3. Calback #: Select ”On” or ”Off”.4. Signature: Select ”On” or ”Off”.• Cancel Msg.: To cancel message.](https://usermanual.wiki/UTStarcom-Korea-Technologies/CDM7126/User-Guide-890431-Page-45.png)
![9091MESSAGES MESSAGESOUTBOXManages sent messages.1. Press the OK Key [Menu], then press for the “Messages” menu. Press “Outbox”.2. Select a message, then press the OK Key . The message is displayed.DRAFTSDraft Folder contains any draft messages or saved messages. If message composition is interrupted by a voice call or other interrupting event, the text of the current composition is automatically saved in the drafts folder.1. Press the OK Key [Menu], then press for the “Messages” menu. Press “Drafts”.2. Select a message then press the OK Key . 4. To send the message, press the Left Soft Key [Send].VOICEMAILVoicemail allows callers to leave voice messages in your voice mailbox, and lets you review, play, and delete your voice messages any time you are in your Carrier’s network coverage area.1. Press the OK Key [Menu], then press for the “Messages” menu. Press “Voicemail”.ORPress the SEND Key [Send] to dial voicemail. From the idle screen, press then the SEND Key [Send] to direct dial voicemail. If the feature “Speed Dial” is enabled you can press and hold to speed dial voicemail.By pressing the Right Soft Key [Options], you can choose from the following:• Forward: To forward the message.• Save as Draft: Saves the message in the Saved folder.• Save contacts: Save the phone number in contacts.• Erase: To erase the message.• Edit: Change the recipient’s number and send a message.• Send: Resend the selected message to the original recipient.By pressing the Right Soft Key [Options], you can choose from the following:• Forward: Send the message to another person.• Save contacts: Save the phone number in contacts.• Erase: To erase the message.• Edit: To edit the message.• Call Voicemail: Place a call to the number the voicemail was sent to.• Details: View last voicemail information.• Clear Notification: Delete the voicemail icon.](https://usermanual.wiki/UTStarcom-Korea-Technologies/CDM7126/User-Guide-890431-Page-46.png)
![9293SETTINGSNOTIFICATIONTo set a notification:1. Press the OK Key [Menu], then press for the “Messages” menu. Press “Settings”. 2. Press “Notification”. 3. Select ”MSG. & Icon” or ”Icon Only”, then press the Left Soft Key [Select] to save the setting.AUTO SAVESelect if you want to automatically save a message after sending it.1. Press the OK Key [Menu], then press for the “Messages” menu. Press “Settings”. 2. Press “Auto Save”. 3. Select ”Auto Save”, “Do Not Save” or ”Prompt”, then press the Left Soft Key [Select] to save the setting.AUTO ERASEAutomatically erases inbox messages when new messages arrive.1. Press the OK Key [Menu], then press for the “Messages” menu. Press “Settings”. 2. Press “Auto Erase”. 3. Select ”On” or ”Off”.3. Press the Left Soft Key [Select] to save the setting.AUTO VIEWTo set Auto View:1. Press the OK Key [Menu], then press for the “Messages” menu. Press “Settings”. 2. Press “Auto View”. 3. Select ”On” or ”Off” , then press the Left Soft Key [Select] to save the setting.ENTRY MODETo change the text input mode:1. Press the OK Key [Menu], then press for the “Messages” menu. Press “Settings”. 2. Press “Entry Mode”. 3. Select ”T9 Word”, “Abc”, ”ABC”, or “123” then press the Left Soft Key [Select] to save the setting.MESSAGESMESSAGES• On: Oldest message erased from inbox automatically when box is full.• Off: Oldest message not erased from inbox automatically, user prompted when box is full.](https://usermanual.wiki/UTStarcom-Korea-Technologies/CDM7126/User-Guide-890431-Page-47.png)
![9495MESSAGES MESSAGESCALLBACK #Allows you to input a specific callback number. Callback numbers are used in text messaging so the other party knows how to get back to you.1. Press the OK Key [Menu], then press for the “Messages” menu. Press “Settings”. 2. Press “Callback #”. 3. Select “Custom”, ”MDN”, or ”None” then press the Left Soft Key [Select] to save the setting.VOICEMAIL #To set your voicemail number:1. Press the OK Key [Menu], then press for the “Messages” menu. Press “Settings”. 2. Press “Voicemail #”.3. “Enter the desired voicemail access number.” Default setting is *99.4. Press the Left Soft Key [Save] to save the setting.SIGNATURETo create a signature that can be automatically inserted at the end of a text message:1. Press the OK Key [Menu], then press for the “Messages” menu. Press “Settings”. 2. Press “Signature”.3. To activate Signature, highlight “Custom” then press the OK Key . The signature input screen appears.4. Input your signature and press the Left Soft Key [Save] to save and exit.PRESET MSGS.1. Press the OK Key [Menu], then press for the “Messages” menu. Press “Settings”. 2. Press “Preset Msgs.”.3. The text messages are displayed. 4. Press the Left Soft Key [Add new].5. Press the Right Soft Key [Options], then select one of the following options:5. Select the text message, then press the OK Key . Input the text message, then press the Left Soft Key [Save].• Send to: Send a message with the highlighted preset message inserted.• Erase: Erase the highlighted preset message.• Erase All: Erase all the preset messages.](https://usermanual.wiki/UTStarcom-Korea-Technologies/CDM7126/User-Guide-890431-Page-48.png)
![9899MEDIA GALLERY CHAPTER 8 BROWSERMY IMAGEThis menu displays the list of downloaded still images.1. Press the OK Key [Menu], then press for the “Media Gallery” menu. Press “My Image”.2. Scroll throgh the downloaded images to display the image.MY SOUNDSThis menu displays the list of downloaded ringtones.1. Press the OK Key [Menu], then press for the “Media Gallery” menu. Press “My Sounds”.2. Scroll throgh the downloaded ringtones to display the ringtone you want .You can access news, sports, weather, and e-mail from your CDM7126. CHAPTER 8 BROWSERYou can also access Media Gallery menu by pressing the Navigation Key down .Note](https://usermanual.wiki/UTStarcom-Korea-Technologies/CDM7126/User-Guide-890431-Page-50.png)
![100101BROWSERBROWSERBROWSERThe browser menu lists the actions necessary to operate the browser.To access the browser menu. 1. Press OK Ke [Menu], then press for the “Browser” menu. BROWSER MENUBROWSERWhen the “Browser” item is selected from the Browser Menu, the phone displays the homepage.1. To display the homepage, press .BACKWhen the “Back” item is selected from the Browser Menu, the phone displays the previous page in the history. 1. To return to the previous page, press .FORWARDWhen the “Forward” item is selected from the Browser Menu, the phone displays the next page in the history. This is only available if the user has navigated backward in the history. 1. To forward to the next page, press .REFRESHSelecting the “Refresh” item from the Browser Menu refreshes the current page.1. To select “Refresh”, press .HISTORYThe history list is available from the Browser Menu and the user may delete all items from the history. 1. To select “History”, press .ADDRESSSelecting the “Address” item from the Browser Menu displays the URL of the current page.1. To select “Address”, press .CLEAR MEMORYThe user may clear cache, history, cookies and auto fill from the memory.1. To clear browser memory, press . You can also access Browser menu by pressing the Navigation Key left .Note](https://usermanual.wiki/UTStarcom-Korea-Technologies/CDM7126/User-Guide-890431-Page-51.png)

![106107GAMES & APPSGames & Apps is a fun collection of features which you can access directly from your phone - download games and more. Charges apply.1. Press the OK Key [Menu], then press for the “Games & Apps” menu. Press “Games & Apps“.2. You will see 3 icons - Games & Apps, Settings, Help. To download games, etc., select Games & Apps and press the OK Key .3. Select from “Catalog“ and press the OK Key . The server will launch. Browse through the catalog and press the OK Key to select an application and price plan. Then follow the prompts to download the application. Repeat this process for each additional application.4. To exit Games & Apps, press the END Key .Read this information before using your handheld portable Cellular Telephone.SafetyWarrantyCHAPTER 10 SAFETY INFORMATION• Settings: Select to Manage Apps. or Erase Downloads.• Help: Select to learn more about Games & Apps and how to use it.CHAPTER 10 SAFETY INFORMATIONYou can also access Games & Apps menu by pressing the Navigation Key right .Note](https://usermanual.wiki/UTStarcom-Korea-Technologies/CDM7126/User-Guide-890431-Page-54.png)

![132133SAFETY SAFETYA sum of 5 is considered acceptable for normal use. A sum of 6 is considered for best use. In the above example, if a hearing aid meets the M2 level rating and the wireless phone meets the M3 level rating, the sum of the two values equal M5. This should provide the hearing aid user with “normal usage” while using their hearing aid with the particular wireless phone. “Normal usage” in this context is defined as a signal quality that is acceptable for normal operation. The M mark is intended to be synonymous with the U mark. The T mark is intended to be synonymous with the UT mark. The M and T marks are recommended by the Alliance for Telecommunications Industries Solutions (ATIS). The U and UT marks are referenced in Section 20.19 of the FCC Rules. The HAC rating and measurement procedure are described in the American National Standards Institute (ANSI) C63.19 standard.For information about hearing aids and digital wireless phone:• FCC Hearing Aid Compatibility and Volume Control http://www.fcc.gov/cgb/dro/hearing.html• GallaudetUniversity,RERC http://tap.gallaudet.edu/DigWireless.KS/DigWireless.htm• Self Help for Hard of Hearing People Inc. [SHHH] www.hearingloss.org/hat/TipsWirelessPhones.htm• The Hearing Aid Compatibility FCC Order http://hraunfoss.fcc.gov/edocs_public/attachmatch/ FCC-03-168A1.pdfGAMESSEIZURES/BLACKOUTSWarningA very small percentage of individuals may experience epileptic seizures when exposed to certain light patterns or flashing lights. Exposure to certain patterns or backgrounds on a computer screen, or while playing video games, may induce an epileptic seizure in these individuals. Certain conditions may induce previously undetected epileptic symptoms even in persons who have no history of prior seizures or epilepsy.If you, or anyone in your family, have an epileptic condition, consult your physician prior to playing. If you experience any of the following symptoms while playing a video or computer game -- dizziness, altered vision, eye or muscle twitches, loss of awareness, disorientation, any involuntary movement, or convulsions -- IMMEDIATELY discontinue use and consult your physician before resuming play.Repetitive Motion InjuriesWhen you play games on your phone, you may experience occasional discomfort in your hands, arms, shoulders, neck, or other parts of your body. Follow these instructions to avoid problems such as tendonitis, carpal tunnel syndrome, or other musculoskeletal disorders:• Take a minimum 15-minute break every hour of game playing.• If your hands, wrists, or arms become tired or sore while playing, stop and rest for several hours before playing again.• If you continue to have sore hands, wrists, or arms during or after play, stop playing and see a doctor.](https://usermanual.wiki/UTStarcom-Korea-Technologies/CDM7126/User-Guide-890431-Page-67.png)