UTStarcom Korea Technologies PCS1450 PCS CDMA Phone with Bluetooth User Manual 1450VM 070124 EN
UTStarcom Korea Technologies Ltd. PCS CDMA Phone with Bluetooth 1450VM 070124 EN
UserManual.wiki
>
UTStarcom Korea Technologies
>
PCS1450 User Manual
Users Manual
Navigation menu
Upload a User Manual
Namespaces
Wiki Guide
HTML
PDF
Info
Views
User Manual
Discussion / Help
Navigation

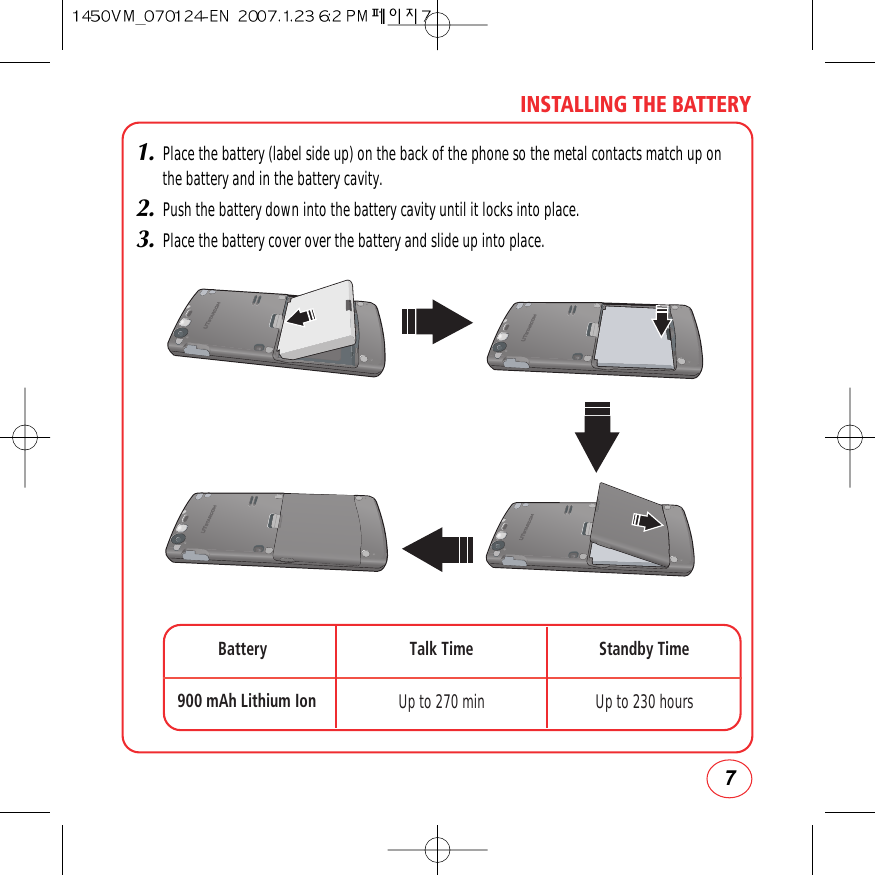
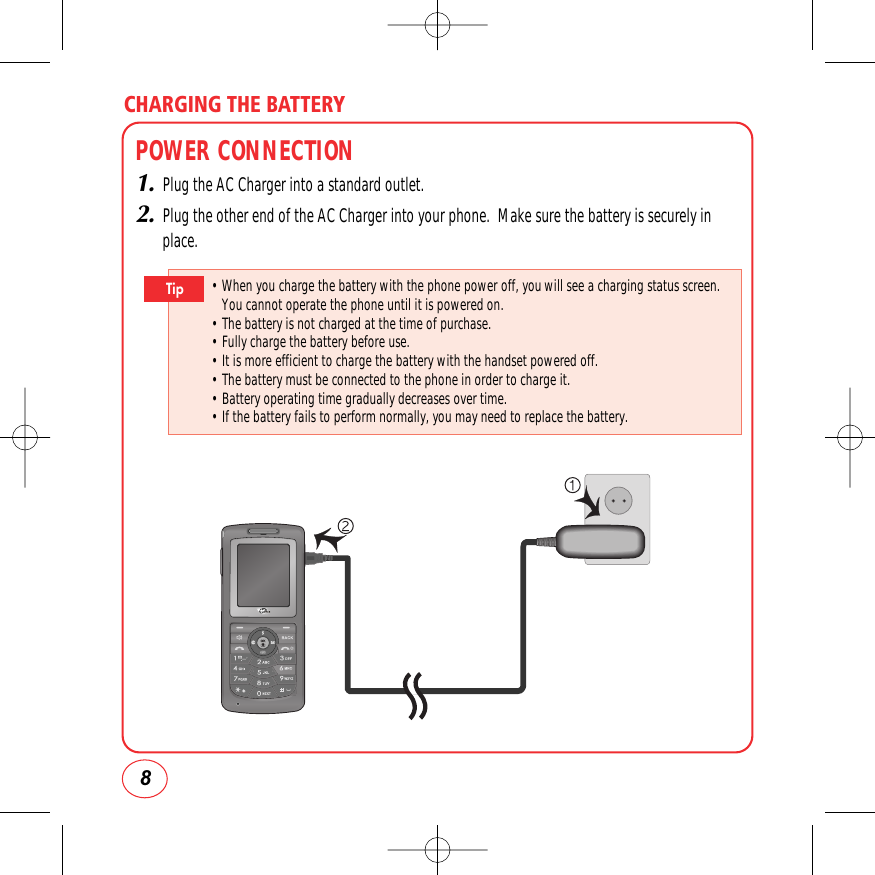
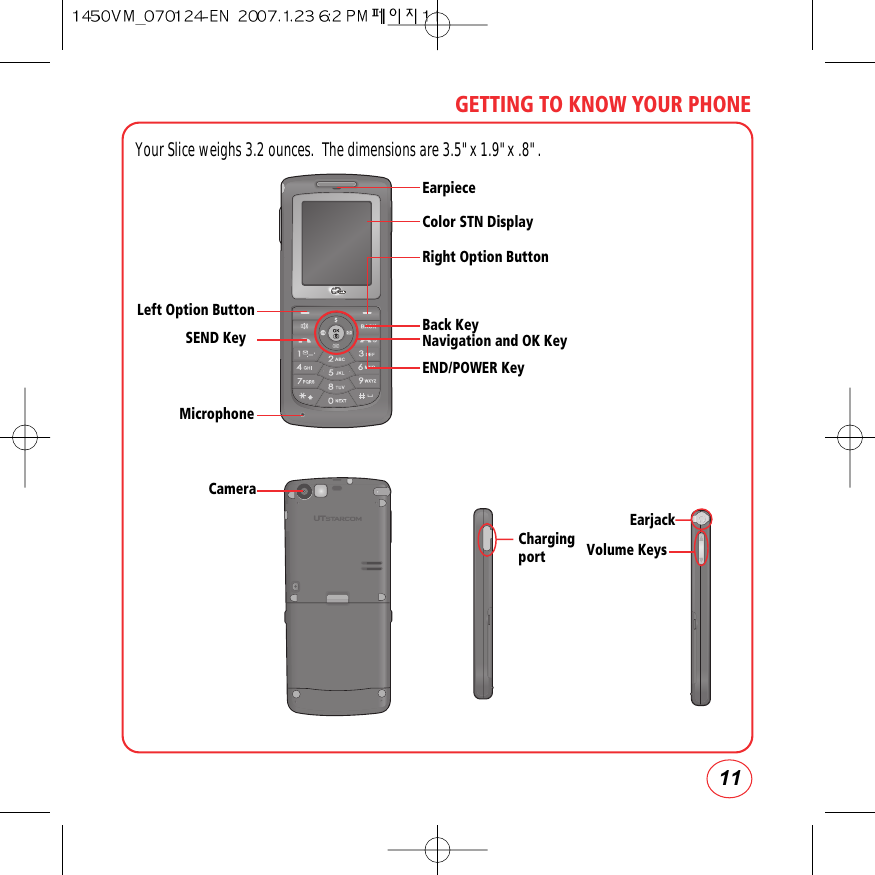
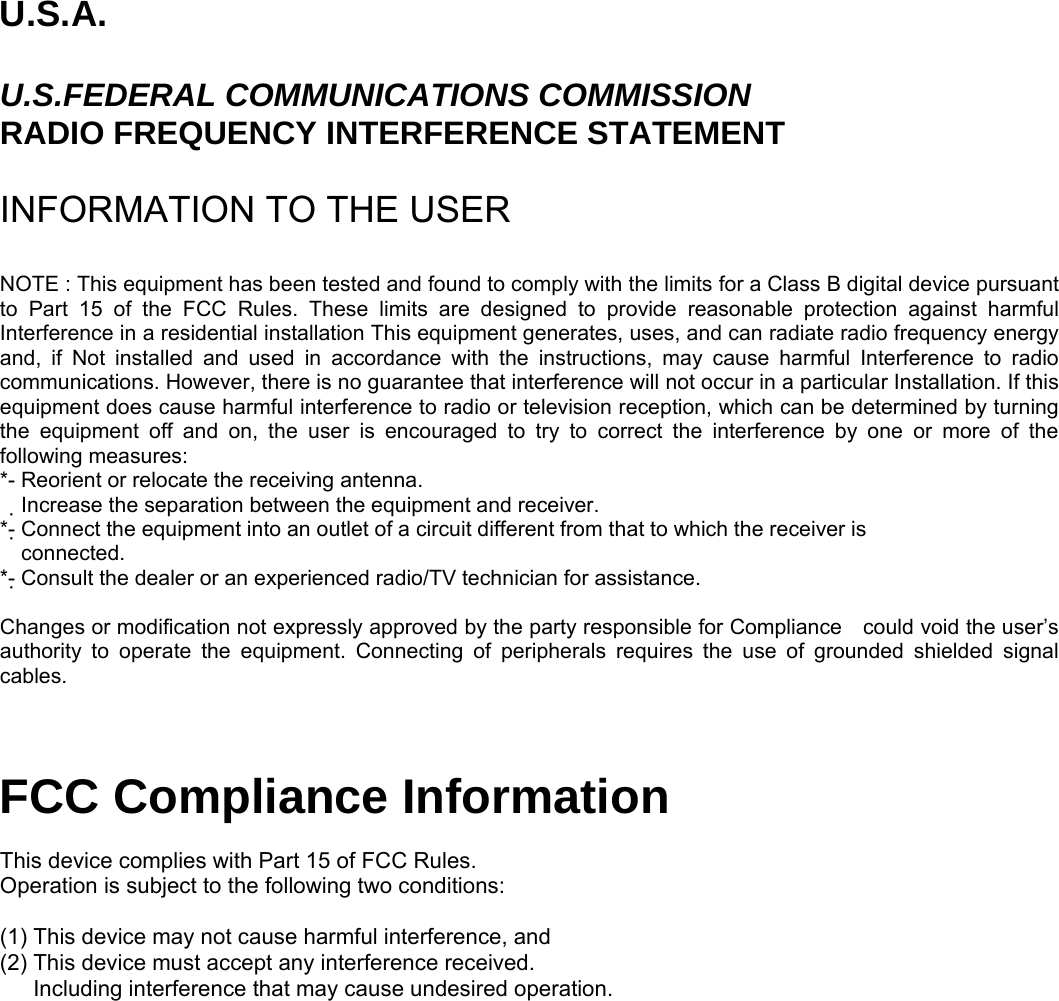
![GETTING TO KNOW YOUR PHONE12Send Key Press to make or receive a call or in idle mode, press to access the Recent Calls list.NAVIGATION KEYIn Idle Mode : Press for Send txt msg, for Contacts, for My Contents and for Pictures.Within a Menu : Within a menu, use to scroll through menu options, or to select a function displayed on thescreen.On a Call : Press to activate speakerphone mode.End Key Press to terminate a call or to return to idle mode. Press and hold to turn the phone on/off.Left Option Button Press to access the menu or function displayed at the bottom left of the screen.BACK Key Press to clear a digit or press and hold to clear all digits from the display. Press to return to the previous page.Shift Key Enters the asterisk [*] character for calling features. Press and hold to enter Keyguard mode.Right Option ButtonPress to access the menu or function displayed at the bottom right of the screen.Space Key In text entry mode, press to accept the word and add a space.0 Key In T9 Mode, press to see other word choices.1 Key Press and hold to access voicemail.OK Key Press to access the Menu.Side Volume Key Allows you to adjust the ringtone volume in standby mode or adjust the voice volume during a call. The volume key can also be used to scroll up or down to navigate through the different menu options. Press to ignore an incoming call and mute the ringtone.](https://usermanual.wiki/UTStarcom-Korea-Technologies/PCS1450/User-Guide-766337-Page-12.png)
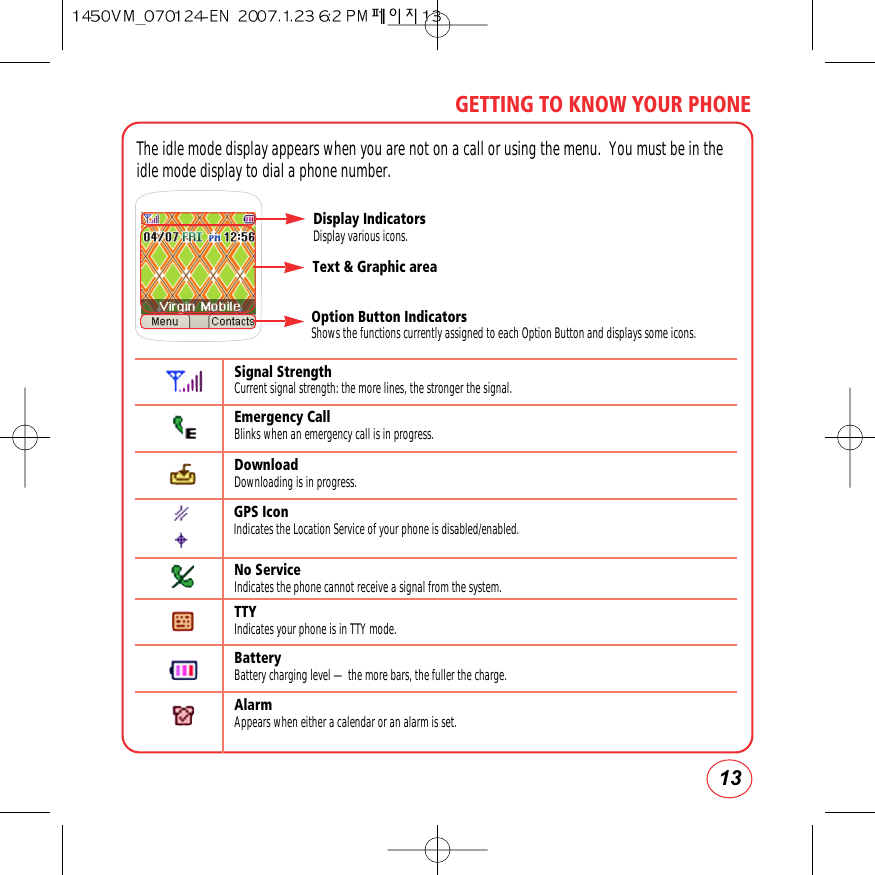
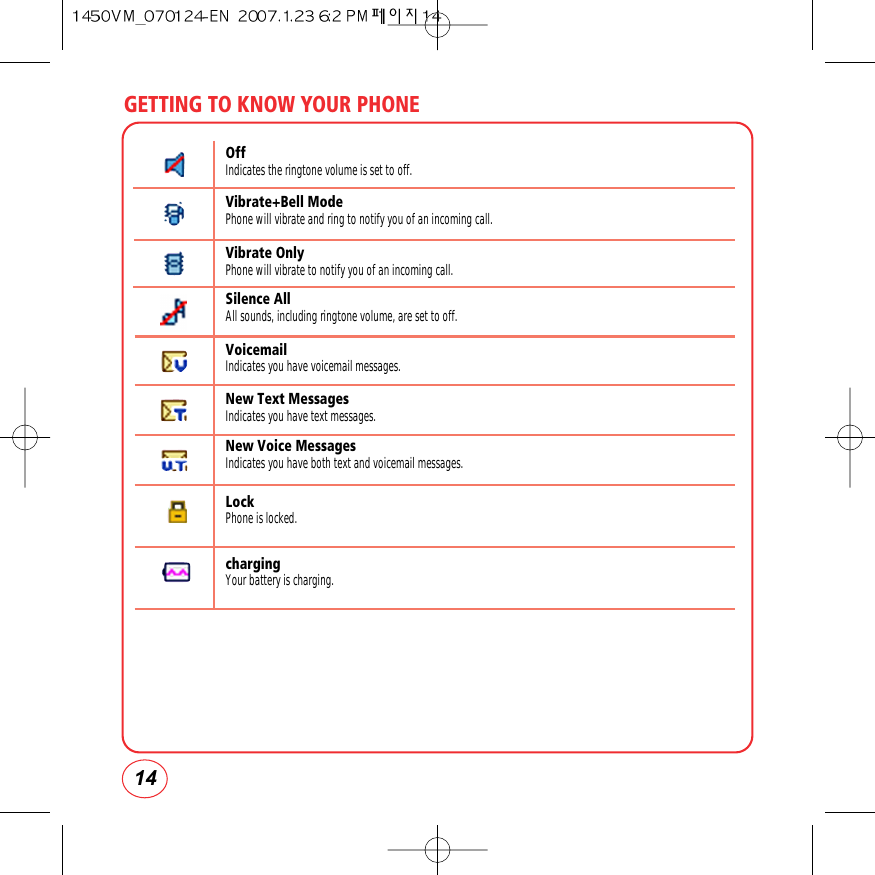
![15GETTING TO KNOW YOUR PHONETURNING THE PHONE ON1.Press and hold until the phone powers off.TURNING THE PHONE OFF1.Press and hold until the phone powers off.Each function can be accessed by scrolling with the or by pressing the number thatcorresponds with the menu item.1.To access the menu in the idle mode, press [Menu].2.Press / / / to scroll through the 8 menu items.3.To return to the previous page, press . To exit the current menu and return to the idle mode, press .4.Press to enter a function when its main page is displayed or press its assigned number tohave direct access to the function.• Immediately change or recharge the battery when “LOW BATTERY!! PHONE IS TURNING OFF!”appears on thedisplay. Memory may possibly be damaged if the phone turns offdue to thebattery completely draining.• Turn the phone off before removing or replacing the battery. If the phone is on, unsaved datamay be lost.Tip• If “Password” appears on the display enter your 4-digit password to unlock your phone. • The default password is the last 4 digits of your phone number.Tip](https://usermanual.wiki/UTStarcom-Korea-Technologies/PCS1450/User-Guide-766337-Page-15.png)
![GETTING TO KNOW YOUR PHONE16MY PHONE #Displays your phone number.1.Press [Menu], then press "Contacts".2.Press "My Phone #". Your phone number will be displayed.TTYYour phone is able to operate with a TTY(Teletypewriter) device. This feature is system dependentand may not be available in all areas.1.Press [Menu], then press "Settings".Press “Others”, then press "TTY".2.Press [Next]. Highlight “Disable” or “Enable", then press then Press [Close]to save the setting.Send txt msgMy ContentsContactsPictures• Enabling TTY may impair headset use and non- TTY accessory performance.](https://usermanual.wiki/UTStarcom-Korea-Technologies/PCS1450/User-Guide-766337-Page-16.png)
![17GETTING TO KNOW YOUR PHONEPHONE INFODisplays your phone’s information:MY MOBILE NUMBERDisplays your phone number.1.Press [Menu], then press "Settings".Press "Phone info", then press "Phone Number".2.Your phone number is displayed.HELPDisplays some of the indicator icons of your phone.1.Press [Menu], then press "Settings".Press "Phone info", then press "Help".2.Your phone's indicator icons is displayed.S/W VERSIONDisplays your phone's software version.1.Press [Menu], then press "Settings".Press "Phone info", then press "S/W version".2.Your phone's software version is displayed.](https://usermanual.wiki/UTStarcom-Korea-Technologies/PCS1450/User-Guide-766337-Page-17.png)
![GETTING TO KNOW YOUR PHONE18ADVANCEDDisplays your phone's SID, Channel, Technology and Frequency information.1.Press [Menu], then press "Settings".Press "Phone info", then press "Advanced".2.Your phone's SID, Channel, Technology and Frequency information is displayed.](https://usermanual.wiki/UTStarcom-Korea-Technologies/PCS1450/User-Guide-766337-Page-18.png)


![MAKING AND RECEIVING CALLS28MAKING A CALL1.Enter a phone number.2.Press .3.To end a call, press .ANSWERING CALLS1.When your phone rings or vibrates, press to answer the incoming call. (Depending onyour phone’s settings, you may also answer incoming calls by pressing any digit key.)2.To end a call, press .To modify the phone number you have entered :• To erase one digit at a time, press .• To erase the entire number, press and hold.Tip• If “CALL FAILED” appears on the display or the line is busy, press or . • If you activate the "AUTO RETRY"function, the phone will automatically retry for the number of times you have selected. • When you place or receive a call from stored phone numbers, only the number will be displayed. • If “Enter lock code” appears on the display enter your 4-digit password to unlock your phone. Tip• To ignore incoming calls, press [Ignore].• It works only when handsfree is connectedTip](https://usermanual.wiki/UTStarcom-Korea-Technologies/PCS1450/User-Guide-766337-Page-28.png)
![29MAKING AND RECEIVING CALLSSPEAKERPHONEThe speakerphone feature lets you hear audio through the speaker and talk without holding thephone.1.To activate the speakerphone while on a call, press . Or, you can press [Options]and select Speaker On.2.The phone returns to normal (Speakerphone Off) after ending a call or when the phone isturned off and back on.HARD/2.SEC PAUSE FEATUREPauses are used for automated systems (i.e., voicemail, calling cards). Insert a pause after a phonenumber then enter another group of numbers. The second set of numbers is dialed automaticallyafter the pause. This feature is useful for dialing into systems that require a code. 1.To insert a Hard Pause/2-sec Pause, enter a phone number then press [Options].Select either a P Hard pause ("P" appears) or a T 2.Sec pause ("T" appears).2.Press to dial or press options and select “Save” to save phone number".CALLER ID FUNCTIONIdentifies caller by displaying their phone number. If the caller’s name and number are alreadystored in your phone book, their name will appear. This is a system dependent feature. Please contact your service provider for details.](https://usermanual.wiki/UTStarcom-Korea-Technologies/PCS1450/User-Guide-766337-Page-29.png)
![MAKING AND RECEIVING CALLS30CALL WAITING FUNCTIONNotifies you of an incoming call when you are already on a call by sounding a beep tone anddisplaying the caller’s phone number.1.To answer another call while on the phone, press .This places the first call on hold. To switch back to the first caller, press again.ADJUSTING VOLUMETo adjust the ringtone volume:1.In idle mode, press up or down. Choose from Silence All, Vibrate All, Ringer off, or Level1~5. You can also choose to have the phone vibrate as well when the the phone rings. Press to check the box on/off for Vibrate.2.Press [Done] to save the setting.ONE-TOUCH/TWO-TOUCH DIALINGIdeal for frequently dialed numbers, this feature allows entries in your contact list to be dialed viathe keypad with only one or two key presses.ONE-TOUCH DIALING2-9 : Press and hold the corresponding memory number for more than 1 second.• Call waiting is a system dependent feature. Please contact your service provider for details.Tip](https://usermanual.wiki/UTStarcom-Korea-Technologies/PCS1450/User-Guide-766337-Page-30.png)
![31MAKING AND RECEIVING CALLSTWO-TOUCH DIALING10-99 : Press and release the first digit, then press and hold the second digit for more than 1 second.RECENT CALLS LIST-INCOMING CALLSDisplays information about the At least 25 entries in each call list. Place a call to a selected numberby pressing .1.If the number is already stored in your contact list, only the name appears. If the number is notstored, the number appears.2.To view incoming call details, press .3.Press [Options] to “Send txt msg”, 'Save”, “Prepend”, “Erase”, or “Erase all”.• It should be "Location is Empty" instead of "Speed dial# X Empty" will appear on the screen.• Location 1 is reserved for voicemail. Locations 2-99 are unassigned. To assign a speed diallocation, please see page 43.Tip• Send txt msg: Send to screen shown with contact number already displayed in the field to send amessage.• Save: Save the phone number in your phonebook.• Prepend: Adds numbers to the beginning of the phone number.• Erase: To erase incoming call list.• Erase all: To erase all incoming calls list.](https://usermanual.wiki/UTStarcom-Korea-Technologies/PCS1450/User-Guide-766337-Page-31.png)
![MAKING AND RECEIVING CALLS32RECENT CALLS LIST-OUTGOING CALLSDisplays information about the At least 25 entries in each call list. Place a call to a selectednumber by pressing .If the number is already stored in your contact list, only the name appears. If the number isnot stored, the number appears.2.To view incoming call details, press . 3.Press [Options] to “Send txt msg”, “Save”, “Prepend”, “Erase”, or “Erase all”.• Call details include date, time and phone number.Tip• Send txt msg: Send to screen shown with contact number already displayed in the field to send amessage.• Save: Save the phone number in your phonebook.• Prepend: Adds numbers to the beginning of the phone number.• Erase: To erase outgoing call list.• Erase all: To erase all outgoing call list.](https://usermanual.wiki/UTStarcom-Korea-Technologies/PCS1450/User-Guide-766337-Page-32.png)
![33MAKING AND RECEIVING CALLSRECENT CALLS LIST-MISSED CALLSDisplays information about the At least 25 entries in each call list. Place a call to a selected numberby pressing .1.If the number is already stored in your contact list, only the name appears. If the number is notstored, the number appears.2.To view incoming call details, press .3.Press [Options] to “Send txt msg”, “Save”, “Prepend”, “Erase”, or “Erase all”.• Send txt msg: Send to screen shown with contact number already displayed in the field to send amessage.• Save: Save the phone number in your phonebook.• Prepend: Adds numbers to the beginning of the phone number.• Erase: To erase missed call list.• Erase all: To erase all missed call list.](https://usermanual.wiki/UTStarcom-Korea-Technologies/PCS1450/User-Guide-766337-Page-33.png)
![MAKING AND RECEIVING CALLS34RECENT CALLS LIST-RECENT CALLSDisplays information about the 60 most recent incoming, outgoing or missed calls.1.If the number is already stored in your phone book, only the name appears. If the number isnot stored, only the phone number appears.2.To view call detail, press .3.Press [Options] to “Send txt msg”, “Save”, “Prepend”, “Erase”, or “Erase all”.• Call details include date, time, and phone number.Tip• After 60 incoming, outgoing or missed calls, the oldest call will automatcally be erased from thehistory.Tip• Send txt msg: Send to screen shown with contact number already displayed in the field to send amessage.• Save: Save the phone number in your phonebook.• Prepend: Adds numbers to the beginning of the phone number.• Erase: To erase all call list.• Erase All: To erase all all calls list.](https://usermanual.wiki/UTStarcom-Korea-Technologies/PCS1450/User-Guide-766337-Page-34.png)
![35MAKING AND RECEIVING CALLSVOICEMAILCALL INTO YOUR VOICEMAIL1.Press and hold "Call voicemail", OR2.Press [Menu] then press "Messaging". Press "Voicemail". 3.Press “Call Voicemail”.CALL TIMERCheck the talk time and manages your calls within the limit you set. The four call timers include:Last call, Recent call, Incoming calls, and Outgoing calls.1.press "Recent calls".2.Press / to view the different timers.Press [ResetAll] to Reset all call times.3.To return to the previous page, press .](https://usermanual.wiki/UTStarcom-Korea-Technologies/PCS1450/User-Guide-766337-Page-35.png)
![37DURING A CALLMUTEThe caller cannot hear you or any sounds from your side but you can still hear them.1.Press [Mute].RECENT CALLSTo display the Recent Call menu.1.Press [Options], then press .CONTACTSTo select the phone number in your internal Contact List.1.Press [Options], then press .MESSAGINGTo send a text message during a call:1.Press [Options], then press .LOCATIONTo enable the network to locate your current location through Global Positioning System (GPS).1.Press [Options], then press .• To deactivate, press [Unmute].• The phone will automatically unmute in Emergency Call or Callback mode.](https://usermanual.wiki/UTStarcom-Korea-Technologies/PCS1450/User-Guide-766337-Page-37.png)

![ENTERING LETTERS, NUMBERS, SYMBOLS40You can enter letters, numbers, and symbols using several entry modes: Alphabet, Number, T9,Symbol, Auto Text, and Emoticon. Not all options are available for every text entry screen. An indicator for the current entry mode will appear in the middle of the bottom row on the displaywhen you are entering letters and numbers. To select an entry mode, press the right[Options], then choose from the list onscreen.ALPHABET INPUT MODEUse the number keys to enter letters, numbers and symbols. Select Alphabet mode by press[Options], then select Alphabet. The Alphabet mode icon [ABC] will appear in the middle of thebottom of your screen.1.Find the key that corresponds to the letter you want to enter. Press it as many times asneeded for the letter to appear on the screen.2.To enter a space, press . The cursor will automatically move to the next column.3.To delete one digit, press . To delete all letters, press and hold .Select Alphabet mode by pressing [Options], then select "Alphabet".When you select this mode, the Alphabet icon [Abc] appears as a visual confirmation.- Find the key that corresponds to the letter you want to enter.- Press it as many times as needed for the letter to appear on the screen.- To enter the name "John" in Alphabet mode:Press [ ] JPress [,,] oPress [ , ] hPress [ , ] nTip](https://usermanual.wiki/UTStarcom-Korea-Technologies/PCS1450/User-Guide-766337-Page-40.png)
![41ENTERING LETTERS, NUMBERS, SYMBOLST9 INPUT MODET9 mode uses a built-in dictionary to select a word based on the letters you've entered. A word canbe entered more quickly by pressing each key once per character. Instead of typing out the entireword, scroll through the list of words provided and select the one you want.1.To select T9 mode, press [Options], then select T9 Word from the list. The T9 icon [T9 Word] will appear in the middle of the bottom of your screen.2.For each letter of the word you want, press the corresponding number key once. For example,to enter the word "any", press -> -> .3.If the word doesn't match what you want, press to look at other word matches.4.When you see the word you want, press to accept the word and enter a space.To enter a compound word:• Enter the first part of the word then press to accept it without adding a space after it.• Enter the last part of the word then press to accept the word.TipTo enter "Sweetcakes"in T9 mode:- Press [Options] to select and select T9 Word mode.- Press , , , , and you will see the word "Sweet".- Press to keep Sweet selected and to complete the compound word entry.- Press , , , , and you will see "baker". Press until you see"cakes".Tip](https://usermanual.wiki/UTStarcom-Korea-Technologies/PCS1450/User-Guide-766337-Page-41.png)
![ENTERING LETTERS, NUMBERS, SYMBOLS42NUMBER MODENumber mode allows you to enter numbers.1.To select Number mode, press [Options] then select Number from the list.2.To enter a number, press the corresponding number key.SYMBOL MODESymbol mode allows you to enter symbols.1.To select Symbols mode, press [Options] then select Symbols from the list.2.Select the symbol you want to enter by pressing / / / . Then press .SMILEYSSmileys mode allows you to enter Smileys.1.To select an emoticon, press [Options] then select Smileys. 2.Select the emoticon from the list by pressing / / / . Then press .PRESET MSG.Preset Msg. allows you to use preloaded messages.1.To select an Preset message, press [Options] then select Preset Msg. from the list.2.Highlight a message from the list and press [Select].](https://usermanual.wiki/UTStarcom-Korea-Technologies/PCS1450/User-Guide-766337-Page-42.png)
![STORING CONTACTS441.Enter phone number then press [Options] and then press [Save].2.Highlight "New Entry" or "Existing Entry". Press to select.If "Existing Entry" is selected, your contact list is displayed. Choose the entry to add thenumber to, then press [Next]. You will then see the phone number listed above thenumber type list. Select the type then press .3.If "New Entry" is selected, the list of phone number types will be shown.Press / to choose the type of number you are adding. Press to select. Enter aname. To change the input mode, press [Options]. Press to enter information inother fields for the contact. Fields include “Name”, “Mobile 1”, “Mobile 2”, “E-mail”,“URL”, “Group”, “Ringer”, “Photo”, “Memo”, “Photo”.4.To store the entry in your contact list, press [Save]. • Group: To set a group for the contact, highlight the Group field and press . The Group screenwill appear. Highlight the group name and press [Done].• Ringer: To set a ringtone for the contact, highlight the Ringtone field and press . The Ring typescreen will appear. Highlight a ringtone and press [Done].• Photo: To add a Photo for a contact, highlight the Photo field and press . The Photo screen willappear. Highlight a photo and press [Done].• Memo: To add a memo for a contact, highlight the memo field and press . The Memo screenwill appear. Enter your Memo and press [Done].• If you are trying to add a phone number to an existing contact and that type of number already exists,you will see "Overwrite?". Select Yes to save the new number to that type of number.](https://usermanual.wiki/UTStarcom-Korea-Technologies/PCS1450/User-Guide-766337-Page-44.png)
![45STORING CONTACTSADD NEW ENTRYAdds a new entry to your phone's contact list.1.Press [Menu], then press "Contacts".2.Press "Add New Entry".3.Fill in the fields as they are selected.Press / to highlight a field, then press to select it.4.To save the entry, press [Save]. To return to the previous page, press .FIND NAMERetrieves an entry by name and calls the primary number by simply pressing .1.Press [Menu], then press "Contacts".2.Press "Find Name".3.The list of names in your contacts is displayed alphabetically.4.Enter a name or scroll through the list. If more than one contact is listed, highlight the contactyou want.5.To select the contact, highlight it and press . The contact information is displayed.6.To edit the contact information, press [Edit]. The Edit Contact screen will appear withthe selected contact information shown. See page 44 for Storing a Phone Number.7.To save the entry, press [Save]. To return to the previous page, press .• Phone book fields : Name/Mobile/Home/Work/etc/Email/Group/Ringtone/Notes.](https://usermanual.wiki/UTStarcom-Korea-Technologies/PCS1450/User-Guide-766337-Page-45.png)
![STORING CONTACTS468.Highlight a field in the contact and press [Options] for various functions for the fields.9.To call the selected number, press .GROUP SETTINGOrganize your contact list into groups for better management, like "Family", "Business", etc.CHANGE GROUP NAME1.Press [Menu], then press "Contacts".2.Press "Group Setting".3.Scroll to Group 1, Group 2, Group 3 or Group 4. Press [Options], then select“Rename” from the list.4.Input a new group name.5.Press [Done] to save the setting.RINGER1.Press [Menu], then press "Contacts".2.Press "Group Setting".3.Select an existing group name. 4.Press [Options], then select “Ringer” from the list.5.Select ringtone and press [Select].](https://usermanual.wiki/UTStarcom-Korea-Technologies/PCS1450/User-Guide-766337-Page-46.png)
![47STORING CONTACTSERASE GROUP1.Press [Menu], then press "Contacts".2.Press "Group Setting".3.Select Group 1, Group 2, Group 3 or Group 4.4.Press [Options], then select “Erase” from the list.5.“Erase?” will be displayed. Select “Yes” and press to erase the group.SPEED DIALIn idle mode, calls can be placed to numbers stored in speed dial by pressing & holding the locationnumber on the key pad. For a 2-digit location number, press the first number, then press and holdthe second number.1.Press [Menu], then press "Contacts".2.Press "Speed dial".3.To assign a phone number to a location, select the location then press [Assign].4.Highlight a name from your contact list. If the contact has more than 1 number saved, press / until the correct number for the speed dial location is shown.5.Press [Done] to save the number to the speed dial location. You will see the contactname next to the speed dial location number in the speed dial list.• "Unassigned"appears if the location is available.Tip](https://usermanual.wiki/UTStarcom-Korea-Technologies/PCS1450/User-Guide-766337-Page-47.png)

![50MESSAGINGSEND A TEXT MESSAGETo send a new text message:1.Press [Menu], then press "Messaging". Press "Send txt msg".2.Under "Recipients", input the phone number or e-mail then press [Next].3.Under "Enter Msg.", input your message, then press [Next].4.From preview screen , Press to highlight message field. When field is highlightedpress [Options] to edit. You can press [Options] to “Save to Drafts” or“Change”.5.To send the message, press [Send].SEND A PICTURE MESSAGETo send a new picture message:1.Press [Menu], then press "Messaging". Press "Send Pic msg".Press [Options] to choose from:• Find: Look up a phone number from your contact list.• Recent List: Look up a number from your recent message list.](https://usermanual.wiki/UTStarcom-Korea-Technologies/PCS1450/User-Guide-766337-Page-50.png)
![51MESSAGINGSEND A E-MAIL MESSAGETo send a new e-mail message:1.Press [Menu], then press "Messaging". Press "Send email msg".2.Select an email provider,such as Yahoo!Mail or EarthLink .3.Use your keypad to enter the required sign-in information for the selected provider,such as username,email address,and password,and select Sign In. (Your mailbox for the selected providerwill be displayed.)4.Follow the onscreen instructions to read,reply to, compose,send,and manage emails in youraccount.SEND IMTo send a new instant message:1.Press [Menu], then press "Messaging". Press "Send IM".2.Select an email provider,such as AOL Instant Messenger or Yahoo!Messenger.3.Use your keypad to enter the required sign-in information for the selected provider,such as username and password,and select Sign In.(Your IM screen for the selected provider will bedisplayed.)• The information required to sign in will vary depending on the email provider you are accessing.• The information required to sign in will vary depending on the instant messaging provider you areaccessing.](https://usermanual.wiki/UTStarcom-Korea-Technologies/PCS1450/User-Guide-766337-Page-51.png)
![MESSAGING52INBOXThe Inbox manages messages you've received.1.Press [Menu], then press "Messaging". Press "Inbox".2.Select a message, then press . The message is displayed.3.Press [Option], then select one of the following options:VIRGIN ALERTS1.Press [Menu], then press "Messaging". Press "Virgin Alerts".2.To select "GoTo", press .• Call: Place a call to the number the message was sent to.• Forward: Send the message to another person.• Save: Saves the message in the Saved folder.• Save contact: Save the phone number in the contacts.• Erase: Delete the messages • Cancel: Cancel the message.](https://usermanual.wiki/UTStarcom-Korea-Technologies/PCS1450/User-Guide-766337-Page-52.png)
![53MESSAGINGSENTThe Sent folder manages the messages you've sent.1.Press [Menu], then press "Messaging". Press "Sent".2.Select a message, then press . The message is displayed.3.Press [Option], then select one of the following options:SAVEDThe Saved folder manages the text messages you've save.1.Press [Menu], then press "Messaging". Press "Save".2.Select a message, press [Erase] then Select Yes and press to delete the messagesfrom the saved folder.3.Select a message, then press . The message is displayed.4.Press [Options], then select one of the following options:• Forward: Send the message to another person.• Call: Place a call to the number the message was sent to.• Lock/Unlock: Lock/Unlock the message.• Compose New: Compose new message.• Erase: Delete the messages.• Erase All: Delete the all messages.• Call: Place a call to the number the message was sent to.• Forward: Send the message to another person.• Save contact: Save the phone number in the contacts.• Erase: Delete the message.• Cancel: Cancel the message.](https://usermanual.wiki/UTStarcom-Korea-Technologies/PCS1450/User-Guide-766337-Page-53.png)
![MESSAGING54ERASE MSGSThis feature allows you to erase text messages.1.Press [Menu], then press "Messaging". Press "Erase msgs".2.Select:1. Inbox2. Sent3. Saved3.Select “Yes” and press to delete the messages from the selected folder.MSG SETTINGSThis feature enables you to manage your text message settings.SOUND1.Press [Menu], then press "Messaging". Select “Msg Settings" from the list.2.Press "Sound".3.Highlight "Beep", "Msg Tone", "Vibrate", "Silent", "Ring & Remind", or “Vibrate &Remind”, then press or press [Done] to save the setting. REMINDER1.Press [Menu], then press "Messaging". Select “Msg Settings" from the list.2.Press "Reminder".](https://usermanual.wiki/UTStarcom-Korea-Technologies/PCS1450/User-Guide-766337-Page-54.png)
![55MESSAGINGAUTO TEXTTo edit the Auto text message you have saved.1.Press [Menu], then press "Messaging". Select “Msg Settings" from the list.2.Press "Auto Text".3.Highlight a message from the list. To add a new Quick Text message, press [Options],then press "Add New". To edit the Quick Text message you have selected, press .Press to delete any characters you don't want then enter your text. Press[Done] to save the text and return to the Auto Text list.4.From the Auto Text list, press [Options] to select one of the following:TEXT ENTRY1.Press [Menu], then press "Messaging". Select “Msg Settings" from the list.2.Press "Text Entry".3.Highlight "Alphabet", "Number", or "T9 Word" then press or press [Done] to savethe setting.GROUP1.Press [Menu], then press "Messaging". Select “Msg Settings" from the list.2.Press "Group".•Add new• Edit• Send text msg• Erase• Erase all](https://usermanual.wiki/UTStarcom-Korea-Technologies/PCS1450/User-Guide-766337-Page-55.png)
![MESSAGING56SIGNATURECreate a signature that can be automatically inserted at the end of a text message.1.Press [Menu], then press "Messaging". Select “Msg Settings" from the list.2.Press "Signature".3.Highlight “On” or “Off” then press or press [Done] to save the setting.SAVE TO SENT FOLDER1.Press [Menu], then press "Messaging". Select “Msg Settings" from the list.2.Press "Save to sent folder".3.Highlight “On” or “Off” then press or press [Done] to save the setting.AUTO ERASEAutomatically erases inbox messages when new messages arrived.1.Press [Menu], then press "Messaging". Select “Msg Settings" from the list.2.Press "Auto Erase".3.Highlight “On” or “Off” then press or press [Done] to save the setting.• On: All sent messages saved in the Sent box.• Off: All sent messages not saved in the Sent box.• On: Oldest message erased automatically when message box is full.• Off: Messages not erased automatically when message box is full.](https://usermanual.wiki/UTStarcom-Korea-Technologies/PCS1450/User-Guide-766337-Page-56.png)
![57MESSAGINGNOTIFICATION1.Press [Menu], then press "Messaging". Select “Msg Settings" from the list.2.Press "Notification".3.Highlight “Only Icon” or “Msg & Icon”. then press or press [Done] to save thesetting.CALLBACK NUMBERAllows you to input a specific call back number. Call back numbers are used in text messaging so the other party knows how to get back to you.1.Press [Menu], then press "Messaging". Select “Msg Settings" from the list.2.Press "Callback Number".3.Highlight one of the following options then press or press [Done] to save thesetting.• None: No callback number will be sent.• My Mobile Number: Your phone's number will be sent.• Other: Input another phone number to be sent.](https://usermanual.wiki/UTStarcom-Korea-Technologies/PCS1450/User-Guide-766337-Page-57.png)

![60IMIM1.Press [Menu], then press "IM".](https://usermanual.wiki/UTStarcom-Korea-Technologies/PCS1450/User-Guide-766337-Page-60.png)
![62MY STUFFAnything you download from Web - games, ringtones, graphics, and applications - will be stored inthe My Stuff folder. You can access these files from My Stuff.GAMESYou can download the latest games and play them right on your phone. Charges apply. Visitwww.virginmobileusa.com for details.1.Press [Menu], then press "My stuff".2.Press "Game".3. Your games list will be shown. Select “1. Get more games” to download additional games toyour phone. Web will launch and you will be taken to the download menu.4.Download your game. From the information page select "Buy".5. A confirmation page will notify you that the game has been purchased. To download thegame, select "Download".RINGERSYou can download the latest ringtones right to your phone. Charges apply. Visitwww.virginmobileusa.com for details.1.Press [Menu], then press "My stuff".2.Press "Ringers".3.Your list of ringtones is shown. Select “1. Get more ringtones” to download any additionalringtones to your phone. Web will launch and you will be taken to the download menu.4.Download your ringtones. From the information page select "Buy".](https://usermanual.wiki/UTStarcom-Korea-Technologies/PCS1450/User-Guide-766337-Page-62.png)
![63MY STUFF5.A confirmation page will notify you that the ringtone has been purchased. To download theringtone, select "Download".SCREEN SAVERSYou can download screen saver right on your phone. Charges apply. Visit www.virginmobileusa.com for details.1.Press [Menu], then press "My stuff".2.Press "Screen Savers".3.Your screen saver list will be shown. Select “1. Get more stuff” to download additional screensaver to your phone. Web will launch and you will be taken to the download menu.4.Download your screen saver. From the information page select "Buy".5.A confirmation page will notify you that the application has been purchased. To download thescreen savers, select "Download".APPLICATIONSYou can download application right on your phone. Charges apply. Visit www.virginmobileusa.com for details.1.Press [Menu], then press "My stuff".2.Press "Applications".3.Your application stuff list will be shown. Select “1. Get more stuff” to download additionalapplications to your phone. Web will launch and you will be taken to the download menu.](https://usermanual.wiki/UTStarcom-Korea-Technologies/PCS1450/User-Guide-766337-Page-63.png)

![PICTURES68TAKE A PICTURETaking pictures with your phone ’s built-in camera is as simple as choosing a subject,pointing thelens,and pressing a button.1.Press [Menu], then press "Pictures". Press "Take a picture".2.Using the phone ’s Main LCD as a viewfinder,aim the camera lens at your subject.3.Press [Capture], until the shutter sounds. Press to save the picture in the inCamera folder. To return to camera mode without saving the picture,press [Cancel].Press [Options] to choose from:• Send Pictures: To send the picture to up to 16 contacts at one time.• Upload to Album: To upload the picture you just took to the picture messaging Web site(www.plspictures.com).• Exit Text Caption: To edit the selected picture ’s caption.• Assign: To assign the selected picture to display for specific tasks:(Picture ID,Screensaver,IncomingCalls )• Take a Picture: To return to camera mode to take another picture.• Thumbnail: To switch to the thumbnail view mode.• Erase: To delete the picture you just took.](https://usermanual.wiki/UTStarcom-Korea-Technologies/PCS1450/User-Guide-766337-Page-68.png)
![69PICTURESSEND A PICTURE MESSAGETo send a picture message.1.Press [Menu], then press "Pictures". Press "Send pic msg".2.Under "Recipients", input the phone number or e-mail then press [Next].3.Under "Enter Msg.", input your message, then press [Next].4.Under “Subject”, input a subject text and press [OK].5.To send a message to another person, select “CC” or “BCC”, input the phone numbers, thenpress [OK].6.Press the for more fields. Under “Priority”, select “Normal” or “High”.7.Under “Insert Signature”, select “On” or “Off”.8.To send the message, press [Send].Press [Options] to choose from:• Find: Look up a phone number from your contact list.• Recent List: Look up a number from your recent message list.Press [Options] to choose from:• New Pix: To take a new photo.• Saved Pix: To insert a saved photo.• Delete Pix: Delete an existing photo.• Voice Record: To record a voice memo.• Insert Quick Text: Inserts pre-programmed text into a Pix Msg.• Insert Sound: Inserts sound in Pix Msg.• Insert Slide: Insert other pix messages (To insert a maximum of 3 picture message).• Slide Dration: To select a slide duration time.](https://usermanual.wiki/UTStarcom-Korea-Technologies/PCS1450/User-Guide-766337-Page-69.png)
![PICTURES70MY PICTURES1.Press [Menu], then press "Pictures". Press "My Pictures".2.In Review Mode, you can view all the pictures you have taken and stored.3.Select photo image with the Navigation Key then press [OK].CAMERA SETTINGSRESOLUTIONYou can adjust the size using resolution settings.1.Press [Menu], then press "Pictures". Press "Settings".2.Press "Resolution".3.Select “640x480”, “320x240”, “160x120” or “Wallpaper” then press or [Select]to save setting.QUALITYYou can adjust the copression ratio using this.1.Press [Menu], then press "Pictures". Press "Settings".Press [Options] to choose from:• Edit: To edit the picture’s title.• Assign: To assign the picture image.• Take New Pix: To return to camera mode to take another picture.• Erase: To erase selected pictures.• Erase All: To erase all pictures.](https://usermanual.wiki/UTStarcom-Korea-Technologies/PCS1450/User-Guide-766337-Page-70.png)
![71PICTURES2.Press "Quality".3.Select “Economy”, “Normal” or “Fine” then press or [Select] to save setting.SHUTTER SOUNDTo select shutter sound.1.Press [Menu], then press "Pictures". Press "Settings".2.Press "Shutter sound".3.Select “Default”, “Cheese” or “Record new” then press or [Select] to save setting.HELPRESOLUTION1.Press [Menu], then press "Pictures". Press "Help".2.Press "Resolution".3.To return to the previous page, press .QUALITY1.Press [Menu], then press "Pictures". Press "Help".2.Press "Quality".3.To return to the previous page, press .](https://usermanual.wiki/UTStarcom-Korea-Technologies/PCS1450/User-Guide-766337-Page-71.png)

![CUSTOMIZING YOUR PHONE74Customizes your phone and optimizes performance through a variety of settings.SOUNDSRINGER TYPETo select a ringer type for:Voice calls1.Press [Menu], then press "Settings". Press "Sounds", then press Ringer Type".2.Press "Voice calls".3.Select "With Caller ID" or "No Caller ID" then press .4.Select your desired ringers from the list by pressing the / . To hear a ringtone that ishighlighted, press [Play].5.To save the selected ringtone, press [Select] or press [Done] to save the setting.Messaging1.Press [Menu], then press "Settings". Press "Sounds", then press Ringer Type".2.Press "Messaging".• With Caller ID: Set ringtone for any incoming call from a saved contact phone number, unless thecontact was saved with a specific ringtone.• No Caller ID: Set ringtone for any incoming call from someone not saved to your contact list.](https://usermanual.wiki/UTStarcom-Korea-Technologies/PCS1450/User-Guide-766337-Page-74.png)
![3.Select your desired ringers from the list by pressing the / . To hear a ringtone that ishighlighted, press [Play].4.To save the selected ringtone, press [Select] or press [Done] to save the setting.Alarms1.Press [Menu], then press "Settings". Press "Sounds", then press Ringer Type".2.Press "Alarms".3.Select your desired ringers from the list by pressing the / . To hear a ringtone that ishighlighted, press [Play].4.To save the selected ringtone, press [Select] or press [Done] to save the setting.Roaming Ringer1.Press [Menu], then press "Settings". Press "Sounds", then press Ringer Type".2.Press "Roaming ringer".3.Select “Normal” or “Distinctive”.4.Press then press [Close] to save the setting.75CUSTOMIZING YOUR PHONE](https://usermanual.wiki/UTStarcom-Korea-Technologies/PCS1450/User-Guide-766337-Page-75.png)
![CUSTOMIZING YOUR PHONE76VOLUMEControl the volume for Ringtone, Speakerphone, Headset, and Advanced settings.RingerSet ringer volume and incoming call alert options:1.Press [Menu], then press "Settings". Press "Sounds", then press “Volume".2.Press "Ringer".3.Press / to adjust the volume level. Press to select Vibrate when High is thevolume level. The volume settings available are:• Silence All: All sounds are off.• Vibrate All: Phone will vibrate to alert you of incoming call or message.• Ringer Off: Only the ringtone is muted.• Ringtone mode: 1~5.• You can adjust the ringtone volume with the side keys.Tip](https://usermanual.wiki/UTStarcom-Korea-Technologies/PCS1450/User-Guide-766337-Page-76.png)
![77CUSTOMIZING YOUR PHONESpeakerphoneAdjust the speakerphone volume:1.Press [Menu], then press "Settings". Press "Sounds", then press “Volume".2.Press "Speakerphone".3.Adjust the Speakerphone volume by pressing / . Press or press [Done] tosave the setting.ReceiverAdjust the receiver volume:1.Press [Menu], then press "Settings". Press "Sounds", then press “Volume".2.Press "Receiver".3.Adjust the Receiver volume by pressing / . Press or press [Done] to savethe setting.HeadsetAdjust the headset volume:1.Press [Menu], then press "Settings". Press "Sounds", then press “Volume".2.Press "Headset".3.Adjust the Headset volume by pressing / . Press or press [Done] to savethe setting.](https://usermanual.wiki/UTStarcom-Korea-Technologies/PCS1450/User-Guide-766337-Page-77.png)
![CUSTOMIZING YOUR PHONE78Key BeepAdjust the Key Beep volume:1.Press [Menu], then press "Settings". Press "Sounds", then press “Volume".2.Press "Key Beep".3.Adjust the Key Beep volume by pressing / . Press or press [Done] to savethe setting.AdvancedMessagingAdjust the message alert volume:1.Press [Menu], then press "Settings". Press "Sounds", then press “Volume".2.Press “Advanced”, then press “Messaging”.3.Highlight "Use ringtone" or "Separate" and press to select. If Separate is selected,press to highlight the volume level. Press / to adjust the volume level.4.Press Done] to save the setting.5.Press [Help].](https://usermanual.wiki/UTStarcom-Korea-Technologies/PCS1450/User-Guide-766337-Page-78.png)
![79CUSTOMIZING YOUR PHONEVoice MailAdjust the voicemail alert volume:1.Press [Menu], then press "Settings". Press "Sounds", then press “Volume".2.Press “Advanced”, then press “Voice Mail”.3.Highlight "Use ringtone" or "Separate" and press to select. If Separate is selected,press to highlight the volume level. Press / to adjust the volume level.4.Press Done] to save the setting.5.Press [Help].This setting controls the volume of new text message alerts.• Use ringer vol.: Plays the text message alerts at the same volume as the voice ringtone and allowsthe side volume keys to change the text message alert volume at the same time asthe voice ringtone.• Separate vol.: Plays the text message alerts at the selected volume level. Alerts will always play atthis level unless the ringtone volume is set to “Silence all” or “Vibrate”.• Always vibrate: Selecting this causes the application to add vibration to any sound. Only works with“Separate”.This setting controls the volume of new voicemail alerts.• Use ringtone vol.: Plays the voicemail alerts at the same volume as the voice ringtone and allowsthe side volume keys to change the voicemail alert volume at the same time asthe voice ringtone.• Use separate vol.: Plays the voicemail alerts at the selected volume level. Alerts will always play atthis level unless the ringtone volume is set to “Silence all” or “Vibrate”.• Use vibrate: Selecting this causes the application to add vibration to any sound. Only works with“Separate”.](https://usermanual.wiki/UTStarcom-Korea-Technologies/PCS1450/User-Guide-766337-Page-79.png)
![CUSTOMIZING YOUR PHONE80AlarmsAdjust the alarms volume:1.Press [Menu], then press "Settings". Press "Sounds", then press “Volume".2.Press “Advanced”, then press “Alarms”.3.Highlight "Use ringtone" or "Separate" and press to select. If Separate is selected,press to highlight the volume level. Press / to adjust the volume level.4.Press Done] to save the setting.5.Press [Help].This setting controls the volume of new voicemail alerts.• Use ringtone vol.: Plays the voicemail alerts at the same volume as the voice ringtone and allowsthe side volume keys to change the voicemail alert volume at the same time asthe voice ringtone.• Use separate vol.: Plays the voicemail alerts at the selected volume level. Alerts will always play atthis level unless the ringtone volume is set to “Silence all” or “Vibrate”.• Use vibrate: Selecting this causes the application to add vibration to any sound. Only works with“Separate”.](https://usermanual.wiki/UTStarcom-Korea-Technologies/PCS1450/User-Guide-766337-Page-80.png)
![81CUSTOMIZING YOUR PHONEApplicationsAdjust the Applications volume:1.Press [Menu], then press "Settings". Press "Sounds", then press “Volume".2.Press “Advanced”, then press “Applications”.3.Highlight "Use ringtone" or "Separate" and press to select. If Separate is selected,press to highlight the volume level. Press / to adjust the volume level.4.Press Done] to save the setting.5.Press [Help].This setting controls the volume of new voicemail alerts.• Use ringtone vol.: Plays the voicemail alerts at the same volume as the voice ringtone and allowsthe side volume keys to change the voicemail alert volume at the same time asthe voice ringtone.• Use separate vol.: Plays the voicemail alerts at the selected volume level. Alerts will always play atthis level unless the ringtone volume is set to “Silence all” or “Vibrate”.• Use vibrate: Selecting this causes the application to add vibration to any sound. Only works with“Separate”.](https://usermanual.wiki/UTStarcom-Korea-Technologies/PCS1450/User-Guide-766337-Page-81.png)
![CUSTOMIZING YOUR PHONE82Power On/OffAdjust the Power On/Off volume:1.Press [Menu], then press "Settings". Press "Sounds", then press “Volume".2.Press “Advanced”, then press “Power On/Off”.3.Highlight "Use ringtone" or "Separate" and press to select. If Separate is selected,press to highlight the volume level. Press / to adjust the volume level. 4.Press Done] to save the setting.5.Press [Help].This setting controls the volume of new voicemail alerts.• Use ringtone vol.: Plays the voicemail alerts at the same volume as the voice ringtone and allowsthe side volume keys to change the voicemail alert volume at the same time asthe voice ringtone.• Use separate vol.: Plays the voicemail alerts at the selected volume level. Alerts will always play atthis level unless the ringtone volume is set to “Silence all” or “Vibrate”.• Use vibrate: Selecting this causes the application to add vibration to any sound. Only works with“Separate”.](https://usermanual.wiki/UTStarcom-Korea-Technologies/PCS1450/User-Guide-766337-Page-82.png)
![83CUSTOMIZING YOUR PHONEALERT SOUNDSThis feature allows you to set additional phone alerts.Minute BeepThis alert notifies you every minute that you have been on a call.1.Press [Menu], then press "Settings". Press "Sounds", then press "Alert sounds".2.Press "Minute Beep".3.Highlight “On” or “Off” then press or press [Done] to save the setting.Connect ToneThis alert notifies you that a call has been successfully placed.1.Press [Menu], then press "Settings". Press "Sounds", then press "Alert sounds".2.Press "Connect Tone".3.Highlight “On” or “Off” then press or press [Done] to save the setting.Service Tone1.Press [Menu], then press "Settings". Press "Sounds", then press "Alert sounds".2.Press "Service Tone".3.Highlight “On” or “Off” then press or press [Done] to save the setting.](https://usermanual.wiki/UTStarcom-Korea-Technologies/PCS1450/User-Guide-766337-Page-83.png)
![CUSTOMIZING YOUR PHONE84Fade Tone1.Press [Menu], then press "Settings". Press "Sounds", then press "Alert sounds".2.Press "Fade Tone".3.Highlight “On” or “Off” then press or press [Done] to save the setting.TONE LENGTHAdjust key pad tone length.1.Press [Menu], then press "Settings". Press "Sounds", then press "Tone length".2.Highlight “Normal” or “Long”. Press or press [Done] to save the setting.](https://usermanual.wiki/UTStarcom-Korea-Technologies/PCS1450/User-Guide-766337-Page-84.png)
![85CUSTOMIZING YOUR PHONEDISPLAY SETTINGSThis set of features allows you to customize your display.SCREENSAVERSSelect an image for your idle display.Image1.Press [Menu], then press "Settings". Press "Display Settings", then press "Screensavers".2.Press "Image".3.Press / to scroll through the images.4.Press or press [Select] to save the image as your wallpaper.Decoration1.Press [Menu], then press "Settings". Press "Display Settings", then press "Screensavers".2.Press "Decoration".4.Press or press [Select] to save the setting.Clock types:• Analog: Shows time in a standard clock format.• Digital: Shows date and time in written format.• Calendar: Shows the current month's calendar.• Dual time: Shows Digital at top of display and selected city with its Digital date and time at bottomof display. Press [City] to select a city.](https://usermanual.wiki/UTStarcom-Korea-Technologies/PCS1450/User-Guide-766337-Page-85.png)
![CUSTOMIZING YOUR PHONE86BACKLIGHTTurn on the backlight on the display and keypad for easy viewing in dark places.Main Display1.Press [Menu], then press "Settings". Press "Display Settings", then press "Backlight".2.Press "Main Display".3.Highlight one of the following options by pressing / .4.Press then press [Close] to save the setting. Keypad1.Press [Menu], then press "Settings". Press "Display Settings", then press "Backlight".2.Press "Keypad".3.Highlight one of the following options by pressing / .4.Press then press [Close] to save the setting. • 10 seconds, 20 seconds, 30 seconds, Flip Open, Always Dim.• 10 seconds, 20 seconds, 30 seconds, Flip Open, Always Off.](https://usermanual.wiki/UTStarcom-Korea-Technologies/PCS1450/User-Guide-766337-Page-86.png)
![87CUSTOMIZING YOUR PHONEGREETINGThe greeting is your personal label for your phone. It appears on the main screen along the bottomof the display.1.Press [Menu], then press "Settings". Press "Display Settings", then press "Greeting".2.The current greeting text is displayed. Press to delete the greeting, then enter your newgreeting. Press [Options] to change the input mode.3.Press or press [Done] to save the greeting.INCOMMING CALLSSelect an image for incomming calls.1.Press [Menu], then press "Settings". Press "Display Settings", then press "Incomming Calls".2.Press / to scroll through the images.3.Press or press [Select] to save the image as your wallpaper.CONTRASTAdjust the display contrast:1.Press [Menu], then press "Settings". Press "Display Settings", then press "Contrast".2.To adjust the display contrast, press / . Press or press [Done] to save thesetting.](https://usermanual.wiki/UTStarcom-Korea-Technologies/PCS1450/User-Guide-766337-Page-87.png)
![CUSTOMIZING YOUR PHONE88MENU STYLESelect how the phone menu will display.1.Press [Menu], then press "Settings". Press "Display Settings", then press "Menu style".2.Highlight “Graphic” or “List” then press to select it.MESSAGINGThis feature enables you to manage your text message settings.SOUND1.Press [Menu], then press "Settings". Press "Messaging".2.Press "Sound".3.Highlight "Beep", "Msg Tone", "Vibrate", "Silent", "Ring & Remind", or “Vibrate & Remind”,then press or press [Done] to save the setting. REMINDER1.Press [Menu], then press "Settings". Press "Messaging".2.Press "Reminder".3.Highlight "Beep", "Msg Tone", "Vibrate", "Silent", "Ring & Remind", or “Vibrate & Remind”,then press or press [Done] to save the setting.](https://usermanual.wiki/UTStarcom-Korea-Technologies/PCS1450/User-Guide-766337-Page-88.png)
![89CUSTOMIZING YOUR PHONEAUTO TEXTTo edit the Auto Text message you have saved.1.Press [Menu], then press "Settings". Press "Messaging".2.Press "Auto Text".3.Highlight a message from the list. To add a new Quick Text message, press [Options],then press "Add New". To edit the Quick Text message you have selected, press .Press to delete any characters you don't want then enter your text. Press [Done]to save the text and return to the Auto Text list.4.From the Auto Text list, press [Options] to select one of the following:TEXT ENTRY1.Press [Menu], then press "Settings". Press "Messaging".2.Press "Text Entry".3.Highlight "T9 Word" or "Alphabet" then press or press [Select] to save the setting.GROUP1.Press [Menu], then press "Settings". Press "Messaging".2.Press "Group".• Add new• Send To• Erase• Erase all](https://usermanual.wiki/UTStarcom-Korea-Technologies/PCS1450/User-Guide-766337-Page-89.png)
![CUSTOMIZING YOUR PHONE90SIGNATURECreate a signature that can be automatically inserted at the end of a text message.1.Press [Menu], then press "Settings". Press "Messaging".2.Press "Signature".3.Highlight "On" or "Off" then press or press [Close] to save the setting.SAVE TO SENT FOLDER1.Press [Menu], then press "Settings". Press "Messaging".2.Press "Save To Sent Folder".3.Highlight "On" or "Off" then press or press [Close] to save the setting.AUTO ERASEAutomatically erases messages when new messages arrived.1.Press [Menu], then press "Settings". Press "Messaging".2.Press "Auto Erase".3.Highlight "On" or "Off" then press or press [Close] to save the setting.• On: All sent messages saved in the Sent box.• Off: All sent messages not saved in the Sent box.• On: Oldest message erased automatically when message is full.• Off: Oldest message not erased automatically when message is full.](https://usermanual.wiki/UTStarcom-Korea-Technologies/PCS1450/User-Guide-766337-Page-90.png)
![91CUSTOMIZING YOUR PHONENOTIFICATION1.Press [Menu], then press "Settings". Press "Messaging".2.Press "Notification".3.Highlight “Icon & Message” or “Icon Only” then press or press [Close] to save thesetting.CALLBACK NUMBERAllows you to input a specific call back number. Call back numbers are used in text messaging so the other party knows how to get back to you.1.Press [Menu], then press "Settings". Press "Messaging".2.Press "Callback Number".3.Highlight one of the following options then press or press [Close] to save thesetting.• My Number: Your phone's number will be sent.• Other Number: Input another phone number to be sent.• None: No callback number will be sent.](https://usermanual.wiki/UTStarcom-Korea-Technologies/PCS1450/User-Guide-766337-Page-91.png)
![CUSTOMIZING YOUR PHONE92BLUETOOTHMY DEVICE1.Press [Menu], then press "Settings". Press "Bluetooth".2.Press "My Device".SETTING1.Press [Menu], then press "Settings". Press "Bluetooth".2.Press "Setting".3.Press [Save] to save the settings.Press [Options] to choose from:• Add New:Searching the all bluetooth device, which is in possible range.• Assign Short Name• Device Information: Shows a information about bluetooth function.• Erase: To erase selected bluetooth device.• Erase All: To erase all bluetooth device.• Set Bluetooth: Select “On” or “Off” the bluetooth function.• Handset’s Visibi:Select “Hidden” or “Shown to all”.• Handset’s Name:Can edit the device name.](https://usermanual.wiki/UTStarcom-Korea-Technologies/PCS1450/User-Guide-766337-Page-92.png)
![93CUSTOMIZING YOUR PHONESUPPORT SERVICE1.Press [Menu], then press "Settings". Press "Bluetooth".2.Press "Support Service".SECURITYUse these settings to prevent unauthorized use of your phone. LOCK PHONETurn on the lock to prevent the phone from being used without entering the password first.1.Press [Menu], then press "Settings". Press "Security". Enter your password.2.Press "Lock Phone".3.Highlight “Unlock”, “Lock Now”, or “Power” then Press then press [Close] tosave the setting.• Hand Free Service: This is used to allow car hands-free kits to communicate with mobile phones in thecar. In the car, the stereo is used for the phone audio and a microphone is installedin the car for sending outgoing audio.• Headset Serivce:This is providing support for the popular bluetooth headsets to be used with mobilephones. When connected and configured, the headset can act as the remote device aaudio input and output interface.• The default password is the last 4 digits of your phone number.](https://usermanual.wiki/UTStarcom-Korea-Technologies/PCS1450/User-Guide-766337-Page-93.png)
![CUSTOMIZING YOUR PHONE94CHANGE LOCK CODEYou can change the 4-digit password to lock and unlock your phone.1.Press [Menu], then press "Settings". Press "Security". Enter your password.2.Press "Change Lock Code".3.Enter your lock code then enter your new lock code. Enter your new lock code again.SPECIAL #’sThis features allows you to set 3 phone numbers that can be called even when the phone is locked.1.Press [Menu], then press "Settings". Press "Security". Enter your password.2.Press "Special #’s".3.Select a location and press [Add].4.Enter the phone number and press or press [Done] to save it to that location.• The default password is the last 4 digits of your phone number.• The default password is the last 4 digits of your phone number.•IMPORTANT: Be sure to write down your lock code if you change it. Virgin Mobile cannot unlockyour phone for you if you forget your password.](https://usermanual.wiki/UTStarcom-Korea-Technologies/PCS1450/User-Guide-766337-Page-94.png)
![95CUSTOMIZING YOUR PHONELIMIT USEIncoming Calls1.Press [Menu], then press "Settings". Press "Security". Enter your password.2.Press "Limit Use". Press "Incoming Calls".3.Select “Allow” or “Restricted”.4.Press then press [Close] to save the settings.Outgoing Calls1.Press [Menu], then press "Settings". Press "Security". Enter your password.2.Press "Limit Use". Press "Outgoing Calls".3.Select “Allow” or “Restricted”.4.Press then press [Close] to save the settings.• The default password is the last 4 digits of your phone number.• The default password is the last 4 digits of your phone number.](https://usermanual.wiki/UTStarcom-Korea-Technologies/PCS1450/User-Guide-766337-Page-95.png)
![ERASE DATAErase all data in your phone.1.Press [Menu], then press "Settings". Press "Security". Enter your password.2.Press "Erase Data". Select “ Erase Contacts”, “Erase My Contents”, “ Erase VoiceMemo”, “Erase Pictures”, and “Erase Message”.3.A warning message stating that this function will delete all contacts in your contact list isdisplayed.4.Select "Yes" then press to erase data in your phone.RESET BROWSER1.Press [Menu], then press "Settings". Press "Security". Enter your password.2.Press "Reset Browser".3.Select "Yes" then press to erase data in your phone.CUSTOMIZING YOUR PHONE96• The default password is the last 4 digits of your phone number.• The default password is the last 4 digits of your phone number.](https://usermanual.wiki/UTStarcom-Korea-Technologies/PCS1450/User-Guide-766337-Page-96.png)
![97CUSTOMIZING YOUR PHONEDEFAULT SETTINGS1.Press [Menu], then press "Settings". Press "Security". Enter your password.2.Press "Default Settings".3.A warning message stating that this function will delete all contacts in your contact list isdisplayed.4.Select "Yes" then press to erase data in your phone.RESET PHONE1.Press [Menu], then press "Settings". Press "Security". Enter your password.2.Press "Reset Phone".3.A warning message stating that this function will delete all contacts in your contact list isdisplayed.4.Select "Yes" then press to erase data in your phone.• The default password is the last 4 digits of your phone number.• The default password is the last 4 digits of your phone number.](https://usermanual.wiki/UTStarcom-Korea-Technologies/PCS1450/User-Guide-766337-Page-97.png)
![CUSTOMIZING YOUR PHONE98LOCATIONYour telephone is equipped with a Location feature for use in connection with location-basedservices that may be available in the future. The Location Feature allows the network to detectyour position. Turning Location Off will hide your location from everyone except 911.1.Press [Menu], then press "Settings". Press "Location".2.Press [Next]. Highlight “On” or “Off”, then press then press [Close] toselect it.• Turning location on will allow the network to detect your position using GPS technology, makingsome Virgin Mobile applications and services easier to use. Turning location off will disable the GPSlocation function for all purposes except 911, but will not hide your general location based on the cellsite serving your call. No application or services may use your location without your expresspermission. GPS enhanced 911 is not available in all areas.• On: Turning location “On” lets the network detect your where abouts using GPS.• Off:Turning location "Off" disables GPS- except for 911- but cell tower technology may still used to detectyour whereabouts for some features and basic telephone service.](https://usermanual.wiki/UTStarcom-Korea-Technologies/PCS1450/User-Guide-766337-Page-98.png)
![99CUSTOMIZING YOUR PHONECALL SETTINGSCALL ANSWERThis feature allows you to select the answer mode.1.Press [Menu], then press "Settings".Press "Call Settings", then press "Call Answer".2.Highlight “Send key” or “Any Key”, then press then press [Close] to save thesetting.AUTO ANSWERThis features allows you to set the phone to answer automatically when you're using a hands-free headset.1.Press [Menu], then press "Settings".Press "Call Settings", then press "Auto Answer".2.Highlight “Off”, “5 sec”, “10 sec”, or “15 sec” then press then press [Close] tosave the setting.• Send key: Press only to answer a call.• Any key:Press any key to answer an incoming call except , , , and .](https://usermanual.wiki/UTStarcom-Korea-Technologies/PCS1450/User-Guide-766337-Page-99.png)
![CUSTOMIZING YOUR PHONE100OTHERABBREV. DIALThis function allows you to dial just the last 4 digits of phone number, instead of all the digits. Ifyou have several phones numbers that start with the same digits, you can enter the beginningnumbers here so when you dial the phone, all you enter is the last 4 digits.1.Press [Menu], then press "Settings".Press "Others", then press "Abbrev. Dial".2.Select “Disable” or “Enable”, then press [Close] to save the setting.3.If Enable is selected, a blank screen will appear. Enter the digits that are common to severalphone numbers you dial and press .• You have 5 numbers you dial often that all begin with (516) 123. In the blank screen that appears when you select"Enable", type in 516123.• When you need to dial (516) 123-6652, simply press 6652 . Your phone will show it is dialing (516) 123-6652.](https://usermanual.wiki/UTStarcom-Korea-Technologies/PCS1450/User-Guide-766337-Page-100.png)
![101CUSTOMIZING YOUR PHONECONTACTS MATCHThis function will match your abbreviated dialed number with an entry from your phone's contactlist. So when you dial the 4 digits, your phone will show the name of the contact you are dialing aswell as the phone number.1.Press [Menu], then press "Settings".Press "Others", then press "Contacts Match".2.Select “Disable” or “Enable”, then press [Close] to save the setting.ANSWER MODETo select an answer mode:1.Press [Menu], then press "Settings".Press "Others", then press "Answer Mode".2.Select one of the following options:3.Press [Close] to save the setting.• Talk Key: Answers an incoming call by pressing only.• Any Key: Answers an incoming call by pressing any key except , or .• Folder Open: Answers an incoming calls by simply opening the phone.](https://usermanual.wiki/UTStarcom-Korea-Technologies/PCS1450/User-Guide-766337-Page-101.png)
![CUSTOMIZING YOUR PHONE102AUTO ANSWER1.Press [Menu], then press "Settings".Press "Others", then press "Contacts Match".2.Select “On” or “Off”, then press [Close] to save the setting.LANGUAGE1.Press [Menu], then press "Settings".Press "Others", then press "Language".2.Select “English” or “Spanish”, then press [Close] to save the setting.AIRPLANE MODEAllows you to turn off the wireless connectivity of your phone (for airline travel and other areaswhere posted). You can still use non-network functions, like calendar or games.1.Press [Menu], then press "Settings".Press "Others", then press "Airplane Mode".2.Select “On”, “Off” or “Power Up”, then press [Close] to save the setting.HEADSET ONLY1.Press [Menu], then press "Settings".Press "Others", then press "Airplane Mode".2.Select “Normal” or “Discreet”, then press [Close] to save the setting.](https://usermanual.wiki/UTStarcom-Korea-Technologies/PCS1450/User-Guide-766337-Page-102.png)
![USING TOOLS104VOICEVOICE MEMOVoice Memo allows you to record a reminder message that can be up to 60 seconds. To record amemo:1.Press [Menu], then press "Tools".Press "Voice". Press "Voice Memo ".2.To record a voice memo, select press [Record].3.To stop recording a voice memo, press [Stop]. Stopping the recording will automaticallysave the entry. The list is sorted by dates of the voice memo list.4.To play voice memo, select the voice tag you want to play then press [Play]. To eraseone or all voice memos, press [Options] to select one of the following options:VOICE COMMANDTo activate voice recognition:1.Press [Menu], then press "Tools".Press "Voice". Press "Voice Command ".2.When prompted,say one of the following commands:• Erase• Erase All](https://usermanual.wiki/UTStarcom-Korea-Technologies/PCS1450/User-Guide-766337-Page-104.png)
![105USING TOOLS3.Press [Set].4.To return to the previous page,press .• Call• Digit Dial• Voicemail• Choice List: “Automatic,” “On” or “Off”.• Train Voice: “Train Words” or “Train Digits” (Train your phone to recognize words or numbers.).• Prompts: “Mode (“Prompts” or “Tones Only ”)” or “Timeout (“5 sec.” or “10 sec.”).”• Call Alert: “Ring Only,” “Name + Ring” and “Name Repeat.”• When it recognizes one of these commands,the phone launches the associated application. You may beasked to repeat a command if the command is not recognized by voice recognition.Tip](https://usermanual.wiki/UTStarcom-Korea-Technologies/PCS1450/User-Guide-766337-Page-105.png)
![USING TOOLS106CALCULATORYour phone comes with two calculators: a standard calculator and a tip calculator.1.Press [Menu], then press "Tools".Press "Calculator". 2.Enter numbers using your keypad, and use the following keys to enter mathematical functions:3.Press to calculate the result.For example, to calculate 5x2, enter 5, press , enter 2, then press to calculate theresult of 10.ALARM CLOCK1.Press [Menu], then press "Tools".Press "Alarm Clock". 2.Select Alarm 1, 2 or 3 to set a new alarm. To edit an existing alarm, select the alarm name.Press [Set].3.The setting field will be highlighted. Press to select alarm options.• Press for Multiplication (x). Press for Division (÷). Press for Subtraction (-).• Press for Addition (+). Press for a decimal point. Press [AC] to clear all numbers.• Press to change a number from positive (+) to negative (-).](https://usermanual.wiki/UTStarcom-Korea-Technologies/PCS1450/User-Guide-766337-Page-106.png)
![107USING TOOLS4.To save an alarm setting press [Save].SCHEDULERADD NEW EVENT1.Press [Menu], then press "Tools". Press "Scheduler". 2.Press to choose a date in the calendar.Press [Add] to add an event to the calendar.3.The Schedule screen will be displayed. When the Title field is highlighted, enter the event title.Then press [Save]. Press to move to the next fields. In the From field and To field,edit the date and time by pressing / to the number and press the digit key you want.Press for “AM” or “PM”.In the Contents field, enter any notes or message for the event, then press [Done] to goback to the Scheduler screen. In the Notice field, press / to select On Time, Before 10min, Before 20min, Before 30min. In the Snooze field, press / to select 5Min, 10Min,15Min, or 20Min. In the Ring Type field, press or press [Change] to get the list ofringtones. Highlight the ringtone you want and press [Select].4.Press or press [Save] to save the event or to return to the calendar.5.The date of the event will be marked on your calendar.• Set: Press / to select alarm on or off.• Time: Use the keypad to set a time for the alarm and to select “AM” or “PM”.• Repeat: Press / to select Daily/Once/Mon to Fri/Sat to Sun. • Snooze: Press / to select 5Min/10Min/15Min/20Min.• Ring type: Press [Change] to select a ringtone for the alarm sound.](https://usermanual.wiki/UTStarcom-Korea-Technologies/PCS1450/User-Guide-766337-Page-107.png)
![USING TOOLS108MEMO PAD1.Press [Menu], then press "Tools".Press "Memo Pad". 2.To input a memo, select press [Add].3.Press [Save] to save the memo.STOPWATCHYou can simultaneously time up to 10 different events.1.Press [Menu], then press "Tools".Press "Stopwatch".2.To measure a time period:• To start, press [Start].• To stop the timing, press [Stop]. To continue timing, press [Cont.].• Press [Check] to save the time at one instance. You can show up to 10 times.• To reset it, press [Reset].](https://usermanual.wiki/UTStarcom-Korea-Technologies/PCS1450/User-Guide-766337-Page-108.png)
![109USING TOOLSWORLD TIME1.Press [Menu], then press "Tools".Press "World Time".2.Press / to scroll through the different cities.3.Press [Options] to select “World time” options:4.To return to the previous page and save current view city’s time information, press orpress [Close] to save the setting.• Set /Unset DST: Specifies whether the current time of the selected place is adjusted to daylightsaving time.• Set Dual Time: To set dual time.](https://usermanual.wiki/UTStarcom-Korea-Technologies/PCS1450/User-Guide-766337-Page-109.png)