UTStarcom Korea Technologies UTS-702U Portable PCS Phone User Manual CERTIFICATE OF COMPLIANCE
UTStarcom Korea Technologies Ltd. Portable PCS Phone CERTIFICATE OF COMPLIANCE
Manual revised

Rhein Tech Laboratories Client: UTStarcom
360 Herndon Parkway Model: UTS702U
Suite 1400 FCC ID: O6YUTS-702U
FCC: Part 24 Herndon, VA 20170
http://www.rheintech.com
Page 38 of 58
APPENDIX H: MANUAL
Please see the following pages.
Document No. 2XX 702 100
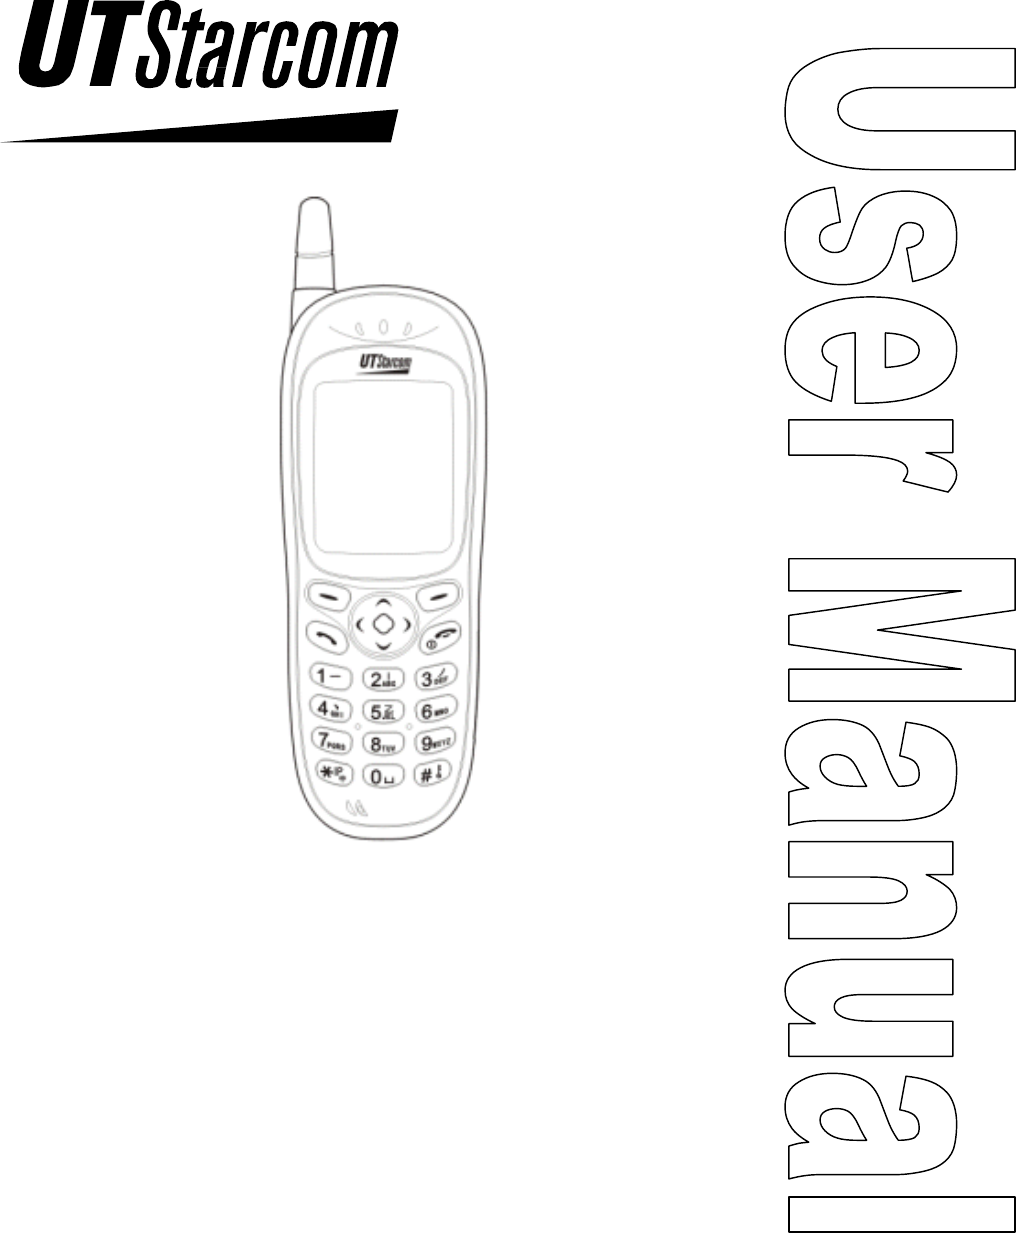
UTS 702 U
User Manual
Issue 1.0

ii Table of Contents 702 U User Manual
Trademark Statement: “‘UTStarcom,’ ‘AN2000,’ and the UTStarcom logo are trademarks of
UTStarcom, Inc.”
Copyright Statement: “UTStarcom, Inc. 2000. All rights reserved. No part of this publication
may be reproduced in any form or by any means without the prior written permission of
UTStarcom, Inc.”
Warranty Language: “The contents of this manual, whether in whole or in part, do not constitute
any express or implied warranty with respect to any products of UTStarcom, Inc., or it
subsidiaries.”

702 U User Manual Table of Contents iii
Safety Precautions
Introduction
Thank you for purchasing your new UTS 702 U phone.
Please read this instruction manual thoroughly.
The display screens, illustrations, etc., used in this document are created for
instructional purposes and can differ slightly with the actual phone.
How to Use This Instruction Manual
1. Before using your phone
Includes facts you should know before using your new phone.
2. Basic phone operation
3. Explains the basic operation of making and receiving calls. More Essential function
Explains useful convenience functions.
4. Reference
Explains phone maintenance and troubleshooting procedures.
Conventions with the manual:
“press” means to press a key and then release;
“press and hold down” means to press a key for 2 sec or more and then release.
“service area” refers to a service coverage area where a handset can receive signals
effectively.
iv Table of Contents 702 U User Manual
Explanation of Symbols
Before using your phone, please read the “Safety Precautions” thoroughly.
The cautions included here are provided to prevent danger to persons and property.
The following explain the degree of danger and damage that could occur if these safety
precautions are not observed.
This symbol indicates that erroneous operations may directly
result in serious personal injury or death.
This symbol indicates that erroneous operations may result in
the possibility of serious injury or death.
This symbol indicates that erroneous operations may result in
the possibility of injury or physical damage.
Explanations of other symbols used in the manual:
Prohibited This symbol indicates a prohibited action.
Compulsory This symbol indicates an action that must always be performed.
Disassembly
Prohibited
This symbol indicates that disassembly is prohibited.
Remove Power Plug
This symbol indicates that the power cord must be removed
from the outlet.
702 U User Manual Table of Contents v
Handling the Phone, Battery, and Charger
Use only the battery and charger approved for the UTS702U phone. The use
of any other types can result in damage to the phone, electric shock or the
risk of fire.
Compulsory
Do not store the phone or charger in hot, wet, or dusty areas. High
temperatures, humidity and dust can damage electrical and mechanical
components. This can cause the phone or charger to malfunction.
Prohibited
Keep the phone, battery and the charger dry. Exposure to precipitation,
humidity and liquids can damage electronic components and circuit boards.
Prohibited
Do not drop, shake or throw the phone or charger. Rough handling can break
internal circuit boards and damage the battery pack.
Prohibited
Do not use a microwave oven or any other type of heating equipment to dry
the phone, battery pack or charger. High temperature can shorten the life of
electronic devices, damage the battery pack, and warp or melt plastic parts.
Prohibited
Do not use the phone in the vicinity of volatile gases. Leave the area before
using the phone. Failure to leave the area can result in the risk of fire or an
explosion.
Prohibited
Do not disassemble or modify the phone or charger. Incorrect modifications
or reassembly can cause malfunctions or personal injury when the phone or
charger is used.
Disassembly
Prohibited
vi Table of Contents 702 U User Manual
Handling the Phone
Do not use the phone while driving. Park the vehicle before using the phone.
Traffic safety first.
Prohibited
Observe any special regulations in effect in any area (hospital, aircraft, etc)
when you have to use the phone. Always disconnect the charger and remove
the battery of your phone whenever it is forbidden to use it, or when it may
cause interference or danger.
Compulsory
Do not use the phone near electronic equipment prone to interference. .
Radio frequency interference may result in malfunction of the electronic
equipment.
The following electronic equipment can be effected:
Hearing aids, pacemakers and other clinical electronic devices, fire detectors,
automatic doors and other automatically controlled devices.
If you have to use phone near electronic medical devices such as
pacemakers, please consult device manufacturer or local dealers.
Prohibited
In rare cases, using the phone inside certain models of vehicles can adversely
affect the electronic equipment inside the vehicle. Do not use the phone in
such cases, because it is dangerous for personal security.
Prohibited
Keep all storage media (magnetic cards, floppy disks, credit cards, etc.,)
away from the phone. Close encounters or contact can erase or damage the
storage media.
Prohibited
Keep all sharp metal objects (Pins, Nails, Hairpins etc.) away from the
handset of the phone. The earpiece of the handset contains a strong magnet
that can attract and hold metal objects. Remove any objects from the handset
earpiece before using to avoid personal injury.
Prohibited
702 U User Manual Table of Contents vii
Handling the Battery
Do not dispose of the battery pack in a fire. They may explode. Check with
local waste management codes for disposal instructions.
Prohibited
Do not force the battery pack into the phone. Improper installation can cause
malfunctions or damage the battery pack. This may result in the risk of fire
or personal injury.
Prohibited
Use caution in handling batteries in order not to short the battery to
conductive materials such as rings, bracelets, and keys. The battery and/or
conductor may overheat and cause burns.
Prohibited
Do not solder the battery terminals together. This may result in a cracked or
leaking battery pack or the risk of fire.
Prohibited
Do not open or mutilate the battery pack. Battery acid is corrosive and may
cause burns or injury to eyes. If battery acid gets into the eyes, DO NOT
RUB.
Immediately flush the eyes with clean water and call a physician.
Compulsory
Do not leave or store the battery pack in hot areas (Near fire, a heater, etc).
High temperature can damage and shorten the life of the battery pack. This
may result in a cracked or leaking battery pack or the risk of fire.
Prohibited
Do not use a discolored, deformed or damaged battery pack in the phone.
This may result in personal injury or the risk of fire.
Disassembly
Prohibited
Do not open or mutilate the battery pack. Battery acid is corrosive and may
cause burns or injury to skin or clothing. If battery acid is spilled,
immediately flush the area with clean water to prevent injury.
Compulsory
Do not use a cracked, leaking or odor emitting battery pack near an open
flame.
Compulsory
Do not leave or store the phone in areas where temperatures are more than 45
°C for a long period of time. High temperature can shorten the life of
electronic devices, damage the battery pack, and warp or melt plastic parts.
Prohibited
The battery cord is color-coded, the red line is positive (anode), the black
line is negative (cathode) and the yellow line is a sensor output.
Compulsory
viii Table of Contents 702 U User Manual
Handling the Charger
Use only a power source that provides the appropriate voltage
(AC220V±10% or AC110V±10%) for the charger. An unsuitable power
source can result in damaging the charger, electric shock or the risk of fire.
Compulsory
Do not short circuit the charger connector jack. This may result in the risk of
fire or electric shock.
Prohibited
Do not use the charger if the power supply cord or plug is damaged or frayed
(exposed or broken wires, etc). This can result in the risk of fire or electric
shock
Prohibited
Unplug the charger from the outlet before cleaning. Do not use liquid or
aerosols cleaners. Use a damp cloth for cleaning to wipe off any accumulated
dust to prevent any chance of fire.
Compulsory
Never spill any liquid on the charger. This may result in the risk of fire or
electric shock.
Prohibited
Unplug the charger immediately from the wall outlet if liquid has been
spilled into the unit to prevent the risk of fire or electric shock.
Remove
Power Plug
Do not use the charger in areas with high humidity, such as bathrooms or the
like. This may result in malfunction, electric shock or the risk of fire.
Prohibited
Do not touch the charger power cord or wall outlet with wet hands. This may
result in the risk of fire or electric shock.
Prohibited
Always unplug the charger from the wall outlet before cleaning to avoid the
risk of electric shock.
Compulsory
Do not place objects on the power cord. Install the charger where no one can
step or trip on the power cord.
Prohibited
Always grip the power plug when removing charger from the wall outlet. Do
not pull on power supply cord to avoid damage and the risk of electric shock.
Compulsory
702 U User Manual Table of Contents ix
Phone Information
Avoid extremely high or low temperatures.
Always use the phone in an environment with a temperature range of 10°C~40°C and
humidity range of 45%~95%.
For maximum signal strength and noise free operation, use away from electrical
appliances such as TV, radio or personal computer.
Leaving the phone in hot or cold places such as a car will reduce the capacity and life
of the battery. A phone with a hot or cold battery may temporarily not work even
when the battery is fully charged.
Battery Information
Store the battery in a cool, well-ventilated area. Do not store in direct sunlight.
If left unused a fully charged battery will discharge itself over time. If a fully
discharge battery is stored for a long period of time, it may not be possible to recharge
the battery.
Do not discard old batteries with household trash. Where regulated, check with local
waste management codes for disposal instructions.
The Battery can be charged and discharged hundreds of times but it will eventually
wear out. When the operating time is shorter than normal it time to replace the
battery.
Warning Information for FCC RF Exposure Compliance
This PCS phone has been tested and complies with the Federal Communications
Commission (FCC) RF exposure limits for General Population/Uncontrolled exposure
environment. In addition, it complies with the following Standards and
Guidelines:
• FCC 96-326, Guidelines for Evaluating the Environmental Effects of Radio-
Frequency Radiation.
• FCC OET Bulletin 65 Edition 01-01 (2001) Supplement C, Evaluating Compliance
with FCC Guidelines for Human Exposure to Radio Frequency Electromagnetic
Fields.
• ANSI/IEEE C95.1-1992, IEEE Standard for Safety Levels with Respect to Human
Exposure to Radio Frequency Electromagnetic Fields, 3 kHz to 300 GHz.
• ANSI/IEEE C95.3-1992, IEEE Recommended Practice for the Measurement of
Potentially Hazardous Electromagnetic Fields - RF and Microwave.

x Table of Contents 702 U User Manual
BLANK PAGE

702 U User Manual Table of Contents xi
Table of Contents
1. BEFORE USING YOUR PHONE .................................................................................................................1-1
1.1 PACKAGE CONTENTS......................................................................................................................................1-1
1.2 PHONE SPEC ...................................................................................................................................................1-2
1.3 HANDSET DESCRIPTION..................................................................................................................................1-3
1.4 DISPLAY INDICATORS .....................................................................................................................................1-5
1.5 BATTERY INSTALLATION................................................................................................................................1-6
1.5.1 Battery Insertion ....................................................................................................................................1-6
1.5.2 Battery Replacement..............................................................................................................................1-8
1.6 BATTERY CHARGING......................................................................................................................................1-9
1.7 ATTACHING THE HAND STRAP .....................................................................................................................1-10
1.8 HOW TO NAVIGATE THE MENU: ...................................................................................................................1-11
1.9 MENU SUMMARY .........................................................................................................................................1-12
2. BASIC OPERATIONS....................................................................................................................................2-1
2.1 TURNING THE PHONE ON AND OFF.................................................................................................................2-1
2.1.1 Turning the Phone ON...........................................................................................................................2-1
2.1.2 Turning the Phone Off ...........................................................................................................................2-1
2.2 MAKING CALLS ..............................................................................................................................................2-1
2.2.1 Making IP Calls.....................................................................................................................................2-2
2.3 ANSWERING CALLS ........................................................................................................................................2-4
2.4 CALL LOGS.....................................................................................................................................................2-4
2.4.1 Missed Call Log.....................................................................................................................................2-4
2.4.2 Outgoing Call log ..................................................................................................................................2-7
2.4.3 Answered Call Log ..............................................................................................................................2-10
2.4.4 Delete Log............................................................................................................................................2-13
2.4.5 Duration...............................................................................................................................................2-14
2.4.6 Call Log Quick View............................................................................................................................2-15
2.5 ADJUSTING THE EARPIECE VOLUME.............................................................................................................2-15
2.6 KEYPAD LOCK..............................................................................................................................................2-16
3. ADDRESS BOOK............................................................................................................................................3-1
3.1 HOW TO ENTER LETTERS, CHARACTERS AND SYMBOLS USING THE KEYPAD ................................................3-1
3.1.1 Character Input Mode ...........................................................................................................................3-1
3.1.2 Upper Case/ Lower Case Mode.............................................................................................................3-2
3.1.3 Digit Mode.............................................................................................................................................3-2
3.1.4 Symbol Mode .........................................................................................................................................3-3
3.1.5 Simplified Chinese Mode .......................................................................................................................3-3
3.2 GROUP INFO ...................................................................................................................................................3-4
3.2.1 Assigning a Ringing Pattern to a Group Name .....................................................................................3-4
3.2.2 Modifying Group Member Information .................................................................................................3-5
3.2.3 Deleting a Group Member from the Address Book................................................................................3-6
3.3 STORING NAMES AND PHONE NUMBERS ........................................................................................................3-7
3.4 MAKING A CALL USING A STORED PHONE NUMBER ......................................................................................3-8
3.5 SPEED DIALING ............................................................................................................................................3-10
3.5.1 Assigning a Phone Number for Speed Dialing ....................................................................................3-10
3.5.2 Speed Dialing.......................................................................................................................................3-10
3.6 DELETING.....................................................................................................................................................3-12
3.6.1 Delete one by one from the Address Book ...........................................................................................3-12
3.6.2 Deleting the Address book ...................................................................................................................3-13
3.7 MODIFY ENTRY IN ADDRESS BOOK..............................................................................................................3-13
3.8 MEMORY ......................................................................................................................................................3-15

xii Table of Contents 702 U User Manual
4. OTHER ESSENTIAL FUNCTIONS .............................................................................................................4-1
4.1 PROFILES ........................................................................................................................................................4-1
4.1.1 Profile Option Descriptions:..................................................................................................................4-1
4.1.2 Enable a Profile.....................................................................................................................................4-2
4.1.3 Modify a Profile.....................................................................................................................................4-3
4.2 SMS ...............................................................................................................................................................4-5
4.2.1 How to Enter Letters, Characters and Symbols Using the Keypad .......................................................4-5
4.2.2 Character Input Mode ...........................................................................................................................4-6
4.2.3 Upper Case/ Lower Case Mode.............................................................................................................4-7
4.2.4 Digit Mode.............................................................................................................................................4-7
4.2.5 Symbol Mode .........................................................................................................................................4-7
4.2.6 Simplified Chinese Mode .......................................................................................................................4-8
4.2.7 Edit a Message.......................................................................................................................................4-8
4.2.8 Inbox ....................................................................................................................................................4-10
4.2.9 Outbox .................................................................................................................................................4-15
4.2.10 Drafts ...................................................................................................................................................4-17
4.2.11 Clear Messages....................................................................................................................................4-20
4.3 SETTINGS......................................................................................................................................................4-23
4.3.1 Own Number........................................................................................................................................4-23
4.3.2 Alarm ...................................................................................................................................................4-23
4.3.3 Date/Time ............................................................................................................................................4-25
4.3.4 Answer Mode .......................................................................................................................................4-26
4.3.5 Language .............................................................................................................................................4-27
4.3.6 IP Phone ..............................................................................................................................................4-28
4.3.7 Display.................................................................................................................................................4-29
4.3.8 Set Security ..........................................................................................................................................4-30
4.4 TOOLS ..........................................................................................................................................................4-34
4.4.1 Calculator............................................................................................................................................4-34
4.4.2 Calendar ..............................................................................................................................................4-35
4.4.3 My Picture ...........................................................................................................................................4-36
4.5 GAMES .........................................................................................................................................................4-37
4.5.1 Reversi .................................................................................................................................................4-37
4.5.2 EVsan...................................................................................................................................................4-37
4.5.3 Wacko ..................................................................................................................................................4-38
5. WIRELESS INTERNET ACCESS....................................................................................................................5-1
5.1 CONNECTING TO DATA COMMUNICATION PORT ............................................................................................5-1
5.2 DIALING TO INTERNET....................................................................................................................................5-2
6. MAINTENANCE & TROUBLESHOOTING ..................................................................................................6-1
6.1 PHONE MAINTENANCE .....................................................................................................................................6-1
6.2 TROUBLESHOOTING .........................................................................................................................................6-1
SAFETY PRECAUTIONS ......................................................................................................................................... III
INTRODUCTION............................................................................................................................................................. III
HOW TO USE THIS INSTRUCTION MANUAL .................................................................................................................. III
EXPLANATION OF SYMBOLS .........................................................................................................................................IV
HANDLING THE PHONE, BATTERY, AND CHARGER .......................................................................................................V
HANDLING THE PHONE .................................................................................................................................................VI
HANDLING THE BATTERY............................................................................................................................................VII
HANDLING THE CHARGER ..........................................................................................................................................VIII
PHONE INFORMATION...................................................................................................................................................IX
BATTERY INFORMATION...............................................................................................................................................IX
WARNING INFORMATION FOR FCC RF EXPOSURE COMPLIANCE.................................................................................IX
1
Before Usin
g
Your Phone
1. Before Using Your Phone
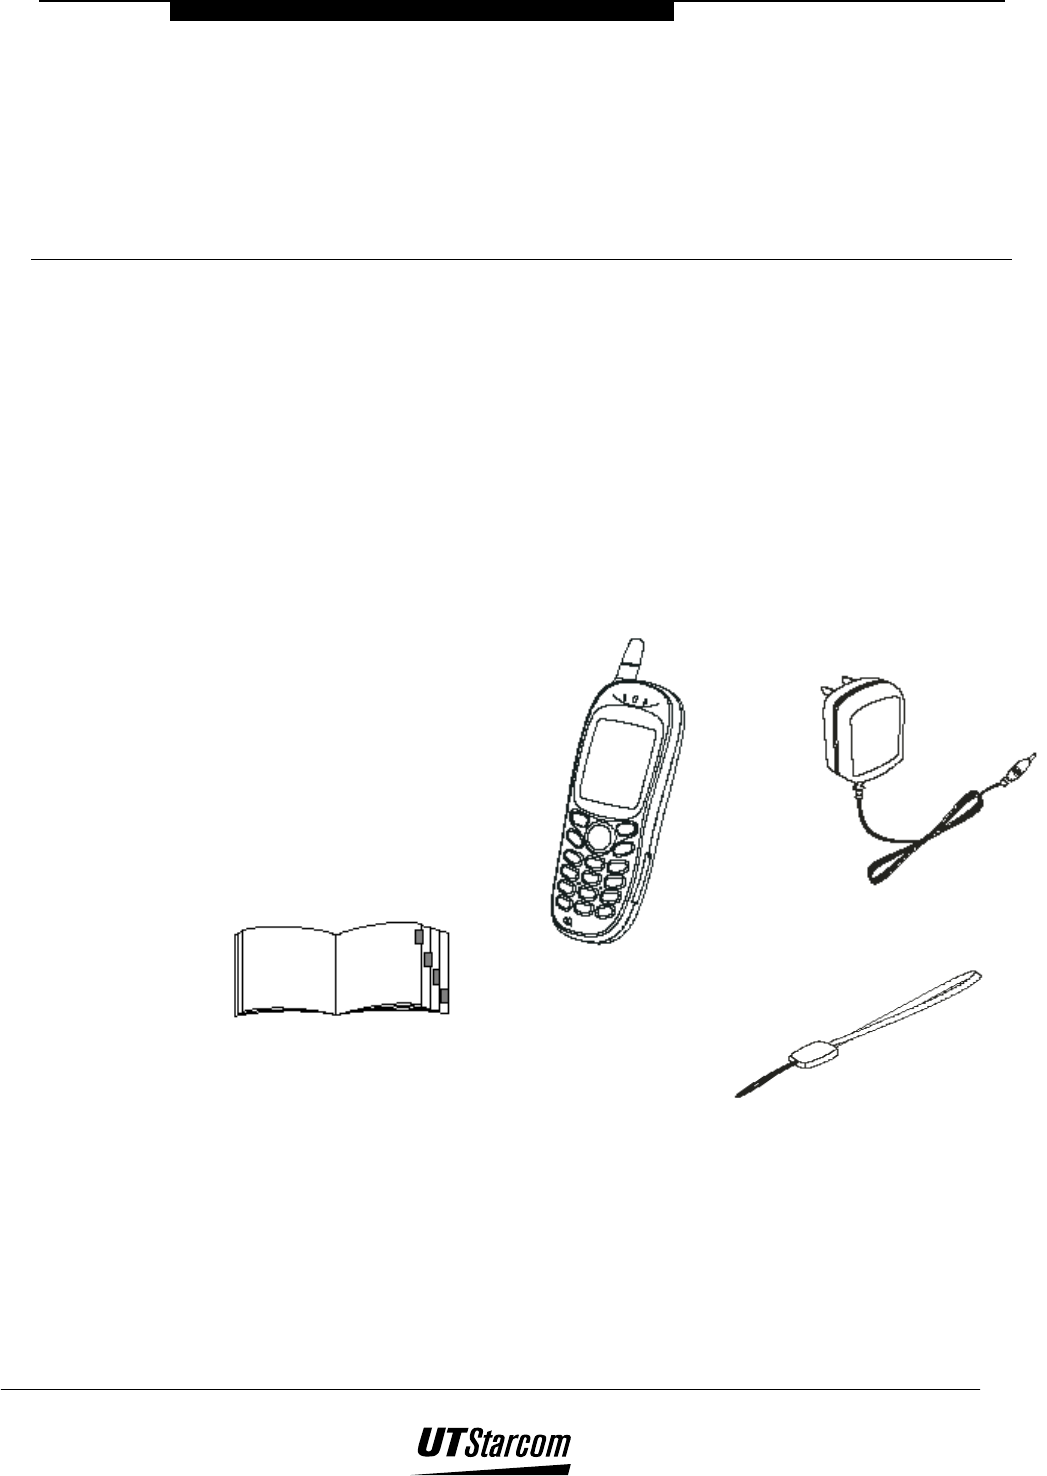
1.1 Package Contents
Please check the package contents by comparing them with the following
list. In case there are missing items or product defects, please contact your
local phone dealer.
Main Unit (UTS 702-U) and Ni-MH battery
Charger
Hand strap
Instruction
manual
After service
guide
Warranty Card

1-2 Before Using Your Phone 702-U User Manual
1.2 Phone Spec
Transmission power Approximately 10mW on average
Battery DC 3.6V Li-ion battery, at least 480mAh
Size 119×44 (excluding antenna) ×22mm (L×W×H)
Weight Approximately 83g (including battery pack)
Charger Input: AC 100-240V±10%, 50-60Hz
Output: DC 5.2V, 210mA
Weight: 50g
Charging time Approximately 2.5 hours
Continuous standby time 48~200 hours
Table 1-1: Phone Specification
(
((
( Note: The length of standby time the battery can supply power is determined by the
telephone usage. The following actions or situations can consume more power
and reduce the standby time.
Migration to areas where signal strength is weak.
Moving through the service area.
Talking on the phone for long periods of time.
Ringing volume is set to the maximum.
Earpiece volume is set to the maximum.
Leaving the phone in hot or cold places such as a car will reduce the
capacity and life of the battery. A phone with a hot or cold battery
may temporarily not work even when the battery is fully charged.
Repeated changing of phone parameters. (i.e. Adding or deleting
entries to/from the phonebook feature)
702-U User Manual Before Using Your Phone 1-3
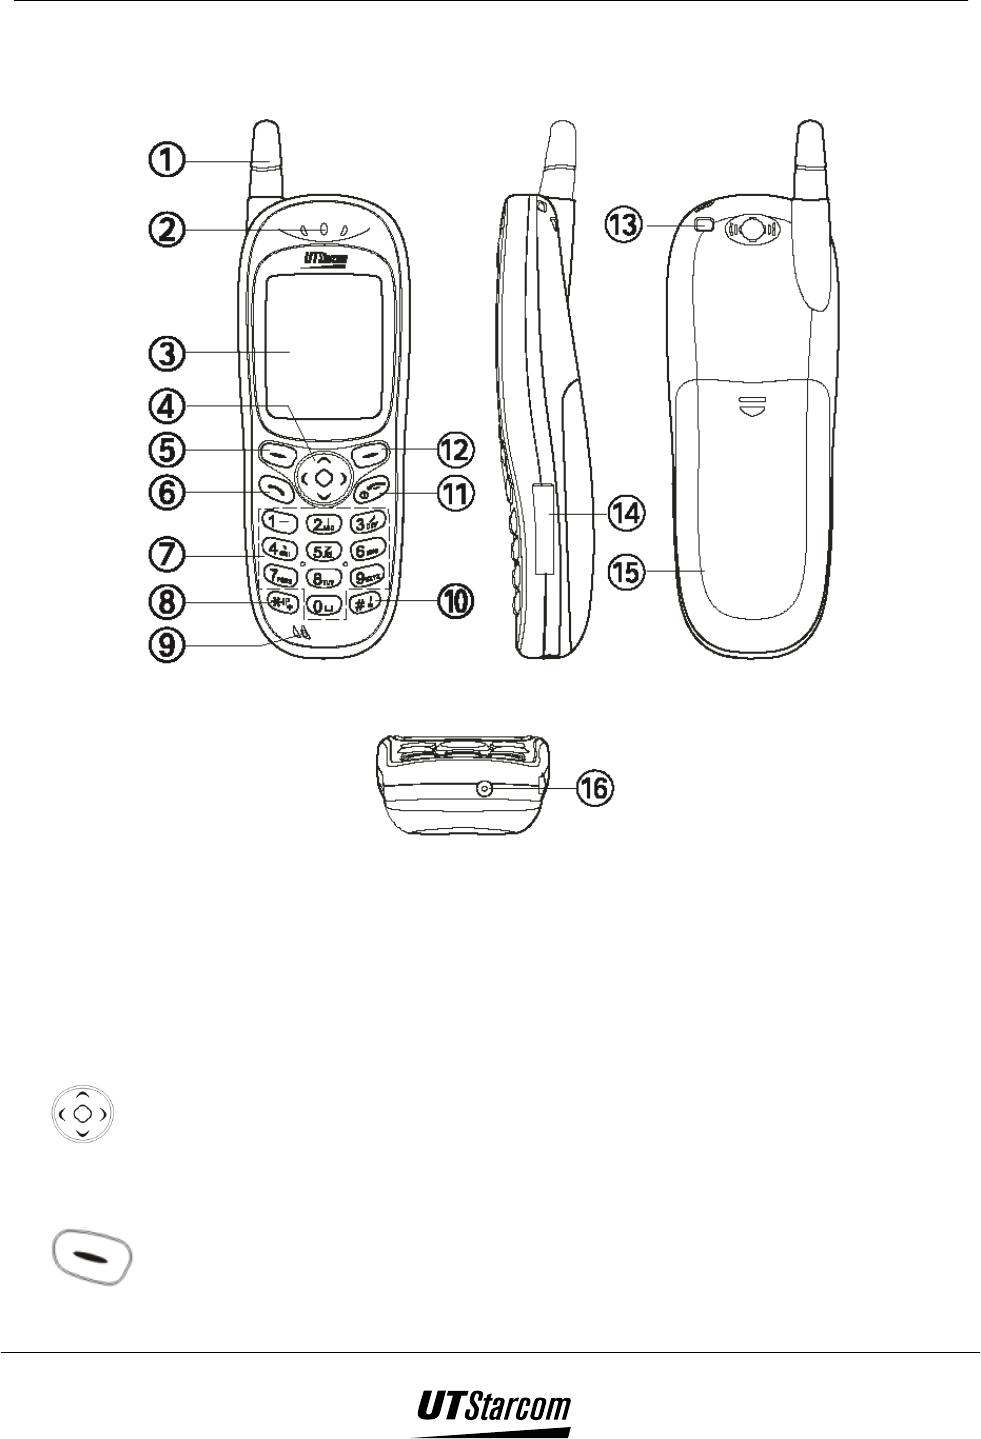
1.3 Handset Description
1. Antenna:
The antenna cannot to be extended. Any attempt to pull out the antenna may
damage the handset and antenna.
2. Earpiece
3. LCD Screen:
Displays the phone numbers, text that have been entered and other mode states.
4. Navigation Key:
This key is used to scroll through the contents of the menu, phone book, and
incoming and outgoing call logs. The key can scroll up or down right or left.
5. Left Soft /Function Key:
1-4 Before Using Your Phone 702-U User Manual
This unmarked key that sits below the screen is used to access and select functions.
The meaning of the key is determined by what’s presently on the screen above it.
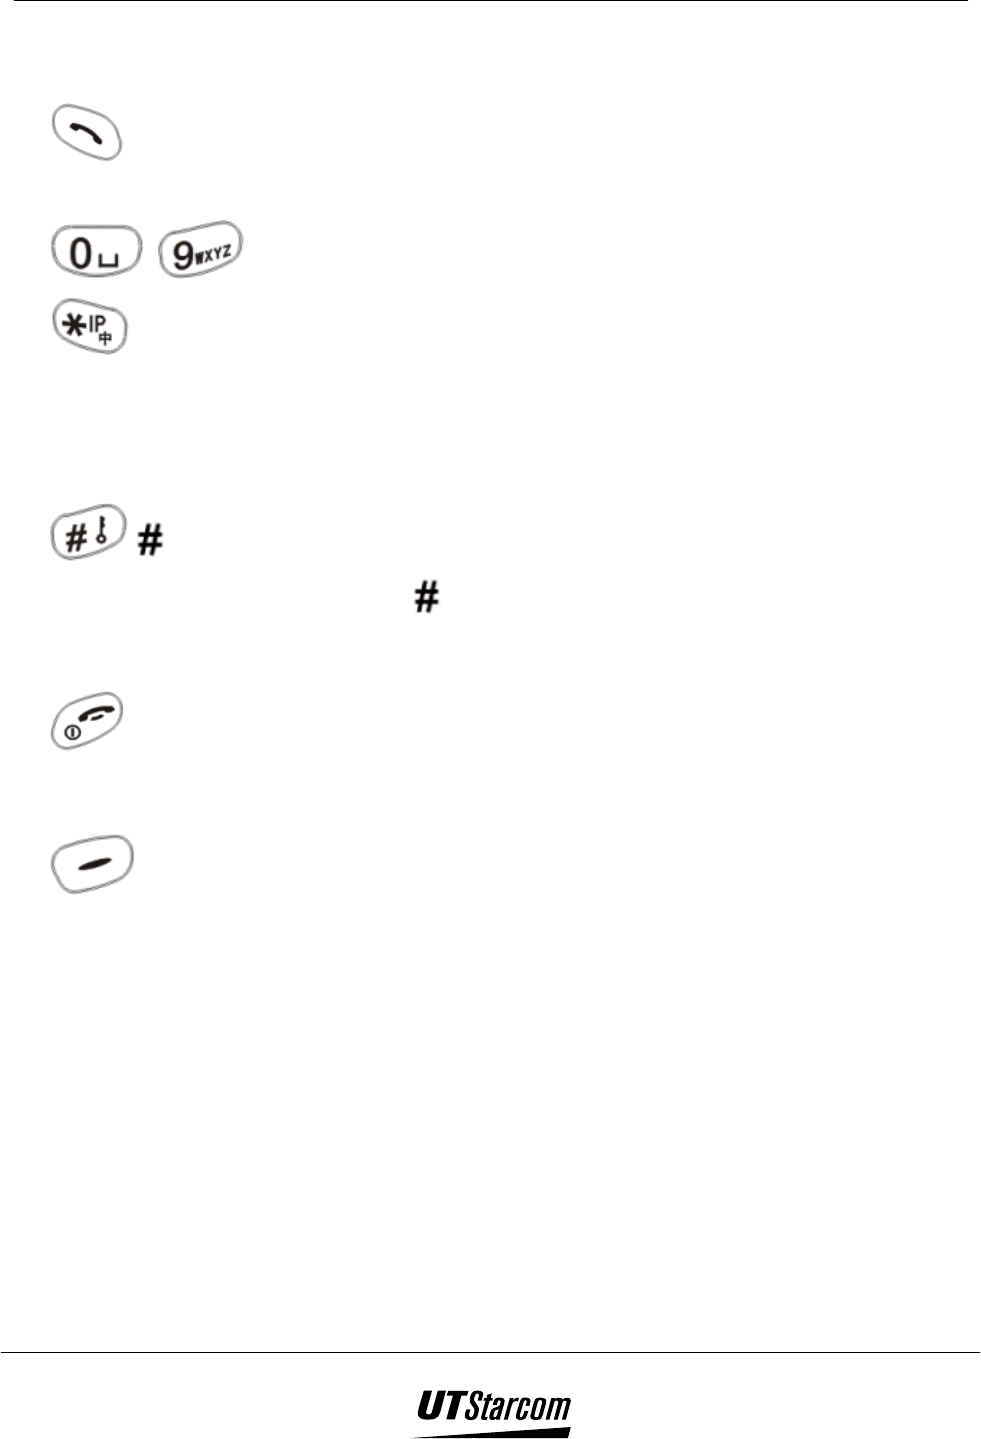
6. Send Key:
This key is used to make or receive a call.
7. ~ Keypad
8. Star/IP Key:
This key is used to enter the symbol º
ºº
º or a pause “P” symbol in a telephone
number or change the input mode of the keypad. This key is used to make IP calls
9. Microphone
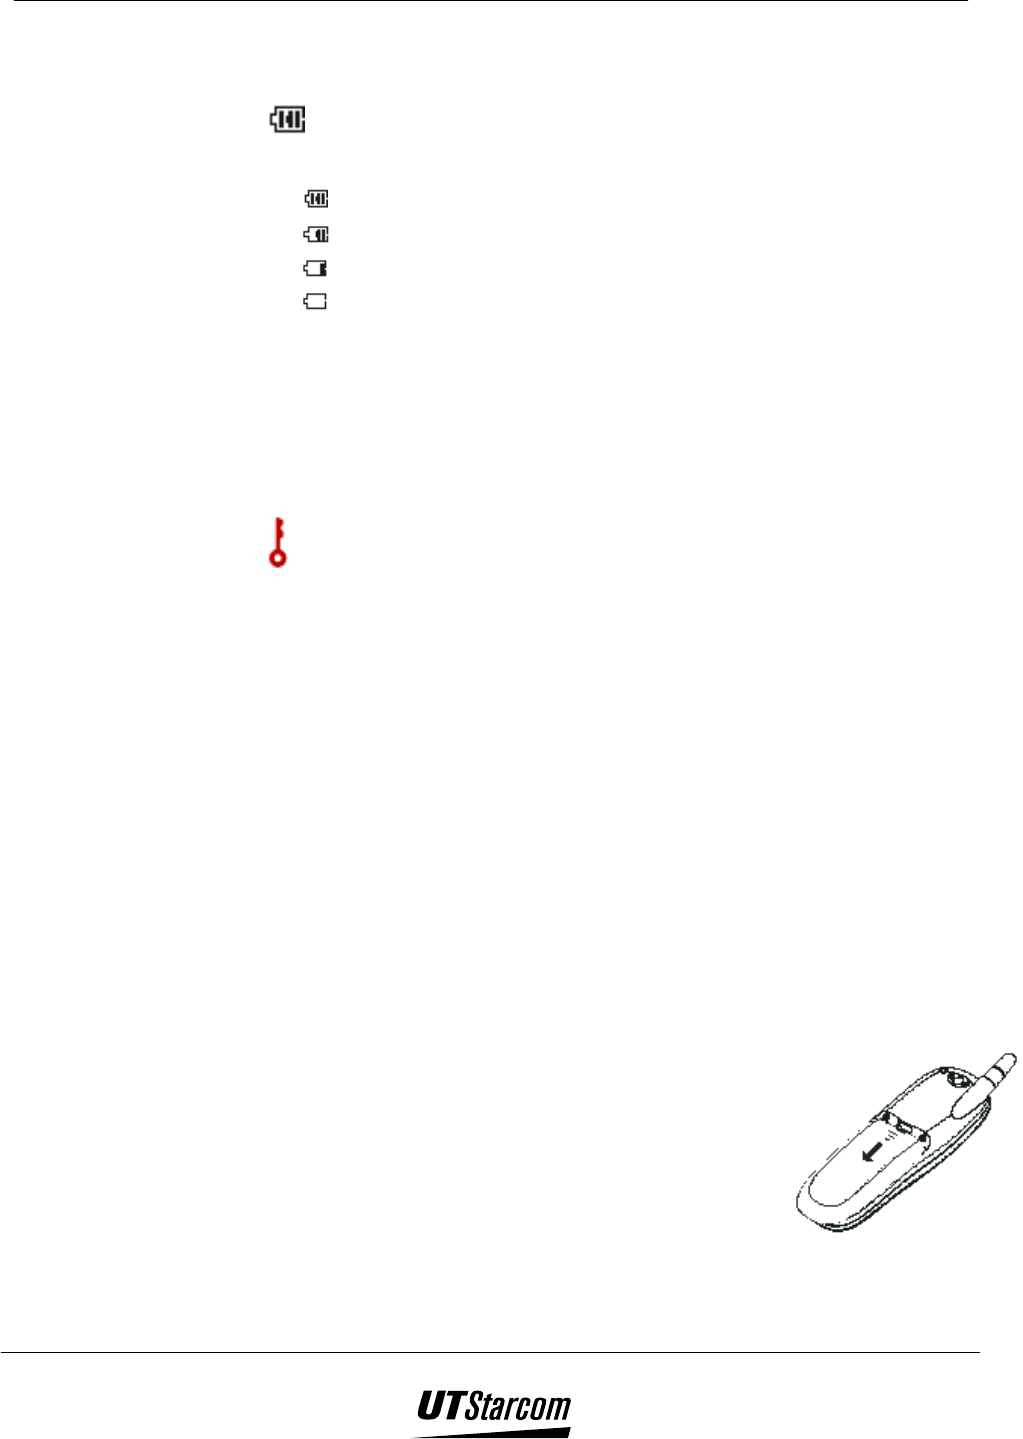
10. /Lock Key:
This key is used to enter in a telephone number. This key locks the keypad to
prevent keys from being accidentally pressed. When it is locked, the handset can
only answer calls.
11. End/Power Key:
This key is used to terminate a call or exit the current menu. This key is used to turn
the handset on or off.
12. Right Function/Enter Key:
This unmarked key that sits below the screen is used to access and select functions.
The meaning of the key is determined by what’s presently on the screen above it.
13. Strap eyelet
14. Data Communication Port cover
15. Battery cover
16. Charging jack
( Note: This is only a brief introduction of the keypad functions; details are depicted
in latter part of the manual.
702-U User Manual Before Using Your Phone 1-5
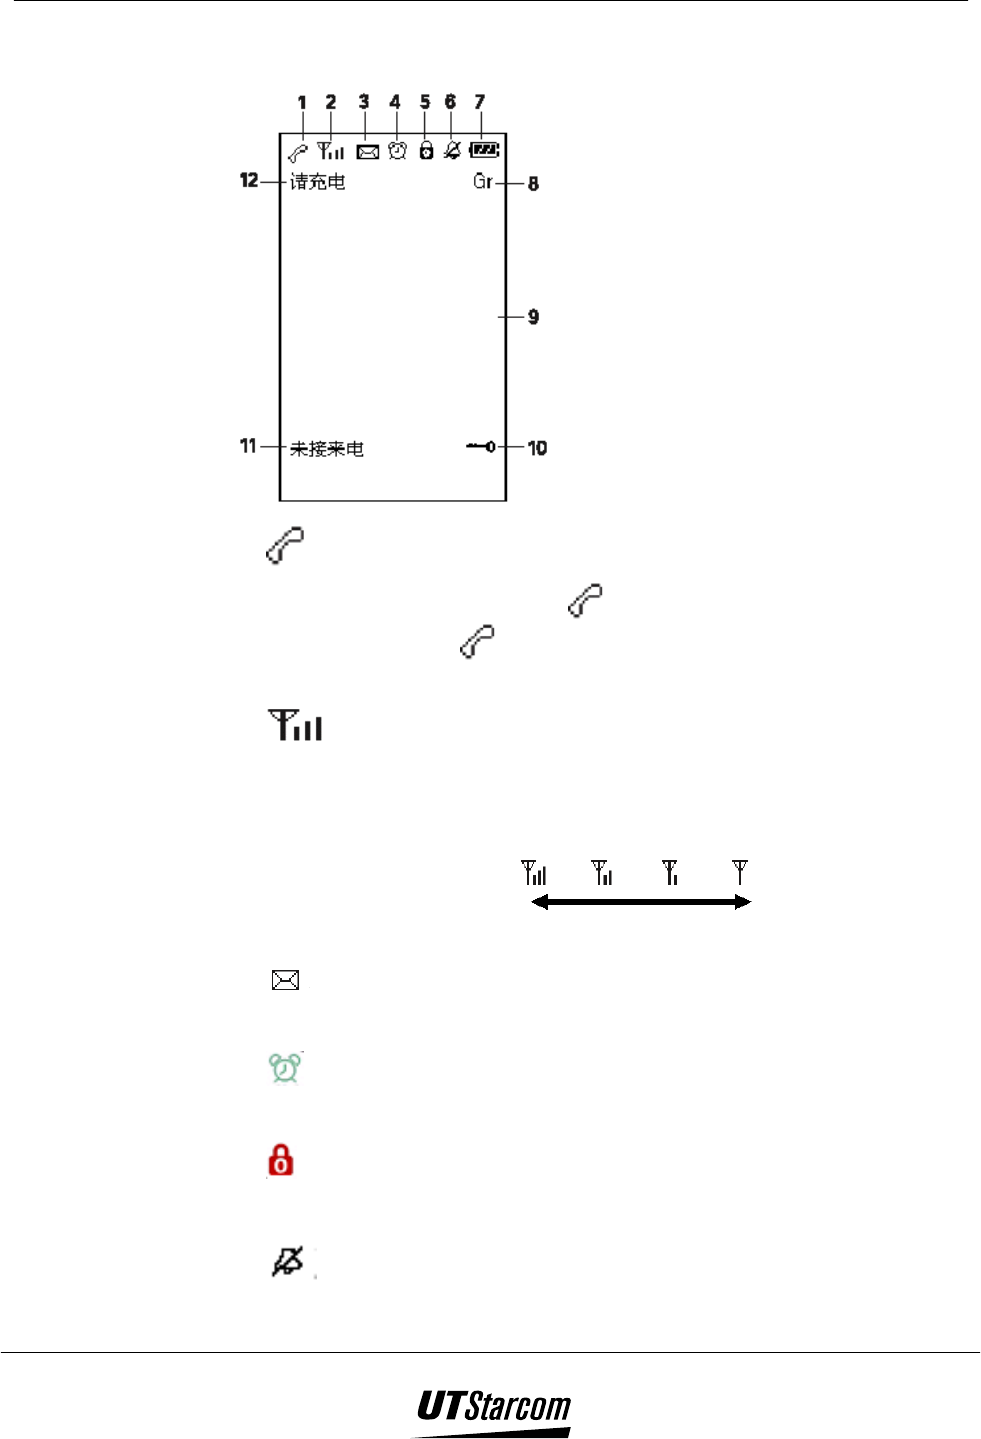
1.4 Display Indicators
1. Service Indicator:
When a call is in progress, is displayed to show hook-off status.
When the icon is not shown on the display the handset is in
standby mode.
2. Signal Strength:
Indicates the current signal strength. When the phone is in a service
area lines are displayed to signify signal strength. More lines mean
better signal strength. Signal strength is symbolize as follows:
Strong Weak
3. Text Message:
Indicates a text message has been received and/or not read.
4. Alarm:
Indicates the alarm is activated.
5. Long Distance Call Lock:
Indicates the long distance call lock is activated.
6. Mute Ringing Tone:
1-6 Before Using Your Phone 702-U User Manual
Indicates the handset ringer has been disabled and/or the vibrator has
been activated.
7. Battery:
Indicates the battery charge level status in 4 steps:
- Fully charged
- Fair
- Low, not much power left
- Requires charging
8. GR (Group Mode):
Indicates the handset is logging into a group.
9. LCD Screen:
Displays the phone numbers, short messages and text that have been
entered.
10. Keypad Lock:
Indicates the keypad lock is activated.
11. Missed Call:
Indicates a call was received but was not answered.
12. Low Power Warning:
Indicates the battery is running out of power and only a few minutes
of talk time remains, a warning tone is heard and “Please Charge” is
flashed on the display. When there is no more talk time the phone
switches itself off.
1.5 Battery Installation
1.5.1 Battery Insertion
1. Remove the cover by sliding while pressing towards the base of the
phone as illustrated.
2. Connect the cord of the battery by firmly inserting
the connector until a click is heard. Check the
orientation of the connector before inserting.
(
((
( Note: The battery cord is color-coded, the red line is
positive (anode), the black line is negative (cathode)
and the yellow line is a sensor output
3. Insert the battery into the compartment of the phone. Place the cord
between the phone body and the battery.
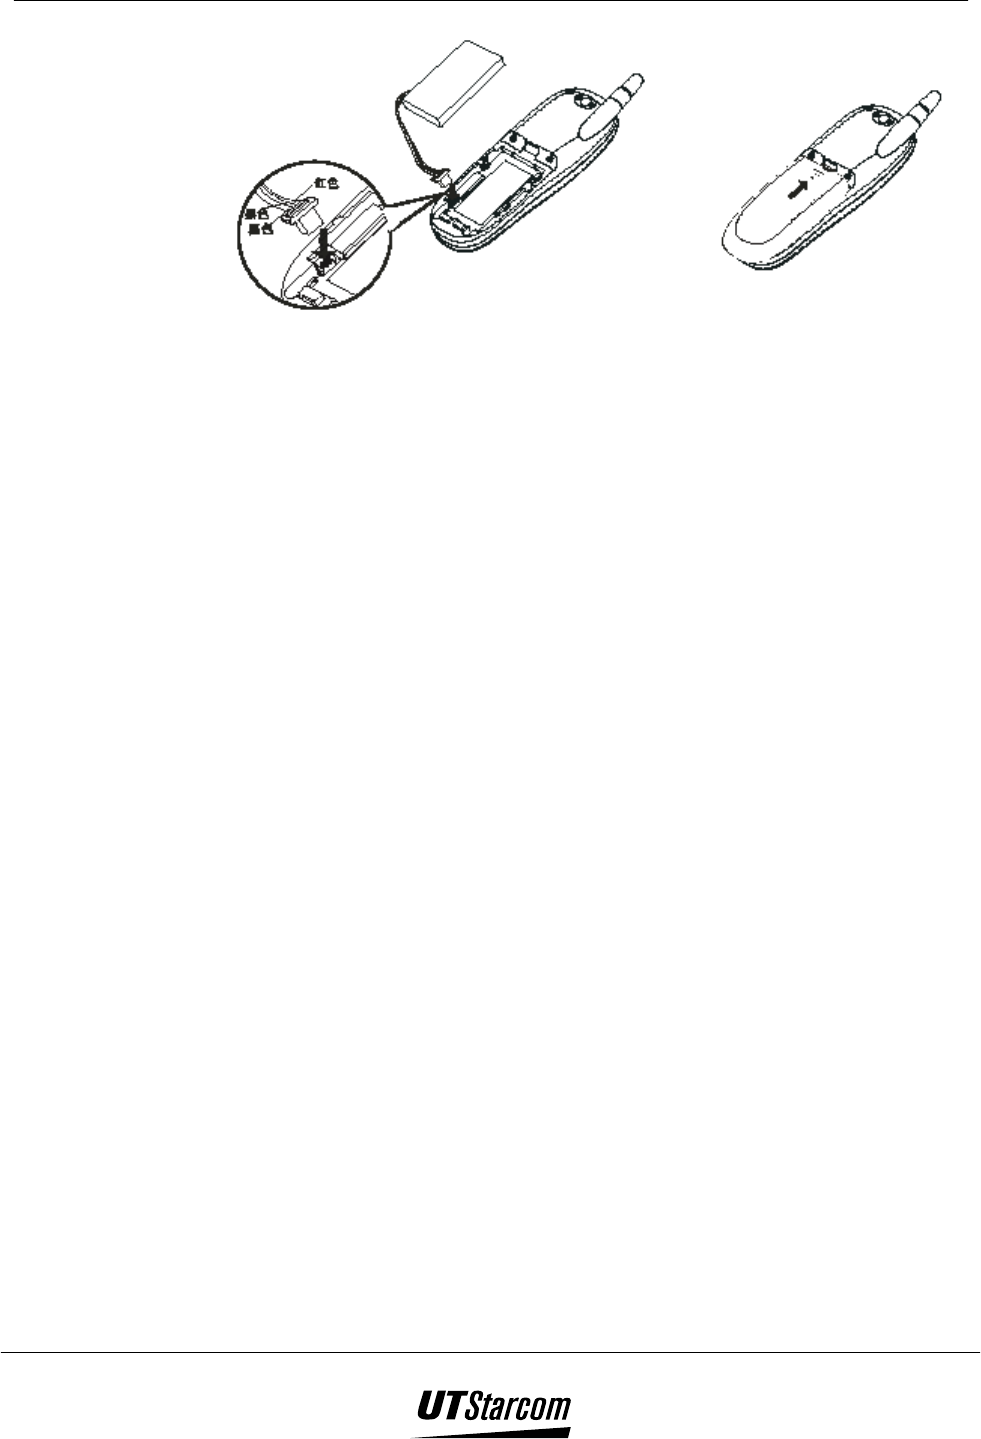
702-U User Manual Before Using Your Phone 1-7
(
((
( Note: When installing the battery, make sure the connector of the battery
cord is firmly inserted into the connector pin of the phone. Do not use
excessive force when handling the battery cord.
4. Attach the battery cover. Fit the cover into the slots and slide towards
the top of the phone until a click is heard. Do not pinch the battery cord
with the cover.
5. Be sure to charge the battery for a minimum of four hours.
1-8 Before Using Your Phone 702-U User Manual
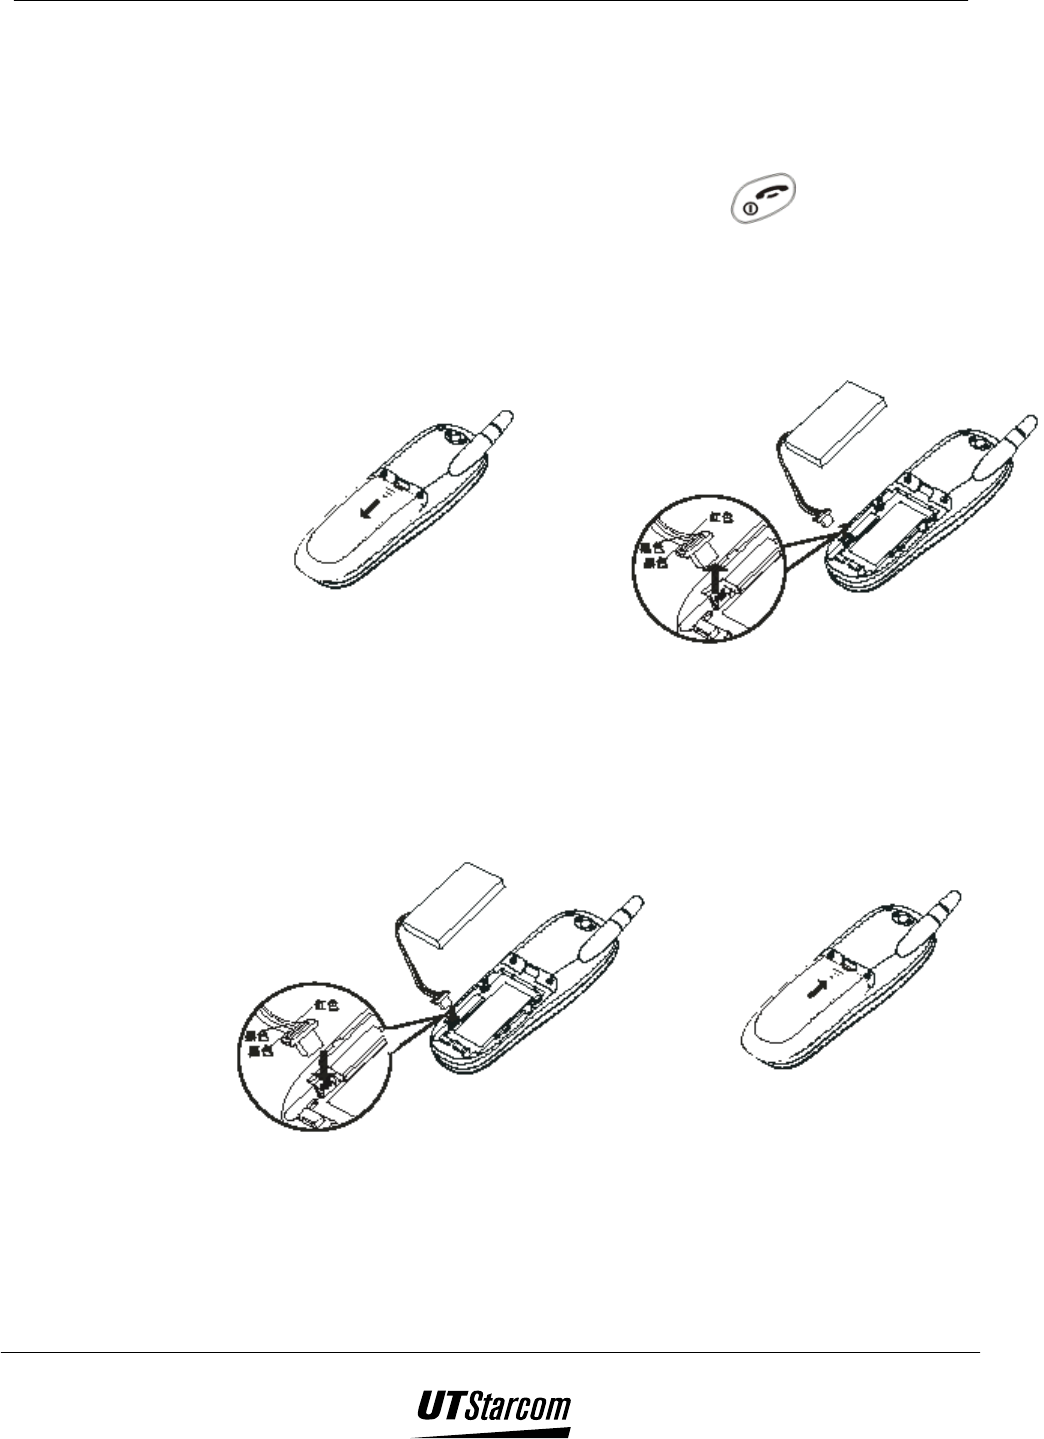
1.5.2 Battery Replacement
The battery can be charged and discharged hundreds of times but will
eventually wear out. When the operating time (talk time and stand-by time)
becomes obviously shorter than normal, it is time to replace the battery.
1. Turn off the phone by pressing and holding until the LCD is
cleared of all texts and icons.
2. Remove the cover by sliding while pressing towards the base of the
phone as illustrated.
3. Remove the battery. Disconnect the cord by firmly griping the connector
and pulling gently as illustrated.
4. Connect the cord of the new
battery by firmly inserting the
connector until a click is heard. Check the orientation of the connector
before inserting.
(
((
( Note: The battery cord is color-coded, the red line is positive (anode), the black
line is negative (cathode) and the yellow line is a sensor output
5. Insert the battery into the compartment of the phone. Place the cord
between the phone body and the battery.
(
((
( Note: When installing the battery, make sure the connector of the battery cord is
firmly inserted into the connector pin of the phone. Do not use excessive
force when handling the battery cord.
6. Attach the battery cover. Fit the cover into the slots and slide in the
direction of arrow until a click is heard. Do not pinch the battery cord
with the cover.
702-U User Manual Before Using Your Phone 1-9
7. Be sure to charge the new battery for a minimum of four hours and reset
the time and date on the phone.
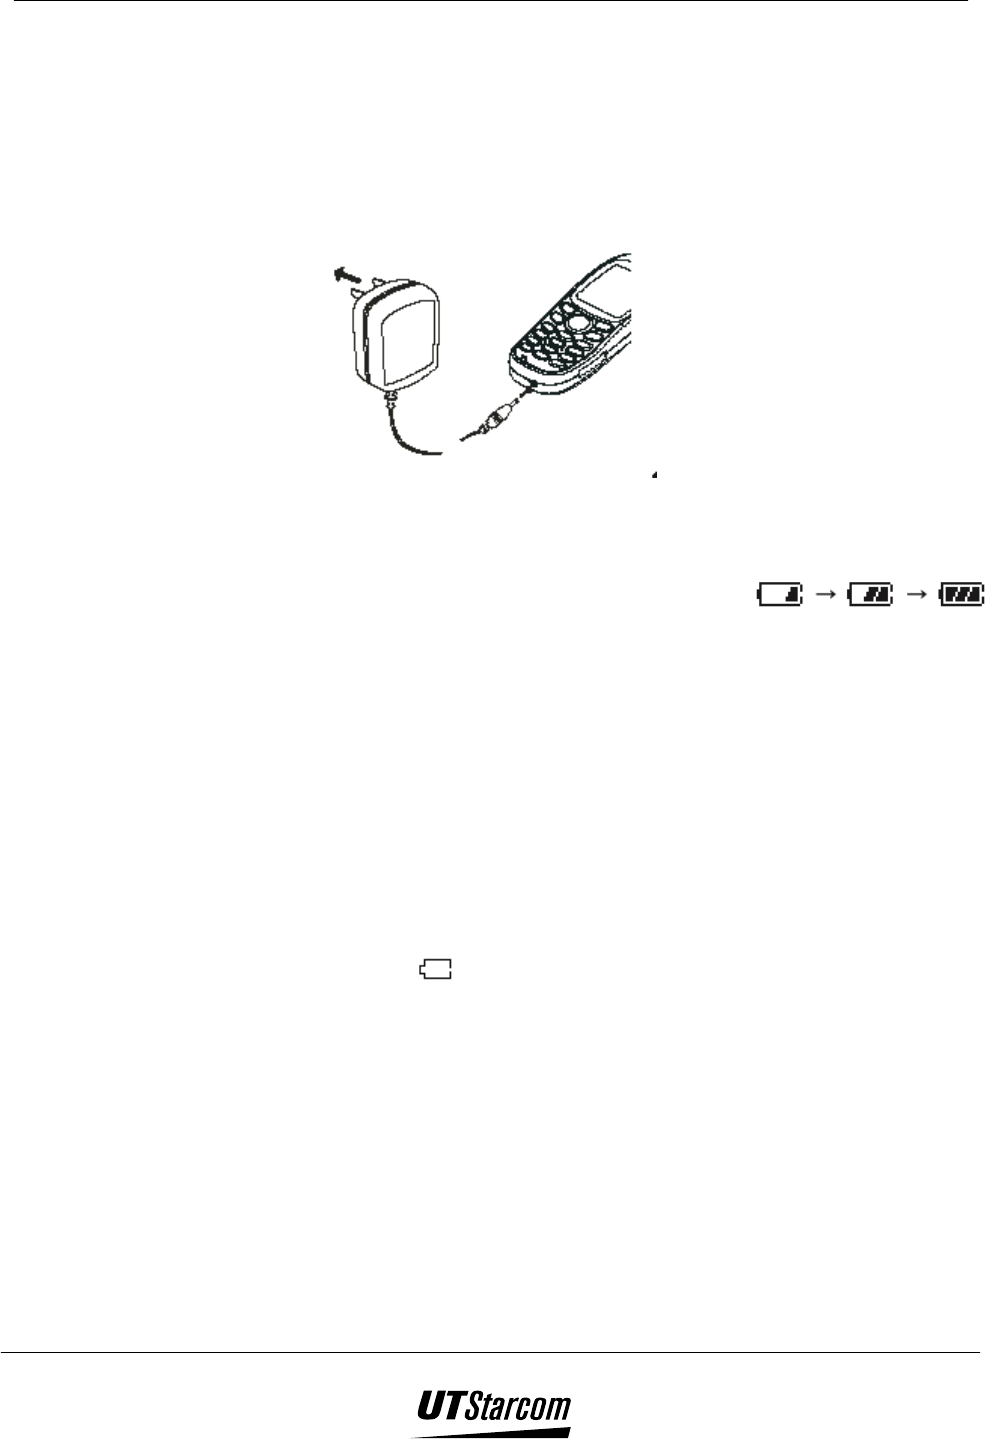
1.6 Battery Charging
1. Connect the charger plug to the charging jack on the bottom of the
handset.
( Note: Charging the battery with phone on is less efficient than charging with the phone
off.
2. Plug the charger into (110/220V AC) wall
outlet the battery indicator starts to scroll and
the texts “Charging…” is displayed on the
LCD screen when the phone is off. If the phone is on the “Charging…”
is removed from the LCD screen.
3. The battery is fully charged when the battery indicator stops scrolling,
and the texts “Fully Charged!” is displayed on the LCD screen when
the phone is off.
4. Disconnect the charger from the AC outlet and the phone.
(
((
( Note:
Before using the phone for the first time, charge the battery for a minimum of
four hours.
When the LCD displays , the phone should be recharged.
When the battery is running out of power and only few minutes of talk time
remains, a warning tone is heard and “Charge” is flashed on the display. When
there is no more talk time the phone switches itself off.
In order to maintain good operating times, fully discharge the battery from time to
time by leaving the phone switch on until it turns itself off.
The phone can be used to make and receive calls while charging if the phone is
on.
1-10 Before Using Your Phone 702-U User Manual
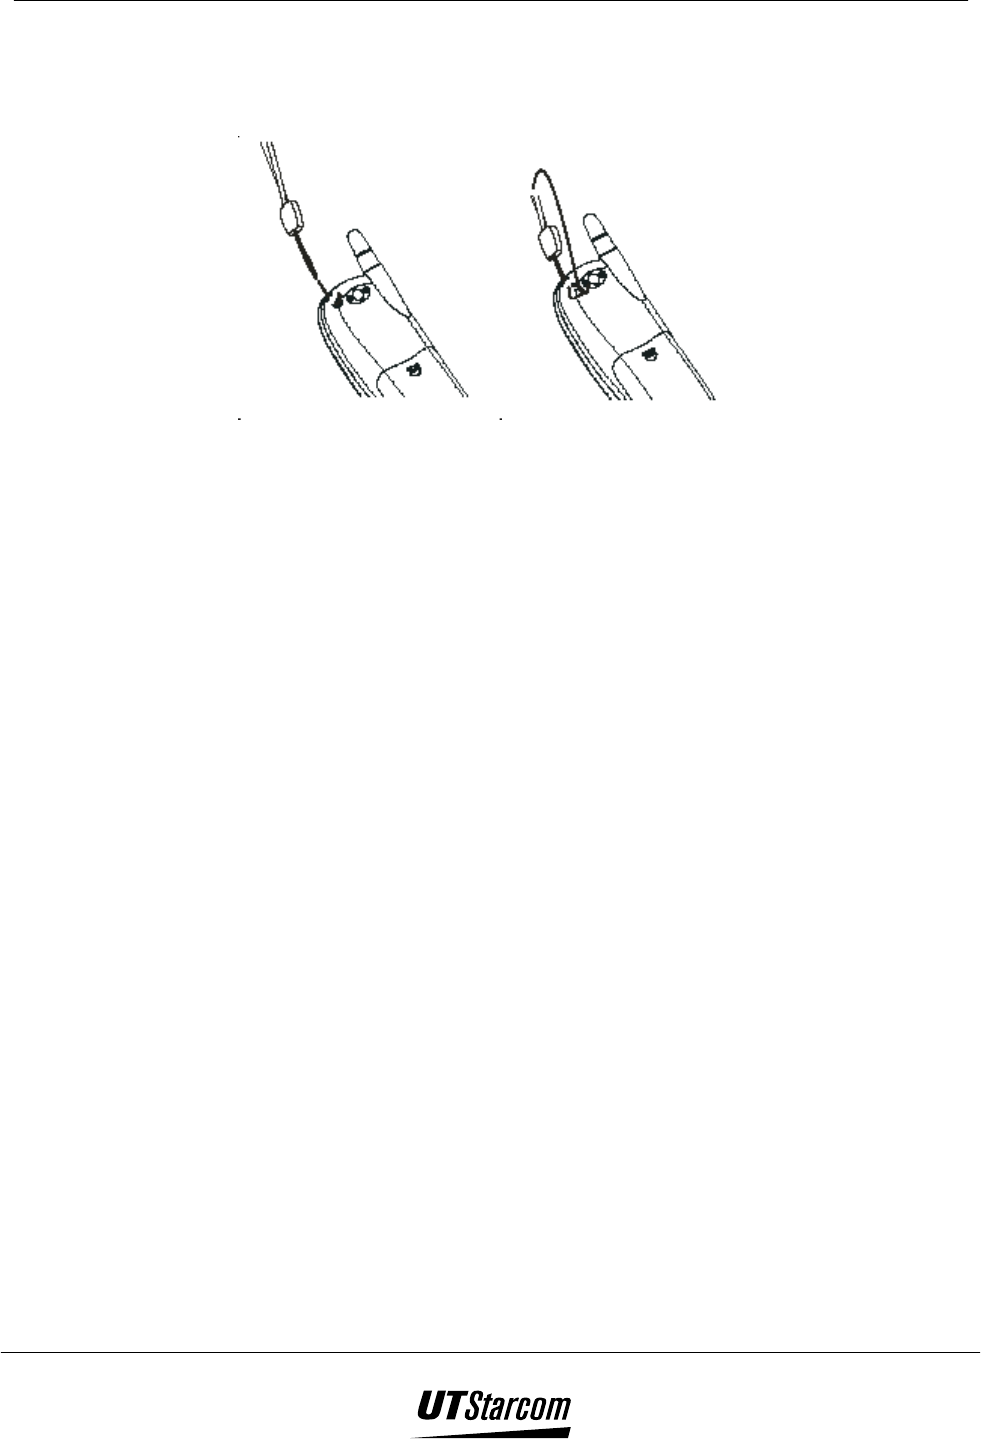
1.7 Attaching the Hand Strap
Fasten the hand strap as shown in the figures below.
702-U User Manual Before Using Your Phone 1-11
1.8 How to Navigate the Menu:
1. Press the left soft key (Menu) to access the menu options.
2. In the menu, use the navigation key to select a menu option. Press the
navigation keys to highlight the desired menu item. Use the navigate key
to move the cursor.
Up Down Left Right
3. To go back to a previous screen press the right soft key or to
exit the menu and return to standby mode press .
4. To go into a submenu press the left soft key (OK).
1-12 Before Using Your Phone 702-U User Manual
1.9 Menu Summary
Searchx Enter Name x <Display Results>
Add Entry x Enter Name x Enter Numberx Select Group
Delete Entryx 1. Delete One x
2. Delete All x
<Select Name>x
<Enter Password>x
<Delete Name>
<Delete All
Group Infox <Group Names> x 1. Set Ring x
2. Browse x
<Ringing Pattern>
<Group Members>
Speed Dial x Key (1 to 9) x Set
Addresses x
Memory x <Total Phone No.>
Edit message x 1. Optionsx
1. Send
2. Save
1. Optionsx 1. Reply
2. Forward
Inbox x
3. Delete
4. Call Back
Outbox x 1. Optionsx 1. Forward
2. Delete
Drafts x 1. Optionsx 1. Edit
2. Send
3. Delete
SMS x
Clear x 1. Optionsx 1. Clear Inbox
2. Clear Outbox
3. Clear Drafts
4. Clear All
1. Enable
Profile x <Profile Name > x
xx
x
Standard
Meeting
Outdoors
Silent
2. Set x 1. Whisper Mode
2. Ring Volume
3. Ring Mode
4. Ring Tone
5. Message Tone
6. Alarm Tone
7. Keypad Tone
8. Alert Tone
Missed Log x 1. Optionsx 1. Store
2. Delete Entry
Answered Log x 1. Optionsx 1. Store
2. Delete Entry
Outgoing Log x 1. Optionsx 1. Store
2. Delete Entry
Call Log x
Duration x <Total Talk Time>
Tools x Calculator
Calendar
My Picture

702-U User Manual Before Using Your Phone 1-13
Reversi x 1. Start
2. Set Level
3. First Player
4. Set Array
5. Game Rule
Evsan x 1. Start
2. Top Score
3. Games Rule
Games x
Wacko x 1. Start
2. Top Score
3. Set Speed
4. Game Rule
Own Numberx <Display Number>
Alarm x 1. ON/Off
2. Set Time
3. Snooze
4. Repeat Type
Answer Mode x 1. Any Key Answer
2. Talk Key Answer
IP Phonex <Enter IP Information>
Setting x
Display x 1. Toll Call Lock
2. Code Request
3. Change Code
4. Reset All

1-14 Before Using Your Phone 702-U User Manual
BLANK PAGE
2
Basic Operation
2. Basic Operations
2.1 Turning the Phone On and Off
2.1.1 Turning the Phone ON
1. Press and hold (minimum of two seconds) until the LCD
backlight turns on.
The phone is locked when “Enter Code:” is displayed on the
LCD screen. When “Enter Code:” is displayed enter the six-
digit (0-6) password and press the left soft key (Ok) to
unlock the phone. If the correct password has been entered, the
selected greeting will be displayed on the LCD screen and the
phone will enter standby mode.
The default six-digit password is 8-8-8-8-8-8.
When the battery power is too low, a warning tone is heard and
the phone switches itself off.
2.1.2 Turning the Phone Off
Press and hold until the LCD is cleared of all texts and
icons.
The phone keypad is locked if icon is displayed on the screen.
When the icon is displayed, press to unlock the phone
keypad.
2.2 Making Calls
Before dialing a telephone number, make sure the signal strength is
sufficient. The signal strength icon on the LCD of the phone should be at
least .
2-2 Basic Operations 702 U User Manual
1. Dial a phone number.
Correct misdialed digits by one of the following methods.
o Press the right soft key (Clear) to delete the
last digit dialed.
o Press and hold down the right soft key
(Clear) for two seconds to delete all dialed digits.
2. Press to send dialed digits. The screen displays
“Connecting.”
The LCD on the phone will display a call timer in the lower
left hand corner if the call is successfully completed.
When making a long distance call and the long distance call
lock has been activated, the LCD will display the icon.
Refer to section of “Cancel Long Distance Call Lock” to
release.
3. To end a call or cancel the call attempt, press or the right
soft key . The LCD on the phone will display the call
duration for three seconds and then return to stand-by mode.
Note: The call timer is for reference only and should not be used in
calculating the cost of a call.
Note: When a phone moves to an area with inadequate signal strength a
warning tone is generated by the handset if the “out of service area alarm”
has been activated.
2.2.1 Making IP Calls
Prior to making an IP call using the key, make sure the correct
access number; account number and password have been entered into the
memory of the phone.
1. Dial the number, e.g. 17980
2. Press the key. The phone will automatically send the IP
access number, account number and password stored in memory.

702 U User Manual Basic Operations 2-3
3. If the call is successfully completed, “IP Call” is displayed on
the LCD screen.
4. Follow the instructions from your service provider.
5. To end a call or cancel the call attempt, press .
Note: The IP card access number, account number and password must be
entered into the phone prior to using the key.
Note: Refer to “Entering an IP number and Password.”
2-4 Basic Operations 702 U User Manual
2.3 Answering Calls
1. When a call is being received, the phone rings.
If you subscribe to a Caller ID service, the calling party information
will be displayed.
If the calling party has blocked the calling information from being
sent, “No Caller ID” will be displayed on the LCD screen.
2. Press or left soft key to answer the call.
The LCD on the phone will display a call timer in the lower left hand
corner.
3. To end a call, press or right soft key on the handset.
Note:
Pressing when the phone rings will mute the ringer and reject the
call.
When the keypad is locked, calls can be answered by pressing .
2.4 Call Logs
Your phone can display the most recent missed, answered and outgoing
calls. The phone stores the phone numbers in memory into three separate
logs. Each log allows you to view the phone number, call the phone number,
delete the phone number or save it to the Address book.
2.4.1 Missed Call Log
If there is a missed call, “Missed Call” will be displayed on the LCD
screen. The last forty phone numbers (maximum of 24 digits each) received
are stored in the phone’s memory. The missed call log allows you to view
the phone number, call the phone number, view the time of the missed call,
delete the phone number or save it to the Address book.
If the caller’s phone number has been entered into the Address book, their
name and group is shown when the miss call is displayed.
Note:
You must subscribe to a Caller ID service for the calling party information
to be entered into the Missed Call log.
If calling party has blocked the calling information from being sent, the
caller’s phone number will not entered into the Missed Call log.
702 U User Manual Basic Operations 2-5
If the same caller calls more than one time, the caller’s phone number is
entered only once into the Missed Call log.
The Missed Call log can store a maximum of 40 phone numbers. When
the 41st phone number is received the oldest phone number is deleted.
2.4.1.1 Using the Missed Call log to make a Call.
Menu x
xx
x Call Log x
xx
x Missed Log x
xx
x Select Phone Number x
xx
x Dial
1. Press the left soft key (Menu) to access the menu options.
2. Use the navigation key or to reach Call Log and press the left
soft key (Ok) to select.
3. Use the navigation key or to reach Missed Log and press the
left soft key (Ok) to select.
4. To scroll between the phone numbers, press the navigation key or
.
If you do not subscribe to a Caller ID service, “No Caller ID”
will be displayed on the LCD screen for the calling party
information.
If the calling party has blocked the calling information from
being sent, “No Caller ID” will be displayed on the LCD screen.
5. Press to dial the number.
2.4.1.2 Delete a Missed Call
Menu x
xx
x Call Log x
xx
x Missed Log x
xx
x Select Phone Number x
xx
x Options x
xx
x Delete Entry
1. Press the left soft key (Menu) to access the menu options.
2. Use the navigation key or to reach Call Log and press the left
soft key (Ok) to select.
3. Use the navigation key or to reach Missed Log and press the
left soft key (Ok) to select.
2-6 Basic Operations 702 U User Manual
4. To scroll between the phone numbers, press the navigation key or
.
If you do not subscribe to a Caller ID service, “No Caller ID”
will be displayed on the LCD screen for the calling party
information.
If the calling party has blocked the calling information from
being sent, “No Caller ID” will be displayed on the LCD screen.
5. Press the left soft key Options.
6. Use the navigation key or to reach Delete Entry and press the
left soft key (Ok) to select.
7. Press the left soft key (Ok) to delete the phone number. The
phone erases the information and returns to the Call Log menu.
8. Press the right soft key (Cancel) to stop the deletion of the
phone number and return to the Options menu. Press the right soft key
(Back) to return to the list of missed calls.
9. Press (End) to exit the menu and return to stand-by mode.
2.4.1.3 Store a Missed Call
Menu x
xx
x Call Log x
xx
x Missed Log x
xx
x Select Phone Number x
xx
x Options x
xx
x Store
1. Press the left soft key (Menu) to access the menu options.
2. Use the navigation key or to reach Call Log and press the left
soft key (Ok) to select.
3. Use the navigation key or to reach Missed Log and press the
left soft key (Ok) to select.
4. To scroll between the phone numbers, press the navigation key or
.
702 U User Manual Basic Operations 2-7
5. Press the left soft key (Options.)
If the calling information is “No Caller ID” for the missed call, “Error”
is displayed on the LCD Screen and the Store option is not available.
6. Use the navigation key or to reach Store and press the left soft
key (Ok) to select.
7. Enter the person’s name (up to 12 letters) or leave blank if desired. Press
the left soft key (Ok) to enter. If no name is entered, the phone
number is use for the name.
If the LCD display flashes “Exists” after you enter a name it
means there is already an entry with the exact same name and
phone number stored in the phone’s memory.
If there are no empty memory locations, the LCD displays
flashes ”Full”. Select a name and phone number to delete before
adding new name and phone number.
8. Choose a Group by pressing or and then press the left soft
key (Ok).
9. The phone enters the information and returns to the Options menu.
Press the right soft key (Back) to return to the list of missed
calls.
10. Press (End) to exit the menu and return to stand-by mode.
2.4.2 Outgoing Call log
The last forty phone numbers (maximum of 24 digits each) dialed on the
phone are stored in memory. The outgoing call log allows you to view the
phone number, call the phone number, view the time of the call, call
duration, delete the phone number or save it to the Address book.
If the calling information (phone number, name, etc.) has been entered into
the Address book, the name and group is shown when the call is displayed.
Note:
The Outgoing log can store a maximum of 40 phone numbers. When the
41st phone number is dialed the oldest phone number is deleted.
2-8 Basic Operations 702 U User Manual
2.4.2.1 Using the Outgoing Call log to make a Call
Menu x
xx
x Call Log x
xx
x Outgoing Log x
xx
x Select Phone Number x
xx
xDial
1. Press the left soft key (Menu) to access the menu options.
2. Press Menu to access the menu options.
3. Use the navigation key or to reach Call Log and press the left
soft key (Ok) to select.
4. Use the navigation key or to reach Outgoing Log and press the
left soft key (Ok) to select.
5. To scroll between the phone numbers, press the navigation key or
.
To search from the most recent dialed phone number, press
navigation key .
To search from the oldest dialed phone number, press navigation
key.
6. Press to dial the number.
2.4.2.2 Delete an Outgoing Call
Menu x
xx
x Call Log x
xx
x Outgoing Log x
xx
x Select Phone Number x
xx
x Options x
xx
x Delete
Entry
1. Press the left soft key (Menu) to access the menu options.
2. Press Menu to access the menu options.
3. Use the navigation key or to reach Call Log and press the
left soft key (Ok) to select.
4. Use the navigation key or to reach Outgoing Log and press
the left soft key (Ok) to select.
702 U User Manual Basic Operations 2-9
5. To scroll between the phone numbers, press the navigation key
or .
6. Press the left soft key Options.
7. Use the navigation key or to reach Delete Entry and press
the left soft key (Ok) to select.
8. Press the left soft key (Ok) to delete the phone number.
The phone erases the information and returns to the Call Log menu.
9. Press the right soft key (Cancel) to stop the deletion of the
phone number and return to the Options menu. Press the right soft
key (Back) to return to the list of outgoing calls.
10. Press (End) to exit the menu and return to stand-by mode.
2.4.2.3 Store an Outgoing Call
Menu x
xx
x Call Log x
xx
x Outgoing Log x
xx
x Select Phone Number x
xx
x Options x
xx
x Store
1. Press the left soft key (Menu) to access the menu options.
2. Use the navigation key or to reach Call Log and press the
left soft key (Ok) to select.
3. Use the navigation key or to reach Outgoing Log and press
the left soft key (Ok) to select.
4. To scroll between the phone numbers, press the navigation key
or .
5. Press the left soft key Options.
2-10 Basic Operations 702 U User Manual
6. Use the navigation key or to reach Store and press the left
soft key (Ok) to select.
7. Enter the person’s name (up to 12 letters) or leave blank if desired.
Press the left soft key (Ok) to enter. If no name is entered,
the phone number is use for the name.
If the LCD display flashes “Exists” after you enter a name it
means there is already an entry with the exact same name and
phone number stored in the phone’s memory.
If there are no empty memory locations, the LCD displays
flashes ”Full”. Select a name and phone number to delete before
adding new name and phone number.
8. Choose a Group by pressing or and then press the left soft
key (Ok).
9. The phone enters the information and returns to the Options menu.
Press the right soft key (Back) to return to the list of
outgoing calls.
10. Press (End) to exit the menu and return to stand-by mode.
2.4.3 Answered Call Log
The last forty phone numbers (maximum of 24 digits each) received by the
phone are stored in memory. The answered call log allows you to view the
phone number, call the phone number, view the time of the received call,
call duration, delete the phone number or save it to the Address book.
If the caller’s phone number has been entered into the Address book, their
name and group is shown when the call is displayed.
Note:
You must subscribe to a Caller ID service for the calling party information
to be entered into the Answered Call log.
If calling party has blocked the calling information from being sent, the
caller’s phone number will not entered into the Answer Call log.
If the same caller calls more than one time, the caller’s phone number is
entered only once into the Answered Call log.
702 U User Manual Basic Operations 2-11
The Answered Call log can store a maximum of 40 phone numbers. When
the 41st phone number is received the oldest phone number is deleted.
2.4.3.1 Using the Answered Call Log to make a call
Menu x
xx
x Call Log x
xx
x Answered Log x
xx
x Select Phone Number x
xx
xDial
1. Press the left soft key (Menu) to access the menu options.
2. Use the navigation key or to reach Call Log and press the
left soft key (Ok) to select.
3. Use the navigation key or to reach Answered Log and
press the left soft key (Ok) to select.
4. To scroll between the phone numbers, press the navigation key
or .
If you do not subscribe to a Caller ID service, “No Caller ID”
will be displayed on the LCD screen for the calling party
information.
If the calling party has blocked the calling information from
being sent, “No Caller ID” will be displayed on the LCD screen.
5. Press to dial the number.
2.4.3.2 Delete an Answered Call
Menu x
xx
x Call Log x
xx
x Answered Log x
xx
x Select Phone Number x
xx
x Options x
xx
x Delete
Entry
1. Press the left soft key (Menu) to access the menu options.
2. Use the navigation key or to reach Call Log and press the left
soft key (Ok) to select.
3. Use the navigation key or to reach Answered Log and press
the left soft key (Ok) to select.
2-12 Basic Operations 702 U User Manual
4. To scroll between the phone numbers, press the navigation key or
.
If you do not subscribe to a Caller ID service, “No Caller ID”
will be displayed on the LCD screen for the calling party
information.
If the calling party has blocked the calling information from
being sent, “No Caller ID” will be displayed on the LCD screen.
5. Press the left soft key Options.
6. Use the navigation key or to reach Delete Entry and press the
left soft key (Ok) to select.
7. Press the left soft key (Ok) to delete the phone number. The
phone erases the information and returns to Call Log menu.
8. Press the right soft key (Cancel) to stop the deletion of the
phone number and return to the Options menu. Press the right soft key
(Back) to return to the list of answered calls.
9. Press (End) to exit the menu and return to stand-by mode.
2.4.3.3 Store an Answered Call
Menu x
xx
x Call Log x
xx
x Answered Log x
xx
x Select Phone Number x
xx
x Options x
xx
x Store
1. Press the left soft key (Menu) to access the menu options.
2. Use the navigation key or to reach Call Log and press the
left soft key (Ok) to select.
3. Use the navigation key or to reach Answered Log and
press the left soft key (Ok) to select.
4. To scroll between the phone numbers, press the navigation key
or .
702 U User Manual Basic Operations 2-13
5. Press the left soft key Options.
If the calling information is “No Caller ID” for the missed call,
“Error” is displayed on the LCD Screen and the Store option is
not available.
6. Use the navigation key or to reach Store and press the left
soft key (Ok) to select.
7. Enter the person’s name (up to 12 letters) or leave blank if desire.
Press the left soft key (Ok) to enter. If no name is entered,
the phone number is use for the name.
If the LCD display flashes “Exists” after you enter a name it
means there is already an entry with the exact same name and
phone number stored in the phone’s memory.
If there are no empty memory locations, the LCD displays
flashes ”Full”. Select a name and phone number to delete before
adding new name and phone number.
8. Choose a Group by pressing or and then press the left soft
key (Ok).
9. The phone enters the information and returns to the Options menu.
Press the right soft key (Back) to return to the list of
answered calls.
10. Press (End) to exit the menu and return to stand-by mode.
2.4.4 Delete Log
Menu x
xx
x Call Log x
xx
x Delete Log x
xx
x Select Call log x
xx
xDelete
You can remove all previously store phone numbers from an individual log
or clear all logs.
1. Press the left soft key (Menu) to access the menu options.
2-14 Basic Operations 702 U User Manual
2. Use the navigation key or to reach Call Log and press the
left soft key (Ok) to select.
3. Use the navigation key or to reach Delete Log and press
the left soft key (Ok) to select.
4. To scroll between the menu options (Missed, Answered, Outgoing
and Delete All), press the navigation key or .
5. Press the left soft key (Ok) to select.
6. Press the left soft key (Ok) to delete the stored phone
numbers. The phone erases the information and returns to the Delete
Log menu.
7. Press (End) to exit the menu and return to stand-by mode.
2.4.5 Duration
Menu x
xx
x Call Log x
xx
x Duration x
xx
x Display Talk Time (Answered/Outgoing calls)
Your phone can display the total duration of the answered and outgoing
calls. The time is shown in hh:mm:ss format.
1. Press the left soft key (Menu) to access the menu options.
2. Use the navigation key or to reach Call Log and press the
left soft key (Ok) to select.
3. Use the navigation key or to reach Duration and press the
left soft key (Ok) to select.
4. The individual and total talk time for Answered and Outgoing calls
is displayed on the LCD screen.
5. Press the left soft key (Reset) to clear all timers if desired.
The phone erases the information and returns to the Call Log menu.
702 U User Manual Basic Operations 2-15
Press the right soft key to (Back) to return to Call Log
menu.
6. Press (End) to exit the menu and return to stand-by mode.
2.4.6 Call Log Quick View
Press when the phone is idle to display the last Outgoing call.
Press when the phone is idle to display the last Incoming call.
Press when the phone is idle to display the last Missed call.
Use the or to browse any of the call logs lists.
2.5 Adjusting the Earpiece Volume
You can adjust the earpiece volume of the phone while on a call.
1. Press the navigation key or while talking to display the current
earpiece volume.
2. Press to increase and to decrease the volume.
If the earpiece volume is at the maximum level 6, the volume level
will not change when is pressed.
If the earpiece volume is at the minimum level 1, the volume level
will not change when is pressed.
3. To exit and return to call timer mode press the left soft key or
wait 2 seconds.
Note: There are 6 volume levels.
1. Lowest
2. Lower
3. Low
4. High
5. Higher
6. Highest
2-16 Basic Operations 702 U User Manual
2.6 Keypad Lock
The keypad lock prevents the keys from being accidentally pressed when;
for example, the phone is in your pocket or handbag.
1. To lock the keypad, press and hold for a minimum of two
seconds. When the keypad is locked the icon appears on the LCD of
the phone.
2. To unlock the keypad, press and hold for a minimum of two
seconds. When the keypad is unlocked the icon disappears from the
LCD of the phone
Note: When the keypad is locked you can:
Answer a call by pressing. .
Turn on the backlight by pressing .
Mute the phone’s ringer by pressing .
3
Address Book
3. Address book
You can store phone numbers and associated names in memory of your
702U phone by using the Address book function.
The phone can store up to 500-phone number of up to 24 digits and names
of up to 12 characters in length.
3.1 How to Enter Letters, Characters and Symbols Using the
Keypad
As shown in the table below, more than one character (letters and a number)
is assigned to each key of the keypad. The available character set depends
on the input character mode and whether a phone number, name or text
message is being entered into the handset. Only the characters (0-9, *, #
and pause for IP only) are available for a phone number whereas the letters
(A, a, B, b, C, etc), numbers and symbols can be used for a name or text
message.
Key Displayed Character Key Displayed Character
1 . , : ; ? ! ( ) * # % @ P (p) Q (q) R (r) 7
A (a) B (b) C (c) 2 T (t) U (u) V (v) 8
D (d) E (e) F (f) 3 W (w) X (x) Y (y) 9
G (g) H (h) I (i) 4 Space 0
J (j) K (k) L (l) 5
# (Press for #)
(Press and hold )
M (m) N (n) O (o) 6
- (Phone number only)
Moves the cursor to the left
Moves the cursor to the right
Press to delete the last character entered.
Press and hold to delete all characters
3.1.1 Character Input Mode
The 702-U offers five types of character modes that can be used when
entering a name in the address book or writing a text message to be sent by
short message service. The five character input modes are upper case letters,
3-2 Address book 702 U User Manual
lower case letters, simplified Chinese, digits and symbols. Each input mode
provides a different set of characters that are accessed using the keypad
and/or the navigation key and soft keys.
Pressing (Star / IP) or (# / Lock) key changes the character
input mode when a name or text message is being entered. The
(Star / IP) key switches the input mode between the upper case letters,
lower case letters, simplified Chinese and digits where as the (# /
Lock) key switches the input mode to symbol mode only.
The selected input mode is shown with an icon that appears in the left corner
of the scratch pad box located at the bottom of the LCD screen as shown in
the table below.
Mode Icon
Upper case letter
Lower case letter
Simplified Chinese
Digits
Symbols
3.1.2 Upper Case/ Lower Case Mode
To select characters for a name or text message that you wish to enter press
the key on the keypad until the character appears in the scratch pad box at
the bottom of the LCD screen. When the desired character is displayed in
the scratch pad box, press the to move the character and the cursor to
the right in the name/text display field at the top of the LCD screen.
Pressing a different key on the keypad to enter the next character has the
same result. If you do not take any action the character displayed in the
scratch pad box is automatically moved to the name/text display field after
approximately one second.
Characters can be deleted from the scratch pad box or name/text display
field using the right soft key (Clear).
3.1.3 Digit Mode
To enter digits press the key on the keypad with the corresponding number.
When the key is pressed the digit appears in the name/text field. Digits can
be deleted from the name/text display field using the right soft key
(Clear).
702 U User Manual Address book 3-3
3.1.4 Symbol Mode
Use the navigation key to highlight a symbol in the menu for
selection. Press the left soft key (Ok) to display the symbol in the
name/text field. After each symbol is selected the phone automatically
returns to the previous input character mode. Additional symbols are
available if the selection menu has an up ( ) or down ( ) arrow. Press
the navigation key or to view the symbols.
Symbols can be deleted from the name/text display field using the right soft
key (Clear). Press the key multiple times to clear the symbol from
the name/text field.
Name/Text field
Symbol Selection Menu
Selected Symbol
OK Clear
Cursor
Character Input Mode
3.1.5 Simplified Chinese Mode
To select a Chinese character for a name or text message that you wish to
enter, press the key(s) on the keypad that represent the initial sound
(constant or vowel) of the pronunciation of the character. The characters that
have this initial sound appear in the selection menu box at the bottom of the
LCD screen. Use the navigation key to scroll to the desired
character. Press the left soft key (Ok) to display the character in
the name/text field. In most cases the selection menu will display a set of
new characters that are often associated with initial selection in a phrase. If
the next character in the phrase is listed you may select it. Otherwise start a
new selection process.
3-4 Address book 702 U User Manual
Additional characters are available if the selection menu has an up ( ) or
down ( ) arrow. Press the navigation key or to view the extra
characters.
Characters can be deleted from the scratch pad box or name/text display
field using the right soft key (Clear).
3.2 Group Info
You can separate phone numbers into several categories or groups. A group
is a number of individuals considered together because of certain similarities
such as business associates, friends or family members. Each group can be
assigned a distinctive ringing pattern or tone. When the phone receives a
call you can identify the caller as a member of a group by the type of
ringing. Since a group is assigned a unique ring pattern or tone you can
determine whether the call is from business associate, friend or family
member.
Group Names
Family Colleague VIP Others
Friend Classmate Partner Black List
Note: Assign the name and phone number of any individual to the “Black List.”
whose call you wish to reject. Entries found in the Black List will not ring
the phone. If you do not subscribe to a Caller ID service or the calling party
has block the information from being sent the phone will ring.
3.2.1 Assigning a Ringing Pattern to a Group Name
Addressesx
xx
x Group Info x
xx
x Set Ring x
xx
x Select Ringing Pattern
1. Press the right soft key (Addresses) to access the menu
options.
2. Use the navigation key or to reach Group Info and press the
left soft key (Ok) to select.
3. Use the navigation key or to select a Group (Family, Friend,
Colleague etc.) and press the left soft key (Ok) to select.
4. Use the navigation key or to select Set Ring and press the left
soft key (Ok) to select.
702 U User Manual Address book 3-5
5. Use the navigation key or to scroll between the Ringing
Patterns. When changing the ringing patterns, the phone automatically
rings.
6. Press the left soft key (Ok) to select and return to the Group
Info menu.
7. To exit and return to standby mode press .
3.2.2 Modifying Group Member Information
Addressesx
xx
x Group Info x
xx
x Browse x
xx
x Select Member Namex
xx
xDetailsx
xx
xEdit
1. Press the right soft key (Addresses) to access the menu
options.
2. Use the navigation key or to reach Group Info and press the
left soft key (Ok) to select.
3. Use the navigation key or to select a Group (Family, Friend,
Colleague etc.) and press the left soft key (Ok) to select. If
there are no entries in the group, the LCD displays flashes ”No Record”.
4. Use the navigation key or to reach Browse and press the left
soft key (Ok) to select. The names of the group members are
displayed on the LCD screen.
5. Use the navigation key or to highlight a group member name’s
and then press the left soft key (Details) to select. The full
record name, phone number and group are displayed on the LCD screen.
6. Press the right soft key (Back) to return to the list of group
members or the left soft key (Options) to edit entry.
3-6 Address book 702 U User Manual
7. Use the navigation key or to reach Edit and then press the left
soft key (Ok) to select.
8. Modify the name (up to 12 letters or leave blank if desire) by pressing
the keys on the phone then press the left soft key (Ok). If no
name is entered, the phone number is use for the name.
9. Modify the phone number (up to 24 digits) by pressing the keys on the
phone and then press the left soft key (Ok).
If you do not enter a phone number, “Error” is displayed on the
LCD screen of the phone.
If the LCD display flashes “Exists” after you enter a number it
means there is already an entry with the exact same name and
phone number stored in the phone’s memory.
10. Choose a Group by pressing or and then press the left soft
key (Ok) to select
11. The phone enters the information and returns to the<Group
Name>Options menu. Press the right soft key (Back) to return
to the list of group names.
12. Press (End) to exit the menu and return to stand-by mode.
3.2.3 Deleting a Group Member from the Address Book
Addressesx
xx
x Group Info x
xx
x Browse x
xx
x Select Member Namex
xx
xDetailsx
xx
xDelete Entry
1. Press the right soft key (Addresses) to access the menu
options.
2. Use the navigation key or to reach Group Info and press the
left soft key (Ok) to select.
3. Use the navigation key or to select a Group (Family, Friend,
Colleague etc.) and press the left soft key (Ok) to select. If
there are no entries in the group, the LCD displays flashes ”No Record”.
702 U User Manual Address book 3-7
4. Use the navigation key or to select Browse and press the left
soft key (Ok) to select. The names of the group members are
displayed on the LCD screen.
5. Use the navigation key or to highlight a group member name’s
and press the left soft key (Details) to select. The full record
name, phone number and group are displayed on the LCD screen.
6. Press the right soft key (Back) to return to the list of group
members or the left soft key (Options) to delete entry.
7. Use the navigation key or to reach Delete Entry and then press
the left soft key (Ok) to select.
8. Press the left soft key (Ok) to delete the phone number. The
phone erases the information and returns to the list of group members.
9. Press the right soft key (Cancel) to stop the deletion of the
phone number and return to the Options menu. Press the right soft key
(Back) to return to the list of group members.
10. Press the right soft key (Exit) or (End) to exit the menu
and return to stand-by mode.
3.3 Storing Names and Phone Numbers
Addressesx
xx
x Add Entry x
xx
x Enter Namex
xx
x Enter Phonex
xx
xNumberx
xx
xSelect Group
You can store up to 500 frequently used phone numbers in the memory of
the handset.
1. Press the right soft key (Addresses) to access the menu
options.
3-8 Address book 702 U User Manual
2. Use the navigation key or to reach Add Entry and press the
left soft key (Ok) to select.
3. Enter the person’s name (up to 12 letters) by pressing the keys on the
phone or leave blank if desire. Press the left soft key (Ok) to
enter. If no name is entered, the phone number is use for the name.
4. Enter the phone number (up to 24 digits) by pressing the keys on the
phone and then press the left soft key (Ok).
If you do not enter a phone number, “Error” is displayed on the
LCD screen of the phone.
If the LCD display flashes “Exists” after you enter a number it
means there is already an entry with the exact same name and
phone number stored in the phone’s memory.
5. Choose a Group by pressing or and then press the left soft
key (Ok).
6. The phone enters the information and displays the new entry in the
address book. Press the left soft key (Details) to show the
particulars of the new entry.
7. Press the right soft key (Exit) or (End) to exit the menu
and return to stand-by mode.
Note: The address book information can be changed, deleted or lost if the
following occurs:
Discharge of static electricity or electrical noise strikes the
phone.
The phone is brought to the service center for repair.
Fully discharged.
No battery for an extended period of time.
3.4 Making a Call Using a Stored Phone Number
Addressesx
xx
x Search x
xx
x Enter Namex
xx
xSend Key
1. Press the right soft key (Addresses) to access the menu
options.
702 U User Manual Address book 3-9
2. Use the navigation key or to reach Search and press the left
soft key (Ok) to select.
3. Enter the person’s name (up to 12 letters) you want to find or leave
blank. Press the left soft key (Ok) to enter.
4. The names that begin with the letters entered and the telephone
number is displayed. If the desired name is not displayed press
or to search through the address book. If you did not enter a
name the address book displays the first entry, press or to
search through the address book.
5. Press to dial the phone number displayed on the LCD of the
phone.
Note:
If there are no records in the address book, the LCD will display
“No Record”.
3-10 Address book 702 U User Manual
3.5 Speed Dialing
3.5.1 Assigning a Phone Number for Speed Dialing
Addressesx
xx
x Speed Dial x
xx
x Setx
xx
x Select Phone Numberx
xx
xDone
Ten numbers stored in the address book can be assigned to the keys
thru for single key dialing.
1. Press the right soft key (Addresses) to access the menu
options.
2. Use the navigation key or to reach Speed Dial and press the
left soft key (Ok) to select.
3. To scroll between the Keys, press the navigation key or . If no
phone number is assigned to a Key, press the left soft key (Set).
4. Search the address book for the desired name and/or phone number
using the navigation keys or , press the left soft key
(Ok) to select it. If there are no phone numbers in the address book the
“No Record” is displayed on the LCD screen.
5. The phone enters the information and displays the entry assigned to the
key on the LCD screen. Press the left soft key (Options) to
access a menu to cancel the assignment.
6. Press the right soft key (Back) to return to the address book
menu or (End) to exit the menu and return to stand-by mode.
3.5.2 Speed Dialing
This function allows the address book entries to be dialed via the keys
thru .
1. Press the desired single dial key and hold for more than one second.

702 U User Manual Address book 3-11
“1” will be displayed on the screen first and 2 seconds later the entry
in the address book will be displayed.
2. Press to dial the phone number displayed on the LCD of the
phone.
Note:
If there is no corresponding entry in the address book, the key will
function normally.
3-12 Address book 702 U User Manual
3.6 Deleting
3.6.1 Delete one by one from the Address Book
Addressesx
xx
x Delete Entry x
xx
x Delete Onex
xx
x Select Phone Numberx
xx
xDone
1. Press the right soft key (Addresses) to access the menu
options.
2. Use the navigation key or to reach Delete Entry and press the
left soft key (Ok) to select.
3. Use the navigation key or to reach Delete One and press the
left soft key (Ok) to select.
4. Press or to scroll through the address book to search for the
desired name and phone number and then press the left soft key
(Delete) to select.
5. Press the left soft key (Ok) to delete the phone number. The
phone erases the information and displays the current entries in the
address book
6. Press the right soft key (Cancel) to stop the deletion of the
phone number and return to the address book.
7. Press (End) to exit the menu and return to stand-by mode.
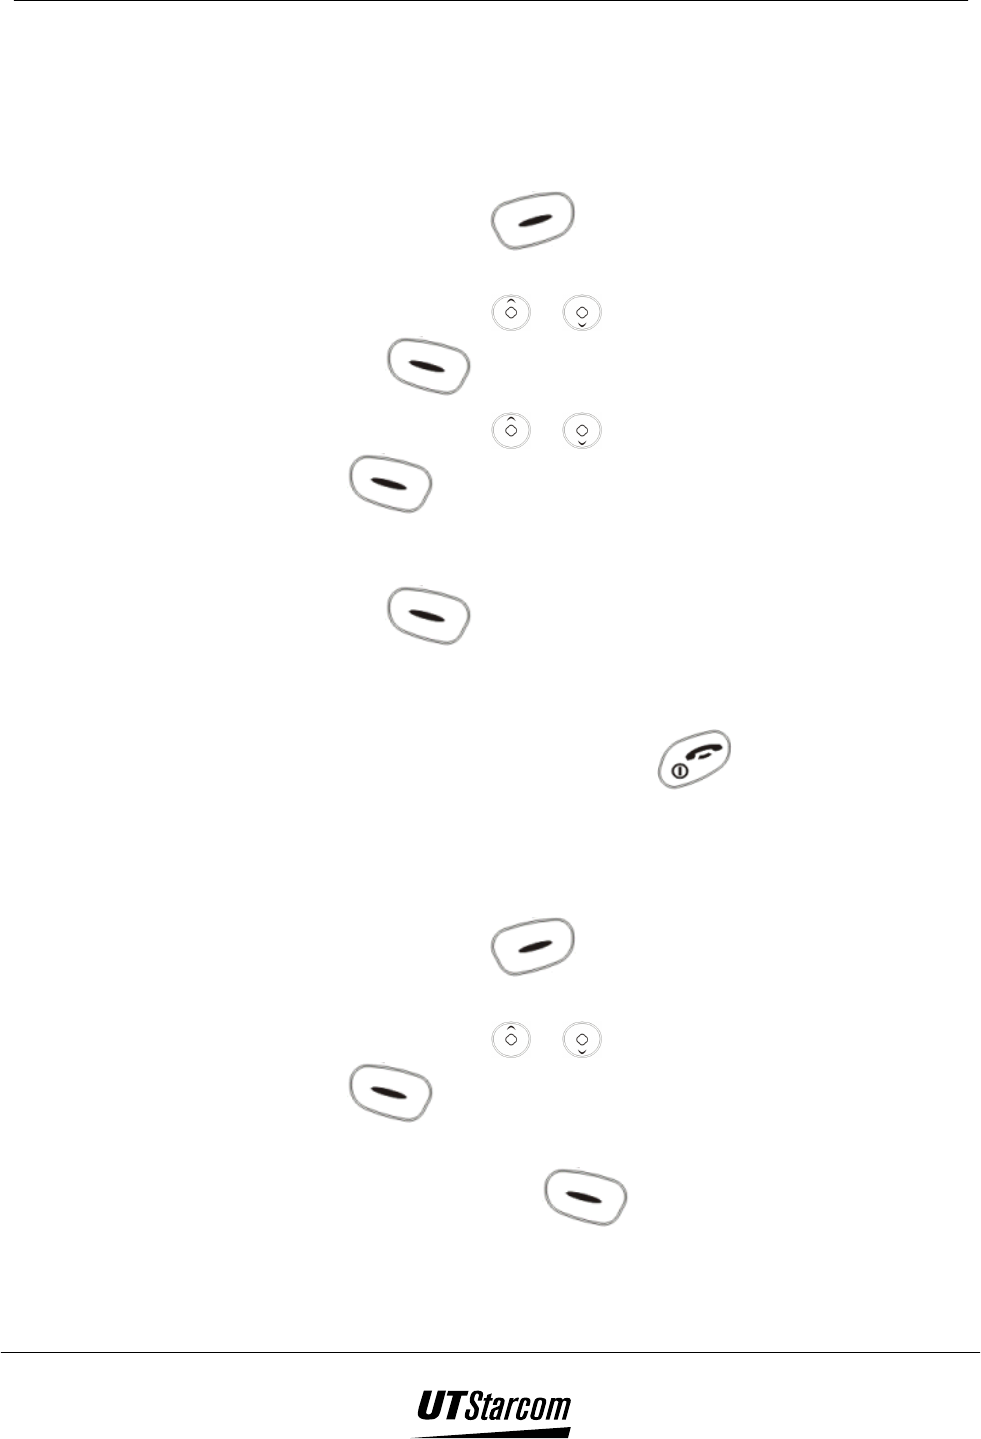
702 U User Manual Address book 3-13
3.6.2 Deleting the Address book
Addressesx
xx
x Delete Entry x
xx
x Delete Allx
xx
x Enter Passwordx
xx
xDone
1. Press the right soft key (Addresses) to access the menu
options.
2. Use the navigation key or to reach Delete Entry and press the
left soft key (Ok) to select.
3. Use the navigation key or to reach Delete All and press the left
soft key (Ok) to select
4. The address book is password protected. When “Enter Code:” is
displayed on the LCD screen enter the six-digit password then press the
left soft key (Ok). If the correct password has been entered, the
phone will erase the all entries in the address book.
The default password is 8-8-8-8-8-8.
5. To exit and return to standby mode press (End).
3.7 Modify Entry in Address Book
Addressesx
xx
x Search x
xx
x Enter Namex
xx
x Select Phone Numberx
xx
xDetailsx
xx
xOptionsx
xx
xEdit
x
xx
xDone
1. Press the right soft key (Addresses) to access the menu
options.
2. Use the navigation key or to reach Search and press the left
soft key (Ok) to select.
3. Enter the person’s name (up to 12 letters) you want to find or leave
blank. Press the left soft key (Ok) to enter.
3-14 Address book 702 U User Manual
4. The names that begin with the letters entered and the telephone number
is displayed. If the desired name is not displayed press or to
search through the address book. If you did not enter a name the address
book displays the first entry, press or to search through the
address book.
5. Use the navigation key or to highlight a phone number and
then press the left soft key (Details) to select. The full record
name, phone number and group are displayed on the LCD screen.
6. Press the right soft key (Back) to return to the address book or
the left soft key (Options) to edit entry.
7. Use the navigation key or to reach Edit and then press the left
soft key (Ok) to select.
8. Modify the name (up to 12 letters or leave blank if desire) by pressing
the keys on the phone then press the left soft key (Ok). If no
name is entered, the phone number is use for the name.
9. Modify the phone number (up to 24 digits) by pressing the keys on the
phone and then press the left soft key (Ok).
If you do not enter a phone number, “Error” is displayed on the
LCD screen of the phone.
If the LCD display flashes “Exists” after you enter a number it
means there is already an entry with the exact same name and
phone number stored in the phone’s memory.
10. Choose a Group by pressing or and then press the left soft
key (Ok) to select
11. The phone enters the information and displays the details of the entry on
the LCD screen. Press the right soft key (Back) to return to the
address book.
702 U User Manual Address book 3-15
12. Press the right soft key (Exit) or (End) to exit the menu
and return to stand-by mode.
Note:
If there are no records in the address book, the LCD will display “No
Record”.
3.8 Memory
Addressesx
xx
x Memory x
xx
xDone
Displays a count of the phone numbers stored in the address book of the
phone. The count provides the number of phone numbers assigned to each
group, the total number stored and the remaining capacity to store phone
numbers.
1. Press the right soft key (Addresses) to access the menu
options.
2. Use the navigation key or to reach Memory and press the left
soft key (Ok) to select.
3. Use the navigation key or to scroll up or down to view the
number of phone numbers assigned to each group, the total number
stored and the remaining capacity.
4. Press the left soft key (Back) to return to the Addresses menu
or (End) to exit and return to stand-by mode.

3-16 Address book 702 U User Manual
BLANK PAGE
4
Other Essential Functions
4. Other Essential Functions
4.1 Profiles
Profiles provide a means to customize the setting of the phone to suit your
personal needs for an event such as a meeting or use outdoors. You can
custom tailor four different profiles Standard, Meeting, Silent and Outdoor
to fit four different environments. Each profile allows you to set the
microphone mode, ringing volume, ringing mode, ringing tone, incoming
message tone, alarm clock tone, and enable or disable the keypad tone and
the out of service area alarm. Once you have modified one or all four
profiles, select a profile to that best suits your needs.
Default Settings for the Profiles
Option Standard Meeting Silent Outdoor
Whisper Mode Off On Off On
Ring Volume 3 1 0 5
Ring Mode Ringing Ring Once Off Ascending
Ring Tone Ring 1 Ring 1 Ring 1 Ring 1
Message Tone Ring 2 Ring 2 Ring 2 Ring 2
Alarm Tone Ring 4 Ring 4 Ring 4 Ring 4
Keypad Tone Off Off Off On
Alert Tone On On On Off
The default factory setting is Standard.
4.1.1 Profile Option Descriptions:
Whisper Mode:
When enabled, the microphone volume is adjusted to allow you to speak in a
whisper, without affecting the voice quality. You can set the whisper mode to either
ON or OFF. The default setting is setting is OFF.
Ringing Volume:
Adjusts the ringing volume level of the phone’s ringer for incoming calls, received
SMS messages, and the alarm clock. You can select one of the six ringing volume
levels (1- Lowest to 6 - Highest) that are available. The default ringing volume
level setting is 3.
Ring Mode:

4-2 Other Essential Functions 702 U User Manual
Controls the ringing style of the ringing tone or pattern selected for the phone’s
ringer and alarm clock. Four options are available:
Ring Once – One time only.
Ascending – Slowly increase to maximum volume.
Ringing – No change to the selected ringing tone pattern.
OFF – Disables all ringing tones. If the phone is set to OFF, no ringing tone,
message alert tone or warning tone will be heard.
The default ring mode setting is Ringing.
Ring Tone:
You can select one of the six different types (1 to 6) of ringing tones or one of the
eighteen different (7 to 24) melodies to sound when an incoming call is received.
The default ringing tone setting is Ring1.
Message Tone:
You can select one of the six different types (1 to 6) of ringing tones or one of the
eighteen different (7 to 24) melodies to sound to indicate an incoming SMS
message. The default message tone setting is Ring2.
Alarm Clock Tone:
You can select one of the six different types (1 to 6) of ringing tones or one of the
eighteen different (7 to 24) melodies to sound when the alarm clock timer expires.
The default alarm clock tone setting is Ring4.
Keypad Tone:
Each time a key is pressed on the phone a tone is heard. You can set the keypad
tone to ON or OFF. The default keypad tone setting is ON.
Alert Tone:
You can select whether an alerting tone is heard in the earpiece of the handset when
a handover occurs during your phone conversation or the handset is out of the
service area.
A handover is the process of transferring a call from one cell site to another as the
handset moves through the service area. The handover tone indicates that the
handset is searching for to a cell site with a stronger radio signal in the service area
to maintain the communication link. If the handover is successful you won’t notice
any difference in the quality conversation since the connection is not broken.
However, if the handover fails the quality of the conversation will degrade, as the
radio signal grows weaker. The handover tone provides an early alert to the
possibility of a service interruption during a conversation. The default Alert Tone
setting is ON.
4.1.2 Enable a Profile
Menux
xx
xProfilex
xx
xSelect Profilex
xx
xEnablex
xx
xDone
702 U User Manual Other Essential Functions 4-3
1. Press the left soft key (Menu) to access the menu options.
2. Use the navigation key or to reach Profiles and press the left
soft key (Ok) to select.
3. Use the navigation key or to reach (Standard, Meeting, Silent
or Outdoor) and press the left soft key (Ok) to select.
4. Use the navigation key or to reach (Enable) and press the left
soft key (Ok) to select.
5. To return to standby mode press (End).
4.1.3 Modify a Profile
Menux
xx
xProfilex
xx
xSelect Profilex
xx
xSetx
xx
xWhisper Modex
xx
xRing Volumex
xx
xRing
Modex
xx
xRing Tonex
xx
x
Message Tonex
xx
xAlarm Tonex
xx
xKeypad Tonex
xx
xAlert Tonex
xx
xDone
1. Press the left soft key (Menu) to access the menu options.
2. Use the navigation key or to reach Profiles and press the left
soft key (Ok) to select.
3. Use the navigation key or to reach (Standard, Meeting, Silent
or Outdoor) and press the left soft key (Ok) to select.
4. Use the navigation key or to reach (Set) and press the left soft
key (Ok) to select.
5. Use the navigation key or to reach Whisper Mode and press
the left soft key (Ok) to select.
4-4 Other Essential Functions 702 U User Manual
6. Use the navigation key or to reach (ON or OFF) and press the
left soft key (Ok) to select.
7. Use the navigation key or to select a Ringing Volume and
press the left soft key (Ok) to select.
8. Use the navigation key or to adjust the volume (1 –Lowest to 6
– Highest) and press the left soft key (Ok) to select.
9. Use the navigation key or to reach Ring Mode and press the
left soft key (Ok) to select.
10. Use the navigation key or to select a ring mode (Ring Once,
Ascending, Ringing or OFF) and press the left soft key (Ok)
to select.
11. Use the navigation key or to reach Ring Tone and press the
left soft key (Ok) to select.
12. Use the navigation key or to select a ring tone (Ring 1, Ring 2,
etc.) and press the left soft key (Ok) to select. When changing
the ringing tone types, the phone automatically rings.
13. Use the navigation key or to reach Message Tone and press the
left soft key (Ok) to select.
14. Use the navigation key or to select a message tone (Ring 1,
Ring 2, etc.) and press the left soft key (Ok) to select. When
changing the ringing tone types, the phone automatically rings.
15. Use the navigation key or to reach Alarm Tone and press the
left soft key (Ok) to select.
702 U User Manual Other Essential Functions 4-5
16. Use the navigation key or to select an alarm tone (Ring 1, Ring
2, etc.) and press the left soft key (Ok) to select. When
changing the ringing tone types, the phone automatically rings.
17. Use the navigation key or to reach Keypad Tone and press the
left soft key (Ok) to select.
18. Use the navigation key or to turn the keypad tone (ON or
OFF) and press the left soft key (Ok) to select.
19. Use the navigation key or to reach Alert Tone and press the
left soft key (Ok) to select.
20. Use the navigation key or to turn the alert tone (ON or OFF)
and press the left soft key (Ok) to select.
21. To exit and return to standby mode press (End).
4.2 SMS
The Short Message Service (SMS) is a network service, which enables you
to send and receive text messages up to 116 English or 58 Chinese
characters in length. Messages can be edited, stored, deleted and forward to
others using your phone.
Before you can send any messages, you will need to contact your service
provider to subscribe to the SMS. Your service provider can tell you if the
service is available in your area and answer any questions.
Prior to sending any text messages make sure the receiving phone is SMS
compatible.
4.2.1 How to Enter Letters, Characters and Symbols Using the Keypad
As shown in the table below, more than one character (letters and a number)
is assigned to each key of the keypad. The available character set depends
on the input character mode and whether a phone number, name or text
message is being entered into the handset. Only the characters (0-9, *, #
and pause for IP only) are available for a phone number whereas the letters
(A, a, B, b, C, etc), numbers and symbols can be used for a name or text
message.
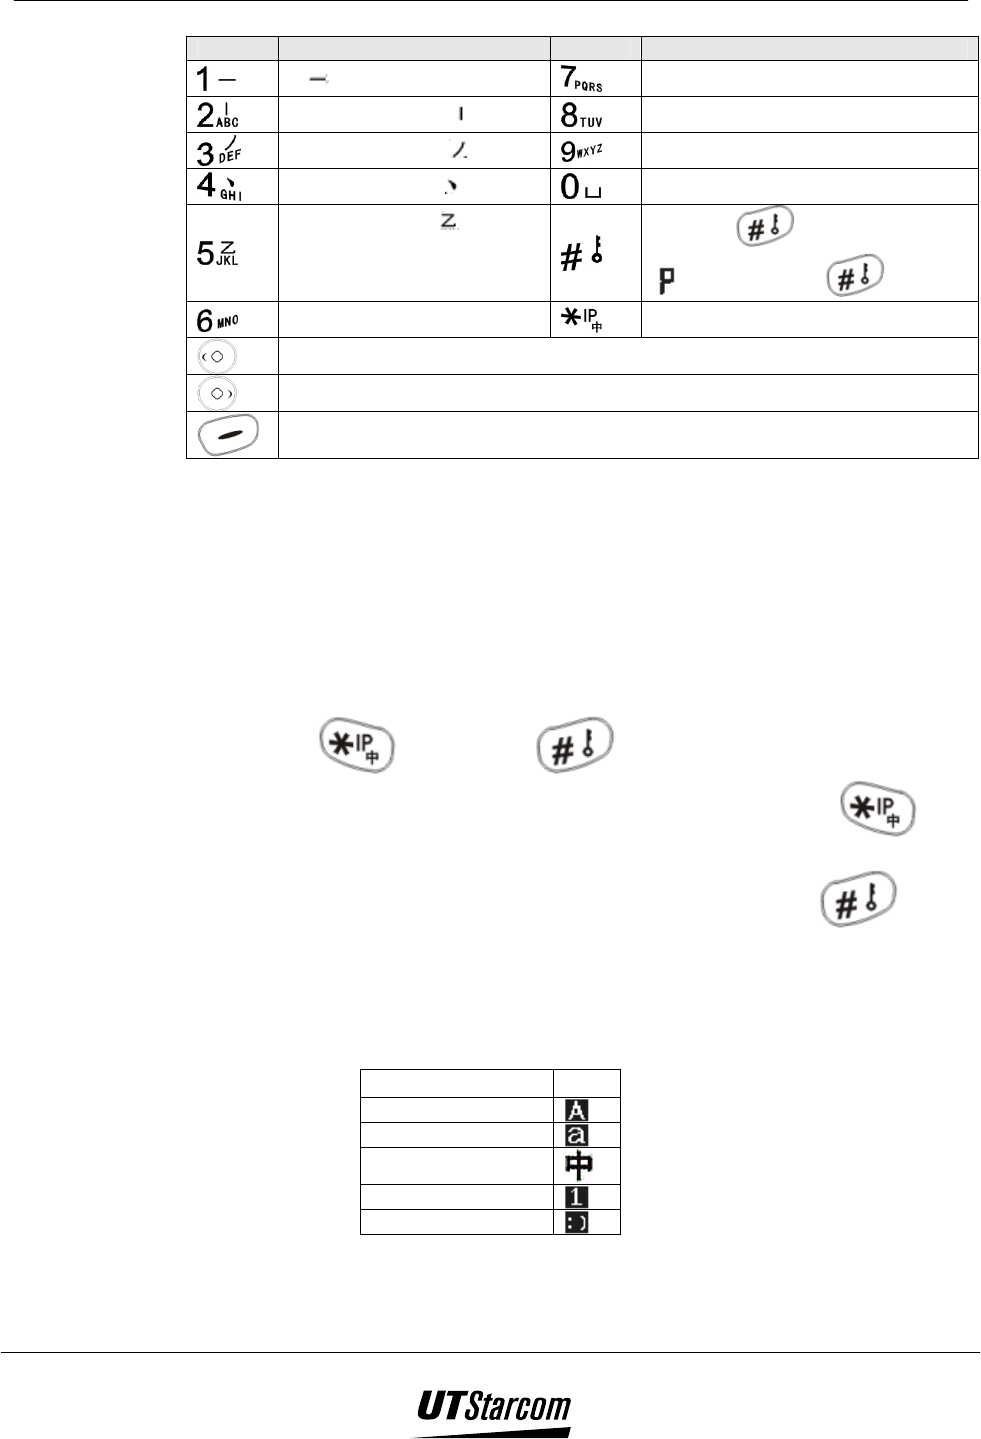
4-6 Other Essential Functions 702 U User Manual
Key Displayed Character Key Displayed Character
1 . , : ; ? ! ( ) * # % @ P (p) Q (q) R (r) 7
A (a) B (b) C (c) 2 T (t) U (u) V (v) 8
D (d) E (e) F (f) 3 W (w) X (x) Y (y) 9
G (g) H (h) I (i) 4 Space 0
J (j) K (k) L (l) 5
# (Press for #)
(Press and hold )
M (m) N (n) O (o) 6 ¾
¾¾
¾ - (Phone number only)
Moves the cursor to the left
Moves the cursor to the right
Press to delete the last character entered.
Press and hold to delete all characters
4.2.2 Character Input Mode
The 702-U offers five types of character modes that can be used when
entering a name in the address book or writing a text message to be sent by
short message service. The five character input modes are upper case letters,
lower case letters, simplified Chinese, digits and symbols. Each input mode
provides a different set of characters that are accessed using the keypad
and/or the navigation key and soft keys.
Pressing (Star / IP) or (# / Lock) key changes the character
input mode when a name or text message is being entered. The
(Star / IP) key switches the input mode between the upper case letters,
lower case letters, simplified Chinese and digits where as the (# /
Lock) key switches the input mode to symbol mode only.
The selected input mode is shown with an icon that appears in the left corner
of the scratch pad box located at the bottom of the LCD screen as shown in
the table below.
Mode Icon
Upper case letter
Lower case letter
Simplified Chinese
Digits
Symbols
702 U User Manual Other Essential Functions 4-7
4.2.3 Upper Case/ Lower Case Mode
To select characters for a name or text message that you wish to enter press
the key on the keypad until the character appears in the scratch pad box at
the bottom of the LCD screen. When the desired character is displayed in
the scratch pad box, press the to move the character and the cursor to
the right in the name/text display field at the top of the LCD screen.
Pressing a different key on the keypad to enter the next character has the
same result. If you do not take any action the character displayed in the
scratch pad box is automatically moved to the name/text display field after
approximately one second.
Characters can be deleted from the scratch pad box or name/text display
field using the right soft key (Clear).
4.2.4 Digit Mode
To enter digits press the key on the keypad with the corresponding number.
When the key is pressed the digit appears in the name/text field. Digits can
be deleted from the name/text display field using the right soft key
(Clear).
4.2.5 Symbol Mode
Use the navigation key to highlight a symbol in the menu for
selection. Press the left soft key (Ok) to display the symbol in the
name/text field. After each symbol is selected the phone automatically
returns to the previous input character mode. Additional symbols are
available if the selection menu has an up ( ) or down ( ) arrow. Press
the navigation key or to view the symbols.
Symbols can be deleted from the name/text display field using the right soft
key (Clear). Pressed the key multiple times to clear the symbol
from the name/text field.
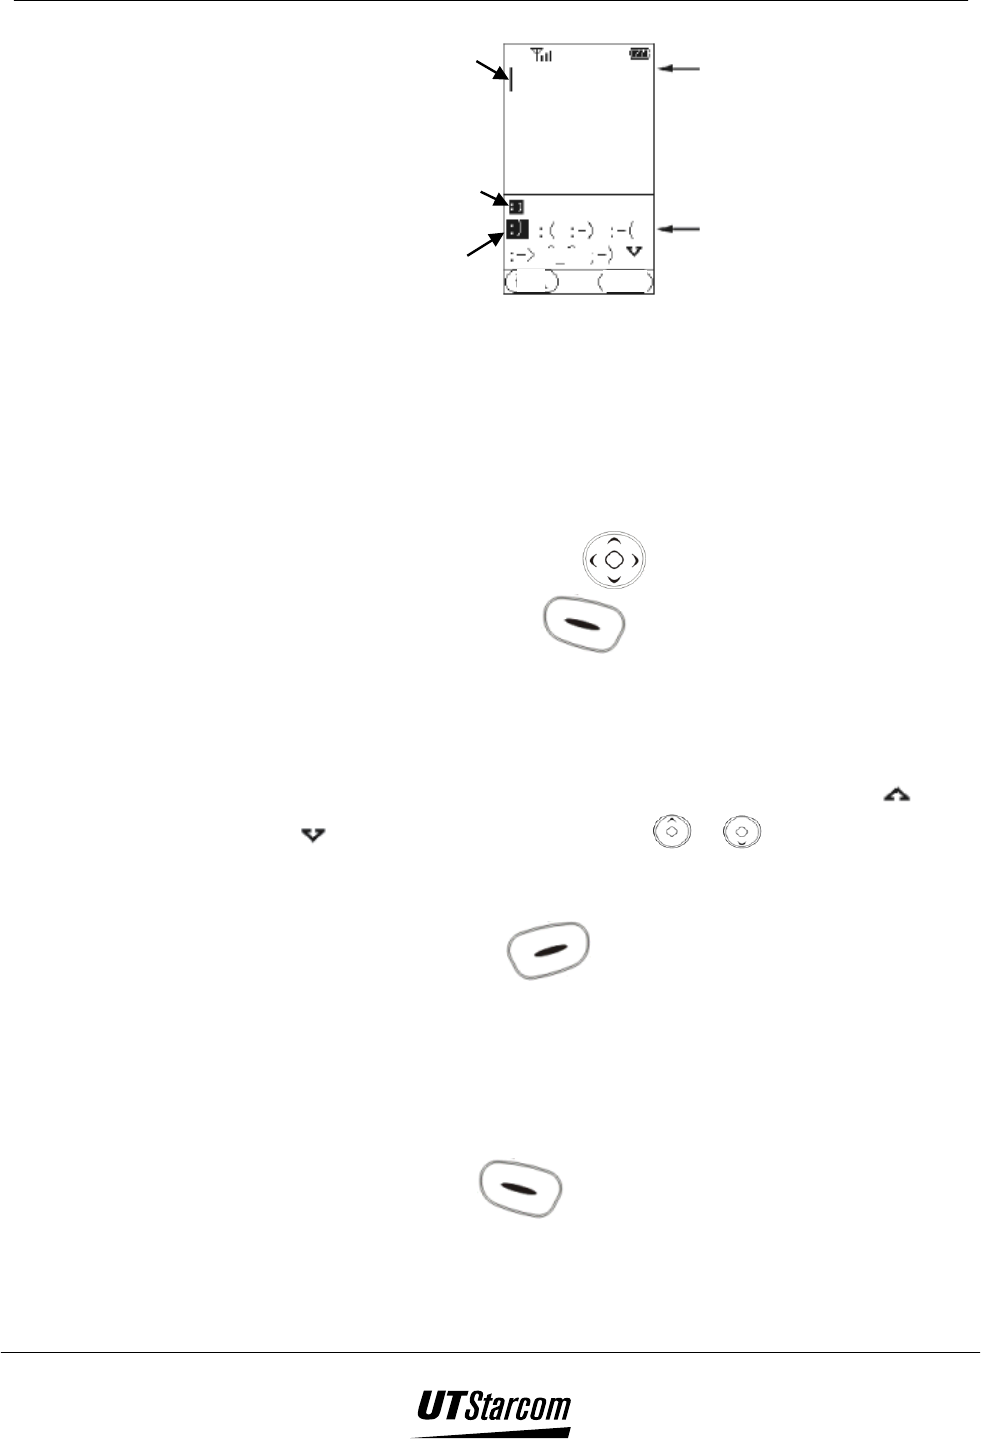
4-8 Other Essential Functions 702 U User Manual
Name/Text field
Symbol Selection Menu
Selected Symbol
OK Clear
Cursor
Character Input Mode
4.2.6 Simplified Chinese Mode
To select a Chinese character for a name or text message that you wish to
enter, press the key(s) on the keypad that represent the initial sound
(constant or vowel) of the pronunciation of the character. The characters that
have this initial sound appear in the selection menu box at the bottom of the
LCD screen. Use the navigation key to scroll to the desired
character. Press the left soft key (Ok) to display the character in
the name/text field. In most cases the selection menu will display a set of
new characters that are often associated with initial selection in a phrase. If
the next character in the phrase is listed you may select it. Otherwise start a
new selection process.
Additional characters are available if the selection menu has an up ( ) or
down ( ) arrow. Press the navigation key or to view the extra
characters.
Characters can be deleted from the scratch pad box or name/text display
field using the right soft key (Clear).
4.2.7 Edit a Message
4.2.7.1 Writing and Sending a Short Message
Menux
xx
xSMSx
xx
xEdit Messagex
xx
xEnter Textsx
xx
xOptionsx
xx
xSendx
xx
xDone
1. Press the left soft key (Menu) to access the menu options.
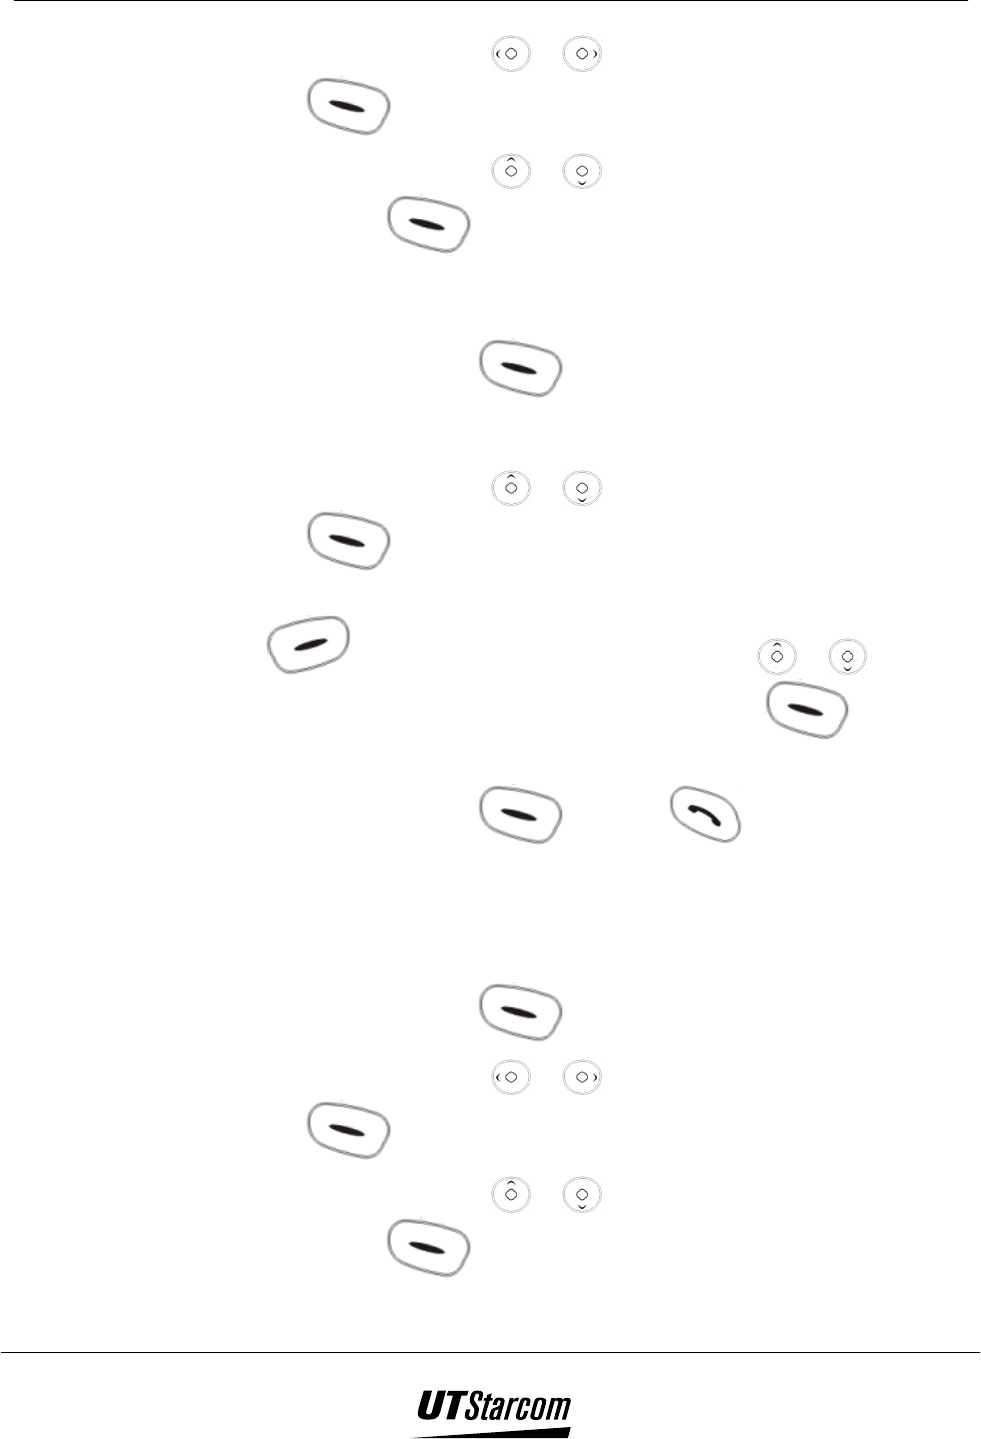
702 U User Manual Other Essential Functions 4-9
2. Use the navigation key or to reach SMS and press the left soft
key (Ok) to select.
3. Use the navigation key or to reach Edit Message and press the
left soft key (Ok) to select. If you have previously entered a
message it will be displayed on the LCD screen.
4. Enter the text message you want to send using the keypad.
5. Press the left soft key (Options) to send the message on the
LCD screen. If you do not enter a text message, “Empty” is displayed
on the LCD screen of the phone.
6. Use the navigation key or to reach Send and press the left soft
key (Ok) to select.
7. Enter the phone number of the recipient or press the right soft key
(Search) to search the address book. Use or to search
through the address book and press the left soft key (Ok) to
select.
8. Press the left soft key (Send) or to dial the phone
number displayed on the LCD of the phone.
4.2.7.2 Writing and Saving a Short Message
Menux
xx
xSMSx
xx
xEdit Messagex
xx
xEnter Textsx
xx
xOptionsx
xx
xSavex
xx
xDone
1. Press the left soft key (Menu) to access the menu options.
2. Use the navigation key or to reach SMS and press the left soft
key (Ok) to select.
3. Use the navigation key or to reach Edit Message and press the
left soft key (Ok) to select.
4. Enter the text message you want to save using the keypad.
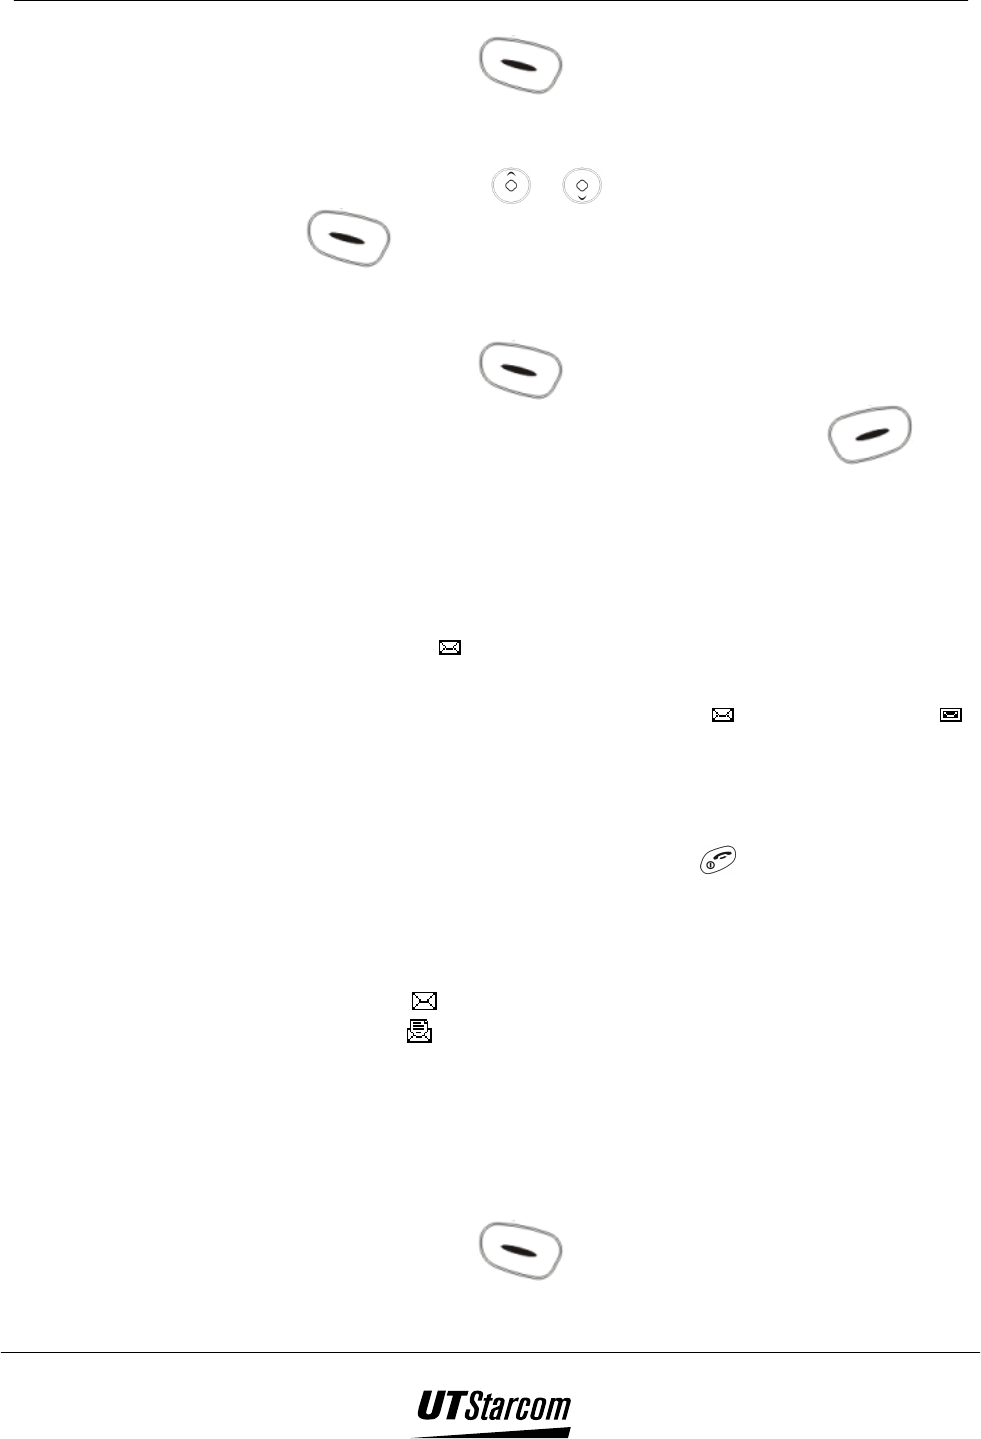
4-10 Other Essential Functions 702 U User Manual
5. Press the left soft key (Options) to save the message on the
LCD screen. If you do not enter a text message, “Empty” is displayed
on the LCD screen of the phone.
6. Use the navigation key or to reach Save and press the left soft
key (Ok) to select. If the maximum number of messages (10)
has been saved, “Update?” is displayed on the LCD screen of the
phone.
7. Press the left soft key (Ok) to delete the oldest message and
save the new message in Drafts or press the right soft key
(Cancel).
4.2.8 Inbox
When you receive a message, the message alert tone will sound, and “New
Message” will appear on the LCD screen. If there are any unread messages
or new messages, the icon will appear on the screen.
The Inbox can store up to 100 messages. When the 100th message is
received, “Inbox Full” is displayed, and the icon will change to .
When the inbox is full, the phone cannot receive any messages. You will
need to erase some of the existing messages, so that new messages can
be received.
When the Inbox is selected, the number of unread messages will appear
briefly i.e. “New 5”. Press any key except or wait 2 seconds, the
message list will appear on the screen. If there are no unread messages,
the list will be displayed directly. The list shows the sender’s phone
number and name (if it is saved in the address book). The messages are
listed according to the time received. The latest message is displayed
first. The icon in front of the header means that the message has not
yet been read; in front of the header means that the message has been
read.
4.2.8.1 Read Messages
Menux
xx
xSMSx
xx
xInboxx
xx
xSelect Messagex
xx
x Done
1. Press the left soft key (Menu) to access the menu options.
702 U User Manual Other Essential Functions 4-11
2. Use the navigation key or to reach SMS and press the left soft
key (Ok) to select.
3. Use the navigation key or to reach Inbox and press the left soft
key (Ok) to select. If the Inbox is empty, “No Record” is
displayed on the LCD screen of the phone.
4. Press navigation key or to scroll to the desired message and
press left soft key (Ok) to select.
5. Use navigation key or to browse through the message and
related information (sender and time).
4.2.8.2 Reply to a Message
Menux
xx
xSMSx
xx
xInboxx
xx
xSelect Messagex
xx
xOptionsx
xx
xReplyx
xx
xSendx
xx
xDone
1. Press the left soft key (Menu) to access the menu options.
2. Use the navigation key or to reach SMS and press the left soft
key (Ok) to select.
3. Use the navigation key or to reach Inbox and press the left soft
key (Ok) to select. If the Inbox is empty, “No Record” is
displayed on the LCD screen of the phone.
4. Press navigation key or to scroll to the desired message and
press left soft key (Ok) to select.
5. Press the left soft key (Options) to reply to the message on the
LCD screen.
6. Use the navigation key or to reach Reply and press the left soft
key (Ok) to select.
7. Enter the text message you want to send using the keypad.
4-12 Other Essential Functions 702 U User Manual
8. Press the left soft key (Options) to send the message on the
LCD screen. If you do not enter a text message, “Empty” is displayed
on the LCD screen of the phone.
9. Use the navigation key or to reach Send and press the left soft
key (Ok) to select.
10. Press the left soft key (Send) or to send the message.
4.2.8.3 Forward a Message
Menux
xx
xSMSx
xx
xInboxx
xx
xSelect Messagex
xx
xOptionsx
xx
xForwardx
xx
xSendx
xx
xDone
1. Press the left soft key (Menu) to access the menu options.
2. Use the navigation key or to reach SMS and press the left soft
key (Ok) to select.
3. Use the navigation key or to reach Inbox and press the left soft
key (Ok) to select. If the Inbox is empty, “No Record” is
displayed on the LCD screen of the phone.
4. Press navigation key or to scroll to the desired message and
press left soft key (Ok) to select.
5. Press the left soft key (Options) to forward the message on the
LCD screen.
6. Use the navigation key or to reach Forward and press the left
soft key (Ok) to select.
7. Enter the phone number of the recipient or press the right soft key
(Search) to search the address book. Use or to search
through the address book and press the left soft key (Ok) to
select.
702 U User Manual Other Essential Functions 4-13
8. Press the left soft key (Send) or to dial the phone
number displayed on the LCD of the phone.
4.2.8.4 Delete a Message
Menux
xx
xSMSx
xx
xInboxx
xx
xSelect Messagex
xx
xOptionsx
xx
xDelete x
xx
xDelete Okx
xx
xDone
1. Press the left soft key (Menu) to access the menu options.
2. Use the navigation key or to reach SMS and press the left soft
key (Ok) to select.
3. Use the navigation key or to reach Inbox and press the left soft
key (Ok) to select. If the Inbox is empty, “No Record” is
displayed on the LCD screen of the phone.
4. Press navigation key or to scroll to the desired message and
press left soft key (Ok) to select.
5. Press the left soft key (Options) to delete the message on the
LCD screen.
6. Use the navigation key or to reach Delete and press the left soft
key (Ok) to select. “Delete?” is displayed on the LCD screen
of the phone.
7. Press the left soft key (Ok) to erase the message.
4.2.8.5 Call Back
Menux
xx
xSMSx
xx
xInboxx
xx
xSelect Messagex
xx
xOptionsx
xx
xCall Backx
xx
x Done
You can call the message sender’s phone.
1. Press the left soft key (Menu) to access the menu options.
4-14 Other Essential Functions 702 U User Manual
2. Use the navigation key or to reach SMS and press the left soft
key (Ok) to select.
3. Use the navigation key or to reach Inbox and press the left soft
key (Ok) to select. If the Inbox is empty, “No Record” is
displayed on the LCD screen of the phone.
4. Press navigation key or to scroll to the desired message and
press left soft key (Ok) to select.
5. Press the left soft key (Options) to dial the phone number of
the message on the LCD screen.
6. Use the navigation key or to reach Call Back and press the left
soft key (Ok) to select.
7. Press the left soft key (Send) or to dial the phone
number displayed on the LCD of the phone.
4.2.8.6 Store Phone number to Address book
Menux
xx
xSMSx
xx
xInboxx
xx
xSelect Messagex
xx
xOptionsx
xx
xStorex
xx
x Done
1. Press the left soft key (Menu) to access the menu options.
2. Use the navigation key or to reach SMS and press the left soft
key (Ok) to select.
3. Use the navigation key or to reach Inbox and press the left soft
key (Ok) to select. If the Inbox is empty, “No Record” is
displayed on the LCD screen of the phone.
4. Press navigation key or to scroll to the desired message and
press left soft key (Ok) to select.
702 U User Manual Other Essential Functions 4-15
5. Press the left soft key (Options) to add the phone number of
the message on the LCD screen to the address book.
6. Use the navigation key or to reach Store and press the left soft
key (Ok) to select.
7. Enter the person’s name (up to 12 letters) by pressing the keys on the
keypad or leave blank if desire. Press the left soft key (Ok) to
enter. If no name is entered, the phone number is use for the name.
If the LCD display flashes “Exists” after you enter a name it
means there is already an entry with the exact same name and
phone number stored in the phone’s memory.
8. Choose a Group by pressing or and then press the left soft
key .
9. The phone enters the information and returns to the Options menu.
Press the right soft key (Back) to return to the list of incoming
messages.
10. Press (End) to exit the menu and return to stand-by mode.
4.2.9 Outbox
The last 100 messages sent are stored in Outbox. When Outbox is selected,
the sent message list appears on the screen. The list shows the recipient’s
phone number and name (if it is saved in the address book). The messages
are listed according to the time sent. The latest message sent is displayed
first.
4.2.9.1 Read Messages
Menux
xx
xSMSx
xx
xOutboxx
xx
xSelect Messagex
xx
x Done
1. Press the left soft key (Menu) to access the menu options.
2. Use the navigation key or to reach SMS and press the left soft
key (Ok) to select.

4-16 Other Essential Functions 702 U User Manual
3. Use the navigation key or to reach Outbox and press the left
soft key (Ok) to select. If the Outbox is empty, “No Record”
is displayed on the LCD screen of the phone.
4. Press navigation key or to scroll to the desired message and
press left soft key (Ok) to select.
5. Use navigation key or to browse through the message and
related information (sender and time).
4.2.9.2 Delete a Message
Menux
xx
xSMSx
xx
xOutboxx
xx
xSelect Messagex
xx
xOptionsx
xx
xDelete x
xx
xDelete Okx
xx
xDone
1. Press the left soft key (Menu) to access the menu options.
2. Use the navigation key or to reach SMS and press the left soft
key (Ok) to select.
3. Use the navigation key or to reach Outbox and press the left
soft key (Ok) to select. If the Outbox is empty, “No Record”
is displayed on the LCD screen of the phone.
4. Press navigation key or to scroll to the desired message and
press left soft key (Ok) to select.
5. Press the left soft key (Options) to delete the message on the
LCD screen.
6. Use the navigation key or to reach Delete and press the left soft
key (Ok) to select. “Delete?” is displayed on the LCD screen
of the phone.
7. Press the left soft key (Ok) to erase the message.

702 U User Manual Other Essential Functions 4-17
4.2.9.3 Forward a Message
Menux
xx
xSMSx
xx
xOutboxx
xx
xSelect Messagex
xx
xOptionsx
xx
xForwardx
xx
xSendx
xx
xDone
After forwarding the message, the related information about this message
will be replaced by the new information in the Inbox.
1. Press the left soft key (Menu) to access the menu options.
2. Use the navigation key or to reach SMS and press the left soft
key (Ok) to select.
3. Use the navigation key or to reach Outbox and press the left
soft key (Ok) to select. If the Outbox is empty, “No Record”
is displayed on the LCD screen of the phone.
4. Press navigation key or to scroll to the desired message and
press left soft key (Ok) to select.
5. Press the left soft key (Options) to forward the message on the
LCD screen.
6. Use the navigation key or to reach Forward and press the left
soft key (Ok) to select.
7. Enter the phone number of the recipient or press the right soft key
(Search) to search the address book. Use or to search
through the address book and press the left soft key (Ok) to
select.
8. Press the left soft key (Send) or to dial the phone
number displayed on the LCD of the phone.
4.2.10 Drafts
You can store 10 draft messages in the draft box. When Drafts is selected,
the list will be displayed on the screen. The name of the draft is the first 5
Chinese characters or 10 English Characters.
4-18 Other Essential Functions 702 U User Manual
4.2.10.1 Read Messages
Menux
xx
xSMSx
xx
xDraftsx
xx
xSelect Messagex
xx
x Done
1. Press the left soft key (Menu) to access the menu options.
2. Use the navigation key or to reach SMS and press the left soft
key (Ok) to select.
3. Use the navigation key or to reach Draft and press the left soft
key (Ok) to select. If Drafts box is empty, “No Record” is
displayed on the LCD screen of the phone.
4. Press navigation key or to scroll to the desired message and
press left soft key (Ok) to select.
5. Use navigation key or to browse through the message and
related information (sender and time).
4.2.10.2 Modifying a Message
Menux
xx
xSMSx
xx
xDraftsx
xx
xSelect Messagex
xx
xOptionsx
xx
xEditx
xx
xSavex
xx
x Done
1. Press the left soft key (Menu) to access the menu options.
2. Use the navigation key or to reach SMS and press the left soft
key (Ok) to select.
3. Use the navigation key or to reach Drafts and press the left
soft key (Ok) to select. If Drafts box is empty, “No Record” is
displayed on the LCD screen of the phone.
4. Press navigation key or to scroll to the desired message and
press left soft key (Ok) to select.
5. Press the left soft key (Options) to modify the message on the
LCD screen.
702 U User Manual Other Essential Functions 4-19
6. Use the navigation key or to reach Edit and press the left soft
key (Ok) to select.
7. Modify the text message using the keypad.
8. Press the left soft key (Options) to save the message on the
LCD screen. If you do not enter a text message, “Empty” is displayed
on the LCD screen of the phone.
9. Use the navigation key or to reach Save and press the left soft
key (Ok) to select.
4.2.10.3 Send the Message
Menux
xx
xSMSx
xx
xDraftsx
xx
xSelect Messagex
xx
xOptionsx
xx
xSendx
xx
xDone
1. Press the left soft key (Menu) to access the menu options.
2. Use the navigation key or to reach SMS and press the left soft
key (Ok) to select.
3. Use the navigation key or to reach Drafts and press the left
soft key (Ok) to select. If Drafts box is empty, “No Record” is
displayed on the LCD screen of the phone.
4. Press navigation key or to scroll to the desired message and
press left soft key (Ok) to select
5. Press the left soft key (Options) to send the message on the
LCD screen.
6. Use the navigation key or to reach Send and press the left soft
key (Ok) to select.
7. Enter the phone number of the recipient or press the right soft key
(Search) to search the address book. Use or to search
4-20 Other Essential Functions 702 U User Manual
through the address book and press the left soft key (Ok) to
select.
8. Press the left soft key (Send) or to dial the phone
number displayed on the LCD of the phone.
4.2.10.4 Delete a Message
Menux
xx
xSMSx
xx
xInboxx
xx
xSelect Messagex
xx
xOptionsx
xx
xDelete x
xx
xDelete Okx
xx
xDone
1. Press the left soft key (Menu) to access the menu options.
2. Use the navigation key or to reach SMS and press the left soft
key (Ok) to select.
3. Use the navigation key or to reach Drafts and press the left
soft key (Ok) to select.
4. Press navigation key or to scroll to the desired message and
press left soft key (Ok) to select. If Drafts box is empty, “No
Record” is displayed on the LCD screen of the phone.
5. Press the left soft key (Options) to delete the message on the
LCD screen.
6. Use the navigation key or to reach Delete and press the left soft
key (Ok) to select. “Delete?” is displayed on the LCD screen
of the phone.
7. Press the left soft key (Ok) to erase the message.
4.2.11 Clear Messages
4.2.11.1 Clear Messages from the Inbox
Menux
xx
xSMSx
xx
xClearx
xx
xClear Inboxx
xx
xEnter Passwordx
xx
xDone
702 U User Manual Other Essential Functions 4-21
1. Press the left soft key (Menu) to access the menu options.
2. Use the navigation key or to reach SMS and press the left soft
key (Ok) to select.
3. Use the navigation key or to reach Clear and press the left soft
key (Ok) to select.
4. Use the navigation key or to reach Clear Inbox and press the
left soft key (Ok) to select.
5. The Inbox is password protected. When “Enter Code:” is displayed on
the LCD screen enter the six-digit password and press the left soft key
(Ok). If the correct password has been entered, the phone will
erase all messages in the Inbox only.
The default password is 8-8-8-8-8-8.
4.2.11.2 Clear Messages from the Outbox
Menux
xx
xSMSx
xx
xClearx
xx
xClear Outboxx
xx
xEnter Passwordx
xx
xDone
1. Press the left soft key (Menu) to access the menu options.
2. Use the navigation key or to reach SMS and press the left soft
key (Ok) to select.
3. Use the navigation key or to reach Clear and press the left soft
key (Ok) to select.
4. Use the navigation key or to reach Outbox and press the left
soft key (Ok) to select.
5. The Outbox is password protected. When “Enter Code:” is displayed
on the LCD screen enter the six-digit password and press the left soft
4-22 Other Essential Functions 702 U User Manual
key (Ok). If the correct password has been entered, the phone
will erase all messages in the Outbox only.
The default password is 8-8-8-8-8-8.
4.2.11.3 Clear Messages from the Drafts Box
Menux
xx
xSMSx
xx
xClearx
xx
xClear Draftsx
xx
xEnter Passwordx
xx
xDone
1. Press the left soft key (Menu) to access the menu options.
2. Use the navigation key or to reach SMS and press the left soft
key (Ok) to select.
3. Use the navigation key or to reach Clear and press the left soft
key (Ok) to select.
4. Use the navigation key or to reach Drafts and press the left
soft key (Ok) to select.
5. The Drafts box is password protected. When “Enter Code:” is
displayed on the LCD screen enter the six-digit password and press the
left soft key (Ok). If the correct password has been entered, the
phone will erase all messages in the Drafts box only.
The default password is 8-8-8-8-8-8.
4.2.11.4 Clear All Messages from the Phone
Menux
xx
xSMSx
xx
xClearx
xx
xClear Allx
xx
xEnter Passwordx
xx
xDone
1. Press the left soft key (Menu) to access the menu options.
2. Use the navigation key or to reach SMS and press the left soft
key (Ok) to select.
3. Use the navigation key or to reach Clear and press the left soft
key (Ok) to select.
702 U User Manual Other Essential Functions 4-23
4. Use the navigation key or to reach Clear All and press the left
soft key (Ok) to select.
5. All messages boxes are password protected. When “Enter Code:” is
displayed on the LCD screen enter the six-digit password and press the
left soft key (Ok). If the correct password has been entered, the
phone will erase all messages in all the message boxes.
The default password is 8-8-8-8-8-8.
4.3 Settings
Settings provide the means to adjust/view the fundamental functions of the
phone. You can change and/or set several different parameters such as the
security level, password, language, date and time, and LCD screen contrast
to fit your needs.
4.3.1 Own Number
Menux
xx
xSettingx
xx
xOwn Number
You can display your the phone number on the LCD screen.
1. Press the left soft key (Menu) to access the menu options.
2. Use the navigation key or to reach Setting and press the left
soft key (Ok) to select.
3. Use the navigation key or to reach Own Number and press the
left soft key (Ok) to display your telephone number.
4.3.2 Alarm
You can set the alarm clock built into the phone for a specific time. You can
set the alarm time, set the alarm to repeat, and turn the snooze on and off.
The alarm uses the 24 hours format to set the alarm. The alarm provides a
30 second burst of tone when the timer expires and displays the current date
and time on the LCD screen to alert you. The Ring Volume, Ring Mode and
Alerting Tone control the volume of the alarm.
If the phone is off-hook or receiving an incoming call and the timer expires
the alarm will not sound.
4-24 Other Essential Functions 702 U User Manual
4.3.2.1 Alarm Clock Option Descriptions:
4.3.2.1.1 On/Off
Enable or disable the alarm clock function. You can select ON or OFF.
4.3.2.1.2 Set Time:
Allows the time for the alarm to be specified.
4.3.2.1.3 Repeat Type:
Controls the number of times the alarm will sound during the week once it
has been enabled. There are six options available:
Once: One time only in a 24 hour period when the Alarm expirers.
Everyday: One time each day of the week when the Alarm expirers.
Mon. ~ Fri.: One time each day Monday thru Friday when the Alarm expirers.
Mon. ~ Sat.: One time each day Monday thru Saturday when the Alarm
expirers.
Every Sat.: One time only on Saturday when the Alarm expirers.
Every Sun. One time only on Sunday when the Alarm expirers.
4.3.2.1.4 Snooze:
After the alarm expires, the alarm will sound three additional times every 5-
mimutes intervals. You can select ON or OFF.
4.3.2.2 Setting the Alarm Clock:
Menux
xx
xSettingx
xx
xAlarmx
xx
xSet Timex
xx
xRepeat Typex
xx
xSnoozex
xx
xDone
1. Press the left soft key (Menu) to access the menu options.
2. Use the navigation key or to reach Setting and press the left
soft key (Ok) to select.
3. Use the navigation key or to reach Alarm and press the left
soft key (Ok) to select.
4. Use the navigation key or to reach (Set Time) and press the
left soft key (Ok) to select.
5. Enter the time by pressing the numerical keys on the dial pad. The
cursor automatically moves to the next field when a valid entry has been
702 U User Manual Other Essential Functions 4-25
made. To move the cursor between the fields, press the navigation keys
or . Once the time has been set, press the left soft key
(Ok).
6. Use the navigation key or to reach (Repeat Type) and press
the left soft key (Ok) to select.
7. Use the navigation key or to select a repeat type (Once,
Everyday etc) and press the left soft key (Ok) to select.
8. Use the navigation key or to reach Snooze and press the left
soft key (Ok) to select.
9. Use the navigation key or to select (ON or OFF) and press the
left soft key (Ok) to select
10. To exit and return to standby mode press (End).
4.3.3 Date/Time
The phone has a real time clock that displays the data and time on the LCD.
This function allows you to set the clock for a specific date and time.
The date can be set from 2000-1-1 to 2049-12-31.
The clock uses the 24-hour format and cannot be changed to a 12-
hour format.
4.3.3.1 Setting the Date and Time
Menux
xx
xSettingx
xx
xDate/Timex
xx
xSet Datex
xx
xSet Timex
xx
x Done
1. Press the left soft key (Menu) to access the menu options.
2. Use the navigation key or to reach Setting and press the left
soft key (Ok) to select.

4-26 Other Essential Functions 702 U User Manual
3. Use the navigation key or to reach Date/Time and press the
left soft key (Ok) to select.
4. Enter the date by pressing the numerical keys on the dial pad. The cursor
automatically moves to the next field when a valid entry has been made.
To move the cursor between the fields, press the navigation keys or
.
5. Enter the time by pressing the numerical keys on the dial pad. The
cursor automatically moves to the next field when a valid entry has been
made. To move the cursor between the fields, press the navigation keys
or . Once the time has been set, press the left soft key
(Ok) to set.
6. To exit and return to standby mode press (End).
4.3.4 Answer Mode
You can select which keys on the keypad when press will answer an
incoming call.
4.3.4.1 Answer Mode Option Descriptions:
4.3.4.1.1 Any Key Answer
Answer an incoming call with any key except the right soft key
and .
4.3.4.1.2 Talk Key Answer
Answer an incoming call only with the left soft key (Answer) or
.
4.3.4.2 Setting the Answer Mode:
Menux
xx
xSettingx
xx
xAnswer Modex
xx
xSelect Modex
xx
x Done
1. Press the left soft key (Menu) to access the menu options.
702 U User Manual Other Essential Functions 4-27
2. Use the navigation key or to reach Setting and press the left
soft key (Ok) to select.
3. Use the navigation key or to reach Answer Mode and press the
left soft key (Ok) to select.
4. Use the navigation key or to reach (Any or Talk key Ans) and
press the left soft key (Ok) to select.
5. To exit and return to standby mode press (End).
4.3.5 Language
You can select simplified Chinese or English as the language to be
displayed on the LCD screen of the phone. The default language setting is
Chinese.
4.3.5.1.1 Setting the Language:
Menux
xx
xSettingx
xx
x Language x
xx
x Select dialect x
xx
x Done
1. Press the left soft key (Menu) to access the menu options.
2. Use the navigation key or to reach Setting and press the left
soft key (Ok) to select.
3. Use the navigation key or to reach Language and press the left
soft key (Ok) to select.
4. Use the navigation key or to select (Chinese or English) and
press the left soft key (Ok) to select.
5. To exit and return to standby mode press .
4-28 Other Essential Functions 702 U User Manual
4.3.6 IP Phone
This function allows you to enter an IP access number card, account number
and password in the memory of the phone, which can be dialed via the
key.
4.3.6.1.1 Entering an IP Card Number and Password
Menux
xx
xSettingx
xx
x IP Phonex
xx
x Access No. x
xx
x Account No.x
xx
xPasswordx
xx
xDone
1. Press the left soft key (Menu) to access the menu options.
2. Use the navigation key or to reach Setting and press the left
soft key (Ok) to select.
3. Use the navigation key or to reach IP Phone and press the left
soft key (Ok) to select.
4. Enter the IP access number (Maximum of 14 digits including Pause) by
pressing the numerical keys on the dial pad. If you need to add a delay
(~1.5 seconds) between the digits of the IP access number when the
phone dials it. Press and hold down for 2 seconds, the pause
symbol “ ” will be displayed in the number. Once the IP access number
has been entered, press to move the cursor to the IP account
number field.
5. Enter the IP Account number (Maximum of 28 digits including Pause
and #) by pressing the numerical keys on the dial pad. If you need to add
a delay (~1.5 seconds) or # sign between the digits of the IP account
number when the phone dials it. Press and hold down for 2
seconds for a pause “ ” or press for a # sign the symbol will be
displayed in the number. Once the IP access number has been entered,
press to move the cursor to the password field.
6. Enter the password (Maximum of 10 digits including Pause and #) by
pressing the numerical keys on the dial pad. Once the password has been
entered, press the left soft key (Ok) to select.
702 U User Manual Other Essential Functions 4-29
7. To exit and return to standby mode press (End).
4.3.7 Display
You may set the following parameters for the LCD screen of the phone:
4.3.7.1 Backlight
You can adjust the time to light up the LCD screen when you press any key
or an incoming call or message is received. The default backlight setting is
Battery Saving. Three options are available.
OFF: Disable the backlight
Battery Saving: 5 seconds
Normal: 15 seconds
4.3.7.2 Contrast
Adjusts the contrast level of the phone’s LCD screen. You can select one of
the six contrast levels (1- Lowest to 6 - Highest) that are available. The
default contrast level setting is 2.
4.3.7.3 Scheme
You can enter a message or phrase (14 English characters or 7 Chinese
characters) to be displayed on the LCD screen when the phone is in standby
mode. If you do not enter a message, the operator name will be displayed on
the screen. The default scheme message is None.
4.3.7.4 Greetings
You can enter a greeting message (56 English characters or 28 Chinese
characters) to be displayed on the LCD screen of the phone when it is
switched on. If a greeting message is not entered, the power-on animation
will be displayed on the screen. The default greeting message is None.
4.3.7.5 Setting the Display
Menux
xx
xSettingx
xx
x Displayx
xx
x Backlight x
xx
x Contrastx
xx
xSchemex
xx
xGreetingx
xx
xDone
1. Press the left soft key (Menu) to access the menu options.
2. Use the navigation key or to reach Setting and press the left
soft key (Ok) to select.
4-30 Other Essential Functions 702 U User Manual
3. Use the navigation key or to reach Display and press the left
soft key (Ok) to select.
4. Use the navigation key or to reach Backlight and press the left
soft key (Ok) to select.
5. Use the navigation key or to select backlight mode (OFF,
Battery Saving or Normal) and press the left soft key (Ok) to
select.
6. Use the navigation key or to reach Contrast and press the left
soft key (Ok) to select.
7. Use the navigation key or to adjust the volume (1 –Lowest to 6
– Highest) and press the left soft key (Ok) to select.
8. Use the navigation key or to reach Scheme and press the left
soft key (Ok) to select.
9. Enter a message (up to 14 letters) using the keypad or leave blank if
desired. Press the left soft key (Ok) to enter.
10. Use the navigation key or to reach Greeting and press the left
soft key (Ok) to select.
11. Enter a greeting message (up to 56 letters) using the keypad or leave
blank if desired. Press the left soft key (Ok) to enter
12. To return to standby mode press .
4.3.8 Set Security
You can adjust the level of security for long distance calling and access to
the phone.

702 U User Manual Other Essential Functions 4-31
4.3.8.1 Set Security Option Descriptions:
4.3.8.1.1 Toll Call Lock
Prevents any person from using your phone without permission to make
long distance phone call. When the lock is activated, the handset can be
used to dial and answer local calls or use any of the other functions. The
default Toll Call Lock setting is Disable.
4.3.8.1.2 Code Request
Prevents any person from using your phone without permission. When the
Code Request is activated, the handset requests a password when the phone
is switched on. The phone cannot be used to dial, answer calls or use any of
the other functions until the correct password has been entered. The default
Code Request setting is OFF.
4.3.8.1.3 Change Code
The option allows you to change the 6-digit password for the phone.
4.3.8.1.4 Reset All
The option allows you to reset your phone to the default factory setting.
Address book records, short message service records and call logs are not
affected by the reset. The default factory setting are listed in the tables
below:
4.3.8.1.4.1 Profiles Default Settings
Profile Options Standard Meeting Silent Outdoor
Whisper Mode Off On Off On
Ring Volume 3 1 0 5
Ring Mode Ringing Ring Once Off Ascending
Ring Tone Ring 1 Ring 1 Ring 1 Ring 1
Message Tone Ring 2 Ring 2 Ring 2 Ring 2
Alarm Tone Ring 4 Ring 4 Ring 4 Ring 4
Keypad Tone Off Off Off On
Alert Tone On On On Off
4.3.8.1.4.2 Phone Default Setting
Function Default Setting
Profile Standard
Call Log (Duration) 0:00:00
My Picture Picture1
Speed Dial No
Group Ring Ring 1
Game (Set Level) Beginner
Game (First Player) Me First
4-32 Other Essential Functions 702 U User Manual
Game (Set Array) Array1
Game (Set Speed) Slow
Game (Top Score) --
Password 888888
Alarm (On/Off) Off
Alarm (Set Time) 08:00
Alarm (Repeat Type) Once
Alarm (Snooze) Off
Answer Mode Talk Key Answer
Language (Simplified Chinese)
IP Phone setting No
Backlight Battery Saving
Contrast 2
Scheme setting No
Greetings setting No
Toll Call Lock Disable
Code Request Off
4.3.8.2 Setting Security
Menux
xx
xSettingx
xx
xSet Securityx
xx
xToll Call Lockx
xx
xCode Requestx
xx
xChange Code x
xx
xDone
1. Press the left soft key (Menu) to access the menu options.
2. Use the navigation key or to reach Setting and press the left
soft key (Ok) to select.
3. Use the navigation key or to reach Set Security and press the
left soft key (Ok) to select.
4. Use the navigation key or to reach Toll Call Lock and press
the left soft key (Ok) to select.
5. The Toll Call Lock is password protected. When “Enter Code:” is
displayed on the LCD screen enter the six-digit password and press the
left soft key (Ok). If the correct password has been entered, the
LCD screen of the phone will display Enable and Disable.
The default password is 8-8-8-8-8-8
702 U User Manual Other Essential Functions 4-33
6. Use the navigation key or to reach (Enable or Disable) and
press the left soft key (Ok) to select.
7. Use the navigation key or to reach Code Request and press the
left soft key (Ok) to select.
8. Code Request is password protected. When “Enter Code:” is displayed
on the LCD screen enter the six-digit password and press the left soft
key (Ok). If the correct password has been entered, the LCD
screen of the phone will display ON and OFF.
The default password is 8-8-8-8-8-8
9. Use the navigation key or to reach (ON or OFF) and press the
left soft key (Ok) to select.
10. Use the navigation key or to reach Change Code and press the
left soft key (Ok) to select.
11. Enter the current 6-digit password (default password is 8-8-8-8-8-8) and
press the left soft key (Ok) to enter.
12. Enter a new 6-digit password (0~9 only) in the “Enter New Code”
field. Use the navigation key to reach “Confirm Code” field.
13. Re-enter the new password and press the left soft key (Ok) to
complete the change.
14. To exit and return to standby mode press (End).
4.3.8.3 Reset Phone to Default Setting
Menux
xx
xSettingx
xx
xSet Securityx
xx
xReset Al x
xx
xDone
1. Press the left soft key (Menu) to access the menu options.
4-34 Other Essential Functions 702 U User Manual
2. Use the navigation key or to reach Setting and press the left
soft key (Ok) to select.
3. Use the navigation key or to reach Set Security and press the
left soft key (Ok) to select.
4. Use the navigation key or to reach Reset All and press the left
soft key (Ok) to select.
5. Reset All is password protected. When “Enter Code:” is displayed on
the LCD screen enter the six-digit password and press the left soft key
(Ok). If the correct password has been entered, the phone will
reset to the default factory setting.
The default password is 8-8-8-8-8-8
4.4 Tools
4.4.1 Calculator
You can use the calculator to add, subtract, multiply or divide.
Definitions:
Add Subtract Multiple Divide Equals Decimal
During a calculation, you can press right soft key (Clear)
to erase a single character.
To clear all characters, press and hold right soft key
(Clear).
A maximum of 9 digits (including minus sign and decimal) can be
made for each entry.
If the formula violates mathematical principles (such as: 5/0),“Error
“ is displayed on the screen.
If the absolute value of the calculation is larger than 999,999,999,
“Overflow” is displayed on the screen.
702 U User Manual Other Essential Functions 4-35
Example:
1. When “0” is displayed on the screen, enter the first number in the
calculation. To add a minus sign, press (only the first number can
be negative).
2. Press , , or to add, subtract, multiply or divide.
3. Enter the second number.
4. Press to get the results. If you want to operate on the results,
you may repeat steps 2~4 as may times as necessary.
5. Press the right soft key (Clear) to start a new calculation
4.4.1.1 Open Calculator
Menux
xx
xToolsx
xx
xCalculator
1. Press the left soft key (Menu) to access the menu options
2. Use the navigation key or to reach Tools and press the left soft
key (Ok) to select.
3. Use the navigation key or to reach Calculator and press the
left soft key (Ok) to select
4. To exit and return to standby mode press (End).
4.4.2 Calendar
You may view the calendar (solar or lunar) from January 1, 1900 to
December 31, 2049.When the calendar appears on the screen the current
date is highlighted. Use the navigation key to highlight different
calendar days or move from month to month.
Press the left soft key (Lunar) to view the lunar year, month, day
and solar year, month, day of the highlighted date. To return to solar
calendar display, press right soft key (Back).
4-36 Other Essential Functions 702 U User Manual
4.4.2.1 Open Calendar
Menux
xx
xToolsx
xx
xCalendar
1. Press the left soft key (Menu) to access the menu options
2. Use the navigation key or to reach Tools and press the left soft
key (Ok) to select.
3. Use the navigation key or to reach Calendar and press the left
soft key (Ok) to select
4. To exit and return to standby mode press (End).
4.4.3 My Picture
You can select one of eight different pictures to be displayed on the LCD
screen of the phone when it is in standby mode.
4.4.3.1 Selecting a Picture
1. Press the left soft key (Menu) to access the menu options.
2. Use the navigation key or to reach Tools and press the left soft
key (Ok) to select.
3. Use the navigation key or to reach My Picture and press the
left soft key (Ok) to select.
4. Use the navigation key or to browse (Picture 1 to 8) and press
the left soft key (View) to see the picture.
5. Press the left soft key (Ok) to select the pictures or use the
navigation key or to choose a different picture.
6. To exit and return to standby mode press (End).

702 U User Manual Other Essential Functions 4-37
4.5 Games
4.5.1 Reversi
MenuxGamesx
xx
x Reversi
The object of the game is to capture the rival’s pieces by surrounding them
horizontally, vertically or diagonally. After the game ends, player with the
most pieces is the winner.
To move upwards, downwards, leftwards or rightwards, press , ,
or ( , , or ). To move diagonally, press , ,
or . To place a piece, press left soft key or . You may see
the following options after entering this menu:
4.5.1.1 Start
Start the game. The piece with a dot is the pieces latest placed by your rival
(phone). If you want to exit before the game ends, press right soft key
(Back).
4.5.1.2 Set Level
You may select Beginner or Advanced to set the difficulty of the game.
4.5.1.3 First Player
Select Phone First or Me First to determine the player who goes first with
black pieces.
4.5.1.4 Set Array
From array 1~10, select one as the beginning array.
4.5.1.5 Game Rule
It helps you to know how to play the game. Press to scroll through the
text.
4.5.2 EVsan
Menux Games xEVsan
The goal of the game is to move the block “” to the bottom arrow. Press
~ to select the desired block, and press to move the block.
After the game ends, the few the moves, the higher the score. If the score
breaks record, it will be saved as top score.
4-38 Other Essential Functions 702 U User Manual
You may see the following options after entering this menu:
4.5.2.1 Start
While selecting this option, you should select an array (Array1~5) to start
the game.
To exit before the game ends, press right soft key (Back).
4.5.2.2 Top Score
Entering this option, you may view the top scores corresponding to the
arrays. For an array has not been played, the top score is “--”.
4.5.2.3 Game Rule
It helps you to know how to play the game. Press to scroll through the
text.
4.5.3 Wacko
Menux Games xWacko
Press ~, to hit the rat in the corresponding position. The game is
limited to 1 minute. Every time a rat is hit, on point is won. If your score
breaks the record, it will be saved as the top score.
You may see the following options after entering this menu:
4.5.3.1 Start
While entering this option, you may press left soft key (Start) to start
the game. The number shown next to “S:” is the current score, and the
number next to “T:” is the remaining time (second).
While playing the game, you may press left soft key (Pause) to pause
the game. You can continue the paused game by pressing left soft key
(Start).
To exit before the game ends, press right soft key (Back).
4.5.3.2 Top Score
Entering this option, you may view the top scores corresponding to the
speeds. For a speed has not been adopted, the top score is “--”.
4.5.3.3 Set Speed
You may select Slow, Medium or Fast, to set the speed of the game.

702 U User Manual Other Essential Functions 4-39
4.5.3.4 Game Rule
It helps you to know how to play the game.

4-40 Other Essential Functions 702 U User Manual
BLANK PAGE
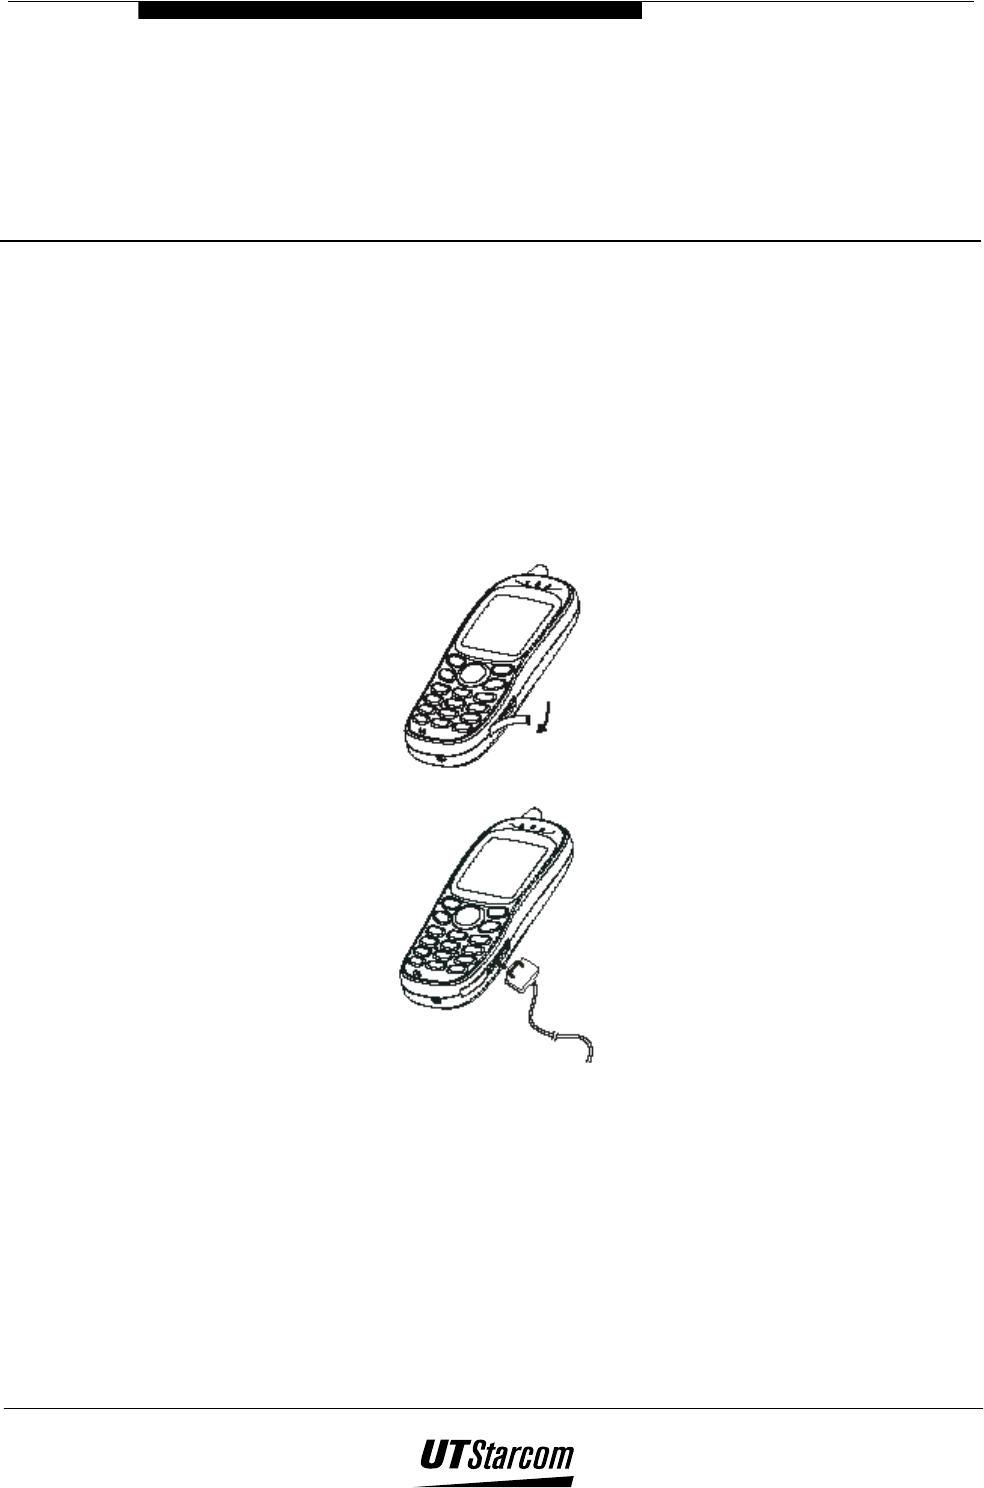
5
Wireless Internet Access
5. Wireless Internet Access
UT 702-U has the capability of wireless Internet access. It can connect to a
computer with 32K wireless data communication. Please refer to PAS USB
modem user manual for operation procedures.
5.1 Connecting to Data Communication Port
Open the cover of data communication port on UTS702-U handset.
Plug the modem to the data communication port on the handset.
(
((
( Note:
Do not reverse the plug.
Please refer to PAS USB cable modem user manual for the connection
between the USB plug and computer USB plug.
Dialing the wireless Internet access can be started after connecting the
handset, computer and USB cable modem.
When disconnecting the handset and the USB cable modem, use thumb
and index finger to press the spring on the plug then pull out the plug.
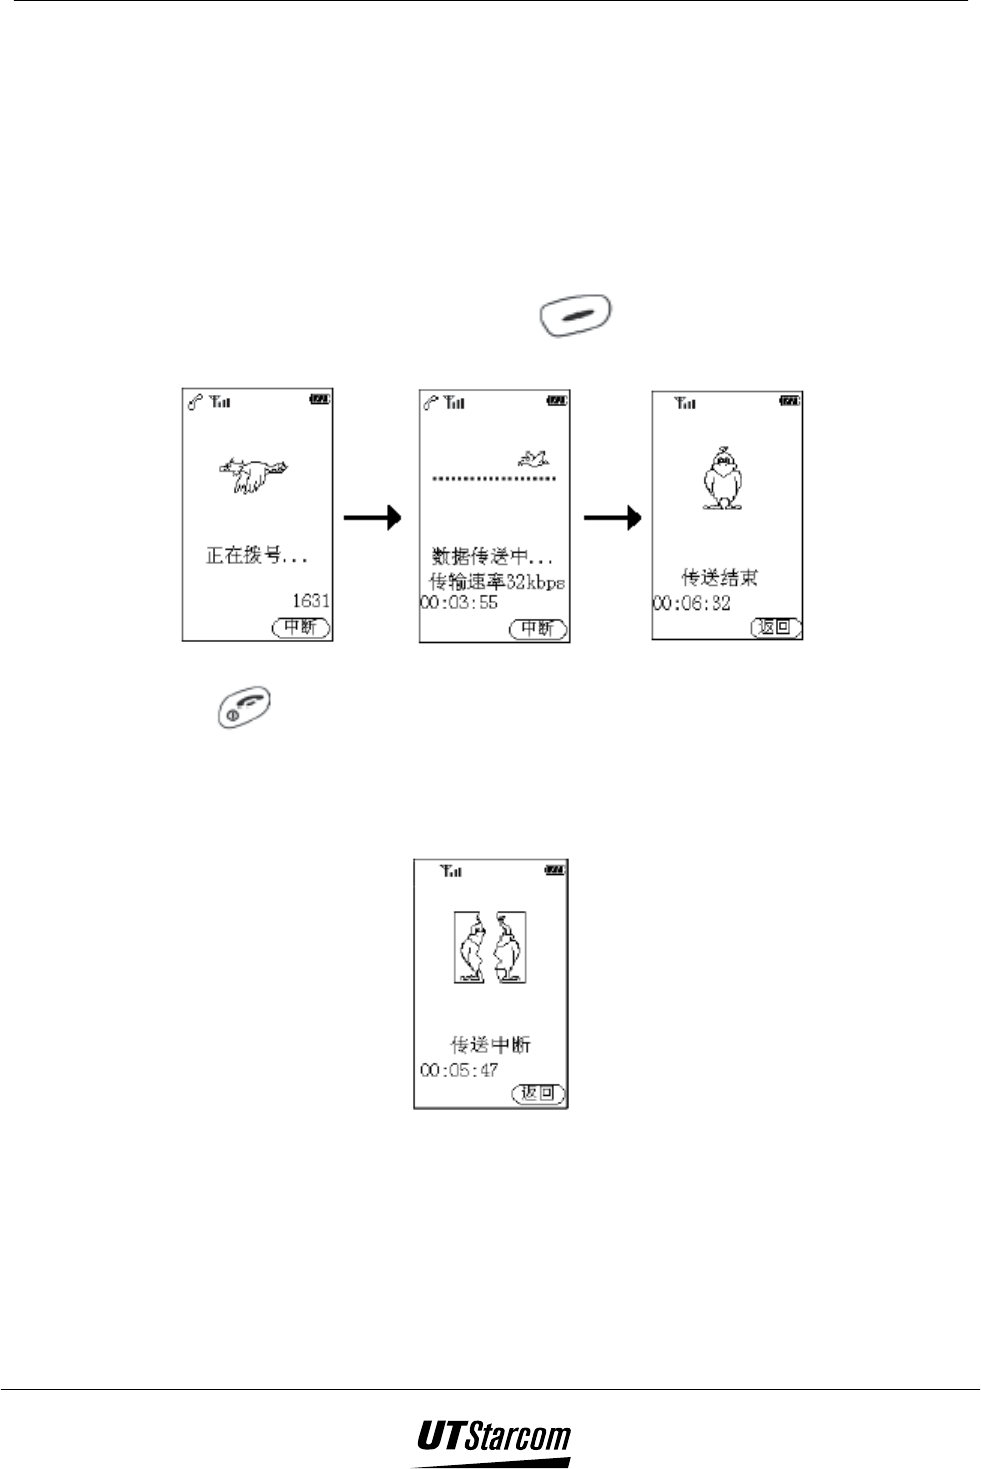
5-2 Maintenance & Troubleshooting 702 U User Manual
5.2 Dialing to Internet
(
((
( Note: Please refer to USB modem user manual for detailed steps of
the Dialing access.
During the dialing process, the handset screen displays “Dialing…” signal
and the dialing number. After successful connection, the screen displays
“Data Transmitting…” and the speed and approximated time for
downloading. Press the left soft key to disconnect directly or
disconnect through computer. The screen displays “End Transmitting.”
(
((
( Note:
If key is pressed during data transmission, the handset screen returns
directly to standby screen after the transmission is over.
The screen display “Transmission Interrupted” if the connection is interrupted
abnormally due to USB/internet disconnection. Press any keys or wait for two
seconds to return to stand by screen.
Disconnection may occur if the signal is weak. It’s suggested to use wireless
internet when the handset signal is at level 1 or above.
Avoid using wireless Internet while traveling in a high speed in order to prevent
disconnection.
The time for wireless access is also limited by the power of the battery. To
access Internet for a long period of time, please fully charge the battery to
insure the phone has enough power.
When accessing Internet through the handset, the voice function of the handset
is not available.

5-4 Maintenance & Troubleshooting 702 U User Manual
BLANK PAGE
6
Maintenance &
Troubleshooting
6. Maintenance & Troubleshooting
6.1 Phone Maintenance
Use a soft dry cloth for cleaning to wipe off any accumulated dust or
fingerprints.
Use a soft cloth dampened in water for cleaning to wipe off any heavily
accumulated dust and dirt.
Do not use harsh chemicals, cleaning solvents or strong detergents to
clean the phone.
6.2 Troubleshooting
Before requesting help please check the following.
Symptom Diagnosis Solution
Unit properly turned on?
Press and hold for 2 seconds.
Battery connected? Install the battery properly
The Unit does not work
Dead Battery? Connect the charger to the Phone.
Plug in the charger.
Charger connected to the
phone?
Connect the Charger to the Phone. The Battery will not charge.
(Battery icon on screen is not
blinking) Charger plugged into the wall
outlet?
Plug in the Charger.
Sufficient Signal Strength? Move to a place with stronger signal.
Keypad lock on?
Press and hold for 2 seconds.
Cannot make calls.
Misdialed Number? Enter the correct number to place the
call.
Ringer Muted? Un-mute Ringer
No ringing.
Low Ringer Volume? Increase Volume level.
Is there an obstacle surrounding
you that is preventing signals to
pass?
Change your location. The call reception is bad (Static,
sound cuts in/out, fades etc.)
Using the phone in moving
vehicle?
Slow down vehicle or stop while using
the phone.
If the malfunction is beyond this table, or the corresponding solution is
invalid, please contact UTStarcom PAS Customer Service Center.
ADDRESS: Building 2, Yile Industry Park No.129, Wenyi Road, Hangzhou
310012, PRC
Hot line: 86 800-8571082, 86 0571-8892345
FAX: 0571-88914678
E-mail: xiaolingtong@utstar.com

6-2 Maintenance & Troubleshooting 702 U User Manual
BLANK PAGE