UTStarcom Korea Technologies UTS-708SY PCS Band Cellular Telephone User Manual Revised Manual
UTStarcom Korea Technologies Ltd. PCS Band Cellular Telephone Revised Manual
UserManual.wiki
>
UTStarcom Korea Technologies
>
UTS 708SY User Manual
Revised Manual
Navigation menu
Upload a User Manual
Namespaces
Wiki Guide
HTML
PDF
Info
Views
User Manual
Discussion / Help
Navigation
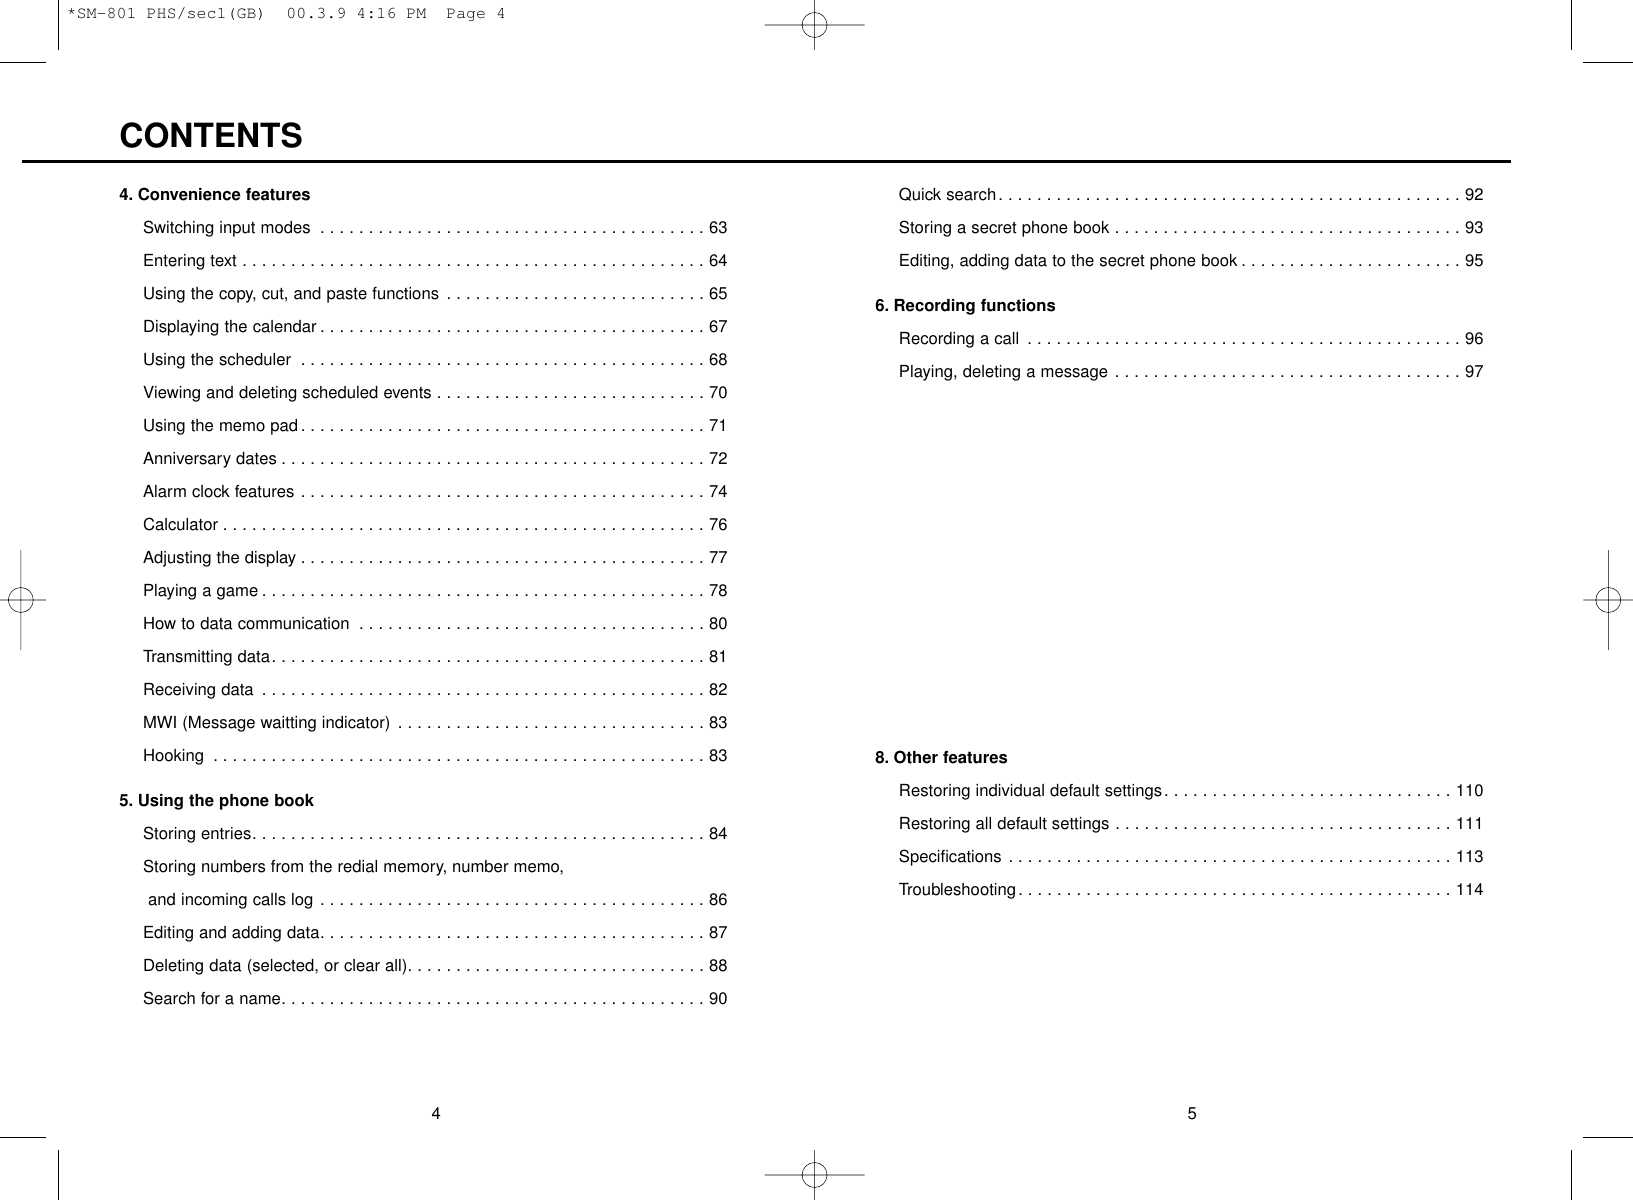
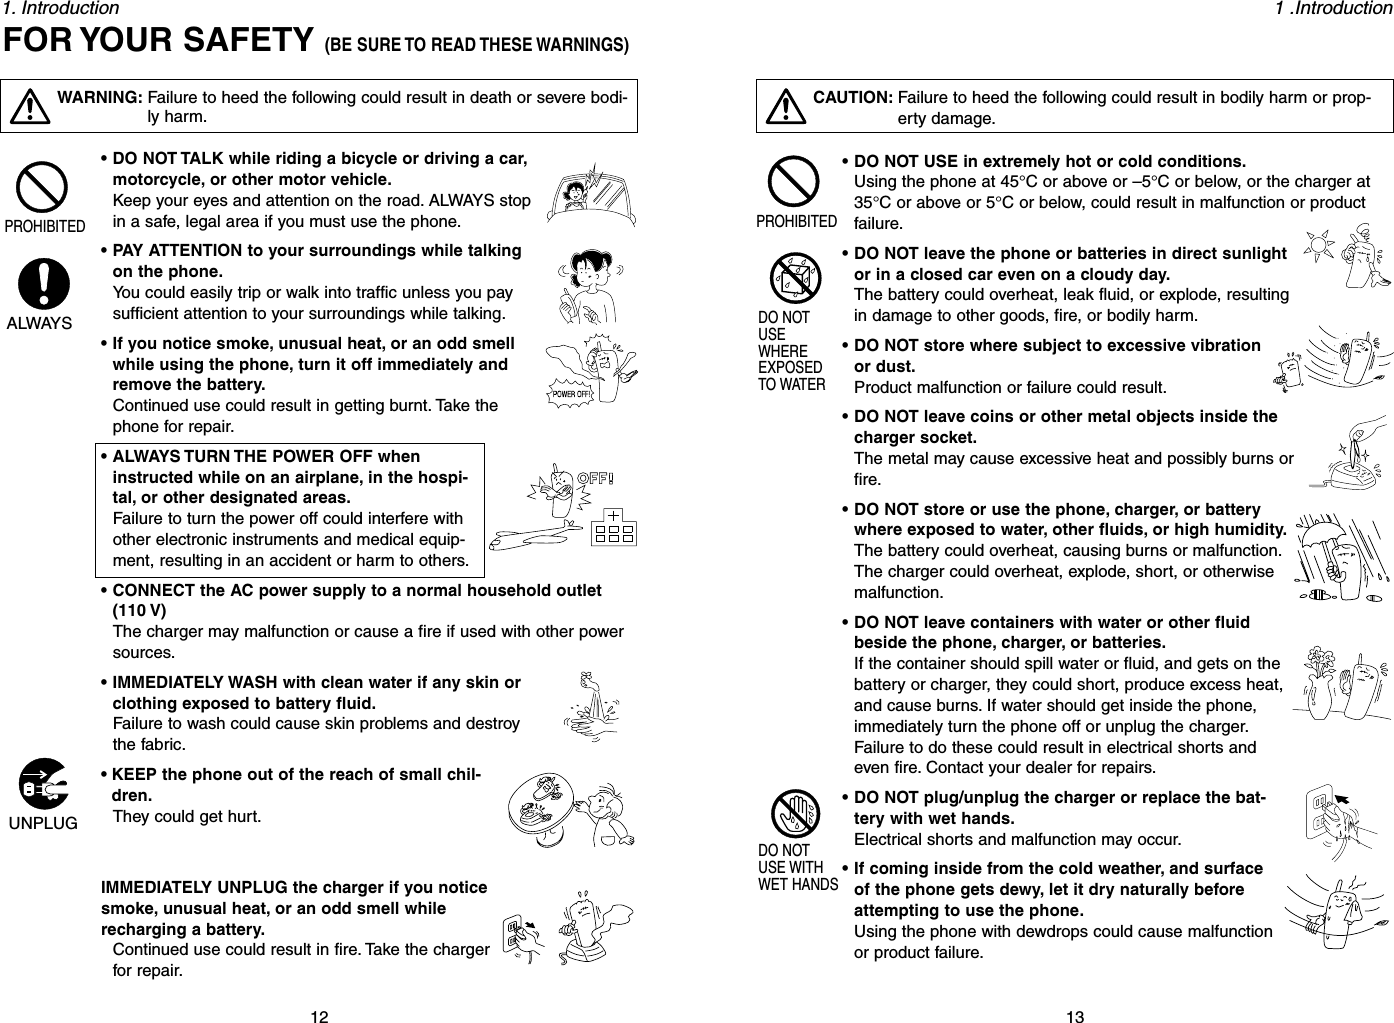
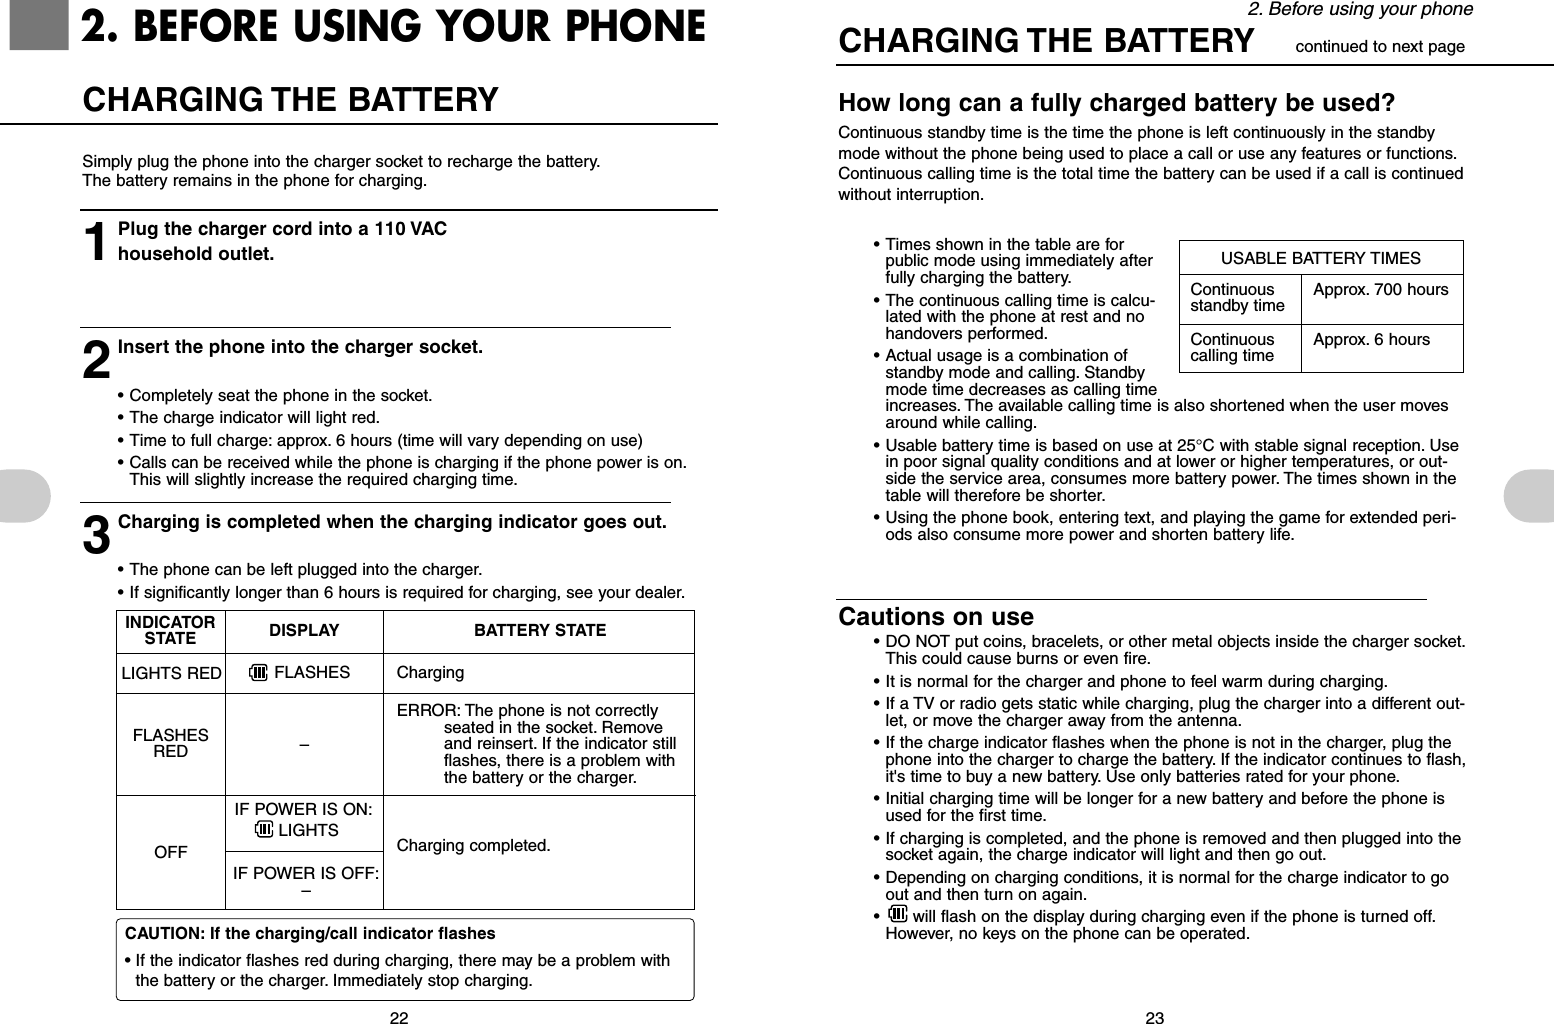
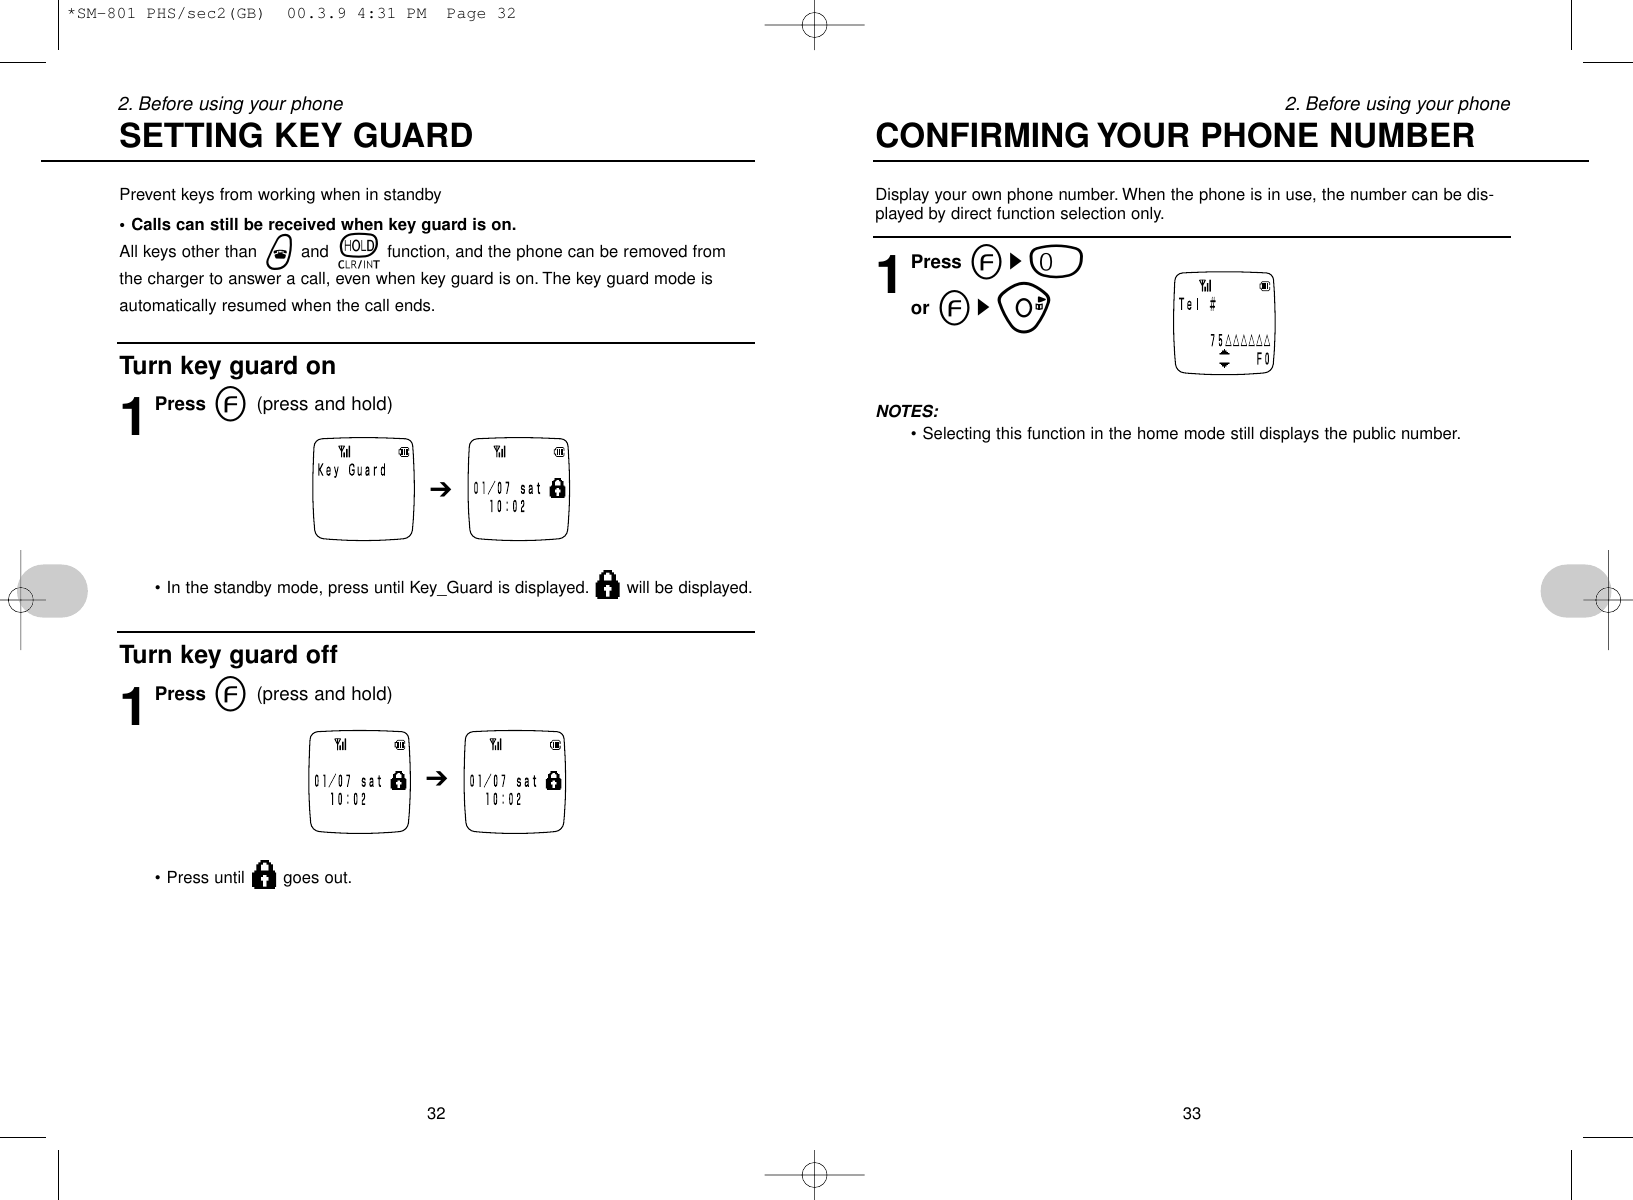
![191 .Introduction181. IntroductionuFunction selection key (p. 17, 27)Used to select and set each function.iCursor (p. 17, 27)Press up, down, right, or left to select a function. Also used forcursor movement.oTalk/hands-free mode selection (p. 39, 49 to 51)Used when placing and answering incoming calls. Also used toswitch to the hands-free, speakerphone, and whisper modes.!0 Power on/off (p. 26)Turns the power on/off, hangs up the phone, and interrupts anyselected functions.!1 Dialing keys Used to dial a number, as well as program various numbers andletters, and for function selection.!2 [ ] (asterisk) key (p. 78, 90, 103, 104)!3 [#] (pound) key (p. 65)!4 Recording, text mode key (p. 96)Recording a call, and the text entry mode.!5 Hold, clear, Intercom key (p. 48)Puts a call on hold, and cancels hold. Also used to delete entriesin the phone book, incoming calls log, and individual letters.!6 Microphone!7 Ear speaker!8 Display (p. 20)!9 Data communications card slot (data communications terminal) (p. 80)]Q0–9-=RteqRetractable antennaThe phone can be used with the antenna retracted.For better reception, extend the antenna.wHole for attaching the hand strap (p. 6)ePower Search key (p. 41)Selects the strongest signal for best reception.rSpeakerUsed for the ringer, warning tones, and other system alerts. Also used for hands-free and speakerphone reception.tBattery coveryHeadset jack (p. 52)Lets you use a headset to converse without holding the phone.PART NAMES AND THEIR FUNCTIONSExtend Shrink*SM-801 PHS/sec1(GB) 00.3.9 4:16 PM Page 18](https://usermanual.wiki/UTStarcom-Korea-Technologies/UTS-708SY/User-Guide-181477-Page-10.png)

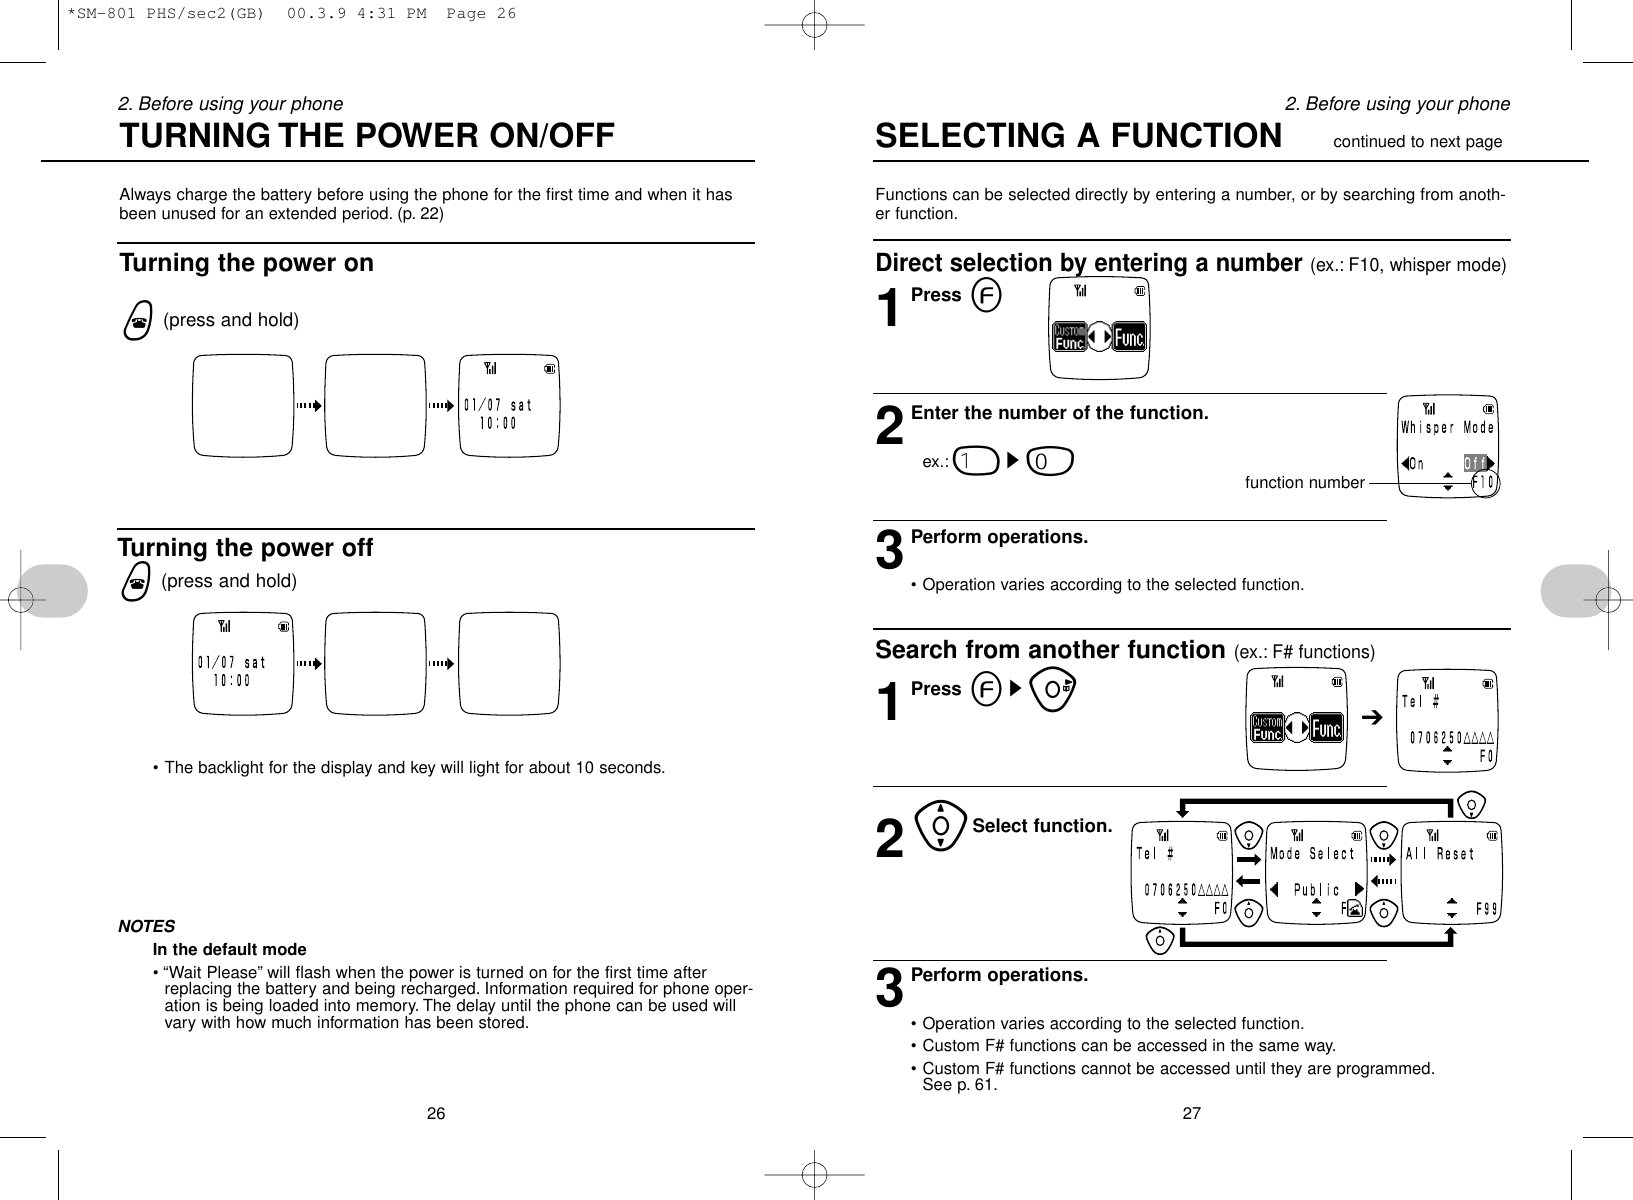
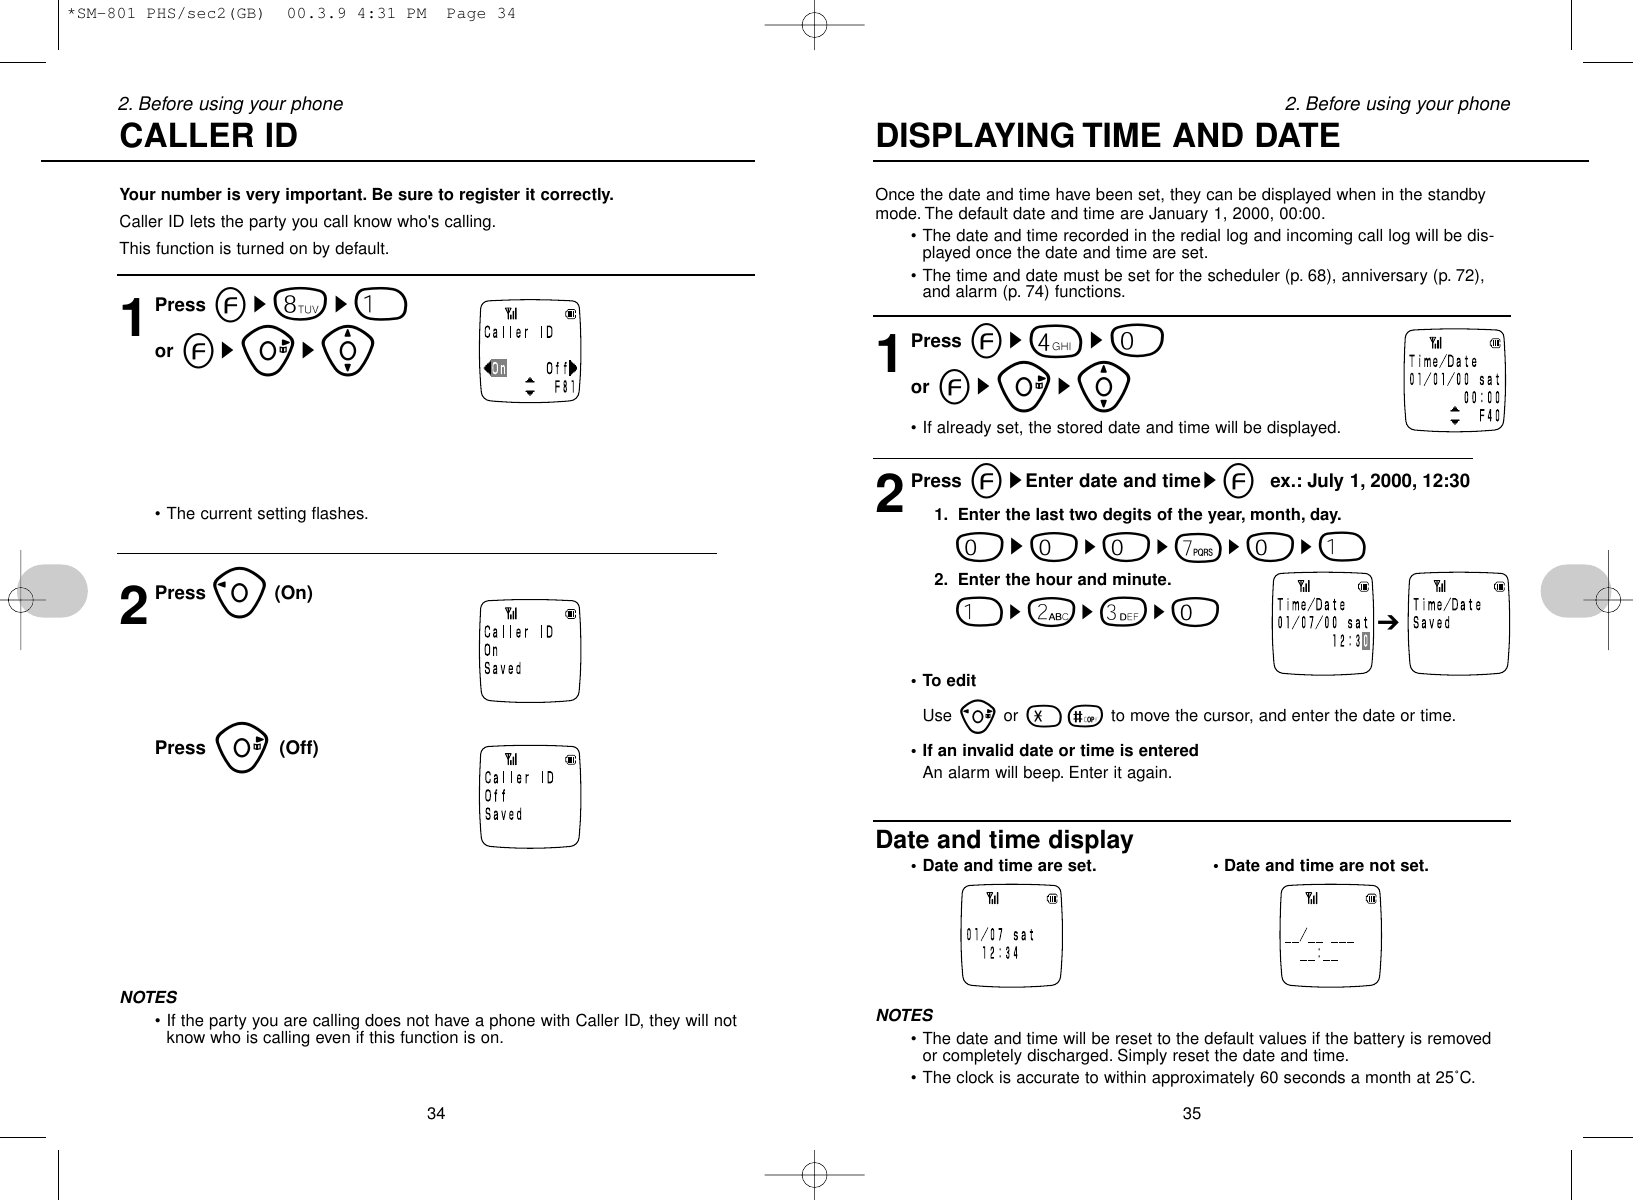
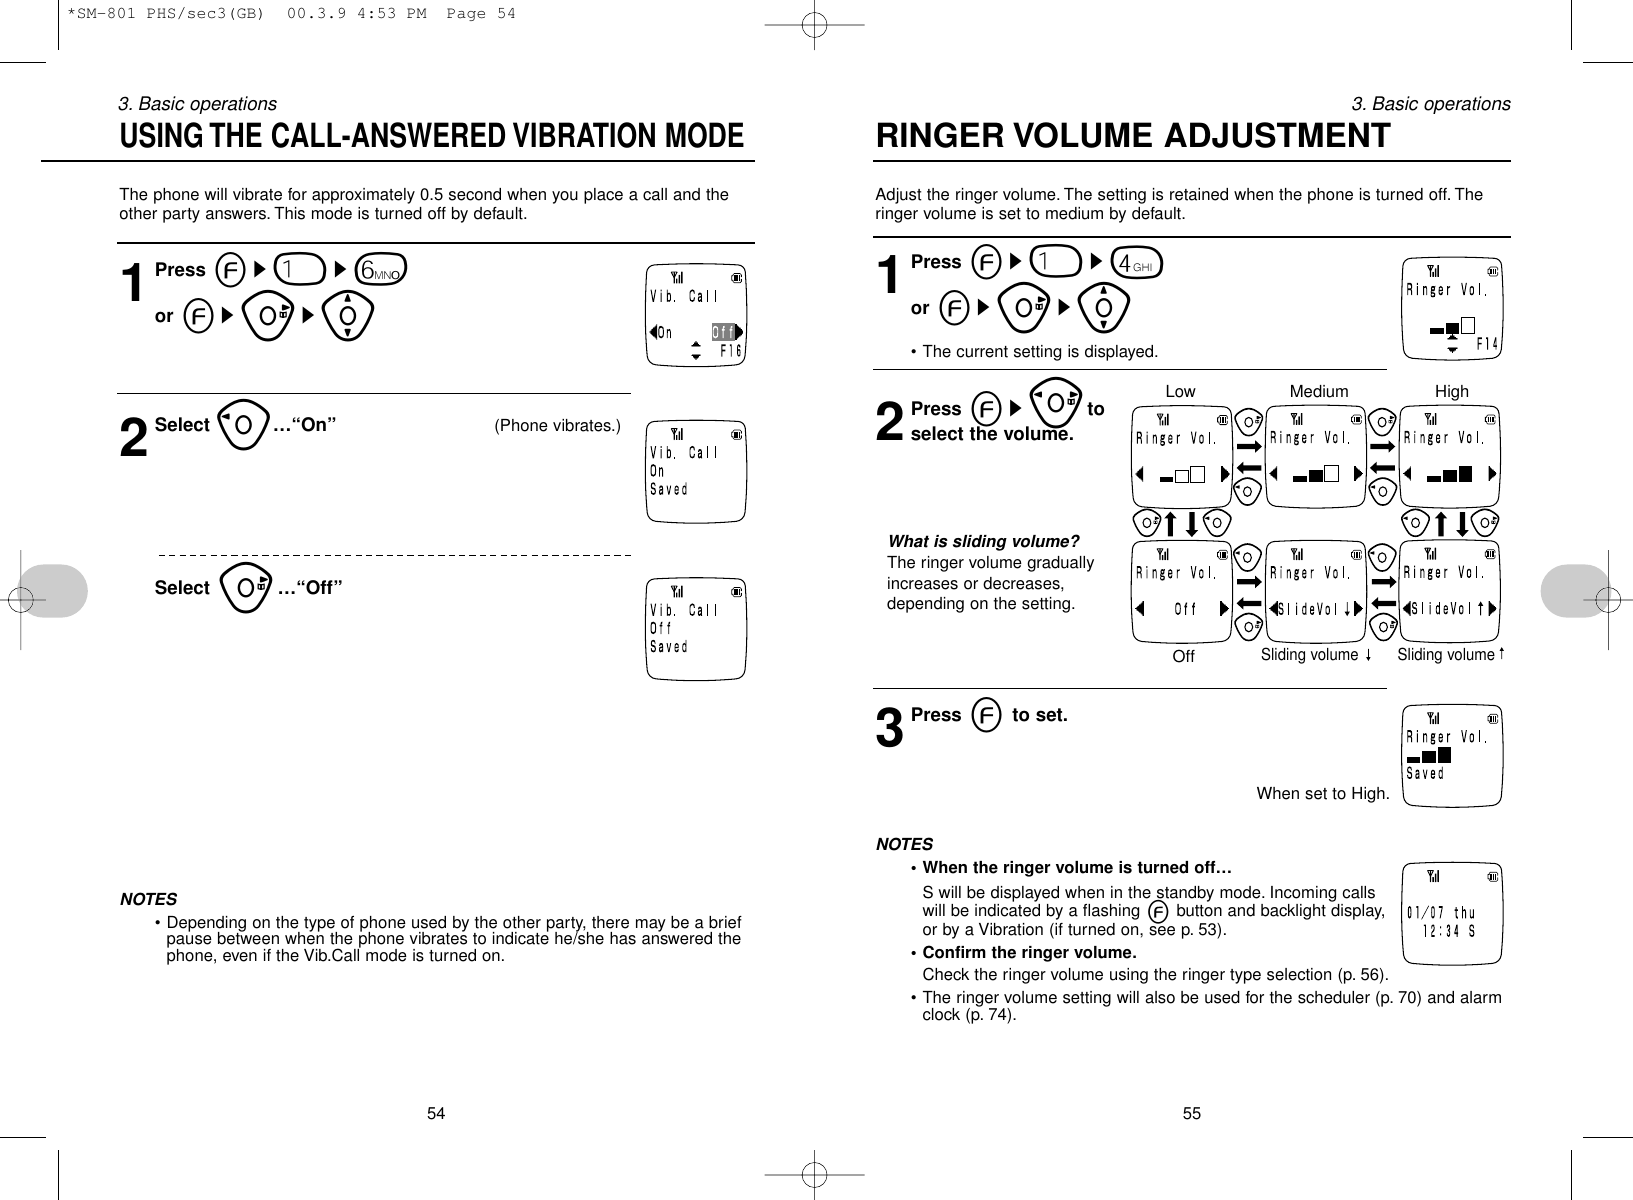
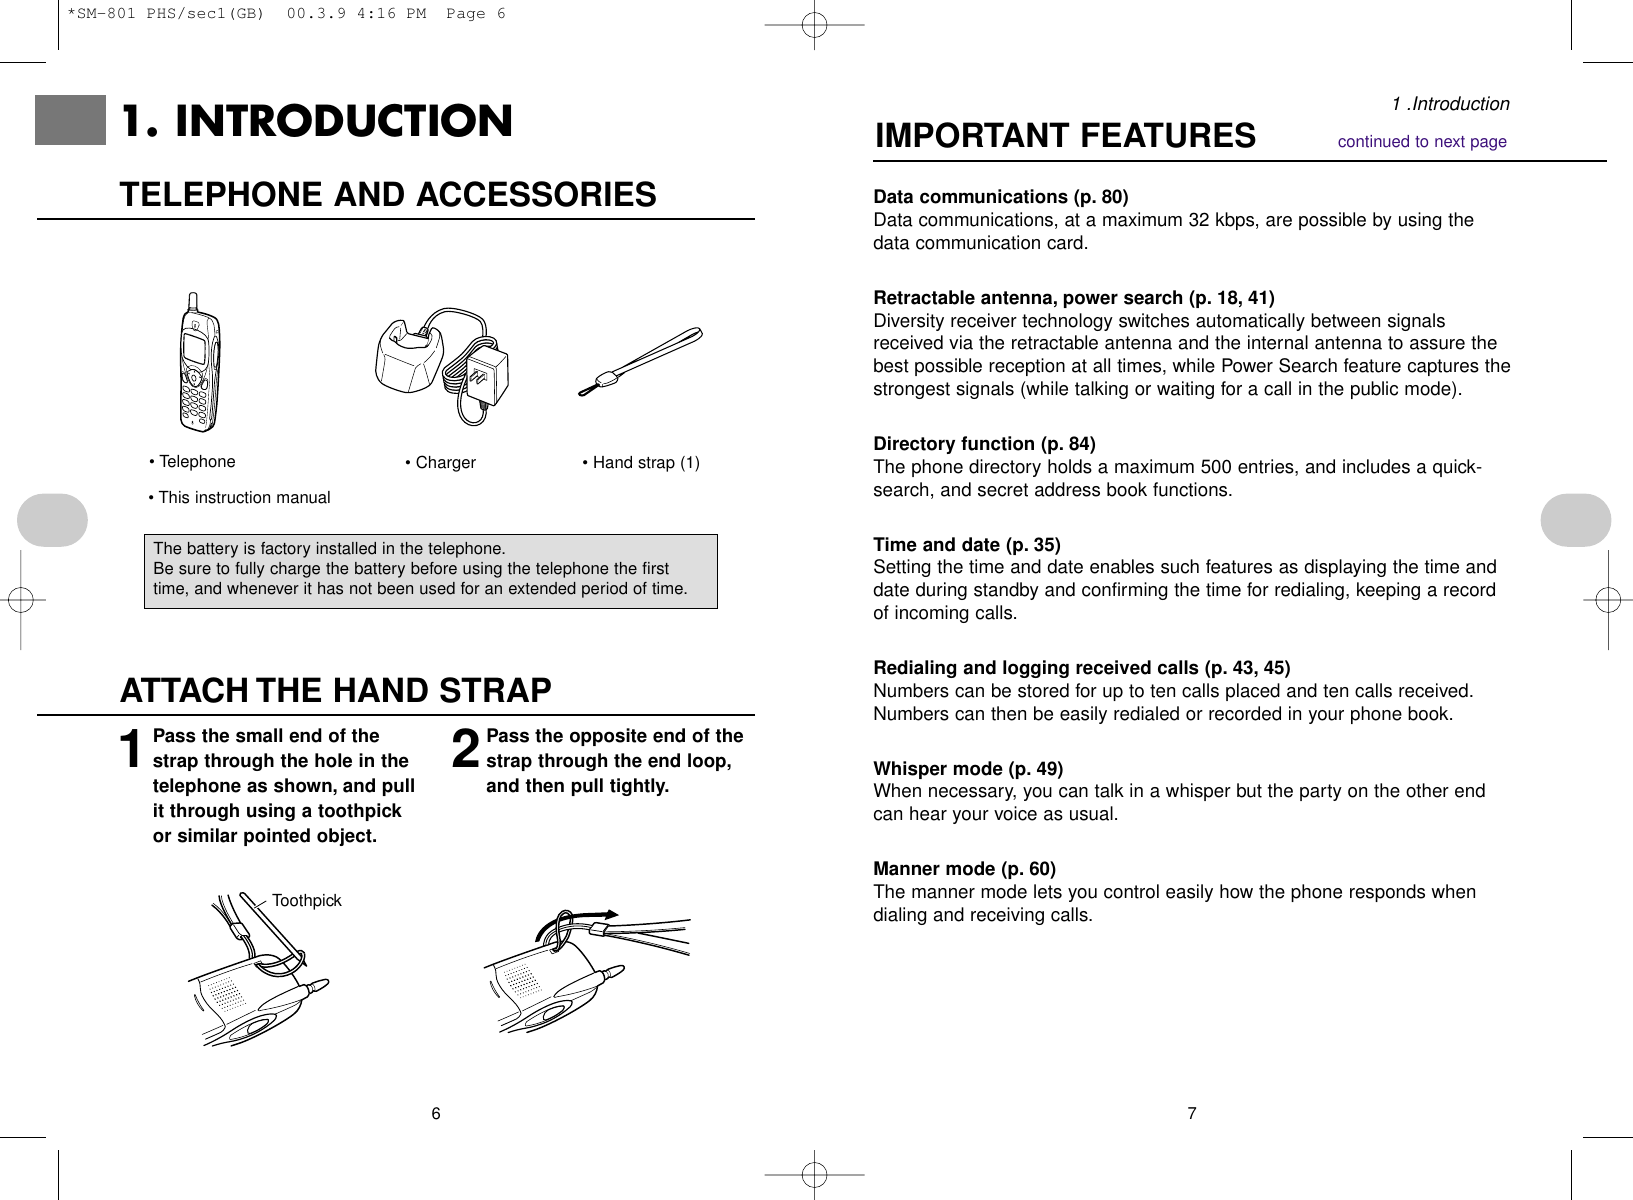
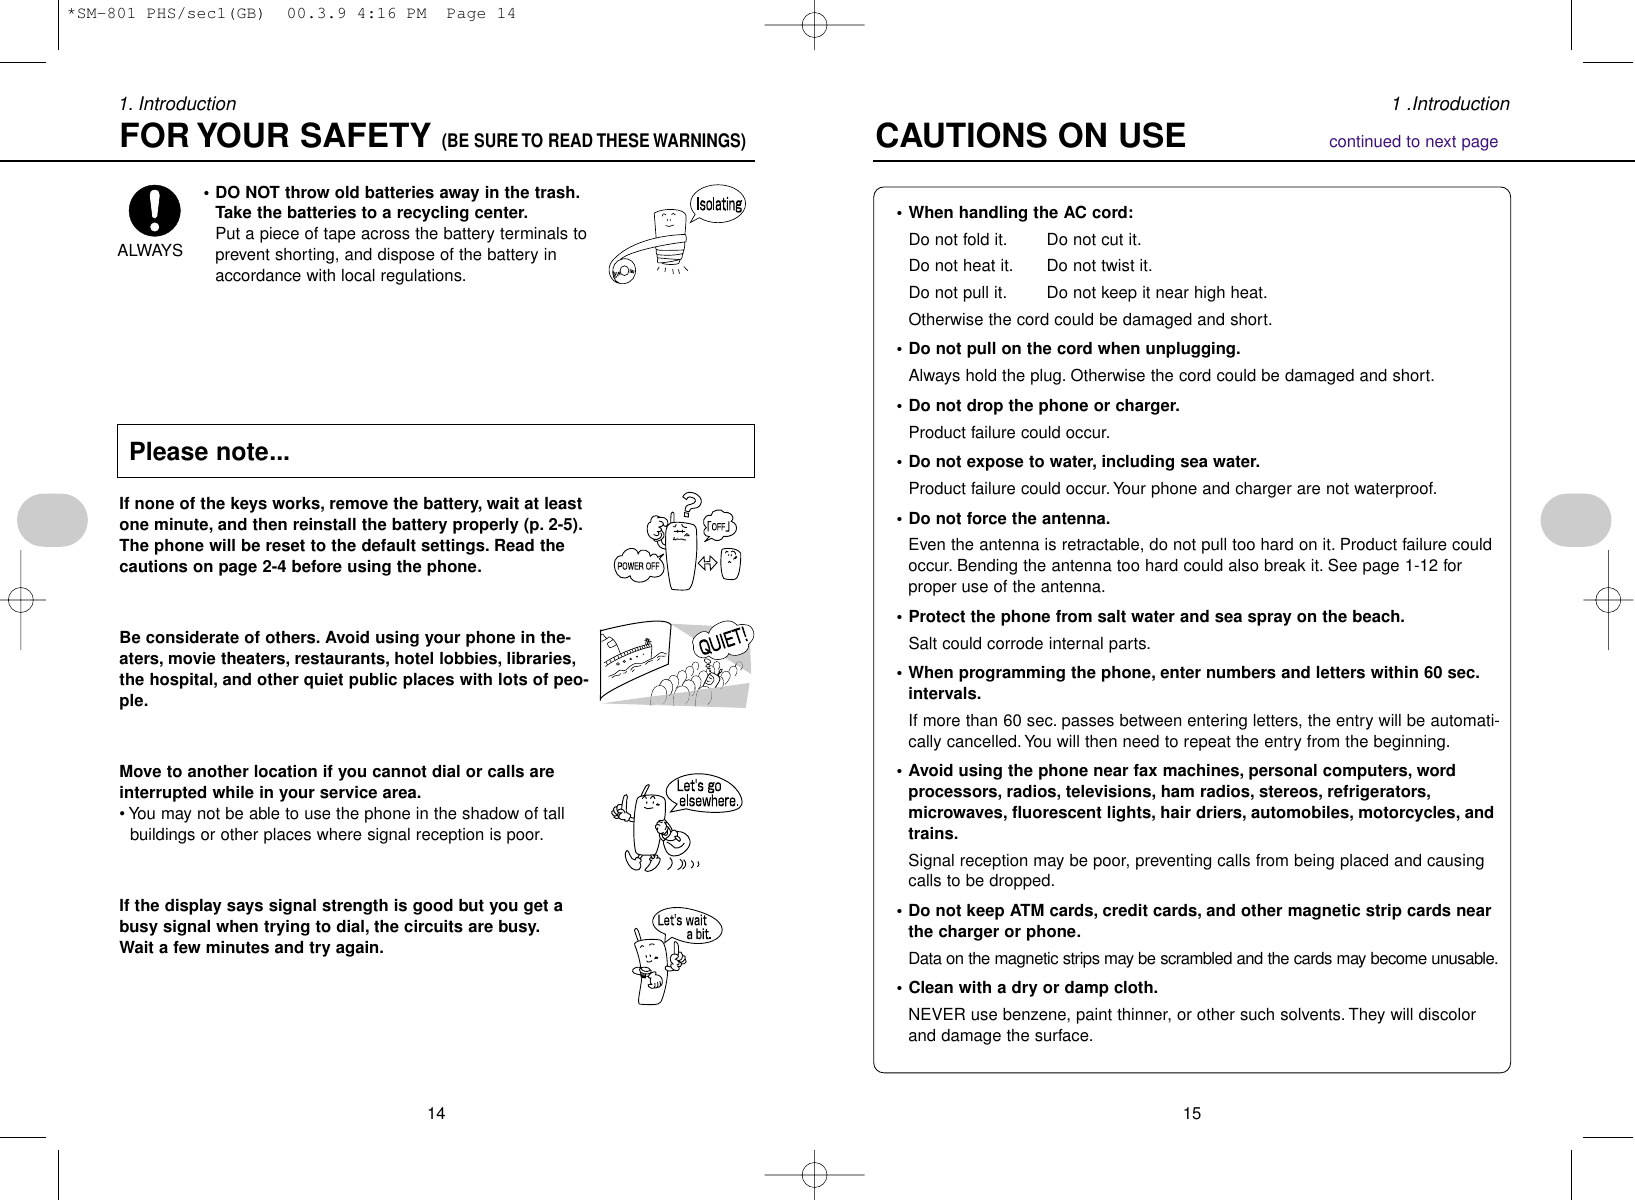
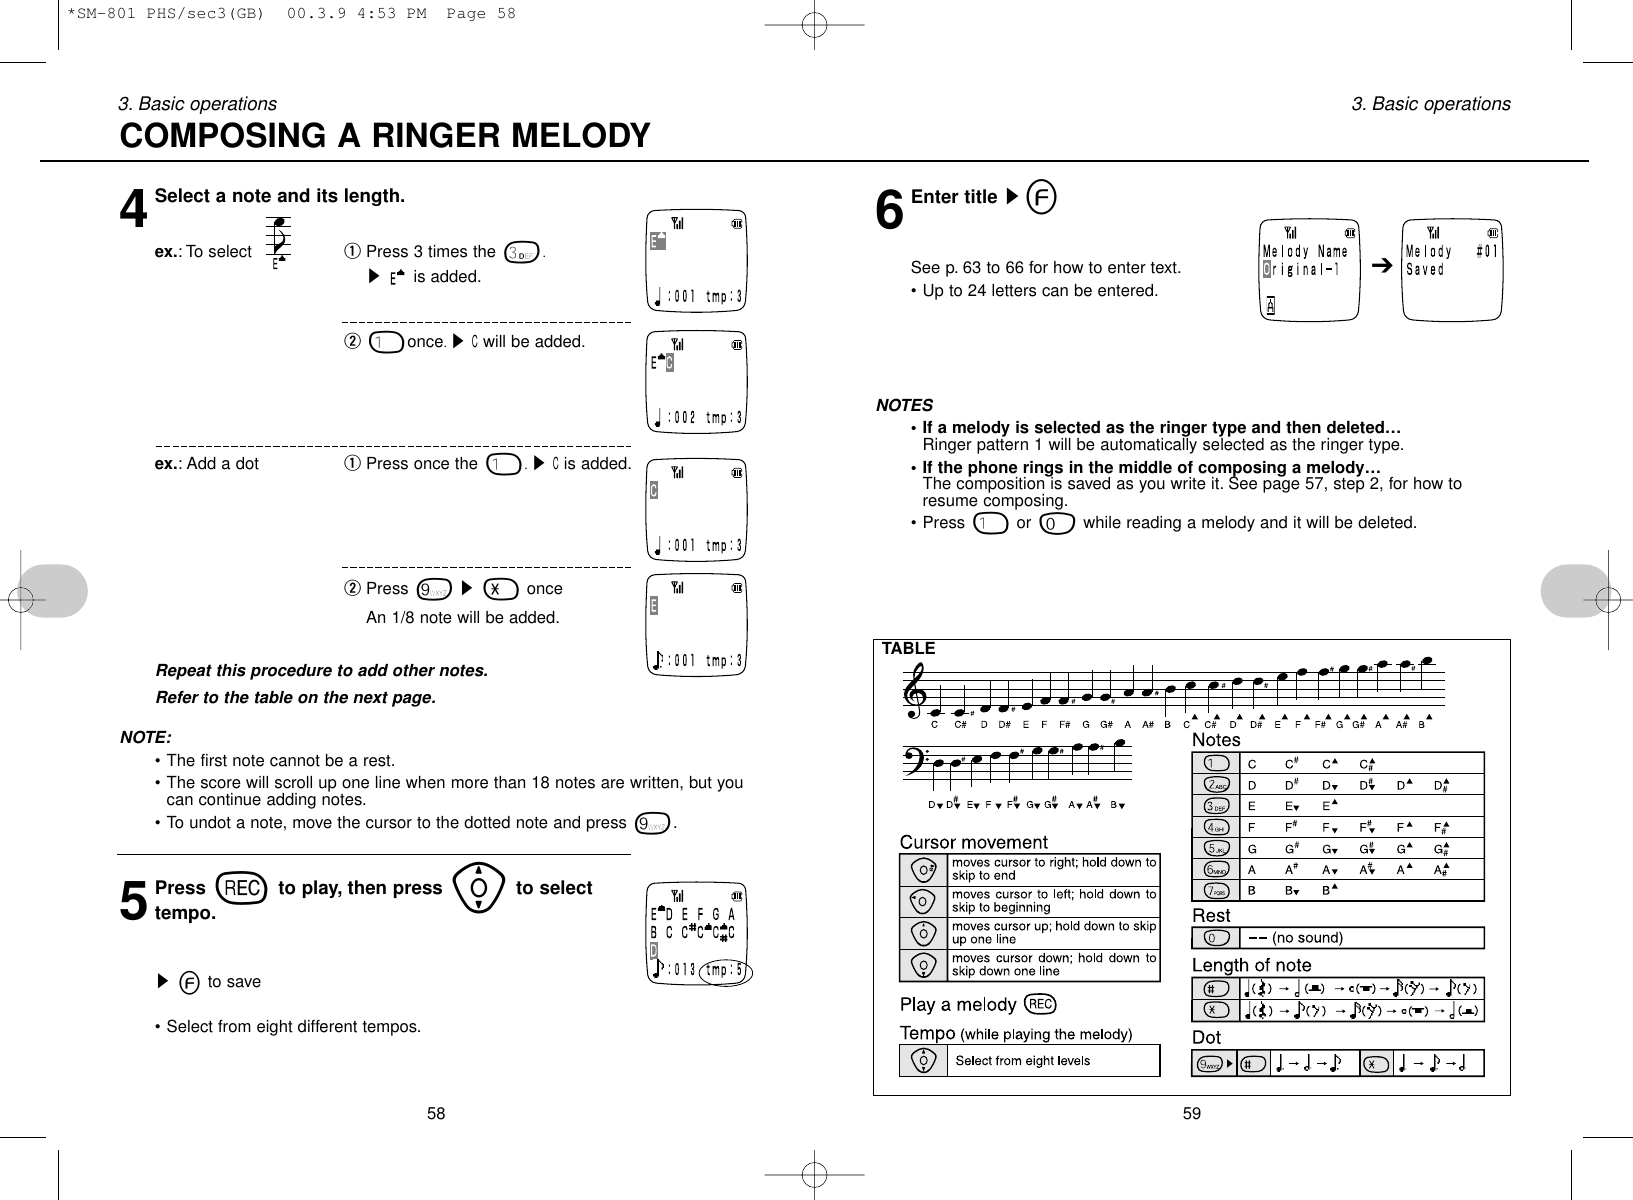
![Compose up to ten of your own ringer melodies.• A melody can contain up to 255 notes with eight different tempos.• After composing a melody, you must select as the ringer type (see p. 56) touse it for the ringer.Compose a ringer melody1Press es1s3or esus[2esIf no ringer melodies have been composed sstep 3sIf in the middle of composing a melody (for example, if the phone rang while composing a melody, or if composition was interrupted in step 4 by pressing w)1: “Continue” (read melody) sstep 40: “Erase” (delete the melody being composed)sstep 33Press [sSelect the number of the melody (press rtoplay the selected melody)se573. Basic operationsSelect the type of ringer used to signal incoming calls from among six different pat-terns, six melodies, and up to ten melodies that you can compose. The selectedringer type is used in public and home modes. Pattern 1 is the default ringer type.1Press es1s2or esus[• The current setting is displayed.2Press es]to select the ringer type.• phas no effect if no custommelodies have been composed.• The selected ringer pattern ormelody is played twice.Press ]while a melody is play-ing to hear another ringer type.• When the ringer volume is set tosliding volume ↑, the ringer willsound once each at low, medium,and high volume.• When the ringer volume is set tosliding volume ↓, the ringer willsound once each at high, medium,and low volume.3Press eor wto save the setting.• The setting will be saved even if the key is pressed after theringer stops.NOTES• Types of patterns Patterns 1 to 6• Types of prerecorded melodiesRadetzky MarchFarandoleDance of the Four SwansOde To JOYBoleroSaints Go Marching In The563. Basic operationsSELECTING THE RINGER TYPECOMPOSING A RINGER MELODY(continued to next page)Pattern or melodyYour own composition*SM-801 PHS/sec3(GB) 00.3.9 4:53 PM Page 56](https://usermanual.wiki/UTStarcom-Korea-Technologies/UTS-708SY/User-Guide-181477-Page-30.png)

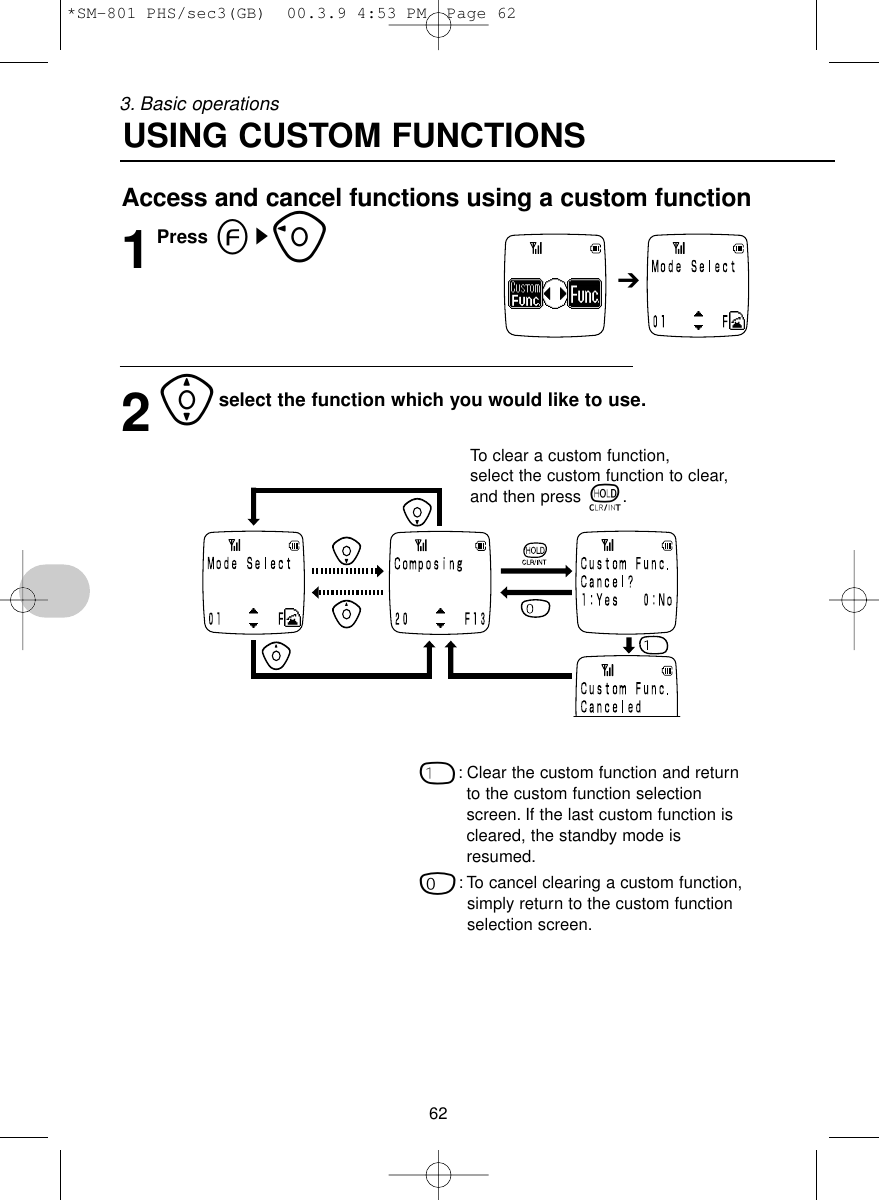
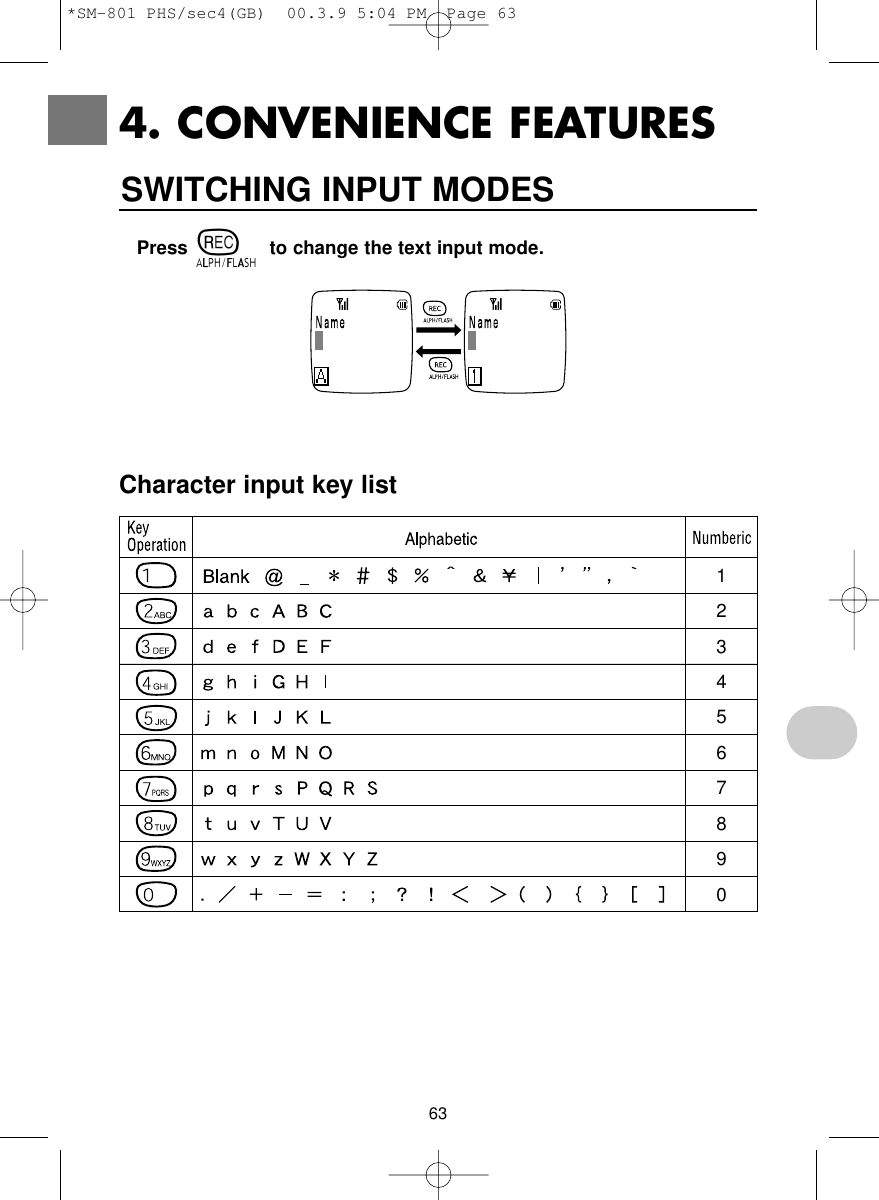
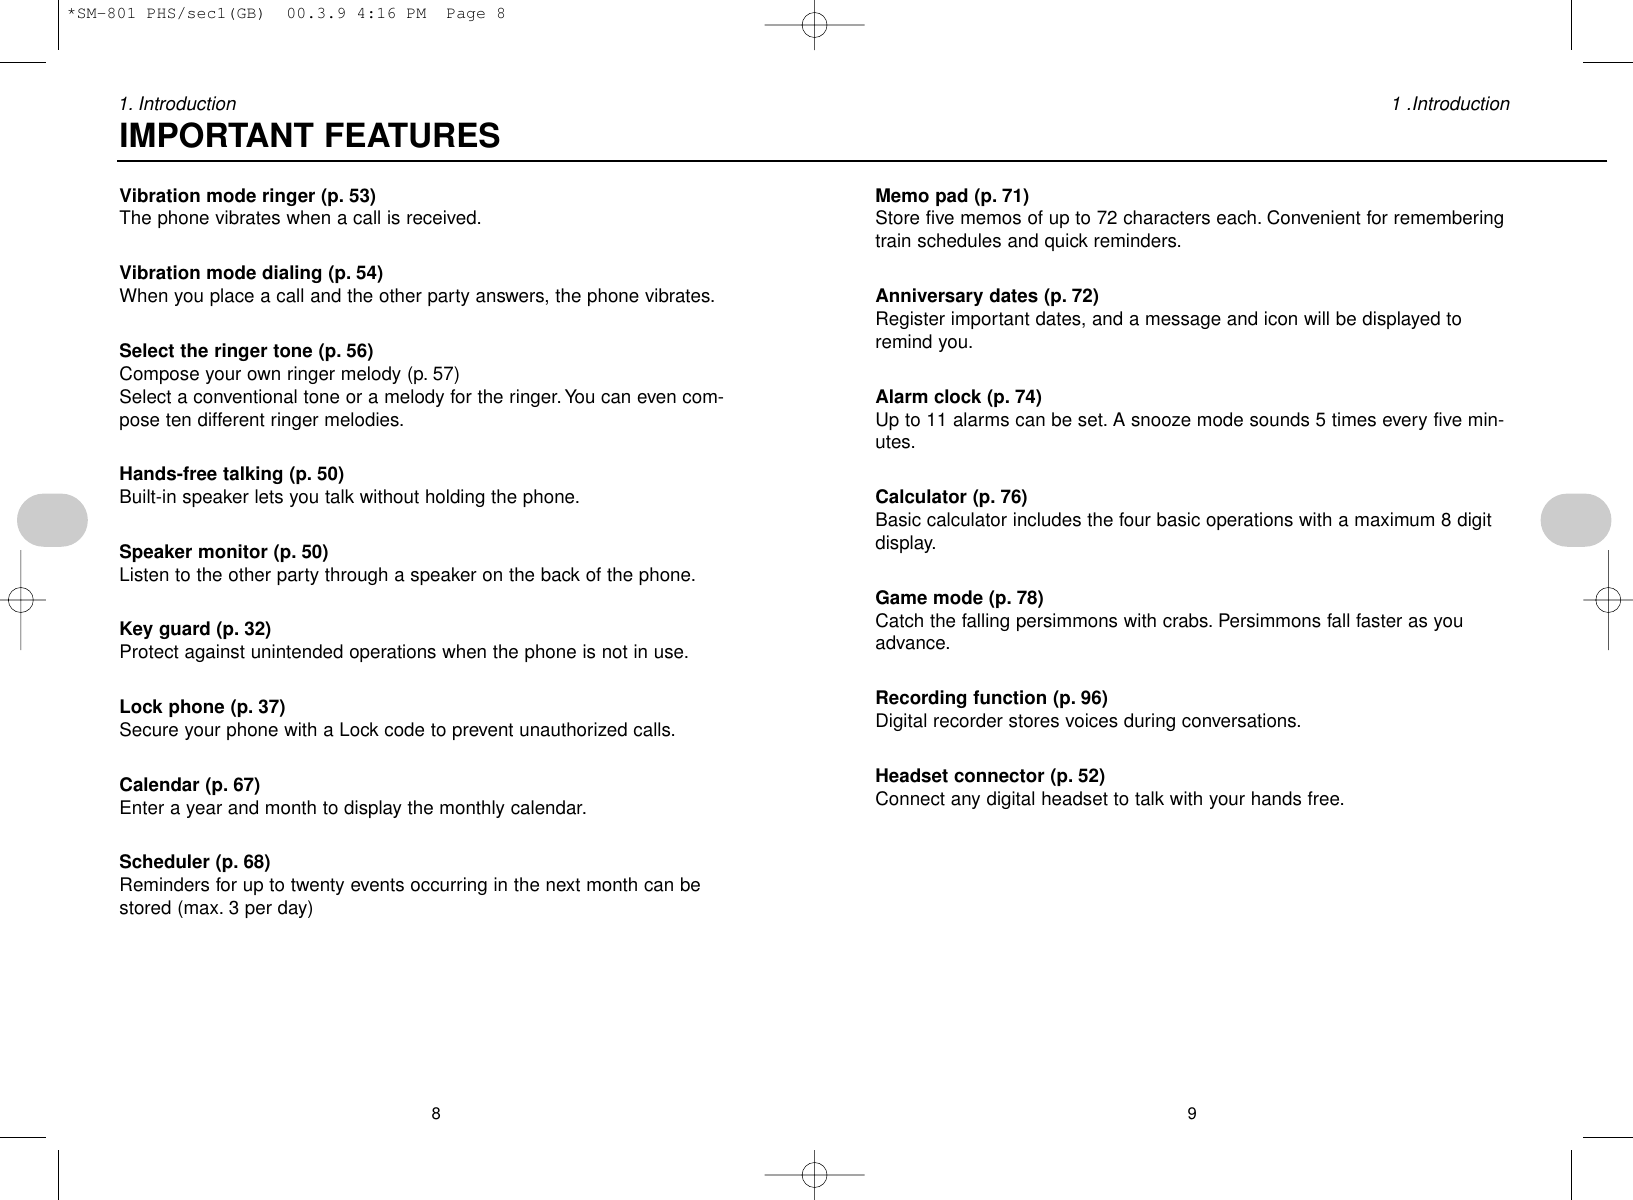
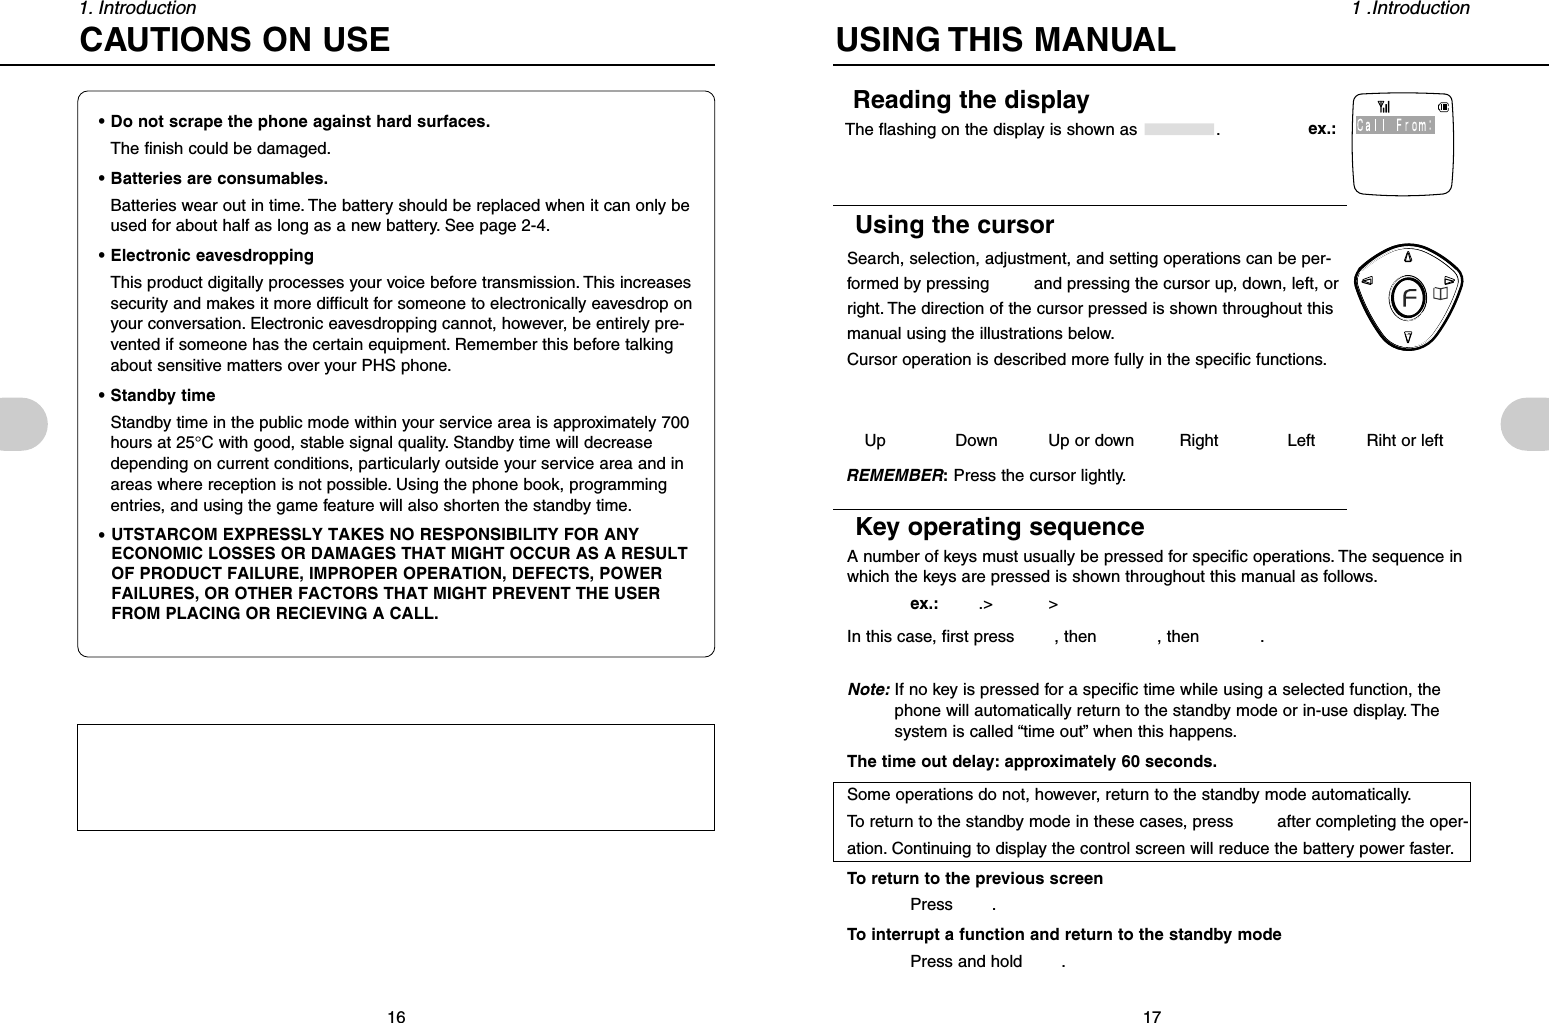
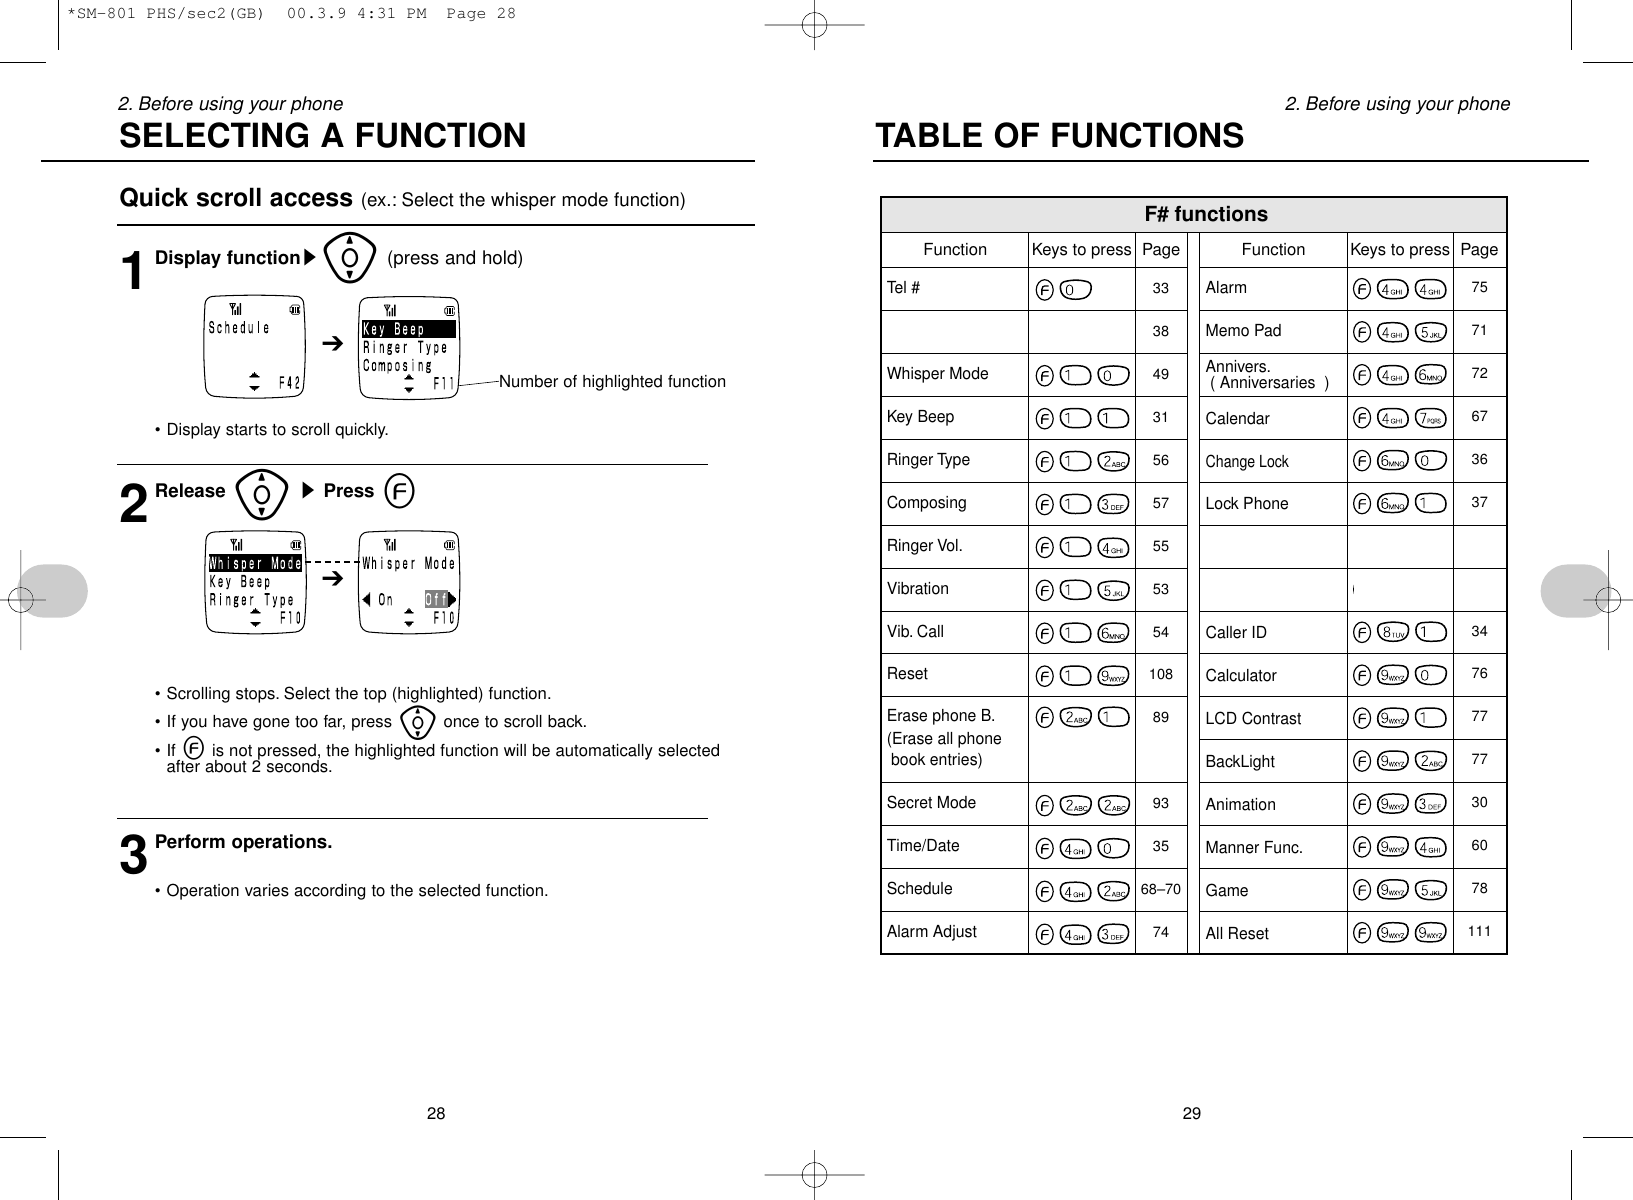
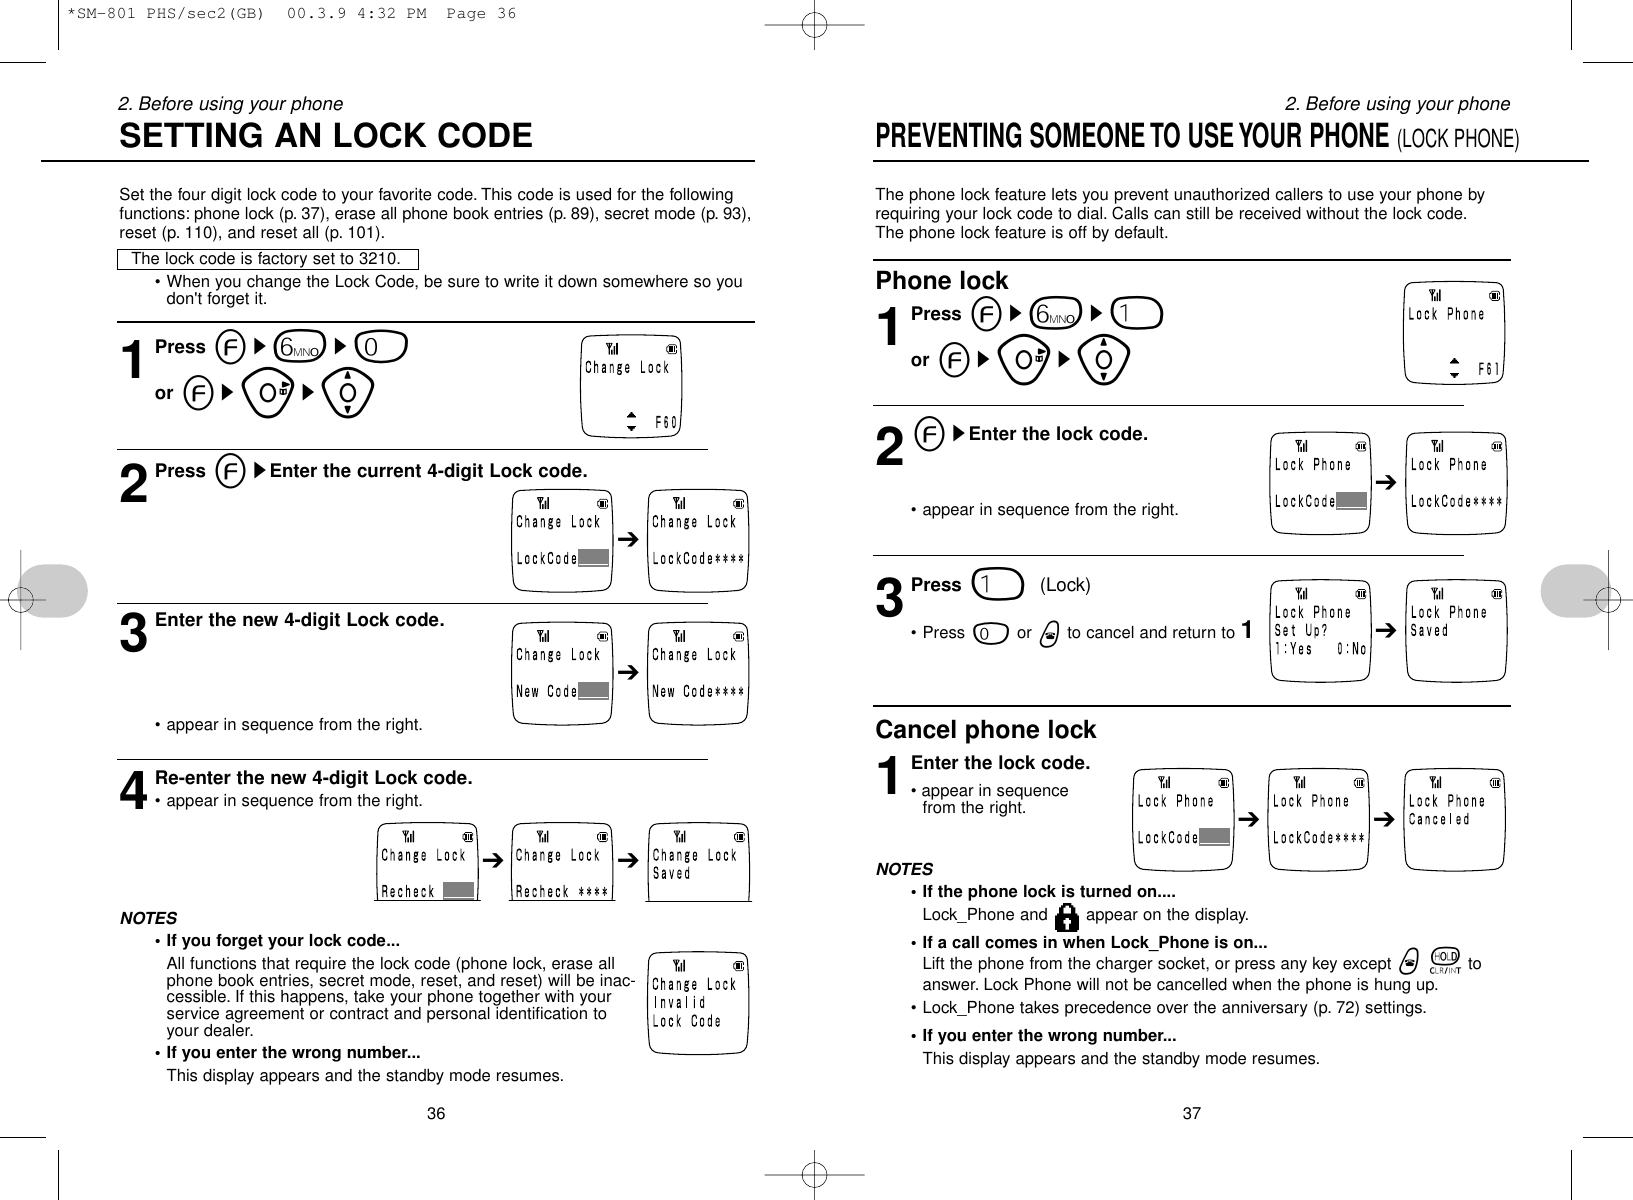
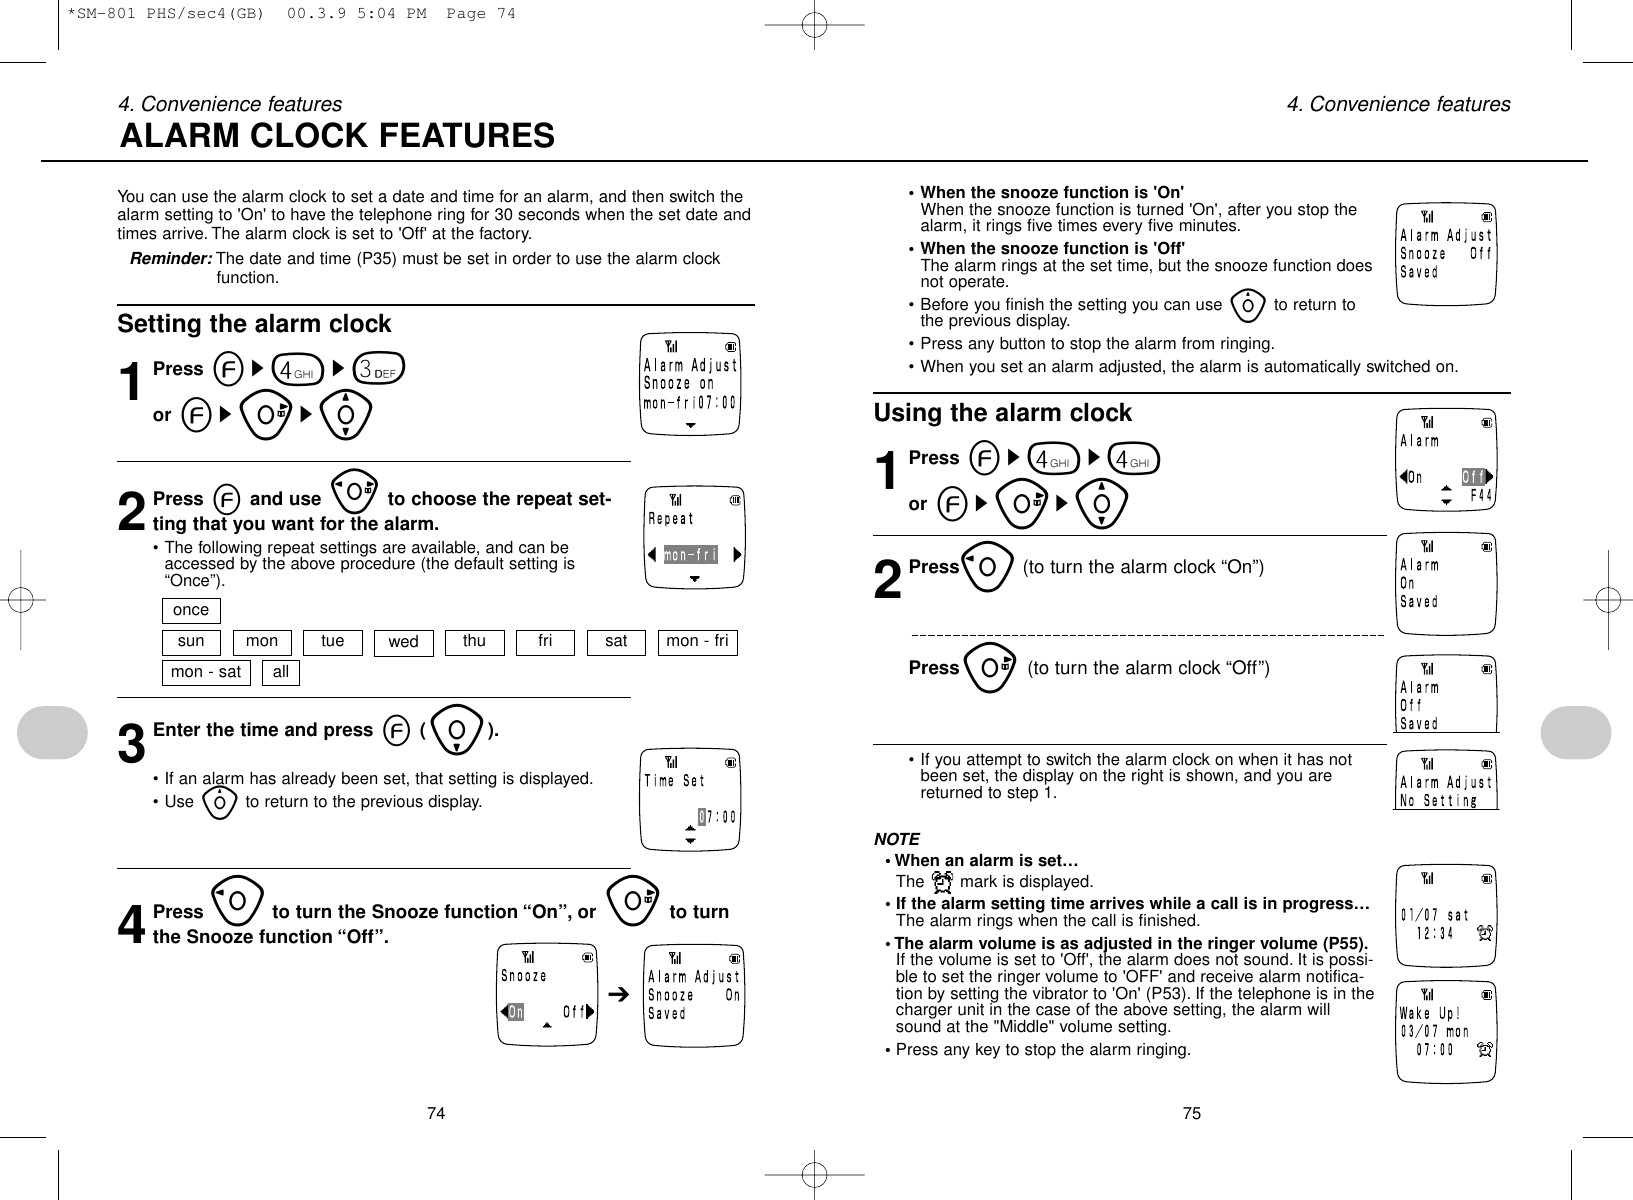
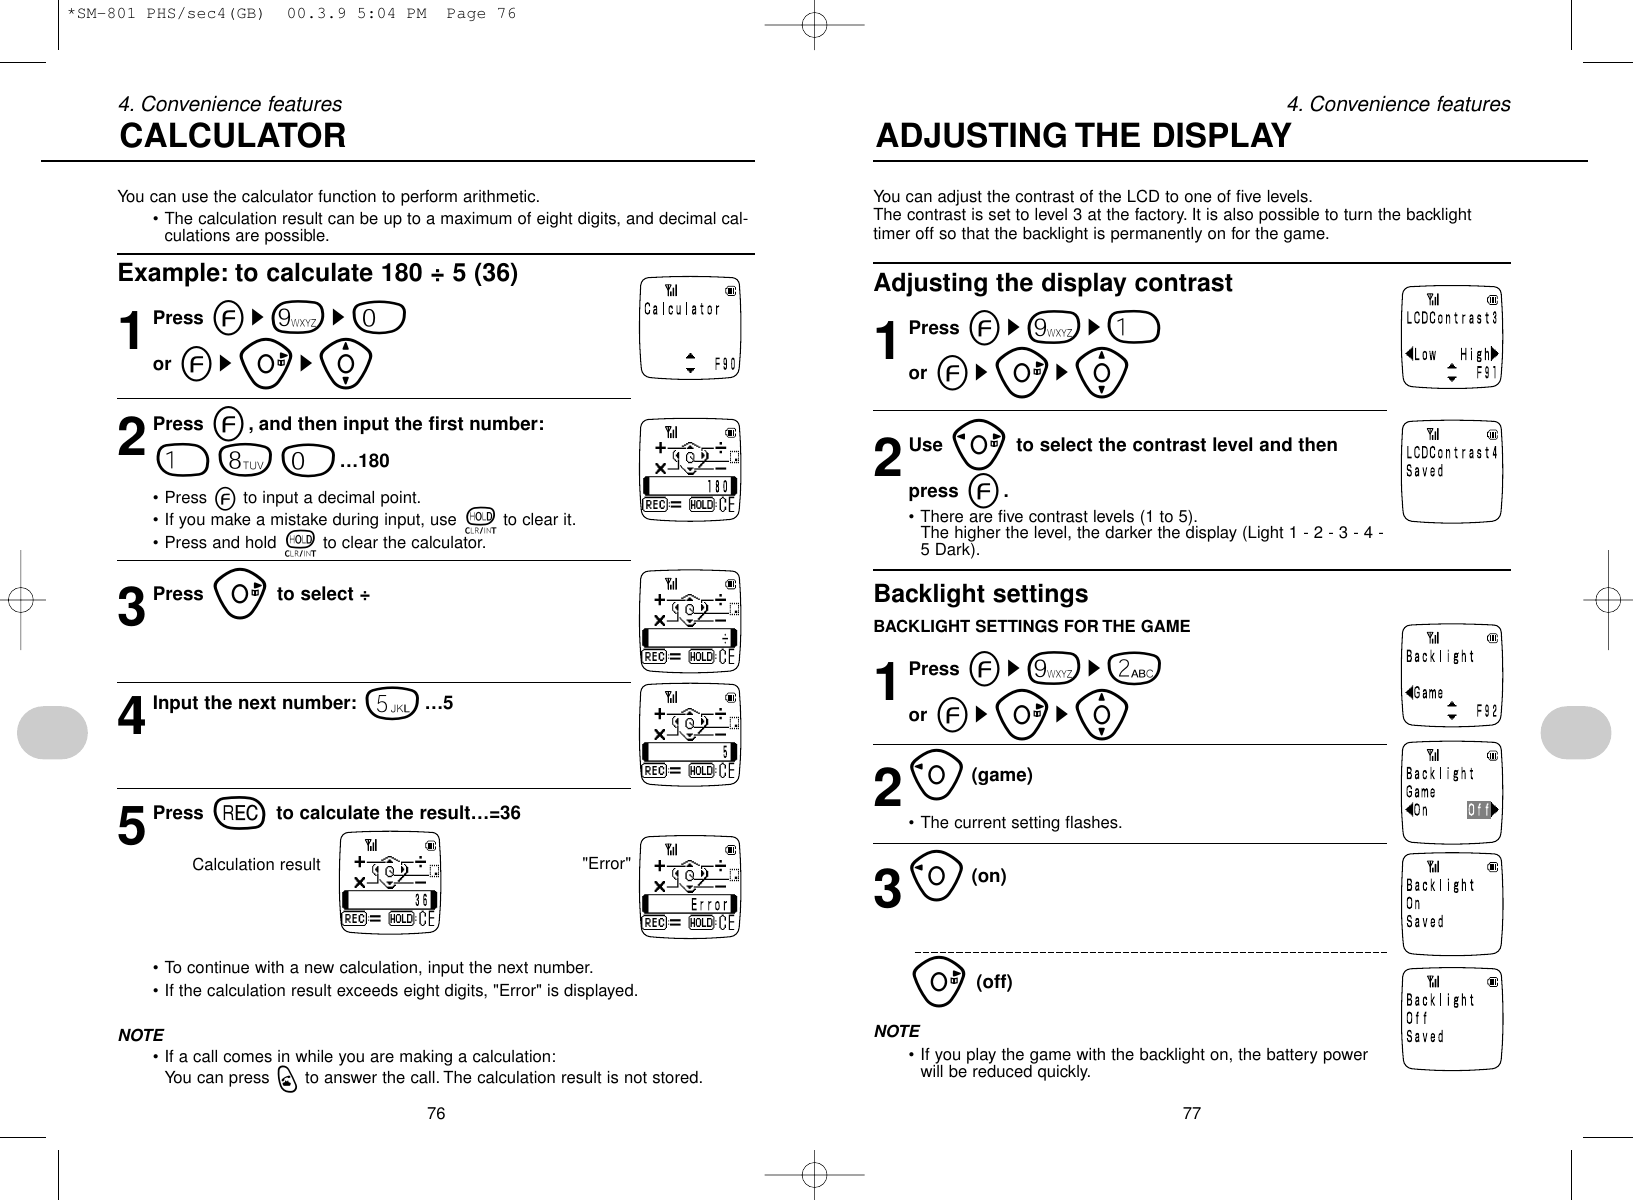
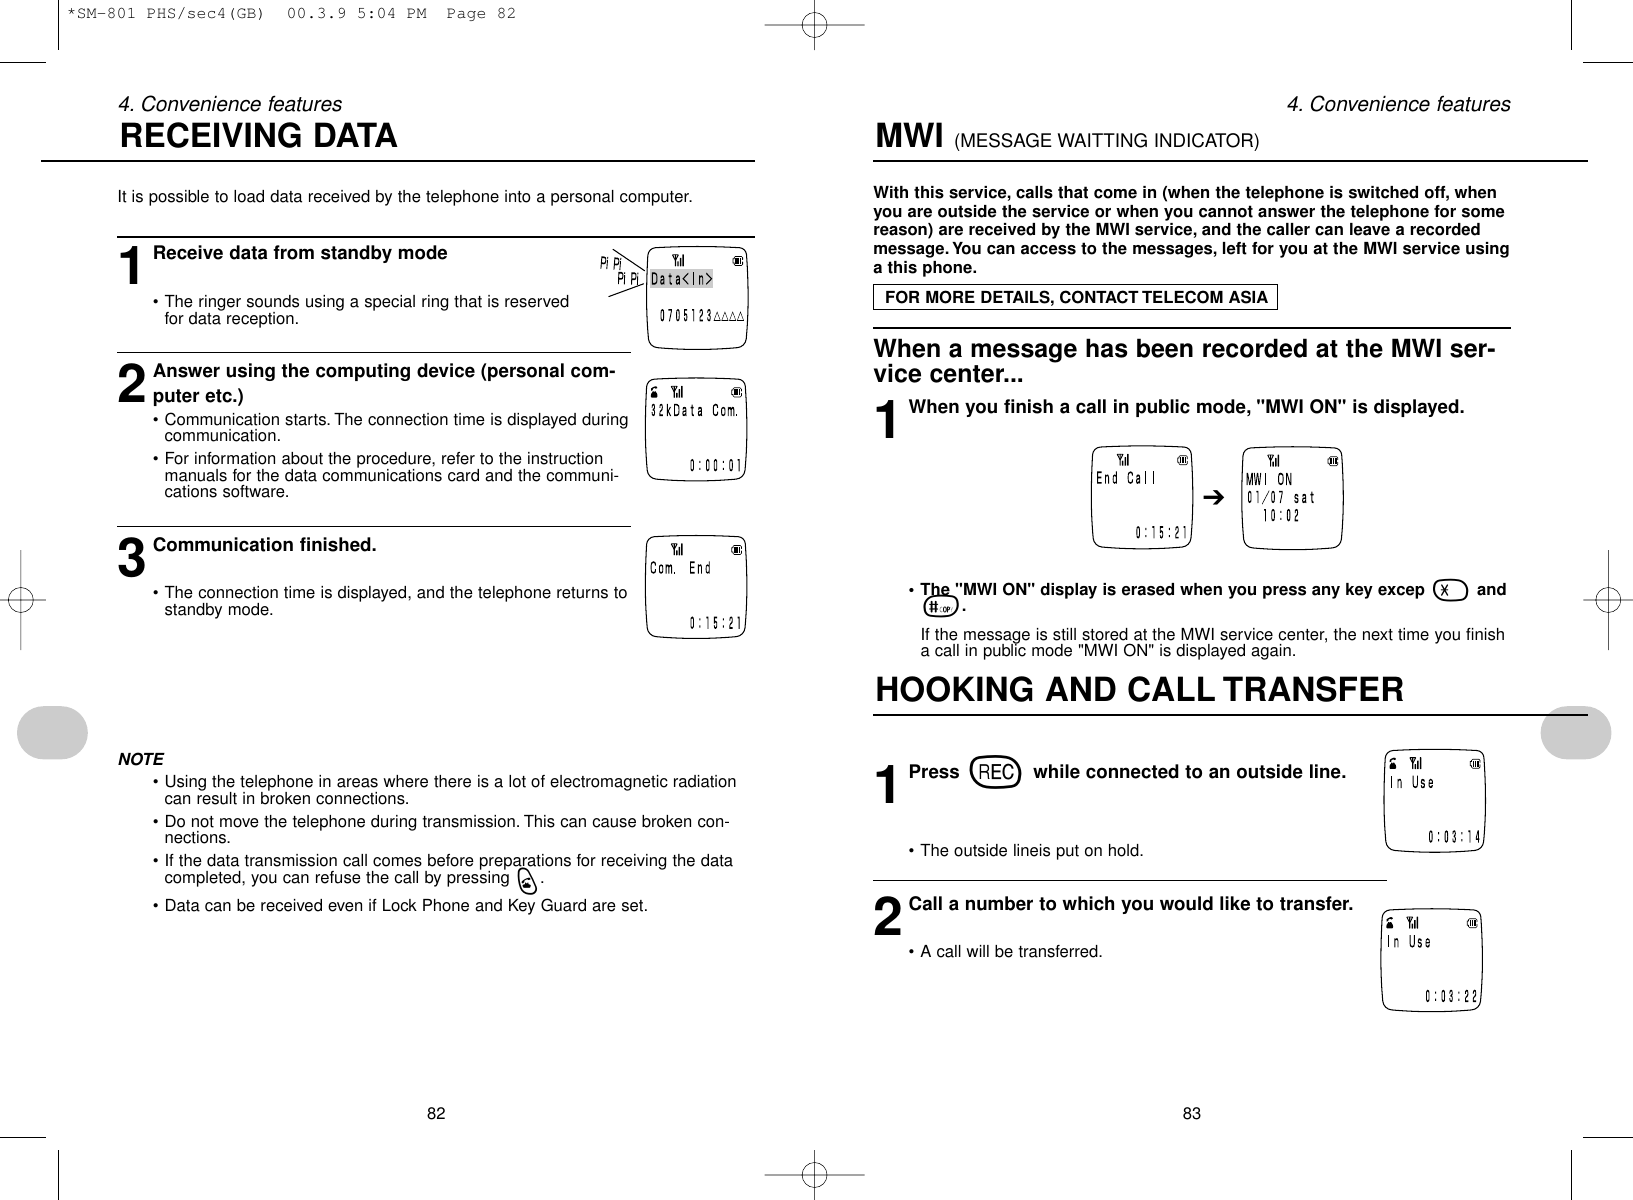
![654. Convenience featuresCopy, cut, and paste functions are provided for convenient editing during text input.• Copy: Copies the selected text.Ex: “ABCDEFG”➔“ABCD ” ➔“ | ABCDEFG”➔“EFGABCDEFG”• Cut: Copies and deletes the selected text.Ex: “ABCDEFG”➔“ABCD ” ➔“ | ABCD” ➔“EFGABCD”• Paste: Inserts the text stored by the Copy or Cut functions at the desig-nated position.• Only one text string can be stored by the Copy and Cut functions. Previously storedtext is deleted each time they are used.• The maximum number of characters that can be stored differs depending on the textinput application.Copy and Paste1Use the ]key to position the cursor at thestart of the first character of the text string that youwish to copy.2Press =su(]) to specify the range of text tocopy.• Press either =or wto cancel theediting function and return to normal textediting.3Press 1(copy), then ]to move the cursor to the posi-tion where you want to paste the copied text.• After the text is copied, you are returnedto normal text editing.EFGEFGUSING THE COPY, CUT, AND PASTE FUNCTIONS (continued to next page)644. Convenience features◆Character entry by number of key pushesExample: If the button that you are pressing is 2.◆Alphabetic inputExample: To input "Dog"ENTERING TEXT ◆Numeric inputExample: To input "12345"◆Character deletion and insertionExample: To change "SAMACYO" to "SANYO"• In the case of numerical input, the number that you input is set as soon as youpress the relevant number button, and subsequent presses inputs the numberagain.• The number is set as soon as you press the button.CopyCut PastePaste➔➔*SM-801 PHS/sec4(GB) 00.3.9 5:04 PM Page 64](https://usermanual.wiki/UTStarcom-Korea-Technologies/UTS-708SY/User-Guide-181477-Page-35.png)
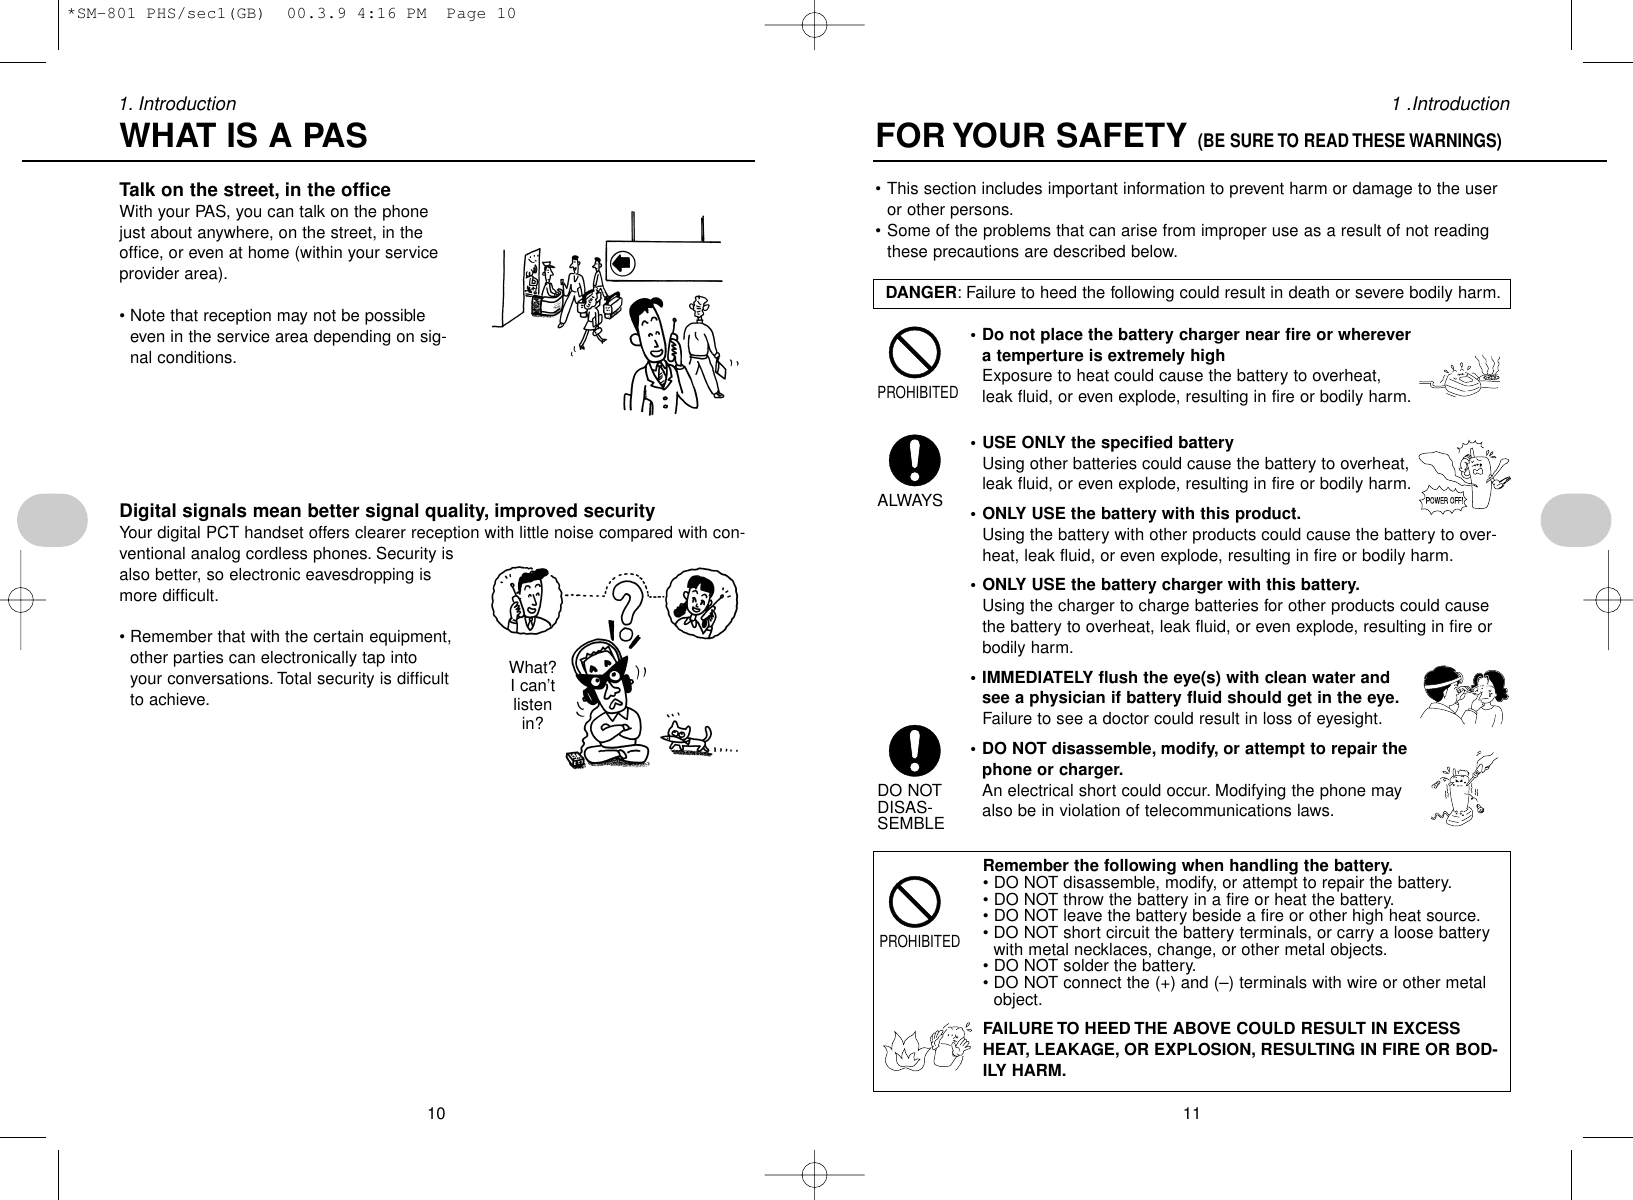
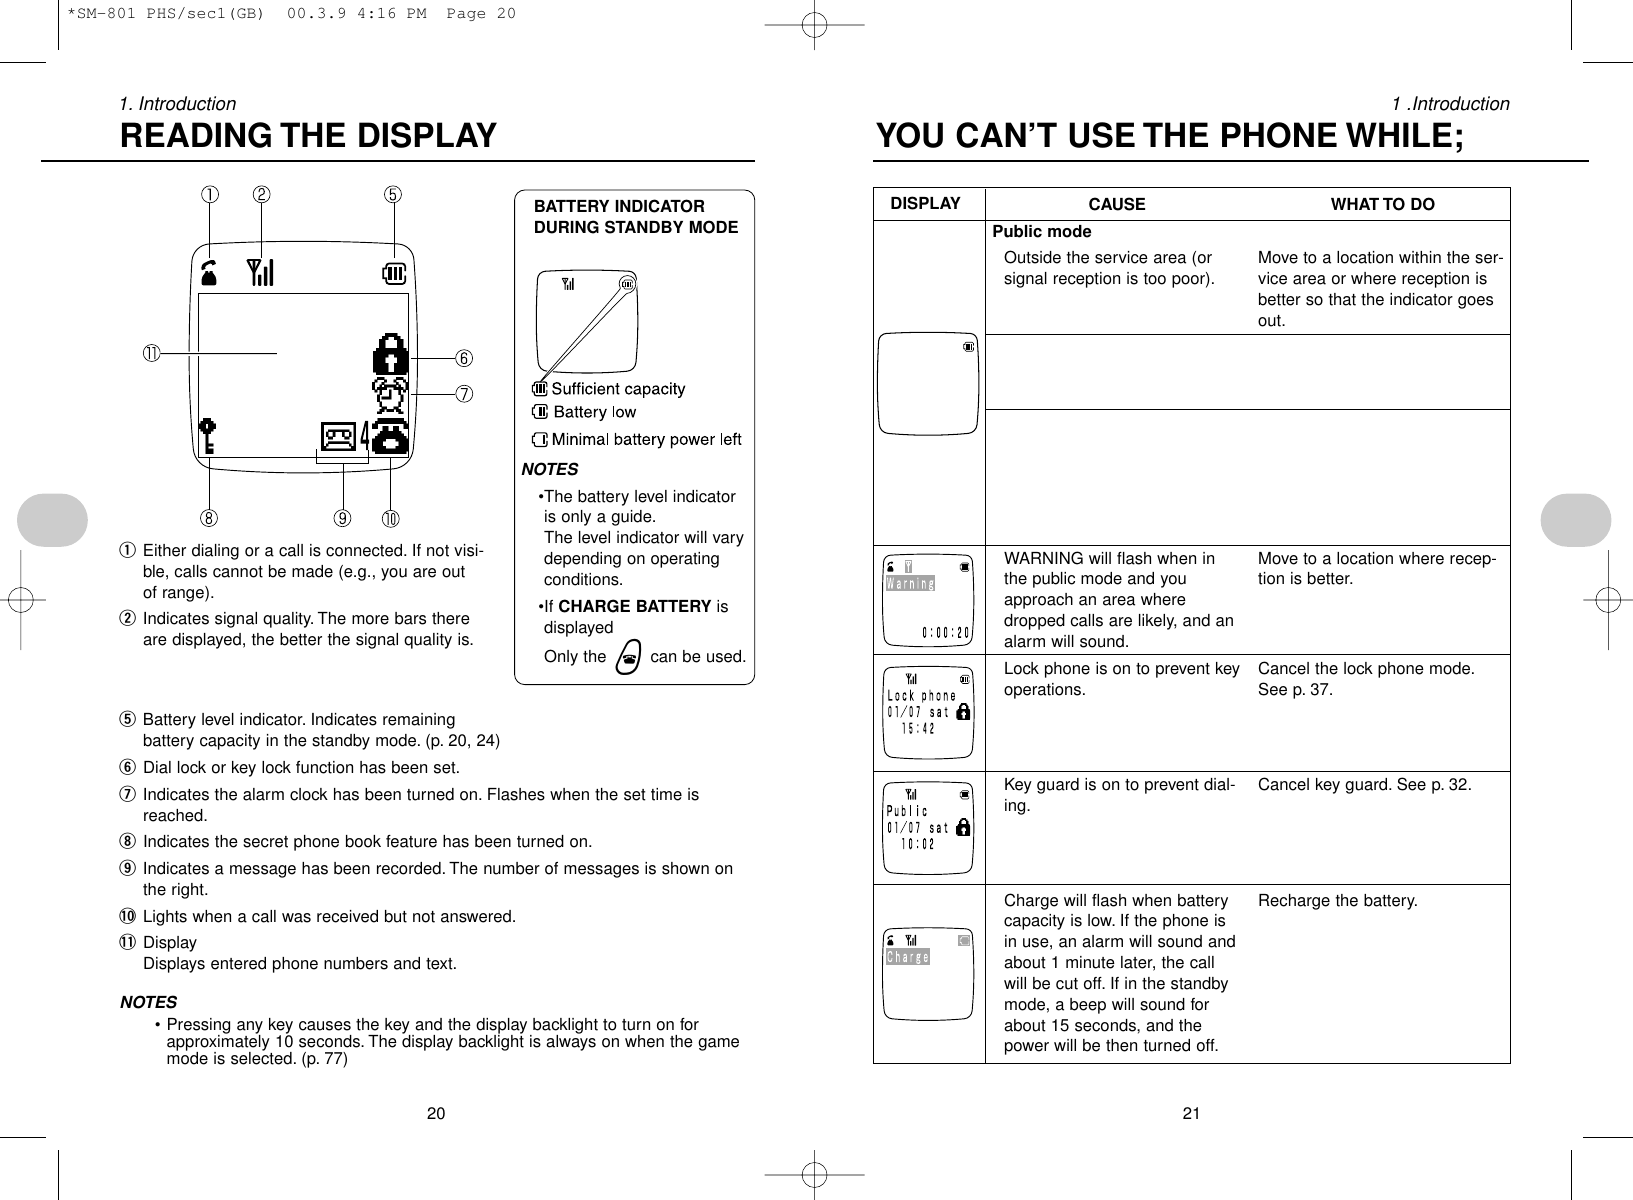
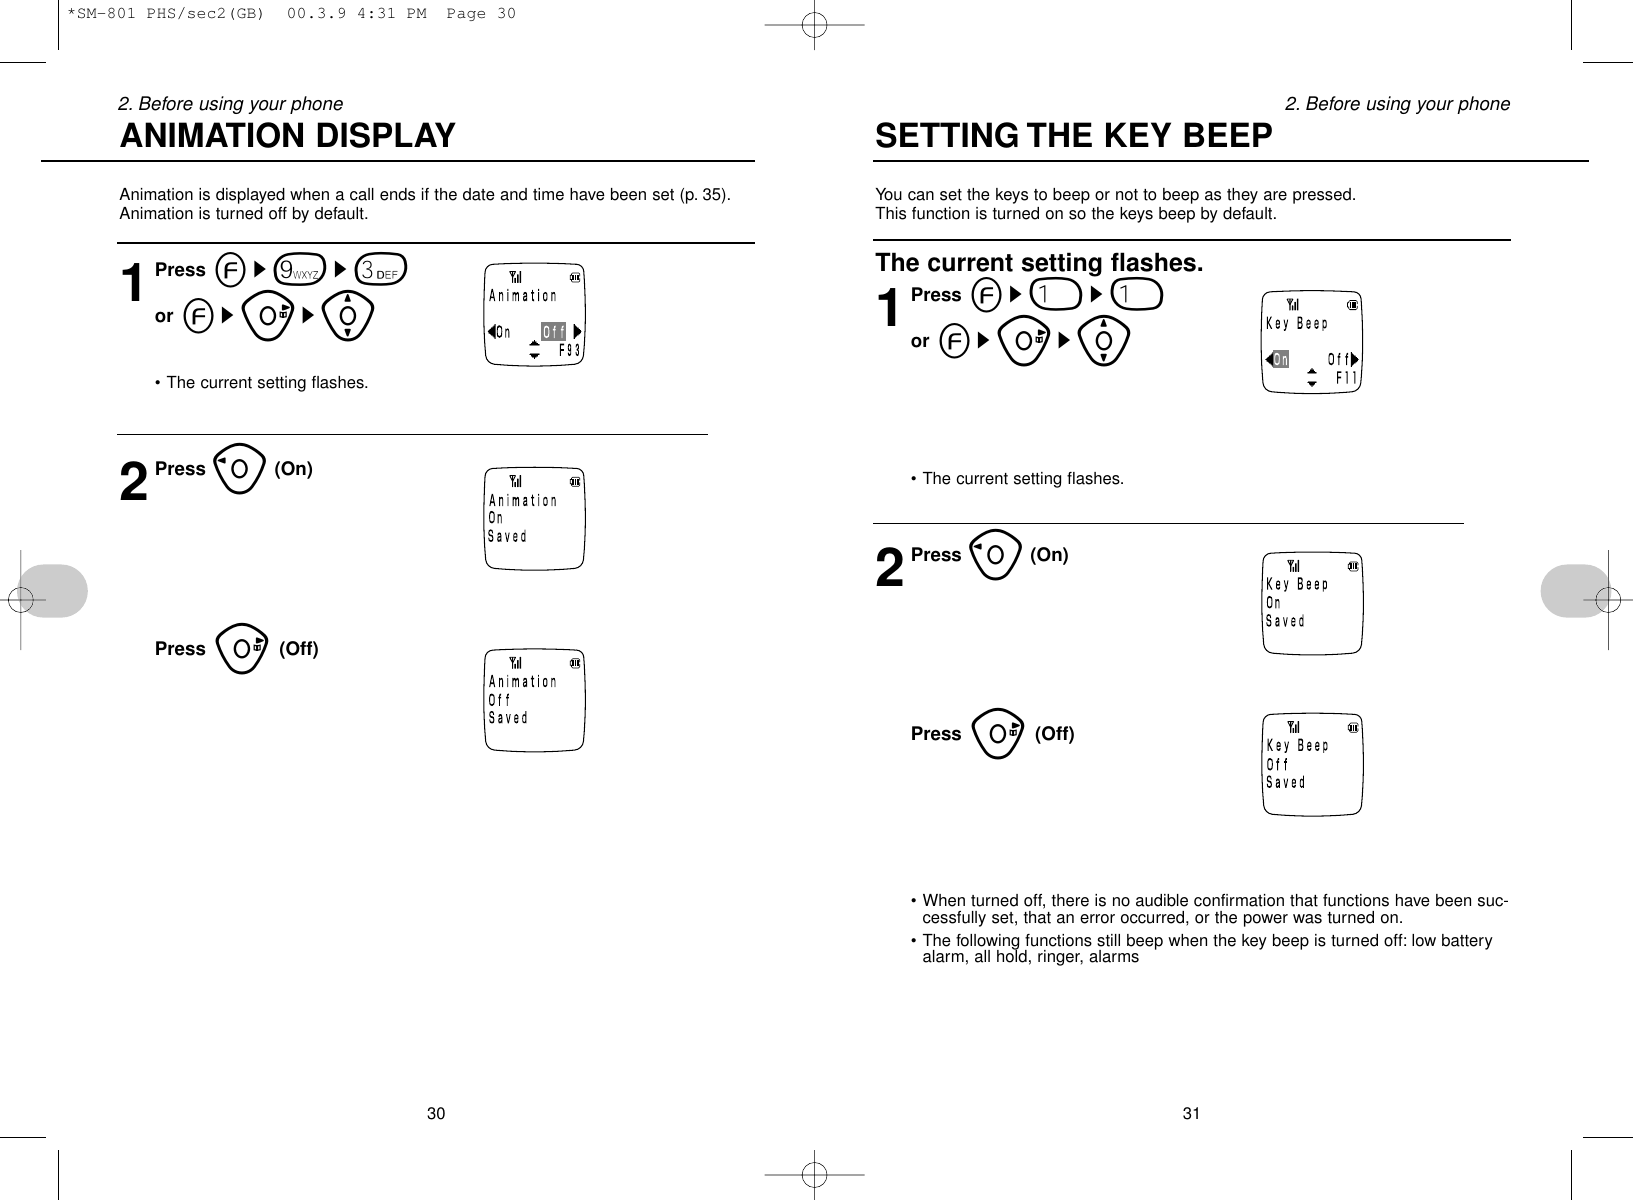
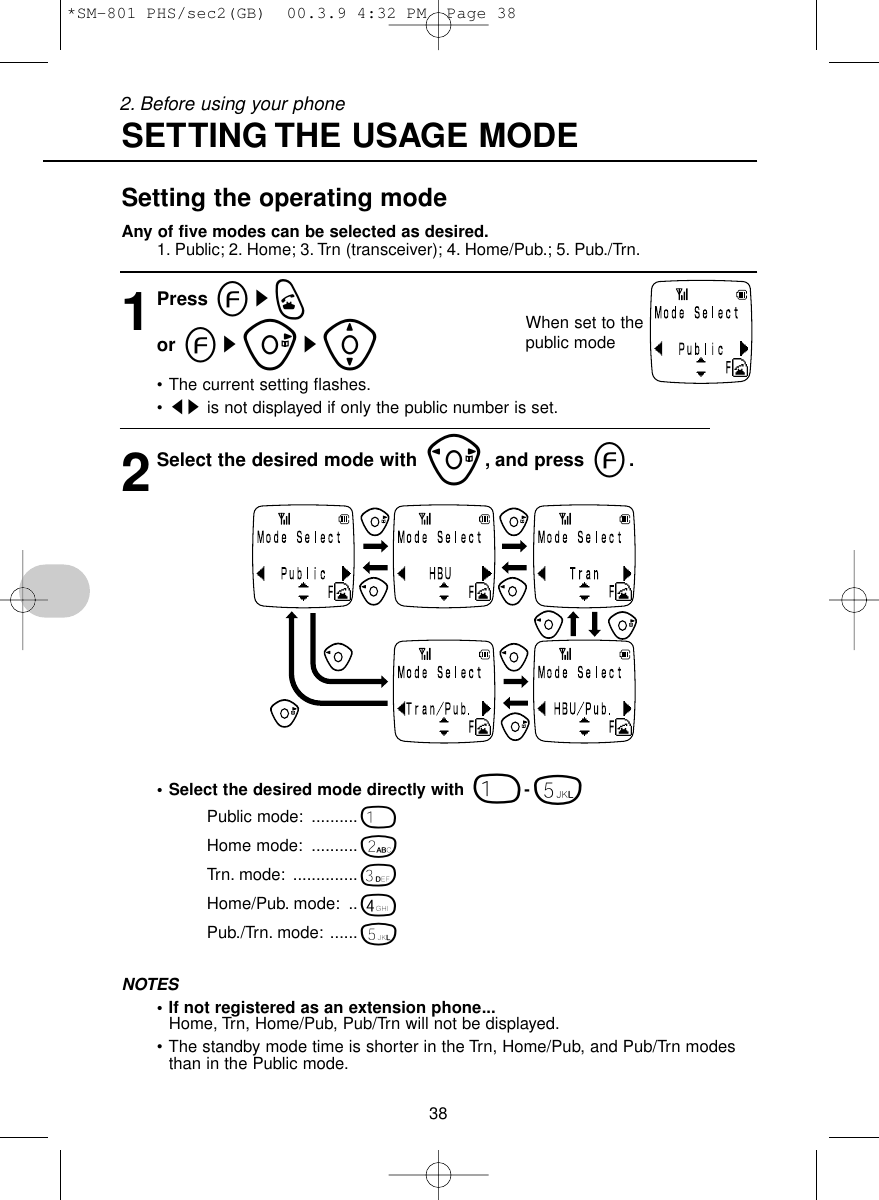
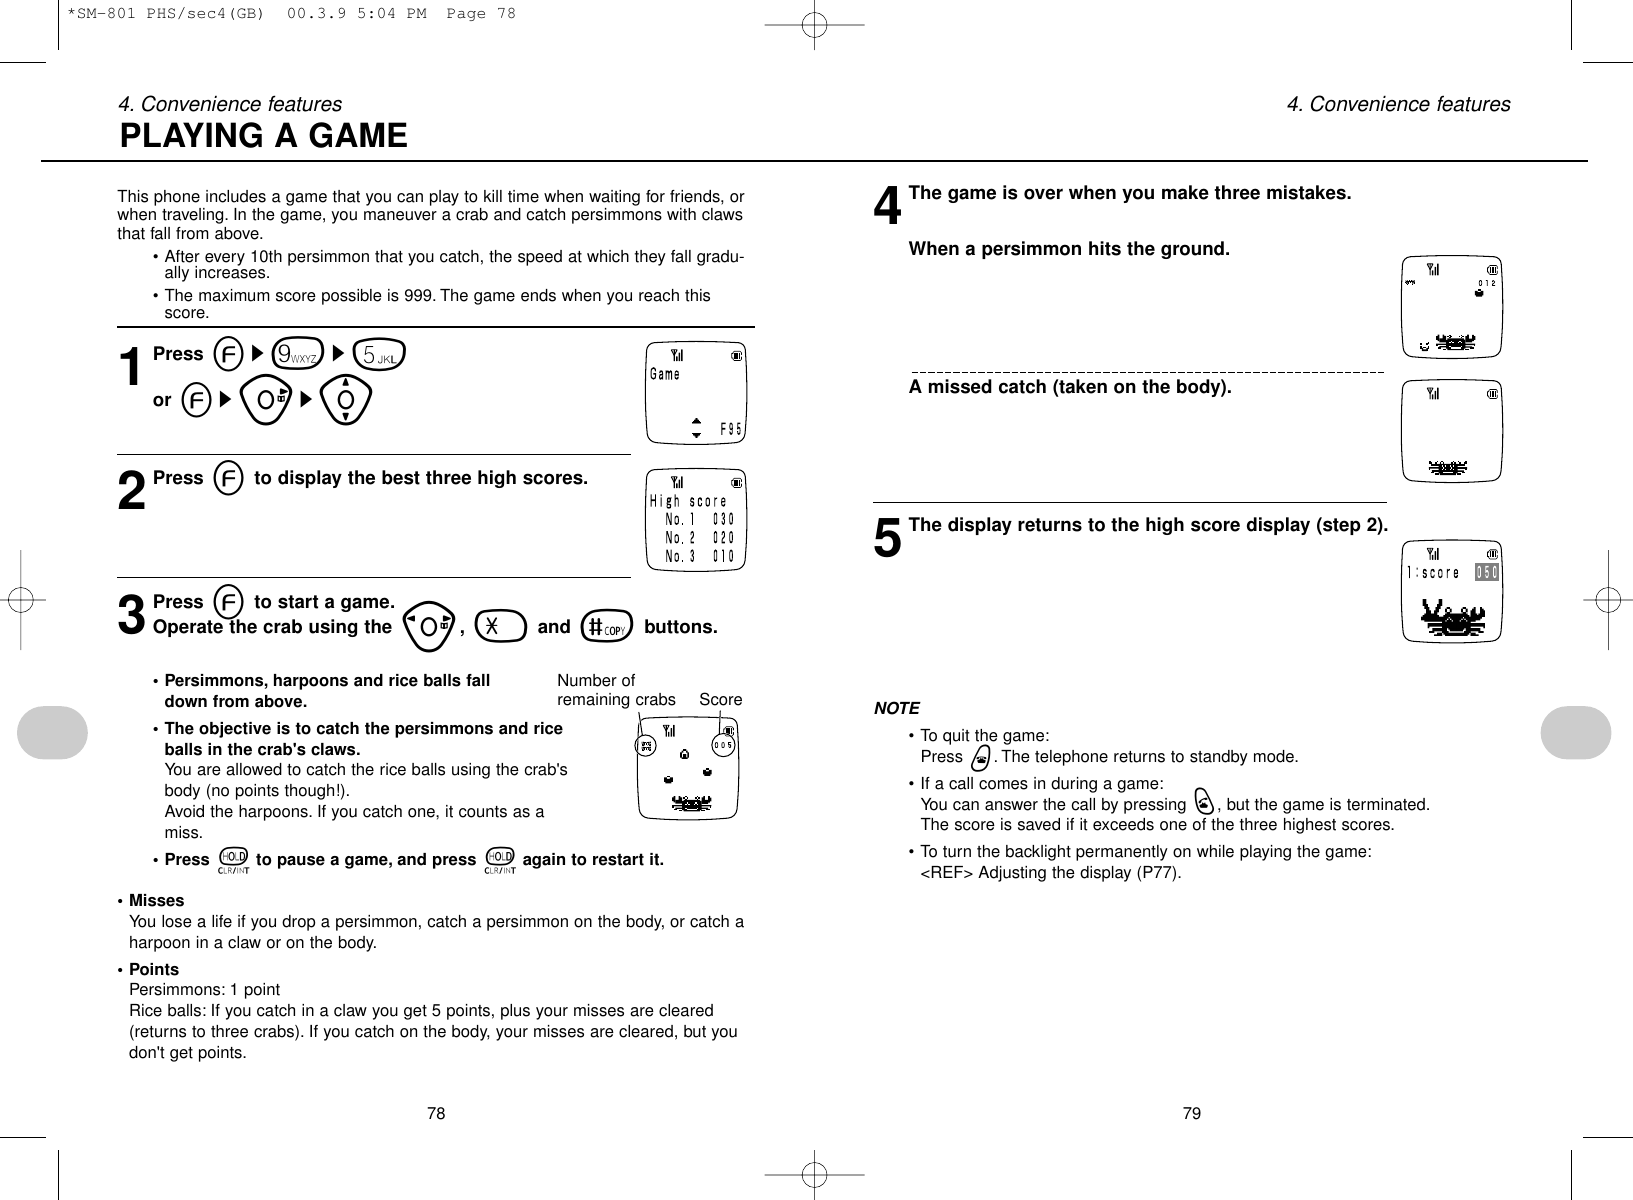
![664. Convenience features4Press =s3(paste)• After the text is pasted, you are returnedto normal text editing.Cut and Paste1Use the ]key to position the cursor at thestart of the first character of the text string that youwish to cut.2Press =s]to specify the range of text to cut.• Press either =or wto cancel theediting function and return to normal textediting.3Press 2(cut), then ]to move the cursor to the positionwhere you want to paste the cut text.• After the text is cut, you are returned tonormal text editing.4Press =s3(paste)• After the text is pasted, you are returnedto normal text editing.Display the calendar for a specific month and year.The valid range for the calendar function is January 1900 to December 2099.1Press es4s7or esus[2Press e.Example:• If a time and date have been set (P35), the current month is displayed.• If a time and date have not been set, the calendar for January 2000 is displayed.3Use pto move the cursor and input the year and month, then press e.DISPLAYING THE CALENDAR➔u: displays the calendar for thenext montho: displays the calendar for theprevious monthi: displays the calendar for thesame month of the followingyeary: displays the calendar for thesame month of the previousyear• If you input a year that is out of the allowed range, or input an invalid month oryear, input again.674. Convenience features➔➔➔➔USING THE COPY, CUT, AND PASTE FUNCTIONS*SM-801 PHS/sec4(GB) 00.3.9 5:04 PM Page 66](https://usermanual.wiki/UTStarcom-Korea-Technologies/UTS-708SY/User-Guide-181477-Page-36.png)
![68You can use the Scheduler function to sound a 30-second alarm and display a mes-sage at a specified time.• Up to three events per day, and a total of 20 events can be scheduled.• Schedules can be set up to one month in advance from the date of setting.• The alarm stops automatically after 30 seconds. Press any key to stop thealarm manually.• Pressing either qor twill clear the message from the display and memo-ry after 60 seconds.• The date and time (P35) must be set in order to use the Scheduler function.1Press es4s2or esus[2Presse eand use ]to move the cursor to the mark for theevent that you want to schedule, and then press eagain.• To register a new schedule: select space.• To edit an existing schedule: select the mark that you want to change.USING THE SCHEDULER➔Scheduled events Cursor• Marks for existing scheduled events are displayed.• Up to three events can be scheduled per day, and they are displayed in orderof occurrence from the left.• It is not possible to schedule multiple events for the same time.3Input the message and then press e.• If 20 events have alreadybeen scheduled, the mes-sage shown on the right isdisplayed and you arereturned to step 1.• If the data already exists, it is displayed.• The message can be up to 24 characters in length.<REF>Entering text (P63 to 66)694. Convenience features 4. Convenience features4Use ]to select a mark, then press e.(use 0to 9, =or -for direct selection)• If the data already exists, the selected mark will flash.• The marks provide a convenient means of distinguishing between events.5Press e, set the time, and then presseagain.➔The name for the selectedmark is displayedNOTE• If a call is in progress when the time for a scheduled event arrives:The alarm sounds and the message for the scheduled event is displayed whenyou finish the call.• If several schedules are set close together, and call is in progress at thetimes set for them:The schedules are displayed in order of occurrence from the left.(e.g. if the schedule times are set for 11:00 and 11:01)• If the power is off:The schedule is not displayed.If the set time for a schedule elapses while the power is off, the schedule isautomatically erased on the following day.• Alarms:– The alarm volume is as adjusted in the ringer volume (P55).– If the volume is set to "Off", the alarm does not sound.– It is possible to set the ringer volume to "OFF" and receive alarm notificationby setting the vibrator to "On" (P53). If the telephone is in the charger unit inthe case of the above setting, the alarm will sound at the "Middle" volumesetting.• If the date/time is modified after setting a schedule:Be aware that this can cause schedules to be shifted or erased.*SM-801 PHS/sec4(GB) 00.3.9 5:04 PM Page 68](https://usermanual.wiki/UTStarcom-Korea-Technologies/UTS-708SY/User-Guide-181477-Page-37.png)
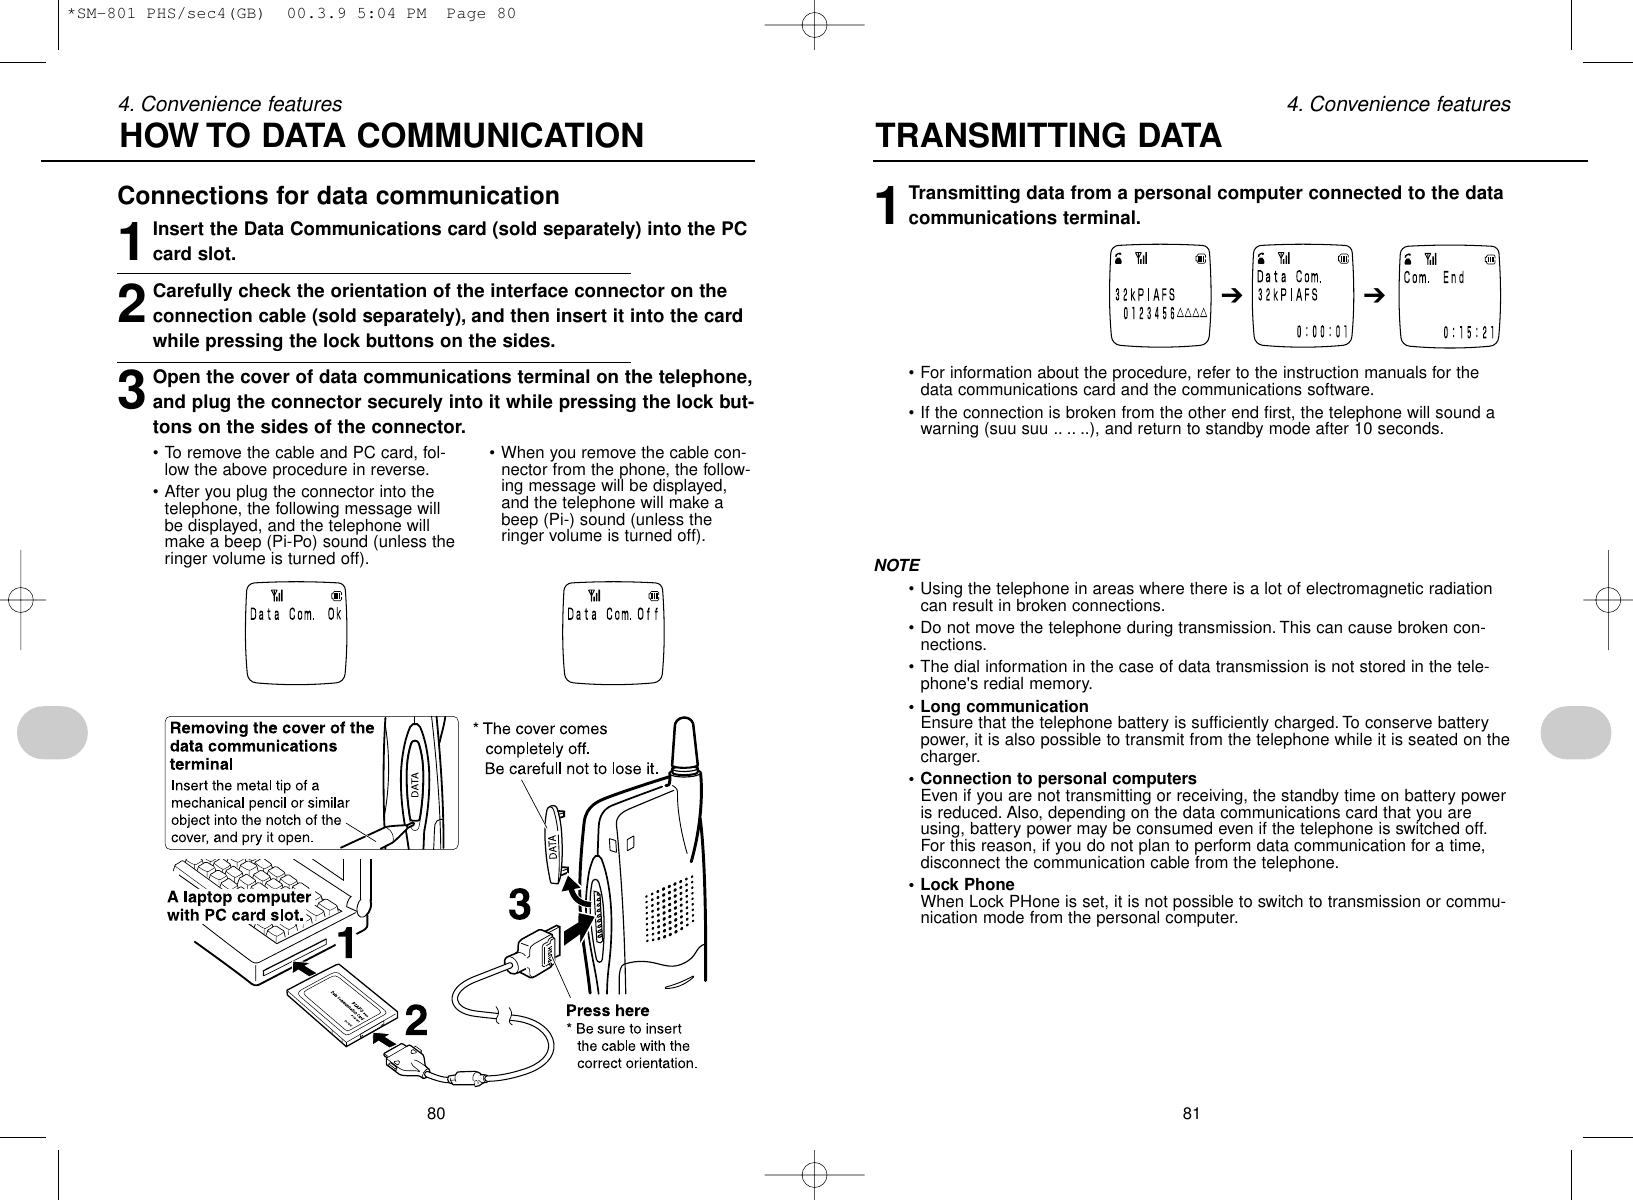
![The memo pad is a convenient way to store information (e.g. train schedules etc.). Upto 5 memos, 72 characters can be entered for each memo.Entering and viewing memo pad items1Press es4s5or esus[2Press es]s[to display the memo]3[Select the number of the memo that you wish to input] spress es[input the text] spress eagain.• Up to 72 characters can be entered for each memo.<REF>Entering text (P63 to 66)Deleting memos1[Select the number of the memo that you wish to delete] spresstspress 1to delete • Press 0to cancel the operation and return to the memo selection screen.70Viewing and deleting schedules.◆Viewing schedules1Press es4s2or esus[2Press e, and use ]to select the mark for the schedule you wish to view.3Press eto display the message.4Press eto display the marks.5Press eto display the setting time.◆Deleting schedules1Press eto display the message (as followed in step 1~3), thenpress and hold down tuntil the message is cleared, and thenpress eagain.VIEWING AND DELETING SCHEDULED EVENTS➔ ➔➔➔ ➔➔ ➔714. Convenience features 4. Convenience featuresUSING THE MEMO PAD*SM-801 PHS/sec4(GB) 00.3.9 5:04 PM Page 70](https://usermanual.wiki/UTStarcom-Korea-Technologies/UTS-708SY/User-Guide-181477-Page-38.png)
![5Use pto select a mark.(use 0to 9,=or -for direct selection)• If the data already exists, the selected mark will flash.• The marks provide a convenient means of distinguishing between anniversaryevents.ANNIVERSARY MARKS6Press eDeleting an anniversary event1Use the procedure in step 2 to select the anniversary that you wishto delete, and then press tthen 1to delete it.• Press 0to cancel the operation and return to the anniversary selectionscreen.• When entering the text in step 4,, you can delete all text by pressing and hold-ing tuntil the text is deleted, and then pressing e.72 734. Convenience features 4. Convenience featuresYou can store up to 10 important anniversary events (birthdays etc.). When the dayspecified for an anniversary event arrives, the message set for it is displayed duringstandby mode for the period of that day.Reminder: The date and time (P35) must be set in order to use the Anniversaryfunction.1Press es4s6or esus[2Press es[[to select anumber (from 0 to 9) for theanniversary event]spresseagain.• If an anniversary is already set for thenumber that you select, that anniversaryis displayed.When an anniversary date arrives:• The message for the anniversary is displayed in standby mode for that day (thedata is retained unless manually deleted).3Input the date spress e• It is not possible to set more than one anniversary per day.4Input the message spresse• If the data already exists, it is displayed.• Up to 20 characters can be entered for each anniversaryitem.Entering text (P63 to 66)ANNIVERSARY DATES➔ ➔When an anniversary date arrives:• The message for the anniversary is displayed instandby mode for that day (the data is retained unlessmanually deleted).Name of the selected mark*SM-801 PHS/sec4(GB) 00.3.9 5:04 PM Page 72](https://usermanual.wiki/UTStarcom-Korea-Technologies/UTS-708SY/User-Guide-181477-Page-39.png)
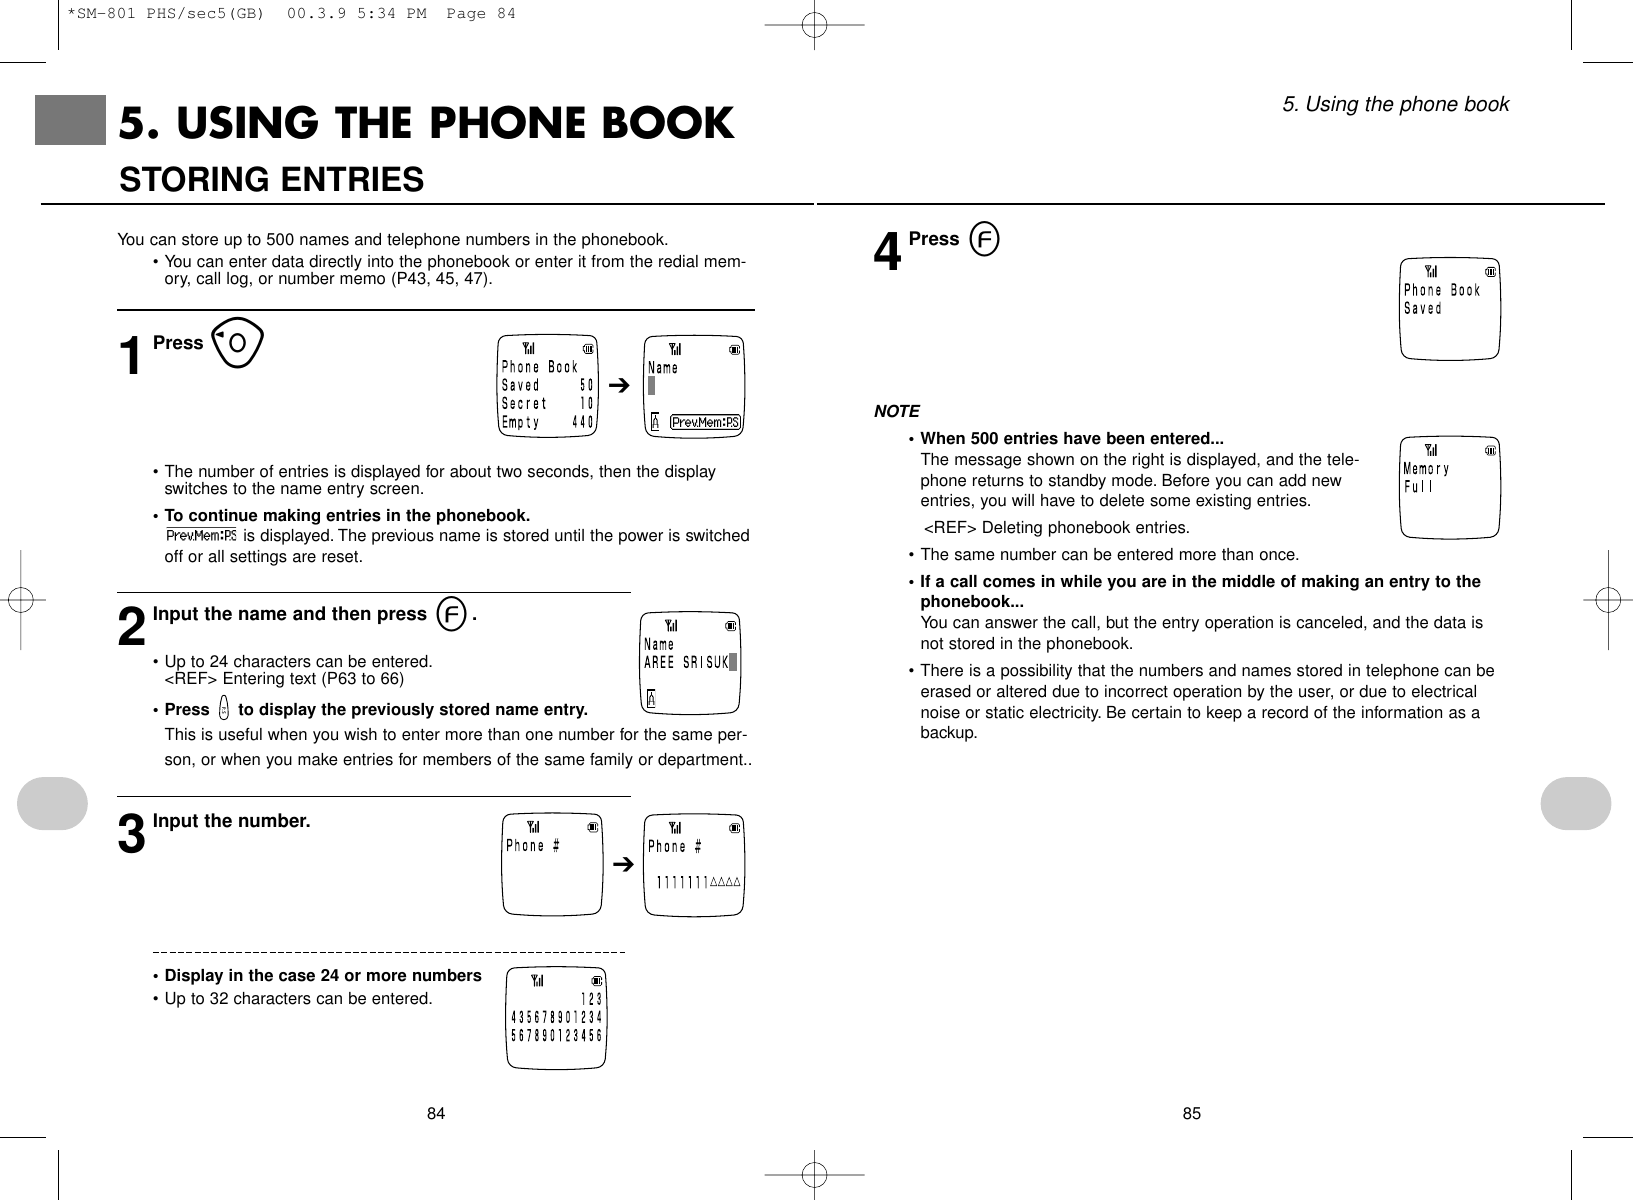
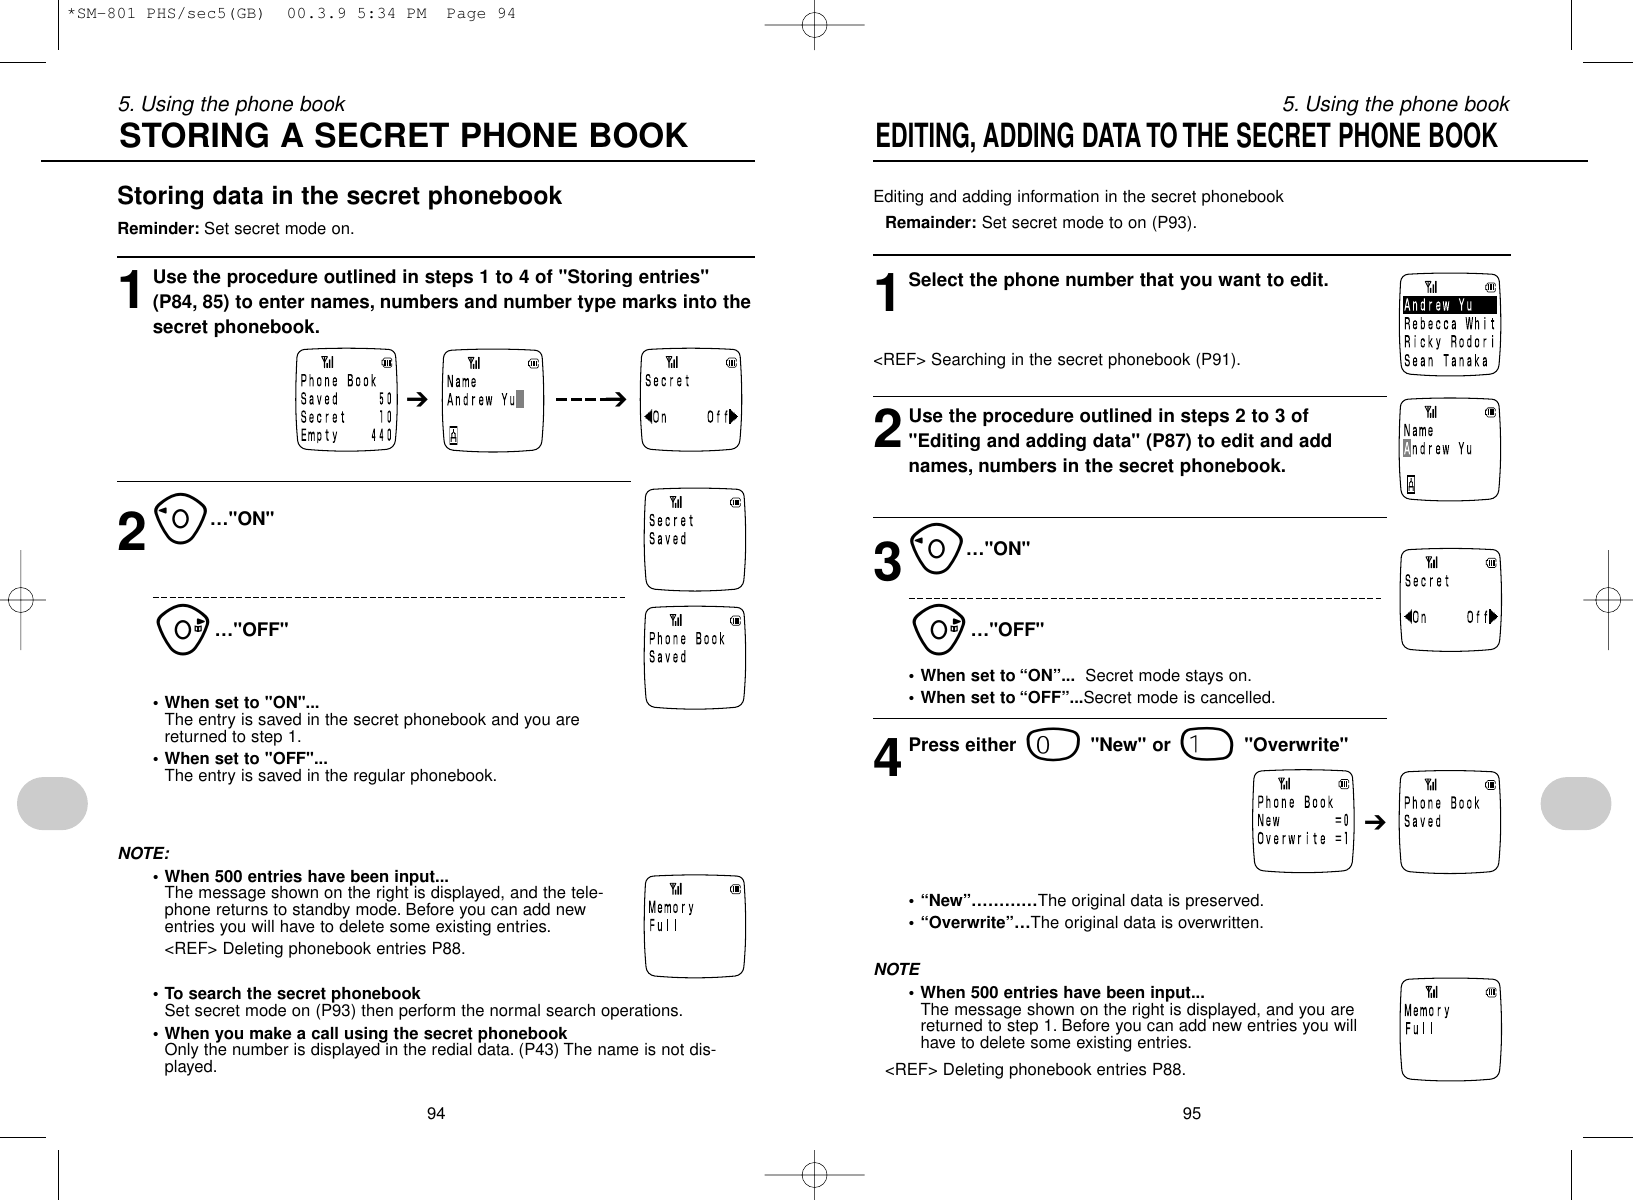
![875. Using the phone book865. Using the phone bookNames, numbers, and number classifications stored in the phonebook can be edited.•Editing method ... Press tto delete one character, and press and hold tto delete all characters.1Display the number that you want to edit.<REF> Search for a name P90<REF> Quick search P922Press r, edit the name, and then presse.• Up to 24 characters can be entered.[<REF>] Entering text (P63 to 66)3Edit the number, and then press e.4Press 0for a new entry, or The original data is kept.1to overwrite an existing entry.The original data is overwritten.NOTE•If 500 entries have already been stored...The message on the right is displayed and you are returned tostep 1. You will have to delete an entry from the phonebookbefore you can add a new one.<REF> Deleting phonebook entries P88.EDITING AND ADDING DATA ➔It is possible to enter data into the phone book from the redial memory, numbermemo, and call log.There must be a number in the redial memory, number memo or call log in order todo this.1Display the number that you want to enter into the phonebook.•y… display redial/number memo<REF> P43•i… display call log<REF> P452Press r• The number of entries is displayed for twoseconds, and then the name entry screenis displayed.3From now, follow the procedure given in steps 2, 4,"Storing entries" (P84, 85) to enter the number into thephonebook.NOTE• If 500 entries have already been stored...The message on the right is displayed and you are returned tostep 1. You will have to delete an entry from the phonebookbefore you can add a new one.<REF> Deleting phonebook entries P88.•When a number in the redial memory, number memo orcall log is entered into the phonebook...The entered names are displayed when you use the searchfunction.STORING NUMBERS FROM THE REDIAL MEMO-RY, NUMBER MEMO, AND INCOMING CALLS LOG➔Example:When redial was selected*SM-801 PHS/sec5(GB) 00.3.9 5:34 PM Page 86](https://usermanual.wiki/UTStarcom-Korea-Technologies/UTS-708SY/User-Guide-181477-Page-46.png)
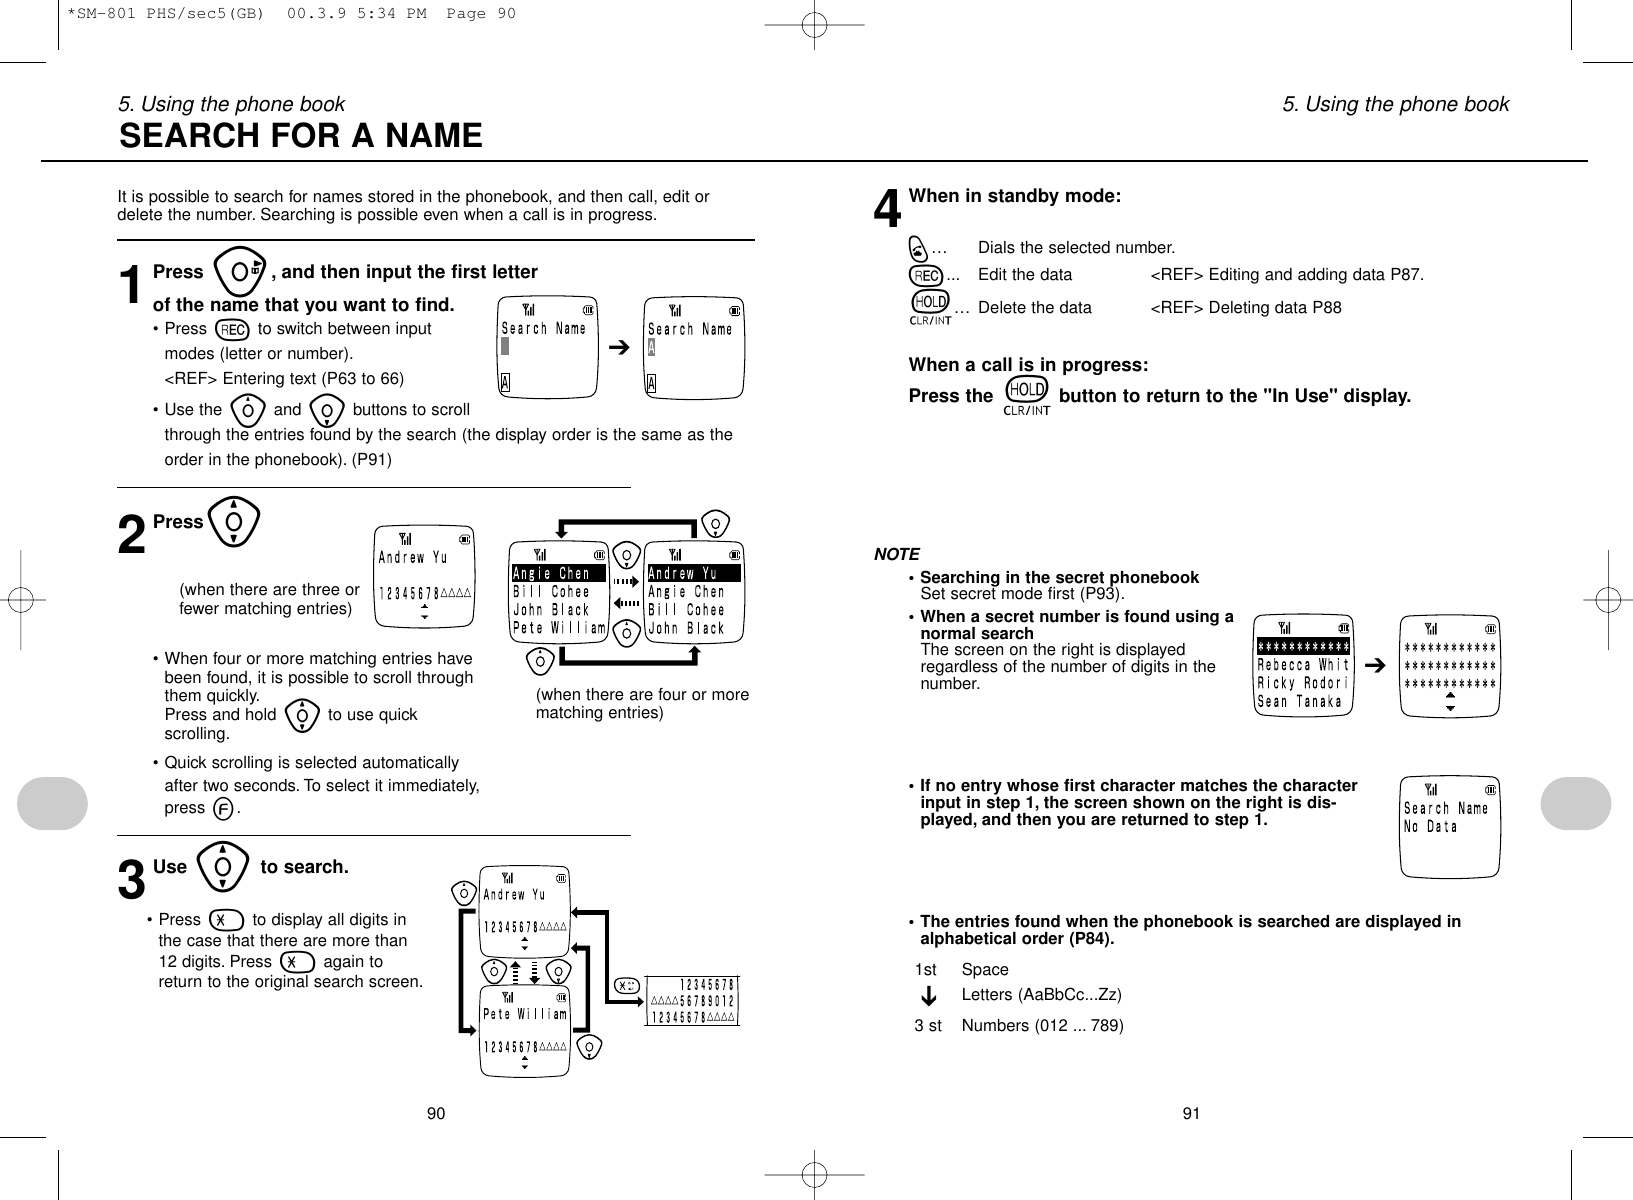
![935. Using the phone book925. Using the phone bookTo create a phonebook that others cannot see, it is first necessary to set secret modeon. You can then store names and numbers in the secret phonebook.•The number of entries for the normal phonebook and the secret phonebookcannot exceed 500 in combination.• It is only possible to use the secret phonebook to call when secret mode is on.Setting secret mode1Press es2s2or esus[• The current setting is displayed.2Press o, and then input yourlock code.• Press uto switch secret mode off.3If the lock code that you input iscorrect, secret mode is set to on.• If the lock code that you input is incorrect...“Invalid Lock Code” is displayed, and you are returned tostep 1.• If you turned secret mode off,“Secret Mode Cancelled”is displayed, the telephone returns to standby mode.STORING A SECRET PHONE BOOK (continued to next page)➔➔(the asterisks appearfrom the right)[ ] mark isdisplayed onthe screen.• To cancel secret modeIn addition to canceling secret mode by switching it off, you can also switch itoff by switching the telephone off and on, by using Reset or All Reset, or byerasing the entire phonebook or address book.You can use the letters assigned to the number buttons (0to 9) for search-ing, and calling. This quick search function is not available when a call is in progress.1Press and hold one of 0to 9(the button corresponding to the first letter of the name that you want to search for)}Example: If you press and hold down the 7button...Data starting with p, q, r, s, P, Q, R, S, 7, is dis-played.2Use[to search.QUICK SEARCH(when there are three orfewer matching entries) (when there are four or more matchingentries)• When four or more matching entries have been found, it is possible to scrollthrough them quickly.• Press and hold [to use quick scrolling.Quick scrolling is selected automatically after two seconds. To select it immedi-ately, press e.3q…Dials the number found.r…Edit the data <REF> Editing and adding data P87t…Delete the data <REF> Deleting data P88NOTE• If there is no data in the phonebook whose first charactermatches the button that you pressed in step 1, the messageshown on the right is displayed, and you are returned tostandby mode.NOTE*SM-801 PHS/sec5(GB) 00.3.9 5:34 PM Page 92](https://usermanual.wiki/UTStarcom-Korea-Technologies/UTS-708SY/User-Guide-181477-Page-49.png)