UTStarcom Korea Technologies UTS-C3000 Tri-Mode Dual-Band Phone (AMPS/CDMA) User Manual c3000 2
UTStarcom Korea Technologies Ltd. Tri-Mode Dual-Band Phone (AMPS/CDMA) c3000 2
Users Manual

T
TABLE OF CONTENTS
ABLE OF CONTENTS
1
PACKAGE INCLUDES .......................................................................4
HANDSET DESCRIPTION .................................................................5
FUNCTION KEYS ..............................................................................6
LCD DISPLAY....................................................................................7
USING THE BATTERY .......................................................................8
INSTALLING THE BATTERY .......................................................................8
CHARGING THE BATTERY ........................................................................9
BATTERY LEVEL INDICATOR...................................................................10
POWER MANAGEMENT ..........................................................................10
BASIC OPERATION ........................................................................11
TURNING THE PHONE ON.....................................................................11
TURNING YOUR PHONE OFF ................................................................11
MAKING A CALL......................................................................................11
ENDING A CALL ......................................................................................12
LAST NUMBER REDIAL............................................................................12
SPEED DIALING .......................................................................................12
EMERGENCY CALL...................................................................................13
ANSWERING A CALL...............................................................................13
CALLER ID WITH NAME ..........................................................................14
ADJUSTING THE EARPIECE VOLUME......................................................14
TO VIEW CALL HISTORIES ......................................................................14
CALL WAITING........................................................................................15
STORING A PHONE NUMBER .......................................................16
SOUND...........................................................................................18
BELL / VIBRATE ........................................................................................18
RING TYPE ...............................................................................................19
DTMF LENGTH ........................................................................................19
VOLUME CONTROL................................................................................20
CONNECT TONE .....................................................................................20
c3000_2 2004.9.14 7:4 PM 페이지1
T
TABLE OF CONTENTS
ABLE OF CONTENTS T
TABLE OF CONTENTS
ABLE OF CONTENTS
32
FADE TONE..............................................................................................21
MINUTE BEEP...........................................................................................21
DISPLAY..........................................................................................22
LIGHT SETTING .......................................................................................22
MAIN SCREEN SET ...................................................................................23
CONTRAST SET........................................................................................25
LAMP SETTING ........................................................................................26
VOICE .............................................................................................27
ANS. MACHINE........................................................................................27
VOICE MEMO ..........................................................................................28
VAD (Voice Activated Dailing) .................................................................29
DIARY .............................................................................................30
ALARM.....................................................................................................30
SCHEDULE...............................................................................................32
D-DAY......................................................................................................33
MEMO......................................................................................................34
WORLD TIME...........................................................................................35
STOP WATCH..........................................................................................36
CALCULATOR..........................................................................................36
CONVERT UNIT.......................................................................................37
SETTINGS........................................................................................38
SECURITY.................................................................................................38
CALL ANSWER.........................................................................................40
CALL TIMERS............................................................................................41
CALL INFO...............................................................................................42
T9 SETTING..............................................................................................44
LANGUAGE .............................................................................................44
OWN PHONE NO. ..................................................................................45
SYSTEM ....................................................................................................45
DATA FOLDER.........................................................................................49
GAMES............................................................................................50
EGGMAN 2 ..............................................................................................50
JUNGLE BOY............................................................................................50
MY MENU.......................................................................................51
PHONE BOOK ................................................................................52
SEARCH NO.............................................................................................52
RECORD NO............................................................................................54
EDIT GRP ................................................................................................56
CALL HISTORY.........................................................................................56
CLR PHONEBOOK...................................................................................58
SPECIAL NO.............................................................................................59
SMS .................................................................................................60
VOICE ......................................................................................................60
NEW MESSAGE ........................................................................................60
INBOX......................................................................................................62
OUTBOX..................................................................................................64
SAVED......................................................................................................65
SETTINGS.................................................................................................67
DELETE ALL..............................................................................................70
BREW .............................................................................................71
MOBILE SHOP .........................................................................................71
SETTINGS.................................................................................................72
HELP.........................................................................................................73
IMPORTANT SAFETY INFORMATION ..........................................74
DECLARATION OF CONFORMITY ................................................79
SAR .................................................................................................80
c3000_2 2004.9.14 7:4 PM 페이지2
P
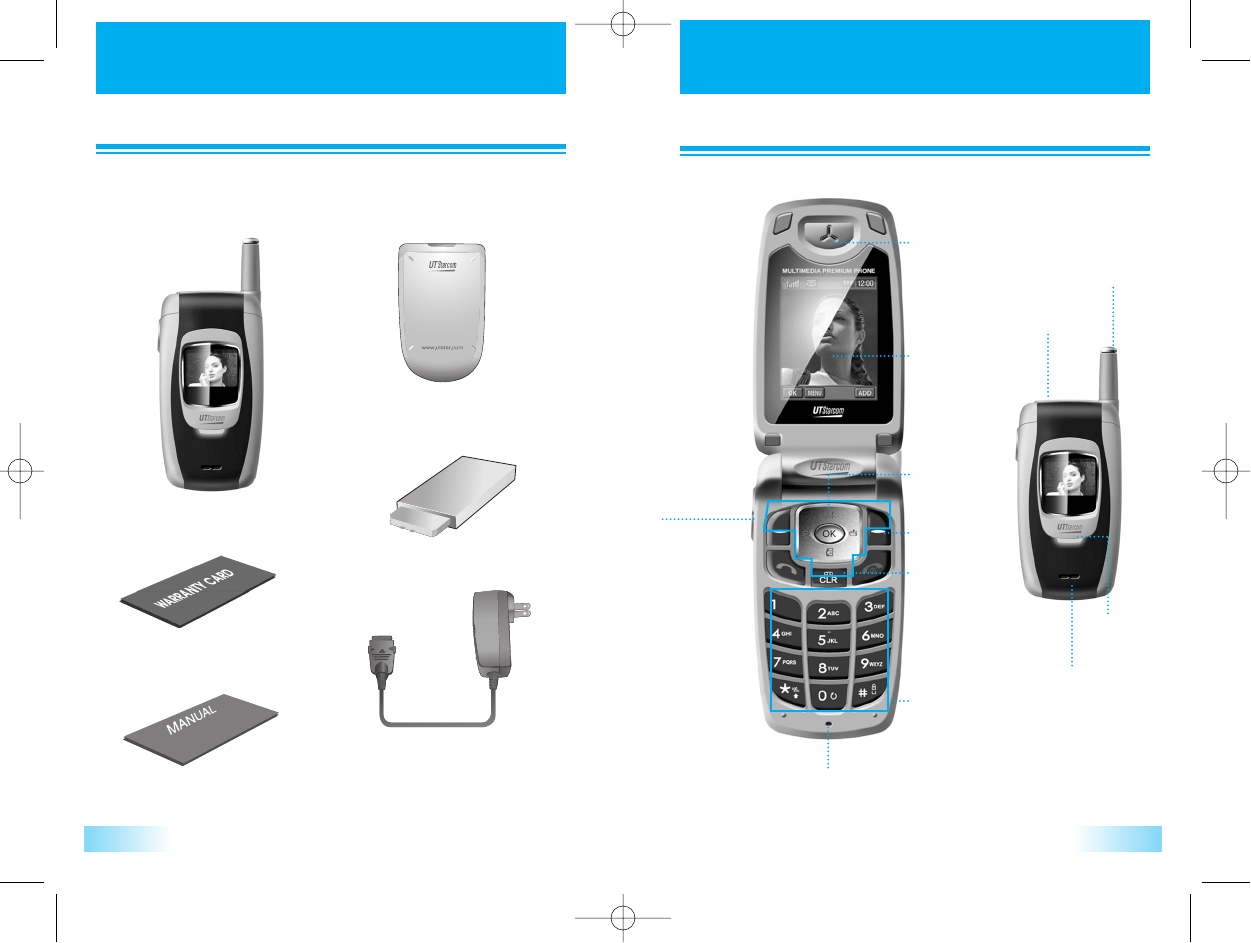
PACKAGE INCLUDES
ACKAGE INCLUDES
HANDSET DESCRIPTION
HANDSET DESCRIPTION
54
Thank you for purchasing this product.
Please check the product contents by comparing them with following
pictures.
Handset
User Manual in English
Warranty Card
Battery
Battery Cover
Travel Charger
Volume Button
Used to adjust
the volume of
the earpiece
and keypad,
ringer volume
Earpiece
LCD Screen
Function Keys
Voice Memo/
Voice Dial
Button
Voice Dial &
Speaker phone
Keypad
Microphone
Earjack
Sub speaker
Antenna
LED
c3000_2 2004.9.14 7:4 PM 페이지4
FUNCTION KEYS
FUNCTION KEYS LCD DISPLA
LCD DISPLAY
Y
76
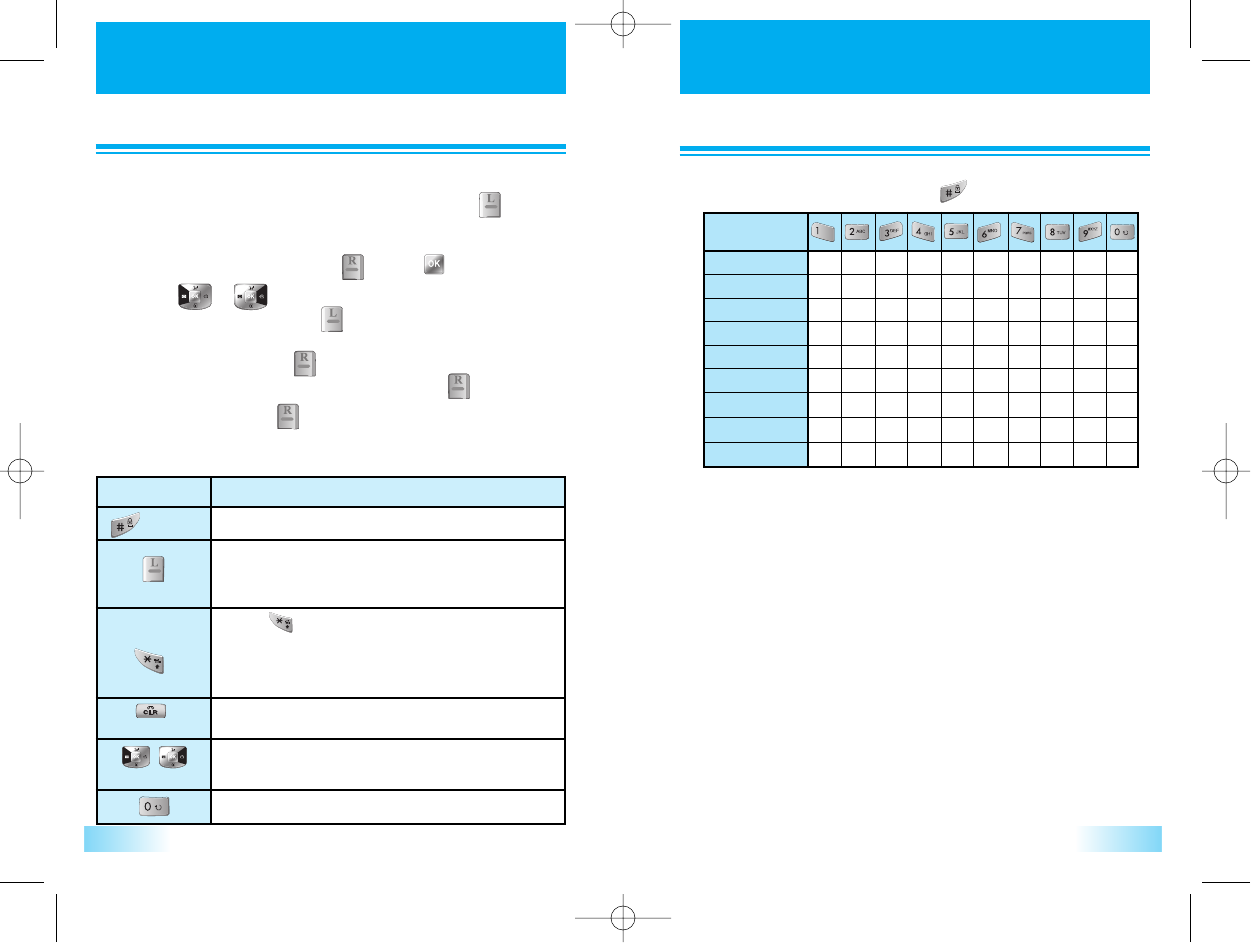
Digit Keys
Function Keys
Key - Board Arrangement
To enter Telephone Numbers.
To enter letters and symbols
[ ] : To turn manner mode on/off by pressing and
holding.
[ ] : To turn lock mode on/off by pressing and holding.
To function as shown on the softkey
To originate or receive a call. To enter call history list directly.
To terminate a call and to turn the phone ON/OFF.
To enter SMS menu. Also used as left arrow key.
To enter My menu. And also used for as right arrow key.
To confirm operation. To activate BREW.
To activate VAD by pressing the key.
To toggle speaker mode on/off by pressing & holding.
And also used for upper arrow key.
To enter Quick search list directly. And also used as down arrow key.
To clear digits and letters from the display in edit mode or return to
previous mode. To activate voice memo by pressing and holding.
Side Keys
To control the volume of ringer, key tone and earpiece.
And also used as up/down arrow key.
Top Line on Main LCD
Received signal strength bar.
No service area.
In call state.
Vibrate alert mode on.
Silence alert mode on.
Alarm has set
Phone is roaming state
Speaker Phone mode
Phone is TTY mode.
Phone is emergency mode.
Network Out of Amps mode
1x Network
Unread text message is existed. Urgent unread message:
Blinking Normal unread message: Keep turn ON
No unread message: turn OFF
Unread voice message is existed.
Unread text and voice message is existed.
Battery level.
Icons Descriptions
c3000_2 2004.9.14 7:4 PM 페이지6
USING THE BA
USING THE BATTER
TTERY
Y USING THE BA
USING THE BATTER
TTERY
Y
98
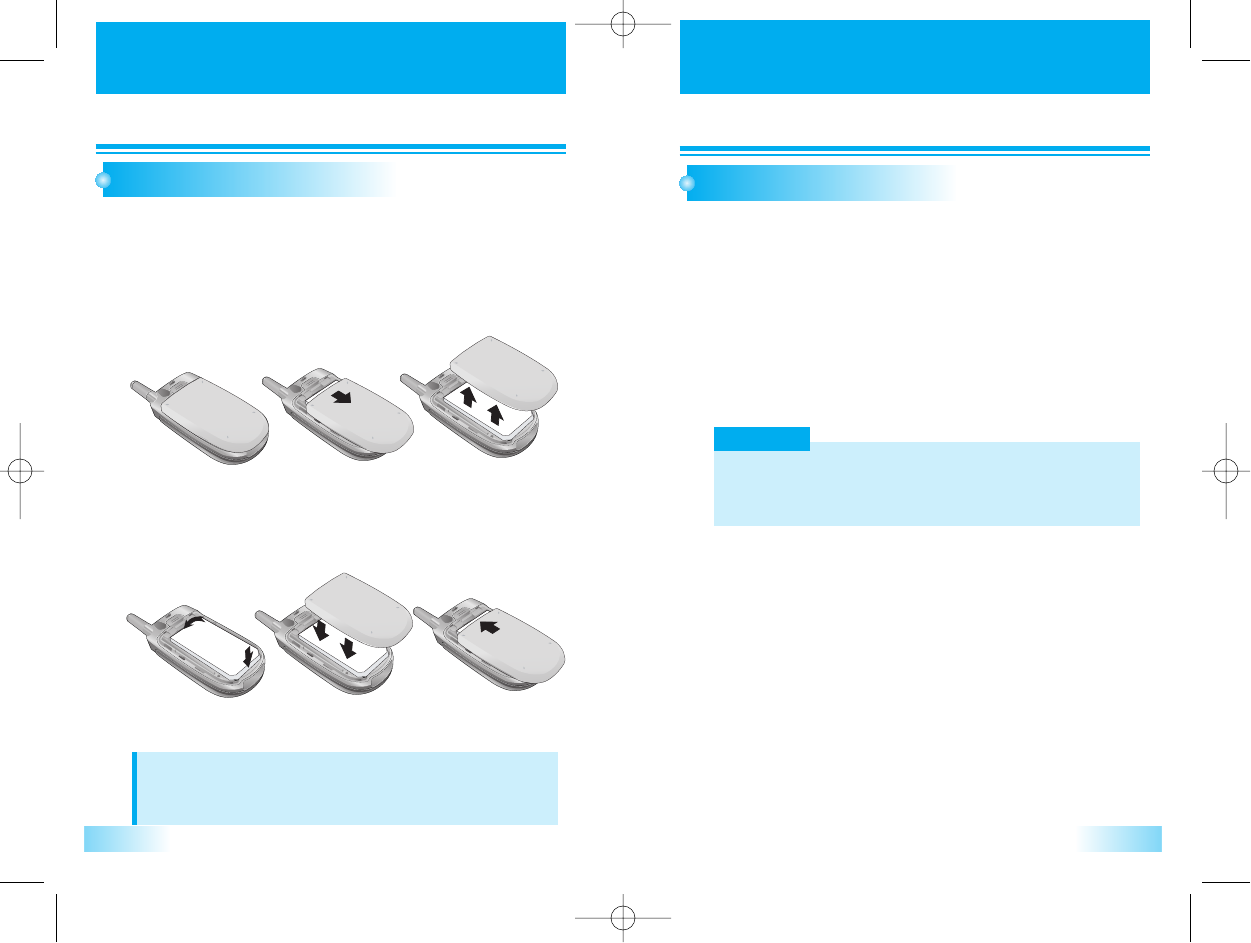
INSTALLING THE BATTERY
As shown in the picture below, put the metal locators of the
battery into the holes located in the bottom of the unit.
Insert the metal locators of the battery into the hole located in the
bottom of the unit.
NOTE
The battery must be correctly placed in the battery compartment.
If battery is incorrectly inserted, the handset will not turn on or the battery may
slip out during use.
1
1
Press the Upper part of the battery until the sound of a ‘click’ is
heard.
2
2
CHARGING THE BATTERY
POWER CONNECTION
Connect the charger to a standard 100~240 VAC Oultet.
LED Off : No battery
LED Blinking (500msec) : Battery faut.
The temperature of battery is abnormal.
LED Blinking (1sec on, 3 sec off) : Normal Charging.
Service Light : Charging completed.
1
1
WARNING!
In case of instant electric power interruption, the travel charge may not function
properly.
In this case, please disconnect the travel charger from the wall outlet and then try
charging again after 5 seconds.
c3000_2 2004.9.14 7:4 PM 페이지8
USING THE BA
USING THE BATTER
TTERY
Y
BASIC OPERA
BASIC OPERATION
TION
1110
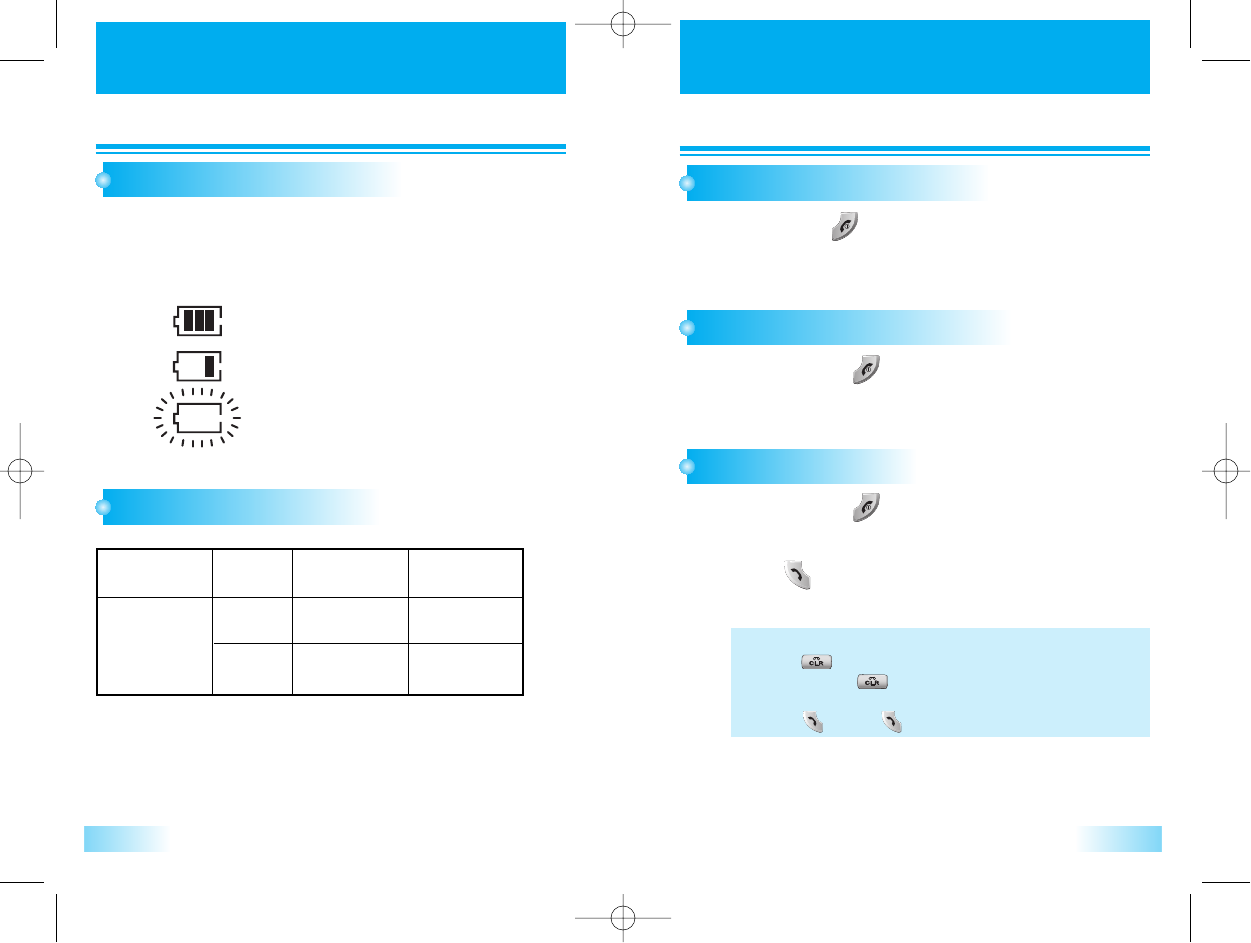
BATTERY LEVEL INDICATOR
You can always monitor the battery charge condition with the
constant battery level indicator. The number of blocks indicates
the battery conditions as follows;
1
1
POWER MANAGEMENT
TURNING THE PHONE ON
Press and hold [ ] key till Power LED is turned ON.
1
1
TURNING YOUR PHONE OFF
Press and hold the [ ]key to turn your phone off.
1
1
MAKING A CALL
Press and hold the [ ]key to turn your phone on.
1
1
In idle mode, enter the phone number with the area code.
Press the [ ] key to make a call.
(A maximum of 32 digits will be displayed.)
2
2
Full charge
Low charge
Flashing indicates discharged.
Battery
Lithium Ion
800 mAh
Mode
Digital
Analog
160~210 min
70~90 min
45~140 Hour
11~13 Hour
Standby Time
Talk Time
(The criteria of measurement is in accordance with our internal
specification.)
The operating times are approximate values and may vary depending
on network configuration and handset usage.
• To Correct a Number
Press [ ] to clear the last digit.
Press and hold [ ] to erase all the digits entered.
• If the Call Fails to Go through
Press [ ] and [ ] to redial the number.
c3000_2 2004.9.14 7:4 PM 페이지10

BASIC OPERA
BASIC OPERATION
TION BASIC OPERA
BASIC OPERATION
TION
1312
ENDING A CALL
If you wish to cancel or disconnect a call, press the [ ]key
or close flip.
1
1
When the phone rings a melody or vibrates, the screen will
display the name or telephone number of the caller, provided
that you have been subscribed to your telecommunications
service provider for such service.
The caller's name will be displayed only when his/her
telephone number and name are archived in the Phone Book.
If you wish to answer a call in normal mode, simply press the
[ ]key.
1
1
LAST NUMBER REDIAL
Press [ ] the outgoing call list will be displayed.
SPEED DIALING
1
1
1
1
Press [ ] key on selected number in listed outgoing call history.
2
2
EMERGENCY CALL
Enter the one or two or three digits of your Phonebook address
and hold down the last digit. (1 to 9 or 10 to 99 or 100 to 500).
If you know the phonebook address of the telephone number that you want to calls.
NOTE
If two telephone numbers are stored in the address, the Primary
Number will be dialed.
This feature permits you to place an emergency call even if your phone is in
“Phone Lock” or “Restrict” mode when you dial the preprogrammed
emergency number, 911, #911, or *911. It also operates in out of service area.
The phone maintains the emergency mode until user press [ ]key after
disconnecting emergency call. In the emergency call mode, the phone can
receive an incoming call from any available system. However it can’t make a
normal call.
Example : To Call “911” in “Phone Lock” or “Restrick” mode.
1
1. Enter [ , , ].
The “911” will be displayed.
2
2. Press [ ].
The “911”, ”Emergency” will be displayed.
ANSWERING A CALL
c3000_2 2004.9.14 7:4 PM 페이지12
BASIC OPERA
BASIC OPERATION
TION BASIC OPERA
BASIC OPERATION
TION
1514
CALLER ID WITH NAME
ADJUSTING THE EARPIECE VOLUME
1
1
1
1
2
2
CALL WAITING
1
1
2
2
When the phone rings, the calling number appears in the
display.
The last 20 Caller ID’s are stored in the memory for your
review and redial.
During a call, if you wish to adjust the earpiece volume, use
the volume key on the side of the phone to select the desired
level from the 8 different volume levels.
TO VIEW CALL HISTORIES
1
1
To view outgoing calls, incoming calls, missed calls history :
[ ]+[ / ]
This feature allows you to preview in your display the number and name of the party
calling you before you answer the call. The name is as you programmed it in your
phonebook.
NOTE
“Number Restricted”or “Number Unavailable” is displayed when the
Caller ID is restricted or not available.
Your service provider may provide Call Waiting service.
When you are on a call, you may hear a beep tone alerting you of another
incoming call.
Your phone displays “Call Waiting” and the new caller’s name and number.
The name is as you programmed it in your phonebook.
Press [ ] to answer the new call.
Press [ ] again to switch between the two calls.
c3000_2 2004.9.14 7:4 PM 페이지14
STORING A PHONE NUMBER
STORING A PHONE NUMBER
17
1
1
2
2
3
3
4
4
STORING A PHONE NUMBER
STORING A PHONE NUMBER
16
Enter a phone number you want to store and press [ ] .
Use the navigation key to select the phone type:
home/work/mobile and press [ ] or [ ].
Press [ ] [ ] enter a name edit mode.
To change T9 mode, press [ ] and select text input method
menu among Symbols, 123, Abc, T9 Portuques, T9 Spanish and
T9 Enlgish by pressing [ ].
After writing name and phone numbers, press [ ].
To confirm it, press [ ] to save.
The phone book stores up to 500 names, each with up to 3 different phone numbers.
The following illustrates how to utilize the available functions for
each assigned key:
Space
Mode
Clear
Left,Right
Press once to accept a word and add a space.
Press to select the letter case of the standard
text input or [Abc], [Symbols], [123], indicate
standard text input.
Press
[ ]
to change text input mode as blew.
1. T9 Portuques :T9 Po -> T9 PO ->T9 po
T9 Spanish : T9 Sp -> T9 SP ->T9 sp
2. T9 Eng:T9 En->T9EN -> T9 en
3. ABC:Abc>ABC->abc
Press once to delete a character to the left of the
cursor or press and hold to delete all characters.
To move the cursor.
To set next word at T9 mod.
KEY FUNCTION
Input the letters you want to enter using the keypad as follows:
You can change the input mode by pressing .
Keypad
1 Time .
,
-
?
!
‘
@
:
1
a
b
c
ç
ã
á
à
â
2
d
e
f
é
ê
3
g
h
I
í
4
j
k
l
5
m
n
o
õ
ó
ô
ñ
6
p
q
r
s
7
t
u
v
ú
ü
8
w
x
y
z
9
0
Repetitions 2 times
Repetitions 3 times
Repetitions 4 times
Repetitions 5 times
Repetitions 6 times
Repetitions 7 times
Repetitions 8 times
Repetitions 9 times
With T9 Text Input you can enter text on your mobile phone using
just one key press per letter.
Example: for entering "meeting"
press: 6, 3, 3, 8, 4, 6, 4
c3000_2 2004.9.14 7:5 PM 페이지16
SOUND
SOUND SOUND
SOUND
1918
BELL / VIBRATE
Press [ ].
This feature is used to select the receive type
between bell, or vibrate.
This feature is used to select the ring type the user wants.
• Bell : Bell ringing and Lamp is blinking.
•Vibrate : Vibrating and Lamp is blinking.
• Vib / Bell : Vibrating first 2 time and then ringing.
• Lamp only : Lamp is blinking.
NOTE
• Conditions in Vibrate mode.
Incoming call received : Activate vibrate
New Text Message received : Activate vibrate
New Voice Mail Notification : Activate vibrate
Service Mode Alert : Use beep
Schedule, Alarm : Activate vibrate
Other. : Beep
1
1
Press [ ], then [ ].
Select the parameter by using the navigation key.
2
2
Press [ ] to save it.
3
3
RING TYPE
Press [ ].
• Classic Bell : Lake, Waltz, Spring, Skate Waltz, Carmen, Turkischer,
Chorus, La Paloma, Pathetic Sym, Joy to World, Noel,
Hungari Dance, Jingle Bell, Serenade, Pastoral,
• My Bell : Select File
• Create Bell : Analog, Effect01, Funny Park, Western, Chinese Song,
Fanatstic, Orgol, Duck, Country, Tap Dance, Seashore,
Comic
1
1
Press [ ], then [ ].
Select the parameter by using the navigation key.
To listen the ringer tone :
Scroll and down in selection list.
2
2
Press [ ] to save it.
3
3
This feature select sending DTMF tone length when user press digit key
in calling state.
DTMF LENGTH
Press [ ] to save it.
3
3
Press [ ].
• Normal : Send DTMF until release the digit key. (Max 2 sec.)
• Long : Send DTMF in 150msec.
1
1
Press [ ], then [ ].
Select the parameter by using the navigation key.
2
2
c3000_2 2004.9.14 7:5 PM 페이지18
SOUND
SOUND SOUND
SOUND
2120
VOLUME CONTROL
Press [ ].
• Bell Volume : Adjust the bell volume.
• Earpiece Vol : Adjust the earpiece volume.
• Key Volume : Adjust the key volume.
1
1
Press [ ] to save it.
3
3
Press [ ], then [ ].
Select the parameter by using the navigation
key.
2
2
CONNECT TONE
Press [ ].
• On
• Off
1
1
Press [ ] to save it.
3
3
Press [ ], then [ ].
Select the parameter by using the navigation
key.
2
2
FADE TONE
This function beep a tone when call has been connected.
Press [ ].
• On
• Off
1
1
Press [ ] to save it.
3
3
Press [ ], then [ ].
Select the parameter by using the navigation
key.
2
2
This function beep a tone when call has been disconnected.
Adjust ringer volume.
If volume is set to “0”(mute), silence icon is appeared except for etiquette mode.
MINUTE BEEP
Press [ ].
• On
• Off
1
1
Press [ ] to save it.
3
3
Press [ ], then [ ].
Select the parameter by using the navigation
key.
2
2
This function beep a tone when every minute during a call.
c3000_2 2004.9.14 7:5 PM 페이지20
DISPLA
DISPLAY
YDISPLA
DISPLAY
Y
2322
LIGHT SETTING
This function adjusts lighting time.
To select your favorite LCD display in the following modes.
MAIN SCREEN SET
1. Animations
1. Animations
Press [ ], [ ].
1
1
Press [ ], then [ ].
Select the parameter by using the navigation key.
2
2
Press [ ].
• LCD Time : Adjust the main screen lighting time.
(10, 20, 30 seconds, Flip open)
• Light Level : On, Off
• Keypad Light : Adjust the keypad lighting time.
(10, 20, 30 seconds, Flip open)
• Idle
• Outgoing calls
• Incoming calls
• Power On
• Power Off
1
1
Press [ ] to save it.
3
3
Press [ ] to save it.
3
3
Press [ ], then [ ].
Select the parameter by using the navigation key.
2
2
This function is to select wallpaper on each state.
2. Wallpaper
2. Wallpaper
Press [ ], [ ].
1
1
Press [ ], then [ ].
Select the parameter by using the navigation key.
2
2
• Idle animation
• Still image 1 ~ 12
• Calendar
NOTE
If animation is set on idle, it affects for the standby time.
c3000_2 2004.9.14 7:5 PM 페이지22
DISPLA
DISPLAY
YDISPLA
DISPLAY
Y
2524
NOTE
You can enter a banner up to english 16 charaters long.
NOTE
Idle image가Calendar인 상태에서는 Clock설정이 불가능함.
NOTE
When, Calendar is selected, M223 greeting message display is offed.
This function is to select clock mode on each state.
4. Clock
4. Clock
Press [ ], [ ].
1
1
Press [ ], then [ ].
Select the parameter by using the navigation
key.
2
2
• Digital
• Analog
Press [ ] to save it.
3
3
To input a personal greeting on edits an existing one.
3. Greeting
3. Greeting
Press [ ], [ ].
1
1
Press [ ], then [ ].
2
2
Press the navigation key to edit the greeting.
3
3
Press [ ].
4
4
Press [ ] to save it.
8
8
Press [ ].
6
6
Move the greeting message by using the navigation key.
7
7
Select the greeting message display On/Off.
Select the greeting message slide On/Off.
Select the background color by using the navigation key.
5
5
Press [ ] to save it.
3
3
c3000_2 2004.9.14 7:5 PM 페이지24
DISPLA
DISPLAY
Y
27
DISPLA
DISPLAY
Y
26
SUB SCREEN SET
Select wallpaper of sub screen.
Press [ ], [ ].
Press [ ] to save it.
Press [ ], then [ ].
Select the parameter by using the navigation key.
1
1
2
2
3
3
1. Screen
1. Screen
Select clock type of sub screen.
Press [ ], [ ].
Press [ ] to save it.
Press [ ], then [ ].
Select the parameter by using the navigation key.
• Digital
• Analog
1
1
2
2
3
3
2. Clock
2. Clock
1. Main Screen
1. Main Screen
CONTRAST SET
This function adjusts main screen contrast level.
Press [ ].
Press [ ] to save it.
Press [ ], then [ ].
Press [Navigation] key on the “Main Screen” line to change back
light level.
1
1
2
2
3
3
2. Sub Screen
2. Sub Screen
Press [ ].
Press [ ] to save it.
Press [ ], then [ ].
Press [Navigation] key on the “Sub Screen” line to change back
light level.
1
1
2
2
3
3
c3000_2 2004.9.14 7:5 PM 페이지26
DISPLA
DISPLAY
YVOICE
VOICE
2928
ANS. MACHINE
Blinking call LED when the phone in the service area.
LAMP SETTING
Press [ ].
Press [ ] to save it.
Press [ ], then [ ].
Select the parameter by using the navigation key.
1
1
2
2
3
3
• Incoming call
• Incoming SMS
• Service Light
• Alarm
The user can also overhear the recording and can
choose to accept or reject the call.
1. Setting
1. Setting
Press [ ], [ ].
1
1
Press [ ], then [ ].
Select the parameter by using the navigation
key.
In Greet Voice menu
Select voice comment to be used when answering machine is
activated.
Listen the prompts by pressing [ ] except for user prompt.
In Greet Record menu
Record user comment to use as answering machine greeting.
Press [ ],[ ] then [ ].
Record the user prompt by pressing [ ].
2
2
• Set Bell Time : (Off, Immediately, 5sec, 10sec)
• Set Greet Voice : (Common, User, Driving, Meeting)
• Set Greet Rec
Press [ ] to save it.
3
3
NOTE
Can be reduced the standby time, when service light is on.
1. Incomming call lamp is checked by alert type setting, when alert type is
changed to lamp only.
2. Incomming call lamp can’t change setting value, when alert type is lamp
only mode.
3. Incomming SMS Lamp is checked by alert type setting, when alert type is
changed to lamp only.
4. Incomming SMS lamp can’t change setting value, when alert type is lamp
only mode.
c3000_2 2004.9.14 7:5 PM 페이지28
VOICE
VOICE VOICE
VOICE
3130
VOICE MEMO
Press [ ], then press [ ], then
press [ ].
Select the parameter by using the
navigation key, then press [ ].
- Enables you to record a message (by holding [ ]key)
either in idle mode or during a call.
1
1
2
2
VAD (Voice Activated Dailing)
Press [ ], then press [ ], then press [ ].
VAD is listed and choose any parameter you want, by using
navigation key [ ], [ ].
NOTE
- If you didn’t add voice dial on phonebook, main display will show
- To register voice dial name, see phonebook.
- If you use voice dial in noisy place or public place voice dial may
be not activated due to noise, we reconmend that you use voice
dial on the place where you can make enough your personal voice.
NOTE
The sum of all recorded voice from voice memo, answering machine,
answering machine greeting and sound is limited to 4 minutes totally.
NOTE
The sum of all recorded voice from voice memo, answering machine,
answering machine greeting and sound is limited to 4 minutes totally.
1
1
To use voice dial, press VAD[ ] key shortly then say
recorded name in standby mode.
3
3
Press [ ]keys, to retrain phone voice dailing, then press
[ ].
Only VAD list is displayed.
(Not all stored phonebook choose any parameter you want to
edit, then press [ ] or [ ] to edit.)
2
2
2. Listening
2. Listening
Press [ ], [ ].
1
1
Press [ ], then [ ].
Select the parameter by using the navigation
key.
2
2
Play the recorded voice memos and record new voice memos
List up all voice dial linked phonebook record.
c3000_2 2004.9.14 7:5 PM 페이지30
DIAR
DIARY
YDIAR
DIARY
Y
3332
ALARM
Press [ ].
Sets alarm time.
This allows user to set alarm time quickly.
1
1
Press [ ], [ ], [ ], [ ].
1
1
Press [Navigation]key to change the timer
value and press [ ] to start.
The icon [ ]will appear.
2
2
When the time expires, the alarm will
ring and disapear alarm [ ] after
alarm ringing.
Press any key to stop ringing.
3
3
Press [ ] on quick setting screen or
select "off" on quick setting screen to
cancel quick setting.
4
4
Press [ ], then [ ].
1. Quick Setting
1. Quick Setting
In call state, the alarm does not be notified.
And notified after just call ended.
Press [ ], [ ], [ ].
1
1
Press [Navigation] key to select alarm and
then press [ ] Key to delete the alarm or
press[ ] to edit the alarm.
2
2
Press digit keys to chang the value of
Date&Time.
Press [ ],[ ] keys to change the
value of Repeat, Remind & Melody.
Press [Navigation] keys to move to item which user wants to
change to.
3
3
2. Personal Setting
2. Personal Setting
2
2
NOTE
The phone does not provide a clock IC, but displays the date and
time based on the information from the digital CDMA network.
Therefore the date and time will not be displayed, while the phone is
out of the service area or operates on the analog mode after the
phone is turned on. The clock alarm, schedule alarm are NOT
available as long as the date and time are not displayed.
c3000_2 2004.9.14 7:5 PM 페이지32
DIAR
DIARY
YDIAR
DIARY
Y
3534
SCHEDULE
Press [ ].
Sets an event or anniversary in the phone and reminds you through time
setting when the time comes.
1
1
Press [ ], then [ ],and press [ ] to
display the list of all schedules or press [ ]
to display the list of schedules for selected date.
2
2
D-DAY
1
1
Press [Navigation] key to select schedule
and then press [ ] key to delete the
schedule or press [ ] to edit the
schedule.
1. Search Schedule
1. Search Schedule
1
1
Press digit keys to change the value of Date&Time.
Press [ ],[ ] keys to change the
value of Repeat, Remind & Melody.
Press [Navigation] keys to move to item
which user wants to change to.
2. Record Schedule
2. Record Schedule
Records schedule time and contents.
1
1
1
1
Press [ ].
2
2
Press [ ], then [ ].
Press[Navigation] key to select d-day
and then [ ] to record d-day.
Press digit keys to change the value of To.
Press [Navigation]keys to move to item
which user wants to change to.
2
2
Press [ ] to delete the present d-day.
1. Record
1. Record D
D-day
-day
Records the designated day to count down.
1
1
Press [ , , , ].
2
2
Press [ ] to cancel or press [ ] to delete a d-days.
2. Delete
2. Delete
Deletes all d-days.
NOTE
User cannot record the 11th schedule. In order to record the more
schedule, user have to erase existed schedule so that no. of schedule
is lower than 10 schedule.
c3000_2 2004.9.14 7:5 PM 페이지34
DIAR
DIARY
YDIAR
DIARY
Y
3736
MEMO
1
1
WORLD TIME
1
1
2
2
3
3
1
1
Press [ ].
2
2
Press [ ], then [ ].
3
3
Press [Navigation] key to select memo
and then [ ] to reord memo.
Press [ ] in memo list.
2
2
Press [ ] to delete the memo or press [ ] to edit
the memo.
1. View Memo
1. View Memo
Views registered memo.
1
1
Press [ ] to save the memo.
•
Press
[ ] to enter text mode.
2. Record Memo
2. Record Memo
Records Memo.
1
1
Press [ , , , ].
2
2
Enter Lock Code.
3
3
Press [ ] to cancel or press [ ] to delete a memo.
3. Delete
3. Delete
Deletes all memo data.
1
1
Press [ ].
Press [ ], then [ ].
Press [Navigation] key to change the city.
Honolulu, Vancouver, Los Angeles, Denver, Chicago, Mexico City, Toronto, New
York, Sao Paulo, London, Paris, Athene, Nairobi, Moscow, New Delhi, Bangkok,
Beijing, Hong Kong, Seoul, Tokyo, Sydney, Auckland.
Press [ ][ ][ ][ ].
2
2
Press [ ] to display selected city &
time on idle screen.
Press [ ] to display dual time.
Press [ ] not to display dual time.
Dual Time Display
Dual Time Display
Displays current time of cities.
Dual Time will be displayed in case of Digital Clock Idle Mode.
NOTE
If MS is analog mode or out of service area when power up, world
time is not worked correctly.
If world time is seted, it is appeared in greeting text position. Greeting
text is disapperd.
c3000_2 2004.9.14 7:5 PM 페이지36
DIAR
DIARY
YDIAR
DIARY
Y
3938
STOP WATCH
This function allows you to use your phone as a stopwatch.
The stopwatch displays time in hours, minutes, seconds and milliseconds.
CALCULATOR
CONVERT UNIT
1
1
Press [ ].
2
2
Press [ ], then [ ].
[ ] Start / Stop.
[ ] Spilt /Init/Back.
1
1
Press [ ].
2
2
3
3
Press [ ], then [ ].
This function allows you to use your phone as a calculator.
This calculator will perform basic mathematic functions
(addition, subtraction, multiplication, division).
Press number keys to input number, press [ ], [ ], [ ],
[ ] for +, -, /, ×press [ ] key for point, and press [ ]
key for prefix minus sign press [ ] key for all clear and
[ ]key for calculation.
EXAMPLE
To calculate 128 X 32 =
1. Enter 128
2. Press [ ]
3. Enter 32
4. Press [ ]
1
1
Press [ ].
3
3
Press [ ] or [ ] to change the unit item (1~6) and
press [ ] or press [ ] ~ [ ].
press [ ] or [ ] to change the unit of that kind
(km, m, cm...)
Press (CLR) to clear the digits.
2
2
Press [ ], then [ ].
• 1. Length
• 2. Weight
• 3. Volume
• 4. Area
• 5. Temperature
• 6. Speed
This function allows you to convert unit in your phone.
c3000_2 2004.9.14 7:5 PM 페이지38
SETTINGS
SETTINGS SETTINGS
SETTINGS
4140
SECURITY
1
1
1
1
Press [ ].
2
2
Press [ ], then [ ].
The default Lock Code is “0000”
Press [ , , ] and enter “password”.
2
2
Press [ ].
Select “Off”, “Always”,“Now” or “Power On” and then.
- off : Normal phone mode.
- Always : Go to lock mode immediately.
- Now : Go to lock mode now. If user input lock code by some reason
such as menu entering, phone is unlocked.
- Power on : Go to lock mode when the phone is powered up. If user
input lock code by some reason such as menu entering,
phone is unlocked.
3
3
Press [ ].
1. Security Mode
1. Security Mode
Prevents others from using the phone without permission
and allows an access to a security features only after
pasword input.
To set security mode.
1
1
Press [ , , ] and enter “password”.
2
2
3
3
Press [ ] to select.
Enter a new password and press [ ].
Enter a new password again and press[ ].
2. Change PWD
2. Change PWD
Changes your 4-digit password.
1
1
Press [ , , ] and enter “password”.
2
2
Press [ ] and select “Off”, “On” by using navigation key
[ ][ ] on each items.
To save, press [ ] or [ ].
3. Privacy Lock
3. Privacy Lock
This function enables locking each function separately.
1
1
Press [ , , ] and enter “password”.
2
2
Press [ ] and select “Off”, “On” by using navigation key
[ ][ ] on each items.
To save, press [ ] or [ ].
4. Call Restrict
4. Call Restrict
User cannot make a call as selected restriction mode.
c3000_2 2004.9.14 7:5 PM 페이지40
SETTINGS
SETTINGS SETTINGS
SETTINGS
4342
CALL ANSWER
CALL TIMES
1
1
Press [ , , ] and enter “password”.
2
2
Press [ ].
3
3
Select “Yes”or“No” with the Navigation key Press [ ].
5. Initialization
5. Initialization
1
1
Press [ ].
3
3
Press [ ].
2
2
Press [ ], then [ ].
• Press Key
• Folder Open
• Auto Answer
1
1
Press [ ].
2
2
Press [ ], then [ ].
To help you manage your calls, your phone is equipped with
several Call Timers.
Total usage time and the number of calls (resettable)
Time of Last Call ( only 1 call )(non-resettable)
Total time of Incoming Calls and the number of calls
(resettable)
Total time of Outgoing calls and the number of calls
(resettable)
1
1
Press [ , , ].
1. Total Calls
1. Total Calls
1
1
Press [ , , , ].
2. Last Calls
2. Last Calls
1
1
Press [ , , , ].
3. Incoming Calls
3. Incoming Calls
1
1
Press [ , , , ].
4. Outgoing Calls
4. Outgoing Calls
Reset phone configuration to factory default values.
Automatically answer the phone when user opens the folder.
c3000_2 2004.9.14 7:5 PM 페이지42
SETTINGS
SETTINGS
45
SETTINGS
SETTINGS
44
CALL INFO
1
1
Press [ ].
2
2
Press [ ], then [ ].
This function notifies you of who’s calling by displaying that person’s phone
number. If the caller’s name and number are stored in your phonebook, the
name and number from the memory location are displayed.
MS can enable/disable incoming call access during
conversation state.
MS to forward incoming call to another preset phone
number as selected condition.
Enable/Disable calling line identification number
showing at incoming call state.
1
1
2
2
Press [ ], [ ], [ ], [ ].
Enter password [ **** ].
Select on/off forCaller Phone and Caller Name.
Caller Phone : Restrict phone number of caller.
Caller Name : Restrict name of caller include
phonebook referencing.
1. Info Display
1. Info Display
1
1
2
2
Press [ ], [ ], [ ], [ ].
Select on/off for Call Waiting
2. Call Waiting
2. Call Waiting
1
1
2
2
Press [ ], [ ], [ ], [ ].
Select Busy/No Answer/Always/Default.
Busy : Call forward at busy.
No Answer : Call forward at no answer.
Always : Call forward always.
Default : Call forward at busy or no answer.
3.Call Forward
3.Call Forward
c3000_2 2004.9.14 7:5 PM 페이지44
SETTINGS
SETTINGS
46
SETTINGS
SETTINGS
47
T9 SETTING
LANGUAGE
1
1
Press [ ].
2
2
Press [ ], then [ ].
Select T9 setting for your default text input mode.
• Abc
• 123
• T9 Spanish
• T9 French
• T9 English
1
1
Press [ ].
2
2
Press [ ], then [ ].
Select the parameter by using the navigation key.
• English
• Español
• Français
3
3
Press [ ].
This function changes the language of the phone.
OWN PHONE NO
1
1
Press [ ].
2
2
This allows user to confirm their own Tel No.
Press [ ], then [ ].
It displays user’s own phone no. for about
1 Min.
SYSTEM
1
1
Press [ ].
2
2
Press [ ], then [ ].
Select the parameter by using the navigation key.
This function changes the language of the phone.
1
1
Press [ ].
2
2
Press [ ] [ ] [ ].
Select the parameters by using navigation key.
• NAM 1
• NAM 2
3
3
To save, press [ ].
1. Change NAM
1. Change NAM
c3000_2 2004.9.14 7:5 PM 페이지46
SETTINGS
SETTINGS
49
SETTINGS
SETTINGS
48
1
1
Press [ ].
2
2
Press [ ] [ ] [ ].
Select the parameters by using navigation key.
• Standard : Not activate voice privacy when it is
available by system.
• Enhanced : Activate voice privacy when it is
available by system.
3
3
To save, press [ ].
3. Privacy
3. Privacy
Select preferred system..
Select voice privacy mode of conversation.
1
1
Press [ ].
2
2
Press [ ] [ ] [ ] [ ].
Select the parameters by using navigation key.
• Modem : Always answer voice as modem
• Modem Once : Answer voice as modem once
• Fax : Always answer voice as fax
• Fax Once : Answer voice as fax once
• Cancel : Never answer voice call as a data call
3
3
To save, press [ ].
4. Data Service
4. Data Service
TERMINATION
Select termination type
1
1
Press [ ].
2
2
Press [ ] [ ] [ ] [ ].
Select the parameters by using navigation key.
• Async/Fax : Async data and Fax services
• QNC : Quick net connect
• Packet 115k : Packet data service (115kbps)
• Packet 230k : Packet data service (230kbps)
3
3
To save, press [ ].
SERVICE TYPE
Select data service type
1
1
Press [ ].
2
2
Press [ ] [ ] [ ].
Select the parameters by using navigation key.
• Standard : Automatic system selection.
• Home Only : Service is limited to home system only.
3
3
To save, press [ ].
2. Set Mode
2. Set Mode
c3000_2 2004.9.14 7:5 PM 페이지48
SETTINGS
SETTINGS
50
SETTINGS
SETTINGS
51
DATA FOLDER
1
1
Press [ , , , ].
5. S/W Version
5. S/W Version
1
1
Press [ , , , ].
7. Last SID
7. Last SID
1
1
Press [ , , , ].
8. PRL ID
8. PRL ID
This allows user to confirm the PRL ID.
1
1
Press [ , , , ].
9. TTY MODE
9. TTY MODE
To manage pictures or download image and sound files.
1
1
Press [ ].
2
2
Press [ ], then [ ].
Select the parameters by using navigation key.
• Image : BMP, JPG, GIF,PNG
• Sounds : MIDI, PMD
• TTY off • TTY Talk • TTY Hear • TTY Full
1
1
Press [ ].
2
2
Press [ ] [ ] [ ] [ ].
4
4
Edit user ID and press [ ] to save it.
PPP AUTH
-
INPUT ID
3
3
Enter password [ **** ] and press [ ].
Input user ID for password authentication protocol
1
1
Press [ ].
2
2
Press [ ] [ ] [ ] [ ].
4
4
Edit user password and press [ ] to save it.
-
INPUT ID
3
3
Enter password [ **** ] and press [ ].
Input user ID for password authentication protocol
This allows user to confirm the software version.
1
1
Press [ , , , ].
6. S/W Update
6. S/W Update
Upgrade phone software via network connection. The phone will be
reset after downloading new software and then go to upgrade process
after upgrade processing, you can use new version of software.
This allows user to confirm the Last SID.
c3000_2 2004.9.14 7:5 PM 페이지50
GAMES
GAMES MY
MY MENU
MENU
5352
1
1
Select My menu [ ]
2
2
Set, Save [ ]
3
3
Select [ ]
[ ], [ ]
4
4
No register [ ]
SET
- Press [ ] to select my menu.
- To save your own “My Menu”, choose
1 to 8 by pressing [ ].
- To set My Menu, use [ ][ ] or [ ][ ] key.
- Select [ ].
- Choose parameter you want to save.
- The press [ ].
Change or Delete
- Choose 1to 8 that you want to change or delete.
- Press [ ].
- Choose any parameter then press [ ] to change or
press [ ]:No register to delete My Menu.
You can select my menu that allows you to various setted phone functions
(Sound, Display, Voice, Diary, Settings, Games are etc) and changing phone
function to set my menu.
CUTY
1
1
Press [ , , ]
• START
• EASY
• RANK
• HELP
RIGHT
LEFT
STAR PONG
1
1
Press [ , , ]
• START
• EASY
• RANK
• HELP
RIGHT
LEFT
c3000_2 2004.9.14 7:5 PM 페이지52
PHONE BOOK
PHONE BOOK PHONE BOOK
PHONE BOOK
5554
SEARCH NO
1
1
Press [ ].
2
2
Press [ ].
Select the parameter by using the navigation key.
Stores up to 500 entries, each of which can be assigned to
a group. Entries can be retrieved by Quick Search,
Srch by name, Srch by No, Srch by Index,
Srch by E-mail, Srch by URL.
This Function lists up recorded phonebook data with
sorting of address index.
1
1
Press [ , , ].
1. Quick Search.
1. Quick Search.
This Function is searching recorded phonebook data
with part of name.
1
1
Press [ , , ].
2
2
Press [Nevigation] to select range of searching among all
phonebook or exist groups. and then press [ ]key to
delete the record or press [ ] to view detail information.
2
2
Press [Nevigation] keys or input searching name by Alpha
mode to select a record and then press [ ] to view
detail information.
2. Srch by Name
2. Srch by Name
This Function is searching recorded phonebook data
with number.
1
1
Press [ , , ].
2
2
Input part of phone number and press [ ]to find out
matched number. and then press [ ]key to delete the
record or press [ ] to view detail information.
3. Srch by No
3. Srch by No
This Function is searching recorded phonebook data
with index.
1
1
Press [ , , ].
Enter index that you want to find.
2
2
Press [ ] or [ ] to select a record and then press
[ ]key to delete the record or press [ ] to view
detail information.
4. Srch by Index
4. Srch by Index
This Function is searching recorded phonebook data
with part of e-mail address.
1
1
Press [ , , ].
Enter E-mail address.
5. Srch by E-mail
5. Srch by E-mail
• Maximum number of input characters : 3 digits. (1~500)
c3000_2 2004.9.14 7:5 PM 페이지54
PHONE BOOK
PHONE BOOK PHONE BOOK
PHONE BOOK
5756
RECORD NO
2
2
Press [Nevigation] keys to select a record and then press
[ ]key to delete the record or press [ ] to view
detail information.
• Maximum number of input characters : 48 characters.
2
2
Press [Nevigation] keys to select a record and then press
[ ]key to delete the record or press [ ] to view
detail information.
• Maximum number of input characters : 128 characters.
1
1
Press [ ].
3
3
Press [ ] to save phone book.
2
2
Press [ ].
Select the parameter by using the navigation key.
Press [ ]key to edit selected item and then press [ ].
This Function records phone number to empty phonebook address.
• Maximum number of input address : 500
• Maximum number of input name : 16 characters
• Maximum number of input telephone No.
: 32 digits in address 1~500,
• Maximum number of input E-mail address : 48 characters.
• Maximum number of input URL address : 128 characters.
Voice Dial
• Press [ ] key to select VR Mode.
• You can choose to add a voice tag to the entry for use with
Voice Activated Dialing.
Select “Yes” or “No” and press .
If you choose yes, “VR mode…
Please speak voice tag” will be displayed and you will hear
“Name please”. Speak the name clearly into the phone.
You will be heard “Again” then speak the name again into
the phone.
You will hear “Added” and the phones display will return to
standby mode.
Voice Dial Calling
• Shortly Press VAD
[ ].
• To make a call, you can say a recorded tag or name of the
phonebook.
This Function is searching recorded phonebook data with part of URL.
1
1
Press [ , , ].
Enter URL address.
6. Srch by URL
6. Srch by URL
c3000_2 2004.9.14 7:5 PM 페이지56
PHONE BOOK
PHONE BOOK PHONE BOOK
PHONE BOOK
5958
EDIT GROUP
Press [ ].
1
1
Press [ ].
3
3
Press [ ].
Press [Nevigation] keys to select a record and then press [ ]key
to delete the record and select a group ringer.
press [ ]key to view detail information.
2
2
CALL HISTORY
Press [ ].
1
1
Press [ ].
Select the parameter by moving the navigation key left and right.
2
2
Displays information of the 20 most recently outgoing calls.
Saves the numbers and places calls by simply pressing [ ].
1. Outgoing Calls
1. Outgoing Calls
1
1
Press [ , ]keys sequentially.
Displays information of the 20 most recently missed calls.
Saves the numbers and places calls by simply pressing [ ].
3. Missed Calls
3. Missed Calls
1
1
To see a list of the 20 most recently missed calls, press
[ ], [ ], [ ], [ ]. If the number is already
stored in your phone book, only the name appears. If the
number is not stored, only the phone number appears.
2
2
To view incoming call details, press the Navigation key.
Press [ ] again to save it or press [ ] to delete it.
2
2
Press [Nevigation]keys to select a record and then press
[ ]key to delete the record or press [ ] to view
detail information.
• Maximum number of history : 20
Displays information of the 20 most recently answered calls.
Saves the numbers and places calls by simply pressing [ ].
2. Incoming Calls
2. Incoming Calls
1
1
To see a list of the 20 most recently answered calls, press
[ ], [ ], [ ]. If the number is already stored
in your phone book, only the name appears. If the number is
not stored, only the phone number appears.
2
2
To view incoming call details, press the Navigation key.
Press [ ] again to save it or press [ ] to delete it.
This Function is add, edit or remove phonebook group.
c3000_2 2004.9.14 7:5 PM 페이지58
PHONE BOOK
PHONE BOOK PHONE BOOK
PHONE BOOK
6160
SPECIAL #’S
Press [ ].
1
1
Press [ ] and enter Special #’s.
3
3
Press [ ].
Input lock code.
Select the parameter by using the navigation key.
2
2
This function is clears all call history.
4. Clear Calls
4. Clear Calls
1
1
Press [ ][ ][ ][ ] and press [ ]
three times.
2
2
Select “Yes’’ or “No’’ with the scroll key.
press [ ].
When you select “Yes”, you will see “Enter Lock Code” on
the display and input your phone password.
CLR PHONEBOOK
Press [ ].
1
1
Enter "Lock Code".
3
3
Press [ ].
4
4
Press [ ].
Select the parameter by using the navigation key.
2
2
This function is clears all the phonebook data.
This function is adds or edits emergency phone number.
c3000_2 2004.9.14 7:5 PM 페이지60
To send the message, press [ ].
To insert the saved message, press [ ],[ ].
To save message, press [ ],[ ].
SMS
SMS
63
SMS
SMS
62
VOICE
Press [ ].
1
1
Press [ ].
• To get the message, press [ ](=”Get)
• To delete the message, press [ ](=”Del)
2
2
The phone will notify the user when user receives a
message. And phone display the number of received
voice mail message.
The user can create and send text messages by selecting
new submenu.
NEW MESSAGE
Press [ ][ ].
1
1
Input a text message.
2
2
3
3
Edit Message
Edit Message
1
1
Input text message.
2
2
To delete one character, press [ ].
3
3
To delete all characters, press and hold [ ].
Input a Destination Phone Number
Input a Destination Phone Number
1
1
Input phone number.
2
2
To search the phone number of Phonebook /
Call History, press [ ] or [ ]
Edit a Default Callback Number
Edit a Default Callback Number
1
1
Press [ ].
Edit a default Callback Number.
2
2
Select the Priority
Select the Priority
1
1
Press [ ].
To change the Priority(Normal/Urgent/Emergency),
press [ ] or [ ].
2
2
Select the Delivery Ack
Select the Delivery Ack
1
1
Press [ ].
To change the Delivery(No Ack/Enhanced Ack/Normal Ack),
press [ ] or [ ].
2
2
c3000_2 2004.9.14 7:5 PM 페이지62

SMS
SMS
65
SMS
SMS
64
INBOX
Press
[ ][ ]
.
: New message.
: New Urgent / Emergent message.
: Read Lock message
: Read message
1
1
Select menu using
[ ]
or
[ ]
.
2
2
To display the message, press [ ] or [ ].
3
3
To use message option, press [ ] or [ ].
4
4
To review the message that you received.
Reply
Reply
1
1
To reply the message, press [ ].
2
2
Process as like NEW MASSAGE, except for input a
Destination Phone Number.
Save Address
Save Address
1
1
To save the original address(Fr) of message, press [ ].
Save CB
Save CB
1
1
To save the callback number of message, press [ ].
Lock Msg
Lock Msg
1
1
To lock or unlock the message, press [ ].
Delete
Delete
1
1
To delete the message, press [ ].
Move to Saved
Move to Saved
1
1
To move to saved folder the message, press [ ].
Forward
Forward
1
1
To forward the message, press [ ].
2
2
Process as like NEW MASSAGE, and edit the text message.
c3000_2 2004.9.14 7:5 PM 페이지64
SMS
SMS
67
SMS
SMS
66
OUTBOX
Press
[ ][ ]
.
: Fail message.
: Fail Lock message.
: Send message.
: Send Lock message
: Delivered message
: Delivered Lock message
1
1
Select menu using
[ ]
or
[ ]
.
To display the message, press [ ] or [ ]
2
2
3
3
To use outbox option, press [ ] or [ ]
4
4
To review the message that you sent.
And to edit or send message.
(Re)Send
(Re)Send
1
1
To resend to the message, press [ ].
Detail
Detail
1
1
To see the status of the message, press [ ],[ ] or [ ].
Lock Msg
Lock Msg
1
1
To lock or unlock the message, press [ ].
Delete
Delete
1
1
To delete the message, press [ ].
Move to saved
Move to saved
1
1
To move to saved folder the message, press [ ].
Send To
Send To
1
1
To forward the message, press [ ].
2
2
Process as like NEW MASSAGE, and edit the text message.
SAVED
Press
[ ][ ]
.
: Save message.
: Save Lock message.
: Moved from Inbox message
: Moved from Inbox Lock message
: Draft message
: Draft message Lock
1
1
Reviews messages in the saved folder.
c3000_2 2004.9.14 7:5 PM 페이지66
Select the message using
[ ]
or
[ ]
.
SMS
SMS
68
SMS
SMS
69
SETTINGS
Press
[ ][ ]
.
1
1
To customize the messaging features.
Receive Alert
Receive Alert
1
1
Press [ ], [ ], [ ]keys sequentially.
• Bell : Use beep and lamp.
• Vibrator : Use vibrator and lamp.
• Lamp Only : Use lamp only.
2
2
To display the message, press [ ] or [ ].
3
3
To use saved option, press [ ] or [ ].
4
4
(Re)Send
(Re)Send
1
1
To resend to the message, press [ ].
2
2
After sending, auto delete the message in the saved folder.
Lock Msg
Lock Msg
1
1
To lock or unlock the message, press [ ].
Delete
Delete
1
1
To delete the message, press [ ].
Alert Remind
Alert Remind
1
1
Press [ ], [ ], [ ]keys
sequentially.
• One Time
• Every 2 Min : Every 2 minutes alert.
2
2
Press [Nevigation]keys to select alert remind method and
then press [ ] to confirm.
If user has not read new incoming messages, phone alert by selected option.
Moved from Outbox message.
: Fail message.
: Fail Lock message.
: Send message
: Send Lock message
: Delivered message
: Delivered Lock message
To display the message, press [ ] or [ ]
c3000_2 2004.9.14 7:5 PM 페이지68
SMS
SMS SMS
SMS
7170
Set the Delivery Ack : The network will only send Delivery Ack’s for
messages that were successfully delivered..
Memory Full
Memory Full
1
1
Press [ ], [ ], [ ]keys
sequentially.
• Warn to user : Show warnning message to user and
automatical reject in case of full
memory.
• Auto Delete : If full of memory, previous message is
deleted one by one.
2
2
Press [Nevigation]keys to select memory management
method and then press [ ] to confirm.
The phone can automatically delete oldest message or waning to user a
received message can not be received since the memory reaches full.
Delivery Ack
Delivery Ack
1
1
Press [ ], [ ], [ ]keys sequentially.
2
2
Press [ ][ ] and press [ ].
• Enhanced Ack
• Normal Ack
• No Ack
Set the priority of outgoing messages.
Priority
Priority
1
1
Press [ ], [ ], [ ]keys sequentially.
• Normal : Normal messages.
• Urgent : Urgent messages.
• Emergency : Emergent messages.
After sending outgoing messages, user can select save sent messages.
Save Sent Mag
Save Sent Mag
1
1
Press [ ], [ ], [ ]keys sequentially.
• Auto Save : Automatically save sent
message.
• Prompt : User can select to each case.
• Do Not Save : Do not save sent message.
2
2
Press [Nevigation] keys to select save option of sent
messages, and then press [ ] to confirm.
c3000_2 2004.9.14 7:5 PM 페이지70

SMS
SMS BREW
BREW
7372
Callback No.
Callback No.
1
1
Press [ ], [ ], [ ]keys
sequentially.
2
2
Press [ ]key after input callback number.
The phone shall automatically populate call back number with saved in
this menu when user make a new message to send.
Accessing
Accessing
1
1
Press [ ] and select [ ] by pressing [ ].
2
2
Use [ ][ ] to scroll and [ ] to select.
3
3
To go back, press [ ].
and press [ ] lets you exit from Mobile Shop menu.
• Catalog : Shows available Mobile Shop application.
• Search : Input keyword for easy searching.
• About Download : Detail information on
downloadable application list,
downloading cost, how to
download and memory status so
on.
DELETE ALL
Press
[ ][ ]
keys sequentially.
1
1
Enter the Lock Code.
2
2
Press [Navigation]keys to select delete option, and then
press
[ ]
(=”Select”) to confirm.
• Inbox : To delete inbox message
• Read Inbox : To delete only Read Inbox message
• Outbox : To delete outbox message
• Saved : To delete saved folder message
• Delete All : To delete Inbox/Outbox message
3
3
To delete Inbox/Outbox/Saved folder Message.(Except for Locked Message)
MOBILE SHOP
Mobile shop lets you download your favorite ringtone, screen saver, game
so on through accessing to Application Server.
c3000_2 2004.9.14 7:5 PM 페이지72
BREW
BREW
75
BREW
BREW
74
SETTINGS
Accessing
Accessing
1
1
Press [ ].
2
2
Move to [ ] by pressing [ ].
3
3
Select [ ] by pressing [ ].
- Order Apps : Set application order in the display.
1) Select Order Apps and folder.
2) Press [ ] and then you will see up and down arrow key.
3) Set application order by pressing <navigation up/down key>.
- Move Apps
1) Select Move Apps and folder.
2) Select Application to move to another folder.
3) Select folder where to be saved selected application.
4) You will see “Application moved to the selected folder.”
message.
- Manage Apps
1) Select Manage Apps and application to manage.
- View Properties : Web page information.
- Set folder : Select folder among main menu, work and fun
where to be saved each selected application.
- Lock App : Select “Locked” or “Unlocked”.
- Remove : Remove application from your folder.
- Upgrade Check : If application is upgraded, it lets you have
automatical application upgrade by
connecting to the server.
- Main Menu View : Select Main Menu Display style among
“Small Icon” “Large Icon” and “List” type.
- Screen Savers : Shows your screen savers and lets you selet
screen saver image.
- View Log : Shows log.
Function Key Description
Function Key Description
HELP
Accessing
Accessing
1
1
Press [ ].
2
2
Move to [ ] by pressing [ ].
3
3
Select [ ] by pressing [ ].
Detail explanation to help you understand how to purchase application and
use it.
c3000_2 2004.9.14 7:5 PM 페이지74

WEB BROWSING
WEB BROWSING
77
E-MAILING WITH BROWSER
Select E-mail menu on the browser HOME deck.
1
1
User can read the received e-mail or compose and send a
e-mail.
2
2
WEB BROWSING
WEB BROWSING
76
ACCESSING INTERNET
Press & hold [ ] key for web menu.
1
1
Press [1] key.
During connecting to internet, Openwave log display is
appeared and “connecting …” is displayed.
2
2
After connected, It appears Web Page automatically.
3
3
User can access internet with mobile browser.
User can send or receive a e-mail
NET ALERT WITH BROWSER
Popup alert notification screen when an alert has arrived.
1
1
User can read or skip the message by [Left SK](=”View”),
[Right SK] (=Skip).
2
2
Net alert is a small size message in order to notify a user of important
information.
WEB MENU
WEB MENU
Start : Launch a browser.
Settings : Linger timer - User can set a linger timer which triggers
the termination of an idle data call. (the
default value is 30 seconds)
User can select one of time lists. (30 sec, 1
min, 2 min, 3 min, 4 min)
BROWSER MENU
BROWSER MENU
Press [SideBottom] key while the browser is active to see the
browser’s local menu.
Reload : To reload the current page
Home : To get back to the Homepage.
Press and hold (send) key will do the same
Bookmarks : To view your bookmark list
Mark Site : To store the current page in your bookmark list
About Openwave : To view the browser version
Advanced
Show URL : To display the URL of the current page
Homepage : To change your home page
Set WAP Proxy : To select a network server
Offline Service : To use WAP applications efficiently in area of
poor or no network coverage
Outbox : To maintain the browser outbox
Restart Browser : To clear the cache memory in your browser
Encryption : To execute security-related commands
c3000_2 2004.9.14 7:5 PM 페이지76

79
IMPORT
IMPORTANT SAFETY INFORMA
ANT SAFETY INFORMATION
TION
- Traffic Safety
Do not use a hand-held telephone while driving a vehicle.
If using a hand-held phone park the vehicle before conversing.
Always secure the phone in its holder; do not place the phone on
the passenger seat or where it can break loose in a collision or
sudden stop.
The use of an alert device to operate a vehicle's lights or horn on
public roads is not permitted. Remember, road safety always
comes first!
- Operating Environment
Remember to follow any special regulations in force in any area
and always switch off your phone whenever it is forbidden to use
it, or when it may cause interference or danger.
When connecting the phone or any accessory to another device,
read its user's guide for detailed safety instructions.
Do not connect incompatible products.
As with other mobile radio transmitting equipment, users are
advised that for the satisfactory operation of the equipment and for
the safety of personnel, it is recommended that the equipments
should only be used in the normal operating position (held to your
ear with the antenna pointing over your shoulder).
- Electronic devices
Most modern electronic equipment is shielded from radio
frequency signals, However, certain electronic equipment may not
be shielded against the RF signals from your wireless phone.
WEB BROWSING
WEB BROWSING
78
DOWNLOAD FUN
Activate WAP browser.
1
1
Go to download fun site.
2
2
Select object to download.
3
3
User can download wall paper or ring tone from network by browser.
WEB BROWSER SETTINGS
Web Lock : N/A, Always off.
Web Backlight : N/A, Depend on main menu setting
Web Idle Timer : Web idle timer triggers the termination of
idle data call.
Reference to web menu W21.
Connect Prompt : N/A, No prompt
IP addresses : IP address can be changed in idle mode by
pressing “##872769737” sequentially. (TBD)
(This information is not permitted to the
common user!!)
Username and Password : Reference to menu (M863), PPP
Authenfication. (TBD)
To select Link A or Link B : WAP proxy can be changed in
advanced menu after launching
browser.
c3000_2 2004.9.14 7:5 PM 페이지78

8180
IMPORT
IMPORTANT SAFETY INFORMA
ANT SAFETY INFORMATION
TION
- Vehicles
Do not store or carry flammable liquids, gases or explosive materials
in the same compartment as the phone, its parts or accessories.
Switch off your phone before boarding an aircraft. The use of wireless
telephones in an aircraft may be dangerous to the operation of the
aircraft, disrupt the wireless telephone network and may be illegal.
Failure to observe these instructions may lead to the suspension or
denial of telephone services to the offender, or legal action, or both.
- Posted facilities
Switch your phone off in any facility where posted notices so require.
- Potentially explosive atmospheres
Switch off your phone when in any area with a potentially explosive
atmosphere and obey all signs and instructions.
Sparks in such areas could cause an explosion or fire resulting in
bodily injury or even death. Users are advised to switch off the phone
while at a refueling point.
Users are reminded of the need to observe restrictions on the use of
radio equipment in fuel depots(fuel storage and distribution areas),
chemical plants or where blasting operations are in progress.
Areas with a potentially explosive atmosphere are often but not always
clearly marked. They include below deck on boats; chemical transfer
or storage facilities; vehicles using liquefied petroleum gas (such as
propane or butane); areas where the air contains chemicals or
particles, such as grain, dust or metal powders; and any other area
where you would normally be advised to turn off your vehicle engine.
IMPORT
IMPORTANT SAFETY INFORMA
ANT SAFETY INFORMATION
TION
- Pacemakers
Pacemaker manufacturers recommend that a minimum separation of 6
inches be maintained between a handheld wireless phone and a
pacemaker to avoid potential interference with the pacemaker.
These recommendations are consistent with the independent research
by and, recommendations of Wireless Technology Research. Persons
with pacemakers;
Should always keep the phone more than 6 inches from their
pacemaker when the
phone is switched on. Should not carry the phone in a breast pocket.
Should use the ear opposite the pacemaker to minimize the potential
for interference. If you have any reason to suspect that interference is
taking place, switch off your phone immediately.
- Hearing aids
Some digital wireless phones may interfere with some hearing aids. In
the event of such interference, you may want to consult your service
provider.
- Other medical devices
Operation of any radio transmitting equipment, including cellular
phones, may interfere with the functionality of inadequately protected
medical devices.
Consult physician or the manufacturer of the medical device to
determine if they are adequately shielded from external
RF energy or if you have any questions. Switch off your phone in
health care facilities when any regulations posted in these areas
instruct you to do so.
Hospitals or health care facilities may be using equipment that could
be sensitive to external RF energy.
c3000_2 2004.9.14 7:5 PM 페이지80

8382
IMPORT
IMPORTANT SAFETY INFORMA
ANT SAFETY INFORMATION
TION
· Use only the supplied or an approved replacement antenna.
Unauthorized antennas, modifications or attachments could damage
the phone and may violate regulations governing radio devices.
· If the phone, battery, charger, or any accessory is not working
properly, take it to your nearest qualified service facility.
The personnel there will assist you, and if necessary, arrange for
service.
IMPORT
IMPORTANT SAFETY INFORMA
ANT SAFETY INFORMATION
TION
- Emergency calls
- Care and maintenance
Your phone is a product of superior design and craftsmanship and
should be treated with care. The suggestions below will help you to
fulfill any warranty obligations and allow you to enjoy this product for
many years.
When using your phone, battery, charger, or any accessory;
· Keep it and all its parts and accessories out of small children's reach.
· Keep it dry. Precipitation, humidity and liquids contain minerals that
will corrode electronic circuits.
· Do not use or store it in dusty, dirty areas as its moving parts can be
damaged.
· Do not store it in hot areas. High temperatures can shorten the life of
electronic devices, damage batteries, and warp or melt certain
plastics.
· Do not store it in cold areas. When the phone warms up (to its
normal operating temperature), moisture can form inside the phone,
which may damage the phone's electronic circuit boards.
· Do not attempt to open it. Non-expert handling of the device may
damage it.
· Do not drop, knock or shake it. Rough handling can break internal
circuit boards.
· Do not use harsh chemicals, cleaning solvents, or strong detergents
to clean it, Wipe it with a soft cloth slightly dampened in a mild
soap-and-water solution.
· Do not paint it. Paint can clog the device's moving parts and prevent
proper operation.
c3000_2 2004.9.14 7:5 PM 페이지82

Safety Information
1 . SAFETY INFORMATION FOR FIXED WIRELESS TERMINALS
.POTE NTIALLY EXPLOSIVE ATMOSPHERES
Turn your phone OFF when in any area with a potentially explosive atmosphere and obey all signs and instructions. Sparks in
such areas could cauls e an explosion or fire resulting in bodily injury or even death.
.
INTERFERENCE TO MEDICAL DIVICES
Certain electronic equipment may be shielded against RF signal from you wireless phone. (pacemakers, Hearing Aids, and so
on) Turn your phone OFF in health care facilities when any regulations posted in these areas instruct you to do so.
RF signals may affect improperly installed or inadequately shielded electronic system in motor vehicles.
.EXPOSURE TO RF ENERGY
Use only the supplied or an approved replacement antenna.
Do not touch the antenna unnecessarily when the phone is in use.
Do not move the antenna close to, or touching any exposed part of the body when making a call.

SAR INFORMATION
THIS MODEL PHONE MEETS THE GOVERNMENT’S
REQUIREMENTS FOR EXPOSURE TO RADIO WAVES.
Your wireless phone is a radio transmitter and receiver. It is designed and manufactured not to exceed the emission limits for exposure to
radiofrequency (RF) energy set by the Federal Communications Commission of the U.S. Government. These limits are part of comprehensive
guidelines and establish permitted levels of RF energy for the general population. The guidelines are based on standards that were developed by
independent scientific organizations through periodic and thorough evaluation of scientific studies. The standards include a substantial safety margin
designed to assure the safety of all persons, regardless of age and health. The exposure standard for wireless mobile phones employs a unit of
measurement known as the Specific Absorption Rate, or SAR. The SAR limit set by the FCC is 1.6 W/kg. * Tests for SAR are conducted with the
phone transmitting at its highest certified power level in all tested frequency bands. Although the SAR is determined at the highest certified power
level, the actual SAR level of the phone while operating can be well below the maximum value. This is because the phone is designed to operate at
multiple power levels so as to use only the power required to reach the network. In general, the closer you are to a wireless base station antenna,
the lower the power output. Before a phone model is available for sale to the public, it must be tested and certified to the FCC that it does not exceed
the limit established by the government adopted requirement for safe exposure. The tests are performed in positions and locations (e.g., at the ear
and worn on the body) as required by the FCC for each model. The highest SAR value for this model phone when tested for use at the ear is 1.33
W/Kg and when worn on the body, as described in this user guide, is 0.624 W/Kg. (Body-worn measurements differ among phone models,
depending upon available accessories and FCC requirements). While there may be differences between the SAR levels of various phones and at
various positions, they all meet the government requirement for safe exposure. The FCC has granted an Equipment Authorization for this model
phone with all reported SAR levels evaluated as in compliance with the FCC RF exposure guidelines. SAR information on this model phone is on file
with the FCC and can be found under the Display Grant section of http://www.fcc.gov/ oet/fccid after searching on FCC ID: O6YUTS-C3000.
Additional information on Specific Absorption Rates (SAR) can be found on the Cellular Telecommunications Industry Asso-ciation (CTIA) web-site
at http://www.wow-com.com.
* In the United States and Canada, the SAR limit for mobile phones used by the public is 1.6 watts/kg (W/kg) averaged over one gram of tissue. The
standard incorporates a sub-stantial margin of safety to give additional protection for the public and to account for any variations in measurements.

SAFETY INFORMATION FOR RF EXPOSURE
Body- worn operation
This device was tested for typical body-worn operations with the back of the phone kept 25 mm. from the body. To maintain
compliance with FCC RF exposure requirements, use only belt-clips, holsters or similar accessories that maintain a 25 mm. separation
distance between the user’s body and the back of the phone, including the antenna. The use of belt-clips, holsters and similar
accessories should not contain metallic components in its assembly. The use of accessories that do not satisfy these requirements
may not comply with FCC RF exposure requirements, and should be avoided.
FCC Compliance Information
This device complies with Part 15 of FCC Rules.
Operation is subject to the following two conditions:
(1) This device may not cause harmful interference, and
(2) This device must accept any interference received.
Including interference that may cause undesired operation.
U.S.A.
U.S.FEDERAL COMMUNICATIONS COMMISSION
RADIO FREQUENCY INTERFERENCE STATEMENT
INFORMATION TO THE USER
NOTE : This equipment has been tested and found to comply with the limits for a Class B
digital device pursuant to Part 15 of the FCC Rules.
These limits are designed to provide reasonable protection against harmful Interference in a residential installation This equipment generates,
uses, and can radiate radio frequency energy and, if Not installed and used in accordance with the instructions, may cause harmful
Interference to radio communications. However, there is no guarantee that interference will not occur in a particular Installation. If this
equipment does cause harmful interference to radio or television reception, which can be determined by turning the equipment off and on, the
user is encouraged to try to correct the interference by one or more of the following measures:
z Reorient or relocate the receiving antenna.
z Increase the separation between the equipment and receiver.
z Connect the equipment into an outlet of a circuit different from that to which
the receiver is connected.
z Consult the dealer or an experienced radio/TV technician for assistance.
Changes or modification not expressly approved by the party responsible for Compliance could void the user’s authority to operate the
equipment. Connecting of peripherals requires the use of grounded shielded signal cables.