Ubiquiti PS5AC PRISM Station AC User Manual Part 1
Ubiquiti Networks, Inc. PRISM Station AC Part 1
Ubiquiti >
Contents
- 1. User Manual
- 2. User Guide
- 3. User Guide 0.5A
- 4. User Manual Part 1
- 5. User Manual Part 2
User Manual Part 1
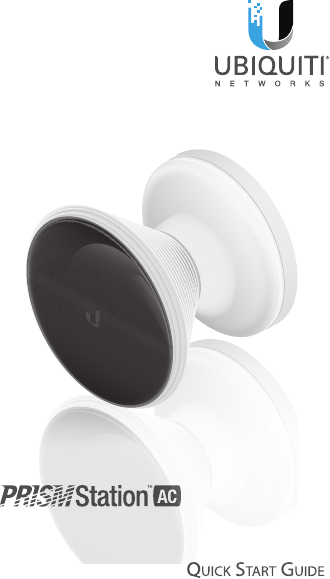
Shielded airMAX® ac Radio with
Isolation Antenna
and airPrism® Technology
Model: PS-5AC
Introduction
Thank you for purchasing the Ubiquiti Networks®
PrismStation™AC. This Quick Start Guide is designed to guide
you through installation and also includes warrantyterms.
Package Contents
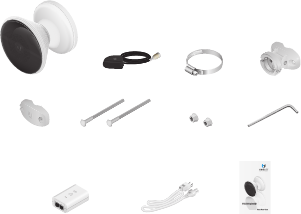
PrismStation AC GPS Antenna Metal Strap Mounting Bracket
Pole Clamp Carriage Bolts
(Qty. 2)
Flange Nuts
(Qty. 2)
Allen Wrench
Shielded airMAX® ac Radio with
Isolation Antenna
and airPrism® Technology
Model: PS-5AC
Gigabit PoE (24V, 1A)
with Mounting Bracket
Power Cord Quick Start Guide
Installation Requirements
• The GPS Antenna needs to have clear line of sight to thesky
for proper GPS operation.
• 7 mm socket wrench or screwdriver (for the Metal Strap)
• 13 mm wrench (for the Mounting Bracket)
• 5 mm hex socket (recommended for the Mounting Bracket)
• Shielded Category 5 (or above) cabling should be used for
all wired Ethernet connections and should be grounded
through the AC ground of the PoE.
We recommend that you protect your networks from
harmful outdoor environments and destructive ESD events
with industrial‑grade, shielded Ethernet cable from Ubiquiti
Networks. For more details, visit
www.ubnt.com/toughcable
TERMS OF USE: Ubiquiti radio devices must be professionally installed. Shielded Ethernet
cable and earth grounding must be used as conditions of product warranty. TOUGHCable™ is
designed for outdoor installations. It is the customer’s responsibility to follow local country
regulations, including operation within legal frequency channels, output power, and Dynamic
Frequency Selection (DFS) requirements.
Hardware Overview
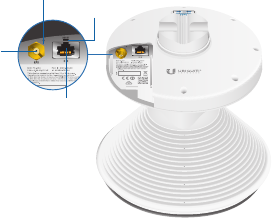
Reset
Button
Ethernet
Port
Power
LED
GPS Antenna
Connector
GPS Antenna Connector This is used to connect the included
GPS Antenna.
Power LED The LED will light blue when the device is
connected to a power source.
Ethernet Port This Gigabit Ethernet port is used to connect
the power and should be connected to the LAN and DHCP
server.
Reset Button To reset to factory defaults, press and hold the
Reset button for more than 10 seconds while the PrismStation
is poweredon. Alternatively, the PrismStation may be reset
remotely via a Reset button located on the bottom of the
Gigabit PoE Adapter.

Release Button
Release
Button
Release Button The default horn (beamwidth: 45°) can
be swapped out for an optional horn with a different
beamwidth. To remove the attached horn, rotate the horn
counterclockwise while depressing the Release Button.
To reinstall the horn, align the arrow on the horn with the
Release Button. Then press down on the horn and rotate it
clockwise until you hear a click.
Hardware Installation
There are two pole-mounting methods; follow the appropriate
instructions for your selection.
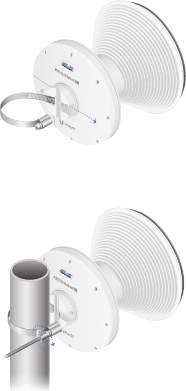
Metal Strap Use this option for quick mounting on a pole.
Mounting Bracket Use this option for elevation adjustments.
Metal Strap
1. Open the Metal Strap and feed it through the base of the
PrismStation.
2. Wrap the Metal Strap around the pole. Use a 7 mm socket
wrench to turn the screw clockwise and securely fasten the
clamp to the pole.
3. Proceed to the Connecting to Power and GPS section.
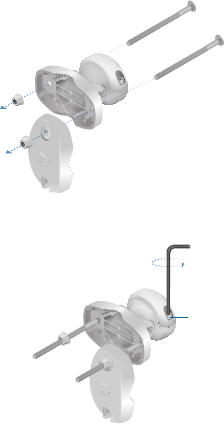
Mounting Bracket
1. Attach the Pole Clamp to the Mounting Bracket.
a. Hold the Mounting Bracket with its clamps facing you
and the head of the Tightening Bolt facing upward.
b. Insert the two Carriage Bolts through the holes of the
Mounting Bracket.
c. Slide the hole of the Pole Clamp over one bolt of the
Mounting Bracket.
d. Place one Flange Nut on each bolt.
2. Loosen the Tightening Bolt of the Mounting Bracket and
open the bracket 90°.
Tightening Bolt
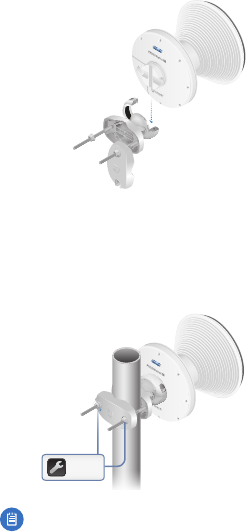
3. Insert the PrismStation into the Mounting Bracket, and then
tighten the bolt to lock the PrismStation in place.
4. Mount the PrismStation on the pole and secure it.
a. Place the Mounting Bracket against the pole.
b. Slide the slot of the Pole Clamp over the adjacent
Carriage Bolt.
c. Tighten the Flange Nuts of the bolts to 25 N ∙ m to
secure the Mounting Bracket to the pole.
25 N ∙ m
Note: The mounting assembly can accommodate a
Ø 25 ‑ 75 mm pole.
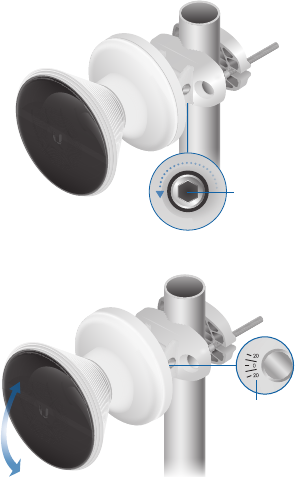
5. Adjust the elevation angle.
a. Loosen the Elevation Screw on the bottom of the
bracket.
Elevation Screw
b. Pivot the PrismStation until the Elevation Indicator
shows the desired elevation angle.
Elevation Indicator
c. Tighten the Elevation Screw to 15 N ∙ m.
6. Proceed to the Connecting to Power and GPS section.
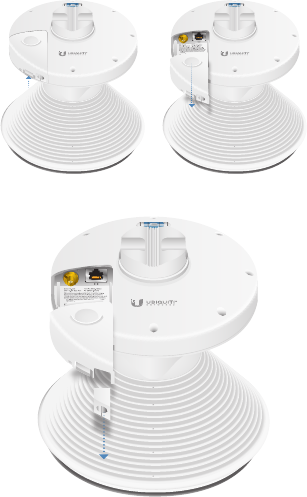
Connecting to Power and GPS
1. Remove the port cover by pressing up the latch of the
cover and sliding the cover out.
2. Remove the rubber gasket from the port cover.
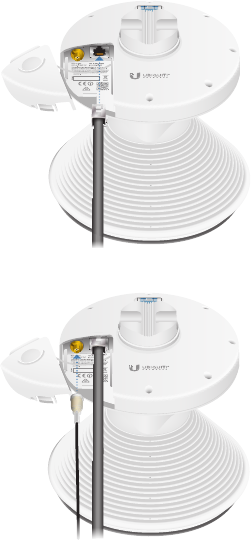
3. Connect an Ethernet cable to the Ethernet port.
4. Connect the GPS Antenna to the GPS Antenna Connector.
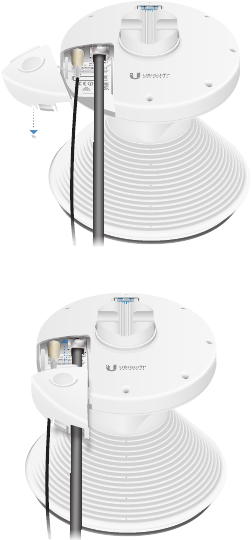
5. Punch out the cutout for the GPS cable.
6. Replace the port cover.