Ubiquiti UAPSTMXG UniFi StadiumXG User Manual UniFi Stadium XG AP Quick Start Guide
Ubiquiti Networks, Inc. UniFi StadiumXG UniFi Stadium XG AP Quick Start Guide
UserManual.wiki
>
Ubiquiti
>
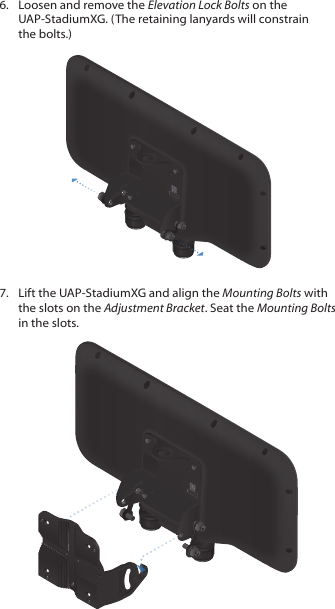
UAPSTMXG User Manual
>
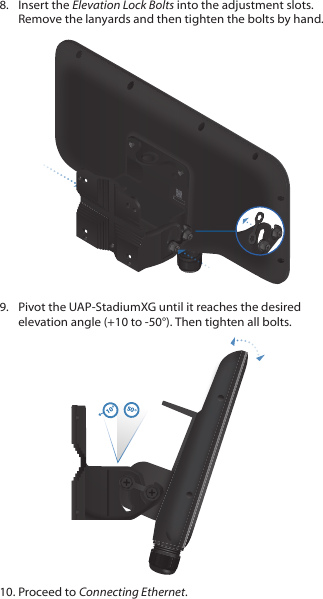
User Manual BK Part 1
Contents
1.
User Manual BK Part 1
2.
User Manual BK Part 2
3.
User Manual Part 1
4.
User Manual Part 2
5.
User Manual UWB-XG-BK Part 1
6.
User Manual UWB-XG-BK Part 2
7.
User Manual UWB-XG Part 1
8.
User Manual UWB-XG Part 2
User Manual BK Part 1
Navigation menu
Upload a User Manual
Namespaces
Wiki Guide
HTML
PDF
Info
Views
User Manual
Discussion / Help
Navigation
![Network Topology Requirements• A DHCP‑enabled network (for the AP to obtain an IP address as well as for the wireless clients after deployment)• A UniFi Cloud Key or management station running the UniFi Controller v5.7 (or newer) software, located either on‑site and connected to the same Layer 2 network, or off‑site in the cloud or NOCUSG-XG-8(DHCP Server)US-16-XGInternetUAP-StadiumXGLANWANRemote Access toUniFi ControllerUAP-XGUAP-StadiumXGUniFi HybridCloud InstallDOWNLOAD THROUGHPUT & LATENCY DEVICES ON 2.4 GHZ CHANNELDEVICES ON 5 GHZ CHANNELUPLOAD THROUGHPUT & LATENCYLATENCY THROUGHPUTSPEED TESTmsec Mbps7 0.94 12.3325 225970.9 116200+0700+00.01 4132290.22118547ACTIVE DEVICEWANInacve 0Pending 0Inacve 0Pending 07ACTIVE DEVICESInacve 0Pending 0118ACTIVE DEVICESLAN WLANDEEP PACKET INSPECTIONCLIENTSDEVICES250200150100500108642024 HRS 12 HRS NOWAvg/Max Throughput LatencyLatency [msec]Throughput [Mbps]100806040200108642024 HRS 12 HRS NOWLatency [msec]Throughput [Mbps]Network ProtocolsStreaming MediaWeb / Web 2.0File TransferSocial NetworkOtherMotorolaLenovoSamsungEDellAcerOtherWLANLANWAN11871582 GB23.3 GB22.7 GB8.47 GB3.6 GB5.46 GB258241220213130110126DEVICES645 GBTRAFFIC1172CLIENTS1 2 3 4 5 6 7 8 9 10 1136 40 44 48 52 56 60 64100 104 108 112 116 120 124 128132 136 140 144 149 153 157 161 165CURRENT SITEDefaultUSERNAMEadminSample Network DiagramAll UniFi devices support off‑site management controllers. For setup details, see the User Guide on the website: www.ubnt.com/download/unifi](https://usermanual.wiki/Ubiquiti/UAPSTMXG.User-Manual-BK-Part-1/User-Guide-3701475-Page-4.png)