UnderSea Sensor Systems T14903 Wireless Pressure Sensor Transmitter User Manual 4056858
UnderSea Sensor Systems, Inc Wireless Pressure Sensor Transmitter 4056858
Users Manual

PRISM –Wireless HUD System
Installation & Operation Instructions
Wireless HUD System Contents
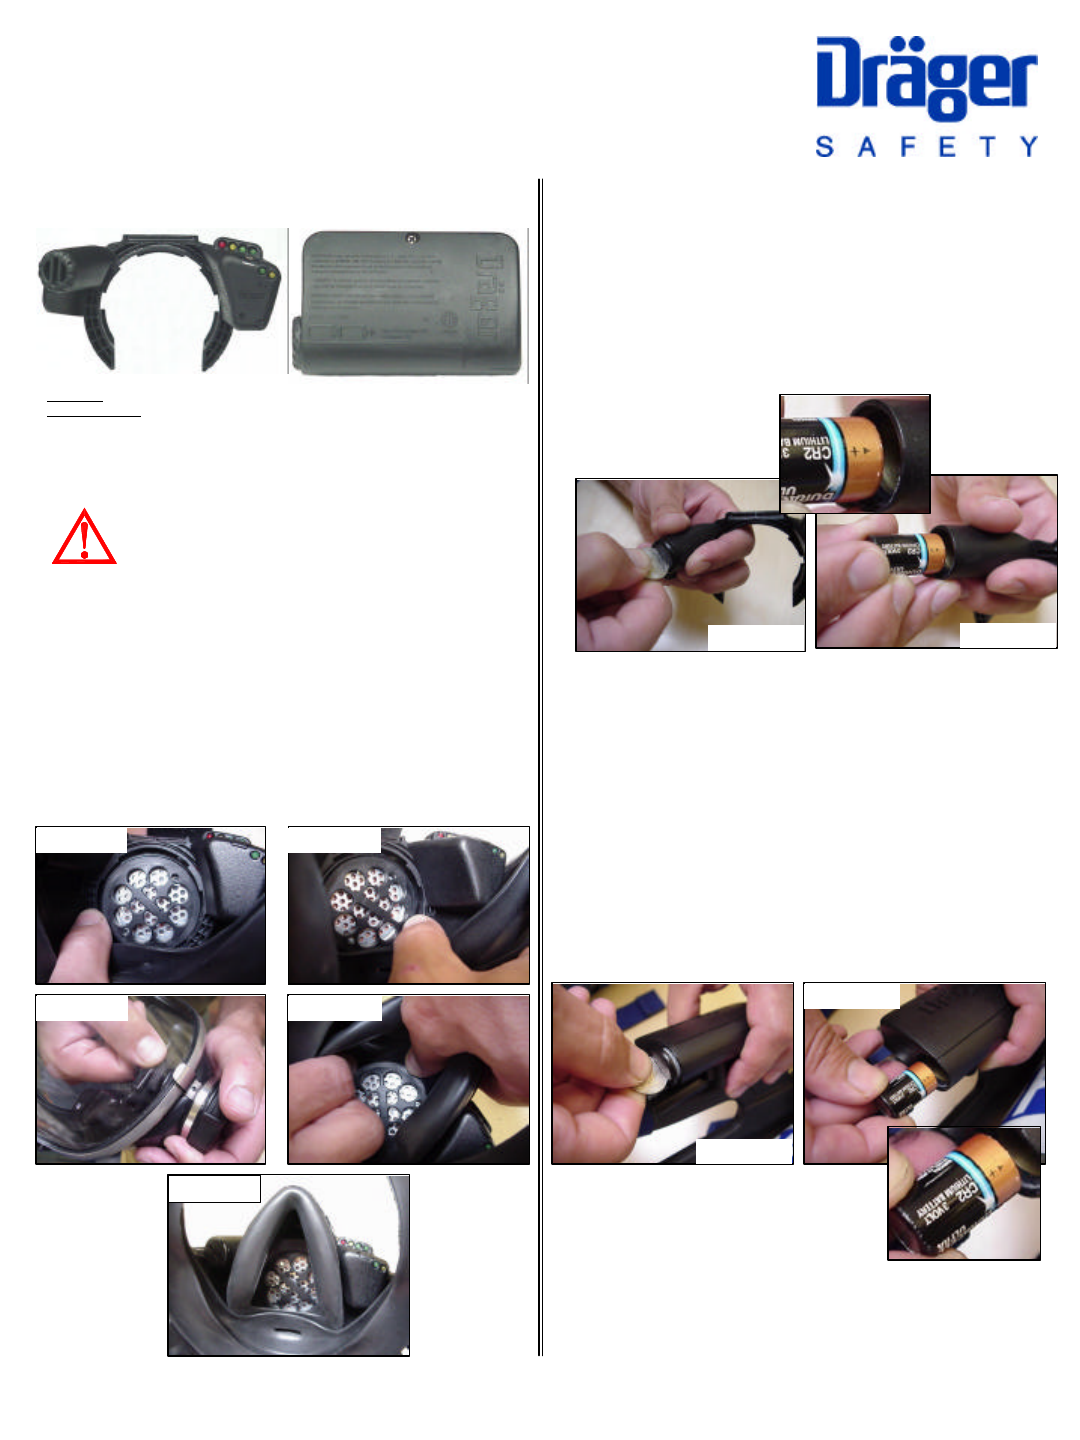
PRISM (In-Mask Receiver) -4056743
Installation of the In-Mask Receiver
Remove the nose cup from inside the mask. Install the In-Mask Receiver into the
mask. Tilt the In-Mask Receiver toward the speech diaphragm and locate the
left side (battery side) of In-Mask Receiver ring behind speech diaphragm ring
(Figure 1a). Spread right side of the In-Mask Receiver ring only far enough to
get it to snap into place around speech diaphragm ring (Figure 1b). CAUTION:
Do not overflex the In-Mask Receiver ring legs during installation. Press top of
In-Mask Receiver ring down to ensure it is fully seated (Figure 1c). Install the
nose cup back into place making sure that the nose cup is fully seated behind
the speech diaphragm mounting ring. (Figure 1d & 1e).
WARNING: SUBSTITUTION OF COMPONENTS MAY IMPAIR INTRINSIC SAFETY.
AVERTISSEMENT: LA SUBSTITUTION DE COMPOSANTS PEUT COMPROMETTRE
LA SÉCURITÉ INTRINSÈQUE
Intrinsically Safe. Securite Intrinseque per CL. I, II, III, Div.1 Gr. A-G. Conforms
to UL std. 913. Certified to CAN/CSA C22.2 No. 157-92.
WARNING! To prevent ignition of a hazardous atmosphere,
batteries must only be changed in an area known to be
nonhazardous.
AVERTISSEMENT! Afin de prevenir l’inflammation
d’atmospheres dangereuses, ne changer les batteries que
dans des emplacements designes non dangereux.
This device complies with part 15 of the FCC Rules. Operation is subject to
the following two conditions: (1) This device may not cause harmful
interference, and (2) this device must accept any interference received,
including interference that may cause undesired operation.
PRISM Transducer -4056744
FIGURE 1a FIGURE 1b
FIGURE 1c FIGURE 1d
Battery installation
In-Mask Receiver
The In-Mask Receiver is powered by one CR2 lithium battery. To install the
battery, unscrew the battery cap using a coin (Figure 2a). Noting the battery
polarity, install a new cell, positive ”+” end in first (Figure 2b). Screw battery cap
securely into place. When a new battery is first installed, the In-Mask Receiver
will blink the green low-battery indicator for 5 seconds to indicate that the
battery has been installed correctly.
Caution: The cell used in this device may present a fire or chemical burn hazard
if mistreated. DO NOT recharge, disassemble, heat above 100oC, or incinerate.
Dispose of used cell promptly. Keep away from children.
Transducer
The Transducer is powered by two (2) CR2 lithium batteries. To install
the batteries, unscrew the battery cap using a coin (Figure 3a). Noting the
battery polarity, install two new cells, positive ”+” end in first (Figure 3b).
Both batteries MUST be replaced with fresh cells at the same time.
Screw battery cap securely into place.
Caution: The cell used in this device may present a fire or chemical burn
hazard if mistreated. DO NOT recharge, disassemble, heat above 100oC,
or incinerate. Dispose of used cell promptly. Keep away from children.
Note: Install batteries with transducer in transmission range of In-Mask
Receiver.
When new batteries are first installed, the In-Mask Receiver will blink the
amber low-battery indicator for up to 5 seconds to indicate that the
batteries have been installed correctly.
Note: Use only Duracell or Energizer CR2 lithium batteries.
FIGURE 3a
FIGURE 3b
FIGURE 2a FIGURE 2b
FIGURE 1e
Page 1 of 2

Cleaning
In-Mask Receiver :Remove In-Mask Receiver from mask and use a damp cloth
to clean the surface of the assembly. Refer to the mask cleaning procedure in
the Draeger Service manual.
Transducer: Use a damp cloth to clean the surface of assembly.
Wireless HUD System Operation
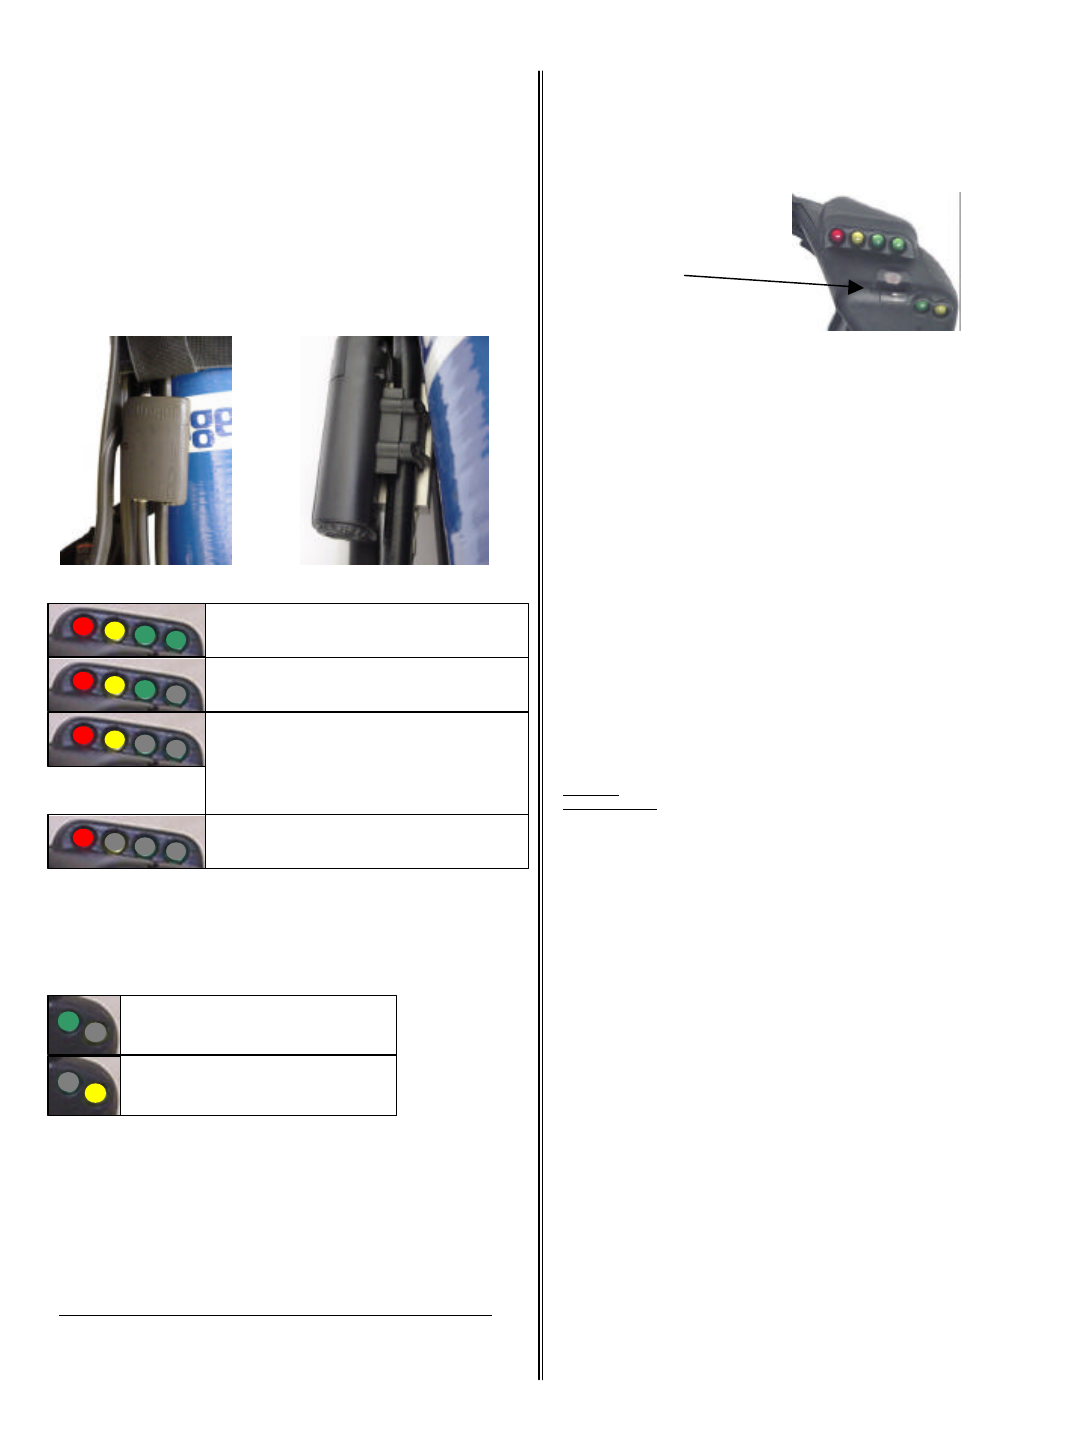
The In-Mask Receiver is located inside the mask. It will power-up when it is in
range of a transducer unit that is sensing air pressure. The transducer is located
on the back plate and is connected to the high pressure line (Figure 4).
When the In-Mask Receiver receives the first air pressure signal from the
transducer, the display will initially be on for 20 seconds. After that the display
will function as described below.
You should be at least 6 Feet away from another PRISM system when first
pressurizing your SCBA to prevent your In-Mask Receiver from linking to another
system. If this occurs, move away from the other individual. Your In-Mask
Receiver will display a Loss Of Signal indication in approximately 40 seconds
then link to your own SCBA.
A properly linked PRISM system will function correctly when used in close
proximity to another properly linked system.
In-Mask Receiver low-battery indicator
The Green led will flash at a rate of
approximately once per second.
Transducer low-battery indicator
The Amber led will flash at a rate of
approximately once per second.
Tank Pressure below ¼
The Red led will blink at a rate of once per second
until the tank is out of air.
Tank Pressure between ¾ & ½
3 leds (R,A,G) will be on for 12 seconds and then
be off for 48 seconds.
Tank pressure between ½ and ¼
The Red led will be on for 24 seconds, while the
Amber led will blink at a rate of once per second
for 24 seconds. Both leds will then be off for 36
seconds. After that, both leds will be on for 12
seconds and then be off for 48 seconds.
Tank Pressure above ¾
All 4 leds (R,A,G,G) will be on for 12 seconds and
then be off for 48 seconds.
Low Battery Indication*
When 2 hours or less of operation time remains the low battery indicators will
function as follows:
The Flashing LED will remain active until the battery is replaced or the system is
shut down. WARNING: Inaccurate reading may occur if the battery has not been
changed after 2 hours in the low battery condition.
FIGURE 4
Loss of Signal Indication (LOS)
When the In-Mask Receiver is out of range or does not receive a transmission
from the transducer the 4 pressure leds will scan red-amber-green-green 5
times. If the In-Mask Receiver is brought back into range of the transducer and
there is still tank pressure, the In-Mask Receiver will resume displaying the
proper tank pressure indications.
Power Down
When the SCBA system has been depressurized or is out of air, the In-Mask
Receiver will receive a power down signal, the 4 pressure leds will flash 5 times
at a rate of approximately once per second and then turn off.
If the In-Mask Receiver has not received a signal for approximately 4 minutes,
the In-Mask Receiver will shut down. In this case, the 4 pressure LEDs will flash 5
times at a rate of approximately once per second and turn off. The In-Mask
Receiver will activate again if a valid signal is received.
P/N 4056858 Rev. 0
Low Battery Shutdown
When the batteries are insufficient to insure that accurate data is being
displayed, the system will shut down. In this case, the 4 pressure LEDS will flash
5 times at a rate of approximately once per second. At this point the batteries
must be replaced.
* The Low battery indication may prematurely activate at temperatures below 0oF
(–18oC) The Flashing LED will remain active until the system is shut down and re-
pressurized at higher temperatures.
•REFER TO YOUR SECONDARY GAUGE FOR STATUS
Troubleshooting
No user serviceable parts inside.
WARNING: SUBSTITUTION OF COMPONENTS MAY IMPAIR INTRINSIC SAFETY.
AVERTISSEMENT: LA SUBSTITUTION DE COMPOSANTS PEUT COMPROMETTRE LA
SÉCURITÉ INTRINSÈQUE
No new battery indication:
•Check battery orientation as indicated on unit.
•Verify that batteries are in good condition.
•Verify that the battery cover is securely tightened.
No pressure indication:
•Check batteries in system.
•Is SCBA pressurized above 250PSI?
System shuts down while in use:
•Check batteries in system (see Low Battery Shutdown).
•Refer to your secondary gauge for status.
Loss Of Signal indications:
•Check batteries in system.
•Check In-Mask Receiver and transmitter for damage.
•In-Mask Receiver was linked to another individual.
Your In-Mask Receiver appears to be linked to another individual:
•This may have occurred during power up if you were close to another
active system.
•Move approximately 6 feet away from others.
•Refer to your secondary gauge for status until the In-Mask Receiver links to
your SCBA.
This will occur within 10 seconds after the LOS indication.
LED display appears to not change intensity:
•Clean and dry the lens on the In-Mask Receiver with a soft damp cloth.
•Move to a brightly lit area.
•Link the In-Mask Receiver to a fully charged SCBA.
•Cover and uncover the lens with your finger while the 4 LEDs are on. You
should notice the LED intensity change.
Dimming
The In-Mask Receiver is equipped with an automatic dimming feature to allow
the display to be visible in bright ambient light while not being distracting
under dim light conditions. The sensor is fastened under a lens located on
the top of the receiver. The 4 LEDs of the pressure display will be at their full
brightness in bright light. They will dim when entering a dark area. Keep this
area clean to allow proper function.
Lens
Draeger Safety, Inc.
101 Technology Drive
Pittsburgh, PA 15275-1057
USA
Phone: 800-922-5518
Fax: 800-922-5519
Page 2 of 2