Unical D81 TELEPHONE MACHINE User Manual
Unical Enterprises Inc TELEPHONE MACHINE Users Manual
Unical >
Users Manual

Scorpion
Quick Reference
Manual
1
1. Minimum Requirements
Telephone connection (for making telephone calls)
AC power connection
Broadband Internet access (cable/DSL for accessing Scorpion
features)
Broadband router with an available LAN port
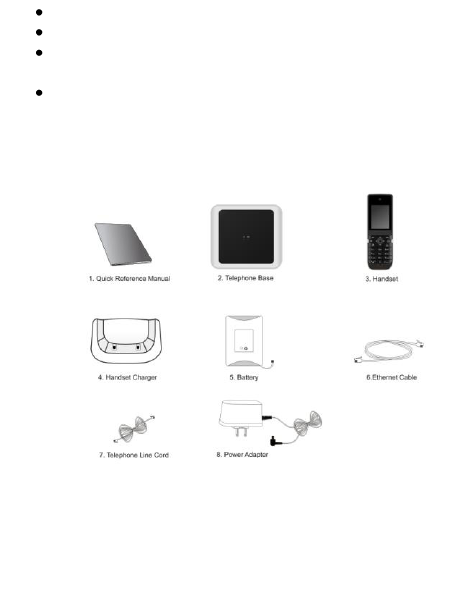
2. Parts Checklist
Verify that the package includes the following:
Note: Save the original packaging in case you may have to ship your telephone
for warranty service.
1
Quick Reference Manual
2
Telephone Base
3
Handset
4
Handset Charger
5
Battery
6
Ethernet Cable
7
Telephone Line Cord
8
Power Adapter (two
identical adapters for
Telephone Base and for
Handset Charger)

2
3. Specifications
Standard
DECT (Digital Enhanced Cordless
Telecommunications), GAP (Generic
Access Profile)
Number of channels
120 duplex channels
Frequency range
1.88 GHz to 1.9 GHz
Duplex procedure
TDMA (Time Division Multiple Access)
Channel spacing
1,728 kHz
Bit rate
1,152 Kbps
Modulation
GFSK (Gaussian Frequency Shift Keying)
RF transmission power
250 mW (approx.)
Voice coding
ADPCM 32 Kbps
Power source
120 V, 60 Hz
Power consumption
Base unit
Standby*: 2.5 W (approx.)
Maximum: 4.5 W (approx.)
Charger
Standby: 1.0 W (approx.)
Maximum: 4.5 W (approx.)
Operating conditions
Temperature
5 °C–40 °C (41 °F–104 °F),
Relative humidity (dry)
20%–80%
* Handset is off the charger but not in use.
Dimensions
Length
(mm)
Width
(mm)
Height
(mm)
Weight
g (lb)
Handset
138.8
49.0
23.2
105 (0.23)
Base
122.2
118.9
42.7
151 (0.33)
Charger
68.0
64.0
34.6
59 (0.13)
Note
Specifications are subject to change.
The illustrations used in this manual may differ slightly from the
actual product.
3
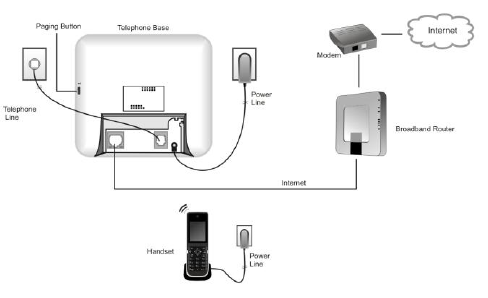
4. Installing the Scorpion Telephone Base
Before installing the Scorpion telephone base, ensure that the DHCP is
enabled in the router. To configure the DHCP, refer to your router’s
documentation. To install the Scorpion telephone base:
1. Connect the telephone line cord to the telephone base and to the
telephone outlet.
2. Connect the ethernet cable to the telephone base and to the
broadband router.
3. Plug the base power adapter into the telephone base and connect
the other end to an electrical outlet.
The power light should be steady, which indicates that the power is on.
The following diagram illustrates a typical network layout after installing the
Scorpion.

4
4. Installing the Handset
To install the handset:
1. Plug the power adapter into the handset charger and connect the
other end to an electrical outlet. The power adapters for the base
and for the handset are identical.
2. Insert the battery into the handset.
3. Place the handset on the charger for charging. It is recommended
that you charge the handset for 16 hours before first use.
After the battery is fully charged, you can expect the following performance:
Operation
Operating Time
While in use (handset/headset)
5 hours
While standby
5 days
You need to charge the battery when:
The battery is new.
The battery indicator on the handset display is empty and flashing
red.
Registering the Handset
You can register a maximum of five handsets for a telephone base. To register
a handset:
1. Press and hold the paging button on the telephone base until the
“Line in use” LED starts blinking.
2. On the handset, select the Menu softkey. If the Menu softkey is not
available, press and hold the Off button until you see the idle
screen with the Menu softkey.
3. From Menu Settings, select Phone Settings.
4. From Phone Settings, select Registration.
5. Select Yes to confirm registration.
After registration is successful, a circle is displayed in the upper-left corner of
the screen. A filled green circle indicates a healthy signal from the telephone
base, whereas an empty red circle indicates that there is no signal.
5
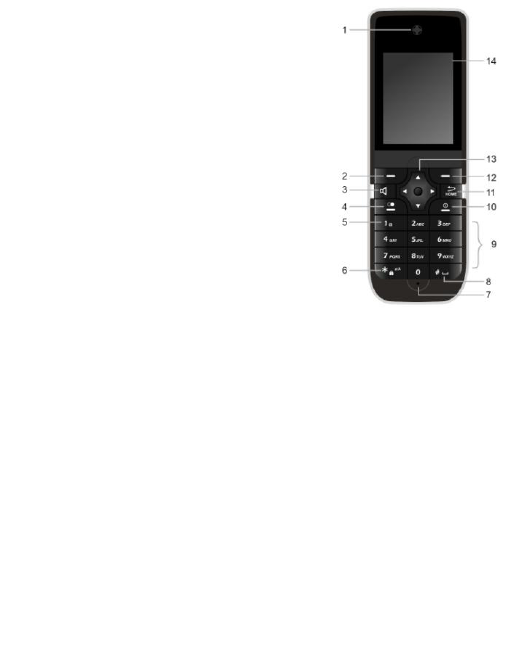
5. Scorpion Handset Layout
1
Earpiece
Audio output of the telephone.
2
Left softkey
For selecting the function displayed
on the lower left of the screen.
3
Speaker
For turning the speaker on or off.
4
Talk
For getting a dial tone and for
making a call.
5
1 Key
For typing “1” and selecting a special
character.
6
* Key
For typing * and for switching
between character input modes, Ab,
AB, ab, 12.
7
Microphone
Audio input of the telephone.
8
# Key
For typing # and for entering a space
between words.
9
Keypad
For dialing phone numbers and
entering text.
10
Off
For ending a call and for returning to
the idle screen.
11
Home
Press quickly to go back one level.
Press and hold to go back to the
Main screen.
12
Right softkey
For selecting the
function displayed on
the lower right of the
screen.
13
Navigation Keys
For navigating menu
screens and for
positioning the cursor
while writing or editing
text. Press the center
button to open the
selected item.
14
Screen
The display.
6
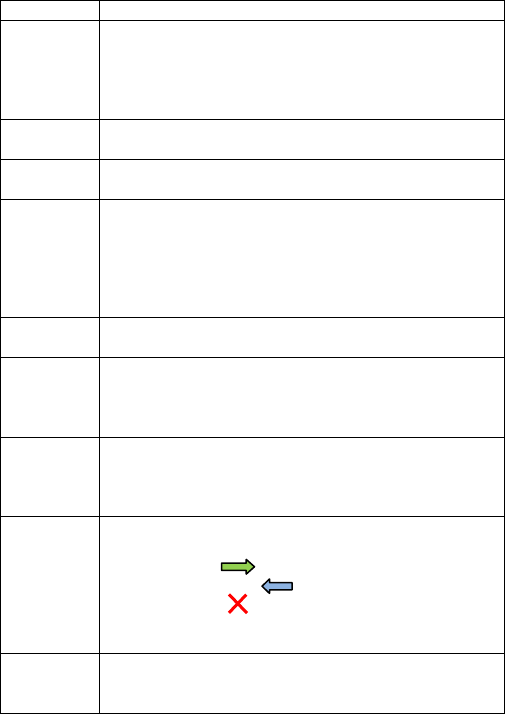
6. Scorpion Standard Features
Features
Description
Intercom
To call between two Scorpion handsets, select Intercom,
and then select the number of the handset you want to
call. The handset number is displayed in the upper-left
corner, inside the colored circle that indicates the
handset’s connection to the base station.
Speaker
Phone
While in a call, the speaker phone can be enabled by
pressing the speaker key.
Redial
To redial the last dialed number, press the Talk key, and
then select the Redial softkey.
Backlight
Timer and
Screen
Saver
The backlight timer controls the duration for which the
display will remain on after a key is pressed. This is used
only when the phone is left out of the cradle. Screen Saver
allows you to set a screen saver and the duration after
which it is displayed when the handset is not in use. Both
these options can be set from Settings > Phone.
Joining a
Call
To join a call, press the Talk key.
Volume
during a
Call
To change the volume while on a call, press the up or
down navigation key. The change in volume is reflected on
the screen. The change will affect both the speaker
volume in speakerphone mode and the earpiece volume.
Ringtones,
Keytones,
Ring
Volume
To modify ringtones, keytones, or ring volume, go to
Settings > Phone > Sound.
Call Logs
Provides a list of all dialed, answered, and missed calls.
The type of call is indicated by the following icons:
Dialed Calls
Answered Calls
Missed Calls
To cycle through the lists of specific types of calls, press
the left or right navigation key.
Time and
Date
The date and time are automatically set when Scorpion is
connected to the Internet and the activation process is
complete. However, if your phone is not connected to the
7
Features
Description
Internet or if there is a configuration issue, you can
manually set the time from Settings > Phone > Date and
Time.
Alarm
Each Scorpion handset can be configured with different
alarm clock settings. The alarm clock feature will allow you
to set the time, the melody, the frequency (once or daily),
and the snooze time for the alarm. It also allows you to
turn the alarm on or off without changing any of the other
settings. When the alarm rings, the screen displays the
alarm clock screen pop. While setting the alarm, always
enter four digits (0938).
7. Service Registration
To register a Scorpion phone with your service provider and to avail of the
features provided by the provider, follow the registration instructions
displayed on the handset. These screens will be provided only during phone
registration. If you have any problems during service registration, call your
service provider for assistance.
To register for an individual feature, follow the screens that are displayed
during the registration of that specific feature.
8. Scorpion Service Features
Yellow Pages
Allows you to search for local businesses and
listings. A search can be performed by typing in
keywords or selecting a search string from Top
Searches or All Categories. Use Options to modify
your location or to redo previous searches. Results
provide telephone numbers, addresses, and
distances from your configured location. You can
also save the result into your Scorpion address
book and send the business address and phone
number to your mobile phone.
TXT Messages
Allows you to send and receive text messages. By
accessing Options > Settings > TXT, you can specify
8
how Scorpion should alert you when a new
message has been received. Alerting options
include screen pops, icons, and beep tones. You can
also configure multiple phone numbers to
automatically receive a copy of any text message
through the TXT Forward feature. When you
receive a text message, you can easily save the
number of the phone (from which you received the
text message) into your Scorpion address book.
Address Book
Allows you to access your Scorpion address book.
The address book allows you to enter new contacts
or save contact information from search results,
voicemail messages, or text messages. Your address
book can also be automatically synchronized with
network address books that you may already have.
Selecting an external network address book with
which you want your address book to be
synchronized and configuring synchronization is
done in Settings. New address book options are
being added regularly. If your current choice is not
on the list, check back later.
Voice Mail
Provides a visual list of all the voicemail messages
that are stored in the network voicemail system.
Allows you to view the list, listen to messages in
any order, and delete the ones you no longer want
to save. In Settings/Voicemail, you can specify how
your handset should alert you. You can choose
from screen pops, audible beeps, and icon alerts.
The telephone number from which you receive a
voicemail message can be easily saved into your
Scorpion address book.
Weather
Provides the day’s weather report and a three-day
forecast for up to three separate locations. To
configure and/or change locations for which you
want to view weather reports, select the “Location”
softkey.
9
Info
(Channels)
Provides information snippets such as news, sports,
and horoscope.
Personal User
Accounts
Allows you to configure your own personal user
account on Scorpion. With a personal account, you
can set up your own text message list (messages
from contacts in this list are stored in the personal
account, and not in the general account), configure
access to your e-mail account, create a personal
Scorpion address book that you can synchronize
with a network address book of your choice, access
your own social networking accounts to send and
receive updates. Social networking sites and e-mail
providers are being added regularly. E-mail
providers, social networking sites, and address
book options are configured in Settings. If the site
that you want to access is not available, check back
later to see if it has been added.
Email
Allows you to read, reply to, and delete e-mail
messages from the account selected in your
Scorpion personal user account. Because display
limitations, e-mail attachments cannot be viewed in
Scorpion.
Useful Information
Federal Communications Commission (FCC)
This equipment complies with Part 68 of the FCC rules and the requirements
adopted by the ACTA. On the bottom of this equipment is a label that
contains, among other information, a product identifier in the format
US:ACJ---------- . If requested, this number must be provided to the telephone
company.

10
Registration No ............(found on the bottom of the unit)
Ringer Equivalence No.
(REN).......0.2
A plug and jack used to connect this equipment to the premises wiring and
telephone network must comply with the applicable FCC Part 68 rules and
requirements adopted by the ACTA. A compliant telephone cord and modular
plug is provided with the product. It is designed to be connected to a
compatible modular jack that is also compliant.
The REN is used to determine the number of devices that may be connected
to a telephone line. Excessive RENs on a telephone line may result in the
devices not ringing in response to an incoming call. In most but not all areas,
the sum of RENs should not exceed five (5.0). To be certain of the number of
devices that may be connected to a line, as determined by the total RENs,
contact the local telephone company. For products approved after July 23,
2001, the REN for the product is part of the product identifier that has the
format US:AAAEQ##TXXXX. The digits represented by ## are the REN without
a decimal point (e.g., 03 is a REN of 0.3).
If this equipment causes harm to the telephone network, the telephone
company will notify you in advance that temporary discontinuance of service
may be required. But if advance notice isn’t practical, the telephone company
will notify the customer as soon as possible. Also, you will be advised of your
right to file a complaint with the FCC if you believe it is necessary.
The telephone company may make changes in its facilities, equipment,
operations or procedures that could affect the operation of the equipment. If
this happens the telephone company will provide advance notice in order for
you to make necessary modifications to maintain uninterrupted service.
If the equipment is causing harm to the telephone network, the telephone
company may request that you disconnect the equipment until the problem is
resolved.
If your home has specially wired alarm equipment connected to the telephone
line, ensure the installation of this equipment does not disable your alarm
equipment. If you have questions about what will disable alarm equipment,
consult your telephone company or a qualified installer.
11
This equipment is hearing aid compatible as defined by the FCC in 47 CFR
Section 68.316 {check w/ CCT)
When you hold the phone to your ear, noise might be heard in your Hearing
Aid. Some Hearing Aids are not adequately shielded from external RF (radio
frequency) energy. If noise occurs, use an optional headset accessory or the
speakerphone option (if applicable) when using this phone. Consult with your
audiologist or Hearing Aid manufacturer about the availability of Hearing Aids
which provide adequate shielding to RF energy commonly emitted by digital
devices.
This device complies with Part 15 of the FCC Rules. Operation is subject to the
following two conditions:
(1) This device may not cause harmful interference, and (2) this device must
accept any interference received, including interference that may cause
undesired operation.
Privacy of communications may not be ensured when using this phone.
Caution
Any changes or modifications not expressly approved by the party responsible
for compliance could void the user’s authority to operate this device.
Note
This equipment has been tested and found to comply with the limits for a
Class B digital device, pursuant to Part 15 of the FCC Rules. These limits are
designed to provide reasonable protection against harmful interference in a
residential installation. This equipment generates, uses, and can radiate radio
frequency energy and, if not installed and used in accordance with the
instructions, may cause harmful interference to radio communications.
However, there is no guarantee that interference will not occur in a particular
installation. If this equipment does cause harmful interference to radio or
television reception, which can be determined by turning the equipment off
and on, the user is encouraged to try to correct the interference by one or
more of the following measures:
– Reorient or relocate the receiving antenna.
– Increase the separation between the equipment and receiver.

12
– Connect the equipment into an outlet on a circuit different from that to
which the receiver is connected.
– Consult the dealer or an experienced radio/TV technician for help.
Some cordless telephones operate at frequencies that may cause interference
to nearby TVs and VCRs. To minimize or prevent such interference, the base of
the cordless telephone should not be placed near or on top of a TV or VCR. If
interference is experienced, move the cordless telephone further away from
the TV or VCR. This will often reduce, or eliminate, interference.
FCC RF Exposure Warning:
This product complies with FCC radiation exposure limits set forth
for an uncontrolled environment.
To comply with FCC RF exposure requirements, the base unit must
be installed and operated 20 cm (8 inches) or more between the
product and all person’s body (excluding extremities of hands,
wrist and feet).
This product may not be collocated or operated in conjunction with
any other antenna or transmitter.
The handset may be carried and operated with only the specific
provided belt-clip. Other non-tested belt-clips or similar body-worn
accessories may not comply and must be avoided.
Notice
This product is designed for use in the United States of America. Sale or use of
this product in other countries may violate local laws.
Safety Instructions
When using the product, basic safety precautions should always be followed
to reduce the risk of fire, electric shock, or personal injury.
1. Read all instructions carefully.
2. Follow all warnings and instructions marked on the product.

13
3. Unplug the product from power outlets before cleaning. Do not
use liquid or aerosol cleaners. Use a moist cloth for cleaning.
4. Do not use the product near water, for example near a bathtub,
wash bowl, kitchen sink, etc.
5. Do not cover slots and openings on the product. They are provided
for ventilation and protection against overheating. Never place the
product near radiators, or in a place where proper ventilation is
not provided.
6. Use only the power source marked on the product. If you are not
sure of the type of power supplied to your home, consult your
dealer or local power company.
7. Do not use the product to report a gas leak, when in the vicinity of
the leak.
Warning
To prevent the risk of fire or electrical shock, do not expose the
product to rain or any type of moisture.
Unplug the product from power outlets if it emits smoke, an
abnormal smell, or makes an unusual noise. These conditions can
cause fire or electric shock. Confirm that the phone has stopped
emitting smoke and call your telephone company help desk.
Do not spill liquids (detergents, cleansers, etc.) onto the telephone
line cord plug, or allow it to become wet at all. This may cause a
fire. If the telephone line cord plug becomes wet, immediately pull
it from the telephone wall jack, and do not use.
Do not place or use this product near automatically controlled
devices such as automatic doors and fire alarms. Radio waves
emitted from this product may cause such devices to malfunction
resulting in an accident.
Completely insert the AC adaptor/power plug into the power
outlet. Failure to do so may cause electric shock and/or excessive
heat resulting in a fire.

14
Regularly remove any dust, etc. from the AC adaptor/power plug
by pulling it from the power outlet, then wiping with a dry cloth.
Accumulated dust may cause an insulation defect from moisture,
etc. resulting in a fire.
Do not excessively pull the receiver cord from the base unit. This
may cause the base unit to fall, resulting in injury.
Caution
Installation
Never install telephone wiring during a lightning storm.
Never install telephone line jacks in wet locations unless the jack is
specifically designed for wet locations.
Never touch uninsulated telephone wires or terminals unless the
telephone line has been disconnected at the network interface.
Use caution when installing or modifying telephone lines.
Do not touch the plug with wet hands.
The AC adaptor is used as the main disconnect device. Ensure that
the AC outlet is installed near the product and is easily accessible.
Battery
To reduce the risk of fire or injury to persons, read and follow these
instructions.
Use only the battery(ies) specified.
Do not dispose of the battery(ies) in a fire, as they may explode.
Check with local waste management codes for special disposal
instructions.
Do not open or mutilate the battery(ies). Released electrolyte is
corrosive and may cause burns or injury to the eyes or skin. The
electrolyte may be toxic if swallowed.

15
Exercise care when handling the battery(ies). Do not allow
conductive materials such as rings, bracelets or keys to touch the
battery(ies), otherwise a short circuit may cause the battery(ies)
and/or the conductive material to overheat and cause burns.
Charge the battery(ies) provided with or identified for use with this
product only, in accordance with the instructions and limitations
specified in this manual.
Medical
Consult the manufacturer of any personal medical devices, such as
pacemakers or hearing aids, to determine if they are adequately shielded
from external RF (radio frequency) energy. (The product operates in the
frequency range of 1.92 GHz to 1.93 GHz, and the power output is 125 mW
(max.).) Do not use the product in health care facilities if any regulations
posted in the area instruct you not to do so. Hospitals or health care facilities
may be using equipment that could be sensitive to external RF energy.
For Best Performance
Base unit location/avoiding noise
The base unit and other compatible Casabi units use radio waves to
communicate with each other.
For maximum coverage and noise-free communications, place your
base unit:
– at a convenient, high, and central location with no obstructions
between the handset and base unit in an indoor environment.
– away from electronic appliances such as TVs, radios, personal
computers, wireless devices or other phones.
– avoid facing radio frequency transmitters, such as external
antennas of mobile phone cell stations (avoid putting the base
unit on a bay window or near a window).
Coverage and voice quality depends on the local environmental
conditions.

16
If the reception for a base unit location is not satisfactory, move
the base unit to another location for better reception.
Environment
Keep the product away from electrical noise generating devices,
such as fluorescent lamps and motors.
The product should be kept free from excessive smoke, dust, high
temperature, and vibration.
The product should not be exposed to direct sunlight.
Do not place heavy objects on top of the product.
When you leave the product unused for a long period of time,
unplug the product from the power outlet.
The product should be kept away from heat sources such as
heaters, kitchen stoves, etc. It should not be placed in rooms
where the temperature is less than 5 °C (41 °F) or greater than 40
°C (104 °F). Damp basements should also be avoided.
The maximum calling distance may be shortened when the product
is used in the following places: Near obstacles such as hills, tunnels,
underground, near metal objects such as wire fences, etc.
Operating the product near electrical appliances may cause
interference. Move away from the electrical appliances.
Routine care
Wipe the outer surface of the product with a soft moist cloth. Do not use
benzine, thinner, or any abrasive powder.
Contact Information
For technical support questions, please contact your phone service provider.