Uniden America UB338 MOBILE TYPE SCANNER User Manual USERS MANUAL
Uniden America Corporation MOBILE TYPE SCANNER USERS MANUAL
UserManual.wiki
>
Uniden America
>
UB338 User Manual
USERS MANUAL
Navigation menu
Upload a User Manual
Namespaces
Wiki Guide
HTML
PDF
Info
Views
User Manual
Discussion / Help
Navigation
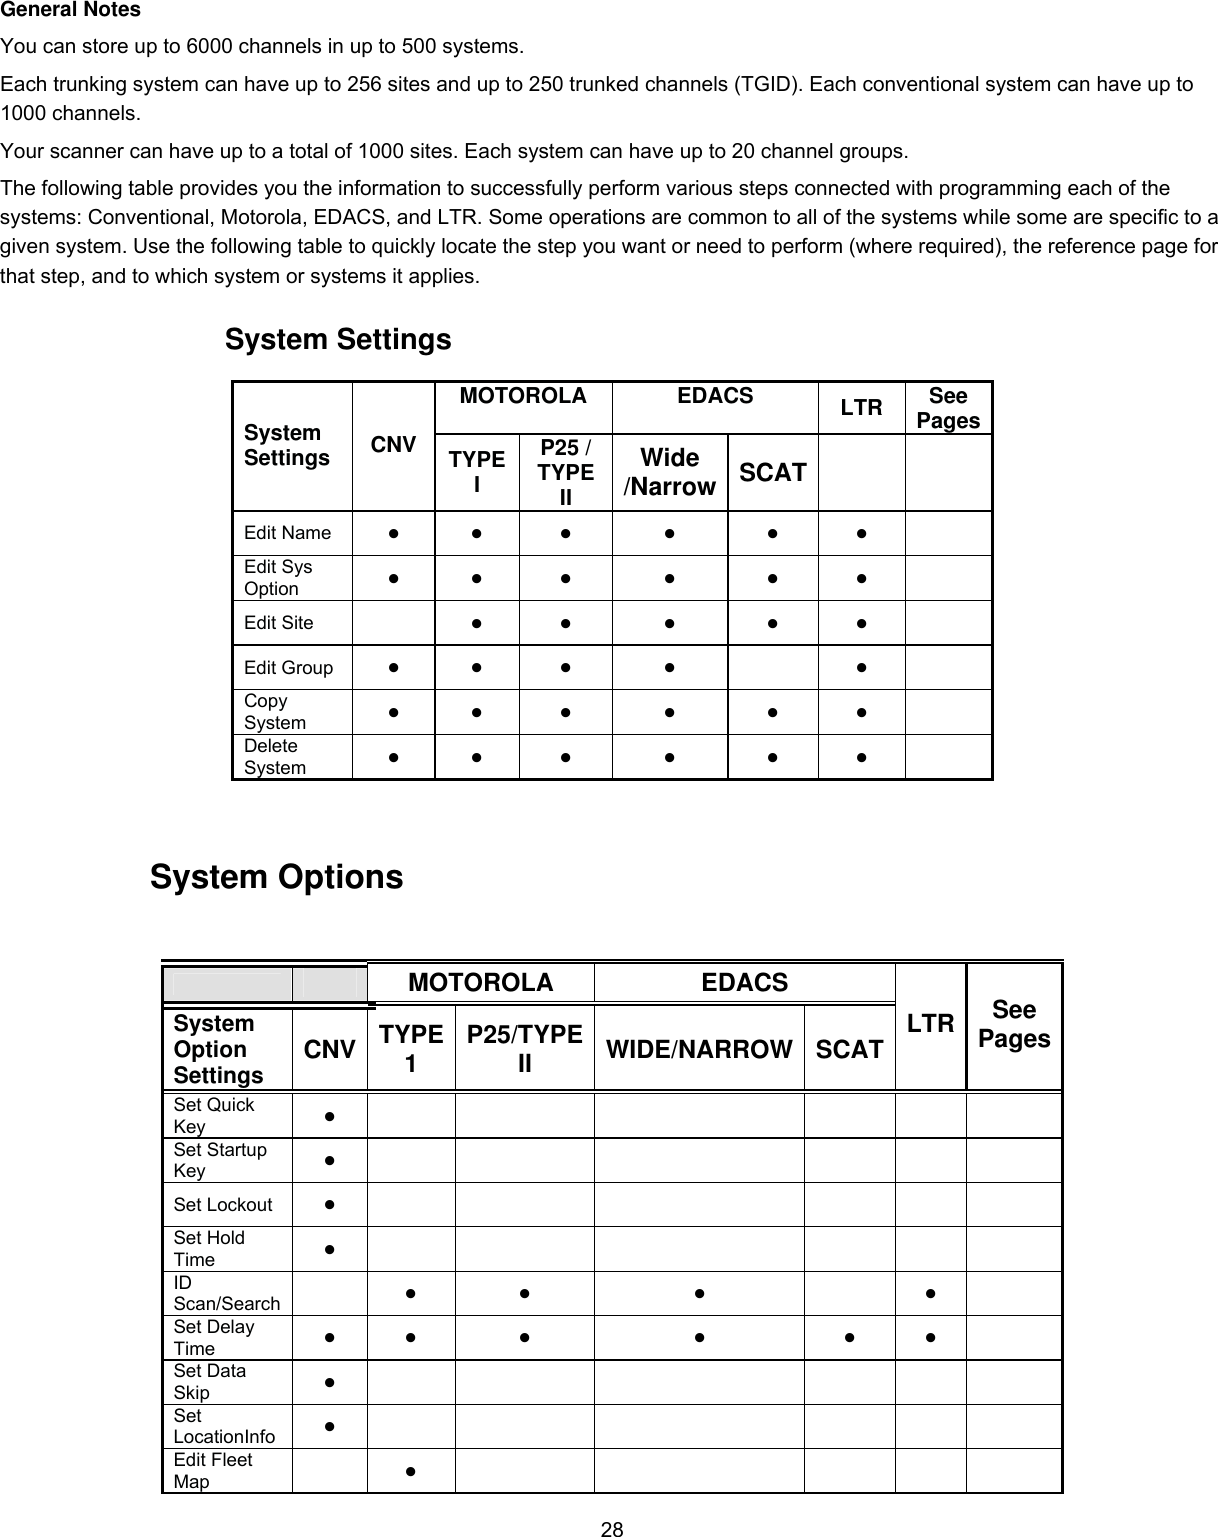
![1Precautions Before you use this scanner, please read and observe the following. IMPORTANT! This scanning radio has been manufactured so that it will not tune to the radio frequencies assigned by the FCC for cellular telephone usage. The Electronic Communications Privacy Act of 1986, as amended, makes it a federal crime to intentionally intercept cellular or cordless telephone transmissions or to market this radio when altered to receive them. The installation, possession, or use of this scanning radio in a motor vehicle may be prohibited, regulated, or require a permit in certain states, cities, and/or local jurisdictions. Your local law enforcement officials should be able to provide you with information regarding the laws in your community. Changes or modifications to this product not expressly approved by Uniden, or operation of this product in any way other than as detailed by this Operating Guide, could void your authority to operate this product. EARPHONE WARNING! Be sure to use only a monaural earphone or 32 Ω stereo headset. Use of an incorrect earphone or stereo headset might be potentially hazardous to your hearing. The output of the phone jack is monaural, but you will hear it in both headphones of a stereo headset. Set the volume to a comfortable audio level coming from the speaker before plugging in the monaural earphone or a stereo headset of the proper impedance (32 Ω). Otherwise, you might experience some discomfort or possible hearing damage if the volume suddenly becomes too loud because of the volume control or squelch control setting. This might be particularly true of the type of earphone that is placed in the ear canal. Uniden does not represent this unit to be waterproof. To reduce the risk of fire or electrical shock, do not expose this unit to rain or moisture. Astro®, DPL®, Digital Private Line®, Motorola®, PL®, PRIVACY PLUS®, Private Line®, SMARTNET®, and SMARTZONE® are registered trademarks of Motorola, Inc. LTR® is a registered trademark of E.F. Johnson Co. EDACS® is a registered trademark of M/A-COM Private Radio Systems Inc. Uniden® and Bearcat® are registered trademarks of Uniden America Corporation. Trunk Tracker™, Trunk Tracking™, and Close Call™ are proprietary trademarks of Uniden America Corporation. Other trademarks used throughout this manual are the property of their respective holders. Power Related Issues Important: To prevent memory from being corrupted, do not unplug the AC adapter during the time the memory is accessed for programming or auto store. Notes: • If when you connect the AC adapter the [VOL] /Power Switch is ON, the scanner may not power on. Should this occur, simply turn the control OFF, then ON again. • If the scanner loses power (as when you turn off your car’s ignition with the scanner’s power switch on), it can lose some system settings such as display color and backlight. To ensure that such settings persist, either change the setting using the scanner’s menu or power the scanner off then back on using the power switch after making such setting changes. • When you turn off the scanner using the power switch, the scanner remembers the last settings and mode. When you turn power back on, it resumes the previous mode. Table of Contents PPRELIMINARY DRAFT FOR BCD996T (AMWUB338) OWNER'S MANUAL](https://usermanual.wiki/Uniden-America/UB338/User-Guide-631532-Page-1.png)
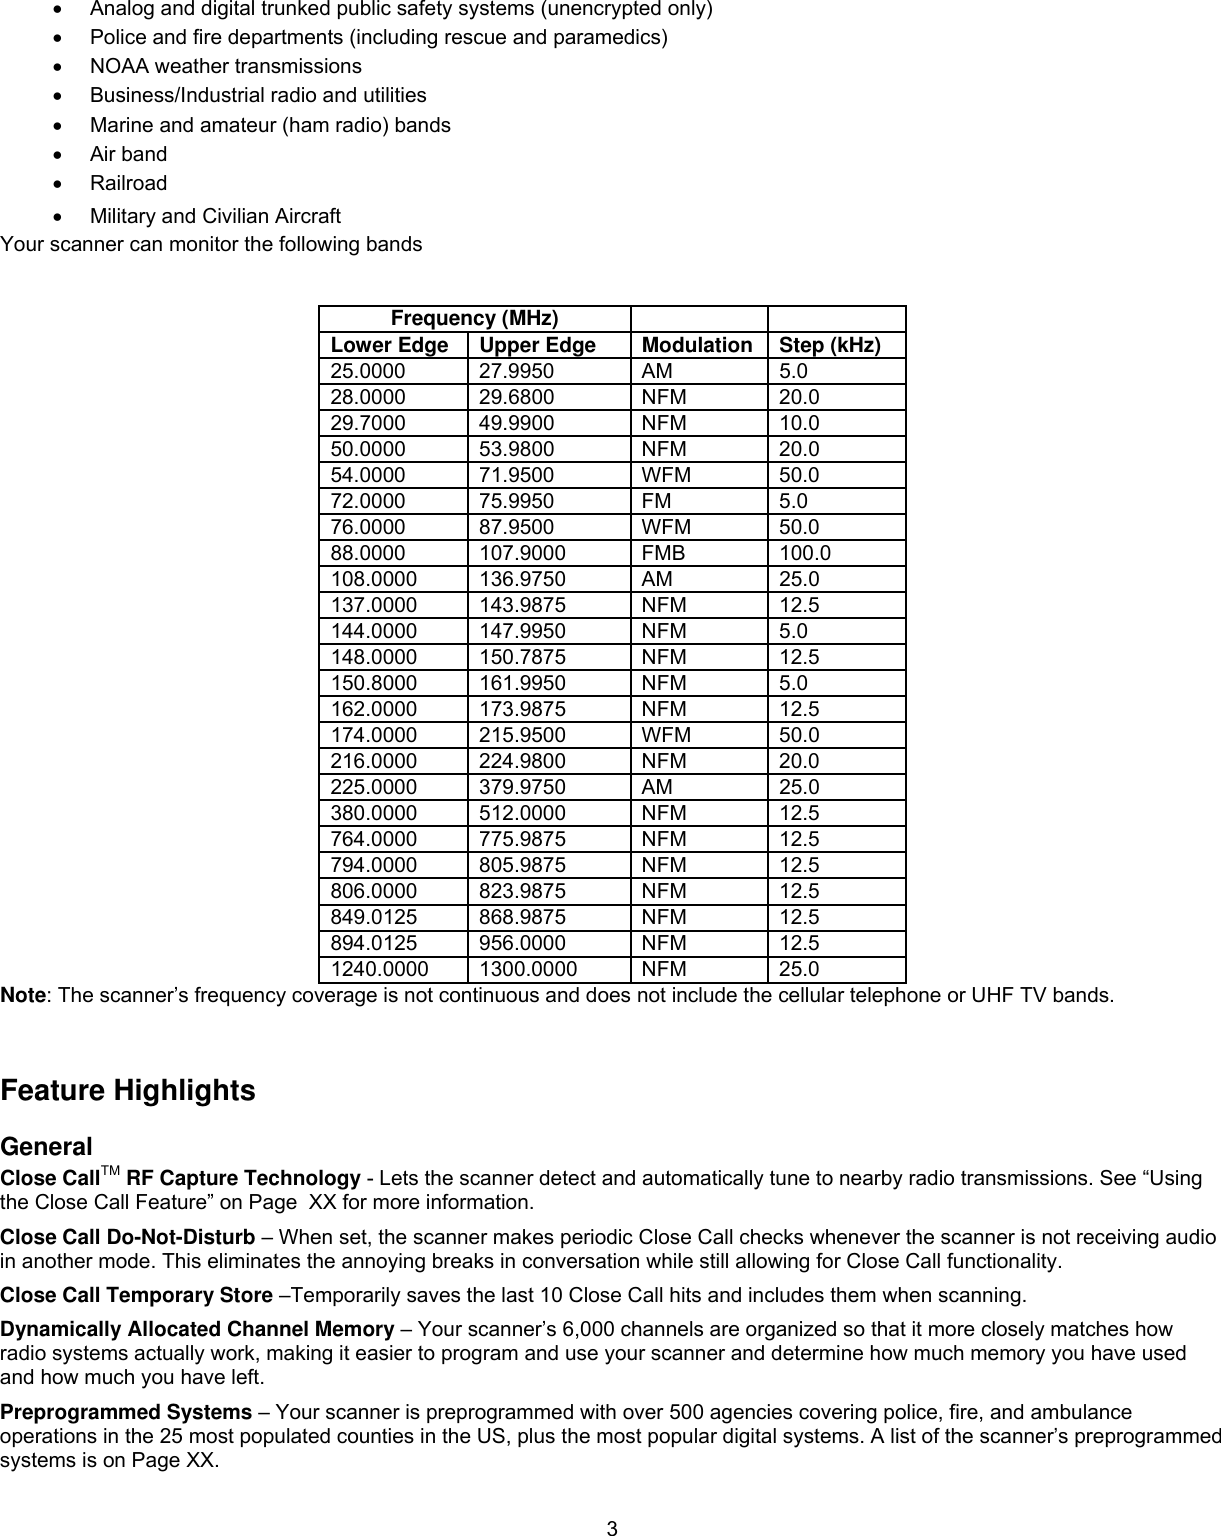
![2[to be generated by Framemaker Software] The FCC Wants You To Know This scanner has been tested and found to comply with the limits for a scanning receiver, pursuant to Part 15 of the FCC Rules. These limits are designed to provide reasonable protection against harmful interference in a residential installation. This scanner generates, uses, and can radiate radio frequency energy and, if not installed and used in accordance with the instructions, may cause harmful interference to radio communications. There is no guarantee that interference will not occur in a particular installation. If this scanner does cause harmful interference to radio or television reception, which can be determined by turning the scanner on and off, you are encouraged to try to correct the interference by one or more of the following measures: • Reorient or relocate the receiving antenna • Increase the separation between the scanner and the receiver This device complies with Part 15 of the FCC Rules. Operation is subject to the following two conditions: 1) This device may not cause harmful interference, and 2) this device must accept any interference received, including interference that may cause undesired operation. Scanning Legally Your scanner covers frequencies used by many different groups, including police and fire departments, ambulance services, government agencies, private companies, amateur radio services, military operations, pager services, and wireline (telephone and telegraph) service providers. It is legal to listen to almost every transmission your scanner can receive. However, there are some transmissions that you should never intentionally listen to. These include: • Telephone conversations (cellular, cordless, or other private means of telephone signal transmission) • Pager transmissions • Any scrambled or encrypted transmissions According to the Electronic Communications Privacy Act (ECPA), you are subject to fines and possible imprisonment for intentionally listening to, using, or divulging the contents of such a conversation unless you have the consent of a party to the conversation (unless such activity is otherwise illegal). This scanner has been designed to prevent the reception of cellular telephone transmissions and the decoding of scrambled transmissions. This is done to comply with the legal requirement that scanners be manufactured so they are not easy to modify to pick up these transmissions. Do not open your scanner’s case to make any modifications that could allow it to pick up transmissions that are illegal to monitor. Modifying or tampering with your scanner’s internal components or using it in a way other than as described in this manual could invalidate your warranty and void your FCC authorization to operate it. In some areas, mobile and/or portable use of this scanner is unlawful or requires a permit. Check the laws in your area. It is also illegal in many areas (and a bad idea everywhere) to interfere with the duties of public safety officials by traveling to the scene of an incident without authorization. A license is required to use this product in Canada. Introduction Your BCD996T scanner is a state-of-the-art scanner radio with Trunk Tracker IV™ and automatic scanning capabilities. You can store in the dynamic memory conventional frequencies such as police, fire/emergency, marine, air, amateur, and other communications. You can store and scan services that use Trunked Radio Systems and so much more. You can use the scanner’s Scroll Control to quickly select channels and frequencies, and you can automatically program channels in a system using the Auto Store feature. Use your scanner to monitor:](https://usermanual.wiki/Uniden-America/UB338/User-Guide-631532-Page-2.png)
![6Channels in Conventional Systems Channels in Trunked Systems Trunked Frequencies In Site* 1000 250 750-1000 * depending on the number of TGID in the system. Search Lockout Limits Frequency Temporary L/O Frequency Permanent L/O Frequencies Skipped Review 500 250 250 Search Mode Close Call Mode Menu Mode About This Manual The screen displays used in this manual are representations of what might appear when you use your scanner. Since what you see depends on the frequencies and user IDs for your area and the settings you select, you might notice some differences between what is in this manual and what appears on your scanner. To get the most from this manual, review the contents to become familiar with the basic functions available. If you are new to scanning or trunk tracking, start with the following short introduction to scanning and follow-up with the enclosed reprinted article on Programming provided with the courtesy of Popular Communications magazine. Using the Scroll Control [FUNC] The Scroll Control, a dual purpose control, also lets you switch to secondary function operations. When used in this manner, you see [FUNC] in this manual. Located prominently on the right of the BCD996T’s front panel, the knob/switch lets you easily control channel selection, plus Normal and Function Modes, as well as how most of the information appears on the display. To adjust menu settings, change channels in Hold mode, and resume scanning: Simply turn the Scroll Control. To use [FUNC] tap the Scroll Control. This action is written in shorthand as ◙ which is fully explained in the next section. When you tap the control [F] appears and remains in the upper left corner of the display for 3 seconds. During this time, press any button to access the button’s second function. Or, press and hold the Scroll Control for 2 seconds. The scanner beeps, and the [FUNC] function is “latched” so that is does not return to normal mode until you tap the Scroll Control again. [F] flashes at approximately 1 second intervals. If you select [FUNC] while scanning, the BCD996T continues to scan, but holds on the current system until the function operation is cancelled. How the Scanner’s Controls Are Represented in This Manual To help navigate the scanner’s menus, the steps shown in this manual show the displays you see and the keys you press or control you operate to get a desired result. We use a form of shorthand symbols to save space. The following example shows you how to use the scanner’s menu to edit an existing system name. It shows you the key to press in brackets [MENU] to select a menu option and the option you see on the LCD in Boldface Courier type (Program System) when you press [MENU]. It also instructs you to turn the Scroll Control (shown as ) to view a series of choices then press or tap the Scroll Control (the shorthand action shown as ◙ to enter a choice such as Edit Name. [MENU] Program System ◙ Select the system ◙ Edit Name ◙ Then, edit the system name.](https://usermanual.wiki/Uniden-America/UB338/User-Guide-631532-Page-6.png)
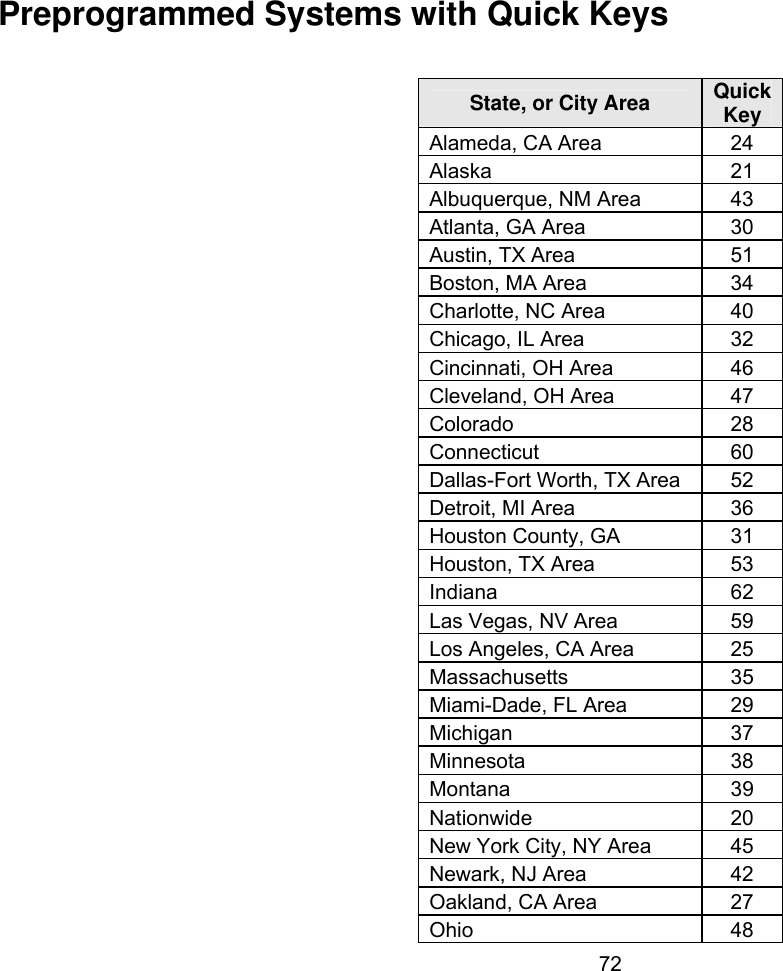
![7Entering Text Within A Menu Option To enter a letter, turn the Scroll Control ()until the letter, numeral or other character you want appears. To move the cursor to the left, press [4]. To move the cursor to the right, press [6]. To clear a character, press [./No] twice. To clear all characters, press [./No] three times. To accept an entry, press or tap the Scroll Control or press [E/YES]. To cancel an entry, press [MENU]. A Short User’s Guide to Assist the First-Time Scanner Enthusiast and Glossary Welcome to the family of Uniden scanner users. You have just unpacked your Uniden BCD996T scanner. You are anxious to scan and hear something so you rotate the [VOL/POWER] control and wait a moment as the opening Message and Copyright screens confirm the model information. Then, if you live in a residential area, you probably hear nothing or very little. Why? The reason is simple. The programmable BCD996T does not instinctively know where you are and what you wish to listen to. Take a few minutes to assist in the ‘educating your scanner’ process so you can enjoy listening for the first time and feel good about your purchase. Before proceeding, first follow the steps on Page XX to set the volume and the squelch levels. Once set correctly, these settings let you listen at a comfortable level and let the scanner provide a signal whose strength is sufficient to be heard clearly. Always be sure to connect the provided antenna. There are several options that quickly assure you that your scanner works. The easiest is to activate the scanner’s Weather System. Refer to Page XX for the steps to tune to the nearest NOAA (National Oceanic and Atmospheric Administration) broadcast. Once you establish that the scanner operates using the NOAA information, and if you live in one of the areas listed on the Preprogrammed charts immediately following page XX, you are ready to enter the exciting world of trunk tracking. Uniden has made it easy for you to start scanning. We have preprogrammed the BCD996T with more than 500 agencies across the U.S. If you live in one of the preprogrammed areas, simply press SCAN to start scanning. Then, press [.No] and the two-digit quick key for your area. One of the preprogrammed systems has common frequencies used across the country. By default, this system is enabled. To turn this system on or off, press [.No] If you do not live in one of the preprogrammed system areas, refer to page XX. There, you can follow the steps to select and search among the most popular service systems. Finally, you may decide to program the scanner yourself. To correctly program the BCD996T scanner begin on page XX. The two programming steps are 1. Plan the system 2. Program the system based on the plan. Enclosed with the materials provided with your scanner is a reprinted article from Popular Communications, which, in clear, easy-to-understand language, tells you how to start the programming session. The article also includes a glossary of terms and other valuable data. Be sure to take time out to look it over before proceeding. To provide you with useful sized worksheets and instructions to complete them, we have established links at our company website. Visit, http://www.uniden.com/scanners to see a list of helpful forms. But first, visit http://www.radioreference.com and locate the system nearest your location that you want to scan. If you register and pay a small fee, you can download a ready-to-use formatted PDF complete with the data from your selected system. Otherwise, you can print the blank worksheet on our web page as you would any other web based page. The programming data of a large metropolitan area may consist of many pages depending on how extensive the area’s Public Service System Talkgroups are. Don’t be overwhelmed. Begin by choosing the Talkgroups of interest to you. Begin on page XX and](https://usermanual.wiki/Uniden-America/UB338/User-Guide-631532-Page-7.png)
![8follow the steps to transfer the data from the Radio Reference sheets to the appropriate work sheet, finally programming the data into the scanner. You can visit one of the Radio Reference forums and potentially learn of someone in your immediate area who has programmed the same model scanner in your area. Then, by using the Clone feature or by exchanging files that you each have transferred to a computer using the Uniden Advanced Scanner Director (UASD) software you can install the programmed data into your scanner. Once you have either programmed or selected the option that lets you start experiencing scanning, spend the next few minutes learning the basics of trunk tracking for an even more complete listening appreciation. After you read the following material, you should have a more comfortable approach to the text on pages XX through XX in your Owner’s Manual. Understanding Scanning and the BCD996T This section provides you with additional background on how scanning works and how your scanner provides that feature. You don’t really need to know all of this to use your scanner, but some further background knowledge will help you get the most from your BCD996T. Understanding the Scanner’s Memory Your scanner’s memory is organized in an architecture called Dynamic Allocated Channel memory. This type of memory is organized differently and more efficiently than the bank/channel architecture used by traditional scanners. Dynamic Allocated design matches how radio systems actually work much more closely, making it easier to program and use your scanner and determine how much memory you have used and how much you have left. Instead of being organized into separate banks and channels, your scanner’s memory is contained in a pool. You simply use as much memory as you need in the pool to store as many frequencies, and talk group ID’s as desired. No memory space is wasted, and you can tell at a glance how much memory you have used and how much remains. With a traditional scanner, when you program it to track a trunked system, you must first program the frequencies. Since you can only program one trunking system per bank in a traditional scanner, if there were (for example) 30 frequencies, the remaining channels in the bank are not used and therefore wasted. Also, since some trunked systems might have hundreds of talk groups, you would have had to enter those types of systems into multiple banks in order to monitor and track all the ID’s. Understanding Quick Keys Traditional “Banked” scanners let you select and deselect banks by pressing a single digit on the keypad. The BCD996T uses a similar method to turn on and off scanning sites and systems. When you program a system or site, you assign a quick key (System/Site Quick Key, or SQK) from 0 to 99. You can use the same quick key for multiple systems, so that the systems are turned on and off together. To turn a system/site on or off, just press the digit corresponding to the assigned SQK. For two-digit SQK’s, first press [.No], then enter the two-digit SQK. The BCD996T lets you assign another quick key to a group of channels within a system. This group quick key (GQK) can be from 0-9. To turn on and off channel groups, you press [Func] while the scanner is scanning the system containing the channels, then press the GQK within 2 seconds. Systems can have up to 20 channel groups, and multiple channel groups can be assigned to the same GQK. What is Scanning? Unlike standard AM or FM radio stations, most two-way communications do not transmit continuously. Your BCD996T scans programmed channels until it finds an active frequency, then stops on that frequency and remains on that channel as long as the transmission continues. When the transmission ends, the scanning cycle resumes until the scanner receives another transmission. What is Searching? The BCD996T can search each of its 13 service search ranges and up to 10 custom search ranges to find active frequencies. This is different from scanning because you are searching for frequencies that have not been programmed into the scanner’s channels. You set the upper and the lower values of the range and then the scanner searches for any active frequency within the limits you specify.](https://usermanual.wiki/Uniden-America/UB338/User-Guide-631532-Page-8.png)
![12When the scanner receives a transmission on a channel set to the LTR mode, it first decodes the LTR data included with the transmission. In the ID search mode, the scanner stops on the transmission and displays the talk group ID on the display. In the ID scan mode, the scanner only stops on the transmission if the LTR data matches a talk group ID that you have stored in the talk group ID list and have not locked out. LTR systems are frequently programmed so that each radio has a unique user ID. Startup Configuration Setup/Operation The Startup Configuration option lets you quickly and automatically lock and unlock systems based on your desired configuration. Simply hold down a number button while powering on the scanner. Systems assigned to that number are automatically unlocked and systems assigned to other numbers are automatically locked. Systems that are not assigned to any startup configuration are left unchanged. You could use this feature to give you quick, single-press Quick Key access to your favorite systems even when you travel to other locations. For example, if you program your scanner as follows: System/Site Quick Key Configuration 1 Configuration 21 Fort Worth Phoenix 2 Tarrant County Mesa 3 Arlington Mariposa Cnty When you are in the Fort Worth area, press [1] while turning on the scanner. System Quick Keys [1], [2], and [3] then allow you to select between the local systems. When you travel to the Phoenix area, hold [2] while turning on the scanner. Now, the Fort Worth systems are locked out and System Quick Keys [1], [2], and [3] allow selection between the Phoenix-area systems. Multi-Site Trunking Some systems covering a very large geographic area use multiple antenna sites that each operate on different frequencies, but that use the same Talk Group ID’s for traffic. When programming such a system, you program each site’s frequencies and other settings into the system, then program the channels into channel groups within that system. Each site can have its own quick key, so you can turn each individual site on or off while you scan. Since all sites share all the channels within the system, multi-site trunking is much more efficient than programming each site as a separate system. I-Call (Motorola/EDACS) I-calls are direct unit-to-unit transmissions that are not heard by other system users. Your BCD996T can receive I-call transmissions. See “Setting I-Call (Motorola and EDACS Systems Only)” on Page XX for more information about monitoring I-call transmissions. Where To Get More Information By itself, this manual only provides part of what you need to know to have fun scanning – how to program and use the scanner. Other sources provide additional information. Information On The Internet The Internet is the best source for current frequencies and information about scanning. Many web sites are dedicated to providing lists of frequencies for your area. Many have built-in database search engines to assist you. Make a list of the agencies you want to listen to, then look up the frequencies and systems used by those agencies. Here are a few useful sites: • http://www.scannermaster.com * - frequency resources and home of Police Call. You can also call them at 1 800 SCANNER (hours are from 10:00 a.m. to 5:00 p.m. Eastern Time Monday through Friday). • http://www.radioreference.com * - the Internet's premier source for user-supported radio system information. • http://www.bearcat1.com - frequency information from National Communications.](https://usermanual.wiki/Uniden-America/UB338/User-Guide-631532-Page-12.png)
![13• http://svartifoss2.fcc.gov/reports/index.cfm * - conventional frequency information on file with the US Government • http://groups.yahoo.com/group/BCD996T * - a group for people interested in discussing the BCD996T. * - These web sites are not affiliated with Uniden Corporation. For more information about Uniden and our products, visit http://www.uniden.com. Included With Your Scanner [illus to replace the following list] (similar to the line art I used in the VHF150/250 OMs) • BCD996T Scanner • AC Adapter (P/N AD-1009) • Cigarette Lighter Adapter Power Cord • Three Wire DC (with Orange Wire - See Step 6, “Mounting Using the DIN-E Sleeve)” Power Cord • Mounting Bracket and Hardware • DIN-E Sleeve and Removal Keys for vehicle installation • Push-on type Telescopic Antenna • Remote PC to Scanner Cable (scanner plug to female DB9) • Owner’s Manual • Other printed material If any of these items are missing or damaged, immediately contact your place of purchase or Uniden Customer Service at: (800) 297-1023, 8:00 a.m. to 5:00 p.m., Central, Monday through Friday. Setting Up Your Scanner These guidelines will help you install and set up your new scanner: The BCD996T can be placed on a convenient surface in your home as a base station, and connected to a standard outlet that supplies 120VAC, 60Hz. You must use either the supplied antenna or an electrically correct outdoor antenna, properly and safely mounted at your chosen site. The scanner is also designed to accommodate the DIN-E and ISO-DIN automotive mounting configurations. A DIN-E sleeve is supplied. The unit can also be placed above or beneath the dash of your vehicle using the supplied bracket and mounting hardware. • If your scanner receives interference or electrical noise, move the scanner or its antenna away from the source. • To improve the scanner’s reception, use an optional external antenna designed for multi-band coverage. (You can purchase this type of antenna at a local electronics store). If the optional antenna has no cable, use 50-75 Ω coaxial cable for lead-in. A mating plug might be necessary for the optional antennas. • Use an optional mono earphone or mono headset with proper impedance (32 Ω) for private listening. Read the precautions on the inside front cover of this Owners Manual. • Do not use the scanner in high-moisture environments such as the kitchen or bathroom. • Avoid placing the scanner in direct sunlight or near heating elements or vents. Base Station This is the simplest approach to let you get started quickly. Decide on a location that is convenient to a nearby wall outlet, has desk space to let you complete your programming worksheets, will safely allow the indoor antenna to be extended, or near a window to use an outdoor antenna. [illus of exploded view of bracket, washers and knobs with desk surface beneath it] To secure the radio, by means of the mounting bracket, to a surface, follow the steps below:](https://usermanual.wiki/Uniden-America/UB338/User-Guide-631532-Page-13.png)
![14 1. Attach the four protective rubber feet to the mounting bracket when you use the scanner on a flat surface. Do not use them when you mount the bracket using screws. 2. Use the bracket as a template to mark positions for the two mounting screws. 3. At the marked positions, drill holes slightly smaller than the screws. 4. Remove the paper backing from each washer and stick one inside of each bracket’s ear, aligning the washer’s hole with the bracket’s hole. 5. Align the bracket with the threaded holes on the sides of the radio case so the bracket is beneath the radio. Secure the bracket using the two threaded knobs. Never overtighten the knobs. Once the radio is positioned, connect it to a source of AC power using the supplied 13.8V, 750 mA AC adapter. Insert the barrel of the AC adapter to the jack on the rear, upper right side of the radio marked Warning: Use only the Uniden-supplied AC adapter with this scanner. Insert the connector of the supplied indoor telescoping antenna to the BNC Antenna Connector and apply moderate pressure to secure it. Setting Up an Audio Recording Device or Computer Recording It is best if you plan ahead when you initiate the basic setup of the scanner if you include the components to record incoming reception. You need only an audio recording device which can be control by a Voice Operated module (VOX) either externally or from within the unit and the correct connecting cable. The RECORD jack on the rear apron provides a constant-level audio output which is not affected by the setting of the volume control. Use a mono or stereo cable that ends in a 3.5mm plug for the scanner. The recorder might have its own requirements as to the proper plug Check the recorder’s instructions to be sure. Connect the cable to an external or internal VOX control so that the recorder activates when audio is present. You can also connect the cable to the appropriate input jack on your PC so that with controlling software, you can record to your hard disc. In order for the function to operate, you must set the channel to record. You must also set the system’s record option to either All Channel, which will record all channels regardless of any channel’s setting, or Marked Channel which only lets recording occur if you have selected record for that channel. Which you choose will depend on various factors. Vehicle Installation You can mount your scanner in your vehicle, using either the supplied bracket or the supplied DIN-E sleeve. Mounting Using the Bracket With the bracket removed from the radio, use the holes in the bracket as a template to initially mark the location you plan to use in your vehicle. Be absolutely certain of what might be behind the mounting surface before making any holes, be it above, or below, or in front of your dash, armrest console, or other location. If you drill carelessly, expensive damage can result. If in doubt, consult your vehicle dealer’s service department or a qualified professional installer. Important: AVOID AIRBAG DEPLOYMENT ZONES. Ignoring this installation concern may result in bodily harm and the inability of the airbag to perform properly. [illus unit with bracket beneath dash] 1. Using appropriate screws or other hardware, secure the bracket. 2. Insert the scanner and insert the bracket knobs to lock the scanner in position. 3. Attach the Cigarette Lighter Power Cord to the rear of the scanner and plug the adapter end into a dash mounted 12V DC socket. 4. Attach a suitable mounted mobile antenna to the antenna jack on the back of the scanner. Mounting Using the DIN-E Sleeve](https://usermanual.wiki/Uniden-America/UB338/User-Guide-631532-Page-14.png)
![15If you are unsure about how to install your scanner in your vehicle using the DIN-E sleeve, consult your automobile manufacturer, dealer, or a qualified installer. Before installing, confirm that your scanner fits in the desired mounting area and you have all the necessary materials to complete the task. Your scanner requires a 2 x 71/8 x 5 5/16 inch (50 x 180 x 135 mm) mounting area. [illus-exploded view of hole in dash, sleeve, scanner and keys.] 1. Remove the bracket if previously attached. 2. Remove the four Philips screws on the rear that secure the outer metal case and pull off the case with care. 3. Install the DIN sleeve into the opening in your dashboard, lip facing out. 4. Push out the top and bottom tabs to hold the sleeve firmly in place. 5. Before inserting the scanner in the sleeve, attach the cable from the previously mounted antenna. Attach the DC Power leads. RED goes to a positive (+) connection on your fuse block while BLACK connects to the vehicles chassis ground (-). 6. Connect the ORANGE lead to one side of the headlamp switch so that when you activate the headlights, the scanner’s LCD changes color and intensity of its display. Be sure all the connections are routed away from any potentially pinching or slicing sheet metal. 7. Slowly slide the scanner into the sleeve until it locks in place. 8. To remove the unit, fully insert the removal keys into each slot on the left and right edges of the front panel. Carefully slide the radio from the sleeve. Note: if you plan to connect a GPS unit or external speaker at a later time, expect to remove the unit for ease of making those connections. Mounting Using ISO Technique Some vehicles can take advantage of another approach to mounting a radio referred to as ISO mounting. If you are unsure of your understanding and abilities after reading the following information, seek the services of a professional installer. It is necessary to first remove the black metal sleeve from the scanner chassis. Unthread the four screws in the rear of the unit to do this. Once the sleeve is off, you will see threaded machine screw holes on either side of the chassis cabinet. Uniden does not supply these metric machine screws. Obtain XX.Xmm machine screws to fit. Their length will depend somewhat on the bracket assembly used by your vehicle manufacturer to hold the factory installed radio. In your vehicle, remove the trim around the factory radio and most likely the ash tray or other removable devices adjacent to the radio. Expose the bracket assembly that holds the factory radio. Remove the entire assembly from the dash. Remove the radio from the bracket. Replace the factory radio with the BCD996T, being sure it is in the identical position as the factory radio was. Once the radio is in the bracket, arrange to connect the power, including the orange wire needed for dimmer operation, and any control cables/connectors to the rear of the scanner such as external speakers, a record out cable, and the antenna. Then, when the cables are routed so that no damage potentially is possible, replace the entire assembly in the dash and replace all trim and other removed items. Removing the Display Sticker Before you use the scanner for the first time, remove the protective plastic film over the display. Connecting an Optional Antenna The scanner's BNC connector makes it easy to connect a variety of optional antennas, including an external mobile antenna or outdoor base station antenna. Note: Always use 50- or 75-ohm, RG-58, or RG-8, BNC terminated coaxial cable to connect an outdoor antenna. If the antenna is over 50 feet from the scanner, use RG-8 low-loss dielectric coaxial cable. Cable loss increases with higher frequency. Connecting an Earphone/Headphone For private listening, you can plug a 1/8-inch (3.5 mm) mini-plug earphone or headphones (not supplied) into the headphone jack on the front of your scanner. This automatically disconnects the internal speaker. See “Earphone Warning” at the front of the manual for important information about using an earphone/headphone. WARNING! Never connect anything other than the recommended amplified extension speaker to the scanner’s headphone jack. Damage to the scanner might occur.](https://usermanual.wiki/Uniden-America/UB338/User-Guide-631532-Page-15.png)
![16Connecting an Extension Speaker In a noisy area, an optional amplified extension speaker, positioned in the right place, might provide more comfortable listening. Plug the speaker cable's 1/8-inch (3.5-mm) mini-plug into your scanner's back-panel Ext. Sp. Jack. Never connect any part of the headphone jack to the antenna jack or connect the radio to an installation where the antenna and audio connection are grounded. This might also damage the scanner. Controls, Keys, and Functions [illustration of front panel with call out numbers matching “Label” number in the table below] Each of the knobs and keys on the BCD996T produce several different actions depending upon how you activate them. You can, for example, rotate the knobs as well as press them to achieve a different action. Some keys provide one action when briefly pressed while pressing and holding a key gives a different result. Finally, many controls and keys behave differently depending on the mode your radio is in when you use the key or control. Carefully examine the following table to separate those actions. Note: “Press” means press and release briefly. “Press and hold” means press and hold down for at least 2-seconds. “[FUNC] + Press” means Tap or Press the Scroll Control to put the scanner into Function mode then press the key under discussion. Control/Key Label Mode Action Result All Rotate Power ON – Volume Increase or decrease All Press Backlight enabled and intensity changes: Green Low-Green Medium-Green High-Red Low-Red Medium-Red High Power/VOL 1 Function Press FUNC then tap VOL Rotate Scroll Control Sets APCO threshold Rotate Sets the Squelch Level to permit strong signals to be heard with no background noise or lower strength signals with some background noise Press Toggle: Close Call DND-CC Primary-OFF Squelch 2 All Press & Hold Turns on Close Call Only Mode All Rotate Turn to change scanning or searching direction. Scan or Custom Search [FUNC] + Rotate Turn to select System or Search Range Hold Rotate Turn to Select channel or frequency Menu Rotate Press Turn to scroll to menu item-Tap to select current option Use as the <Enter> key for menu choices Name Edit Rotate Turn to select alpha/numeric entry for names Monitor Rotate Turn to resume scanning or searching GPS [FUNC] + Rotate Turn to operate alphabet skip Scroll Control and Function Button [FUNC] 3 Function Press/Tap Switches to Function Mode; To latch Function Mode, press and hold [FUNC] [PRI] 4 Scan Press Toggle Priority Mode (On-Plus On-Off) WX Scan or WX Alert Scan Press Toggle between WX Scan and WX Alert Scan [WX] 5 Other Press Turn to toggle WX Alert Priority On and Off](https://usermanual.wiki/Uniden-America/UB338/User-Guide-631532-Page-16.png)
![17 Press & Hold Starts WX Scan All Press Changes to GPS Mode Press & Hold Stores current GPS data [GPS] 6 GPS [FUNC] + Press Change GPS Display Press Temporarily locks out a system channel, a search frequency, or location data. Cancelled when Power is turned off. Scan Search Hold Press 2X Permanently locks out system channel, a search frequency, or location data. Remains locked after power cycle. Menu Press Exit the menu. Press & Hold Enables System Quick Key and Group Quick Key in the current system. Unlocks System, Group and Channel in the current system. Scan/Scan Hold [FUNC] + Press & Hold Turns off System Quick Key and Group Quick key in all systems Unlocks system, group and channel in all systems [L/O] 7 Search Search Hold Close Call Only Close Call Hold Press & Hold Unlocks all frequencies of Global Lockout List. Scan Press Enable/Disable selected System/Site Quick Keys Custom Search Press Turn on and off each custom search number All Hold Close Call Tone-Out Press Directly enter frequencies or Talk Group IDs Scan [FUNC] + Press Enable/Disable Group Quick Key Other than Scan or GPS [FUNC] + Press [1] to [6] [1] to [6] to start check of set search range Other than Scan or GPS [FUNC] + Press [7] [7/ATT] to toggle attenuator setting All [FUNC] + [0] Switches to Display Mode- Mode 1 default [0] to [9] Scan/Scan Hold [FUNC] + [.No] Enables Trunking activity Indicators [4] move left [6] move right 8 Editing Name Press Moves the cursor left or right during name or label editing. All Press Cancel error or warning messages Press Enter “.” For frequency Press Enter “-“ or “I” for TGID Press 2X Delete current character in name edit Press 3X Clear all letters in name edit Hold Close Call Only Tone-Out Press Enter “-“ or “I” for Direct Entry Scan Scan Hold [FUNC] + Press Toggle Active Channel Display On or Off [./no] 9 Scan Press Starts two-digit of (SQK) System/Site Quick Key MENU Press Use as the <Enter> key for menu choices Scan Scan Hold Press Edit the channel data for active channel [E/YES] 10 Search Search Hold Close Call Close Call Hold WX Scan WX Scan Hold Press Saves the active frequency](https://usermanual.wiki/Uniden-America/UB338/User-Guide-631532-Page-17.png)
![18 Tone-Out Standby Press Switches to Tone Out edit Menu to change Tone Out Settings Scan Hold Press Start Scanning Other than Scan or Scan Hold or GPS Press Instant switch to Scan Mode Search Hold [FUNC] + Press Toggle to resume searching GPS Press Toggle to scanner LCD Scan Search Close Call Only WX Scan Press Toggles HOLD on or off; In Close Call mode, error tone sounds if no frequency is detected. [SCAN/ SEARCH] 11 Scan [FUNC] + Press Toggle ID Search and ID Scan. Scan Scan Hold GPS [FUNC] + Press Initiates edit menu for current system, current search range, or current location data Menu Press Back up one level in the menu. [MENU] 13 All Press Use with Scroll Control to select menu settings A Look At The Display [please use line art for the screen to show the icons and messages - use as many screens as needed to cover all icons and text on the screen for different situations] The display has indicators that show the scanner's current operating status. The display information helps you understand how your scanner operates. Operation Turning On the Scanner and Setting the Squelch To turn the scanner on, rotate [VOL] clockwise. Turn the knob to a comfortable sound level. Rotate the squelch control [SQ] clockwise until you either hear a broadcast or noise just stops. The control is now set for strong signals. If you desire to hear a weaker signal, turn it counter clockwise from that point until you hear background noise once more. Startup Key Operation You can setup a Startup Key Configuration so that when you power up, the scanner can change the lockout state for each system or each site by pressing an assigned key. Navigate to Set Startup Key there are differences in the menu structure for Trunked and Conventional systems.](https://usermanual.wiki/Uniden-America/UB338/User-Guide-631532-Page-18.png)
![19Trunked [MENU] Program System ◙ Select the system [non-conventional] ◙ Edit System Option ◙ Set Startup Key ◙ for each system or site. Conventional [MENU] Program System ◙ Select the conventional [C] system ◙ Edit Site ◙ Set Startup Key ◙ for each system or site. Search Range [MENU] Search For… ◙ Edit Service ◙ Select a Service◙ Search with Scan ◙ Set Startup Key◙ OR [MENU] Search For… ◙ Edit Custom ◙ Select a Custom Range◙ Search with Scan ◙ Set Startup Key◙ Assign all the systems/sites that you want to scan at the same time. You can use one key [0] to [9] for each. In additional, you can assign the same startup key to the next system or site so that system or site is unlocked at power up. Scanning Systems To begin scanning preprogrammed or programmed systems, press [SCAN/SEARCH]. The BCD996T scans all unlocked systems in all programmed and activated quick-key groups and any searches unlocked for search with scan. To enable or disable systems or sites for scanning, press the site/system’s System/Site Quick Key while scanning. Notes: • If no systems are programmed, or all systems are locked out, Nothing to Scan appears. Program a system or select a system to scan. The default is none assigned. • When scanning multiple systems, the BCD996T scans systems according to the assigned quick key. Systems assigned to quick key 1 are scanned first, then 2, 3, 4, etc. Systems not assigned to a quick key are scanned last, then unlocked searches. Within a quick key, systems are scanned in the order they were assigned. • Within a system, channels are scanned according to the assigned channel group, with the same priority as described above for systems. • The BCD996T scans a system for the duration you set using the System Hold Time option (see “Setting the System Hold Time” on Page XX). For trunked systems, the scanner moves to the next system after the hold time expires, the current](https://usermanual.wiki/Uniden-America/UB338/User-Guide-631532-Page-19.png)
![20transmission ends, and the channel delay expires. Conventional systems operate similarly, but all unlocked channels are scanned at least one time regardless of the hold time setting. • Each search range is searched for the amount of time you set using the “Set Hold Time” option. See “Setting the System Hold Time” on Page XX for more information. Preprogrammed System Tips All systems preprogrammed into the scanner are assigned to a Quick Key. See “Preprogrammed Systems” on Page XX for a list of preprogrammed systems and their Quick Key assignments. Notes: • The systems preprogrammed into the scanner are located primarily in major metropolitan areas. • You might hear transmissions on frequencies assigned to very distant stations. This will happen if a local system also uses the same frequency. • The Nationwide system assigned to SQK 20 is enabled by default. Selecting Systems to Scan To select systems to scan, press Scan then press the quick key assigned to the system or systems you want to scan. For quick keys [0] - [9], press the quick key’s number. For quick keys 10-99, press [./No] then press the quick key’s 2-digit number. To stop scanning the system(s), press [./No] (if the quick key is a 2-digit quick key) then the number button or buttons again. The Sx: (system) indicators on the display show the systems that are currently selected. To select or lock out a system that is not assigned to a key, press [Func] then rotate the Scroll Control until the desired system is selected. Then, press L/O within 2 seconds to either lock out or unlock the system. Selecting System Channel Groups Within a system, you can assign groups of channels to a group quick key (see “Setting the Group Quick Key” on Page XX). Follow these steps to activate or deactivate a channel group within a system while scanning. 1. Press [HOLD/RESUME] to hold on the system or tap ◙ then turn the Scroll Control to select the system. 2. While [F] still appears on the display, press the number key corresponding to the channel group you want to activate or deactivate. Locking/Unlocking Systems Follow these steps to lock out a system so that it does not scan even if its quick key is selected. 1. Tap the Scroll Control to switch to the Function Mode [FUNC] then rotate the control to select the desired system. 2. Press [L/O] to temporarily lock out the system. Temporary L/O appears. Or, quickly press [L/O] twice to permanently lockout the system. Locked Out appears. 3. To unlock temporarily locked out systems, turn power off and then back on. To unlock permanently locked out systems, repeat Steps 1 and 2. System Unlocked appears. Locking/Unlocking Channels If the scanner has stopped on a channel press [L/O] once to temporarily lock it out or quickly press [L/O] twice to permanently lock it out. Cycling power off/on automatically unlocks temporarily locked-out channels. To lockout a channel when the scanner has not stopped on the channel, or to unlock a permanently locked-out channel 1. Press [HOLD/RESUME] to hold on a channel. 2. Tap the Scroll Control to switch to the Function Mode [FUNC], then rotate the control to select the system where the channel is stored. 3. Tap the Scroll Control or wait 2 seconds, then rotate the Scroll Control to select the channel you want to lock or unlock.](https://usermanual.wiki/Uniden-America/UB338/User-Guide-631532-Page-20.png)
![214. Press [L/O] to temporarily lock or unlock the current the channel. Double-tap L/O to permanently lockout the current channel. ID Scan/ID Search Mode While you are scanning a trunked system, the scanner can be in either ID Scan or ID Search mode: • ID Scan – the scanner only stops on talk group ID’s (TGID) that you have programmed into the system that are unlocked. • ID Search – the scanner stops on any unlocked talk group that becomes active. To toggle between ID Scan and ID Search, press ◙ then press [SCAN/SEARCH] while the scanner is scanning the system. If the scanner does not scan the system long enough for you to easily do this, press ◙ and rotate the Scroll Control to select the changed system. Then, press [SCAN/SEARCH] within 2 seconds. Holding On a System To temporarily hold on a system, tap the Scroll Control ◙. To hold on a different system, tap the Scroll Control ◙ then rotate the control to select the system. Normal scanning resumes 2 seconds after your last selection. To permanently hold on a site or system, press and hold the Scroll Control for 2 seconds.[F] flashes in the display’s upper left corner. The scanner continues to scan only the current system. To hold on a different site or system, rotate the Scroll Control to select the new site or system then press [EYES]. Holding On a Channel To hold on a channel, press [HOLD/RESUME] while the channel is active. To select a different channel, turn the Scroll Control. If you scroll past the beginning or end of the current system, the scanner selects channels in the previous or next system. To resume scanning, press [SCAN/SEARCH]. Quickly Storing an ID During ID Search To quickly store an active talk group ID during ID search, press [E/YES]. You see: Quick TGID Save? To save the ID into a channel, press [E/YES]. Otherwise, press [. No] . If you press [E/YES], the scanner stores the ID into a channel group called Qck Save Grp in the current system. Quick-Storing Channels or Talk Group ID’s (TGID) 1. Hold on an existing channel in any system. 2. Enter the frequency or talk group ID you want to store (press twice to enter hyphens in talk group ID’s). 3. To quick-store the channel or talk group ID, press [E/YES]. Otherwise, press [.No]. If you enter a frequency then press [E/YES], the scanner stores it in the Qck Save Grp group in a system called Qck Save Cnv Sys. These groups are created if they do not exist. Then, the scanner prompts you to save other channel settings. If you enter a talk group ID then press [E/YES], the scanner stores it into a channel group named Qck Save Grp in the current system. If the talk group ID’s format is not the type used by the current system, the scanner displays an error message and does not save the talk group ID. If you pressed [.No] in Step 3, the scanner prompts you to select the system and the group where you want to store the frequency or talk group ID. Note: The scanner will warn you if you try to store two channels in the same system that have the same frequency or Talk Group ID or if you try to store two systems with the same name. Trunking Activity Indicators](https://usermanual.wiki/Uniden-America/UB338/User-Guide-631532-Page-21.png)
![22To get a visual indication of the activity on trunking systems, press [HOLD/RESUME] to hold on any channel. Then tap the Scroll Control and then press [.No] The scanner replaces the third line on the display with trunking activity indicators. When the scanner is monitoring on EDACS or Motorola system, the activity indicators will show which system frequencies have activity. Note: for Motorola systems you must program all system frequencies (control and voice frequencies) for this feature to work. Toggling the Display Mode To change the display so the channel and frequency or Talk Group ID appear instead of extended channel information, hold on any channel then press [FUNC] + [0]. The scanner displays Display Mode 2. To return to Mode 1, press [FUNC] + [0] Mode1 indicates the channel data under the Channel Name. Mode2 indicates the frequencies under the Channel Name. [ILLUS- show examples of trunked and conventional with Call outs] Optimizing P25 Performance You can optimize the scanner’s performance with digital APCO 25 systems. Follow these steps for each system where you can hear APCO 25 traffic. Notes: These steps work only when you can clearly receive the system. If you are in a weak-signal area or receive interference, these steps will not work. These steps do not compensate for weak signals or signals subject to interference. If you set an incorrect decode threshold level in Step 5, the scanner might stop decoding all digital signals in the system. If this happens, change the setting to a value between 8 and 12 then repeat these steps. Conventional System [MENU] Program System ◙ Select the system ◙ Edit Sys Option ◙ Adjust P25 Level ◙ Trunked System [MENU] Program System ◙ Select the system ◙ Edit Site ◙ Select the site ◙ Adjust P25 Level ◙ Make sure the system's P25 Level option is set to Auto. Press [HOLD/RESUME] on an active digital channel on the system. HOLD appears on the display. Press FUNC then [VOL]. [F] disappears and APCO threshold Adjust Mode appears at the bottom of the display. • The next to last line on the display now shows the digital error rate and the AUTO decode threshold start level (0-20). • The last line on the display shows the decode threshold levels for the system.](https://usermanual.wiki/Uniden-America/UB338/User-Guide-631532-Page-22.png)
![23Allow the scanner to monitor channel activity for several minutes. The error rate should drop for each transmission and the threshold levels should automatically adjust to a more optimal setting. Then, once the threshold level settles to a stable setting, write down these values. This is the system's optimum decode threshold. Rotate the Scroll Control to set the AUTO decode threshold start level to a setting that most closely matches the system's optimum decode threshold. Now, when the scanner stops on a system, it will use this threshold as the starting point for automatic optimization. To exit when the settings are complete, press ◙ then press [VOL]. Using the Menu The BCD996T incorporates an effective menu system that lets you make all the necessary setting options required to program the scanner and effectively use the many features. To use the menu, press [MENU]. You immediately see the screen display the menu title at the top and three of ten menu options beneath. Using the Multifunction Scroll Control, you can rotate the control left or right to quickly review all ten listings. The depth of each menu selection is extensive. For the purpose of this manual, the following chart indicates the primary menu selection, the purpose of that selection, and a reference to the page or pages that provide the details associated with the option. Menu Item Let’s You… For Detail, See… Program System Select options related to setting up a new system or editing one already programmed. “Scanner Programming” reprint; Pages XX and XX Program Location Choose GPS related locations for data to alert, confirm location, and provide you with an audible warning if desired. See Using the Position Locations Srch/CloCall Opt Lets you adjust settings that affect the scanner during search and Close Call operation Search and Close Call options on Page XX. Search for… Choose and search programmed ranges of desired services See Searching and Storing on Page XX Close Call Setup the radio to receive, and let you hear, nearby strong stations. See Using the Feature on Page XX Set Priority Lets you scan a conventional system and check for designated priority channels. See Priority Scan on Page XX WX Operation Set choices for weather scanning. See Using Weather Alert on Page XX Tone-Out for… Select up to 10 Tone-Out settings or Standby See Using Tone-Out on Page XX Wired Clone Copy data directly from one BCD996T to another BCD996T. See Using the Cloning Options on Page XX. Settings Choose settings for miscellaneous but convenient options. See the respective pages for each option: Operation Programming General Settings This section covers your scanners general settings. Setting and Using the Backlight The LCD has a backlight that can be set to green or red with three levels of intensity for each color plus OFF. To make your selection, press [VOL]. Each time you press the control, the backlight cycles in the following order. OFF - Low Intensity Green - Medium Intensity Green - High Intensity Green - Low Intensity Red - Medium Intensity Red - High Intensity Red](https://usermanual.wiki/Uniden-America/UB338/User-Guide-631532-Page-23.png)
![24When you stop at the desired level, the scanner remembers your setting the next time you turn on the scanner. You can also set the backlight using the menu. Setting the Dimmer If you connect the orange wire to a wire in your car that changes state when you turn on the headlights, the scanner can automatically dim the display when you turn on the headlights. If you have not connected the orange wire, set Dimmer to Manual and manually select the dimmer level. If you have connected the orange wire, set Dimmer to Auto, then select “+ Polarity” if the orange wire gets 12V when you turn on the headlights or to “- Polarity” if the orange wire is switched to chassis ground when you turn on the headlights. Tapping [VOL] overrides the menu setting and cycles through all backlight settings. [MENU] Settings ◙ Set Backlight ◙ Set Dimmer ◙ Auto — Use this setting if you have connected the scanner to your vehicle’s headlights using the orange wire. If you select this option, the scanner automatically dims the backlight when you turn on the headlights. After selecting this option, select: + Polarity – If the headlight wire is connected to +12V when the headlights are on pick this setting. - Polarity – If the headlight wire is connected to vehicle ground when the headlights are on, pick this setting. Manual — Use this setting to manually set the dimmer level to High, Middle, Low, or Off. To guide you in your selection, at each setting the display shows what you can expect to see. Setting the Backlight Color [MENU[ Settings ◙ Set Backlight ◙ Set Color ◙ Set this option to either Red or Green. Adjusting the Key Beep [MENU] Settings ◙ Adjust Key Beep ◙ Auto - the scanner automatically sets the key beep to match the master volume setting level you select. Level 1 - 15 the scanner lets you manually select one of fifteen key beep levels. As you turn the Scroll Control, the beep gets louder. Press ◙ when you reach the desired level. Off - the scanner turns the key beep off. Setting the Audio AGC [MENU] ◙ Settings ◙ Set Audio AGC ◙ This setting helps balance the audio level you hear as you listen to different radio sources so you can hear them at a similar volume. Use this setting if you listen to an audio source that has natural changes in audio level for which you want to compensate. You can set the Analog or the Digital mode to be on or off. Analog to select either on or off specifically for receiving analog channels.](https://usermanual.wiki/Uniden-America/UB338/User-Guide-631532-Page-24.png)
![25On — ◙ to select. Off — ◙ to select. Digital to select either on or off specifically for receiving digital channels. On — Press ◙ to select. Off — Press ◙ to select. Setting the Display Orientation [MENU] ◙ Settings ◙ Set Upside-down ◙ This setting controls the orientation of the display. If you set Upside-down to On, the scanner inverts the display text and graphics. Adjusting the Display Contrast There are 15 contrast levels. As you scroll from level 1 o 15 you see the contrast change. Press the Scroll Control to lock the desired level until the time you desire to change it. [MENU] Settings Adjust Contrast ◙ Select a level Level 1 to…Level 15 ◙ Setting the GPS Format [MENU] ◙ Settings ◙ Set GPS Format ◙ These settings control how the scanner handles GPS input when you are using the location-based functions. Setting the Position Format [MENU] ◙ Settings ◙ Set GPS Format ◙ Set Position Format ◙ This setting controls the format used for entering GPS coordinates into the scanner. DMS: DDD MM SS.ss – Enter the location in Degree, Minute, Second format. DEG: DDD.dddddd – Enter the location in Degree and fraction format. Setting the Time Format [MENU] ◙ Settings ◙ Set GPS Format ◙ Set Time Format ◙ This setting controls the format used for displaying the time on the GPS data screens. 12H – the scanner displays time in 12-hour format using am for mornings and pm for evening times. 24H – the scanner displays time in 24-hour format using 0 for midnight and 23 for 11 pm. Setting the Time Zone [MENU] ◙ Settings ◙ Set GPS Format ◙ Set Time Zone ◙ This setting controls the format used for adjusting Universal time to local time. Set your local time’s offset from UTC (formally known as GMT). Setting the Distance Units [MENU] ◙ Settings ◙ Set GPS Format ◙ Set Pos Format ◙ This setting controls the distance units shown in the GPS data screens and used for entering distance for POI’s mile – The scanner uses miles.](https://usermanual.wiki/Uniden-America/UB338/User-Guide-631532-Page-25.png)
![26km – The scanner uses kilometers. Setting the Serial Port Speed [MENU] ◙ Settings ◙ Set Serial Port ◙ Set Baud Rate ◙ Use this setting to control the data rate used for the front and back panel serial ports. You typically set the front port to match the speed used to communicate with your PC (default 115000 bps) and the back port to the speed used to communicate with an attached GPS (default 4800 bps). Note that the back port is male. You may need a gender changer and a null modem adapter to use a typical DB9 serial cable from the rear port. For Serial Port Speed (Baud Rate), you may select from 4800 bps 9600 bps 19200 bps 38400 bps 57600 bps 112500 bps OFF Displaying Scanner Information Viewing Memory Used [MENU] Settings ◙ See Scanner Info ◙ % Memory Used ◙ A bar showing the percent of memory used appears as well as a percentile to the right of the screen. Press any key to return to the previous menu, then press any key to exit the menu. Viewing the Firmware Version and Electronic Serial Number [MENU] Settings ◙ See Scanner Info ◙ Firmware Version ◙ Press any key to return to the previous menu, then press any key. Initializing the Scanner’s Memory Warning: This clears data you have entered. You cannot restore user programmed data that has been deleted. You can, at a last step, restore only the original factory data. 1. To initialize the scanner’s memory, turn off the scanner. 2. While pressing [2], [9], and [HOLD] at the same time, turn on power. At that point anything you have programmed is gone. You are given a last opportunity to keep the factory programmed data when you see the question: :Restore Preprogram List? Yes=”E”/”No= “.” If you do not say Yes, the scanner is totally empty. Connecting Your Scanner to a Personal Computer](https://usermanual.wiki/Uniden-America/UB338/User-Guide-631532-Page-26.png)
![27You can connect your scanner, by means of the supplied cable, to a personal computer to download data from the computer to the memory of the scanner. Before you proceed, you must first set the scanner’s communications speed as described in the previous section. [illus of Computer and Scanner and cable] Important: Start with a high baud rate setting. If, during transfer, you get an error message, reduce the setting and start again until you get reliable, complete transfer of data. Volume/Squelch with PC Control If you use a PC to control the scanner, and you change the scanner’s volume or squelch setting using the PC, the scanner ignores the front-panel control’s current setting. However, if you later change the volume or squelch setting using the front-panel control, the scanner uses the control’s setting (i.e. the scanner pays attention to the last method used). Wired Cloning Using the scanner in a cloning setup lets you transfer programmed data directly from a source or master BCD996T to a target or slave BCD996T. Wired cloning between other models to the BCD996T is not possible. [MENU] Wired Clone ◙ Master or Slave (select one as the master and one as the slave) To clone (transfer) data directly from one BCD996T scanner to another BCD996T scanner, you must first connect the scanners to each other using the included connection cables and a DB9 null modem adapter and for the rear port, a DB9 gender changer (neither included), available at most computer stores. Then you must set one scanner as the source and the other as the target. [illus of two BCD996T with “exploded” view of cables and null modem and DB9 gender changer] 1. Plug the smaller end of each of the included connection cables into either the front or the rear connection port. Then connect the other end of the cables together using the null modem connector and gender changer. 2. Set the scanner containing the programming you want to transfer as the master scanner, then set the other scanner as the slave scanner. 3a. (Master scanner) Clone Master Press SCAN Key [SCAN] Clone Master Connecting 3b. (Slave scanner) Clone Slave Press SCAN Key [SCAN] Clone Slave Connecting 4. When you are ready to clone the scanner, press [SCAN] on the slave scanner first, then [SCAN] on the master scanner. The master scanner checks the connection between the two scanners, then transfers its data to the slave scanner. 5. When the transfer is complete, Complete appears on both scanners. If the transfer did not work, Error appears on the master scanner. Readjust the baud rate to a lower setting and try again. Programming Your Scanner Your BCD996T comes preprogrammed with over 500 state and local agencies, both analog and digital, selected from the most populous areas in the US. This should let you get started quickly to enjoy your new scanner. However, to get the most enjoyment from your scanner (especially if you do not live near one of these counties), you must customize the programming for your area. To edit an existing system, use the menu to navigate to the system setting you want to change. This section assumes you are programming a new system. Programming radio systems is completed in two major steps. Don't skip either step! 1. Plan the system. 2. Program the system into your scanner according to the plan you prepared in Step 1. To make this easier, planning worksheets are included in the back of this manual for each system type. You can copy the worksheets in this manual or download letter-size worksheets from the Uniden America Corporation website [www.uniden.com].](https://usermanual.wiki/Uniden-America/UB338/User-Guide-631532-Page-27.png)
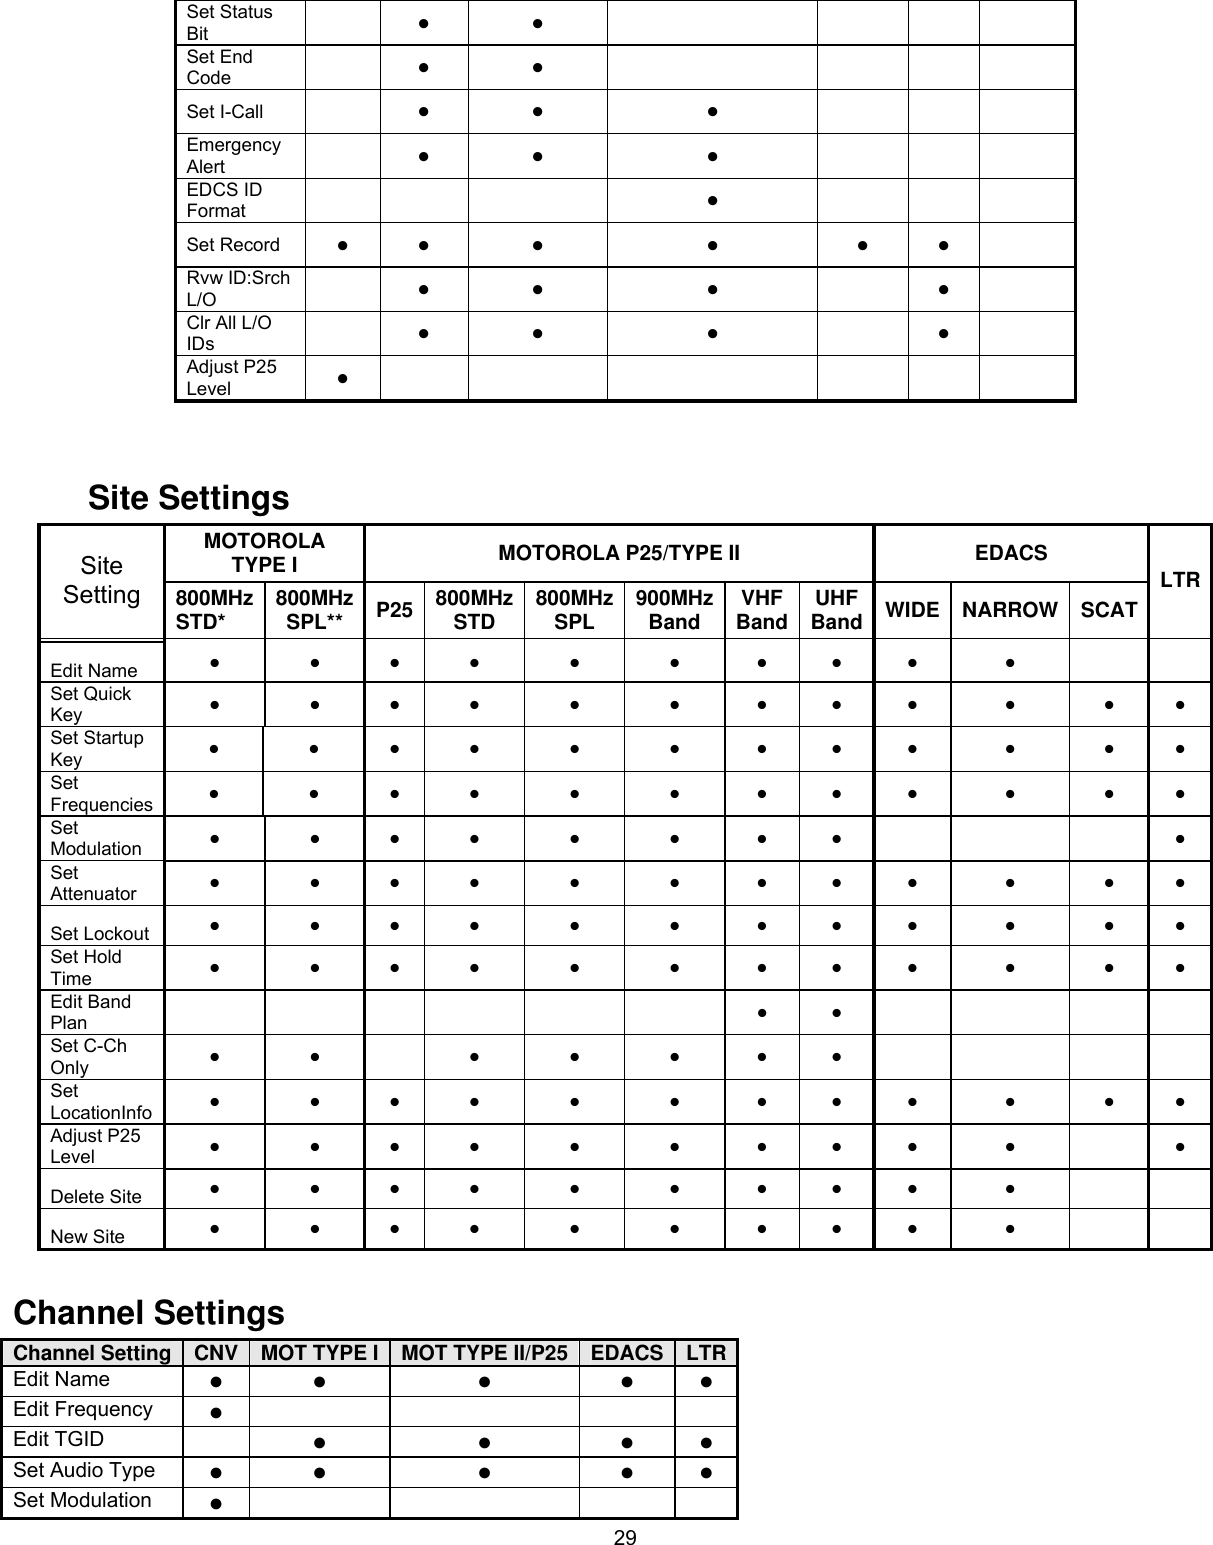
![30Set Attenuator ● Set Priority ● Set Alert ● ● ● ● ● Set Record ● ● ● ● ● Set Lockout ● ● ● ● ● Copy Channel ● ● ● ● ● Delete Channel ● ● ● ● ● New Channel ● ● ● ● ● Programming Conventional Systems [MENU] Program System ◙ New System ◙ Conventional ◙ Confirm? Yes=”E” / No=”.” [press desired key] The scanner creates an empty conventional system with a default name of System n C. Note that “n” is a number that increments as you add new systems. The C on the right side of the display indicates that this is a conventional system. After creating the system: 1. Set system-level settings that apply to conventional systems in “Programming System Settings.” 2. Create one or more channel groups with channels as described in “Programming Channel Groups.” Programming Trunked Radio Systems [MENU] Program System ◙ New System ◙ Then, select the system type: MOT TYPE 1 – Motorola Type I systems MOT TYPE2/P25 – Motorola Type II and APCO 25 systems EDCS WIDE/NARROW – EDACS Wide and Narrow systems EDCS SCAT – EDACS SCAT systems LT – LTR Systems The scanner creates an empty system with a default name of System n x. Note that “n” is a number that increments as you add new systems. The “x” on the right side of the display is M for Motorola system, E for EDACS systems, and L for LTR systems. After creating the system: 1. Set the system-level settings in “Programming System Settings” that apply to the type of system you selected. 2. Set up at least one site for the system as described in “Programming Sites” on Page xx. 3. To scan specific channels, create one or more channel groups with channels as described in “Programming Channel Groups.” Programming System Settings Editing the System Name MELC Each system name can be up to 16 characters. Abbreviate as necessary to fit. For Motorola and EDACS Wide/Narrow systems, the system name only appears in the scanner menu’s Program System listings. It is not shown during scanning. For other systems, the system name alternates with the Channel group when the scanner stops on a channel. The default system names include the following letter in the 16th position to indicate the system type: M = Motorola; E = EDACS; L = LTR; C = Conventional S = SCAT Specifying the Correct System Type](https://usermanual.wiki/Uniden-America/UB338/User-Guide-631532-Page-30.png)
![31In order for trunk tracking to work properly, you have to specify the correct system type when you create the system. Here are some tips for selecting the correct type: Use online resources, such as the www.radioreference.com database, to identify the system type. Even though a system has digital channels, it is not necessarily a P25 system. To be P25, the system type must be described as Project 25 (there are many Motorola 800 Standard systems that have some digital channels. These should be entered as Motorola 800 Standard and not P25). EDACS Wide is the same as EDAC Standard. EDACS Networked sites are EDACS Narrow Following these steps to change the system name. [MENU] Program System ◙ Select the system ◙ Edit Name ◙ To enter a letter, turn the Scroll Control until the character you want appears. To enter a decimal point, press [.No] . To move the cursor to the left, press [4]. To move the cursor to the right, press [6]. To clear a character, press [.No] twice. To clear all characters, press [.No] 3 times. To accept an entry, press [E YES] or ◙. Programming System Options MELCS Editing the System Quick Key C [MENU] Program System ◙ Select a conventional system ◙ Edit Sys Options◙ Set Quick Key ◙ After selecting this option, select any number from 0-99 to assign the system to a quick key or press [.No] to assign the system to no quick key, then press ◙. Notes: • Access single-digit system/site Quick Keys by pressing the single digit on the keypad during scanning. Access two-digit system Quick Keys by pressing [.No] then both digits. • You can assign as many systems to the same quick key as you want. • To be scanned, a system’s Quick Key must be activated and the system must be unlocked. Setting the Startup Key C [MENU] Program System ◙ Select a conventional system ◙ Edit Sys Options ◙ Set Startup Key ◙ Select a startup key from 0-9 or select “.” for no startup key. Notes:](https://usermanual.wiki/Uniden-America/UB338/User-Guide-631532-Page-31.png)
![32• To unlock the system at startup, press and hold the selected startup key while you turn on the scanner. • The system Quick Key is also enabled. • If you press a different key at startup, the system is locked out. • If you do not assign the system a startup key, the system is not affected by any key press during startup. Setting the System Lockout C [MENU] Program System ◙ Select a conventional system ◙ Edit Sys Options ◙ Set Lockout ◙ Unlocked – The system is scanned when its quick key is enabled. Temporary L/O – The system is not scanned, even if its quick key is enabled. Cycling power will remove the lockout. Lockout – The system is not scanned, even if its quick key is enabled. You must manually unlock the system. Setting the System Hold Time C [MENU] Program System ◙ Select a conventional system ◙ Edit Sys Options ◙ Set Hold Time ◙ Set how long the scanner will remain scanning on this system before moving to the next system (up to 255 seconds). Note that the scanner will scan all unlocked channels at least one time, regardless of the system hold time setting. Setting ID Scan/ID Search MEL [MENU] Program System ◙ Select a system ◙ Edit Sys Options ◙ ID Scan/Search ◙ Sets whether the scanner only stops on talk groups you have programmed in (ID Scan) or whether the scanner stops on any unlocked channel (ID Search). Setting Channel Delay Time MELCS [MENU] Program System ◙ Select a system ◙ Edit Sys Option ◙ Set Delay Time ◙ This setting controls how many seconds the scanner waits after a transmission ends before resuming scanning. Enter a value from 1-5 or Off, then press ◙. Notes: • The default setting is 2 seconds for each system. • This setting applies to all channels within the system.](https://usermanual.wiki/Uniden-America/UB338/User-Guide-631532-Page-32.png)
![33Setting Data Skip C [MENU] Program System ◙ Select a Conventional system ◙ Edit Sys Option ◙ Set Data Skip ◙ This setting controls whether the scanner automatically skips channels it identifies as data. This includes channels with either no audio or a constant-level audio source. If turned on, the scanner resumes scanning as soon as it detects the data signal. Setting Location Information C [MENU] Program System ◙ Select a Conventional system ◙ Edit Sys Option ◙ Set LocationInfo ◙ This setting control whether the system is automatically enabled and disabled when you connect a GPS to the scanner. Set Latitude – Enter the system’s latitude using the format you selected in the system settings. Set Longitude – Enter the system’s longitude using the format you selected in the system settings. Set Range – Set the system’s range using the units you selected in the system settings. Set GPS Enable – L/O status is automatically controlled by receiving data from GPS. [Picture of a circle with latitude/longitude labeled in the middle and a radius drawn and labeled range.] Setting the Fleet Map M (Type 1 Only) [MENU] Program System ◙ Select a Motorola Type 1 system ◙ Edit Sys Option ◙ Edit Fleet Map ◙ Preset - select from the 16 most common fleet maps Custom - allows you to enter a custom fleet map. Enter the size code (0 to 14) for each block. Press ◙ to select. For Motorola Type I systems, you must enter a system fleet map in order for the scanner to properly track and display talk group ID's. The fleet map is usually included in the same resource that provided system frequencies and talk group ID lists. Note: If you don't know the fleet map for your Motorola Type I system, check the Internet such as www.radioreference.com or the other websites we reference. Setting the Status Bit M [MENU] Program System ◙ Select a Motorola Type I or II system ◙ Edit Sys Option ◙ Set Status Bit ◙ Ignore - the scanner rounds all received ID's down to the next interval of 16. The default setting is Ignore. Yes - the scanner treats all received ID's as unique ID's.](https://usermanual.wiki/Uniden-America/UB338/User-Guide-631532-Page-33.png)
![34Note: Motorola analog systems use talk group ID's in multiples of 16. ID numbers that fall between these ID's indicate special status flags for the system. This setting determines how the scanner will handle ID's that are not multiples of 16. Select your setting then press ◙. Setting End Code Operation M [MENU] Program System ◙ Select a Motorola Type I or II system ◙ Edit Sys Option ◙ Set End Code ◙ This setting determines how the scanner handles the transmission end code sent by most Motorola systems. Select your setting then press ◙. Yes - the scanner immediately returns to the control channel when it detects the end code. Ignore - the scanner does not return to the control channel until the carrier drops. Note: The default setting is Yes. Setting I-Call Operation ME [MENU] Program System ◙ Select a Motorola Type I, II or EDACS system ◙ Edit Sys Option ◙ Set I-Call ◙ This setting determines how your scanner treats I-calls while ID Searching. On - the scanner tracks I-calls. Press ◙ to select. Off - the scanner ignores I-calls. Press ◙ to select. Only - the scanner only tracks I-calls and ignores other radio traffic on the system. Press ◙ to select. Note: The default setting is Off. To set the I-Call to a wildcard receive condition, press [.No] + [0]. Setting the Emergency Alert Option ME [MENU] Program System ◙ Select a Motorola Type I , II or EDACS system ◙ Edit Sys Option ◙ Emergency Alert ◙ Off - the scanner does not alert you to emergency transmissions. Alert 1 - 9 the scanner sounds an alert beep to notify you of the emergency transmission. The default alert is Off. You can choose any of 9 different beep types. Once you choose an alert tone, next: Set Level ◙ Auto - the scanner automatically sets the emergency alert beep to the master volume level. Level 1 - 15 - the scanner adjusts the volume you hear to the level you select.](https://usermanual.wiki/Uniden-America/UB338/User-Guide-631532-Page-34.png)
![35Setting the EDACS ID Format E [MENU] Program System ◙ Select an EDACS system ◙ Edit Sys Option ◙ EDCS ID Format ◙ EDACS Talk Group ID's are commonly provided in one of two formats: AFS and Decimal. This setting determines how you enter EDACS ID's and how the scanner displays them. AFS Format - the scanner uses AFS format for Talk Group ID's Decimal Format - the scanner uses decimal format for Talk Group ID's Notes: The scanner defaults to AFS (agency, fleet, subfleet) format - the format used in most EDACS systems. Setting the System Record Option MELCS [MENU] Program System ◙ Select a system ◙ Edit Sys Option ◙ Set Record ◙ This setting controls how the scanner handles the record option for channels in the system. All Channel – The scanner sends the audio for all channels in the system to the RECORD jack, regardless of the channel’s record option setting. Marked Channel – The scanner only sends the audio for channels that have the Record option turned on to the RECORD jack. Off – The scanner does not send any audio from any channel in the system to the RECORD jack, even if the record option is turned on for a channel. Note for systems: In order for the function to work, you must set the channel to record. You must also set the system’s record option to either All Channel (which will record all channels regardless of the channel’s record setting) or Marked Channel (which only records the channels you’ve set to record). Reviewing ID Search Lockouts MEL [MENU] Program System ◙ Select a trunked system ◙ Edit Sys Option ◙ Rvw ID:Srch L/O ◙ The scanner displays each locked out ID for the system and gives you the option to Unlock the ID. To unlock an ID, rotate the scroll to select the locked out ID, then press [E/YES]. If no ID’s are locked out, the scanner displays “Nothing Locked / Press Any Key.” Clearing All Locked Out ID’s MEL [MENU] Program System ◙ Select a trunked system ◙ Edit Sys Option ◙ Clr All L/O IDs ◙ To quickly unlock all IDs in the system, answer “Y” to “Confirm? Unlock All(Y/N).”](https://usermanual.wiki/Uniden-America/UB338/User-Guide-631532-Page-35.png)
![36Adjust the P25 Decode Threshold C [MENU] Program System ◙ Select a conventional system ◙ Edit Sys Option ◙ Adjust P25 Level ◙ This setting determines some system-specific parameters for digital channels. In most cases, setting this to Auto provides the best performance. However, you can also manually set the digital decode threshold. This setting affects all channels in the current system. See “Optimizing P25 performance” on Page XX Auto - the scanner automatically adjusts the digital decode threshold to match the transmission you are hearing when it receives a strong signal and has a high decode rate. Manual - lets you manually adjust the digital decode threshold. To manually adjust the P25 level, select Manual. Default - sets the digital decode threshold to the default value. Use this setting to return to the value that usually provides adequate performance. This is handy is you have manually adjusted the value to a setting that prevents proper decoding. Note: This setting has no effect on how these systems are received. Editing Sites MESL Use this option to enter and edit site information for the current system. See “Programming Sites” for instructions for each site option. Note that you must program at least one site for each trunked system in order for your scanner to scan the system. Editing Channel Groups MECL Use this option to enter and edit channel groups and channel information. See “Programming Channel Groups” for instructions for each channel group and channel option. Note that you must program at least one channel group and one channel for each conventional system in your scanner. You do not have to enter channel group information for trunked systems, but doing so makes it easier to follow specific talk groups. Copying Systems MECSL Occasionally you might want to copy and rename a system to highlight one group over another. One system might be called City - Fire and the same system City - PD with adjustments to data within. This lets you quickly locate the desired set of data. To copy a system including all settings, groups, and channels: [MENU] Program System ◙ Select the existing system ◙ Copy System ◙ New Sys Name? Enter your new name using the Scroll Control and [4] and [6] to traverse the display and enter characters. Press ◙ when finished. Deleting Systems MECSL [MENU] Program System ◙ Select the existing system ◙ Delete System ◙ Confirm Delete? Yes=”E” / No= “.”](https://usermanual.wiki/Uniden-America/UB338/User-Guide-631532-Page-36.png)
![37Important: Deleted systems cannot be restored. You must re-enter them. Programming Sites MESL This section covers settings that apply to trunked radio site. You must program at least one site for each trunked radio system. When you program multiple sites, all sites share the same channel groups and channels within the system. Note: You can only program one site in an EDACS SCAT and LTR system. Setting the Site Name ME Each site name can be up to 16 characters. Abbreviate as necessary to fit. The site name alternates with the Channel group when the scanner stops on a channel. The default site names include the following letter in the 16th position to indicate the system type: MS1: Motorola 800 MHz Type I Standard MS2: Motorola 800 MHz Type II Standard MP1: Motorola 800 MHz Type I Splinter MP2: Motorola 800 MHz Type II Splinter P25: APCO 25 (all bands) M92: Motorola 900 MHz MV2: Motorola VHF MU2: Motorola UHF EDW: EDACS Wide EDN: EDACS Narrow Following these steps to change the system name. [MENU] Program System ◙ Select a trunked system ◙ Edit Site ◙ Select a Site ◙ Edit Name ◙ To enter a letter, turn the Scroll Control until the character you want appears. To enter a decimal point, press [.No] . To move the cursor to the left, press [4]. To move the cursor to the right, press [6]. To clear a character, press [.No] twice. To clear all characters, press [.No] 3 times. To accept an entry, press [E YES] or ◙. Setting the Site Quick Key MESL [MENU] Program System ◙ Select a trunked system ◙ Edit Site ◙ Select a Site ◙ Set Quick Key ◙ After selecting this option, select any number from 0-99 to assign the system to a quick key or press [.No] to assign the system to no quick key, then press ◙. Notes:](https://usermanual.wiki/Uniden-America/UB338/User-Guide-631532-Page-37.png)
![38• Access single-digit system/site Quick Keys by pressing the single digit on the keypad during scanning. Access two-digit system Quick Keys by pressing [.No] then both digits. • You can assign as many systems to the same quick key as you want. • To be scanned, a system’s Quick Key must be activated and the system must be unlocked. Setting the Site Startup Key MESL [MENU] Program System ◙ Select a trunked system ◙ Edit Site ◙ Select a Site ◙ Set Startup Key ◙ Select a startup key from 0-9 or select “.” for no startup key. Notes: • To unlock the system at startup, press and hold the selected startup key while you turn on the scanner. • The system Quick Key is also enabled. • If you press a different key at startup, the system is locked out. • If you do not assign the system a startup key, the system is not affected by any key press during startup. Setting Site Frequencies MESL [MENU] Program System ◙ Select a trunked system ◙ Select the site ◙ Edit Site ◙ Set Frequencies ◙ New Frequency (or select an existing frequency) ◙ Input a system frequency using the number keys and [./No] key, then press ◙. If you are entering frequencies for an LTR or EDACS system, the scanner will also prompt you to enter the LCN for the frequency you just entered. LCN’s (logical channel numbers) are provided from the same source where you got the other system information. To enter additional frequencies, press [MENU], then to select New Frequency. Then repeat the above. Note: If you select Control Channel Only mode (see “ Setting Control-Channel Only (Motorola Systems Only)” on Page XX), you only need to enter the frequency(s) that can be assigned as the control channel. Most frequency lists usually indicate which of the frequencies are the control channel frequencies. Otherwise, you must enter all of the frequencies. Setting Site Modulation ML [MENU] Program System ◙ Select a trunked system ◙ Edit Site ◙ Select a Site ◙ Set Modulation ◙](https://usermanual.wiki/Uniden-America/UB338/User-Guide-631532-Page-38.png)
![39Auto - the scanner uses the default modulation for the frequency band. FM - the scanner uses FM (frequency modulation) for the frequency band. NFM - the scanner uses narrowband FM for the frequency band. Note: The default setting is Auto. This setting controls the modulation method used for the frequency band. In most cases, if you leave this set to Auto, the scanner automatically selects the correct modulation type for the system you are programming. Setting Site Attenuation MESL Enable Attenuation if you are near strong signal sources. Attenuation can help reduce interference and desensitization that strong signals create. You can also turn this setting on or off by holding on a trunked system, then pressing ◙ + [7/ATT]. [MENU] Program System ◙ Select a trunked system ◙ Edit Site ◙ Select a Site ◙ Set Attenuator ◙ Off - the attenuator is off. On - site frequencies are attenuated by about 20 dB. Setting Site Lockout MESL [MENU] Program System ◙ Select a system ◙ Edit Site ◙ Select a site ◙ Set Lockout ◙ Select from the following choices ◙ Unlocked - the system is scanned when its quick key is enabled. Temporary L/O - the system is locked for this session. Locked - the system is not scanned. Setting Site Hold Time MESL [MENU] Program System ◙ Select a trunked system ◙ Edit Site ◙ Select a site ◙ Set Hold Time ◙ This setting controls how many seconds the scanner looks at a site before moving to the next unlocked site or system. Using the number keypad, enter a value from 0-255, then press ◙ to save the setting. Notes:](https://usermanual.wiki/Uniden-America/UB338/User-Guide-631532-Page-39.png)
![40• If the scanner cannot detect a control channel on an EDACS or Motorola system, it immediately moves to the next site or system. The scanner always scans LTR or SCAT systems for at least 1 second to check for current activity. • If you select 0 and the control channel is received, the scanner stays on the system for a minimal time (only long enough to check current system activity). • The default setting is 2 seconds for each system. • The scanner moves to the next system after the hold time expires, any current transmission ends, and the channel delay time expires. Editing the Band Plan M (VHF and UHF only) In order for the scanner to scan Motorola VHF and UHF sites, you must enter parameters that allow the scanner to determine the frequencies in use by the system. This information is normally available at the same source where the other system information is found. [MENU] Program System ◙ Select a trunked system ◙ Edit Site ◙ Select a site ◙ Edit Band Plan ◙ You can enter up to 3 band plans. Select the plan to enter or edit, then follow the prompts to enter the Base Frequency, Channel Step, and Channel Offset for the site. Setting Control-Channel Only Mode M (except for P25) [MENU] Program System ◙ Select a trunked system ◙ Edit Site (current) ◙ Select a non-P25 site ◙ Set C-Ch Only ◙ This setting determines the frequencies you need to enter for Motorola systems. Select your setting, then press ◙. On - You only need to enter control channel frequencies. Off - You must enter all voice and control channel frequencies. Note: The scanner defaults to On. Setting Site Location Information MESL [MENU] Program System ◙ Select a trunked system ◙ Edit Site (current) ◙ Select a site ◙ Set LocationInfo ◙ This setting control whether the system is automatically enabled and disabled when you connect a GPS to the scanner. Set Latitude – Enter the system’s latitude using the format you selected in the system settings. Set Longitude – Enter the system’s longitude using the format you selected in the system settings. Set Range – Set the system’s range using the units you selected in the system settings. Set GPS Enable – Depending on the data received from the GPS, the L/O status of the site is automatically controlled.](https://usermanual.wiki/Uniden-America/UB338/User-Guide-631532-Page-40.png)
![41 [Picture of a circle with latitude/longitude labeled in the middle and a radius drawn and labeled range.] Adjust P25 Level MEL [MENU] Program System ◙ Select a trunked system ◙ Edit Site (current) ◙ Select a site ◙ Adjust P25 Level ◙ This setting determines some site-specific parameters for digital channels. In most cases, setting this to Auto provides the best performance. However, you can also manually set the digital decode threshold. This setting affects all channels in the current site. See “Optimizing P25 performance” on Page XX Auto - the scanner automatically adjusts the digital decode threshold to match the transmission you are hearing when it receives a strong signal and has a high decode rate. Manual - lets you manually adjust the digital decode threshold. To manually adjust the P25 level, select Manual. Default - sets the digital decode threshold to the default value. Use this setting to return to the value that usually provides adequate performance. This is handy is you have manually adjusted the value to a setting that prevents proper decoding. Note: This setting has no effect on how these sites are received. Deleting Sites ME [MENU] Program System ◙ Select a trunked system ◙ Edit Site ◙ Select a site ◙ Delete Site ◙ Confirm Delete? Yes=”E” / No= “.” Important: Deleted sites cannot be restored. You must re-enter them. Programming Channel Groups MECL Setting Up a Channel Group MECL [MENU] Program System ◙ Select a system ◙ Edit Group ◙ New Group ◙ The scanner creates a group with a default name of Group n. n increments by one for each new group you create within a system. Editing a Channel Group Name MECL [MENU] Program System ◙ Select a system ◙ Edit Group ◙](https://usermanual.wiki/Uniden-America/UB338/User-Guide-631532-Page-41.png)
![42 Select a Group ◙ Edit Name ◙ Follow these steps to enter/edit the group name. 1. The current name displays with the first character of the name highlighted. 2. Rotate the Scroll Control to select a new first letter. Press [6] to move one character to the right. Repeat the Scroll Control action to change the character. To move one character to the left, press [4]. 3. Repeat Step 2 until you have entered the system name. Then press ◙ to accept the setting. Notes: • Each group name can be up to 16 characters. Abbreviate as necessary to fit. • The group and system (for conventional, SCAT, and LTR systems) or site (for Motorola and EDACS systems) name alternate in the top line of the display when the scanner stops on a channel. • Press [.No] twice to delete the current character. • Press [.No] three times to clear the entire alpha tag. Editing Channels MECL Once you create a channel group, store channels in that group. See “Programming Channels” for specific channel options. Locking Out Channel Groups MECL [MENU] Program System ◙ Select the existing system ◙ Edit Group ◙ Select the existing group ◙ Set Lockout ◙ This setting determines whether the scanner will scan this group of channels. Select your setting, then press ◙. Lockout - the group is not scanned. Temporary L/O - the group is not scanned for this session. The L/O is cancelled when you cycle power. Unlocked - the group is scanned. The default setting is Unlocked Deleting Channel Groups MECL [MENU] Program System ◙ Select a system ◙ Edit Group ◙ Select a channel group ◙ Delete Group ◙ Confirm Delete? Yes=”E” / No= “.”](https://usermanual.wiki/Uniden-America/UB338/User-Guide-631532-Page-42.png)
![43Important: Deleted channel groups cannot be restored. You must re-enter them. Programming Channels MECL Creating a Channel MECL [MENU] Program System ◙ Select a system ◙ Edit Group ◙ Select a channel group ◙ Edit Channel ◙ Select an existing channel to edit or “New Channel” to create a new channel. When you create a new channel you are prompted to enter the frequency (for conventional systems) or Talk Group ID (for Trunked systems). Enter the information for the channel, then press ◙ to proceed to setting additional channel options. Editing the Channel Name (Alpha Tag) MECL [MENU] Program System ◙ Select a system ◙ Edit Group ◙ Select the group ◙ Edit Channel ◙ Select the channel ◙ Edit Name ◙ Follow these steps to enter/edit the channel name. 1. The current name displays with the first character of the name highlighted. 2. Rotate the Scroll Control to select a new first letter. 3. Press [6] to move one character to the right. 4. Repeat the Scroll Control action to change the character. To move one character to the left, press [4]. Press [.No] twice to delete the current character. Press [.No] three times to clear the entire alpha tag. 5. Repeat Step 2 until you have entered the desired name. Then press ◙ to accept the setting. Notes: • Each channel name can be up to 16 characters. Abbreviate as necessary to fit. • The channel name appears on the second line of the display when the radio scans or stops on a channel. • If you do not enter a channel name, the scanner displays the frequency (for conventional systems) or the talk group ID (for trunked systems) when it stops on a channel. Editing Frequencies C [MENU] Program System ◙ Select a conventional system ◙ Edit Group ◙](https://usermanual.wiki/Uniden-America/UB338/User-Guide-631532-Page-43.png)
![44 Select a channel group ◙ Edit Channel ◙ Select the channel ◙ Edit Frequency ◙ Use the [0] to [9] and [.No] keys to enter or modify a frequency. When you press the first place key, the cursor automatically moves one character to the right. You can also , clockwise or counter-clockwise to highlight any digit. Editing the Talk Group ID MEL [MENU] Program System ◙ Select a trunked system ◙ Edit Group ◙ Select a channel group ◙ Edit Channel ◙ Select the channel ◙ Edit TGID ◙ To edit the Talk Group ID, enter the Talk Group ID you want using the number keys. Then press ◙. Setting the Audio Type MECL For each channel, you can select the audio type that the channel receives. [MENU] Program System ◙ Select the system ◙ Edit Group Select the group ◙ Edit Channel ◙ Select an existing channel ◙ Set Audio Type ◙ Select from All, Digital Only, Analog Only ◙ All – The scanner automatically determines whether the audio is analog or digital. Digital Only – The scanner only remains on the channel if it is carrying APCO 25 digital audio Analog Only – The scanner only remains on the channel if it is carrying analog audio. If you are programming a conventional system and select Analog Only, the scanner prompts you to select the CTCSS/DCS tone setting. See the next section. Selecting CTCSS/DCS Tones C To program a channel with a CTCSS or DCS setting, your conventional system audio must be set to Analog Only first. [MENU] Program System ◙ Select the system ◙](https://usermanual.wiki/Uniden-America/UB338/User-Guide-631532-Page-44.png)
![45 Edit Group ◙ Select the group ◙ Edit Channel ◙ Select the channel ◙ Set Audio Type ◙ Analog Only ◙ At this point you can scroll to CTCSS or DCS and select the subaudible frequency in the CTCSS range or the DCS code. CTCSS or DCS ◙ This setting controls how a sub audible CTCSS or DCS is used for the channel. Select your setting, then press ◙. Off - any signal opens squelch. The default setting is Off. Search - the scanner searches for and displays any CTCSS or DCS tone that accompanies the transmission. CTCSS - the scanner only opens squelch if the CTCSS tone you select is also present with the signal. The scanner then prompts you to enter or scroll to the desired tone. DCS - the scanner only opens squelch if the DCS tone you select is also present with the signal. The scanner then prompts you to enter or scroll to the desired tone. Set Lockout - the scanner does not stop on the channel if the tone you select is present. The scanner prompts you to select a CTCSS or DCS tone. Note: The scanner does not detect or decode a P25 digital signal if the channel or search has CTCSS/DCS search turned on. Quick CTCSS/DCS Save If you set a channel to CTCSS/DCS Search and the scanner detects a tone, when you press [EYES], the first option is Save found CTCSS/DCS? Setting Channel Modulation Method C [MENU] Program System ◙ Select the conventional system ◙ Edit Group ◙ Select a channel group ◙ Edit Channel ◙ Select the Channel ◙ Set Modulation ◙ Auto — the scanner uses the default modulation for the channel. The default setting is Auto. AM — the scanner uses AM (amplitude modulation) for the channel. FM — the scanner uses FM (frequency modulation) for the channel. NFM — the scanner uses narrowband FM for the channel. WFM — the scanner uses wideband FM for the channel. FMB — the scanner uses FM Broadcast for the channel.](https://usermanual.wiki/Uniden-America/UB338/User-Guide-631532-Page-45.png)
![46This setting controls the modulation method used for the channel. In most cases, if you leave this set to Auto, the scanner automatically selects the correct modulation type for the channel you are programming. Setting Channel Attenuation C [MENU] Program System ◙ Select a conventional system ◙ Edit Group (existing site) ◙ Select a Channel Group ◙ Edit Channel ◙ Select a channel ◙ Set Attenuator ◙ This setting controls whether the scanner attenuates signals on this channel. Select your setting, then press ◙. On - the channel is attenuated by about 20 dB. Off - the channel is not attenuated. The default setting is Off You can also toggle this setting by holding on the channel and pressing ◙ then [7/ATT] within 2 seconds. Setting Channel Priority C [MENU] Program System ◙ Select a conventional system ◙ Edit Group ◙ Select a channel group ◙ Edit Channel ◙ Select the channel ◙ Set Priority ◙ This setting controls whether the scanner treats the channel as a priority channel while scanning. Select On or Off, then press ◙. On - when you turn on the Priority feature, the channel will be scanned every 2 seconds. Off - the channel will not be treated with priority. The default setting is Off Setting Channel Alert MECL [MENU] Program System ◙ Select a system ◙ Edit Group ◙ Select a channel group ◙ Edit Channel ◙ Select the channel ◙ Set Alert ◙ Off - the scanner does not alert you when the channel becomes active.](https://usermanual.wiki/Uniden-America/UB338/User-Guide-631532-Page-46.png)
![47Alert 1 - 9 the scanner sounds an alert beep to notify you that the channel has become active. You can choose any of 9 different beep types. Once you choose an alert tone, then: Set Level ◙ Auto - the scanner automatically sets the channel alert beep to match the master volume level. Level 1 - 15 - the scanner adjusts the volume of the beep to the level you select. Searching and Storing Service Search Service Search lets you select and search the scanner’s preprogrammed search ranges. During service search, the scanner searches starting with the lowest frequency in the search range you select to the highest frequency in the range. There are two ways to do this. [MENU] Search for ... ◙ Service Search ◙ Select the service search range ◙ The other approach is: ◙ + [SCAN.SEARCH] ◙ Quick Search? Yes=E” / No=”.” Press [.No] then to select Service Search ◙ The following search ranges appear as you scroll Public Safety News HAM Radio Marine Railroad Air CB Radio FRS/GMRS Racing TV Broadcast FM Broadcast Military Air Special The scanner searches the service you selected, stopping on any transmission it finds and displaying the frequency. Turn the Scroll Control to change the search direction. An arrow appears, showing the current search direction. To pause searching, press [HOLD/RESUME]. To resume searching, press then press ◙ + [SCAN/SEARCH]. Or, press [HOLD/RESUME]. To lock out a frequency found while searching, press [L/O]. Locked Out appears and the scanner resumes service search. Notes:](https://usermanual.wiki/Uniden-America/UB338/User-Guide-631532-Page-47.png)
![48• If all frequencies in the search range you selected are locked out, All Locked! appears and the scanner does not search the range. • If the service you select uses channels (such as CB Radio or Marine), the scanner displays the service channel number. Quick Search Quick Search lets you search from the currently-tuned frequency if you are scanning a conventional system or sets the system to ID search if you are scanning a trunked system. If you are on a conventional system or channel, press ◙ + [SCAN/SEARCH] to start quick search. Quick Search? Yes = “E” / No = “.” appears. Press [HOLD/RESUME] to go to quick search hold. Press [E/YES] to start quick search or [.No] to go to the search menu. Custom Search Custom Search lets you program and search 10 custom search ranges. You can search any of these ranges simultaneously and select each custom search range you set. During custom search, the scanner searches starting with the lowest frequency in the search range you select to the highest frequency in the range. There are two methods to begin a custom search. Notes: • Search ranges are preset. These ranges can be edited. See “Editing a Custom Search Range” on Page XX to change the range. • You cannot turn off all custom search ranges. [MENU] Search for ... ◙ Custom Search ... ◙ The other approach is: ◙ (Func) + [SCAN/SEARCH] Quick Search? Yes=E” / No=”.” Press [.No] then to Custom Search ◙. The scanner starts custom search of the custom search range you selected, stopping on any transmission it finds and displaying the frequency. Turn the Scroll Control to change the search direction. An arrow appears, showing the current search direction. To turn search ranges on or off, press [0] and [1] - [9]. To hold searching, press [HOLD/RESUME]. To resume searching, press [HOLD/RESUME]. To lock out a frequency found while searching, press [L/O]. There are two different results based on the number of times you press [L/O]. Press [L/O] 1 time: Temporary L/O appears Press [L/O] 2 times: .Locked Out appears and the scanner resumes custom search. If you turn off the active custom search range, the scanner skips to the next custom search range and continues searching. Note: If all frequencies in all active custom search ranges are locked out, All Locked! appears and the scanner does not stop. Editing a Custom Search Range You can edit up to 10 custom search ranges. The names of the custom search ranges appear on the display. The default custom search range names appear as Custom 1, Custom 2, and so on. [MENU] Search for ... ◙ Edit Custom ◙](https://usermanual.wiki/Uniden-America/UB338/User-Guide-631532-Page-48.png)
![49 Custom 1, Custom 2 to Custom 10. ◙ Another approach is ◙ [Func] + [SCAN/SEARCH] Quick Search? Yes=E” / No=”.” Press [.No] then to Edit Custom ◙. At this point you can edit each of the settings that comprise a custom search. Edit Name — lets you edit the custom search range’s name. Edit Srch Limit — lets you view and select the frequency ranges to search. The scanner prompts you to enter the upper and lower search limits. Set Delay Time — lets you set the amount of time the scanner will delay before continuing to search after a transmission ends. Set Modulation — lets you set the custom search range’s modulation type. Set Attenuator — lets you set whether the scanner will attenuate reception by 20 dB during search. Set Data Skip — lets you set whether the scanner will skip data transmissions during search. Set Step — lets you set the custom search range’s step (the gap between frequencies). Set C-Ch Only — lets you search for a Motorola control channel. If it finds one, the scanner scans the system. Set Record — if during your listening to the selected service, if a transmission is received, choosing On will send an audio signal to the connected audio recording device. Adjust P25 Level — adjusts the digital decode threshold to match the transmission you are hearing when it receives a strong signal and has a high decode rate. Search with Scan — sets whether the scanner includes the custom search during scanning. If unlocked, the scanner first scans all selected systems, then searches the selected service searches for the selected hold time (0-255 seconds). Within this menu item are the following settable options Set Quick key — lets you assign a Quick Key for the custom search range. Set Startup Key — lets you decide which custom search range should be unlocked and scanned at power up Set Lockout — lets you lock the custom search range for this session or permanently as with any other L/O action. Set Hold Time — sets how long (seconds) the custom search range is checked before the scanner moves to the next programmed entry. Search With Scan When you press [SCAN/SEARCH] the BCD996T starts a scan of those sites, channels, etc you have manually programmed or the Uniden preprogrammed data for your metropolitan area that are unlocked and have their System Quick key enabled. In addition to this scan you can search any of the preprogrammed service or custom search ranges. While scanning, press ◙. Rotate the Scroll Control until you reach the desired service or custom search range. Press [L/O] to unlock it. You can also assign a System Quick Key to the search to make it easy to quickly enable/disable the search range for search and scan. The Search with Scan Hold time determines how long the scanner stays on a search before moving on. The default is 2 seconds. See Page XX to change the Search with Scan settings. Editing a Service Search You can change the way service search works for each service. There are also two methods to reach the point of editing. Method One [MENU] Search for ... ◙](https://usermanual.wiki/Uniden-America/UB338/User-Guide-631532-Page-49.png)
![50 Edit Service ◙ Select a service range: Public Safety, News, HAM Radio, Marine, Railroad, Air, CB Radio, FRS/GMRS, Racing, TV Broadcast, FM Broadcast, Military Air, Special ◙ Method Two ◙ (Func) + [SCAN/SEARCH] Quick Search? Yes=E” / No=”.” Press [.No] then to Edit Service ◙. At this point you can edit each of the settings that comprise each custom search range. The following show you how to set the various option settings associated with a Service. For each, your starting operation is [MENU] Search for ... ◙ Edit Service ◙ Select a service range: Set Delay Time to select a value from 1 sec, 2 sec, 3 sec, 4 sec, 5 sec, and Off. ◙ Set Attenuator to select to choose an attenuation for all frequencies in the range. ◙ On — the frequencies are attenuated. Off — the frequencies are not attenuated. Set Record to select to enable a live audio output from REC to an audio recording device. ◙ On — the scanner outputs the signal. Off — the scanner does not output any audio. Assigning a Search Range to a Search Key You can assign any of the Service or Custom Searches to the six Search keys for quick access to your favorite searches. [MENU] Search for ... ◙ Set Search Key ◙ Select the key to assign ◙ Select a search range ◙ [MENU] Search for ... ◙ Now, to access that search, hold on any channel, then press ◙ and the number key [1] to [6] corresponding to the search range. The default settings are: SRCH 1: Custom 1 SRCH 2: Public Safety SRCH 3: Railroad SRCH 4: FRS/GMRS](https://usermanual.wiki/Uniden-America/UB338/User-Guide-631532-Page-50.png)
![51SRCH 5: TV SRCH 6: FM Saving a Found Channel (Quick Save) Press [EYES] to save a channel’s frequency if you hold on a channel or detect a channel, instead of using Direct Entry at another time. The alpha data is also stored. If a GPS unit is attached, the longitude and latitude data is saved and also becomes the name of the channel. For example, if the position is 32°57’33.60 N latitude and 97°05’34.18 W longitude, the name saved is 3257.33-09705.34. Auto Search and Store Your scanner’s Auto Store feature lets you search for new frequencies in custom search ranges or within a service search range on a conventional system, or new talk group ID’s on a trunked system. Selecting a System To store frequencies or talk group ID’s you find during Auto Store, you must first select a system where the frequencies or talk group ID’s will be stored. [MENU] Search for ... ◙ Search and Store ◙ Select the system where you want to store the frequencies or talk group IDs ◙ If no systems are programmed, No System Stored appears. If you have already stored too many systems, Over Limit appears. Conventional Search and Store You can store frequencies into the system you selected in “Selecting a System” above. Otherwise, the scanner stores frequencies in a new group it creates. Follow the steps in the preceding section but be sure to select a Conventional System. A search option appears that lets you choose from a Custom Search to the other service search ranges previously mentioned (Public Safety, News…etc) . Turn the Scroll Control until the search range you want appears, then press ◙ to select it. One of the search ranges appears. If frequencies in your selected search range are all locked out, All Locked! appears and the scanner does not store any frequencies. When you select a search range, the scanner looks for active frequencies within that range. The top line of the display alternates between the system name and the search range name while SEARCH AND STORE appears beneath it. The second line changes to Memory Check when the scanner detects a transmission while it is checking to see if the frequency has already been stored. When the scanner finds an active transmission, it checks to see if the frequency has already been stored in the system. If the frequency has already been stored, the scanner continues to search. If the frequency has not been stored, it stores the frequency into a group named Found Channels, then resumes searching. The scanner creates this group if it doesn’t already exist. Trunked Search and Store You can store talk group ID’s into the system you selected in “Selecting a System”. Otherwise, the scanner stores talk group ID’s in a new group it creates. Note: Trunked system search and store does not work if an EDACS SCAT system is selected, a system with no frequency is selected, the quick key to which the system belongs is turned off, and the group you selected to store found talk group ID’s contains more talk group ID’s than the maximum set in Max Auto Store. To store a trunked system, follow the beginning steps in Selecting A System above. When you select a Trunked System and press ◙, the scanner enters TGID Search and Store mode. When you select a trunked system, the scanner looks for active talk group ID’s within that range and ID SEARCH AND STORE appears and scrolls across the display’s lower line while the site name appears on the display’s upper line. When the scanner finds an active talk group ID, it checks if the talk group ID has already been stored in the site. If it has, the scanner continues to search. If the talk group ID has not been stored, it stores the talk group ID into a group named Found Channels, then resumes searching. The scanner creates this group if it does not already exist.](https://usermanual.wiki/Uniden-America/UB338/User-Guide-631532-Page-51.png)
![52Using the Close Call Feature Your scanner's Close CallTM feature lets you set the scanner so it detects, displays the frequency of, and lets you hear a nearby strong radio transmission. You can set the scanner so the Close Call feature works "in the background" while you are scanning other frequencies, turn off normal scanning while the Close Call feature is working, or turn off the Close Call feature and use the scanner normally. You can set the scanner so it alerts you when the Close Call feature finds a frequency. You can also set the frequency band where you want the scanner to look for transmissions. To toggle Close Call mode, press [SQ/ ]. When the feature is on, CC DND or CC Pri {insert the two icons here] and their indicating icons appear on the display. Normal operation is briefly interrupted about every 2 seconds. Notes: • The Close Call feature works well for locating the source of strong local transmissions such as mobile and handheld two-way radios in areas with no other strong transmission sources. Several factors affect Close Call performance, however. Performance is increased with higher transmit power, receive antenna tuned to the target band, and a low background RF level. Other than the antenna, you have no control over these factors, but they explain why performance might vary by both location and time. • The Close Call feature cannot detect satellite dishes or any transmitter with a frequency above or below the frequency ranges listed under the Set CC Bands: option on Page XX. • The Close Call feature works better with some types of transmissions than others. It might not correctly display frequency information for transmitters using a highly directional antenna (such as an amateur radio beam antenna) or if there are many transmitters operating at the same time in the same area. Setting Close Call Options [MENU] Close Call ◙ Next, turn the Scroll Control to select an option. Close Call Only — Lets you set the scanner only for Close Call searching. The scanner does not scan frequencies or channels when this option is turned on. To select this option, press ◙. CC Auto Store — Lets you select whether the scanner automatically stores Close Call hits into channels. If you turn this option on, the scanner starts Close Call mode and stores any Close Call hits, up to the maximum you specified in the Max Auto Store setting. If the scanner stores more hits than this setting, it stops auto store operation. Turn the Scroll Control to display an option, then press ◙. Set CC Mode — Lets you select the Close Call mode. If you set CC DND or CC Pri, then every 2 seconds the scanner switches the filter settings to the ones set by the CC Bands option. Off — Close Call is turned off for all modes. CC DND (Do Not Disturb) – The scanner checks for a Close Call hit every 2 seconds only if the scanner is not currently stopped on a transmission. If the scanner is on a transmission the scanner waits until the signal ends to perform a Close Call check. This prevents breaks in audio during Close Call checks. CC Pri (Primary) — Close Call operates if a carrier is detected. Set CC Override — Lets you select how the Close Call feature works with other scanning activities. If you turn this option off, when the scanner detects a Close Call signal, CC Found! Press Func Key to listen appear for the time you set in Set CC Pause. Press ◙ when this appears to jump to and hold on the frequency. If this option is turned on, the scanner overrides the current channel and goes to the Close Call hit. The scanner displays CC Found! Press Any Key. When you press a key, the frequency appears. Set CC Alert — Lets you select how the scanner alerts you when it receives a Close Call signal. You can select from these options. • Beep — The scanner beeps when it receives a Close Call signal. You can set the beep alert in the following manner. Off (the scanner does not beep)](https://usermanual.wiki/Uniden-America/UB338/User-Guide-631532-Page-52.png)
![53 Alert 1-9 - The scanner sounds a specialized beep to notify you of a Close Call hit. When you select an alert type, the scanner automatically enters the setting of the Alert volume level. Each alert has a unique one or sound pattern. Set CC Pause — Lets you select how long the scanner waits after a hit before it returns to the previous operation. Your options are: 3/5/10/15/30/45/60 sec. Infinite — The scanner stops and requires you to manually select another operation to enable its return. Set CC Bands — Lets you select the Close Call band settings. You can turn the following bands on or off. VHF Low 1 — (25.0000-53.9800 MHz) VHF Low 2 — (54.0000-107.9000 MHz) Air Band — (108.0000 - 136.9750 MHz) VHF High 1 — (137.0000-224.9800 MHz) VHF High 2 — (225.0000-319.9750 MHz) UHF — (320.0000 - 512.0000 MHz) 800MHz+ — (764.0000 - 775.9875 MHz, 794.0000 - 823.9875 MHz, 849.0125 - 868.9875 MHz, 894.0125 - 956.0000 MHz,1240.000 - 1300.0000 MHz) Use the Scroll Control to select a band, press ◙, then use the Scroll Control to select On or Off and press ◙. Turning off undesired bands speeds up Close Call operation (works for all frequencies listed above). Close Call Hits When the scanner detects a Close Call hit, it alerts you according to the Override and Alert settings in the previous section. While listening to a Close Call hit, you can press [HOLD/RESUME] to hold on the hit frequency, press ◙ to quickly save the frequency into memory, press [L/O] to lock out the frequency from Close Call and Search operation, or wait for the transmission to end. If you are in Close Call Only or Close Call Override mode, and you do not press any key, the scanner returns to its previous operation after the transmission ends and the set delay time expires. If you are holding on the frequency, press [HOLD/RESUME] again to resume the previous operation. Close Call Hits are just the last 10 hits received in Close Call mode. The hits go away when you cycle power (if you want to store it "permanently" press ◙when the scanner is on the frequency; the scanner then stores the frequency into the "Close Call" system which does show up in the systems list). Close Call Hits with Scan When you turn on this option, the scanner automatically stores and scans the last 10 Close Call hits received. You can assign a Quick Key to this special scan and you can also set how long the scanner will wait after the signal stops before resuming scan. This lets you continue to hear transmissions detected with the Close Call feature, even after you are no longer close enough to receive it as a Close Call hit. Follow these steps to set up the option. [MENU] Close Call ◙ Hits with Scan ◙ Set Quick Key or Set Lockout or Set Hold Time ◙ Set the available option as you would for other menu items. This special channel group is automatically cleared whenever you cycle the scanner’s power. To permanently save one of the channels, press [EYES] when the scanner is stopped on one of the frequencies. To keep the scanner from repeatedly stopping on an annoyance hit, press [L/O] when the scanner stops on the frequency. Search and Close Call Options The settings in this section affect custom searches, service searches, and Close Call operation. The following table shows what options are available for various search modes.](https://usermanual.wiki/Uniden-America/UB338/User-Guide-631532-Page-53.png)
![54Setting Service Search1 Custom Search1Quick Search Search and StoreClose Call CC AutoStore CC HitsSystemFreq. Lockouts ● ● ● ● ● ● Broadcast Screen ● ● ●2 ● ● CTCSS/DCS Search ● ● ● ● ● ● Repeater Find ● ● ● Max Auto Store ● ● Set Delay Time ● ● ● Set Modulation ● ● ● Set Attenuator ● ● ● Set Data Skip ● ● ●3 ● ● ● Set Step ● Set Record ● ● ● Adjust P25 Level ● ● ● ● 1 — Valid only for searching a range using Search with Scan. 2 — Valid only for storing a frequency from Search and Store. 3 — Valid only for storing a frequency from Service Search. Managing Locked-Out Frequencies While searching or during Close Call operation, if you press [L/O] while the scanner is stopped on a frequency, that frequency is locked out of these modes. The temporary L/O frequency limit is 250. The permanent L/O frequency number limit is up to 250 Unlocking All Frequencies [MENU] Srch/CloCall Opt ◙ Freq Lockouts ◙ Unlock All ◙ The scanner prompts you to confirm deletion. To confirm and delete all locked-out frequencies, press ◙. If no frequencies are locked, you see Nothing Locked Press Any Key. Otherwise, to cancel, press [MENU] to backstep. Reviewing Locked Out Frequencies [MENU] Srch/CloCall Opt ◙ Freq Lockouts ◙ Rvw Search L/O ◙ The scanner displays the first locked-out frequency and prompts you to unlock the frequency. Press ◙ to unlock the frequency. Or, rotate the Scroll Control or press to select a different frequency. If there are no frequencies to review, you see Nothing Locked Press Any Key. Otherwise, to cancel, press [MENU] to backstep. Searching for Subaudible Tones [MENU] Srch/CloCall Opt ◙ CTCSS/DCS Search ◙ On or Off ◙](https://usermanual.wiki/Uniden-America/UB338/User-Guide-631532-Page-54.png)
![55This setting controls whether the scanner will search for a subaudible tone when it stops on a transmission during search or Close Call operation. On — The scanner searches for and displays any subaudible tone found. Off — The scanner does not search for subaudible tones. Note: This feature does not operate when the scanner is in AM/WFM/FMB modulation mode. Screening Out Broadcast Sources [MENU] Srch/CloCall Opt ◙ Broadcast Screen ◙ This setting determines whether the scanner automatically ignores transmissions found during Custom Search, Quick Search, or Close Call operation that are on common broadcasts, paging systems, and other annoyance radio sources. Note: Broadcast screening does not work in All service search ranges. Set All Band On — turns on broadcast screen on each band. Set All Band Off — turns off broadcast screen on each band. Set Each Band — lets you set broadcast screen only on specific bands you select. On or Off appears next to each option. Turn the Scroll Control to select an option then press ◙ to change the setting. Pager — the scanner skips known paging system frequencies. FM — the scanner skips known FM frequencies. UHF TV — the scanner skips known UHF TV frequencies. VHF TV — the scanner skips known VHF TV frequencies. NOAA WX — the scanner skips known NOAA weather frequencies. Band 1-10 — select the custom band where you want to screen out broadcast sources. Program Band — brings you to a menu setting to let you program a custom frequency range for broadcast screen. Turn the Scroll Control to select an option then press ◙ to change the following setting. To set the custom range of a band, select one and press ◙ to set the limit. Band 1-10 — select the group where you want to screen out broadcast sources. Set Lower Limit— enter the lower limit of the frequency range, then press ◙ to set it. Set Upper Limit — enter the upper limit of the frequency range, then press ◙ to set it. To set the custom range of a band, select one and press ◙ to set the limit Finding Repeater Output Frequencies [MENU] ◙ Srch/CloCall Opt ◙ Repeater Find ◙ On or Off ◙](https://usermanual.wiki/Uniden-America/UB338/User-Guide-631532-Page-55.png)
![56This feature sets whether the scanner tries to tune to a repeater output frequency during Custom Search, Quick Search, or Close Call operation when it detects a transmission on a repeater input frequency. Since you can normally only hear one side of a conversation when you listen to an input frequency transmission, turning this feature on can let you hear both sides of the conversation where a standard difference frequency is set between the input and the output, to and from the repeater. On — The scanner automatically applies repeater reverse to detected transmissions. If the scanner detects the transmission on the output frequency, it beeps, Repeater Found appears, and it remains on the output frequency until transmissions end. If it does not detect a transmission on the output frequency, it remains on the original frequency. Off — The scanner does not try to find the output frequency. Setting the Maximum Auto Store Value [MENU] Srch/CloCall Opt◙ Max Auto Store ◙ This value sets how many hits the scanner will automatically store when it is in either Search and Store or Close Call Auto Store mode. Use the number keys to enter a value from 1 - 256, then press ◙. The default value is 100. When the scanner exceeds the maximum number of hits you set, it stops the auto-store operation. Setting the Modulation Type This setting controls the modulation method used for the frequency band and for Quick Search and Close Call operations. In most cases, if you leave this set to Auto, the scanner automatically selects the correct modulation type for the system you are programming. [MENU] Srch/CloCall Opt ◙ Set Modulation ◙ Auto — the scanner uses the default modulation for the frequency band. The default setting is Auto. AM — the scanner uses AM (amplitude modulation) for the frequency band. FM — the scanner uses FM (frequency modulation) for the frequency band. NFM — the scanner uses narrowband FM for the frequency band. WFM — the scanner uses wideband FM for the frequency band. WFM (Broadcast) — the scanner uses FM Broadcast for the frequency band. Setting Attenuation Turn on this setting if you are near other strong signal sources. Attenuation sometimes helps to reduce interference and desensitization that strong signals create. [MENU] Srch/CloCall Opt ◙ Set Attenuator ◙ This setting controls the attenuator for Quick Search and Close Call operation. Select your setting, then press ◙. On — Reception is attenuated by about 20 dB. Off — The attenuator is off. Setting Data Skip [MENU] Srch/CloCall Opt ◙](https://usermanual.wiki/Uniden-America/UB338/User-Guide-631532-Page-56.png)
![57 Set Data Skip ◙ This setting controls how the scanner behaves when it stops on a channel that has a data signal. On — the scanner stops briefly on the channel, but then immediately resumes scanning automatically. Off — the scanner remains on the channel until the transmission stops. The default setting is Off Notes: If you are trying to test the Close Call feature with a nearby transmitter (such as a CB) and you do not talk into the transmitter, the scanner detects this unmodulated carrier as data and skips the frequency when Data Skip is on. Turn the feature off or talk into the transmitter to modulate the carrier. This setting is ignored for AM/WFM/FMB channels. Setting the Delay Time [MENU] Srch/CloCall Opt ◙ Set Delay Time ◙ This setting determines how long the scanner waits after a transmission ends before resuming Quick Search or Close Call operation. 1-5 sec The scanner waits the set amount of time after the transmission ends before resuming. The default setting is 2 sec. Off The scanner resumes immediately when the transmission ends. Setting the Search Frequency Step [MENU] Srch/CloCall Opt ◙ Set Step ◙ This setting lets you select the frequency step used for setting the channels. Auto The step is based on the band (see the table at the front of the manual) This is also the default setting. 5.0 kHz, 6.25kHz, 7.5 kHz, 8.33kHz, 10.0 kHz, 12.5 kHz, The scanner uses the selected step. 15.0 kHz, 20.0 kHz, 25.0 kHz, 50.0 kHz, 100.0 kHz Setting Record You can set the RECORD OUTPUT jack to provide an audio signal to a sound recording device (tape, PC, flash memory) for live recording of transmissions. [MENU] Srch/CloCall Opt ◙ Set Record ◙ On — enables an output to an audio recorder at the RECORD OUT jack. Off — disables an audio signal at the output jack. Adjust P25 Level You can select the best threshold for the APCO mode. [MENU] Srch/CloCall Opt ◙ Adjust P25 Level ◙](https://usermanual.wiki/Uniden-America/UB338/User-Guide-631532-Page-57.png)
![58Auto — The automatic adjust feature is enabled. Manual — you can set the threshold manuals depending on your circumstances. Default — sets the factory default value. Priority Scan If you activate a Priority Scan while scanning , the radio interrupts its scan every two seconds to check the priority channel (P-Ch). PRI appears on the screen. There are two ways to set Priority Scan. 1. Press [PRI] to set one of the following Priority Scan levels in Scan / Scan Hold mode. Off — Normal scanning. The scanner provides no special treatment for Priority Channels. On — The scanner scans all unlocked channels and also checks those designated as Priority. While scanning a conventional system, the scanner interrupts every 2 seconds and checks the priority channels in each unlocked conventional system. Priority channels in lower priority key numbered systems (starting from 1) have highest priority. PRI appears when you select this mode. Plus On — The scanner only scans priority channels in unlocked conventional systems. PRI flashes when you select this mode. [insert LCD screen line art from Page 83 of Op Spec] 2. You can choose how the scanner treats Priority Channels using the Menu options. [MENU] Set Priority ◙ Choose Off, On, or Plus On ◙ Using Weather Alert (SAME) Your BCD996T has been primarily designed as a multi-band, general services scanner. While it incorporates a weather alert ability as one of its features, we recommend that you not use the scanner as your sole means for receiving emergency alerts. Your local electronics retailer can supply a selection of weather radios that are dedicated to weather service monitoring including SAME alerts. Such radios can be more dependable for this application. Your scanner allows you to search for a local NOAA weather broadcast and set it to alert when a SAME (Specific Area Message Encoding) weather alert is broadcast on a NOAA channel. You can also program SAME codes into the scanner and set a weather channel as a priority channel. Searching For a Weather Broadcast [MENU] WX Operation ◙ Weather Scan ◙ The scanner starts scanning the preprogrammed weather frequencies, and stops on the first signal. Generally, there will be one channel of the ten that you will receive best. If this station is weak, rotate the Scroll Control to check for other weather broadcasts in your area. Note: NOAA broadcasts are continuous broadcasts. You only lose reception if you move out of a coverage area. If the signal is lost, the scanner resumes searching for a weather transmission. Turning Weather Alert On/Off In weather alert mode, your scanner functions as a severe weather warning radio. This is especially useful when your area is expecting severe weather conditions late at night. When you set the scanner to weather alert mode, it holds on the weather channel,](https://usermanual.wiki/Uniden-America/UB338/User-Guide-631532-Page-58.png)
![59but does not play the channel’s audio. If it detects a weather alert, it sounds a tone, displays information about the weather alert, and turns on the audio so you can hear the weather broadcast. [MENU] WX Operation ◙ Weather Alert ◙ This setting determines which types of signals will trigger an alert. Choose your setting, then press ◙. Alert Only — the scanner alerts when it detects the 1050 Hz tone that accompanies all weather alerts. SAME 1-5 — the scanner alerts and displays information about the weather alert when it receives a weather alert signal that includes any FIPS code you have programmed into the specified SAME group. All FIPS — the scanner alerts and displays information about the weather alert when it receives any FIPS code. Programming a SAME Group You can edit any of the 5 SAME groups in your scanner. Each group can have up to 8 FIPS codes. SAME (Specific Area Messaging System) is a system developed by the National Weather Service to reduce the number of alerts received by consumers by allowing them to hear alerts only for the counties in which they have interest such as where they live or work. Each alert contains information about the type and severity of the alert, as well as the specific geographic locations affected by the alert. The geographic locations are designated using FIPS codes. Each county or parish in the US and its territories are assigned a FIPS code. In addition, certain special regions and wildcard settings can be assigned. FIPS codes are in the format nSSCCC: n: A special sub-county designator. For an entire county, use 0. SS: The state code. CCC: The county code. For example, Tarrant County in Texas is assigned to FIPS code 048439. 0 indicates the entire county 48 indicates the state of Texas 439 indicates Tarrant County To get the FIPS code for your county, visit the National Weather Service web site at http://www.nws.noaa.gov and search for “FIPS Listing”. [MENU] WX Operation ◙ Program SAME ◙ Select the SAME group to edit ◙ Edit Name — enter the name you want to assign to the SAME group you selected. Edit County — select the position you want to store the FIPS code into, then press ◙, enter the FIPS code, and press ◙ again. Setting WX Alert Priority [MENU] WX Operation ◙ WX Alt Priority ◙ ](https://usermanual.wiki/Uniden-America/UB338/User-Guide-631532-Page-59.png)
![60On — the scanner checks the weather channels every 5 seconds for a 1050 Hz weather alert signal. Press the Scroll Control to select. Off — the scanner does not check the weather channels. This is the default setting. Press ◙ to select. Notes: • You can also turn this option on and off by pressing the front-panel WX key. • When you turn on this option, you will notice a break in the audio every 5 seconds as the scanner checks for the weather alert signal. Fire Tone-Out Introduction Your scanner can be set to respond to fire tone-outs, a system comprised of standardized two-tone sequential paging, short one-tone paging, and long group tone paging. You can save up to 10 settings. When you select a setting in standby mode, the scanner also monitors for any other setting that uses the same transmit frequency, modulation, and attenuation settings. You need tone-out setup information from the agency you wish to monitor. Check with your local agency or on-line resources as Uniden America Corporation has no information regarding local tone-out systems. Setting Tone-Out Standby [MENU] Tone-Out for... ◙ Tone-Out Standby ◙ Turn the Scroll Control to select which of the ten tone-outs to monitor. All tone-outs that have the same frequency, modulation, and attenuation setting as the one you select, are also monitored. In standby mode, the display cycles through all monitored tone-out settings. Regardless of the current display, the scanner always alerts on any received tone-out that matches a stored setting. If you press [HOLD/RESUME] while in standby mode, the scanner temporarily exits the mode and you hear all transmissions on that frequency. No alerts sound, even if a tone-out matches one you have stored. Press [HOLD/RESUME] again to return to standby mode. Setting Up Tone-Out [MENU] Tone-Out for... ◙ Tone-Out Setup ◙ Scroll to select the tone-out (1 - 10) you want to program, then press ◙. Then you can scroll to any of the following settings and press ◙ to select and modify the selected settings: Edit Name — Sets the name for the selected tone-out setting. Set Frequency — Sets the tone-out’s RF frequency parameters. Then select: • Edit Frequency — Enter the desired frequency that the scanner should monitor for the tone-out. • Set Modulation — Set the modulation type for the paging signal. Next choose the modulation setting: Auto —The scanner uses the default modulation for the frequency band. If the default modulation is AM, WFM, or FMB, the modulation operates as FM. FM — The scanner uses FM for the frequency band. This is the default setting. NFM — The scanner uses NFM modulation. Set Attenuation — Turn the Scroll Control to select On or Off.](https://usermanual.wiki/Uniden-America/UB338/User-Guide-631532-Page-60.png)
![61Set Tone — Sets the audio tone frequency for the page. Then choose the Tone setting. • Edit Tone A — Set the audio frequency for Tone A • Edit Tone B — Set the audio frequency for Tone B Notes: For two-tone pages, enter a value for A and B. For one-tone pages using short tones of less than 3.75 seconds, enter the tone value for A, and 0 (zero) for B. For long-tone pages, such as group pages of more than 3.75 seconds, enter 0 (zero) for A and the tone value for B. Set Delay Time — Sets the time the scanner remains in monitor mode after the scanner receives a page and the carrier drops. • 1-5 sec — the scanner resumes standby mode after the carrier drops and the selected time expires. • Infinite — you must press [HOLD/RESUME] after a page to resume standby mode. • Off — the scanner resumes standby as soon as the carrier drops after a page. Set Alert — Sets the alert the scanner uses when it receives an alert. Alert 1 - 9 — scroll to select the alert tone pattern, The scanner sounds each alert as you scroll to its numbered value Off — the scanner does not sound an alert. After you select an alert pattern, the scanner prompts for the alert level for a received alert. Level options 1 to 15 sets a fixed audio level independent of the main volume setting. AUTO uses the main volume setting for the alerts. Tone-Out Multi-Channel Monitoring The scanner can check multiple tone combination pages for channels whose settings are the same. To achieve this, set the channel to the same frequency, modulation, and attenuation. For example, the scanner checks tone combinations for channel 1 to channel 3 for the following settings Frequency (MHz) Modulation Attenuator Tone A (Hz) Tone B (Hz) Ch 1 137.0000 Auto (NFM) Off 1000.0 2000.0 Ch 2 137.0000 Auto (NFM) Off 2200.0 3200.0 Ch 3 137.0000 Auto (NFM) Off 1500.0 2500.0 Ch 4 137.0000 NFM Off 1800.0 2800.0 Ch 5 137.0000 FM Off 2000.0 3000.0 Ch 6 138.0000 Auto (NFM) Off 1000.0 2000.0 Although set to Auto, if the band default is anything other than FM or NFM, modulation will always be FM. If you switch to Tone-Out Standby Mode for Multi-Channel Monitoring, the display switches every 2 seconds to show the frequency it is checking. However, it is, at the same time, checking all frequencies for Tones. If one is detected, it switches to Tone-Out Hold mode. Location-Based (GPS) Scanning The BCD996T can make use of data transmitted from an attached GPS unit that lets the radio automatically enable and disable systems based on the geographic information you provide such as: • Latitude (the center of the range) • Longitude (center of the range) • Range (the radius of a circle around the latitude and longitude coordinates selected from .5, 1, 3, 5, 10, 20, 30,and 50 miles.](https://usermanual.wiki/Uniden-America/UB338/User-Guide-631532-Page-61.png)
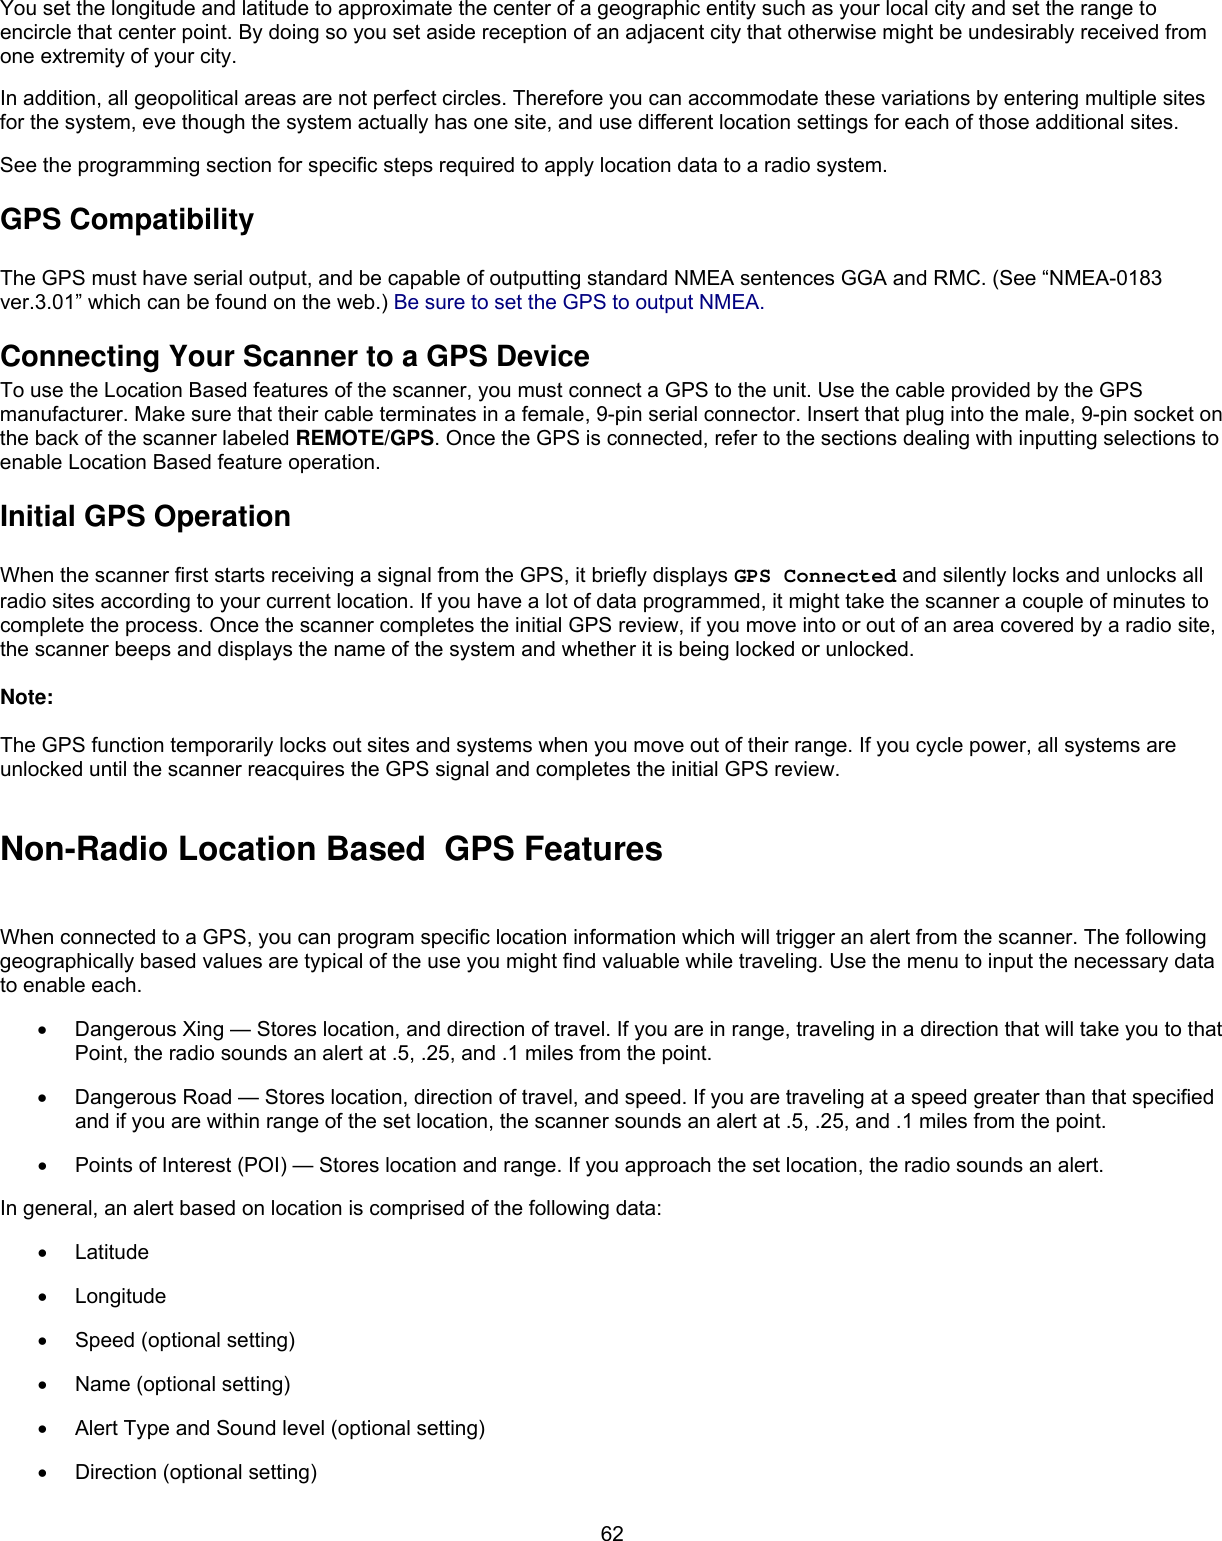
![63There are four setting conditions that can be set to result in alerts: • A speed setting greater than zero with no direction entered. This results in an alert based only on speed in any direction. • A speed setting grater than zero with a specific direction entered. This triggers an alert when the speed is exceeded but only in the specified direction. • Speed is equal to zero and a direction is entered along with a location. This setting is used for a dangerous intersection alert. • Speed is set to zero and no direction is entered but only location. This is a point of interest alert. By pressing [FUNC] + [GPS] you can next choose from a setting for Speed, Intersection, or Point of Interest. By pressing & holding [GPS], you can select a location type and store current location data. The following table shows the attributes available for each category. Note that some options are different for a specific location type. Refer to the information that follows to set those specific attributes. Menu Option POI Dangerous Xing Dangerous Road New Location ● ● ● Edit Name ● ● ● Set Type (edit) ● ● ● Set Alert Beep ● Set Alert Volume ● ● Set Location Info ● ● ● Set Heading ● ● Set Range ● Set Speed Limit ● ● Set Lockout ● ● ● Delete Location ● ● ● Setting the Options [MENU] Program Location ◙ Select your location type ◙ New Location ◙ The scanner assigns a sequentially created number to your new Point of Interest. Edit Name ◙ Use the Scroll Control and ◙ to change the name the scanner assigns to the POI to one you prefer. Set Type ◙ At this level you have an opportunity to reassign or edit the location type you first selected and set the location to either one of the other types or change the data in an existing location. This switch also associates a new Alert Tone to the location. You can still associate a different sound level. Set Alert Beep ◙ Choose from Off, no tone sounds or Alert 1 to Alert 4. Set Alert Volume ◙ select from 15 sound levels, plus Auto and Off. As you rotate the Scroll Control the Alert tone set through the POI menu is played louder and louder. Press ◙ to select one. You can also select no sound or Auto, a level that is the same setting as your volume control setting. Note: First choose POI as your type so that you can then choose the desired Alert Beep. Set LocationInfo ◙ Input the latitude and then the longitude.](https://usermanual.wiki/Uniden-America/UB338/User-Guide-631532-Page-63.png)
![64 Set Range ◙ Input how far away the alert sounds for the site (only available for POI’s) For Dangerous Xing and Dangerous Road sites there are two additional settings: . Set Heading ◙ You can input the compass direction to the site from your present location or, you can select All Range. For example: If the Dangerous Road location is toward the Northeast and you are driving in that direction, then choose NE (45°) If you know you will be driving a course which is not a fairly straight line to that site, choose All Range which will trigger the alert regardless of direction as long as the other requirements (range, speed) are met. If you travel in a Northeast direction and do not travel either side of a northeast line by up to 22 degrees, the alert system will function. Set Speed Limit ◙ Choose from 0, through 100 MPH in 5 PHM steps or the equivalent in KPH for metric usage. Set Lockout ◙ As you near your target location, an alert sounds at 0.5, 0.25, and 0.1 mi. If you hear the first and prefer to not hear any others that occasion, simply press [L/O] to disable the operation while keeping all the data for another time. You can use the menu Lockout option as well. When you set the location system to Temporary L/O and move away more than four miles and then come back again, L/O status is automatically canceled. If you turn off the switch, the scanner is unlocked. GPS Display Mode If you press GPS, the scanner switches to a GPS display mode. In this mode, you can see location information as well as information about your position relative to the selected POI. The third line of the screen shows Off if no POI is selected. Rotate the Scroll Control to select different POI’s. Press [FUNC] (◙) + [GPS] then rotate the Scroll Control to select among the following GPS screens: [place screen shots of each GPS related screen with callouts to the screen fields] GPS Review Location Mode If you have programmed data for a Point of Interest, Dangerous Crossing, and a Dangerous Road, you can review each set on a screen dedicated to showing just that data. Press [GPS] and then [EYES] The most recent stored location is displayed. Use the Scroll Control to display the next screen for review. Important: While you are in normal GPS mode or Scan Mode and you press and hold [GPS] for 2 seconds, location data at that point is stored. The scanner opens a dialog to store your current location. The default name is T YYMMDD hhmmss that indicates the date and time you stored the location point. The data is put into memory and you are given the opportunity to designate the location as POI, Dangerous Xing, or Danger Road. However, if you are in Review Mode and press and hold [GPS], the data of the new point will overwrite the currently displayed data. The some of the following keys have a somewhat different function while in GPS Review Mode. [GPS] — Press and Hold: overwrites and stores current location data [MENU] — returns to GPS Mode. [L/O] — changes the status of the currently displayed location data. [L/O] — press and hold to unlock all locations of the current type (POI, DXG, or DRG) [L/O] — press and hold in Function Mode unlocks all locations of all types. Location System and All Unlocked is displayed. [.No] — returns to GPS Mode. [EYES] — lets you edit a location details [SCAN/SEARCH] — enter scan mode. [HOLD/RESUME] — enter Scan Hold mode ◙ — enter Function Mode. — select a programmed location from all stored locations. The location data is stored in the order POI, Dangerous Xing, and Dangerous Road. Then, within each category, the data is stored by the programmed name.](https://usermanual.wiki/Uniden-America/UB338/User-Guide-631532-Page-64.png)
![65[insert the following here: 3 LCD illus such as on page 113 of V 1.02 Op Spec. For each screen, place small circle number near or almost on a display line or abbreviation such as DXG, DRD, L/O, Hollywood etc. Then make a list of meaning for each next to or below the screen] Care and Maintenance General Use Turn the scanner off before disconnecting the power. If memory is lost, simply reprogram each channel. Always press each button firmly until you hear the entry tone for that key entry. Location Do not use the scanner in high-moisture environments such as the kitchen or bathroom. Avoid placing the unit in direct sunlight or near heating elements or vents. If the scanner receives strong interference or electrical noise, move it or its antenna away from the source of the noise. If possible, a higher elevation might provide better reception. Also try changing the height or angle of the antenna. Cleaning Disconnect the power to the unit before cleaning. Clean the outside of the scanner with a mild detergent. To prevent scratches, do not use abrasive cleaners or solvents. Be careful not to rub the LCD window. Do not use excessive amounts of water. Repairs Do not attempt any repair. The scanner contains no user serviceable parts. Contact the Uniden Customer Service Center or take it to a qualified repair technician. Birdies All radios can receive “birdies” (undesired signals). If your scanner stops during Scan mode and no sound is heard, it might be receiving a birdie. Birdies are internally generated signals inherent in the electronics of the scanner. Press [L/O] to lock out the channel. Troubleshooting From time to time, Uniden might update the BCD996T’s firmware to change the scanner’s performance or incorporate new features. These updates can be applied by you using the supplied PC cable and the software that we will provide. Please note that firmware data must be input by means of the front panel serial cable connection, not the rear connector. We recommend you visit the Uniden web site periodically to check for the latest updates. However, if you believe your BCD996T is not performing properly, try these suggestions. Problem Possible Cause Suggestion The scanner doesn’t work. The scanner might not be receiving any power. Make sure the AC adapter is connected to an AC outlet and the scanner. The display should light and cycle if you repeatedly press [VOL]](https://usermanual.wiki/Uniden-America/UB338/User-Guide-631532-Page-65.png)
![66 If there is a wall switch that controls power to the AC outlet where you connected the AC adapter, make sure it is on. Check the antenna connection or move or reposition the antenna. Move the scanner. Improper reception. The antenna might need to be adjusted. You might be in a remote area that could require an optional multi-band antenna. Check with your dealer or local electronics store. The squelch might need to be adjusted. Adjust the squelch threshold. See “Turning On the Scanner and Setting the Squelch” on Page XX. The antenna might need to be adjusted. Check the antenna connection. One or more channels might be locked out. Make sure the channels you want to scan are not locked out. The channel’s frequency might not be stored in memory. Make sure the channel’s frequency is stored in the scanner’s memory. Scan won’t stop. The channel might not be active. Wait for a transmission on the channel. You must press [SCAN/SEARCH] to scan. Press [SCAN/SEARCH]. The squelch might need to be adjusted. Adjust the squelch threshold. See “Turning On the Scanner and Setting the Squelch” on Page XX. One or more channels might be locked out. Make sure the channels you want to scan are not locked out. Scan won’t start. The antenna might need to be adjusted. Check the antenna connection. The squelch might need to be adjusted. Adjust the squelch threshold. See “Turning On the Scanner and Setting the Squelch” on Page 42. The antenna might need to be adjusted. Check the antenna connection. Weather scan doesn’t work. There might not be a NOAA weather broadcast in your area. Move to an area with a NOAA weather broadcast. If you experience difficulty while in TrunkTracker™ mode, try the following steps.](https://usermanual.wiki/Uniden-America/UB338/User-Guide-631532-Page-66.png)
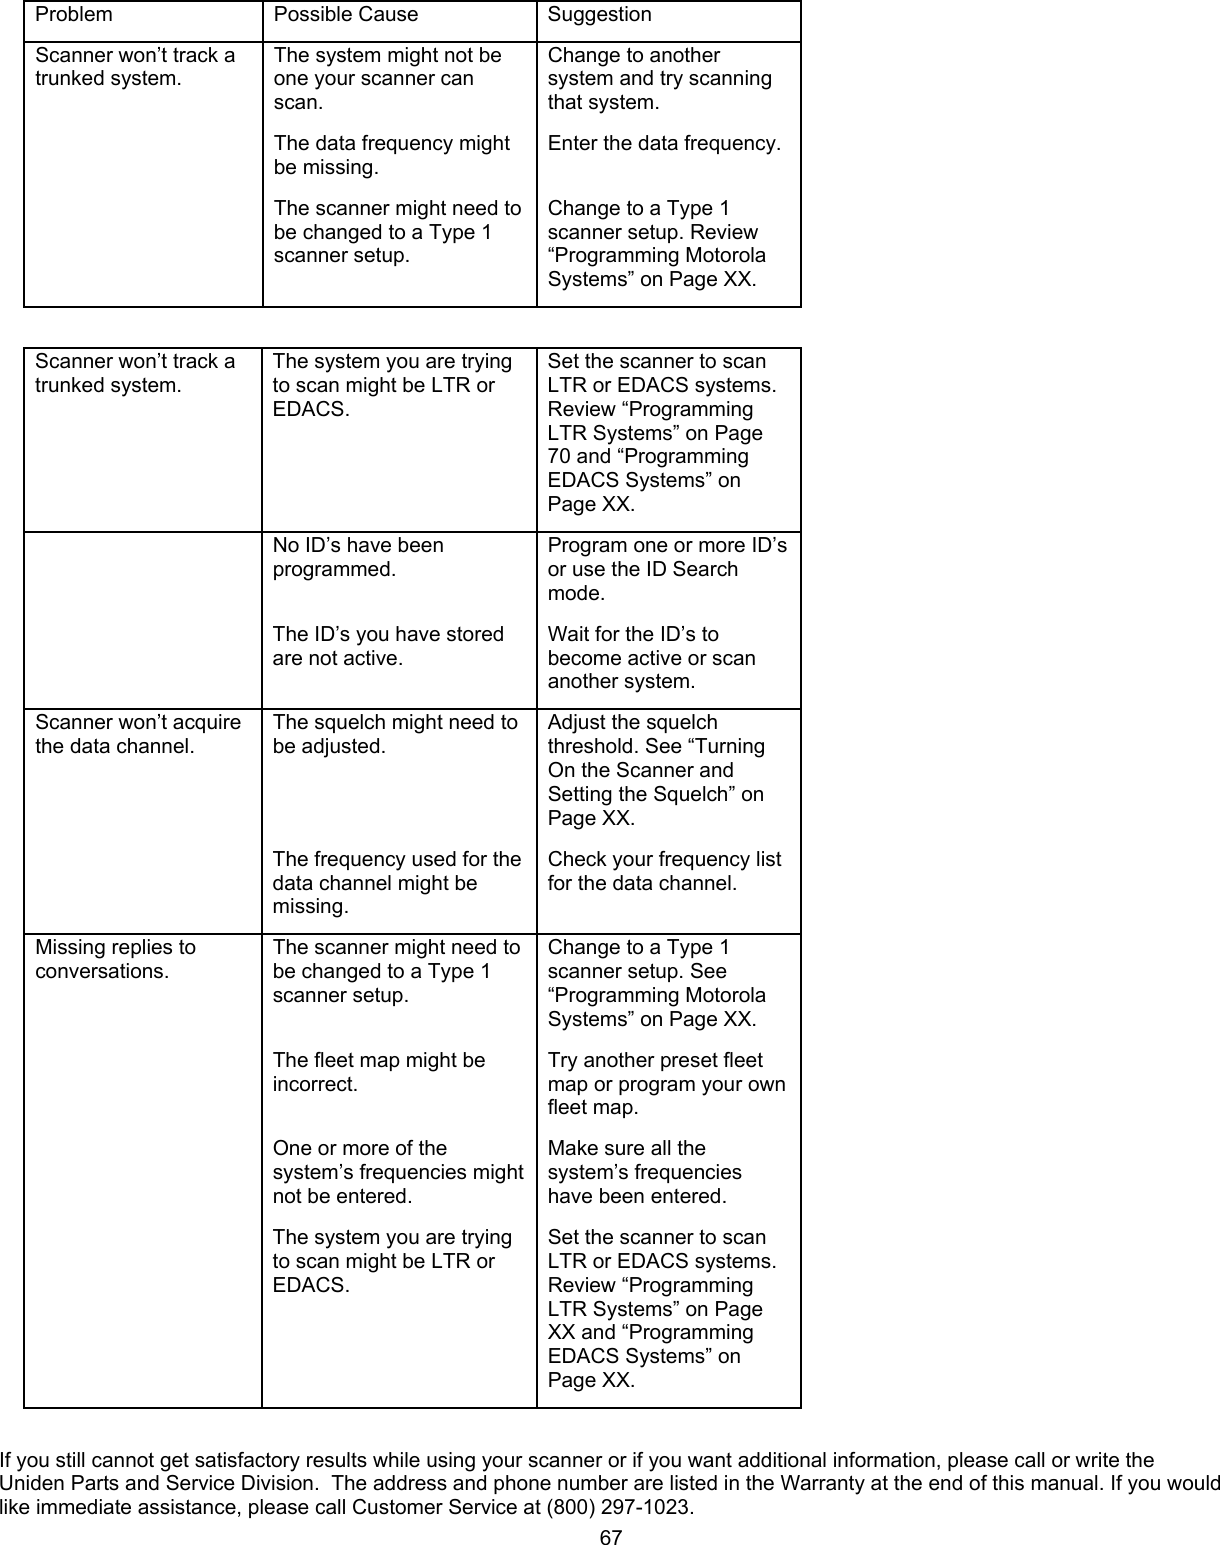
![68If you have Internet access, you can visit http://www.uniden.com for additional information. Specifications [INSERT NEW, FINAL SPECIFICATIONS FOR THE BCD996T HERE] Features, specifications, and availability of optional accessories are all subject to change without notice. Contact your local Uniden Dealer or call the Uniden Parts Center at: (800) 554-3988, 8:00AM to 5:00PM EST, Monday through Friday, for information about ordering these optional accessories. Reference Preset Fleet Maps Note: Size Codes in parenthesis indicates that the Size Code spans more than one block. Preset Map 1 Preset Map 2 Block/Size Code Block/Size Code 0 Size Code 11 0 Size Code 4 1 Size Code 11 1 Size Code 4 2 Size Code 11 2 Size Code 4 3 Size Code 11 3 Size Code 4 4 Size Code 11 4 Size Code 4 5 Size Code 11 5 Size Code 4 6 Size Code 11 6 Size Code 4 7 Size Code 11 7 Size Code 4 Preset Map 3 Preset Map 4 Block/Size Code Block/Size Code 0 Size Code 4 0 Size Code 12 1 Size Code 4 1 (Size Code 12) 2 Size Code 4 2 Size Code 4 3 Size Code 4 3 Size Code 4 4 Size Code 4 4 Size Code 4 5 Size Code 4 5 Size Code 4 6 Size Code 12 6 Size Code 4 7 (Size Code 12) 7 Size Code 4 Preset Map 5 Preset Map 6 Block/Size Code Block/Size Code 0 Size Code 4 0 Size Code 3 1 Size Code 4 1 Size Code 10](https://usermanual.wiki/Uniden-America/UB338/User-Guide-631532-Page-68.png)
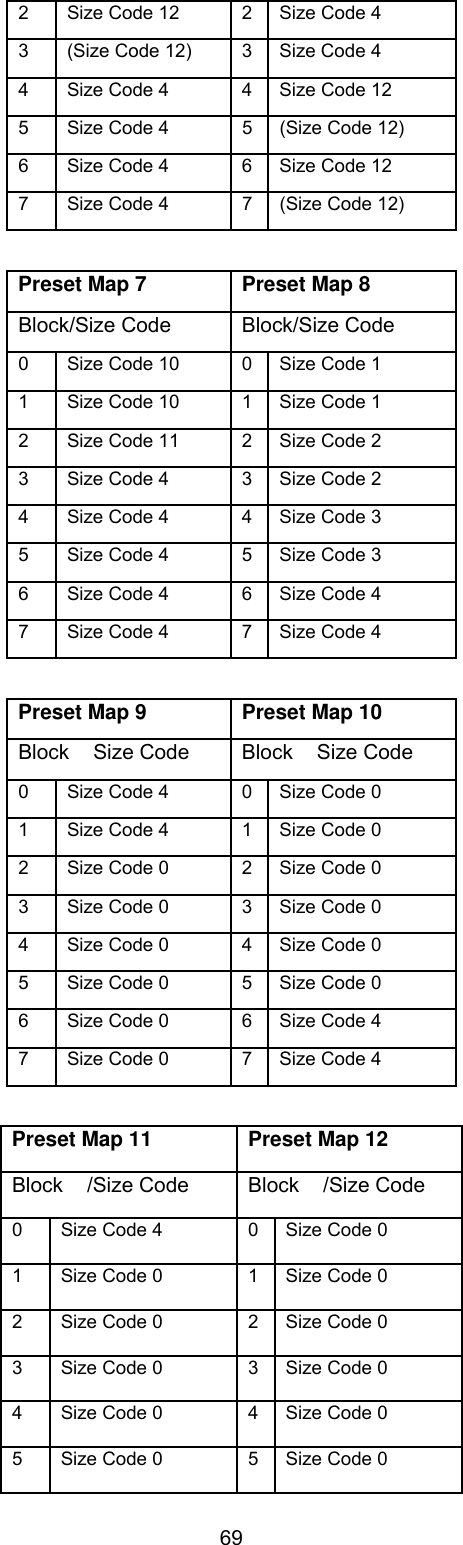
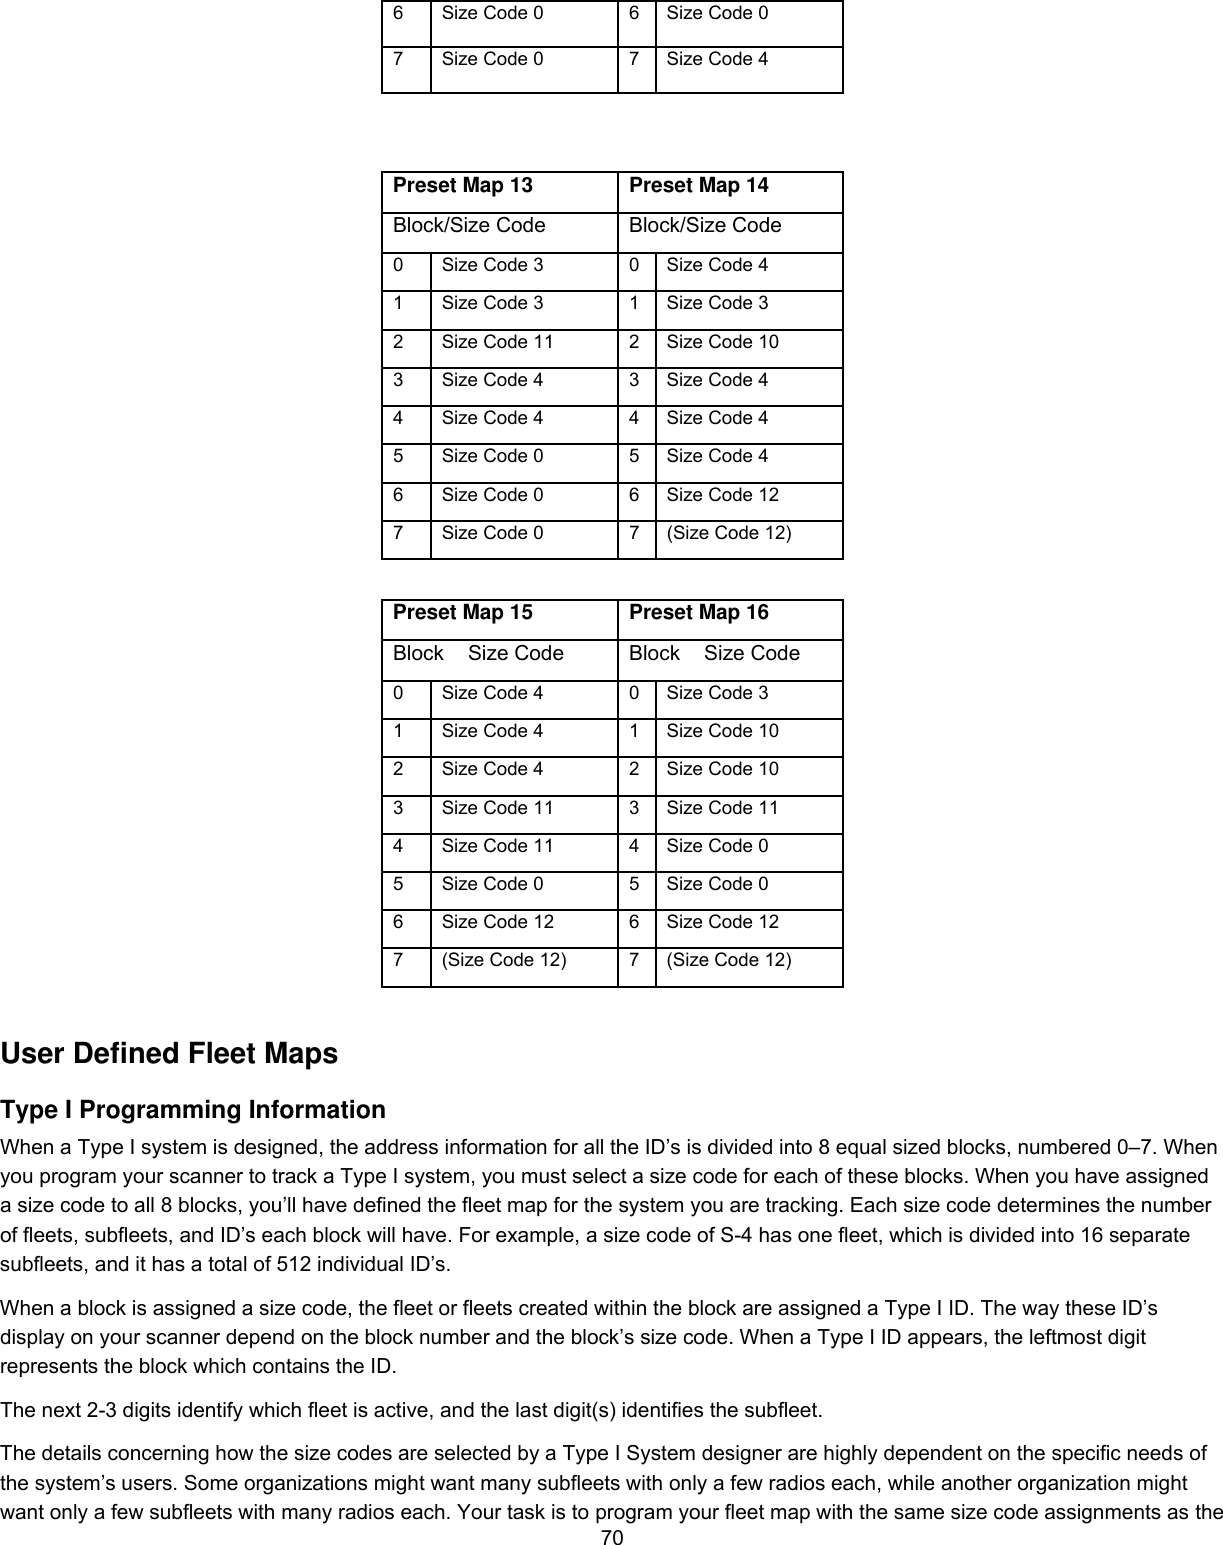
![71trunked system. If you do this accurately, you’ll track all the Fleet-Subfleet combinations used by the system. In other words, you’ll hear complete communications while monitoring a trunked system. If you don’t already know the size codes used, you’ll have to guess at them. But since you don’t have to figure out all the blocks at once, this isn’t as hard as it seems. Select a size code for a block, and then press Scan. Now listen to the communications. If you decide you are receiving most of the replies to the conversations with ID’s assigned to the block you just programmed, then you’ve probably selected the right size code and can work on the next block of the map. Finally, for most public safety systems there are some size codes which are more common. S-3 and S-4 are probably the most common, followed by S-10, S-11, and S-12. Size Code Restrictions If you select size code S-12, S-13, or S-14, there are some restrictions as to which blocks can be used for these codes. • S-12 can only be assigned to Blocks 0, 2, 4, or 6. • S-13 can only be assigned to Blocks 0 and 4. • S-14 can only be assigned to Block 0. Since these size codes require multiple blocks, you will be prompted for the next available block when programming a fleet map. For example, if you assign Block 0 as an S-12, you will be prompted for b2, the next block available, instead of b1. And if you assign Block 0 as an S-14, you would not see another prompt because it uses all available blocks. Preprogrammed Systems and Lockout Options Your scanner is preprogrammed with over 500 channels covering police, fire, and ambulance operations in the 25 most populated counties in the US. The following list details the preprogrammed information. By default, only the Nationwide systems are unlocked, and your scanner begins to scan them when you turn it on. To speed up scanning, you can lock out systems that are beyond your reception area (typically no more than 25 miles using the supplied antenna). Suggestion: Do not unlock all the preprogrammed sites. You may wish to lock all the sites and unlock only those in your area by using their Quick Key. Follow these steps to lock out systems. 1. Press and hold [FUNC] 2. While continuing to hold , rotate the Scroll Control to select a system you want to lock out. 3. While continuing to hold , press L/O to lock out the system. 4. Repeat Steps 2, and 3 to lock out additional systems. The preprogrammed systems provide a starting point; you will want to find out more information about your local radio systems so you can customize the programming to better suit your listening preferences. Notes: The list is subject to change. You might hear transmissions on frequencies assigned to very distant stations. This will happen if a local system also uses the same frequency. Disregard the text tag for these transmissions (e.g. if you are in California, you aren’t really receiving Florida transmissions even if the scanner displays Dade County). To free up memory, delete systems that you will not be monitoring. Data used for the preprogrammed information was supplied courtesy of http://www.radioreference.com , the Internet’s premier scanning resource (RadioReference is not affiliated with Uniden America Corporation).](https://usermanual.wiki/Uniden-America/UB338/User-Guide-631532-Page-71.png)