Uniden America UB350 HANDHELD SCANNER User Manual OML AMWUB350
Uniden America Corporation HANDHELD SCANNER OML AMWUB350
UserManual.wiki
>
Uniden America
>
UB350 User Manual
USERS MANUAL
Navigation menu
Upload a User Manual
Namespaces
Wiki Guide
HTML
PDF
Info
Views
User Manual
Discussion / Help
Navigation
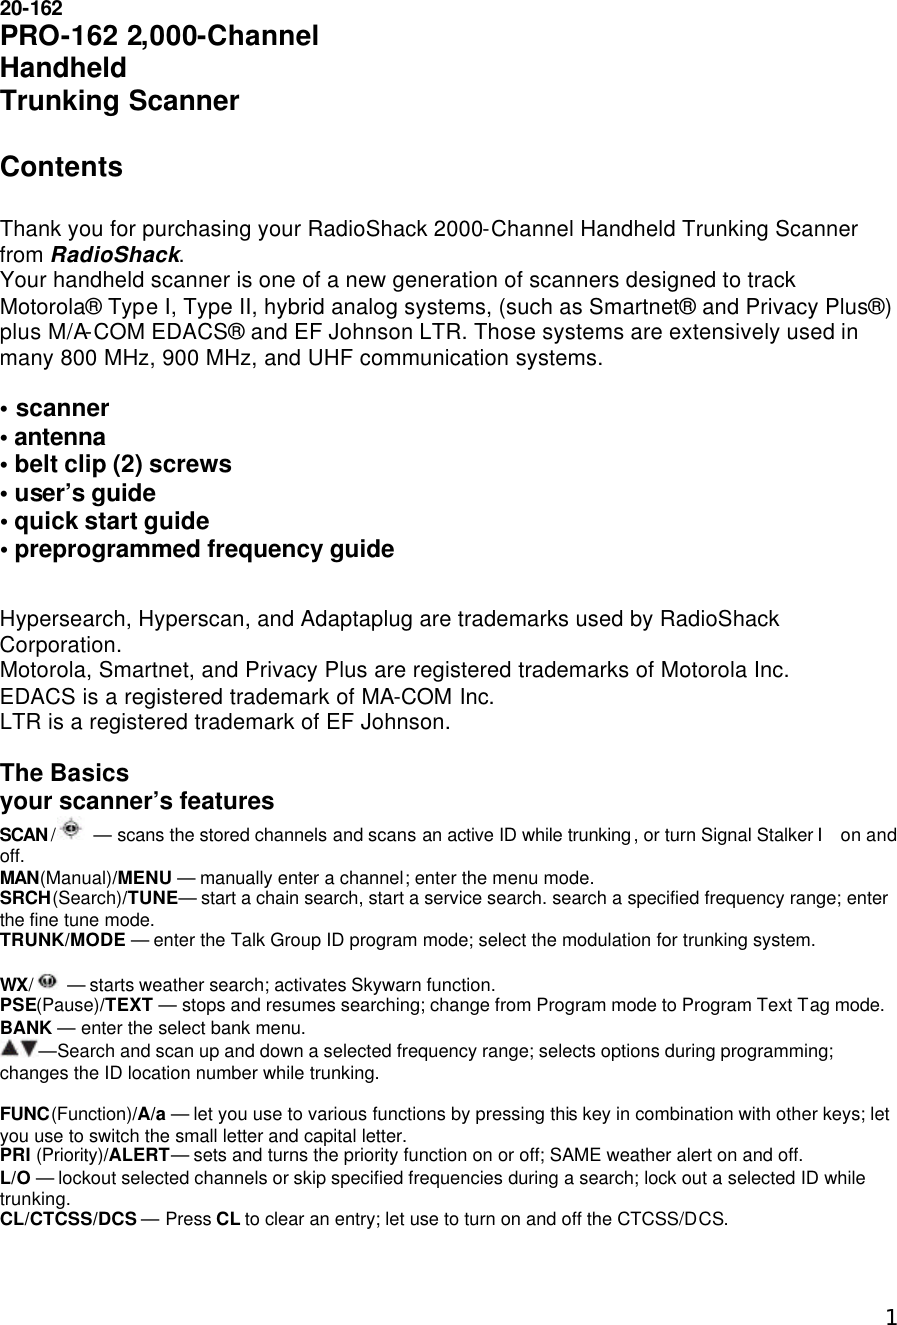
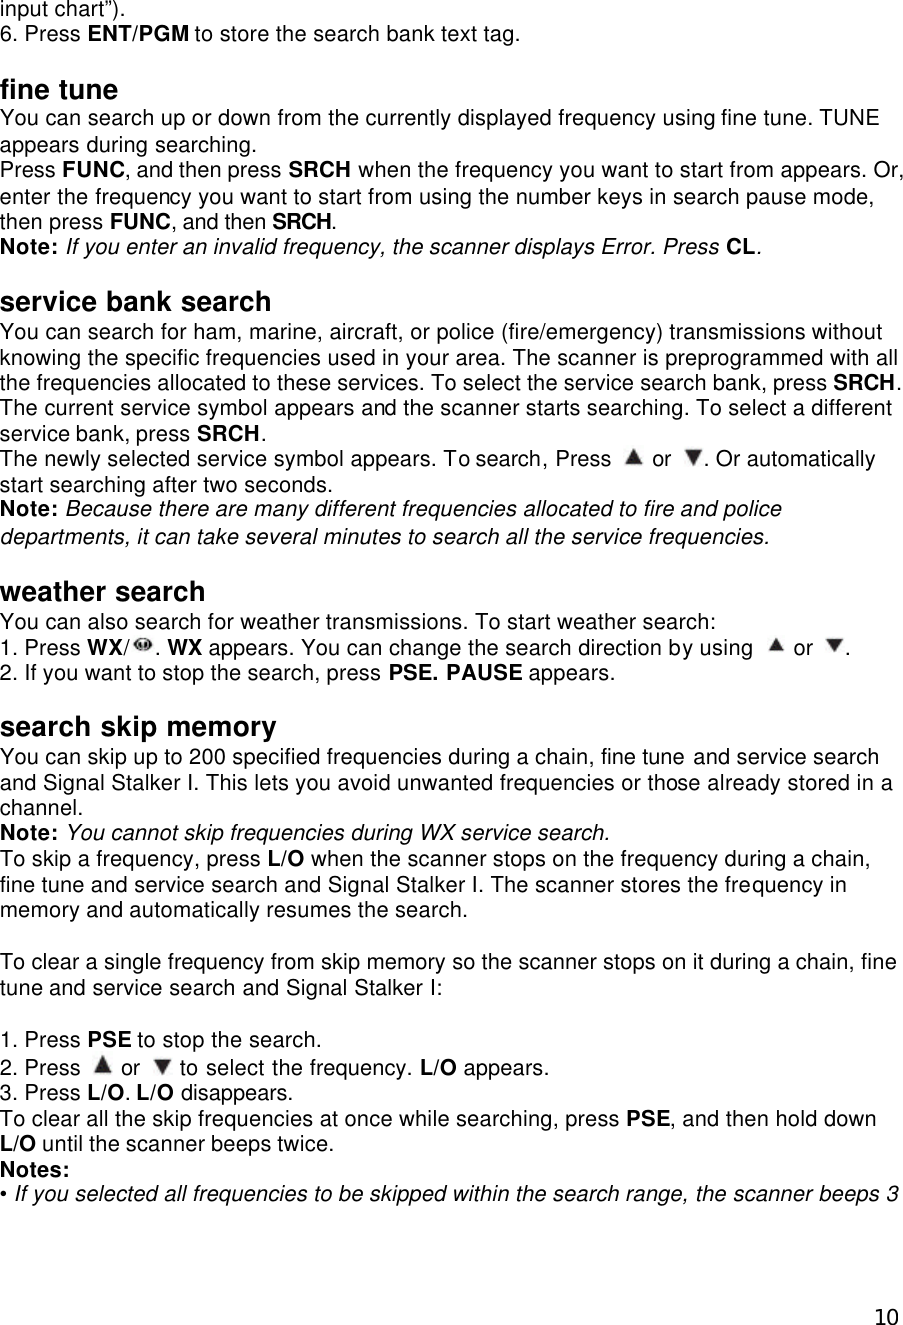
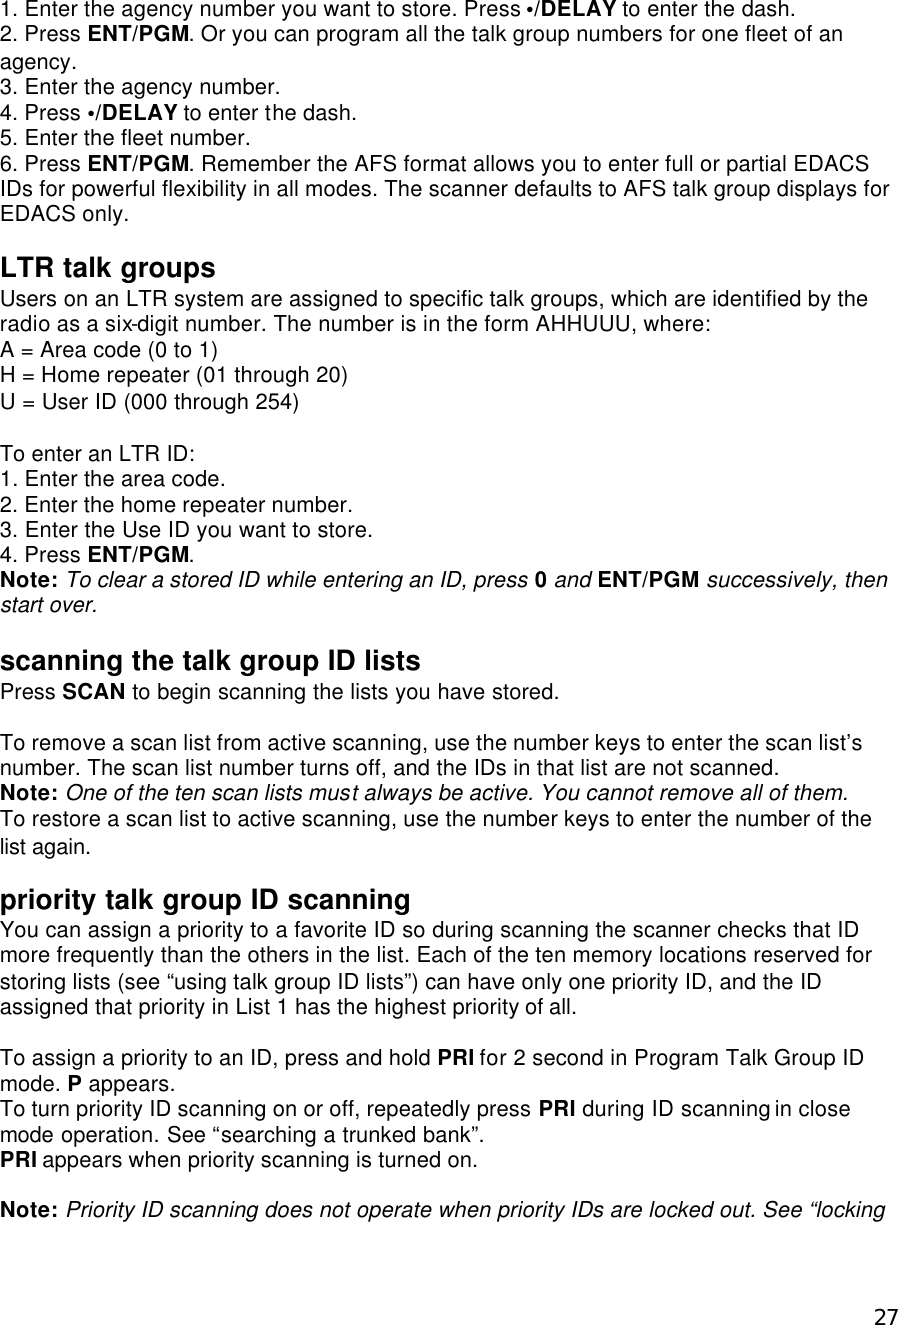
![65. You can store same as channel text tag. text input chart User can use the number keypad on scanner to enter text by referring to the alphabet printed on each number key. When user presses the number key in the text entry field, the scanner displays the first alphabet printed on the number key. Press the number key twice to display the second alphabet and three times to display the third. When user wants to input the small letter, press [A/a] to switch the capital letter and small letter. For example, to enter "Scanner": 1. Press [7/PQRS] 4 times to enter "S". 2. Press [A/a] to switch the capital letter and small letter. 3. Then press [2/ABC] 3 times to enter "c". 4. Press [?] to move cursor. 5. Press [2/ABC] 1 times to enter "a". 6. Press [6/MNO] 2 times to enter "n". 7. Press [?] to move cursor. 8. Press [6/MNO] 2 times to enter "n". 9. Press [3/DEF] 2 times to enter "e". 10. Press [7/PQRS] 3 times to enter "r". 11. Press [ENT] to end your text entry. Number of times key is pressed Keys 0 1 2 3 4 5 6 7 8 9 1 . ( ) - + * / @ ^ & 2/ABC A B C 2 3/DEF D E F 3 4/GHI G H I 4 5/JKL J K L 5 6/MNO M N O 6 7/PQRS P Q R S 7 8/TUV T U V 8 9/WXYZ W X Y Z 9 0 Space # ? _ , $ % ! ~ ' Press A/a to choose the input mode. (Capital letter, Small letter, Numeric) programming channel CTCSS/DCS code Your scanner can monitor systems using a Continuous Tone Coded Squelch System (CTCSS) and Digital Coded Squelch (DCS) system, which allow squelch to open only when the tone you have programmed with a specific frequency is received along with a transmission. 1. Press ENT/PGM to put the scanner in programming mode. 2. Enter the channel number where you want to store a CTCSS/DCS code. If you make a mistake, press CL repeatedly until the display is cleared. 3. Press MAN to advance the channel.](https://usermanual.wiki/Uniden-America/UB350/User-Guide-846673-Page-6.png)
![14PRO-162 to another PRO-162 or PRO-433 using an optional interface cable and software. 1. Make sure the scanners are turned off and then plug the cable into each scanner’s PC/IF jack. 2. Turn on both scanners. “Clone Mode [ENT] to send” appears. 3. Press ENT. Then “Confirm Send Data? [1] to Yes [CL] to No” appears. 4. Press 1 to send the data to the other unit or press CL key to cancel the operation. 5. When the data transfer is completed, “Clone Mode Finished” appears. If the data transfer is not successful, “Clone Mode Error” appears. 6. After the clone operation is complete, remove the cable, turn both unit off and then on again. using the display backlight To turn on the display light for easy viewing at night, press .The display lights for 15 seconds. using the auto backlight display You can set the scanner so the auto backlight turns on for about 5 seconds when the scanner receives signals. If you press a key (except) within 5 seconds, the display remains lighted for more than 15 seconds. To turn auto backlight display on or off: 1. Press FUNC, and then press MAN/MENU. 2. Repeatedly press or to select Back Light, then press ENT/PGM. 3. Repeatedly press or to select Auto Light, then press ENT/PGM. 3. Repeatedly press or to select ON or OFF, then press ENT/PGM. 4. Press L/O to exit the menu mode, or press CL to back to a previous menu. using LCD contrast You can change LCD Contrast you want. To change LCD Contrast on your scanner: 1. Press FUNC, and then press MAN/MENU. 2. Repeatedly press or to select LCD Contrast, then press ENT/PGM. 3. Repeatedly press or to select contrast level you want. There are 8 steps as Contrast 1-8. 4. Press MAN to exit the menu mode. search speeds Note: Hypersearch applies only to the 5 kHz step bands (25–54 MHz, 137–174 MHz, and 216–224.9950 MHz). The scanner has two search speeds. Normal Search (90 steps/second) Hypersearch (270 steps/second) turning the keytone off/on Each time you press any of the scanner’s keys, the scanner sounds a tone. To turn the](https://usermanual.wiki/Uniden-America/UB350/User-Guide-846673-Page-14.png)
![30S-14, you would not see another prompt because S-14 uses all available blocks. programming a hybrid system A hybrid system is simply a Type I system with some of its blocks designated as Type II blocks. To program a hybrid system, follow the steps listed in “Programming a Fleet Map.” However, if you want a block to be Type II, instead of pressing or to select the size block (Step 6), enter size code S-0 instead. programming the Base and Offset frequencies To properly track Motorola VHF and UHF trunked systems, you must program the applicable base and offset frequencies for each system. For a list of these frequencies and other scanner information, go to www.trunkscanner.com and other similar frequency resources. 1. Press FUNC, then press MENU to open menu mode. 2. Select the “Trunk Option” - “Select Bank” - “Select Trunk Sys”. 3. Repeatedly press or to select MOT 800 CUSTOM, MOT VHF or MOT UHF and press ENT/PGM. 4. Repeatedly press or to select Edit Band Plan, and press ENT/PGM. 5. Repeatedly press or to select desired Band Plan, and press ENT/PGM. 6. Repeatedly press or to select Base Frequency, and press ENT/PGM. 7. Use [1] through [9], [0], [.] to enter a Base Frequency, and then press ENT/PGM. 8. Repeatedly press or to select Spacing, and press ENT/PGM. 9. Repeatedly press or to select desired spacing frequency, and press ENT/PGM. • For MOT 800 CUSTOM (Motorola Type I, Type II and Hybrid 800 MHz), use 12.5 kHz or 25kHz steps. • For MOT VHF (Motorola Type II VHF), use 5 kHz steps between 5 kHz – 100 kHz. • For MOT UHF (Motorola Type II UHF), use 12.5 kHz steps between 12.5 kHz – 100 kHz. 10. Repeatedly press or to select Offset, and press ENT/PGM. 11. Use [1] through [9], [0] to enter an Offset Channel, then press ENT/PGM. Note: You can only input a frequency between 380 – 759 for VHF and UHF trunked system. You can only input within a range of 0 – 1023 for Custom trunked system. 12. Press CL. The scanner returns to the previous screen. Repeat steps 5 through 10 to program additional configurations. turning the Motorola disconnect tone detect function On/Off When the Motorola disconnect tone detect function is disabled, the scanner looks for squelch before returning to the control channel instead of waiting for the disconnect tone. Only in rare instances will you need to adjust the default settings. The condition to return to control channels depends on whether the signal is present or not. 1. Press FUNC, then press MENU to open menu mode. 2. Select the “Trunk Option” - “Select Bank” - “Select Trunk Sys”. 3. Repeatedly press or to select Motorola system, and press ENT/PGM.](https://usermanual.wiki/Uniden-America/UB350/User-Guide-846673-Page-30.png)