Uniden America UC033 CORDLESS TELEPHONE- BASE UNIT User Manual USERS MANUAL
Uniden America Corporation CORDLESS TELEPHONE- BASE UNIT USERS MANUAL
UserManual.wiki
>
Uniden America
>
UC033 User Manual
USERS MANUAL
Navigation menu
Upload a User Manual
Namespaces
Wiki Guide
HTML
PDF
Info
Views
User Manual
Discussion / Help
Navigation


![5TerminologyBase The main part of the phone that connects to your phone line and lets you make and receive calls.CID Caller ID is available from your telephone provider. With this service, you can see the name and number of incoming callers.CIDCW Caller ID on Call Waiting is available from your telephone provider. With this service, you can see incoming caller information while on another call.Handset A cordless handset that can be placed anywhere in your home or offi ce where AC power is available.Standby The handset may be sitting on the base charging or out of the base cradle, but is NOT in use. [talk/fl ash] has not been pressed and there is no dial tone.Talk When a dial tone has been enabled allowing the user to dial and carry on a conversation with an outside party.Manual ConventionsThis manual uses several different type styles to help you distinguish between different parts of the phone:•lower case bold text with Ǝ[ ]Ǝ indicates a key or button on the phone• ALL CAPITALS indicates text on the display, such as menu options, prompts, and confi rmation messages•lower case bold text indicates a status light on the phone baseUC033BH.indd 5UC033BH.indd 510/25/2006 9:06:28 AM10/25/2006 9:06:28 AM](https://usermanual.wiki/Uniden-America/UC033/User-Guide-726967-Page-6.png)
![7Controls and FunctionsHandset 1. Handset antenna2. Belt clip hole3. Jack for optional handset4. Handset ringer speaker5. Handset battery compartment 6. Handset earpiece7. LCD display8. [] and [ ] (volume & ringer up/down) keys9. [cid/menu] key10. [/tone/ ] (left cursor) key11. [redial/pause] key12. [select] key13. [talk/fl ash] key14. [end] key15. [#/ ] (right cursor) key16. [mem] (memory) key17. [delete/channel] key18. Handset microphone19. Handset charging contacts1314151617181912678910111234513141516171819126789101112345UC033BH.indd 7UC033BH.indd 710/25/2006 9:06:29 AM10/25/2006 9:06:29 AM](https://usermanual.wiki/Uniden-America/UC033/User-Guide-726967-Page-8.png)
![8Main Base Unit21 24 2520222320. charge/in use LED21. Base antenna 22. Base charging contacts23. [fi nd hs] key24. Base DC IN 9V jack25. TEL LINE jackUC033BH.indd 8UC033BH.indd 810/25/2006 9:06:36 AM10/25/2006 9:06:36 AM](https://usermanual.wiki/Uniden-America/UC033/User-Guide-726967-Page-9.png)

![15Basic SetupThere are fi ve basic options that you will need to set up: AutoTalk, CIDCW (Caller ID on Call Waiting), Area Code, Dial Mode and Language. Activating AutoTalkAutoTalk will allow you to answer the phone simply by removing the handset from the base. You do not have to press a key to answer the incoming call. To activate:1) When the phone is in standby, press and hold [cid/menu]. The following screen appears.2) Press [select] to turn AutoTalk on.3) Press [end] or return the handset to the base unit to complete the setting. The handset returns to standby.Activating Caller ID on Call WaitingCaller ID allows you to see the name and number of the calling party before you answer the phone. Caller ID on Call Waiting (CIDCW) lets you see the name and number of a call that comes in when you are on the line. You must subscribe to Caller ID service through your local telephone provider to use this feature.1) When the phone is in standby, press and hold [cid/menu]. The following screen appears.UC033BH.indd 15UC033BH.indd 1510/25/2006 9:07:00 AM10/25/2006 9:07:00 AM](https://usermanual.wiki/Uniden-America/UC033/User-Guide-726967-Page-16.png)
![162) Press [ ] to move the pointer to select CIDCW. 3) Press [select] to toggle and turn on Caller ID on Call Waiting.4) Press [end] and return the handset to the base unit to complete the setting. The handset returns to standby.Note: To enable the setting change of CIDCW, you need to return the handset to the base unit when you complete the setting.Programming Your Area CodeIn some areas the telephone company may allow you to place a local call by dialing only 7 digits (instead of 10). If this is the case in your area, you can program your local area code in your phone. Programming your area code will allow you to see the caller’s 7-digit phone number which will allow you to easily return the local call without modifying the number before dialing. If you get a call from outside your area code, you'll see all 10 digits.To program your area code:1) When the phone is in standby, press and hold [cid/menu]. The following screen appears.2) Press [] to move the pointer to select AREA CODE.3) Press [select]. If an area code was already stored, the phone will display it.4) Use the number keys ( [0] – [9] ) to enter the 3-digit area code. If you make an error, use [delete/channel] to backspace.5) Press [select]. A confi rmation tone sounds.6) Press [end] or return the handset to the base unit to complete the setting. The handset returns to standby.UC033BH.indd 16UC033BH.indd 1610/25/2006 9:07:02 AM10/25/2006 9:07:02 AM](https://usermanual.wiki/Uniden-America/UC033/User-Guide-726967-Page-17.png)
![17Choosing the Dialing ModeYour phone can communicate with the telephone network in two different ways: tone dialing and pulse dialing. These days, most telephone networks use a method called tone dialing, so your phone comes programmed for tone dialing by default.If your phone company uses pulse dialing, you'll need to change your phone's dial mode. There's an easy way to tell: try making a call. If your call connects, your phone's setting is fi ne. If not, you may need to change the dial mode.To change the dial mode:1) When the phone is in standby, press and hold [cid/menu]. The following screen appears.2) Press [] to move the pointer to select DIAL.3) Press [select] to set the phone to pulse dialing.4) Press [end] or return the handset to the base unit to complete the setting. The handset returns to standby.Note: If your phone system requires pulse dialing and you need to send the DTMF tones during a call, you can temporarily switch over to tone dialing. (Refer to ƎTone Dialing Switch-overƎ on page 27.)UC033BH.indd 17UC033BH.indd 1710/25/2006 9:07:17 AM10/25/2006 9:07:17 AM](https://usermanual.wiki/Uniden-America/UC033/User-Guide-726967-Page-18.png)
![18Setting the LanguageYou can change the language the handset menu displays. Choose from English, French, or Spanish.To change the language setting:1) When the phone is in standby, Press and hold [cid/menu]. The following screen appears.2) Press [] to move the pointer to select LANGUAGE.3) Press [select] to select ENG, FR. or ESP.4) Press [end] or return the handset to the base unit to complete the setting. The handset returns to standby.UC033BH.indd 18UC033BH.indd 1810/25/2006 9:07:27 AM10/25/2006 9:07:27 AM](https://usermanual.wiki/Uniden-America/UC033/User-Guide-726967-Page-19.png)
![19Using the Speed Dial MemoryYour cordless phone allows you to store up to 10 names and numbers in the handset. You can dial these numbers with just a few key presses. The speed dial memory is not limited to phone numbers. You can store any number (up to 20 digits) that you need to enter once your call connects. This is referred to as Chain Dialing. An example is a frequently refi lled prescription number. Store your pharmacy phone number in one speed dial and your most frequently refi lled prescription number as another speed dial. To use, once you ring your pharmacy's automated prescription line, simply press [mem] and the speed dial number where you stored your prescription number and press [select].Note: When editing the speed dial memory, you must press a key within 30 seconds or the phone will return to standby. If you return the handset to the base, the phone will return to standby also.Storing a Name and Number in Memory1) With the phone in standby, press [mem].2) Enter [0] - [9] or use [] and [ ] to select the speed dial location where you would like to store this entry, and then press [select] twice.3) STORE NAME appears and a cursor fl ashes indicating that the phone is ready for the name to be entered.Note: If the selected speed dial number is already assigned, the Edit screen appears. You can select EDIT MEMORY to edit this entry, select DELETE MEMORY to erase this entry, or select GO BACK to choose another speed dial number.UC033BH.indd 19UC033BH.indd 1910/25/2006 9:07:33 AM10/25/2006 9:07:33 AM](https://usermanual.wiki/Uniden-America/UC033/User-Guide-726967-Page-20.png)
![204) Enter a name according to the instructions below, then press [select]. If no name is required, go to step 5.• The name can be up to 13 characters.• Use [/tone/ ] and [#/ ] to move the cursor to the desired location.• Press [delete/channel] to delete characters as needed or press and hold to delete all characters. Refer to the letters on the number keys to select the desired characters. With each press of a numeric key, the displayed character appears in the following order: upper case letters fi rst, lower case letters next and fi nally the number corresponding to the key.Note: If the next character uses the same number key, you must press [#/ ] to move the cursor over. Otherwise the next time you press the number key, it changes the character that was previously set. For example, to enter Movies.1) Press [6] once. Then press [#/ ] to move the cursor to the right.2) Press [6] six times.3) Press [8] six times.4) Press [4] six times.5) Press [3] fi ve times.6) Press [7] eight times.Number of times key is pressedkeys 1 2 3 4 5 6 7 8 92abc3def4ghi5jkl6mno7pqrs8tuv9wxyz01operNumber of times key is pressedkeys 1 2 3 4 5 6 7 8 92abc3def4ghi5jkl6mno7pqrs8tuv9wxyz01operUC033BH.indd 20UC033BH.indd 2010/25/2006 9:07:38 AM10/25/2006 9:07:38 AM](https://usermanual.wiki/Uniden-America/UC033/User-Guide-726967-Page-21.png)
![21If you make a mistake while entering a name Use [/tone/ ] or [#/ ] to move the cursor to the incorrect character. Press [delete/channel] to erase the wrong character. Then enter the correct character. To delete all characters, press and hold [delete/channel].5) STORE NUMBER is displayed. The cursor fl ashes indicating that the phone is ready for the number to be entered.6) Use the keypad to enter the phone number; each number can be up to 20 digits. If you need the phone to pause during the dialing sequence, press [redial/pause] to insert a two-second delay between the numbers. You can enter multiple pauses to increase the delay. Each pause counts as a digit. The display shows a P for every pause.7) Press [mem]. You will hear a confi rmation tone, and the following screen appears. Memory storage is complete. 8) After about 2 seconds, the following screen displays all the speed dial memory entries.9) Press [end] to exit memory setup mode. The phone returns to standby.Note: When storing numbers into memory, if the handset is idle (i.e., no key is pressed) for more than 30 seconds, it will beep rapidly, and the phone will return to standby.UC033BH.indd 21UC033BH.indd 2110/25/2006 9:07:48 AM10/25/2006 9:07:48 AM](https://usermanual.wiki/Uniden-America/UC033/User-Guide-726967-Page-22.png)
![22Storing Caller ID in Speed Dial MemoryCaller ID names and numbers shown in the Caller ID list can be stored in speed dial memory. To store a caller id name/number to memory:1) With the phone in standby, press [cid/menu]. Select the phone number to be stored from the Caller ID list by pressing [] or [ ].2) Press [mem].3) Enter a number ( [0] – [9] ) or press [] or [ ] to select the memory location to be stored.4) Press [select]. You hear a confi rmation tone, and the number is stored in memory. The display returns to the Caller ID list.Note:• If a number has already been stored in the selected memory number location, a confi rmation screen is displayed. To overwrite, press [ ] to YES and press [select]. The display returns to the Caller ID list.• You cannot store a Caller ID message if no phone number appears in the message.UC033BH.indd 22UC033BH.indd 2210/25/2006 9:08:06 AM10/25/2006 9:08:06 AM](https://usermanual.wiki/Uniden-America/UC033/User-Guide-726967-Page-23.png)
![23Using Your PhoneMaking and Receiving CallsHandset on the base Handset off the baseMaking a call1) Pick up the handset from the base.2) Press [talk/fl ash].3) Listen for the dial tone.4) Dial the number.OR1) Pick up the handset from the base.2) Dial the number. Then press [talk/fl ash].1) Press [talk/fl ash].2) Listen for the dial tone.3) Dial the number.ORDial the number. Then press [talk/fl ash].Receiving a call1) Pick up the handset from the base. (If AutoTalk is on, the phone will answer the call when you pick it up.)2) Press [talk/fl ash].Press [talk/fl ash] (or [/tone/ ],[#/ ] or any number key if AutoTalk is on).Hanging up Press [end] or return the handset to the base.Note: To turn on the AutoTalk feature, see "Activating AutoTalk" on page 15.Making a Call from Speed Dial MemoryTo make a call from speed dial memory:1) Press [mem] in standby. The handset displays your programmed speed dial number.UC033BH.indd 23UC033BH.indd 2310/25/2006 9:08:20 AM10/25/2006 9:08:20 AM](https://usermanual.wiki/Uniden-America/UC033/User-Guide-726967-Page-24.png)
![242) Enter the number ( [0] – [9] ), or press [ ] or [ ] to select the speed dial number you would like to dial.3) Press [talk/fl ash]. TALK and the volume setting and the number selected appear on the display. Then the displayed number is dialed.Note: You can also press [talk/fl ash] before you access the speed dial memory. When you come to the phone number you want to dial, press [select].To cancel speed dialingPress [end] to return to standby, or press [mem] to return to the call. (During a call, don’t press [end], or the call will be disconnected.) Also, if the handset is idle (e.g., no key is pressed) for 30 seconds, the speed dialing will be cancelled.Making a Call from the Caller ID ListYou can place a call directly from the Caller ID list.1) Press [cid/menu] in standby. Use [] or [ ] to select the phone number that you want to dial.2) To have the phone dial a Ǝ1Ǝ before the displayed Caller ID number, press [1]. To have the phone dial the stored area code before the displayed Caller ID number, press [3].3) Press [talk/fl ash]. The displayed phone number dials automatically.Note:• You can also press [talk/fl ash] before you access the Caller ID list. When you come to the phone number you want to dial, press [select].• You cannot make a call from the Caller ID list if your cordless telephone is connected to a private branch exchange (PBX).UC033BH.indd 24UC033BH.indd 2410/25/2006 9:08:22 AM10/25/2006 9:08:22 AM](https://usermanual.wiki/Uniden-America/UC033/User-Guide-726967-Page-25.png)
![25Redialing the Last Dialed Number1) Pick up the handset from the base.2) Press [talk/fl ash].3) Listen for the dial tone.4) Press [redial/pause].OR1) Pick up the handset from the base.2) Press [redial/pause].3) Press [talk/fl ash].Selecting the Ring Tone and VolumeYour phone has fi ve different ringer tone/volume combinations you can choose from.To select the ringer:1) With the phone in standby, press [] or [ ].2) The phone will sound the different ring tones at different volumes. To turn the ringer off, select RINGER OFF.3) When the phone sounds the ring tone and volume you wish to use, press [end].Temporarily Mute RingerIf the handset is off the base while an incoming call is ringing, simply press [end] to mute the incoming ring. The ringer will sound with the next incoming call. Note: You can only mute the handset ringer if the handset is off the base when the phone starts ringing.Adjusting the Earpiece VolumeTo change the earpiece volume, press [ ] or [ ] during a call.UC033BH.indd 25UC033BH.indd 2510/25/2006 9:08:30 AM10/25/2006 9:08:30 AM](https://usermanual.wiki/Uniden-America/UC033/User-Guide-726967-Page-26.png)
![26Using Call WaitingIf you subscribe to Call Waiting through your local telephone company, you can receive calls while on the line. To answer a call waiting call:1) While on the phone, you will hear a call waiting tone. (If you have CIDCW service activated, you will see the name and number of the incoming caller. See page 28 for more information)2) Press [talk/fl ash] to accept the waiting call. After a short pause, you will hear the new caller.3) To return to the original caller, press [talk/fl ash] again.Selecting a Different ChannelYour phone incorporates UltraClear Plus™ true compander circuitry which virtually eliminates background noise. This innovative technology, together with 20 different channels, provides you with the best possible reception during all your conversations. If you happen to encounter interference while using your phone, you can manually change the phone’s channel for clear operation. To change the channel during a call, press [delete/channel]. SCANNING appears on the display, indicating the phone is changing to another channel. For more information on interference, refer to "Radio Interference" on page 40.Find HandsetTo locate a lost handset, press [fi nd hs] on the base. The handset will beep for 60 seconds. The beeping will stop when any handset key is pressed, when the handset is returned to the base, or when [fi nd hs] is pressed. The handset will also stop beeping automatically when an incoming call is received.UC033BH.indd 26UC033BH.indd 2610/25/2006 9:08:35 AM10/25/2006 9:08:35 AM](https://usermanual.wiki/Uniden-America/UC033/User-Guide-726967-Page-27.png)
![27Tone Dialing Switch-overIf your telephone company requires pulse dialing, you can temporarily switch over to tone dialing after the call connects. This feature is useful when you need tone dialing to use automated such as telephone bank tellers, telephone prescription refi lls, customer support menus, etc.If your phone is set to pulse dialing mode, make your call normally. Once your call connects, press [/tone/ ]. Any digits you enter from then on will be sent as tone dialing. When this particular call ends, the phone automatically returns to pulse dialing mode.Voice Mail Waiting IndicatorIf you subscribe to voice mail service through your local telephone company, you can use your cordless telephone to access your voice mailbox. The voice mail company will provide you with the access number.The charge/in use LED on the base of your phone fl ashes whenever you have messages waiting in your voice mailbox.To access your voice mailboxJust dial the access number supplied by your voice mail provider to enter your mailbox. You can program your voice mail access number to a speed dial number.If the voice mail waiting indicator remains on after you have retrieved your messages, press and hold [fi nd hs] for 5 seconds. This will reset the indicator.UC033BH.indd 27UC033BH.indd 2710/25/2006 9:08:43 AM10/25/2006 9:08:43 AM](https://usermanual.wiki/Uniden-America/UC033/User-Guide-726967-Page-28.png)
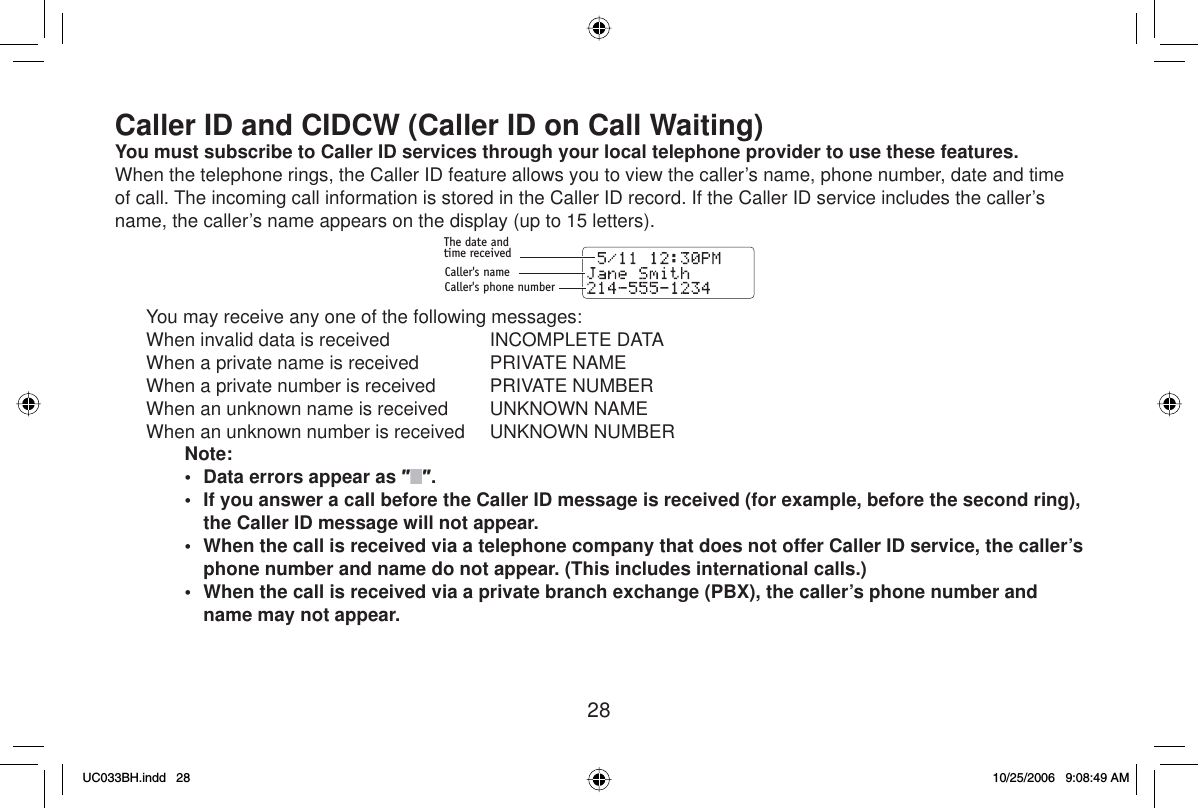
![29Caller ID on Call Waiting (CIDCW)If you subscribe to CIDCW offered by your telephone company, you will hear a Call Waiting tone while you are on a call, and the Caller ID data will be displayed at the handset. To accept the waiting call, press [talk/fl ash] (see page 26).Viewing the Caller ID Message ListThe Caller ID list stores information for up to 30 incoming calls - even unanswered calls. You can also view the Caller ID list during a call.1) Press [cid/menu]. The summary screen displays the number of new messages and total messages.2) Use [] to scroll through the messages from the latest to the earliest, or use [ ] to scroll through the messages from the earliest to the latest.3) Press [cid/menu] to return to the call, or press [end] to return to standby.Note:• In Caller ID operation, if no key is pressed for more than 30 seconds, an error tone sounds and the handset returns to standby.• Each message can be up to 15 characters for the name and 15 digits for the phone number.• The number of calls from the same Caller ID appears next to the received time. Once you view the new message, the number will be cleared and disappear.• During a call, don't press [end], or the call will be disconnected.UC033BH.indd 29UC033BH.indd 2910/25/2006 9:08:55 AM10/25/2006 9:08:55 AM](https://usermanual.wiki/Uniden-America/UC033/User-Guide-726967-Page-30.png)
![30Deleting Information from the Caller ID ListIf the phone receives more Caller ID messages than it can store, the oldest one in the list is automatically deleted. Caller ID data can also be deleted manually.Deleting a Caller ID message1) Press [cid/menu] in standby. Find the message to be deleted from the Caller ID list by pressing [] or [ ].2) Press [delete/channel].3) Press [] or [ ] to select YES, and then press [select].Deleting all Caller ID names/numbers1) With the phone in standby, press [cid/menu].2) Press [delete/channel].3) Press [] or [ ] to select YES, and then press [select]. You hear a confi rmation tone and all stored Caller ID messages are deleted.Note:• While using the DELETE ALL? or DELETE MESSAGE? screen, if no key is pressed for more than 30 seconds, an error tone sounds, and the handset returns to standby. • If you get an incoming call or page, the deleting operation is canceled and you can answer the call or page.UC033BH.indd 30UC033BH.indd 3010/25/2006 9:09:00 AM10/25/2006 9:09:00 AM](https://usermanual.wiki/Uniden-America/UC033/User-Guide-726967-Page-31.png)
![31Changing the Digital Security CodeTo protect you against misbilled calls which might result from your phone being activated by other equipment, the cordless phone provides AutoSecure™ (which electronically locks your phone when the handset is in the base) and Random Code™ digital security which automatically selects one of over 262,000 digital security codes for the handset and the base. If the handset battery pack is completely discharged or the battery pack is removed, the digital security code will be lost. If this happens, a new security code is set automatically the next time the battery pack is charged. In the rare situation that you suspect another cordless telephone is using the same security code, you can change the code.1) Pick up the handset from the base unit. Press and hold [fi nd hs] on the base.2) While holding [fi nd hs], place the handset in the base, and leave the handset in the base for more than 3 seconds. A new random security code is set.UC033BH.indd 31UC033BH.indd 3110/25/2006 9:09:10 AM10/25/2006 9:09:10 AM](https://usermanual.wiki/Uniden-America/UC033/User-Guide-726967-Page-32.png)
![35TroubleshootingTraveling Out-of-RangeDuring a call, as you begin to move your handset too far from your base unit, noise increases. If you pass the range limits of the base, your call will terminate within one minute.Common IssuesIf your phone is not performing to your expectations, please try these simple steps fi rst. If these steps do not solve your problem, please call our Customer Hotline. See back cover page for contact information.Symptom SuggestionThe charge/in use LED won't illuminate when the handset is placed in the base.• Make sure the AC adapter is plugged into the base and wall outlet.• Make sure the handset is properly seated in the base.• Make sure the charging contacts on the handset are clean.The audio sounds weak and/or scratchy.• Move the handset and/or base away from metal objects or appliances and try again.• Press [delete/channel] during a call to help eliminate background noise.• Make sure that the handset is not too far from the base.Can’t make or receive calls.• Check both ends of telephone line cord.• Make sure the AC adapter is plugged into the base and wall outlet.• Disconnect the AC adapter for a few minutes, then reconnect it.• Change the digital security code (see page 31).• Make sure that the handset is not too far from the base.• Check the dialing mode used by your telephone company.UC033BH.indd 35UC033BH.indd 3510/25/2006 9:09:15 AM10/25/2006 9:09:15 AM](https://usermanual.wiki/Uniden-America/UC033/User-Guide-726967-Page-36.png)
![36Symptom SuggestionThe handset doesn’t ring or receive a page.• The battery pack may be weak. Charge the battery for 15-20 hours.• The handset may be too far away from the base unit.• Place the base unit away from appliances or metal objects.• Change the digital security code (see page 31).• Check the battery pack to ensure there is a secure connection.• Make sure ringer volume isn’t set to Ǝoff.ƎSevere noise interference.• Keep the handset away from microwave ovens, computers, remote control toys, wireless microphones, alarm systems, intercoms, room monitors, fl uorescent lights, and electrical appliances.• Move the base to another location or turn off the source of interference.The Caller ID does not display.• The call was answered before the second ring.• The call was placed through a switchboard.• Charge the handset.• Your Caller ID service may not be active; contact your local telephone service provider.Voice Message Indication does not work.• Contact your local telephone company to make sure that your telephone receives FSK message signaling.• Reset the indicator by pressing and holding [fi nd hs] for 5 seconds.UC033BH.indd 36UC033BH.indd 3610/25/2006 9:09:17 AM10/25/2006 9:09:17 AM](https://usermanual.wiki/Uniden-America/UC033/User-Guide-726967-Page-37.png)