Uniden America UC518R 1.9GHZ UPCS CORDLESS TELEPHONE-HANDSET User Manual USERS MANUAL 1
Uniden America Corporation 1.9GHZ UPCS CORDLESS TELEPHONE-HANDSET USERS MANUAL 1
UserManual.wiki
>
Uniden America
>
UC518R User Manual
>
USERS MANUAL 1
Contents
1.
USERS MANUAL 1
2.
USERS MANUAL 2
USERS MANUAL 1
Navigation menu
Upload a User Manual
Namespaces
Wiki Guide
HTML
PDF
Info
Views
User Manual
Discussion / Help
Navigation

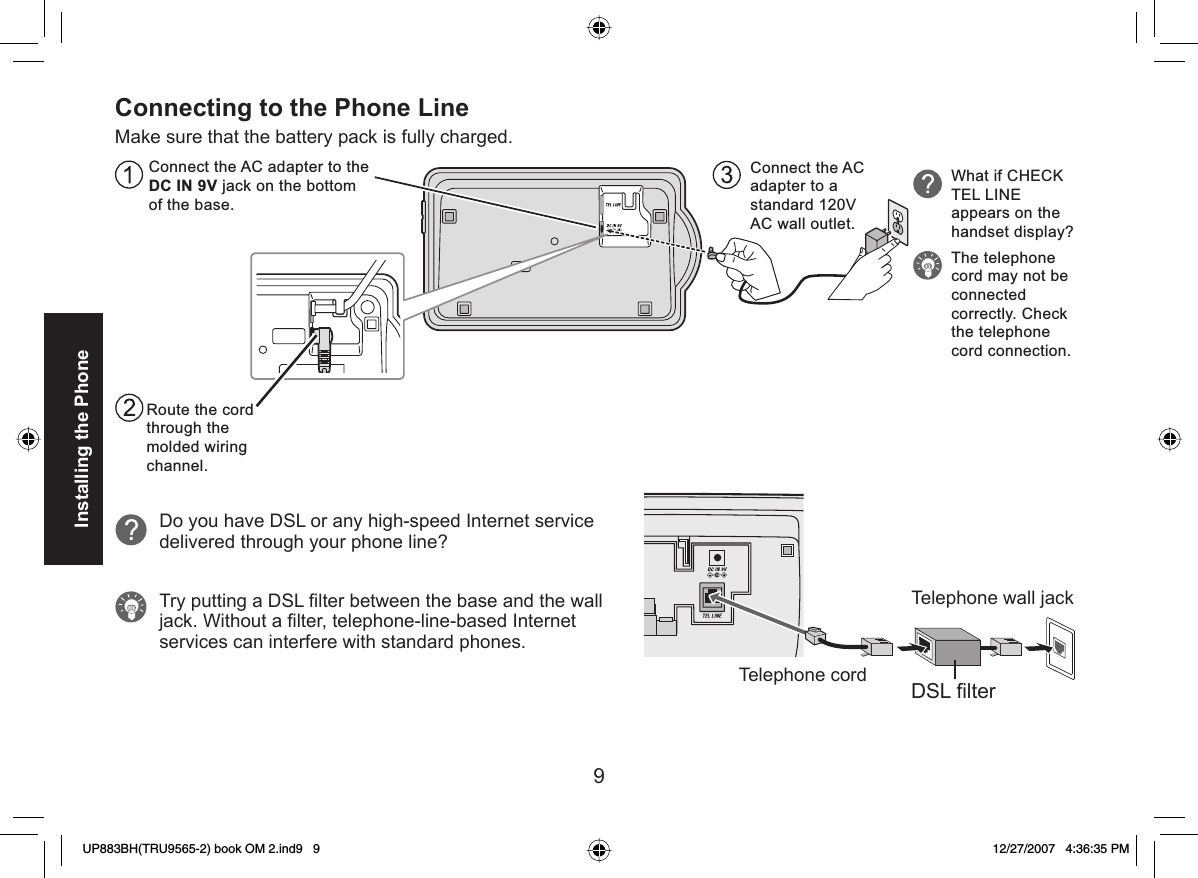
![10Installing the PhoneTesting the ConnectionPick up the handset from the base and press [ /fl ash]. You should hear a dial tone, and the display should show TALK.What if I can’t hear a dial tone?Check the telephone cord connection on the base.What if the display doesn’t show TALK? Check the battery pack connection in the handset.Make sure the battery pack is fully charged. Make sure the AC adapter cord is securely connected to the DC IN 9V jack and a standard power outlet.Try resetting the handset (see page 50).Make a quick test call, and then press [] to hang up. What if there is a lot of static? Check the sources of interference described in Choosing the Best Location (see page 5): is the base near any of those?What if the call doesn’t go through?Try changing the dialing mode (see the next section).Note: Make sure you can get a dial tone on any accessory handsets that were packaged with your phone. ••••UP883BH(TRU9565-2) book OM 2.ind10 10UP883BH(TRU9565-2) book OM 2.ind10 10 12/27/2007 4:36:36 PM12/27/2007 4:36:36 PM](https://usermanual.wiki/Uniden-America/UC518R.USERS-MANUAL-1/User-Guide-900676-Page-11.png)
![11Installing the PhoneChanging the dial modeYour phone can communicate with the telephone network in two different ways: tone dialing or pulse dialing. These days, most base networks use a method called tone dialing, so your phone comes programmed for tone dialing. If your phone company uses pulse dialing, you will need to change your phone’s dial mode. If you don’t get a dial tone or can’t connect to the telephone network, please follow the steps below to modify your phone’s settings:Press [Select/menu]. Select the GLOBAL SETUP menu, and then the DIAL MODE submenu.Scroll [] to highlight PULSE.Press [Select/menu]. You will hear a confi rmation tone.If you ever need to change the dial mode back to tone dialing, follow the same procedure, but select TONE in step 2.NOW YOU ARE READY TO USE YOUR PHONE!1)2)3)4)Installing the Belt ClipInsert the tabs on the sides of the belt clip into the holes on either side of the handset. Press the belt clip down until it clicks into place. (Tug on the clip to make sure it’s secure.) To remove the belt clip, gently pull the tabs out of the holes, then slide the belt clip off of the handset.UP883BH(TRU9565-2) book OM 2.ind11 11UP883BH(TRU9565-2) book OM 2.ind11 11 12/27/2007 4:36:38 PM12/27/2007 4:36:38 PM](https://usermanual.wiki/Uniden-America/UC518R.USERS-MANUAL-1/User-Guide-900676-Page-12.png)
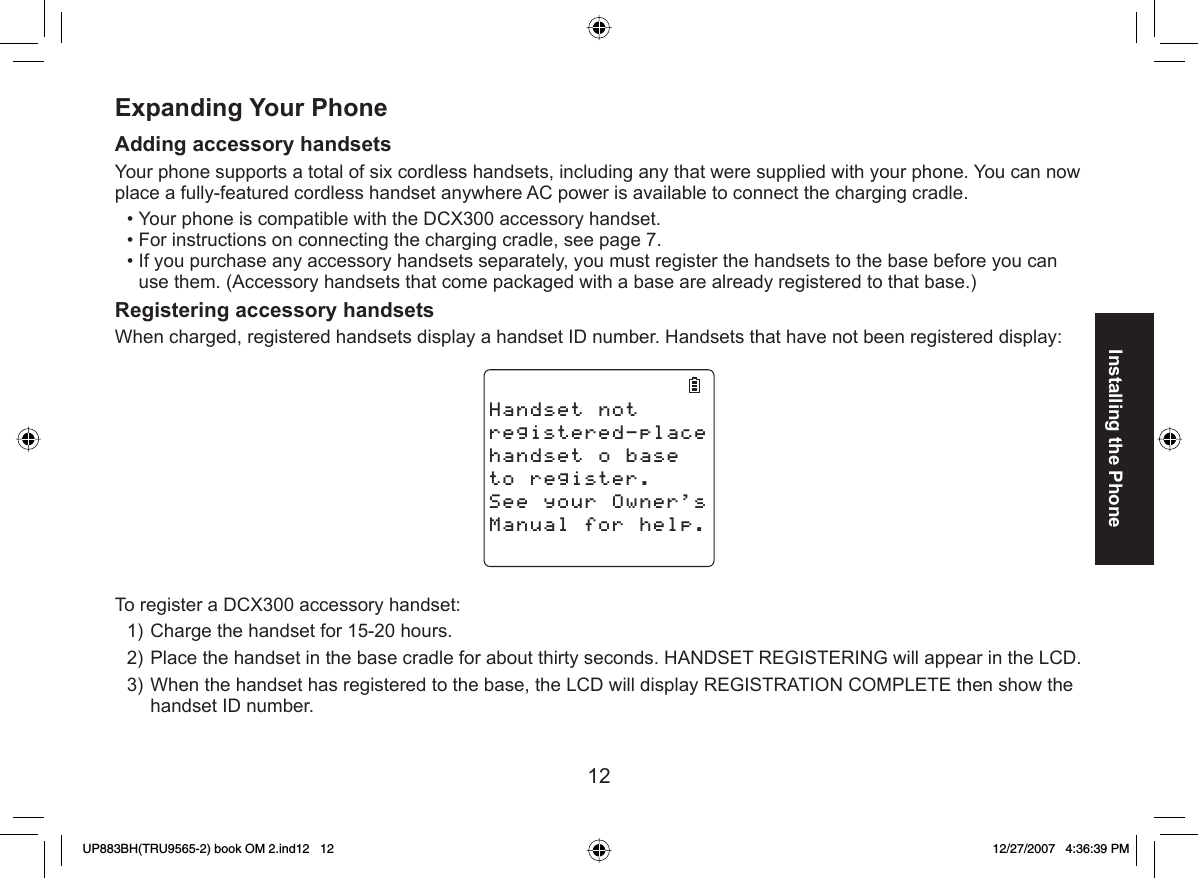
![13Installing the PhoneIf REGISTRATION FAILED appears in the LCD, please try these steps again.Note: If a handset has ever been registered to a base, you must reset the handset before you can register it to a new base. See Resetting the Handset on page 50. Using Multiple BasesThe handsets supplied with your phone (or any DCX200 accessory handsets) can be registered to a total of four different bases. Compatible bases include the DECT2060, DECT2080, DECT2085, and DECT2088 models. Once your handset is registered to more than one base, you can set the handset to search automatically the available base, or you can select manually which base the handset should connect to (for example, if you have one base with an answering machine, you can tell the handset to connect that base to check messages). Registering the Handset to Another BaseMake sure the handset battery is fully charged.To register a handset to DECT2060 or DECT2080 base:Disconnect the base AC adapter. Then press and hold [fi nd hs] while you reconnect the adapter.Keep pressing [fi nd hs] until the charge LED starts to blink.To register a handset to DECT2085 or DECT2088 base:With the phone in standby, press [Select/menu] on the base. Move the cursor to select the REGISTER HANDSET menu, and then press [Select/menu]. HANDSET REGISTERING will appear.On the handset, Press [Select/menu]. Select the REGISTER BASE menu. HANDSET REGISTERING will appear in the display.Wait approximately thirty seconds. “REGISTRATION COMPLETE” will be displayed to indicate the handset has been registered to the base and a handset ID will be automatically assigned.If REGISTRATION FAILED appears in the LCD, please try these steps again.1.2.••3.4.UP883BH(TRU9565-2) book OM 2.ind13 13UP883BH(TRU9565-2) book OM 2.ind13 13 12/27/2007 4:36:39 PM12/27/2007 4:36:39 PM](https://usermanual.wiki/Uniden-America/UC518R.USERS-MANUAL-1/User-Guide-900676-Page-14.png)
![14Installing the Phone Selecting the BaseWhen your handset is registered to another base, it will automatically connect to the base. A base ID (that is for the handset only) will be assigned in the order of registration. You can either select a base you want to use manually, or set to AUTO. If you set to AUTO, when the handset comes out of range, it searches automatically the available base in order of base ID.With the phone in standby, press [Select/menu]. Select the HANDSET SETUP menu, and then the SELECT BASE submenu.Move the cursor to select the base you want to connect to, or choose AUTO to have the handset automatically select the base.Press [Select/menu]. SEARCHING will appear in the display.When the base is found, the handset will return to standby. If the base is not found, “SEARCHING” continues to appear. You can repeat the procedure listed above to return back to the original connection or to fi nd the different base.Notes: • You cannot change bases during a call. • To confi rm which bases the handset is registered to, open the SELECT BASE submenu and use [] and [] to scroll through the list. Press [ ] to close the list and return to standby.1.2.3.4.UP883BH(TRU9565-2) book OM 2.ind14 14UP883BH(TRU9565-2) book OM 2.ind14 14 12/27/2007 4:36:40 PM12/27/2007 4:36:40 PM](https://usermanual.wiki/Uniden-America/UC518R.USERS-MANUAL-1/User-Guide-900676-Page-15.png)
![16Getting to Know Your New PhoneTerminology Used in this ManualAccessory HandsetsAdditional handsets that can register to the base, allowing you to add handsets without connecting another phone line. This base supports a total of ten cordless handsets; see page 12 for compatible handsets.Base The main part of the phone that connects to your phone line and lets you make and receive calls.Charging cradleA cradle that comes with an accessory handset and charges the handset battery pack.It connects to power but does not connect to a phone line.CID Caller ID is available from your telephone provider and is offered to users on a subscription basis.With this service, you will be able to see the incoming caller information such as name and phone number.CID/CW or CIDCWCaller ID with Call Waiting is available by subscription from your telephone provider.With this service, you will be able to view incoming caller information while on a call with another user.Global SettingsAny settings that apply to all registered handsets and the base.These features are available by selecting “GLOBAL SETUP” in the handset or the base menu. Only one handset or the base can change global settings at a time, and you have to make sure the phone is not currently being used. If you have multiple bases, the different bases have each global settings; select the base before changing the global setting (see Selecting the Base on page 14).Standby The handset and the base are not in use. (It doesn’t matter whether the handset is in the cradle: the [/fl ash] or [ ] hasn’t been pressed, and there is no dial tone.) Station Any registered handset or the base.Talk A dial tone has been enabled, so you can dial and carry on a conversation with an outside party.Manual ConventionsThis manual uses several different type styles to help you distinguish between different parts of the phone:Bold text with “[ ]” indicates a key or button on the phoneALL CAPITALS indicates text on the display, such as menu options, prompts, and confi rmation messageslower case bold text indicates a status light on the phoneALL CAPITALS BOLD indicates a connection jack on the base or charging cradle••••UP883BH(TRU9565-2) book OM 2.ind16 16UP883BH(TRU9565-2) book OM 2.ind16 16 12/27/2007 4:36:40 PM12/27/2007 4:36:40 PM](https://usermanual.wiki/Uniden-America/UC518R.USERS-MANUAL-1/User-Guide-900676-Page-17.png)
![17Getting to Know Your New Phone Parts of the HandsetHeadset jack coverBelt clip holeSpeakerphonespeaker and ringerBattery compartmentnew message LEDEarpieceDisplay (LCD)[Int’com/clear] key(intercom/clear)[ ] key (phonebook/left)[ /flash] key (talk/flash)[ /tone] key[ /pause] key (redial/pause)[ /mute] key(messages/mute)[ ] key (up)[Select/menu] keyTwelve-key dial pad[#] keyMicrophoneCharging contacts[ ] key (caller ID/right)[ ] key (end call)[ ] key (down)UP883BH(TRU9565-2) book OM 2.ind17 17UP883BH(TRU9565-2) book OM 2.ind17 17 12/27/2007 4:36:41 PM12/27/2007 4:36:41 PM](https://usermanual.wiki/Uniden-America/UC518R.USERS-MANUAL-1/User-Guide-900676-Page-18.png)
![18Getting to Know Your New PhoneSpeakermessage counter LED[+] key (volume up)[-] key (volume down)[ ] key (play/stop)[ ] key (skip)[ ] key (repeat)[ ] key (delete)[find] key (find handset)Charging contactscharge LED[on] key (answering system on/off) Parts of the BaseUP883BH(TRU9565-2) book OM 2.ind18 18UP883BH(TRU9565-2) book OM 2.ind18 18 12/27/2007 4:36:41 PM12/27/2007 4:36:41 PM](https://usermanual.wiki/Uniden-America/UC518R.USERS-MANUAL-1/User-Guide-900676-Page-19.png)
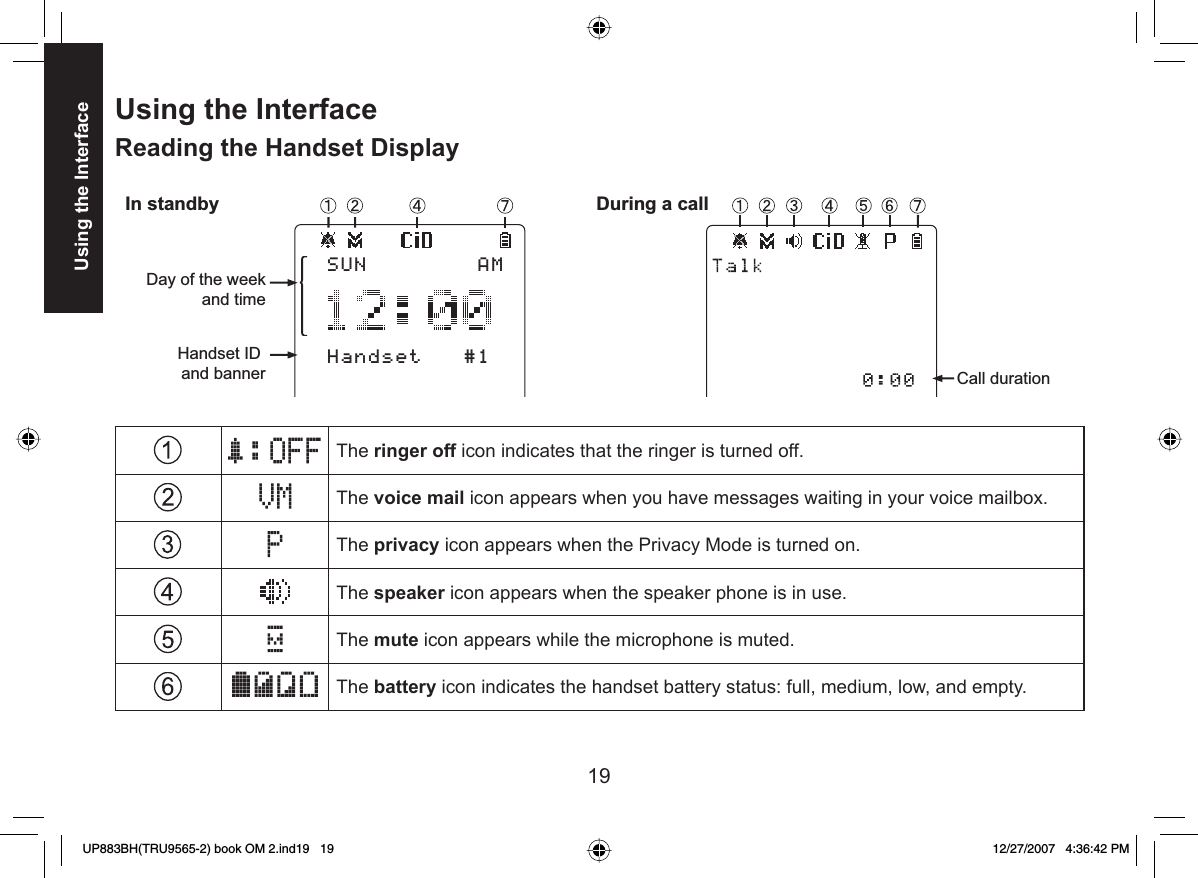
![20Using the Interface Using the Four-way Function KeyYour handset has a four-way function key that allows you to move the cursor or pointer on the display and access the most commonly used features at the touch of a button. By moving this key to the left, you open the phonebook. Move the key to the right to access Caller ID information. To use this four-way key, place your thumb over the key and move to the four positions to get the feel of how it moves and operates.Using the Handset MenuTo open the menu, press the [Select/menu] key.The arrow pointer on the left side of the line shows which menu item is currently highlighted. Use [] on the four-way function key to move the pointer up and [] to move the pointer down.To select the highlighted option, press [Select/menu].To go back to the previous screen, press [left] on the four-way function key.To exit the menu, press []. If you don’t press any keys for thirty seconds, the phone will time out and exit the menu.For ANSW. SETUP, GLOBAL SETUP and DAY & TIME menu options, make sure the line is not in use and the handsets are within range of the base.•••••••View the phonebook Four-way Function KeyUpView the Caller IDDownView the phonebook Four-way Function KeyUpView the Caller IDDownUP883BH(TRU9565-2) book OM 2.ind20 20UP883BH(TRU9565-2) book OM 2.ind20 20 12/27/2007 4:36:44 PM12/27/2007 4:36:44 PM](https://usermanual.wiki/Uniden-America/UC518R.USERS-MANUAL-1/User-Guide-900676-Page-21.png)
![21Using the Interface Entering Text from Your HandsetYou can use the number keypad on your handset to enter text by referring to the letters printed on each number key. When you press the number key in a text entry fi eld, the phone displays the fi rst letter printed on the number key. Press the number key twice to display the second letter and three times to display the third. Capital letters are displayed fi rst, then lower case letters, and then the number on the key.If two letters in a row use the same number key, enter the fi rst letter, then use [right] on the four-way function key to move the cursor to the next position to enter the second letter. For example, to enter the word “Movies”: Press [6] once to enter M.Use [right] on the four-way function key to move the cursor to the right.Press [6] six times to enter o.Press [8] six times to enter v.Press [4] six times to enter i.Press [3] fi ve times to enter e.Press [7] eight times to enter s.Press [Select/menu] to end your text entry.If you make a mistake while entering a name, use [right] or [left] on the four-way function key to move the cursor to the incorrect character. Press [Int’com/clear] to erase the wrong character, and then enter the correct character. To delete all characters, press and hold [Int’com/clear].1)2)3)4)5)6)7)8)UP883BH(TRU9565-2) book OM 2.ind21 21UP883BH(TRU9565-2) book OM 2.ind21 21 12/27/2007 4:36:45 PM12/27/2007 4:36:45 PM](https://usermanual.wiki/Uniden-America/UC518R.USERS-MANUAL-1/User-Guide-900676-Page-22.png)
![22Basic SetupBasic Setup Selecting a LanguageEach handset supports two languages: English and Spanish for US models or English and French for Canadian models. Once you select a language, the menus on the handset will display in that language. The default language is English.Press [Select/menu]. Select the HANDSET SETUP menu, and then the HANDSET LANGUAGE submenu.Move the cursor to choose a language.for US models: Choose ENGLISH or ESPAÑOL (Spanish).for Canadian models: Choose ENGLISH or FRANÇAIS (French).Press [Select/menu]. You will hear a confi rmation tone.Setting the Day & TimeIf you do not set the clock on your answering system, your messages may not have the correct time and day stamp. Press [Select/menu].Move the cursor to DAY & TIME and press [Select/menu].Use [] and [ ] to select the day of the week, and press [Select/menu].Use the number keypad ([0] through [9]) to enter the hour and minutes.Use [] and [ ] to select AM or PM, and press [Select/menu]. You hear a confi rmation tone.1)2)3)4)1)2)3)4)5)UP883BH(TRU9565-2) book OM 2.ind22 22UP883BH(TRU9565-2) book OM 2.ind22 22 12/27/2007 4:36:46 PM12/27/2007 4:36:46 PM](https://usermanual.wiki/Uniden-America/UC518R.USERS-MANUAL-1/User-Guide-900676-Page-23.png)
![23Basic SetupActivating Personal SettingsYou can assign special ringer tones to anyone in your phonebook. When your phone gets a call, it looks up the Caller ID information in your phonebook. If you’ve assigned a personal ringer and color to that number, the phone uses it so you know who is calling. To turn the personal ringing on or off, follow these steps:Press [Select/menu]. Select the HANDSET SETUP menu, and then the PERSONAL RING submenu.Move the cursor to select ON or OFF.Press [Select/menu]. You will hear a confi rmation tone.Activating the Key Touch ToneKey Touch Tone is the tone your keypad makes when keys are pressed. You can turn this tone on or off.Press [Select/menu]. Select the HANDSET SETUP menu, and then the KEY TOUCH TONE submenu.Move the cursor to select ON or OFF.Press [Select/menu]. You will hear a confi rmation tone.1)2)3)4)1)2)3)4)2GTUPN5GVVKPIU1P1HH2GTUPN5GVVKPIU1P1HH-G[6QWEJ6QPG1P1HH-G[6QWEJ6QPG1P1HHUP883BH(TRU9565-2) book OM 2.ind23 23UP883BH(TRU9565-2) book OM 2.ind23 23 12/27/2007 4:36:47 PM12/27/2007 4:36:47 PM](https://usermanual.wiki/Uniden-America/UC518R.USERS-MANUAL-1/User-Guide-900676-Page-24.png)
![24Setting Up the PhonebookEach handset has its own separate phonebook that holds up to seventy names and numbers. When a handset’s phonebook is full, the handset beeps and shows MEMORY FULL on the display. You cannot add any names and numbers in that handset’s phonebook until you delete some of the existing ones.You can also use the phonebook entries to store a group of numbers (up to twenty digits) that you may need to enter once your call connects. This is referred to as chain dialing. (See Chain dialing from the phonebook on page 32.) Creating Phonebook EntriesTo store names and numbers in your phonebook, please follow these steps:With the phone in standby, press [ ] (on the left side of the four-way key).To create a new phonebook entry, press [Select/menu]. Select the CREATE NEW menu. EDIT NAME appears.Enter the name for this entry (EDIT NAME). Use the keypad to enter a name for this entry; the name can contain up to sixteen characters. (See Entering Text from Your Handset on page 21 for instructions on entering text.) If you do not want to enter a name for this entry, your phone will store this entry as <NO NAME>. Press [Select/menu] when you are fi nished.Enter the number for this entry (EDIT NUMBER).Once you have stored a name, EDIT NUMBER appears next. Use the number keypad to enter the phone number; the phone number can contain up to twenty digits. If you need the phone to pause between digits when it’s dialing (for example, to enter an extension or an access code), press [/pause] to insert a two-second pause. You will see a P in the display. You can also use more than one pause together if two seconds is not long enough. Each pause counts as one digit. Press [Select/menu] when you are fi nished.1)2)3)4)Setting Up the PhonebookUP883BH(TRU9565-2) book OM 2.ind24 24UP883BH(TRU9565-2) book OM 2.ind24 24 12/27/2007 4:36:48 PM12/27/2007 4:36:48 PM](https://usermanual.wiki/Uniden-America/UC518R.USERS-MANUAL-1/User-Guide-900676-Page-25.png)
![25 Assign a personal ring tone for this entry (PERSONAL RING).You can attach a special ring tone to each phonebook entry; the phone will use this ring tone when this person calls. Use [] and [ ] to select one of the seven different ring tone options (see Selecting a Ring Tone on page 29 for a complete list of ring tones). As you scroll through the tones, you will hear a sample of each tone (unless the handset ringer volume is set to off). When you hear the ring tone you want to use, press [Select/menu]. If you do not want to use a personal ring tone for this phonebook entry, choose NO SELECTION; the phone will use your standard ring tone setting.Assign a personal display color for this entry (PERSONAL COLOR).You can attach a color scheme to each phonebook entry; the display will use this color when this person calls. Use [] and [ ] to select one of the seven different color scheme options. As you scroll through the options, you will see each color scheme on the display. When you see the color scheme you want to use, press [Select/menu]. If you do not want to use a color scheme for this phonebook entry, choose NO SELECTION; the phone will use your standard color scheme setting.You will hear a tone confi rming that the new entry has been stored, and DONE! appears in the display. Finding a Phonebook EntryPress [ ] to open the phonebook. Phonebook entries are stored in alphabetical order. To scroll through the phonebook from A to Z, press []. To scroll trough the phonebook from Z to A press [ ].You can also use the letters on the number keys to jump to a name that starts with that letter. For example, to search for an entry beginning with the letter M, press [6] once. The phonebook jumps to the fi rst entry that begins with the letter you entered; you can then use [] and [ ] to scroll to other entries.To close the phonebook and return to standby, press [ ]. If you are looking up a phonebook entry during a call and want to close the phonebook, press [] again instead of [ ].5)6)7)2GTUQPCN4KPI0Q5GNGEVKQP4KPIGT2GTUQPCN4KPI0Q5GNGEVKQP4KPIGT2GTUQPCN%QNQT0Q5GNGEVKQP%QNQT5EJGOG2GTUQPCN%QNQT0Q5GNGEVKQP%QNQT5EJGOGSetting Up the PhonebookUP883BH(TRU9565-2) book OM 2.ind25 25UP883BH(TRU9565-2) book OM 2.ind25 25 12/27/2007 4:36:49 PM12/27/2007 4:36:49 PM](https://usermanual.wiki/Uniden-America/UC518R.USERS-MANUAL-1/User-Guide-900676-Page-26.png)
![26 Editing an Existing Phonebook EntryWith the phone in standby, press [ ] to open the phonebook.Find the entry you want to edit and press [Select/menu].Select EDIT. Follow the steps for Creating Phonebook Entries on page 24. If you do not wish to change the information at any step, simply press [Select/menu] to go to the next step. Storing Caller ID or Redial Numbers in the PhonebookYou can store Caller ID records or redial numbers in the phonebook so you can use them later. Go to the Caller ID or redial list and select the number you want to store. (If the Caller ID information did not include the number, then you will not be able to store it.)With the phone in standby, press [] to open the Caller ID list or [ /pause] to open the redial list.Use [] and [ ] to scroll through the Caller ID records or redial numbers. When you come to the information you want to store, press [Select/menu]. Select STORE INTO PB. EDIT NAME appears. If the phone number is already stored in memory, you will hear a beep, and THIS DATA IS ALREADY SAVED! appears in the display. The number will not be stored.Continue by following the steps for Creating Phonebook Entries on page 24.Deleting a Single Phonebook EntryWith the phone in standby, press [ ].Find the entry that you want to delete and press [Select/menu]. Select DELETE. DELETE ENTRY? appears in the display.Move the cursor to select YES.Press [Select/menu]. You will hear a confi rmation tone, and DELETED! appears in the display. 1)2)3)1)2)3)4)1)2)3)4)5)'FKV%QR[&GNGVG'FKV%QR[&GNGVGSetting Up the PhonebookUP883BH(TRU9565-2) book OM 2.ind26 26UP883BH(TRU9565-2) book OM 2.ind26 26 12/27/2007 4:36:50 PM12/27/2007 4:36:50 PM](https://usermanual.wiki/Uniden-America/UC518R.USERS-MANUAL-1/User-Guide-900676-Page-27.png)
![27 Deleting all Phonebook EntriesWith the phone in standby, press [ ].Press [Select/menu], and then select DELETE ALL. DELETE ALL? appears in the display.Move the cursor to select YES.Press [Select/menu]. You will hear a confi rmation tone, and DELETED! appears in the display. Copying Phonebook Entries to Another HandsetIf you have more than one handset, you can transfer phonebook entries from one handset to another without having to re-enter names and numbers. You can transfer one phonebook entry at a time or all phonebook entries at once.With the phone in standby, press []. To copy one entry, fi nd the phonebook entry you want to copy. Press [Select/menu], and then select COPY.To copy all entries, press [Select/menu], and then select COPY ALL.Move the cursor to select the handset which you want to transfer the entries to and then press [Select/menu].If you select COPY ALL, ARE YOU SURE? appears on the display screen. Move the cursor to select YES, and then press [Select/menu].The phonebook entries will be transferred to the designated handset. During the copy process, the receiving handset shows RECEIVING and the ID of the sending handset.When the transfer is completed, DONE! appears on the handset.Notes: • The handsets must be currently connected to the same base (see page 14). • If the handset you want to transfer to already has seventy entries in its phonebook, you will hear a beep, and NOT ENOUGH MEMORY IN RECEIVING UNIT appears on the display. • If the selected handset is out of range or data transfer is cancelled, UNAVAILABLE appears in the display. Phonebook listings will not be transferred.1)2)3)4)1)2)3)4)5)%TGCVG0GY%QR[#NN&GNGVG#NN%TGCVG0GY%QR[#NN&GNGVG#NNSetting Up the PhonebookUP883BH(TRU9565-2) book OM 2.ind27 27UP883BH(TRU9565-2) book OM 2.ind27 27 12/27/2007 4:36:51 PM12/27/2007 4:36:51 PM](https://usermanual.wiki/Uniden-America/UC518R.USERS-MANUAL-1/User-Guide-900676-Page-28.png)
![2828Customizing Your HandsetsAll of the following options are set separately for each handset, so you can customize a handset for each room in your house.Changing the Handset BannerEach handset will display a banner name once it is registered to the base. The default banner is Handset #1, Handset #2, etc. You can change the name your phone displays by changing the banner display. If you have more than one handset, the banner name identifi es your handset.Press [Select/menu]. Select the HANDSET SETUP menu, and then the BANNER submenu.Use the keypad to enter or edit the banner name. (See Entering Text from Your Phone on page 21 for detailed instructions on entering text.)Press [Select/menu]. You will hear a confi rmation tone.Note: When you have multiple bases and even if the handset ID is changed when you switch to a different base, the handset will keep the banner name. Selecting a Ringer ToneYou may choose from fi ve melodies or tones for your phone’s primary ring tone. Each handset can use a different ring tone or melody.Press [Select/menu]. Select the HANDSET SETUP menu, and then the RINGER TONES submenu.Move the cursor to select a ringer tone. As each ringer tone is highlighted, you will hear a sample (unless the handset ringer volume is set to off).When you hear the tone you want to use, press [Select/menu]. You will hear a confi rmation tone.1)2)3)4)1)2)3)4)4KPIGT6QPGU4KPIGT4KPIGT4KPIGT6QPGU4KPIGT4KPIGTCustomizing Your HandsetsUP883BH(TRU9565-2) book OM 2.ind28 28UP883BH(TRU9565-2) book OM 2.ind28 28 12/27/2007 4:36:52 PM12/27/2007 4:36:52 PM](https://usermanual.wiki/Uniden-America/UC518R.USERS-MANUAL-1/User-Guide-900676-Page-29.png)
![2929Activating AutoTalkAutoTalk allows you to answer the phone simply by picking up the handset from the cradle. You do not have to press a button to answer the call.Press [Select/menu]. Select the HANDSET SETUP menu, and then the AUTOTALK submenu.Move the cursor to select ON or OFF.Press [Select/menu]. You will hear a confi rmation tone.Activating Any Key AnswerAny Key Answer allows you to answer the phone by pressing any key on the twelve-key dial pad. Press [Select/menu]. Select the HANDSET SETUP menu, and then the ANY KEY ANSWER submenu.Move the cursor to select ON or OFF.Press [Select/menu]. You will hear a confi rmation tone.Color SchemeYou can change the color of your phone's display. There are 7 different colors to choose from.Press [Select/menu]. Select the HANDSET SETUP menu, and then the COLOR SCHEME submenu.Move the cursor to select a color scheme. As you scroll through the options, you will see each color scheme on the display.When you see the color scheme you want to use, press [Select/menu]. You will hear a confi rmation tone.1)2)3)4)1)2)3)4)1)2)3)4)#WVQ6CNM1P1HH#WVQ6CNM1P1HH#P[-G[#PUYGT1P1HH#P[-G[#PUYGT1P1HH%QNQT5EJGOG%QNQT5EJGOG%QNQT5EJGOG%QNQT5EJGOG%QNQT5EJGOG%QNQT5EJGOGCustomizing Your HandsetsUP883BH(TRU9565-2) book OM 2.ind29 29UP883BH(TRU9565-2) book OM 2.ind29 29 12/27/2007 4:36:53 PM12/27/2007 4:36:53 PM](https://usermanual.wiki/Uniden-America/UC518R.USERS-MANUAL-1/User-Guide-900676-Page-30.png)
![3030WallpaperYour phone has 4 wallpapers to choose from.Press [Select/menu]. Select the HANDSET SETUP menu, and then the WALLPAPER submenu.Move the cursor to select a wall paper. As you scroll through the options, you will see each wallpaper on the display. If you do not want to use a wallpaper, choose NO SELECTION.Press [Select/menu]. You will hear a confi rmation tone. Adjusting the Display (LCD Contrast)LCD Contrast adjusts the handset display brightness. Choose from one of the 10 levels for optimum viewing.Press [Select/menu].Select the HANDSET SETUP, and then the LCD CONTRAST submenu.Use [] or [ ] to adjust the contrast of the display.Press [Select/menu]. You will hear a confi rmation tone.1)2)3)4)1)2)3)4)9CNNRCRGT0Q5GNGEVKQP9CNNRCRGT9CNNRCRGT0Q5GNGEVKQP9CNNRCRGT.%&%QPVTCUVޓ.%&%QPVTCUVޓCustomizing Your HandsetsUP883BH(TRU9565-2) book OM 2.ind30 30UP883BH(TRU9565-2) book OM 2.ind30 30 12/27/2007 4:36:54 PM12/27/2007 4:36:54 PM](https://usermanual.wiki/Uniden-America/UC518R.USERS-MANUAL-1/User-Guide-900676-Page-31.png)