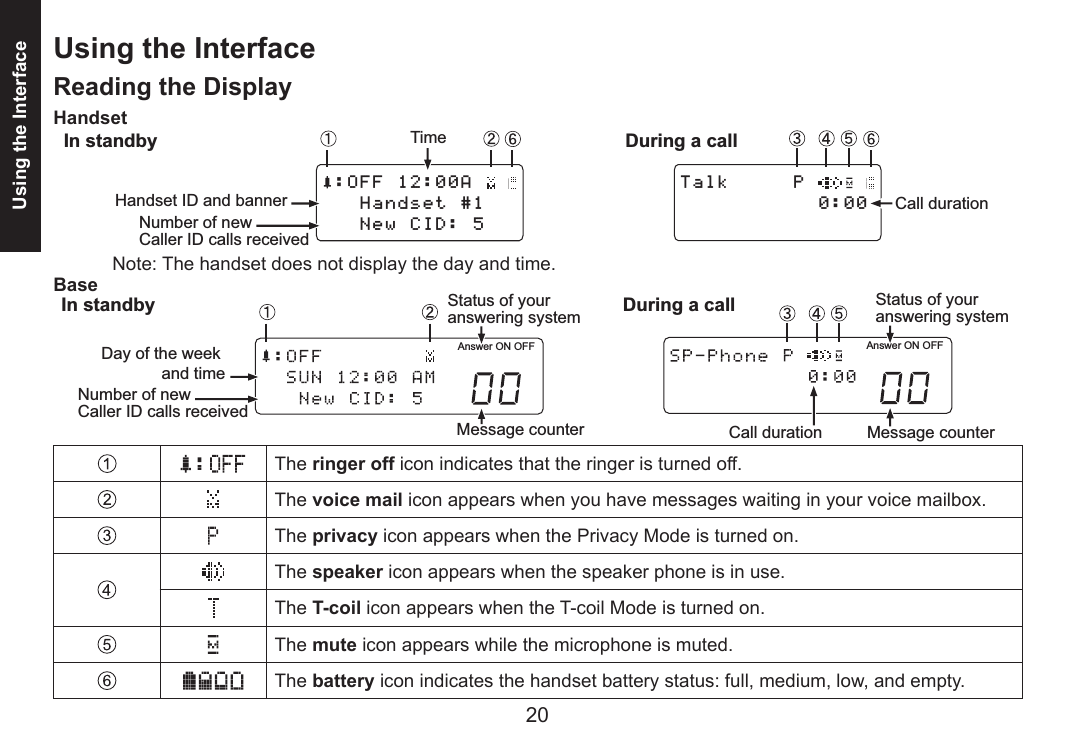
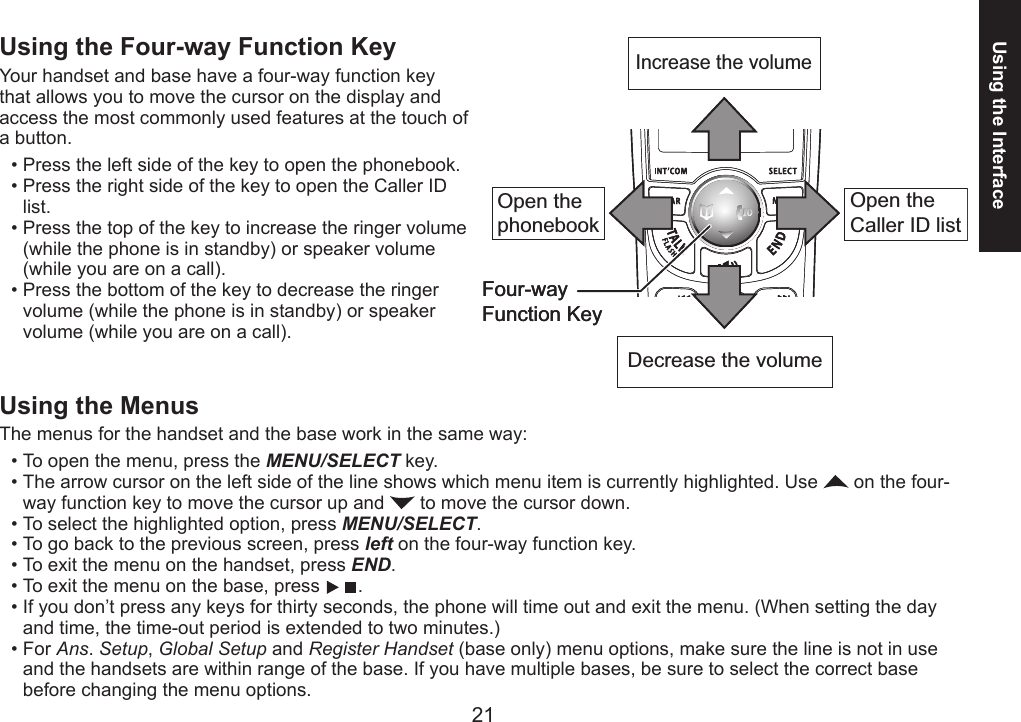
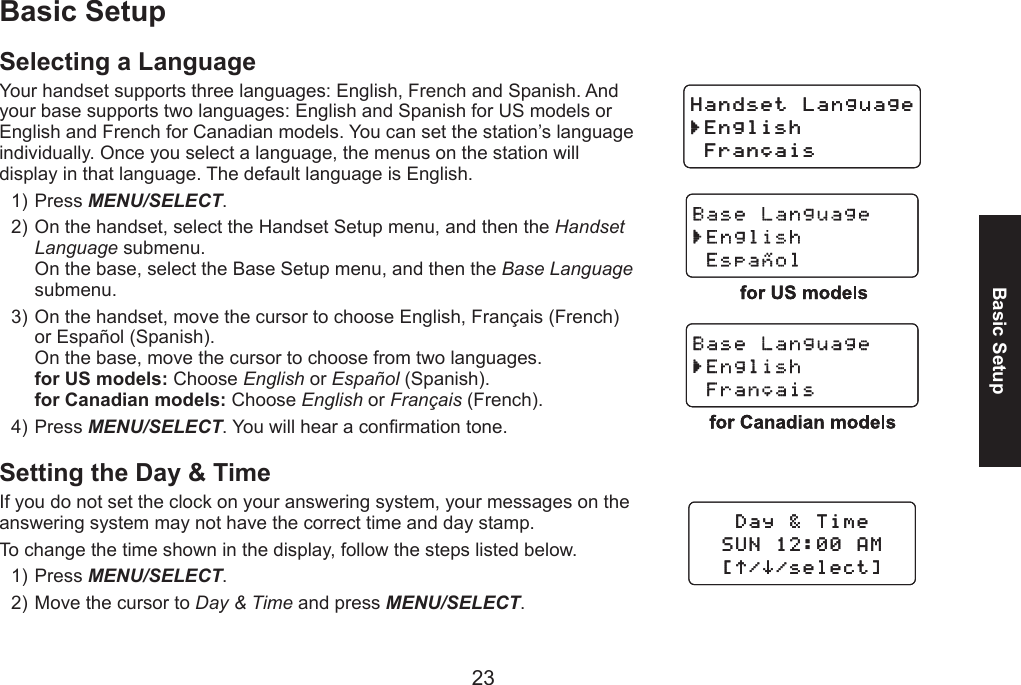
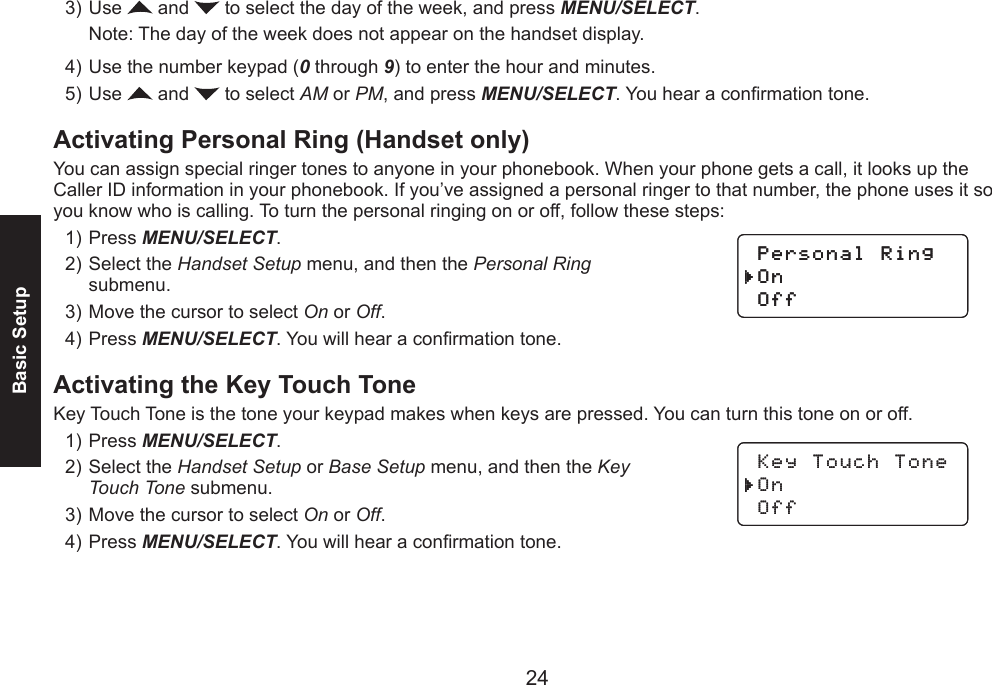
Uniden America UC551 1.9GHz UPCS CORDLESS TELEPHONE-BASE UNIT User Manual
Uniden America Corporation 1.9GHz UPCS CORDLESS TELEPHONE-BASE UNIT Users Manual
UserManual.wiki
>
Uniden America
>
UC551 User Manual
Users Manual
Navigation menu
Upload a User Manual
Namespaces
Wiki Guide
HTML
PDF
Info
Views
User Manual
Discussion / Help
Navigation


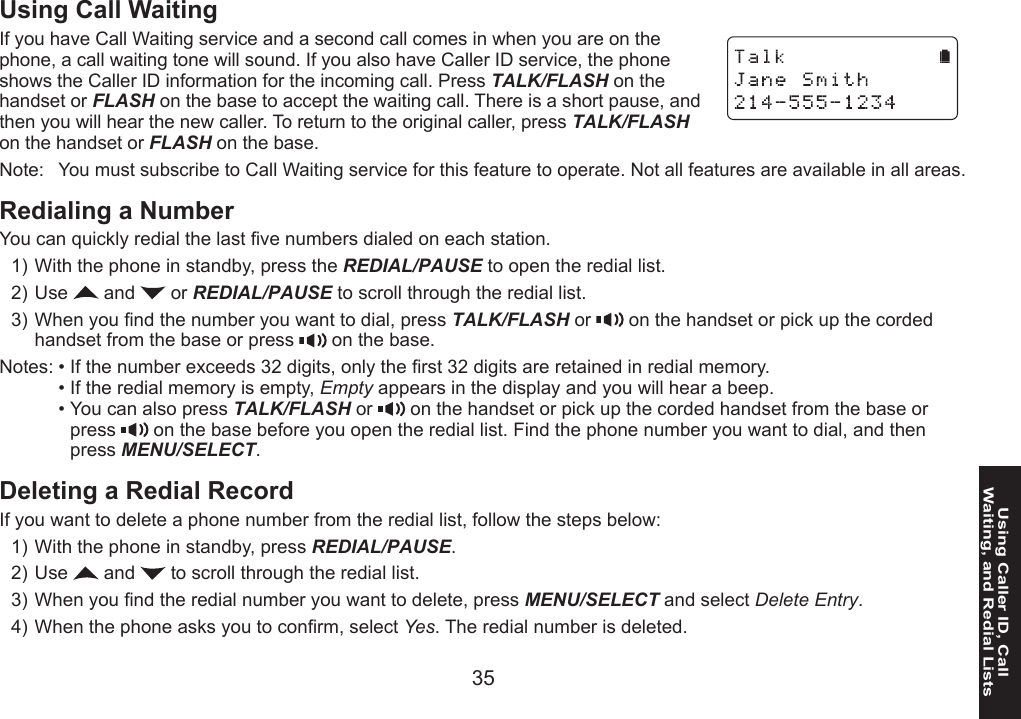
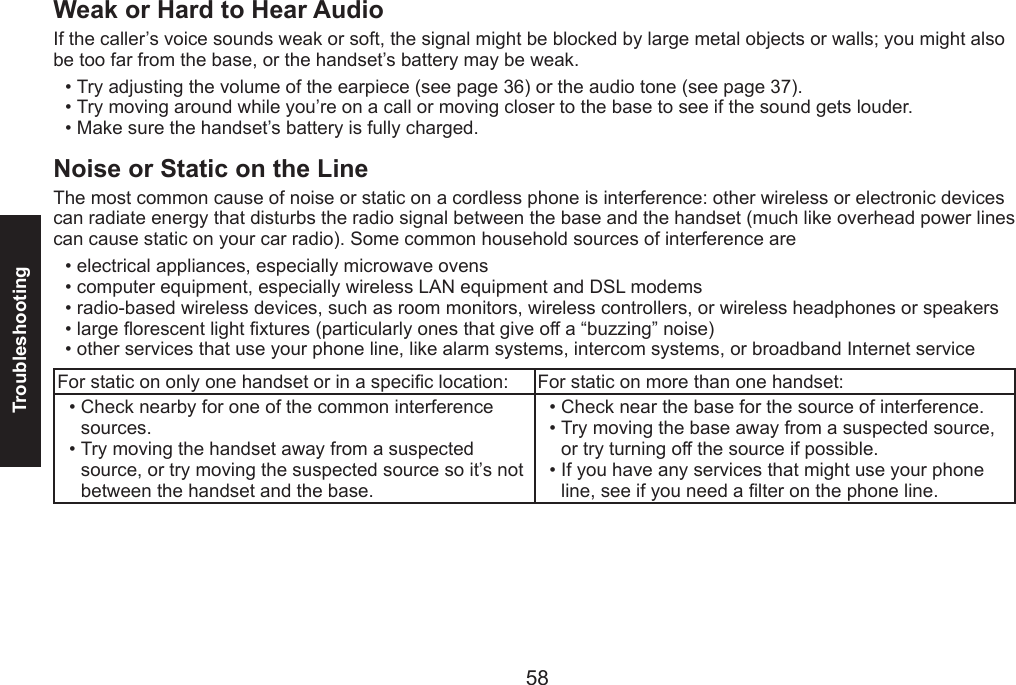
![22Using the InterfaceEntering Text from Your PhoneYou can use the number keypad on your handset or base to enter text by referring to the letters printed on each number key. When you press the number key in a text entry eld, the phone displays the rst letter printed on the number key. Press the number key twice to display the second letter and three times to display the third.When [Aa] appears on the display, capital letters are displayed rst, then lower case letters, and then the number on the key.When [aA] appears on the display, lower case letters are displayed rst, then the number on the key, and then capital letters.When you input the rst letter or a letter after a blank space, the default mode is [Aa]. From the next letter, the mode changes to [aA] automatically.You can switch back and forth the mode manually between [Aa] and [aA]. Press /TONE; the case (small/capital) of the letter entered changes also.If two letters in a row use the same number key, enter the rst letter, then use right on the four-way function key to move the cursor to the next position to enter the second letter. For example, to enter the word “Movies”: Press 6 once to enter M.Use right on the four-way function key to move the cursor to the right.Press 6 three times to enter o.Press 8 three times to enter v.Press 4 three times to enter i.Press 3 two times to enter e.Press 7 four times to enter s.Press MENU/SELECT to end your text entry.If you make a mistake while entering a name, use right or left on the four-way function key to move the cursor to the incorrect character. Press CLEAR/INT’COM on the handset or CLEAR on the base to erase the wrong character, and then enter the correct character. To delete all characters, press and hold CLEAR/INT’COM on the handset or CLEAR on the base.••••1)2)3)4)5)6)7)8)Number of times key is pressed (when [Aa] appears on the display)12 ABC3 DEF4 GHI5 JKL6 MNO7 PQRS8 TUV9 WXYZ0 OPERNumber of times key is pressed (when [Aa] appears on the display)12 ABC3 DEF4 GHI5 JKL6 MNO7 PQRS8 TUV9 WXYZ0 OPER](https://usermanual.wiki/Uniden-America/UC551/User-Guide-1056937-Page-22.png)


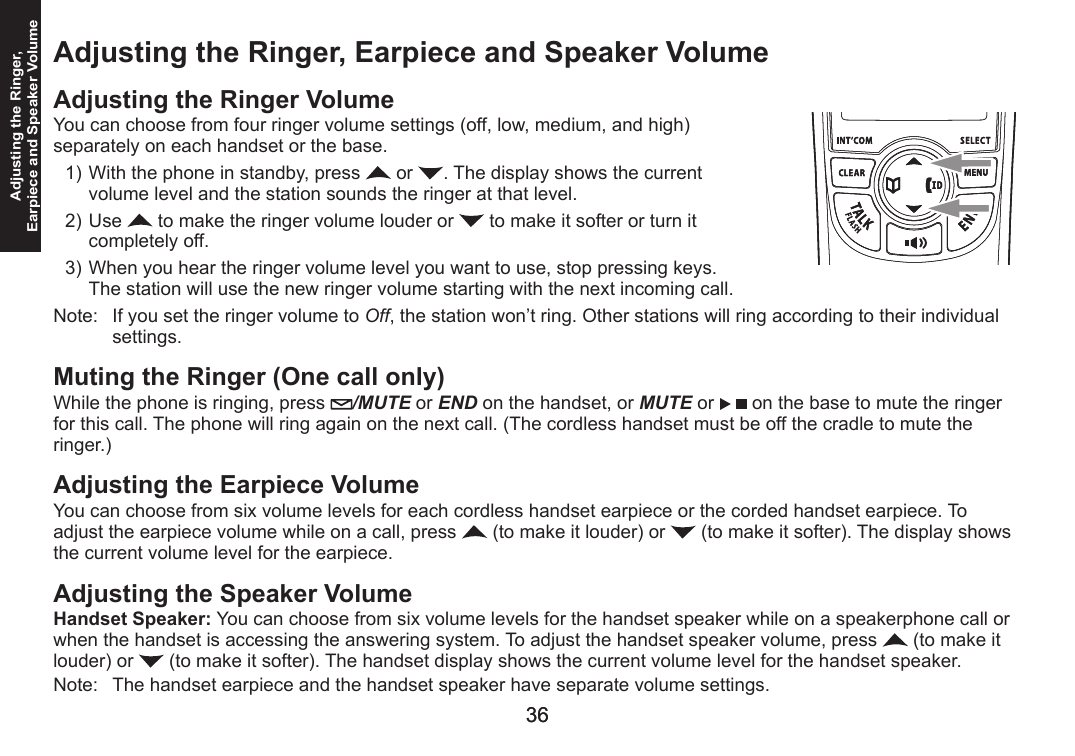
![4343Setting Up the Answering SystemSetting Up the Answering SystemYou can set up your answering system’s features from the base or handset with two exceptions: you can only change the greeting or record a new greeting from the base. Only one station at a time can access the answering system menus.Recording a Personal GreetingYour answering system comes with a pre-recorded outgoing message or greeting that plays when you receive a call: “Hello, no one is available to take your call. Please leave a message after the tone.” You can record your own personal outgoing greeting. Your recorded greeting must be between two seconds and thirty seconds long.On the base, press MENU/SELECT. Select the Ans. Setup menu, and then the Record Greeting submenu.Record Greeting, Start [select] appears. Press MENU/SELECT to start the recording. Begin recording after the announcement. The message counter on the base LCD displays “30”, and then begins to count down.When you nish recording, press MENU/SELECT again or press . You will hear a conrmation tone, and your recorded greeting plays back for you.Selecting a GreetingYou can switch back and forth between the pre-recorded greeting and your own greeting at any time.On the base, press MENU/SELECT. Select the Ans. Setup menu, and then the Greeting Options submenu. The system plays the current greeting.To keep this greeting, do nothing. To switch to the other greeting, press or on the four-way function key while the system is playing the current greeting.Each time you press or , the system switches between the pre-recorded and the personal greeting. The last greeting you hear is used as the current greeting.1)2)3)4)1)2)3)4)](https://usermanual.wiki/Uniden-America/UC551/User-Guide-1056937-Page-43.png)

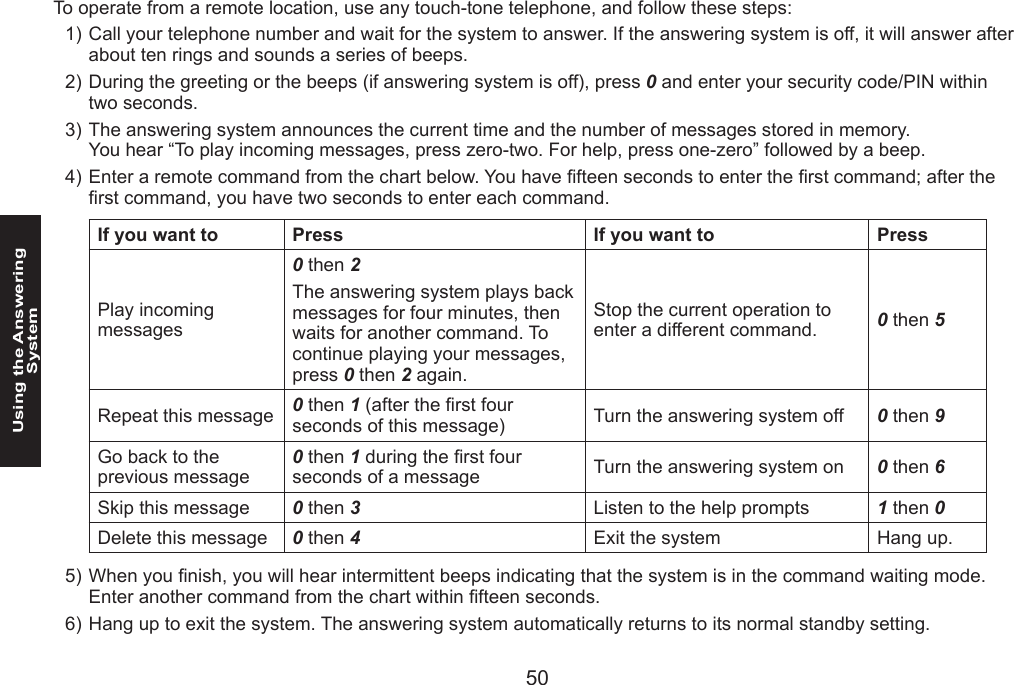
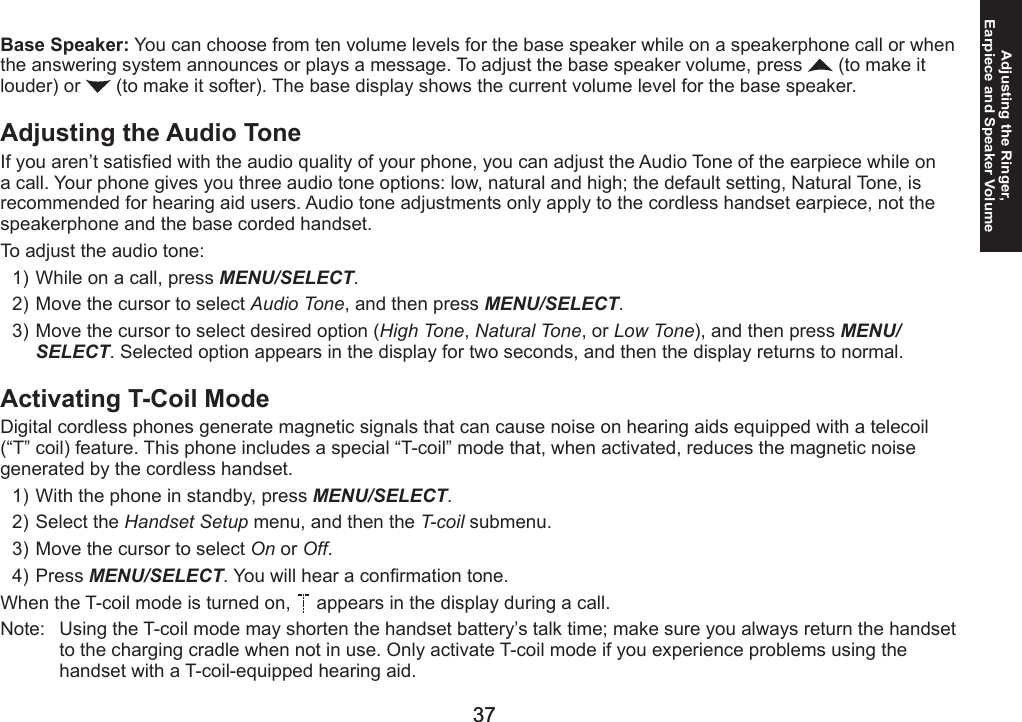
![6061TroubleshootingChanging the Line Mode for Multiple ExtensionsLine mode refers to the method that telephones use to signal each other that an extension is in use. Customer service may recommend changing the line mode if you have any of the following problems:Your phone keeps ringing after someone answers on an extension phone.Your answering system doesn’t stop recording when you answer on an extension phone.Caller ID displays briey and then clears.If you set from a handset and you have multiple bases, select the base that is having problems (see page 15).Press MENU/SELECT. Select the Global Setup menu, and then the Set Line Mode submenu. If Instructed by Customer Service Press [select] appears. Press MENU/SELECT.Move the cursor to select Type - A, Type - B, or Off.Press MENU/SELECT. You will hear a conrmation tone.Traveling Out of RangeWhen the handset is in standby, the handset will display Out Of Range.During a call, if you move your handset too far from your base, noise may increase. If you pass the range limit of the base, the handset will beep, display Out Of Range, and then go to standby. The base will maintain the connection for thirty seconds after the handset goes out of range. If you move the handset back within range of the base within thirty seconds, press TALK/FLASH or to pick up the call again.Note: If it is set to automatically select the available base, the handset will begin searching for another base thirty seconds after going out of range. (see Selecting the base on page 15).•••1)2)3)4)5)6)](https://usermanual.wiki/Uniden-America/UC551/User-Guide-1056937-Page-61.png)