Uniden America UT608 Combination Portable Marine VHF and FRS Radio User Manual HH960 MARINE VHF HANDHELD
Uniden America Corporation Combination Portable Marine VHF and FRS Radio HH960 MARINE VHF HANDHELD
Owners Manual

1
WEST MARINE VHF250 (MULTI-BAND)
HANDHELD MARINE RADIO
PRELIMINARY DRAFT
UNIDEN AMERICA CORPORATION
6West Marine VHF150 Radio Owner’s Manual
Maritime Radio Services Operation
Warning! This transmitter will operate on channels/frequen-
cie that have restricted use in the United States. The channel
assignments include frequencies assigned for exclusive use
of the U.S. Coast Guard, use in Canada, and use in interna-
tional waters. Operation on these frequencies without proper
authorization is strictly forbidden. For frequencies/channels
that are currently for use in the U.S. without an individual li-
cense, please contact the FCC Call Center at 1-888-CALL-
FCC (1-888-225-5322).
For individuals requiring a license, such as commercial us-
ers, you should obtain a license application from your near-
est FCC fi eld offi ce (for US users) or Industry Canada (for
Canadian users).
FCC/Industry Canada Information
Certifi cation FCC Part 80 or RSS-182/188
Output Power 5W
Emmision 16K0F3E, 16K0F2D
Transmitter Frequency Range 156.025 to 157.425 MHz
FCC Identifi er AMWUT601
IC Certifi cation Number 513C-UT601D
This device complies with the GMDSS provisions with Part
80 of the FCC Rules, as well as Part 15 of the FCC Rules.
Operation is subject to the condition that this device does not
cause harmful interference.
Unauthorized changes or modifi cations to this equipment
may void compliance with the FCC Rules. Any change or
modifi cation must be approved in writing by West Marine.
Changes or modifi cations not approved by West Marine
could void the user’s authority to operate the equipment.
8West Marine VHF150 Radio Owner’s Manual
FCC RF Exposure Information
WARNING! Read this information before using the radio
In August 1996 the Federal Communications Commission (FCC)
of the United States with its action in Report and Order FCC 96-
326 adopted an updated safety standard for human exposure to
radio frequency electromagnetic energy emitted by FCC regulated
transmitters. Those guidelines are consistent with the safety stan-
dard previously set by both U.S. and international standards bod-
ies. The design of the radio complies with the FCC guidelines and
these international standards.
Never allow children to operate the radio without adult supervision
and the knowledge of the following guidelines.
WARNING! It is up to the user to properly operate this radio trans-
mitter to insure safe operation. Please adhere to the following:
Use only the supplied or an approved antenna. Unauthorized an-
tennas, modifi cations, or attachments could impair call quality,
damage the radio, or result in violation of FCC regulations.
Do not use the radio with a damaged antenna. If a damaged an-
tenna comes into contact with the skin, a minor burn may result.
Please contact your local dealer for a replacement antenna.
Body-worn Operation This device was tested for typical body-
worn operations using the supplied belt-clip. To maintain compli-
ance with FCC RF exposure requirements, body-worn operations
are restricted to the supplied belt-clip. For hand-held operation,
the radio should be held 1 inch from the user’s face. The use of
accessories that do not satisfy these requirements may not com-
ply with FCC RF exposure requirements and should be avoided.
For more information about RF exposure, please visit the FCC
website at www.fcc.gov

2
Table Of Contents
Section & Item Page
1. Executive Summary 4
2. Product Specifications 4
3. Keys and Controls 5
4. Printed Materials and Packaging 5
5. Frequencies & Channels 6
6. Key Layout 9
7. LCD Screen 9
7.1 Opening Screen 9
8. ON/OFF/Volume Knob 10
9. Squelch Knob 10
10. Channel UP & DOWN Keys 10
11. Band/1/2.5/5W Key 11
11.1 Marine VHF 12
11.2 FRS Radio 12
11.3 AM Radio 14
11.4 FM Radio 15
11.5 Air Band 17
11.6 Marine Transmit Power 18
12. MEM / SCAN Key 19
13. WX/ALERT Key 22
14. 16/9/TRI Key 24
15. PTT (Push To Talk) Key 26
16. Light / Lock Key 27
17. Menu Key 28
17.1 Channel Names 30
17.2 Contrast Adjust 31
17.3 Lamp Adjust 31
17.4 Key Beep 32
17.5 U.I.C. 32
17.6 F.I.P.S. 33
17.7 FM Muting 34
17.8 FRS CTCSS/DCS 35
17.9 AM Radio Frequencies 36
17.10.0 Dual or Tri Watch 36
18. Enter Key 37
19. S.A.M.E. Event Codes 38
20 CTCSS/DCS Code List 41
21. FRS Channel Chart 42

3
1. Executive Summary
The VHF250 will be designed to be a step up model to the current West Marine
VHF100/200 radio. This radio will incorporate a full featured dot matrix display, Marine
transceiver, AM radio receiver, FM radio receiver, AM Aircraft band receiver, FRS
transceiver, a 1200mAh LiON battery, and a swivel belt clip to assure compliance with
the FCC SAR requirements.
2. Product Specifications
Channels All US, International, and Canadian
Transmit Power (5W Default) 1 Watt/2.5 Watt/5 Watt, User Selectable
Submersible Yes, JIS Level 7
LiON Capable Yes, 12 hours (minimum) of operation
based upon the 90/5/5 rule
Drop-in Charging Cradle (4 Hour
Charge) Yes, Included. Rapid Charge. Includes
Stainless Steel Mounting Hardware
Cigarette Lighter DC Plug Yes, included.
Alkaline Battery Tray Yes, included. 4xAAA (9 Hour, 2 Watt)
AM Band Radio Receiver Yes
FM Band Radio Receiver Yes
Air Band Radio Receiver Yes
14 Channel FRS Transceiver Yes (0.5W ERP output)
Tri-Watch Yes
Weather All 10 Weather Channels
S.A.M.E. Weather Alert Yes
F.I.P.S. Code Memory Size 20 Locations
Memory Channel Scan Yes, up to all channels
Backlit LCD & Keys Yes, Green Color
Instant Channel 16 Yes, second press is channel 9
Belt Clip Yes, detachable and swivel
AC Adapter Yes, Input AC 100~240V 50/60Hz/
Output DC.
Flexible Soft Rubber Antenna
(Non-removable type, FCC rule) Yes, West Marine “ROPE” logo
embedded in the rubber cover of the
antenna
Speaker/Microphone Jacks Yes, to be compatible with the new
Uniden speaker microphone (model#
HHVTA07) Jacks are to keep JIS level 7
spec. Screw-on Submersible cap
required.
Sensitivity 0.20uV for 12 dB SINAD Nominal
Squelch Sensitivity Threshold 0.10 uV Nominal
Adjacent Channel Selectivity 70 dB @ +or – 25kHz
Operating Temperature -4 F (-20C) to 122F (+50C)
Frequency StaDuallity + or – 2.5ppm Limit
Channel Spacing 25KHz Fixed
Antenna Connector Fixed. FRS band FCC requirement

4
Speaker Built in 32mm Dynamic Type, 8 ohm,
0.5 watt rated
Microphone Built in Electret type
UV Resistant Plastic Yes
Stainless Steel Parts Yes, for all exposed to the elements.
Wrist Strap Yes, connected on the side of the radio.
3. Keys and Controls
On/Off/Volume Knob Yes
Squelch Knob Yes
PTT Key Yes, on the side of the radio
WX/Alert Key Yes
16/9/Tri Watch Key Yes
Band/1/2.5/5W Yes
UP Key Yes
DOWN Key Yes
MEM/Scan Key Yes
Menu Key Yes
Enter Key Yes
Light/Lock Key Yes, underneath the PTT key
Large LCD Screen: 22mm x 35.9mm
(Viewable Size is 19mm high, 31mm
wide)
Yes, Full Dot Matrix
4. Printed Materials and Packaging
Display Box Yes, UJ to supply the Die, UAC to
supply the film (West Marine to Create)
Owners Manual Yes, To be written in English, French,
and Spanish
Warranty 3 year, to be included in the owners
manual (West Marine Information)
Registration Card No, this is a West Marine model
Certificate of Compliance N/A
RLI (Radio Life Insurance) Card No, this is a West Marine model
POP Hang Tag No, this is a West Marine model
POP for LCD Yes, Placed on the LCD at the Factory
Serial Number Sticker Yes, affixed to the Display Box and
radio
Battery Specification Label Yes, affixed to the battery pack
FCC/IC ID Label Yes
Patent Engraving No
Regulations FCC, IC, UL
UPC Code 05063350093 4
ITF14 Code 10050633500931

5
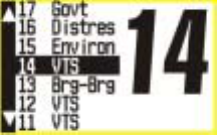
5. Frequencies and Channels
USA FREQUENCY CHART
Ch No. RX Freq TX Freq Status Name Full Name 16 Char Name
1 ”A” 156.0500 156.0500 Simplex VTS/COM VESSEL TRAFFIC SYSTEM/COOMERCIAL VTS/COMMERCIAL
3 ”A” 156.1500 156.1500 Simplex CG ONLY COAST GUARD,GOVT ONLY COAST GUARD ONLY
5 “A” 156.2500 156.2500 Simplex VTS/COM VESSEL TRAFFIC SYSTEM/COMMERCIAL VTS/COMMERCIAL
6 156.3000 156.3000 Simplex SAFETY INTER-SHIP SAFETY SAFETY
7 “A” 156.3500 156.3500 Simplex COMMERC COMMERCIAL COMMERCIAL
8 156.4000 156.4000 Simplex COMMERC COMMERCIAL COMMERCIAL
9 156.4500 156.4500 Simplex NON COM NON COMMERCIAL NON COMMERCIAL
10 156.5000 156.5000 Simplex COMMERC COMMERCIAL COMMERCIAL
11 156.5500 156.5500 Simplex VTS VESSEL TRAFFIC SYSTEM VESSEL TRAFFIC
12 156.6000 156.6000 Simplex VTS VESSEL TRAFFIC SYSTEM VESSEL TRAFFIC
13 156.6500 156.6500 Simplex, 1W BRG-BRG BRIDGE TO BRIDGE BRIDGE TO BRIDGE
14 156.7000 156.7000 Simplex VTS VESSEL TRAFFIC SYSTEM VESSEL TRAFFIC
15 156.7500
InhiDualt Receive Only ENVIRON ENVIRONMENTAL ENVIRONMENTAL
16 156.8000 156.8000 Simplex DISTRES DISTRESS, SAFETY, CALLING DISTRESS
17 156.8500 156.8500 Simplex, 1W GOVT GOVT MARITIME CONTROL GOVERNMENT
18 “A” 156.9000 156.9000 Simplex COMMERC COMMERCIAL COMMERCIAL
19 “A” 156.9500 156.9500 Simplex COMMERC COMMERCIAL COMMERCIAL
20 161.6000 157.0000 Duplex PORT OP PORT OPERATION PORT OPERATION
20 “A” 157.0000 157.0000 Simplex PORT OP PORT OPERATION PORT OPERATION
21 “A” 157.0500 157.0500 Simplex CG ONLY COAST GUARD ONLY COAST GUARD ONLY
22 “A” 157.1000 157.1000 Simplex CG COAST GUARD COAST GUARD
23 “A” 157.1500 157.1500 Simplex CG ONLY COAST GUARD ONLY COAST GUARD ONLY
24 161.8000 157.2000 Duplex MAR OPR MARINE OPERATOR MARINE OPERATOR
25 161.8500 157.2500 Duplex MAR OPR MARINE OPERATOR MARINE OPERATOR
26 161.9000 157.3000 Duplex MAR OPR MARINE OPERATOR MARINE OPERATOR
27 161.9500 157.3500 Duplex MAR OPR MARINE OPERATOR MARINE OPERATOR
28 162.0000 157.4000 Duplex MAR OPR MARINE OPERATOR MARINE OPERATOR
61 “A” 156.0750 156.0750 Simplex CG COAST GUARD COAST GUARD
63 “A” 156.1750 156.1750 Simplex VTS VESSEL TRAFFIC SYSTEM VESSEL TRAFFIC
64 “A” 156.2250 156.2250 Simplex COMMERC COMMERCIAL COMMERCIAL
65 “A” 156.2750 156.2750 Simplex PORT OP PORT OPERATION PORT OPERATION
66 “A” 156.3250 156.3250 Simplex PORT OP PORT OPERATION PORT OPERATION
67 156.3750 156.3750 Simplex, 1W BRG-BRG BRIDGE TO BRIDGE BRIDGE TO BRIDGE
68 156.4250 156.4250 Simplex NON COM NON COMMERCIAL NON COMMERCIAL
69 156.4750 156.4750 Simplex NON COM NON COMMERCIAL NON COMMERCIAL
70 156.5250
InhiDualt Receive Only DSC DIGITAL SELECTIVE CALLING DSC RECEIVE ONLY
71 156.5750 156.5750 Simplex NON COM NON COMMERCIAL NON COMMERCIAL
72 156.6250 156.6250 Simplex NON COM NON COMMERCIAL (SHIP-SHIP) NON COMMERCIAL
73 156.6750 156.6750 Simplex PORT OP PORT OPERATION PORT OPERATION
74 156.7250 156.7250 Simplex PORT OP PORT OPERATION PORT OPERATION
75 156.7750 156.7750 Simplex, 1W PORT OP PORT OPERATION PORT OPERATION
76 156.8250 156.8250 Simplex, 1W PORT OP PORT OPERATION PORT OPERATION
77 156.8750 156.8750 Simplex, 1W PORT OP PORT OPERATION (SHIP-SHIP) PORT OPERATION
78 “A” 156.9250 156.9250 Simplex NON COM NON COMMERCIAL NON COMMERCIAL
79 “A” 156.9750 156.9750 Simplex COMMERC COMMERCIAL COMMERCIAL
80 “A” 157.0250 157.0250 Simplex COMMERC COMMERCIAL COMMERCIAL
81 “A” 157.0750 157.0750 Simplex USCG COAST GUARD COAST GUARD
82 “A” 157.1250 157.1250 Simplex USCG COAST GUARD COAST GUARD
83 “A” 157.1750 157.1750 Simplex GOVT GOVERNMENT GOVERNMENT
84 161.8250 157.2250 Duplex MAR OPR MARINE OPERATOR MARINE OPERATOR
85 161.8750 157.2750 Duplex MAR OPR MARINE OPERATOR MARINE OPERATOR
86 161.9250 157.3250 Duplex MAR OPR MARINE OPERATOR MARINE OPERATOR
87 161.9750 157.3750 Duplex MAR OPR MARINE OPERATOR MARINE OPERATOR
88 162. 0250 157.4250 Duplex MAR OPR MARINE OPERATOR MARINE OPERATOR
88 “A” 157.4250 157.4250 Simplex COMMERC COMMERCIAL (SHIP-SHIP) COMMERCIAL

6
CANADIAN FREQUENCY CHART
Ch No. RX Freq TX Freq Status Name Full Name 16 Char Name
1 160.6500 156.0500 Duplex MAR OPR MARINE OPERATOR MARINE OPERATOR
2 160.7000 156.1000 Duplex MAR OPR MARINE OPERATOR MARINE OPERATOR
3 160.7500 156.1500 Duplex MAR OPR MARINE OPERATOR MARINE OPERATOR
4 “A” 156.2000 156.2000 Simplex CCG CANADIAN COAST GUARD COAST GUARD
5 “A” 156.2500 156.2500 Simplex VTS VESSEL TRAFFIC SYSTEM VESSEL TRAFFIC
6 156.3000 156.3000 Simplex SAFETY INTER-SHIP SAFETY SAFETY
7 “A” 156.3500 156.3500 Simplex COMMERC COMMERCIAL COMMERCIAL
8 156.4000 156.4000 Simplex COMMERC COMMERCIAL COMMERCIAL
9 156.4500 156.4500 Simplex CALLING BOATER CALLING CHANNEL CALLING
10 156.5000 156.5000 Simplex COMMERC COMMERCIAL COMMERCIAL
11 156.5500 156.5500 Simplex VTS VESSEL TRAFFIC SYSTEM VESSEL TRAFFIC
12 156.6000 156.6000 Simplex VTS VESSEL TRAFFIC SYSTEM VESSEL TRAFFIC
13 156.6500 156.6500 Simplex, 1W BRG-BRG BRIDGE TO BRIDGE BRIDGE TO BRIDGE
14 156.7000 156.7000 Simplex VTS VESSEL TRAFFIC SYSTEM VESSEL TRAFFIC
15 156.7500 156.7500 Simplex ENVIRON ENVIRONMENTAL ENVIRONMENTAL
16 156.8000 156.8000 Simplex DISTRES DISTRESS, SAFETY, CALLING DISTRESS
17 156.8500 156.8500 Simplex, 1W SAR STATE CONTROL STATE CONTROL
18 “A” 156.9000 156.9000 Simplex COMMERC COMMERCIAL COMMERCIAL
19 “A” 156.9500 156.9500 Simplex CCG CANADIAN COAST GUARD COAST GUARD
20 161.6000 157.0000 Duplex, 1W PORT OP PORT OPERATION PORT OPERATION
21 “A” 157.0500 157.0500 Simplex CCG CANADIAN COAST GUARD COAST GUARD
22 “A” 157.1000 157.1000 Simplex CCG CANADIAN COAST GUARD COAST GUARD
23 161.7500 157.1500 Duplex CCG CANADIAN COAST GUARD COAST GUARD
24 161.8000 157.2000 Duplex MAR OPR MARINE OPERATOR MARINE OPERATOR
25 161.8500 157.2500 Duplex MAR OPR MARINE OPERATOR MARINE OPERATOR
26 161.9000 157.3000 Duplex MAR OPR MARINE OPERATOR MARINE OPERATOR
27 161.9500 157.3500 Duplex MAR OPR MARINE OPERATOR MARINE OPERATOR
28 162.0000 157.4000 Duplex MAR OPR MARINE OPERATOR MARINE OPERATOR
60 160.6250 156.0250 Duplex MAR OPR MARINE OPERATOR MARINE OPERATOR
61 “A” 156.0750 156.0750 Simplex CCG CANADIAN COAST GUARD COAST GUARD
62 “A” 156.1250 156.1250 Simplex CCG CANADIAN COAST GUARD COAST GUARD
64 160.8250 156.2250 Duplex MAR OPR MARINE OPERATOR MARINE OPERATOR
64 “A” 156.2250 156.2250 Simplex MAR OPR MARINE OPERATOR MARINE OPERATOR
65 “A” 156.2750 156.2750 Simplex RESCUE SEARCH AND RESCUE SEARCH & RESCUE
66 “A” 156.3250 156.3250 Simplex, 1W PORT OP PORT OPERATION PORT OPERATION
67 156.3750 156.3750 Simplex BRG-BRG BRIDGE TO BRIDGE BRIDGE TO BRIDGE
68 156.4250 156.4250 Simplex NON COM NON COMMERCIAL NON COMMERCIAL
69 156.4750 156.4750 Simplex NON COM NON COMMERCIAL NON COMMERCIAL
70 156.5250
InhiDualt Receive Only DSC DIGITAL SELECTIVE CALLING DSC RECEIVE ONLY
71 156.5750 156.5750 Simplex NON COM NON COMMERCIAL NON COMMERCIAL
72 156.6250 156.6250 Simplex NON COM NON COMMERCIAL NON COMMERCIAL
73 156.6750 156.6750 Simplex PORT OPR PORT OPERATION PORT OPERATION
74 156.7250 156.7250 Simplex PORT OPR PORT OPERATION PORT OPERATION
77 156.8750 156.8750 Simplex, 1W PORT OPR PORT OPERATION PORT OPERATION
78 “A” 156.9250 156.9250 Simplex SHP-SHP INTER SHIP INTER SHIP
79 “A” 156.9750 156.9750 Simplex SHP-SHP INTER SHIP INTER SHIP
80 “A” 157.0250 157.0250 Simplex SHP-SHP INTER SHIP INTER SHIP
81 “A” 157.0750 157.0750 Simplex CCG CANADIAN COAST GUARD COAST GUARD
82 “A” 157.1250 157.1250 Simplex CCG CANADIAN COAST GUARD COAST GUARD
83 161.7750 157.1750 Duplex CCG CANADIAN COST GUARD COAST GUARD
83 “A” 157.1750 157.1750 Simplex CCG CANADIAN COAST GUARD COAST GUARD
84 161.8250 157.2250 Duplex MAR OPR MARINE OPERATOR MARINE OPERATOR
85 161.8750 157.2750 Duplex MAR OPR MARINE OPERATOR MARINE OPERATOR
86 161.9250 157.3250 Duplex MAR OPR MARINE OPERATOR MARINE OPERATOR
87 161.9750 157.3750 Duplex MAR OPR MARINE OPERATOR MARINE OPERATOR
88 162.0250 157.4250 Duplex MAR OPR MARINE OPERATOR MARINE OPERATOR

7
INTERNATIONAL FREQUENCY CHART
Ch No. RX Freq TX Freq Status Name Full Name 16 Char Name
1 160.6500 156.0500 Duplex MAR OPR MARINE OPERATOR MARINE OPERATOR
2 160.7000 156.1000 Duplex MAR OPR MARINE OPERATOR MARINE OPERATOR
3 160.7500 156.1500 Duplex MAR OPR MARINE OPERATOR MARINE OPERATOR
4 160.8000 156.2000 Duplex MAR OPR MARINE OPERATOR MARINE OPERATOR
5 160.8500 156.2500 Duplex MAR OPR MARINE OPERATOR MARINE OPERATOR
6 156.3000 156.3000 Simplex SAFETY INTER-SHIP SAFETY SAFETY
7 160.9500 156.3500 Duplex MAR OPR MARINE OPERATOR MARINE OPERATOR
8 156.4000 156.4000 Simplex COMMERC COMMERCIAL (SHIP-SHIP) COMMERCIAL
9 156.4500 156.4500 Simplex CALLING BOATER CALLING CHANNEL CALLING
10 156.5000 156.5000 Simplex COMMERC COMMERCIAL COMMERCIAL
11 156.5500 156.5500 Simplex VTS VESSEL TRAFFIC SYSTEM VESSEL TRAFFIC
12 156.6000 156.6000 Simplex VTS VESSEL TRAFFIC SYSTEM VESSEL TRAFFIC
13 156.6500 156.6500 Simplex BRG-BRG BRIDGE TO BRIDGE BRIDGE TO BRIDGE
14 156.7000 156.7000 Simplex VTS VESSEL TRAFFIC SYSTEM VESSEL TRAFFIC
15 156.7500 156.7500 Simplex, 1W ENVIRON ENVIRONMENTAL ENVIRONMENTAL
16 156.8000 156.8000 Simplex DISTRESS DISTRESS, SAFETY, CALLING DISTRESS
17 156.8500 156.8500 Simplex, 1W GOVT GOVT MARINE CONTROL GOVERNMENT
18 161.5000 156.9000 Duplex PORT OP PORT OPERATION PORT OPERATION
19 161.5500 156.9500 Duplex COMMERC COMMERCIAL COMMERCIAL
20 161.6000 157.0000 Duplex PORT OP PORT OPERATION PORT OPERATION
21 161.6500 157.0500 Duplex PORT OP PORT OPERATION PORT OPERATION
22 161.7000 157.1000 Duplex PORT OP PORT OPERATION PORT OPERATION
23 161.7500 157.1500 Duplex MAR OPR MARINE OPERATOR MARINE OPERATOR
24 161.8000 157.2000 Duplex MAR OPR MARINE OPERATOR MARINE OPERATOR
25 161.8500 157.2500 Duplex MAR OPR MARINE OPERATOR MARINE OPERATOR
26 161.9000 157.3000 Duplex MAR OPR MARINE OPERATOR MARINE OPERATOR
27 161.9500 157.3500 Duplex MAR OPR MARINE OPERATOR MARINE OPERATOR
28 162.0000 157.4000 Duplex MAR OPR MARINE OPERATOR MARINE OPERATOR
60 160.6250 156.0250 Duplex MAR OPR MARINE OPERATOR MARINE OPERATOR
61 160.6750 156.0750 Duplex MAR OPR MARINE OPERATOR MARINE OPERATOR
62 160.7250 156.1250 Duplex MAR OPR MARINE OPERATOR MARINE OPERATOR
63 160.7750 156.1750 Duplex MAR OPR MARINE OPERATOR MARINE OPERATOR
64 160.8250 156.2250 Duplex MAR OPR MARINE OPERATOR MARINE OPERATOR
65 160.8750 156.2750 Duplex MAR OPR MARINE OPERATOR MARINE OPERATOR
66 160.9250 156.3250 Duplex MAR OPR MARINE OPERATOR MARINE OPERATOR
67 156.3750 156.3750 Simplex BRG-BRG BRIDGE TO BRIDGE BRIDGE TO BRIDGE
68 156.4250 156.4250 Simplex NON COM NON COMMERCIAL NON COMMERCIAL
69 156.4750 156.4750 Simplex NON COM NON COMMERCIAL NON COMMERCIAL
70 156.5250
InhiDualt Receive Only DSC DIGITAL SELECTIVE CALLING DSC RECEIVE ONLY
71 156.5750 156.5750 Simplex NON COM NON COMMERCIAL NON COMMERCIAL
72 156.6250 156.6250 Simplex NON COM NON COMMERCIAL NON COMMERCIAL
73 156.6750 156.6750 Simplex PORT OP PORT OPERATION PORT OPERATION
74 156.7250 156.7250 Simplex PORT OP PORT OPERATION PORT OPERATION
77 156.8750 156.8750 Simplex PORT OP PORT OPERATION (SHIP-SHIP) PORT OPERATION
78 161.5750 156.9250 Duplex PORT OP PORT OPERATION PORT OPERATION
79 161.5750 156.9750 Duplex PORT OP PORT OPERATION PORT OPERATION
80 161.6250 157.0250 Duplex PORT OP PORT OPERATION PORT OPERATION
81 161.6750 157.0750 Duplex PORT OP PORT OPERATION PORT OPERATION
82 161.7250 157.1250 Duplex PORT OP PORT OPERATION PORT OPERATION
83 161.7750 157.1750 Duplex PORT OP PORT OPERATION PORT OPERATION
84 161.8250 157.2250 Duplex MAR OPR MARINE OPERATOR MARINE OPERATOR
85 161.8750 157.2750 Duplex MAR OPR MARINE OPERATOR MARINE OPERATOR
86 161.9250 157.3250 Duplex MAR OPR MARINE OPERATOR MARINE OPERATOR
87 161.9750 157.3750 Duplex MAR OPR MARINE OPERATOR MARINE OPERATOR
88 162.0250 157.4250 Duplex MAR OPR MARINE OPERATOR MARINE OPERATOR
8
WEATHER FREQUENCY CHART
Ch No. RX Frequency Description
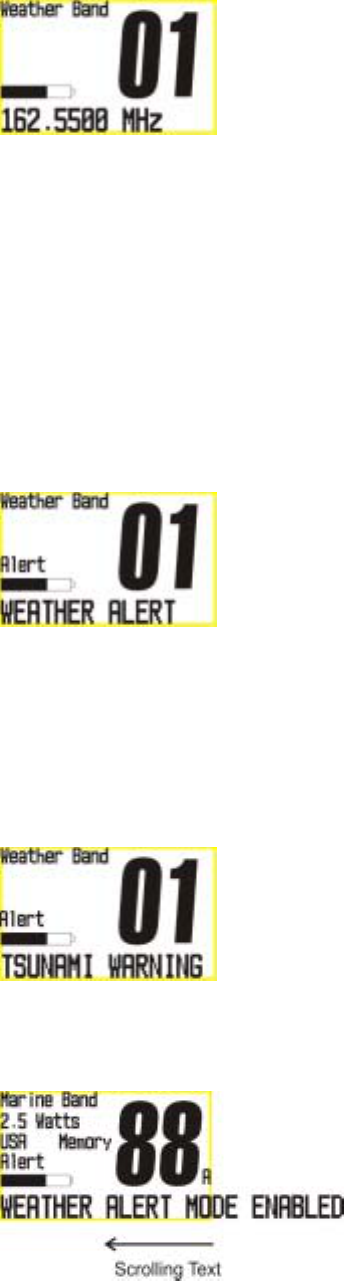
WX01 162.5500 Weather Information (Receive Only)
WX02 162.4000 Weather Information (Receive Only)
WX03 162.4750 Weather Information (Receive Only)
WX04 162.4250 Weather Information (Receive Only)
WX05 162.4500 Weather Information (Receive Only)
WX06 162.5000 Weather Information (Receive Only)
WX07 162.5250 Weather Information (Receive Only)
WX08 161.6500 Weather Information (Receive Only)
WX09 161.7750 Weather Information (Receive Only)
WX10 163.2750 Weather Information (Receive Only)
6. Key Layout
See the image at the top of this document.
7. LCD Screen
This information will be provided with the radio image and throughout this document.
The display images in this document are for feature description only.
7.1 Opening Screen
See animation provided by West Marine. This will be an animated splash screen
featuring the West Marine “Rope” logo, then West Marine and model number.
8. ON/OFF/Volume Knob
9
The ON/OFF/Volume knob will be rotated in a clockwise direction to turn the radio on.
Continued rotation of the knob will increase the volume level of the built in speaker.
Upon turning the radio on, the radio will emit a wake up tone and will also have a click
feel. The click feel will be felt upon both turning on and turning off and while changing
the volume.
*NOTE: Every time that the radio is turned on, the radio will remember the last
channel selected. Memory channels, 1/2.5W/5W, Channel Tag, Key Beep, and UIC
(including the last channel selected) settings will remain in the mode that was selected
prior to turning the radio off.
9. Squelch Knob
The Squelch knob will be rotated in a clockwise direction to increase the threshold of
squelch. This control will have a clicking feeling for every level.
Example: As the user rotates the knob clockwise, the long-range sensitivity of the
radio steadily decreases until a threshold is reached where there is no loud hissing
sound. At that point, the radio will be able to receive signals without the excess
background noise. The user may rotate the knob counterclockwise from this point to
receive weaker or distant signals.
10. Channel UP and DOWN Keys
These keys will be used to incrementally change the channels in either an ascending
order or a descending order. The UP key will move through the channels in an
ascending order and the DOWN key will move through the channels in a descending
order. The following screens show examples of changing channels downward. The
currently selected channel will be highlighted in the center of the display. After a
channel has been selected and no more UP or DOWN arrow keys presses, this screen
will automatically time out after 3 seconds and return to the normal radio standby
screen.
10
*NOTE: If either the UP or DOWN keys are held down for an interval of 2 seconds,
the channel display will quickly scroll (no beep tones) in the direction of the
appropriately held key.
***NOTE: When AM, FM, or Air Band are active, pressing and holding the UP or Down
keys will activate a SEEK feature, where the radio continues to increment the
frequency until an active frequency is found. At this point, if the UP or DOWN keys are
still held down, the radio will pause on the active channel for 3 seconds, then continue
to the next active frequency. This operation will continue as long as the UP or DOWN
keys are held down. If the UP or DOWN keys are released when an active frequency
is found, then the radio will stay on that frequency. If the UP or DOWN arrow keys are
released before and active channel is found, the radio will continue to seek until a
active channel is found. Briefly pressing the UP or DOWN arrow keys will cancel the
seek mode.
11. Band/1/2.5/5W Key
Momentarily pressing this key for will select between the available bands on this model.
The bands include Marine VHF, AM radio, FM radio, AM Air Band, and FRS radio. The
default on power-up will be Marine VHF. The Band order will be: VHF, FRS, AM, FM,
and then Air. Pressing and holding this key will change the transmit output power
setting (see section 11.6).
11.1 Marine VHF
When the Band key is pressed to select the VHF mode, the following screen will be
displayed for ~3 seconds, then the normal VHF screen will be displayed. If the Band
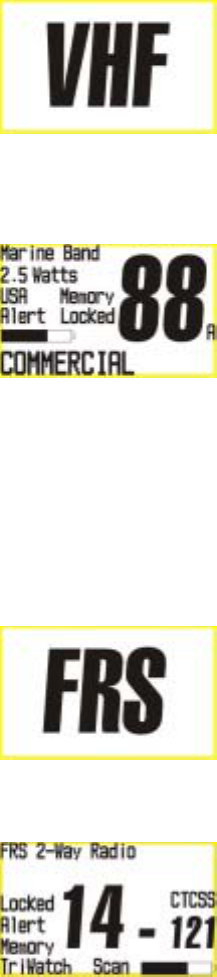
11
key is pressed again while this screen is displayed, the FRS opening screen will be
activated.
The features explaining the operation of the VHF radio are described in other parts of
this document.
11.2 FRS Radio
When the Band key is pressed to select the FRS radio mode, the following screen will
be displayed for ~3 seconds, then the normal FRS screen will be displayed. If the
Band key is pressed again while this screen is displayed, the AM opening screen will
be activated.
The following is the display for the FRS radio:
The frequency range for FRS is 462.5625~467.7125MHz, 12.5KHz steps, 0.5 Watt
maximum transmit power.
There will be 142 CTCSS codes for this feature (see Menu for setup details). All 14
channels can be stored into the scan memory.
When the CTCSS code option is not activated on the current FRS channel, the
following screen will be displayed.
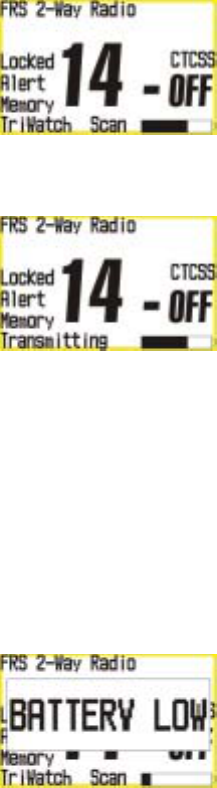
12
During transmit, the following screen will be displayed.
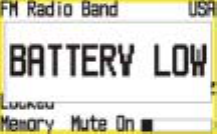
If the low battery occurs and the PTT is pressed, or anytime of a battery low condition
occurs, an error tone will sound (400Hz every 1 second) and the Battery Low message
will show on the bottom of the display. This indicates that the TX is disabled. After the
PTT key is released. The Battery Low message will disappear. The Battery level icon
will continue to blink until the radio either shuts off or the radio is recharged. The only
exception to this would be the battery low condition can happen much more easily
while transmitting. After the PTT is released, the radio will check the battery voltage to
determine if the radio is still in a low battery condition, if not then the battery icon will
not continue to blink.
Note: During Tri Watch or Dual Watch, The FRS radio does not change to the Marine
VHF while looking channel 16 or channel 9. If carrier is detected on channel 16 or
channel 9 while checking these channels, the Marine VHF screen will be displayed.
11.3 AM Radio
When the Band key is pressed to select the AM radio mode, the following screen will
be displayed for ~3 seconds, then the normal AM radio screen will be displayed.

13
If the Band key is pressed again while this screen is displayed, the FM opening screen
will be activated.
The following is the display for the AM radio receiver:
The frequency range for AM is 500~1800KHz, 9KHz or 10KHz steps (See Menu). The
default setting is 10KHz steps.
If 9KHz steps are selected in the menu, “Europe” will be displayed on the LCD.
Up to 25 frequencies can be stored in the memory scan feature.
Pressing the UP or DOWN arrow keys will increase or decrease the frequency by
10KHz. The user can momentarily press the MEM key to store the currently selected
channel into memory or deselect the current channel if it is already in memory. The
user can access up to 25 frequencies by activating the SCAN feature (press and hold
the MEM/SCAN key for ~2 seconds). Each time SCAN is pressed, the next stored
frequency, in ascending order will be selected.
When the radio detects a battery Low condition the following screen will be displayed.
The radio will also beep (400Hz every 1 second) for 15 second and blink the Battery
level icon. If any key is pressed, the tone will stop and the battery low message will
disappear. The battery Low icon will continue to blink until the radio shuts off or until
the radio is recharged.
14
***NOTE: When AM, FM, or Air Band are active, pressing and holding the UP or Down
keys will activate a SEEK feature, where the radio continues to increment the
frequency until an active frequency is found. At this point, if the UP or DOWN keys are
still held down, the radio will pause on the active channel for 3 seconds, then continue
to the next active frequency. This operation will continue as long as the UP or DOWN
keys are held down. If the UP or DOWN keys are released when an active frequency
is found, then the radio will stay on that frequency. . If the UP or DOWN arrow keys
are released before and active channel is found, the radio will continue to seek until a
active channel is found. Briefly pressing the UP or DOWN arrow keys will cancel the
seek mode.
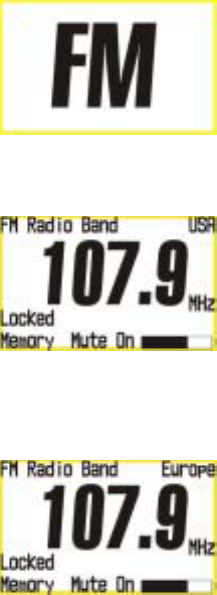
11.4 FM Radio
When the Band key is pressed to select the FM radio mode, the following screen will
be displayed for ~3 seconds, then the normal FM screen will be displayed. If the Band
key is pressed again while this screen is displayed, the AIR opening screen will be
activated.
The following is the display for the FM radio receiver:
The frequency range for FM is 88~108MHz, 200KHz steps (factory default), or 100KHz
steps for foreign ports.
If 100KHz steps are selected in the menu, “Europe” will be displayed on the LCD.
Up to 25 frequencies can be stored in the memory scan feature.
Pressing the UP or DOWN arrow keys will increase or decrease the frequency by
200KHz (100Khz optional for foreign ports). The user can momentarily press the MEM
key to store the currently selected channel into memory or deselect the current
15
channel if it is already in memory. The user can access up to 25 frequencies by
activating the SCAN feature (press and hold the MEM/SCAN key for ~2 seconds).
Each time SCAN is pressed, the next stored frequency, in ascending order will be
selected.
When the radio detects a battery Low condition the following screen will be displayed.
The radio will also beep (400Hz every 1 second) for 15 second and blink the Battery
level icon. If any key is pressed, the tone will stop and the battery low message will
disappear. The battery Low icon will continue to blink until the radio shuts off or until
the radio is recharged.
***NOTE: When AM, FM, or Air Band are active, pressing and holding the UP or Down
keys will activate a SEEK feature, where the radio continues to increment the
frequency until an active frequency is found. At this point, if the UP or DOWN keys are
still held down, the radio will pause on the active channel for 3 seconds, then continue
to the next active frequency. This operation will continue as long as the UP or DOWN
keys are held down. If the UP or DOWN keys are released when an active frequency
is found, then the radio will stay on that frequency. . If the UP or DOWN arrow keys
are released before and active channel is found, the radio will continue to seek until a
active channel is found. Briefly pressing the UP or DOWN arrow keys will cancel the
seek mode.
11.5 Air Band
When the Band key is pressed to select the Aircraft radio mode, the following screen
will be displayed for ~3 seconds, then the normal air band screen will be displayed. If
the Band key is pressed again while this screen is displayed, the VHF opening screen
will be activated.

16
The following is the display for the Air band AM receiver:
The frequency range for Air band is 108~137MHz, 25KHz steps.
Up to 25 frequencies can be stored in the memory scan feature.
Pressing the UP or DOWN arrow keys will increase or decrease the frequency by
25KHz. The user can momentarily press the MEM key to store the currently selected
channel into memory or deselect the current channel if it is already in memory. The
user can access up to 25 frequencies by activating the SCAN feature. Each time
SCAN is pressed, the next stored frequency, in ascending order will be selected.
When the radio detects a battery Low condition the following screen will be displayed.
The radio will also beep (400Hz every 1 second) for 15 second and blink the Battery
level icon. If any key is pressed, the tone will stop and the battery low message will
disappear. The battery Low icon will continue to blink until the radio shuts off or until
the radio is recharged.
***NOTE: When AM, FM, or Air Band are active, pressing and holding the UP or Down
keys will activate a SEEK feature, where the radio continues to increment the
frequency until an active frequency is found. At this point, if the UP or DOWN keys are
still held down, the radio will pause on the active channel for 3 seconds, then continue
to the next active frequency. This operation will continue as long as the UP or DOWN
keys are held down. If the UP or DOWN keys are released when an active frequency
is found, then the radio will stay on that frequency. . If the UP or DOWN arrow keys
are released before and active channel is found, the radio will continue to seek until a
active channel is found. Briefly pressing the UP or DOWN arrow keys will cancel the
seek mode.
17
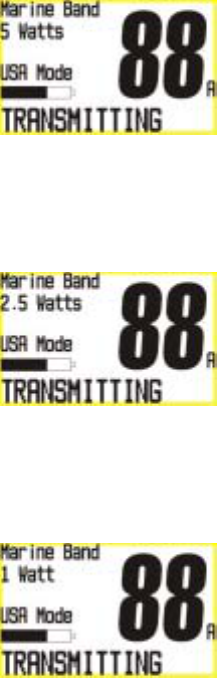
11.6 Marine Transmit Power
Pressing and holding the Band/1/2.5/5W key for ~2 seconds will switch the transmit
power from 5 Watts output to 2.5 Watts output to 1 Watt output. The default setting for
all channels is the 5 Watt mode (Except for channels 13 and 67 that may not be used
in 5 Watt mode except in emergencies by pressing this key during transmit, also
channels 75 and 76 are 1 Watt only). When the radio is transmitting in the 5 Watt
mode, the following screen will be displayed.
From the radio idle mode, pressing and holding the Band/1/2.5/5W key for ~2 seconds
will place the radio into the 2.5 Watt mode. When the radio is transmitting in 2.5 Watt
mode, the following screen will be displayed.
By again pressing the Band/1/2.5/5W key for ~2 seconds, the radio will be placed into
the 1 Watt transmit mode. When the radio is transmitting in the 1 Watt mode the
following screen will be displayed.
*NOTE: Pressing and holding the Band/1/2.5/5W down while transmitting will over
ride the 1W default setting for channels 13 and 67. Doing this will place either channel
into 5 Watt mode. This needs to be available for emergency purposes but these
channels are not to typically be used in high power. The 5 Watt text will be shown for
as long as the PTT key is held down (this feature is currently used on all Uniden
handheld radio models) .
12. MEM/SCAN Key
This key will be used to place a channel into memory so it can be scanned. A press of
the MEM key will place the active channel into memory and the following screen will
be displayed.

18
If no other action is preformed, this screen will timeout after 3 seconds and the radio
idle screen will be displayed.
Another press of the MEM key will take the channel out of memory and the following
screen will be displayed.
If no other action is preformed, this screen will timeout after 5 seconds and the radio
idle screen will be displayed.
Pressing and holding the MEM/SCAN key for ~2 seconds will activate the memory
channel scan feature. This feature will scan all of the channels previously placed into
the channel memory.
If the SCAN key is pressed from this mode, the LCD will display the following screen.
In this mode the radio will scan the memory channels in ascending order and will
check channel 16 every 2 seconds, then channel 9 (depending on the user menu
setting), and then resume scanning the memory channels. During this mode, the

19
“TriWatch Scan” text will remain at the bottom of the screen. If the user has opted not
to scan channel 9, the following screen will be displayed.
During this mode, the “DualWatch Scan” text will remain at the bottom of the screen.
From this mode, the 16/9/TRI key when pressed will automatically exit the scan mode
and go immediately to channel 16. If the 16/9/TRI key is held for 2 seconds in the
scan mode, the Triwatch or Dualwatch text will disappear and then the radio will only
scan the memory channels. During this mode, the “Channel Scan” text will remain at
the bottom of the screen.
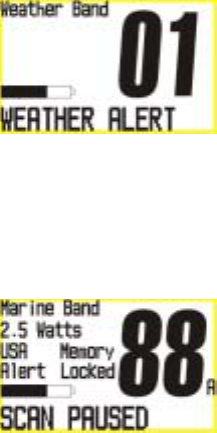
If the SCAN feature is activated from the weather channel display mode the following
screen will be displayed.
The radio at this point will leave the WX mode. Now the scan function will operate as
described above (Section 12).
NOTE: TriWatch is activated by default when scan is activated. The reason is that the
radio should keep watch on channel 16 whenever possible.
NOTE: From this mode the user may hold down the TRI key for 2 seconds and the
radio will just scan the channels that have been placed into memory. The following
screen will be displayed.
20
NOTE: If the weather alert function is activated when the SCAN key is pressed, the
radio will scan the memory channels and then check the active weather channel every
7 seconds for the 1050Hz tone, then return to scanning the memory channels.
NOTE: If the weather alert function is activated while the scan and Tri watch functions
are active, the radio will scan the memory channels, check channel 16 every 2
seconds, then check channel 9, then check the active weather channel every 7
seconds for the 1050Hz tone, then go back to scanning the memory channels. In all
cases if the 1050Hz tone is received, the radio will stay on the weather channel until
the user takes it out of the weather mode. The radio will display the following screen.
NOTE: When a transmission is found in scan mode the radio will receive the
transmission and hold on that channel for 2 seconds before resuming scan. Any time
that squelch is broken, the radio will have an automatic 2 second delay. During receive,
the following screen will be displayed.
NOTE: When in Scan mode, the user can press the SCAN,16/9/TRI, or the
WX/ALERT keys to exit the scan function and return to the channel display mode.
NOTE: All channels can be stored into memory. (Except weather channels)
NOTE: The memory status of each channel is retained when the radio is powered
down. Upon turning on, all of the memory channels are still retained.
NOTE: The factory default is that no channels are stored into the memory.
NOTE: For AM, FM, and Air band, the user can store 25 frequencies per band. The
FRS radio feature will be capable of storing all 14 channels.
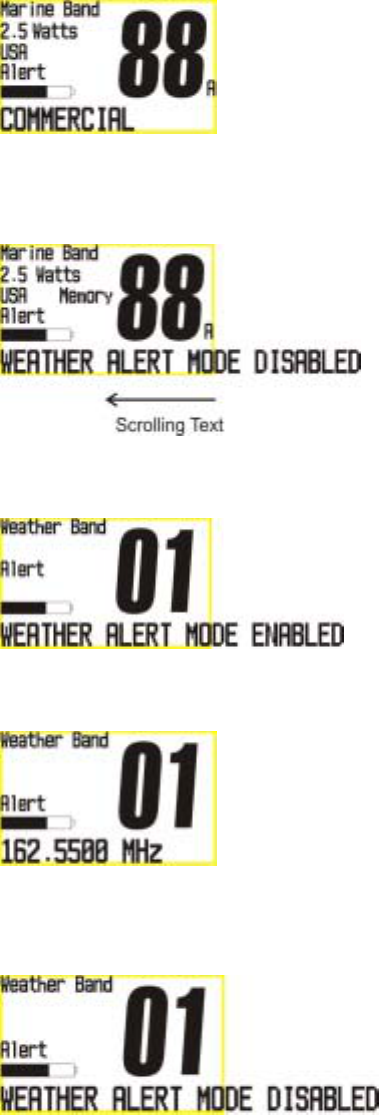
13. WX/Alert Key
A single press of this key will place the radio into the weather channel display mode.
The channel display will show channel 01 as the initial default. The user can use the
channel UP or DOWN keys to move through the 10 weather channels to find the active
channel in their local area. The following screen will also be displayed as long as the
user is in this mode.
21
*NOTE: The weather channel that is active when the radio is turned off will be kept in
memory and will be the active weather channel the next time the radio is turned back
on and placed in the weather mode.
From weather channel display mode only, the user will hold down the WX/ALERT key
for 2 seconds and the radio will be placed into ALERT mode.
When a Weather Alert or a S.A.M.E. Alert is detected and will sound the Siren tone to
let the user know of a serious impending weather condition. The radio will blink both
the Weather channel numbers and the Alert icon. If the radio does not detect and
decode the FIPS code and/or the Event code, the radio will display the following
screen.
If the radio detects and decodes a FIPS and Event code, the radio will display the
decoded Event code from the table at the back of this document and will display the
information on the display. The following screen is an example of a decoded S.A.M.E.
event code. If the Event code is more than16 characters, the display will scroll the long
name and after the entire long name has scrolled across the display, the short name
will be displayed.
*NOTE: When the WX/ALERT key is held down, the following screens will be
displayed depending what mode the radio is currently in.
VHF Radio mode:
After 3 seconds, the following screen is displayed.
22
If the WX/Alert key is pressed and held again for ~2 seconds, the following screen will
be displayed.
WX Mode:
After 3 seconds, the following screen is displayed.
If the WX/Alert key is pressed and held again for ~2 seconds, the following screen will
be displayed.
23
FRS Mode:
*NOTE: When the user returns to the channel display mode, the alert icon will still be
displayed.
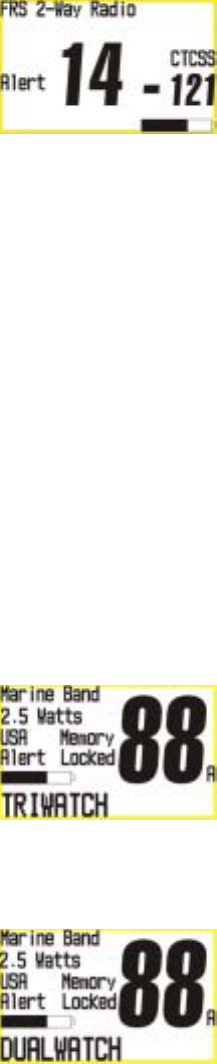
14. 16/9/TRI Key
The 16/9/TRI key will instantly tune the radio to channel 16. A second press of this
key will change the radio from channel 16 to channel 9. A third press of this key will
return the radio to the last user selected channel. The 16/9/TRI key may be held down
in the following modes to operate the Triwatch function. It will operate in the following
ways based on the mode of the radio.
From the channel display mode the 16/9/TRI key may be held down for 2 seconds.
The radio will search the existing working channel, then channel 16 every two seconds,
then channel 9 (depending on the user menu setting) for transmissions before
returning back to the working channel and starting the cycle over again. The following
screen will be displayed when this mode is activated. During this mode, the “Triwatch”
text will remain at the bottom of the screen.
If the user has opted not to scan channel 9, the following screen will be displayed.
During this mode, the “DualWatch” text will remain at the bottom of the screen.
To exit this function, hold down the 16/9/TRI key for two seconds.
From the weather channel display mode, the 16/9/TRI key may be held down for 2
seconds. The radio will search the existing weather working channel, then channel 16
every 2 seconds, then channel 9 (depending on the user menu setting) for a
transmission before returning back to the weather channel and starting the cycle over

24
again. The following screen will be displayed when this mode is activated. During this
mode, the “TriWatch” text will remain at the bottom of the screen.
The Weather Band text will only be displayed when the weather channel appears on
the screen. When the radio leaves the weather channel to scan channels 16 and 9,
the Marine Band text will displayed on the screen. To exit this function, hold down the
16/9/TRI key for two seconds.
From the channel display mode (with Weather Alert enabled), the 16/9/TRI key may be
held down for 2 seconds. The following screen will be displayed. During this mode, the
“TriWatch” text will remain at the bottom of the screen.
The radio will search the existing weather working channel, then channel 16 every 2
seconds, then channel 9, then for the 1050Hz tone (Weather Alert) every seven
seconds for a transmission before returning back to the working channel and starting
the cycle over again. TriWatch and Alert will be displayed when this mode is activated.
Weather Band will only be displayed when the weather channel appears on the screen.
The ALERT icon will be displayed throughout the entire cycle. To exit this function,
hold down the 16/9/TRI key for two seconds.
*NOTE: When in the Triwatch mode, the user can press the UP and DOWN arrows to
change the existing working channel and still continue to be in Triwatch scanning
channels 16 and 9. If the UP and DOWN arrows are pressed in the weather channel
display mode, the weather channel that is being monitored will change accordingly.
*NOTE: Pressing the SCAN key from the Triwatch mode will start the memory
channel scan and also continue to do the Triwatch based on the aforementioned
timing parameters.
*NOTE: A single press of the WX/ALERT key in Triwatch mode will change the
working channel to the active weather channel and continue to check channels 9 and
16 as specified above.
*NOTE: When a transmission is found in scan mode the radio will receive the
transmission and hold on that channel for 2 seconds before resuming scan. Any time
that squelch is broken, the radio will have an automatic 2 second delay.
25
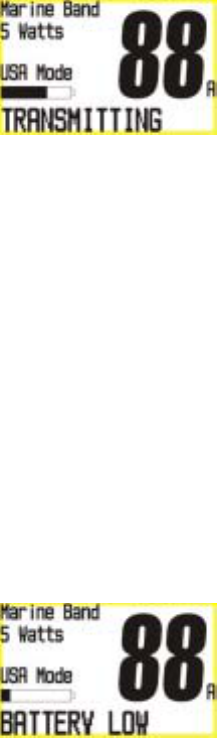
15. PTT (Push To Talk) Key
Pressing the PTT key will allow the user to send a transmission on the channel
currently displayed on the LCD. The following screen will be displayed during
transmitting.
The word “Transmitting” will be displayed as long as the PTT is held. The PTT key will
not allow the user to transmit on the weather channels, specific receive only VHF-FM
channels, AM, FM, or AIR bands. The PTT key will also not work if the user has the
key pressed down while turning on the radio. In any of these cases, the radio will emit
an error tone and the current channel number will flash along with the Transmitting text.
If the low battery occurs and the PTT is pressed, or anytime of a battery low condition
occurs, an error tone will sound (400Hz every 1 second) and the Battery Low message
will show on the bottom of the display. This indicates that the TX is disabled. After the
PTT key is released. The Battery Low message will disappear and be replaced by the
channel name. The Battery level icon will continue to blink until the radio either shuts
off or the radio is recharged. The only exception to this would be the battery low
condition can happen much more easily while transmitting. After the PTT is released,
the radio will check the battery voltage to determine if the radio is still in a low battery
condition, if not then the battery icon will not continue to blink.
*NOTE: The PTT key will not transmit during the Scan mode or during the Tri Watch
mode. When the PTT key is pressed, all scanning modes are immediately disabled
and the radio will start transmitting on the currently selected channel if there is carrier
on this channel. If a carrier is not present, the first press of the PTT key will only take
the radio out of the scan mode. The second press of the PTT key will activate transmit.
*NOTE: If the PTT key is pressed for 5 minutes, a timer will timeout causing the radio
to stop transmitting, an error tone will sound, the “Transmitting” text will blink, and an
error message will be displayed at the bottom of the screen, until the PTT key is
released. The PTT key may now be pressed to start transmit and restart the 5 minute
timeout timer. The following error screen will be displayed.

26
16. Light / Lock Key
Pressing this key will activate the LCD and Key backlight. The following screen will be
displayed.
The backlight “on” time will correspond to the setting in the Lamp Adjust menu (the
factory default will be set to 5 seconds). Momentarily pressing this key again will turn
off the backlight. The following screen will be displayed.
The keyboard lock function will be activated by holding the Light/Lock key down for 2
seconds. The display will show “Keypad Locked” to let the user know that the
keyboard is locked. The following screen will be displayed for 3 seconds and then will
return to the radio idle screen.
The only keys and controls that can be used in this mode are the PTT key, Light/Lock
key, 1/2.5/5W key, Volume, and Squelch. To deactivate the keyboard Lock function,
hold down the Light/Lock key for 2 seconds and the Locked text will disappear, or turn
the radio off and back on again. The keyboard lock function will not remain in memory
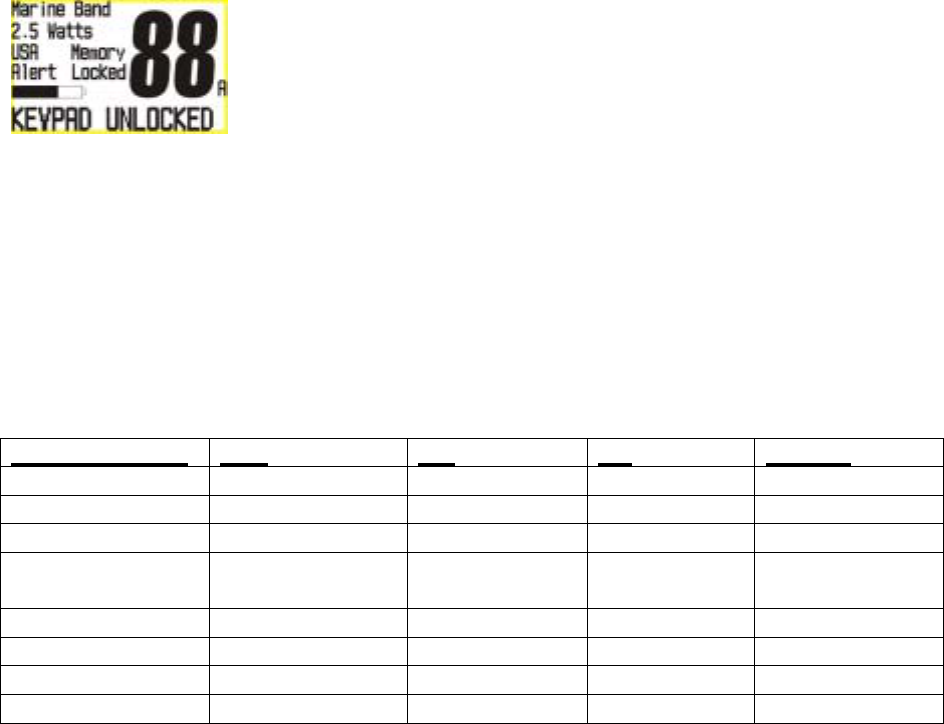
27
when the radio is turned off. The following screen will be displayed for 3 seconds and
then will return to the radio idle screen.
17. Menu Key
Pressing this key will activate the radio menu. The menu items are dependant on
which radio band is currently selected. The following chart indicates which menu items
are available for that radio band. When a item menu is activated, the current option
that the radio is using is highlighted (example: the current channel mode of the radio is
USA mode. When the USA/CAN/INT menu is selected, USA mode is highlighted).
Marine VHF/WX FRS AM FM Aircraft
USA/CAN/INT CTCSS Lamp Adjust Lamp Adjust Lamp Adjust
Lamp Adjust Lamp Adjust Contrast Contrast Contrast
Contrast Contrast Tuning Steps FM Muting Key Beep
Dual or Tri Watch Dual or Tri
Watch Key Beep Tuning Steps Exit
Key Beep Key Beep Exit Key Beep
FIPS Codes Exit Exit
Channel Name
Exit
The first press of the Menu key will activate the menu, if the Menu key is pressed
again, the radio exits the menu mode. If a menu item is selected by pressing the enter
key and the menu key is pressed, the radio will back-up one level in the menu. If a
menu item is selected and the Menu key is pressed and held for ~2 seconds, the radio
will exit the menu mode.
The following screens show the menus for each mode.

28
29
All of the common items, Lamp adjust, Contrast Adjust, Key Beep, and Exit operate
the same way in all modes.
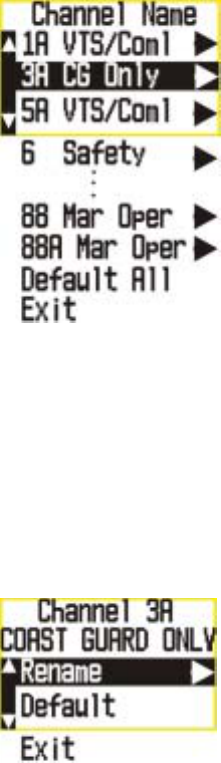
17.1 Channel Names
This item in the menu will allow the user to change the default channel names. This is
necessary when the user needs to change the channel name depending what the
channel’s authorized use is for that area. From the Menu, this is the last menu item, or
pressing the DOWN or UP arrow keys until the following screen is displayed (the menu
highlights the last channel selected in the VHF mode).
Pressing the UP or DOWN arrow keys will scroll through a list of preprogrammed
channel names. A selection of Default all, when selected, will restore all of the channel
names to the factory default channel names.
Highlighting and selecting an individual channel will allow the rename of that channel.
From this screen, the user can select Rename, Default, or Exit. When Default is
selected, the current channel name will be restored the factory default name. When
the Rename option is highlighted and Enter is pressed, the next screen is displayed:
The UP and DOWN arrow keys will select a new first character. After choosing the first
character, pressing the Enter key will flash the second character. Repeating this
process for a maximum of a 16 character channel name.

30
Pressing the Enter key again will activate a double beep and return the radio to the
Channel Name menu. This way, the user can quickly rename all of the channels they
want.
17.2 Contrast Adjust
The feature will allow the user to adjust the LCD contrast setting. From the Menu,
press the UP or DOWN arrow keys to highlight the Contrast Adjust menu item and
press the Enter key. This feature will have 10 levels of contrast adjustment. The
following screen shows the Contrast Adjust display:
Pressing the Enter key will save the current setting and return to the radio Menu.
There needs to be a way to reset the contrast adjustment if the screen is either too
light or too dark. Pressing and holding the Menu key while turning on the radio will
reset the contrast to a middle setting of 7.
17.3 Lamp Adjust
The feature will allow the user to adjust the LCD and Keypad backlight setting. In
addition, the user can set the backlight timer. From the Menu, press the UP or DOWN
arrow keys to highlight the Lamp Adjust menu item and press the Enter key. The
following screen shows the Lamp Adjust display:
From this screen, the user can select Always Off, Timer, Always On, or Exit. When the
Timer option is highlighted and Enter is pressed, the next screen is displayed:

31
From this screen, the user can select how long the backlight stays on after any key
press or if the Light / Lock key is momentarily pressed. Select Exit will return the radio
to the Lamp Adjust menu.
17.4 Key Beep
This feature will allow the user to turn on or off the key beep tones. From the Menu,
press the DOWN or UP arrow keys until the Key Beep option is highlighted. The radio
will then display the following screen.
Pressing the Enter key will accept this setting and return the radio to the radio Menu.
17.5 U.I.C
This feature will allow the user to select the channel mode of the radio. The user can
choose between USA channel mode (Factory Default), Canadian channel mode, or
International channel mode.
*NOTE: The radio will remember the last selected channel in each mode, even the
radio is powered off or disconnected from power.
From the Menu, use the UP or DOWN arrow keys until the UIC Channel option is
highlighted and then press the Enter key. The radio will then display the following
screen.
32
To select the channel mode, the user just needs to press the Enter key when the
desired option is highlighted or pressing the Exit option will return the radio to the
Marine VHF radio Menu mode.
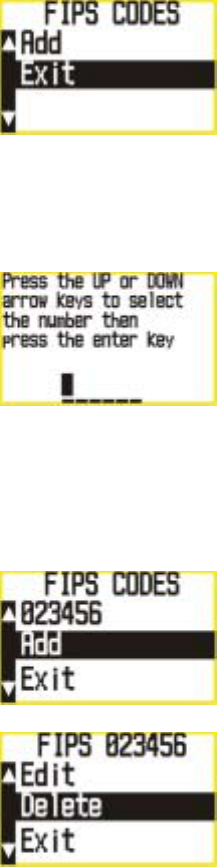
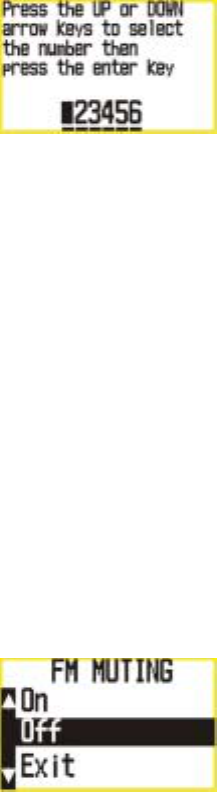
17.6 F.I.P.S
This option from the menu system will allow the user the aDuallity to add FIPS codes
in order to activate the Specific Area Message Encoding (S.A.M.E.) weather alert
system. The following screens will be used to program FIPS codes and to activate the
weather alert. From the Menu, use the UP and DOWN arrow keys to highlight the
FIPS option and press the Enter key. The radio will display the following screen if a
FIPS code has not yet been entered:
Use the DOWN or UP keys to select either Add or Exit if a FIPS code has not yet been
entered to a location.
The following screen will be used to add a new FIPS code.
If a FIPS code has already been programmed into the location, the user can select the
FIPS code and either Edit, Delete, or Exit from this entry. The EXIT option will take the
user back to the radio Menu mode.
If the edit option is selected, the following screen will be displayed.
33
*Note : There will be a minimum of 20 FIPS memory locations.
*Note : The radio will be able to decode the event codes only when the radio is left in
the Weather radio mode.
17.7 FM Muting
This feature allows FM muting on the FM broadcast band. This feature is used to
eliminate the White noise while tuning between FM radio stations with sufficient signal
strength. Another way of explaining this feature is: Muting is user-selectable and keyed
to the noise level within the received signal. With MUTE invoked, the program signal
will be squelched whenever the noise level rises above a preset level, such as when
moving between stations.
From the Menu, use the UP and DOWN arrow keys to highlight the FM Muting option
and press the Enter key. The radio will display the following screen:
From this screen, the options are ON, OFF, or Exit. If the Exit option is selected, the
radio will return to the radio Menu Mode.
17.8 FRS CTCSS/DCS
This feature allows the user to select a CTCSS/DCS privacy code for each of the 14
FRS channels. From the Menu, use the UP or DOWN arrow keys to highlight the FRS
CTCSS menu option and press the Enter key.
The radio will display the following screen.

34
Using the UP or DOWN arrows keys, the user will select a channel to assign a CTCSS
code to. Channels that have an asterisk after the channel numbers indicate that these
channels currently have CTCSS codes assigned to them.
Note : When entering this menu, the currently selected channel will be highlighted. An
example would be: The user is using FRS channel 2. When entering this menu,
channel 2 would be highlighted. This will allow the user to quickly set the CTCSS code
for the channel they are using.
Channels that have an asterisk after the channel numbers indicate that these channels
currently have CTCSS codes assigned to them.
When a channel is selected and the Enter key is pressed, the following screen will be
displayed.
When the On menu option is selected, the following screen will be displayed.
35
From this screen, the user will be able to see the currently selected CTCSS code for
this channel (NONE, 01~142). If the EXIT option is selected, the radio will return to the
radio Menu.
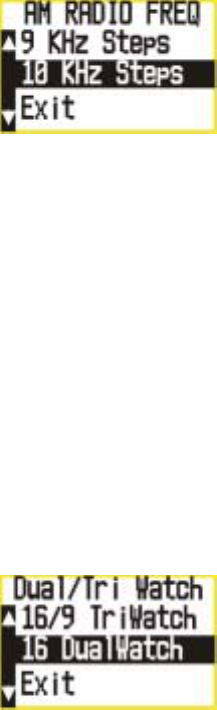
17.9 AM Radio Frequencies
This feature enables the AM radio to operate in foreign countries where the frequency
steps are 9KHz. The factory default is set to 10KHz steps.
From the Menu, use the UP or DOWN arrow keys to highlight the AM RADIO FREQ
menu option and press the Enter key.
The radio will display the following screen.
From this screen, the user can choose 9 KHz frequency steps, 10 KHz frequency
steps, or Exit this screen. If the EXIT option is selected, the radio will return to the
radio Menu.
17.10.0 Dual or Tri Watch
This feature allows the customer to choose whether the radio will TriWatch channels
16 and 9, or whether the radio will DualWatch only channel 16. The option of watching
channel 9 in certain parts of the USA will have no meaning to the user. The use of
channel 9 as the secondary hailing and distress frequency is used in all parts of the
USA. From the VHF radio Menu, use the UP or DOWN arrow keys to highlight the
Dual / TriWatch menu option and press the Enter key.
The radio will display the following screen.
From this screen, the user can choose to TriWatch channels 16 and 9 (factory default),
or DualWatch just channel 16, or Exit this screen. If the EXIT option is selected, the
radio will return to the radio Menu.

36
18. Enter Key
This key is used to select Menu items.
19. SAME Event Codes
SAME Event Codes
Standard Event Code (Scrolling Name) Warning Watch Statement Test Display (16 Character Name)
A
DR ADMINISTRATIVE MESSAGE X ADMIN MESSAGE
A
VA AVALANCHE WATCH X AVALANCHE WATCH
A
VW AVALANCHE WARNING X AVALANCHE WARN
BHW DUALOLOGICAL HAZARD
WARNING
X DUALOLOGICAL WARN
BWW BOIL WATER WARNING X BOIL WATER WARN
BZW BLIZZARD WARNING X BLIZZARD WARNING
CAE CHILD ABDUCTION
EMERGENCY
X CHILD EMERGENCY
CDW CIVIL DANGER WARNING X CIVIL DANGER
CEM CIVIL EMERGENCY MESSAGE X CIVIL EMERGENCY

37
CFA COASTAL FLOOD WATCH X COASTAL FLOOD
CFW COASTAL FLOOD WARNING X COASTAL FLOOD
CHW CHEMICAL HAZARD WARNING X CHEMICAL HAZARD
DBA DAM WATCH x DAM BREAK WATCH
DBW DAM BREAK WARNING X DAM BREAK WARN
DEW CONTAGIOUS DISEASE
WARNING
X CONTAGIOUS WARN
DMO PRACTICE/DEMO X SYSTEM DEMO
DSW DUST STORM WARNING X DUST STORM WARN
EAN EMERGENCY ACTION
NOTIFICATION
X EMERGENCY NOTIFY
EAT EMERGENCY ACTION
TERMINATION
X X EMERGENCY END
EQW EARTHQUAKE WARNING X EARTHQUAKE WARN
EVI IMMEDIATE EVACUATION X IMMED EVACUATION
EVA EVACUATION WATCH X EVACUATION
FCW FOOD CONTAMINATION
WARNING
X FOOD CONTAMIN
FFA FLASH FLOOD WATCH X FLASH FLOOD WARN
FFS FLASH FLOOD STATEMENT X FLASH FLOOD WARN
FFW FLASH FLOOD WARNING‘ X FLASH FLOOD WARN
FLA FLOOD WATCH X FLOOD WATCH
FLS FLOOD STATEMENT X FLOOD STATEMENT
FLW FLOOD WARNING X FLOOD WARNING
FRW FIRE WARNING X FIRE WARNING
FSW FLASH FREEZE WARNING X FLASH FREEZE
FZW FREEZE WARNING X FREEZE WARNING
HLS HURRICANE STATEMENT X HURRICANE
HMW HAZARDOUS MATERIAL
WARNING
X HAZARDOUS WARN
HUA HURRICANE WATCH X HURRICANE WATCH
Standard Event Code (Scrolling Name) Warning Watch Statement Test Display (16 Character Name)
HUW HURRICANE WARNING X HURRICANE WARN
HWA HIGH WIND WATCH X HIGH WIND WATCH
HWW HIGH WIND WARNING X HIGH WIND WARN
IBW ICEBERG WARNING X ICEBERG WARNING
IFW INDUSTRIAL FIRE WARNING X INDUSTRIAL FIRE
LAE LOCAL AREA EMERGENCY X LOCAL EMERGENCY
LEW LAW ENFORCEMENT
WARNING
X LAW ENFORCE WARN
LSW LAND SLIDE WARNING X LAND SLIDE WARN
NAT NATIONAL AUDIBLE TEST X NATIONAL AUDIBLE
NIC NATIONAL INFORMATION
CENTER
X NATIONAL INFORM
NMN NETWORK NOTIFICATION
MESSAGE
X NETWORK MESSAGE
NPT NATIONAL PERIODIC TEST X NATION PERIODIC
NST NATIONAL SILENT TEST X NATIONAL SILENT

38
NUW NUCLEAR POWER PLANT
WARNING
X NUCLEAR WARNING
POS POWER OUTAGE ADVISORY X POWER OUTAGE ADV
RHW RADIOLOGICAL HAZARD
WARNING
X RADIOLOGICAL
RMT REQUIRED MONTHLY TEST X REQ MONTHLY TEST
RWT REQUIRED WEEKLY TEST X REQ WEEKLY TEST
SMW SPECIAL MARINE WARNING X SPECIAL MRN WARN
SPS SPECIAL WEATHER
STATEMENT
X SPECIAL WEATHER
SPW SHELTER IN-PLACE WARNING X SHELTER IN-PLACE
SVA SEVERE THUNDERSTORM
WATCH
X THUNDERSTORM
SVR SEVERE THUNDERSTORM
WARNING
X THUNDERSTORM
SVS SEVERE WEATHER
STATEMENT
X SEVERE WEATHER
TOA TORNADO WATCH X TORNADO WATCH
TOE 911 TELEPHONE OUTAGE
EMERGENCY
X 911 OUTAGE
TOR TORNADO WARNING X TORNADO WARN
TRA TROPICAL STORM WATCH X TROPIC STORM
TRW TROPICAL STORM WARNING X TROPIC STORM
TSA TSUNAMI WATCH X TSUNAMI WATCH
TSW TSUNAMI WARNING X TSUNAMI WARNING
VOW VOLCANO WARNING X VOLCANO WARNING
WFW WILD FIRE WARNING X WILD FIRE WARN
WFA WILD FIRE WATCH X WILD FIRE WATCH
WSA WINTER STORM WATCH X WINTER STORM
WSW WINTER STORM WARNING X WINTER STORM
* * A UNRECOGNIZED WATCH X UNRECOGNIZED
Standard Event Code (Scrolling Name) Warning Watch Statement Test Display (16 Character Name)
* * E UNRECOGNIZED EMERGENCY X UNRECOGNIZED
* * S UNRECOGNIZED STATEMENT X UNRECOGNIZED
* * W UNRECOGNIZED WARNING X UNRECOGNIZED
TXB TRANSMITTER BACKUP ON No event code shown
TXF TRANSMITTER CARRIER ON No event code shown
TXO TRANSMITTER CARRIER OFF No event code shown
TXP TRANSMITTER PRIMARY ON No event code shown

39
20. CTCSS/DCS Code LIST
CTCSS Code List
Code No. Frequency (Hz) Code No. Frequency (Hz) Code No. Frequency (Hz)
“OFF” OFF 13 103.5 26 162.2
1 67.0 14 107.2 27 167.9
2 71.9 15 110.9 28 173.8
3 74.4 16 114.8 29 179.9
4 77.0 17 118.8 30 186.2
5 79.7 18 123.0 31 192.8
6 82.5 19 127.3 32 203.5
7 85.4 20 131.8 33 210.7
8 88.5 21 136.5 34 218.1
9 91.5 22 141.3 35 225.7
10 94.8 23 146.2 36 233.6
11 97.4 24 151.4 37 241.8
12 100.0 25 156.7 38 250.3
DCS Code LIST
Code
No. DCS Code
(Octal) Code
No. DCS Code
(Octal) Code
No. DCS Code
(Octal) Code
No. DCS Code
(Octal) Code
No. DCS Code
(Octal)
39 023 60 143 81 315 102 532 123 53
40 025 61 152 82 331 103 546 124 122
41 026 62 155 83 343 104 565 125 145
42 031 63 156 84 346 105 606 126 212
43 032 64 162 85 351 106 612 127 225
44 043 65 165 86 364 107 624 128 246
45 047 66 172 87 365 108 627 129 252
46 051 67 174 88 371 109 631 130 255
47 054 68 205 89 411 110 632 131 266
48 065 69 223 90 412 111 654 132 274
49 071 70 226 91 413 112 662 133 325
50 072 71 243 92 423 113 664 134 332
51 073 72 244 93 431 114 703 135 356
52 074 73 245 94 432 115 712 136 446
53 114 74 251 95 445 116 723 137 452
54 115 75 261 96 464 117 731 138 454
55 116 76 263 97 465 118 732 139 455
56 125 77 265 98 466 119 734 140 462
57 131 78 271 99 503 120 743 141 523
58 132 79 306 100 506 121 754 142 526
59 134 80 311 101 516 122 36

40
21. FRS Channel Chart
CH No. RX Frequency
(MHz) TX Frequency
(MHz)
1 462.5625 462.5625
2 462.5875 462.5875
3 462.6125 462.6125
4 462.6375 462.6375
5 462.6625 462.6625
6 462.6875 462.6875
7 462.7125 462.7125
8 467.5625 467.5625
9 467.5875 467.5875
10 467.6125 467.6125
11 467.6375 467.6375
12 467.6625 467.6625
13 467.6875 467.6875
14 467.7125 467.7125