Uniden America UT645 PORTABLE VHF PTT MARINE RADIO TRANSCEIVER User Manual 1
Uniden America Corporation PORTABLE VHF PTT MARINE RADIO TRANSCEIVER 1
UserManual.wiki
>
Uniden America
>
UT645 User Manual
>
User Manual 1
Contents
1.
User Manual 1
2.
User Manual 3
3.
User Manual Rev
User Manual 1
Navigation menu
Upload a User Manual
Namespaces
Wiki Guide
HTML
PDF
Info
Views
User Manual
Discussion / Help
Navigation
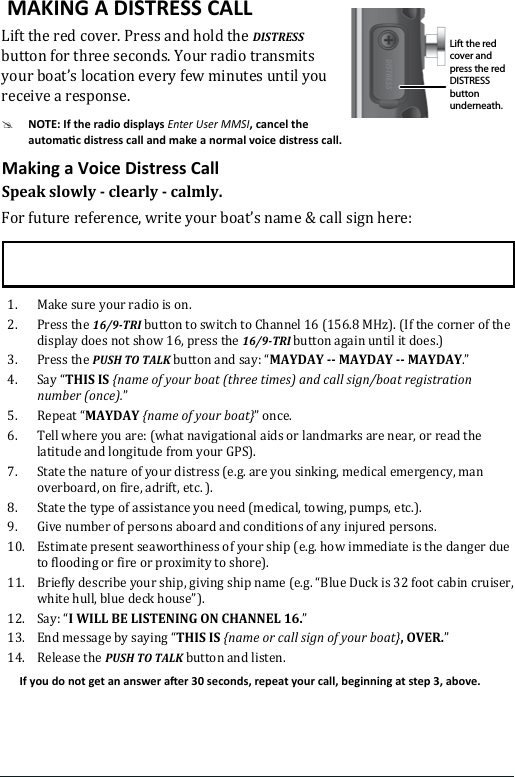
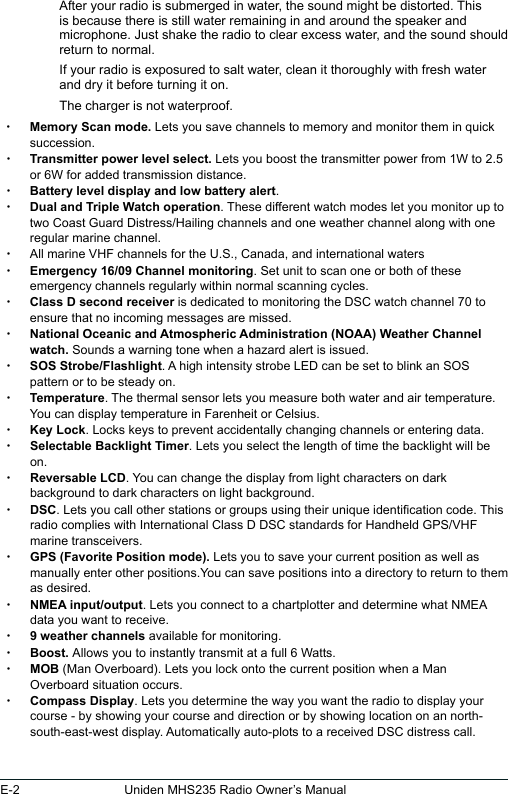
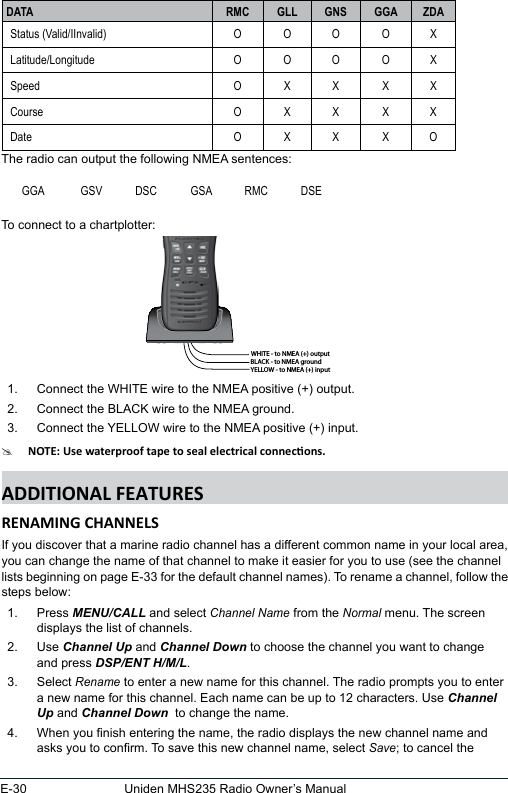
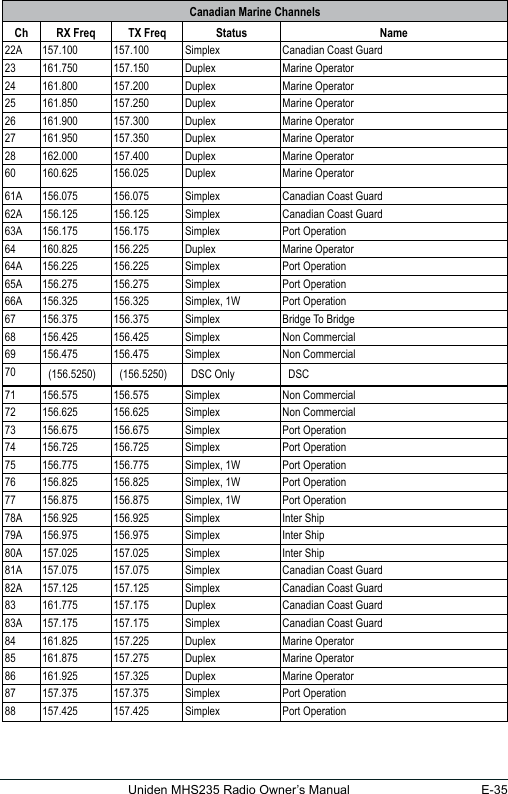
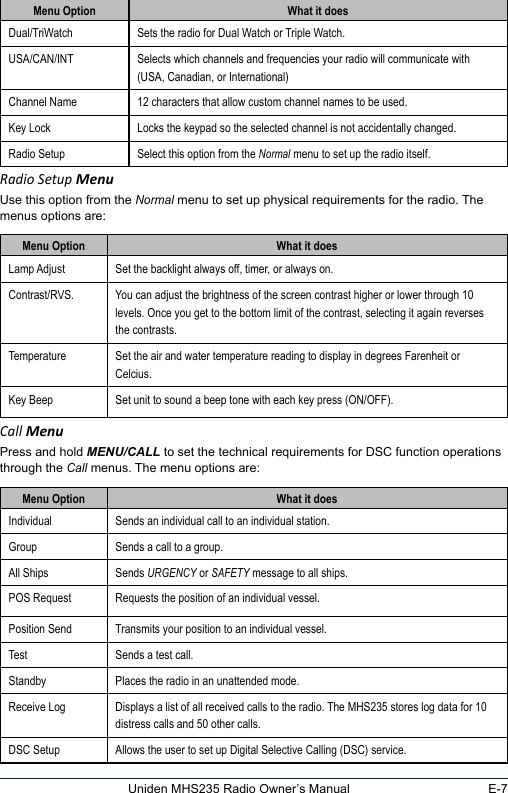
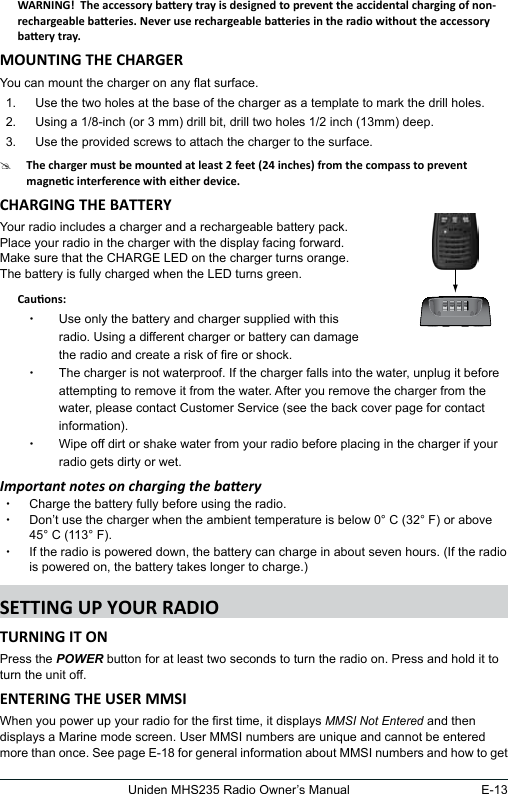
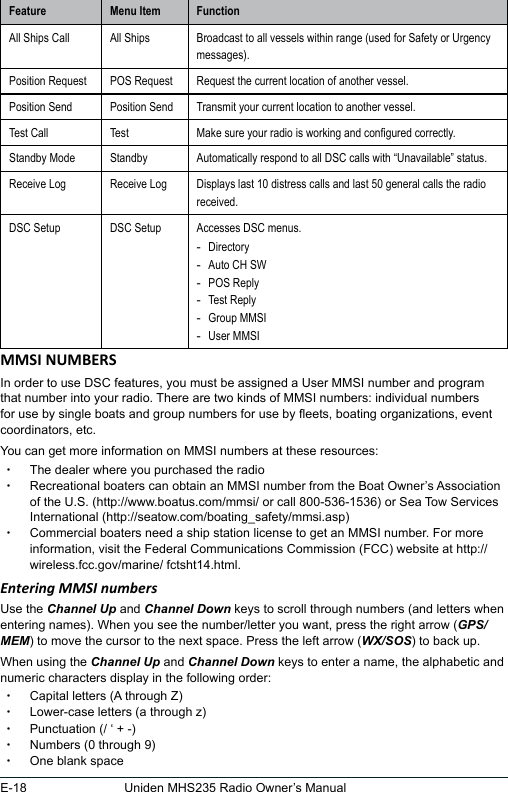
![E-5Uniden MHS235 Radio Owner’s ManualThe LCD display shows different information depending on what you are doing. Not all icons display on every screen. This dummy screen displays many of the possible icons. The table below shows possible icons and what they mean.Display icons and what they meanIcon What it means The keys are locked. Weather Alert Watch is turned on.The battery is fully charged, mostly charged, half charged, mostly empty, or completely empty.BRG Bearing from boat’s position to destination from Favorite’s list.COG Current course (Course over Ground). COG displays when Favorite mode or Compass mode is active, or when a DSC distress call is received.DIST Distance from boat’s position to destination.LOW / MID / HI The transmitter power is set to LOW (1W), MID (2.5W), or HI (6W).USA / CAN / INT Indicates Channel mode: US, CANadian, or INTernational channels.MEM The current channel is saved in memory.˚F/ ˚C Temperature display is active (Farenheit or Centigrade).Valid GPS data received from the GPS receiver.No valid GPS data received from the GPS receiver.Charging contactsCHARGE LEDScrew holes for mountingPower jack[cigarette (DC) or wall (AC) plug]Charging latchesNMEA contactsA Weather Alert Watch is onCurrent channel numberThis channel is in MemoryBattery statusChannel name GPS dataKeylock is activeHIMEMUSA87˚F11:00AM 35˚ 40.610 N139˚ 46.564 ECOMMERCIALTimeChannel modeAmbient temperature Transmit power level](https://usermanual.wiki/Uniden-America/UT645.User-Manual-1/User-Guide-1875182-Page-9.png)

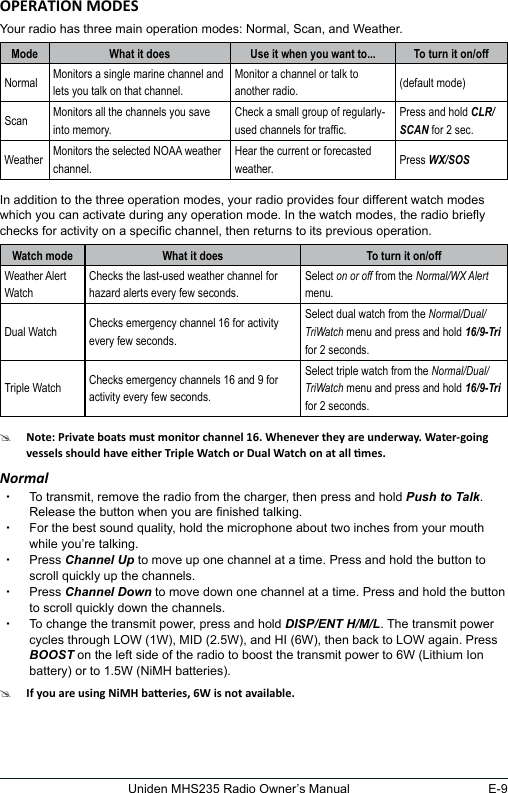

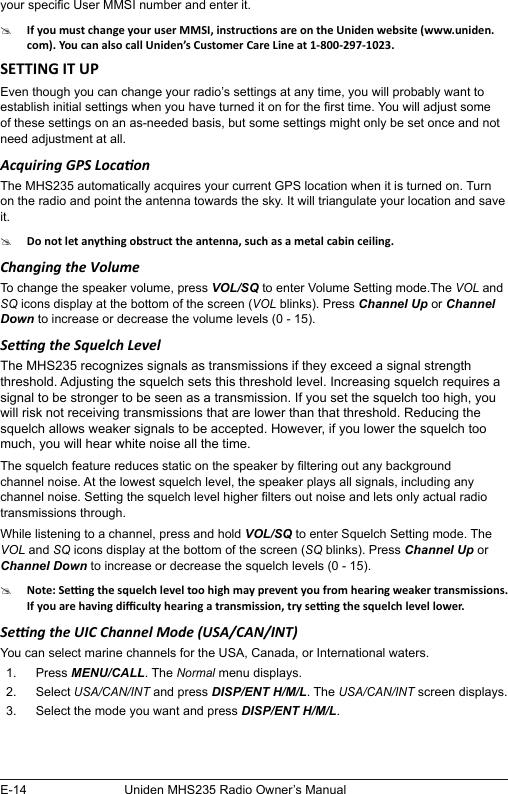
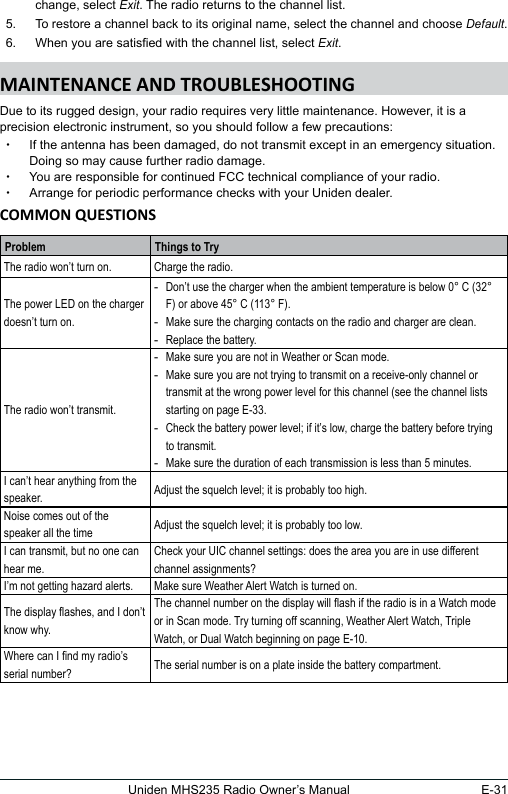
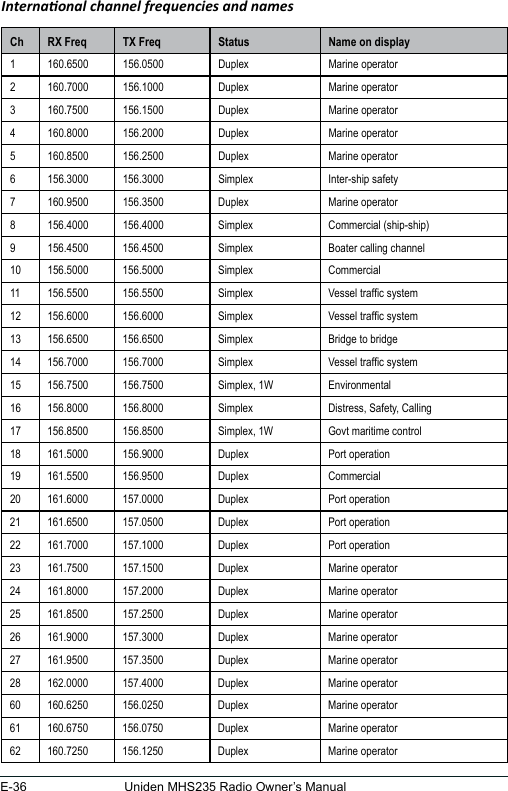
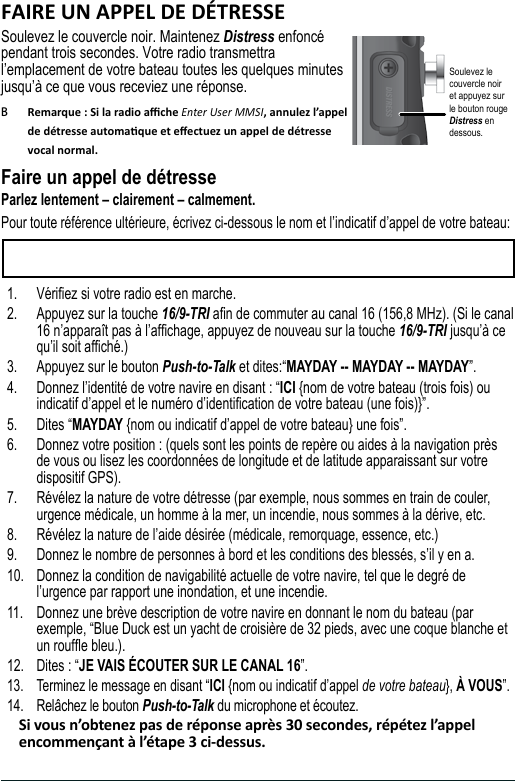
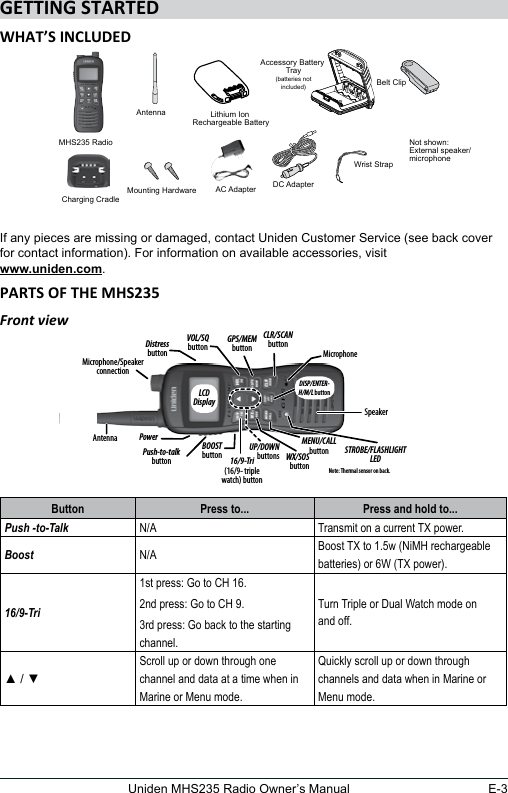
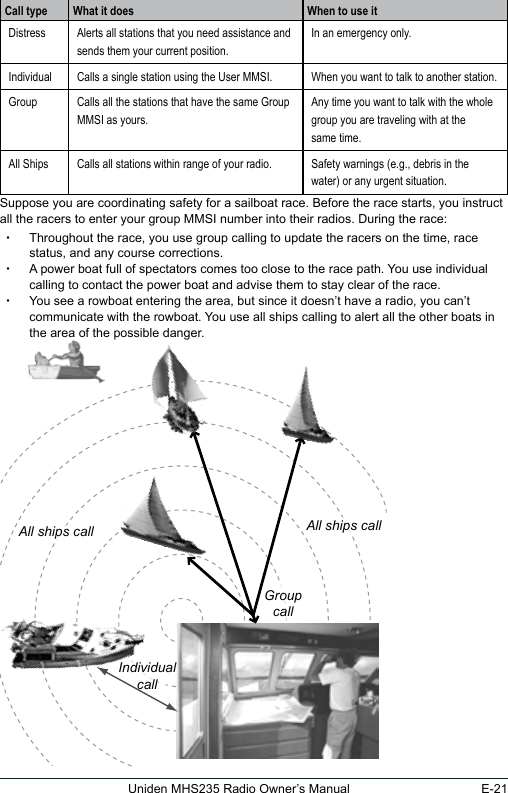
![E-15Uniden MHS235 Radio Owner’s ManualSeng Key LockYou can lock the keypad through the Normal menu. The icon displays when Keylock is on. Unlock it by pressing and holding MENU/CALL for 2 seconds.Seng WX Alert ModeFrom the Normal menu, select WX Alert mode to turn this mode ON for the radio to monitor weather channels and alert you to any broadcast weather alerts or notications. Turn WX Alert OFF through the Normal menu as well.Seng FIPS CodesFIPS codes identify counties in the United States. FIPS codes allow you to receive only the SAME alert occurring in a specic area. You can enter a maximum of 30 FIPS codes. #1. Press MENU/CALL to bring up the Normal menu. 2. Select FIPS Codes.3. [New] and a list of previously entered FIPS codes display. Enter a new FIPS code or select from the list of existing FIPS codes to edit or delete.Adjusng the LampThe backlight LCD function can be set to automatically dim after a set time.1. Press MENU/CALL and select Radio Setup/Lamp Adjust. 2. Lamp Adjust options are Always Off, Timer, or Always On.3. If you select Always On, the next screen lets you choose between Green and Orange.If you select timer, the options are x10 sec x30 sec x1 min x3 min x5 minAdjust the LCD ContrastThis feature lets you adjust the LCD’s contrast level. It also permits you to reverse the contrast completely. You can choose to have dark characters on a light background or light characters on a dark background. 1. Press MENU/CALL and select Radio Setup/Contrast/RVS; press Channel Up or Channel Down to adjust the contrast.2. Pressing Channel Down to turn the contrast all the way off will reverse the background/letters.Seng the Air or WaterTemperature Measurement You can set the temperature to display in Celsius or Farenheit.1. Press MENU/CALL and select select Radio Setup/Temperature.2. Temperature options are °C (Celsius) or °F (Farenheit).](https://usermanual.wiki/Uniden-America/UT645.User-Manual-1/User-Guide-1875182-Page-19.png)
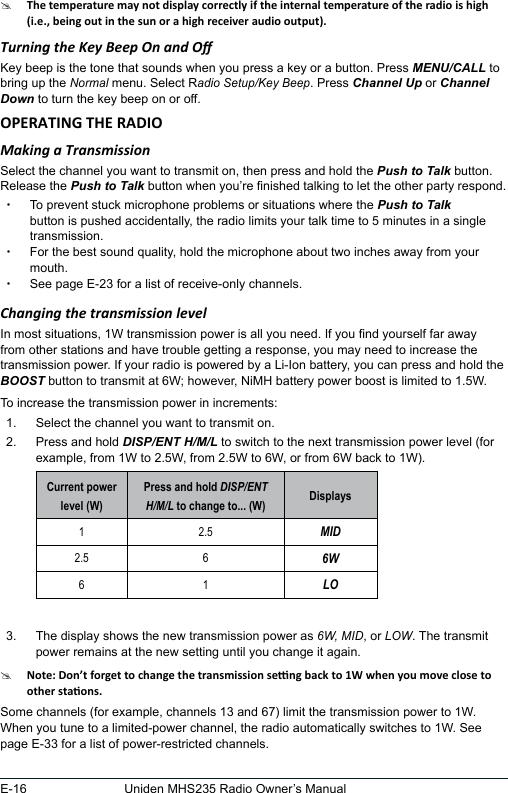
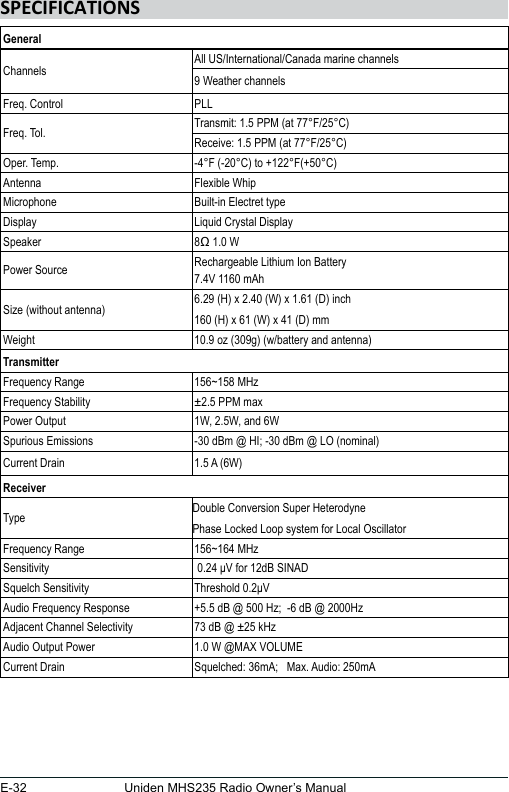
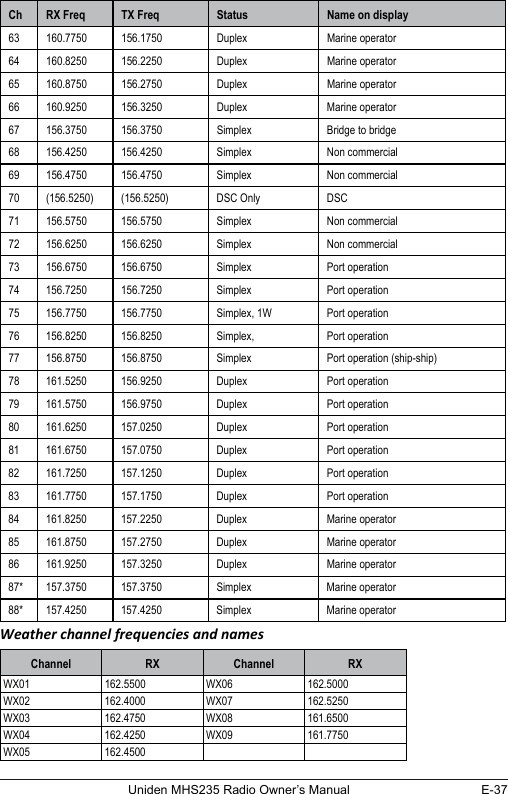
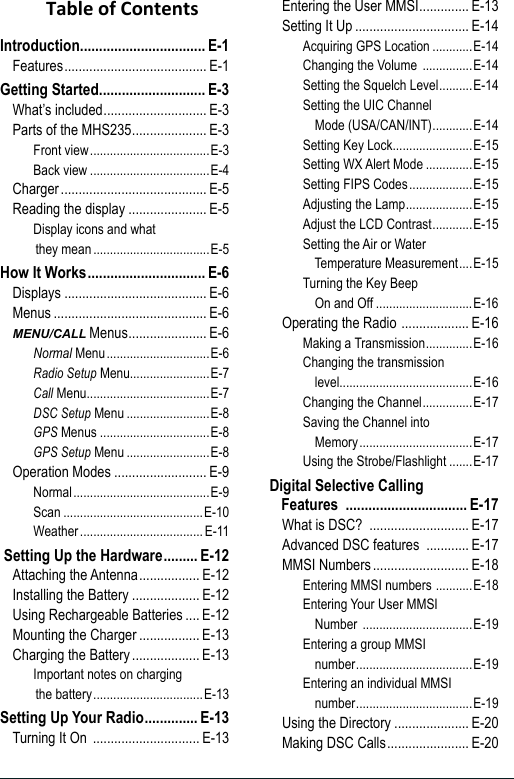
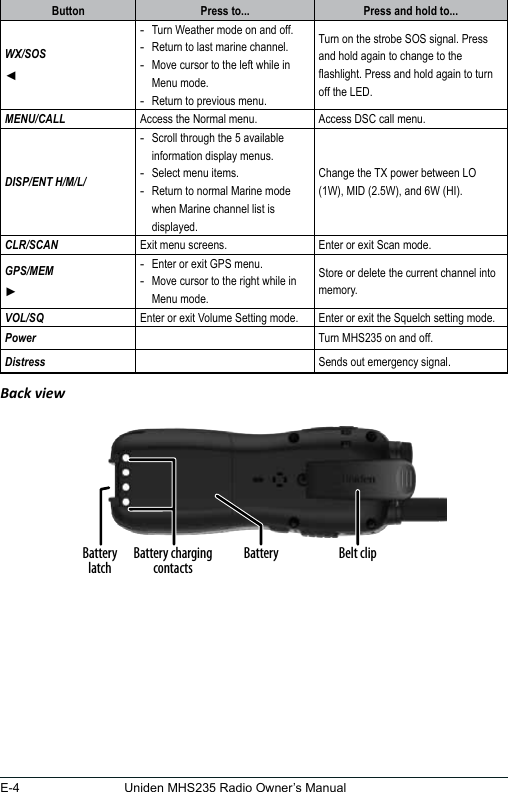
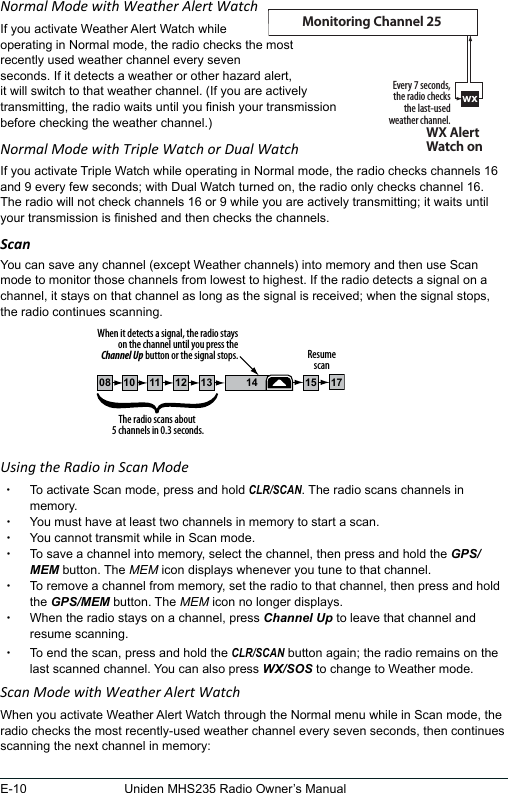
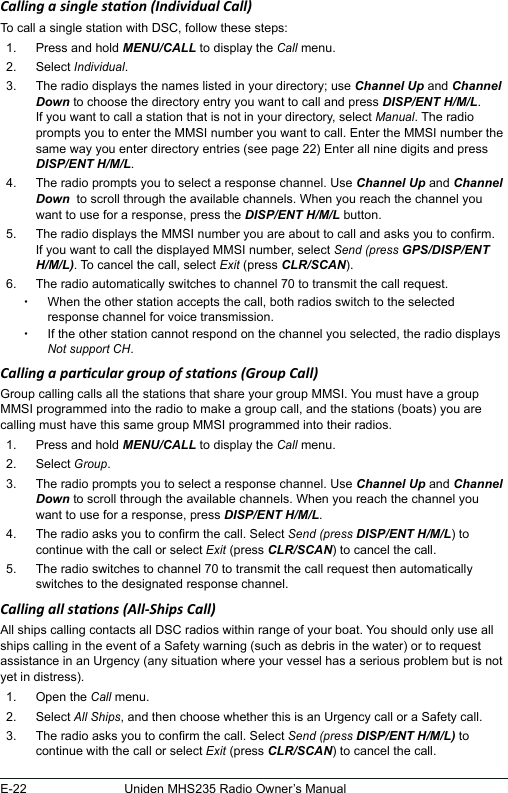
![E-19Uniden MHS235 Radio Owner’s ManualEntering Your User MMSI Number #When you power up your radio for the rst time, it displays MMSI Not Entered and then displays a Marine mode screen. 1. Press and hold MENU/CALL; the Enter User MMSI screen displays.2. Press DISP/ENT H/M/L. The User MMSI screen displays.3. Enter the MMSI number as described previously to scroll through the numbers. When the ninth digit is entered, the radio asks if you want to save the number and conrm it. Press DISP/ENT H/M/L to save it.4. Before saving the number, the radio displays the message Conrm number! User MMSI data is Permanent! At this point you can edit the number (press MENU/CALL), save the number (press DISP/ENT H/M/L), or return to the Marine mode screen (press CLR/SCAN),Entering a group MMSI numberYou can change the group MMSI number as often as you want. The rst digit of a group MMSI is xed at “0.” Follow the steps below to enter a group MMSI number into the radio: 1. Press and hold MENU/CALL to display the Call Menu.2. Select DSC Setup/Group MMSI and press DISP/ENT H/M/L. The Group MMSI screen displays. 3. Group MMSI numbers always start with a 0, so that digit is already entered for you. Enter the MMSI number as described previously. When the ninth digit is correct, press DISP/ENT H/M/L. The radio asks you to conrm. 4. To save this MMSI number, press DISP/ENT H/M/L. To cancel this MMSI number, press CLR/SCAN. Entering an individual MMSI numberFollow the steps below to enter individual MMSIs and names of other vessels into the directory:1. Press and hold MENU/CALL to display the Call Menu.0________Use the up and down arrows to adjust each of the eight digits in turn.16Group MMSIBack[MENU]Exit[CLR]Save[ENT]USAPress and hold Group MMSIDSC Setup0________Use the up and down arrows to adjust each of the nine digits in turn.16MMSIBack[MENU]Exit[CLR]Save[ENT]Name USADSC SetupPress and hold [New]DirectoryCall Menu](https://usermanual.wiki/Uniden-America/UT645.User-Manual-1/User-Guide-1875182-Page-23.png)
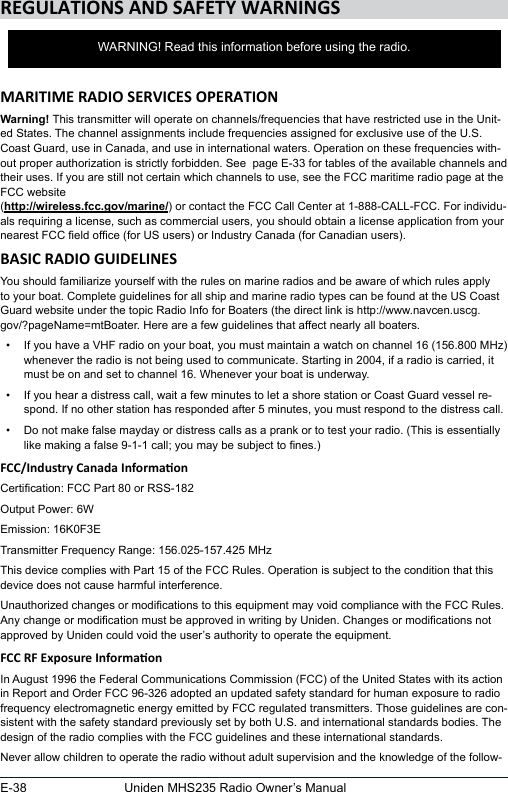
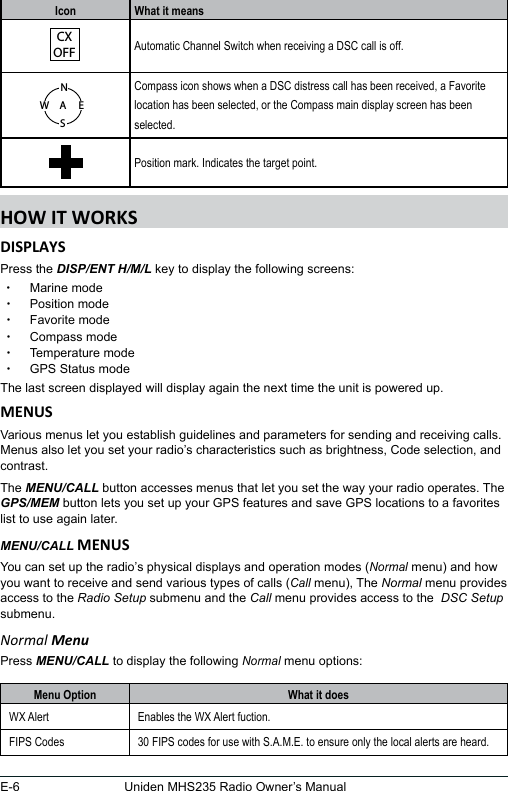
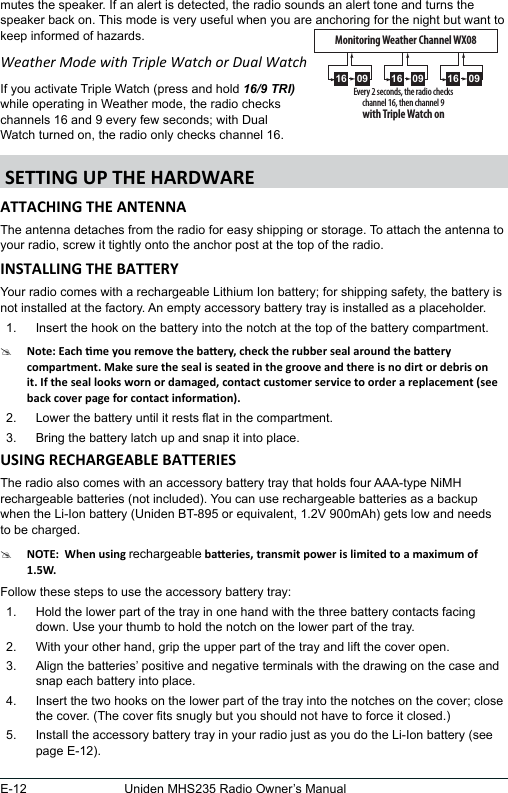
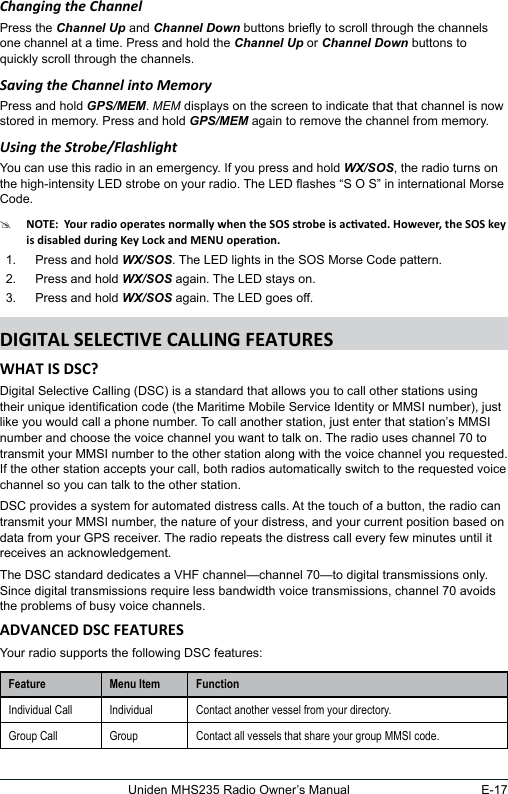
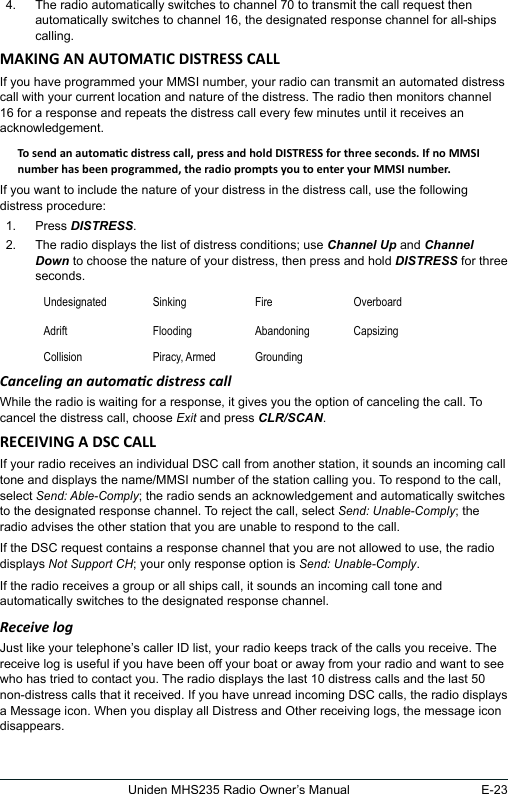
![E-20 Uniden MHS235 Radio Owner’s Manual2. Scroll to DSC Setup and press DISP/ENT H/M/L.The DSC Setup menu displays.3. Scroll to Directory and press DISP/ENT H/M/L. The Directory menu displays. 4. Select [New] and press DISP/ENT H/M/L. 5. Enter the MMSI number as described previously. When the ninth digit is correct, press DISP/ENT H/M/L and the cursor moves to the Name eld.6. Enter the name as described previously. When you have entered the name, press DISP/ENT H/M/L.7. The radio displays the new MMSI number and name and asks you to conrm. To save this MMSI number and name, press DISP/ENT H/M/L To cancel this MMSI number, press CLR/SCAN.The directory lets you store up to 20 MMSI numbers of other stations so you can call them quickly. From the directory, you can edit or delete MMSI numbers. Follow the steps below to edit the MMSI numbers in your directory: 1. Press and hold MENU/CALL to display the Call menu. 2. Scroll to DSC Setup and press DISP/ENT H/M/L.The DSC Setup menu displays. 3. Scroll to Directory and press DISP/ENT H/M/L.The Directory screen displays. This screen lets you add a new MMSI or edit/delete an existing MMSI. 4. To enter a new MMSI, select [NEW] and follow the procedures for entering an individual MMSI number. 5. To edit an existing MMSI number/name, select the entry and press DISP/ENT H/M/L.6. Select Edit and press DISP/ENT H/M/L. The MMSI number and name display. Edit accordingly and press DISP/ENT H/M/L when complete. A conrmation screen displays.7. Press DISP/ENT H/M/L to accept the edits or CLR/SCAN to cancel. The radio returns to the DSC Directory Edit screen. 8. To delete the directory entry, select Delete. When you are satised with the directory list, press CLR/SCAN to close the menu screen. There are essentially four different types of DSC voice calls: Back[MENU]Exit[CLR]Save[ENT]USAMMSI123456789NameUniden16DirectoryPress and hold Select an entryEditCall Menu/DSC Setup](https://usermanual.wiki/Uniden-America/UT645.User-Manual-1/User-Guide-1875182-Page-24.png)
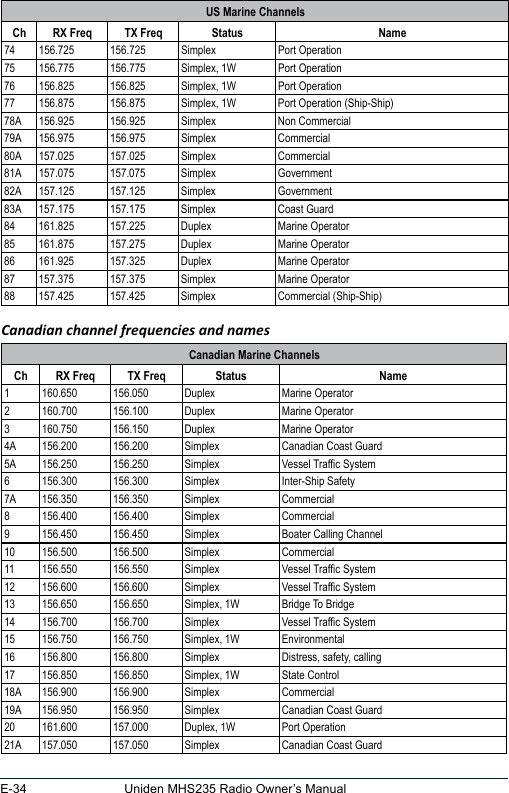
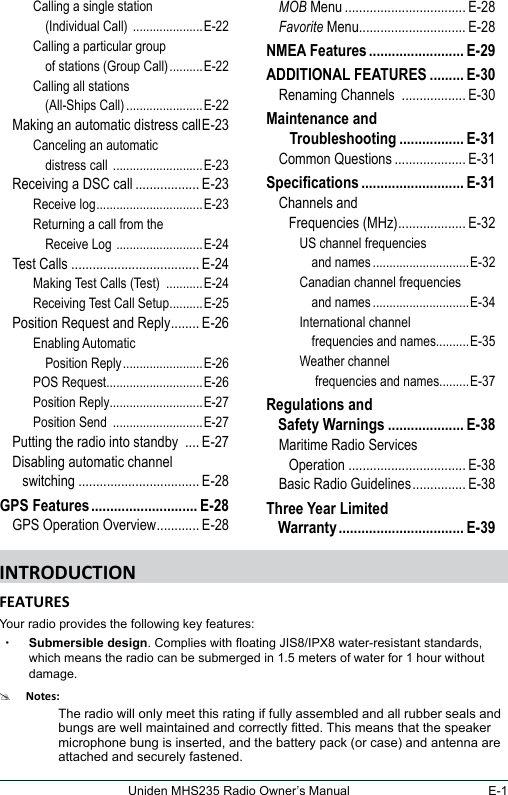
![E-24 Uniden MHS235 Radio Owner’s Manual1. ress and hold MENU/CALL to display the Call menu. 2. Select Receive Log. 3. Select Distress to see the last 10 distress calls received by the radio. Select Other to see the last 50 normal calls received by the radio, then choose from Individual, Group, or All Ships calls. 4. Calls are listed in the order they were received, with the newest call shown rst. The display blinks if there are new calls you have not reviewed. The Message icon also displays.5. Select the call you want to see the details of. Use Channel Up and Channel Down to see all of the information. The log displays different information depending on type of call received. See the table below for the information stored for each type of call: DSC Call Type Receive Log InformationDistress MMSI (or name), position, time, nature code. Distress Acknowledge MMSI (or name), distress MMSI, position, time, nature code.All Ships MMSI (or name), category code, communication channel number.Group MMSI (or name), category code, communication channel number.Individual MMSI (or name), category code, communication channel number.Individual Acknowledge MMSI (or name), Completed/Unattended, category code, communication channel number.Test MMSI (or name), category code.Test Acknowledge MMSI (or name), category code.Pos Reply MMSI (or name), position, time, category code.Pos Request MMSI (or name), category code.Pos Send MMSI (or name), position, time, category code.6. From the log menu, select Exit to close the receive log and return to the mode you were in. Returning a call from the Receive Log You can return individual calls directly from the Receive Log. From the call detail screen, press Channel Down until Call Back appears at the bottom of the display. Press DISP/ENT H/M/L to return that station’s call. 16USADistress Log 123456789 246853790 357911135Back[MENU]Exit[CLR]Save[ENT]Press and hold Call Menu/Receive LogDistress](https://usermanual.wiki/Uniden-America/UT645.User-Manual-1/User-Guide-1875182-Page-28.png)
![E-25Uniden MHS235 Radio Owner’s ManualMaking Test Calls (Test) #1. Press and hold MENU/CALL to display the Call menu. 2. Select Test. 3. The radio displays the names listed in your directory; use Channel Up and Channel Down to choose the directory entry you want to send a test call to and press DISP/ENT H/M/L.4. If you want to send a test call to a station that is not in your directory, select Manual. The radio prompts you to enter the MMSI number you want to call. Enter the MMSI number the same way you enter directory entries (see page 22). Enter all nine digits and press DISP/ENT H/M/L. 5. The radio displays the MMSI number you are about to call and asks you to conrm. If you want to call the displayed number, select Send. To cancel the call, select Exit. 6. The radio automatically switches to channel 70 to transmit the test call request, then switches back to the last-used channel. 7. When the other station acknowledges the test call, the radio displays an acknowledgement screen. Receiving Test Call SetupWhen another station sends you a test call, you can select options to answer the test call manually or have the radio answer automatically.Press and hold MENU/CALL to display the Call menu. 8. Select DSC Setup and then Test Reply. 9. Choose Auto and press DISP/ENT H/M/L. The radio will automatically send an Test [Manual] JIM CASSIDY KENT NEWMANBack[MENU]Exit[CLR]Select[ENT]16USATestPress and hold 18Test Reply Auto ManualBack[MENU]Exit[CLR]Select[ENT]AUSACall Menu/DSC SetupPress and hold Test Reply](https://usermanual.wiki/Uniden-America/UT645.User-Manual-1/User-Guide-1875182-Page-29.png)
![E-26 Uniden MHS235 Radio Owner’s Manualacknowledgement when it receives a test call. 10. To disable automatic test call reply, repeat the steps above and select Manual. Acknowledging Test Call ReceiptDifferent screens display depending on whether you set the Test Reply to Auto or Manual.If Test Reply is set to Auto: If Test Reply is set to Manual:18Test 123456789006/20 11:00 SafetyExit[CLR]AUSA18Test 123456789 ReplyExit[CLR]AUSASend[ENT]No action is necessary. Select Send to send a reply.Enabling Automac Posion ReplyIf you want the radio to automatically transmit your current position whenever it receives a position request, you can enable automatic position reply. Most boaters activate automatic position reply for safety reasons or because they subscribe to a marine towing service. Sometimes—for example, in some competitive situations--you may not want other stations to get your position without your manual conrmation 1. Press and hold MENU/CALL to display the Call menu. 2. Select DSC Setup and then Position Reply. 3. Choose Auto and press DISP/ENT H/M/L. The radio will automatically transmit your position when it receives a position request. 4. To disable automatic position reply, repeat the steps above and select Manual. POS RequestAny time you need to know where another boat currently is—to nd your boating partners, to respond to a request for assistance, etc.—you can send a position request to their radio: 1. Press and hold MENU/CALL to display the Call menu. 2. Select POS Request and press DISP/ENT H/M/L.3. The radio displays the names listed in your directory; use Channel Up and Channel Down to choose the directory entry you want to contact and press DISP/ENT H/M/L. If you want to contact a station that is not in your directory, select Manual. The radio prompts you to enter the MMSI number you want to call. Enter the MMSI number the 16POS Request [Manual] Norwester HarrisBack[MENU]Exit[CLR]Select[ENT]USACall Menu/POS RequestPress and hold](https://usermanual.wiki/Uniden-America/UT645.User-Manual-1/User-Guide-1875182-Page-30.png)
![E-27Uniden MHS235 Radio Owner’s Manualsame way you enter directory entries (see page 22). Enter all nine digits and press DISP/ENT H/M/L. 4. The radio displays the MMSI number you are about to contact and asks you to conrm. If you want to request the position of the displayed MMSI number, select Send. To cancel the request, select Exit. 5. When the other station responds, the radio displays the MMSI number, the longitude, and the latitude of the other station. If your radio is connected to a chartplotter through the NMEA OUT connection (see page 34), the position information will also be displayed on the plotter screen. 6. If the other station does not have valid GPS data, the radio displays No Position. Posion ReplyWhen another station requests your current position, different screens display depending on whether you set Position Reply to Auto or Manual.If Position Reply is set to Auto: If Position Reply is set to Manual:16Position RequestHarris06/20 11:00RoutineExit[CLR]USA16Position RequestHarris ReplyExit[CLR]USASend[ENT]No action is necessary. Select Send to send a reply or Exit to reject the request.Posion Send If you are requesting assistance or using an all ships call to give a safety warning, you can send your current position so other stations know where you are: 1. Press and hold MENU/CALL to display the Call menu. 2. Select Position Send. 3. The radio displays the names listed in your directory; use Channel Up and Channel Down to choose the directory entry you want to contact and press DISP/ENT H/M/L. If you want to contact a station that is not in your directory, select Manual. The radio prompts you to enter the MMSI number you want to call. Enter the MMSI number the same way you enter directory entries (see page 22). Enter all nine digits and press DISP/ENT H/M/L. 4. The radio displays the MMSI number you are about to contact and asks you to conrm. If you want to transmit your position to the displayed MMSI number, select Send. To cancel the transmission, select Exit. 5. The radio transmits your MMSI number, your longitude, and your latitude to the other station.If you are leaving your radio or do not wish to answer any DSC calls, you can put your radio in standby mode. If your radio receives an individual call, it will automatically respond with](https://usermanual.wiki/Uniden-America/UT645.User-Manual-1/User-Guide-1875182-Page-31.png)
![E-28 Uniden MHS235 Radio Owner’s Manuala message that indicates your radio is currently unattended. Follow the steps below to put your radio in standby: 1. Press and hold MENU/CALL to display the Call menu. 2. Select Standby to place your radio in standby mode. 3. To cancel standby and return to the mode your radio was in, press any button. If you are involved in a bridge-to-bridge call, you may not want the radio to automatically switch channels when it receives a DSC call. In cases like this, you can disable automatic channel switching. If you receive an individual call, the radio will respond with an unattended code, just as if the radio were in Standby. 1. Press and hold MENU/CALL to display the Call menu. 2. Select DSC Setup, then Auto CH SW.3. Select Off and press DISP/ENT H/M/L. The radio will not automatically switch channels until you reactivate this feature. #If you have unread incoming DSC calls, the radio displays a message icon. You will be able to review who has called. The radio displays the last 10 distress calls and the last 50 non-distress calls it received (see page E-23). Your GPS system provides more than just your specic location. The MOB (Man Overboard) menu lets you immediately save your current position so rescuers can converge on the exact man overboard location. The Favorites menus let you create a directory of favorite places and their coordinates so you can easily return there. Using the GPS Setup menus, you can determine power-saving options, measurement increments, and time settings.The radio is factory-preset to search for your geographic location when it is turned on for the rst time. MOBThe MOB menu lets you quickly save your current selection so you can easily navigate back to it. It will be saved in the rst position of the Favorites list.16USAAuto CH SW On OffBack[MENU]Exit[CLR]Select[ENT]Press and hold Call Menu/DSC SetupAuto CH SW](https://usermanual.wiki/Uniden-America/UT645.User-Manual-1/User-Guide-1875182-Page-32.png)
![E-29Uniden MHS235 Radio Owner’s ManualFAvORITEThe Favorite menu is comprised of the Goto menu and the Add menu. The Goto menu adds (saves) the current GPS position as well as recalls that position and others you have saved to sail back to it.Goto MenuThe Goto menu allows you to select from a list of saved coordinates or to input coordinates manually.To input coordinates1. From the Goto Fav. screen, select [Manual].2. Manually input coordinates. When the last digit is entered, the screen displays Go and Save.3. Select Go to display the coordinates and the compass bearing and begin traveling towards that destination. 4. Select Save to save the location into a Favorites directory. When you select Save, the screen prompts you to name these coordinates.5. When you have entered a name for the saved coordinates, they will appear on the Goto screen as a selection.To select a Goto entry1. From the Goto Fav. screen, select from the directory entries listed.2. The screen displays three options: Go, Delete, and Edit.3. Select Go to display the coordinates and the compass bearing and begin traveling towards that destination. Select Delete to delete the entry. Select Edit to change the entry.Your radio supports NMEA0183, a standard for data communication between marine instruments. If you are connected to a chartplotter and the radio receives another boat’s position data (sentences) in a DSC call, the radio sends the position data to the chartplotter so you can see the location. NMEA sentences contain different sets of data. The MHS235 supports the following sentences:DATA RMC GLL GNS GGA ZDAUTC Time OO O O O18Goto Fav. [Manual] UnidenBack[MENU]Exit[CLR]Select[ENT]AUSAFavoritePress Goto](https://usermanual.wiki/Uniden-America/UT645.User-Manual-1/User-Guide-1875182-Page-33.png)