Uniden Bcd396T Users Manual
BCD396T to the manual ddcaef2a-1d9a-4538-ba36-22cbfb2a876f
2015-02-10
: Uniden Uniden-Bcd396T-Users-Manual-360231 uniden-bcd396t-users-manual-360231 uniden pdf
Open the PDF directly: View PDF ![]() .
.
Page Count: 1
- Precautions
- Contents
- The FCC Wants You to Know
- Scanning Legally
- About This Manual
- Using the Multifunction Scroll Control
- Entering Text
- How the Scanner’s Controls Are Represented in This Manual
- 1. The first character of the system name is covered by a cursor. Rotate the scroll control to select the character you want.
- 2. Press 6/ on the keypad to select the next character. The cursor moves to the next character. To move the cursor to a previous character, press /4.
- 3. Repeat Steps 1 and 2 until you have entered the system name. Then press down on the scroll control or press E to accept the setting.
- Understanding Scanning
- Understanding the Scanner’s Memory
- What is Scanning?
- What is Searching?
- What is CTCSS/DCS?
- Conventional Scanning
- What is Trunk Tracking?
- Trunked Scanning
- Types of Trunking Systems
- I-Call (Motorola/EDACS)
- Where To Get More Information
- Using Internal Batteries
- Using Rechargeable Batteries
- Removing the Display Sticker
- Using AC Power
- Connecting the Antenna
- Connecting an Earphone/ Headphone
- Connecting an Extension Speaker
- Attaching the Belt Clip
- Attaching the Wrist Strap
- A Look At The Keypad
- A Look At The Display
- Using Menu
- Using Func
- Turning On the Scanner and Setting the Squelch
- 1. Press and hold for about 2 seconds to turn on the scanner.
- 2. Briefly press the scroll control once. VOLUME LEVEL and a number appear on the display.
- 3. While VOLUME LEVEL appears, rotate the scroll control to set the volume to a comfortable listening level.
- 4. While holding down Func on the left side of the scanner, briefly press the scroll control once. SQUELCH LEVEL and a number appear on the display.
- 5. While SQUELCH LEVEL appears, rotate the scroll control to set the squelch to the level you want.
- Scanning Systems
- Selecting Systems to Scan
- Selecting System Channel Groups
- Locking/Unlocking Systems
- Locking/Unlocking Channels
- ID Scan/ID Search Mode
- Temporarily Holding On a System
- Holding On a Channel
- Quickly Storing an ID During ID Search
- Quick-Storing Channels or Talk Group ID’s
- Quickly Recalling Channels
- 1. Press Hold to hold on any channel.
- 2. Press + Rcl. The scanner prompts you to select the system where the channel is stored.
- 3. Rotate the scroll control to select the system, then press E. The scanner prompts you to select the channel group where the channel is stored.
- 4. Rotate the scroll control to select the group, then press E. The scanner prompts you to select a channel.
- 5. Rotate the scroll control to select the channel, then press E to hold on that channel.
- Monitoring Trunking Activity
- Programming Systems Menu
- Displaying System Information
- Adjusting the Key Beep
- Locking/Unlocking the Keypad
- Turning Power Save On or Off
- Priority Scan
- Using the Backlight
- Setting the Audio AGC
- Adjusting the Display Contrast
- Initializing the Scanner’s Memory
- Connecting Your Scanner to a Personal Computer
- Using the Cloning Options
- Programming Conventional Systems
- Programming Motorola Systems
- Programming EDACS Systems
- Programming LTR Systems
- System-Level Settings
- Editing the System Name
- Editing the System Quick Key
- Setting System Lockout
- Setting the System Hold Time
- Setting the Channel Delay Time
- Q Set Delay Time i
- Setting ID Scan/Search (Trunked Systems Only)
- Editing the Fleet Map (Motorola Systems Only)
- Setting the Motorola Status Bit (Motorola Systems Only)
- Setting the End Code Operation (Motorola Systems Only)
- Setting I-Call (Motorola Analog and EDACS Systems Only)
- Setting Emergency Alert (Motorola and EDACS Systems Only)
- Setting Control-Channel Only (Motorola Systems Only)
- Reviewing Locked Out Frequencies
- Clearing All Locked-Out IDs
- Setting the Digital Decode Threshold (Motorola and Conventional Systems Only)
- Setting the EDACS ID Format (EDACS Systems Only)
- Setting System Attenuation (Trunked Systems Only)
- Deleting Systems
- Copying Systems
- Group-Level Settings
- Channel-Level Settings
- Editing the Channel Name
- Setting Channel Priority (Conventional Channels Only)
- Setting Channel Alert
- Setting CTCSS/DCS (Conventional Channels Only)
- Setting the System Frequency Modulation
- Setting Channel Attenuation (Conventional Channels Only)
- Setting the Frequency Step (Conventional Channels Only)
- Setting Channel Lockout
- Deleting Channels
- Select the group g i Q Edit Channel g i Select the channel g i Q Delete Channelg i
- Copying/Pasting Channels
- Searching and Storing
- Service Search
- 1. Press then turn the scroll control until Search for . . . appears. Then press down on the scroll control. The search feature options appear.
- 2. Press down on the scroll control to select Service Search.
- 3. Turn the scroll control until the type of service search you want appears, then press down on the scroll control to select it. The following search bands appear.
- Quick Search
- CTCSS/DCS Search
- 1. Press then turn the scroll control until Srch/CloCall Opt appears. Then press the scroll control. One of the search feature options appear.
- 2. Turn the scroll control until CTCSS/DCS Search appears, then press the scroll control to select it.
- 3. Turn the scroll control until On appears to turn on CTCSS/DCS search or until Off appears to turn it off, then press the scroll control.
- Custom Search
- 1. Press then turn the scroll control until Search for ... appears. Then press the scroll control. Or, press + Scan/Srch, then select No. One of the search feature options appear.
- 2. Turn the scroll control until Custom Search appears, then press the scroll control to select it. The scanner starts custom se...
- Editing a Custom Search Range
- 1. Press then turn the scroll control until Search for ... appears. Then press the scroll control. Or press and Srch, then No. One of the search feature options appear.
- 2. Turn the scroll control until Edit Custom appears, then press the scroll control to select it.
- 3. Turn the scroll control until the name of the custom search range you want to edit appears, then press the scroll control to select it. The following options appear as you turn the scroll control.
- 4. Select the option you want to change for the custom search range you selected, then press the scroll control.
- Editing a Service Search
- 1. Press then turn the scroll control until Search for ... appears. Then press the scroll control. Or press and Srch, then No. One of the search feature options appear.
- 2. Turn the scroll control until Edit Service appears, then press the scroll control to select it.
- 3. Turn the scroll control to highlight the service search you want to edit, then press the scroll control to select it.
- Auto Search and Store
- Selecting a System
- 1. Press then turn the scroll control until Search for ... appears. Then press the scroll control. One of the search feature options appear.
- 2. Turn the scroll control until Search and Store appears, then press the scroll control to select it.
- 3. Turn the scroll control until the system where you want to store the frequencies or talk group ID’s appears, then press the scroll control to select it.
- Storing a Conventional System
- Storing a Trunked System
- 1. Follow Steps 1-3 under “Selecting a System”. A search option appears.
- 2. Turn the scroll control until the type of search you want appears, then press the scroll control to select it. A search band appears. If all systems are locked out, All Locked! appears and the scanner does not store any frequencies.
- Using the Close Call Feature
- Selecting a System
- Setting Close Call Options
- Close Call Hits
- Managing Locked-Out Frequencies
- Searching for Subaudible Tones
- Screening Out Broadcast Sources
- Finding Repeater Output Frequencies
- Setting the Maximum Auto Store Value
- Setting the Modulation Type
- Setting Attenuation
- Setting Data Skip
- Setting the Delay Time
- Setting the Search Frequency Step
- Searching For a Weather Broadcast
- Fire Tone Out Operation
- Turning Weather Alert On/Off
- Programming a SAME Group
- Setting WX Alert Priority
- General Use
- Location
- Cleaning
- Repairs
- Birdies
- Preset Fleet Maps
- User Defined Fleet Maps
- Collecting Information
- 1. Collect information about the system(s) you want to monitor.
- 2. Organize the system information using these system worksheets included in this appendix.
- 3. Follow the instructions in “Filling Out The Conventional System Worksheet” on Page 131, “Filling Out The Motorola Worksheet” on Page 131, and “Filling Out the LTR and EDACS Worksheet” on Page 133 to program your scanner.
- Filling Out The Conventional System Worksheet
- Filling Out The Motorola Worksheet
- Filling Out the LTR and EDACS Worksheet
- Conventional System Worksheet
- Motorola System Worksheet
- LTR/EDACS System Worksheet

BCD396T
OWNER’S
MANUAL
OWNER’S MANUAL
(INDICATES INFORMATION SUBJECT TO
*
*
AND/OR DELETION)CHANGE
Revision 1; 031005

2
Precautions
Precautions
Before you use this scanner, please read and observe
the following.
IMPORTANT!
This scanning radio has been manufactured so that it
will not tune to the radio frequencies assigned by the
FCC for cellular telephone usage. The Electronic
Communications Privacy Act of 1986, as amended,
makes it a federal crime to intentionally intercept
cellular or cordless telephone transmissions or to
market this radio when altered to receive them. The
installation, possession, or use of this scanning radio
in a motor vehicle may be prohibited, regulated, or
require a permit in certain states, cities, and/or local
jurisdictions. Your local law enforcement officials
should be able to provide you with information
regarding the laws in your community.
Changes or modifications to this product not expressly
approved by Uniden, or operation of this product in
any way other than as detailed by this Operating
Guide, could void your authority to operate this
product.
EARPHONE WARNING!
Be sure to use only a monaural earphone with this
scanner. You can also use an optional 32 Ω stereo
headset. Use of an incorrect earphone or stereo
headset might be potentially hazardous to your
hearing. The output of the phone jack is monaural, but
you will hear it in both headphones of a stereo
headset.
Set the volume to a comfortable audio level coming
from the speaker before plugging in the monaural
earphone or a stereo headset of the proper
impedance (32 Ω). Otherwise, you might experience
some discomfort or possible hearing damage if the
volume suddenly becomes too loud because of the
volume control or squelch control setting. This might
be particularly true of the type of earphone that is
placed in the ear canal.
Precautions

3
Precautions
WARNING!
Uniden does not represent this unit to be
waterproof. To reduce the risk of fire or electrical
shock, do not expose this unit to rain or moisture.
Astro®, DPL®, Digital Private Line®, Motorola®,
PL®, PRIVACY PLUS®, Private Line®,
SMARTNET®,and SMARTZONE® are registered
trademarks of Motorola, Inc.
LTR® is a registered trademark of E.F. Johnson Co.
EDACS® is a registered trademark of M/A-COM
Private Radio Systems Inc.
Uniden® and Bearcat® are registered trademarks of
Uniden America Corporation.
TrunkTracker™, Trunk Tracking™, and Close Call™
are proprietary trademarks of Uniden America
Corporation.
Other trademarks used throughout this manual are the
property of their respective holders.

4
Contents
Contents
Precautions 2
Contents 4
The FCC Wants You to Know 8
Scanning Legally 8
Introduction 10
Feature Highlights 11
About This Manual 16
Using the Multifunction Scroll Control 16
Entering Text 16
How the Scanner’s Controls Are Represented in This Manual 17
Understanding Scanning 19
Understanding the Scanner’s Memory 19
What is Scanning? 19
What is Searching? 20
What is CTCSS/DCS? 20
Conventional Scanning 22
Simplex Operation 23
Repeater Operation 23
What is Trunk Tracking? 23
Trunked Scanning 24
Types of Trunking Systems 25
Motorola Trunking 25
EDACS Trunking 27
LTR Trunking 28
I-Call (Motorola/EDACS) 29
Where To Get More Information 29
Information On The Internet 29
Included With Your Scanner 31
Setting Up Your Scanner 32
Using Internal Batteries 32
Using Rechargeable Batteries 34
Removing the Display Sticker 35
Using AC Power 35
Connecting the Antenna 35
Connecting an Optional Antenna 35
Connecting an Earphone/Headphone 36
Connecting an Extension Speaker 36
Attaching the Belt Clip 36
Attaching the Wrist Strap 36
A Look At The Keypad 37
A Look At The Display 41
Using Menu 42
Using Func 42
Basic Operation 43
Turning On the Scanner and Setting the Squelch 43
Scanning Systems 43
Preprogrammed System Tips 44
Selecting Systems to Scan 45
Selecting System Channel Groups 45
Locking/Unlocking Systems 46
Locking/Unlocking Channels 46
ID Scan/ID Search Mode 46
Temporarily Holding On a System 47
Holding On a Channel 47
Quickly Storing an ID During ID Search 47
Quick-Storing Channels or Talk Group ID’s 47
Quickly Recalling Channels 48
Monitoring Trunking Activity 48
Using the Menu 49
Programming Systems Menu 51
Other Settings 53
Displaying System Information 53
Contents

5
Contents
Viewing Memory Used 53
Viewing the Firmware Version 53
Adjusting the Key Beep 53
Locking/Unlocking the Keypad 53
Turning Power Save On or Off 54
Priority Scan 54
Other Settings 54
Using the Backlight 54
Setting the Audio AGC 55
Adjusting the Display Contrast 55
Initializing the Scanner’s Memory 55
Connecting Your Scanner to a Personal Computer 56
Using the Cloning Options 56
Wired Cloning 57
On-Air Cloning 58
Programming Radio Systems 59
Programming Conventional Systems 60
Entering/Editing Conventional Channel Groups 60
Entering/Editing Conventional Channels 61
Programming Motorola Systems 62
Setting System Frequencies 63
Setting Modulation 64
Setting Attenuation 64
Entering/Editing Motorola Channel Groups 65
Entering/Editing Motorola Channels 66
Programming EDACS Systems 66
Setting System Frequencies 68
Entering/Editing EDACS Channel Groups 68
Entering/Editing EDACS Channels 69
Programming LTR Systems 69
Setting System Frequencies 70
Entering/Editing LTR Channel Groups 70
Entering/Editing LTR Channels/Talkgroups 71
Programming/Editing Optional Settings 72
System-Level Settings 72
Editing the System Name 72
Editing the System Quick Key 73
Setting System Lockout 73
Setting the System Hold Time 74
Setting the Channel Delay Time 74
Setting ID Scan/Search (Trunked Systems Only) 75
Editing the Fleet Map (Motorola Systems Only) 75
Setting the Motorola Status Bit (Motorola Systems Only) 76
Setting the End Code Operation (Motorola Systems Only) 77
Setting I-Call (Motorola Analog and EDACS Systems Only) 77
Setting Emergency Alert (Motorola and EDACS Systems Only) 78
Setting Control-Channel Only (Motorola Systems Only) 78
Reviewing Locked Out Frequencies 79
Clearing All Locked-Out IDs 79
Setting the Digital Decode Threshold
(Motorola and Conventional Systems Only) 79
Setting the EDACS ID Format (EDACS Systems Only) 80
Setting System Attenuation (Trunked Systems Only) 81
Deleting Systems 81
Copying Systems 81
Group-Level Settings 82
Entering/Editing the Group Name 82
Setting the Group Quick Key 83
Setting Group Lockout 83
Deleting Groups 83
Channel-Level Settings 84
Editing the Channel Name 84

6
Contents
Setting Channel Priority (Conventional Channels Only) 85
Setting Channel Alert 85
Setting CTCSS/DCS (Conventional Channels Only) 86
Setting the System Frequency Modulation 87
Setting Channel Attenuation (Conventional Channels Only) 88
Setting the Frequency Step (Conventional Channels Only) 88
Setting Channel Lockout 89
Deleting Channels 89
Copying/Pasting Channels 90
Searching and Storing 91
Service Search 91
Quick Search 92
CTCSS/DCS Search 92
Custom Search 93
Editing a Custom Search Range 94
Editing a Service Search 95
Auto Search and Store 97
Selecting a System 97
Storing a Conventional System 97
Storing a Trunked System 98
Using the Close Call Feature 100
Setting Close Call Options 101
Close Call Hits 103
Search and Close Call Options 104
Managing Locked-Out Frequencies 104
Unlocking All Frequencies 104
Reviewing Locked Out Frequencies 104
Searching for Subaudible Tones 104
Screening Out Broadcast Sources 105
Finding Repeater Output Frequencies 106
Setting the Maximum Auto Store Value 107
Setting the Modulation Type 107
Setting Attenuation 107
Setting Data Skip 108
Setting the Delay Time 108
Setting the Search Frequency Step 109
Using Weather Alert (SAME) 110
Searching For a Weather Broadcast 110
Fire Tone Out Operation 110
Setting Tone-Out Standby 111
Setting up Tone-Out 111
Turning Weather Alert On/Off 112
Programming a SAME Group 113
Setting WX Alert Priority 114
Care and Maintenance 115
General Use 115
Location 115
Cleaning 115
Repairs 116
Birdies 116
Troubleshooting 117
Specifications 121
Optional Accessories 124
Appendix 125
Preset Fleet Maps 125
User Defined Fleet Maps 127
Type I Programming Information 127
Size Code Restrictions 128
Planning 129
Collecting Information 129
Filling Out The Conventional System Worksheet 131
System Name and Quick Key 131

7
Contents
Group Name and Quick Key 131
Frequency-Alpha Tag-Priority-CTCSS/DCS 131
Filling Out The Motorola Worksheet 131
System Name and Quick Key 131
System Type 132
System Frequencies 132
Fleet Map (Type I or Type I/Type II Hybrid Only) 132
Band Plan (VHF or UHF Only) 133
Group Name and Quick Key 133
Talk Group ID-Alpha Tag-Alert 133
Filling Out the LTR and EDACS Worksheet 133
System Name and Quick Key 133
System Frequencies and LCN 134
Group Name and Quick Key 134
Talk Group ID-Alpha Tag-Alert 134
Conventional System Worksheet 135
Motorola System Worksheet 136
LTR/EDACS System Worksheet 138
Preprogrammed Systems 140
One-Year Limited Warranty 152

8
The FCC Wants You to Know
The FCC Wants You to Know
This scanner has been tested and found to comply
with the limits for a scanning receiver, pursuant to Part
15 of the FCC Rules. These limits are designed to
provide reasonable protection against harmful
interference in a residential installation. This scanner
generates, uses, and can radiate radio frequency
energy and, if not installed and used in accordance
with the instructions, may cause harmful interference
to radio communications.
However, there is no guarantee that interference will
not occur in a particular installation. If this scanner
does cause harmful interference to radio or television
reception, which can be determined by turning the
scanner on and off, you are encouraged to try to
correct the interference by one or more of the following
measures:
• Reorient or relocate the receiving antenna
• Increase the separation between the scanner and
the receiver
This device complies with Part 15 of the FCC Rules.
Operation is subject to the following two conditions:
1) This device may not cause harmful interference,
and 2) this device must accept any interference
received, including interference that may cause
undesired operation.
Scanning Legally
Your scanner covers frequencies used by many
different groups, including police and fire departments,
ambulance services, government agencies, private
companies, amateur radio services, military operations,
pager services, and wireline (telephone and telegraph)
service providers. It is legal to listen to almost every
transmission your scanner can receive. However, there
are some transmissions that you should never
intentionally listen to. These include:
The FCC Wants You to Know

9
The FCC Wants You to Know
• Telephone conversations (cellular, cordless, or
other private means of telephone signal transmis-
sion)
• Pager transmissions
• Any scrambled or encrypted transmissions
According to the Electronic Communications Privacy
Act (ECPA), you are subject to fines and possible
imprisonment for intentionally listening to, using, or
divulging the contents of such a conversation unless
you have the consent of a party to the conversation
(unless such activity is otherwise illegal). This scanner
has been designed to prevent the reception of cellular
telephone transmissions and the decoding of
scrambled transmissions. This is done to comply with
the legal requirement that scanners be manufactured
so they are not easy to modify to pick up these
transmissions. Do not open your scanner’s case to
make any modifications that could allow it to pick up
transmissions that are illegal to monitor. Modifying or
tampering with your scanner’s internal components or
using it in a way other than as described in this manual
could invalidate your warranty and void your FCC
authorization to operate it.
In some areas, mobile use of this scanner is unlawful
or requires a permit. Check the laws in your area. It is
also illegal in many areas (and a bad idea everywhere)
to interfere with the duties of public safety officials by
traveling to the scene of an incident without
authorization.

10
Introduction
Introduction
Your BCD396T scanner is a state-of-the-art scanner
radio with TrunkTracker IV™ and automatic scanning
capabilities. You can store frequencies such as police,
fire/emergency, marine, air, amateur, and other
communications into the scanner. You can carry it with
you wherever you go, use it at home as a base unit, or
install it in your vehicle as a mobile unit.
You can use the scanner’s scroll control to quickly
select channels and frequencies, and you can
automatically program channels in a system using the
AutoStore feature.
Use your scanner to monitor:
• Analog and digital trunked public safety systems *
• Police and fire departments (including rescue and
paramedics)
• NOAA weather transmissions
• Business/Industrial radio
• Utilities
• Marine and amateur (ham radio) bands
• Air band
• Railroad
* Motorola® Astro®, SMARTNET®,SMARTZONE®,
and PRIVACY PLUS®, M/A-COM Private Radio
Systems Inc. EDACS® Wide, Narrow, and SCAT, and
E.F. Johnson Co. LTR systems.
Introduction

11
Feature Highlights
Feature Highlights
General
Close CallTM RF Capture Technology - you can set
the scanner so it detects and provides information
about nearby radio transmissions. See “Using the
Close Call Feature” on Page 100 for more information.
Dynamically Allocated Channel Memory - your
scanner’s memory is organized so that it more closely
matches how radio systems actually work, making it
easier to program and use your scanner and determine
how much memory you have used and how much you
have left.
Preprogrammed Systems - your scanner is
preprogrammed with over 400 channels covering
police, fire, and ambulance operations in the 25 most
populated counties in the US. A complete list of the
scanner’s preprogrammed systems is in “Prepro-
grammed Systems” on Page 140.
Quick Keys – You can set the scanner so you can
quickly select systems and groups by using the
keypad. This makes it easy to listen to or quickly lock
out those systems or groups you don’t want to scan.
Pager Screen – You can set the scanner so it ignores
hits generated by common pager frequencies while
using the Close Call or search features.
12 Service Searches - frequencies are preset in
separate public safety, news, amateur radio, marine,
railroad, air, CB radio, FRS/GMRS, racing, TV broad-
cast, FM broadcast, and special searches, to make it
easy to find specific transmissions.
Lockout – You can lock out any system, group,
frequency, or channel while scanning. If you lock out a
system or group, any channels belonging to that sys-
tem or group are also locked out.
You can lock out up to 200 frequencies. The scanner
skips locked-out frequencies while using the Close
Call feature or while searching.
Feature Highlights

12
Feature Highlights
CTCSS and DCS Squelch Modes – prevent
interference from stations not using the mode you
select.
Audio AGC – Helps automatically balance the volume
level between different radio systems.
Fire Tone-Out Standby – Lets you set the scanner to
alert you if a two-tone sequential page is transmitted.
You can set up to 10 settings (transmit frequency, tone
frequencies) for standby monitoring.
Broadcast Screen – Sets the scanner so it ignores
Close CallTM or search hits on known broadcast
frequencies.
Custom Screen – Lets you input up to 10 frequency
ranges that the scanner will ignore during Close CallTM
or search operation.
Dropout Delay – You can set whether the scanner
pauses at the end of a transmission to wait for a reply.
You can set the delay time for each system you scan,
and while searching and using the Close CallTM
feature.
Attenuator – You can set the scanner’s attenuator to
reduce the input strength of strong signals by about 18
dB received by the scanner.
Repeater Reverse – You can set the scanner so it
switches to the input frequency on a conventional
repeater system.
Channel Alert – You can set the scanner so it alerts
you when there is activity on any channel you specify.
Memory Check – Lets you see at a glance how much
total memory is left.
Scan and Search Operation – Lets you include
selected service searches or custom search ranges
during normal scan operation.
Custom Alerts – For each alert in the scanner (such as
channel alert, Close Call alert, emergency alert), you

13
Feature Highlights
can select from 9 different tone patterns and also set
the alert volume level independently from the main
volume level.
Automatic Channel Step – Accepts frequencies on
any valid channel step, even if it does not fall within
the band plan’s default step.
Frequency Step – Lets you select a frequency step
(5, 6.25, 7.5, 8.33, 10, 12.5,15, 20, 25, 50 or 100 kHz)
for manual mode and chain search mode. The scan-
ner’s auto step feature lets you set the scanner so it
automatically chooses the correct step.
Quick Recall – Lets you quickly select a specific
channel by choosing the system, group, and channel.
Scan/Search Delay – You can set the scanner so it
remains on a frequency up to 5 seconds after the last
transmission to wait for a possible reply.
Text Tagging – You can name each system, group,
channel, talk group ID, custom search range, and
SAME group, using up to 16 characters per name.
Unique Data Skip – Allows your scanner to skip
unwanted data transmissions and reduces birdies.
Duplicate Frequency Alert – Alerts you if you try to
enter a duplicate name or frequency already stored in
a system.
Memory Backup – If power is lost or disconnected,
the scanner retains the frequencies you programmed
in its memory.
Note: The scanner’s frequency coverage is not
continuous and does not include the cellular telephone
band.
Trunk Tracking
Trunk Tracker IV™ Operation – Follows conversa-
tions on analog Motorola, Motorola Astro (APCO 25),
EDACS, EDACS SCAT, and LTR trunked radio

14
Feature Highlights
systems. The scanner can scan both conventional and
trunked systems at the same time.
Control Channel Only Scanning – If the scanner is
set to scan Motorola trunking frequencies, you can set
it so it scans using only control channel data. You do
not have to program voice channel frequencies into
memory in this mode.
Adaptive Digital Threshold – Automatically sets the
digital decode threshold for APCO 25 systems.
Weather
Weather Search – Lets your scanner receive your
local NOAA weather transmission.
SAME Weather Alert – Lets your scanner alert you when
a SAME weather alert is transmitted on a NOAA weather
channel. The scanner also displays the transmitted
alert type. This helps you quickly find out about severe
weather in your area and lets you avoid false alarms.
Search
Service Search – Lets you quickly select and search
the scanner’s preprogrammed frequencies.
Custom Search – Lets you program up to 10 custom
search ranges. You can search any of these ranges
simultaneously.
CTCSS/DCS Search – Lets the scanner search for
CTCSS or DCS tones. You can identify up to 50
CTCSS tones and 104 DCS tones.
Quick Search – Lets you search from the currently-tuned
frequency if you are searching a conventional system.
Auto Store
Frequency AutoStore – Automatically stores all
active frequencies within a system you select.
Talk Group ID AutoStore – Automatically stores all
new talk group ID’s into a system you select.

15
Feature Highlights
Priority
Priority Scan – Priority channels let you keep track of
activity on your most important channel(s) while
monitoring other channels for transmissions.
Priority Plus – You can set the scanner so it scans
only the priority channels
Backlight and Power
Display and Keypad Backlight – Makes the display and
keypad easy to see in dim light. You can adjust the
back light so it turns on when you press a key, when
squelch breaks during a transmission, or manually.
Low Battery Alert – The scanner alerts you if the
batteries need to be recharged or replaced.
Battery Save – You can set the scanner so it reduces
the amount of power it needs if there are no transmis-
sions.
Key Controls
Key Lock – You can deactivate the scanner’s keys to
help prevent accidentally changing the scanner’s
programming.
PC Control and Cloning
PC Control – You can transfer programming data to
and from your scanner and your personal computer,
and control the scanner using a computer. This helps
you find frequencies listed on the Internet and load
them into the scanner. Free PC control and
programming software will be available at
http://www.uniden.com.
Clone Mode – You can clone all programmed data,
including the contents of the scanner’s memory, menu
settings, and other parameters from one BCD396T
scanner to another BCD396T scanner.
On-Air Cloning – You can clone all programmed data
over the air from one BCD396T scanner to another

16
Feature Highlights
BCD396T scanner using a personal computer and a
radio transmitter.
About This Manual
The screen displays used in this manual are
representations of what might appear when you use
your scanner. Since what you see depends on the
frequencies and user IDs for your area and the
settings you select, you might notice some differences
between what is in this manual and what appears on
your scanner.
Using the Multifunction Scroll Control
The scroll control on top of the BCD396T lets you
easily control channel selection, volume, and squelch,
and how information appears on the display.
To adjust menu settings, change channels in Hold
mode, and resume scanning: Simply rotate the
scroll control.
To change the scanner’s volume: Briefly press the
scroll control once, then rotate it. VOLUME LEVEL and
the current volume level appear on the display.
To adjust the squelch: While holding down Func on
the left side of the scanner, briefly press the scroll
control once then rotate it. SQUELCH LEVEL and the
current squelch level appear on the display.
To change the display mode: While holding down
Func, briefly press the scroll control twice. Extended
receive information, usually applicable to digital
scanning, appears on the display. Then briefly press
the scroll control again to return to the original display.
Entering Text
To enter a letter, turn the scroll control until the
character you want appears, To enter a number, press a
number key. To enter a decimal point, press .
To move the cursor to the left, hold then press
Func
17
Feature Highlights
/4 or rotate the scroll control to the left. To move the
cursor to the right, hold then press 6/ or rotate
the scroll control to the right.
To clear a character, press No twice. To clear all
characters, press No 3 times.
To accept an entry, press down on the scroll control or
press E.
How the Scanner’s Controls Are
Represented in This Manual
To help navigate the scanner’s menus, the steps
shown in this manual show the displays you see and
the keys you press or control you operate to get a
desired result.
This example shows you how to use the scanner’s
menu to edit an existing system name. It shows you
the key to press ( ) to select a menu option and
the option you see (Program System) when you
press . It also instructs you to turn the scroll
control (shown as ) to view a series of choices then
press the scroll control (shown as ) to select a choice
(Edit Name).
Program System
Select the system
Edit Name
Follow these steps to enter/edit the system name.
1. The first character of the system name is covered
by a cursor. Rotate the scroll control to select the
character you want.
2. Press 6/ on the keypad to select the next
character. The cursor moves to the next character.
To move the cursor to a previous character, press
/4.
Func
Menu
Menu
Menu

18
Feature Highlights
3. Repeat Steps 1 and 2 until you have entered the
system name. Then press down on the scroll
control or press E to accept the setting.
Hints:
• Each system name can be up to 16 characters.
Abbreviate as necessary to fit.
• The default system names include the following
letter in the 16th position to indicate the system
type:
M = Motorola
E = EDACS
L = LTR
C = Conventional
• Press twice to delete the current character.
• Press three times to clear the entire alpha tag.
To get the most from this manual, review the contents
to become familiar with the basic functions available.
If you are new to scanning or trunk tracking, be sure to
read “Understanding Scanning” on Page 19 for a quick
background on the technology. The first thing you’ll
need to do is install batteries in the scanner. Then you
need to connect the included antenna to the scanner.
See “Setting Up Your Scanner” on Page 30 if you need
any help doing this.

19
Understanding Scanning
Understanding Scanning
This section provides you with background on how
scanning works. You don’t really need to know all of
this to use your scanner, but some background
knowledge will help you get the most from your
BCD396T.
Understanding the Scanner’s
Memory
Your scanner’s memory is organized in an architecture
called Dynamic Allocated Channel memory. This type
of memory is organized differently and more efficiently
than the bank/channel architecture used by traditional
scanners. Dynamic Allocated design matches how
radio systems actually work much more closely, making
it easier to program and use your scanner and deter-
mine how much memory you have used and how much
you have left.
Instead of being organized into separate banks and
channels, your scanner’s memory is contained in a
pool. You simply use as much memory as you need in
the pool to store as many frequencies, talk group ID’s,
and alpha tags as you need. No memory space is
wasted, and you can tell at a glance how much
memory you have used and how much remains.
With a traditional scanner, when you program it to
track a trunked system, you must first program the
frequencies. Since you can only program one trunking
system per bank in a traditional scanner, if there were
(for example) 30 frequencies, the remaining 70 or so
channels in the bank are not used and therefore
wasted. Also, since some trunked systems might have
hundreds of talk groups, you would have had to enter
those types of systems into multiple banks in order to
monitor and track all the ID’s.
What is Scanning?
Unlike standard AM or FM radio stations, most two-
way communications do not transmit continuously.
Your BCD396T scans programmed channels until it
Understanding Scanning

20
Understanding Scanning
finds an active frequency, then stops on that frequency
and remains on that channel as long as the
transmission continues. When the transmission ends,
the scanning cycle resumes until the scanner receives
another transmission.
What is Searching?
The BCD396T can search each of its 21 bands and up
to 10 bands together to find active frequencies. This is
different from scanning because you are searching for
frequencies that have not been programmed into the
scanner. When you select frequency bands to search,
the scanner searches for any active frequency within
the lower and upper limits you specify. When the scan-
ner finds an active frequency, it stops on that fre-
quency as long as the transmission lasts. If you think
the frequency is interesting, you can program it into
the scanner’s memory. If not, you can continue to
search.
What is CTCSS/DCS?
Your scanner can monitor systems using a Continuous
Tone Coded Squelch System (CTCSS) and Digital
Coded Squelch (DCS) system, which allow squelch to
open only when the tone you have programmed with a
specific frequency is received along with a
transmission.
CTCSS and DCS are subaudible tone signaling
systems sometimes referred to as PL or DPL
(Motorola’s trademarked terms for Private Line and
Digital Private Line respectively). CTCSS and DCS
are used only for FM signals and are usually
associated with both amateur and commercial two-
way frequencies. These systems make use of a
special subaudible tone that accompanies a
transmitted signal.
CTCSS and DCS are used for many purposes. In
many cases, CTCSS and DCS are used to restrict
access to a commercial repeater, so that only those

21
Understanding Scanning
units, which transmit the correct tone along with their
signal can “talk” to the repeater.
CTCSS and DCS are also used in areas that receive
interference where there are several stations with
output frequencies close to each other. When this
occurs, you might hear multiple communications on
the same frequency. The stations might even interfere
with each other to the point where it is impossible to
clearly receive any of the stations. A scanner
equipped with CTCSS and DCS (like your scanner)
can code each received frequency with a specific
CTCSS or DCS frequency. Then, when you receive
multiple signals, you only hear the transmission with
the CTCSS or DCS tone you programmed. If you do
not receive the correct tone with a signal, the
scanner’s squelch remains closed and you hear
nothing.
You can search for the following CTCSS frequencies
and DCS codes.
CTCSS Frequencies (Hz)
DCS Codes (Octal)
67.0 69.3 71.9 74.4 77.0 79.7
82.5 85.4 88.5 91.5 94.8 97.4
100.0 103.5 107.2 110.9 114.8 118.8
123.0 127.3 131.8 136.5 141.3 146.2
151.4 156.7 159.8 162.2 165.5 167.9
171.3 173.8 177.3 179.9 183.5 186.2
189.9 192.8 196.6 199.5 203.5 206.5
210.7 218.1 225.7 229.1 233.6 241.8
250.3 254.1
023 025 026 031 032 036 043 047
051 053 054 065 071 072 073 074
114 115 116 122 125 131 132 134
143 145 152 155 156 162 165 172

22
Understanding Scanning
Conventional Scanning
Conventional scanning is a relatively simple concept.
Each group of users in a conventional system is
assigned a single frequency (for simplex systems) or
two frequencies (for repeater systems). Any time one
of them transmits, their transmission always goes out
on the same frequency. Up until the late 1980s, this
was the primary way that radio systems operated.
Even today, there are many 2-way radio users who
operate using a conventional system:
•Aircraft
• Amateur radio
• FRS/GMRS users
• Broadcast AM/FM/TV stations
• Many business radio users
When you want to store a conventional system, all you
need to know is the frequencies they operate on.
When you are scanning a conventional system, the
scanner stops very briefly on each channel to see if
there is activity. If there isn’t, the scanner quickly
moves to the next channel. If there is, then the
scanner pauses on the transmission until it is over.
174 205 212 223 225 226 243 244
245 246 251 252 255 261 263 265
266 271 274 306 311 315 325 331
332 343 346 351 356 364 365 371
411 412 413 423 431 432 445 446
452 454 455 462 464 465 466 503
506 516 523 526 532 546 565 606
612 624 627 631 632 654 662 664
703 712 723 731 732 734 743 754

23
Understanding Scanning
Simplex Operation
Simplex systems use a single frequency for both
transmit and receive. Most radios using this type of
operation are limited to line-of-sight operation. This
type of radio is frequently used at construction job
sites, and with inexpensive consumer radios such as
GMRS/FRS radios. The range is typically 1-8 miles,
depending upon the terrain and many other factors.
Repeater Operation
Repeater systems use two frequencies: one transmits
from the radio to a central repeater; the other transmits
from the repeater to other radios in the system. With a
repeater-based system, the repeater is located on top
of a tall building or on a radio tower that provides great
visibility to the area of operation. When a user
transmits (on an input frequency), the signal is picked
up by the repeater and retransmitted (on an output
frequency). The user’s radios always listen for activity
on the output frequency and transmit on the input
frequency. Since the repeater is located very high,
there is a very large line of sight.
Typical repeater systems provide coverage out to
about a 25-mile radius from the repeater location.
What is Trunk Tracking?
Your BCD396T is designed to track the following types
of trunking systems.
• Motorola Astro (APCO 25) trunking systems.
• Motorola Type I, Type II, Type IIi hybrid,
SMARTNET, and PRIVACYPLUS analog trunking
systems, which are extensively used in 800 MHz
communication systems.
• LTR trunking systems
• EDACS SCAT trunking systems
• EDACS trunking systems

24
Understanding Scanning
When tracking these types of systems, you might want
to remember these important points:
• Your scanner can track more than one trunking
system at a time and scan conventional and
trunked systems at the same time.
• The frequencies for many of the 800 MHz public
safety systems are listed in the National Public
Safety Trunked System Frequency Guide included
with your BCD396T scanner.
Conventional scanning is a simple concept. You enter
a frequency used by someone you want to monitor into
your scanner’s memory. For example, the police in your
area might transmit on 460.500 MHz, the fire department
on 154.445 MHz, the highway department on 37.900
MHz, etc. So when your scanner stops on a frequency,
you usually know who it is, and more importantly, you
can stop on a channel and listen to an entire
conversation. This type of scanning is easy and fun.
However, as the demand for public communications
has increased, many public radio users do not have
enough frequencies to meet their needs, creating a
serious problem. Trunking radio systems help solve
this problem.
Trunked Scanning
While conventional scanning worked great while there
were only a few groups wanting to use the
frequencies, with the advent of smaller, lower-cost
radios more and more agencies and businesses
wanted to take advantage of the utility of 2-way radio.
As a result, the bands that were used most became
full, so new users were not able to take advantage of
the technology as quickly as they wanted.
Trunking solved this frequency shortage by allowing
multiple groups to use the same set of frequencies in a
very efficient way. While each type of trunking system
operates a little differently (see the next few sections),
they all work on the same basic premise: even in a

25
Understanding Scanning
system with a lot of users, only a few users are ever
transmitting at any one time.
Instead of being assigned a frequency, as with
conventional systems, each group is assigned a talk
group ID. A central computer controls the frequency
each group operates on...and this frequency selection
is made each time a user transmits. So, while on a
conventional system queries, replies, and follow-ups
are all on a single frequency, they could each be on
completely different frequencies on a trunked system.
This semi-random frequency assignment made
monitoring such a system impossible prior to Uniden’s
invention of the TrunkTracker IV scanner.
Not only does your BCD396T scan channels like a
conventional scanner, it actually follows the users of a
trunked radio system. Once you know a talk group’s
ID, you won’t miss any of the action.
If you are a new scanner enthusiast, you might want to
read the first part of this manual and use your scanner
in conventional mode before you begin trunk tracking.
Understanding scanning fundamentals and
terminology will make trunk tracking much easier. If
you are already an experienced scanner operator, you
might want to go to “Programming Motorola Systems”
on Page 62, “Programming EDACS Systems” on
Page 66, or “Programming LTR Systems” on Page 69
now.
Types of Trunking Systems
Trunking systems divide a few frequencies among
many different users, but the way that each system
does this is slightly different. This section describes
some of the technical data behind Motorola, EDACS,
and LTR trunked radio systems.
Motorola Trunking
While there are different types of Motorola trunking
systems, they all use the same basic trunking method.
The system consists of one control channel (or as

26
Understanding Scanning
many as 4 per system), plus one or more voice
channels (typically 10, 20, or 28 total channels). When
a user presses Push To Talk (PTT) to transmit, their
radio first sends their talk group information to the
control channel. The computer then assigns that talk
group to a specific voice channel and transmits that
data over the control channel. All radios in that talk
group switch over to the assigned voice channel and
the user can begin speaking. This all typically takes
place in about a second...the person transmitting
hears a beep from their radio when the channel is
assigned and then it is OK to start talking.
The systems in use are:
Motorola Type I – the radios send the radio ID, the
fleet and subfleet talk group ID to the control channel
each time they transmit. To program a Type I system,
you need to know the system’s fleet map. The most
common fleet maps are included in “Preset Fleet
Maps” on Page 125. You can also find fleet map
resources on the web.
Motorola Type II – the radios only send the radio ID
and radio channel code to the control channel. The
central computer keeps a database of radio ID’s and
which talk group is assigned to which channel code for
each radio, so with this system the user’s radio sends
only about 1/3 the data as a Type I system with each
transmission. Type II systems do not use Fleet-
subfleet talk groups; instead they use a 5-digit ID for
each talk group.
Type IIi Hybrid — these systems support a mix of both
Type I and Type II users. Like Type I systems, you
must know the system’s fleet map to ensure proper
tracking.
Motorola ASTRO (APCO 25) – these radios are
similar to Type II systems, but send only the radio ID
and radio channel code to the control channel, trans-
mitting voice in digital form.

27
Understanding Scanning
EDACS Trunking
EDACS trunking works in much the same way as
Motorola trunking with a couple of major differences.
In an EDACS system, each frequency used by the
system is assigned a Logical Channel Number (LCN)
so that less data needs to be transmitted by the
control channel. Also, talk groups are assigned in an
Agency-Fleet-Subfleet (AFS) hierarchy. Also, there is
one variation of EDACS called SCAT that your
BCD396T can monitor.
Logical Channel Numbers – each frequency used by
the system is assigned an LCN. This information is
programmed into each user radio. When a user
presses PTT, their radio sends their AFS information
to the control channel. The computer then assigns that
talk group to a channel and sends the LCN so that all
other radios in that talk group will switch to the correct
channel. To program an EDACS system in your
scanner, you will need to know both the frequencies
used by the system and the LCN for each frequency.
Agency-Fleet-Subfleet – talk group ID’s for EDACS
systems are assigned in a way that makes it easy to
see at a glance the affiliation of the user. Each radio is
assigned a 2-digit agency identifier from 00 – 15.
For example, 01 might be used by the police, 02 by
ambulance service, 03 by the fire department, and so
on. Each agency is then subdivided up to 16 times to
provide fleet identification, and then 8 more times to
identify subfleets.
For example, the complete AFS for the Police
Department West District’s dispatch channel might be
01-062. 01 identifies the agency as the police
department, 06 identifies the fleet as the West district,
and 2 identifies the subfleet as the dispatch channel.
While these assignments are somewhat arbitrary and
vary from system to system, there are many resources
on the web for finding the assignments for most
systems. Because of the logical hierarchy of the AFS

28
Understanding Scanning
system, your BCD396T lets you assign wildcard ID’s
that let you, for example, use only one ID memory to
identify all units in either an agency or a fleet.
EDACS SCAT – EDACS SCAT (Single Channel
Autonomous Trunking) systems operate on a single
channel and alternate control data with analog voice
traffic. While your BCD396T cannot track ID’s in this
system, it can eliminate the control data so that all you
hear is the voice transmissions when you monitor this
type of system.
LTR Trunking
LTR (Logic Trunked Radio) systems are trunking
systems used primarily by business or private
communications service providers, such as taxicabs,
delivery trucks, and repair services. These systems
encode all control information as digital subaudible
data that accompanies each transmission, so there is
no separate control channel. Users on an LTR system
are assigned to specific talk groups, which are identi-
fied by the radio as six digit numbers.
These numbers are in the form AHHUUU, where:
A = Area code (0 or 1)
H = Home repeater (01 through 20)
U = User ID (000 through 254)
When the scanner receives a transmission on a
channel set to the LTR mode, it first decodes the LTR
data included with the transmission. In the ID search
mode, the scanner stops on the transmission and
displays the talk group ID on the display. In the ID scan
mode, the scanner only stops on the transmission if
the LTR data matches a talk group ID that you have
stored in the talk group ID list and have not locked out.
LTR systems are frequently programmed so that each
radio has a unique user ID.

29
Understanding Scanning
I-Call (Motorola/EDACS)
I-calls are direct unit-to-unit transmissions that are not
heard by other system users. Your BCD396T can
receive I-call transmissions. See “Setting I-Call
(Motorola Analog and EDACS Systems Only)” on
Page 77 for more information about monitoring I-call
transmissions.
Where To Get More Information
By itself, this manual really only provides part of what
you need to know to have fun scanning – how to
program and use the scanner. The two included
conventional and trunking frequency guides will give
you a good head start on the other part of what you
need to know – what frequencies have interesting
content.
Information On The Internet
The Internet is a great source for current frequencies
and information about scanning. Many web sites have
lists of frequencies for your area. You can use a
search engine to find and use them.
Make a list of the agencies you want to listen to, then
look up the frequencies and systems used by those
agencies. Here are a few useful sites:
•http://www.scannermaster.com * - frequency
resources and home of Police Call.
You can also call them at 1 800 SCANNER (hours are
from 10:00 a.m. to 5:00 p.m. Eastern Time Monday
through Friday).
•http://www.radioreference.com * - the Internet's
premier source for user-supported radio system
information.
•http://www.bearcat1.com - frequency information
from National Communications.

30
Understanding Scanning
•http://svartifoss2.fcc.gov/reports/index.cfm * -
conventional frequency information on file with the
US Government
•http://groups.yahoo.com/group/BCD396T * - a
group for people interested in discussing the
BCD396T.
* - These web sites are not affiliated with Uniden
Corporation.
To purchase another copy of the conventional or
trunking frequency guide, contact your local dealer or:
Uniden Parts Department
(800) 554-3988
(Hours are from 8:00 a.m. to 5:00 p.m.Central Time
Monday through Friday.)
For more information about Uniden and our other
products, visit http://www.uniden.com.
31
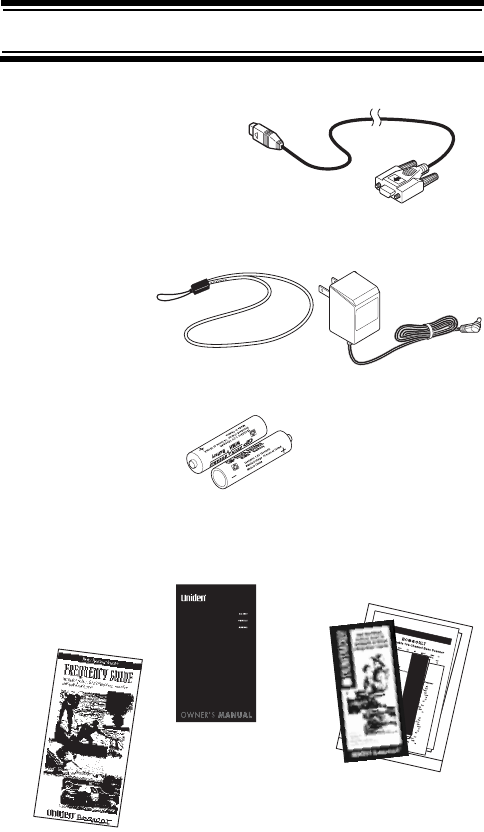
Included With Your Scanner
Included With Your Scanner
If any of these items are missing or damaged,
immediately contact your place of purchase or Uniden
Customer Service at: (800) 297-1023, 8:00 a.m. to
5:00 p.m., Central, Monday through Friday.
Owners
Scanner
AC Adapter
Frequency Guide
National Public Safet
y
Trunked System
Frequency Guide
Belt Clip
Manual
Antenna
Wrist Strap
Batteries
Connection
Cable
(illus)
(illus)
(illus)
Included With Your Scanner

32
Setting Up Your Scanner
Setting Up Your Scanner
These guidelines will help you install and set up your
new scanner:
• If your scanner receives interference or electrical
noise, move the scanner or its antenna away from
the source.
• To improve the scanner’s reception, use an
optional external antenna designed for multi-band
coverage. (You can purchase this type of antenna
at a local electronics store). If the optional antenna
has no cable, use 50-70 Ω coaxial cable for
lead-in. A mating plug might be necessary for the
optional antennas.
• Use an optional mono earphone or mono headset
with proper impedance (32 Ω) for private listening.
Read the precautions on the inside front cover of
this Owners Manual.
• Do not use the scanner in high-moisture
environments such as the kitchen or bathroom.
• Avoid placing the scanner in direct sunlight or near
heating elements or vents.
Using Internal Batteries
You can power your scanner using three alkaline, or
rechargeable AA batteries.
(illus - show AC adapter
being conn to scanner)
Setting Up Your Scanner

33
Setting Up Your Scanner
Before installing batteries, set the switch in the battery
compartment to match the type of batteries you will
use. Select REG. ALK. BATT. for non-rechargeable
battery types and NI-MH. BATT. for rechargeable
battery types. See also “Using Rechargeable Batter-
ies” on Page 34 when you use rechargeable batteries.
1. Remove the battery cover and set the battery
switch.
2. Install 3 AA batteries, matching the polarity sym-
bols (+ -).
WARNING!
Set REG. ALK. BATT./NI-MH. BATT. to NI-MH.
BATT. for use only with rechargeable batteries.
Never attempt to recharge non-rechargeable
batteries. Non-rechargeable batteries can get hot
and can even burst if you try to recharge them.
(illus - show battery compartment
open and stylus pointing to
battery switch)
(illus - show batteries being
installed in batt compartment)

34
Setting Up Your Scanner
3. Replace the cover.
When flashes and the scanner beeps every 15
seconds, replace both batteries.
Using Rechargeable Batteries
You can also use two rechargeable batteries to power
your scanner. Before you use rechargeable batteries,
you must charge them.
The scanner has a built-in circuit that lets you
recharge batteries while they are in the scanner.
To charge the batteries, set REG. ALK. BATT./NI-MH.
BATT. inside the battery compartment to NI-MH.
BATT., install the batteries in the scanner, and connect
the supplied AC adapter to the scanner's DC 6V jack
(see “Using AC Power” on Page 35).
WARNING!
Do not connect the AC adapter to the scanner if
non-rechargeable batteries (such as alkaline
batteries) are installed in the scanner and REG.
ALK. BATT./NI-MH. BATT. is set to NI-MH. BATT. ,
or if you are unsure of the switch's position.
Non-rechargeable batteries can get hot and can
even burst if you try to recharge them.
Before you use rechargeable batteries for the first
time, charge them for 14 hours to bring them to a
full charge. Discharged batteries take about 14
hours to fully recharge.
(illus - show back of scanner
with battery compartment in place)

35
Setting Up Your Scanner
Removing the Display Sticker
Before you use the scanner, use your thumb and
forefinger to remove the protective plastic sticker over
the display.
Using AC Power
You can power the scanner using the supplied 6V,
800 mA AC adapter.
To use the scanner on AC power, plug the AC adapter
into a standard AC outlet.
If rechargeable batteries are installed and REG. ALK.
BATT./NI-MH. BATT. is set to NI-MH. BATT., the
adapter powers the scanner and recharges the
installed batteries at the same time.
Connecting the Antenna
To attach the supplied flexible antenna to the
connector on the top of your scanner, simply screw it
onto the scanner's SMA connector.
Connecting an Optional Antenna
The scanner's SMA connector makes it easy to
connect a variety of optional antennas, including an
external mobile antenna or outdoor base station
antenna.
Note: Always use 50-ohm, RG-58, or RG-8, coaxial
cable to connect an outdoor antenna. If the antenna is
over 50 feet from the scanner, use RG-8 low-loss
dielectric coaxial cable. You can get an SMA adapter
at your local electronics store.

36
Setting Up Your Scanner
Connecting an Earphone/
Headphone
For private listening, you can plug a 1/8-inch (3.5 mm)
mini-plug earphone or headphones (not supplied) into
the headphone jack on top of your scanner. This
automatically disconnects the internal speaker.
See “Earphone Warning” at the front of the manual for
important information about using an earphone/
headphone.
Connecting an Extension Speaker
In a noisy area, an optional amplified extension
speaker, positioned in the right place, might provide
more comfortable listening. Plug the speaker cable's
1/8-inch (3.5-mm) mini-plug into your scanner's jack.
WARNING!
Never connect anything other than an earphone or
the recommended amplified extension speaker to
the scanner’s headphone jack. This might damage
the scanner.
Attaching the Belt Clip
To make your scanner easier to carry when you are on
the go, use the supplied belt clip. Use a Phillips
screwdriver and the supplied screw to attach the clip
to the scanner.
Attaching the Wrist Strap
To keep your scanner safely close at hand, use the
supplied wrist strap. Push the small loop on one end of
the wrist strap through the lug on the right side of the
scanner, then thread the other end of the wrist strap
back through the small loop to secure it.

37
Setting Up Your Scanner
A Look At The Keypad
Your scanner's keys have various functions labeled on
the key tops and below the keys.
To select the function labeled on a key, simply press
the key. To select the function labeled below a key,
hold down on the left side of the scanner then
press the key. appears on the display.
If your scanner's keys seem confusing at first, the fol-
lowing information should help you understand each
key's function.
Key Name Description
Hold/ Hold – Holds the scan or the
frequency search when pressed.
Resumes the scan or the
frequency search when pressed
again.
+ – Quickly turns the
Close Call feature on or off (see
“Setting Close Call Options” on
Page 101).
Scan/Srch Scan – Scans the stored channels.
+ Srch – Starts quick search
or quickly accesses the
search menu.
(illus - show keypad)
Func
F
Func
Func
38
Setting Up Your Scanner
L/O L/O – Lets you lock out a selected
channel or skip a specified
frequency.
+ L/O – Press quickly to lock
and unlock a selected system in
Scan or Scan Hold mode and
review search lockout frequencies
in Search or Search Hold mode.
Press and hold for more than 2
seconds to lock all groups and
channels in a system.
/ / – Turns the display
backlight on or off.
Press and hold for more than
2 seconds to turn the scanner on
or off. Press quickly to cancel a
prompt.
+ – Locks and unlocks
the keypad.
1-9, 0 1-9, 0 – Enters a frequency, enters
quick key numbers, and selects a
custom search range in Custom
Search mode.
Selects systems by quick key in
scan mode.
+ 1-9, 0 – Selects groups by
quick key in scan mode.
1/Pri 1 – Enters a 1.
+ Pri – Selects the priority
mode in scan hold mode.
Key Name Description
Func
Func
Func
Func
39
Setting Up Your Scanner
2/Wx 2 – Enters a 2.
+ WX – Selects the weather
function in the menu in the Hold
mode.
/4 4 – Enters a 4.
+ – Moves the active
character to the left while editing data.
6/ 6 – Enters a 6.
+ – Moves the active
character to the right while editing
data.
7/Rcl 7 – Enters a 7.
+ Rcl – Displays a series of
prompts to quickly select a specific
channel in the scan hold mode.
No/Rev – Enters a decimal point or dash
in a frequency or talk group ID,
enters an “i” for I-Call input.
At a prompt, answers “No.”
+ Rev – Monitors the
currently-tuned frequency’s
reverse frequency.
Key Name Description
Func
Func
Func
Func
Func
40
Setting Up Your Scanner
E/Yes/Att E – Press to select input and menu
items, to quickly edit a channel in
Scan Hold Mode, and store a fre-
quency into memory in Scan Hold
mode.
At a prompt, answers “Yes.”
+ Att – Turns the scanner’s
attenuator on or off for the current
channel (for conventional systems)
or system (for trunked systems).
Key Name Description
Func

41
Setting Up Your Scanner
A Look At The Display
The display has indicators that show the scanner's
current operating status. The display information helps
you understand how your scanner operates. The dark
area shown above the icons in this illustration is the
text display area. Information about the currently tuned
frequency appears here.
SYS - shows the currently activated system, appears
with numbers (0-9). The currently active system
indicator flashes.
ATT - appears when the attenuation feature is turned
on (see “Setting System Attenuation (Trunked Sys-
tems Only)” on Page 81).
PRI - appears when the priority feature is turned on
(see “Priority Scan” on Page 54).
- appears when you lock the keypad (see
“Locking/Unlocking the Keypad” on Page 53).
- alerts you when the battery power gets low.
GRP - shows the currently activated group, appears
with numbers ( - ). The currently active group
indicator flashes.
AM/FM/NFM - appears to show the type of transmission.
L/O - appears when you manually select a channel
you locked out or a skip frequency.
- appears when you hold down to select a
function.
- appears when the scanner is set to a Close Call
feature mode (see “Using the Close Call Feature” on
Page 100).
(illus - show display)
0 9
FFunc
42
Setting Up Your Scanner
Using Menu
Press on the left side of the scanner to enter the
menu. See “Using the Menu” on Page 49 for more
information about the scanner’s menu options.
Using Func
To select the function labeled below a key on the front
of the scanner, hold down on the left side of the
scanner, then press that key. To hold on a system
while scanning or temporarily stop on a channel while
searching, press . To select a system in Scan or
Scan Hold mode, hold down and rotate the scroll
control.
Menu
(illus - show left side
of scanner)
Menu
Func
(illus - show left side
of scanner)
Func
Func
Func

43
Basic Operation
Basic Operation
Turning On the Scanner and
Setting the Squelch
Note: Make sure the scanner's antenna is connected
before you turn it on.
1. Press and hold for about 2 seconds to turn on
the scanner.
2. Briefly press the scroll control once. VOLUME
LEVEL and a number appear on the display.
3. While VOLUME LEVEL appears, rotate the scroll
control to set the volume to a comfortable listening
level.
Note: If you do not press any key or turn the scroll
control within about 10 seconds, VOLUME LEVEL
disappears. If this happens, simply press the
scroll control again.
4. While holding down Func on the left side of the
scanner, briefly press the scroll control once.
SQUELCH LEVEL and a number appear on the
display.
5. While SQUELCH LEVEL appears, rotate the scroll
control to set the squelch to the level you want.
Note: If you do not press any key or turn the scroll
control within about 10 seconds, SQUELCH
LEVEL disappears. If this happens, simply press
the scroll control again.
Scanning Systems
To begin scanning programmed systems, press Scan.
The BCD396T scans all unlocked systems in all
activated quick-key groups.
Sql
Vol Scroll
Control
(illus - show top
of scanner)
Basic Operation

44
Basic Operation
Notes:
• If no systems are programmed, or all systems are
locked out, an error message appears. Program a
system or select a system to scan.
• When scanning multiple systems, the BCD396T
scans systems according to the assigned quick
key. Systems assigned to quick key 1 are scanned
first, then 2, 3, 4, etc. Systems not assigned to a
quick key are scanned last. Within a quick key,
systems are scanned in the order they were
assigned.
• Within a system, channels are scanned according
to the assigned channel group, with the same
priority as described above for systems.
• The BCD396T scans a system for the duration
you set using the System Hold Time option (see
“Setting the System Hold Time” on Page 74). For
trunked systems, the scanner moves to the next
system after the hold time expires, the current
transmission ends, and the channel delay expires.
Conventional systems operate similarly, but all
unlocked channels are scanned at least one time
regardless of the hold time setting.
Preprogrammed System Tips
All systems preprogrammed into the scanner are
assigned to quick key 9. To turn the preprogrammed
systems on or off, simply press 9 while scanning.
Notes:
• The systems preprogrammed into the scanner are
located primarily in major metropolitan areas. You
might not be able to receive one or more of these
preprogrammed systems.
• You might hear transmissions on frequencies
assigned to very distant stations. This will happen
if a local system also uses the same frequency.

45
Basic Operation
You can scan preprogrammed systems more
efficiently by preventing the BCD396T from scanning
systems that are not in your area. There are three
ways to do this:
• Lock out the faraway systems (see “Locking/
Unlocking Systems” on Page 46).
• Reassign your local systems to another quick key
(see “Editing the System Quick Key” on Page 73).
• Delete the faraway systems (see “Deleting Sys-
tems” on Page 81).
Important! You cannot restore preprogrammed
systems if you delete them.
Selecting Systems to Scan
To select systems to scan, press Scan then press the
quick key assigned to the system or systems you want
to scan. For quick keys 0-9, press the quick key’s
number. For quick keys 11-99, press then press the
quick key’s 2-digit number. To stop scanning the
system(s), press (if the quick key is a 2-digit quick
key) then the number button or buttons again.
The SYS indicators on the display show the systems
that are currently selected.
To select or lock out a system that is not assigned to a
key, press and hold while you rotate the scroll
control until the desired system is selected. Then,
continue to hold and press L/O to either lock out
or unlock the system.
Selecting System Channel Groups
Within a system, you can assign groups of channels to
a group quick key (see “Setting the Group Quick Key”
on Page 83).
Follow these steps to activate or deactivate a channel
group within a system while scanning.
FUNC
FUNC

46
Basic Operation
1. Press to hold on the system (or hold down
then rotate the scroll control to select the
system).
2. Continue to hold and press the number key
corresponding to the channel group you want to
activate or deactivate.
Locking/Unlocking Systems
Follow these steps to lock out a system so that it does
not scan even if its quick key is selected.
1. While holding down , rotate the scroll control
to select the system.
2. Continue to hold down and press L/O to lock
out the system. SYSTEM LOCKED appears.
3. Repeat Steps 1 and 2 to unlock a system you
have previously locked.
Locking/Unlocking Channels
Follow these steps to lock out a channel so that it does
not scan even if its system and channel group are
selected.
1. While holding down , rotate the scroll control
to select the system where the channel is stored.
2. Release then press Hold within 2 seconds
to hold on the system.
3. Rotate the scroll control to select the channel you
want to lock or unlock.
4. Press L/O to lock or unlock the channel.
You can also lock out an active channel by pressing
L/O while the scanner is stopped on the channel.
ID Scan/ID Search Mode
While you are scanning a trunked system, the scanner
can be in either ID Scan or ID Search mode:
Func
Func
Func
Func
Func
Func
Func

47
Basic Operation
• ID Scan – the scanner only stops on talk group
ID’s that you have programmed into the system
• ID Search – the scanner stops on any unlocked
talk group that becomes active.
To toggle between ID Scan and ID Search, press
Scan while the scanner is scanning the system.
Temporarily Holding On a System
To temporarily hold on a system, press and hold .
To hold on a different system, continue to hold
and rotate the scroll control to select the system.
Normal scanning resumes 2 seconds after you release
.
Holding On a Channel
To hold on a channel, press Hold while the channel is
active. To select a different channel, rotate the scroll
control. If you scroll past the beginning or end of the
current system, the scanner selects channels in the
previous or next system. To resume scanning, press
Scan.
Quickly Storing an ID During ID
Search
To quickly store an active talk group ID during ID
search, press E. You see:
Quick TGID Save?
To save the ID into a channel, press E. Otherwise,
press No. If you press E, the scanner stores the ID
into a channel group called Qck Save Grp in the
current system.
Quick-Storing Channels or
Talk Group ID’s
1. Hold on an existing channel in any system.
2. Enter the frequency or talk group ID you want to
store (press twice to enter hyphens in talk group
ID’s).
Func
Func
Func

48
Basic Operation
3. To quick-store the channel or talk group ID, press
E. Otherwise, press No.
If you enter a frequency then press E, the scanner
stores it in the Qck Save Grp group in a system
called Qck Save Cnv Sys. These are created if they
do not exist. Then, the scanner prompts you to save
other channel settings.
If you enter a talk group ID then press E, the scanner
prompts you to rotate the scroll control to select the
system where you want to store the ID. The ID is
stored into a channel group named Qck Save Grp in
the selected system. Only systems that match the ID
type are shown.
If you pressed No in Step 3, the scanner prompts you
to select the system and the group where you want to
store the frequency or talk group ID.
Quickly Recalling Channels
1. Press Hold to hold on any channel.
2. Press + Rcl. The scanner prompts you to
select the system where the channel is stored.
3. Rotate the scroll control to select the system, then
press E. The scanner prompts you to select the
channel group where the channel is stored.
4. Rotate the scroll control to select the group, then
press E. The scanner prompts you to select a
channel.
5. Rotate the scroll control to select the channel,
then press E to hold on that channel.
Monitoring Trunking Activity
To monitor trunking activity, press Hold then turn the
scroll control to select the control channel frequency
(for a Motorola or EDACS system) or any system
frequency (for an LTR system). Active talk group ID’s
appear on the second line of the display.
Func

49
Using the Menu
Using the Menu
The scanner’s menu lets you select options that let you
set up and use the scanner.
To use the menu, press on the left side of the
scanner. To select a menu item, rotate the scroll control
clockwise or counterclockwise. The currently-selected
menu item is highlighted with a bar on the display. When
the menu item you want to select is highlighted, briefly
press the scroll control to select it. To back up a level,
press . To exit the menu mode, press again.
This table shows the scanner’s menu structure. To find
information about a particular menu setting in this
manual, go to the page number shown in parentheses
next to the setting.
Note: Not all of the options shown in this table may
appear at the same time. To view all available options on
any screen, rotate the scroll control.
Menu Item Submenu
Menu
Menu Menu
-- M E N U --
Srch/CloCall Opt
Search for ...
Program System
Select System
Srch/CloCall Opt
New System (51)
-- M E N U --
Srch/CloCall Opt
Search for ...
Program System
Srch/CloCall Opt
Srch/CloCall Opt
Broadcast Screen
CTCSS/DCS Search
Repeater Find
Max Auto Store
Set Delay Time
Set Modulation
Set Attenuator
Set Data Skip
Set Step
Adjust P25 Level
(87) (107)
Freq Lockouts (104)
(105)
(92)
(106)
(107)
(108)
(107)
(108)
(109)
(77)
-- M E N U --
Search for ...
Program System
Srch/CloCall Opt
Search for ...
Srch/CloCall Opt
Edit Service
Custom Search
Edit Custom
Search and Store
Service Search (91)
(95)
(94)
(93)
(97)
Using the Menu
50
Using the Menu
Menu Item Submenu
-- M E N U --
Srch/CloCall Opt
Search for ...
Close Call
Close Call
CC Auto Store
Set CC Mode
Set CC Override
Set CC Alert
Set CC Bands
Close Call Only (101)
(101)
(101)
(101)
(101)
(101)
-- M E N U --
Search for ...
Close Call
Set Priority
Set Priority
Srch/CloCall Opt
On
Plus On
(54)
Off (54)
(54)
(54)
-- M E N U --
Close Call
Set Priority
WX Operation
WX Operation
Srch/CloCall Opt
Weather Alert
Program SAME
Set Delay Time
Weather Scan
Set Attenuator
WX Alt Priority
(110)
(112)
(113)
(108)
(107)
(114)
-- M E N U --
Set Priority
WX Operation
Tone-Out for ...
Tone-Out for ...
h/ l ll
Tone-Out Setup
Tone-Out Standby (111)
(111)
-- M E N U --
WX Operation
Tone-Out for ...
Xfer Information
Xfer Information
h/ l ll
On-Air Clone
(57)
Wired Clone
-- M E N U --
Tone-Out for ...
Xfer Information
Settings
Settings
Srch/CloCall Opt
Adjust Key Beep
Set Battery Save
Set Audio AGC
Adjust Contrast
PC Control
See Scanner Info
Set Backlight
(56)
(58)
(55)
(55)
(53)
(53)
(54)
(54)
51
Using the Menu
Programming Systems Menu
This table shows the scanner’s systems menu
structure. This menu lets you program new systems or
change existing systems. To find information about a
particular menu setting in this manual, go to the page
number shown under or next to the setting.
To use the systems menu, press then briefly
press the scroll control. To back up a level, press
. To exit the menu mode, press again.
Note: Not all of the options shown in this table may
appear at the same time. To view all available options
on any screen, rotate the scroll control
Menu/
Submenu
Option Menu
Menu
Menu Menu
Select Sys Type
Srch/CloCall O
p
MOT
EDCS
LT
Conventional
System 1 C
Srch/CloCall Op
t
Edit Sys Option
Edit Group
Delete System
Copy System
Edit Name
Select Sys Type
Srch/CloCall O
p
EDCS
LT
Conventional
MOT
System 1
Srch/CloCall Op
800MHz Splinter
900MHz band
VHF Band
UHF Band
800MHz Standard
P25
System 1 M
Srch/CloCall Op
t
Edit Sys Option
Set Frequencies
Set Modulation
Set Attenuator
Edit Name
Edit Group
Delete System
Copy System
Select Sys Type
Srch/CloCall O
p
LT
Conventional
MOT
EDCS
EDCS
Srch/CloCall Op
SCAT
NARROW
WIDE
System 1 E
Srch/CloCall Opt
Edit Sys Option
Set Frequencies
Set Attenuator
Edit Name
Edit Group
Delete System
Copy System
“Programming Conventional
Systems” on Page 60
“Programming EDACS Systems”
on Page 66
“Programming Motorola Systems”
on Page 62
(72)
(73)
(61)
(81)
(81)
(72)
(72)
(73)
(73)
(70)
(64)
(81)
(81)
(65)
(81)
(81)
(70)
(65)
(81)
(81)

53
Other Settings
Other Settings
Displaying System Information
Viewing Memory Used
Settings
See Scanner Info
% Memory Used
A bar showing the percent of memory used appears.
Press any key to return to the previous menu, then
press Scan or Hold.
Viewing the Firmware Version
Settings
See Scanner Info
Firmware Version
Press any key to return to the previous menu, then
press Scan or Hold.
Adjusting the Key Beep
Settings
Adjust Key Beep
Auto - the scanner automatically sets the emergency
alert beep to the key beep level you select.
Level 1 - 15 the scanner lets you select a key beep
level. You can choose any of 15 different key beep lev-
els.
Off - the scanner turns the key beep off.
Locking/Unlocking the Keypad
Press and hold down then press / / to
lock or unlock the keypad. Keypad Lock and On
(if the keypad is locked) or Off (if the keypad is
unlocked) appears.
Menu
Menu
Menu
Func
Other Settings

54
Other Settings
Turning Power Save On or Off
Settings
Set Battery Save
•On The scanner goes into low-power mode when
you monitor a conventional channel that has no
activity.
•Off Power save is off.
Priority Scan
Set Priority
Or, while holding on any channel, press + 1/Pri
to select one of these priority modes:
•Off Normal scanning
•On While scanning a conventional system, the
scanner interrupts every 2 seconds and checks
the priority channels in each unlocked
conventional system. Priority channels in lower
priority key numbered systems (starting from 1)
have highest priority. Pri appears when you
select this mode.
•Plus On The scanner only scans priority
channels in unlocked conventional systems.
Pri flashes when you select this mode.
Other Settings
Using the Backlight
Settings
Set Backlight
•10 sec The backlight stays on for 10 seconds
after you press .
•30 sec The backlight stays on for 30 seconds
after you press .
•Squelch The backlight turns on when the
squelch opens then stays on for 5 seconds.
Menu
Menu
Func
Menu
55
Other Settings
•Keypress The backlight turns on when any key
is pressed then stays on for 10 seconds.
•Infinite The backlight turns on when you
press then stays on until you press again.
Pressing any key while the backlight is on extends the
backlight period. Pressing while the backlight is on
turns off the backlight.
Setting the Audio AGC
Settings Set Audio AGC
•On Audio AGC is turned on.
•Off Audio AGC is turned off.
This setting helps balance the audio level you hear as
you listen to different radio sources so you can hear
them at a similar volume. Use this setting if you listen
to an audio source that has natural changes in audio
level for which you want to compensate.
Adjusting the Display Contrast
Settings
Adjust Contrast
Contrast 1 - 15 the scanner adjusts the display to
the contrast level you select.
This setting controls the display’s contrast (how light
or dark it appears). Use this setting to change the
contrast for different viewing conditions. There are 15
contrast settings. You see the change in contrast as
you scroll through the settings.
Initializing the Scanner’s Memory
Important! This deletes all preprogrammed data.
You cannot restore preprogrammed data that has
been deleted.
To initialize the scanner’s memory, turn off the
scanner. Then, press 2, 9, and Hold while turning it on.
Menu
Menu

56
Other Settings
Connecting Your Scanner to a
Personal Computer
To connect your scanner to a personal computer, you
must first set the scanner’s baud rate (the rate at
which data is transferred between the scanner and the
computer, in bits per second (bps)).
Hint: If you have trouble transferring data between
your scanner and your computer, try setting the baud
rate to a slower setting.
Use the included connection cable to connect your
scanner to another BCD396T scanner or your
personal computer.
Settings
PC Control
PC Control Lets you set the baud rate your
scanner uses to communicate with a personal
computer.
•Off The baud rate is not set.
•9600 bps The baud rate is set to 9600 bps.
•19200 bps The baud rate is set to 19,200 bps.
•38400 bps The baud rate is set to 38,400 bps.
•57600 bps The baud rate is set to 57,600 bps.
•115200 bps The baud rate is set to 115,200 bps.
Using the Cloning Options
Lets you set your scanner as a master (source) or
slave (recipient), letting you transfer programming to
or from another BCD396T scanner. See “Wired Clon-
ing” on Page 57 and “On-Air Cloning” on Page 58.
Menu

57
Other Settings
Wired Cloning
Xfer Information
Wired Clone
•Master Sets the scanner to be the source
scanner.
•Slave Sets the scanner to be the recipient
scanner.
To clone (copy) data directly from one BCD396T
scanner to another BCD396T scanner, you must first
connect the scanners to each other using the included
connection cables and a DB9 null modem adapter and
DB9 gender changer (neither included), available at
most computer stores. Then you must set one scanner
as the source and the other as the destination.
Plug the smaller end of each of the included connection
cables into Remote on the right side of each scanner.
Then connect the other end of the cables together
using the null modem connector and gender changer.
Then set the scanner containing the programming you
want to transfer as the master scanner, then set the
other scanner as the slave scanner.
(Master scanner) Clone Master Press SCAN Key
(Master scanner) Clone Slave Press SCAN Key
When you are ready to clone the scanner, press
on the slave scanner first, then on the master scanner.
The master scanner checks the connection between
the two scanners, then transfers its data to the slave
scanner.
When the transfer is complete, Complete appears on
both scanners. If the transfer did not work, Error
appears on the master scanner.
Menu
Scan
Scan
Scan

58
Other Settings
On-Air Cloning
Xfer Information
On-Air Clone
•Start Cloning Start on-air cloning.
•Set Frequency Lets you set the frequency
where your scanner receives the cloning
broadcast.
•Set Modulation Lets you set the cloning
broadcast’s modulation type.
To clone (copy) data from a transceiver to a BCD396T
scanner, you need a transceiver, a PC that has an
audio input, and a cable to connect your PC’s sound
card to the transceiver. Follow the directions supplied
with the Uniden Advanced Scanner Director Software
(available online at http://www.uniden.com) to
construct a cable and use on-air cloning.
When you are receiving the cloning broadcast and are
ready to clone the scanner, select Start Cloning
on the scanner. The scanner receives the data from
the transmission
When the transfer is complete, Complete appears. If
the transfer did not work, Error appears.
Menu

59
Programming Radio Systems
Programming Radio Systems
Your BCD396T comes preprogrammed with the
major analog systems used in the 25 most populous
counties in the US. However, to get the most
enjoyment from your scanner (especially if you do not
live near one of these counties), you must customize
the programming for your area.
To edit an existing system, use the menu to navigate
to the system setting you want to change. This section
assumes you are programming a new system.
Programming radio systems is completed in two major
steps. Don't skip either step!
1. Plan the system.
2. Program the system into your scanner according
to the plan you prepared in Step 1.
To make planning easier, planning worksheets are
included in the back of this manual for each system
type. Copy the worksheets (or download this manual
from the Uniden America Corporation website and
print extra sheets), then use them to plan out how you
will program the scanner.
Important! Before you start programming your
scanner, make sure the batteries are fresh or fully
charged. If the scanner loses power while you
program it, its memory might be corrupted which will
require you to reinitialize it (see “Initializing the Scan-
ner’s Memory” on Page 55). All information
programmed in the scanner, including
preprogrammed systems, might be lost.
General Notes
• You can store up to 200 systems.
• Trunking systems can have up to 200 channels
each. The number of conventional system
channels you can have is limited only by the
amount of scanner memory remaining.
• You can store up to 20 channel groups per
system.
Programming Radio Systems

60
Programming Radio Systems
• Total channels are limited to about 5500.
• Channels that have text tags use more memory
than those that do not. If you use a text tag for
every channel, total channels are reduced from
5500 (2500 is typical).
Programming Conventional
Systems
Program System
New System
Conventional
Confirm? Yes=”E” / No=”.”
The scanner creates an empty conventional system,
with a default name of System n C.
n is a number that increments as you add new
systems. C indicates that this is a conventional
system.
Refer to the appropriate section to set system-wide
options:
• See “Editing the System Name” on Page 72
• See “Editing the System Quick Key” on Page 73
• See “Setting System Lockout” on Page 73
• See “Setting the System Hold Time” on Page 74
• See “Setting the Channel Delay Time” on Page 74
• See “Deleting Systems” on Page 81
• See “Copying Systems” on Page 81
• See “Entering/Editing Conventional Channel
Groups” on Page 60
Entering/Editing Conventional
Channel Groups
To enter channels in a conventional system, first set
up a channel group (or groups) to hold the channels.
Menu

61
Programming Radio Systems
Then, enter the channel and channel parameters in the
group(s).
Setting Up a Channel Group
Program System
Select the system
Edit Group
New Group
The scanner creates a group with a default name of
Group n. n increments by one for each new group you
create within a system.
Refer to the appropriate section to set group-wide
options:
• See “Entering/Editing the Group Name” on
Page 82
• See “Setting the Group Quick Key” on Page 83
• See “Deleting Groups” on Page 83
• See “Setting System Lockout” on Page 73
• See “Entering/Editing Conventional Channels” on
Page 61
Entering/Editing Conventional
Channels
Program System
Select the system
New System
Conventional
Confirm? Yes=”E” / No=”.”
Refer to the appropriate section to change a channel
setting:
• See “Editing the Channel Name” on Page 84
• See “Setting Channel Priority (Conventional
Channels Only)” on Page 85
Menu
Menu

62
Programming Radio Systems
• See “Deleting Channels” on Page 89
• See “Copying/Pasting Channels” on Page 90
To create another channel group and enter more
channels, press four times, then proceed from
“Setting Up a Channel Group” on Page 61.
Programming Motorola Systems
Program System
New System
MOT
Next, rotate the scroll control to select the type of
Motorola system you want to program, then briefly
press the scroll control to select it.
•800MHz Standard - Use for 800 MHz systems
that use the standard band plan
•800MHz Splinter - Use for 800 MHz systems
that use the splinter band plan (typically near
international borders)
•900MHz Band - Use for 900 MHz systems
•VHF band - Use for VHF systems
•UHF band - Use for UHF systems
•P25 - Use for Motorola Astro APCO 25 Digital
systems in any band
Confirm? Yes=”E” / No=”.”
Next, refer to the appropriate section to set system-
wide options. For most settings, you can accept the
default. However, for the items in bold, you must enter
information in order for your scanner to scan the
system.
• See “Editing the System Name” on Page 72
• See “Editing the System Quick Key” on Page 73
• See “Setting System Lockout” on Page 73
• See “Setting the System Hold Time” on Page 74
Menu
Menu

63
Programming Radio Systems
• See “Setting the Channel Delay Time” on Page 74
• See “Setting ID Scan/Search (Trunked Systems
Only)” on Page 75
• See “Editing the Fleet Map (Motorola Systems
Only)” on Page 75 (must be set up for Type I
systems)
• See“Setting the Motorola Status Bit (Motorola Sys-
tems Only)” on Page 76
• See “Setting the End Code Operation (Motorola
Systems Only)” on Page 77
• See “Setting I-Call (Motorola Analog and EDACS
Systems Only)” on Page 77
• See “Setting the Digital Decode Threshold (Motor-
ola and Conventional Systems Only)” on Page 79
• See “Setting Control-Channel Only (Motorola Sys-
tems Only)” on Page 78
• See “Setting System Lockout” on Page 73
• See “Reviewing Locked Out Frequencies” on
Page 104
• See “Setting System Attenuation (Trunked Sys-
tems Only)” on Page 81
• See “Deleting Systems” on Page 81
• See “Copying Systems” on Page 81
• See “Setting System Frequencies” on Page 63
• See “Entering/Editing Motorola Channel Groups”
on Page 65
Setting System Frequencies
Program System
Select the system
Set Frequencies
Input a system frequency, then press the scroll control.
Menu

64
Programming Radio Systems
To enter additional frequencies, press , use the
scroll control to select New Frequency, then repeat
the above.
Note: If you select Control Channel Only mode (see
“Setting Control-Channel Only (Motorola Systems
Only)” on Page 78), you only need to enter the
frequency(s) that can be assigned as the control
channel. Most frequency lists usually indicate which of
the frequencies are the control channel frequencies.
Otherwise, you must enter all of the frequencies.
Setting Modulation
Program System
Select the system
Set Modulation
Auto - the scanner uses the default modulation for
the frequency band.
FM - the scanner uses FM (frequency modulation) for
the frequency band.
NFM - the scanner uses narrowband FM for the
frequency band.
Note: The default setting is Auto.
This setting controls the modulation method used for
the frequency band. In most cases, if you leave this
set to Auto, the scanner automatically selects the
correct modulation type for the system you are
programming.
Setting Attenuation
Program System
Select the system
Set Attenuator
Menu
Menu
Menu

65
Programming Radio Systems
This setting controls whether the attenuator will be on
or off for the current system. Select your setting then
press the scroll control.
Off - the attenuator is off.
On - system frequencies are attenuated by about 18
dB.
Notes:
• Turn on this setting if you are near strong signal
sources. Attenuation can help reduce interference
and desensitization that strong signals create.
• You can also turn this setting on or off by holding
on a trunked system, then pressing + E.
Entering/Editing Motorola Channel
Groups
To enter channels in a system, first set up a channel
group (or groups) to hold the channels. Then, enter
the channel and channel parameters in the group(s).
Setting Up a Channel Group
Program System
Select the system
Edit Group
The scanner creates a group with a default name of
Group nn. nn increments by one for each new group
you create within a system.
Next, refer to the appropriate section to set group-wide
options:
• See “Entering/Editing the Group Name” on
Page 82
• See “Setting the Group Quick Key” on Page 83
• See “Deleting Groups” on Page 83
• See “Copying Systems” on Page 81
Func
Menu

66
Programming Radio Systems
• See “Entering/Editing Motorola Channels” on
Page 66
• See “Setting I-Call (Motorola Analog and EDACS
Systems Only)” on Page 77
Entering/Editing Motorola Channels
Refer to the appropriate section to change a
channel setting:
• See “Setting the Digital Decode Threshold (Motor-
ola and Conventional Systems Only)” on Page 79
• See “Editing the Channel Name” on Page 84
• See “Setting Channel Lockout” on Page 89
• See “Deleting Channels” on Page 89
• See “Copying/Pasting Channels” on Page 90
To program another channel within the same group,
press , then repeat the above. To create another
channel group and enter more channels, press
three times, then proceed from “Entering/Editing
Motorola Channel Groups” on Page 65.
Programming EDACS Systems
Program System
New System
EDCS
Confirm? Yes=”E” / No=”.”
Next, rotate the scroll control to select the type of
EDACS system you want to program, then briefly
press the scroll control to select it.
•WIDE - Use for wideband EDACS systems
•NARROW - Use for narrowband EDACS systems
•SCAT - Use for EDACS SCAT (Single Channel
Autonomous Trunking)
Confirm? Yes=”E” / No=”.”
Menu
Menu
Menu

67
Programming Radio Systems
The scanner creates an empty EDACS system, with a
default name of System n E.
n is a number that increments as you add new
systems. E indicates that this is an EDACS system.
Next, refer to the appropriate section to set system-
wide options. For most settings, you can accept the
default. However, for the items in bold, you must enter
information in order for your scanner to scan the
system.
• See “Editing the System Name” on Page 72
• See “Editing the System Quick Key” on Page 73
• See “Setting System Lockout” on Page 73
• See “Setting the System Hold Time” on Page 74
• See “Setting the Channel Delay Time” on Page 74
• See “Setting ID Scan/Search (Trunked Systems
Only)” on Page 75
• See “Setting I-Call (Motorola Analog and EDACS
Systems Only)” on Page 77
• See “Setting the Digital Decode Threshold (Motor-
ola and Conventional Systems Only)” on Page 79
• See “Setting the EDACS ID Format (EDACS Sys-
tems Only)” on Page 80
• See “Reviewing Locked Out Frequencies” on
Page 104
• See “Setting Channel Attenuation (Conventional
Channels Only)” on Page 88
• See “Deleting Systems” on Page 81
• See “Copying Systems” on Page 81
• See “Setting System Frequencies” on Page 68
• See “Entering/Editing EDACS Channel Groups”
on Page 68

68
Programming Radio Systems
Setting System Frequencies
Program System
Select the system
Set Frequencies
New Frequency
Input a system frequency, then press the scroll control.
The scanner then prompts you to enter the LCN for
the entered frequency. Enter the LCN, then press the
scroll control.
To enter additional frequencies, press , use the
scroll control to select New Frequency, then repeat
the above.
Note: The scanner only accepts a single frequency
and no LCN for SCAT systems.
Entering/Editing EDACS Channel
Groups
To enter channels in a system, first set up a channel
group (or groups) to hold the channels. Then, enter
the channel and channel parameters in the group(s).
Setting Up a Channel Group
Program System
Select the system
Edit Group
The scanner creates a group with a default name of
Group nn. nn increments by one for each new group
you create within a system.
Next, refer to the appropriate section to set group-wide
options:
• See “Entering/Editing the Group Name” on
Page 82
• See “Setting the Group Quick Key” on Page 83
Menu
Menu
Menu

69
Programming Radio Systems
• See “Deleting Groups” on Page 83
• See “Editing the Channel Name” on Page 84
• See “Setting Group Lockout” on Page 83
Entering/Editing EDACS Channels
Refer to the appropriate section to change a
channel setting:
• See “Editing the Channel Name” on Page 84
• See “Setting Channel Lockout” on Page 89
• See “Deleting Channels” on Page 89
• See “Copying/Pasting Channels” on Page 90
To program another channel within the same group,
press , then repeat the above. To create another
channel group and enter more channels, press
three times, then proceed from “Entering/Editing
EDACS Channel Groups” on Page 68.
Programming LTR Systems
Program System
New System
LT
Confirm? Yes=”E” / No=”.”
The scanner creates an empty LTR system, with a
default name of System n L.
n is a number that increments as you add new
systems. L indicates that this is an LTR system.
Next, refer to the appropriate section to set system-
wide options. For most settings, you can accept the
default. However, for the items in bold, you must enter
information in order for your scanner to scan the
system.
• See “Editing the System Name” on Page 72
• See “Setting the System Hold Time” on Page 74
• See “Editing the System Quick Key” on Page 73
Menu
Menu
Menu

70
Programming Radio Systems
• See “Setting the Channel Delay Time” on Page 74
• See “Setting ID Scan/Search (Trunked Systems
Only)” on Page 75
• See “Reviewing Locked Out Frequencies” on
Page 104
• See “Setting Channel Attenuation (Conventional
Channels Only)” on Page 88
• See “Deleting Systems” on Page 81
• See “Copying Systems” on Page 81
• See “Setting System Frequencies” on Page 70
• See “Entering/Editing LTR Channel Groups”
on Page 70
Setting System Frequencies
Program System
Select the system
Set Frequencies
New Frequency
Input a system frequency, then press the scroll control.
The scanner then prompts you to enter the LCN for
the entered frequency. Enter the LCN, then press the
scroll control.
To enter additional frequencies, press , use the
scroll control to select New Frequency, then repeat
the above.
Entering/Editing LTR Channel Groups
To enter channels in a system, first set up a channel
group (or groups) to hold the channels. Then, enter
the channel and channel parameters in the group(s).
Setting Up a Channel Group
Program System
Select the system
Edit Group
Menu
Menu
Menu

71
Programming Radio Systems
The scanner creates a group with a default name of
Group nn. nn increments by one for each new group
you create within a system.
Next, refer to the appropriate section to set group-wide
options:
• See “Entering/Editing the Group Name” on
Page 82
• See “Setting the Group Quick Key” on Page 83
• See “Setting Group Lockout” on Page 83
• See “Deleting Groups” on Page 83
• See “Entering/Editing LTR Channels/ Talkgroups”
on Page 71
Entering/Editing LTR Channels/
Talkgroups
Refer to the appropriate section to change a
channel setting:
• See “Editing the Channel Name” on Page 84
• See “Setting Channel Lockout” on Page 89
• See “Deleting Channels” on Page 89
• See “Copying/Pasting Channels” on Page 90
To program another channel within the same group,
press , then repeat the above.
To create another channel group and enter more
channels, press four times, then proceed from
“Setting Up a Channel Group” on Page 70.
To direct-enter LTR talkgroups, follow the steps under
“Quick-Storing Channels or Talk Group ID’s” on
Page 47.
Menu
Menu

72
Programming/Editing Optional Settings
Programming/Editing Optional Set-tings
This section details the instructions for each of the
optional programming steps referred to in “Program-
ming Radio Systems” on Page 59. Use the
instructions in the appropriate section to enter or edit a
setting.
System-Level Settings
These settings apply to the entire system.
Editing the System Name
Program System
Select the system
Edit Name
To enter a letter, turn the scroll control until the
character you want appears, To enter a number, press a
number key. To enter a decimal point, press .
To move the cursor to the left, hold then press
/4 or rotate the scroll control to the left. To move the
cursor to the right, hold then press 6/ or rotate
the scroll control to the right.
To clear a character, press No twice. To clear all
characters, press No 3 times.
To accept an entry, press E or press down on the scroll
control.
Hints:
• Each system name can be up to 16 characters.
Abbreviate as necessary to fit.
• The default system names include the following
letter in the 16th position to indicate the system
type:
M = Motorola
E = EDACS
L = LTR
C = Conventional
Menu
Func
Func
Programming/Editing Optional Settings

73
Programming/Editing Optional Settings
• Press twice to delete the current character.
• Press three times to clear the entire alpha tag.
Editing the System Quick Key
Program System
Select the system
Edit Sys Option
Set Quick Key
After selecting this option, select any number from
0-99 to assign the system to a quick key or press No
to assign the system to no quick key, then press E.
Hints:
• Access single-digit system Quick Keys by
pressing the single digit on the keypad during
scanning. Access two-digit system Quick Keys by
pressing then both digits.
• You can assign as many systems to the same
quick key as you want.
• Preprogrammed systems are set to quick key 9.
• To be scanned, a system’s quick key must be
activated and the system must be unlocked.
Setting System Lockout
Program System
Select the system
Edit Sys Option
Set Lockout
This setting controls whether the system is scanned
when its quick key is enabled. Rotate the scroll control
to select your setting, then press E.
Locked - the system is not scanned
Unlocked - the system is scanned
Menu
Menu

74
Programming/Editing Optional Settings
Note: You can also lock or unlock a system by press-
ing , selecting the system, then pressing +
L/O.
Setting the System Hold Time
Program System
Select the system
Edit Sys Option
Set Hold Time
This setting controls how many seconds the scanner
scans a system before moving to the next unlocked
system. Enter a value from 0-255, then press E to
save the setting.
Notes:
• If you select 0, the scanner stays on the system
for a minimal time (only long enough to check cur-
rent system activity).
• The default setting is 2 seconds for each system.
• For conventional systems, all unlocked channels
will be scanned at least once regardless of this
setting.
• The scanner moves to the next system after the
hold time expires, any current transmission ends,
and the channel delay time expires.
Setting the Channel Delay Time
Program System
Select the system
Edit Sys Option
Set Delay Time
This setting controls how many seconds the scanner
waits after a transmission ends before resuming
scanning. Enter a value from 1-5 or Off, then press
the scroll control.
Func Func
Menu
Menu

75
Programming/Editing Optional Settings
Notes:
• The default setting is 2 seconds for each system.
• This setting applies to all channels within the
system.
Setting ID Scan/Search
(Trunked Systems Only)
Program System
Select the system
Edit Sys Option
ID Scan/Search
This setting controls how the system will be scanned.
Select your setting, then press E.
ID Scan - the scanner only stops on channels you
have programmed into the system.
ID Search - the scanner stops on any transmission
for unlocked talk group ID's.
Note: You can also change this setting by pressing
Scan while scanning the system.
Editing the Fleet Map
(Motorola Systems Only)
Program System
Select the system
Edit Sys Option
Edit Fleet Map
For Motorola Type I systems, you must enter a system
fleet map in order for the scanner to properly track and
display talk group ID's. The fleet map is usually
included in the same resource that provided system
frequencies and talk group ID lists.
Rotate the scroll control to select the fleet map:
Menu
Menu

76
Programming/Editing Optional Settings
Preset - select from the 16 most common fleet maps
(see “Preset Fleet Maps” on Page 125). Press E to
select.
Custom - allows you to enter a custom fleet map. Enter
the size code for each block. Press E to select.
Notes:
• If you don't know the fleet map for your Motorola
Type I system, check the Internet. This information
is commonly posted on sites such as those we
reference in “Where To Get More Information” on
Page 29.
• The default setting of no fleet map is the correct
setting for Motorola Type II systems.
Setting the Motorola Status Bit
(Motorola Systems Only)
Program System
Select the system
Edit Sys Option
Set Status Bit
Motorola systems use talk group ID's in multiples of
16. ID numbers that fall between these ID's indicate
special status flags for the system. This setting deter-
mines how the scanner will handle ID's that are not
multiples of 16. Select your setting then press E.
Ignore - the scanner rounds all received ID's down to
the next interval of 16.
Yes - the scanner treats all received ID's as unique
ID's.
Note: The default setting is Ignore.
Menu

77
Programming/Editing Optional Settings
Setting the End Code Operation
(Motorola Systems Only)
Program System
Select the system
Edit Sys Option
Set End Code
This setting determines how the scanner handles the
transmission end code sent by most Motorola sys-
tems. Select your setting then press E.
Yes - the scanner immediately returns to the control
channel when it detects the end code.
Ignore - the scanner does not return to the control
channel until the carrier drops.
Note: The default setting is Yes.
Setting I-Call (Motorola Analog and
EDACS Systems Only)
Program System
Select the system
Edit Sys Option
Set I-Call
This setting determines how your scanner treats I-calls
while ID Searching.
On - the scanner tracks I-calls. Press E to select.
Off - the scanner ignores I-calls. Press E to select.
Only - the scanner only tracks I-calls and ignores
other radio traffic on the system. Press E to select.
Note: The default setting is Off.
Menu
Menu

78
Programming/Editing Optional Settings
Setting Emergency Alert
(Motorola and EDACS Systems Only)
Program System
Select the system
Edit Sys Option
Emergency Alert
Off - the scanner does not alert you to emergency
transmissions.
Alert 1 - 9 the scanner sounds an alert beep to
notify you of the emergency transmission. You can
choose any of 9 different beep types.
Set Level
Auto - the scanner automatically sets the emergency
alert beep to the master volume level.
Level 1 - 15 - the scanner adjusts the volume you
hear to the level you select.
Setting Control-Channel Only
(Motorola Systems Only)
Program System
Select the system
Edit Sys Option
Set C-Ch Only
This setting determines the frequencies you need to
enter for Motorola systems. Select your setting, then
press E.
Off - you must enter all voice and control channel
frequencies.
On - you only need to enter control channel
frequencies.
Note: The scanner defaults to Off.
Menu
Menu

79
Programming/Editing Optional Settings
Reviewing Locked Out Frequencies
Program System
Select the system
Edit Sys Option
Rvw ID: Srch L/O
The scanner displays the first locked-out frequency
and prompts you to unlock the frequency. Press E to
unlock the frequency. Or, rotate the scroll control or
press No to select a different frequency. To exit the
review, press .
Clearing All Locked-Out IDs
Program System
Select the system
Edit Sys Option
Clr All L/O IDs
The scanner prompts you to confirm deletion.
To confirm and delete all locked-out frequencies, press
E. Otherwise, to cancel, press No.
Setting the Digital Decode Threshold
(Motorola and Conventional Systems
Only)
Program System
Select the system
Edit Sys Option
Adjust P25 Level
This setting determines some system-specific
parameters for digital channels. In most cases, setting
this to Auto provides the best performance. However,
you can also manually set the digital decode
threshold. This setting affects all channels in the
current system.
Menu
Menu
Menu
Menu

80
Programming/Editing Optional Settings
Auto - the scanner automatically adjusts the digital
decode threshold to match the transmission you are
hearing when it receives a strong signal and has a
high decode rate.
Manual - lets you manually adjust the digital decode
threshold.
Default - sets the digital decode threshold to the
default value. Use this setting to return to the value
that usually provides adequate performance. This is
handy is you have manually adjusted the value to a
setting that prevents proper decoding.
Setting the EDACS ID Format
(EDACS Systems Only)
Program System
Select the system
Edit Sys Option
EDCS ID Format
EDACS talk group ID's are commonly provided in one of
two formats: AFS and Decimal. This setting
determines how you enter EDACS ID's and how the
scanner displays them.
AFS Format - the scanner uses AFS format for talk
group ID's
Decimal Format - the scanner uses decimal format
for talkgroup ID's
Notes:
• The scanner defaults to AFS (agency, fleet,
subfleet) format - the format used in most EDACS
systems.
• See “EDACS Trunking” on Page 27 for more
information about the AFS format.
Menu

81
Programming/Editing Optional Settings
Setting System Attenuation
(Trunked Systems Only)
Program System
Select the system
Set Attenuator
This setting controls whether the attenuator will be on
or off for the current system. Select your setting then
press E.
Off - the attenuator is off.
On - system frequencies are attenuated by about 18
dB.
Notes:
• Turn on this setting if you are near strong signal
sources. Attenuation can help reduce interference
and desensitization that strong signals create.
• You can also turn this setting on or off by holding
on a trunked system, then pressing + E.
Deleting Systems
Program System
Select the system
Delete System
The scanner prompts you to confirm deletion.
To confirm, press E. To cancel, press No.
Notes:
• Deleted systems cannot be restored. You must
re-enter them.
• You cannot restore preloaded systems.
Copying Systems
To copy a system including all settings, groups, and
channels:
Menu
Func
Menu

82
Programming/Editing Optional Settings
Program System
Select the system
Copy System
New Sys Name?
Enter a name for the copied system, then press E.
Group-Level Settings
The settings in this section apply to all of the channels
stored in the current group.
Entering/Editing the Group Name
Program System
Select the system
Edit Group
Select the group
Edit Name
Follow these steps to enter/edit the group name.
1. Rotate the scroll control to select the first letter.
2. Press and hold down then rotate the scroll
control once to select the next letter.
3. Repeat Steps 1 and 2 until you have entered the
system name. Then press E or press down on the
scroll control to accept the setting.
Hints:
• Each group name can be up to 16 characters.
Abbreviate as necessary to fit.
• The group and system name alternate in the top
line of the display when the scanner stops on a
channel.
• Press twice to delete the current character.
• Press three times to clear the entire alpha tag.
Menu
Menu
Func

83
Programming/Editing Optional Settings
Setting the Group Quick Key
Program System
Select the system
Edit Group
Select the group
Set Quick Key
After selecting this option, press 0-9 to assign the
group to a quick key or press No to assign the system
to no quick key, then press E.
Hints:
• You can assign as many groups to the same quick
key as you want.
• To be scanned, a group’s quick key must be
activated.
Setting Group Lockout
Program System
Select the system
Edit Group
Select the group
Set Lockout
This setting determines whether the scanner will scan
this group when it is enabled. Select your setting, then
press E.
Lockout - the group is not scanned.
Unlocked - the group is scanned.
Note: The default setting is Unlocked.
Deleting Groups
Program System
Select the system
Edit Group
Menu
Menu
Menu

84
Programming/Editing Optional Settings
Select the group
Delete Group
The scanner prompts you to confirm deletion. To con-
firm, press E. To cancel, press No.
Note: Deleted groups cannot be restored. You must
re-enter them.
Channel-Level Settings
These settings affect only the channel you are pro-
gramming.
Editing the Channel Name
Program System
Select the system
Edit Group
Select the group
Edit Channel
Select the channel
Edit Name
Follow these steps to enter/edit the channel name.
1. Rotate the scroll control to select the first letter.
2. Press and hold down then rotate the scroll
control once to select the next letter.
3. Repeat Steps 1 and 2 until you have entered the
channel name. Then press E or press down on the
scroll control to accept the setting.
Hints:
• Each channel name can be up to 16 characters.
Abbreviate as necessary to fit.
• The channel name appears on the second line of
the display when the scanner stops on a channel.
Menu
Func

85
Programming/Editing Optional Settings
• If you do not enter a channel name, the scanner
displays the frequency (for conventional systems)
or the talk group ID (for trunked systems) when it
stops on a channel.
• Press twice to delete the current character.
• Press three times to clear the entire alpha tag.
• Channel names take up extra memory. To maxi-
mize channels, use channel names only where
necessary.
Setting Channel Priority
(Conventional Channels Only)
Program System
Select the system
Edit Group
Select the group
Edit Channel
Select the channel
Set Priority
This setting controls whether the scanner treats the
channel as a priority channel while scanning. Select
your setting, then press E.
On - when you turn on the Priority feature, the channel
will be scanned every 2 seconds. P appears at the end
of the default name.
Off - the channel will not be treated with priority.
Note: The default setting is Off.
Setting Channel Alert
Program System
Select the system
Edit Group
Menu
Menu

86
Programming/Editing Optional Settings
Select the group
Edit Channel
Select the channel
Set Alert
Off - the scanner does not alert you to emergency
transmissions.
Alert 1 - 9 the scanner sounds an alert beep to
notify you of the emergency transmission. You can
choose any of 9 different beep types.
Set Level
Auto - the scanner automatically sets the emergency
alert beep to the master volume level.
Level 1 - 15 - the scanner adjusts the volume you
hear to the level you select.
Setting CTCSS/DCS
(Conventional Channels Only)
Program System
Select the system
Edit Group
Select the group
Edit Channel
Select the channel
Set CTCSS/DCS
This setting controls how a subaudible CTCSS or DCS
is used for the channel. Select your setting, then press
E.
Off - any signal opens squelch.
Search - the scanner searches for and displays any
CTCSS or DCS tone that accompanies the transmis-
sion.
Menu

87
Programming/Editing Optional Settings
CTCSS - the scanner only opens squelch if the CTCSS
tone you select is also present with the signal. The
scanner then prompts you to enter or scroll to the
desired tone.
DCS - the scanner only opens squelch if the DCS tone
you select is also present with the signal. The scanner
then prompts you to enter or scroll to the desired tone.
Set Lockout - the scanner does not stop on the
channel if the tone you select is present. The scanner
prompts you to select a CTCSS or DCS tone.
Notes:
• The default setting is Off.
• See “What is CTCSS/DCS?” on Page 20 for a
complete list of CTCSS and DCS tones.
Setting the System Frequency
Modulation
Srch/CloCall Opt
Set Modulation
Auto - the scanner uses the default modulation for
the frequency band.
AM - the scanner uses AM (amplitude modulation) for
the frequency band.
FM - the scanner uses FM (frequency modulation) for
the frequency band.
NFM - the scanner uses narrowband FM for the
frequency band.
WFM - the scanner uses wideband FM for the
frequency band.
Note: The default setting is Auto.
This setting controls the modulation method used for
the frequency band. In most cases, if you leave this
set to Auto, the scanner automatically selects the
Menu

88
Programming/Editing Optional Settings
correct modulation type for the system you are
programming.
Setting Channel Attenuation
(Conventional Channels Only)
Program System
Select the system
Edit Group
Select the group
Edit Channel
Select the channel
Set Attenuator
This setting controls whether the scanner attenuates
signals on this channel. Select your setting, then press
E.
On - the channel is attenuated by about 18 dB.
Off - the channel is not attenuated.
Notes:
• The default setting is Off.
• For trunked systems, the attenuation is a system-
level setting.
• You can also toggle this setting by holding on the
channel and pressing and E.
Setting the Frequency Step
(Conventional Channels Only)
Program System
Select the system
Edit Group
Select the group
Edit Channel
Select the channel
Menu
Func
Menu

89
Programming/Editing Optional Settings
Set Step
This setting selects the frequency step used for setting
the channel's. Select your setting, then press E.
Auto - the step is based on the band (see the table at
the front of the manual)
5.0 kHz, 6.25 kHz, 7.5 kHz, 10.0 kHz, 12.5 kHz, 15.0
kHz, 20.0 kHz, 25.0 kHz, 50.0 kHz, 100.0 kHz - The
scanner uses the selected step.
Note: The scanner defaults to Auto.
Setting Channel Lockout
Program System E
Select the system E
Edit Group E
Select the group E
Edit Channel
Select the channel
Set Lockout
This setting determines whether the scanner will scan
this channel when its system and group are enabled.
Select your setting, then press E.
Lockout - the channel is not scanned.
Unlocked - the channel is scanned.
Notes:
• The default setting is Unlocked.
• You can also lock or unlock a channel by selecting
it while scanning or holding, then pressing L/O.
See “Basic Operation” on Page 43.
Deleting Channels
Program System
Select the system
Edit Group
Menu
Menu

90
Programming/Editing Optional Settings
Select the group
Edit Channel
Select the channel
Delete Channel
The scanner prompts you to confirm deletion.
To confirm, press E. To cancel, press No.
Note: Deleted channels cannot be restored. You must
re-enter them.
Copying/Pasting Channels
To copy a channel including all settings:
Program System
Select the system
Edit Group
Select the group
Edit Channel
Select the channel
Copy Channel
The scanner copies the channel into a copy buffer.
To paste the channel into the same or another system:
Program System
Select the system
Edit Group
Select the group
Edit Channel
Select the channel
Paste Channel
Then, if necessary, edit the channel you copied to give
it a unique name and other settings.
Note: The paste option appears only if you have
previously copied a channel from a system of the
same type you are currently editing.
Menu
Menu

91
Searching and Storing
Searching and Storing
Service Search
Service Search lets you quickly select and search the
scanner’s preprogrammed search ranges. During
service search, the scanner searches starting with the
lowest frequency in the search range you select to the
highest frequency in the range.
1. Press then turn the scroll control until
Search for . . . appears. Then press down on
the scroll control. The search feature options
appear.
2. Press down on the scroll control to select
Service Search.
3. Turn the scroll control until the type of service
search you want appears, then press down on the
scroll control to select it. The following search
bands appear.
• Public Safety
• News
• Ham Radio
• Marine
• Railroad
• Air
• CB Radio
• FRS/GMRS
• Racing
• TV Broadcast
• FM Broadcast
• Special
The scanner searches the service you selected,
stopping on any transmission it finds and displaying
the frequency. Turn the scroll control to change the
search direction. An arrow appears, showing the
current search direction.
To hold searching, press Hold. To resume searching,
press then press Scan/Srch. Or, press Hold.
To lock out a frequency found while searching, press
L/O. Search Lockout? appears. Press E to lock out
the frequency or No to continue monitoring.
Menu
Func
Searching and Storing

92
Searching and Storing
Notes:
• If all frequencies in the search band you selected
are locked out, All Locked! appears and the
scanner does not search the band.
• If the service you select uses channels (such as
CB radio or marine), the scanner displays the
service channel number.
Quick Search
Quick Search lets you search from the currently-tuned
frequency if you are scanning a conventional system
or sets the system to ID search if you are scanning a
trunked system.
If you are on a conventional system or channel, press
and Scan/Srch to start quick search. Quick
Search Yes = E / No = “.” appears.
Qck Search Hold appears if you press Hold.
Press E to start quick search or No to go to the search
menu.
CTCSS/DCS Search
CTCSS/DCS Search lets you search for CTCSS or
DCS tones when it finds an active frequency in search
and Close Call modes. You can identify up to 50
CTCSS tones and 104 DCS codes.
Turning this option on lets the scanner search for
CTCSS/DCS tones. If the scanner detects the tone, it
displays the tone’s frequency and DCS code.
1. Press then turn the scroll control until
Srch/CloCall Opt appears. Then press the
scroll control. One of the search feature options
appear.
2. Turn the scroll control until CTCSS/DCS Search
appears, then press the scroll control to select it.
3. Turn the scroll control until On appears to turn on
CTCSS/DCS search or until Off appears to turn it
off, then press the scroll control.
Func
Menu

93
Searching and Storing
Custom Search
Custom Search lets you program and search 10
custom search ranges. You can search any of these
ranges simultaneously and select each custom search
range you set. During custom search, the scanner
searches starting with the lowest frequency in the
search range you select to the highest frequency in
the range.
Notes:
• Search ranges are preset. See “Editing a Custom
Search Range” on Page 94 to change the range.
• You cannot turn off all custom search ranges.
1. Press then turn the scroll control until
Search for ... appears. Then press the scroll
control. Or, press + Scan/Srch, then select
No. One of the search feature options appear.
2. Turn the scroll control until Custom Search
appears, then press the scroll control to select it.
The scanner starts custom search of the custom
search range you selected, stopping on any trans-
mission it finds and displaying the frequency.
Turn the scroll control to change the search
direction. An arrow appears, showing the current
search direction.
To turn search ranges on or off, press 0 and 1-9.
To hold searching, press Hold. To resume searching,
press then press Scan/Srch or Hold again.
To lock out a frequency found while searching, press
L/O. Search Lockout? appears. Press the scroll
control to lock out the frequency or No to continue
monitoring.
If you turn off the active custom search range, the
scanner skips to the next custom search range and
continues searching.
Menu
Func
Func
94
Searching and Storing
Note: If all frequencies in all active custom search
ranges are locked out, All Locked! appears and
the scanner does not stop.
Editing a Custom Search Range
You can edit up to 10 custom search ranges. The
names of the custom search ranges appear on the
display. The default custom search range names
appear as Custom 1, Custom 2, and so on.
1. Press then turn the scroll control until
Search for ... appears. Then press the scroll
control. Or press and Srch, then No. One of
the search feature options appear.
2. Turn the scroll control until Edit Custom
appears, then press the scroll control to select it.
3. Turn the scroll control until the name of the custom
search range you want to edit appears, then press
the scroll control to select it. The following options
appear as you turn the scroll control.
Edit Name - lets you edit the custom search range’s
name
Edit Srch Limit - lets you view and select the
frequency ranges to search. The scanner prompts you
to enter the upper and lower search limits.
Set Delay Time - lets you set the amount of time
the scanner will delay before continuing to search after
a transmission ends
Set Modulation - lets you set the custom search
range’s modulation type
Set Attenuator - lets you set whether the scanner
will attenuate reception by 18dB during search
Set Data Skip - lets you set whether the scanner
will skip data transmissions during search
Set Step - lets you set the custom search range’s
step (the gap between frequencies)
Menu
Func

95
Searching and Storing
Set C-Ch Only - lets you search for a Motorola con-
trol channel. If it finds one, the scanner scans the sys-
tem.
Adjust P25 Level - adjusts the digital decode
threshold to match the transmission you are
hearing when it receives a strong signal and has a
high decode rate.
Search With Scan - sets whether the scanner
includes the custom search during scanning.
If unlocked, the scanner first scans all selected sys-
tems, then searches the selected service searches for
the selected hold time (0-255
seconds).
4. Select the option you want to change for the
custom search range you selected, then press the
scroll control.
Editing a Service Search
You can change the way service search works for
each service.
1. Press then turn the scroll control until
Search for ... appears. Then press the scroll
control. Or press and Srch, then No. One of
the search feature options appear.
2. Turn the scroll control until Edit Service
appears, then press the scroll control to select it.
3. Turn the scroll control to highlight the service
search you want to edit, then press the scroll
control to select it.
•Set Delay Time This setting determines how
long the scanner waits after a transmission ends
before resuming quick search or Close Call
operation. Select your setting, then press the scroll
control.
Off The scanner resumes immediately when
the transmission ends.
Menu
Func

96
Searching and Storing
1-5 sec The scanner waits the set amount of
time after the transmission ends before
resuming.
Note: The default setting is 2 sec.
• Set Attenuator This setting controls the
attenuator for search operation. Select your
setting, then press the scroll control.
Off The attenuator is off.
On Reception is attenuated by about 18 dB.
Note: Turn on this setting if you are near other
strong signal sources. Attenuation sometimes helps
to reduce interference and desensitization that
strong signals create.
•Search with Scan This setting controls how
search with scan works.
•Set Lockout This setting controls whether
the system is scanned when its quick key is
enabled. Rotate the scroll control to select your
setting, then press the scroll control.
Locked - the system is not scanned
Unlocked - the system is scanned
Note: You can also lock or unlock a system by
pressing , selecting the system, then
pressing + L/O.
•Set Hold Time This setting controls how
many seconds the scanner scans a system
before moving to the next unlocked system.
Enter a value from 0-255, then press the scroll
control to save the setting.
Notes:
• If you select 0, the scanner stays on the system
for a minimal time (only long enough to check cur-
rent system activity).
• The default setting is 2 seconds for each system.
Func
Func

97
Searching and Storing
• For conventional systems, all unlocked channels
will be scanned at least once regardless of this
setting.
• The scanner moves to the next system after the
hold time expires, any current transmission ends,
and the channel delay time expires.
Auto Search and Store
Your scanner’s Auto Store feature lets you search for
new frequencies in custom search ranges or within a
service search range on a conventional system, or
new talk group ID’s on a trunked system.
Selecting a System
To store frequencies or talk group ID’s you find during
Auto Store, you must first select a system where the
frequencies or talk group ID’s will be stored.
1. Press then turn the scroll control until
Search for ... appears. Then press the scroll
control. One of the search feature options appear.
2. Turn the scroll control until Search and Store
appears, then press the scroll control to select it.
3. Turn the scroll control until the system where you
want to store the frequencies or talk group ID’s
appears, then press the scroll control to select it.
If no systems are programmed, or all systems are
locked out, No System Stored appears.
Storing a Conventional System
You can store frequencies into the system you
selected in “Selecting a System”. Otherwise, the scan-
ner stores
frequencies in a new group it creates.
1. Follow Steps 1-3 under “Selecting a System”.
A search option appears.
Menu

98
Searching and Storing
2. Turn the scroll control until the type of search you
want appears, then press the scroll control to
select it. A search band appears.
If all systems are locked out, All Locked!
appears and the scanner does not store any fre-
quencies.
When you select a search range, the scanner looks for
active frequencies within that range and Search and
Store appears on the display’s lower line and the
system name and search range name appear on the
display’s upper line. When the scanner finds an active
transmission, it checks to see if the frequency has
already been stored in the system. If the frequency
has already been stored, the scanner continues to
search. If the frequency has not been stored, it stores
the frequency into a group named Found Channels,
then resumes searching. The scanner creates this
group if it doesn’t already exist.
Storing a Trunked System
You can store talk group ID’s into the system you
selected in “Selecting a System”. Otherwise, the scan-
ner stores talk group ID’s in a new group it creates.
Note: Trunked system search and store does not work
if an EDACS SCAT system is selected, a system with
no frequency is selected, the selected system is
locked out or the quick key for system to which the
system belongs is turned off, and the group you
selected to store found talk group ID’s contains more
talk group ID’s than the maximum set in Max Auto Store.
1. Follow Steps 1-3 under “Selecting a System”. A
search option appears.
2. Turn the scroll control until the type of search you
want appears, then press the scroll control to
select it. A search band appears. If all systems are
locked out, All Locked! appears and the scan-
ner does not store any frequencies.

99
Searching and Storing
When you select a search range, the scanner looks for
active talk group ID’s within that range and ID
Search and Store appears on the display’s lower
line and the system name and search range name
appear on the display’s upper line. When the scanner
finds an active talk group ID, it checks if the talk group
ID has already been stored in the system. If it has, the
scanner continues to search. If the talk group ID has
not been stored, it stores the talk group ID into a group
named Found Channels, then resumes searching.
The scanner creates this group if it does not already
exist.
100
Using the Close Call Feature
Using the Close Call Feature
Your scanner's Close CallTM feature lets you set the
scanner so it detects, displays the frequency of, and
lets you hear a nearby strong radio transmission. You
can set the scanner so the Close Call feature works "in
the background" while you are scanning other fre-
quencies, turn off normal scanning while the Close
Call feature is working, or turn off the Close Call fea-
ture and use the scanner normally. You can set the
scanner so it alerts you when the Close Call feature
finds a frequency. You can also set the frequency band
where you want the scanner to look for transmissions.
To turn Close Call detection on or off, press then
. When the feature is on, appears on the display
and normal operation is briefly interrupted about every
2 seconds.
Notes:
• The Close Call feature works well for locating the
source of strong local transmissions such as
mobile and handheld two-way radios in areas with
no other strong transmission sources. Several
factors affect Close Call performance, however.
Performance is increased with higher transmit
power, receive antenna tuned to the target band,
and a low background RF level. Other than the
antenna, you have no control over these factors,
but they explain why performance might vary by
both location and time.
• The Close Call feature cannot detect satellite
dishes or any transmitter with a frequency above
or below the frequency ranges listed under “Set-
ting Close Call Options” on Page 101.
• The Close Call feature works better with some
types of transmissions than others. It might not
correctly display frequency information for trans-
mitters using a highly directional antenna (such as
an amateur radio beam antenna) or if there are
many transmitters operating at the same time in
the same area.
Func
Using the Close Call Feature

101
Using the Close Call Feature
Setting Close Call Options
1. Press then turn the scroll control until Close
Call appears. Then press the scroll control.
Close Call feature options appear.
2. Turn the scroll control to select an option.
•Close Call Only: Lets you set the scanner
only for Close Call searching. The scanner
does not scan frequencies or channels when
this option is turned on. To select this option,
press E.
•CC Auto Store: Lets you select whether the
scanner automatically stores Close Call hits
into channels. If you turn this option on, the
scanner starts Close Call mode and stores any
Close Call hits, up to the maximum you
specified in the Max Auto Store setting. If the
scanner stores more hits this setting, it stops
Autostore operation.
Turn the scroll control to display an option, then
press the scroll control.
•Set CC Mode: Lets you select the Close Call
mode. If you turn this option on, the scanner
sets itself to its Close Call settings about once
every 2 seconds.
Turn the scroll control to display an option, then
press the scroll control.
You can also toggle this setting by pressing
then
•Set CC Override: Lets you select how the
Close Call feature works with other scanning
activities. If you turn this option off, when the
scanner detects a Close Call signal,
CC Found! and E to Listen appear for
about 3 seconds. Press the scroll control when
this appears to jump to and hold on the
frequency.
Menu
Func

102
Using the Close Call Feature
If this option is turned on, the scanner overrides
the current channel and goes to the Close Call
hit. The scanner displays CC Found Press
Any Key. When you press a key, the
frequency appears.
Turn the scroll control to display an option, then
press the scroll control.
•Set CC Alert: Lets you select how the
scanner alerts you when it receives a Close
Call signal. You can select any of the following
options.
Select Mode
• Beep (the scanner beeps when it receives a
Close Call signal)
• Light (the backlight turns on when it
receives a Close Call signal)
• Beep+Light (the scanner beeps and the
backlight turns on when it receives a Close
Call signal)
• None (the scanner does not alert)
Select Beep
• Off (the scanner does not beep)
• Alert 1-9 (the scanner sounds an alert
beep to notify you of the emergency
transmission. You can choose any of 9
different beep types
Set CC Pause
• 3-60 sec (the scanner pauses for this
amount of time before it notifies you of the
emergency transmission).
• Infinite (the scanner does not notify you
of the emergency transmission).
Turn the scroll control to display an option, then
press the scroll control to select it.

103
Using the Close Call Feature
•Set CC Bands: Lets you select the Close Call
band settings. You can turn the following bands
on or off.
VHF Low 1 (25.0000 MHz)
VHF Low 2 (54.0000 MHz)
Air Band (108.0000 - 136.9750 MHz)
VHF High1 (137.0000 MHz)
VHF High2 (224.9950 MHz)
UHF (400.0000 - 512.0000 MHz)
800MHz+ (806.0000 - 956.0000 MHz)
Use the scroll control to select a band, press
the scroll control, then use the scroll control to
select On or Off and press the scroll control.
Turning off undesired bands speeds up Close
Call operation. (The Close Call feature does
not work for frequencies greater than 956
MHz.)
Close Call Hits
When the scanner detects a Close Call hit, it alerts you
according to the Override and Alert settings in the
previous section. While listening to a Close Call hit,
you can press Hold to hold on the hit frequency, press
the scroll control to quickly save the frequency into
memory, press L/O to lock out the frequency from
Close Call and Search operation, or wait for the
transmission to end. If you are in Close Call Only or
Close Call Override mode, and you do not press any
key, the scanner returns to its previous operation after
the transmission ends and the set delay time expires.
If you are holding on the frequency, press Hold again
to resume the previous operation.

104
Search and Close Call Options
Search and Close Call Options
The settings in this section affect custom searches,
service searches, and Close Call operation.
Managing Locked-Out Frequencies
While searching or during Close Call operation, if you
press L/O while the scanner is stopped on a frequency,
that frequency is locked out of these modes. You can
lock out up to 200 frequencies.
Note: Locking out a frequency does not lock out a
channel that contains that frequency.
Unlocking All Frequencies
Srch/CloCall Opt
Freq Lockouts
Unlock All
The scanner prompts you to confirm deletion.
To confirm and delete all locked-out frequencies, press
the scroll control. Otherwise, to cancel, press No.
Reviewing Locked Out Frequencies
Srch/CloCall Opt
Freq Lockouts
Rvw Search L/O
The scanner displays the first locked-out frequency
and prompts you to unlock the frequency. Press the
scroll control to unlock the frequency. Or, rotate the
scroll control or press No to select a different
frequency. To exit the review, press .
Searching for Subaudible Tones
Srch/CloCall Opt
CTCSS/DCS Search
This setting controls whether the scanner will search
for a subaudible tone when it stops on a transmission
during search or Close Call operation.
Menu
Menu
Menu
Menu
Search and Close Call Options

105
Search and Close Call Options
Off The scanner does not search for subaudible
tones.
On The scanner searches for and displays any
subaudible tone found.
Note: This feature does not operate when the scanner
is in AM modulation mode.
Screening Out Broadcast Sources
Srch/CloCall Opt
Broadcast Screen
This setting determines whether the scanner
automatically ignores transmissions found during
searching or Close Call operation that are on common
broadcasts, paging systems, and other annoyance
radio sources.
Note: Broadcast screen is not effective during some
service searches.
Set All Band On - turns on broadcast screen on
each band.
Set All Band Off - turns off broadcast screen on
each band.
Set Each Band - lets you set broadcast screen only
on specific bands you select. On or Off appears next
to each option. Turn the scroll control to select an
option then press the scroll control to change the
setting.
•Pager - the scanner skips known paging
system frequencies.
•FM - the scanner skips known FM frequencies.
•UHF TV - the scanner skips known UHF TV
frequencies.
•VHF TV - the scanner skips known VHF TV
frequencies.
Menu

106
Search and Close Call Options
•NOAA WX - the scanner skips known NOAA
weather frequencies.
•Band 1-10 - select the band where you want to
screen out broadcast sources.
Program Band - lets you program a specific band for
broadcast screen. Turn the scroll control to select an
option then press the scroll control to change the
setting.
•Band 1-10 - select the band where you want to
screen out broadcast sources.
Set Lower Limit - turn the scroll control to
enter the lower limit of the frequency range,
then press the scroll control to set it.
Set Upper Limit - turn the scroll control to
enter the upper limit of the frequency range,
then press the scroll control to set it.
Finding Repeater Output
Frequencies
Srch/CloCall Opt
Repeater Find
This feature sets whether the scanner tries to tune to a
repeater output frequency during Close Call operation
when it detects a transmission on a repeater input
frequency. Since you can normally only hear one side
of a conversation when you listen to an input frequency
transmission, turning this feature on can let you hear
both sides of the conversation.
On The scanner automatically applies repeater
reverse to detected transmissions. If the scanner
detects the transmission on the output frequency, it
beeps, Repeater Find appears, and it remains on
the output frequency until transmissions end. If it does
not detect a transmission on the output frequency, it
remains on the original frequency.
Menu

107
Search and Close Call Options
Off The scanner does not try to find the output
frequency.
Setting the Maximum Auto Store
Value
Srch/CloCall Opt
Max Auto Store
This value sets how many hits the scanner will
automatically store when it is in either Search and
Store or Close Call Auto Store mode.
Use the number keys to enter a value from 1 - 256,
then press the scroll control.
When the scanner reaches the maximum number of
hits you set, it stops the auto-store operation.
Setting the Modulation Type
Srch/CloCall Opt
Set Modulation
This setting controls the modulation type used for
quick search and Close Call operations. Select your
setting, then press the scroll control.
Auto Uses the default setting for the current
frequency (see the table at the front of the manual)
AM Uses AM (amplitude modulation)
FM Uses FM (frequency modulation)
NFM Uses narrowband FM
WFM Uses narrowband FM
Setting Attenuation
Srch/CloCall Opt
Set Attenuator
Menu
Menu
Menu

108
Search and Close Call Options
This setting controls the attenuator for quick search
and Close Call operation. Select your setting, then
press the scroll control.
Off The attenuator is off.
On Reception is attenuated by about 18 dB.
Note: Turn on this setting if you are near other strong
signal sources. Attenuation sometimes helps to
reduce interference and desensitization that strong sig-
nals create.
Setting Data Skip
Srch/CloCall Opt
Set Data Skip
This setting controls how the scanner behaves when it
stops on a channel that has a data signal.
On - the scanner stops briefly on the channel, but then
immediately resumes scanning automatically. Press E
to select.
Off - the scanner remains on the channel until the
transmission stops. Press the scroll control to select.
Notes:
• If you are trying to test the Close Call feature with
a nearby transmitter and you do not talk into the
transmitter, the scanner will detect this as data and
will skip the frequency when Data Skip is on. Turn
the feature off or talk into the transmitter.
• This setting is ignored for AM channels.
• The default setting for this feature is On.
Setting the Delay Time
Srch/CloCall Opt
Set Delay Time
Menu
Menu

109
Search and Close Call Options
This setting determines how long the scanner waits
after a transmission ends before resuming quick
search or Close Call operation. Select your setting,
then press the scroll control.
Off The scanner resumes immediately when the
transmission ends.
1-5 sec The scanner waits the set amount of time
after the transmission ends before resuming.
Note: The default setting is 2 sec.
Setting the Search Frequency Step
Srch/CloCall Opt
Set Step
This setting selects the frequency step used for setting
the channels. Select your setting, then press the scroll
control.
Auto The step is based on the band (see the table at
the front of the manual)
5.0 kHz, 6.25kHz, 7.5 kHz, 8.33kHz, 10.0 kHz,
12.5 kHz, 15.0 kHz, 20.0 kHz, 25.0 kHz,
50.0 kHz, 100.0 kHz The scanner uses the
selected step.
Note: The scanner defaults to Auto.
Menu

110
Using Weather Alert (SAME)
Using Weather Alert (SAME)
Your scanner has been primarily designed to be a
radio scanner. While it incorporates weather alert as
one of its features, we strongly recommend that you
not use the scanner as your sole means for receiving
emergency alerts. Your local electronics retailer
carries several weather radios specifically designed
for this function.
Your scanner allows you to search for a local NOAA
weather broadcast and set it to alert when a SAME
weather alert is broadcast on a NOAA channel.
You can also program SAME codes into the scanner
and set a weather channel as a priority channel.
In the following sections, you can also access the
weather menu from Hold mode by holding then
pressing Wx.
Searching For a Weather Broadcast
WX Operation
Weather Scan
The scanner starts scanning the preprogrammed
weather frequencies, and stops on the first signal.
If this station is weak, rotate the scroll control to check
for other weather broadcasts in your area.
Note: NOAA broadcasts are continuous broadcasts.
You will only lose reception if you move out of a
coverage area. If the signal is lost, the scanner
resumes searching for a weather transmission.
Fire Tone Out Operation
Tone-Out for ...
Your scanner can be set up to respond to fire
tone-outs that use standard two-tone sequential
paging. You can save up to 10 tone-out settings.
The scanner continuously monitors the setting you
select and alerts you if a transmission is received that
matches it.
Func
Menu
Menu
Using Weather Alert (SAME)
111
Using Weather Alert (SAME)
You need tone-out setup information from the agency
you want to be alerted for or from online sources.
Uniden America Corporation does not have
information for local tone-out systems.
Setting Tone-Out Standby
Tone-Out for ...
Tone-Out Standby
Turn the scroll control until the tone-out standby mode
you want to select appears. Then press the scroll
control to select it.
Setting up Tone-Out
Tone-Out for ...
Tone-Out Setup
Tone-Out 1 - 10 select the tone-out you want to
work with.
•Edit Name - enter the name you want to assign
to the tone-out you selected.
•Set Frequency Lets you set the tone-out’s
frequency.
Edit Frequency Turn the scroll control to
enter the tone-out’s frequency.
Set Modulation:
•Auto - the scanner uses the default
modulation for the frequency band.
•FM - the scanner uses FM (frequency
modulation) for the frequency band.
•NFM - the scanner uses narrowband FM for
the frequency band.
Note: The default setting is Auto.
Set Attenuator Turn the scroll control to
select On or Off.
Menu
Menu

112
Using Weather Alert (SAME)
•Set Tone Lets you set the tone-out type.
Edit Tone A - Enter the frequency (in Hz) for
Tone A
Edit Duration A - Enter the duration (in ns)
for Duration A. 500 ns is the default.
Edit Tone B - Enter the frequency (in Hz) for
Tone B
Edit Duration B - Enter the duration (in ns)
for Duration B. 500 ns is the default.
Tone Gap - Enter the tone gap (in ns). 100 ns
is the default.
Set Delay Time Enter a value from 1-5 or Off,
then press the scroll control.
Set Alert Enter a value from 1-9 or Off, then press
the scroll control.
Turning Weather Alert On/Off
In weather alert mode, your scanner functions as a
severe weather warning radio. This is especially useful
when your area is expecting severe weather
conditions late at night. When you set the scanner to
weather alert mode, it holds on the weather channel,
but does not play the channel’s audio. If it detects a
weather alert, it sounds a tone, displays information
about the weather alert, and turns on the audio so you
can hear the weather broadcast.
WX Operation
Weather Alert
This setting determines which types of signals will
trigger an alert. Select your setting, then press the
scroll control.
Alert Only - the scanner alerts when it detects the
1050 Hz tone that accompanies all weather alerts.
Menu

113
Using Weather Alert (SAME)
All FIPS - the scanner alerts and displays
information about the weather alert when it receives
any FIPS code (see “Programming a SAME Group” on
Page 113).
SAME 1-5 - the scanner alerts and displays
information about the weather alert when it receives a
weather alert signal that includes any FIPS code you
have programmed into the specified SAME group.
Programming a SAME Group
You can edit any of the 5 SAME groups in your scan-
ner. Each group can have up to 8 FIPS codes.
SAME (Specific Area Messaging System) is a system
developed by the National Weather Service to reduce
the number of alerts received by consumers by allow-
ing them to hear alerts only for the county(ies) they are
interested in. Each alert contains information about the
type and severity of the alert, as well as the specific
geographic locations affected by the alert.
The geographic locations are designated using FIPS
codes. Each county or parish in the US and its territo-
ries are assigned a FIPS code. In addition, certain
special regions and wildcard settings can be assigned.
FIPS codes are in the format nSSCCC:
n: A special subcounty designator. For an entire
county, use 0.
SS: The state code.
CCC: The county code.
For example, Tarrant County in Texas is assigned to
FIPS code 048439.
0 indicates the entire county
48 indicates the state of Texas
439 indicates Tarrant County
114
Using Weather Alert (SAME)
To get the FIPS code for your county, visit the National
Weather Service web site at http://www.nws.noaa.gov
and search for “FIPS Listing”.
WX Operation
Program SAME
Select the SAME group to edit
Edit Name - enter the name you want to assign to
the SAME group you selected.
Edit County - select the position you want to store
the FIPS code into, then press the scroll control, enter
the FIPS code, and press the scroll control again.
Setting WX Alert Priority
WX Operation
WX Alt Priority
On - the scanner checks the weather channels every 5
seconds for a 1050 Hz weather alert signal. Press the
scroll control to select.
Off - the scanner does not check the weather
channels. Press the scroll control to select.
Menu
Menu

115
Care and Maintenance
Care and Mainte-nance
General Use
• Turn the scanner off before disconnecting the
power.
• Always write down the programmed frequencies in
the event of memory loss.
• If memory is lost, simply reprogram each channel.
• Always press each button firmly until you hear the
entry tone for that key entry.
Location
• Do not use the scanner in high-moisture
environments such as the kitchen or bathroom.
• Avoid placing the unit in direct sunlight or near
heating elements or vents.
• If the scanner receives strong interference or
electrical noise, move it or its antenna away from
the source of the noise. If possible, a higher eleva-
tion might provide better reception.
• Also try changing the height or angle of the
antenna.
Cleaning
• Disconnect the power to the unit before cleaning.
• Clean the outside of the scanner with a mild
detergent.
• To prevent scratches, do not use abrasive clean-
ers or solvents. Be careful not to rub the LCD win-
dow.
• Do not use excessive amounts of water.
Care and Maintenance

116
Care and Maintenance
Repairs
Do not attempt any repair. The scanner contains no
user serviceable parts. Contact the Uniden Customer
Service Center or take it to a qualified repair techni-
cian.
Birdies
All radios can receive “birdies” (undesired signals). If
your scanner stops during Scan mode and no sound is
heard, it might be receiving a birdie. Birdies are inter-
nally
generated signals inherent in the electronics of the
scanner.
Press L/O to lock out the channel.

117
Troubleshooting
Troubleshooting
If your BCD396T is not performing properly, try these
steps.
Problem Possible Cause Suggestion
The
scanner
doesn’t
work.
The scanner might
not be receiving
any power.
Make sure the AC
adapter is connected to
an AC outlet and the
scanner.
If there is a wall switch
that controls power to
the AC outlet where
you connected the AC
adapter, make sure it is
on.
Improper
reception.
The antenna
might need to be
adjusted.
Check the antenna
connection or move or
reposition the antenna.
Move the scanner.
You might be in a remote
area that could require
an optional multi-band
antenna. Check with
your dealer or local
electronics store.
Scan
won’t
stop.
The squelch might
need to be
adjusted.
Adjust the squelch
threshold. See “Turning
On the Scanner and
Setting the Squelch” on
Page 43.
The antenna
might need to be
adjusted.
Check the antenna
connection.
One or more
channels might be
locked out.
Make sure the
channels you want to
scan are not locked
out.
The channel’s
frequency might
not be stored in
memory.
Make sure the
channel’s frequency is
stored in the scanner’s
memory.
The channel might
not be active.
Wait for a transmission
on the channel.
Scan
won’t
start.
You must press
Scan to scan.
Press Scan.
Troubleshooting

118
Troubleshooting
If you experience difficulty while in TrunkTracker™
mode, try the following steps.
The squelch might
need to be
adjusted.
Adjust the squelch
threshold. See “Turning
On the Scanner and
Setting the Squelch” on
Page 43.
One or more
channels might be
locked out.
Make sure the
channels you want to
scan are not locked
out.
The antenna
might need to be
adjusted.
Check the antenna
connection.
Weather
scan
doesn’t
work.
The squelch might
need to be
adjusted.
Adjust the squelch
threshold. See “Turning
On the Scanner and
Setting the Squelch” on
Page 43.
The antenna
might need to be
adjusted.
Check the antenna
connection.
There might not
be a NOAA
weather broadcast
in your area.
Move to an area with a
NOAA weather
broadcast.
Problem Possible Cause Suggestion
Scanner
won’t
track a
trunked
system.
The system might
not be one your
scanner can scan.
Scan another system.
The data
frequency might
be missing.
Enter the data
frequency.
The scanner might
need to be
changed to a Type
1 scanner setup.
Change to a Type 1
scanner setup. Review
“Programming
Motorola Systems” on
Page 62.

119
Troubleshooting
Scanner
won’t
track a
trunked
system.
(continued)
The system you
are trying to scan
might be LTR or
EDACS.
Set the scanner to
scan LTR or EDACS
systems. Review
“Programming LTR
Systems” on Page 69
and “Programming
EDACS Systems” on
Page 66.
Scanner
won’t stop
scanning
a trunked
system.
No ID’s have been
programmed.
Program one or more
ID’s or use the ID
Search mode.
The ID’s you have
stored are not
active.
Wait for the ID’s to
become active or scan
another system.
Scanner
won’t
acquire
the data
channel.
The squelch might
need to be
adjusted.
Adjust the squelch
threshold. See
“Turning On the
Scanner and Setting
the Squelch” on
Page 43.
The frequency
used for the data
channel might be
missing.
Check your frequency
list for the data
channel.
Missing
replies to
conver-
sations.
The scanner might
need to be
changed to a Type
1 scanner setup.
Change to a Type 1
scanner setup. See
“Programming
Motorola Systems” on
Page 62.
The fleet map
might be incorrect.
Try another preset fleet
map or program your
own fleet map.
One or more of
the system’s
frequencies might
not be entered.
Make sure all the
system’s frequencies
have been entered.
The system you
are trying to scan
might be LTR or
EDACS.
Set the scanner to
scan LTR or EDACS
systems. Review
“Programming LTR
Systems” on Page 69
and “Programming
EDACS Systems” on
Page 66.

120
Troubleshooting
If you still cannot get satisfactory results while using
your scanner or if you want additional information,
please call or write the Uniden Parts and Service Divi-
sion. The address and phone number are listed in the
Warranty at the end of this manual. If you would like
immediate assistance, please call Customer Service
at (800) 297-1023.
If you have Internet access, you can visit
http://www.uniden.com for additional information.

121
Specifications
Specifications
Certified in accordance with FCC Rules and
Regulations Part 15, Subpart C, as of date of
manufacture.
Dynamic Allocation Capacity
(with Name Assigned To Each System, Group, and
Channel):
Systems: 200 max
Groups: 20 per system
Channels: up to 2500
Channels per Trunked System: up to 200
Attenuation: 18 dB (nominal), 10 dB (limit)
Frequency Range (MHz):
25.0 - 26.960 Petroleum Prods/Bcst Pinch Band
26.965 - 27.405 Citizens Band Class D
27.410 - 27.995 Business/Forest Prods
144.0 - 147.995 2 Meter Amateur Band
150.8 - 161.9950 VHF High Band
Above bands in 5 kHz steps
29.7 - 49.990 VHF Low Band
Above band in 10 kHz steps
137.0 - 143.9875 Military Land Mobile
148.0 - 150.7875 Military Land Mobile
162.0 - 174.0 Federal Government
400.0 - 405.9875 Miscellaneous
406.0 - 419.9875 Federal Land Mobile
420.0 - 449.9875 70 cm Amateur Band
450.0 - 469.9875 UHF Standard Band
470.0 - 512.0 UHF TV Band
Specifications

122
Specifications
806.0 - 823.9875 Public Service Band
849.0125 - 868.9875 Public Service Band
894.0125 - 956.0 Public Service Band
Above bands in 12.5 kHz steps
28.0 - 29.680 10 Meter Amateur Band
50.0 - 54.0 6 Meter Amateur Band
216.0 - 224.980 1.25 Meter Amateur Band
Above bands in 20 kHz steps
108.0 - 136.9750 Aircraft
1240.0 - 1300.0 25 cm Amateur Band
Above bands in 25 kHz steps
Operating Temperature:
Normal –20°C to +60°C
Close Call –10°C to +60°C
Scan Rate: 100 channels per second
(conventional mode)
Search Rate: 300 steps per second (5 kHz step only)
Scan Delay: 0-5 seconds
Audio Output: 320mW nominal into 8Ω internal
speaker
30 mW nominal into 32Ω headphone
6 mW nominal into 64Ω earphone
Power Requirements:
2 AA Alkaline Batteries (3V DC),
or 2 AA Rechargeable Ni-MH Batteries (2.4V DC),
or AC Adapter (6 VDC 500mA) (AD-0008)
Antenna: 50 Ω (Impedance)

123
Specifications
External Jacks:
Antenna Jack SMA Type
Ext. Speaker Jack 3.5mm
DC Power Jack (EIAJ TYPE-2 Center Positive)
5.5mm
Remote Jack 4 Pin Mini
Size: 2.72 in. (W) x 1.26 in. (D) x 4.6 in. (H)
Weight: 0.48 lbs
Features, specifications, and availability of optional
accessories are all subject to change without notice.
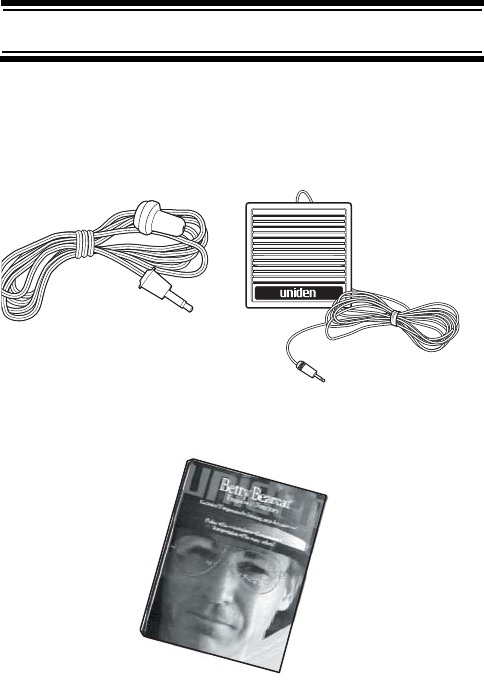
124
Optional Accessories
Optional Accessories
Contact your local Uniden Dealer or call the Uniden
Parts Center at: (800) 554-3988, 8:00AM to 5:00PM
EST, Monday through Friday, for information about
ordering these optional accessories.
Betty Bearcat Frequency Directory/
Local Directories
fi
External Amplified Speaker
Earphone
Optional Accessories

125
Appendix
Appendix
Preset Fleet Maps
Preset Map 1Preset Map 2
Preset Map 3Preset Map 4
Preset Map 5Preset Map 6
Preset Map 7Preset Map 8
Block Size Code Block Size Code
0Size Code 11 0 Size Code 4
1Size Code 11 1 Size Code 4
2Size Code 11 2 Size Code 4
3Size Code 11 3 Size Code 4
4Size Code 11 4 Size Code 4
5Size Code 11 5 Size Code 4
6Size Code 11 6 Size Code 4
7Size Code 11 7 Size Code 4
Block Size Code Block Size Code
0 Size Code 4 0 Size Code 12
1 Size Code 4 1 (Size Code 12)
2 Size Code 4 2 Size Code 4
3 Size Code 4 3 Size Code 4
4 Size Code 4 4 Size Code 4
5 Size Code 4 5 Size Code 4
6 Size Code 12 6 Size Code 4
7 (Size Code 12) 7 Size Code 4
Block Size Code Block Size Code
0 Size Code 4 0 Size Code 3
1 Size Code 4 1 Size Code 10
2 Size Code 12 2 Size Code 4
3 (Size Code 12) 3 Size Code 4
4 Size Code 4 4 Size Code 12
5 Size Code 4 5 (Size Code 12)
6 Size Code 4 6 Size Code 12
7 Size Code 4 7 (Size Code 12)
Block Size Code Block Size Code
0 Size Code 10 0 Size Code 1
1 Size Code 10 1 Size Code 1
2 Size Code 11 2 Size Code 2
3 Size Code 4 3 Size Code 2
4 Size Code 4 4 Size Code 3
5 Size Code 4 5 Size Code 3
6 Size Code 4 6 Size Code 4
7 Size Code 4 7 Size Code 4
Appendix
126
Appendix
Preset Map 9Preset Map 10
Preset Map 11Preset Map 12
Preset Map 13Preset Map 14
Preset Map 15Preset Map 16
Block Size Code Block Size Code
0 Size Code 4 0 Size Code 0
1 Size Code 4 1 Size Code 0
2 Size Code 0 2 Size Code 0
3 Size Code 0 3 Size Code 0
4 Size Code 0 4 Size Code 0
5 Size Code 0 5 Size Code 0
6 Size Code 0 6 Size Code 4
7 Size Code 0 7 Size Code 4
Block Size Code Block Size Code
0 Size Code 4 0 Size Code 0
1 Size Code 0 1 Size Code 0
2 Size Code 0 2 Size Code 0
3 Size Code 0 3 Size Code 0
4 Size Code 0 4 Size Code 0
5 Size Code 0 5 Size Code 0
6 Size Code 0 6 Size Code 0
7 Size Code 0 7 Size Code 4
Block Size Code Block Size Code
0 Size Code 3 0 Size Code 4
1 Size Code 3 1 Size Code 3
2 Size Code 11 2 Size Code 10
3 Size Code 4 3 Size Code 4
4 Size Code 4 4 Size Code 4
5 Size Code 0 5 Size Code 4
6 Size Code 0 6 Size Code 12
7 Size Code 0 7 (Size Code 12)
Block Size Code Block Size Code
0 Size Code 4 0 Size Code 3
1 Size Code 4 1 Size Code 10
2 Size Code 4 2 Size Code 10
3 Size Code 11 3 Size Code 11
4 Size Code 11 4 Size Code 0
5 Size Code 0 5 Size Code 0
6 Size Code 12 6 Size Code 12
7 (Size Code 12) 7 (Size Code 12)

127
Appendix
User Defined Fleet Maps
Type I Programming Information
When a Type I system is designed, the address
information for all the ID’s is divided into 8 equal sized
blocks, numbered 0–7. When you program your
scanner to track a Type I system, you must select a
size code for each of these blocks. When you have
assigned a size code to all 8 blocks, you’ll have
defined the fleet map for the system you are tracking.
Each size code determines the number of fleets, sub-
fleets, and ID’s each block will have. For example, a
size code of S-4 has one fleet, which is divided into 16
separate subfleets, and it has a total of 512 individual
ID’s.
When a block is assigned a size code, the fleet or
fleets created within the block are assigned a Type I
ID. The way these ID’s display on your scanner
depend on the block number and the block’s size
code. When a Type I ID appears, the leftmost digit
represents the block which contains the ID.
The next 2-3 digits identify which fleet is active, and
the last digit(s) identifies the subfleet.
The details concerning how the size codes are
selected by a Type I System designer are highly
dependent on the specific needs of the system’s
users. Some organizations might want many subfleets
with only a few radios each, while another organiza-
tion might want only a few subfleets with many radios
each. Your task is to program your fleet map with the
same size code assignments as the trunked system. If
you do this accurately, you’ll track all the Fleet-Sub-
fleet combinations used by the system. In other words,
you’ll hear complete communications while monitoring
a trunked system.
If you don’t already know the size codes used, you’ll
have to guess at them. But since you don’t have to
figure out all the blocks at once, this isn’t as hard as it

128
Appendix
seems. Select a size code for a block, and then press
Scan. Now listen to the communications. If you decide
you are receiving most of the replies to the conversa-
tions with ID’s assigned to the block you just pro-
grammed, then you’ve probably selected the right size
code and can work on the next block of the map.
Finally, for most public safety systems there are some
size codes which are more common. S-3 and S-4 are
probably the most common, followed by S-10, S-11,
and S-12.
Size Code Restrictions
If you select size code S-12, S-13, or S-14, there are
some restrictions as to which blocks can be used for
these codes.
S-12 can only be assigned to Blocks 0, 2, 4, or 6.
S-13 can only be assigned to Blocks 0 and 4.
S-14 can only be assigned to Block 0.
Since these size codes require multiple blocks, you
will be prompted for the next available block when pro-
gramming a fleet map. For example, if you assign
Block 0 as an S-12, you will be prompted for b2, the
next block available, instead of b1. And if you assign
Block 0 as an S-14, you would not see another prompt
because it uses all available blocks.

129
Planning
Planning
Collecting Information
Getting your scanner programmed and scanning takes
a few steps. This help guides you through these steps
that will make it easier for you to start scanning.
1. Collect information about the system(s) you want
to monitor.
Do you want to listen to your local police and
fire departments? How about the highway
patrol, ambulance service, and aircraft? You
might even want to listen to your local utility
company as they track down a break in electri-
cal service in your area.
Make a list of the agencies you want to listen to,
then look up the frequencies and systems used
by those agencies. The Internet is a great
source for current frequencies and information
about scanning. Here are a few useful sites:
•http://www.scannermaster.com/ - frequency
resources and home of Police Call.
You can also call them at 1 800 SCANNER
(hours are from 10:00 a.m. to 5:00 p.m. Eastern
Time Monday through Friday.)
•http://www.radioreference.com/ - the Internet's
premier source for user-supported radio system
information.
•http://www.bearcat1.com/ - frequency information
from National Communications.
•http://svartifoss2.fcc.gov/reports/index.cfm -
conventional frequency information on file with the
US Government
Tips:
• Scanners are designed to monitor complex radio
systems. That means that programming your
scanner might seem like a daunting task at first.
Be patient if you don't get it right the first time. You
can also seek out help locally for the systems you
want to scan by visiting the forums section of
http://www.radioreference.com/forums.
Planning

130
Planning
• Before you start to program your scanner, decide
how you want to organize the frequencies you
want to scan. For example, some areas are best
organized by geographic location (east, north,
south, west, central, etc), while others are best
organized by agency (police, sheriff, ambulance,
fire, etc.). You might even find it easier to organize
a mixture of frequencies (north, southeast, and
west for police but fire all in one group for exam-
ple).
2. Organize the system information using these sys-
tem worksheets included in this appendix.
• Use “Conventional System Worksheet” on
Page 135 to organize info about conventional fre-
quencies.
• Use “Motorola System Worksheet” on Page 136 to
organize information about Motorola frequencies.
• Use “LTR/EDACS System Worksheet” on
Page 138 to organize information about LTR and
EDACS frequencies.
3. Follow the instructions in “Filling Out The Conven-
tional System Worksheet” on Page 131, “Filling
Out The Motorola Worksheet” on Page 131, and
“Filling Out the LTR and EDACS Worksheet” on
Page 133 to program your scanner.
Tips:
• Before you start, make as many copies of the
worksheets as you think you'll need. You can also
go to the download section of
http://www.uniden.com/productsupport.cfm and
download the worksheets there.
• All worksheet instructions assume that you have
completed the critical Step 1 (collecting the system
information). Don't skip this step.
• Use a pencil to fill out the worksheets. This lets
you change information if necessary.

131
Planning
Filling Out The Conventional
System Worksheet
System Name and Quick Key
Fill in a name that describes the system you want to
create. For example, you can enter "Dallas Police" or
"Amateur Radio" here. If you want to store more than
one type of frequency, you can enter "Mixed."
Fill in the key you want to press to quickly activate/
deactivate the system. You can assign the same quick
key to multiple systems.
Group Name and Quick Key
Each worksheet documents the settings for one chan-
nel group within a system. If you have fewer channels
in the group than fits on the page, you can skip a line
and enter an additional group of channels (enter the
group info in the line you skipped). If you have more
channels for the group than will fit on the page, use
additional pages.
Fill in the key you want to press with to quickly
activate/deactivate the channel group. You can assign
the same quick key to multiple groups within a system.
Frequency-Alpha Tag-Priority-
CTCSS/DCS
Fill in the details for each channel you want to store in
this channel group.
Filling Out The Motorola Worksheet
System Name and Quick Key
Fill in a name that describes the system you want to cre-
ate. For example, you can enter "Dallas Police" or
"Amateur Radio" here. If you want to store more than
one type of frequency, you can enter "Mixed."
Func

132
Planning
Fill in the key you want to press to quickly activate/
deactivate the system. You can assign the same quick
key to multiple systems.
System Type
Circle in the type of Motorola system you are scan-
ning.
• Type 1. A fleet map is supplied for this type of
system.
• Type 2 800 MHz Standard. Used for most 800
MHz systems. No fleet map is supplied for this
type of system.
• Type 2 800 MHz Splinter. Used for some 800 MHz
systems near border areas.
• Type 2 900 MHz. The supplied frequencies are
between 935.0125 MHz and 939.9875 MHz.
No fleet map is supplied for this type of system.
• Type 2 UHF. The supplied frequencies are
between 406 MHz and 512 MHz. No fleet map is
supplied for this type of system.
• Type 2 VHF. The supplied frequencies are
between 136 MHz and 174 MHz. No fleet map is
supplied for this type of system.
System Frequencies
Enter the frequencies used by the system. Motorola
systems can use up to 28 frequencies. Place an aster-
isk or other mark next to frequencies identified as data
channels.
Fleet Map (Type I or Type I/Type II
Hybrid Only)
Fill in the fleet map used by this agency.

133
Planning
Band Plan (VHF or UHF Only)
A band plan is required so the scanner can correctly
determine the voice channel frequency. Fill in the band
plan used by this agency, consisting of:
• Base frequency
• Step frequency
• Channel offset
You can enter up to three band plans.
Group Name and Quick Key
Each “Motorola System Worksheet 2” documents the
settings for one channel group within a system. If you
have fewer channels in the group than fits on the
page, you can skip a line and enter an additional
group of
channels (enter the group information in the line you
skipped). If you have more channels for the group than
will fit on the page, use additional pages.
Fill in the key you want to press with to quickly
activate/deactivate the channel group. You can assign
the same quick key to multiple groups within a system.
Talk Group ID-Alpha Tag-Alert
Fill in the details for each channel you want to store in
this channel group.
Filling Out the LTR and EDACS
Worksheet
System Name and Quick Key
Fill in a name that describes the system you want to
create. For example, you can enter "Dallas Police" or
"Amateur Radio" here. If you want to store more than
one type of frequency, you can enter "Mixed."
Func

134
Planning
Fill in the key you want to press to quickly activate/
deactivate the system. You can assign the same quick
key to multiple systems.
System Frequencies and LCN
Fill in each system frequency and its associated Logi-
cal Channel Number (LCN).
Group Name and Quick Key
Each “LTR/EDACS System Worksheet 2” documents
the settings for one channel group within a system. If
you have fewer channels in the group than fits on the
page, you can skip a line and enter an additional
group of
channels (enter the group information in the line you
skipped). If you have more channels for the group than
will fit on the page, use additional pages.
Fill in the key you want to press with to quickly
activate/deactivate the channel group. You can assign
the same quick key to multiple groups within a system.
Talk Group ID-Alpha Tag-Alert
Fill in the details for each channel you want to store in
this channel group.
Func

135
Planning
Conventional System Worksheet
System Name Group Name
System Quick Key Group Quick Key
Frequency Alpha Tag Priority CTCSS/DCS
Conventional System Worksheet
136
Planning
System Name
System Quick Key
System
Frequencies
Fleet Map
Block 0
Block 1
Block 2
Block 3
Block 4
Block 5
Block 6
Block 7
Band Plan A
Base Frequency
Step Frequency
Offset
Band Plan B
Base Frequency
Step Frequency
Offset
Band Plan C
Base Frequency
Step Frequency
Offset
Type I
Type II 800 MHz:
Standard
Splinter
Type II UHF
Type II VHF
Motorola System Worksheet 1
Motorola System Worksheet

137
Planning
System Name Group Name
Group Quick Key
Talk Group ID Alpha Tag Alert
Motorola System Worksheet 2

138
Planning
System Name
System Quick Key
System
Frequency
Logical
Channel
LTR/EDACS System Worksheet 1
LTR/EDACS System Worksheet

139
Planning
System Name Group Name
System Quick Key Group Quick Key
Talk Group ID Alpha Tag Alert
LTR/EDACS System W orksheet 2

140
Preprogrammed Systems
Preprogrammed Systems
Your scanner is preprogrammed with over 400
channels covering police, fire, and ambulance
operations in the 25 most populated counties in the
US. The following list details the preprogrammed
information.
By default, all of the preprogrammed systems are
unlocked, and your scanner begins to scan them when
you turn it on. To speed up scanning, you can lock out
systems that are beyond your reception area (typically
no more than 25 miles using the supplied antenna).
Follow these steps to lock out systems:.
1. Press and hold .
2. While continuing to hold , rotate the scroll
control to select a system you want to lock out.
3. While continuing to hold , press L/O to lock
out the system.
4. Repeat Steps 2, 3, and 4 to lock out additional
systems.
The preprogrammed systems provide a starting point;
you will want to find out more information about your
local radio systems so you can customize the pro-
gramming to better suit your listening preferences.
Notes:
• You might hear transmissions on frequencies
assigned to very distant stations. This will happen
if a local system also uses the same frequency.
Disregard the text tag for these transmissions (e.g.
if you are in California, you aren’t really receiving
Florida transmissions even if the scanner displays
Dade County).
• To free up memory, you can delete systems that
you will not be monitoring. Refer to “Deleting Sys-
tems” on Page 81.
• Data used for the preprogrammed information was
supplied courtesy of
http://www.radioreference.com , the Internet’s
premier scanning resource (RadioReference is not
affiliated with Uniden America Corporation).
Func
Func
Func
Preprogrammed Systems

141
Preprogrammed Systems
.
State County City System
Arizona
Arizona Maricopa Avondale Maricopa Conv
Arizona Maricopa Capitol Maricopa Conv
Arizona Maricopa Chandler Chandler MOT
Arizona Maricopa Chandler Maricopa Conv
Arizona Maricopa El Mirage Maricopa Conv
Arizona Maricopa
Fort McDowell
Indian Community Maricopa Conv
Arizona Maricopa Goodyear Maricopa Conv
Arizona Maricopa
Salt River Indian
Community Maricopa Conv
Arizona Maricopa Scotsdale Maricopa Conv
Arizona Maricopa Tempe Tempe MOT
Arizona Maricopa Tolleson Maricopa Conv
Arizona Maricopa Tonopah Maricopa Conv
Arizona Maricopa Wickenberg Maricopa Conv
California
California Alameda Alameda Alameda MOT
California Alameda Albany Alameda Conv
California Alameda East Bay Park Alameda Conv
California Alameda Fremont Alameda MOT
California Alameda Hayward Alameda MOT
California Alameda Newark Alameda MOT
California Alameda Oakland Oakland EDACS
California Alameda Piedmont Oakland EDACS
California Alameda San Leandro Alameda MOT
California Alameda Union City Alameda MOT
California
Los
Angeles Alhambra Los Angeles Conv
California
Los
Angeles
Altaden Crest
Valley Los Angeles Conv
California
Los
Angeles Arcadia Los Angeles Conv
California
Los
Angeles Avalon Los Angeles Conv
California
Los
Angeles Baldwin Park Los Angeles Conv
California
Los
Angeles Bell Los Angeles Conv
California
Los
Angeles Bell Gardens Los Angeles Conv
California
Los
Angeles Beverly Hills Los Angeles Conv
California
Los
Angeles Burbank Los Angeles Conv
California
Los
Angeles Carson Los Angeles Conv

142
Preprogrammed Systems
California
Los
Angeles Century Los Angeles Conv
California
Los
Angeles Claremont Los Angeles Conv
California
Los
Angeles College/Transit Los Angeles Conv
California
Los
Angeles Compton Los Angeles Conv
California
Los
Angeles Covina Los Angeles Conv
California
Los
Angeles Crescenta Los Angeles Conv
California
Los
Angeles Culver City Culver City MOT
California
Los
Angeles Downey Los Angeles Conv
California
Los
Angeles El Segundo Los Angeles Conv
California
Los
Angeles Gardena Los Angeles Conv
California
Los
Angeles Glendora Los Angeles Conv
California
Los
Angeles Hawthorn Los Angeles Conv
State County City System
California
Los
Angeles Hermosa Beach Los Angeles Conv
California
Los
Angeles Huntington Park Los Angeles Conv
California
Los
Angeles Industry Los Angeles Conv
California
Los
Angeles Inglewood Los Angeles Conv
California
Los
Angeles Irwindale Los Angeles Conv
California
Los
Angeles LA County Los Angeles Conv
California
Los
Angeles La Habra Heights Los Angeles Conv
California
Los
Angeles La Verne Los Angeles Conv
California
Los
Angeles Lakewood Los Angeles Conv
California
Los
Angeles Lancaster Los Angeles Conv
California
Los
Angeles Lennox Los Angeles Conv

143
Preprogrammed Systems
California
Los
Angeles Lomita Los Angeles Conv
California
Los
Angeles Long Beach Los Angeles Conv
California
Los
Angeles Lost Hills Los Angeles Conv
California
Los
Angeles Manhattan Beach Los Angeles Conv
California
Los
Angeles Marina Del Rey Los Angeles Conv
California
Los
Angeles Maywood Los Angeles Conv
California
Los
Angeles Monrovia Los Angeles Conv
California
Los
Angeles Montebello Los Angeles Conv
California
Los
Angeles Monterey Park Los Angeles Conv
California
Los
Angeles Norwalk Los Angeles Conv
California
Los
Angeles Pasadena Los Angeles Conv
California
Los
Angeles Pico Rivera Los Angeles Conv
California
Los
Angeles Pomona Los Angeles Conv
California
Los
Angeles Redondo Beach Los Angeles Conv
California
Los
Angeles San Dimas Los Angeles Conv
California
Los
Angeles San Fernando Los Angeles Conv
California
Los
Angeles Santa Clarita Valley Los Angeles Conv
California
Los
Angeles Santa Monica Los Angeles Conv
California
Los
Angeles Signal Hill Signal Hill MOT
California
Los
Angeles South Bay Los Angeles Conv
California
Los
Angeles Temple City Los Angeles Conv
California
Los
Angeles Verdugo Los Angeles Conv
California
Los
Angeles Walnut Los Angeles Conv
California
Los
Angeles West Covina Los Angeles Conv

144
Preprogrammed Systems
California
Los
Angeles West Hollywood Los Angeles Conv
California
Los
Angeles Whittier Los Angeles Conv
California Orange Brea Orange MOT
California Orange Costa Mesa Orange MOT
California Orange La Habra Orange MOT
California Orange Laguna Beach Orange MOT
California Orange Orange County Orange MOT
California Orange Santa Ana Orange MOT
California Riverside Banning Riverside Conv
California Riverside Beaumont Riverside Conv
California Riverside Blythe Riverside Conv
California Riverside Cathedral Riverside Conv
California Riverside Corona Riverside Conv
California Riverside Desert Hot Springs Riverside Conv
California Riverside Hemet Riverside Conv
State County City System
California Riverside Murrietta Riverside Conv
California Riverside Palm Springs Palm Springs MOT
California Riverside Palm Springs Riverside Conv
California Riverside Riverside Riverside Conv
California Riverside San Jacinto Riverside Conv
California
San
Bernadino Adelanto
SanBernadinoE
MOT
California
San
Bernadino Barstow
SanBernadinoD
MOT
California
San
Bernadino Big Bear
SanBernadinoA
MOT
California
San
Bernadino Chino
SanBernadinoA
MOT
California
San
Bernadino Chino
SanBernadinoB
MOT
California
San
Bernadino Colton
SanBernadinoA
MOT
California
San
Bernadino Fontana
SanBernadinoB
MOT
California
San
Bernadino Greater Highland
SanBernadinoB
MOT
California
San
Bernadino Loma Linda
SanBernadinoB
MOT
California
San
Bernadino Lucerne Valley
SanBernadinoC
MOT
California
San
Bernadino Montclair
SanBernadinoA
MOT
California
San
Bernadino Ontario
SanBernadinoA
MOT
California
San
Bernadino
Rancho
Cucamonga
SanBernadinoB
MOT

145
Preprogrammed Systems
California
San
Bernadino Redlands
SanBernadinoB
MOT
California
San
Bernadino Rialto
SanBernadinoB
MOT
California
San
Bernadino San Bernadino
SanBernadinoA
MOT
California
San
Bernadino Twin Peaks
SanBernadinoA
MOT
California
San
Bernadino Upland
SanBernadinoA
MOT
California
San
Bernadino Wrightwood
SanBernadinoA
MOT
California
San
Bernadino Yucaipa
SanBernadinoB
MOT
California San Diego Camp Pendalton San Diego MOT
California San Diego Del Mar San Diego MOT
California San Diego Escondido San Diego MOT
State County City System
California San Diego Inland San Diego MOT
California San Diego Monte Vista San Diego MOT
California San Diego National City National City MOT
California San Diego North County San Diego MOT
California San Diego Rancho San Diego MOT
California San Diego San Diego San Diego City MOT
California San Diego San Diego County San Diego Conv
California San Diego South Bay San Diego MOT
California Santa Clara Gilroy Santa Clara Conv
California Santa Clara Milpitas Santa Clara Conv
California Santa Clara Mountain View Santa Clara Conv
California Santa Clara Palo Alto Santa Clara Conv
California Santa Clara San Jose Santa Clara Conv
California Santa Clara Santa Clara Santa Clara Conv
California Santa Clara Santa Clara Santa Clara MOT
California Santa Clara Sunnyvale Santa Clara Conv
Florida
Florida Broward Broward
Broward County
MOT
Florida Broward Coconut Creek Broward Conv
Florida Broward Coral Springs Coral Springs MOT
Florida Broward Dania Hollywood EDACS
Florida Broward Fort Lauderdale Ft.Lauderdale MOT
Florida Broward Hollywood Hollywood EDACS
Florida Broward Margate Coral Springs MOT
Florida Broward Miramar
Broward County
MOT
Florida Broward Oakland Park Ft.Lauderdale MOT
Florida Broward PembrokePines Broward Conv
Florida Broward Plantation Plantation MOT
Florida Broward Pompano Ft.Lauderdale MOT

146
Preprogrammed Systems
Florida Broward Pompano Beach Ft.Lauderdale MOT
Florida Broward Sunrise Broward Conv
Florida Dade Carol City Dade EDACS
Florida Dade Cutler Ridge Dade EDACS
Florida Dade Dade Dade Conv
Florida Dade Dade Dade Fire EDACS
Florida Dade Doral Dade EDACS
Florida Dade Hammocks Dade EDACS
Florida Dade Homestead Dade Conv
Florida Dade Intracostal Dade EDACS
Florida Dade Kendall Dade EDACS
Florida Dade Miami Miami MOT
Florida Dade Miami Beach Miami Beach MOT
Florida Dade Miami Lakes Dade EDACS
Florida Dade Miccosokuee Dade Fire EDACS
Florida Dade Municipal Dade EDACS
Florida Dade Northside Dade EDACS
Illinois
Illinois Cook Alsip Cook Conv
Illinois Cook Chicago Cook Conv
State County City System
Illinois Cook Englewood Cook Conv
Illinois Cook Evergreen Park Cook Conv
Illinois Cook Franklin Park Cook Conv
Illinois Cook Hoffman NW Central MOT
Illinois Cook Hometown Cook Conv
Illinois Cook Merriont Park Cook Conv
Illinois Cook Northlake Cook Conv
Illinois Cook Northlake Cook Conv
Illinois Cook Oak Lawn Cook Conv
Illinois Cook Rosemont Cook Conv
Illinois Cook Schaumburg Schaumburg MOT
Illinois Cook Streamwood NW Central MOT
Illinois Cook Veteran's Park Cook Conv
Massachusetts
Massachusetts Middlesex Ashby Middlesex Conv
Massachusetts Middlesex Ayer Middlesex Conv
Massachusetts Middlesex Belmont Cambridge MOT
Massachusetts Middlesex Cambridge Cambridge MOT
Massachusetts Middlesex Shirley Middlesex Conv
Massachusetts Middlesex Townsend Middlesex Conv
Michigan
Michigan Wayne Allen Park Wayne Conv
Michigan Wayne Belleville Wayne Conv
Michigan Wayne Canton Wayne Conv
Michigan Wayne Dearborn Wayne Conv
Michigan Wayne Garden City Wayne Conv
Michigan Wayne Huron Wayne Conv
Michigan Wayne Northville Wayne Conv
Michigan Wayne Plymouth Wayne Conv

147
Preprogrammed Systems
Michigan Wayne Redford Wayne Conv
Michigan Wayne Romulus Wayne Conv
Michigan Wayne Sumpter Wayne Conv
Michigan Wayne Van Buren Wayne Conv
Michigan Wayne WSU Wayne Conv
Nevada
Nevada Clark Clark County Clark County MOT
Nevada Clark Henderson Clark County MOT
Nevada Clark Las Vegas Clark County MOT
Nevada Clark North Las Vegas Clark County MOT
New York
New York New York Bronx New York Conv
New York New York Brooklyn New York Conv
New York New York Manhattan New York Conv
New York New York New York New York Conv
New York New York Queens New York Conv
New York New York Staten Island New York Conv
New York Suffolk Amangansett East Hampton MOT
New York Suffolk Amityville Village SuffolkCounty MOT
New York Suffolk Asharoken SuffolkCounty MOT
State County City System
New York Suffolk Bridgehampton East Hampton MOT
New York Suffolk East Hampton East Hampton MOT
New York Suffolk East Hampton East Hampton MOT
New York Suffolk
East Hampton
Village East Hampton MOT
New York Suffolk Islip Township SuffolkCounty MOT
New York Suffolk Lloyd Park SuffolkCounty MOT
New York Suffolk Montauk East Hampton MOT
New York Suffolk Northport SuffolkCounty MOT
New York Suffolk Ocean Beach SuffolkCounty MOT
New York Suffolk Riverhead SuffolkCounty MOT
New York Suffolk Sag Harbor East Hampton MOT
New York Suffolk Sag Harbor Village East Hampton MOT
New York Suffolk Smithtown SuffolkCounty MOT
New York Suffolk Springs East Hampton MOT
New York Suffolk Suffolk County SuffolkCounty MOT
Ohio
Ohio Cuyahoga Bay Village Cuyahoga Conv
Ohio Cuyahoga Beachwood Cuyahoga Conv
Ohio Cuyahoga Bedford Cuyahoga Conv
Ohio Cuyahoga Bedford Heights Cuyahoga Conv
Ohio Cuyahoga Bentleyville Cuyahoga Conv
Ohio Cuyahoga Berea Cuyahoga Conv
Ohio Cuyahoga Bratenhal Cuyahoga Conv
Ohio Cuyahoga Brecksville Cuyahoga Conv
Ohio Cuyahoga Broadview Heights Cuyahoga Conv
Ohio Cuyahoga Brooklyn Parma EDACS
Ohio Cuyahoga Brooklyn Heights Cuyahoga Conv

148
Preprogrammed Systems
Ohio Cuyahoga Brookpark Brook Park MOT
Ohio Cuyahoga Chagrin Falls Cuyahoga Conv
Ohio Cuyahoga Cleveland Heights Cuyahoga Conv
Ohio Cuyahoga Cuyahoga Cuyahoga Conv
Ohio Cuyahoga Cuyahoga Heights Cuyahoga Conv
Ohio Cuyahoga East Cleveland Cuyahoga Conv
Ohio Cuyahoga Euclid Cuyahoga Conv
Ohio Cuyahoga Fairview Park Cuyahoga Conv
Ohio Cuyahoga Garfield Heights Cuyahoga Conv
Ohio Cuyahoga Gates Mills Cuyahoga Conv
Ohio Cuyahoga Glenwillow Cuyahoga Conv
Ohio Cuyahoga Highland Heights Cuyahoga Conv
Ohio Cuyahoga Highland Hills Cuyahoga Conv
Ohio Cuyahoga Hunting Valley Cuyahoga Conv
Ohio Cuyahoga Independence Cuyahoga Conv
Ohio Cuyahoga Lakewood Cuyahoga Conv
Ohio Cuyahoga Linndale Parma EDACS
Ohio Cuyahoga Lyndhurst Cuyahoga Conv
Ohio Cuyahoga Maple Heights Cuyahoga Conv
Ohio Cuyahoga Mayfield Cuyahoga Conv
Ohio Cuyahoga Middleburg Heights Brook Park MOT
Ohio Cuyahoga Middleburg Heights Cuyahoga Conv
State County City System
Ohio Cuyahoga Moreland Hills Cuyahoga Conv
Ohio Cuyahoga Newburg Heights Cuyahoga Conv
Ohio Cuyahoga North Olmsted Cuyahoga Conv
Ohio Cuyahoga North Randall Cuyahoga Conv
Ohio Cuyahoga North Royalton Brook Park MOT
Ohio Cuyahoga North Royalton Cuyahoga Conv
Ohio Cuyahoga Oakwood Cuyahoga Conv
Ohio Cuyahoga Olmstead Falls Brook Park MOT
Ohio Cuyahoga Olmsted Falls Cuyahoga Conv
Ohio Cuyahoga Olmsted Township Cuyahoga Conv
Ohio Cuyahoga Orange Cuyahoga Conv
Ohio Cuyahoga Parma Parma EDACS
Ohio Cuyahoga Parma Heights Brook Park MOT
Ohio Cuyahoga Pepper Pike Cuyahoga Conv
Ohio Cuyahoga Richmond Heights Cuyahoga Conv
Ohio Cuyahoga Rocky River Cuyahoga Conv
Ohio Cuyahoga Seven Hills Cuyahoga Conv
Ohio Cuyahoga Shaker Heights Cuyahoga Conv
Ohio Cuyahoga Solon Cuyahoga Conv
Ohio Cuyahoga South Euclid Cuyahoga Conv
Ohio Cuyahoga Strongsville Brook Park MOT
Ohio Cuyahoga University Circle Cuyahoga Conv
Ohio Cuyahoga University Heights Cuyahoga Conv
Ohio Cuyahoga Valley View Cuyahoga Conv
Ohio Cuyahoga Walton Hills Cuyahoga Conv
Ohio Cuyahoga
Warrensville
Heights Cuyahoga Conv
Ohio Cuyahoga Westlake Cuyahoga Conv

149
Preprogrammed Systems
Ohio Cuyahoga Woodmere Cuyahoga Conv
Pennsylvania
Pennsylvania Philadlphia Temple PD Philadelphia Conv
Texas
Texas Bexar Alamo Heights Bexar Conv
Texas Bexar Balcones Heights Bexar Conv
Texas Bexar Bexar County Bexar Conv
Texas Bexar Castle Hills Bexar Conv
Texas Bexar Hollywood Park Bexar Conv
Texas Bexar Kirby Bexar Conv
Texas Bexar Leon Valley Bexar Conv
Texas Bexar Live Oak Bexar Conv
Texas Bexar Shavano Park Bexar Conv
Texas Bexar Terrell Hills Bexar Conv
Texas Bexar Universal City Bexar Conv
Texas Bexar Windcrest Bexar Conv
Texas Dallas Addison Carrolton MOT
Texas Dallas Carrolton Carrolton MOT
Texas Dallas Cockrell Hill Dallas MOT
Texas Dallas Coppell Lewisville MOT
Texas Dallas Dallas Dallas Conv
Texas Dallas Dallas Dallas MOT
Texas Dallas Desoto Dallas Conv
State County City System
Texas Dallas Duncanville Dallas Conv
Texas Dallas Farmers Branch Carrolton MOT
Texas Dallas Flower Mound Lewisville MOT
Texas Dallas Garland Garland MOT
Texas Dallas Grand Prairie Grand Prairie MOT
Texas Dallas Highland Park Dallas Conv
Texas Dallas Highland Village Lewisville MOT
Texas Dallas Hutchins Dallas Conv
Texas Dallas Irving Irving EDACS
Texas Dallas Lake Cities Lewisville MOT
Texas Dallas Lancaster Dallas Conv
Texas Dallas Lewisville Lewisville MOT
Texas Dallas Mesquite Mesquite MOT
Texas Dallas Richardson Richardson EDACS
Texas Dallas Rowlett Garland MOT
Texas Dallas Sachse Garland MOT
Texas Dallas Seagoville Dallas Conv
Texas Dallas Sunnyvale Dallas Conv
Texas Dallas University Park Dallas Conv
Texas Dallas Wilmer Dallas Conv
Texas Harris Arcola Starnet MOT
Texas Harris Baytown Starnet MOT
Texas Harris Brazoria County Starnet MOT
Texas Harris Cy-Fair Harris Conv
Texas Harris Cypress Creek Harris Conv
Texas Harris Fresno Starnet MOT

150
Preprogrammed Systems
Texas Harris Ft Bend County Starnet MOT
Texas Harris Fulshar Starnet MOT
Texas Harris Galena Park Starnet MOT
Texas Harris Harris County Starnet MOT
Texas Harris Humble Starnet MOT
Texas Harris Jersey Village Starnet MOT
Texas Harris Katy Starnet MOT
Texas Harris Kendleton Starnet MOT
Texas Harris Meadows Starnet MOT
Texas Harris Needville Starnet MOT
Texas Harris Pasadena Starnet MOT
Texas Harris Pecan Grove Starnet MOT
Texas Harris Richmond Starnet MOT
Texas Harris Rosehill Harris Conv
Texas Harris Rosenberg Starnet MOT
Texas Harris Tomball Harris Conv
Texas Harris Webster Starnet MOT
Tex a s Ha r ri s
West University
Place Starnet MOT
Texas Harris Willow Fork Starnet MOT
Texas Tarrant Arlington Arlington MOT
Texas Tarrant Azle Tarrant Conv
Texas Tarrant Bedford NE Tarrant MOT
Texas Tarrant Benbrook Tarrant Conv
State County City System
Texas Tarrant Burleson Tarrant Conv
Texas Tarrant Colleyville NE Tarrant MOT
Texas Tarrant Crowley Tarrant Conv
Texas Tarrant
Dalworthington
Gardens Tarrant Conv
Texas Tarrant Eagle Mount Tarrant Conv
Texas Tarrant Euless NE Tarrant MOT
Texas Tarrant Forest Hill Tarrant Conv
Texas Tarrant Forest Hills Fort Worth MOT
Texas Tarrant Fort Worth Fort Worth MOT
Texas Tarrant Grapevine NE Tarrant MOT
Texas Tarrant Haltom City Fort Worth MOT
Texas Tarrant Haslet Tarrant Conv
Texas Tarrant Hurst Tarrant Conv
Texas Tarrant Keller NE Tarrant MOT
Texas Tarrant Kennedale Fort Worth MOT
Texas Tarrant Lake Worth Tarrant Conv
Texas Tarrant North Richland Hills Fort Worth MOT
Texas Tarrant Rendon Tarrant Conv
Texas Tarrant Richland Hills Fort Worth MOT
Texas Tarrant Saginaw Tarrant Conv
Texas Tarrant Southlake Fort Worth MOT
Texas Tarrant Southlake NE Tarrant MOT
Texas Tarrant Watauga Tarrant Conv
Texas Tarrant Westlake NE Tarrant MOT

151
Preprogrammed Systems
Texas Tarrant White Settlement Tarrant Conv
Washington
Washington King Airport PortOfSeattle MOT
Washington King Algona Seattle MOT
Washington King Auburn Seattle MOT
Washington King Bellevue Seattle MOT
Washington King Bothell Seattle MOT
Washington King Des Moines Seattle MOT
Washington King Eastside Seattle MOT
Washington King Enumclaw Seattle MOT
Washington King Federal Way Seattle MOT
Washington King Issaquah Seattle MOT
Washington King Kent Seattle MOT
Washington King King County Seattle MOT
Washington King Kirkland Seattle MOT
Washington King Mercer Island Seattle MOT
Washington King Muckleshoot Seattle MOT
Washington King Normandy Park Seattle MOT
Washington King Port PortOfSeattle MOT
Washington King Redmond Seattle MOT
Washington King Seattle Seattle MOT
Washington King Snoqualmie Seattle MOT
Washington King Tukwilla Seattle MOT
Washington King Waterfront PortOfSeattle MOT

152
One-Year Limited Warranty
One-Year Limited Warranty
Important: Evidence of original purchase is required
for warranty service.
WARRANTOR: UNIDEN AMERICA
CORPORATION (“Uniden”)
ELEMENTS OF WARRANTY: Uniden warrants, for
one year, to the original retail owner, this Uniden
Product to be free from defects in materials and
craftsmanship with only the limitations or exclusions
set out below.
WARRANTY DURATION: This warranty to the original
user shall terminate and be of no further effect 12
months after the date of original retail sale. The
warranty is invalid if the Product is (A) damaged or not
maintained as reasonable or necessary, (B) modified,
altered, or used as part of any conversion kits, subas-
semblies, or any configurations not sold by Uniden,
(C) improperly installed, (D) serviced or repaired by
someone other than an authorized Uniden service
center for a defect or malfunction covered by this
warranty, (E) used in any conjunction with equipment
or parts or as part of any system not manufactured by
Uniden, or (F) installed or programmed by anyone
other than as detailed by the Operating Guide for this
product.
STATEMENT OF REMEDY: In the event that the
product does not conform to this warranty at any time
while this warranty is in effect, warrantor will repair the
defect and return it to you without charge for parts,
service, or any other cost (except shipping and
handling) incurred by warrantor or its representatives
in connection with the performance of this warranty.
THE LIMITED WARRANTY SET FORTH ABOVE IS
THE SOLE AND ENTIRE WARRANTY PERTAINING
TO THE PRODUCT AND IS IN LIEU OF AND
EXCLUDES ALL OTHER WARRANTIES OF ANY
NATURE WHATSOEVER, WHETHER EXPRESS,
IMPLIED OR ARISING BY OPERATION OF LAW,
INCLUDING, BUT NOT LIMITED TO ANY IMPLIED
One-Year Limited Warranty

153
One-Year Limited Warranty
WARRANTIES OF MERCHANTABILITY OR
FITNESS FOR A PARTICULAR PURPOSE. THIS
WARRANTY DOES NOT COVER OR PROVIDE FOR
THE REIMBURSEMENT OR PAYMENT OF
INCIDENTAL OR CONSEQUENTIAL DAMAGES.
Some states do not allow this exclusion or limitation of
incidental or consequential damages so the above
limitation or exclusion might not apply to you.
LEGAL REMEDIES: This warranty gives you specific
legal rights, and you might also have other rights
which vary from state to state. This warranty is void
outside the United States of America.
PROCEDURE FOR OBTAINING PERFORMANCE
OF WARRANTY: If, after following the instructions in
this Operating Guide you are certain that the Product
is defective, pack the Product carefully (preferably in
its original packaging). Include evidence of original
purchase and a note describing the defect that has
caused you to return it. The Product should be
shipped freight prepaid, by traceable means, or
delivered, to warrantor at:
Uniden America Corporation
Parts and Service Division
4700 Amon Carter Boulevard
Fort Worth, TX 76155
(800) 297-1023, 8:00 a.m. to 5:00 p.m., Central,
Monday through Friday

154

155

156
REGISTER ONLINE TODAY!
THANK YOU FOR BUYING A UNIDEN PRODUCT.
May be covered under one or more of the following U.S. patents.
4,398,304 4,409,688 4,455,679 4,461,036 4,521,915 4,597,104
4,627,100 4,841,302 4,888,815 4,932,074 4,947,456 5,014,348
5,199,109 5,408,692 5,428,826 5,438,688 5,448,256 5,465,402
5,471,660 5,483,684 5,530,296 5,548,832 5,571,071 5,574,995
5,577,076 5,598,430 5,600,223 5,642,424 5,710,992 5,859,875
5,896,422 5,991,346 5,991,603 6,012,158 6,025,758 6,034,573
6,064,270 6,266,521 ©2005. Uniden America Corporation, Fort Worth, Texas
Contains additional foreign articles. Custom manufactured in
China.
UBZZ01328ZZ
FOR
WWW.UNIDEN.COM
ACCESSORIES,
GO ONLINE &
