Unitron Hearing UWBTE1 HEARING AID User Manual UNIT2068 TechBrochure EN v8
Unitron Hearing, Inc. HEARING AID UNIT2068 TechBrochure EN v8
BTE Guide
Quantum™
Behind-the-ear (BTE)
hearing aid guide

Your hearing aids
Hearing healthcare professional:_______________
__________________________________________
Telephone: _________________________________
Model: ____________________________________
Serial number:______________________________
Replacement batteries: Size 13
Warranty: __________________________________
Program 1 is for: ____________________________
Program 2 is for: ____________________________
Program 3 is for: ____________________________
Program 4 is for: ____________________________
Date of purchase: ___________________________
Thank you
Thank you for choosing Unitron BTE hearing
aids.
At Unitron, we care deeply about people with
hearing loss. We work closely with hearing
healthcare professionals to make advanced,
purpose-driven solutions available to
everyone. Because hearing matters.
Quick reference
Changing batteries
Plus
(+) Signs
Low battery warning
2 beeps every
30 minutes
Battery size
13
On/Off
Lever
volume control; Up=louder, down=softer
comfort-clarity control;
up=clarity, down=comfort
Push button
switching programs
volume control;
right aid=louder, left aid=softer
comfort-clarity control;
right aid=clarity, left aid=comfort
Table of contents
Your hearing aid at a glance....................................................2
Putting your hearing aids on your ears...................................4
Turning your hearing aids on and off .....................................6
Battery information .................................................................8
Tips for wearing hearing aids for the first time .....................12
Operating instructions...........................................................14
Using the telephone..............................................................22
Caring for your hearing aids..................................................25
Cleaning your hearing aids....................................................26
Signature features of your hearing aids ...............................30
Assistive listening devices ....................................................32
Troubleshooting guide ..........................................................34
Warnings ...............................................................................39
Warning to hearing aid dispensers (to comply with the U.S.
Food and Drug Administration (FDA) regulations) ............44
Compliance information........................................................47
Client feedback......................................................................49
on off open
FPO
2 3
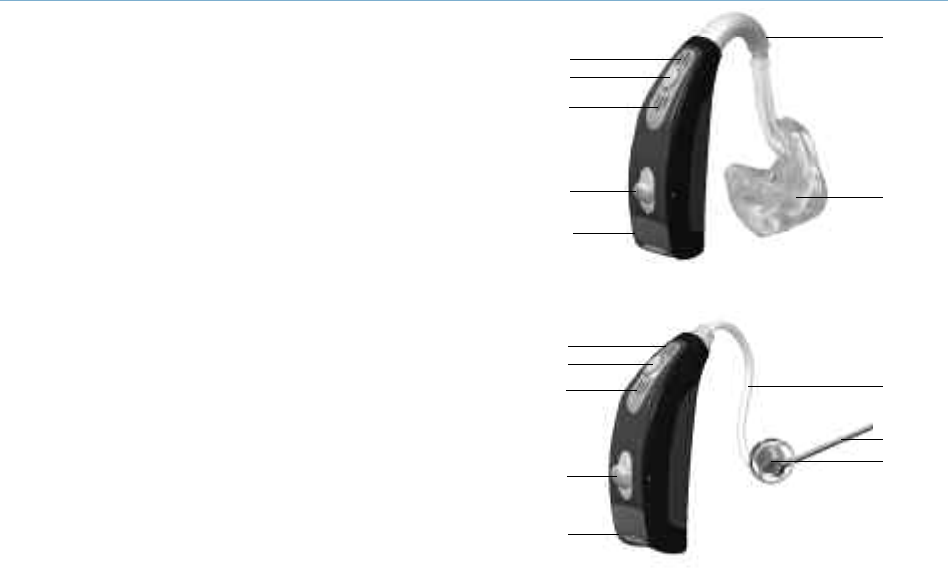
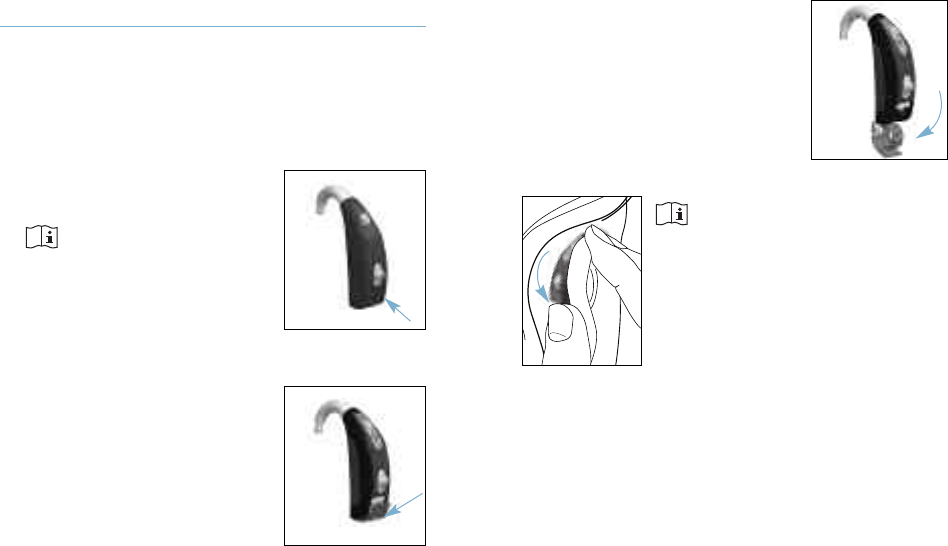
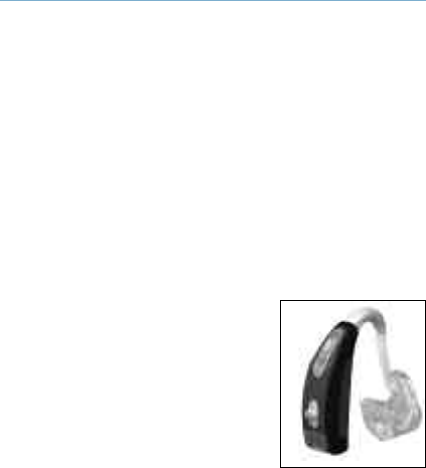
Your hearing aid at a glance
1Earhook - your custom made earmold attaches to your
hearing aid using the earhook
2Microphone - sound enters your hearing aid via the
microphones. Microphone shield - protects
microphones from dirt & debris
3Push button - switches between listening programs or
changes the volume level or comfort-clarity, depending
on your customized fitting
4Lever - controls either the volume or comfort-clarity,
depending on your customized fitting
5Battery door/on & off - close the door to turn on your
hearing aid, partly open the door to turn off your
hearing aid. Opening the door all the way gives you
access to change the battery
6Earmold - allows the sound to pass from the hearing
aid to the ear and holds the hearing aid in place
7Slim tube - sound travels down the slim tube to the
ear canal
8Dome - holds the slim tube in place in your ear canal
9Retention piece - helps prevent the dome and slim
tube from moving out of the ear canal
1
2
3
4
5
6
7
9
2
3
5
8
4
2
2
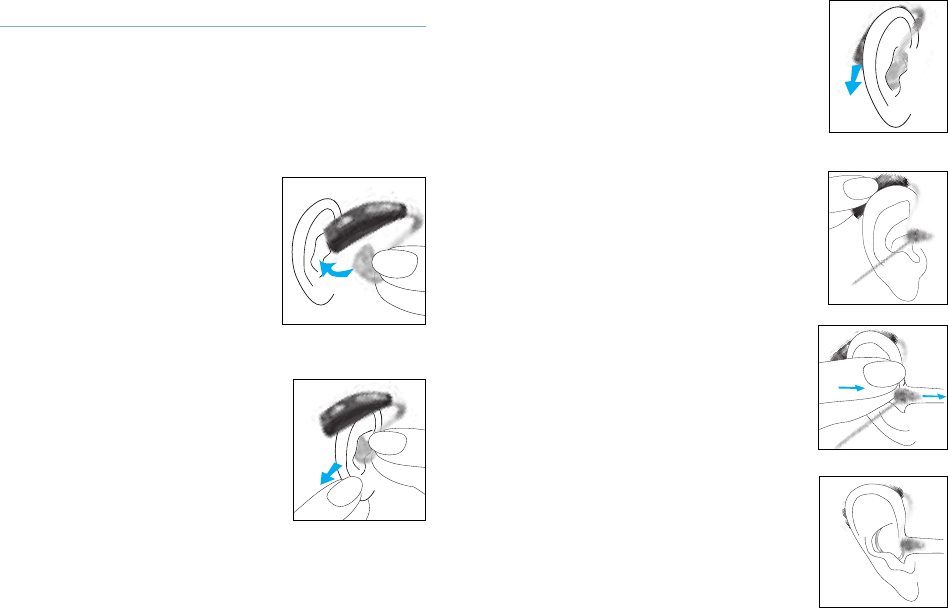
3. Place the hearing aid over
the top of your ear.
BTEs with slim tubes
1. Place the hearing aid over
the top of your ear. The slim
tube should lie flush against
your head and not stick out.
2. Hold the slim tube where it
attaches to the dome and
gently push the dome into
your ear canal.
3. Place the retention piece in
your ear so it rests at the
bottom of the opening of
your ear canal.
Putting your hearing aids on your ears
Your behind-the-ear (BTE) may be color-coded
with a small dot on the battery door:
red = right ear; blue = left ear.
BTEs with earmolds
1. Hold the earmold between
your thumb and index
finger. The opening should
be pointing in towards your
ear canal with the BTE
resting upwards over the
top of your ear.
2. Carefully insert the
earmold in your ear. You
may need to twist it slightly
to the back. The earmold
should fit into your ear
snugly and comfortably.
Pulling down and back on your earlobe
may help you insert the earmold into your
ear canal more easily.
4 5
1.
2.
3.
1.
2.
3.
3. OPEN: Fully open the
battery door to access and
change the battery.
Note: When turning your
hearing aid on and off while it
is on the ear, grasp the top and
bottom of the device with your
index finger and thumb. Use
your thumb to open and close
the battery door.
Turning your hearing aids on and off
Your hearing aids have a three-position
battery door that acts as an on/off switch and
that allows access to the battery
compartment.
1. ON: Close the battery door
fully.
Note: It may take 5
seconds before the hearing
aid turns on. Your hearing
healthcare provider can
additionally increase the
start up delay if required.
2. OFF: Partially open the
battery door.
6 7
2.
3.
FPO
1.
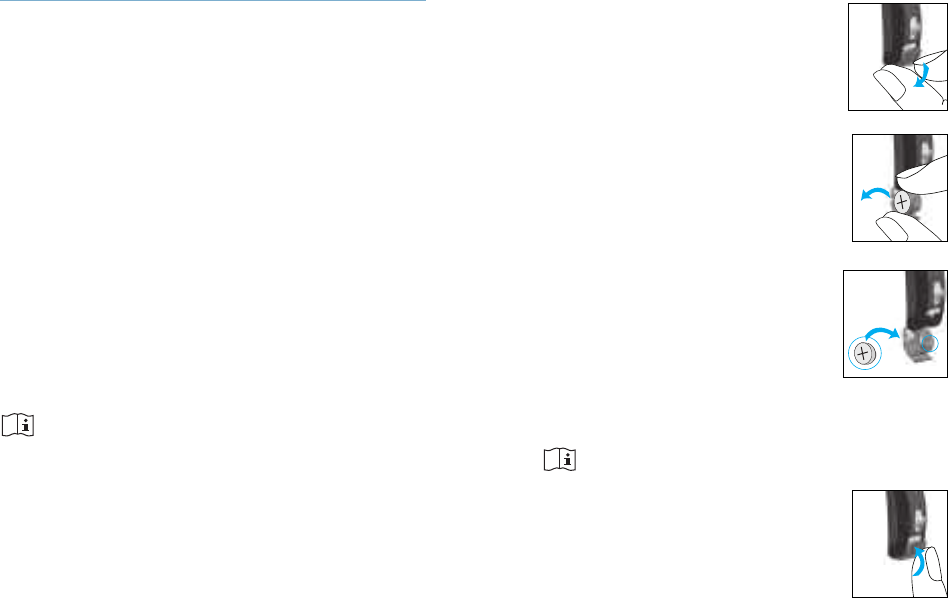
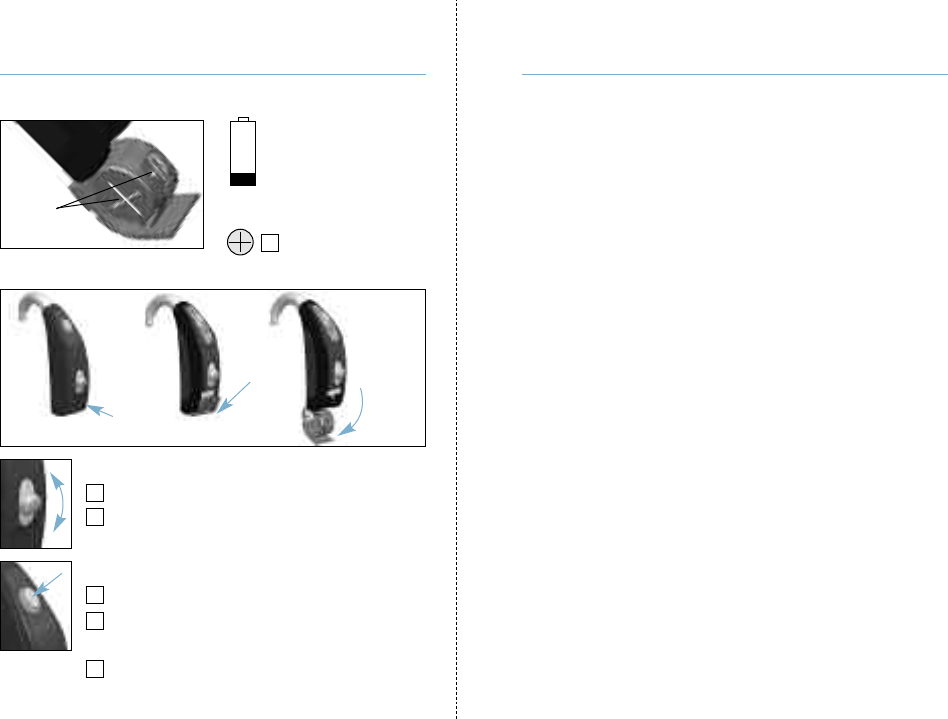
Replacing the battery
1. Gently swing out the battery
door with your fingernail.
2. Grasp the battery with your
thumb and index finger and
remove.
3. Insert the new battery into the
battery compartment with the
plus (+) sign on the battery facing
the same way as the plus (+) sign
on the side of the battery door. This will
ensure that the battery door closes properly.
Note: If the battery is inserted incorrectly, the
hearing aid will not turn on.
4. Close the battery door.
Battery information
To replace the battery, fully open the battery
door for access to the battery compartment.
Low battery warning
Two long beeps indicate the hearing aid
battery is low. After the low battery warning,
you may experience some reduction in sound
quality. This is normal and can be remedied by
inserting fresh batteries into the hearing aids.
If you are not able to hear the low battery
warning, your hearing healthcare professional
can change the pitch or loudness of the low
battery warning. If you prefer, it can be turned
off entirely.
Your hearing aids are designed to generate a low
battery warning every 30 minutes until you
change the batteries, but depending on the
condition of the batteries, they may die before
another low battery warning occurs. Therefore, it
is recommended that the batteries are replaced
as soon as possible once you hear the low
battery warning.
89
1.
2.
3.
4.
FPO
FPO

Caring for batteries
Always discard batteries in a safe and
environmentally friendly way.
To prolong battery life, remember to turn your
hearing aids off when not in use.
Remove the batteries and keep the battery
door open while hearing aids are not in use.
This will allow internal moisture to evaporate.
Replacing the battery in
hearing aids with a
tamper-resistant battery door
Some hearing aids have a
tamper-resistant battery door
for safety reasons. To replace the battery,
open the battery compartment and push the
locking piece back inside the hearing aid
using the tip of a pen.
Remove the old battery. Insert a
new one with the plus (+) sign
on the battery facing the same
way as the plus (+) sign on the
side of the battery door. The
new battery will be secured when you close
the battery door.
10 11
FPO
FPO

6. Make notes at the back of this booklet,
write down difficult situations and describe
what any unpleasant noises were like. This
information will help your hearing
healthcare professional to fine-tune the
devices better for you.
7. Involve your family and friends in this
familiarization period. For example, ask
someone to set the television to a
comfortable volume.
8. When you are beginning to get used to
wearing the hearing aids, wear them in
more difficult listening environments such
as the office, at parties or in restaurants.
This can be difficult even for people who
can hear normally. Give yourself time to
regain your ability to hear in these difficult
situations.
9. Make your hearing aids part of your
everyday life and be patient with yourself
until you have retrained yourself to
interpret the sounds correctly.
Tips for wearing hearing aids for the
first time
1. Start in a quiet room at home first to get
used to the new sound quality. Sounds like
the ticking of a clock, the humming of the
computer, the beep of the microwave or the
rustling of clothes or paper may seem loud
to you at first, because you have not been
hearing them properly for a long time.
2. Read aloud to yourself and learn to correct
the volume of your own voice when you are
wearing the hearing aids.
3. Talk to different people and learn how to
distinguish between different sound
patterns again.
4. It will take some time before you are
completely used to your hearing aids and
can fully enjoy the benefits.
5. Wear your hearing aids for as many hours
a day as you can, and for a little longer
each day.
12 13
Comfort-clarity control
If the lever has been configured as a comfort-
clarity control – press up to increase clarity of
speech; press down to decrease overall noise
or improve listening comfort. Each step will
change the hearing aid performance.
Sometimes multiple steps are required to
achieve the desired listening results. After
each press wait for about 4-5 seconds to allow
the hearing aid to adjust to the new setting.
As you change the comfort-clarity level, your
hearing aids will beep.
Note : As the comfort-clarity control moves
toward the midpoint section, the effect on
sound is minimized.
Operating instructions
Your BTE hearing aid comes with two controls
that allow you to further adjust your hearing
aid – a lever and a push button.
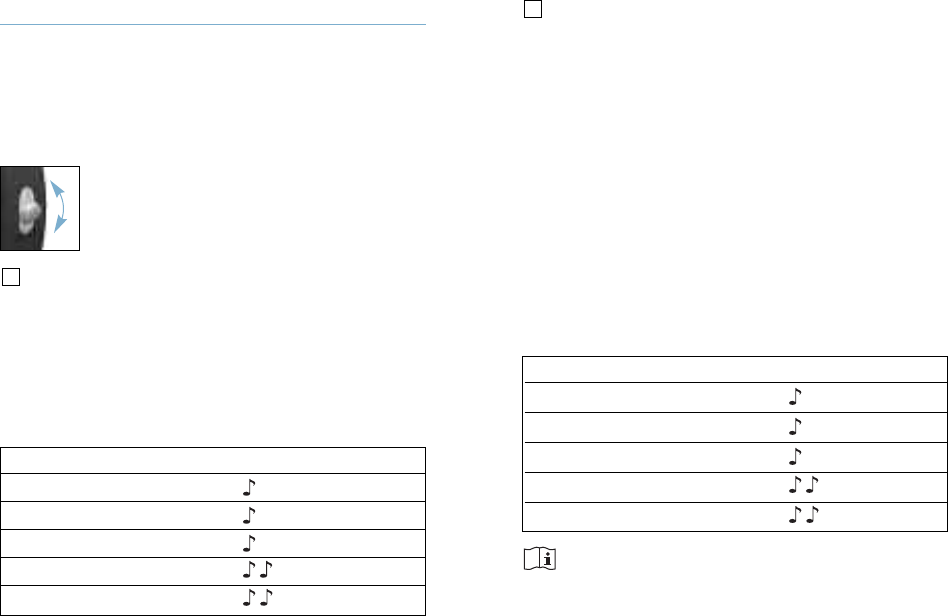
Lever
The lever on your hearing aid can be
set up as either a volume control or
a comfort-clarity control.
Volume control
If the lever has been configured as a volume
control, you can adjust the loudness of your
hearing aids. Press up to increase; press
down to decrease. As you change the volume
level, your hearing aids will beep.
14
Comfort-clarity control setting Beeps
Ideal comfort and clarity level 1 beep
Increase sound clarity level short beep
Increase listening comfort short beep
Maximum sound clarity level 2 beeps
Maximum listening comfort level 2 beeps
15
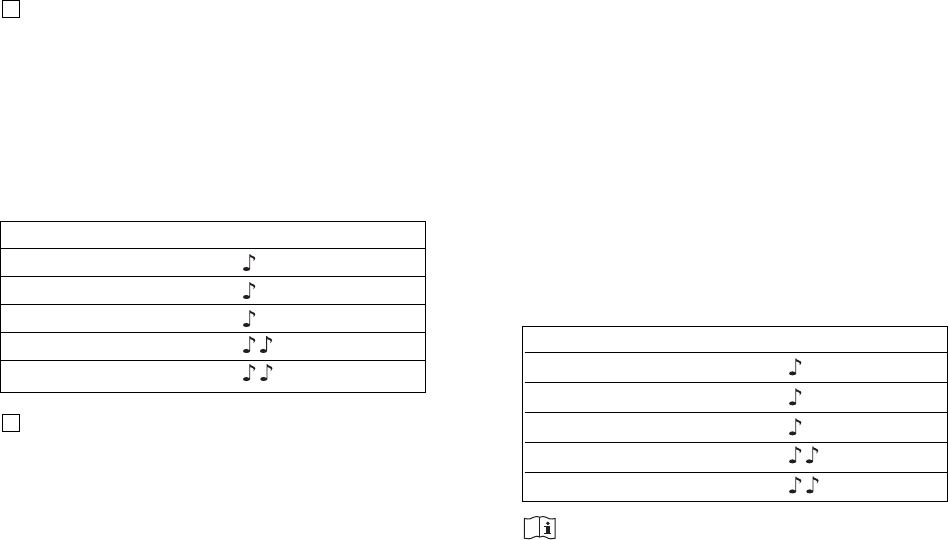
Volume setting Beeps
Recommended volume level 1 beep
Turning volume up short beep
Turning volume down short beep
Maximum volume level 2 beeps
Minimum volume level 2 beeps
Your hearing aids beep to indicate which
program you are in.
Tamper-resistant cover
Some hearing aids are fitted with tamper-
resistant covers instead of levers to prevent
someone from accidentally
adjusting the hearing aids. The
cover can still be used to make
adjustments but it requires using a
fingernail or a small tool to push up
or down.
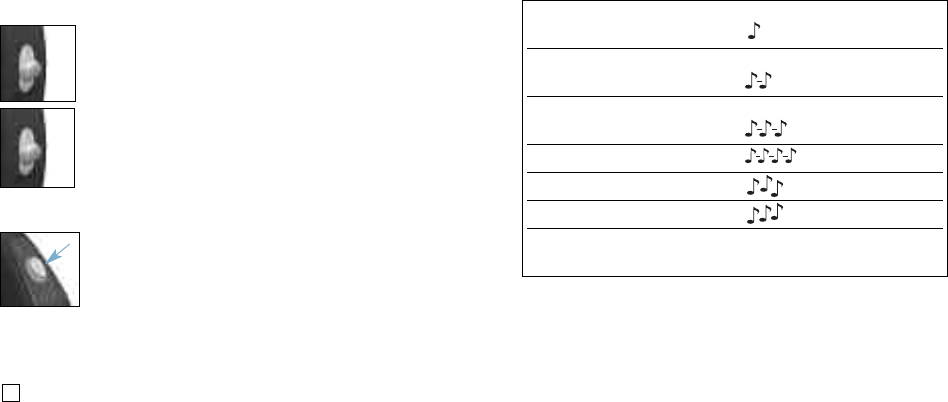
Push button
Your hearing aids are equipped with
a push button which can be set for
switching between programs, to
adjust your volume or to adjust the comfort-
clarity control.
Program control
If the push button has been configured as a
program control, each time you push the
button, you will move to a new hearing aid
program.
16 17
Program 1
(e.g. automatic program) 1 beep
Program 2
(e.g. speech in noise) 2 beeps
Program 3
(e.g. easy-t/telephone) 3 beeps
Program 4 (e.g. music) 4 beeps
Easy-t/telephone (see pg 18) short melody
Easy-DAI (see pg 30) short melody
DuoLink (if enabled) Opposite ear beeps the
(see pg 20) same as side being adjusted
FPO
FPO
• Push the button on your left hearing aid to
decrease overall noise or improve listening
comfort.
Each step will change the hearing aid
performance. Sometimes multiple steps are
required to achieve the desired listening
results. After each press wait for about 4-5
seconds to allow the hearing aid to adjust to
the new setting.
As you change the comfort-clarity level, your
hearing aids will beep.
Note : As the comfort-clarity control moves
toward the midpoint section, the effect on sound
is minimized.
Volume control
If the push button has been configured as a
volume control:
• Push the button on your right hearing aid to
increase the volume in both hearing aids.
• Push the button on your left hearing aid to
decrease the volume in both hearing aids.
Comfort-clarity control
If the push button has been configured as a
comfort-clarity control:
• Push the button on your right hearing aid
to increase clarity of speech.
18 19
Comfort-clarity control setting Beeps
Ideal comfort and clarity level 1 beep
Increase sound clarity level short beep
Increase listening comfort short beep
Maximum sound clarity level 2 beeps
Maximum listening comfort level 2 beeps
Volume setting Beeps
Recommended volume level 1 beep
Turning volume up short beep
Turning volume down short beep
Maximum volume level 2 beeps
Minimum volume level 2 beeps
Remote control
Your hearing aids may also come with an
optional remote control which allows you to
switch between different listening programs,
and change your volume or comfort-clarity
settings.
DuoLink
If DuoLink is enabled, then changing the
volume, program or comfort-clarity setting on
one hearing aid, will automatically make the
change to both hearing aids at the same time.
DuoLink works for both the push button and
the lever.
For example, if your push button is configured
as a program control and DuoLink is enabled,
when you push the button on your right
hearing aid, the program will change in both
hearing aids.
Learning
Your hearing aids will learn your adjustments
in different environments, if this feature is
available and has been enabled by your
hearing healthcare professional. Over time,
the hearing aids will adjust the default
volume and comfort-clarity settings to the
levels that you typically use.
20 21

When the receiver is moved away from the
hearing aid it will automatically return to the
previous listening program. If DuoLink is
enabled on your hearing aids for the
automatic telephone program, both hearing
aids are synchronized and the listening
program for the opposite ear will also change
when the automatic telephone program is
activated. If the hearing aid does not switch
to the telephone program automatically when
the telephone receiver is placed in proximity,
the magnet for easy-t hearing aids should be
attached to the telephone receiver. The
magnet is designed to strengthen the
magnetic field at the ear piece of hearing aid
compatible telephones.
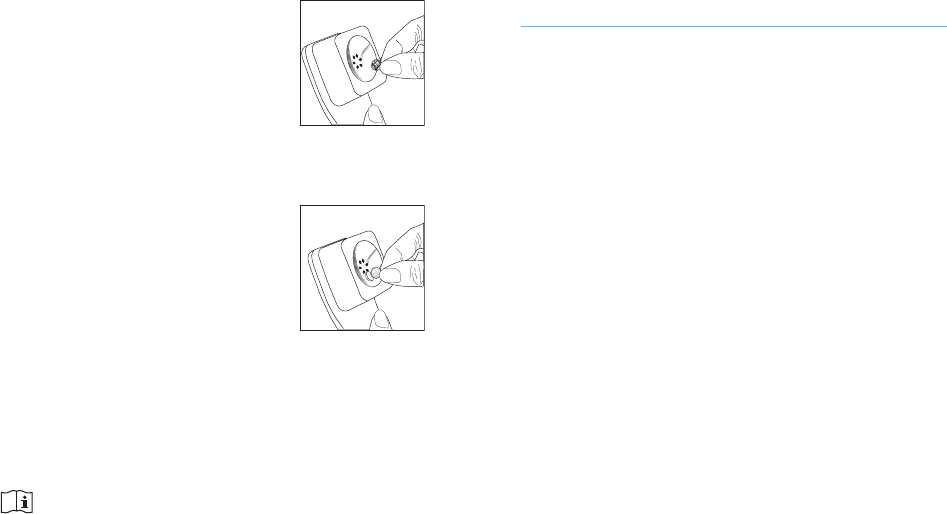
To affix the optional easy-t magnet:
1. Clean the telephone receiver.
Using the telephone
As telephones do not all work the same, you
may experience different results from different
phones. You can use many phones by simply
holding the receiver to your ear, without the
need to change to a dedicated telephone
program on your hearing aid. Remember to
move the handset slightly up or back to find
the position that sounds best to you.
Depending on the phone type you use, your
hearing healthcare professional might have
selected a dedicated phone program on your
hearing aids. Your hearing aids may have an
automatic telephone program (easy-t
feature), which automatically switches to a
dedicated telephone program when a
telephone receiver is brought close to one of
your hearing aids. You will hear a short
melody to indicate you are in the telephone
(easy-t) program.
22 23
1.
Caring for your hearing aids
Open the battery door when not in use.
Always remove your hearing aids when using
hair care products. The hearing aids can
become clogged and cease to function properly.
Do not wear your hearing aids in the bath or
shower or immerse them in water.
If your hearing aids do become wet, do not
attempt to dry them in an oven or microwave.
Do not adjust any controls. Open the battery
doors immediately, and allow your hearing
aids to dry naturally for 24 hours.
Protect your hearing aids from excessive heat
(hair dryer, vehicle glove box or dashboard).
Regular use of a dehumidifier, such as a
Dri-Aid kit, can help prevent corrosion and
prolong the life of your hearing aids.
Do not drop your hearing aids or knock them
against hard surfaces.
2. Hold the magnet near the
“listening end” of your
telephone receiver and
release it. The magnet will
flip to the appropriate side
and seek the optimal position on the
telephone receiver.
3. Place the double-sided tape
in this optimal position on
the telephone receiver and
attach the magnet to the
tape.
If your hearing aids are configured to work
with the wireless uDirect™neck worn
accessory, you might benefit from a
Bluetooth®hands free option. Refer to the
uDirect user guide for more information.
Your hearing healthcare professional may also
have set up a phone program that you can
access through the push button on your hearing
aids, or through your optional remote control.
24 25
2.
3.
®Bluetooth is a registered trademark of Bluetooth SIG Inc.
If your physician prescribes eardrops, clean
any moisture that may get into the earmolds
or tubing to prevent plugging.
If the earmolds require further cleaning:
1. Disconnect the plastic tube from the hook
of the hearing aids.
2. Wash only the earmolds in warm water
with a mild soap.
3. Rinse them with cool water and dry
overnight.
4. Make sure the earmold tubes are dry
before reconnecting them to each hook on
your hearing aids. Use of a hearing aid
blower can assist with removing
moisture/debris from tube. See your
hearing healthcare professional for more
information.
Cleaning your hearing aids
Ear wax is natural and common. Ensuring
your hearing aids are free of ear wax is an
important step in your daily cleaning and
maintenance routine.
Never use alcohol to clean your hearing aids,
earmolds or domes.
Do not use sharp tools to dislodge ear wax.
Sticking household items into your hearing
aids or earmolds can seriously damage them.
Earmolds
Always ensure earmolds are
clean and free of earwax.
Do not use alcohol to clean
your earmolds.
If the earmolds become plugged, clear the
opening with a wax loop or pipe cleaner.
26 27

2928
Slim tubes and domes
You should have the slim
tubes and domes replaced
by your hearing healthcare
professional approximately
every three to six months or
when they become stiff,
brittle, or discolored.
Clean the domes daily with a damp cloth.
You should also clean the slim tubes
periodically, with the cleaning pin provided,
when you begin to notice debris in and
around the tubes.
1. Hold the slim tube in one hand and the
hearing aid in the other hand.
2. Gently turn the hearing aid until it
detaches from the slim tube.
3. Use a damp cloth to clean the outside of
the slim tube and dome.
4. Remove the dome from the slim tube by
pulling gently, before
cleaning the slim tube.
5. Using the black cleaning pin
provided in the kit, gently
insert the cleaning pin where
the slim tube attaches to the
hearing aid and push the pin
all the way through the tube.
Note: The slim tubes and domes should
never be rinsed or submerged in water as
water drops may become lodged in the
tube, block sound or damage the electrical
components of the hearing aid.
6. Once the slim tube has been cleaned,
reattach it by gently turning the hearing aid
onto the slim tube.
7. Reattach the dome to the slim tube by
gently pushing it back onto the threading
at the end of the tube.

3130
Signature features of your hearing aids
Comfort-clarity control
Your hearing aids automatically adjust to
focus on hearing speech more clearly or
providing comfort in noisy situations. Some
Quantum hearing aid models provide a
control to adjust your comfort-clarity settings.
• Adjusting the comfort-clarity control up
causes your hearing aids to focus more on
speech clarity.
• Adjusting the comfort-clarity control down
causes your hearing aids to soften
background noise, providing more comfort.
Comfort-clarity control adjustments can be
made using the controls on your hearing aids
or a remote control. Please talk with your
hearing healthcare professional to find out
which controls have been programmed for the
comfort-clarity control.
As you adjust the comfort clarity control, your
Quantum hearing aids will gradually learn
your preferred comfort-clarity settings.
DuoLink
With DuoLink, your hearing aids wirelessly
communicate with each other. As you make a
program, comfort-clarity or volume change on
one hearing aid, the other hearing aid
automatically changes as well.
Binaural Phone
The Binaural Phone feature enables you to
hold a landline or mobile phone to one ear
and hear the sound clearly in both ears,
automatically. No accessories are required.
uDirect™and uTV™
The uDirect and uTV are optional accessories
for all Quantum BTE hearing aids.
• uDirect provides easy, hands-free access
to Bluetooth enabled devices, such as
mobile phones. It also has a wired audio
jack to plug in devices like MP3 players.

3332
• uTV is used with the uDirect to transmit
sound from your TV directly to your
hearing aids. The uTV can also transmit
sound from stereo systems, computers
and other audio sources.
For more information on using the uDirect or
uTV, please see the appropriate guide. For
information on how to get a uDirect or uTV
accessory, please contact your hearing
healthcare professional.
Assistive listening devices
Listening in public places
Telecoils pick up electromagnetic energy and
convert it into sound. Your hearing aid’s
telecoil option can help you listen in public
places equipped with telecoil compatible
assistive listening devices such as
a loop system. When you see this
symbol, it means that there is loop
system installed; this loop system
is compatible with your hearing aid. Please
contact your hearing healthcare professional
for more information on loop systems.
Connecting to external audio sources
Your hearing aids may feature an
optional direct audio input (DAI)
to connect to other audio sources,
such as a stereo or television,
using an FM system or a cable.
The uDirect, an optional wireless
accessory, also has a DAI jack.
Easy-DAI automatically selects your direct
audio input program when a DAI signal is
detected by your hearing aids. A short
melody will play to confirm that easy-DAI is
activated. When you disconnect the DAI input,
your hearing aids will return to the program
you were in prior to switching.
Ask your hearing healthcare professional for
information about the direct audio input
system and a connector cord.
FPO

Not loud enough
Low volume
Low battery
Earmolds/slim tubes/
domes not inserted
properly
Change in hearing
Earmolds/slim tubes/
domes blocked with
ear wax
Plugged microphone
shield
Turn up volume; see
hearing healthcare
professional for models
without a manual
volume control or if
problem persists.
Replace battery
See “Putting your
hearing aids on your
ears”. Reinsert carefully.
Consult your hearing
healthcare professional
Clean earmolds. See
“Cleaning your hearing
aids”. Use cleaning pin to
dislodge ear wax in slim
tubes. Consult your
hearing healthcare
professional.
Consult your hearing
healthcare professional
Cause Possible remedy
Troubleshooting guide
Cause Possible remedy
No sound
Not turned on
Low/dead battery
Poor battery contact
Battery upside down
Earmolds/slim tubes/
domes blocked with
ear wax
Plugged microphone
shield
Turn on
Replace battery
Consult your hearing
healthcare professional
Insert battery plus (+)
side up
Clean earmolds/ domes.
See “Cleaning your hear-
ing aids”. Use cleaning
pin to dislodge ear wax
in slim tubes. Consult
your hearing healthcare
professional.
Consult your hearing
healthcare professional
34 35

37
Intermittent
Low battery
Dirty battery contact
Two long beeps
Low battery
Whistling
Earmolds/slim tubes/
domes not inserted
properly
Hand/clothing
near ear
Poorly fitting
earmolds/slim tubes/
domes
Replace battery
Consult your hearing
healthcare professional
Replace battery
See “Putting your
hearing aids on your
ears”. Reinsert carefully.
Move hand/clothing
away from your ear
Consult your hearing
healthcare professional
Cause Possible remedy
Not clear, distorted
Poorly fitting
earmolds/slim tubes/
domes
Earmolds/slim tubes/
domes blocked with
ear wax
Low battery
Plugged microphone
shield
Earmolds/slim tubes/domes falling out of ear
Poorly fitting
earmolds/slim tubes/
domes
Earmolds/slim tubes/
domes not inserted
properly
Consult your hearing
healthcare professional
Clean earmolds. See
“Cleaning your hearing
aids”. Use cleaning pin
to dislodge ear wax in
slim tubes. Consult your
hearing healthcare
professional.
Replace battery
Consult your hearing
healthcare professional
Consult your hearing
healthcare professional
See “Putting your
hearing aids on your
ears”. Reinsert carefully.
Cause Possible remedy
36

3938
Warnings
Hearing aids should only be used as
directed by your physician or hearing
healthcare professional.
Hearing aids will not restore normal
hearing and will not prevent or improve a
hearing impairment resulting from organic
conditions.
Do not use your hearing aids in explosion
hazard areas.
Allergic reactions to hearing aids are
unlikely. However, if you experience
itching, redness, soreness, inflammation or
a burning sensation in or around your ears,
inform your hearing healthcare
professional and contact your physician.
In the unlikely case that any parts remain
in the ear canal after the removal of the
hearing aid, contact a physician
immediately.
Weak on the telephone
Telephone not
positioned properly
Hearing aid requires
adjustment
For any problems not listed in the guide, contact your hearing
healthcare professional. If you do not have a hearing health-
care professional, please contact the nearest office listed on
the back page of this booklet.
Move telephone receiver
around ear for clearer
signal. See “Using the
telephone”.
Consult your hearing
healthcare professional
Cause Possible remedy

4140
The magnet may affect some medical
devices or electronic systems. Always keep
the magnet (or the telephone equipped
with the magnet) at least 30 cm (12”) away
from pacemakers, credit cards, floppy disks
or other magnetically sensitive devices.
Too high distortion during dialing or
phoning may mean that the phone handset
is stressed by the magnet. To avoid any
damage, please move the magnet to
another place on the telephone receiver.
Battery warnings
Never leave hearing aids or batteries where
small children and pets can reach them.
Never put hearing aids or batteries in your
mouth. If a hearing aid or battery is
swallowed, call a physician immediately.
Precautions
The use of hearing aids is only part of
hearing rehabilitation; auditory training
Remove your hearing aids for CT and MRI
scans or for other electromagnetic
procedures.
Special care should be exercised in
wearing hearing aids when maximum
sound pressure levels exceed 132 decibels.
There may be a risk of impairing your
remaining hearing. Speak with your
hearing healthcare professional to ensure
the maximum output of your hearing aids
is suitable for your particular hearing loss.
Easy-t magnet warnings
Be sure the magnet is securely affixed to
the telephone.
Keep loose magnets out of reach of children
and pets.
If the magnet falls into your ear, contact
your hearing healthcare professional.
If the magnet is swallowed, contact your
physician immediately.

4342
Note to hearing healthcare professional
Domes should never be fitted on patients
with perforated eardrums, exposed middle
ear cavities, or surgically altered ear
canals. In the case of such a condition, we
recommend to use a customized ear mold.
Labeling
The serial number and year of manufacture
are located inside the battery door.
and lip reading instruction may be required
as well.
In most cases, infrequent use of hearing
aids does not provide full benefit. Once
you have become accustomed to your
hearing aids, wear your hearing aids
everyday all day.
Your hearing aids use the most modern
components to provide the best possible
sound quality in every listening situation.
However, communication devices such as
digital cell phones can create interference
(a buzzing sound) in hearing aids. If you
experience interference from a cell phone
being used close by, you can minimize this
interference in a number of ways. Switch
your hearing aids to another program, turn
your head in a different direction or locate
the cell phone and move away from it.

Licensed physicians who specialize in diseases of the ear are
often referred to as otolaryngologists, otologists or
otorhinolaryngologists. The purpose of medical evaluation is to
assure that all medically treatable conditions that may affect
hearing are identified and treated before the hearing aid is
purchased. Following the medical evaluation, the physician will
give you a written statement that states that your hearing loss
has been medically evaluated and that you may be considered a
candidate for a hearing aid. The physician will refer you to an
audiologist or a hearing aid dispenser, as appropriate, for a
hearing aid evaluation. The audiologist or hearing aid dispenser
will conduct a hearing aid evaluation to assess your ability to
hear with and without a hearing aid. The hearing aid evaluation
will enable the audiologist or dispenser to select and fit a hearing
aid to your individual needs. If you have reservations about your
ability to adapt to amplification, you should inquire about the
availability of a trial-rental or purchase-option program. Many
hearing aid dispensers now offer programs that permit you to
wear a hearing aid for a period of time for a nominal fee after
which you may decide if you want to purchase the hearing aid.
Federal law restricts the sale of hearing aids to those individuals
who have obtained a medical evaluation from a licensed
physician. Federal law permits a fully informed adult to sign a
waiver statement declining the medical evaluation for religious or
personal beliefs that preclude consultation with a physician. The
exercise of such a waiver is not in your best health interest and
its use is strongly discouraged.
Children With Hearing Loss
In addition to seeing a physician for a medical evaluation, a child
with a hearing loss should be directed to an audiologist for
Warning to hearing aid dispensers
(to comply with the U.S. Food and Drug Administration
(FDA) regulations)
A hearing aid dispenser should advise a prospective hearing aid
user to consult promptly with a licensed physician (preferably an
ear specialist) before dispensing a hearing aid if the hearing aid
dispenser determines through inquiry, actual observation, or
review of any other available information concerning the
prospective user, that the prospective user has any of the
following conditions: (i) Visible congenital or traumatic deformity
of the ear. (ii) History of active drainage from the ear within the
previous 90 days. (iii) History of sudden or rapidly progressive
hearing loss within the previous 90 days. (iv) Acute or chronic
dizziness. (v) Unilateral hearing loss of sudden or recent onset
within the previous 90 days. (vi) Audiometric air-bone gap equal
to or greater than 15 decibels at 500 hertz (Hz), 1,000 Hz, and
2,000 Hz. (vii) Visible evidence of significant cerumen
accumulation or a foreign body in the ear canal. (viii) Pain or
discomfort in the ear. Special care should be exercised in
selecting and fitting a hearing aid whose maximum sound
pressure level exceeds 132 decibels because there may be risk of
impairing the remaining hearing of the hearing aid user. [This
provision is required only for those hearing aids with a maximum
sound pressure capability greater than 132 decibels (dB).]
Important notice for prospective hearing aid users
Good health practice requires that a person with a hearing loss
have a medical evaluation by a licensed physician (preferably a
physician who specializes in diseases of the ear) before
purchasing a hearing aid.
44 45

Compliance information
Declaration of conformity
Hereby Unitron declares that this Unitron product meets the
requirements of the Medical Devices Directive 93/42/EEC as well
as the Radio and Telecommunications Terminal Equipment
Directive 1999/5/EC. The full text of the Declaration of Conformity
can be obtained from the manufacturer.
The hearing aid described in this user guide is certified under:
Standard hearing system
USA FCC ID: VMY-UWBTE1
Canada IC: 2756A-UWBTE1
Notice 1
This device complies with Part 15 of the FCC Rules and with RSS-
210 of Industry Canada. Operation is subject to the following two
conditions:
1) this device may not cause harmful interference, and
2) this device must accept any interference received, including
interference that may cause undesired operation.
Notice 2
Changes or modifications made to this device not expressly
approved by Unitron may void the FCC authorization to operate
this device.
evaluation and rehabilitation since hearing loss may cause
problems in language development and the educational and
social growth of a child. An audiologist who is qualified by
training and experience to assist in the evaluation and
rehabilitation of a child with hearing loss is recommended.
46 47

49
Notice 3
This device has been tested and found to comply with the limits
for a Class B digital device, pursuant to Part 15 of the FCC Rules
and ICES-003 of Industry Canada. These limits are designed to
provide reasonable protection against harmful interference in a
residential installation. This device generates, uses and can
radiate radio frequency energy and, if not installed and used in
accordance with the instructions, may cause harmful interference
to radio communications. However, there is no guarantee that
interference will not occur in a particular installation. If this
device does cause harmful interference to radio or television
reception, which can be determined by turning the equipment off
and on, the user is encouraged to try to correct the interference
by one or more of the following measures:
• Reorient or relocate the receiving antenna
• Increase the separation between the equipment and receiver
• Connect the device into an outlet on a circuit different from
that to which the receiver is connected
• Consult the dealer or an experienced radio/TV technician for
help
48
Client feedback
Record your specific needs or concerns and bring to
your first office visit after getting your hearing aids.
This will help your hearing healthcare professional to
address your needs.
...........................................................................................
...........................................................................................
...........................................................................................
...........................................................................................
...........................................................................................
...........................................................................................
...........................................................................................
...........................................................................................
...........................................................................................
...........................................................................................

50
Additional notes
..................................................................................................................
..................................................................................................................
..................................................................................................................
..................................................................................................................
..................................................................................................................
..................................................................................................................
..................................................................................................................
..................................................................................................................
..................................................................................................................
Unitron Hearing Ltd.
20 Beasley Drive, P.O. Box 9017,
Kitchener, ON N2G 4X1 Canada
Unitron distributors
Corporate Office/International
20 Beasley Drive, P.O. Box 9017, Kitchener, ON N2G 4X1 Canada
Australia
Level 2, Norwest Quay,
21 Solent Circuit,
Baulkham Hills, NSW,
NSW 2153
Belgium
Baron de Vironlaan, 60
b-1700 Dilbeek
Canada
20 Beasley Drive,
P.O. Box 9017, Kitchener,
ON N2G 4X1
China
No. 78, Qi Ming Road,
Export Processing Zone
District B, Suzhou
Industrial Park, P.R.
215021
Denmark
Nitivej 10, DK-2000
Frederiksberg
Germany & European
Representative
Daimlerstrasse 22,
70736 Fellbach-
Oeffingen, Germany
France
5 bis, rue Maryse
Bastié - BP 15
69671 Bron Cedex
India
B-308, Everest Grande,
Mahakali Caves Road,
Andheri East,
Mumbai-400 093
Netherlands
Ir. D.S. Tuijnmanweg 10,
4131 PN
VIANEN
New Zealand
10/215 Rosedale Rd.,
M277 Private Bag,
300987, Albany,
Auckland
Russia
Tverskaya str. 16,
bldg. 3, 1st floor
Moscow, 125009
South Africa
First Floor –
Selborne House,
Fourways Golf Park,
Roos Street, Fourways,
Johannesburg
Spain
Avenida de la
Industria nº13/15,
Polígono de
Canastell,
03690 Sant Vicent
del Raspeig. Alicante,
España
Sweden
Förmansvägen 2, 4 tr
SE-11743, Stockholm
United Kingdom
St. George House,
Cygnet Court,
Centre Park,
Warrington, Cheshire
WA1 1PD
U.S.A.
Suite A, 2300
Berkshire Lane North,
Plymouth, MN 55441

10-047 029-5858-02
Distributor
www.unitron.com