Universal Electronics 1033-4 RF Remote User Manual Dolphin II Manual
Universal Electronics Inc RF Remote Dolphin II Manual
Users Manual
DolphinTM II
Water-Resistant Remote Control
P/N 40418 Rev. B 08/18/2006

2
TABLE OF CONTENTS
Introduction..........................3
Features And Functions .................4
Installing Batteries .....................6
Spa Addressing........................7
Programming TV Control ................8
Setup Codes for TVs ....................8
Programming VCR Control ..............12
Setup Codes for VCRs ..................12
Programming Cable Converter
(or Satellite Receiver) Control ...........15
Setup Codes for Cable Converters .........16
Setup Codes for Satellite Receivers ........16
Programming DVD Control..............17
Setup Codes for DVD Players ............18
Programming CD Control ...............20
Setup Codes for CD Players .............20
Programming Audio Control.............22
Setup Codes for Stereo Receivers .........22
Setup Codes for Stereo Amplifiers.........24
Setup Codes for Automotive and Marine .....24
Searching For Your Code ...............25
Checking The Codes...................26
Reassigning Device Keys................27
Setting Volume Lock...................28
To Change Volume Lock to the CBL/SAT Mode 28
To Change Volume Lock to the TV Mode....28
To Change Volume Lock to the VCR Mode. . .28
To Change Volume Lock to the DVD Mode . .28
To Change Volume Lock to the CD Mode . . .29
To Change Volume Lock to the RCVR Mode. .29
Clearing Volume Lock .................29
Clearing Volume Lock For One Device .....29
Using the Learning Feature..............30
Feature Reset ........................31
Using the IR/RF Command Center.........32
Specifications........................34
Compliance with FCC Rules and Regulations 35
Troubleshooting......................36

3
INTRODUCTION
The Universal Dolphin™ II Remote is Balboa’s
latest generation remote control. It is designed
with sophisticated technology that will allow you to
consolidate many of your existing remote controls
along with the entertainment system in your spa.
It’s packed with easy-to-use features such as:
• Pre-programmed to operate the cable converter
supplied by your cable system provider
• Pre-programmed technology for easy setup
• Color-coded keys to quickly locate
popular functions
• Code library for video and audio components
• Code Search to help program control of
older components
• Learning function to allow programming with
another infrared (IR) remote
• Combination IR and RF (radio frequency)
capability that can send commands through
the optional RF base station to devices in
your house.
Before you can use your new remote control, you
will need to program it to operate the specific
home entertainment components you wish to
control. Follow the instructions detailed in this
manual to set up your Dolphin Remote and enjoy
your new remote control.
IMPORTANT! PLEASE READ:
When you are required to enter an address into
the spa, please write down the address you have
selected for future reference. Address may need to
be re-entered after servicing
Remote should be stored outside of spa when
not in use. Do not store in direct sunlight.
4
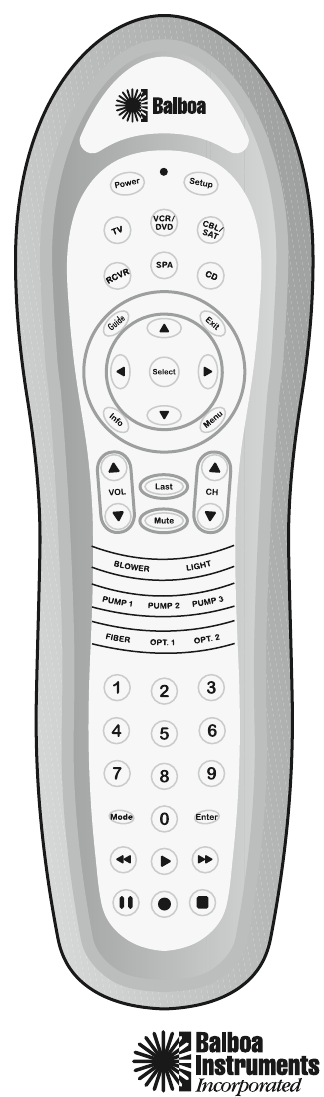
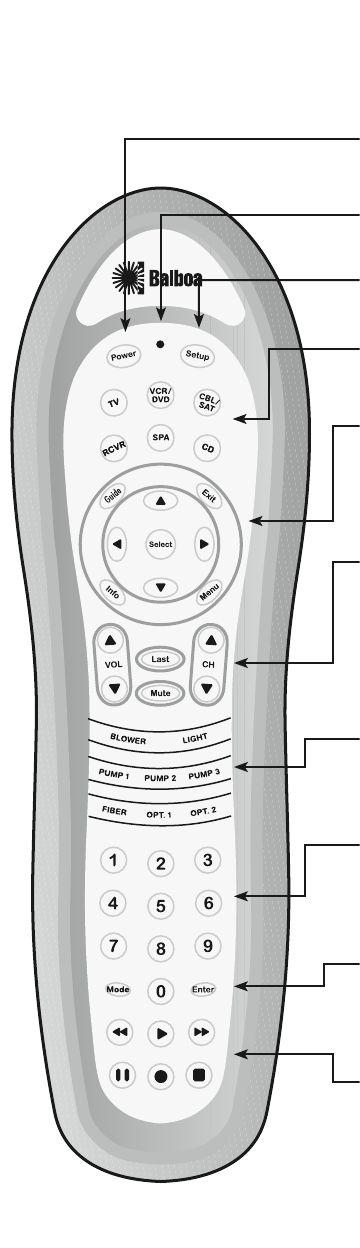
FEATURES AND FUNCTIONS
Use the illustration below to locate the Dolphin™
II RemotE features and study the key locations (on
these two pages) to learn how they function.

5
Press POWER once to turn on or off the selected
home entertainment component.
The LED (red light) blinks to show that the remote
control is working and is sending signals.
Use SETUP for all programming sequences.
Press TV, VCR/DVD, CBL/SAT, RCVR, SPA, or CD
once to select a home entertainment component
to control.
See next page for descriptions of the buttons in
this circular area of the remote.
Use volume + (or volume -) to raise (or lower)
the sound volume.
Use CH + (or CH -) to select the next higher (or
lower) channel.
Press MUTE once to turn sound off or on.
Press LAST once to recall the last channel and to
page back one screen in the main menu.
Use these buttons to control available spa functions.
(Depending on your spa, some buttons may
control other equipment than indicated here.)
Use the keypad (0 ~ 9) to directly select channels
(e.g., 09 or 31).
Press MODE once to switch the VCR to view TV
channels or tape. This key will also control the
input select feature on most TVs.
Press ENTER once after entering channel numbers
on some TV models.
In the VCR and TV modes, use the REW, PLAY, FF,
REC, STOP, and PAUSE keys to control your VCR.
To record a program, press REC twice. These keys
are also used for CD and DVD functions.
Continued on next page…
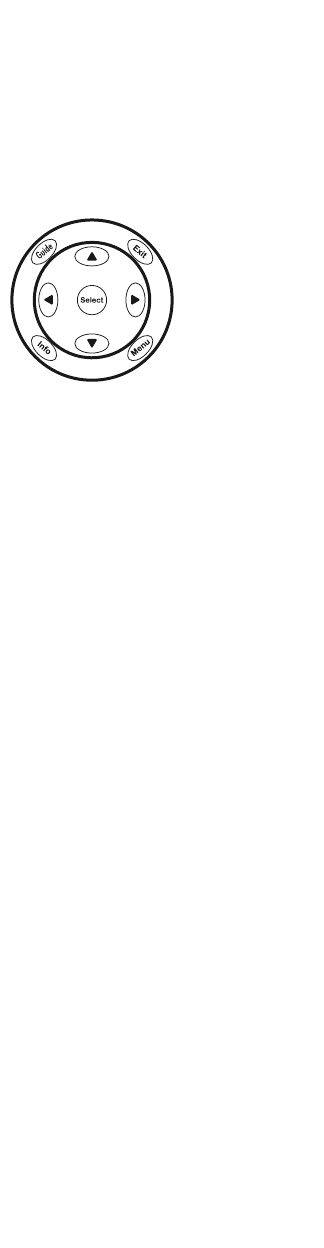
Use GUIDE to display the program guide.
Use EXIT to exit out of an on-screen menu
and guide.
Use the four directional keys to move the cursor in
the program guide and menu screens.
Use SELECT to
choose options, PPV
events, and to tune
programs from the
program guide.
Use INFO to display
current channel
and program
information.
Press MENU once to display an on-screen menu.
FEATURES AND FUNCTIONS
…Continued
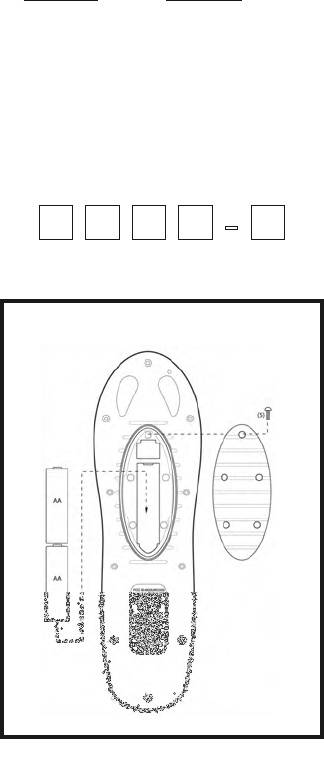
INSTALLING BATTERIES
(See illustration on opposite page)
1. On the back of the Dolphin Remote, remove
the screws that hold the battery cover in place
and lift off the battery cover.
2 Obtain two (2) fully-charged AA
alkaline batteries.
Match the + and – marks on the batteries to
the + and – marks in the battery case, then
insert the new batteries.
3. Press the battery cover back into place, being
careful to align it with the rubber seal.
4. Replace the screws that hold the battery cover
by carefully starting each one without tightening
it. Once they are all started, snug up one
screw and then do the same to the screw on
the opposite side of the door. Repeat this in a
crossing pattern until all screws are snug.
Do not overtighten them. This will assure an
adequate water seal around the battery cover.
5. Test the unit by pressing any mode key (e.g.,
TV, VCR/DVD, CBL/SAT, RCVR, SPA, or CD).
If the batteries are inserted correctly, the LED
will blink once.
NOTE:
Whenever batteries need to be replaced, the
Dolphin LED will blink twice with every key
press. Simply replace the batteries and the
remote will be restored to its full functionality,
complete with your favorite settings.
6
7
SPA ADDRESSING
The Dolphin II technology is capable of eliminating
interference that may occur when neighboring spa
owners use Dolphin remotes.
Important: This feature will not function if your
spa is controlled by RF via the Command Center,
or if your spa is controlled by IR.
1.
If you notice the pumps, blower or light on
your spa operating when your neighbor uses his
Dolphin remote, check your spa manual to see
if this feature is available on your system.
If so, follow the procedure described in your
spa manual to enter a spa address into your spa.
2 After entering the spa address into the spa, you
are now ready to enter a set up code into the
Dolphin Remote.
3. Press the SPA button on the Dolphin once
4. Press and hold SETUP until the LED blinks
once. It will then blink twice.
5. Enter one of the set up codes below:
Set Up Code Spa Address
0000 0 (no address)
0008 1
0080 2
0088 3
0800 4
0808 5
0880 6
0888 7
6. Write your Set Up code and Spa Address in the
boxes below for future reference.
QQQQ-Q
7. If the code is entered correctly, the LED will
blink twice.
Battery Installation (from previous page)

8
PROGRAMMING TV CONTROL
Locate the brand name of your TV in the Setup
Codes For TVs section below, and write it in the
following space.
TV Brand:
The brands are listed in alphabetical order with
the most popular codes listed first. You will use
one of these codes to program the Dolphin to
operate your TV:
1. Turn on the TV.
2. On the Dolphin, press TV once. Press and
hold SETUP until the LED blinks twice, then
release SETUP.
3. Enter the first four-digit code for your TV. If you
perform this procedure correctly, the LED will
blink twice.
NOTE: If the LED did not blink twice after entering
the code’s last digit, repeat steps 2 through 3 and
try entering the same code again.
4. Aim the Dolphin at your TV and press POWER
once. The TV should turn off. If it does not
respond, repeat steps 2-4, trying each code for
your brand until you find one that works. If it
still does not work, try searching for the code
(see Searching For Your Code on page 25).
5. Write your TV code in the boxes below for
future reference.
QQQQ
NOTE: Remember, to use the Dolphin to operate
your TV, press TV first.
Setup Codes for TVs:
Admiral 0463, 0093
Advent 0761, 0842
Aiko 0092
Akai 0702, 0672, 0030, 0812
Albatron 0700
Alfide 0672
America Action 0180
Anam 0180
AOC 0030
Apex Digital 0748, 0765, 0879, 0767
Audinac 0180
Audiovox 0451, 0180, 0092, 0623
Aurora Systems 0801
Baysonic 0180
Bell & Howell 0154
Blaupunkt 0763
Blue Sky 1254
Bradford 0180
Broksonic 0463, 0236
Candle 0030
Carnivale 0030
Carver 0054
Casio 1205

9
CCD TV 0463
Celebrity 0000
Celera 0765
Changhong 0765
Cineral 0451, 0092
Citizen 0060, 0030, 0092
Clarion 0180
Concept 0763
Contec 0180
Craig 0180
Crosley 0054
Crown 0180, 0672
Crown Mustang 0672
Curtis Mathes 0047, 0054, 0154, 0451, 0093,
0060, 0702, 0030, 0145, 0166,
1147, 1347
CXC 0180
Daewoo 0451, 1661, 0672, 0092, 0623
Denon 0511, 0145
Dumont 0017
Durabrand 0463, 0180, 0178, 0171
Electroband 0000
Elektra 0017, 1661
Emerson 0154, 0463, 0180, 0236, 0178,
0171, 0623
Envision 0030
Farenheit 1598
Fisher 0154
Fujitsu 0683, 0809
Funai 0180, 0171
Futuretech 0180
Gateway 1755, 1756
GE 0047, 0051, 0451, 0178, 1147,
1347, 1447
Gibralter 0017, 0030
GoldStar 0030, 0178
Goodmans 0360
Gradiente 0053
Grundig 0672
Grunpy 0180
Hallmark 0178
Harman/Kardon 0054
Harvard 0180
Havermy 0093
Hello Kitty 0451
Himitsu 0180
Hisense 0748
Hitachi 0145, 1145
Infinity 0054
Initial 1990
Inteq 0017
IRT 0451, 1661
JBL 0054
JCB 0000
Jensen 0761, 1299
JVC 0463, 0053, 1253, 0731
KEC 0180
Kenwood 0030
Kioto 0054, 0706
KLH 0765, 0767
Kost 1262, 1483
KTV 0180, 0030, 1593
LG 0030, 0178
Loewe 0136
LXI 0047, 0054, 0154, 0156, 0178
M & S 0054
Magnavox 0054, 0706, 0030, 1454, 1254
Marantz 0054, 0030

10
Matsushita 0250, 0650
Megapower 0700
Megatron 0178, 0145
Memorex 0154, 0463, 0150, 0178
MGA 0150, 0030, 0178
Micro Model 1436
Midland 0047, 0017, 0051
Misc 1530
Mitsubishi 0093, 0150, 1250, 0178, 0836
Monivision 0700
Motorola 0093
MTC 0060, 0030
Multitech 0180
NAD 0156, 0178, 0866
NEC 0030, 1704
Nesa 0763
Nikko 0030, 0178, 0092
Noblex 0154
Norcent 0748
NTC 0092
Onwa 0180
Optimus 0154, 0250, 0166, 0650
Optonica 0093
Orion 0463, 0236
Panasonic 0051, 0250, 0650
Penney 0047, 0156, 0051, 0060, 0030,
0178, 1347
Philco 0054, 0463, 1661, 0030, 0145
Philips 0054, 1454, 0690
Pilot 0030
Pioneer 0166, 0866, 0679, 1398
Portland 0092
Prima 0761
Princeton 0700
Prism 0051
Proscan 0047, 1347, 1447
Proton 0178
Pulsar 0017
Quasar 0051, 0250, 0650
RadioShack 0047, 0154, 0180, 0030, 0178
RCA 0047, 0060, 1047, 1147, 1247,
1347, 1447,1547, 0679
Realistic 0154, 0180, 0030, 0178
Runco 0017, 0030
Sampo 0030, 1755
Samsung 0060, 0702, 0030, 0178, 1060,
0812, 0814, 1575, 1312
Sansei 0451
Sansui 0463
Sanyo 0088, 0154
Scotch 0178
Scott 0180, 0236, 0178
Sears 0047, 0054, 0154, 0156, 0178,
0171
Semivox 0180
Semp 0156, 1356
Sharp 0093, 0818, 1393
Sheng Chia 0093
Signet 0800, 0844, 1262
Sony 0000, 1100
Soundesign 0180, 0178
Squareview 0171
SSS 0180
Starlite 0180
Sunbrite 1435, 1420
Supreme 0000
SVA 0748, 0865

11
Sylvania 0054, 0030, 0171
Symphonic 0180, 0171
Tandy 0093
Tatung 1756
Technics 0051, 0250
Techwood 0051
Teknika 0054, 0180, 0150, 0060, 0092
Telefunken 0702
TMK 0178
TNC 0017
Tophouse 0180
Toshiba 0154, 0156, 0093, 0060, 1156,
1356, 1656, 1704, 0650, 1256
TVS 0463
V Inc. 1756
Vector Research 0030
Victor 0053
Vidikron 0054
Vidtech 0178
Viewsonic 1755
Wards 0054, 0030, 0178, 1156, 0866
Waycon 0156
White Westinghouse 0463, 0623, 1577
Yamaha 0030
Zenith 0017, 0463, 0178, 0092

12
PROGRAMMING
VCR CONTROL
Locate the brand name of your VCR in the Setup
Codes For VCRs section below, and write it in the
following space.
VCR Brand:
The brands are listed in alphabetical order with
the most popular codes listed first. You will use
one of these codes to program the Dolphin to
operate your VCR:
1. Turn on your VCR and insert a video cassette.
2. On the Dolphin, press VCR once. Press and
hold SETUP until the LED blinks twice, then
release SETUP.
3. Enter the first four-digit code for your VCR. If
you perform this procedure correctly, the LED
will blink twice.
NOTE: If the LED did not blink twice after entering
the code’s last digit, repeat steps 2 through 3 and
try entering the same code again.
4. Aim the Dolphin at your VCR and press POWER
once. The VCR should turn off. If your VCR
remote control does not have a POWER key,
press PLAY. If the VCR does not respond, repeat
steps 2-4, trying each code listed for your
brand until you find one that works. If the VCR
still does not work, try searching for the code
(see Searching For Your Code on page 25).
5. Write your VCR code in the boxes below for
future reference.
QQQQ
NOTE: Remember to use the Dolphin to operate
your VCR, press VCR first.
Setup Codes for VCRs:
ABS 1972
Admiral 0048, 0209
Adventura 0000
Aiwa 0124, 0000, 0037
Akai 0175
Alienware 1972
American High 0035
Asha 0240
Audiovox 0037
Beaumark 0240

13
Bell & Howell 0104
Broksonic 1479, 0184, 0121, 0209, 0002
Calix 0037
Canon 0035
Carver 0081
CCE 0072
Citizen 1278, 0037
Clarion 0889, 0888
Colt 0072
Craig 0037, 0047, 0240, 0072
Curtis Mathes 1035, 0035, 0060, 0162
CyberPower 1972
Cybernex 0240
Daewoo 1278, 0045
Dell 1972
Denon 0042
DirecTV 0739
Durabrand 0039
Dynatech 0000
Electrohome 0037
Electrophonic 0037
Emerex 0032
Emerson 1479, 1278, 0000, 0037, 0184,
0121, 0043, 0209, 0002
Fisher 0047, 0104
Fuji 0035, 0033
Funai 0000
Garrard 0000
Gateway 1972
GE 1035, 1060, 0807, 0035, 0060,
0240
Goldstar 1237, 0037
Gradiente 0000
Harley Davidson 0000
Harman/Kardon 0081
Harwood 0072
Hewlett Packard 1972
Hitachi 0000, 0042
HI-Q 0047
Howard Computer 1972
HP 1972
Hughes Network Systems
0739, 0042
IBUYPOWER 1972
Jenson 0889
JVC 0067
KEC 0037
Kenwood 0067
KLH 0072
Kodak 0035, 0037
LG 0037
Lloyd’s 0000
Logik 0072
LXI 0037
Magnasonic 1278
Magnavox 1781, 0000, 0035, 0039, 0081
Magnin 0240
Marantz 0035, 0081
Marta 0037
Matsushita 0035, 0162
Media Center PC 1972
MEI 0035
Memorex 1237, 0000, 0035, 0037, 0048,
0039, 0047, 0162, 0240, 0104,
0209
MGA 0240, 0043
MGN Technology 0240
Microsoft 1972
Mind 1972

14
Minolta 0042
Mitsubishi 0807, 0067, 0043
Motorola 0035, 0048
MTC 0000, 0240
Multitech 0000, 0072
NEC 0067, 0104
Nikko 0037
Noblex 0240
Northgate 1972
Olympus 0035
Onkyo 0222
Optimus 0037, 1062, 0048, 0162, 0104
Orion 1479, 0184, 0209, 0002
Panasonic 0225, 1035, 0616, 0035, 1062,
0162
Penney 1237, 1035, 0035, 0037, 0042,
0240
Pentax 0042
Philco 0035, 0209
Philips 0618, 0739, 0035, 0081
Pilot 0037
Pioneer 0067
Polk Audio 0081
Profitronic 0240
Proscan 1060, 0060
Protec 0072
Pulsar 0039
Quasar 1035, 0035, 0162
RadioShack 0000
Radix 0037
Randex 0037
RCA 1035, 1060, 0807, 0880, 0060,
0042, 0240, 0060
Realistic 0000, 0035, 0037, 0048, 0047,
0104
ReplayTV 0614, 0616
Runco 0039
Samsung 1014, 0045, 0240
Sanky 0048, 0039
Sansui 1479, 0000, 0067, 0209
Sanyo 0159, 0047, 0240, 0104
Scott 0184, 0045, 0121, 0043
Sears 1237, 0000, 0035, 0037, 0047,
0042, 0104
Semp 0045
Sharp 0807, 0048
Shintom 0072
Shogun 0240
Singer 0072
Sonic Blue 0614, 0616
Sony 1232, 0000, 0636, 1972, 0032,
0035, 0033
STS 0042
Sylvania 1781, 0000, 0035, 0081, 0043
Symphonic 0000
Systemax 1972
Tagar Systems 1972
Teac 0000
Technics 0035, 0162
Teknika 0000, 0035, 0037
Thomas 0000
Tivo 0618, 0636, 0739, 1503
TMK 0240
Toshiba 0845, 1145, 1503, 1008, 1972,
0045, 0043
Totevision 0037, 0240
Touch 1972

15
Unitech 0240
Vector 0045
Video Concepts 0045
Videomagic 0037
Videosonic 0240
Viewsonic 1972
Villain 0000
Wards 0000, 0035, 0060, 0048, 0047,
0081, 0042, 0240, 0072
White Westinghouse 0209, 0072
XR-1000 0000, 0035, 0072, 0035
Zenith 1479, 0000, 0039, 0033, 0209
ZT Group 1972
PROGRAMMING CABLE
CONVERTER (OR SATELLITE
RECEIVER) CONTROL
Locate the brand name of your Cable Converter (or
Satellite Receiver) in the Setup Codes For Cable
Converters (or Setup Codes For Satellite Receivers)
section starting on the next page, and write it in the
appropriate space.
Cable Converter Brand:
or
Satellite Receiver Brand:
The brands are listed in alphabetical order
with the most popular codes listed first. You
will use one of these codes to reprogram the
Dolphin to operate your Cable Converter or
Satellite Receiver.
1. Turn on the Cable Converter or the
Satellite Receiver.
2. On the Dolphin, press CBL/SAT once. Press and
hold SETUP until the LED blinks twice, then
release SETUP.
3. Enter the first four-digit code for your
Cable Converter or Satellite Receiver. If you
perform this procedure correctly, the LED will
blink twice.
NOTE: If the LED did not blink twice after entering
the code’s last digit, repeat steps 2-3 and try
entering the same code again.
4. Aim the Dolphin at your Cable Converter or
Satellite Receiver and press POWER once. The
unit should turn off. If it does not respond,
repeat steps 2-4, trying each code listed for
your brand until you find one that works. If it
still does not work, try searching for the code
(see Searching For Your Code on page 25).
5. Write your Cable Converter or Satellite Receiver
code in the boxes below for future reference.
QQQQ
NOTE: Remember to use the Dolphin to operate
your Cable Converter or Satellite Receiver, press
CBL/SAT first.

16
Setup Codes for
Cable Converters:
ABC 0003, 0008
Americast 0899
Bell South 0899
Director 0476
General Instruments
0476, 0810, 0276, 0003
GoldStar 0144
Jerrold 0476, 0810, 0276, 0003
Memorex 0000
Motorola 0476, 1376, 0810, 0276
Pace 1877, 0237
Panasonic 0000
Paragon 0000
Philips 0305, 0317
Pioneer 0877, 1877, 0144, 0533
Pioneer 0533
Pulsar 0000
Quasar 0000
Runco 0000
Samsung 0144
Scientific Atlanta 0877, 1877, 0477, 0008
Starcom 0003
Supercable 0276
Torx 0003
Toshiba 0000
Zenith 0000, 0525, 0899
Setup Codes for
Satellite Receivers:
AlphaStar 0772
Century 0856
Chaparral 0216
DirecTV 0566, 0639, 1639, 1640,
0247, 0749, 1749, 1142,
1442, 0724, 0819, 1856,
0392, 1392, 1414, 1109,
1444, 1076, 0099
Dish Network System
0775, 1005, 1170
DishPro 0775, 1005
Echostar 0775, 1005,1170
Expressvu 0775
GE 0566
General Instruments
0869
GOI 0775
Goodmans 1246
Gradiente 0856
Hitachi 0819
HTS 0775
Hughes Network Systems
0749, 1749, 1142, 1442,
1443, 1444
Innova 0099
JVC 0775, 1170
LG 1226, 1414
Magnavox 0724, 0722
Mega Sat 1551
Memorex 0724
Mitsubishi 0749
Motorola 0869
NEC 1270
Netsat 0099
Next Level 0869
Panasonic 0701, 0247
17
Paysat 0724
Philips 0749, 1749, 1142, 1442,
0724, 0722, 0856, 1076,
0099
Proscan 0566, 0392
RadioShack 0869
RCA 0566, 0143, 0855, 0392,
1392
SKY 0856, 1856, 0099
Samsung 1276, 1109
Sanyo 1219
Sony 0639, 1639,1640
Star Choice 0869
Tivo 1142, 1442, 1443,1444
Toshiba 0749, 1749, 0790,1285
UltimateTV 1640, 1392
Uniden 0724, 0722
Voom 0869
Zenith 0856, 1856
PROGRAMMING DVD
CONTROL
Locate the brand name of your DVD player in the
Setup Codes For DVD Players section below, and
write it in the following space.
DVD Player Brand:
The brands are listed in alphabetical order with
the most popular codes listed first. You will use
one of these codes to program the Dolphin to
operate your DVD Player:
1. Turn on the DVD Player.
2. On the Dolphin, press DVD once. Press and
hold SETUP until the LED blinks twice, then
release SETUP.
3. Enter the first four-digit code for your DVD
Player. If you perform this procedure correctly,
the LED will blink twice.
NOTE: If the LED did not blink twice after entering
the code’s last digit, repeat steps 2 through 3 and
try entering the same code again.
4. Aim the Dolphin at your DVD Player and press
POWER once. The DVD Player should turn
off. If it does not respond, repeat steps 2-4,
trying each code for your brand until you find
one that works. If it still does not work, try
searching for the code (see Searching For Your
Code on page 25).
5. Write your DVD code in the boxes below for
future reference.
QQQQ
NOTE: Remember, to use the Dolphin to operate
your DVD Player, press DVD first.

18
Setup Codes for DVD Players:
Allegro 0869
Anaba 0813
Apex Digital 0672, 1020, 0794, 0796,
0797, 1100, 1004, 0755,
1056, 1061, 0830, 0717
Aspire Digital 1168
Audiovox 1072
Axion 1072
Blaupunkt 0717
Blue Parade 0571
Boss 1680
Broksonic 0695
Cinevision 0876, 0869
Clarion 0891, 0892, 1039, 1559
Coby 1086
Concept 1564
Curtis Mathes 1087
CyberHome 0816, 1023, 1024, 1117, 1129
Daewoo 1172, 0784, 0869, 0833
Denon 0490
Dual 1068, 1085
DVD2000 0521
Emerson 0591, 0675
Enterprise 0591
Fahrenheit 0887,0890, 1054, 1066, 1142
Fisher 0670
Funai 0675
Gateway 1158, 1073
GE 0522, 0815, 0717
Go Video 0783, 1099,1730, 0869,
0833, 0715, 0744, 1075
GPX 0699
Gradiente 0651
Greenhill 0717
Harman/Kardon 0582, 0702
Hitachi 0573, 0664,0695
Hiteker 0672
Honyas 1142
Initial 0717, 1472
IRT 0783
JBL 0702
Jensen 1016, 1700
JVC 0558, 0623, 0867, 1872
KEC 1238
Kenwood 0490, 0534
KLH 1020, 0717
Koss 0651
Lanzar 1398
Lasonic 0798
Lite-On 1058, 1158
Loewe 0511
Magnavox 0503, 0675
Marantz 0539
Memorex 0695
Microsoft 0522
Mintek 0839, 0717
Mitsubishi 0521, 1521
NEC 0785
Nesa 0717, 1603
Norcent 1003
Onkyo 0792, 0503
Optiview 0813
Oritron 0651
Panasonic 0490, 1762,
Philips 0503, 0539, 0646, 0854

19
Pioneer 0525, 0571
Polaroid 1086, 1061
Polk Audio 0539
Proscan 0522
Pyle 1300, 1746
Qwestar 0651
RCA 0522, 0571, 0822, 1132,
1022, 0717
Rio 0869
Rotel 0623
Rowa 0823
Sampo 0752
Samsung 0490, 0573, 0744, 0820, 1075
Sansui 0695
Sanyo 0670,0873, 0695
Semp 0503
Sharp 0752, 0630
Sharper Image 1117
Sherwood 0770
Shinsonic 0533, 0839
Sonic Blue 1099, 0869
Sony 0533, 1033,0864
Sound Mobile 1298
Starvision 1300
Superscan 0821
Sylvania 0675
Symphonic 0675
T-View 0813
Teac 0809
Technics 0490
Theta Digital 0571
Toshiba 0503, 1154, 0695
Tredex 0799
US Logic 0839
Urban Concepts 0503
Xbox 0522
Yamaha 0490, 0539, 0545
Zenith 0503, 0591, 0869

20
PROGRAMMING CD
CONTROL
Locate the brand name of your CD Player in the
Setup Codes For CD Players section below, and
write it in the following space.
CD Player Brand:
The brands are listed in alphabetical order with
the most popular codes listed first. You will use
one of these codes to program the Dolphin to
operate your CD Player:
1. Turn on the CD Player.
2. On the Dolphin, press CD once. Press and
hold SETUP until the LED blinks twice, then
release SETUP.
3. Enter the first four-digit code for your CD
Player. If you perform this procedure correctly,
the LED will blink twice.
NOTE: If the LED did not blink twice after entering
the code’s last digit, repeat steps 2 through 3 and
try entering the same code again.
4. Aim the Dolphin at your CD Player and press
POWER once. The CD Player should turn off.
If it does not respond, repeat steps 2-4,
trying each code for your brand until you find
one that works. If it still does not work, try
searching for the code (see Searching For Your
Code on page 25).
5. Write your CD code in the boxes below for
future reference.
QQQQ
NOTE: Remember, to use the Dolphin to operate
your CD Player, press CD first.
Setup Codes for CD Players:
Aiwa 0157
Burmester 0420
California Audio Labs 0029, 0303
Carver 0157, 0179, 0437
CCE 0157
Classic 1297
Denon 0003, 0873
DKK 0000
DMX Electronics 0157
Emerson 0305
Fisher 0179, 1325
Garrard 0420, 0393
Genexxa 0032, 0305
GPX 1296
Harman/Kardon 0157, 0173, 1202
Hitachi 0032
Integra 0101
JVC 0072, 1294
Kenwood
0826, 0626, 0028, 0037, 0190, 0681
KHL 1711

21
KLH 1318
Koss 1317
Krell 0157
LG 1208
Linn 0157
LXI 0305
Magnavox 0157, 0305
Marantz 0626, 0029, 0157, 0180
Mark Levinson 1484
Matsui 0157
MCS 0029
Miro 0000
Mission 0157
MTC 0420
Nikko 0174, 0164, 0170
NSM 0157
Onkyo 0101, 0868
Optimus 1063, 0032, 0000, 0179, 0305,
0037, 0420, 0145, 0468, 0437,
1075
Panasonic 0029, 0303
Parasound 0420
Philips 0626, 0157
Pioneer 1063, 0032, 0305, 0468, 1062,
1087
Polk Audio 0157
Proton 0157
QED 0157
Quad 0157
Quasar 0029
Radio Shack 1075
RCA 0032, 0179, 0305, 0053, 0468,
0764, 0420
Realistic 0179, 0420, 0180
Rotel 0157, 0420
SAE 0157
Sansui 0157, 0305
Sanyo 0179
Scott 0305
Sears 0305
Sharp 0861, 0037, 0180
Sherwood 1067, 0180
Sonic Frontiers 0157
Sony 0490, 0000, 0185, 0100, 1364
Soundesign 0145
Symphonic 0305
TAG McLaren 0157
Tascam 0420
TDK 1208
Teac 0420, 0393, 0180
Technics 0029, 0303
Tivoli Audio 1553
Victor 0072
Wards 0157, 0053
Yamaha 0888, 0036, 0187, 1292
Yorx 0461
Zonda 0157

22
PROGRAMMING
AUDIO CONTROL
Using the Dolphin’s RCVR mode, you can also
control an audio component, such as a stereo
receiver or a stereo amplifier.
Locate the brand name of your audio component
in one of accompanying code lists. Write it in the
appropriate space.
Stereo Receiver Brand:
or
Stereo Amplifier Brand:
The brands are listed in alphabetical order with
the most popular codes listed first. You will use
one of these codes to program the Dolphin to
operate your audio component:
1. Turn on the audio component.
2. On the Dolphin, press RCVR once. Press and
hold SETUP until the LED blinks twice, then
release SETUP.
3. Enter the four-digit code for your audio
component. If you perform this procedure
correctly, the LED will blink twice.
NOTE: If the LED did not blink twice after
entering the code’s last digit, repeat steps
2 through 3 and try entering the same
code again.
4. Aim the Dolphin at your audio component and
press POWER once. The unit should turn off.
If it does not respond, repeat steps 2-4, trying
each code listed for your brand until you find
one that works. If it still does not work, try
searching for the code (see Searching For Your
Code on page 25).
5. Write your audio component code in the boxes
below for future reference.
QQQQ
NOTE: Remember to use the Dolphin to operate
your audio component, press RCVR first.
Setup Codes for
Stereo Receivers/Tuners:
ADC 0531
Aiwa 1243, 1405, 0158, 0189, 0121
Akai 1255
Alco 1390
Anam 1609, 1074
Anam 1609

23
Apex Digital 1257, 1430
Audiotronic 1189
Audiovox 1390
Blaupunkt 1480, 1481, 1499
Bose 1229, 0639, 1253, 1355
Capetronic 0531
Carver 1189, 0189
Clarion 1377, 1669
Coby 1263
Dell 1383
Denon 1360
Farenheit 1900, 1598
Glory Horse 1263
Harman/Kardon 0110, 0189
Hitachi 1273
Honyas 1900
Integra 0135, 1298
JBL 0110, 1457
Jensen 0110, 1457, 2045
JVC 0074, 1263, 1400
Kenwood 1313, 1570, 1569, 0239,
0027, 0337, 0338
KHL 1664
KLH 1428, 1390, 1664, 1711
Koss 1366
Linn 0189
Magnadyne 1745
Magnavox 1189, 1269, 0531, 0189, 1514
Marantz 1189, 1269, 0039, 0189
MCS 0039
Mitsubishi 1393
Onkyo 0842, 0135, 1298
Optimus 1023, 0531, 0670, 1074
Oritron 1366, 1497
Panasonic 1518, 0039, 0309, 1548,
1288, 1316, 1763, 1764, 1399
Philco 1390
Philips 1189, 1269, 0189, 1266
Pioneer 1023, 0531, 0014, 0150,
1630, 1384, 1456
Polk Audio 0189
Poly Planner 1914
Proscan 1254
Quasar 0039
RadioShack 1263
RCA 1023, 1609, 1254, 0531,
1074, 1390, 1511
Rio 1383
Sansui 0189
Sharper Image 1263
Sonic Blue 1383
Sony 1058, 1441,1258, 1759,
1758, 0158, 1406, 1442,
1858, 1658, 1558, 1349, 1397
Soundesign 0670
Stereophonics 1023
Sunfire 1313
Teac 1267, 1074, 1390, 1528
Technics 1308, 1518,0039, 0309
Thorens 1189
Venturer 1390
Victor 0074
Wards 0158, 0014, 0189
Yamaha 0176, 1176, 1276

24
Setup Codes for
Stereo Amplifiers:
Aiwa 0406
Bose 0674
Carver 0269
Curtis Mathes 0300
Denon 0160
Durabrand 1561
GE 0078
Harman/Kardon 0892
JVC 0331
Left Coast 0892
Lenoxx 1561
Linn 0269
Luxman 0165
Magnavox 0269
Marantz 0892, 0269, 0321
Nakamichi 0321
Optimus 0395, 0300
Panasonic 0308, 0521
Philips 0892, 0269
Pioneer 0013, 0300
Polk Audio 0892, 0269
RCA 0300
Realistic 0395
Sansui 0321
Sony 0815, 0220, 0689
Soundesign 0078
Technics 0308, 0521
Victor 0331
Wards 0078, 0013
Yamaha 0354
Setup Codes for
Automotive and Marine:
AUDIO
Aquatic CD/RCVR 1867, 1866
Aquavobe Magnadyne CD/RCVR 1900
Blaupunkt Honolulu CD/RCVR 1499
Blaupunkt Miami Beach CD/RCVR 1480
Blaupunkt Miami Beach multi-disk chngr 1481
Clarion CD/RCVR 1669
Clarion CD/RCVR 1377
Honyas CD/RCVR 1900
JBL CD/RCVR 1457
JVC CD/RCVR 1400
Kenwood CD/RCVR 0337, 0338
KHL CD 1711
KHL RCVR 1664
Panasonic CD/RCVR 1399
Pioneer CD/RCVR 1456
Poly-Planar CD/RCVR 1914
Sony CD/RCVR 1349, 1397
Sony RCVR 1758

25
SEARCHING FOR YOUR CODE
If your TV, VCR, Cable Converter, Satellite or Audio
Component does not respond to the Dolphin after
trying all of the codes listed for your brand, or if
your brand is not listed at all, try searching for
your code.
For example, to search for a code for your TV:
1. Turn on your TV.
2. On the Dolphin, press and hold SETUP until the
LED blinks twice, then release SETUP.
3. Enter 9 - 9 - 1. The LED will blink twice.
4. Aim the remote control at the TV and slowly
alternate between pressing POWER and TV. Stop
when the TV turns off.
NOTE: In the search mode, the Dolphin will
send IR codes from its library to the selected
component, starting with the most popular
code first.
5. Press SETUP once to lock in the code.
6. To search for the codes of your other
components, repeat steps 1 through 5, but
substitute the appropriate key (i.e., VCR,
CBL/SAT, DVD, CD, or RCVR) for the
component you are searching for.
TV
Aurora Systems TV 0801
Blaupunkt TV 0763
Casio TV 1205
CCD TV 0463
Clarion TV 0180
Fahrenheit TV 1598
JVC Monitor 0731
Signet TV 0844
VCR
Clarion VCR 0800
Clarion/Jenson VCR 0888
Samsung VCR 0889
Sony VCR 0240
DVD
Blaupunkt DVD 0717
Clarion DVD 0891, 0892, 1039
Fahrenheit DVD - 5 0890
Fahrenheit DVD - 12T 1054
Fahrenheit DVD - 11N 1066
Fahrenheit DVD - 16T 0887
Honyas DVD 1142
KEC DVD 1238
T-View DVD 0813
26
CHECKING THE CODES
If you have set up the Dolphin using the
“Searching For Your Code” procedure, you may
need to find out which four-digit code is operating
your equipment:
For example, to find out which code is operating
your TV:
1. Turn on your TV.
2. On the Dolphin, press and hold SETUP until the
LED blinks twice, then release SETUP.
3. Enter 9 - 9 - 0. The LED will blink twice.
4. To view the code for the first digit, press 1
once. Wait 3 seconds and count the number of
LED blinks (e.g., 3 blinks = 3) and write down
the number in the leftmost TV Code box below.
NOTE: If a code digit is “0”, the LED will
not blink.
5. Repeat step 4 three more times for remaining
digits. Use 2 for the second digit, 3 for the third
digit, and 4 for the fourth digit. Finish writing
down the code in the TV Code boxes below.
6. To check for the codes of your other
components, repeat steps 1 through 5, but
substitute the appropriate key (i.e., VCR, CBL/
SAT, DVD, CD or RCVR) for the component
you are checking. Write down the codes in the
appropriate boxes below.
TV Code
QQQQ
VCR Code
QQQQ
CBL/SAT Code
QQQQ
DVD Code
QQQQ
CD Code
QQQQ
RCVR Code
QQQQ

27
REASSIGNING DEVICE KEYS
The Dolphin can be set up to control a second
TV or VCR, or any combination of four home
entertainment components. For example, to have
the Dolphin control a TV, a Cable Converter, and
two VCRs, you will need to reassign the unused
RCVR key to operate the second VCR as follows:
1. On the Dolphin, press and hold SETUP until the
LED blinks twice, then release SETUP.
2. Enter 9 - 9 - 2. The LED will blink twice.
3. Press VCR once, then press RCVR once.
4. The RCVR key is now ready to be programmed
for your second VCR. (See Programming VCR
Control on page 12.)
To reassign other device keys, repeat steps 1
through 4 by substituting the key sequence from
the following chart for a desired component:
To Reassign Perform Key Sequence
TV as 2nd VCR key: SETUP - 9 - 9 - 2 - VCR - TV
TV as 2nd RCVR key: SETUP - 9 - 9 - 2 - RCVR - TV
TV as 2nd CBL/SAT key: SETUP - 9 - 9 - 2 - CBL/SAT - TV
TV back to TV SETUP - 9 - 9 - 2 - TV - TV
VCR as 2nd TV key: SETUP - 9 - 9 - 2 - TV - VCR
VCR as 2nd RCVR key: SETUP - 9 - 9 - 2 - RCVR - VCR
VCR as 2nd CBL/SAT key: SETUP - 9 - 9 - 2 - CBL/SAT - VCR
VCR back to VCR: SETUP - 9 - 9 - 2 - VCR - VCR
RCVR as 2nd TV key: SETUP - 9 - 9 - 2 - TV - RCVR
RCVR as 2nd VCR key: SETUP - 9 - 9 - 2 - VCR - RCVR
RCVR as 2nd CBL/SAT key: SETUP - 9 - 9 - 2 - CBL/SAT - RCVR
RCVR back to RCVR: SETUP - 9 - 9 - 2 - RCVR - RCVR
Upon completion of a reassignment, the LED will
blink twice to confirm your selection. At that time,
you will also need to program the Dolphin to
control the new component (as described earlier
in this document).

SETTING VOLUME LOCK
The Dolphin can be set so that the volume control
buttons will always control the same device no
matter which device mode is selected.
If your TV is not remote controllable, or if you
would like the volume to be controlled by a
different component, you can change the Volume
Lock setting to control volume through a
non-associated mode (e.g., through the cable in
the TV mode).
To Change Volume Lock to the CBL/SAT
mode:
1. On the Dolphin, press and hold SETUP until the
LED blinks twice, then release SETUP.
2. Enter 9 - 9 - 3 and then press CBL/SAT once.
The LED will blink twice.
3. Now ,whenever you press Volume +, Volume
–, or MUTE on the Dolphin, volume will be
controlled by your Cable Converter or Satellite.
To Change Volume Lock to the TV mode:
1. On the Dolphin, press and hold SETUP until the
LED blinks twice, then release SETUP.
2. Enter 9 - 9 - 3 and then press TV once. The
LED will blink twice.
3. Now, whenever you press Volume +, Volume
–, or MUTE on the Dolphin, volume will be
controlled by your TV.
To Change Volume Lock to the VCR mode:
1. On the Dolphin, press and hold SETUP until the
LED blinks twice, then release SETUP.
2. Enter 9 - 9 - 3 and then press VCR once. The
LED will blink twice.
3. Now, whenever you press Volume +, Volume
–, or MUTE on the Dolphin, volume will be
controlled by your VCR.
To Change Volume Lock to the DVD mode:
1. On the Dolphin, press and hold SETUP until the
LED blinks twice, then release SETUP.
2. Enter 9 - 9 - 3 and then press DVD once. The
LED will blink twice.
3. Now, whenever you press Volume +, Volume
–, or MUTE on the Dolphin, volume will be
controlled by your DVD Player.
28

29
To Change Volume Lock to the CD mode:
1. On the Dolphin, press and hold SETUP until the
LED blinks twice, then release SETUP.
2. Enter 9 - 9 - 3 and then press CD once. The
LED will blink twice.
3. Now, whenever you press Volume +, Volume
–, or MUTE on the Dolphin, volume will be
controlled by your CD Player.
To Change Volume Lock to the RCVR mode:
NOTE: Performing these steps will allow you to
access the volume control of your audio component
in all modes.
1. On the Dolphin, press and hold SETUP until the
LED blinks twice, then release SETUP.
2. Enter 9 - 9 - 3 and then press RCVR once. The
LED will blink twice.
3. Now, whenever you press Volume +, Volume
–, or MUTE on the Dolphin, volume will be
controlled by your audio component.
Clearing Volume Lock
The volume lock can be cleared so that the volume
control buttons will control whatever device
is selected.
To clear the volume lock:
1. On the Dolphin, press and hold SETUP until the
LED blinks twice, then release SETUP.
2. Enter 9 - 9 - 3 and then press Volume Up. The
LED will blink 4 times when unlocked.
Clearing Volume Lock For One Device
The volume lock can be cleared for one specific
device so that the volume control buttons will
control that device when it is selected.
To clear the volume lock for a specific device:
1. Press the device key for the unit to
be unlocked.
1. On the Dolphin, press and hold SETUP until the
LED blinks twice, then release SETUP.
2. Enter 9 - 9 - 3 and then press Volume Down.
The LED will blink 4 times when unlocked.

30
USING THE
LEARNING FEATURE
You can program the non-spa buttons to add
functions that are unique to your home entertainment
devices (e.g., VCR Tracking Up or Down).
NOTE: PLEASE HAVE YOUR ORIGINAL REMOTE
CONTROLS ON HAND BEFORE PROGRAMMING
THE LEARNING FEATURE. BE SURE TO PRESS
EACH KEY WITHIN 10 SECONDS OF THE
PREVIOUS ENTRY. IF 10 SECONDS PASS BETWEEN
ENTRIES, THE REMOTE CONTROL WILL EXIT THE
PROGRAMMING MODE.
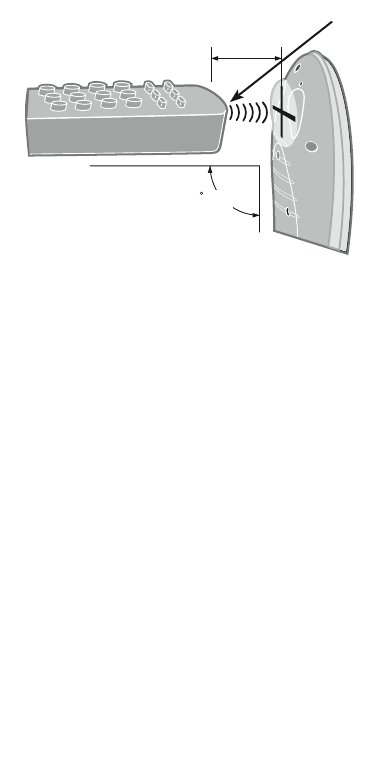
Programming A Learning Key
1. Place your original remote control (e.g., TV
remote control) at a 90˚ angle to the underside
of the Dolphin Remote (1.5" to 2" apart).
The original remote LED should point to the
area directly in between the two footings on the
underside of the Dolphin Remote. (See illustration
on next page.)
2. Press and hold SETUP until the LED (red light)
blinks twice, then release SETUP.
3. Enter 9 - 7 - 5. The LED will blink twice.
4. Press a device key once (e.g., TV) to assign a
mode for learning.
5. Press an open learning key once (e.g., Guide)
to store a feature to be learned. The LED will
blink rapidly.
NOTE: THE DOLPHIN LED LIGHT MUST BE BLINKING
IN ORDER TO PROGRAM. IF AT ANY TIME DURING
PROGRAMMING, THE DOLPHIN LED STOPS
BLINKING, GO BACK TO STEP 1 AND START AGAIN.
6. On your original remote control, press and hold
the key feature to be learned until the LED on the
Dolphin Remote Control blinks twice. If the LED
does not blink twice, repeat steps 3 through 6.
7. To learn functions onto other learning keys,
repeat steps 3 through 6.
8. To exit learning mode, press and hold SETUP
until the LED blinks twice, then release SETUP or
wait 10 seconds.
9. To test a learned feature, press a device key
(e.g., TV) once where the learning mode was
assigned. Then press the learning key (e.g., Guide)
where the learned feature is stored.
Deleting Functions From The Learning Keys:
1. Press and hold SETUP until the LED (red light)
blinks twice, then release SETUP.
2. Enter 9 - 7 - 6. The LED will blink twice.
3. Press the device key once where the learned
feature is stored (e.g., TV).
31
1.5 to 2.0 inches appart
90 angle
Original Remote
4. Press the learning key (e.g., Guide) twice. The
LED will blink twice after the second press.
5. To clear additional functions stored on
other learning keys, repeat steps 1 through 4
(in this section).
Feature Reset
This function will clear all volume lock and learned
key functions. It does not clear device codes and
mode reassignments.
1. On the Dolphin, press and hold SETUP until the
LED (red light) blinks twice, then release SETUP.
2. Enter 9 - 8 - 0. The LED will blink 4 times when
reset is complete..
NOTE: LEARNING SHOULD BE DONE INDOORS AND
AWAY FROM FLUORESCENT LIGHTS.
Original Remote LED
Dolphin Remote

32
USING THE
IR/RF COMMAND CENTER
The Dolphin Remote Control (URC-9811) can
be used with an optional IR/RF Command Center
which receives radio-frequency (RF) signals from
the Dolphin, up to 100 feet away*.
Once it is set up, the IR/RF Command Center will
convert the RF signals into Infrared (IR) signals to
control your home theater devices.
NOTE: The Dolphin remote control transmits both an
IR and an RF signal simultaneously. It is your option
whether you want to install the IR/RF Command
Center for extended remote control range.
NOTE: The RF signal transmitted by the Dolphin
remote control only works with the IR/RF
Command Center.
Setting Up The IR/RF Command Center
1. Find a location several feet in front of your
home theater devices (TV, VCR, DVD, RCVR,
etc.). It should provide line-of sight access to
your equipment and a power outlet to plug in
the IR/RF Command Center.
2. Plug in the IR/RF Command Center’s power
cord and raise the telescoping antenna.
3. Position the IR/RF Command Center so
the black IR Lens is aimed at your home
theater devices.
4. To test the IR/RF Command Center, take the
Dolphin into another room in your home.
Select a device key (e.g., TV) and press it once.
Then press POWER once.
The device should turn on. If it does not turn
on, review the steps 1 through 3 and make the
necessary adjustments. Try step 4 again. If you
continue to have a problem, perhaps there is an
IR line-of sight problem. Try adding the IR Signal
Extension Cord. Also review the tips in Optimizing
IR/RF Command Center Reception.
Adding The IR Signal Extension Cord
Included with the IR/RF Command Center is an IR
Signal Extension Cord for use with a home theater
device that is not in direct line-of-sight of the IR/RF
Command Center.
If you are having problems remotely controlling
a home theater device from another room, try
performing the following installation:
1. Plug the 4' IR Signal Extension Cord into the
back of the IR/RF Command Center.

33
2. Run the IR Signal Extension Cord to the
device that is not in line-of-sight of the IR/RF
Command Center.
3. Using the supplied double-sided tape, attach
the IR Signal Extension Cord so that its LED
is over or next to the IR sensor of your home
theater device.
4. Test the installation by again taking the Dolphin
into another room in your home. Select a
device key (e.g., TV) and press it once. Then
press POWER once.
The IR/RF Command Center will convert the RF
signal from the Dolphin into an IR signal and
transmit that signal through the IR Signal Extension
Cord to turn on your device (e.g., TV).
If it does not turn on, try repositioning the LED
until the device can be controlled, then reattach
the LED.
Optimizing IR/RF Command Center
Reception
Here are some adjustment tips for optimizing the
operation of your IR/RF Command Center:
• Aim the Dolphin toward the room where the
IR/RF Command Center is located.
• Do not position the IR/RF Command Center
near metal objects, such as heat ducts. Metal
can block RF signals.
• Make sure the batteries in the Dolphin are
fully charged. Try replacing them if you are not
sure (see Installing Batteries on page 7). Weak
batteries will affect the signal range.
• Make sure that the Dolphin is not being
affected by other RF transmissions (e.g., garage
door openers, cordless telephones, etc.).
*Distance Note for Command Center
Note: The Dolphin Remote will operate the
Command Center at distances up to 100 feet in
an open field. Range will be adversely affected by
metal structures, objects blocking the signal path,
antenna orientation or extension, radio frequency
interference from other sources, or weak batteries
in the Dolphin Remote.

34
SPECIFICATIONS
Remote Control Power
2 AA Batteries
IR/RF Command Center Power
120 VAC
Remote Control to IR/RF Command Center
RF Range
up to 100 Feet (30.48 m)*
IR/RF Command Center to Audio/Visual
Equipment Range
Up to 30 Feet (7.62 m) ± 30°
Remote Control Dimensions (H x W x D)
9-2⁄16 x 2-10⁄16 x 1-3⁄16 in.
232 x 65 x 31 mm
IR/RF Command Center Dimensions
(H x W x D)
1-9⁄16 x 5 -1⁄16 x 4 in
39.7 x 128.6 x 101.6 mm
Remote Control Weight (without
Batteries)
8 oz (220 g)
IR/RF Command Center Weight
10.4 oz (300 g)
NOTE: Specifications are typical. Individual units
may vary. Specifications are subject to change
and improvement without notice
*Distance may vary

35
COMPLIANCE WITH FCC RULES
AND REGULATIONS
This equipment has been tested and found to
comply with the limits for a class B digital device,
pursuant to part 15 of the FCC Rules.
These limits are designed to provide reasonable
protection against harmful interference in a
residential installation. This equipment generates,
uses and radiates radio frequency energy, and
if not installed and used in accordance with the
instructions, may cause harmful interference
to radio communications. However, there is no
guarantee that interference will not occur in a
particular installation.
If this equipment does cause harmful interference
to radio or television reception, which
can be determined by turning the equipment
off and on, the user is encouraged to try to
correct the interference by one or more of the
following measures:
• Reorient or relocate the receiver and antenna.
• Increase the separation between the equipment
and the receiver.
• Connect the equipment into an outlet that
is different from that which the receiver is
connected.
• Consult the dealer or an experienced radio/
television technician for help.
The user is cautioned that changes and
modifications made to the equipment without the
approval of the manufacturer could void the user’s
authority to operate the modified equipment.
FCC Authorization Label
This device complies with part 15 of the FCC
Rules. Operation is subject to the following
two conditions:
1. This device may not cause harmful
interference; and
2. This device must accept any interference
received, including interference that may cause
undesired operation.
FCC ID #: MG31033-4
Dolphin II Remote Control with RF
Command Center:
(FCC Standards IC:2575-4339BG0)

36
TROUBLESHOOTING
PROBLEM: LED does not blink when you press a key.
SOLUTION: Replace the batteries with two (2) new AA
alkaline batteries (see page 7).
PROBLEM: LED blinks when you press a key, but
home entertainment component does
not respond.
SOLUTION: Make sure you are aiming the Dolphin at
your home entertainment component and
that you are within 15 feet of the
component you are trying to control.
PROBLEM: The Dolphin does not control home
entertainment components or commands
are not performing properly.
SOLUTION: Try all listed codes for the component
brand being set up. Make sure all
components can be operated with an
infrared remote control.
PROBLEM: TV/VCR combo does not respond properly.
SOLUTION: Use the VCR codes for your brand. Some
combo units may require both a TV code
and a VCR code for full operation (see
pages 8-15).
PROBLEM: No volume on a second TV.
SOLUTION: Follow instructions in Changing Volume
Lock (see page 28).
PROBLEM: CH+ , CH– , and LAST do not work for
your RCA TV.
SOLUTION: Due to RCA design (1983-1987), only the
original remote control will operate
these functions.
PROBLEM: Changing channels does not work properly.
SOLUTION: If original remote control required
pressing ENTER to change channels, press
ENTER on the Dolphin after entering a
channel number.
PROBLEM: Tried “Search Method” and still could not
find a working code.
SOLUTION: Try the “Search Method” again after
clearing out the device key as follows:
Press and hold ENTER until red light blinks
twice, then release. Next enter 9 - 9 - 2.
Then press and release the device key to be
cleared twice.
PROBLEM: Dolphin does not control spa (but does
control other devices).
SOLUTION: If spa has RF receiver: 1) Try it at different
distances. You may be too close or too far
away. 2) Make sure the correct address is
set on the spa for the set up code you
entered on the Dolphin. Set the spa address
back to 0. If your spa has addressing
capability, enter set up code 0000 on the
Dolphin. If that works, set a new address
on the spa, and enter the corresponding
set up code on the Dolphin.
If it stops working again, the necessary
equipment for address is probably not
installed in the your spa. In that case, set
it back to 0/0000 and leave it there.
PROBLEM: Dolphin and spa are set to an address but
still experiencing interference from
neighbor's spa.
SOLUTION: You and your neighbor may have chosen
the same address. Choose a different
address and corresponding set up code.
PROBLEM: My spa was just serviced. Everything works
now, except for my remote.
SOLUTION: Reprogram the spa address last used.
Repeat the Spa Addressing procedure if you
don’t remember the address.