Universal Scientific APAGAT02 Flanker Pro Dual Radio AP User Manual AP AG AT 02 User Guide
Universal Scientific Industrial Co., Ltd. Flanker Pro Dual Radio AP AP AG AT 02 User Guide
Contents
- 1. User manual
- 2. Users Manual
Users Manual
USI FlankerPro2 Wireless
Access Point User Guide
(Model : AP-AG-AT-02)
Draft Version V0.1
Corporate Headquarters
Universal Scientific Industrial Co., Ltd.
http://www.usi.com.tw
Tel: 886-59-2350876
Fax: 886-49-2351093
Published OCT, 2003
FCC Information
This equipment has been tested and found to
comply with the limits for a Class A digital devices
pursuant to part 15 of the FCC Rules. These limits
are designed to provide reasonable , protection
against harmful interference when the equipment is
operated in a commercial environment.
This equipment generates, uses, and can radiate
radio frequency energy and, if not installed and
used in accordance with the instruction manual,
may cause harmful interference to radio
communication. Operation of this equipment in
residential area is likely to cause harmful
interference in which case the user will be required
to correct the interference at this own expense.
The user should not modify or change this
equipment without written approval from company
name. Modification could void authority to use this
equipment.
For the safety reason, people should not work in a
situation which RF Exposure limits be exceeded.
To prevent the situation happening, people who
work with the antenna should be aware of the
following rules:
1). In case the accesspoiont is operating with its integral
antenna, or when oprating with range extender model
under 1), special measures have to be taken: the antenna
must be installed by a professional and situated in a location
4). While the device is working, please do not contact
the antenna.
and human body.
2). When using any other antenna, which is not mentioned
AIN-WB-OD-B, position the system in such a way,
that 20cm seperation can be secured between antenna
where a distance of 1m can be secured towards any human
body. Read the external antenna intallation documentation for
essential details regarding conditions and operation.
3). While installing the antenna in the location, please always
turn off the power of the accesspoint.
2
3
Copyright
Copyright © 2003 all rights reserved. No part of this
publication may be reproduced,
adapted, stored in a retrieval system, translated into
any language, or transmitted in any form or by any
means without the written permission of the supplier.
About This Manual
The purpose of this manual is for the setup of the
802.11a/g switchable Wireless LAN Access Point. This
manual includes procedures assisting you in avoiding
unforeseen problems.
Technical Support
Universal Scientific Industrial Co., Ltd.
Address : 141, Lane 351, Taiping Road, Sec. 1, Tsao Tuen, Nan-Tou,
Taiwan
Tel : + 886-49-2350876, 2325876
Fax : +886-49-2329561, 2337360
E-mail : usi@ms.usi.com.tw
Technical Support in the US
Address : 3590 Peterson Way, Santa Clara, CA 95054, USA
Tel : +1-408-986-6589
Fax : +1-408-432-0440
E-mail : alex_lee@ms.usi.com.tw ; altliao@ms.usi.com.tw
Product variants that support 5.15 ~ 5.25 GHz frequency
range, are not equipped with external antenna connector
The transmitter must not be co-located or operate in
conjucntion with any other antenna or transmitter.
We declare that AP-AG-AT-01 (Flanker Pro Single Radio
AP) is limited in the 2.4GHz band on CH1~11 by specified
and are restricted for indoor use only!
firmware controlled in USA.

4
Contents
1.Introduction………………..……………………………………...….3
1.1 Feature and Benefits
1.2 Applications
1.3 System Configurations
2. Content of Product Kit……………………………….….……….…
2.1 Before You Start
2.2 System Requirements
2.3 Mechanical Description
2.4 Hardware Installation
3. Configure The Access Point
3.1 Using the Access Point Utility
3.2 Using the Web Management
3.3 Using the Telnet
4. TroubleShooting
Appendix A Glossary
5
Chapter 1 Introduction
The next-generation wireless LAN device – 54Mbps Wireless Access Point,
are specially designed for Enterprise applications, offering campus-wide
connections between buildings at a speed of up to 54Mbps.
With simply one or two Access Points and wireless adaptors, users can build a
clean and neat wireless network in offices without too much effort. With a
wireless networking environment, everyone can get the access to the Internet
anytime, anywhere in offices.
Going wireless has advantages: It relieves you of the chore of drilling holes
and snaking Ethernet wires through walls and floors. Going wireless has
advantages for desk-bound purchase, too: It relieves you of the chore of
drilling holes and snaking Ethernet wires through walls and floors. In the
wireless environment, you can pick up your notebook with a wireless PC Card
installed, and get free to read e-mail, download files or surf the Web while
sitting anywhere.
With several Access Points, users can solve the problem to build LANs in
frequently changed environments, such as open space, show rooms, meeting
rooms, and manufacturing sites that are frequently rearranged. With
embedded Mini-PCI cards, and wireless PC cards, it is convenient for mobile
workers such as doctors, nurses, and sales to get access to existed databases
and networks anytime anywhere.
Fully compliant with IEEE802.11a/g standard, the Wireless Access Point
provides powerful features such as the Windows-based configuration utility,
MAC address filtering, WEP security and more.
1-1 Features and Benefits
• Detachable antenna allows you for the use of external high gain
antenna.
• With a data rate of 54 Mbps, the system is faster than an E1/T1 data
link.
• Fully IEEE 802.11a/g compatible. Allow inter-operation among multiple
vendors.
• Technique operating in the unlicensed 2.4GHz & 5GHz ISM band.
• Seamless roaming within the 802.11a & 802.11g wireless LAN
6
infrastructure.
• Provides user authentication to enforce tight security.
• MAC address control.
• Highly efficient antenna provides a range of operation up to 800 feet in
free space.
• Easy to install and friendly to user, just plug and play!
• Provides Window-based configuration utility.
• Tight design with light weight, compact size, and low power
consumption.
1-2 Applications
Wireless Infrastructure
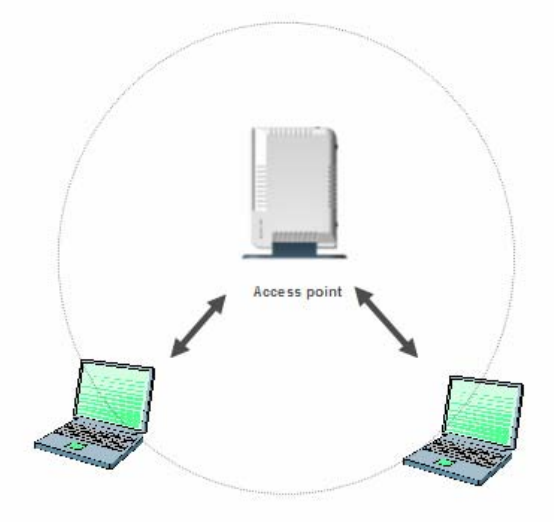
In a wireless infrastructure, the access point acts as a bridge. The access point
connects the wireless clients together.The Access Point acts as a center point
for all wireless communications. This would increase efficiency of the
communications since the wireless adapters do not need to be within direct
range of each other.
Wireless Infrastructure with Stations Attaching to a Wired LAN
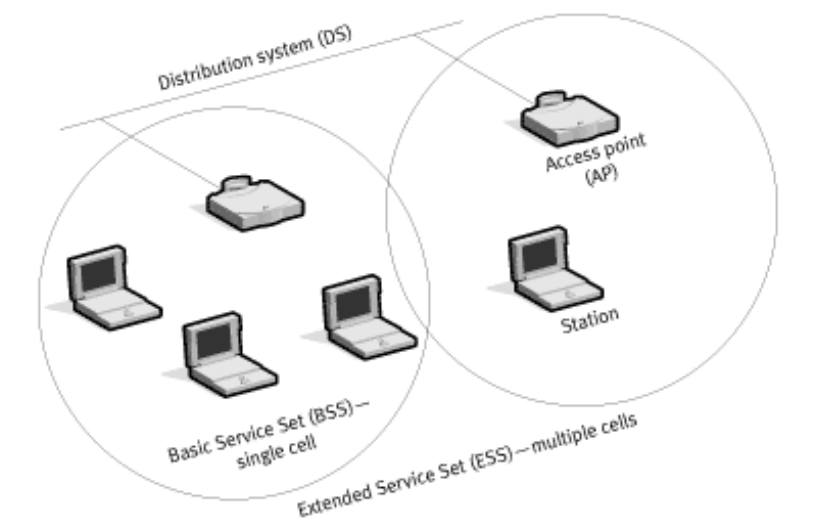
The 802.11a/g WLAN Access Point will provide an access to the local
LAN. LAN integration of wireless and wired LAN is called an
Infrastructure configuration. A group of wireless LAN PC users and an
Access Point construct a Basic Service Set (BSS). Each wireless PC in
this BSS can talk to each other on your network via the Access Point.
7
8
1-3 System Configurations
The 802.11a/g Access Point can be configured in a variety of network
system configurations.

9
Chapter 2 Hardware Installation.
This chapter describes initial setup of the Access Point.
2-1 Content of Product Kit
Before installation, make sure that you the following items:
• One FlankerPro2 Wireless Access Point
• One quick installation guide
• One power adapter
• One product CD
Caution: Please verify the power adapter is correct according to the
country. If there is any missing or improperly functioning item, please
contact your local supplier.
If any of the above items are not included or damaged, please contact your
local dealer for support.
2-2 System Requirements
Installation of the Wireless LAN Access Point requires:
1. An AC power outlet (100~240V, 50~60Hz) which supplies the power for
the Access Point.
2. A 10/100 Base-T (UTP) Ethernet cable drop.
10
2-3 Mechanical Description
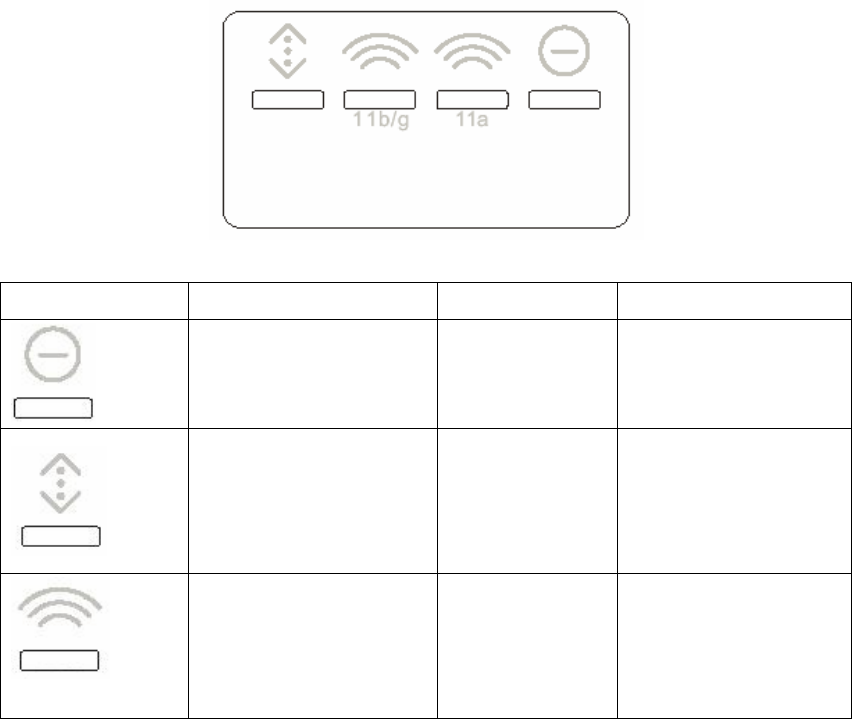
Top panel of FlankerPro2 Access Point:
LED Icon Port State Indicator
Power On* Green
WAN Port Link Active
(combined
with 10/100
status)
Flash Yellow per 10
Mbps packet,
Green per 100
Mbps packet
Wireless LAN
(Gateway only)
Link Active
(combined
with 10/100
status)
Flash Yellow per 10
Mbps packet,
Green per 100
Mbps packet
11
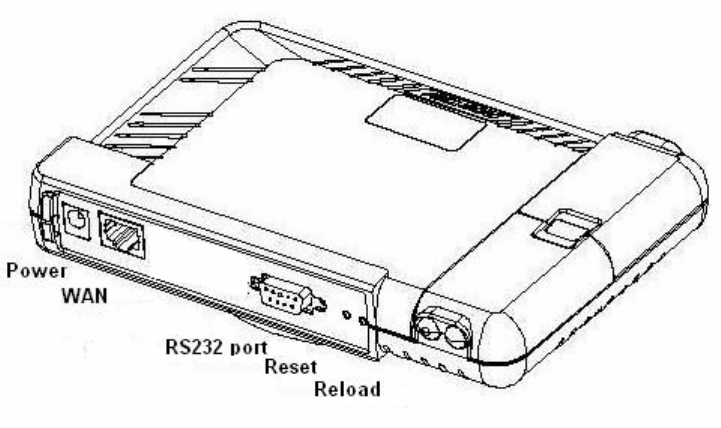
Back panel of the Access Point:
Power
The power adapter plugs into the socket labeled “POWER”.
Ethernet Ports ( WAN port )
The WLAN Access Point supports one Ethernet port: RJ-45
MDI daisy-chain port ,also labeled “MDI”. You may connect the Access Point
either to a hub or a PC. Please note that, use the cross-over cable when you
desire to connect the Access Point to a PC. The two LEDs (10/100/Link)
next to the Ethernet ports indicate the Ethernet physical link status. The
‘Link’ LED is a good indicator to see if you have proper Ethernet connection.
RS232 Port
Users may connect a RS232 cable to a server to configure the server
console.
Reload
NOTE: The button labeled “Reload” enables you to restore the Access Point’s
default setting. This is used when you forget the password. Please detach the
DC power plug and press the “Reload” button on the back panel of the Access
Point. Reconnect the power and keep holding the button in for a few seconds
until the “AP” LED indicator blinks. This will restore the Access Point’s default
settings and enable you to configure the Access Point via utility, telnet or Web
again.
Reset
12
NOTE: The button labeled “Reset” enables you to restart the Access Point.
This is used when the system is Halt. Please press the “Reset” button on the
back panel of the Access Point.
of the Access Point.
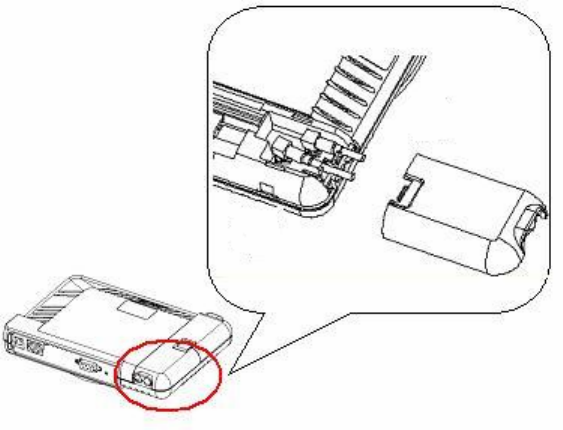
Antenna Connector
The Wireless LAN Access Point supports extension range antennas. To
connect the extension antennas, please open the case and install the
hardware.
2-4 Hardware Installation
Take the following steps to set up your Access Point.
Site Selection
Before installation, determine the Access Point location. Proper
placement of the Access Point is critical to ensure optimum radio range
and performance. You may use the Site Survey and Access Points
Browser utility (The utilities came with the wireless PC Card) to choose a
proper placement for your Access Point. Typically, the best location to
place your Access Point at your site is the center of your wireless
coverage area. Try to place your mobile stations within the line of sight.
Obstructions may impede performance of the Access Point.
Connect the Ethernet Cable
The 802.11a/g WLAN Access Point supports 10/100M Ethernet
13
connection. Attach your UTP Ethernet cable to the RJ-45 connector on the
Access Point and then connect the other end of the RJ-45 cable to a hub
or a station. Please use a cross-over cable when you desire to connect
the Access Point to a PC.
Connect the Power Cable
Connect the power adapter to the power socket on the 802.11a/g Access
Point, and plug the other end of the power into an electrical outlet. The
Access Point will be powered on and all 6 indicators on the top panel will
flash in sequence to test the functionality of the indicators.
NOTE: ONLY use the power adapter supplied with the Access Point.
Otherwise, the product may be damaged.
14
Chapter 3 Configuring the Access Point
The 54Mbps Wireless LAN Access Point is shipped with default
parameters ,which will be suitable for the typical infrastructure wireless
LAN. Just simply install the Access Point, power it on, and it is now ready to
work. Nevertheless, you can still adjust configuration settings depending on
how you would like to manage your wireless network. The 54Mbps Wireless
Access Point allows for configuration either via the configuration utility,
known as Access Point Manager, TCP/IP (Telnet) connection or Web
Management.
3-1 Using the Access Point Utility
Installed on your Windows 95/98/NT/ME/2000 desktop computer, the
Windows-based utility “Access Point Manager” provides a user-friendly
interface. The Access Point Manager enables you to configure all of your
Access Points on the network more easily than ever before. The following
gives instructions guiding you through the installations of the Access Point
Manager utility.
1. Insert the Software and Documentation CD into the CD-ROM drive, or the
floppy disk that came with your product kit into the floppy drive on your
computer.
2. From the Start menu on the Windows desktop, choose Run.
3. In the Run dialog box, type the path where the utility is located, then click
OK. For floppy installation: A:\setup.
4. Follow the on-screen instructions to install the Access Point Manager.
5. Upon completion, go to Program Files and execute the Access Point
Manager. It will begin to browse all the Inter-Building Access Points
available on the network.
3-2 Using the Web Management
The built-in Web Management provides you with a user-friendly graphical user
interface (web pages) to manage your Access Points. An AP with an assigned
IP address (e.g.http://192.168.1.1) will allow you via web browser (e.g.,
Netscape Navigator 3.0 ~ 4.5 or MS Internet Explorer 4.0) to monitor and
configure the Access Point.
1. Open your web browser.
2. Enter the IP address of your Inter-Building Access Point in the Address field
(e.g. http://192.168.1.1). You will have access to the Access Point Web
Pages of the Access Point.
15
3. Enter the password to login to the Inter-Building Access Point. The default
password is default. The main page will show up.
16
3-3 Using the Telnet

17
Chapter 4 Troubleshooting
If you have trouble using the Wireless LAN Access Point, the starting point
to troubleshoot the problem you’re your Access Point is looking at the LED
activity of the Access Point. The following is “LED Error Table” provided to
assist you in diagnosing and solving operational problems.
PWR LAN WLAN Description Action Note
If you are still unable to solve the problem by checking the LED activity, the
error may be caused from configuration mismatch, which prevents the
Access Point from establishing a wireless connection with the network. You
may check the following to ensure normal operation of the Inter-Building
Access Point.
WEP keys: If data encryption is activated, always remember to set WEP
keys exactly the same on the Access Point as are on the wireless stations.
Access Control: Make sure that the MAC address of your Inter -Building
Access Point is not included in the Access Control table of other wireless
devices.
18
Appendix A Glossary
Access Point - An internetworking device that seamlessly connects wired
and wireless networks.
Ad-Hoc - An Ad-Hoc wireless LAN is a group of computers each with
wireless adapters, connected as an independent wireless LAN.
Backbone - The core infrastructure of a network. The portion of the network
that transports information from one central location to another central
location where it is off-loaded onto a local system.
Base Station - In mobile telecommunications, a base station is the central
radio transmitter/receiver that maintains communications with the mobile
radio telephone sets within range. In cellular and personal communications
applications, each cell or Inter-Buildingcell has its own base station; each
base station in turn is interconnected with
other cells’ base.
Bridge - An internetworking function that incorporates the lowest 2 layers of
the OSI network protocol model.
BSS - Stands for “Basic Service Set,” an Inter-Building Access Point and all
the wireless clients that associated with it.
ESS - Stands for “Extended Service Set.” More than one BSS can be
configured as an Extended Service Set. Mobile users can roam between
BSS in an ESS.
Ethernet - A popular local area data communications network, originally
developed by Xerox Corp., which accepts transmission from computers and
terminals. Ethernet operates on 10 Mbps baseband transmission over
shielded coaxial cable or over shielded twisted pair telephone wire.
Infrastructure - An integrated wireless and wired LAN is called an
Infrastructure configuration.
PCMCIA - Personal Computer Memory Card International Association,
which develops standards for PC cards, formerly known as PCMCIA cards,
are available in three “types” which are about the same length and width as
credit cards, but range in thickness from 3.3 mm (Type I) to 5.0 mm (Type II)
to 10.5 mm (Type III). These cards can be used for many functions,
including memory storage, landline modems and wireless modems.
Roaming - A wireless clients around an ESS and get the continuous
connection to the Infrastructure network.
RTS Threshold – Transmitters contending for the medium may not hear
each other. RTS/CTS mechanism can solve this “ Hidden Node Problem”. If
the packet size is smaller than the preset RTS Threshold size, the RTS/CTS
19
mechanism will NOT be enabled.
Web Management - Network management by using web browser
connecting to the target devices.