Universal Scientific BM6621R4 Mini-PCI WLAN User Manual usi ipc manual
Universal Scientific Industrial Co., Ltd. Mini-PCI WLAN usi ipc manual
User Guide

2003/7/9
1
Integrated Baseband and MAC Solution
IEEE 802.11b WLAN
MP-B-IP-00 Configuration Utility User Guide
Table of Contents

2003/7/9
2
Table of Contents .................................................................................................................................... 1
Introduction & Form Factors ................................................................................................................... 3
Installation for Windows XP.................................................................................................................... 4
Installation for Windows 2000................................................................................................................. 7
Installation for Windows 98SE/ME ....................................................................................................... 10
Utility Usage .......................................................................................................................................... 12
Status ......................................................................................................................................... 13
Site Survey................................................................................................................................. 14
General ...................................................................................................................................... 15
Encryption .................................................................................................................................. 15
Advanced ................................................................................................................................... 15
Statistics ..................................................................................................................................... 16
FCC statement ........................................................................................................................... 16
2003/7/9
3
Introduction & Form Factors
Introduction
The Wireless LAN Configuration Utility is a powerful application that helps you to configure
USI MP-B-IP-00 WLAN Mini-PCI card and monitor the statistics of the communication
status. Unlike the standard method of configuring the card via the operating system utilities,
this application permits the dynamic modification of the configuration parameters while the
card is operating. It also offers more configuration options.
INPROCOMM offers the Wireless LAN Configuration Utility for Windows 98SE/Me/2000/XP.
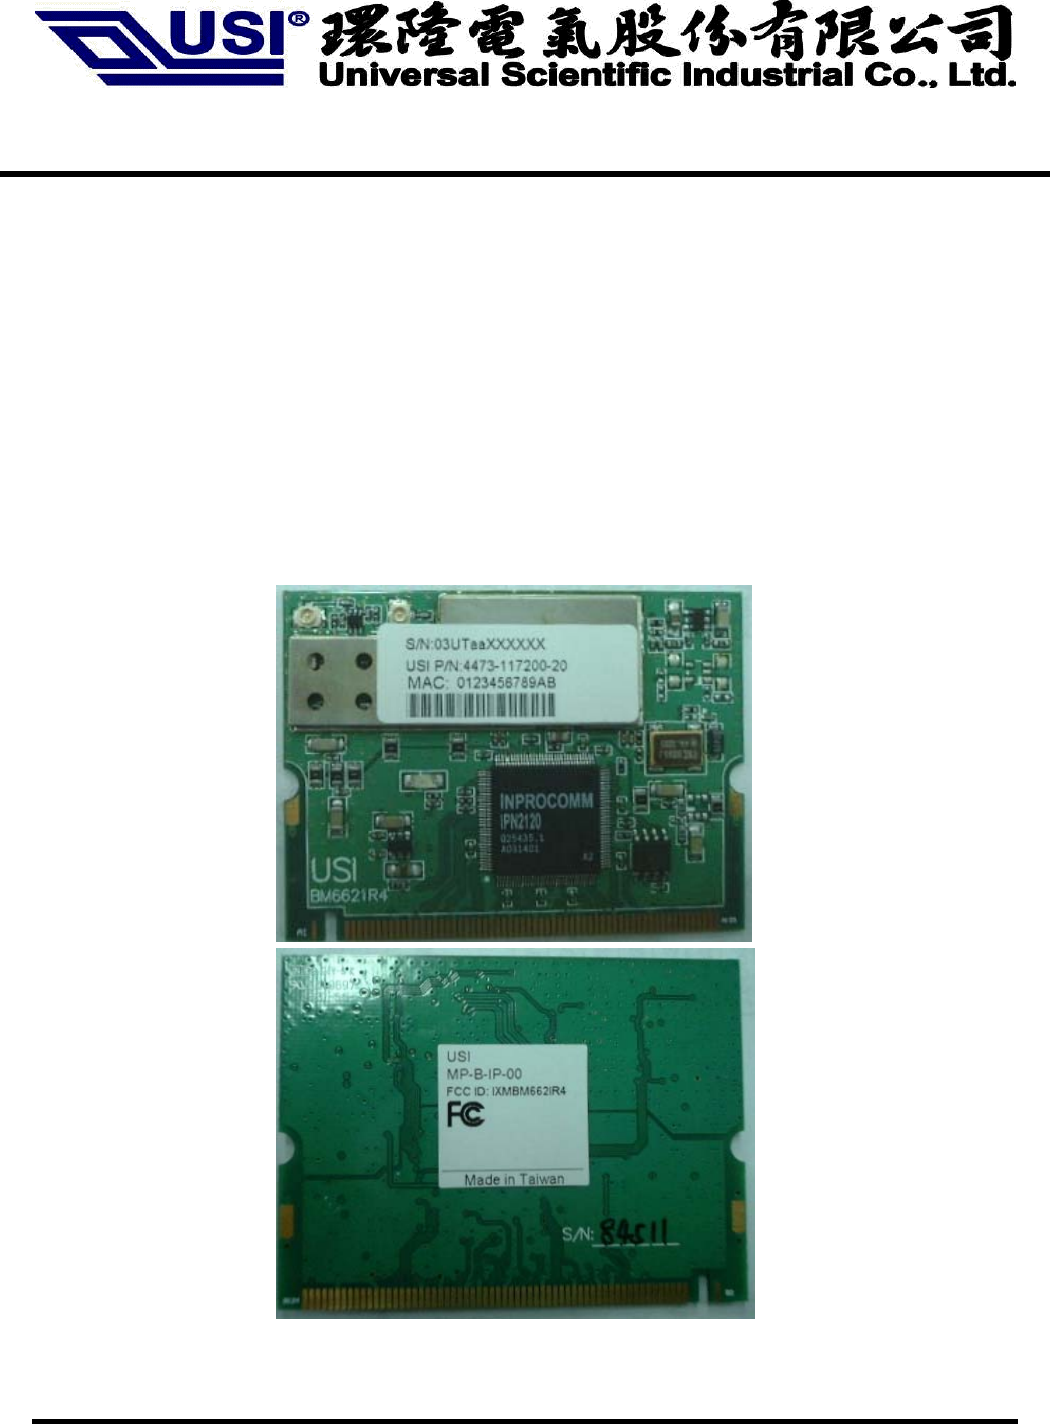
Evaluation Board Mini-PCI
USI MP-B-IP-00 Mini-PCI
2003/7/9
4
Installation for Windows XP
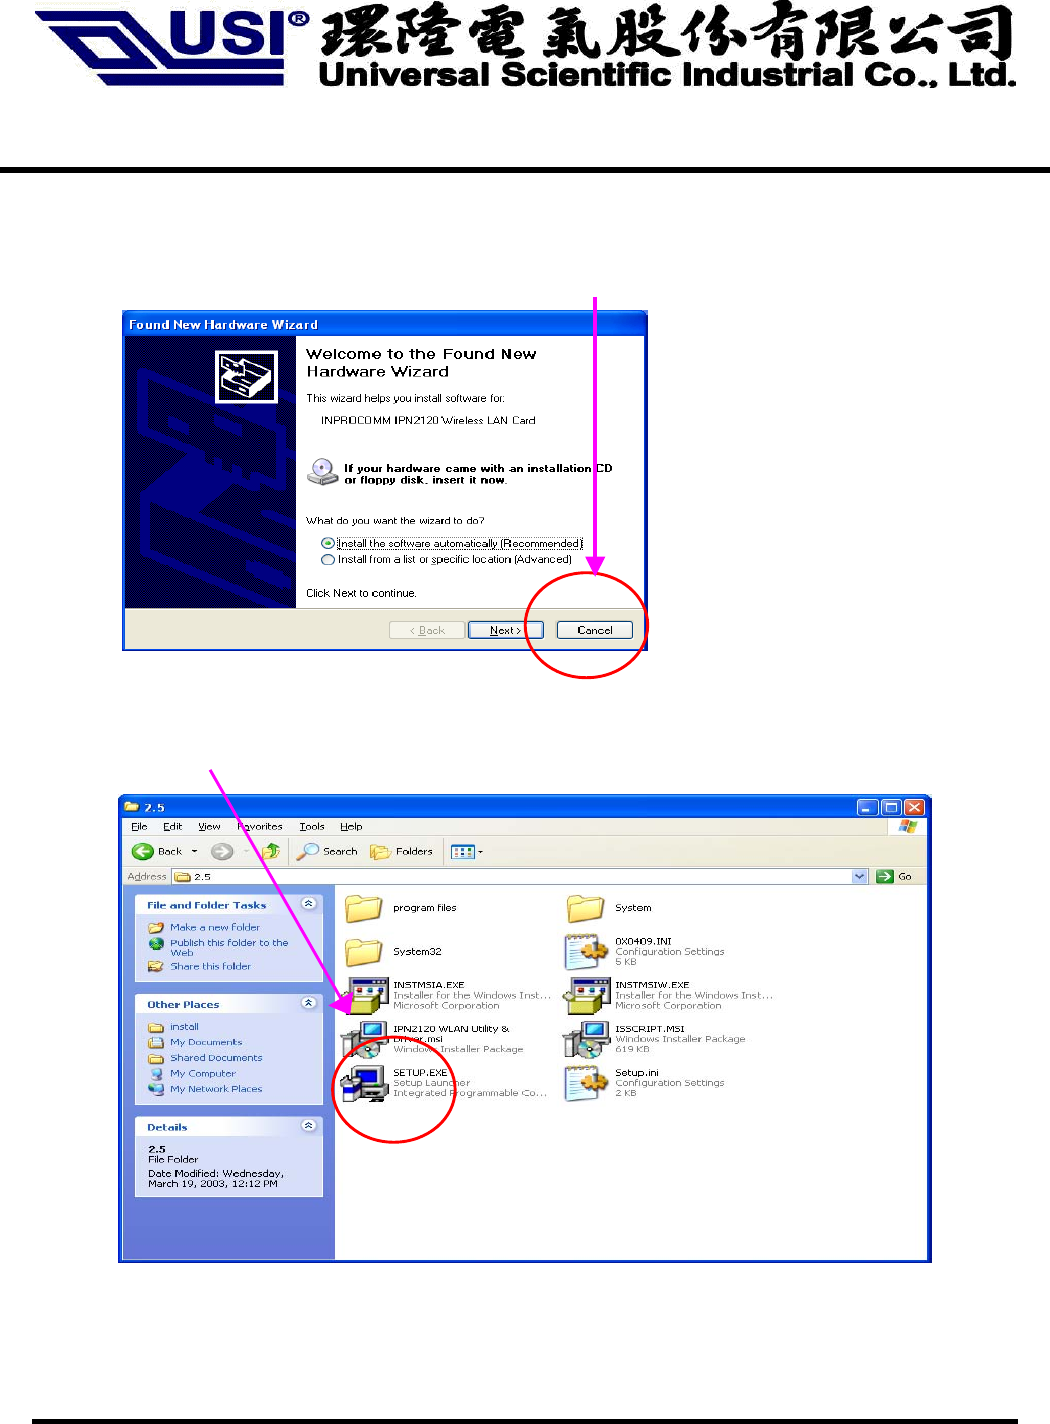
1. Read this First
If your hardware came with an installation CD or floppy disk, choose
“Install the software automatically (Recommended)” and press cancel.
1.1 How to Install IPN2120 WLAN Utility & Driver in Windows XP environment
1.1.1 Double click the “setup” located in “\Wireless LAN Configuration Utility\”
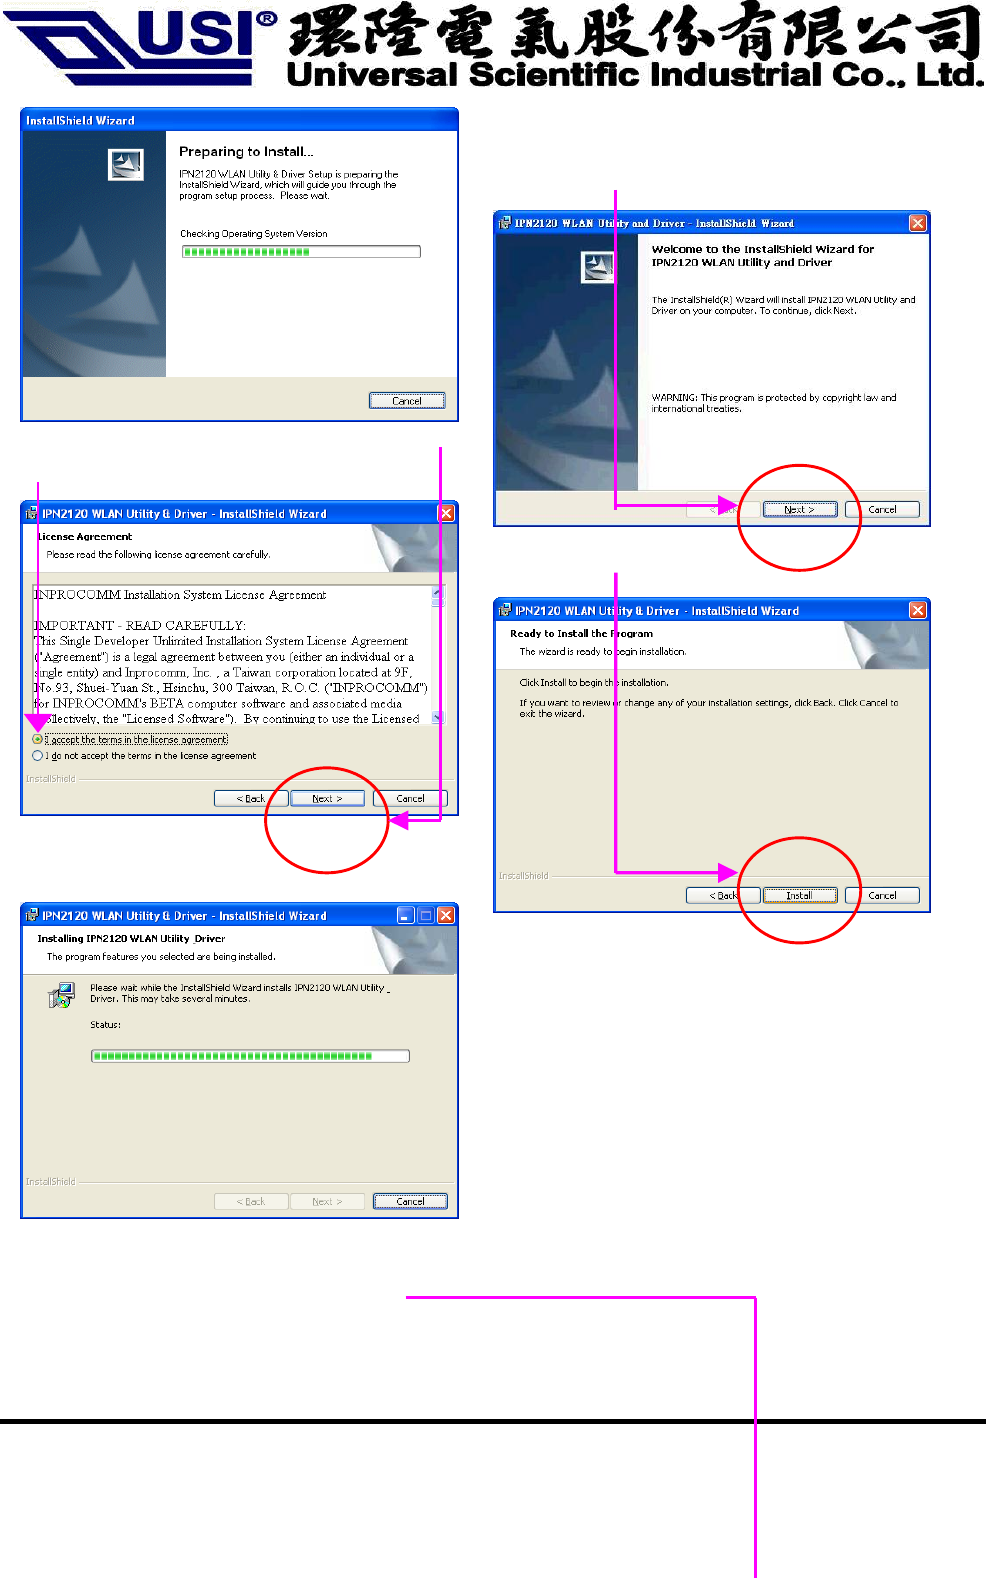
1.1.2 The program will automatically proceed with installing
2003/7/9
5
1.1.3 Press “Next” to continue
1.1.4 Review “The License Agreement” then press
“Next”
1.1.5 Press “Install” to continue the install program
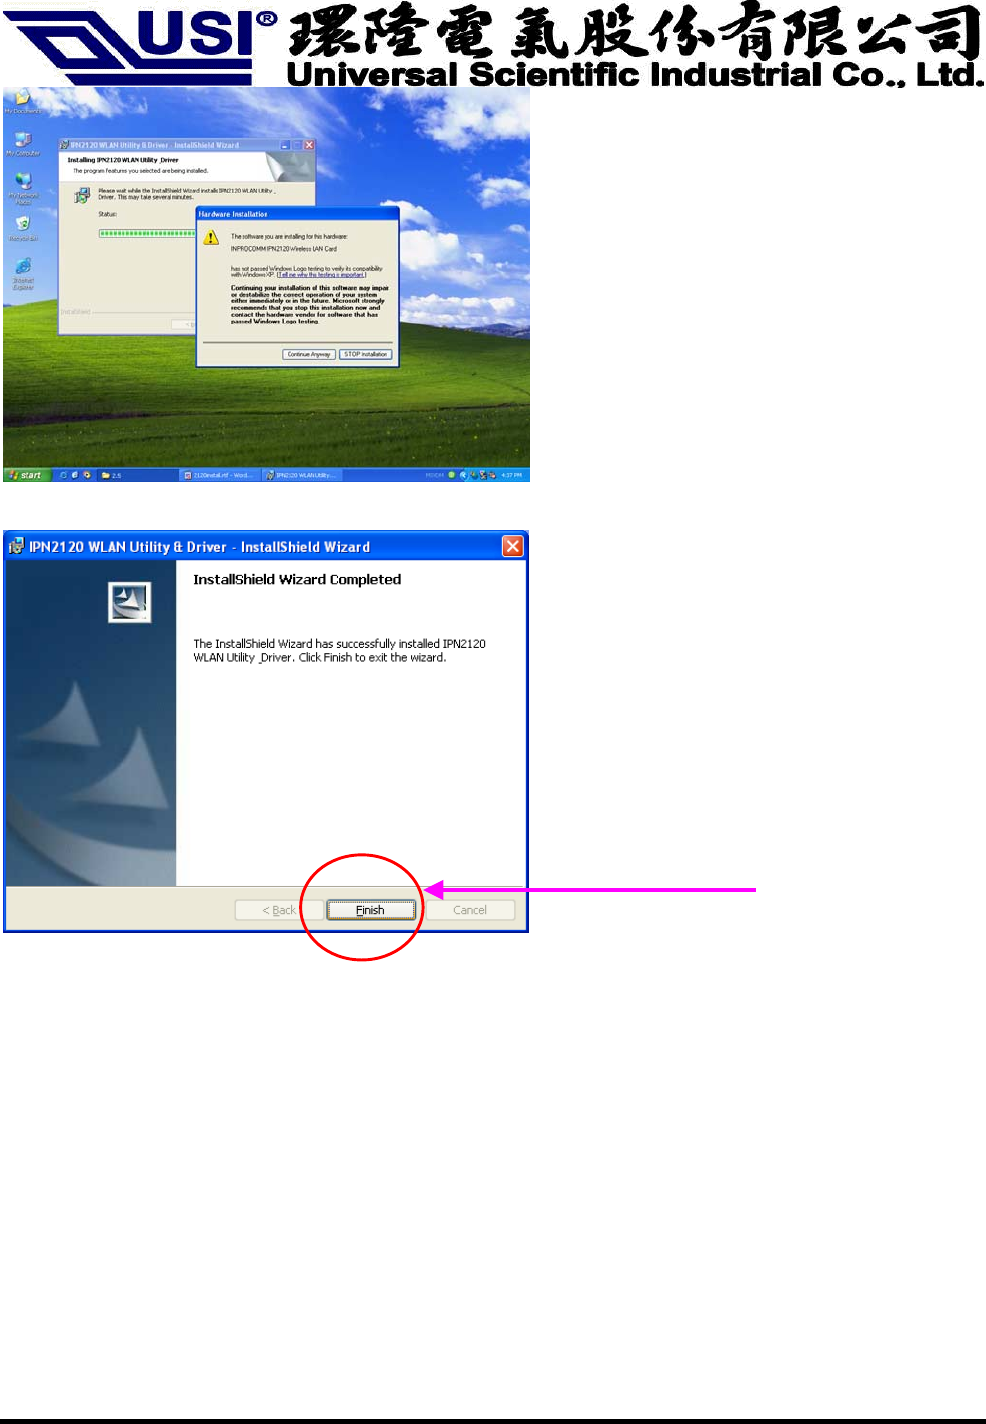
1.1.6 Please wait for the installing
1.1.7 Press “finish” to complete the installation.
2003/7/9
6
2003/7/9
7
Installation for Windows 2000
1.2 How to Install IPN2120 WLAN Utility & Driver in Windows 2000 environment
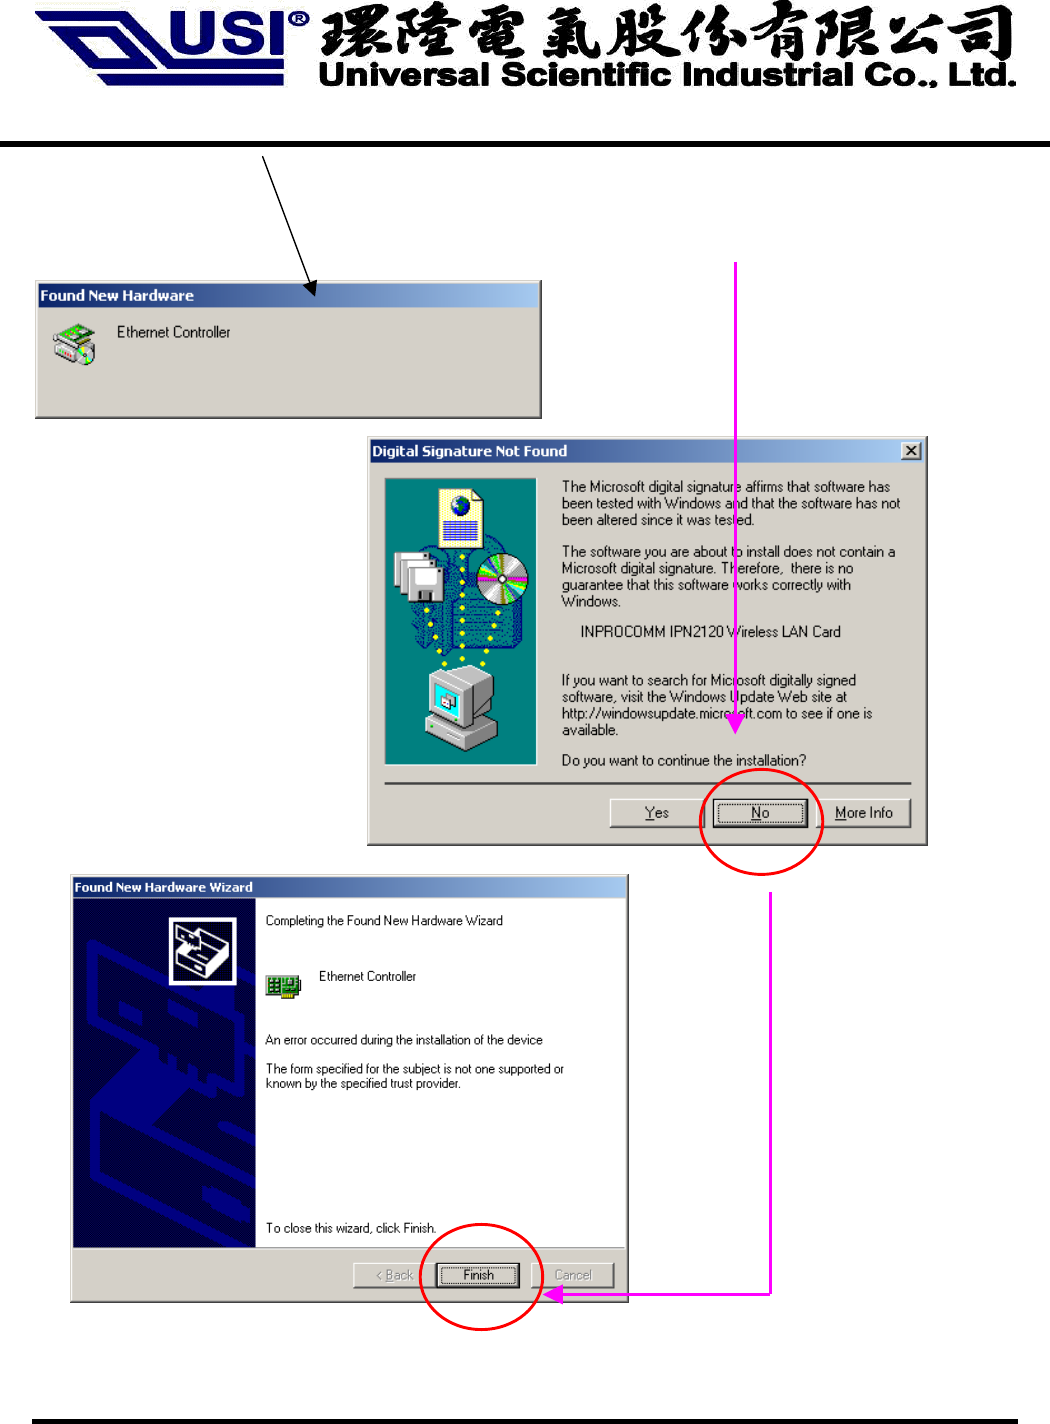
1.2.1 Detecting for a new hardware, press “finish” to run automatically installation
2003/7/9
8
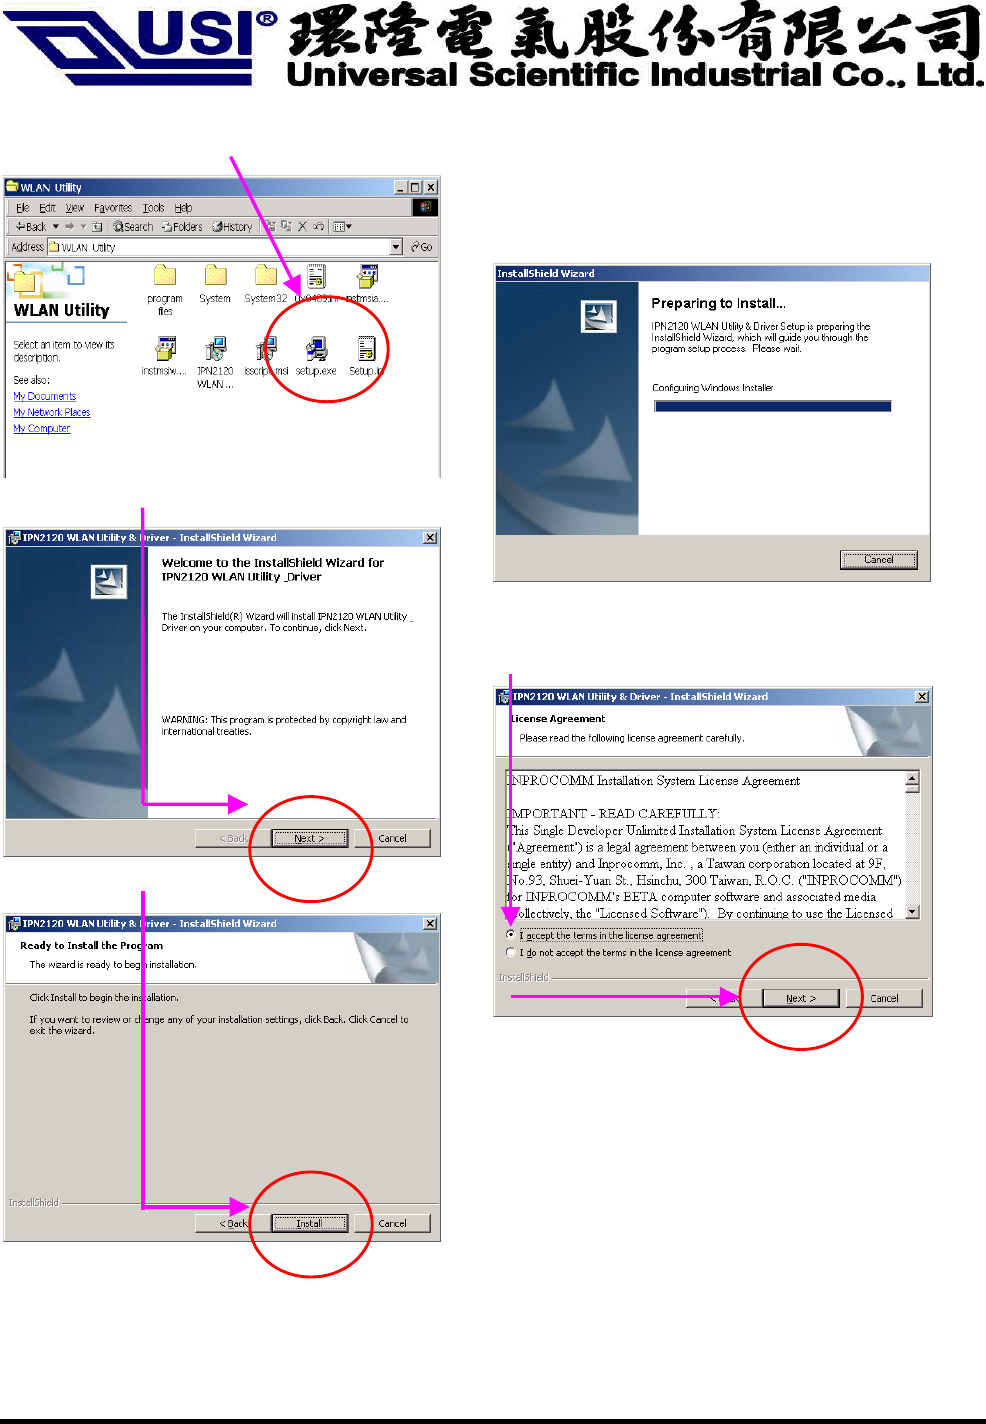
1.2.2 Double click the “setup” located in “\Wireless LAN Configuration Utility\”
1.2.3 Install Shield is installing the program.
1.2.4 Press “Next” to continue
1.2.5 Review “The License Agreement” then press “Next”
1.2.6 Press “Install” to continue the install program
2003/7/9
9
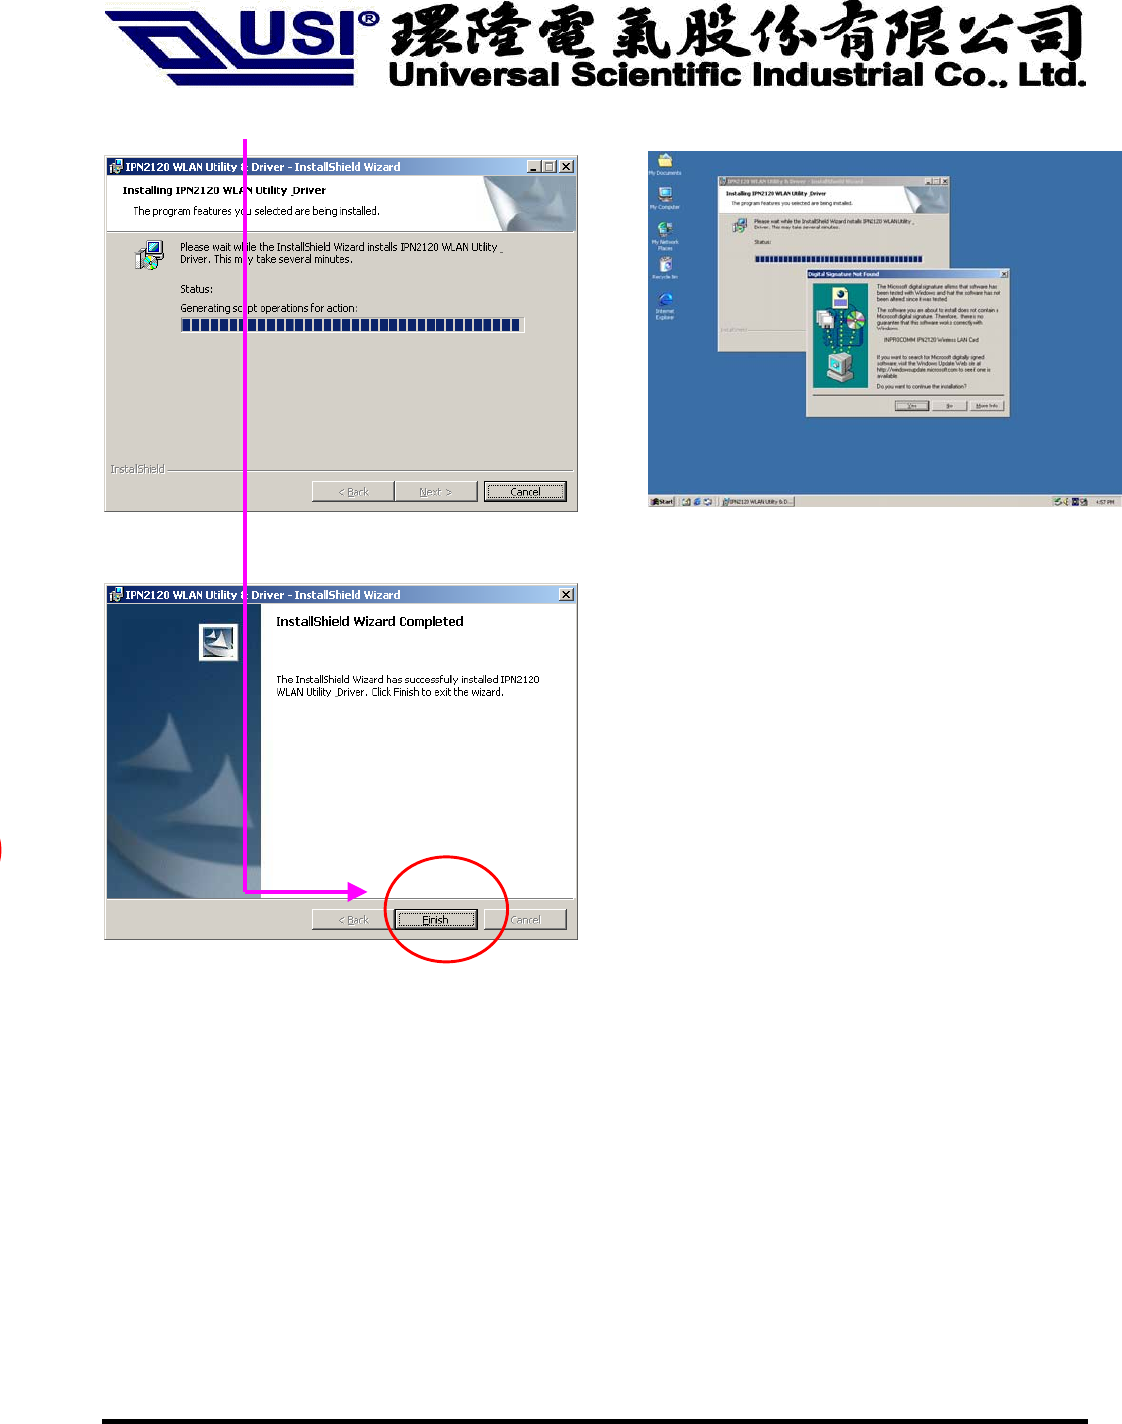
1.2.7 Press “finish” to complete the installation
2003/7/9
10
Installation for Windows 98SE/ME
1.3 How to Install IPN2120 WLAN Utility & Driver in Windows 98SE/ME environment
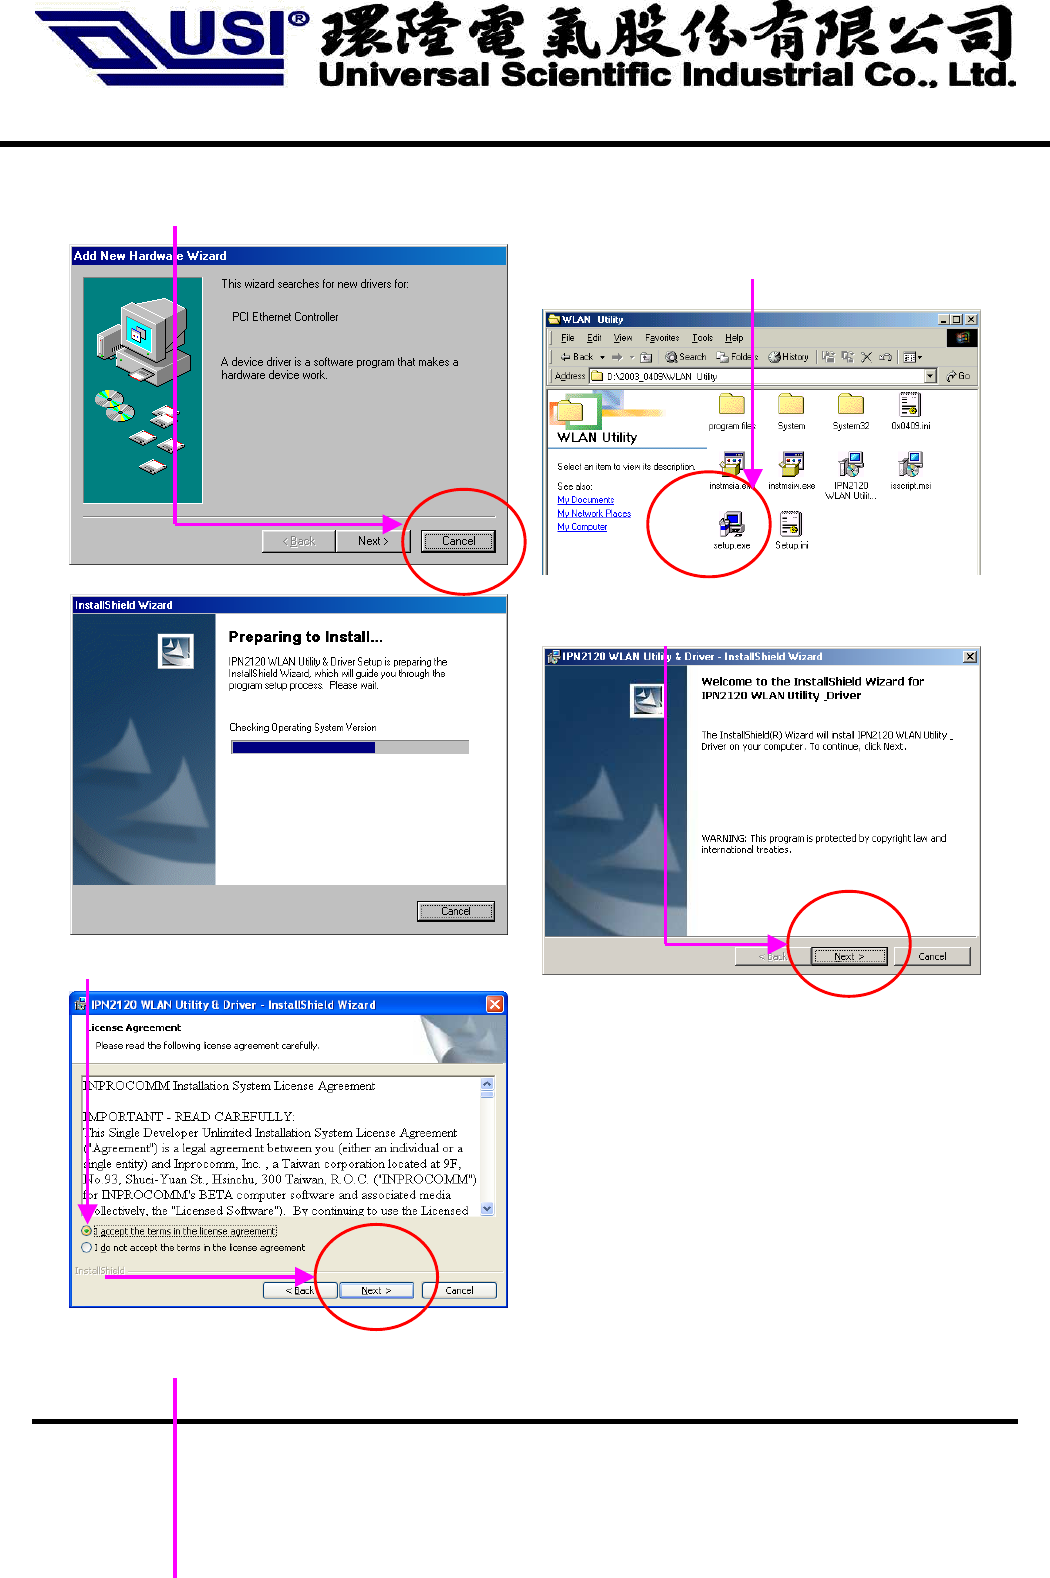
1.3.1 Press cancel to run an automatic installation
1.3.2 Double click the “setup” located in “\Wireless LAN
Configuration Utility\”
1.3.3 Install shield is installing the program
1.3.4 Press “Next” to continue
1.3.5 Review “The License Agreement” then press
“Next”
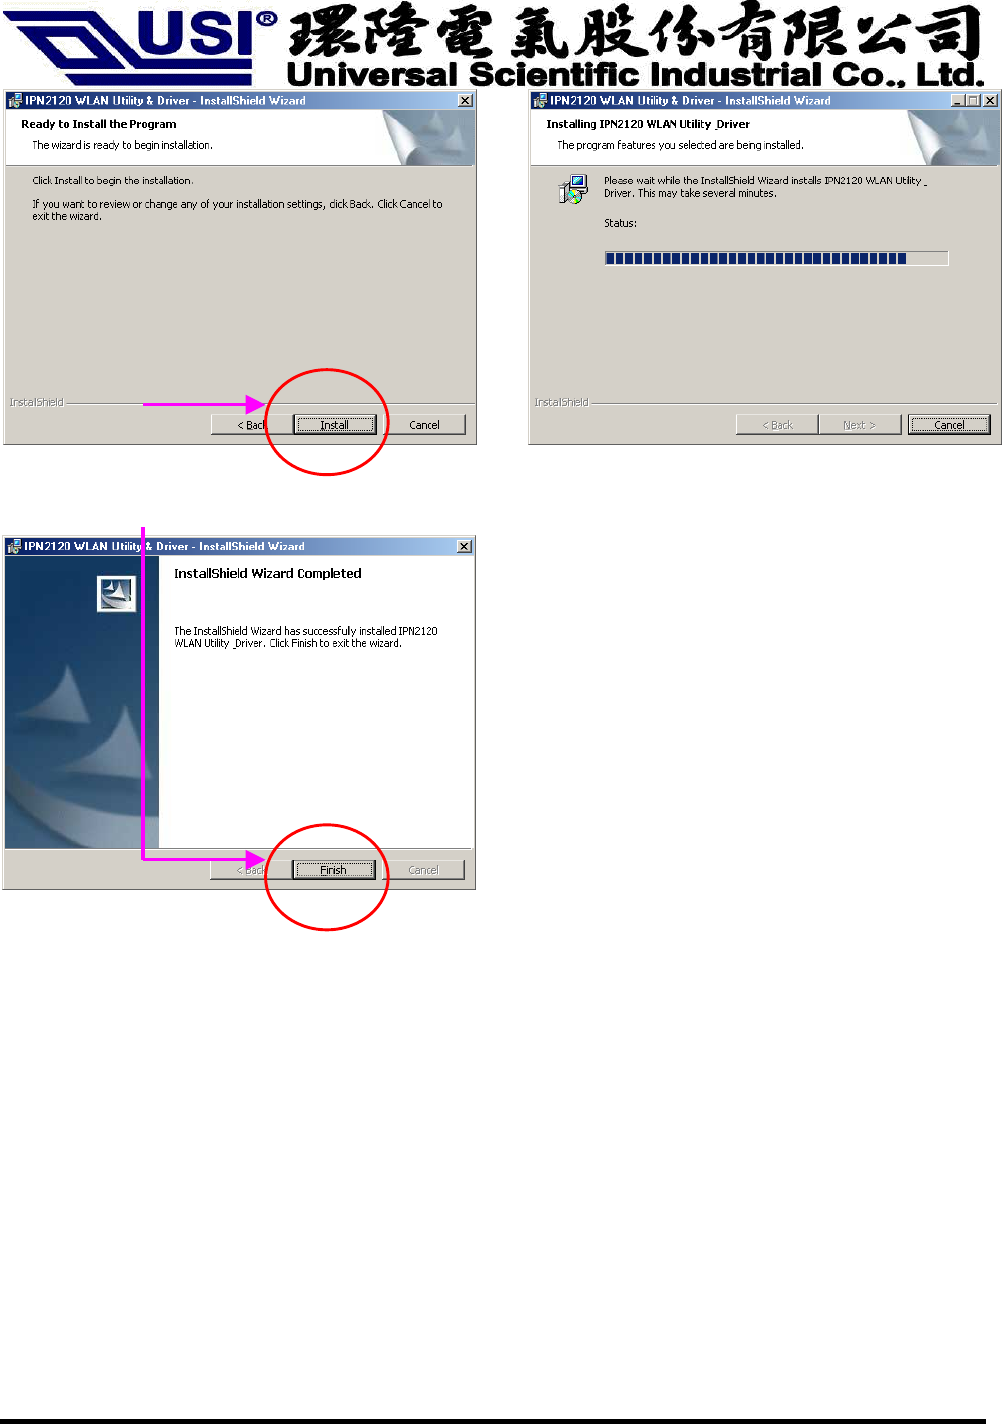
1.3.6 Press “Install” to continue the install program
2003/7/9
11
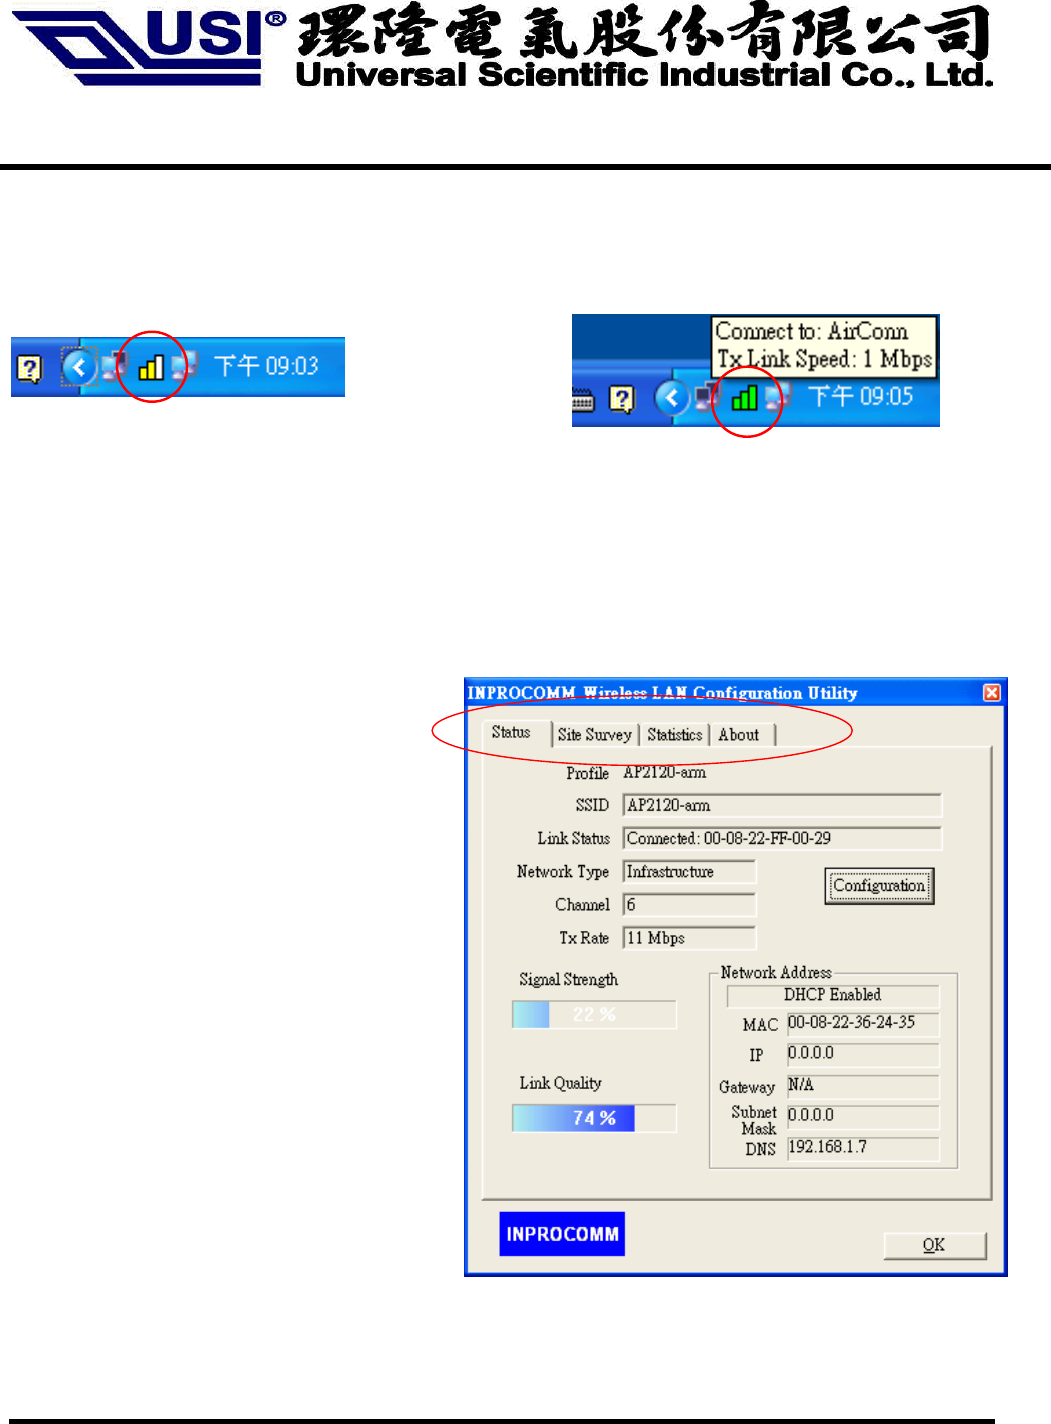
1.3.7 Press “finish” to complete the installation
2003/7/9
12
Utility Usage
1.4 Using the Wireless LAN Configuration Utility
The Wireless LAN Configuration Utility appears as an icon on the system tray of Windows while the card is running.
You can open it by clicking on the icon.
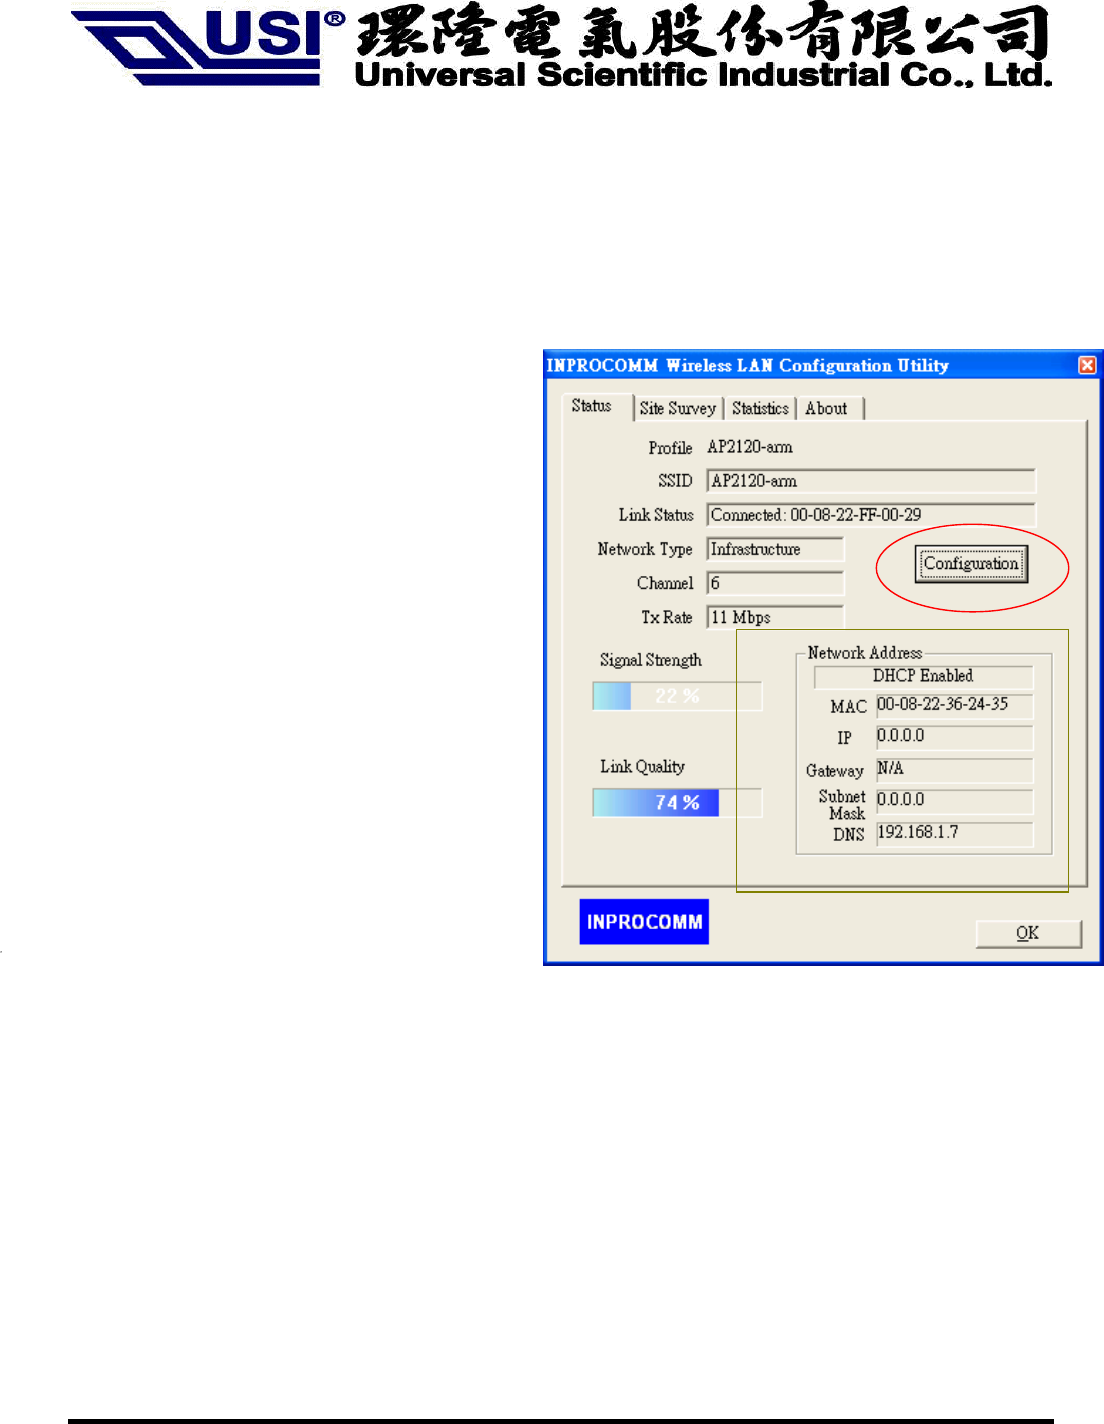
The icon is appeared as bar diagram with different color and level for representing different connection status.
While the station is not associated with other STA/AP, the icon will appear as an empty (blank) bar diagram. Once
it is associated, it will appear as different color for different level of signal strength (RSSI). There are 3 levels of
icons to represent the signal strength, the green one (signal strength from 100%-50%), the yellow one (50%-25%),
and the red one (below 25%).
The Wireless LAN Configuration Utility is a highly integrated application include the following main options (tabs),
Status
Site Survey
Statistics
About
2003/7/9
13
Status
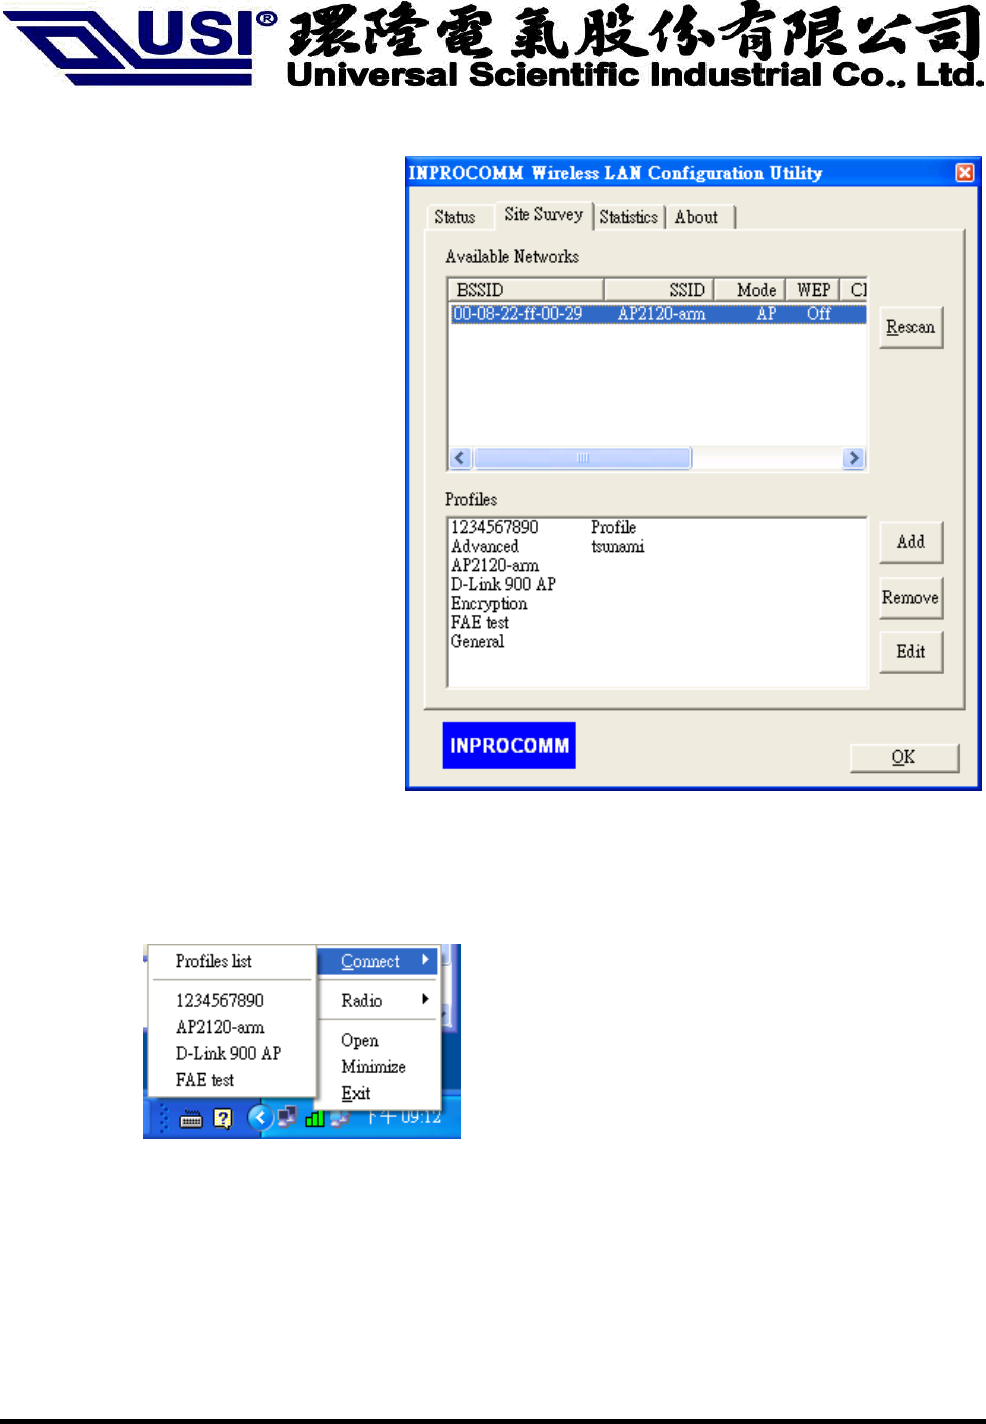
A typical screen of the application in Infrastructure mode is shown in Figure 1-1. The configuration parameters are
shown at the top of the screen.
In order to change the configuration parameters press the “Configuration” button, then it will pop-up a dialog for
you to input your settings. (Figuration 1-3, 1-4, 1-5)
1. Profile Name
2. SSID
3. Link Status
4. Network Type
5. Channel
6. Tx Rate
7. Signal strength, link quality
8. Network Address
9. Link Quality
Network Address section shows the current
Network status such as the MAC address, DHCP
(Enable or not), IP address, Subnet Mask address,
Gateway Address and DNS server address that you
can easily monitor these settings without the
“IPCONFIG” provided by Windows.
Figure 1-1. The screenshot of the Wireless LAN
Configuration Utility in infrastructure
mode.
2003/7/9
14
Site Survey
By choosing the Site Survey option, you can
scan all the channels to find all the access
points/stations within the accessible range of
your card. As shown in Figure 1-2, the list of
the “Available Networks” includes the
information about the BSSID, SSID, Mode
(Network Type), Channel, WEP (On/Off),
signal strength and Supports Rate. You may
press the “Rescan” button dynamically in
order to update this list and double-clicking
at the one on the list once you want to
associate with it. It will show the
configuration property sheet (Figuration 1-3,
1-4, 1-5) and then you can press “APPLY”
after complete all the settings. After this, it
will switch back to the Status page and
update the current established status.
Profiles section: INPROCOMM Wireless
LAN Configuration Utility provides the easy
to use profile function. It shows all the
profiles (Up to 32 sets) with its
configurations currently stored in the
program, which includes Profile Name,
Network Type, SSID, Desired Rate and
Encryption Key and other advanced settings.
User may ADD, REMOVE, EDIT anyone of it
with the buttons next to the window.
Figure 1-2. Site Survey page
Users can apply the profile by double-clicking the item in the list or clicking on the one in the Profiles List of the icon
in system tray.
.
2003/7/9
15
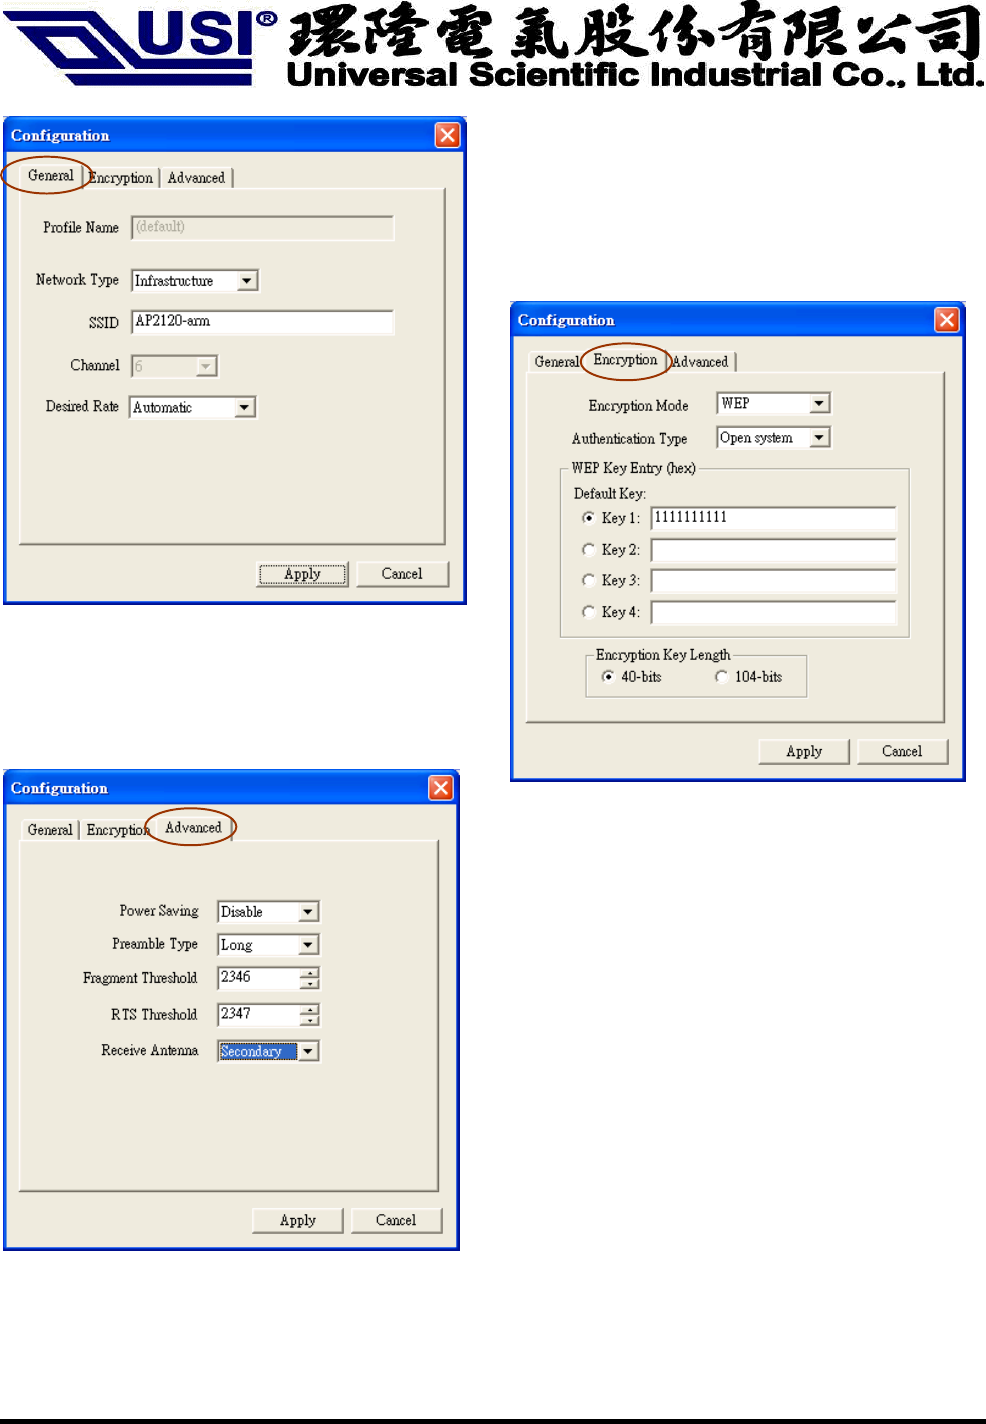
There’s 3 property pages in the Configuration property sheet, which includes General, Encryption, and Advanced
General
In this page, user can configure the station card with its
Network type (Infrastructure/Ad hoc), SSID (up to 32
characters), channel (only in Ad hoc mode, and its range
is according to the regulatory domain setting in the
EEPROM), and the Desire Tx Rate (Automatic/ 1 Mbps/1
Mbps/ 2 Mbps/ 5.5 Mbps/ 11 Mbps)
Figure 1-3. General Settings
Encryption
By choosing this option, you can set the card with its
encryption mode to NONE or WEP, the authentication
mode to Open system or Shared key or Auto Switch.
Figure 1-4. Encryption Settings
When set as WEP enabled, you have to set/complete the
WEP key materials key material length and specify which
one of them as the default key (1 to 4) correctly, which
means 4 different keys should be in the same length or
empty, and the default key radio button should be set to the
set with non-empty key material. If the setting is not
complete, the APPLY button will remain to be “gray” and
cannot be clicked until user do correct settings of this page.
Advanced
Choosing the Advanced option, you can change advanced
configuration settings, such as the Power Saving mode,
Preamble Type, Fragmentation Threshold, and RTS
Threshold (See Figure 1-5). Figure 1-5 shows the
recommended configuration for the advanced settings.
Before selecting Short Preamble, make sure that the other
stations and APs are also supporting this feature.
Figure 1-5. Advanced Settings
2003/7/9
16
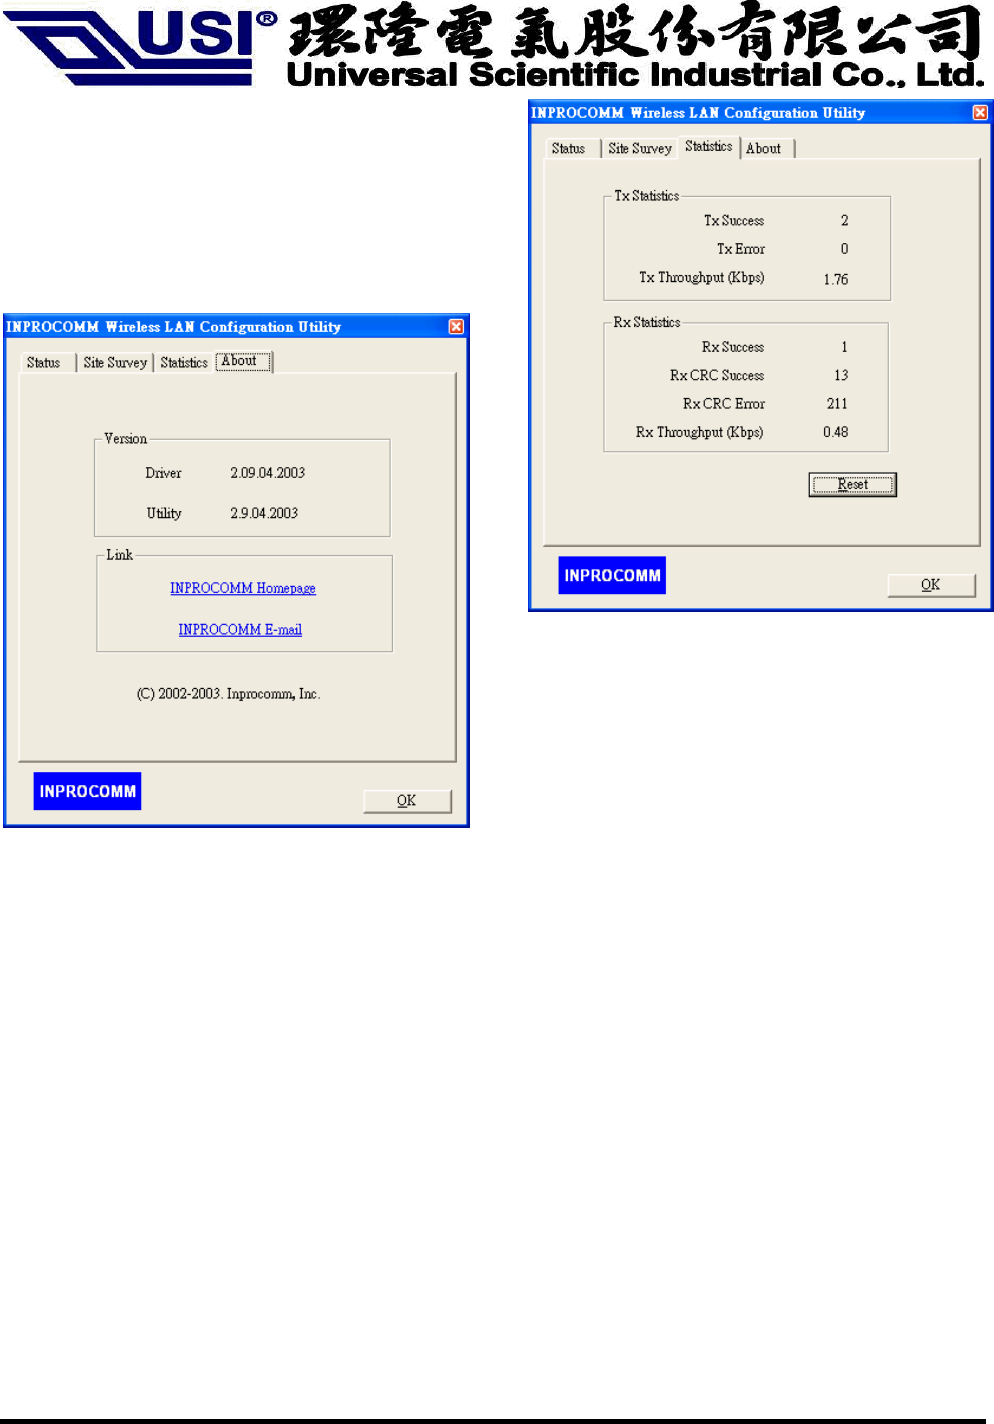
Statistics
This option enables you to view the available statistic
information with its Tx counts (Tx success, Tx error), Tx
Throughput, and its Rx counts (Rx success, Rx error), Rx
Throughput. You may reset the counters by pressing its
RESET button.
Figure 1-6. Statistics page
About
By choosing this option, you can view basic information
about the Utility such as the Driver and Utility Version.
And you can click the hyperlink to connect the website for
technical support.
Figure 1-7. About information
Federal Communication Commission (FCC)
Federal Communication Commission Interference Statement
This equipment has been tested and found to comply with the limits for a Class B digital device,
pursuant to Part 15 of the FCC Rules. These limits are designed to provide reasonable
protection against harmful interference in a residential installation. This equipment generates,
uses and can radiate radio frequency energy and, if not installed and used in accordance with
the instructions, may cause harmful interference to radio communications. However, there is
no guarantee that interference will not occur in a particular installation. If this equipment does
cause harmful interference to radio or television reception, which can be determined by turning
the equipment off and on, the user is encouraged to try to correct the interference by one of the
following measures:
- Reorient or relocate the receiving antenna.
- Increase the separation between the equipment and receiver.
- Connect the equipment into an outlet on a circuit different from that
to which the receiver is connected.

2003/7/9
17
- Consult the dealer or an experienced radio/TV technician for help.
This device complies with Part 15 of the FCC Rules. Operation is subject to the following two
conditions: (1) This device may not cause harmful interference, and (2) this device must accept
any interference received, including interference that may cause undesired operation.
FCC Caution: Any changes or modifications not expressly approved by the party responsible for
compliance could void the user's authority to operate this equipment.
IMPORTANT NOTE:
FCC Radiation Exposure Statement:
This equipment complies with FCC radiation exposure limits set forth for an uncontrolled environment.
This equipment should be installed and operated with minimum distance 20cm between the radiator &
your body.
This transmitter must not be co-located or operating in conjunction with any other antenna or transmitter.
This device is intended only for OEM integrators under the following conditions:
1) The antenna must be installed such that 20 cm is maintained between the antenna and users, and
2) The transmitter module may not be co-located with any other transmitter or antenna.
As long as 2 conditions above are met, further transmitter test will not be required. However, the OEM
integrator is still responsible for testing their end-product for any additional compliance requirements
required with this module installed (for example, digital device emissions, PC peripheral requirements,
etc.).
IMPORTANT NOTE: In the event that these conditions can not be met (for example certain laptop
configurations or co-location with another transmitter), then the FCC authorization is no longer
considered valid and the FCC ID can not be used on the final product. In these circumstances, the OEM
integrator will be responsible for re-evaluating the end product (including the transmitter) and obtaining a
separate FCC authorization.
End Product Labeling
This transmitter module is authorized only for use in device where the antenna may be installed such
that 20 cm may be maintained between the antenna and users. The final end product must be labeled in
a visible area with the following:"Contains TX FCC ID:IXMBM6621R4".
Manual Information That Must be Included
The OEM integrator has to be aware not to provide information to the end user regarding how to install
or remove this RF module in the users manual of the end product which integrate this module.
The users manual for OEM integrators must include the following information in a prominent location
“ IMPORTANT NOTE: To comply with FCC RF exposure compliance requirements, the antenna used for
this transmitter must be installed to provide a separation distance of at least 20 cm from all persons and
must not be co-located or operating in conjunction with any other antenna or transmitter.