Urbini Omni Owners Manual 822471 ManualsLib Makes It Easy To Find Manuals Online! User
2016-11-23
User Manual: Urbini Urbini-Omni-Owners-Manual-822471
Open the PDF directly: View PDF ![]() .
.
Page Count: 28

©2013 IM0001B 11/2013
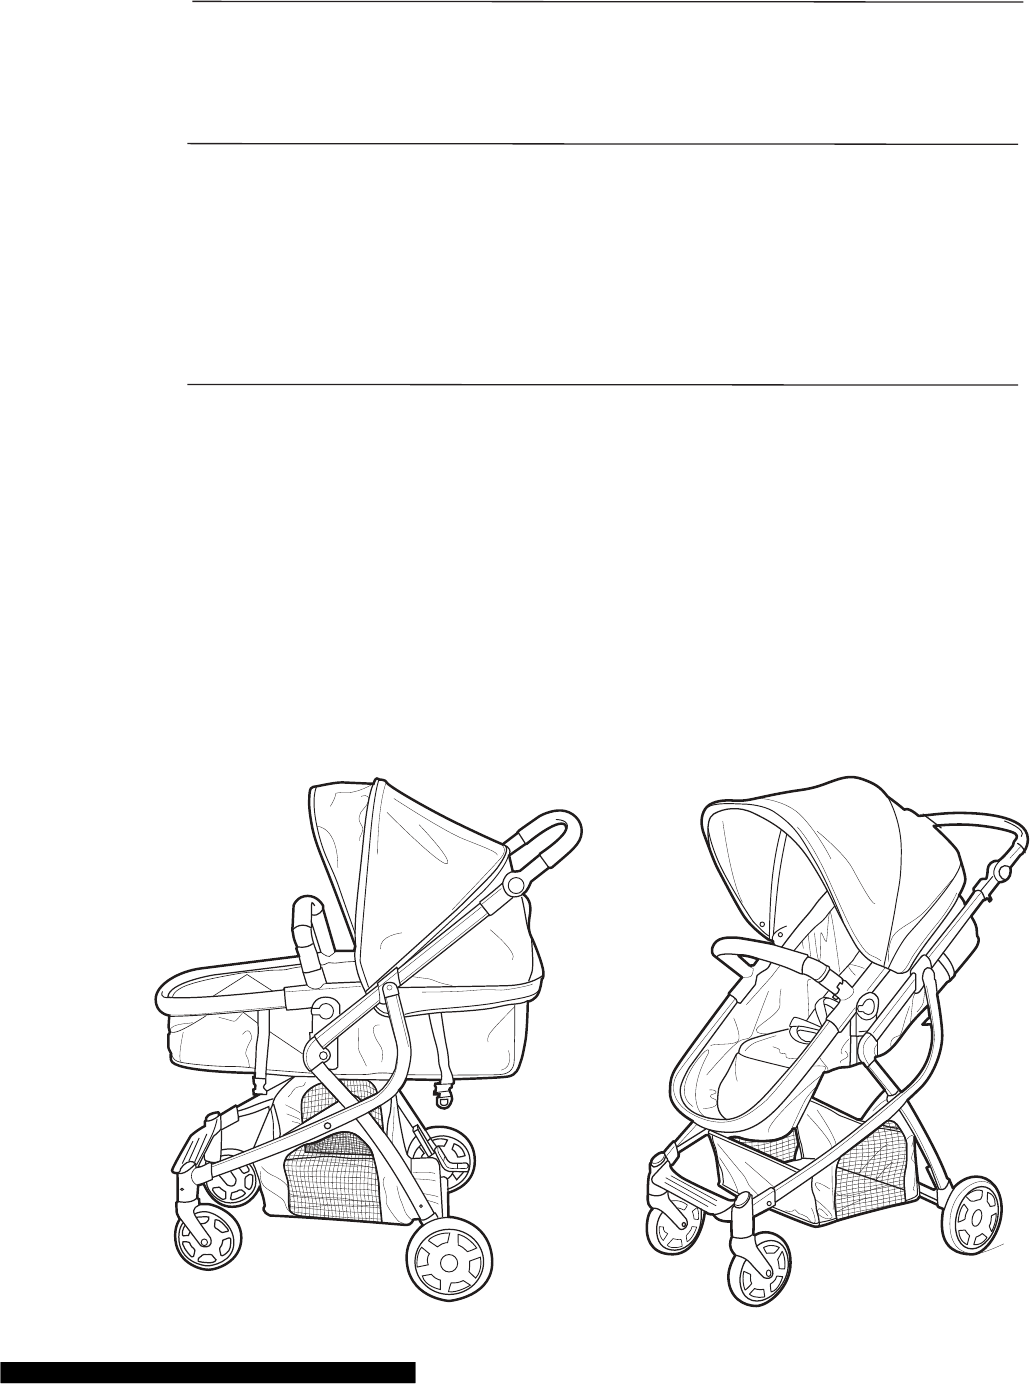
Omni
www.urbinibaby.com
/ Cochecito
Owner’s Manual / Manual del Usuario
Read all instructions before use
and keep them for future reference.
Lea todas las instrucciones
detenidamente antes de usarlo y
guárdelas como referencia futura.
©2014 IM0001C 1/2014

2
Failure to follow these warnings and the
instructions increases the risk of serious injury or death.
PLEASE FOLLOW ALL
INSTRUCTIONS AND KEEP
USER GUIDE FOR FUTURE
USE.
ADULT ASSEMBLY REQUIRED.
NEVER LEAVE child
unattended.
AVOID SERIOUS INJURY from
falling or sliding out. Always use
seat belt. CHECK to make sure
seat belt is fastened securely by
tightening the straps.
NEVER use seat in a reclined
carriage position unless the
straps under the seat are
unbuckled and the seat is set up
in reclined carriage mode as per
the instructions.
STRANGULATION HAZARD:
NEVER hang strings or toys
from stroller.
TO PREVENT STROLLER FROM
BEING IN AN UNSTABLE
CONDITION, never place
parcels or other items on the
stroller handle or canopy. DO
NOT place more than 10lbs
(4.5 kg) in the storage basket.
TO AVOID STRESS AND TO
PREVENT AN UNSTABLE
CONDITION ON STROLLER,
stroller is intended for a child
who weighs up to 50lbs (22.7
kg) and up to 45 inches in
height. Never use with more
than one child at a time. When
stroller is in carriage mode,
it is intended for a child up to 6
months of age.
NEVER USE STROLLER ON
STAIRWAYS or escalators.
STROLLER IS NOT intended
for use while jogging,
roller-blading, skating, or similar
activity.
AVOID FINGERS FROM
GETTING CAUGHT IN
STROLLER: Use care when
opening and closing the stroller.
ALWAYS check to make sure
stroller is completely latched
open before using it.
DO NOT use storage basket to
carry a child.
NEVER LET A CHILD stand on
any part of the stroller. Child
could fall and be injured.
STROLLER IS NOT A TOY.
NEVER allow children to play
with stroller.
WARNING
ADVERTENCIA

3
Failure to follow these warnings and the
instructions increases the risk of serious injury or death.
WARNING
ADVERTENCIA
DISCONTINUE USING YOUR
STROLLER if it becomes
damaged or broken.
NEVER lift or carry toddler seat
by the armbar.
NEVER use stroller frame
without the toddler seat or
carseat attached.
TO AVOID FALLS, never remove
toddler seat from the stroller
frame with child in it.
NEVER USE toddler seat in a car
or use it as a booster seat.
USING THE URBINI PETAL
INFANT CAR SEAT WITH THIS
STROLLER:
- ONLY USE THE URBINI PETAL
INFANT car seat that originally
came with your URBINI OMNI
TRAVEL SYSTEM.
- NEVER use any other
manufacturer’s car seats with
this stroller.
- NEVER use the URBINI TOURI
PETAL infant carseat with the
OMNI stroller as it is not
compatible.
- ALWAYS CHECK to make sure
the car seat is securely latched
into the car seat mounts by
lifting up on it.
- AVOID SERIOUS INJURY TO
YOUR CHILD FROM FALLING
OR SLIDING OUT OF THE
INFANT CAR SEAT :
• Always snugly secure your child
in the car seat with the harness.
• Make sure the armbar is
securely attached on both sides
before attaching the car seat to
the stroller.
- NEVER place carseat in the
toddler seat.

4
WARNING
ADVERTENCIA
POR FAVOR, CUMPLA TODAS
LAS INSTRUCCIONES Y
GUARDE LA GUÍA DEL
USUARIO PARA USO FUTURO.
REQUIERE QUE LO ARME UN
ADULTO.
NUNCA DEJE A un niño sin
atender.
EVITE SERIAS LESIONES de
caídas o resbalones. Use siempre
el cinturón de seguridad.
VERIFIQUE para estar seguro
que el cinturón de seguridad
está sujetado apretadamente
tensionando las correas.
No use NUNCA el asiento en la
posición cochecito reclinado a
menos que las correas debajo
del asiento estén destrabadas y
el asiento esté programado en el
modo cochecito reclinado según
las instrucciones.
PELIGRO DE
ESTRANGULACIÓN: NUNCA
cuelgue cuerdas o
juguetes del cochecito.
PARA PREVENIR QUE EL
COCHECITO ESTÉ EN UNA
CONDICIÓN INESTABLE,
nunca ponga paquetes u otros
artículos en la manija o capota
del cochecito. NO ponga más de
10 libras (4.5 kg) en la canasta de
almacenamiento.
PARA EVITAR LA TENSIÓN Y
PREVENIR UNA SITUACIÓN
INESTABLE EN EL COCHECITO,
el cochecito debe usarse con un
niño que pese hasta 50 libras (22.7
kg) y hasta 45 pulgadas de altura.
Nunca lo use con más de un niño
por vez. Cuando el cochecito está
en el modo cochecito, la intención
es que lo use un niño de hasta 6
meses de edad.
NUNCA USE EL COCHECITO
EN ESCALERAS o escaleras
mecánicas.
EL COCHECITO NO debe usarse
mientras corre, usa patines, patina
sobre hielo o actividad similar.
EVITE QUE LOS DEDOS QUEDEN
ATRAPADOS EN EL COCHECITO:
Tenga cuidado cuando abre y
cierra el cochecito. Verifique
SIEMPRE para tener la seguridad
de que el cochecito esté
completamente abierto antes de
usarlo.
NO use la canasta de
almacenamiento para
transportar a un niño.
NUNCA DEJE QUE EL NIÑO se
pare sobre cualquier parte del
cochecito. El niño podría caerse y
sufrir una lesión.
No observar estas advertencias y las instrucciones aumenta
el riesgo de sufrir lesiones serias o la muerte.

5
WARNING
ADVERTENCIA
- NUNCA use ningún asiento
para automóvil de otro
fabricante con este cochecito.
- NUNCA use el asiento de
automóvil para bebé URBINI
TOURI PETAL con un cochecito
OMNI ya que no es compatible.
- VERIFIQUE SIEMPRE para
tener la seguridad de que el
asiento de automóvil esté
seguramente sujetado a los
montantes del asiento de
automóvil levantándolo.
- EVITE SERIAS LESIONES
A SU NIÑO POR CAÍDAS O
DESLIZAMIENTOS DEL
ASIENTO DE AUTOMÓVIL
PARA BEBÉ:
• Sujete siempre apretadamente
a su niño en el asiento de
automóvil con el arnés.
• Asegúrese de que la barra para
los brazos esté debidamente
sujetada en ambos costados
antes de sujetar el asiento de
automóvil al cochecito.
• NUNCA ponga el asiento de
automóvil en el asiento para
niños.
EL COCHECITO NO ES UN
JUGUETE. NUNCA deje que los
niños jueguen con el cochecito.
DEJE DE USAR EL COCHECITO
si resulta dañado o roto.
NUNCA levante ni transporte el
asiento para niños agarrado de la
barra para los brazos.
NUNCA use el armazón del
cochecito sin el asiento para
niños o asiento de automóvil
sujetado.
PARA EVITAR CAÍDAS, nunca
saque el asiento para niños del
armazón del cochecito con el
niño en él.
NUNCA USE el asiento para
niños en un automóvil ni lo use
como un asiento.
USO EL ASIENTO DE
AUTOMÓVIL PARA BEBÉ
URBINI PETAL CON ESTE
COCHECITO :
- SOLAMENTE USE EL ASIENTO
DE AUTOMÓVIL PARA BEBÉ
URBINI PETAL que vino
originalmente con su SISTEMA
PARA VIAJES OMNI URBINI.
No observar estas advertencias y las instrucciones aumenta
el riesgo de sufrir lesiones serias o la muerte.

6
Parts / Piezas
Frame / Armazón
Product Features / Características del producto
Harness
/ Arnés
Storage Basket /
Canasta de almacenamiento
Toddler Seat
/ Asiento
para niños
Armbar / Barra
para los brazos Canopy / Capota
Please check that you have all the
parts shown below before
assembling product. If you are
missing any parts, please contact
Customer Service at 1-888-569-7288.
2x 2x
Toddler Seat
Release
Button / Botón
de liberación por
asiento para
niños pequeños
Fold Button / Botón
de pliegue
Por favor, verifique que tiene todas
las piezas ilustradas antes de armar
el producto. Si falta alguna pieza,
por favor llame a Servicio al Cliente
al 1-888-569-7288.
Front Wheels /
Ruedas delanteras
Rear Wheels /
Ruedas traseras
Canopy /
Capota
Arm Bar
/ Barra
para los
brazos
Handles / Manija
Buckle /
Hebilla
Foot Rest /
Descanso
del pie Front Wheel /
Rueda delantera
Swivel Lock /
Traba de la rueda
giratoria
Arm Bar
Release Button /
Botón de liberación
por barra para
brazos
Rear Wheels /
Ruedas traseras
Rear Wheel Brake /
Freno de la rueda
trasera
Recline
Adjustment
Strap /
Correa de
ajuste de la
reclinación
7
Your stroller seat can be used in two dierent modes.
Toddler Seat Mode and Carriage Mode.
Su asiento para el cochecito se puede usar en dos modos
diferentes. El modo asiento para niños y
el modo de cochecito.
Your stroller seat is shipped in carriage mode with the buckles unfastened
under the footrest. You will need to follow the instructions completely to
make sure you set up your stroller in your preferred mode of use.
After the frame and the wheels have been assembled, you can choose to set
the stroller up in Carriage Mode or Toddler Seat Mode follow
instructions on pages 10 - 15.
El asiento de su cochecito se despacha en el modo cochecito con las hebillas
destrabadas debajo del apoyapis. Necesitará cumplir las instrucciones
completamente para tener la seguridad de que arma su cochecito según el
modo de uso preferido.
Luego de ensamblar el armazón y las ruedas, puede elegir colocar al
cochecito en el modo cochecito o modo asiento para niños siguiendo las
instrucciones en las páginas 10 a 15.
Toddler Seat Mode /
El modo asiento para niños
Carriage Mode /
Modo de cochecito

8
Frame Assembly / Ensamblaje del armazón
To unfold, press both release buttons
(on insides of the handle) and pull up.
Lift up on handle until stroller frame
latches in position.
2
3
1Press in buttons on sides of handle
and rotate the handle up.
Oprima los botones en los costados
de la manija y gire la manija hacia
arriba.
Para desplegarlo, oprima ambos bot-
ones de liberación (en el interior de la
manija) y tire hacia arriba.
Levante de la manija hasta que el
armazón del cochecito se trabe en su
lugar.
CLICK!
¡CLIC!
CLICK!
¡CLIC!

9
To attach front wheels, push wheel
onto front leg tube until it clicks into
place. Repeat on other side.
Pull on wheels to make sure both of
them are attached.
4
To attach rear wheels, push wheel onto
rear leg tube until it clicks into place.
Repeat on other side.
Pull on wheels to make sure both of
them are attached.
5
Wheel Assembly / Ensamblaje de la rueda
Para instalar las ruedas delanteras,
empuje la rueda en el tubo de la pata
delantera hasta que se trabe en su
lugar. Repita el procedimiento del
otro lado.
Tire rmemente de las ruedas
para asegurarse que las dos
estén instaladas.
CLICK!
¡CLIC!
CLICK!
¡CLIC!
Para instalar las ruedas traseras, empuje
la rueda en el tubo de la pata trasera
hasta que se trabe en su lugar.
Repita el procedimiento del otro lado.
Tire rmemente de las ruedas para
asegurarse que las dos estén instaladas.

10
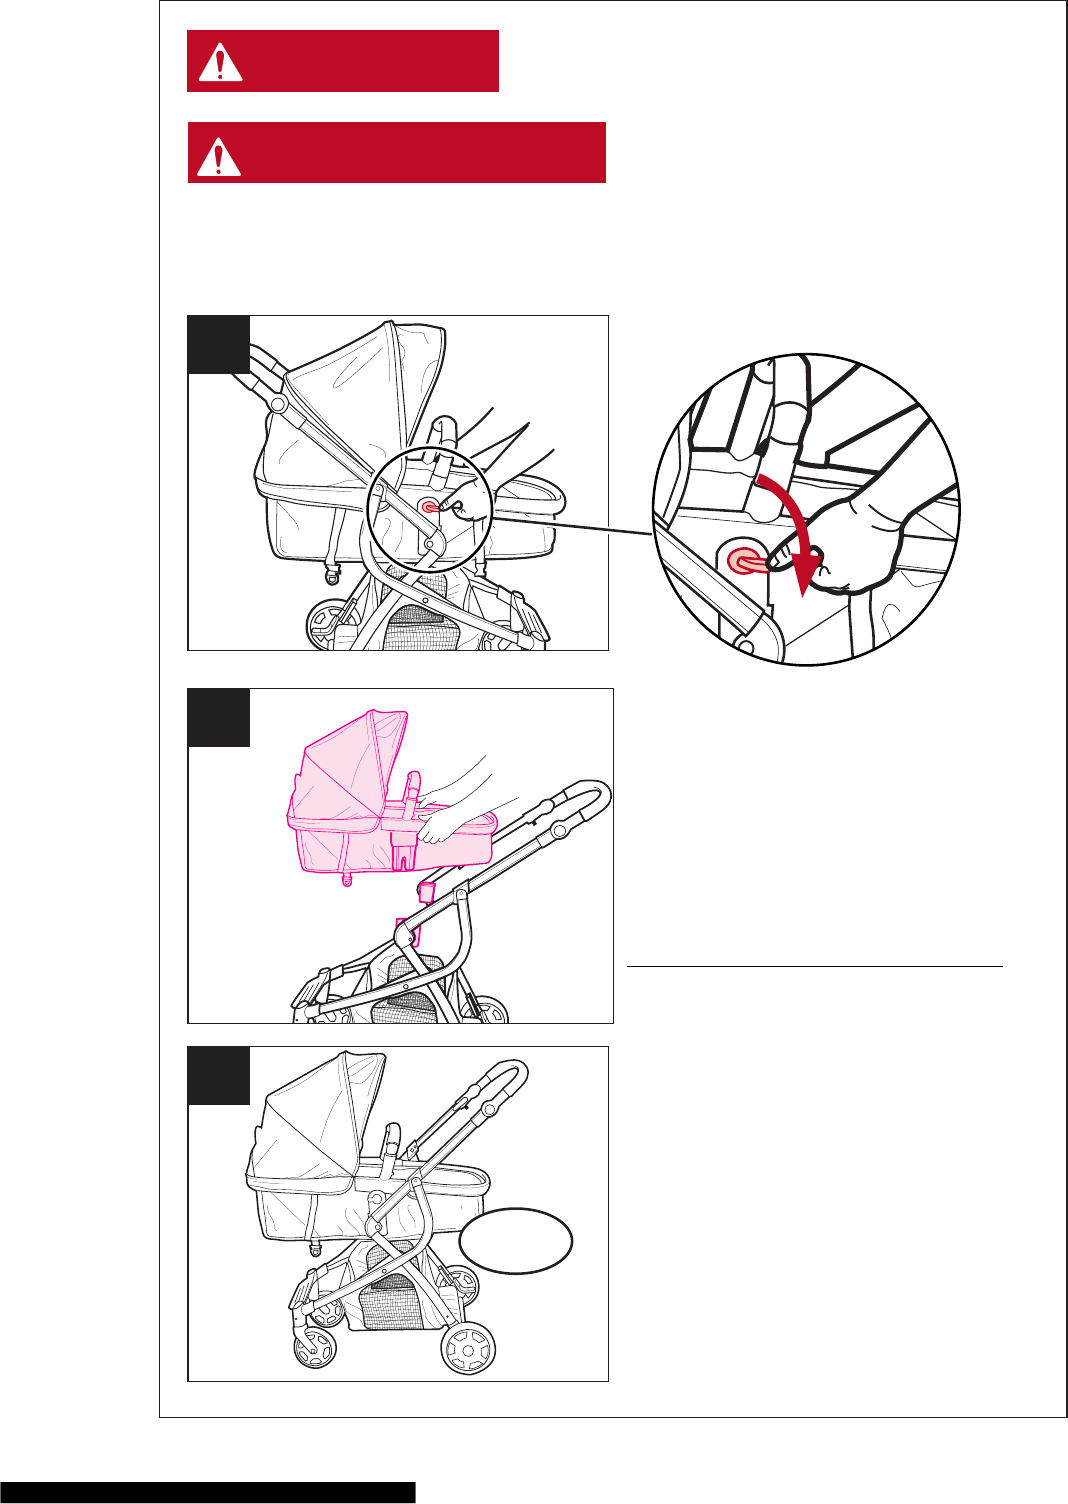
Turn seat back over and attach toddler seat to the mounts until they both click
into place on both sides of the frame.
Toddler seat can be placed on facing forward or to the rear of the stroller.
CHECK to make sure it is securelyattached by pulling up on it.
2 3
Setting Up in Toddler Seat Mode
Programar el modo del asiento para niños
Flip toddler seat over and attach
the 2 buckles on the seat as shown
1
De vuelta el asiento para niños y
sujete las 2 hebillas en el asiento
como se indica.
CLICK!
¡CLIC!
CLICK!
¡CLIC!
CLICK!
¡CLIC!
CLICK!
¡CLIC!
De vuelta de nuevo el asiento y sujete el asiento para niños a los montantes
hasta que ambos se traben en su lugar en ambos costados del armazón.
Se puede colocar el asiento para niños orientado hacia adelante o hacia atrás en
el cochecito.
VERIFIQUE para tener la seguridad de que está sujetado debidamente tirando
hacia arriba.

11
6To attach armbar push pins into holes
on either side of frame until it clicks
into place.
7
Attach canopy by snapping it to boths
sides of the toddler seat as shown.
4
5Fasten the hook and loop tape to the
top edge of the canopy as shown.
Repeat on other side of canopy.
To open armbar, press release button
on either side of armbar and rotate
open.
Setting Up in Toddler Seat Mode
Programar el modo del asiento para niños
Sujete la capota trabándola en ambos
costados del asiento para niños como
se indica.
CLICK!
¡CLIC!
Sujete la cinta de gancho y nudo al
borde superior de la capota como
se indica. Repita en el otro lado de la
capota.
Para sujetar la barra para los brazos,
empuje las clavijas en los agujeros en
ambos costados del armazón hasta
que se trabe en su lugar.
CLICK!
¡CLIC!
Para abrir la barra para los brazos,
oprima el botón de liberación en cada
lado de la barra para los brazos y gírela
para abrir.

12
8
9To remove toddler seat from frame,
press the levers on both sides of the
stroller and lift seat o of the stroller.
To recline toddler seat, lift handle
and rotate to desired position.
Para reclinar el asiento para niños,
levante la manija y gírelo hasta
alcanzar la posición deseada.
Para sacar el asiento para niños del
armazón, oprima las palancas en
ambos costados del cochecito y
levante el asiento del cochecito.

13
Setting Up in Carriage Mode from Toddler Seat Mode
Programar el modo cochecito desde el modo asiento para niños
Fully recline seat, pull down the slider
on rear of seat.
2
If you are in Toddler Seat Mode as
shown, follow these steps to convert
to Carriage Mode.
1
Si está en el modo asiento para niños
como se indica, use estos pasos para
convertirlo al modo cochecito.
Recline el asiento completamente, tire
hacia abajo el deslizador en la parte
trasera del asiento.
NEVER use seat in a reclined carriage position unless the straps
under the seat are unbuckled and the seat is set up in reclined
carriage mode as per the instructions.
WARNING
ADVERTENCIA
WARNING
ADVERTENCIA
No use NUNCA el asiento en la posición cochecito reclinado a menos
que las correas debajo del asiento estén destrabadas y el asiento esté
programado en el modo cochecito reclinado según las instrucciones.

14
Press down on the inside of the toddler
seat to atten out the inside.
6
5Lift handle and rotate seat all the way
down so that it is at.
Undo the 2nd buckle. Refer to page 10
Step 1, for buckle locations.
4
Levante la manija y gire el asiento todo
lo posible hacia abajo para que quede
plano.
Destrabe la segunda hebilla.
Consulte la página 10, Paso 1, para
determinar los lugares de las hebillas.
Oprima hacia abajo en el interior del
asiento para niños para que quede
plano en el interior.
There are 2 sets of buckles that must
be undone.
Undo the front buckle behind the leg
rest on toddler seat. Refer to page 10
Step 1, for buckle locations.
3
Hay 2 juegos de hebillas que debe
destrabar.
Destrabe la hebilla delantera detrás del
apoyapie del asiento para niños.
Consulte la página 10, Paso 1, para
determinar los lugares de las hebillas.
15
NUNCA levante ni transporte el
asiento para niños agarrado de la
barra para los brazos.
To remove and use in rear facing
mode: depress the release buttons
on both sides of the toddler seat,
lift the seat o stroller frame and
turn it around and re-attach.
CHECK to make sure it is securely
attached on both sides by pulling
up on it.
7
9
Para quitar y usarlo con el modo
orientado hacia atrás: Oprima los
botones de liberación en ambos
costados del asiento para niños,
levante el asiento del armazón del
cochecito y délo vuelta y vuelva a
sujetarlo.
VERIFIQUE para tener la seguridad
de que está sujetado en ambos
costados tirando hacia arriba.
8
CLICK!
¡CLIC!
WARNING
ADVERTENCIA
WARNING
ADVERTENCIA
NEVER lift or carry toddler seat by the
armbar.

16
Swivel wheels lock for use on rough surfaces,
such as gravel or stones.
To lock front wheels, push the lock button
down.
To unlock front wheels, push lock button again
to release.
Las ruedas giratorias traban usarse en
supercies ásperas, como de piedra o grava.
Para trabar las ruedas delanteras, empuje el
botón de trabado hacia abajo.
Para destrabar las ruedas delanteras, empuje
de nuevo el botón de trabado para liberarlo.
2
1
1
Brakes / Frenos
Swivel Wheels / Ruedas giratorias
Always lock both brakes. Make sure brakes
are on by trying to push the stroller.
WARNING
ADVERTENCIA
WARNING
ADVERTENCIA
Trabe siempre ambos frenos.
Asegúrese que los frenos estén
activados tratando de empujar el
cochecito.
To lock, press lever DOWN on both rear
wheels.
Para trabarlas, oprima la palanca HACIA
ABAJO en ambas ruedas traseras.
To unlock, press lever UP on
both rear wheels.
Para destrabarlas, oprima la palanca
HACIA ARRIBA en ambas ruedas traseras.
CLICK!
¡CLIC!
CLICK!
¡CLIC!
CLICK!
¡CLIC!

17
Adjusting Harness / Ajuste del arnés
To attach the harness and waist straps
to the crotch buckle, slide shoulder
straps A onto the waist buckles B as
shown, then click them into the
crotch buckle.
Para sujetar el arnés y las correas para
la cintura a la hebilla de la entrepierna,
deslice las correas del hombro A por
las hebillas de la cintura B como se
indica, y luego haga clic en la hebilla
de la entrepierna.
1
To unlock harness, push the button
on the crotch buckle then slide the
shoulder straps o the waist buckles.
Para destrabar el arnés, empuje el
botón en la hebilla de la entrepierna
y luego deslice las correas para el
hombro fuera de las hebillas para la
cintura.
2
AA
B B
To adjust harness around your child,
tighten shoulder and waist straps by
pulling on the free end of the straps as
shown.
Para ajustar el arnés alrededor de su
niño, tensione las correas del hombro
y la cintura tirando del extremo libre
de las correas como se indica.
3
CLICK!
¡CLIC!

18
4To change shoulder strap height
positions, reach one hand behind the
stroller and push the retainer out to
the front of seat then reinsert into the
desired set of slots that are closest to
your child’s shoulder.
Repeat with other harness strap.
When re-inserting the harness straps
MAKE SURE to always place harness
straps at the same height setting.
Para cambiar las posiciones de altura
de la correa del hombro, estreche con
una mano detrás del cochecito y
empuje el retén a la parte delantera
del asiento vuelva a insertar en el
conjunto deseado de ranuras que
están más cerca de los hombros del
niño.
Repita con la otra correa del arnés.
Cuando vuelva a insertar las correas
del arnés asegúrese de colocar
siempre las correas del arnés en la
misma altura.
Changing Shoulder Strap Position /
Para cambiar los posiciones de las correas del hombro

19
Canopy / Capota
1 2
Adjustable Handle / Manija ajustable
To lower handle, push the buttons
on either side of stroller and rotate
down.
1
To raise handle, push the buttons and
rotate to desired height.
2
To open or close canopy, push to the
front or the rear of the stroller.
Para abrir o cerrar la capota, empújela
hacia el frente o la parte de atrás del
cochecito.
Canopy has a window that can be
rolled back so you can view child.
La capota tiene una ventana que se
puede enrollar para que pueda ver a
su niño.
Para levantar la manija, empuje los
botones y gírela hasta alcanzar la
altura deseada.
Para bajar la manija, empuje los
botones en ambos costados del
cochecito y gírela hacia abajo.

20
Folding Stroller / Cómo plegar el cochecito
To fold the stroller, place seat in upright
position, lock brake and push buttons
and pull back on both levers on sides of
stroller handle at the same time.
For more compact fold, remove toddler
seat before folding stroller frame.
1
Lower the handle down until stroller is
completely folded.
2
For more compact fold, press the
buttons on side of handle to lower it.
3
Para plegar el cochecito, ponga el
asiento en la posición vertical, trabe el
freno y empuje los botones y tire hacia
atrás de las dos palancas en los
costados de la manija del cochecito al
mismo tiempo.
Para lograr un pliegue más compacto,
saque el asiento para niños antes de
plegar el armazón del cochecito.
Baje la manija hasta que el cochecito
esté completamente plegado.
Para lograr un pliegue más compacto,
oprima los botones en el costado de la
manija para bajarlo.

21
Attaching the Urbini Omni Petal Infant Car Seat
Cómo sujetar el asiento de automóvil para
bebé Urbini Omni Petal
WARNING
ADVERTENCIA
USING THE URBINI PETAL INFANT CAR SEAT WITH THIS
STROLLER:
- ONLY USE THE URBINI PETAL INFANT car seat that originally
came with your OMNI URBINI TRAVEL SYSTEM.
- NEVER use any other manufacturer’s car seats with this stroller.
- NEVER use the URBINI TOURI PETAL infant carseat with the
OMNI stroller as it is not compatible.
- ALWAYS CHECK to make sure the car seat is securely latched into
the car seat mounts by lifting up on it.
- AVOID SERIOUS INJURY TO YOUR CHILD FROM FALLING OR
SLIDING OUT OF THE INFANT CAR SEAT :
• Always snugly secure your child in the car seat with the harness.
• Make sure the armbar is securely attached on both sides before
attaching the car seat to the stroller.
- NEVER place carseat in the toddler seat.

22
WARNING
ADVERTENCIA
USO EL ASIENTO DE AUTOMÓVIL PARA BEBÉ URBINI PETAL CON
ESTE COCHECITO :
- SOLAMENTE USE EL ASIENTO DE AUTOMÓVIL PARA BEBÉ
URBINI PETAL que vino originalmente con su SISTEMA PARA
VIAJES OMNI URBINI.
- NUNCA use ningún asiento para automóvil de otro fabricante con
este cochecito.
- NUNCA use el asiento de automóvil para bebé URBINI TOURI
PETAL con un cochecito OMNI ya que no es compatible.
- VERIFIQUE SIEMPRE para tener la seguridad de que el asiento de
automóvil esté seguramente sujetado a los montantes del
asiento de automóvil levantándolo.
- EVITE SERIAS LESIONES A SU NIÑO POR CAÍDAS O
DESLIZAMIENTOS DEL ASIENTO DE AUTOMÓVIL PARA BEBÉ:
• Sujete siempre apretadamente a su niño en el asiento de
automóvil con el arnés.
• Asegúrese de que la barra para los brazos esté debidamente
sujetada en ambos costados antes de sujetar el asiento de
automóvil al cochecito.
• NUNCA ponga el asiento de automóvil en el asiento para niños.

23
Remove the toddler seat, press the
release buttons down and remove seat.
1
To attach carseat, insert car seat into
the mounts until they both click into
place on both sides of the frame.
LIft up on carseat to ensure that it is
securely attached.
2
3
Saque el asiento para niños, oprima
los botones de liberación hacia abajo y
saque el asiento.
Para sujetar el asiento de automóvil,
inserte el asiento automóvil a los
montantes hasta que ambos se
traben en su lugar en ambos
costados del armazón.
Tire el asiento de automóvil hacia
arriba para asegurarse de que esté
instalado con seguridad.
CLICK!
¡CLIC!
4
24
To remove car seat, press grey button to
unlock then press grey button and
remove carseat from stroller frame.
Para sacar el asiento de automóvil,
oprima el botón gris para destrabarlo
y luego oprima el botón gris y saque
el asiento de automóvil del armazón del
cochecito.
5
1
6
2
7
2
1
2
1

25
Care and Cleaning
FOR WASHING INSTRUCTIONS, REFER TO YOUR CARE TAG on your seat pad.
NEVER use BLEACH.
TO CLEAN STROLLER FRAME, use a damp cloth with household soap and warm
water. NEVER use BLEACH or detergent.
BEFORE USING STROLLER ALWAYS CHECK for any missing parts , torn material
or if it is broken or damaged. Replace parts as needed by contacting Customer
Service. NEVER USE stroller if any parts are missing or damaged.
Cuidado y limpieza
PARA OBTENER LAS INSTRUCCIONES PARA EL LAVADO, CONSULTE SU
ETIQUETA DE CUIDADO en la almohadilla del asiento. NUNCA use
BLANQUEADOR.
PARA LIMPIAR EL ARMAZÓN DEL COCHECITO, use un trapo húmedo con
jabón de uso doméstico y agua tibia. NUNCA use BLANQUEADOR ni detergente.
ANTES DE USAR EL COCHECITO VERIFIQUE SIEMPRE si hay piezas que faltan,
material rasgado o si está roto o dañado. Reemplace las piezas según sea
necesario, contactando a Servicio al Cliente. NUNCA USE el cochecito si
faltan piezas o están dañadas.

26
Notes / Notas

27
Notes / Notas

28
Replacement Parts and Warranty Information
For customer service, warranty information
or replacement parts,
please call us at 1-888-569-7288
or visit us online at
www.urbinibaby.com
Información sobre la garantía y piezas de repuesto
Para obtener servicio al cliente, información sobre
la garantía o piezas de repuesto,
en los EE.UU. por favor llámenos al 1-888-569-7288
o visite
www.urbinibaby.com
