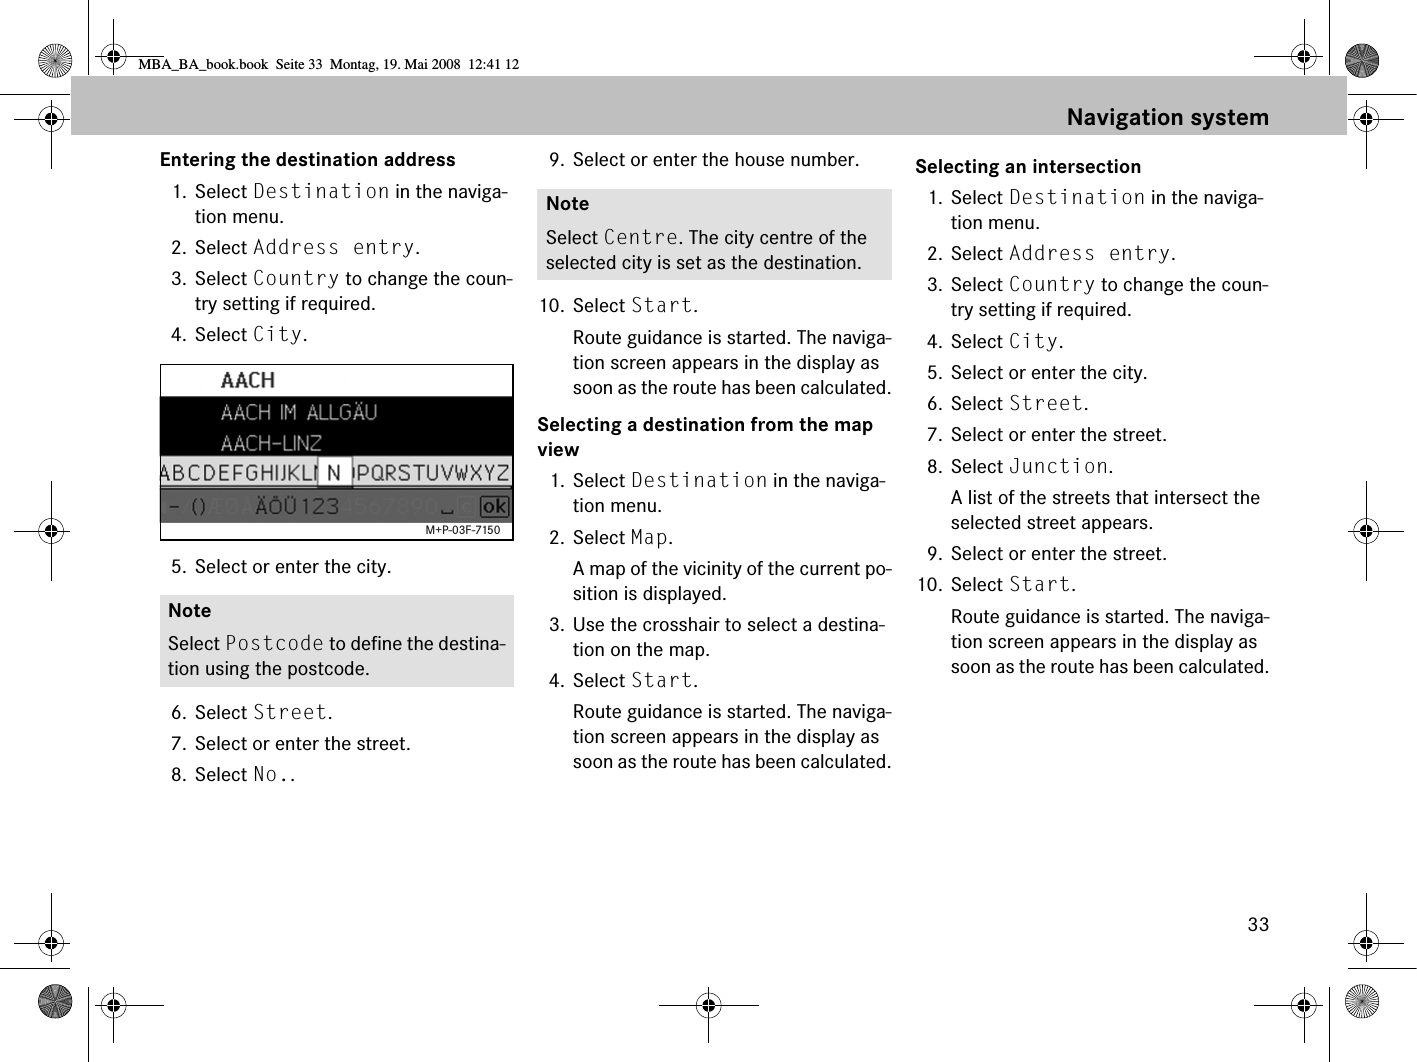
VALEO Telematik und Akustik UMI Universal Media Interface User Manual MBA BA book

Peiker acustic GmbH & Co. KG Universal Media Interface MBA BA book

Users Manual

Teile-Nr. / Part no. / Référence / N. categorico / Código / Onderdeelnr. A 001 584 42 71Betriebsanleitung Universal Media InterfaceOwner's Manual Universal Media InterfaceNotice d'utilisation Universal Media InterfaceInstrucciones de servicio Universal Media InterfaceInstruzioni d'uso Universal Media InterfaceGebruiksaanwijzing Universal Media Interface
Lizenzvereinbarung Wir sind unter keinen Umständen verantwort-lich für den Verlust von Daten und für jedwede besonderen, beiläufigen, mittelbaren oder unmit-telbaren Schäden, wie immer diese auch zustande gekommen sind. Bestandteile der im Universal Media Interface eingesetzten Software unterliegen der GPL bzw. LGPL-Lizenz. Eine Kopie dieser Lizenzen und weiterführende Infor-mationen finden Sie unter: www.peiker.de/umi.html Wir weisen ausdrücklich darauf hin, dass im Fal-le von Modifikationen am Universal Media Inter-face - jedwelcher Art - der Garantieanspruch erlischt.Licence Agreement Under no circumstances can we be held responsible or liable for any loss of data or for any type of specific, incidental, direct or indirect damage, regardless of how this damage may haveoccurred. Components of  the software used in the Universal Media Interface are subject to the GPL or LGPL-Licence agreement(s). A copy of these licenses as well as additional information can be found at: www.peiker.de/umi.html We state here explicitly that if the Universal Media Interface is modified in any way, all warranty entitlements will becomenull and void.Contrat de licenceNe ne saurions en aucun cas être tenus pour responsables de la perte de données et de tout autre dommage particulier, accidentel, direct ou indirect, de quelque origine que ce soit. Les composantes du logiciel utilisé pour l’interface média universelle sont soumis à la licence GPL ou LGPL. Vous trouverez une copie de ces licences ainsi que de plus amples informations à l’adresse suivante : www.peiker.de/umi.html Nous attirons expressément votre attention sur le fait que vous ne pourrez faire valoir vos droits à la garantie en cas de modifications de quelque nature que ce soit qui auraient été apportées à l’interface média universelle.Acuerdo de licencia Bajo ninguna circunstancia nos hacemos responsables de la pérdida de datos ni de ningún daño extraordinario, ocasional, directo o indirecto que pudiera producirse, independientemente de su causa. Los componentes del software utilizado en el Universal Media Interface están sometidos a la licencia GPL o LGPL. Una copia de estas licencias, así como información adicional están disponibles en: www.peiker.de/umi.html Le advertimos expresamente de que cualquier modificación de la Universal Media Interface, sea del tipo que sea,  conlleva la extinción de los derechos de garantía.Contratto di licenza Il produttore non si assume assolutamente la responsabilità per eventuali perdite di dati e per alcun danno diretto, indiretto o incidentale, indipendentemente dalle circostanze in cui si tale danno si sia verificato. I componenti dei dei software impiegati nell'Universal Media Interface sono soggetti a licenza GPL o LGPL. Per ulteriori informazioni e per scaricare una copia della presente licenza consultare il sito: www.peiker.de/umi.html Segnaliamo esplicitamente che eventuali modifiche di qualsaisi genere apportate all'Universal Media Interface, comportano l'invalidazione dei diritti di garanzia.Licentieovereenkomst Wij zijn in geen enkel geval verantwoordelijk voor het verlies van gegevens en voor bijzondere, toevallige, directe of indirecte schade, ongeacht in welke vorm deze optreedt. Bestanddelen van de software die in de Universal Media Interface wordt gebruikt, zijn onderworpen aan de GPL resp. LGPL-licentie. Een kopie van deze licenties en uitvoerige informatie kunt u vinden onder: www.peiker.de/umi.html Wij wijzen er met nadruk op, dat in geval van wijzigingen aan de Universal Media Interface - ongeacht op welke wijze - de garantie vervalt.RedaktionMercedes-Benz Accessories GmbH, Stuttgart · Ein Unternehmen der Daimler AG.Änderungen von technischen Details gegenüber den Angaben und Abbildungen der Betriebsan-leitung sind vorbehalten.Nachdruck, Übersetzung und Vervielfältigung, auch auszugsweise, sind ohne schriftliche Ge-nehmigung nicht erlaubt.Redaktionsschluss: 30.04.2008Titelbild: M+P-03F-729803F048-07Issued byMercedes-Benz Accessories GmbH, Stuttgart · A Daimler AG Company.The manufacturer reserves the right to change technical details from those shown in data and il-lustrations contained in this Owner'sManual.Reprinting, translating and reproduction, in whole or in part, are not permitted without our prior written consent.As at: 30.04.2008Title Illustration: M+P-03F-729803F048-07RédactionMercedes-Benz Accessories GmbH, Stuttgart · Une entreprise du groupe Daimler AG.Sous réserve de modification de détails techni-ques par rapport aux indications et illustrations de cette notice d'utilisation.Toute reproduction, traduction ou publication, même partielle, interdite sans notre autorisation écrite.Fin de rédaction : 30.04.2008Cliché de couverture : M+P-03F-729803F048-07RedacciónMercedes-Benz Accessories GmbH, Stuttgart · Una empresa de Daimler AG.Nos reservamos el derecho de modificar detalles técnicos con respecto a los datos y las figuras de las instrucciones de servicio.Prohibida la reimpresión, la traducción y la re-producción, total o parcial, sin autorización por escrito.Cierre de redacción: 30.04.2008Portada: M+P-03F-729803F048-07RedazioneMercedes-Benz Accessories GmbH, Stuttgart · Un'Azienda del Gruppo Daimler AG.Con riserva di modifiche ai dettagli tecnici rispet-to alle illustrazioni riportate nelle presenti Istru-zioni di montaggio.La ristampa, la traduzione e la riproduzione, an-che parziali, non sono permesse senza espressa autorizzazione scritta.Chiusura redazionale: 30.04.2008Immagine di copertina: M+P-03F-729803F048-07RedactieMercedes-Benz Accessories GmbH, Stuttgart · Een onderneming van de Daimler AG.Wijzigingen in specificaties en technische details ten opzichte van de specificaties en afbeeldingen van deze handleiding voorbehouden.Nadruk, vertaling of verveelvoudiging ook ten dele, zijn zonder schriftliche toestemming niet toegestaan.Redactiesluiting: 30.04.2008Titelafbeelding: M+P-03F-729803F048-07
1Betriebsanleitung Seite 3Owner's Manual page 27Notice d'utilisation page 51Instrucciones de servicio página 75Instruzioni d'uso pagina 99Gebruiksaanwijzing pagina 123쮕MBA_BA_book.book  Seite 1  Montag, 19. Mai 2008  12:41 12
27IntroductionWe hope you enjoy your new Mercedes-Benz Universal Media Interface!Congratulations on your new Universal Media Interface. These Operating Instructions are valid for vehicles of the W/S 204 model series which are equipped with a Universal Media Interface. These instructions will teach you how to use your Universal Media Interface in combination with your AUDIO 20, and provides you with important tips and ad-vice.First of all, familiarise yourself with your Universal Media Interface and read the Op-erating Instructions before driving off. This will enable you to enjoy your Universal Media Interface to the full and help you to avoid dangers to you and others.Mercedes-Benz continuously adapts its Universal Media Interface to the state of the art and therefore reserves the right to make changes in design, equipment and technology. You cannot, therefore, base any claims on the data, illustrations or de-scriptions contained in these Operating In-structions.Any authorised Mercedes-Benz Service Centre will be happy to assist you at any time.These Operating Instructions are a part of the vehicle's equipment. You should there-fore always keep them in the vehicle and hand them over to the new owner if you sell the vehicle.Mercedes-Benz wishes you pleasant mo-toring with your new Universal Media Inter-face.Mercedes-Benz Accessories GmbHA Daimler AG companyMBA_BA_book.book  Seite 27  Montag, 19. Mai 2008  12:41 12
28Table of ContentsSafety ................................................. 29Symbols used ......................................  29Operating safety ..................................  29System Overview .............................. 30Navigation System ............................ 31Map software.......................................  31Information via satellite signal .............  31Operation.............................................  31Switching on the navigation system.....  31Navigation menu..................................  32Route guidance....................................  32Where to? ............................................  32Point of interest (POI) ..........................  34Stopover ..............................................  35Functions of the full-screen map view .............................................  36Information on the destination/stopover ..........................  36Current position...................................  36Changing the map view settings ..........  37Other settings .....................................  38FM traffic radio .................................. 40Displaying traffic jams .........................  40Detours to avoid traffic jams ...............  40iPod® ..................................................  41General notes ......................................  41Connecting the iPod®..........................  42Activating the iPod®............................  42Play mode............................................  43Operation.............................................  44iPod® menu ........................................  44USB (mp3 player)...............................  47General notes ......................................  47Activating the mass storage device .....  47Operation.............................................  47Audio streaming ................................  48Pairing the audio device with the Universal Media Interface ...................  48Selecting a paired audio device ...........  49Operation ............................................  49MBA_BA_book.book  Seite 28  Montag, 19. Mai 2008  12:41 12
29SafetySymbols used 1. These items explain individual operat-ing steps.• These lists show you selection options.Display Messages in the display appear in this font.Where to?  FavouritesThis indicates a sequence of buttons to be pressed in succession.Operating safetyThese operating instructions refer to the audio system operating instructions and assembly instructions for your mobile phone cradle as well as to various operat-ing instructions for connected devices (e.g. iPod®, audio devices). Please keep them handy for reference.GWarningA warning notice draws your attention to pos-sible hazards to your health or life.ImportantText marked in this way alerts you to the risk of possible material damage or malfunctions.NoteInformation marked in this way contains useful tips and additional details.GRisk of accidentDevote your attention to the road and traffic situation. Only use the Universal Media Inter-face or connected devices (iPod, mp3 player, mobile phone, other audio devices) if the traf-fic situation permits. Operating the Universal Media Interface or the connected devices will distract you from the road and traffic situa-tion and you could lose control of your vehicle and cause an accident.MBA_BA_book.book  Seite 29  Montag, 19. Mai 2008  12:41 12
30System overviewThe Universal Media Interface includes a map navigation system for Europe.For information on op-eration, see page 31 onwards.The iPod® interface en-ables playback of au-dio files that are stored on the iPod®. Here, the iPod® can be control-led conveniently via the vehicle controls.For information on op-eration, see page 41 onwards.The mp3 player plays audio files in the mp3 format that are located on a mass storage de-vice connected to the USB interface.For information on op-eration, see page 47 onwards.The audio streaming function enables play-back of audio files by means of a paired, compatible Bluetooth® audio streaming device (e.g. mobile phone).For information on op-eration, see page 49 onwards.Audio devices can be connected to the AUX interface with 3.5-mm jack plugs (e.g. head-phones output of com-mercially available players). They are operated on the audio device.Universal Media Interface AUDIO 20Navigation system iPod® interface USB (mp3 player) Audio streaming AUX inputNoteThe AUX input on the audio system must be activated in order to use the voice and audio playback of the Universal Media Interface. MBA_BA_book.book  Seite 30  Montag, 19. Mai 2008  12:41 12
31*optionalMap softwareThe digital maps generated by the map software become outdated in the same way as conventional road maps. Optimum route guidance can only be provided by the navigation system in conjunction with the most up-to-date map software. Informa-tion about new map software versions can be obtained from any Mercedes-Benz Service Centre.Information via satellite signalsThe navigation system must receive satel-lite signals for route guidance. The system may not be able to acquire satellite signals inside multi-storey car parks or in the vicin-ity of tall buildings or trees.OperationTurn ymz or slide omp to change a selection.Press n to confirm a selection you have made.Press the L button to switch into the next-highest menu level.Switching on the navigation system1. For information on switching on the audio system, please refer to the audio system operating instructions.2. Press and hold the ì button.GRisk of accidentFor safety reasons, only enter a destination when the vehicle is stationary. Otherwise, you could be distracted from the road and traffic situation and cause an accident in which you and/or others could be injured.The Universal Media Interface calculates route guidance to the destination without taking account of e.g.:• Traffic lights• Stop and give way signs• Parking or stopping prohibited signs• Lane narrowing• Other road and traffic controls and regula-tionsThe Universal Media Interface may give incor-rect driving recommendations if the actual road situation differs from the data on the digital map. For example, if the traffic routing has been changed or the direction of a one-way road has been reversed.For this reason, you must always observe ap-plicable road and traffic controls and regula-tions during your journey. Road and traffic controls and regulations always have priority over the system's navigation commands.NoteWhen the navigation system is switched on, no additional information is shown on the display.When using the hands-free function for the mobile phone via the Bluetooth® in-terface or comfort telephony*, bear in mind that incoming calls are displayed exclusively in the multifunction display. Depending on the audio system and tel-ephone settings, you will hear an addi-tional signal tone. (Please refer to the audio system operating instructions and the installation instructions for the mo-bile phone cradle.)Navigation systemMBA_BA_book.book  Seite 31  Montag, 19. Mai 2008  12:41 12
32Navigation menu1 System settings 2 TMC traffic messages 3 Repetition of the current navigation announcement (only when route guidance is active)4 Where to? 5 BackRoute guidanceThe current position is indicated by an ar-row on the road map.The active route is shown by a blue line that ends at the destination.The next driving manoeuvre and the dis-tance to it are shown in the direction dis-play at the top right. If this is followed by another driving manoeuvre, this is shown below.Cancelling/continuing route guidance1. Select Destination in the naviga-tion menu.2. Select Cancel route guidance or Continue route guidance.Where to?The Destination menu contains the following possibilities for entering a desti-nation:• Address entry• From memory• From last destinations• Points of interest along the route• Points of interest in the vicinityA8DestinationTMCNavi 1 2 3 4 5M+P-03F-7149NoteNavigation instructions are also shown in the multifunction display. The corre-sponding menu must be selected in the multifunction display beforehand. (Please refer to the audio system operat-ing instructions.)M+P-03F-7168Navigation systemMBA_BA_book.book  Seite 32  Montag, 19. Mai 2008  12:41 12
33Entering the destination address1. Select Destination in the naviga-tion menu.2. Select Address entry.3. Select Country to change the coun-try setting if required.4. Select City.5. Select or enter the city.6. Select Street. 7. Select or enter the street.8. Select No.. 9. Select or enter the house number.10. Select Start. Route guidance is started. The naviga-tion screen appears in the display as soon as the route has been calculated.Selecting a destination from the map view1. Select Destination in the naviga-tion menu.2. Select Map.A map of the vicinity of the current po-sition is displayed.3. Use the crosshair to select a destina-tion on the map.4. Select Start. Route guidance is started. The naviga-tion screen appears in the display as soon as the route has been calculated.Selecting an intersection1. Select Destination in the naviga-tion menu.2. Select Address entry.3. Select Country to change the coun-try setting if required.4. Select City.5. Select or enter the city.6. Select Street.7. Select or enter the street.8. Select Junction.A list of the streets that intersect the selected street appears.9. Select or enter the street.10. Select Start. Route guidance is started. The naviga-tion screen appears in the display as soon as the route has been calculated.NoteSelect Postcode to define the destina-tion using the postcode.M+P-03F-7150NoteSelect Centre. The city centre of the selected city is set as the destination.Navigation systemMBA_BA_book.book  Seite 33  Montag, 19. Mai 2008  12:41 12
34Saving a destination25 destinations can be saved.1. Select Destination in the naviga-tion menu.2. Select Address entry.3. Enter the destination.4. Select Save.5. Select an option:• Save without name• Save with name• Save as "My address"Selecting a saved address1. Select Destination in the naviga-tion menu.2. Select From memory.A list of up to 25 saved destinations appears.3. Select the destination.4. Select Start. Route guidance is started. The naviga-tion screen appears in the display as soon as the route has been calculated.Selecting one of the last navigated destinationThe last 10 destinations are saved.1. Select Destination in the naviga-tion menu.2. Select From last destina-tions.3. Select the destination.4. Select Start. Route guidance is started. The naviga-tion screen appears in the display as soon as the route has been calculated.Point of interestSelecting a point of interest in a city1. Select Destination in the naviga-tion menu.2. Select Address entry.3. Select Country to change the coun-try setting if required.4. Select City.5. Select or enter the city.6. Select POI.7. Select reference:• Address• Global8. Select a category, e.g. Petrol station.A list of filling stations at the destina-tion appears.NoteBefore route guidance to your home ad-dress can be started, this address must be saved at My address.NoteThe distance to the destination specified by the navigation system corresponds to the distance in a straight line at the time of the query. It is specified without tak-ing account of roads and does not up-date itself as your journey continues. Navigation systemMBA_BA_book.book  Seite 34  Montag, 19. Mai 2008  12:41 12
359. Select the destination.10. Select Start. Route guidance is started. The naviga-tion screen appears in the display as soon as the route has been calculated.Selecting points of interest in the vicinity1. Select Destination in the naviga-tion menu.2. Select From POIs.3. Select a category, e.g. Petrol station.A list of filling stations in the vicinity appears.4. Select the destination.5. Select Start. Route guidance is started. The naviga-tion screen appears in the display as soon as the route has been calculated.Selecting points of interest along a route1. With route guidance active, select Destination in the navigation menu.2. Select From POIs along route.3. Select a category, e.g. Petrol station.A list of filling stations along the active route appears.4. Select the destination.5. Select Start. Route guidance is started. The naviga-tion screen appears in the display as soon as the route has been calculated.StopoverEntering a stopoverYou can add a stopover to your route while route guidance is active.1. Select Destination in the naviga-tion menu.2. Select a stopover from the list of stop-overs or enter a destination manually.3. Confirm the input as a stopover.Removing a stopover1. Select Destination in the naviga-tion menu.2. Select Delete stopover.NoteOnly the categories for which there are points of interest at the selected destina-tion are displayed for selection.NoteThe stopover is removed from the route guidance without any further query.Destination orstopover?Stopover Dest.StartM+P-03F-7151Navigation systemMBA_BA_book.book  Seite 35  Montag, 19. Mai 2008  12:41 12
36Navigation systemFunctions of the full-screen map viewAdditional information can be shown or hidden in the full-screen map view.1 Top information box 2 Lane display3 Direction display4 Maximum speed5 Lower information boxMap sectionTurning ymz enables you to zoom the dis-played map section in or out.After you press n for a longer period, a crosshair appears and the map section can be moved around as you wish. Press the L button to return to the view of your current position. Viewing angleThe viewing angle on the map can be changed by sliding mq or mr if Track up has been specified as the perspective of the map view.Navigation announcementWith route guidance active, the current navigation announcement is repeated when you press n.Top information box Activated/deactivated by sliding om.Bottom information box Activated/deactivated by sliding mp.Information on the destination/stopover1. Select Navi in the navigation menu.2. Select Destination informa-tion or Stopover informa-tion.The destination address, estimated ar-rival time and the remaining distance are displayed.3. Select Save.Current position1. Select Navi in the navigation menu.2. Select Position information.The coordinates and altitude in metres of the current position as well as the number of satellites used for naviga-tion are displayed.3. Select Save.NoteThe additional information is displayed and updated during the journey if there is satellite reception.12345M+P-03F-7169MBA_BA_book.book  Seite 36  Montag, 19. Mai 2008  12:41 12
37Changing the map view settingsTop information box 1. Select Navi in the navigation menu.2. Configuration  Information box top.3. Select the type of display:• Static: the information box appears permanently. You can hide it by sliding om.•Dynamic: the information box is hid-den automatically after approx. 10 sec-onds.4. Select the display content:• Arrival time/total dist.: estimated arrival time and remaining distance are displayed.• Arrival time/next man.: esti-mated arrival time and remaining dis-tance to the next driving manoeuvre are displayed.•Altitude/satellites: the alti-tude in metres of the current position and the number of satellites used for navigation are displayed.Bottom information box 1. Select Navi in the navigation menu.2. Configuration  Information box bottom.3. Select the type of display:• Static: the information box appears permanently. You can hide it by sliding mp.•Dynamic: the information box is hid-den automatically after approx. 10 sec-onds.4. Select the display content:• Current street name: name of the road/street on which the car is driv-ing is shown.•*Direction: the next road/street on which the car will drive is shown.* If this information is unavailable, the name of the road/street on which the car is driv-ing is shown.•Arrival time/total dist.: estimated arrival time and remaining distance are displayed.Display of points of interest1. Select Navi in the navigation menu.2. Configuration  Visible POIs on map.3. Select the categories.Map1. Select Navi in the navigation menu.2. Select Map.3. Select the perspective of the map view:• North up: two-dimensional map view with north at top.•Track up: three-dimensional map view in direction of travel.NoteIf the route guidance is inactive, Altitude/satellites is dis-played continuously in the top informa-tion box.NoteFor points of interest to be shown in the map view, Navi  Map  Show POIs must be activated.The higher the level of detail in the map view, the longer it takes for the map to be displayed.Navigation systemMBA_BA_book.book  Seite 37  Montag, 19. Mai 2008  12:41 12
384. Select additional information:• Autozoom: the displayed map section is automatically zoomed in or out ac-cording to the speed.•Show lane adviser: with route guidance active on multi-lane roads, this indicates the recommended driving lanes using blue arrows. • Show turn adviser: with route guidance active, this shows the next driving manoeuvre.•Show speedlimits: shows the per-mitted speed limits on each section of the route that are stored in the data of the map. •Show POIs: displays points of interest on the map. Other settingsChanging the language settings1. Select Navi in the navigation menu.2. Configuration  Adviser language.3. Select the language.Changing the system settings1. Select Navi in the navigation menu.2. Configuration  Distance unit.3. Select an option:• Kilometres• MilesNavigation settings1. Select Navi in the navigation menu.2. Select Mode.3. Select a route preference:• Short route: route guidance with shorter driving time, but possibly with longer distance.• Fast route: route guidance with shorter driving time, but possibly with longer distance.• Economic route: route guidance with a combination of the fastest and shortest route. ImportantThe Universal Media Interface may give the incorrect speed limit if the actual road situation differs from the data on the digital map. For this reason, you must always ob-serve applicable road and traffic con-trols and regulations during your journey.NoteThe point of interest categories can be selected at Navi  Configuration  Visible POIs on map.NoteWith Auto detect, voice output is in the set language of the audio system.Navigation systemMBA_BA_book.book  Seite 38  Montag, 19. Mai 2008  12:41 12
394. Select avoidances.Select the road types to be avoided during route guidance. The Universal Media Interface will however not avoid these street types if alternative routes take you too far out of your way or if no other roads are available.Repeating navigation announcements• Select f in the navigation menu.• In the full-screen map view, press n.• Press the ¥ button on the multifunc-tion steering wheel.The current navigation announcement is repeated.Regulating the volume of the navigation announcement1. In the full-screen map view, press n.The current navigation announcement is repeated and the volume bar ap-pears.2. During the announcement, set the vol-ume by turning ymz.The volume bar disappears automati-cally.Muting the navigation announcement• In the navigation menu, select f and press n for a longer period.• Press and hold the ¥ button on the multifunction steering wheel.The navigation announcement is muted.Restoring settings to the factory settings1. Select Navi in the navigation menu.2. Configuration  Factory defaults and confirm with Yes.Switching off the navigation system• Press and hold the L button.• Press the L button repeatedly until the navigation menu closes.NoteWith Navi  Mode  Attend TMC activated, traffic obstructions reported via the TMC traffic radio receiver are avoided automatically.M+P-03F-7170Navigation systemMBA_BA_book.book  Seite 39  Montag, 19. Mai 2008  12:41 12
40Displaying traffic obstructions1. Select TMC in the navigation menu.When route guidance is active, a route-related list of all traffic obstruc-tions on the remaining part of the route is displayed.With route guidance inactive, a list of all reported traffic obstructions is dis-played. 2. Select a traffic obstruction from the list.Further details are displayed.Detouring around other traffic obstructionsIf there is a traffic obstruction on the cur-rent route for which there is no TMC traffic message, the route can be blocked manu-ally. The Universal Media Interface calcu-lates a new route to drive around the traffic obstruction.1. Select Navi in the navigation menu.2. Select Detour.3. Select Less and More to set the length of the block.4. Select Start.The Universal Media Interface calcu-lates an alternative route.You can receive traffic information using the TMC traffic radio receiver. If there are TMC traffic messages, coloured arrows are displayed along the course of the traffic jam:• Yellow arrows: slow-moving traffic.• Red arrows: stop-and-go or stopped traffic.NoteA TMC radio station transmits free-of-charge TMC traffic reports in addition to the radio programme. The TMC traffic ra-dio receiver can receive current TMC traffic reports and take them into consid-eration for dynamic route guidance. The navigation system is thus able to re-route around a traffic jam, for example. There may be differences between the reports received and the actual traffic situation. NotesWith Navi  Mode  Attend TMC activated, traffic obstructions reported via the TMC traffic radio receiver are avoided automatically.D  -  A96D  -  A9D  -  A3M+P-03F-7171STUTTGARTA8M+P-03F-7152FM traffic radioMBA_BA_book.book  Seite 40  Montag, 19. Mai 2008  12:41 12
41General notesThe following iPod® models can be used in conjunction with the Universal Media Inter-face:•iPod® Generation 3•iPod® Generation 4•iPod® photo•iPod® mini•iPod® U2•iPod® nano•iPod® video•iPod® Classic•iPod® touch• iPhone®These models shall be referred to below as the iPod®.For instructions on how to operate the iPod® outside the vehicle, please refer to the iPod® User's Guide.It is recommended to install the most cur-rent software version on the iPod®. Please refer to the separate iPod® User's Guide for more detailed information.For optimal sound quality and to avoid vol-ume fluctuations, it is recommended that you use iTunes® when converting CDs. On the iPod®, the equalizer should be switched off. Please refer to the iPod® Us-er's Guide for more detailed information.Once the iPod® is connected, its battery is charged via the Universal Media Interface as soon as the key is turned to position 2 in the ignition lock.The iPod® is not designed for extreme temperatures which may occur inside the vehicle and may be damaged as a result. It is therefore recommended that you not leave the iPod® inside a parked vehicle. NoteThe list of compatible iPod® models cor-responds to information available when the Operating Instructions went to press. Information regarding the compatibility of new iPod® models can be obtained from your Mercedes-Benz Service Centre.NoteWith iPod® generation 3, it is not possi-ble to charge the battery via the Univer-sal Media Interface.iPod®MBA_BA_book.book  Seite 41  Montag, 19. Mai 2008  12:41 12
42Connecting the iPod®1. Open the glove compartment.2. Connect the plug connector to the iPod®, and stow the iPod® inside the glove compartment.Activating the iPod®1. Switch on the audio system and call up the base menu "Disc". (Please refer to the audio system operating instruc-tions.)2. With the CD menu active, switch first of all into the AUX menu.The last selected audio source is acti-vated.3. If necessary, change the audio source: select iPod.The iPod® is activated by the operat-ing system and continues to perform the function which was selected be-fore being connected.Adjusting the volumeThe volume can be adjusted using the thumbwheel on the Audio 20. (Please refer to the audio system operating instruc-tions.)GRisk of accidentOnly connect the iPod® when the vehicle is at a standstill. Otherwise, there is a risk that you could be distracted from traffic conditions and cause an accident.DisciPod SoundAuxUSBAudio streamingM+P-03F-7145NoteIf the message Error appears in the dis-play, the iPod® must be reset (reset function). Please refer to the separate iPod® User's Guide for more detailed in-formation.NoteAny voice announcements while route guidance is active will not interrupt play-back of the audio files.iPod®MBA_BA_book.book  Seite 42  Montag, 19. Mai 2008  12:41 12
43Operating the iPod®Once the iPod® is connected, the "click wheel" on the iPod® will not be active.Play mode1 Main screen 2 Menu barStarting playback1. Slide qm to switch from the menu bar 2 to the main screen 1.2. Press n to start playback.Fast forward/reverse• Slide and hold omp when the main screen is selected.• Press and hold the % or $ button on the multifunction steering wheel.Changing tracks•Turn ymz when the main screen is se-lected.• Slide mp when the main screen is se-lected or briefly press the % button. The next track is played.• Slide om when the main screen is se-lected or briefly press the $ button. The previous track is repeated or the track currently being played is repeated if it has been played for more than ap-prox. 5 seconds.GRisk of accidentOnly use the iPod® when traffic conditions al-low you to do so. You could otherwise be dis-tracted from traffic and cause an accident in which you and/or others could be injured.Do not wear headphones while driving the car; otherwise you may not be able to hear what is going on around you.PodcastsIPODPlaylistsiPod SoundShuffle tracks12M+P-03F-7146NoteOperation via the steering wheel buttons is only possible with the "comfort multi-function steering wheel" when the "Au-dio" submenu has been selected. (Please refer to the audio system operating in-structions.)iPod®MBA_BA_book.book  Seite 43  Montag, 19. Mai 2008  12:41 12
44OperationTurn ymz or slide omp to change a selection.Press n to confirm a selection you have made.Press the L button to switch into the next-highest menu level.iPod® menu1. Press the L button when the main screen is selected. The iPod® menu is opened.2. Select a submenu:•Artists • Albums• Genres• Tracks• Composers• Audiobooks• Podcasts• Shuffle tracks• PlaylistsSelecting an artist1. Open the Artists submenu. All the stored artists are displayed.2. Select an artist from the list.The stored albums of the selected art-ist are displayed.3. Select an album from the list.The stored tracks of the selected al-bum are displayed.4. Select a track from the list.Playback of the selected track is start-ed. The play mode appears in the dis-play.1 Track name2 Artist3 Album title4 Track length5 Expired track timeNoteSelection in the individual submenus is only possible if information on the indi-vidual tracks has been stored. (Please re-fer to the iPod® User's Guide.)NoteSelect All artists for a list of all the stored albums of all the stored artists.NoteSelect All albums for a list of all the stored tracks of all the stored albums.NoteSelect Shuffle tracks to start ran-dom playback of the tracks of the select-ed album.Time Of My LifeMacy Gray8 Mile1:17iPod Sound4:2112345M+P-03F-7147iPod®MBA_BA_book.book  Seite 44  Montag, 19. Mai 2008  12:41 12
45iPod®Selecting an album1. Open the Albums submenu. All the stored albums are displayed.2. Select an album from the list.The stored tracks of the selected al-bum are displayed.3. Select a track from the list.Playback of the selected track is start-ed. The play mode appears in the dis-play.Selecting the genre1. Open the Genres submenu. 2. Select a genre from the list.The stored artists in the selected gen-re are displayed.3. Select an artist from the list.The stored albums of the selected art-ist are displayed.4. Select an album from the list.The stored tracks of the selected al-bum are displayed.5. Select a track from the list.Playback of the selected track is start-ed. The play mode appears in the dis-play.Selecting a track1. Open the Tracks submenu. All the stored tracks are displayed.2. Select a track from the list.Playback of the selected track is start-ed. The play mode appears in the dis-play.NoteSelect All albums for a list of all the stored tracks of all the stored albums.NoteSelect Shuffle tracks to start ran-dom playback of the tracks of the select-ed album.NoteSelect All genres for a list of all the stored artists.NoteSelect All artists for a list of all the stored albums of all the stored artists.NoteSelect All albums for a list of all the stored tracks of all the stored albums.NoteSelect Shuffle tracks to start ran-dom playback of the tracks of the select-ed album.NoteSelect Shuffle tracks to start ran-dom playback of all tracks.MBA_BA_book.book  Seite 45  Montag, 19. Mai 2008  12:41 12
46Selecting a composer1. Open the Composers submenu. All the stored composers are dis-played.2. Select a composer from the list.The stored albums of the selected composer are displayed.3. Select an album from the list.The stored tracks of the selected al-bum are displayed.4. Select a track from the list.Playback of the selected track is start-ed. The play mode appears in the dis-play.Selecting an audiobook1. Open the Audiobooks submenu. All the stored audiobooks are dis-played.2. Select an audiobook from the list.Playback of the selected audiobook is started. The play mode appears in the display.Selecting podcasts1. Open the Podcasts submenu. All the stored tracks are displayed.2. Select a track from the list.Playback of the selected track is start-ed. The play mode appears in the dis-play.Random track playback1. Open the Shuffle tracks sub-menu. Random playback of all the stored tracks is started. The play mode ap-pears in the display.Selecting a playlist1. Open the Playlists submenu. All the stored playlists are displayed.2. Select a playlist from the list.Playback of the selected list is started. The play mode appears in the display.NoteSelect All composers for a list of all the stored albums of all the stored com-posers.NoteSelect All albums for a list of all the stored tracks of all the stored albums.NoteSelect Shuffle tracks to start ran-dom playback of the tracks of the select-ed album.NoteIt is not possible to create new playlists using the Universal Media Interface.iPod®MBA_BA_book.book  Seite 46  Montag, 19. Mai 2008  12:41 12
47USB (mp3 player)General notesIn the case of mass storage devices with built-in batteries, there can be function re-strictions when the battery is completely discharged.Activating the mass storage device1. Switch on the audio system and call up the base menu "Disc". (Please refer to the audio system operating instruc-tions.)2. With the CD menu active, switch first of all into the AUX menu.The last selected audio source is acti-vated.3. If necessary, change the audio source: select USB.The folder structure of the connected mass storage device is displayed.4. Select the file folder.The stored audio file of the selected folder are displayed in alphabetical or-der. 5. Select an mp3 file from the list.Playback is started. The play mode ap-pears in the display.OperationOperation and the play mode are the same as on the iPod®. (See page 43.)GRisk of accidentOnly connect the mass storage device when the vehicle is at a standstill. Otherwise, there is a risk that you could be distracted from traffic conditions and cause an accident.NoteFiles stored in the formats .mp3 and .ogg are displayed in the folder structure. Playback is restricted to mp3 files. NoteUp to 1000 audio files per file folder are displayed.NoteIf the mass storage device is disconnect-ed from the Universal Media Interface during playback or playback is interrupt-ed by switching to another audio source, the current playback position of the se-lected mp3 file is stored in the Universal Media Interface. The next time the mass storage device (with unchanged content) is selected or the system is switched to USB, playback of the last selected mp3 file is continued automatically. MBA_BA_book.book  Seite 47  Montag, 19. Mai 2008  12:41 12
48Audio streamingPairing the audio device with the Universal Media InterfaceThe Universal Media Interface and audio device must be paired before they can be used together. This can be done on either the audio device or the Universal Media In-terface.After they have been paired, the two devic-es are automatically connected within the vehicle whenever they are switched on.Pairing on the Universal Media Interface1. Switch on the audio system and call up the base menu "Disc". (Please refer to the audio system operating instruc-tions.)2. With the CD menu active, switch first of all into the AUX menu.The last selected audio source is acti-vated.3. If necessary, change the audio source: select Audio Streaming.4. Enable the Bluetooth® function of the audio device and make it visible to oth-er devices. (Please refer to the operat-ing instructions for the audio device.)5. Select Search for BT devices.All Bluetooth® audio streaming-com-patible devices are shown.6. Select the desired audio device for connection setup.7. Enter the PIN of the audio device on the Universal Media Interface and con-firm with OK. (Please refer to the oper-ating instructions for the audio device.)The paired Bluetooth® device that is compatible with audio streaming is ac-tivated by the operating system and playback of the existing audio files is started.Pairing on the audio device1. Switch on the audio system and call up the base menu "Disc". (Please refer to the audio system operating instruc-tions.)2. With the CD menu active, switch first of all into the AUX menu.The last selected audio source is acti-vated.3. If necessary, change the audio source: select Audio Streaming.GRisk of accidentOnly pair the Universal Media Interface with the audio device with the vehicle at a stand-still. Otherwise, there is a risk that you could be distracted from traffic conditions and cause an accident.NotesCorresponding settings may need to be configured on the audio device being used for the pairing process and for au-tomatic connection to the Universal Me-dia Interface. (Please refer to the audio device operating instructions.)For successful pairing, the audio device and Universal Media Interface must be switched on and Bluetooth® must be en-abled. The audio device to be paired must be in the vehicle.NoteIf no PIN is specified for the audio device, a combination of numbers of your choice can be entered on the Universal Media Interface. This must then be entered on the audio device.MBA_BA_book.book  Seite 48  Montag, 19. Mai 2008  12:41 12
494. Select Device visible.The Universal Media Interface is avail-able for approx. 5 minutes for estab-lishment of a Bluetooth® connection and can be detected by the audio de-vice.5. Activate the Bluetooth® function of the audio device. (Please refer to the audio device operating instructions.)6. On the audio device, start the search for other Bluetooth® devices. (Please refer to the audio device operating in-structions.)All available Bluetooth®-capable de-vices are shown.7. Select UMI from the list of devices for connection setup.8. First enter the PIN you have chosen the audio device, then on the Universal Media Interface, and confirm with OK.The paired Bluetooth® device that is compatible with audio streaming is ac-tivated by the operating system and playback of the existing audio files is started.Selecting a paired audio device1. Switch on the audio system and call up the base menu "Disc". (Please refer to the audio system operating instruc-tions.)2. With the CD menu active, switch first of all into the AUX menu.The last selected audio source is acti-vated.3. If necessary, change the audio source: select Audio Streaming.4. Enable the Bluetooth® function of the paired audio device.5. Select the desired audio device from the list Paired devices.The paired Bluetooth® device that is compatible with audio streaming is ac-tivated by the operating system and playback of the existing audio files is started.Operation•Turn ymz when the main screen is se-lected.• Slide mp when the main screen is se-lected or briefly press the % button. The next track is played.• Slide om when the main screen is se-lected or briefly press the $ button. The previous track is repeated or the track currently being played is repeated if it has been played for more than ap-prox. 5 seconds.NotesA maximum of 10 audio devices can be paired with the Universal Media Inter-face. If another audio device (an 11th de-vice) is paired with the Universal Media Interface, the first audio device that was paired is deleted.For correct setup of a Bluetooth® con-nection between the Universal Media In-terface and an audio device, neither the Universal Media Interface nor the select-ed audio device may be simultaneously connected to another device via Blue-tooth®.Audio streamingMBA_BA_book.book  Seite 49  Montag, 19. Mai 2008  12:41 12
50MBA_BA_book.book  Seite 50  Montag, 19. Mai 2008  12:41 12

Navigation menu