VALOR TPMS203-RD TPMS-RD User Manual Y5DTPMS203 RD
VALOR HONG KONG COMPANY LIMITED TPMS-RD Y5DTPMS203 RD
VALOR >
Y5DTPMS203-RD_user manual.rev2
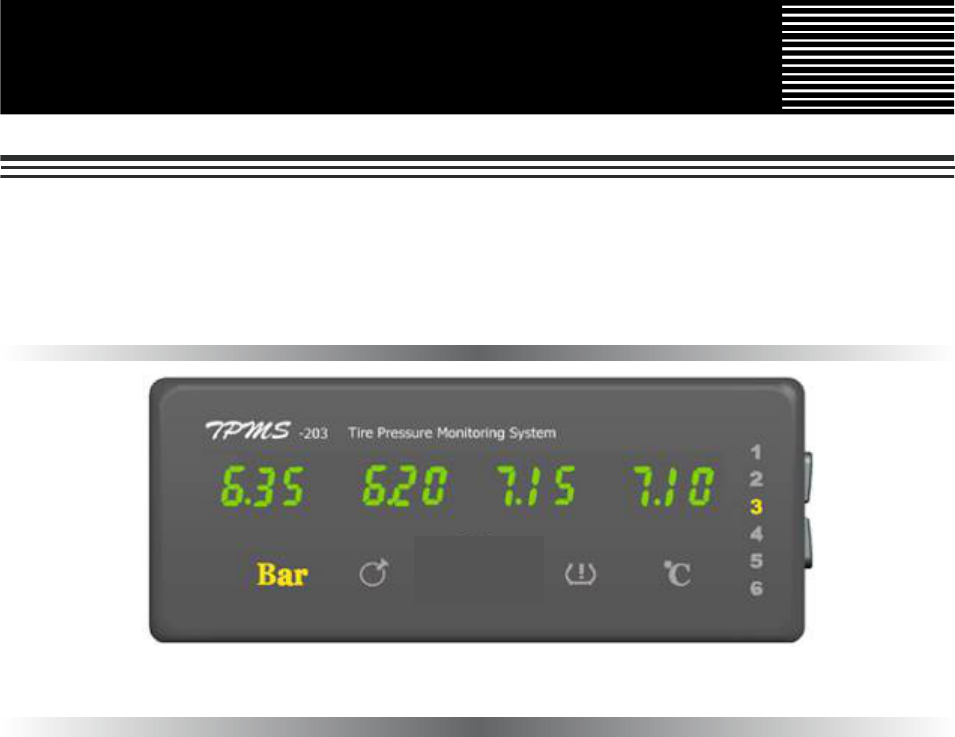
AUTO GENUINE PRODUCTS
Application Models: Buses & Trucks & Fleets & OTR
● It is highly appreciated to buy the genuine products of VALOR.
● Please read this user’s manual carefully to make sure correct operation
● Do not use other ways of operating that is not included in this manual
User’s Manual for TPMS-203 Display
The Third Edition
Copyright 2010 reserved
VALOR HONG KONG COMPANY LIMITED reserves the right to change the contents of
this manual at any time and without notice. The information contained in this manual is
proprietary and must not be reproduced without prior written consent from VALOR HONG
KONG COMPANY LIMITED.
TABLE OF CONTENTS
1.1 INTEGRATED DISPLAY .............................................................................................................................................. 2
1.2 GETTING STARTED ................................................................................................................................................... 3
1.3 CHECKING TYRE CONDITIONS ................................................................................................................................. 4
1.4 TIME SETTING .......................................................................................................................................................... 4
1.5 LOW PRESSURE WARNING ...................................................................................................................................... 5
1.6 HIGH PRESSURE WARNING ..................................................................................................................................... 5
1.7 LEAKAGE WARNING ................................................................................................................................................ 6
1.8 HIGH TEMPERATURE WARNING .............................................................................................................................. 6
1.9 CHANGE ID MODULE POSITION .............................................................................................................................. 6
2.1 TROUBLE SHOOTING ............................................................................................................................................... 8
2.2 PARAMETERS OF THE PRODUCTS .......................................................................................................................... 9
2.3 FCC'S AUTHENTICATION ANNOUNCEMENT ............................................................................................................. 9
2.4 EUROPEAN REGULATIONS ANNOUNCEMENTS ....................................................................................................... 10
2.5 CE DIRECTIVE ANNOUNCEMENT ............................................................................................................................ 10
2
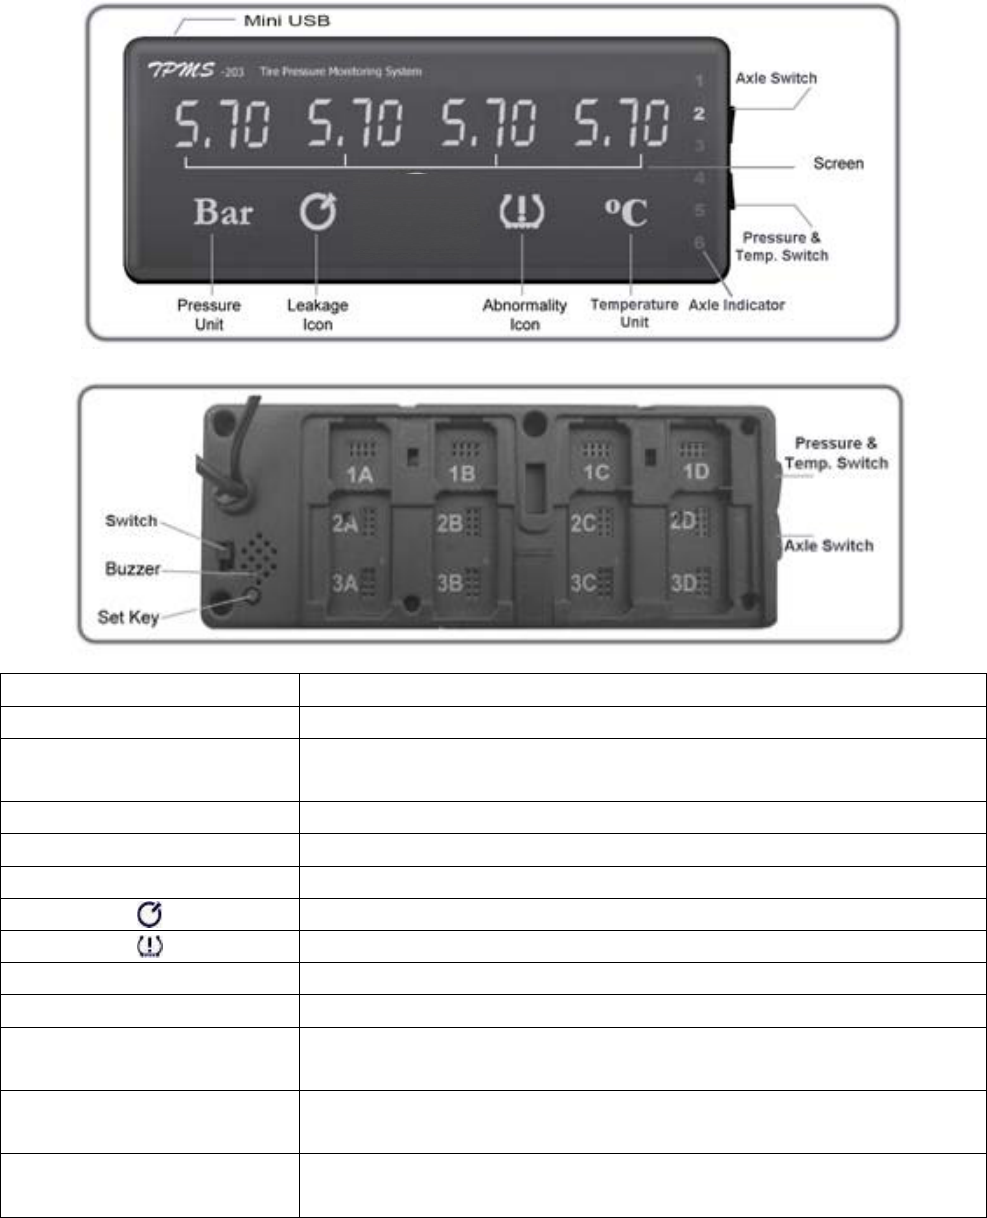
1.1 Integrated Display
The display monitors pressure and temperature information of each tyre in a visual form
continuously. It can provide 6 axles up to 24 tyres’ data as well as enabling baseline
pressure adjustment to suit different tyres.
Controls and Indicators Functions
Axle Switch Press it to circularly show the data of each axle
Pressure & Temperature
Switch
Press it to scroll through the pressure interface and
temperature interface
Axle Indicator Display circularly shows the data of six axles
Bar Pressure unit
℃ Temperature unit
Leakage icon
Abnormality icon: low / high pressure and high temperature
Switch Turn on or off the display
Buzzer Give audible alert when the tyre is abnormal
Set Key Press it to set baseline pressures of truck according to your
tyres’ cold inflation pressure
ID Module Slot ID modules are used to register Transmitters’ ID code into the
display that will recognize wheel positions
Mini USB Port
To download data from display via USB cable to U-disk.
3
1.2 Getting Started
--- For tractor with trailer: turn on the integrated display and trailer ID box, register trailer
into integrated display (see 4.1 in this manual) and set the baseline pressure for each axle.
1.2.1 Set the Baseline Pressure of Tractor
The baseline pressure has been set in the factory at 6Bar (87PSI) for all wheel positions.
We recommend that you set the baseline pressure at the same pressure as standard cold
inflation pressure recommended by tire manufacturer.
1.2.1.1 Inflate all tires’ pressures to their standard cold inflation pressure.
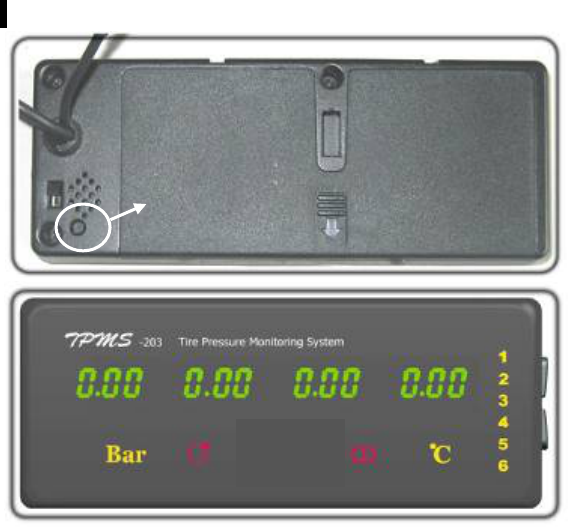
1.2.1.2 Find the set key on the back of display. Press the set key briefly to check the
baseline pressure set by manufacturer (6Bar/87PSI).
1.2.1.3 Press the SET KEY for 4 seconds, you will hear sound “beep”, all backlights will be
on and the screens will show “000”. This means you succeed in deleting the default
baseline pressure.
1.2.1.4 The system will exit setting mode automatically after receiving signal from all
transmitters.
1.2.1.5 The display will refresh the tire data after receiving signal. The first pressure value
received will be saved as new baseline pressure automatically.
After the display has received all transmitters’ pressure, then you can press the SET
KEY of display briefly to look up all tires’ baseline pressure.
--- For bus / straight truck / OTR: turn on the integrated display and set the baseline
pressure for each axle (Just the same as tractor).
--- The screen will remain “000” until the data from its transmitter is received. After data
from all transmitters is received the display will be in the state shown until an alert or
warning condition is detected.
Set Key
4
1.3 Checking Tyre Conditions
--- After data from all transmitters is received, the display will show each axle’s data for 5
seconds and automatically shift to next axle when all tyres are normal. You can also press
Axle Switch to look up tyre data quickly.
--- The display just circularly shows the axles with abnormality when there are abnormal
tyres.
--- If the pressure warning and temperature warning exist in the same axle, the display just
show the pressure warning of this axle.
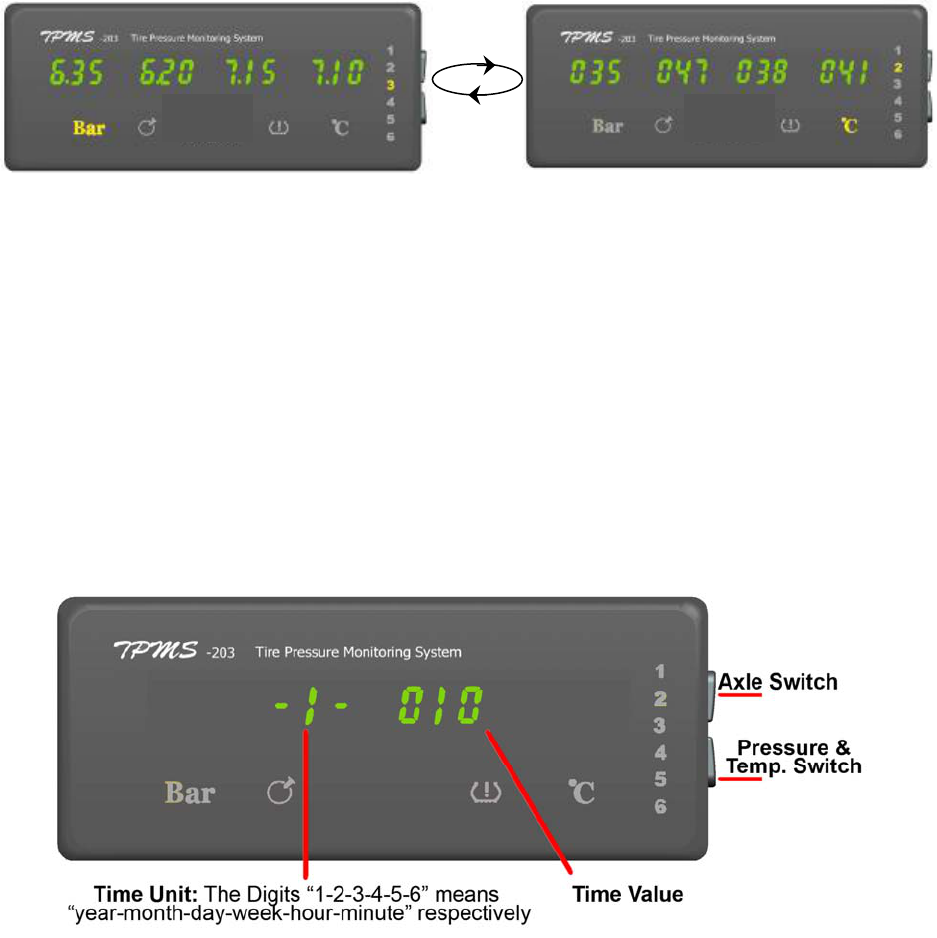
--- Press “Pressure & Temperature Switch” to scroll through the pressure interface and
temperature interface.
Pressure Interface Temperature Interface
--- No data received from the tyre in 20 minutes is shown as dashes ”---”.
1.4 Time Setting
Manage the tyre data for fleet owner is very important, this system can store more than
8000 data. If you need to download them into your computer, please contact us or our local
distributor.
We have set the time in Beijing Time, so you should reset it in your time.
1.4.1 Press the Axle Switch for 8 seconds to get into Time Setting Mode and you will hear
sound “DI”.
1.4.2 Press the Axle Switch swiftly to look up the time “year-month-day-week-hour-minute”
value circularly. The following time is 22:57, Tuesday, May 25, 2010.
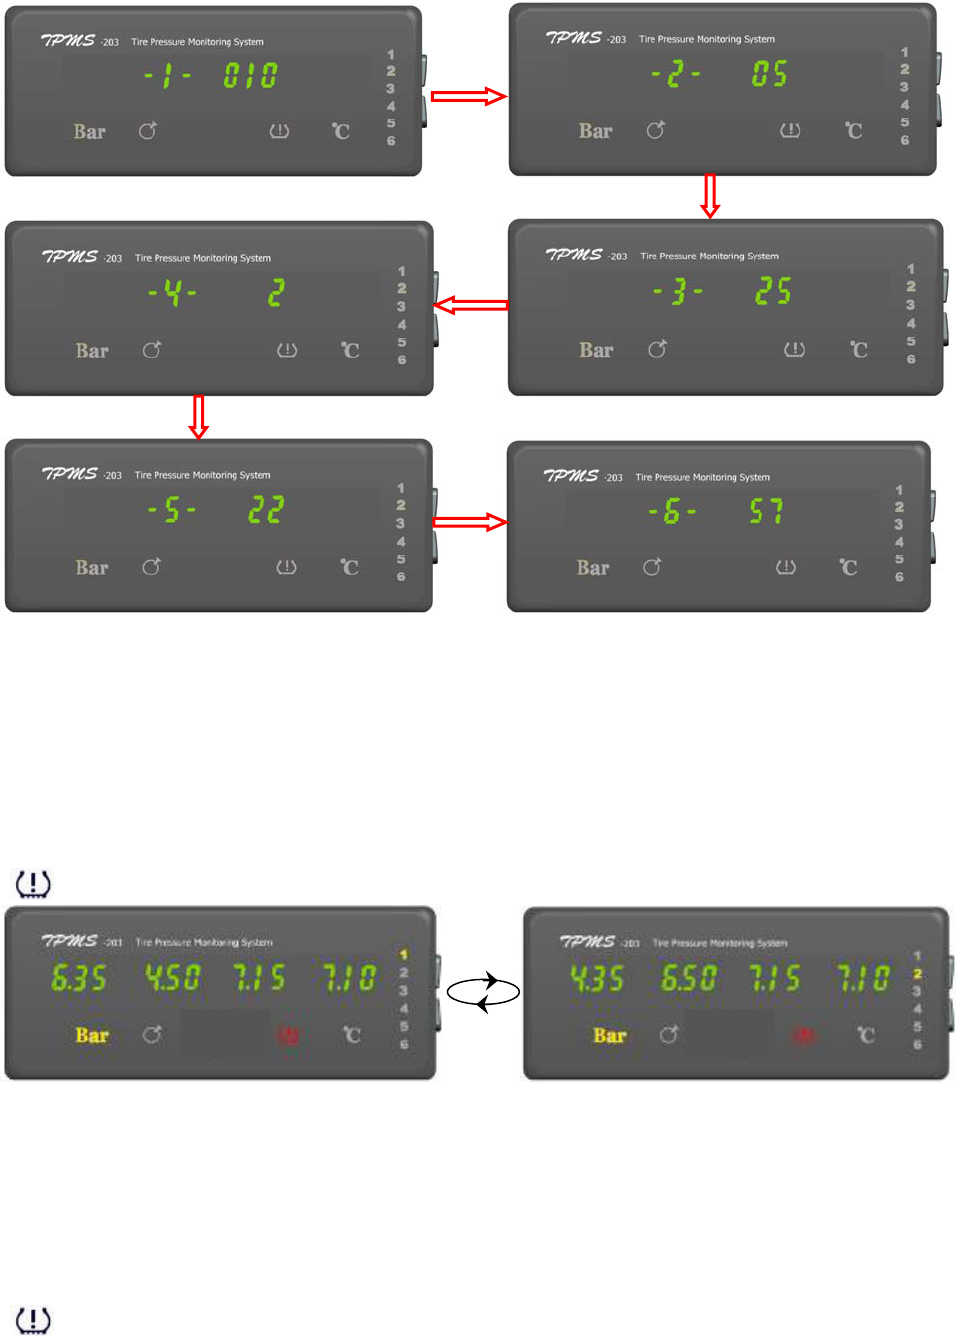
5
1.4.3 Press the Pressure & Temp. Switch to change the time value.
1.4.4 You must press the Axle Switch for 8 seconds to exit time setting mode, if not, the
time setting will not come into effect. A sound “DI” will follow the normally exit.
1.5 Low Pressure Warning
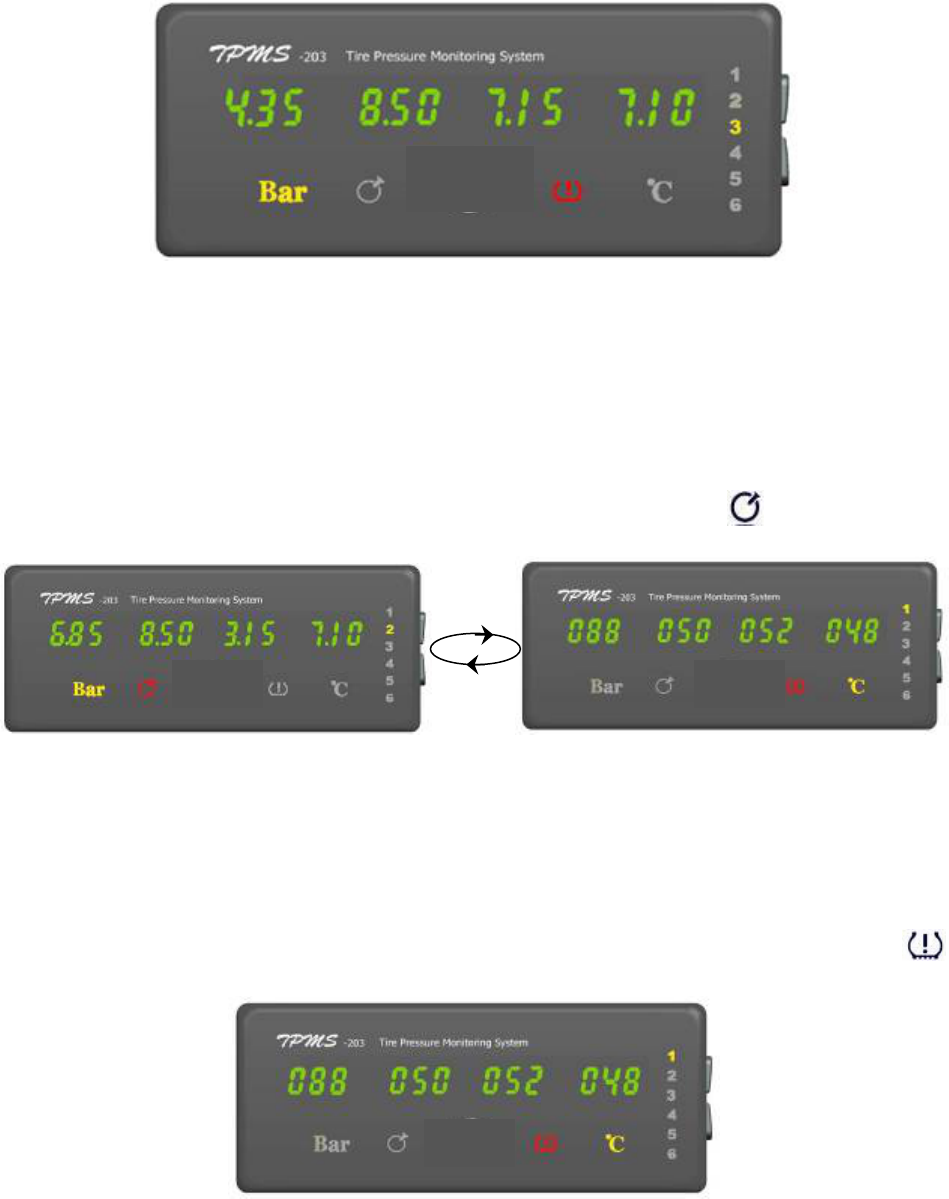
When current pressure in the tyre is 20% lower than baseline pressure: ①Display shows
the pressure of axle with abnormal tyre; ②Warning sound “Di-Di”; ③Abnormality icon
“ ” appears; ④The digits of abnormal tyre position twinkle.
The figure above shows “1B” tyre and ”2A” tyre are under-inflated. The display just shows
axle1 and axle2 automatically and circularly until the problems are corrected.
1.6 High Pressure Warning
When current pressure in the tyre is 30% higher than baseline pressure: ①Display shows
the pressure of axle with abnormal tyre; ②Warning sound “Di-Di”; ③Abnormality icon
“ ” appears; ④The digits of abnormal tyre position twinkle.
6
The figure above shows “3B” tyre is over-inflated and ”3A” tyre is under-inflated. The
display just shows axle3 until the problems are corrected.
1.7 Leakage Warning
If over 0.33 Bar / 4.78PSI pressure loss in 16 seconds: ①Display shows the pressure of
axle with abnormal tyre; ②Warning sound “Di-Di”; ③Leakage icon “ ” appears; ④The
digits of abnormal tyre position twinkle.
The figure above shows “2C” tyre is leaking and “1A” tyre is over-hot. The display just
shows axle1 and axle2 automatically and circularly until the problems are corrected.
1.8 High Temperature Warning
When temperature inside tyre is higher than 80℃ (176℉): ①Display shows the
temperature of axle with abnormal tyre; ②Warning sound “Di-Di”; ③Abnormality icon “ ”
appears; ④The digits of abnormal tyre position twinkle.
The figure above shows “1A” tyre is over-hot. The display just shows axle1 until the
problem is corrected.
1.9 Change ID Module Position
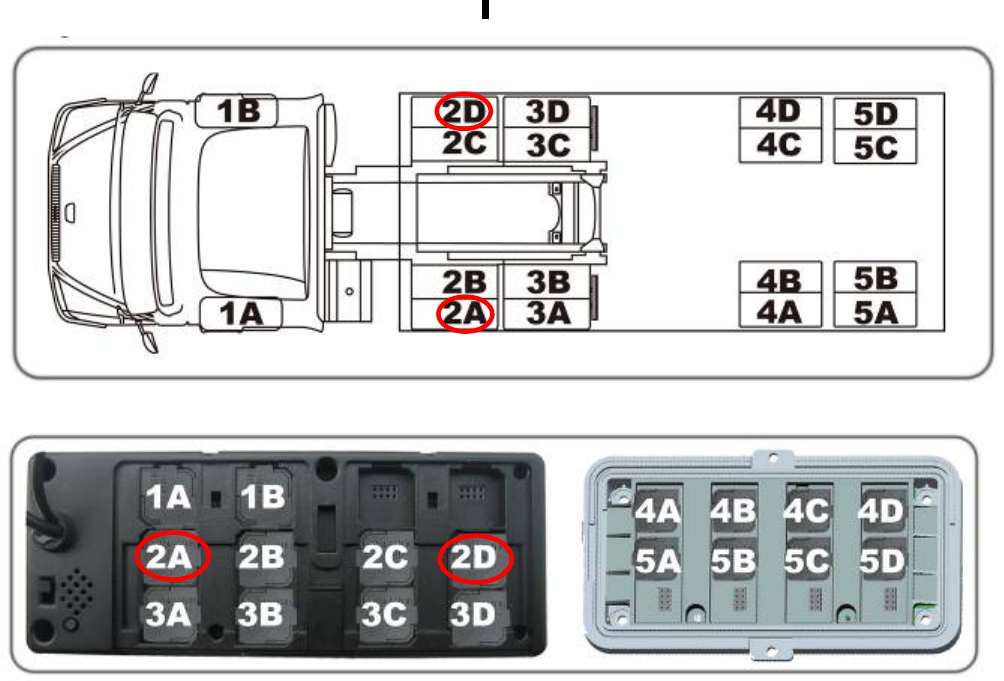
Thanks to our unique ID module technology, when you change wheel position later on, you
don’t need any learn or relearn / register tool. Just change corresponding ID modules’
position and restart the display and trailer ID box. Take 18-wheel vehicle for example.
7
Rotate the wheels in position “2A” and “2D”
Change their corresponding ID modules’ position, restart display and trailer ID box

8
2.1 Trouble Shooting
Problems Possible Reasons Solutions
Both pressure
value and
temperature value
of all tyres are
"000" shown on the
display
Problems of antenna
connection Check antenna connection
The antenna is broken (all
transmitters are well) Replace antenna
There is something wrong
with display
Use a pair of transmitter & ID module
and TPMS Smart Tool to confirm. If it
doesn’t work, replace it
The pressure and
temperature values
are ”000” at one or
more transmitter
locations
(After start the
display)
Problem of transmitter Use TPMS Smart Tool to check it
Problems of ID module
Pull out the ID module and re-plug in,
then restart the display.
If problem still exist, do next step
Pull out the ID module and plug in other
ID module seat, then restart the display.
If problem still exist, replace the ID
module.
The pressure value
is “000”, but
temperature value
is normal.
Air hole of transmitter is
air-logged Replace the transmitter
No values shown
on the display
and all icon
indicators don’t
shine
Display is turned off Turn on switch on the back of display
Power cord is not properly
installed Check power cord connection
The display is burnt out Replace display
No values shown
on the display, but
icon indicator
shines
Without ID module in the seat Plug in ID module
Dash “- - -”shows
on the display
(When the data
transmission was
interrupted)
System failure Restart the system
Surrounding interference Leave the surrounding
Problem of transmitter Use TPMS Smart Tool to check it
Problems of ID module
Pull out the ID module and re-plug in,
then restart the system. If problem still
exist, do next step.
Pull out the ID module and plug in other ID
module seat, then restart the system. If
problem still exist, replace the ID module.
All data does not
refresh System failure Restart the system and run your vehicle
The display
continues to

9
2.2 Parameters of The Products
Display
Power Consumption: 1300 mW (Regular); 1680mW (Max)
Power Supply: DC 12/24 Volt
Weight: 231g (8.15 oz.)
Dimensions: 15.5 x 6.2 x 2.3 cm (6.1 x 2.4 x 0.9 inch)
Operating Temperature Range: -40°C to 85°C (-40°F to 185°F)
Pressure Resolution: ±0.01Bar (0.1PSI)
Temperature Resolution: 1°C (1°F)
2.3 FCC's authentication announcement
This device complies with Part 15 of the FCC Rules. Operation is subject to the following
two conditions: (1) this device may not cause harmful interference, and (2) this device must
accept any interference received, including interference that may cause undesired
operation.
This equipment has been tested and found to comply with the limits for a Class B digital
device, pursuant to Part 15 of the FCC Rules. These limits are designed to provide
reasonable protection against harmful interference in a residential installation. This
equipment generates uses and can radiate radio frequency energy and, if not installed and
show
incomprehensible
codes
Values are not
being received at
a tyre location
after a transmitter
was replaced or a
spare tyre was
installed.
The ID number for the
transmitter at that location is
not programmed into the
receiver
Replace the old ID module with a new
one came with the new transmitter.
Restart the system and set baseline
pressure.
(High or low)
Pressure
Warning is
activated at more
or all
transmitter
locations after the
installation is
complete
Didn’t setup the baseline
pressure
Setup the baseline pressure for each
axle
The buzzer is
continuously
chirping and
nothing shown on
the display
The display does not work Replace the display
10
used in accordance with the instructions, may cause harmful interference to radio
communications. However, there is no guarantee that interference will not occur in a
particular installation. You can test that if this equipment does cause harmful interference to
radio or television reception by turning the equipment off and on.
Caution content: changes or modifications not expressly approved by the party responsible
for compliance could void the user's authority to operate the equipment.
2.4 European regulations announcements
This device complies with all European Electromagnetic compatibility regulations (95/54/EC
and EN300 220-1). The equipment has been tested and found to comply with the above
regulations, and in addition it meets the requirements for low powered
transmitters/receivers as defined by the relevant radio approval authority. The regulations
are designed to provide reasonable protection against harmful interference or susceptibility.
2.5 CE directive announcement
This device complies with the essential protection requirements of Council Directive
89/336/EEC on the approximation of the law of the Member states relating to
electromagnetic compatibility. Operation is subject to the following two conditions: (1) this
device may not cause harmful interference, and (2) this device can accept any interference
received, including interference that may cause undesired operation.