VIKING RANGE CORP. Grill, Gas Manual L0803656
User Manual: VIKING VIKING RANGE CORP. Grill, Gas Manual VIKING RANGE CORP. Grill, Gas Owner's Manual, VIKING RANGE CORP. Grill, Gas installation guides
Open the PDF directly: View PDF ![]() .
.
Page Count: 17
_LR_
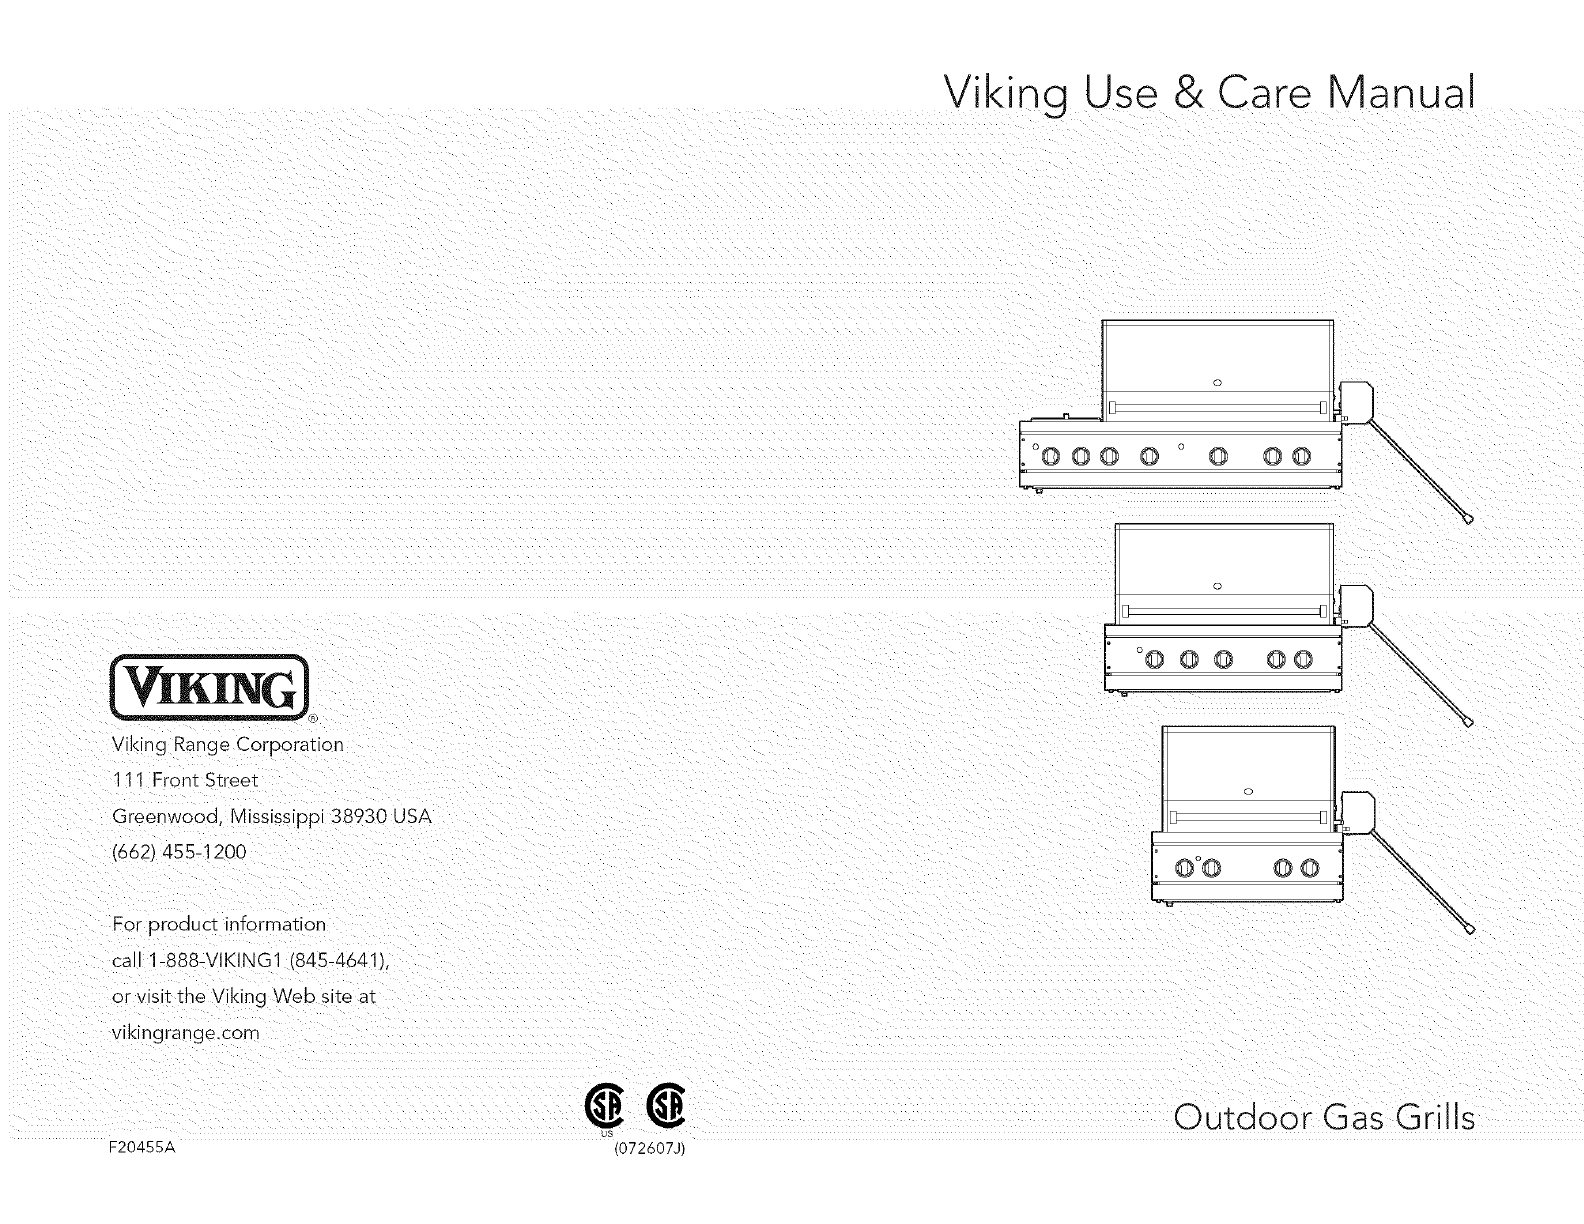
Viking Range Corporation
111 Front Stree_
Greenwood, Mississippi 38930 USA
(662) 455-1200
For product informatior
call 1-888-VIKING1 (845-4641),
or visit the Viking Web site at
vikingrange.com
Viking Use & Care ManuaJ
@o @ @@
o@ @@ @@
@o@ @ @
Outdoor Gas Grills
us
F20455A (072607J)
Congratulations
Congratulations ana welcome to tne elite world of Vildng
ownersr iD. We node you will enjoy ana appreciate the care
ana attention we nave out into every detail of your new,
state-of-the-art orilh
Your Vildng aDoli_nce is designea to offer years of reliable
service. This use and Care Guide wi orovide you with the
information you neea _o Decc _ne familiar with your
refrigerators care ana ooeration.
Your com3lete satisfaction is our ultimate goal. if you have
any questions or comments about this product, please
con_act_neaealerfromwnomyou purchased it orcor[act
our Consumer SUPPOrt Center at 1-888-VIKING1.
Ne aDDreciate your cnoice of a Vii<in _ g'ill and qoDe _na_ you
will again select our products for your otner major aDDliance
neeos.
For more information aDouI the com,alete ana growing
selection of Vildng oroaucts, contact your dealer or visit us
online at vildngrange.com.
Warnings
To reduce the risk of fire, electric shock, or injury, read and
follow these basic precautions before operating your gas grill
ar side burners.
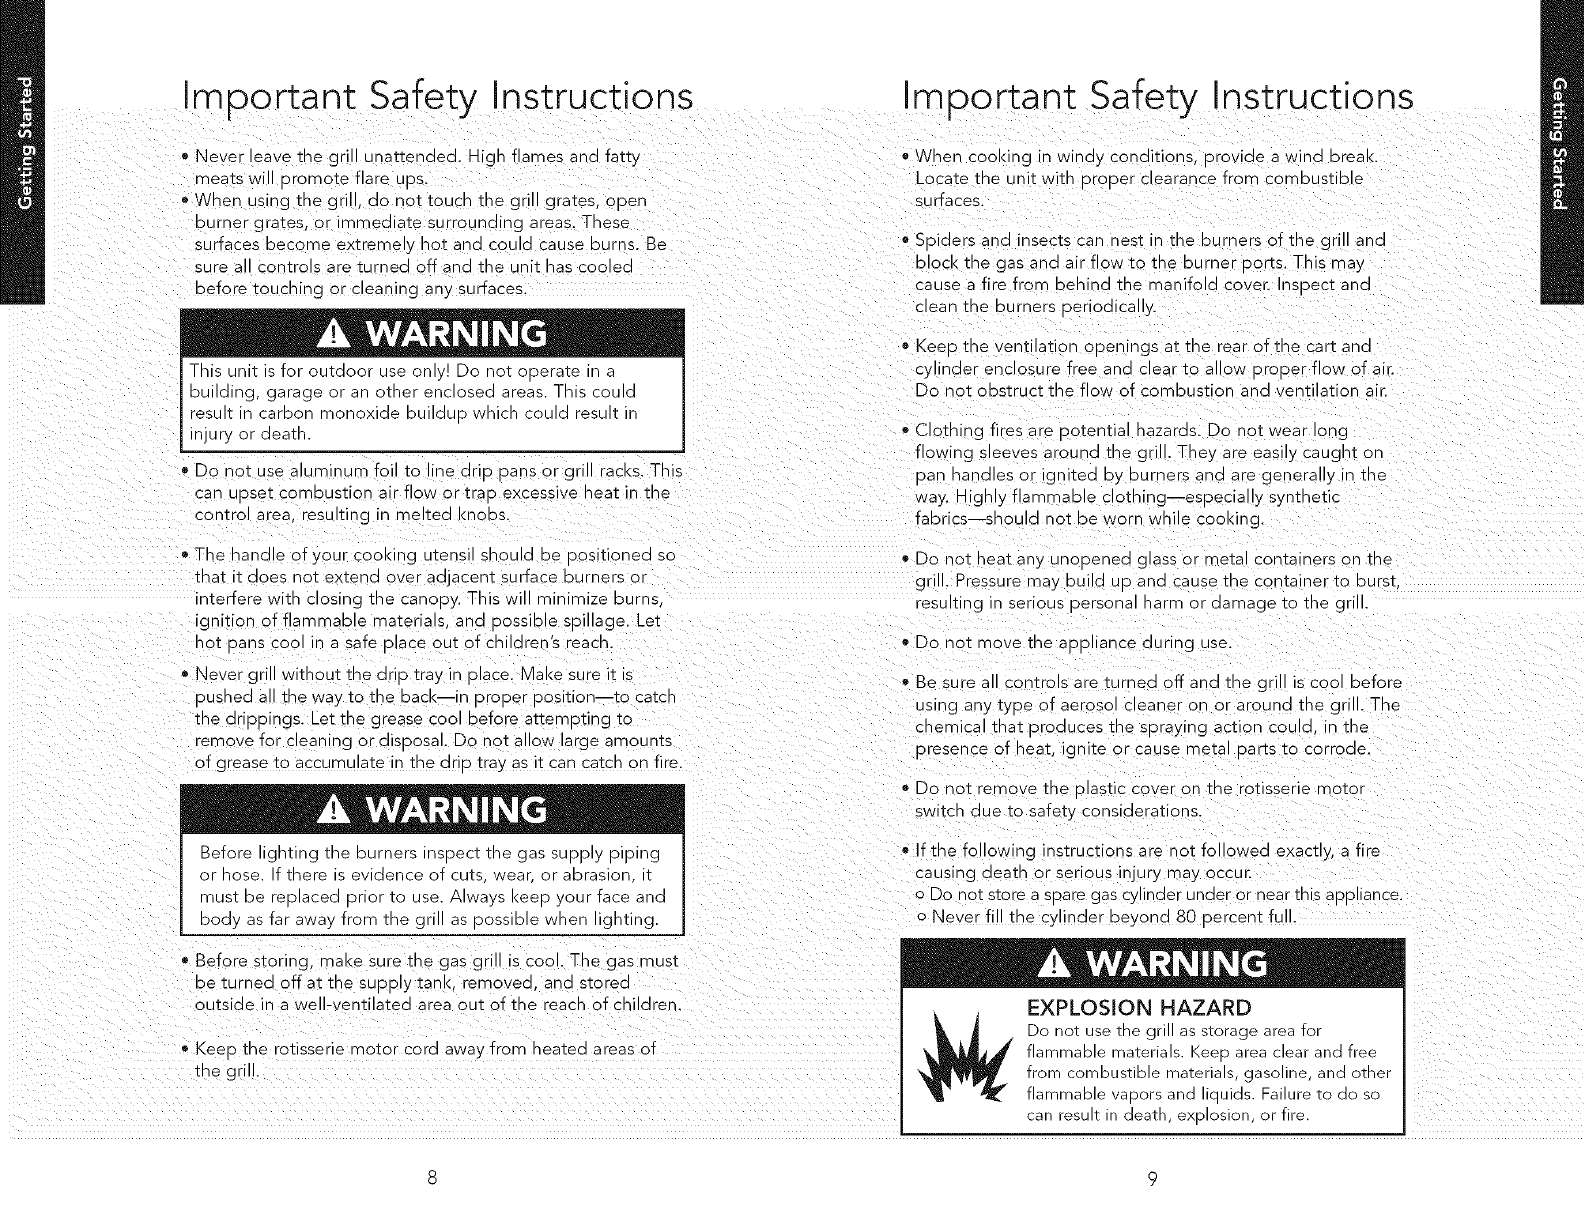
EXPLOSION HAZARD
_j_ o not use the grill as storage area for
flammable materials. Keep area clear and free
from combustible materials, gasoline, and other
flammable vapors and liquids. Failure to do
so can result in death, explosion, or fire.
3efore lighting the burners inspect the gas supply piping
ar nose. If there is evidence of cuts, wear, or abrasion, it must
ae reDlacecl prior to use. Always keep your face and body as
far awav from the grill as possible when lighting.
ELECTRICAL SHOCK HAZARD
This unit is equipped with a grounding plug
for your protection against shock hazard and
should be plugged directly into a properly
grounded receptacle. Do not cut or remove
the 9rounding prong from this plu 9.
Keep the rotisserie motor electric cord away from the
heated surfaces of the grill.
Do not use flammable cleaning materials. Use a flashlight to
nsDec_ _ne burner inlet to ensure it is not blocked. If
abstructions can be seen, use a metal wire coat hanger that
aas been straightened out. Shake out any debris through the
air shutter.
i i
i ii i ili
i i
_iillI i_ i
_ii i i I i_ i
_i i I ii iii ii
iI
2 3
:_iiiii i il
!iili !!_iif! i I Sp,dersand,nsectscannest,ntheb°rners/ventur,t°besof
this or any other grill, and cause the gas to flow from the front
of the burner. This is a very dangerous condition that can
cause a fire to occur behind the valve panel, thereby damaging
the grill and making it unsafe to operate.
Handle the smoker box with care. The cover becomes extremely
hot when being used. Use sturdy, properly insulated gloves or
dry potholders.
) ;):// U ?f/i:IYi (l"Y°UshutSme"gaSo_gastotheapp'iance
2. Extinguish any open flames.
3Open,d
This unit is for outdoor use only! Do not operate in a 4. If odor continues, immediately call your gas supplier.
building, garage or an other enclosed areas. This could result
death.incarbon monoxide buildup which could result in injury or
I 1. Do not store or use gasoline or other flammable vapors and
I • A , i liquids in the vicinity of this or any other appliance.
., - w w , m I 2. Do not store any propane/butane (G31-G30) cylinder I
m that is not connected for use in the vicinity of this or any
g g g I I"
othera hance
•p • p P [____J
a owanyaccumuatedgastodss ate Kee as raybotteof PP "
soapy water near the gas supply valve and checl< the
connections for gas leaks before each use.
TO PROTECT AGAINST ELECTRIC SHOCK
1. Do not immerse cord or plugs in water or other liquids.
The side burner cover may be hot ifthe grill burners are in
operation. 2. Unplug from outlet when not in use and before cleaning.
3. Do not operate any outdoor appliancewith a damaged
cord, plug or after the appliance has malfunctioned. Contact
I • A , the manufacturer for repair.
:- w w ' 4. Do not let the cord hang over the edge or touch hot
. surfaces
Do not use a metal kntfe or any other metal tool to scrape __
stainless steel parts.
Do not permit citrus or tomato juice to remain on stainless
steel surfaces, as citric acid will permanently discolor stainless
steeh Wipe up any spills immediately.
Do not use abrasive cleaners, steel wool pads, or abrasive
cloths on stainless steel, painted parts, or brass parts.
Do not use brass cleaners on tile brass option parts. They
4 5
Table of Contents Important Safety Instructions
Getting Started
moortant Safet_ nstructions 7
Eeatu res 10
Before Lighting Gri 11
Using Grill with Outdoor Approved Hoods 11
Operation
Lightir g Grill 12
Using G _ I 6
Cooldng Tids 17
Grilling Tips 20
SmcKer Burner and Smoker Box 21
Rotisserie 22
Your unit should De properly installed and connectea to tne gas
for whicl _ t was designed. Do not use cnarcoal. WOOd cn E)s.or
otner material in your grill. The smoker tray is the only area
aesic qea to nolo WOOd chios or other smoke flavor enhancers.
Have the technician sno_ you tne location of the gas shut-off
valve so you can shut off the gas suoDly in an emergency, f you
smel gas. the connections are not oropeRy sealed or you ma_
qave a hole in tne gas sc 9ply pipe or hose. Determining wnere
tne gas leak is should De eft to a aualifiecl technician. Warrant)
service must De oerformecl by an autnorized service agency.
Product Care
Cleaning ana Maintenance 24
Battery Reolacement 29
TrouDlesnooting 31
Service Informatior 32
Warranty 33
Children should not be left alone or JnaEenaea n an area
wnere tne gas grill is being used. Never allow children to sit
stano or Play on or around tne grill at any time. Do not store
terns of interest to children around tne grill. Never allow
children to crawl inside tne car or masonry enclosure
use a covered nand wren opening [ne hOOd and ao so SlOWlytO
OW neat and steam to escaoe. To avoid burns wnen cooldng
use ionc qandled BBQ tools. Never lean over an open grill.
-use sturdy, oroperly insulated gloves or potholclers. Dish toweB
or other substitutes can become entangled, causing burns. Use
ury potnolaers: wet Dotr oloers create steam and cause burns.
Keeo ootnolaers away from c 3en flames w _ er lifting or moving
Jtensils. Do not toucr Domons of the grill rack or burner 9rate
with ootnolders untl ]:ne no_ surfaces nave COOled.
• Only cerEain types of c ass. neat-Drool glass ceram c.
eartnenware, or otner g azeo utensils are suitable for grill use.
These types of materials may break with suaaen temperature
cnanges, use on, on low or medium neat settings.
• Select the correct Dan size for the burner. Be sure the Dan
is large enough to avoid boilovers or soillovers. This wi
save cleaning, and orevent accumulations of food, heavy
solattering, or soillovers that car catcn fire.
6 7
Important Safety Instructions Important Safety Instructions
- Neve- eave the grill unattended. Hich flames and faE_
meats wi oromote flare ups.
• When _.sing the grill, do not toucn _he grill grates, open
burner grates, or immediate surroundinc areas. TP ese
surfaces become extreme } not ano COUlC cause burns. Be
sure a con[rols are T_urned off and the unit nas COOleO
before touching or cleaning any surfaces.
o When cooking in windy conditions, provide a Wlqa breaK.
Loca_e the unit with DroDer clearance frorr :ombustiL le
Surfaces
eSDidersana nsec:scan nes_ ;- _ne Durners of the grill and
3lOCK me gas and air flow to the burner oorts. This may
cause a fire from behind the manifolo cover, respect ana
clean tne burners deriodica ..
This Jnit is for outdoor use Dr j. Do no_ operate -
- I<eeD me ventilation ooenings at tne rear of the cart ana
cylinder enclose re free ana c ear to allow proper flow of ain
Do not ODsIruct the flow of comb Jst ar and ventilati Dn air.
njury or aem:n
Do no_ use aluminum foil to ;-e drip pans or grill racks. This
can upset combusti Dn air flow or trap excessive heat in tne
control area, resulting in melted Knobs.
- Clothing fires are ootentia hazards. Do not wear long
flowin 9 sleeves around tne grill. -hey are easily caugn_ on
9an nandles or ignited oy burners and are generally in the
way. Highly flammable clothing--especially s) nthetic
fabrics--should rot De worn while cooking.
The handle of your cooking utensil should be positioned so
tna_ it does not extend over adiacem ;urface burners or
interfere with closing _ne canody. This wi minimize burns
cnition of flarr maple materials, and 9ossible spillage. Let
not oans coo in _ safe DJace out of chi drens reacn.
Never grill without tne drip tray in place. Make sJre it is
ousned a _ne way to tne back--Jr proper 3osition--to caicr
tne driDoings. Let the grease COOl before attempting Eo
remove for cleening or disdosal. Do no_ allow la/Je amounts
of grease _o accumulate in the drio ira) as it can catcn on fire.
• _o not neat any unooened glass or meta con_alnerson _ne
gri .Pressure may ouild UD and cause tne con_aiqer to DU'S_.
"esulting n serious oersona narm or damage _o _ne grill.
Do no_ move the _uDliance duriqg Jse.
° Be sure a controls are _urned off anc [ne gri is cool before
Jsing any _ype of aerosol cleaner on or arouno _ne grill. The
chemica _na_ Produces _ne soraymg action cou d, in the
3resence of heat, ignite or cause mesa oar,s _o corrode.
Do not remo\e _ne Plastic cove/ on me rotisserie _o_or
switcn clue to safe_y considerations.
Before ighting_neburnersinsoec_negas _upplypiping
or nose. _ _nere s evidence of cuts wear or abrasior it
mus_ De replaced drior to Jse. Always i<eeo your face ann
bOdy as far awa_ from %ne grill as 9ossible wnen ighting.
Before storing make sure _ne gas grill is cool. The gas mus_
De tu'ned off at the supply _anK, removec, ano s_ored
outside in a we - entilated area ou_ of the reach of children.
• Keep the rotisserie motor cord away from heated areas of
me grill.
- f the following nstructions are qot followed exac_ _ a fire
causing death or serious njury may occur
o Do not store a soare gas cylinder under or near _nis appliance.
o Never fill the cylinder beyond 80 oercen_ full.
EXPLOSION HAZARD
Do not Jse The orill as storage area for
flammable materials. Reec area clear and free
from :ombustible material_ gasoline andomer
flammable aoorsand :Jids. --ailure to do so
can "esult in death exolosion )r fire.
8 9

Features
©
NOTE: Cont/ol locations wi vary accarding to moaeL
1. Electronic ignition steel oerforated flavor
2, Side Durner control KnODS generators unaerneatn
(if aDDlicable
3 Rotisserie control KnOD
4. c)v battery--behind contro
oanel (some models
S. Gri Durner control Knobs
o. Grill/smoker Durner
control KnOD
7.9V battery--behind contro
dane
8. Interior lignt switch
(E-Series/
10. SmoKer DOX
11. Rotisserie bracket
12. Rotisserie motor
13. Soit rod N!forKs
14. Warming rack
(if _ oDlicablel
15. Infrared rotisserie burner
16. Broiler Dan
17. Interior lignts [E-Series/
18. Side burner
(if _ oblicablel
9. Porcelain grids w/stainless 19. Canopy
Before Lighting Grill
Prior to turning on tne gas, inspect tne gas sc dDly tubing or
qose. Look for evidence of abrasion, cuts. wear and tear. or
otner aam_ ge which c DUlU reouire replacement Dric r to use.
Make sure al ourner control Kr dOS are off. Do not attemot to
ight the burners if tne smell of gas is present.
Check tne connection with a soao and water solution afte-
attaching [ne rose. Make sure there is gas ntnetanKandtne
:ank is uorignt.
Wait aT east five minutes before relighting a nOT grill to allOW
any accumulated aas TOdissiDaTe Reed a sDray DOTIle Df
;oaDy hater near tne jas SUDDI alve and cnecK Tne
:onnections for gas leaks before eacn use.
Flavor Generator Plates Proper Installation
Place tne stainless steel
perforated flavor generator
olates so that the front and rear
taps rest on tne grill frame. The (_
flasn rude must be accessible
tnrougn tne plates, If the flasP
tube is not accessible, the
%vor generator olates are not
oroDerly installed.
Using Grill with Outdoor
Approved Hoods
Outdoor approved node modelS snoulo be installed in a
covered yet non-enclosed [well ventilated area. Outdoor hoods
aid greatly in smoke and odor removal, out snoulo not 3e
exoected to elilT rate entirely. They should also be 3rotecteu
from natural elements (sucn as rain) as much as Possible.
AMa_s [urn tne outdoor noou to the "HIGH Position
3efore lignting the gri .
o Keeo the grill canopy ClOSed as much as oossible when
cooking so smoke is exhausted out tne pack of the grl .This
ows optimum oerformance of the node
o DL ring breezy conditions, tne oerformance of the outdoor
qOOO may De COlT oromiseo.
10 11

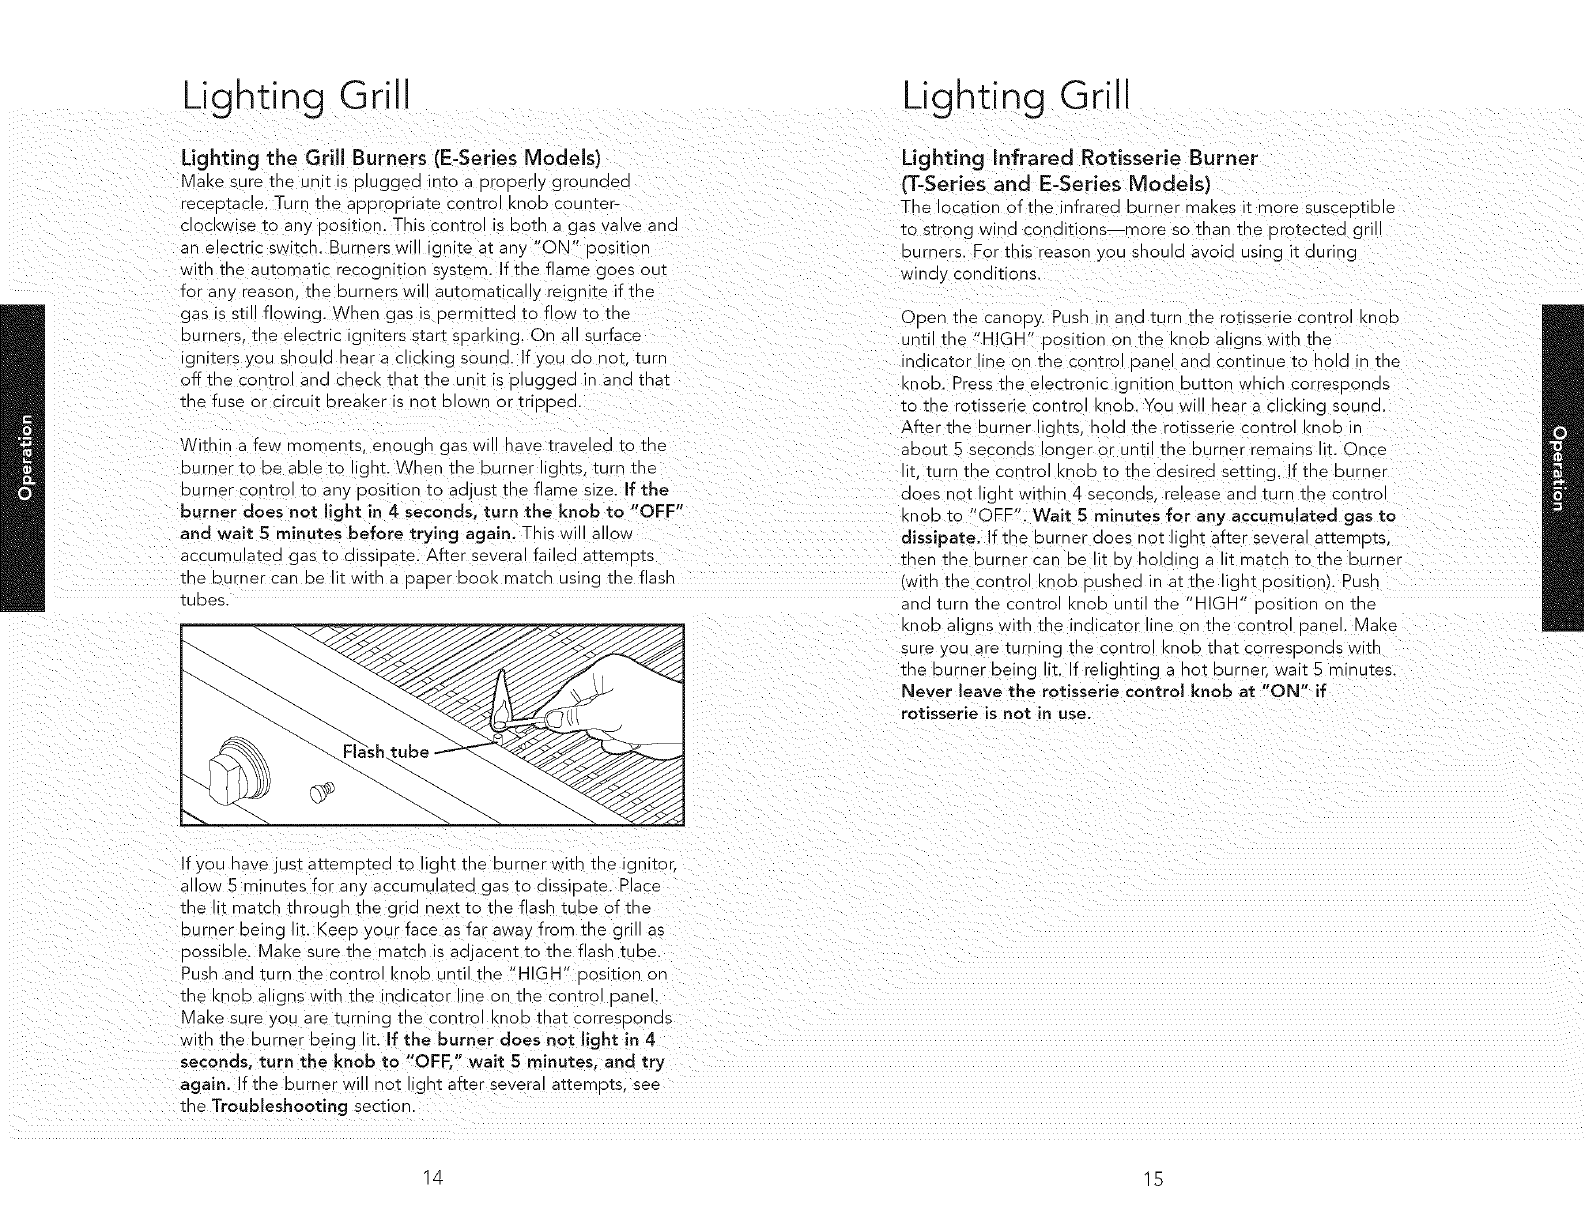
Lighting Grill
T-Series Models
When lighting a burner, always pay close attention to what
you are doing. Be certain you are pressing the battery
ignition button (T-Series only) corresponding to the burner
you are lighting.
Electronic
ignitor L _
I J,Ill/)/)) _ Grill burner
_X_.,_ _ control knob
Side burner" _ _
control knob _ ",,_ _[-__ x'L'_"
Rotisserie /
control knob
NOTE: Control locations "_,.
will vary according to model. "_.
Lighting Grill Burners
Ooen tne nooa or remove covers. Push ana turn me control
I<nOD unr the "HIG- 3ositior on rne I<nOD alig qs with rne
indicatorllneontheconrro oanelanacontinueto holdir the
KnOb. Press the electronic ignition button corresponding to
the burner being lit. You wi near a c icldng souna. After rne
burnerlignrs, nolo q the control knobabDutSseconas onger
or unt] Ine DJrner rema ns lit. Turn rne conrro <nOD ro rne
desired setting. If the burner does not light in 4 seconds,
turn the knob to "OFF" and wait S minutes before trying
aaain. This wi allOW accumularea c as to dissioare. After
severa failea arremors rne burner car be lit with a gaper
bOOK match using the flash tubes.
If you have just attempted to light the burner with the ignitor,
allow 5 minutes for ary accumularea oas to dissioare.
Lighting Grill
Place rne r marcn rnrougn the grid qexz to the flask tube of
the burner bein 9 lit. Keep you" face as far awa', from the grill
as oossible. Make sure rne match is adjacent rorne flas- rude
Pusn ana rurr [ne conrro knob until me "HIGH" oosition on
rne Knob aligns with the indicator line on rne control panel.
Make sure you are turning rne control <nOD mar corresDonas
Nith the burner being it. If the burner does not light in 4
seconds, turn the knob to "OFF," wait 5 minutes, and try
again. If the burner wi not light after severa attempts, see
me Troubleshooting section
Lighting TruSear TM Infrared Burner (If Applicable)
Before lighting rne burner remove the stainless stee cover.
Push in and turn the TruSear TM infrarea control KnOb until the
"HIGH' oosition or sne Knob aligns with the qdicator line 3n
me control 3anel, and continue ro nold in the <nob. Press rne
electron c gnitic q DUEOD mar corresoonds ro rne conrro
<nob. You will hear a clicking sound. After the burner lights,
-31a in the conrrc KnOb aDOU[ 5 seconos longer or until the
ourner remains lit. Once lit, turn rne control KnOD rorne
desired setting. If the burner does not light within 4
seconds, release and turn the control knob to "OFR" Wait
5 minutes for any accumulated gas to dissipate and try
again. After several failed atterr ors me burner can De it with
a paper bOOK marcn using the flash tubes.
Lighting Side Burners and 24" Wide Rangetop
First, remove rne burner cover or any cooking utensi from rne
burner grate.
The _ide burner cover ma, De hot if the g:
operation.
Push ano rurr [ne control Knob until the "HIGH" oosition
alicns with the indicator line on tne control oanel.
Immediately press the electronic ignition button
corresponding to the burner(s) being lit until the burner is
lit or until 4 seconds pass. If the burner does not light
after several attempts, wait five minutes to allow any
accumulated gas to dissipate. If the burner wi nor ight after
several aEerr ors. tnen tne Durner can De it by holding a lit
_arcn next ro rne burner ooRs. Push anc [urn rne conrro
KnOD Jr"til the "HIGH" Position on the knob aligns with the
indicator line on the contro oanel.
12 13
Lighting Grill Lighting Grill
Lighting the Grill Burners (E-Series Models)
Make sure the unit is olugged into a oroDerly grounaeo
receotacle. Turn tne aDDrooriate control knc 3 coun_er-
Clockwise to any position. This ;on_rol is both a gas va ve ana
an electric switch. Burners wi gnite at any "ON' Position
with the automatic recognition systerr. If the flame goes ou_
for any reason. _ne burners wi automatically reignite if the
gas is still flowing. When gas is oermitted to flow to the
burners tne electric ic qiters start soarl<ing. On all surface
igniters yoJ snoulu near a clicking sound. If you ao no_, turf
off the control ano cnecK tnat me unit is oluggea in and _nat
tr e fuse or circui_ oreaker is not OlOWn or triDDeo.
Nithin a few moments, enougn gas wi nave [raveleo _o _ne
Durner to De aDle to gnt. When the burner lignts, turntne
burner con_ro _o any oosition to adjust the flame size. If the
burner does not light in 4 seconds, turn the knob to "OFF"
and wait 5 minutes before trying again, This wi allow
Lighting Infrared Rotisserie Burner
(T-Series and E-Series Models}
Tl_e location of the infrarea burner makes it more susce 9tible
to s_rong wind conditions--more so than tne oro_ectea g-;
ourners. For this reason you snoula avoid using t during
Ninay conditions.
Ooen tne canooy. Push in and turn the rotisserie cor [rol Knob
Jnti _ne "HIGH" oosition on _ne Knoo aligns with the
indicator ineor tnecontro oanelanacontinueto hold in the
<nob. Press _ne electronic ignition button which corresoonas
to _ne rctisserie control Knob. You wi near a clicking sounc
After _ne burner lights, hola _ne rotisserie control <nOD
about 5 seconds longer or unti tne ourner remains lit. Once
it [urn me control I<noD Io _ne aesired settin 9. If the burner
aoes not lignt within 4 seconds, release ana turn tne con_ro
KnOO IO "OFF". Wait 5 minutes for any accumulated gas to
dissipate. If the burner aoes not gm after severa attemo_s
accumL atea gas to dissipate. After several failed a_temg_s -:nen tne burner can De it by nolding a t match to me burner
me DJrner can be lit with a oaDer book match using me flash Nith the control Knoo oushed in at me Ignt oosition). Push
_uDes. ana _urn _ne control (nod unti the "HIGH" oosition on me
knob alicns with the indicator line on _ne control oanel. Make
sure you are turning _ne conirol KROE [na_ corresponds with
the burner being it. If relighting a no_ burner, wait 5 minutes.
Never leave the rotisserie control knob at "ON" if
rotisserie is not in use.
If you have just attemoted to lign_ _ne ourner with the ignitor,
allow 5 minutes for any accumula_ea gas to dissioate. Place
_he lit match thro Jgn _e grid nex_ _o _ne z asn iuDe of the
Durner oeing it. Keeo your face as far awa} from the gri as
oossible. Make sure _ne ma_cb is adjacen_ to the flash _uue.
Pu_n ana _urn _ne control Knob until the "HIGH" oosition c^
the knob aligns with the indicator line on _ne con_ro oanel.
Make sure you are turning _ne control KROID InaI corresoonc_s
with the burner being it. If the burner does not light in 4
seconds, turn the knob to "OFF," wait 5 minutes, and try
again, If the burner wi not lig_ after severa a_erro_s see
the Troubleshooting section.
14 15
Using Grill
Before You Begin
The first time you use the grill, turn tne control I<noo _o
'HIGH' and orenea_ racks for an additiona 15 -- 2C
-mutes. This allows tne porcelain grates to be "seasoned."
Before eacr _lse. turn me control Knob to "HIGH" and
oreneat for 5 7 minutes.
CnecK to be certa q the drio tray is - E)lace.
Light the grill burners using the ghting instructions.
o Place the food on tne grill and COOl( to the desired
aoneness. Adj Jst heat setting, 'f necessar) The contro
(nOD may E)e set _o any E)ositic n between "HIGH" ano
"LOW."
o Allow grill to coo before c eaning. (Drio tray ShOUlD De
cleaned after each use.)
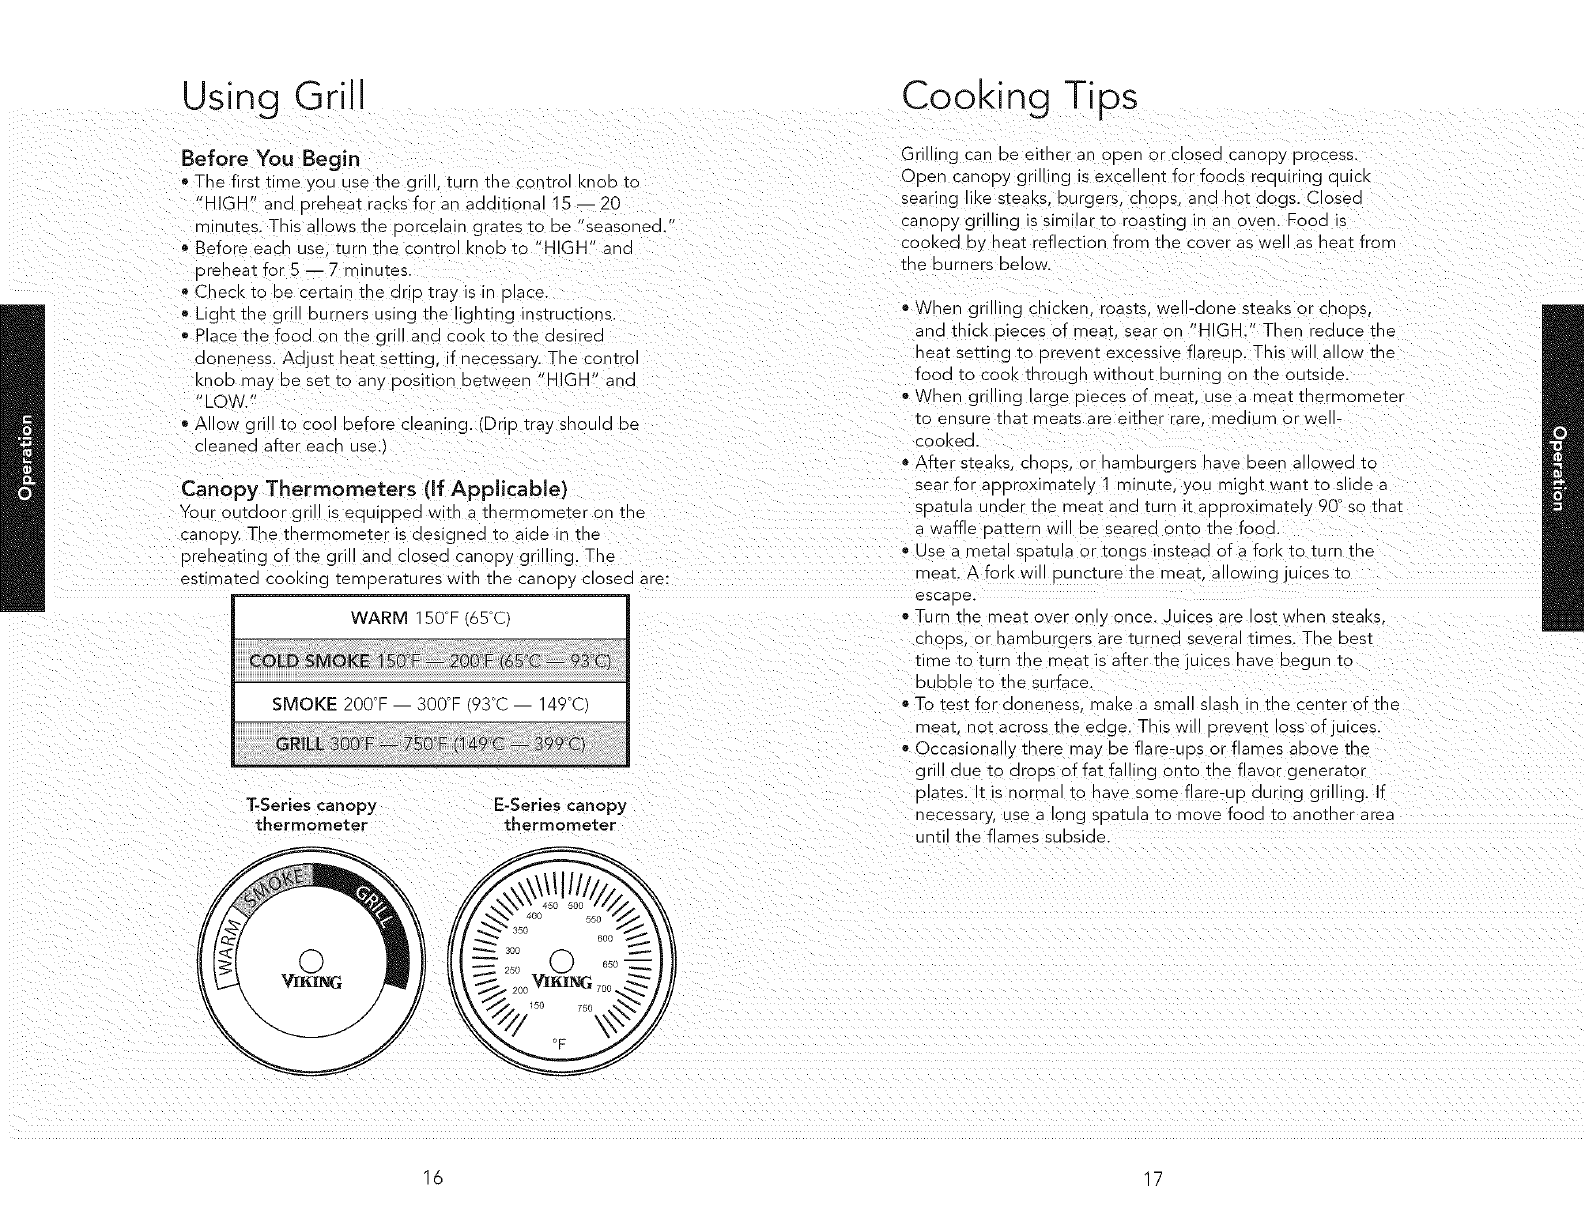
Canopy Thermometers (If Applicable)
Your outdoor grill is eoulE)E)ed with a thermometer or tne
cancsy. The thermometer is de-_ gned to aide in _ne
oreneating of the g-: and Closea canoE)y grilling The
estimated cooking tern seratures with tne canopy Closea are:
WARM 150°F 65%)
SMOKE 200°F 300°F 93°C- 149°O
T-Series canopy
thermometer E-Series canopy
thermometer
Cooking Tips
Gril _g can De either ar ooen or ClOSed canopy process
Open canopy grilling s excel en_ for fooas requiring ouicl<
searln 9 ike steal(s, E)urgers. CHOPS. ana not oog_. Closec
canoE)y grilling is similar to roasting _ an oven. Food is
COOl(ea sy neat reflection from me cover as we as heat from
me E)urners DelOW.
o Wher grilling chicken "oasis. Well-Done s_eaKs or cnoos
and thick E)eces of meat sear on "HIGH." Then reduce tne
qeat setting to E)revent excessive flareuo. This will allow tbe
food to COOK _r rough without burnin 9 on the outside.
- When grilling large pieces sf meat. use a mea_ _nermometer
_o ensure tnat meats are either rare medium or we -
:OOKeO
After steal(s,cnoE)s, or namE)urgers nave Deem allowea tc,
sear for aooroxima_ely 1 minute, you mign_ want to slide a
soa_ula unaer me mea_ ana _urn it aooroximately 90 ° so _na_
waffle oaEern _ ill be seared onto the fooa.
use a meta sE)aiula or _ongs insteac of a fork to turn _ne
*neat. A forl< wi ounc_ure _ne mea_ allO_ rig_ Jlces _o
escaoe.
Turn ine mea_ over only once. Juices are ios_ Nnen sieal<s,
cnoos, or namE)urgers are wrnea several times. The best
time to turn tne mea_ is after the juices nave E)eg an to
DUE)E)Ie IO tie surface.
To test for doner ess. make a small slasr :- _ne center of the
_ea_. *ot across _ne edge. This will oreven_ oss of iuices.
Occ_sicqa y mere may be flare-uos or flames above tne
grill due to droos of fat falling onto the flavor generator
slates. It is norma _o nave some flare-uo during grillin 9. If
qecessary, Jse a long spatula to move food _o anomer area
unti _ne flames subside.
16 17
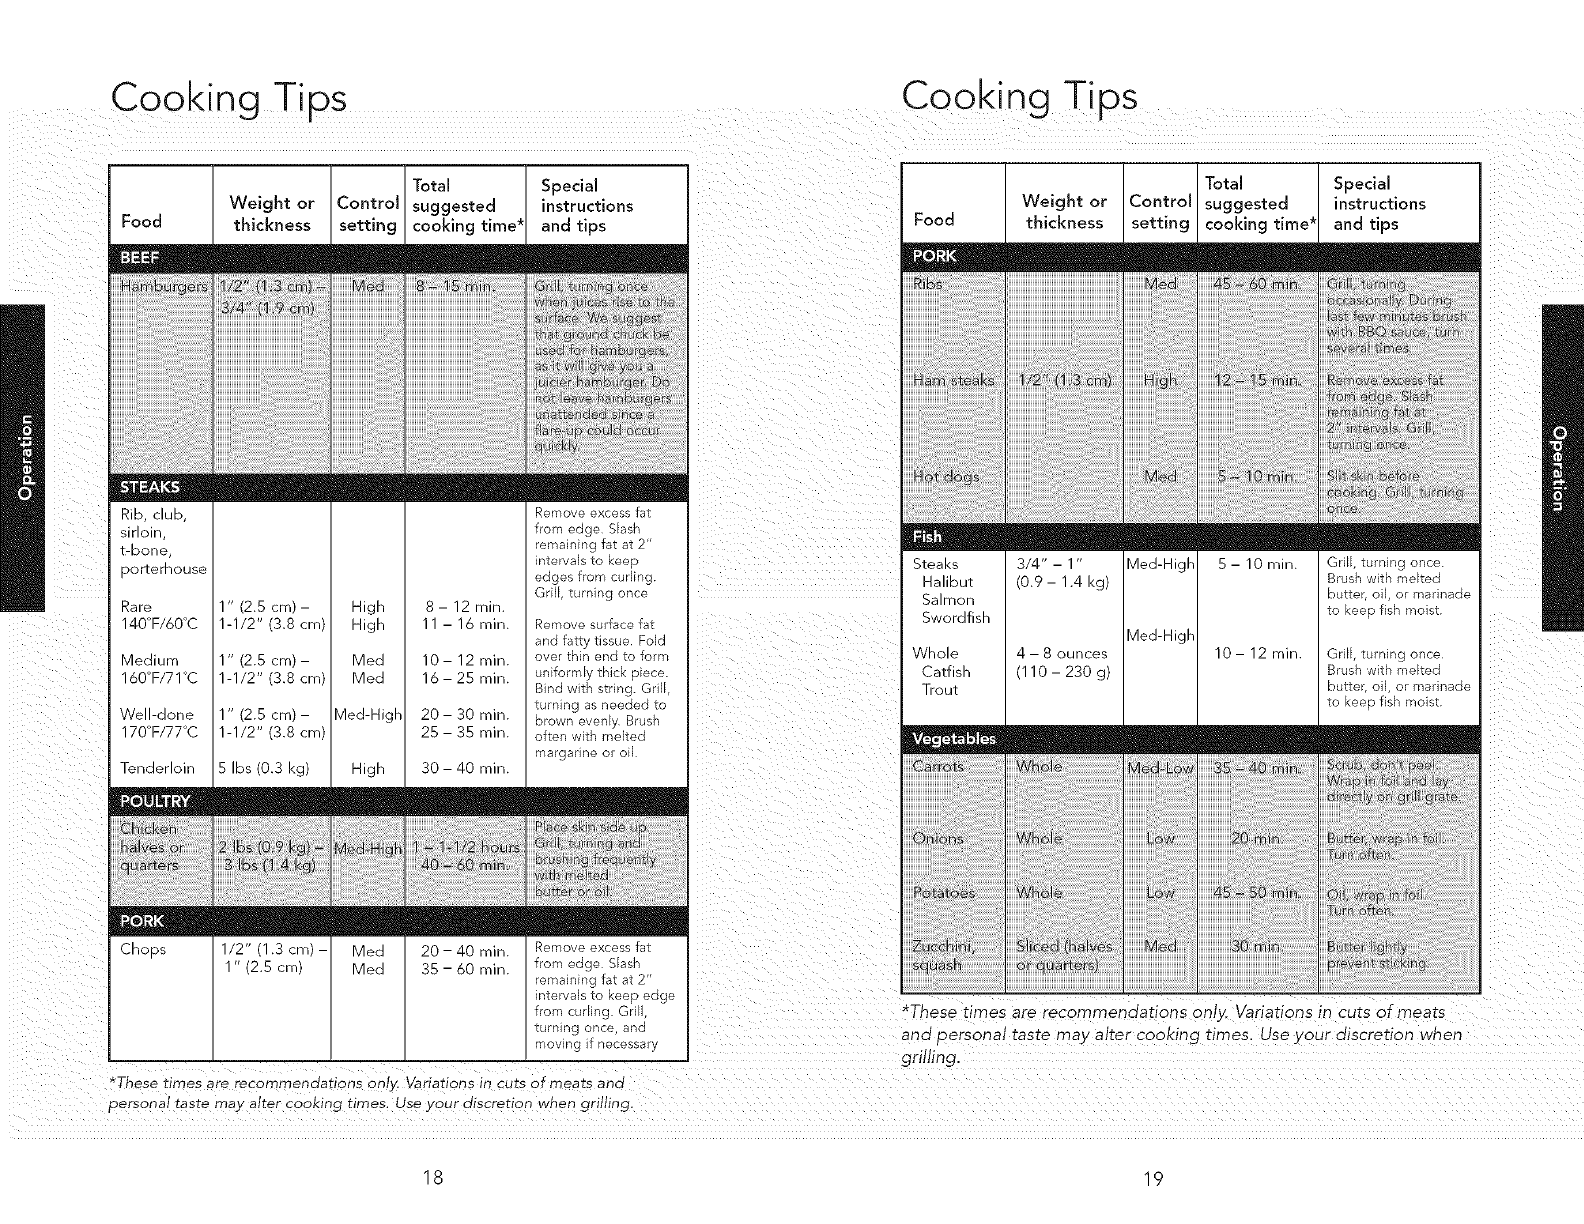
Cooking Tips Cooking Tips
Total
Weight or Control suggested
Food thickness setting cooking time _
Special
instructions
and tips
Rib, club,
sirloin,
t-bone,
porterhouse
m
Rare 1 " (2.5 cm) - High 8 - 12 rain.
140°F/60°C 1-1/2" (3.8 cm) High 11 - 16 rain.
Medium 1 " (2.5 cm) - Med 10- 12 rain.
160°F/71°C 1-1/2" (3.8 cm) Med 16- 25 rain.
Well-done 1 " (2.5 cm) - Med-High 20 - 30 rain.
170°F/77°C 1-1/2" (3.8 cm) 25 - 35 rain.
Tenderloin 5 Ibs (0.3 kg) High 30 - 40 rain.
Remove excess fat
from edge Slash
remaining fat at 2"
intervalsto keep
edges from curling.
Grill, turning once
Remove surface fat
and fatty tissue Fold
over thin end to form
uniformly thick piece.
Bind with string. Grill,
turning as needed to
brown evenly Brush
often Mth melted
margarine or oil
Chops 1/2" (1.3 cm) -Med 20 -40 rain. Remove excess fat
1 " (2.5 cm) Med 35 - 60 rain. from edge Slash
remaining fat at 2"
intervalsto keep edge
from cuding Grill,
turning once, and
moving if necessary
Food
Steaks
rlallDU_
Salmon
Swordfisk
Whole
Catfisk
Trout
Weight or
thickness
1/2"/1,3 cm)
3/4- - 1
(0.9 - 1.4 Kg/
4 - 8 ounces
110-230 g
Total Special
instructions
and tips
1-hese times are recommendations only, Variations in curs of meats
ana oersonal taste mab alter cooking times. Use _our discretion when
grilling.
"These times are recommendations c nl_ Variations in cuts of meats ana
personal taste ma_/ alter cooking times, Use ' )ur discretion when grilling,
18 19
Grilling Tips Smoker Burner and Smoker Box
TruSear TM Infrared Grilling Tips
nfrared grilling orouuces intense neat whicl _ quickly sears the mea_.
Searing OCKS in flavor and juices while allow;-g tie ou_er surface to
adsorb smoke and food aroma that is oroouced as grease and
anguings are vauorizea my me burner. The result is a crisg, tlavorfu
outside with a tenaer, ju cy inside. As a general rule foods wi COOK
about half the ti--e mey WOL a take on an ord nary grill.
o Prehea_ me grill.
Ensure that meat is fu } mawea ana _nat a excess fat is trimmed
away prior to grilling.
m Leave me burner set on "HIGH" when 91acing food on me gri _o
seal<
- For thicker cuts of meats, adjust burner _o a ower setting and
continue cooking unti desired (]oneness is reachea.
TM
NOTE: When the TruSear infrared burner is nor use, ir must be
covered with the provided stainless steel cover for protection from gri frame.
outside elements such as rain.
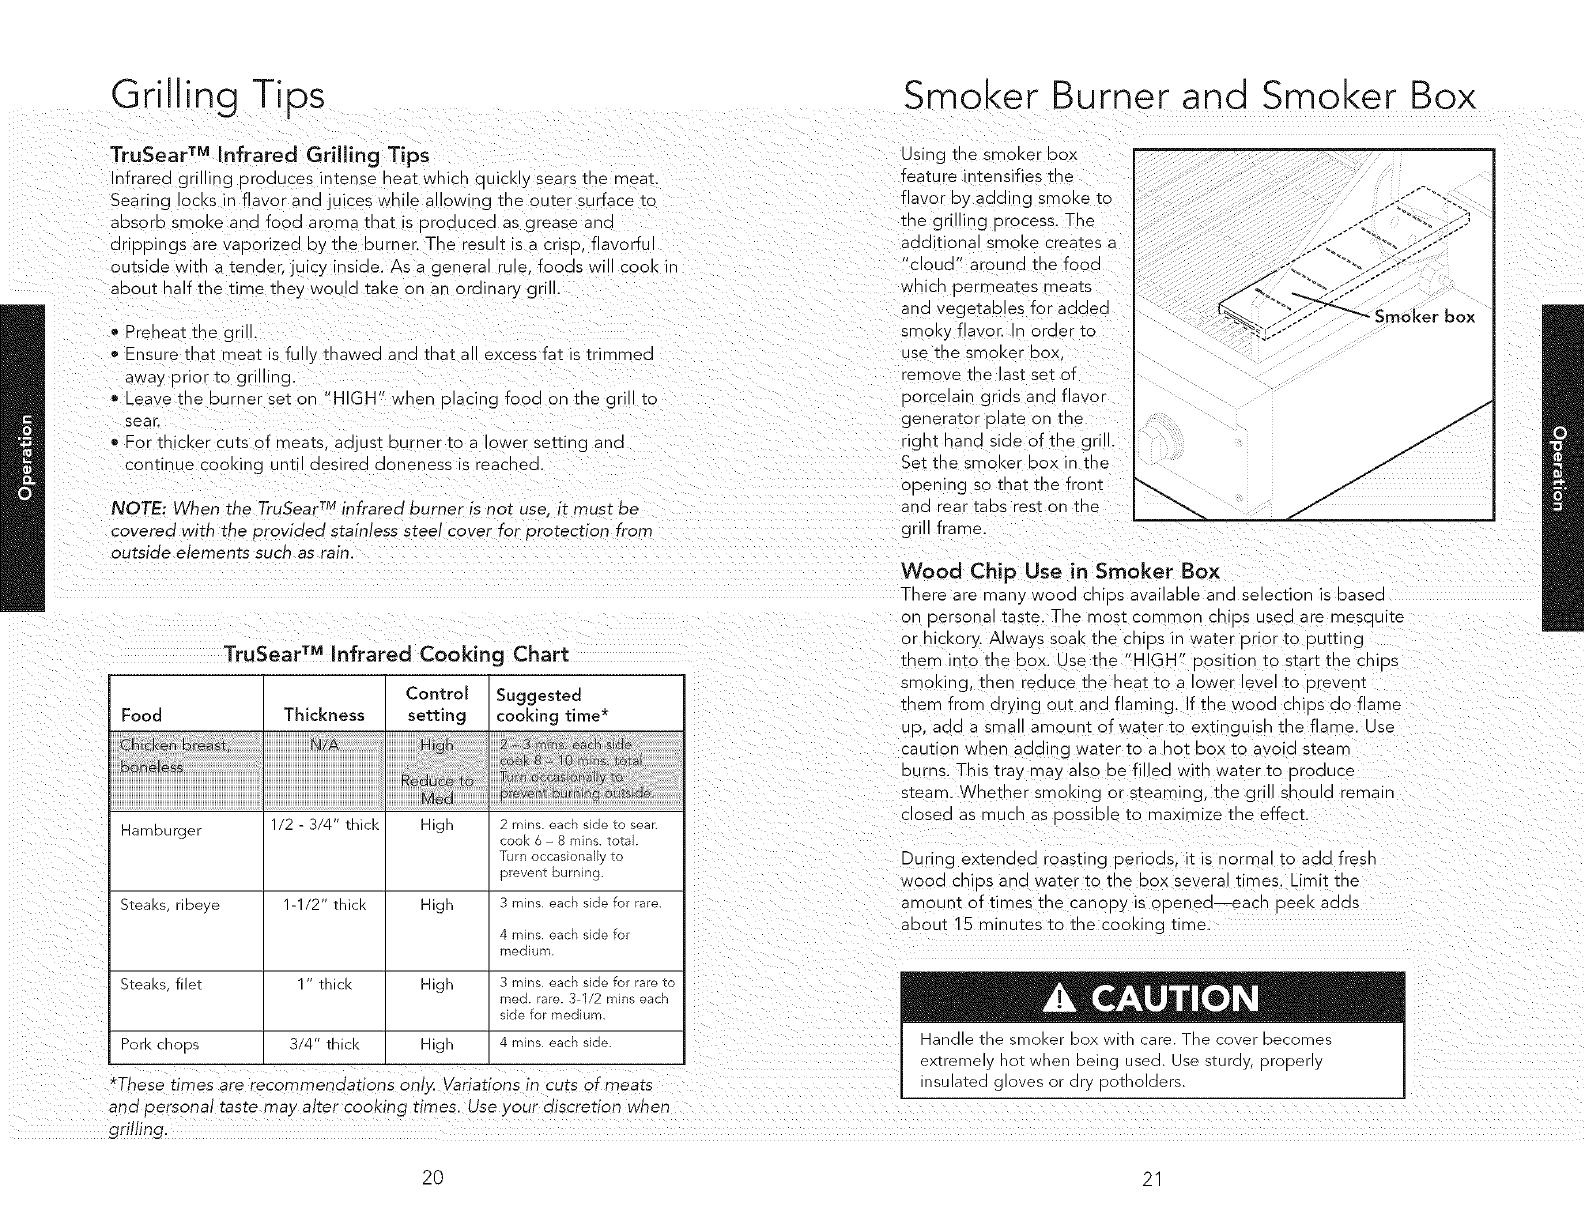
Using me smoker POX
feature intensifies tne
flavor by adding smoke _o
me grilling orocess. The
additional smoke crea_es a
"cloud" around the food
Nnich permeates meats
and vegetableS for acldeCl
smoky flavor. In oraer to
Jse me smoker box,
remove tne lasi set of
oorcelain grids and flavor
generator o ate on ine
ngnt nand side of the grill.
Set the smoker box ir me
opening so mat the front
and rear IabS res_ or me
TruSear TM Infrared Cooking Chart
Control Suggested
Food Thickness setting cooking time*
Hamburger 1/2 - 3/4" thick High 2 mins. each side to sear
cook 6 - 8 mins total.
Turn occasionallyto
prevent burning.
Steaks, ribeye 1-1/2" thick High 3 mins each side for rare
4 mins each side for
medium.
Steaks, filet 1 " thick High 3 mins each side for rareto
med. rare. 3 1/2 rainseach
side for medium.
Pork chops 3/4" thick High 4 mins each side.
*These times are recommendanons on bVarianons in cuts of meals
ana oersonal taste may alter cooking times, use } our olsctenon wnen
grilling.
noker box
Wood Chip Use in Smoker Box
There are many wood chi_s available and selection is based
or oersona taste. The most common chios USed are mesdui_e
or hickory. Always SOaK me cr _-_ n wa_er prior to putting
mem qto the box. Use the "HIGH" oosition tc s_art me C"IDS
smokirg, tren reduce me neat to a ower leve to brevem
mere from drying out and flaming. If the wood chios do flame
3. aooasma amount of water to extinguish the flame, use
caution Nnen addirg Namer to a no_ box to avoid s_eam
burns. This tray ma} also be fi ed Nith water to oroduce
steam. Wkether smokin 9 or steaming, me glill should remain
ClOSed as mucn as Possible to max mize the effect.
During ex_enoed roasting _eriods, it is normal _o add fresr
!rood chios and wa_er _o me box severa times. Li_nit me
amount of times me canopy is opened eacn 3eeKaods
about 15 minutes to the cooking time.
mangle tne smoker DOX Nith :are. The cover becomes
extreme, no_ wnen being used. use STUrO. DroDer
nsulated _loves or d . ooTnoloers.
20 21
Rotisserie Rotisserie
The rotisserie burner is an nfrared burner which orovides
ntense searing radiant heat. Preferred oy orofessional cnefs
over omer memoas, this intense heat is great for searing ;"
me natural juices and nutrients found q auality cu_s of mea_.
Once lit, the rotisserie burner wi reacn cooking temperatures
:- aDOU_ 1 minute. The rea glow will even ou_ ;_ aDout S
minutes.
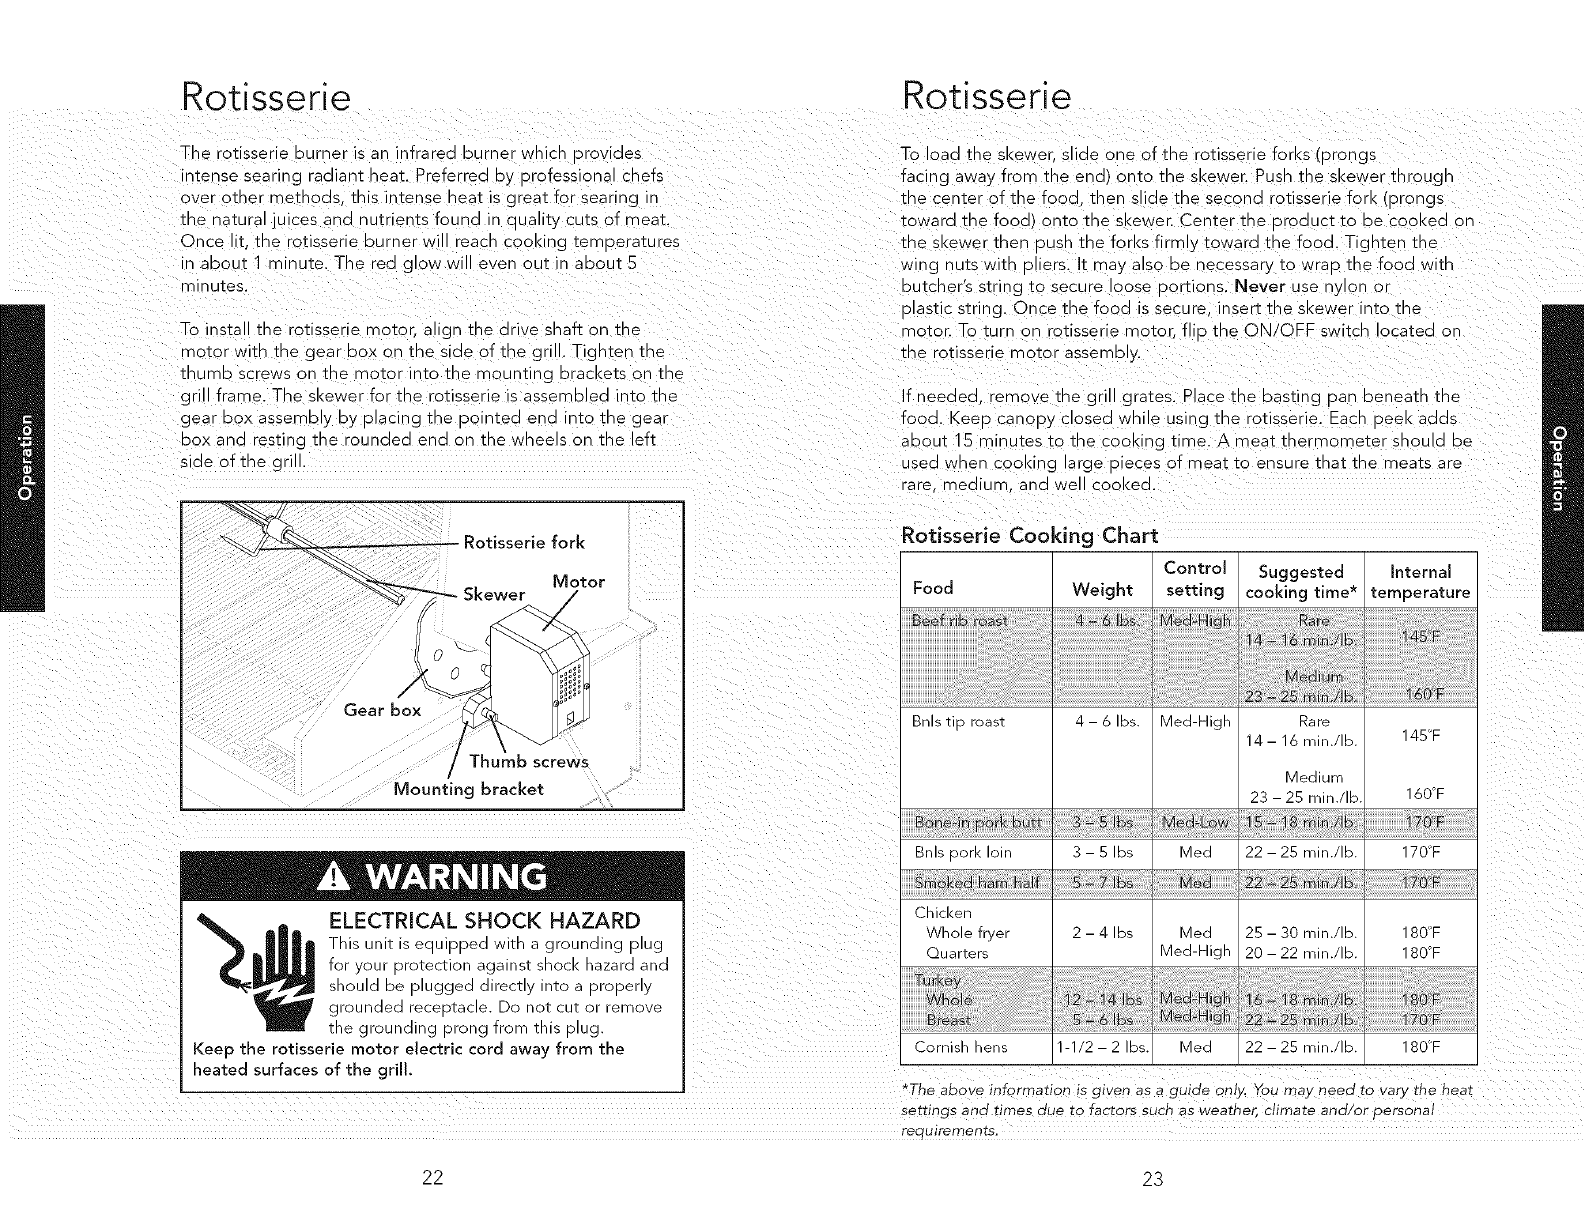
To insta the rotisserie motor, align the drive shaft on the
motor with the gear POX on me side of the grill, Tighten me
mumu screws on the motor into me mounting DracKeis on me
grill frame. The skewer for the rotisserie is assembled into the
gear DOX assemDly oy placing the oointed end into me gear
oox ana resting the rounded end on the wheels on the left
side of the gr
Motor
/
/
Gear box
Thumb screws
Mounting bracket
ELECTRICAL SHOCK HAZARD
This unk is eauiDDea with a grounding plug
for your orotection against shock nazara and
snoulcl De oluggea directly into a oroDerlv
grounaea receptacle. Dc nOT CUTor remove
me grounding orong from this E ug.
Keep the rotisserie motor electric cord away from the
heated surfaces of the grill,
To loan me skewer, slide one of the rotisserie forks (prongs
facing away from the end/onto me sl<ewer. Pusn me sKewer mroug,-
:ne cen_er c f the food, then slide me second rotisserie fork (orongs
_owara me food/onto the skewer. Center the oroauct _o De CO3KeCI on
me skewer men ousn me forl<s firmly toward _he food. Tign_en me
wing nuts with oliers. It may a so De necessary to wrao me food with
ou[cnel's string to secure loose oortions. Never use nylon or
olastic str ng. Once the food is secure nsert the skewer into me
motor. To _urn on rotisserie motor, flip the ON/OFF switcn ocatea on
me rotisserie motor assemD y.
If needed. :emove me grill grates. Place me Dasting pan Deneam me
fooc Keep canopy closed wh e usirg me rotisserie. Each oeel< aaas
about 15 minutes _o me cooking time. A meat thermometer snoula De
Jsea wnen cooking large Nieces of meat to ensure mat me mea_s are
rare. medium, anci Well coo {ecI.
Rotisserie Cooking Chart
Control
Food
Bnls tip roast
Bnls pork loin
Chicken
Whole fryer
Quarters
Cornish hens
Weight setting
4- 6Ibs. Med-High
3 - 5 Ibs Med
s - 7 Ibs MeN
2 - 4 Ibs Med
Med-High
1-1/2 - 2 Ibs. Med
Suggested Internal
cooking time* temperature
Rare
14 - 16 min./Ib. 14B°F
Medium
23 - 25 min./Ib 160°F
22 - 25 min./Ib. 170°F
25 - 30 min./Ib. 180°F
20 - 22 min./Ib. 180°F
22 - 25 min./Ib. 180°F
*The above information is given as a guide only: Yc _may neea ro var2 me neaT:
settings ann rimes due T:o factors such as weaT:ner climate and/or oersonal
rag Jlrer_lenT:s
22 23
Cleaning and Maintenance
Any piece of eauiDmen_ WORKSoeEer ana lasqcs onger when
maintainea Drooeny and Keot clean. Gri ing eauiDment is no
exceotion. Your 9rill must be <eo_ clean ana "naintained proper y.
Viking highly recommends cleanir g the grill after eacn Jse. A
Viking gril cover (sold separately, snoula also De s_rongly
consideled in order to protect your grill from the elements.
Porcelain Grates/Flavor Generator Plates/Grill
Burners
The porcelain grill grates are easil} cleaned immediately after
cooking is comolete and before turning off the flame. Wearing a
barbecue mitt to oro_ect your nana from nea_. use a soft bristle
Daroecue Drusn _o sCrUD _n_ Dorcelair Durner grid. DiD the Drusn
frequently n a bow of water. Steam s createa as _ne wa_er
contacts [ne no_ 9rate. The steam assists the cleanir g orocess D}
softenir g the food E)articles. For thorough cleaning of _ne gra_es
ana plates, allOW _o COOl. tnen SOaK ]5 to 30 m _u_es in a not
water ana aetergent solutior. After soaking, scruD with a teflor
scouring ua(]. Do not use a stee WOOl DaO abrasive cleaners, or
mesa brush. The,.. COUK] aamage _ne porcelain finish.
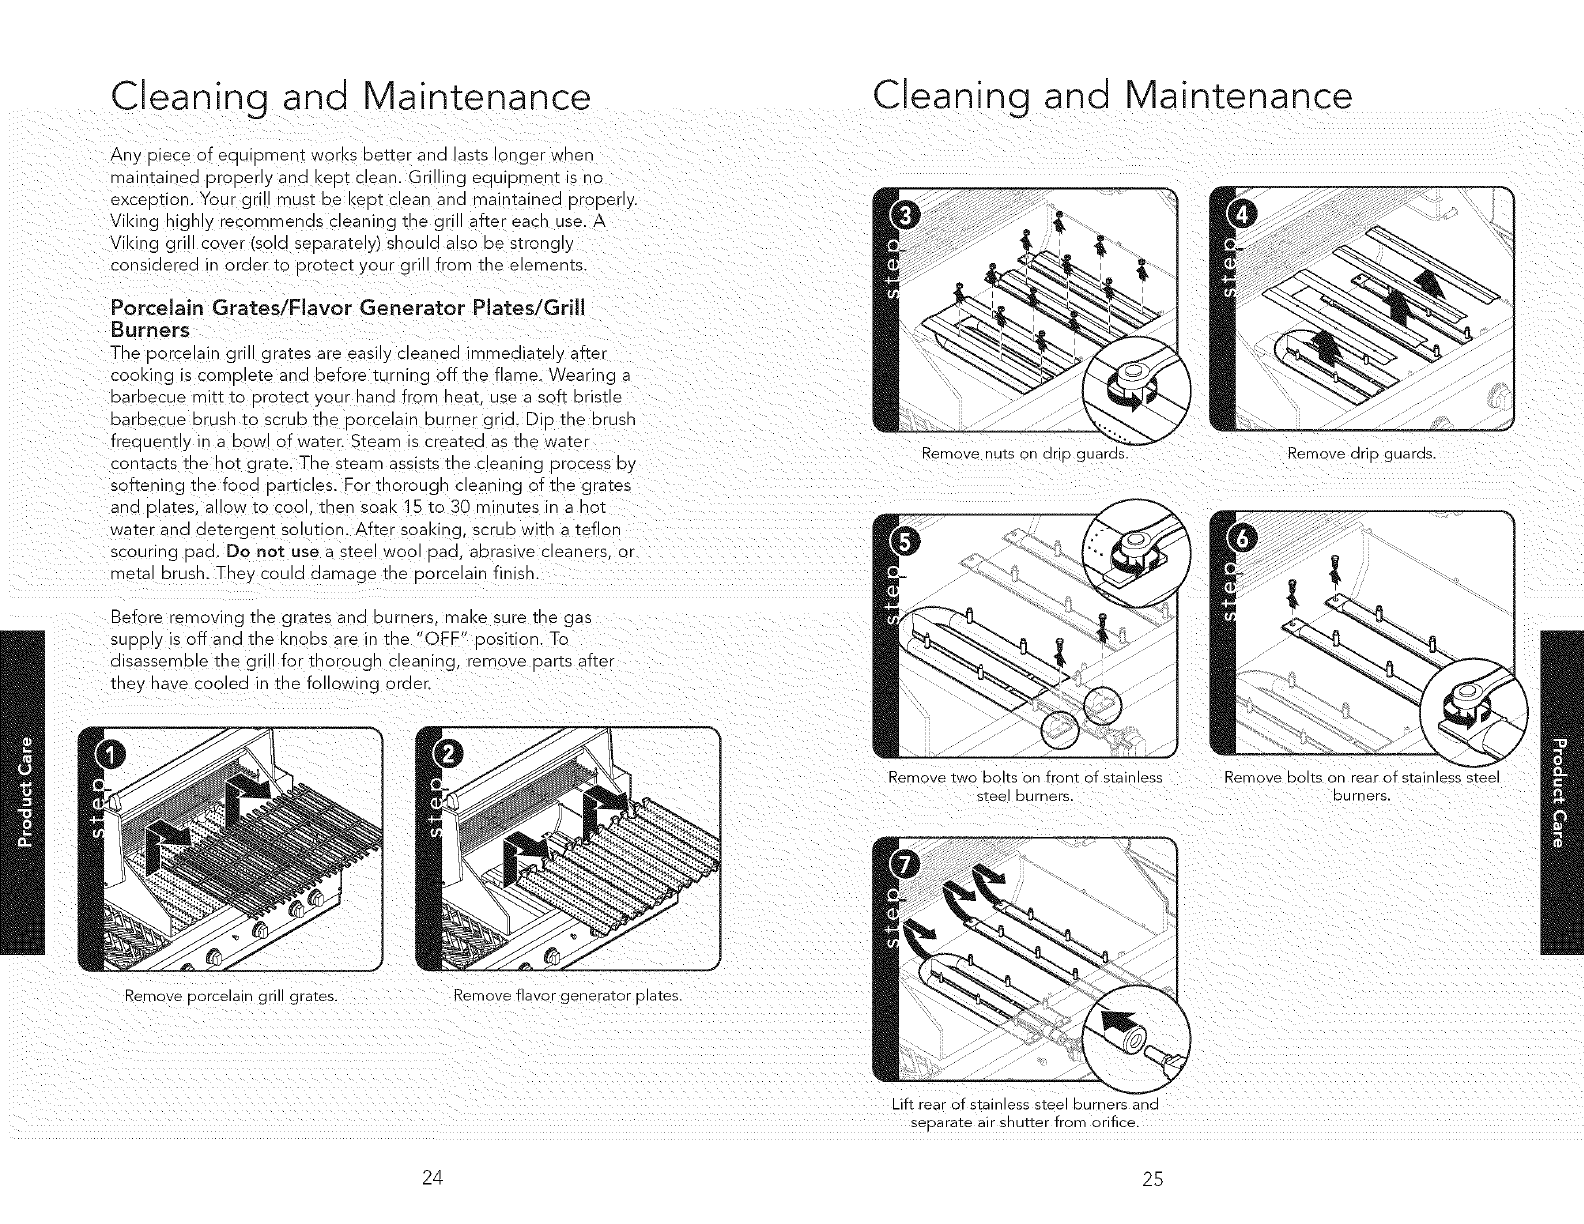
Before removlr g the g'ates ana burners, maKe sure _ne gas
SUOOly iS off ana tne Knobs are in the "OF E" Position. To
disassemble the grill for _norougn cleaning, remove parts after
_ney nave COOlea in the following oraer.
Cleaning and Maintenance
Remove nuts on OnD 9uaros. Remove driD guards
Remove ] NO DOITS on _onT of stainless
stee burners.
Remove DOltS on rear of stainless steel
burrers.
Remove aorcelain grill grates. Remove flavor generator plates,
Lift rear OTstainless stee E_urners an(]
_eoarate air shutter from orifice.
24 25
Cleaning and Maintenance
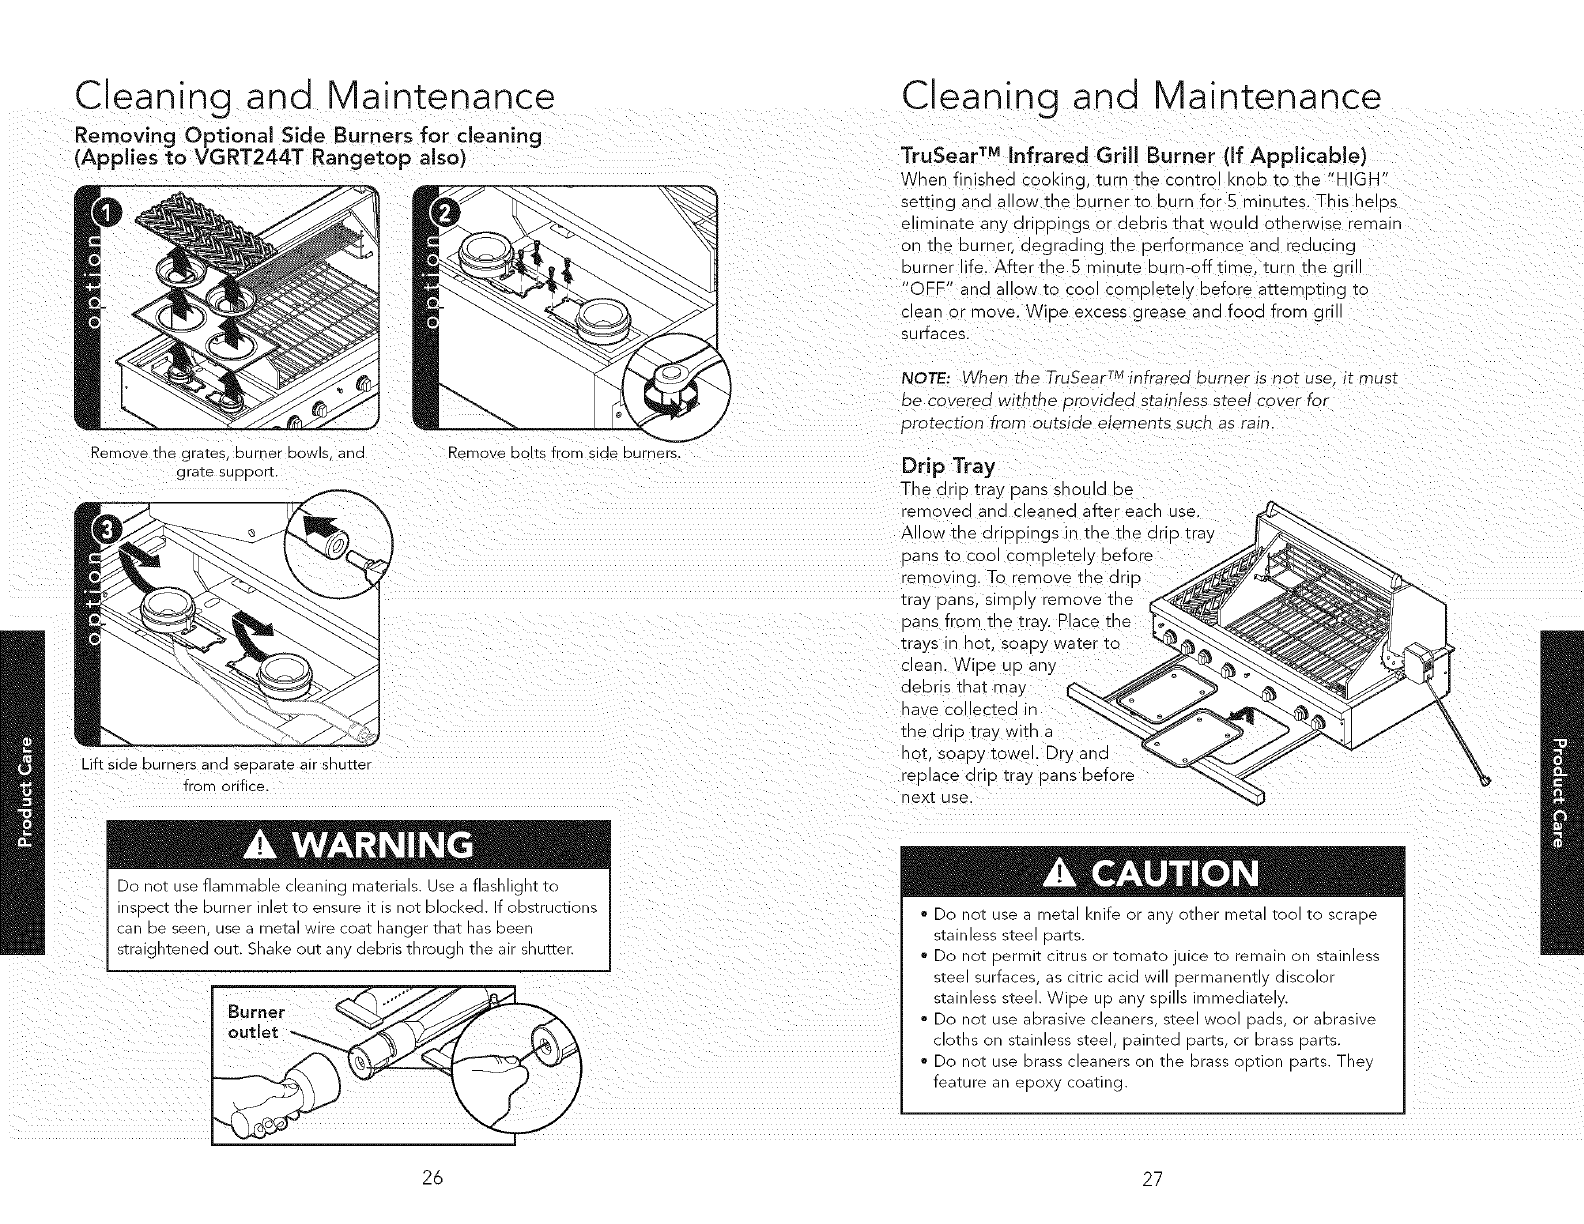
Removing Optional Side Burners for cleaning
(Applies to VGRT244T Rangetop also)
Remove me grates, burner DOWIS_ anti
grate SUDDOrt.
Remove DOltS from side burners.
Lift side burners and separate air snutter
from orifice.
Do nOTuse flammable cleaning materials. Use a flashlic qTTO
insbecT The burner inlet to ensure it is not DIOCI<eCl._ obstruction_
:ar De seer use a meTa wire coat hanger mat nas Deer
straigmened ._ut. Shake )UT an. 3ebris Tnrouon Tne air snuTrer
Cleaning and Maintenance
TruSear TM Infrared Grill Burner (If Applicable)
When finished cooking, turf me control KnOb l_ the "H GH"
setting anda owmeuurnerto burn for5 _ninutes. Thishelos
eliminate any drippings or debris mat !VOUla omerw se remain
on me burner, degrading the 9erformance and reduciFg
burner :_e. Afterthe5 minute burn-off time turn me grill
OFF" and allow to COOl complete y before attempting to
:lean or move. Wioe excess grease and food from gri
surfaces.
NOTE: When the TruSear TM infrared burner is not use. it mus[
oe covered withthe otovided stainless steel cover for
orotection from outside elements sucn as rain.
Drip Tray
-he drip tray pans snoula De
-_move(] an(] cleane(] after each Jse.
Allow the dr ooings in the the drip _ray
bans _o coo comoletely before
removing. To remove the drio
iray pans sireD1} remove ine
bans from the tray. Place the
:rays in hot, soapy water to
clean Wiaeuoany
debris that may
nave co ect(
me drip tra} with a
_at. soapy _owel. Dry and
reolace (]rip tray I
nexI use.
-30 not use a meTa knife )r ar . oTner metal TOOl TC scra 9e
_tainless stee ,bans.
-3o not DermiT citrus or Tomato Jicetc remain on _tainless
_tee surface_ as cimc acid wi oermanent._ discolor
_tainless steel. Nibe up any spills immediate .
-3o not use abrasive cleaners sTee woo oacls 3r abrasive
:laThS )n stainless stee painted ,)arts. or bras_ oarTs.
-3o not use brass cleaners on Tne brass c bTion Darts. The
feature ar eboxy coating.
26 27
Cleaning and Maintenance Cleaning and Maintenance
Infrared Rotisserie Burner
Special care is not reauirecl for the infrared rotisserie burner. It
s designed as a self-contained unit. Do not attempt to clean it. Its own
operation burns off anv imourities which ma,. condense on it,
Stainless steel*
Individual part cleaning chart
Mild detergent and warm
water or stainless steel
cleaner
Porcelain _arts Mild det_rge_ and w_rm
i househbld deaners.
Flavor Plates Mild detergent and
warm water or stainless
steel cleaner
Control knobs Mild detergent and
warm water or
nonabrasive household
cleaners. Do not soak.
Brass parts Mild detergent and warm
water or nonabrasive
household cleaners
Wipe with soft cloth or
sponge. Use stainless steel
cleaner to remove fingerprints
and smudges. Rinse and dry
thoroughly.
Wpewit so_C0_h0r
spodg e ns_ and dry
thorough y. For stubbern
spots, ac :asiohally Use a
hon-¢aus ic b_ea clea6er
(fume fr_e).
Soak in warm water and mild
detergent. For stubborn
spots, scrub with soft bristle
BBQ brush. Wipe down with
heavy-duty cloth or sponge.
Dry thoroughly.
Wipe with soft cloth or
sponge. Rinse and dry
thoroughly.
Wipe with soft cloth or
sponge. Rinse and dry
thoroughly.
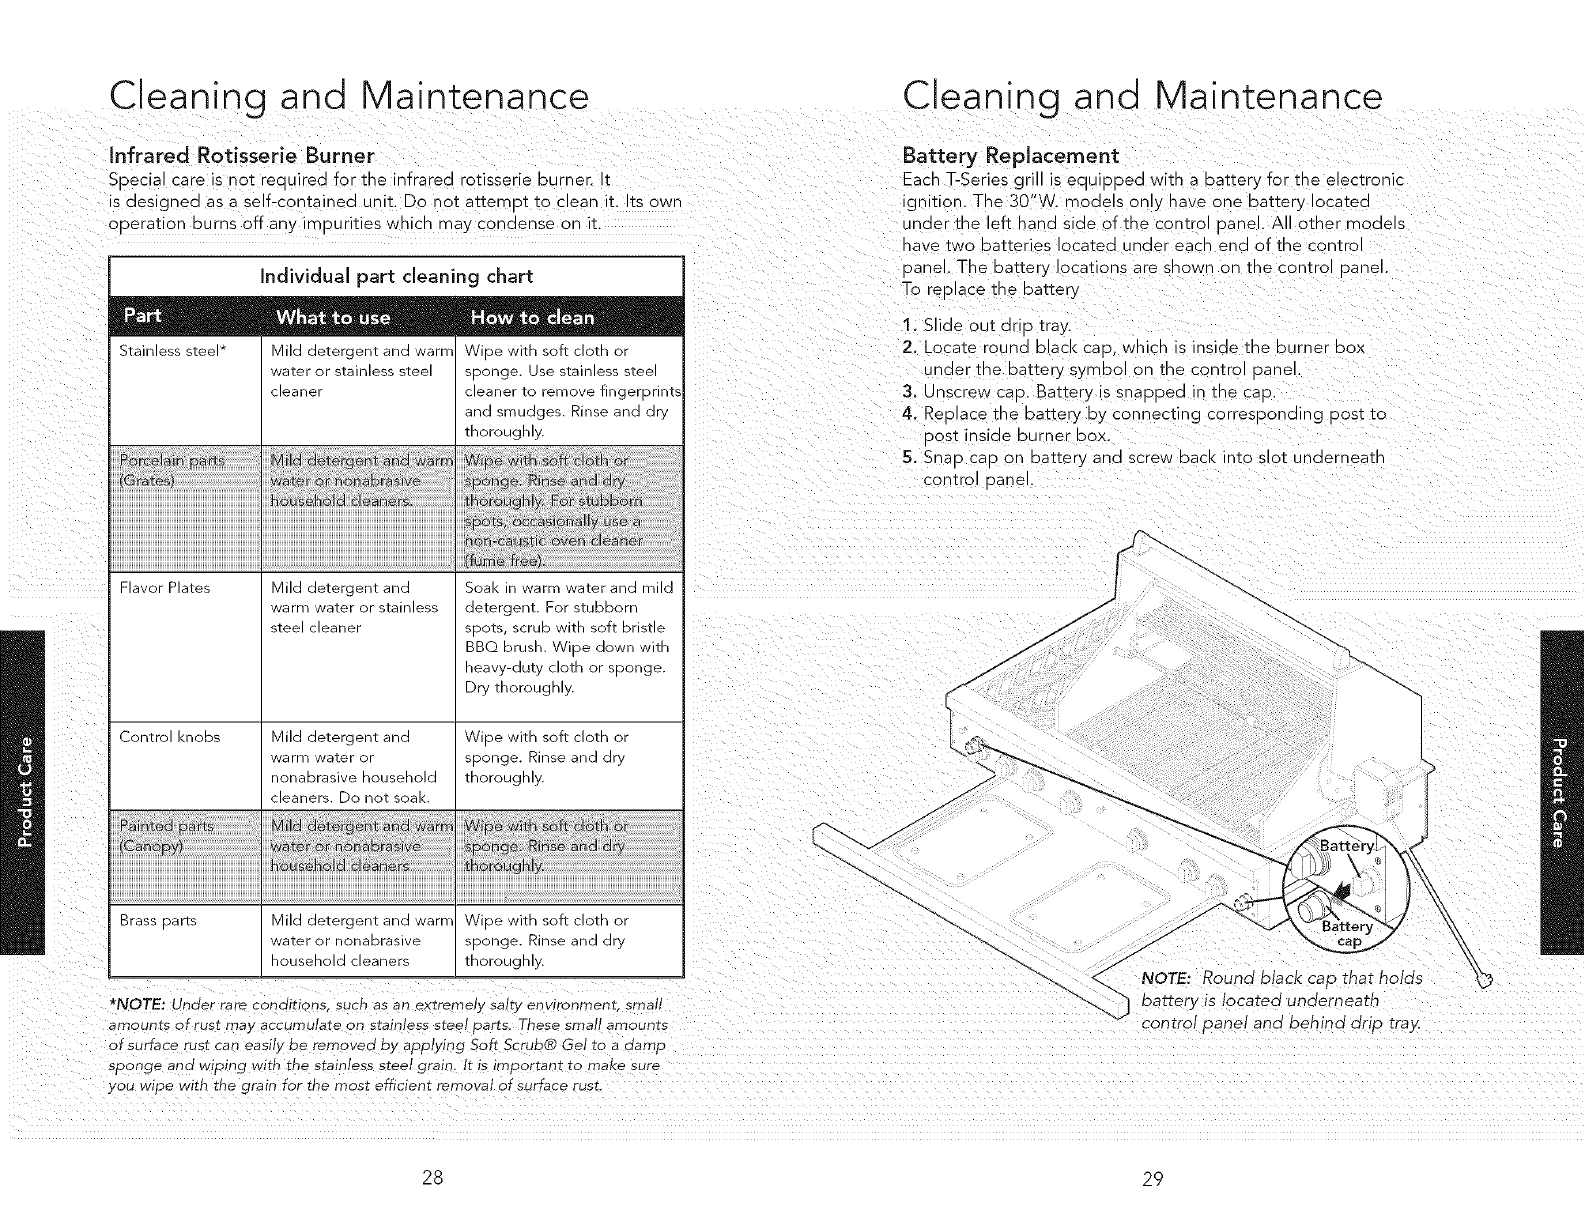
Battery Replacement
Each T-Series grill is eauiDDed with a battery for the electronic
gnition. The 30"W. models only nave one battery ocatea
under the left hanas ca of the control panel. All other models
have two batteries located under eacn end of the centre
:)anel. The battery locations are snown on tne control 3anel.
To reDlace _ne Datter_
1. Slide o Jr drip tra)
2. Locate round blaCK CaD. which s inside me burner POX
Jnaer me battery symbol on tne control 9anel.
3. Unscrew cap. Battery is snapped in the ca9.
4. Replace tne battery Dy connecting corresponding post tc
oost inside burner POX.
5. Snao CaD on Darter) and screw back int3 slot Jnaerneatn
control Danel.
./
/
/J
/NOTE: Round black cad [ha
oa_er) is located unaernearn
confrc oanel and behind dr, _ fray.
_NOTE: Under rare. conditions sucn as an extremely sal[y environment, srna
amounts of rust ma v accumulate on stainless steel Darts. These small amounts
af surface rust can easi y be removed by applying Soft Scrub@ Ge re aoamo
sponge and wiping with the stainless steel grain. It is important to make sure
you w De with the grain for the most efficient remo'.'al of surface rust.
28 29
Cleaning and Maintenance
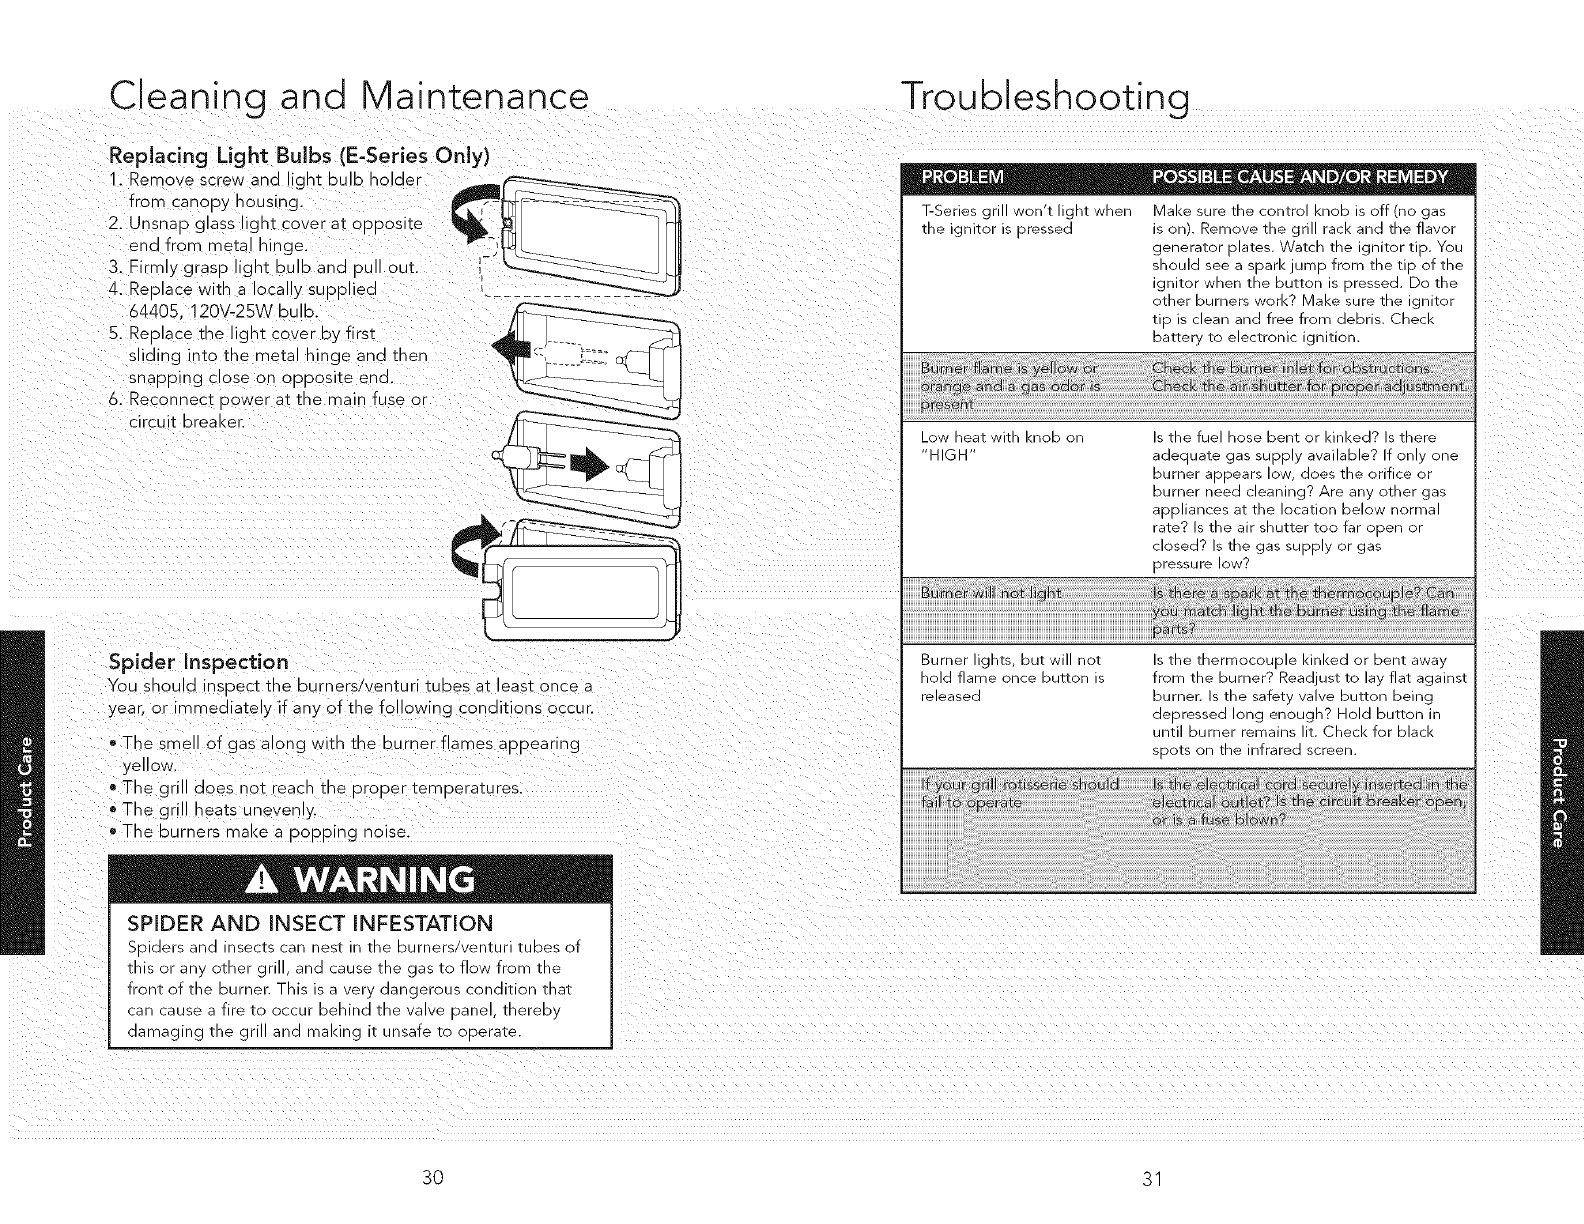
Replacing Light Bulbs (E-Series Only)
1. Remove screw and lignt DUlD nolaer
from canopy housing. __
2. Unsnap glass light cover at oppos te __.,_
end from metal hinge. --)IfI_L--_ I
3. Firmly grasp ght bulb and pul out. _-_,.,_,__
4. Reoacewith a oca yscoDied ..........
64405 120V-25V_ DUID.
5. Replace the light cover Dy first
sliding qtothemeta hingeanatnen
snapping ClOSe on ODDOS ]:e eRa
6. Recor nec_ 9ower a]: the main fuse or
circuit breaker.
Spider Inspection
You snouIcI ;-SDeC]( ]:he Durners/venturi tubes a]: leas]: once
year, or immediate y if any of the following conditions occur.
Thesmel of gas along withtne ourner flames appearing
yellow,
o The gri aoes no]: reacn ]:ne DroDer ]:emDera]:ures.
• The grill hea]:s une/enL_
• The burners make a ooooing noise.
SPIDER AND INSECT INFESTATION
Spiders and insects can qest in the burners/venturi tubes of
this or an. omer ori and :ause me gas to flow from ]:he
front of the burner. This is a very dangerous condition that
can :ausea firetc occur behind the awe oane mereE,
damaging me g : and _nal<ing it unsafe to .)oerate.
Troubleshooting
T-Series grin won T Hgnf wneF Make sure fne contro Knob IS off (no gas
[ne Ignitor s oressea s on Remove the g" rack and the flavor
generator olates. Watch tne ignitor tin. YOU
ShOUld see a spark jump from _ne tin of the
ignitor wnen tne DuEor is oressea. DO the
otner burners work? Make sure tne gnlTor
tin S clean and free frotr debris. Check
Dafter tO electronic ignition.
_ow neat WITh ,'.nod on
HIGH
s the fuel nose Dent or kinked? s mere
aaeoua_e gas SUDDI£ available? • orlv one
burner appears lOW does the orifice 3r
burner need cleaning? Are an otner gas
appliances al _ne iocalrlOn DelOW nortna
ratel is tne air ShUtter too far ooen or
closedl is tne gas sunni or gas
pressure ow?
Burner ignts, OUt Will not
sold flame once DUTfOn S
-eleased
s tne tnermocouole KinKed or Dent awa
from me burner? Read ust Tc lav flat agalnsf
Durnen s the safet_ ValVe DUTTOR me_ng
aeoressea ong enough? mold DUttOr
until burnerrernams r. Check for blacK
soots )n the infrared screen.
3O 31
Service Information
f service is recuired, ca your aea er or authorized service
agen%. The name of the authorized service agency can De
obtained from the dealer or distributor ir }our area.
Have the following _ formatior reac y available.
*Model number
Serial number
o Date burcnasea
e Name of dea er frorr wnorr Durcnaseo
Clearl], describe the OrODlem that vou are na\ing. If you are
JnaDle to obtain the name of an au[norized service agency, or if
you continue to have service DrODlems, contact Viking Range
Corooration at (888) 845-4641. or write to
VIKING RANGE CORPORATION
PREFERRED SERVICE
111 Front Street
Greenwood, Mississippi 38930 USA
Record the information indicated below. You will need it if
service is ever reo_ red. The r-'oae and serial number for _our
gri is Iocateo on an identification olate iocateo Jnoer the drip
tray in me rear left corner n ext to the inlet bide.
Moael no. Seria' no.
Date of ourcnase Date installec
Dealer's name
Ad a ress
f service reouires installation of Darts, use only authorized oarts
to insure brotectic ^ unaer iRe warranty.
Keep this mar ual for future reference.
Warranty
PROFESSIONAL SERIES OUTDOOR GAS GRILL WARRANTY
ONE YEAR FULL WARRANTY
Outdoor gas grills aria a of their component DarTs. except as detailed below" are warranted to be free ftom
_efective materials or workmansh 9 in normal household use for a beriod of twelve 12/_nonths ftom the date OT
ongEnal fetal )urcnase. viking Range Cc r_orauon, warrantor agrees zo "eDalr or reDEace, a_ its option, any pan
_hich f_ is or is found to be defective during _e warranty penoa.
_Painted and decorative items are warranted to be flee from defective materials or workmansh _ Tor a aenoa ot
_lnety (90) days ftom the date of or ]lnal re_aH _ura_ase. ANY DEFFCTS MUST BE REPORTED TO THE SELUNG
DEALER WiTHiN NINET] 90) DAYS FROM DATE OF ORIGINAL RETAIL PURCHASE. Viking Range CorDorauor
uses _e mos_ L9-To-aaTe processes aria pest materials avaJEaD_eto >roauce al_color Tinlsnes. rloweve_ Slgrit
:olor varlaTEonma_ be noticed because of the inherent differences in DaJn_ea DarZSaria porcelain barfs as we_ as
a_serences in K_TcTlen_Jgnung, proauct ioca_ons and other factors.
FIVE YEAR LIMITED WARRANTY
_,, uumer assemu_es TruSear TM infrared burne_ nfrared rotisserie burne_ >r >orcela_n gn grate which fails due
_o defective materials or _vorkmansn oin normal nousenol{] use (_unng the _scona ThrOUghTlrr_year from th_
dateoforiglnalre_a aurcnase_H_aerer_alreaorreDJaced freeofchargeforther_arritself _l_r_Tneo_vner
r_aylng _l other costs. Inc]udlr _ £_bor.Corrosion scra_a_ng, aria a_sco_ora_on aue to _m_rouer use aria care oT
_r_eou_aoor uroduct _s excluded rrorn iBiS warranty
LIFETIME LIMITED WARRANTY
_,- s_a_nlesssteel Dar_ or _orce_a_n grill gra_e _vn_cn rusts _nrougn aue _c defective materials or workmanshb in
normal nousenola use aunng _e Tn_ _rougn _ne USeful lifetime of the grill from the date of original ret_
:_urcnase will De reua_rea or re_]aced, free of charge for the part itself, with the owner uaylng aNo_ner costs
nc_ua_nc _oc
NIN ETY 9g) DAY RESIDENTIAL PLUS WARRANTY. This warranty aoolles zo abD]ications where use of the
r;roauc[ ex_enas oevona norma_ reslaen_la_ use. Exan-bles are ou_ no_ HmlTea tc bed and breakfasts Tire
s_auons, orlvaTe c_uos cnu_es etc. This warrant, excluaes all cor mercla_ _oca_ 9ns SUCh as restaurants, fooc
sen_lce _ocauons aria _nsT_wiona] food service locations
This warranty ex_enas To _e onglnal _urchaser of the oroduct warranted hereunder and to each transferee owner
_T_ne oroauct aunng [he term of the warrant T
This warranty snail appty _o proaucts pura_asea ana iOCaTea in the United States and Canada. Products must be
ourcnasea in _ne cound) where service is reauested. Warranty labor sna_l be aerformed D) an au_nonzea wKing
Range Cormorauon sen/ice agency or reDresentatwe. Warranty sna_ not oDDly to aamage resulting Trom abuse.
acaaent narura_ atsaster )ss ot e_ec[nca_ oower zo _e 3roduct for an} [_asor a[tera_on _murouer insgaNauon
--DroDer operation or repair or service of the oroauc_ Dy anyone outer _r_an an au_onzea VIKing Range
goloorauon seD_lce agency or re )resentative. This warranty aoes no_ appl) to commeraal usage. Warrantor i_
no_ resc )nsib]e for conseoaen_ta_ or inaaentat aamage whether ans_ng out of breach of warranty, breach of
con_rac] br otherwise. Some ur[sa[c_tons ao not aNow the exclusion or itm_a_ _n o_ _nc_aenga_ or conse<]uen] a
aamages, so _qe above Hmt_auon or exaus_on may no[ appty To you.
Owner shall be responsible for urouer instaHatior arowalng normal care ana maintenance, provlalng proof of
purchase ubon reaues_ aria making the a_r_ance reasonac, accessib]e for service. If the )roduct or one of TS
cor Donen_ Darts contains a aeTecr or ma_rdncson aunr ] _ne warranty Denoa after a reasonable number of
aTterr sis D] _qe warrantor TO remeay _le ae_ec_s or ma_uncuons [ne owner _s enut_ea TO e_sler a etuna or
reolacement of the DroaucT or _S cor portent Dart or Darts. Narrantor's hablhty on any claim of any (lna. w_l
respect TO_ne gooas or services coverea nereunaer, sna in no case exceea _ne bnce o_ _se c )oas or service c
oart thereof which c ves rise TO The C aim
WARRANTY SERVICE: Under tJ_e terms of this warranty, sen/ice must Be aerformed by a factory autnorlzec
_ ] Range Co _orar_on service agent or reDresentatwe. Service w_[] be Drov_aea aunnc norma_ _us_ness
nour_ aria _aDc performed at overtime or 9rem_um rates shah no_ De covere(] Dy TIllS warranty. To obtain
warran_ service contact the deaJer from whom the uroauct was 9urcnase<] an au_qonzea wK_ng Range
2oroorauon sen/_ce agent, or Viking Range Corooration. Provide model and serial number and date of or j_na
,_urchase. For the name of, our nearest au_onzea ViKing Range Coroorauon service agency, call the dealer ftom
whom _n_ uroauct was _urcnased or Viking Range Co _oration. IMPORTANT: Retain _roof of original uurcnase
TO establish warranty genoc_
The return of the Owner Registration Card is not a condition of warranty coverage, rOD snou_a hot, even rerarn
the Owner ReglstratJon Card so that Viking Range Cqrpora_lon can con_ac_ you snoula any question oT satery
arise wr cn cou_a a_recr yo_
_qy Im F ied warranties of merc_an_abH_ty and fitness a_@Hcau_e _o _ne a_ove aescnbea burner assemblies
nTrarea ro_sserEe burners _orcela_n grill c _Tes aria s_a_nless sTe_ _arLs are hmffed in duration to the _er_od of
cove_ge OT_e applicable express wr_en Eim_ea warranties set forth above. Some ur_sa_ct_ons ao not a_low
iml_a_ons on now ior _ an imc _ea warran_ _s_s so T]_e above llml_z_lon may not a_ly To yoL This warranty
gives you specific legal r iBiS, ana you may also nz/e other rights which may vary from jurisdiction to jurlsalc_or
SDecmcatlons subjec_ to cnange wl_nou_ notice.
32 33
