VTech Telecommunications 80-0242-00 DECT 6.0 Cordless Telephone with Digital Answering Machine and Bluetooth - Base Unit Blutooth Portion User Manual manual1
VTech Telecommunications Ltd DECT 6.0 Cordless Telephone with Digital Answering Machine and Bluetooth - Base Unit Blutooth Portion manual1
User Manual
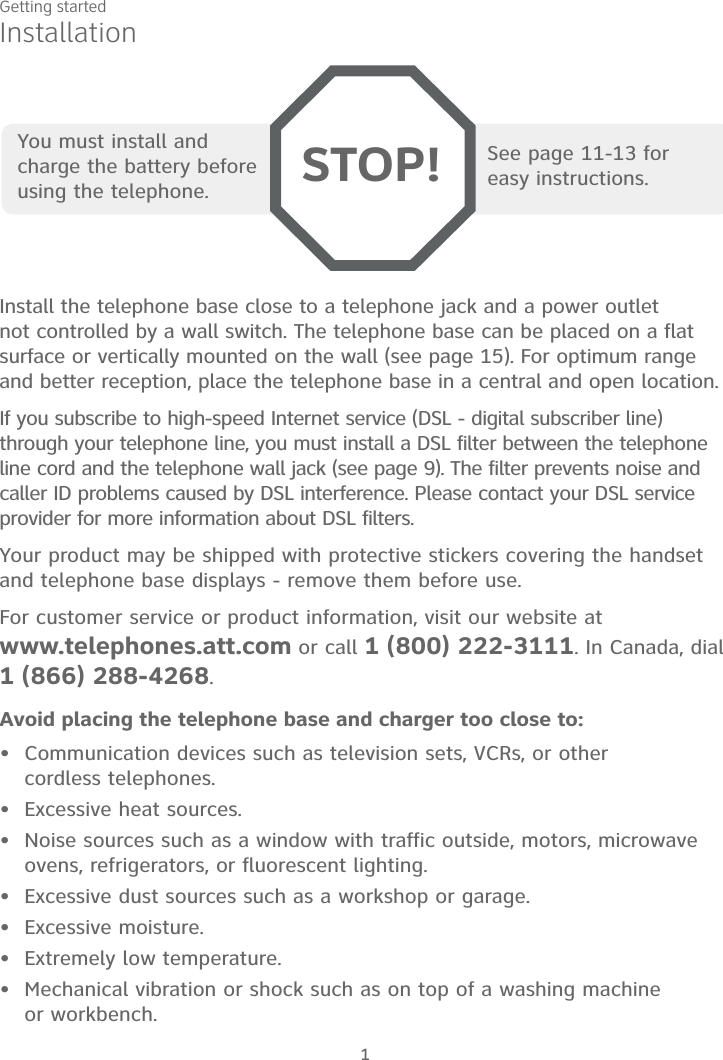
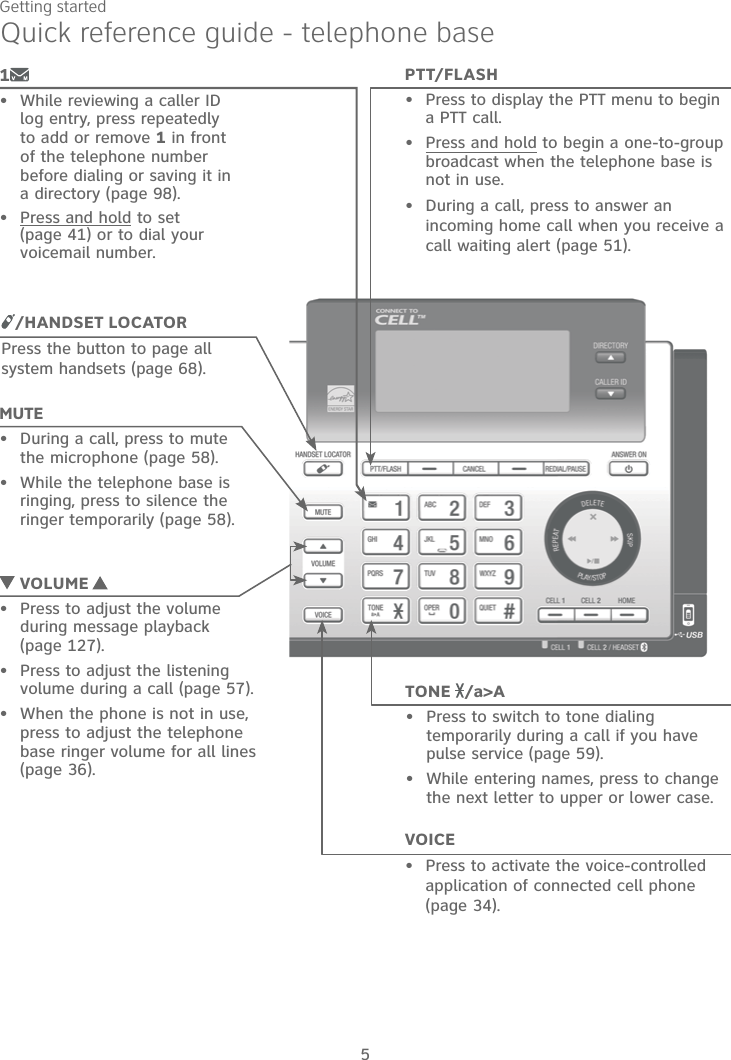
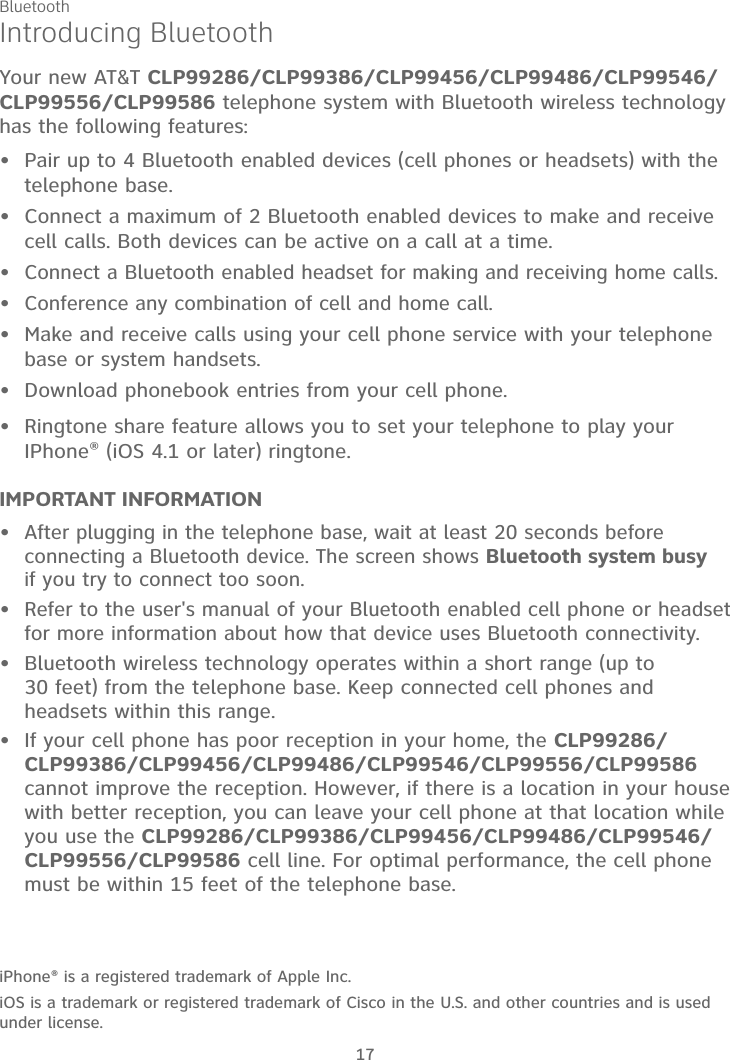


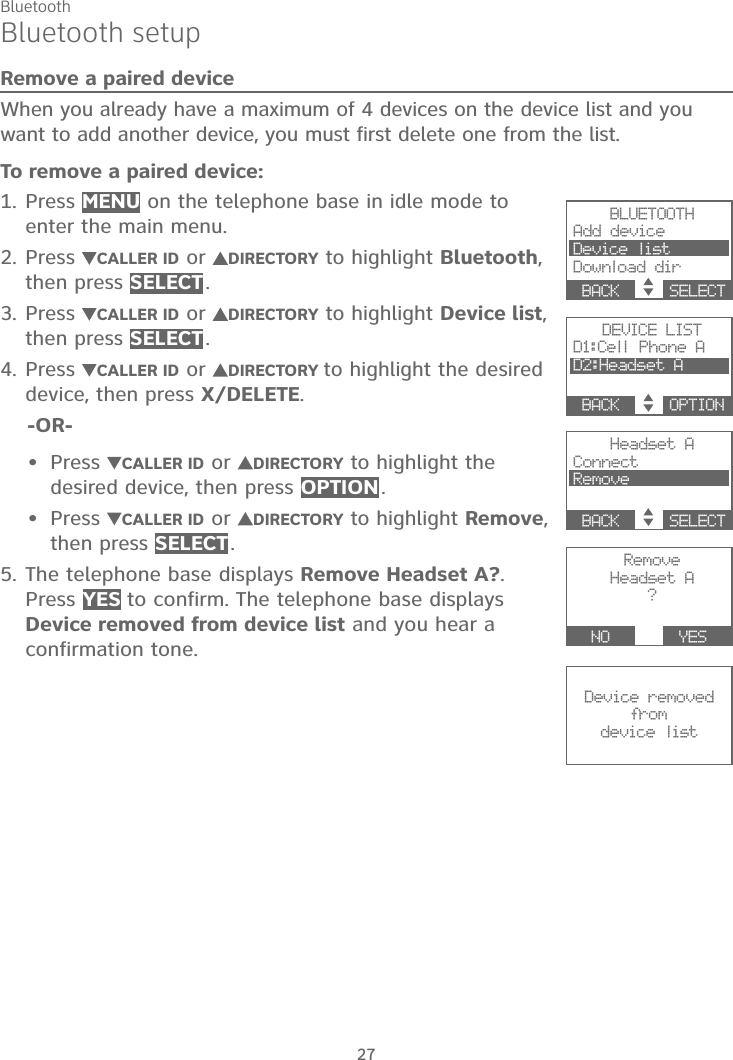

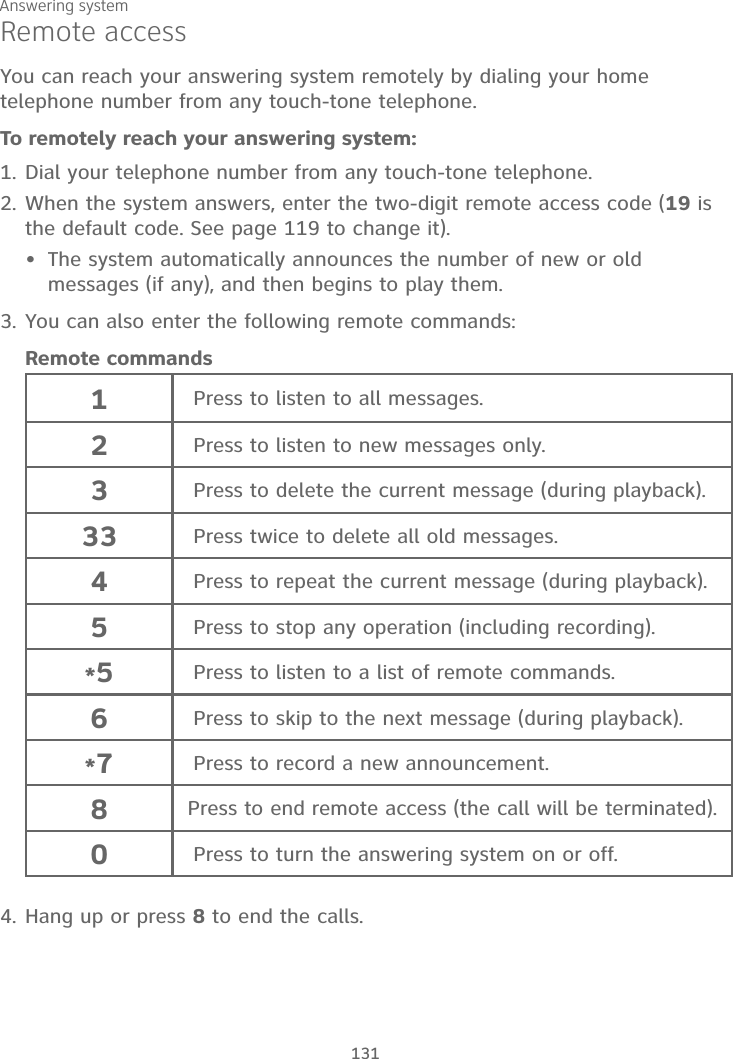
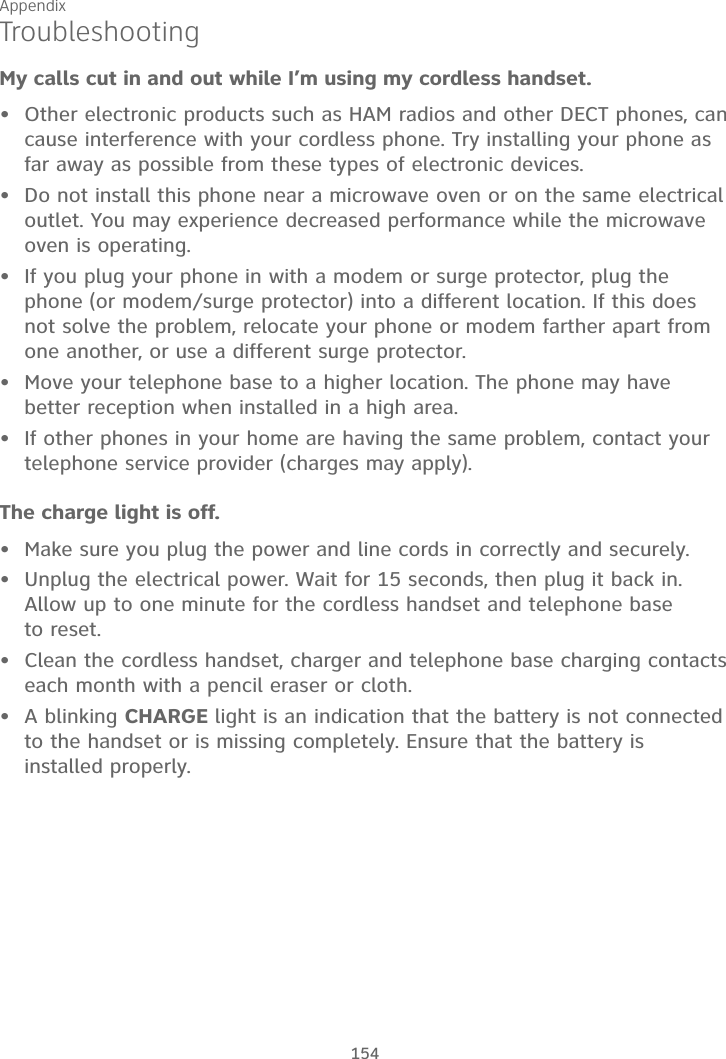
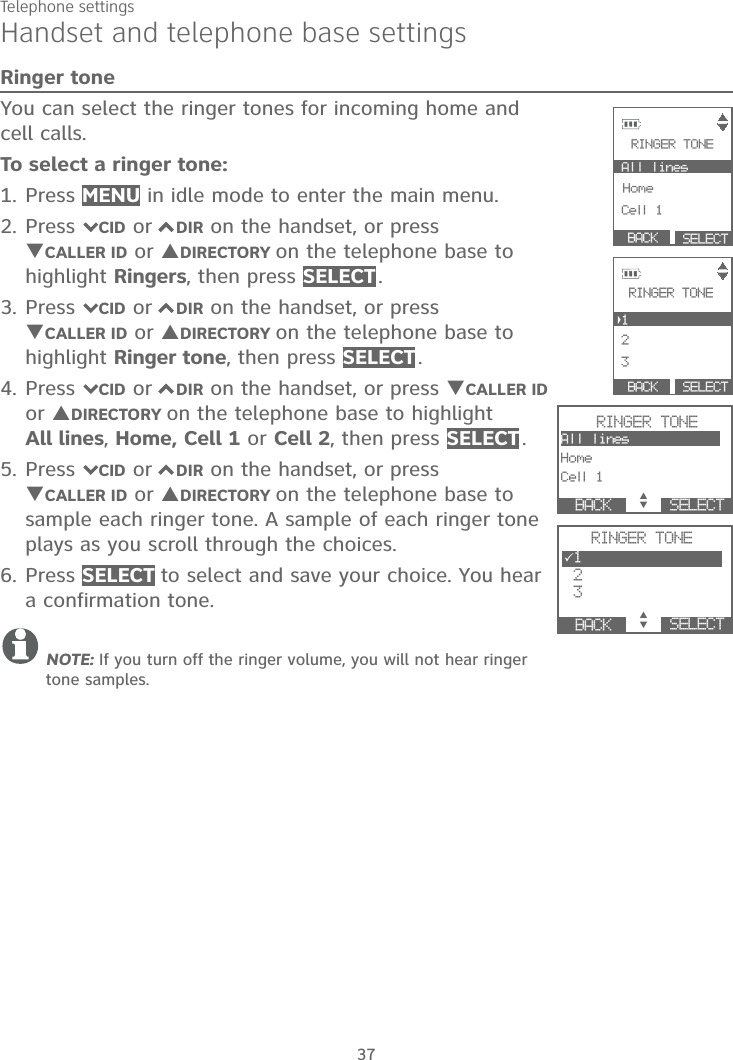
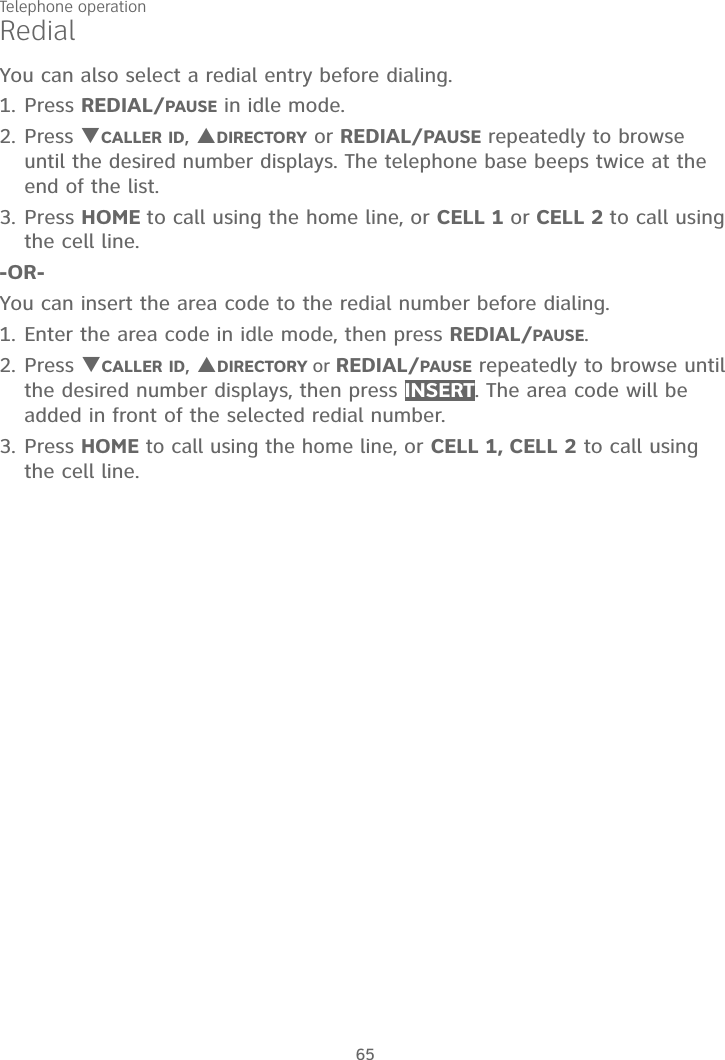
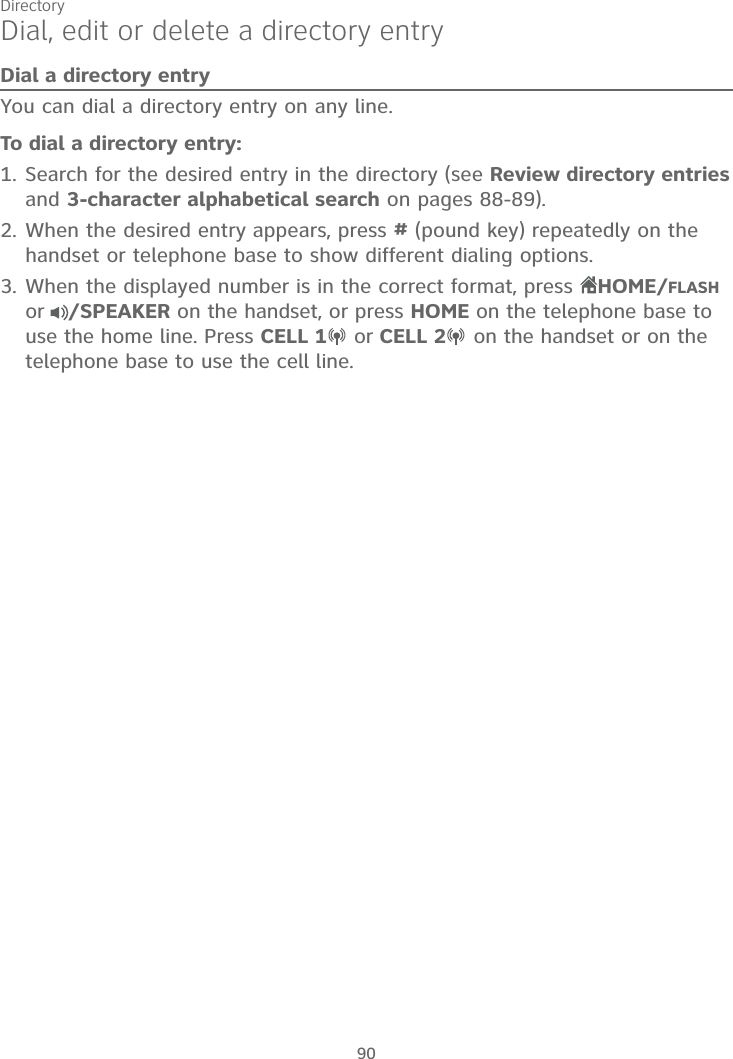
![Bluetooth34Bluetooth setupRemote voice controlIf you have connected a cell phone to the telephone system, you can activate the voice-controlled application of the connected cell phone, such as Siri® on iPhone, Google NowTMon Android devices or S VoiceTM on SamsungTM products, via your telephone system.1. Press VOICE on the handset or telephone base.If you have connected two cell phones to the telephone, the telephone shows Activate remote voice control of 1: CELL 1 2: CELL 2. Select CELL 1 or CELL 2.2. The telephone then shows Activating remote voice control....3. When the function is activated, the telephone shows Voice control 00:00:00 To reply, press [VOICE] again..Speak toward the handset or telephone base to send voice command to the cell phone.4. Press END,HOME/FLASH,CELL 1 , CELL 2 or OFF/CLEAR to stop remote voice control.NOTES:To activate the remote voice control function of the cell phone, you must first pair and connect the cell phone to the telephone system. Refer to Add a cell phone section on page 21 for pairing and connecting a cell phone.You can press /SPEAKER on the handset to switch to speakerphone mode.If the cell phone is in use, the telephone displays Bluetooth system busy.If you press VOICE during an intercom call, the call will be terminated.If the activation fails, the telephone displays Connection timeout. Please check the phone status.. Press OK and try again.Siri® is a registered trademark of Apple Inc.Google NowTM is a trademark or registered trademark of Google Inc.SamsungTM and S VoiceTM are trademarks or registered trademarks of Samsung Electronics Co., Ltd.••••••VOICE1 2Activating remote voice c o n t r ol... END 1 2Activate remote voice control of1: CELL 12: CELL 2 CELL 1 CELL 2 1 2 END Voice control00:00:01To reply, press[VOICE] again.](https://usermanual.wiki/VTech-Telecommunications/80-0242-00/User-Guide-2894801-Page-40.png)
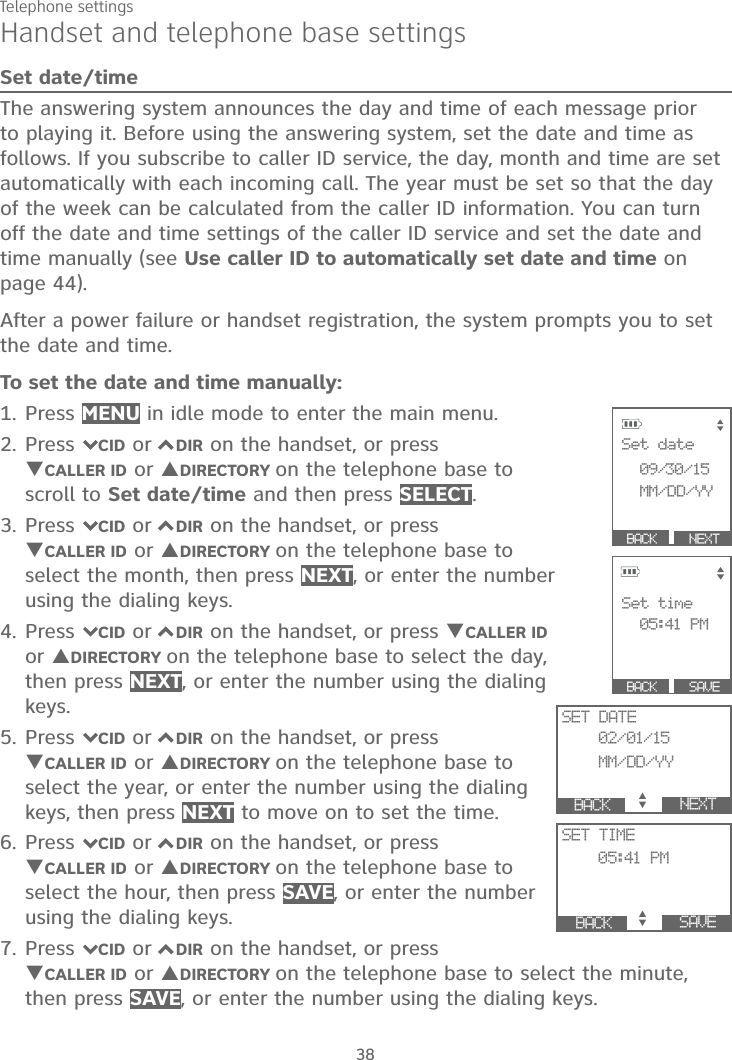


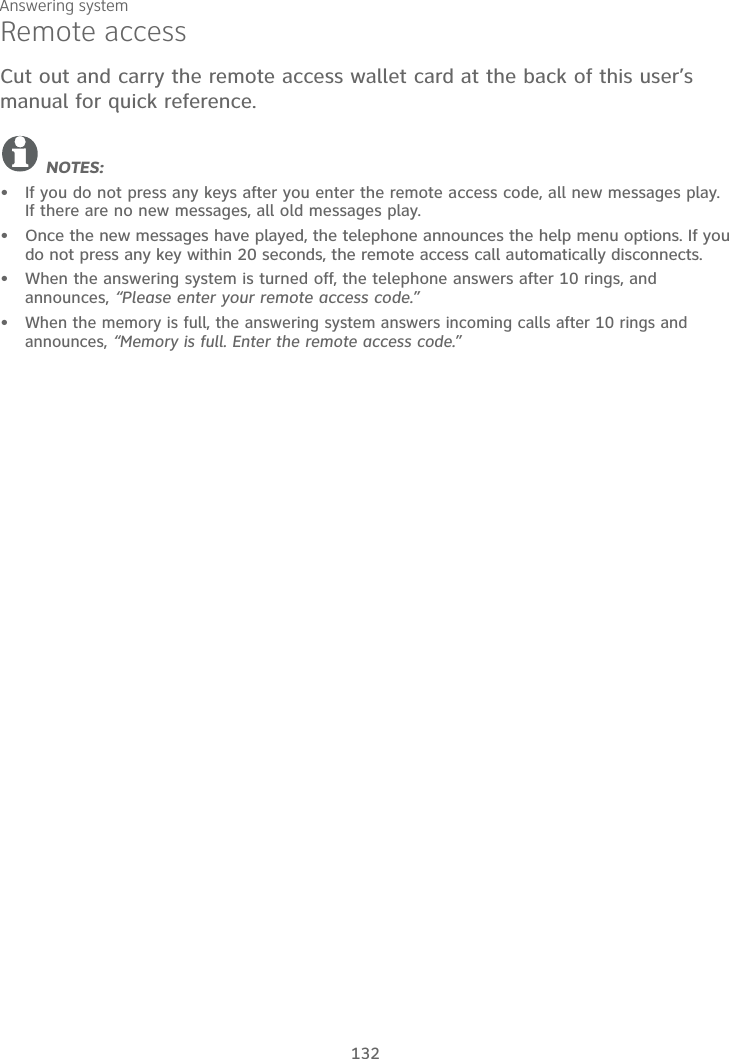
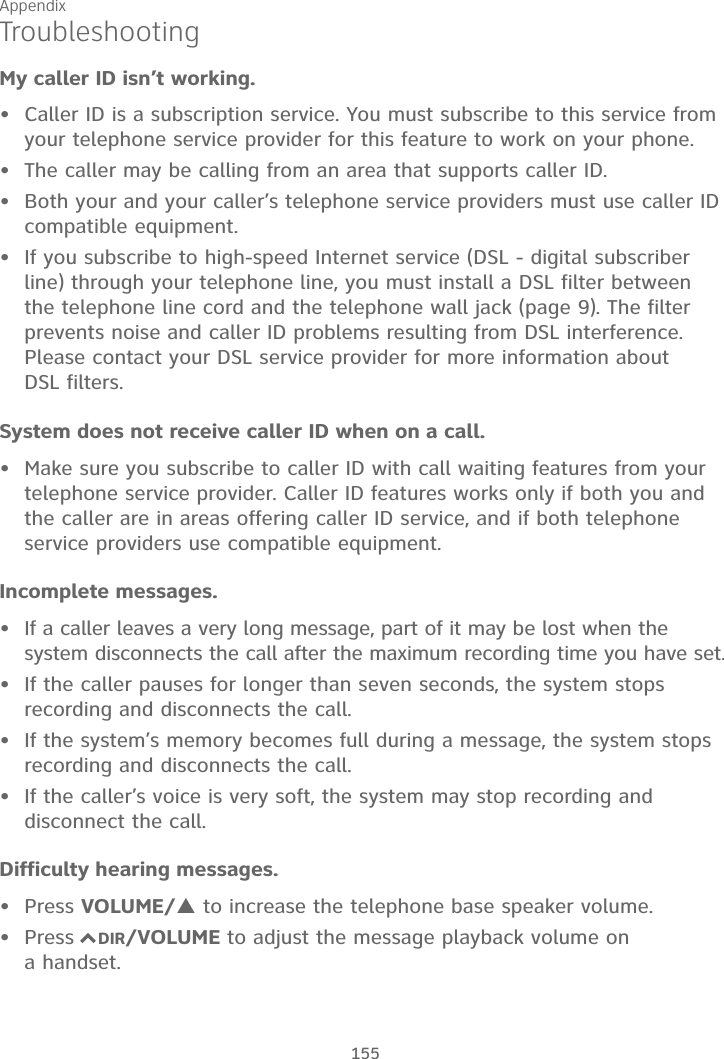
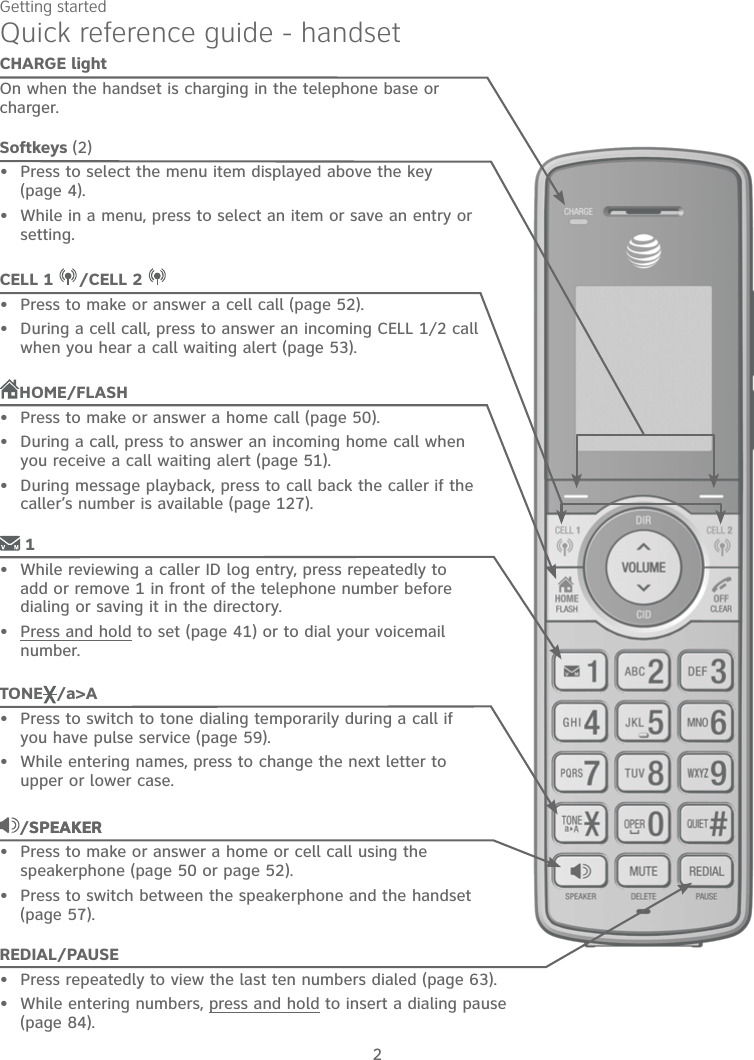
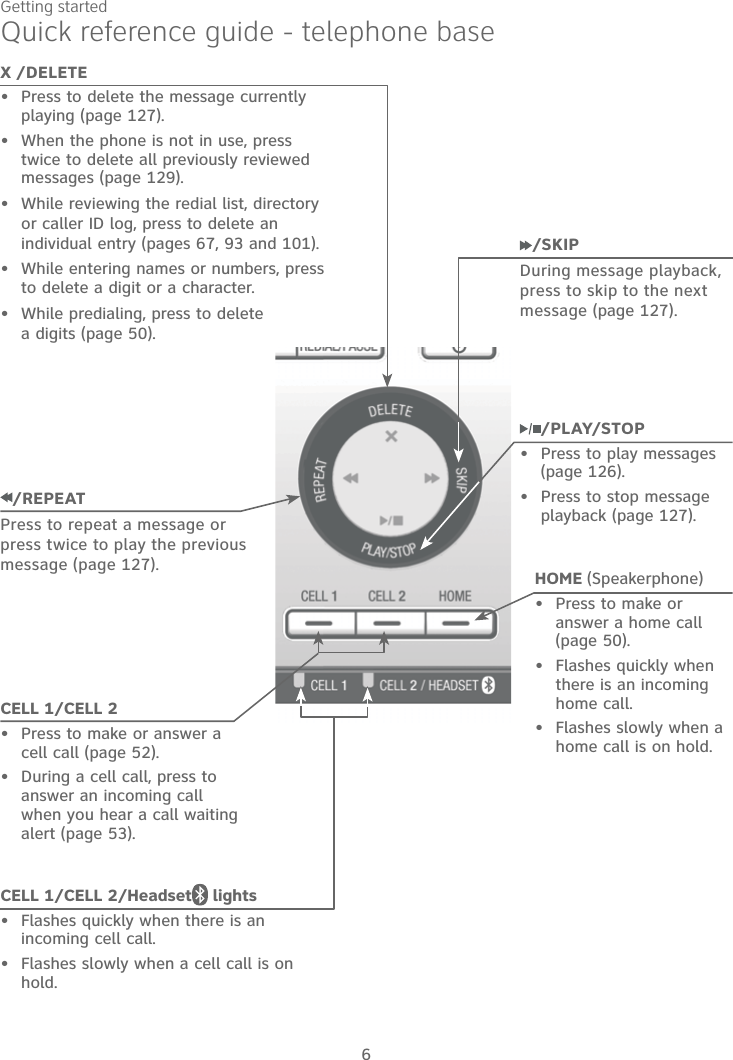
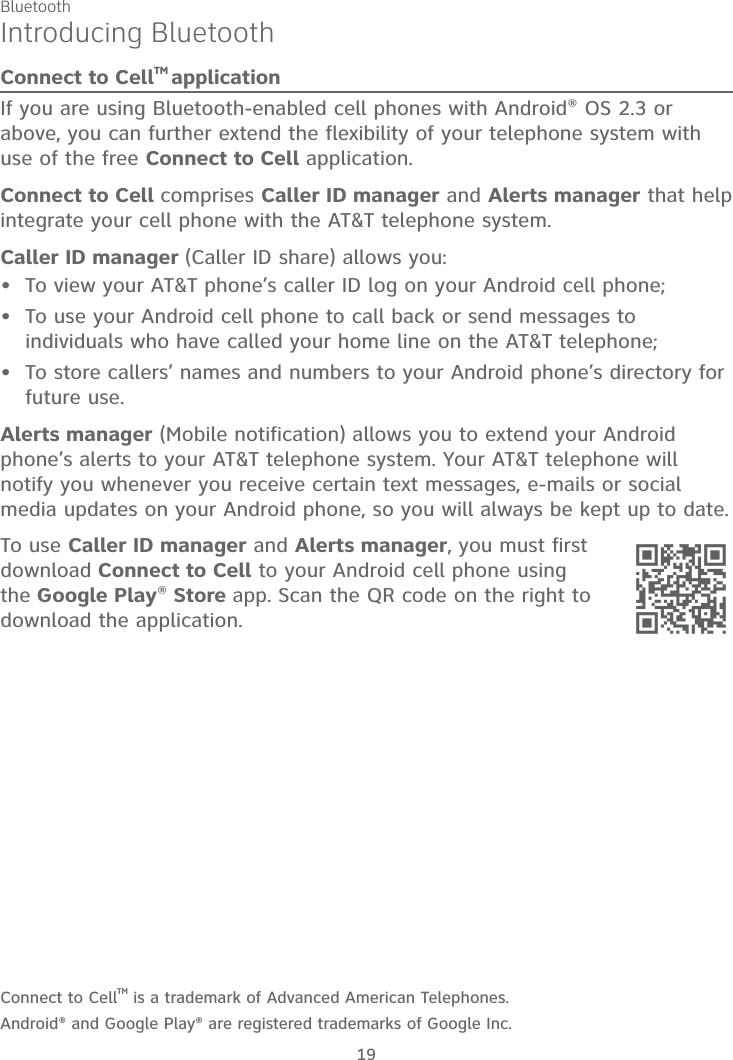
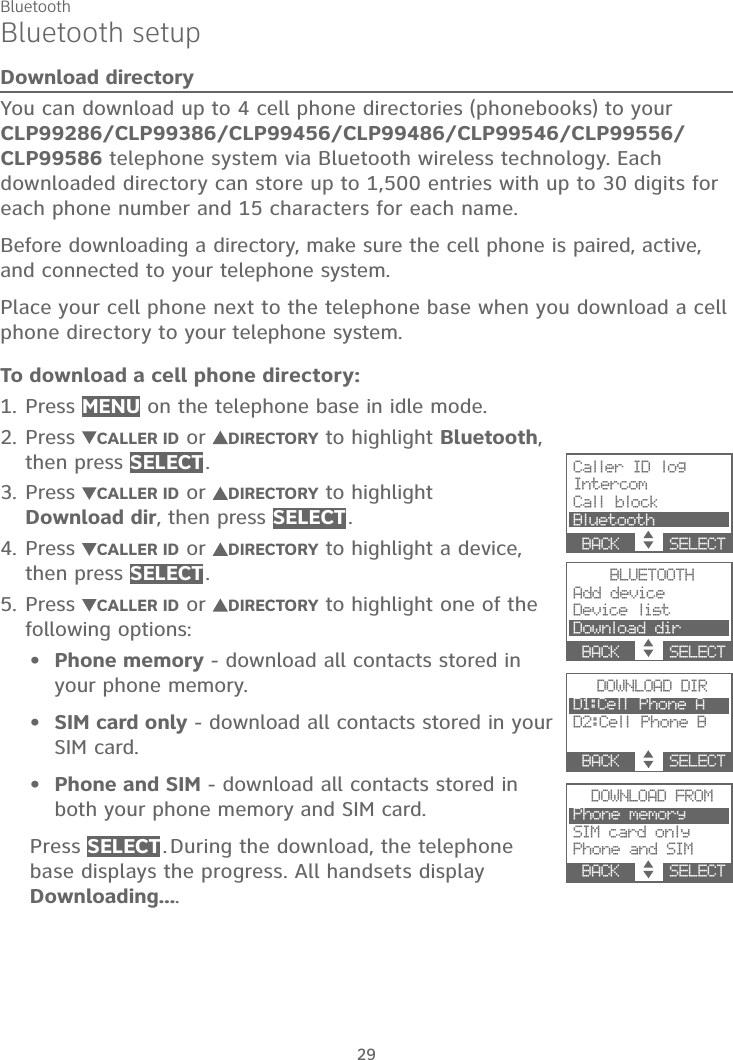
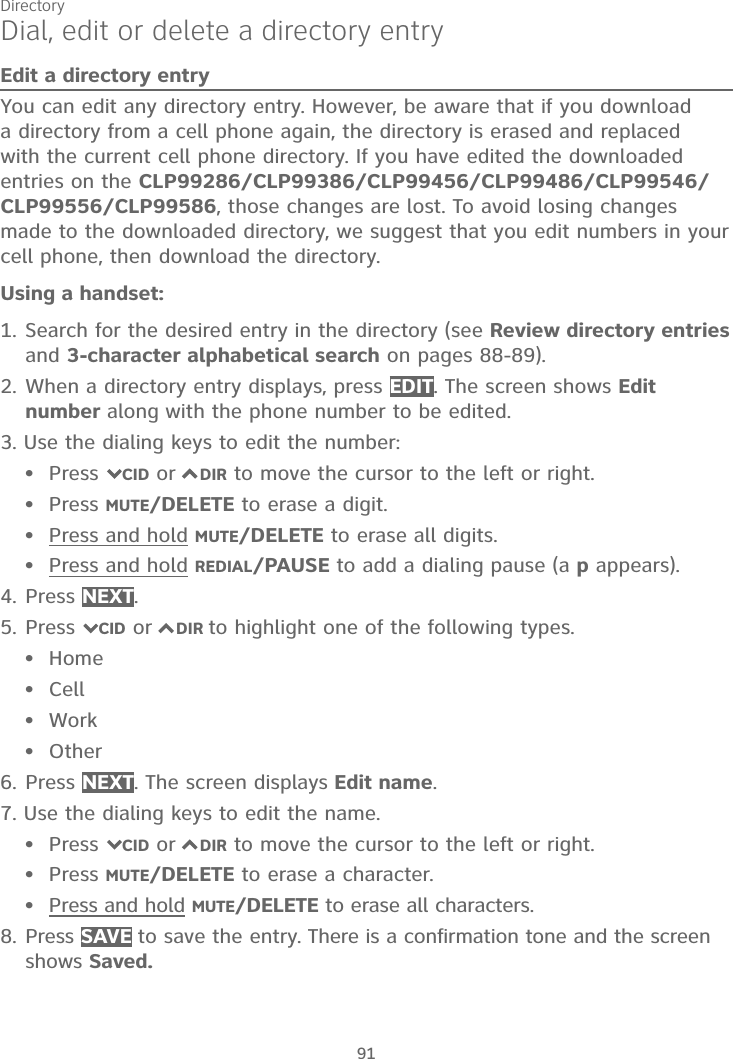
![Multiple handset use76Push-to-talk (PTT)PTT call to a single deviceUsing a cordless handset:1. There are a few ways to begin a PTT call to a single device. When the handset is not in use:If you have one handset, press and hold PUSH TO TALK.If you have more than one handset: Press PUSH TO TALK on the handset, then use the dialing keys to enter the destination device number.-OR- Press PUSH TO TALK on the handset. Press 7CID or 7DIR to highlight the destination device number, then press SELECT or PUSH TO TALK.The handset shows Connecting to HANDSET X... (HANDSET represents the handset name, X represents the destination handset number) orConnecting to BASE 0... (BASE represents the base name)for a few seconds. When the connection is made, both your and the destination device screens display Press and hold [PTT] to talk.2. Press and hold PUSH TO TALK. A chirp indicates your microphone is on. Speak towards the device. Your voice is broadcast to the destination device.While you are speaking, your handset shows PTT To HANDSET X orPTT To BASE 0.3. Release PUSH TO TALK after speaking. Both devices beep once again and the screens show Press and hold [PTT] to talk, then you can press and hold PUSH TO TALK to continue speaking or the destination device can respond (see Answer a PTT call on page 80).4. To end the PTT call, press OFF/CLEAR or END, or place the handset in the telephone base or charger. The handset shows Push to talk ended.NOTE: After PUSH TO TALK is released, the PTT call remains open for a short time. If no one presses PUSH TO TALK within 10 seconds, the PTT call ends automatically.••](https://usermanual.wiki/VTech-Telecommunications/80-0242-00/User-Guide-2894801-Page-82.png)
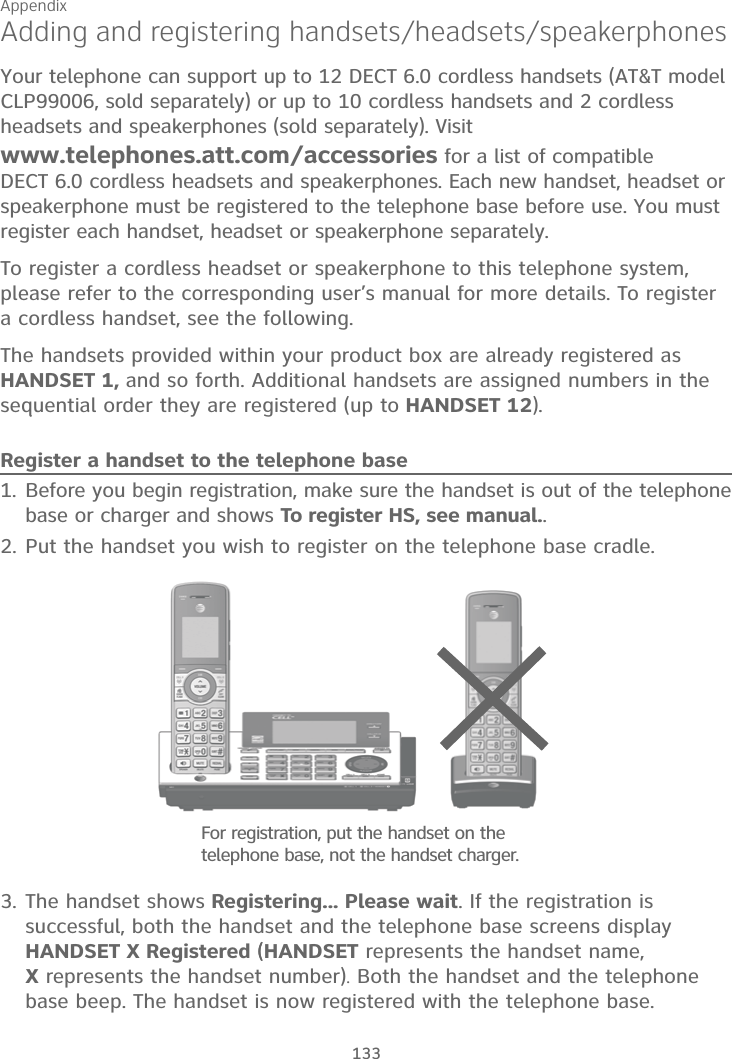
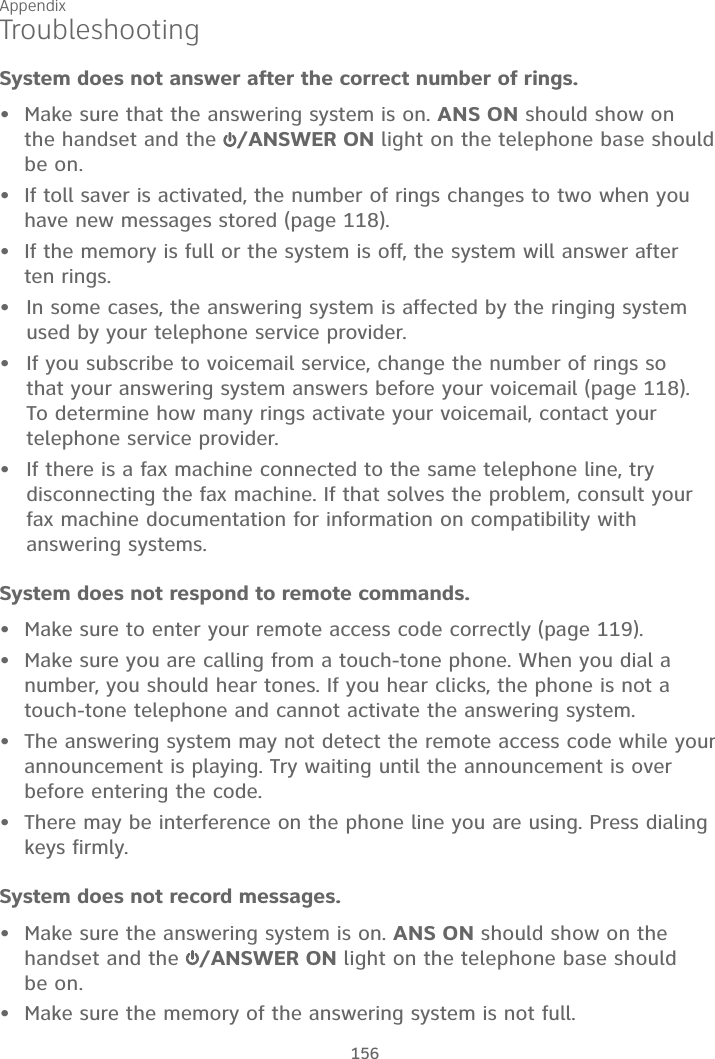
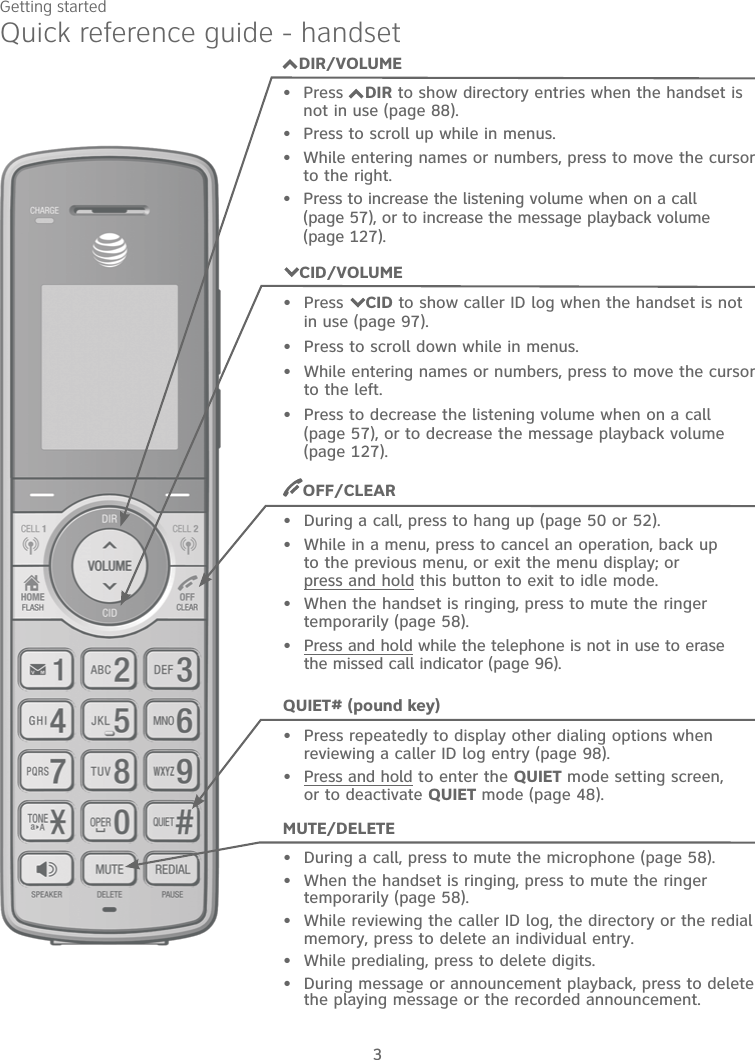
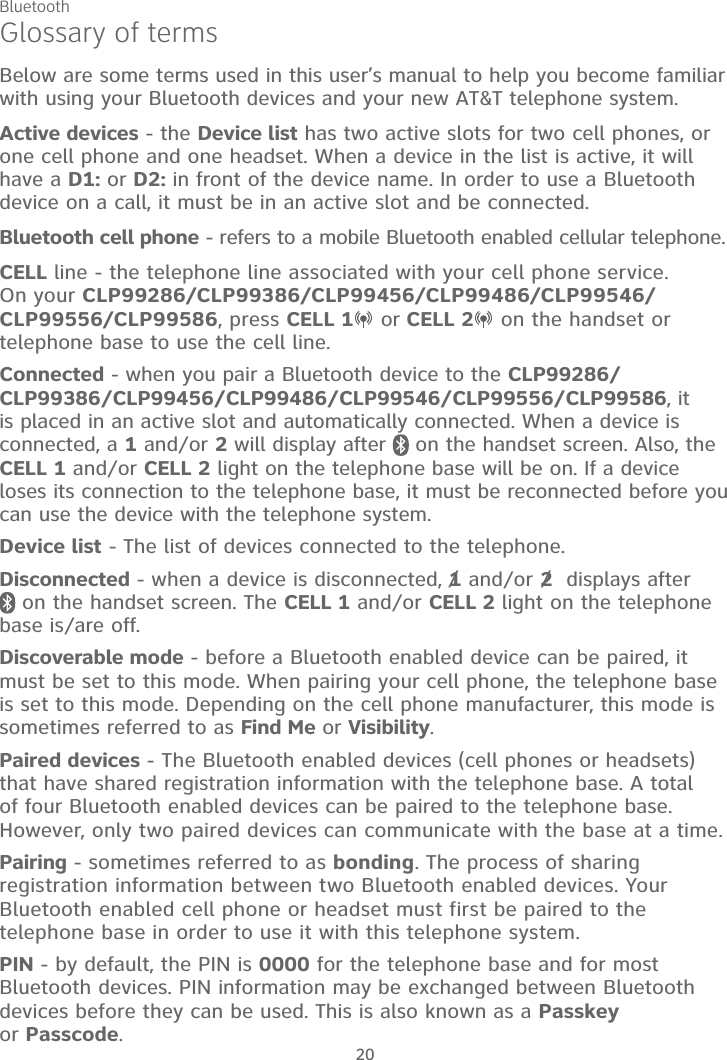
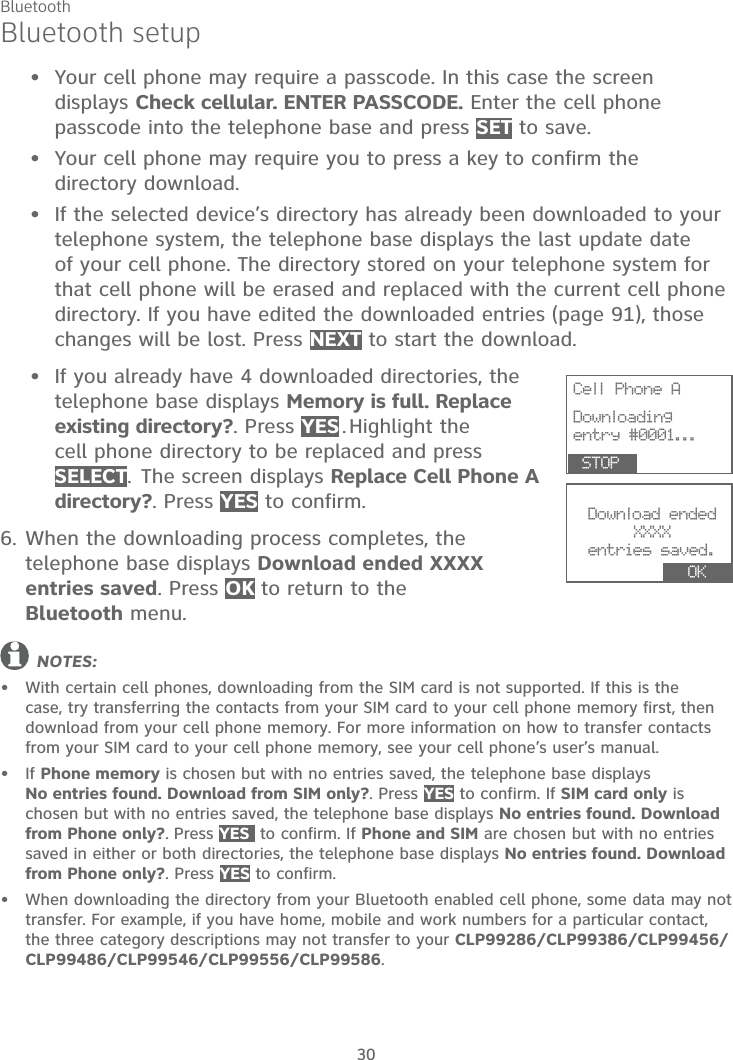
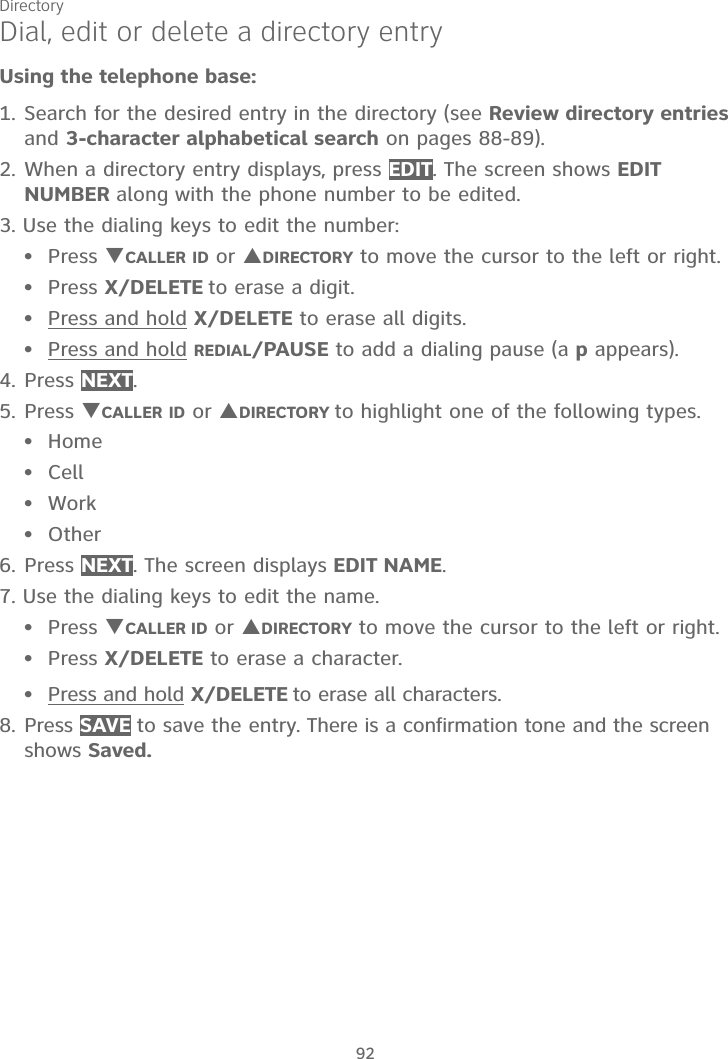
![Multiple handset use77Push-to-talk (PTT)Using the telephone base:1. There are a few ways to begin a PTT call to a single handset. When the telephone base is not in use:If you have one handset, press and hold PTT/FLASH.If you have more than one handset: Press PTT/FLASH,then use the dialing keys to enter the destination handset number. -OR-Press TCALLER ID or SDIRECTORY to highlight the destination handset number, then press SELECT or PTT/FLASH.The telephone base shows Connecting to HANDSET X... (HANDSETrepresents the handset name, X represents the destination handset number)for a few seconds. When the connection is made, both the telephone base and destination handset display Press and hold [PTT] to talk.2. Press and hold PTT/FLASH. A chirp indicates your microphone is on. Speak towards the telephone base. Your voice is broadcast to the destination handset. While you are speaking, the telephone base shows PTT To HANDSET X.3. Release PTT/FLASH after speaking. Both devices beep once again and the screens show Press and hold [PTT] to talk, then you can press and holdPTT/FLASH to continue speaking or the destination device can respond (see Answer a PTT call on page 80).4. To end the PTT call, press CANCEL or END. The telephone base shows Push to talk Ended for a few seconds.NOTE: After PTT/FLASH is released, the PTT call remains open for a short time. If no one presses PTT/FLASH within 10 seconds, the PTT call ends automatically.••](https://usermanual.wiki/VTech-Telecommunications/80-0242-00/User-Guide-2894801-Page-83.png)
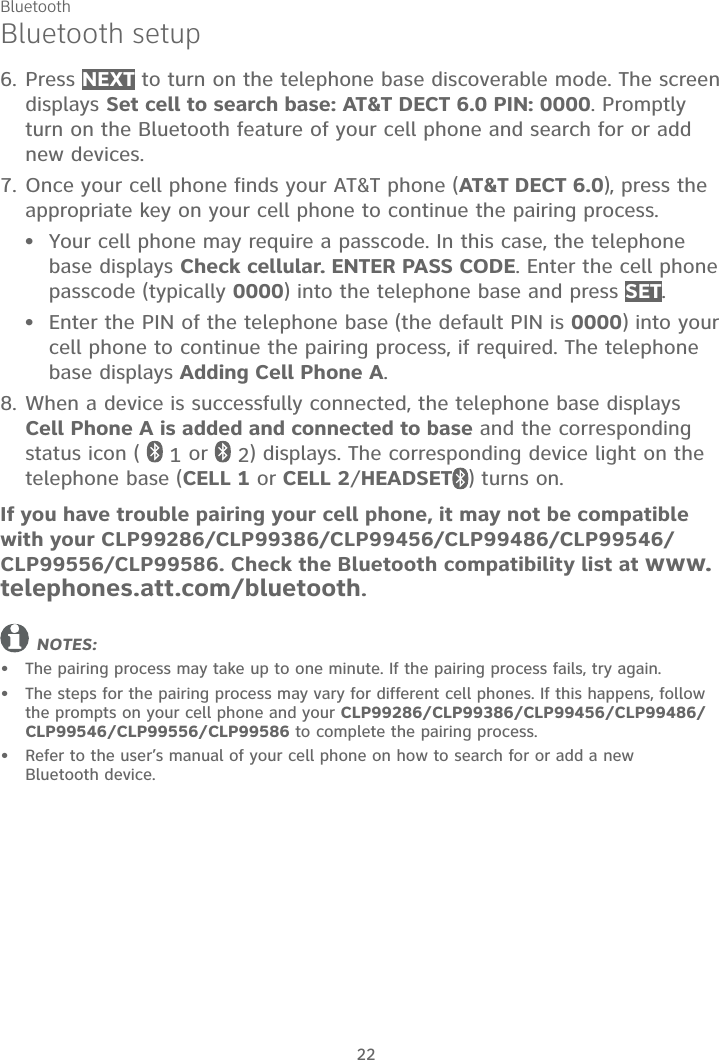
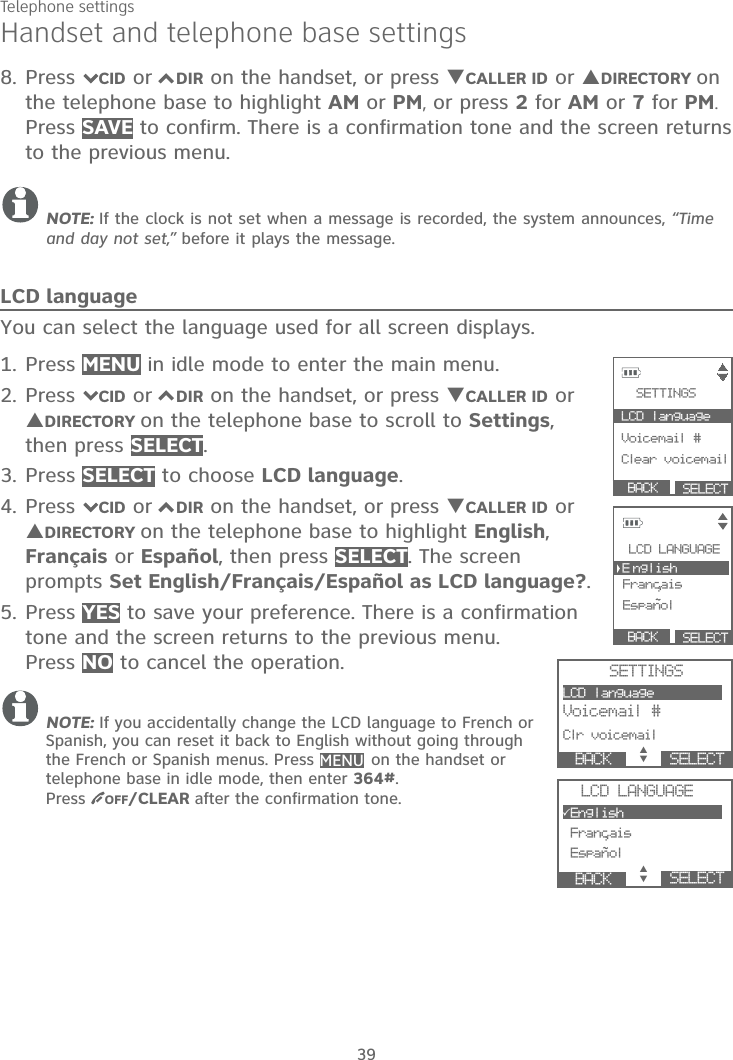
![Multiple handset use80Push-to-talk (PTT)Answer a PTT callYou can respond to a PTT call, as described below.Using a handset or the telephone base:When your device receives a PTT call, it beeps and shows Press and hold[PTT] to talk.When the other party is speaking, your speakerphone light is on, and your device shows:PTT From HANDSET X To devices: X (the first X represents the initiating handset number, and the second X represents your handset number; a maximum of four handset numbers appear).-OR-PTT From BASE 0 To devices: X (the X represents your handset number; a maximum of four handset numbers appear).When your speakerphone light is off (the screen shows Press and hold[PTT] to talk), press and hold PUSH TO TALK on your handset or PTT/FLASH on your telephone base. You will hear a chirp. Speak towards the device.While you are speaking, your device shows PTT To Handset: X (Xrepresents the handset numbers of one or more destination handsets; a maximum of four handset numbers appear) or PTT To devices: X (Xrepresents the handset numbers of one or more destination handsets; a maximum of four handset numbers appear).Your voice is broadcast to all destination devices.After speaking, release PUSH TO TALK on your handset or PTT/FLASHon your telephone base. Your device will beep. After the beep, if your speakerphone light is off, you can press and hold PUSH TO TALK on your handset or PTT/FLASH on your telephone base to continue speaking, or the destination device can respond.1.2.••3.••](https://usermanual.wiki/VTech-Telecommunications/80-0242-00/User-Guide-2894801-Page-86.png)
![Multiple handset use81Push-to-talk (PTT)Change a one-to-one PTT call to an intercom callYou can convert a one-to-one PTT session to an intercom call. Using a handset or the telephone base:When your device shows Press and hold [PTT] to talk, press INTCOM.The screen shows Switch to Intercom?.Press SELECT. Your device displays Calling BASE 0 or Calling HANDSET X. The destination device briefly shows Push to talk Ended and then HANDSET X is calling or BASE 0 is calling. The destination device rings.Press HOME/FLASH or any dialing keys (0-9, or TONE ) on the destination handset, or press HOME or any dialing keys (0-9, orTONE ) on the telephone base to answer the intercom call. Both devices now show Intercom.To end the intercom call, press OFF/CLEAR on your handset or place the handset in the telephone base or charger, or press END on the telephone base. Both screens show Intercom ended.Answer an incoming call during a PTT callWhen you receive an outside call during PTT, there is an alert tone.Using a handset or the telephone base:During a one-to-one PTT, press HOME/FLASH,CELL 1 or CELL 2 onthe initiating or destination handset, or press HOME,CELL 1 or CELL 2 onthe telephone base. The PTT call ends automatically and the outside call is answered.During a one-to-group PTT call, press HOME/FLASH, CELL 1 orCELL 2 on the initiating handset, or press HOME,CELL 1 or CELL 2 onthe telephone base. The PTT call ends automatically and the outside call is answered.During a one-to-group PTT call, press HOME/FLASH,CELL 1 orCELL 2 on any one of the destination handsets or telephone base. That device answers the outside call. The PTT call continues for the rest of the PTT participants.To leave the PTT call without answering the incoming call, press OFF/CLEAR on your handset or CANCEL on your telephone base. Thetelephone continues to ring.1.2.3.4.••••](https://usermanual.wiki/VTech-Telecommunications/80-0242-00/User-Guide-2894801-Page-87.png)


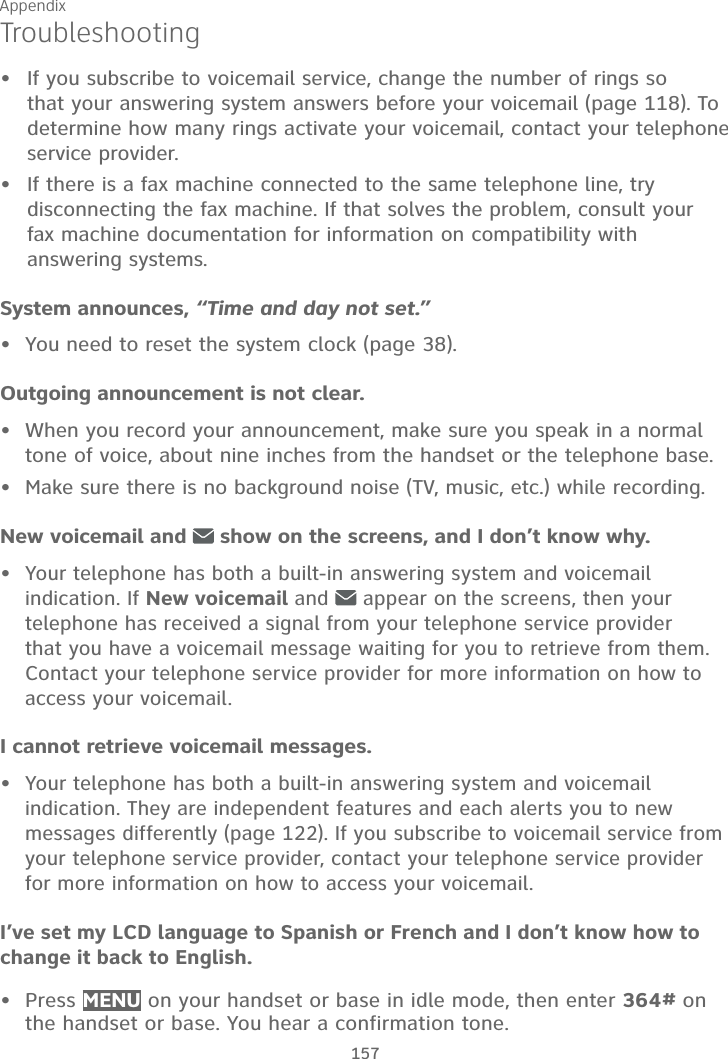
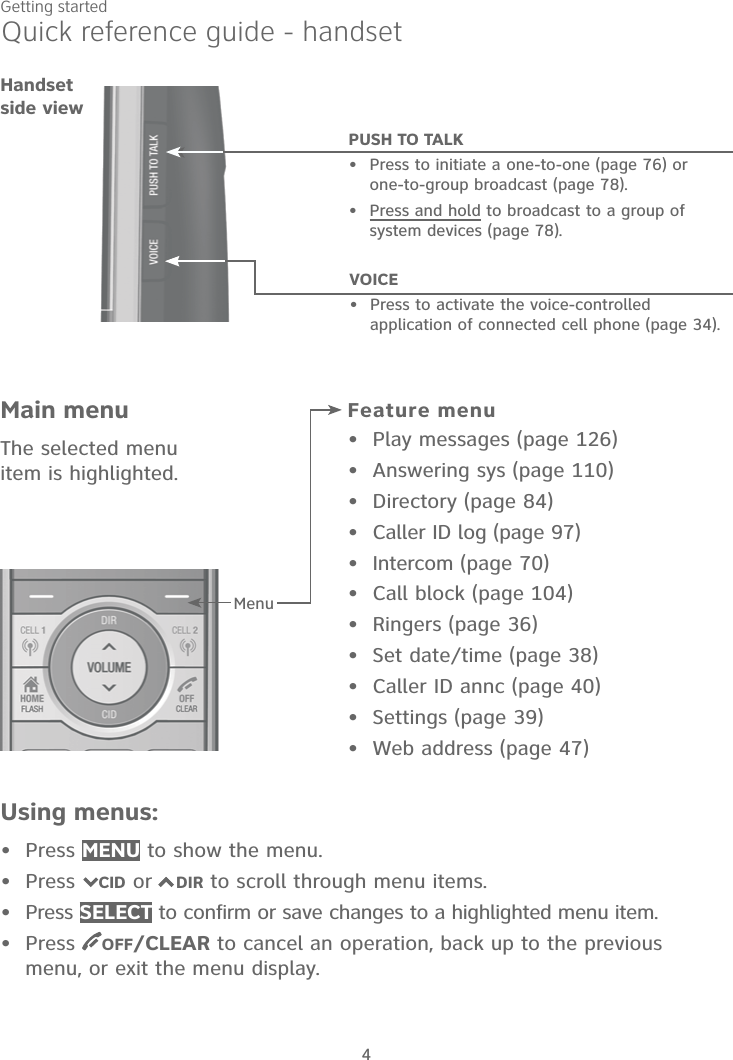
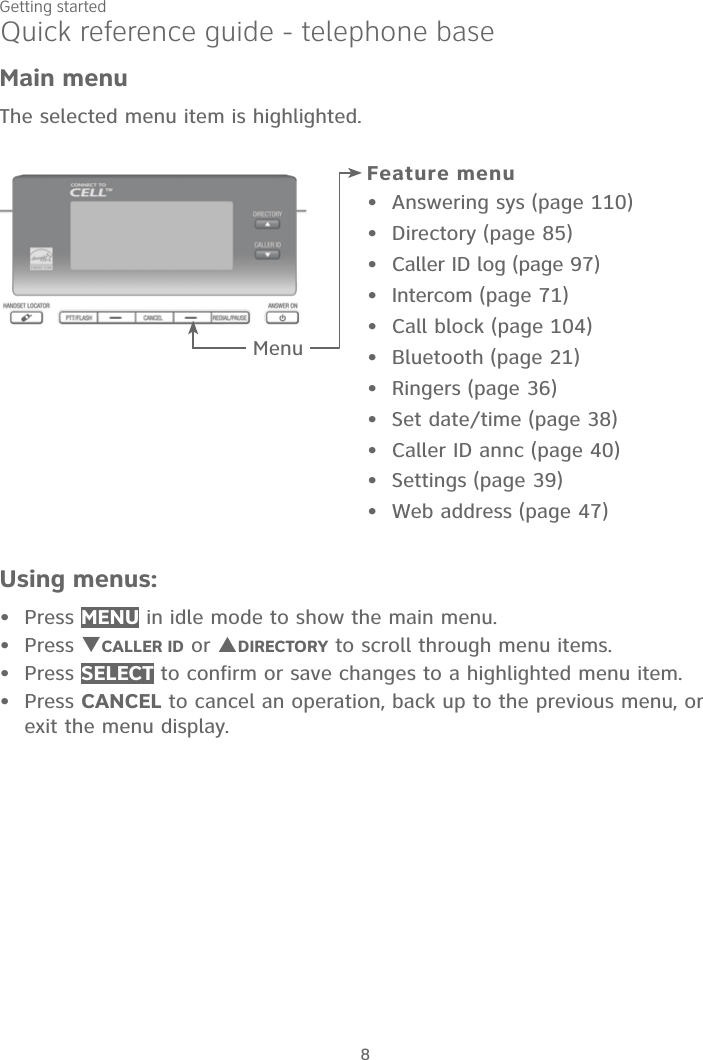
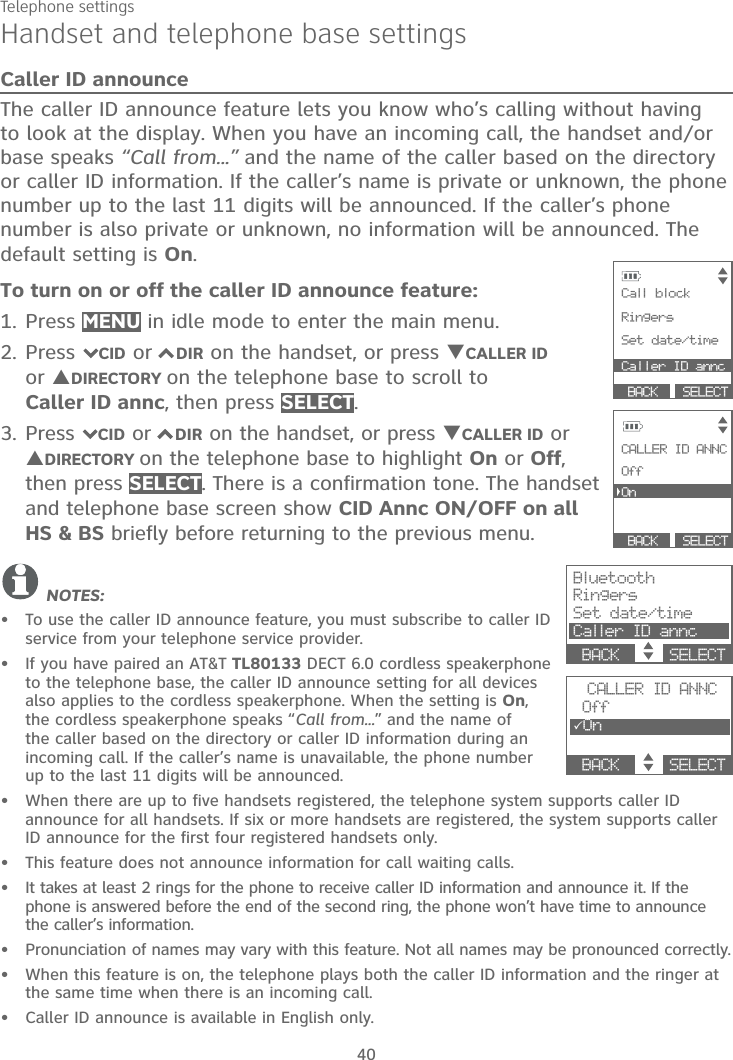
![Answering system126Message playbackIf you have both new and old messages, you can play either new or old messages. The caller ID information displays on the screens when you play messages and you can call back the caller.When playback begins, the handset and telephone base screens display themessage status, caller ID information, and time and date of the message recorded. You hear the total number of messages followed by the day and time of the message. After the last message, the telephone announces, “Endof messages.” and the screen displays End of messages.To listen to messages at the telephone base:Press /PLAY/STOP on the telephone base to listen to the messages. If there are new and old messages, press TCALLER ID or SDIRECTORY to select Play new msgs or Play old msgs, then press SELECT or/PLAY/STOP.If there are only new or only old messages, they will play automatically.When the handset is playing a message, its screen shows [2]-Call info and the caller’s name or number. If the caller’s information is unavailable, the handset shows No caller info.The system announces the number of messages, then begins playback. The message sequence is shown on the telephone base. If there are no recorded messages, the telephone base shows No messages and you hear, “You have no message.”To listen to messages on a cordless handset:1. When the handset is in idle mode, press MENU to enter the main menu.2. Press SELECT to select Play messages.If there are new and old messages, press7CID or 7DIR to select Play new msgs or Play old msgs, then press SELECT.If there are only new or only old messages, they will play automatically.The system announces the number of messages, then begins playback. The message sequence is shown on the handset. If there are no recorded messages, the handset shows No messages and you hear, “You have no message.”••••](https://usermanual.wiki/VTech-Telecommunications/80-0242-00/User-Guide-2894801-Page-132.png)