VTech Telecommunications 80-1005-00 900MHz Wireless E-Mail Device User Manual CIIc
VTech Telecommunications Ltd 900MHz Wireless E-Mail Device CIIc
Users Manual

1
Table of contents
1 INTRODUCTION ........................................................................................................................................ 3
2 UNPACKING YOUR COMPANION™ II CORDLESS.......................................................................... 3
2.1 SET UP THE COMPANION II CORDLESS .................................................................................................. 3
2.2 SET UP THE CORDLESS BASE..................................................................................................................... 4
2.3 SETTING UP YOUR COMPANION™ II CORDLESS WITH OTHER DEVICES................................................. 4
3 USING YOUR COMPANION II CORDLESS *** NEED NEW PICTURE WITH YAHOO
REMOVED***...................................................................................................................................................... 6
3.1 GENERAL INFORMATION.......................................................................................................................... 6
3.2 QUICK KEYS ............................................................................................................................................ 6
3.3 KEYBOARD.............................................................................................................................................. 7
4 YOUR E-MAIL ACCOUNT ....................................................................................................................... 7
4.1 CREATING YOUR PRIMARY ACCOUNT ....................................................................................................... 8
4.2 LOGGING INTO YOUR ACCOUNT ............................................................................................................. 12
4.3 CREATING A SECONDARY ACCOUNT ....................................................................................................... 12
4.4 DELETING A SECONDARY ACCOUNT ....................................................................................................... 13
5 WRITE AN E-MAIL MESSAGE ............................................................................................................. 13
6 SEND AND RECEIVE AN E-MAIL ........................................................................................................ 14
7YOUR MAIL.............................................................................................................................................. 14
7.1 YOUR MAILBOXES................................................................................................................................. 14
7.1.1 Inbox ................................................................................................................................................ 14
7.1.2 Outbox.............................................................................................................................................. 15
7.1.3 Sent Mail .......................................................................................................................................... 15
7.1.4 Drafts ............................................................................................................................................... 16
7.1.5 Mail Archive..................................................................................................................................... 17
7.2 READING AN E-MAIL MESSAGE............................................................................................................... 18
7.3 REPLYING TO AN E-MAIL MESSAGE ........................................................................................................ 20
7.4 FORWARDING AN E-MAIL MESSAGE........................................................................................................ 20
7.5 MOVING AN E-MAIL MESSAGE TO THE MAIL ........................................................................................... 20
7.6 ADDING A SENDER TO THE ADDRESS BOOK ........................................................................................... 21
7.7 DELETING AN E-MAIL MESSAGE ............................................................................................................. 21
7.8 PRINTING AN E-MAIL MESSAGE .............................................................................................................. 21
7.9 MARKING AND UNMARKING MESSAGES ................................................................................................ 21
7.10 MAILBOX SUMMARY ............................................................................................................................. 21
8 ADDRESS BOOK ...................................................................................................................................... 22
8.1 OPENING YOUR ADDRESS BOOK ............................................................................................................ 22
8.2 CREATING AN INDIVIDUAL ADDRESS BOOK CONTACT............................................................................ 23
8.3 UPDATING AN INDIVIDUAL ADDRESS BOOK CONTACT ........................................................................... 23
8.4 DELETING INDIVIDUAL ADDRESS BOOK CONTACT ................................................................................. 23
8.5 INSERT E-MAIL ADDRESS FROM ADDRESS BOOK INTO AN E-MAIL MESSAGE............................................. 24
8.6 ADDRESS BOOK GROUPS ....................................................................................................................... 24
8.6.1 Creating an Address Book Group...................................................................................................... 24
8.6.2 Adding Contacts to an Address Book Group...................................................................................... 24
8.6.3 Deleting Contacts from an Address Book Group................................................................................ 24
8.6.4 Deleting an Address Book Group ...................................................................................................... 24
9 YOUR ACCOUNT ..................................................................................................................................... 25
9.1 YOUR PROFILE ...................................................................................................................................... 25

2
9.2 YOUR SIGNATURE ................................................................................................................................. 25
9.3 YOUR PASSWORD .................................................................................................................................. 26
9.4 MEMORY CARD ..................................................................................................................................... 27
9.4.1 Installing a Memory Card ................................................................................................................. 27
9.4.2 Opening your Memory Card Manager............................................................................................... 27
9.4.3 Creating a new Memory Card folder................................................................................................. 28
9.4.4 Renaming a Memory Card folder ...................................................................................................... 28
9.4.5 Deleting a Memory Card folder ........................................................................................................ 28
9.4.6 Copying e-mail messages to Memory Card folder.............................................................................. 28
10 ACCOUNT MANAGEMENT................................................................................................................... 28
10.1 CHANGE PAYMENT INFORMATION .......................................................................................................... 28
10.2 MAILSCREEN MANAGER........................................................................................................................ 29
10.2.1 Turning MailScreen On/Off .......................................................................................................... 29
10.2.2 Adding and Deleting e-mail Addresses from MailScreen ............................................................... 30
10.2.3 Unlocking an E-mail Message ...................................................................................................... 31
11 YOUR SETTINGS ..................................................................................................................................... 31
11.1 DEVICE SETTINGS.................................................................................................................................. 31
11.2 CONNECTION SETTINGS ......................................................................................................................... 32
12 RECAPTURE YOUR ACCOUNT ........................................................................................................... 34
13 BATTERIES ............................................................................................................................................... 36
13.1 CHARGE THE HANDSET BATTERY PACK ............................................................................................. 36
14 GETTING HELP........................................................................................................................................ 37
15 FREQUENTLY ASKED QUESTIONS ................................................................................................... 38
16 TROUBLESHOOTING............................................................................................................................. 40
17 SAFETY INFORMATION........................................................................................................................ 41
18 WARRANTY STATEMENT .................................................................................................................... 43
19 FCC NOTICE ............................................................................................................................................. 44
20 INDEX ......................................................................................................................................................... 45
3
1 INTRODUCTION
Welcome to a whole new way to stay in touch with friends and family! Vtech’s Companion™ II
cordless is designed to make sending and receiving e-mail as easy as 1, 2, 3!
With Companion™ II cordless, you don’t need to wait for a computer to start-up, learn to configure an
Internet connection, or learn how to use a mouse. We understand that communicating with e-mail
should be quick and easy, so vtech designed a product to do just that!
We've teamed up with HomeRelay Communications to make it easy for you to e-mail anytime,
anywhere. HomeRelay creates your e-mail account, manages your account, and delivers e-mail
messages, news, and information.
2 UNPACKING YOUR COMPANION™ II CORDLESS
Verify that you have all the items listed below:
1. Companion™ II cordless keyboard
2. Companion™ II cordless base
3. 6V AC/DC adaptor (2)
4. 6’ telephone cord
5. Ni-Mh Rechargeable Battery
6. User manual
7. Quick Start Guide
8. Quick Reference Card
9. HomeRelay Internet Services Agreement
The following items are not included but may be required:
1. Second telephone cord
2. Printer. Your Companion II cordless will work with any printer that supports plain text printing.
Refer to your printer’s User Manual to see if plain text is supported. Note: your Companion™
II cordless does not support USB connection.
3. Parallel printer cable
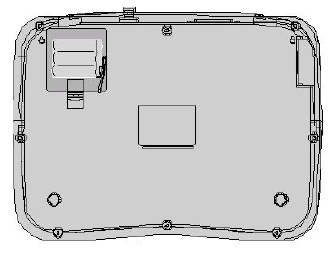
2.1 Set up the Companion II Cordless
Your Companion II Cordless is designed to be portable. The keyboard can be powered with a
rechargeable battery, AC adaptor, or both. We recommend that you keep your Ni-Mh battery
charged inside your Companion™ II cordless at all times in the event of an electrical failure to
prevent any information from being lost. It is very important to only use the AC adaptor and battery
that are included with your Companion™ II cordless. Other AC adaptors and batteries may
damage the product.
NOTE: Before signing up for service on your Companion II cordless, please make sure the battery
has charged for at least 16 hours. Otherwise you should sign up for service on your Companion II
cordless with the AC adaptor plugged in. Use only AT&T Battery 2414, SKU# 23403.
• Remove Battery Compartment cover by pressing the tab and lifting upward.
4
• Locate the 2-pronged connector in the bottom right of the battery compartment. Attach the red
and black wire from the battery pack to the connector in the battery compartment.
• Replace the cover by sliding it into the track and snap it into place.
• Plug the AC adaptor into an electrical outlet.
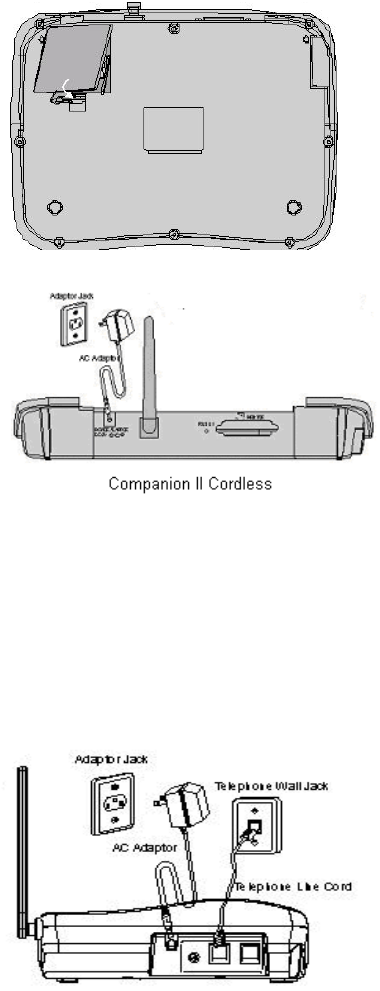
2.2 Set up the cordless base
The base unit of your Companion II Cordless must be connected to a telephone jack and a working
electrical outlet in order to register your device, as well as sending and receiving e-mails. Follow the
steps below to connect your base unit.
Plug in the AC adaptor into an electrical outlet.
Plug one end of the telephone line cord into the back of the base labeled Phone Line. Plug the
other end of the telephone line cord to a wall telephone jack.
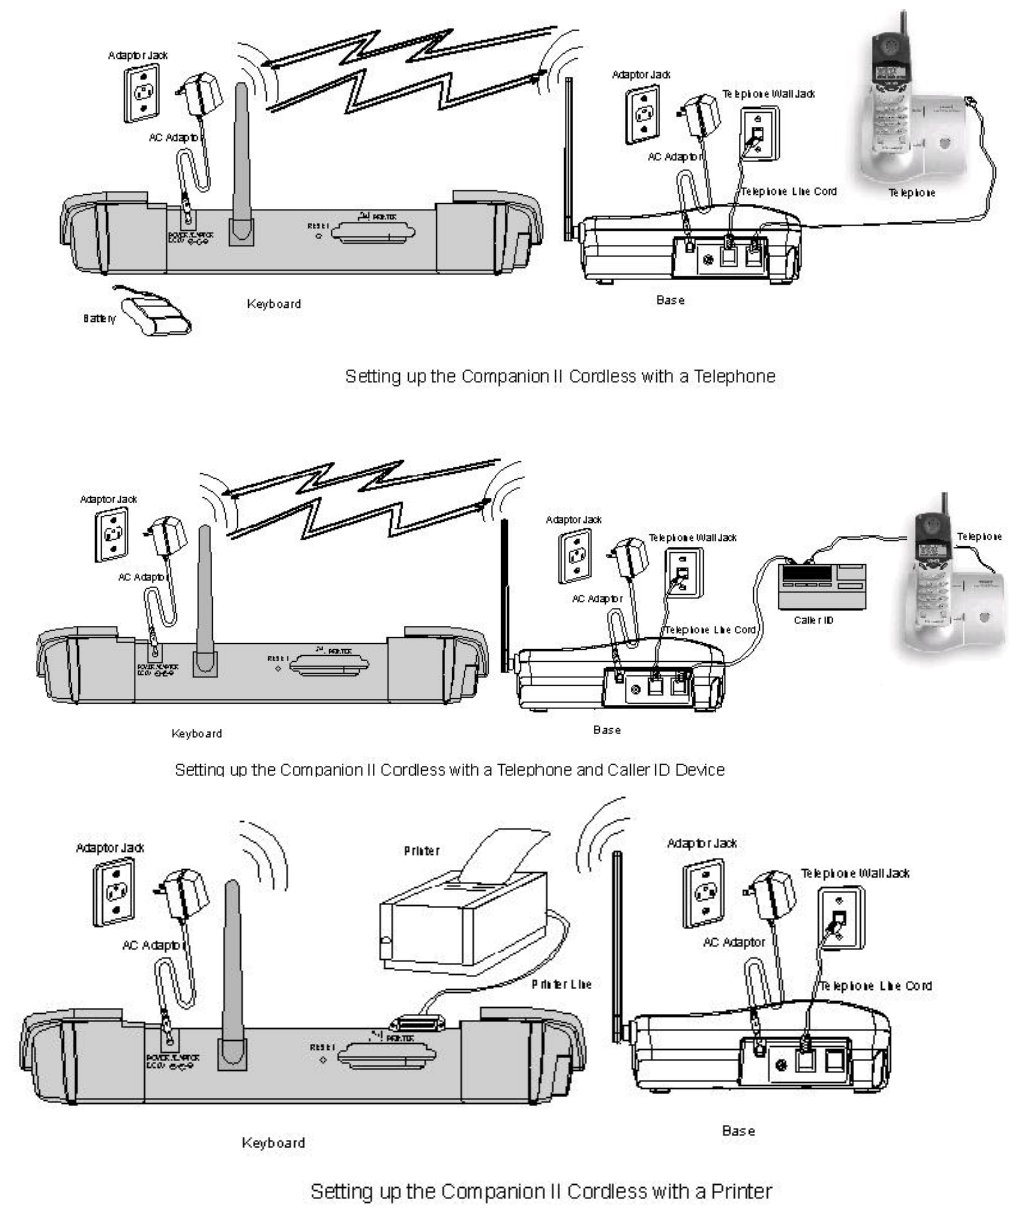
2.3 Setting up your Companion™ II cordless with other devices
Follow the diagrams below to connect your Companion™ II cordless to other devices such as a
telephone, caller ID, answering machine, and printer.
5
6
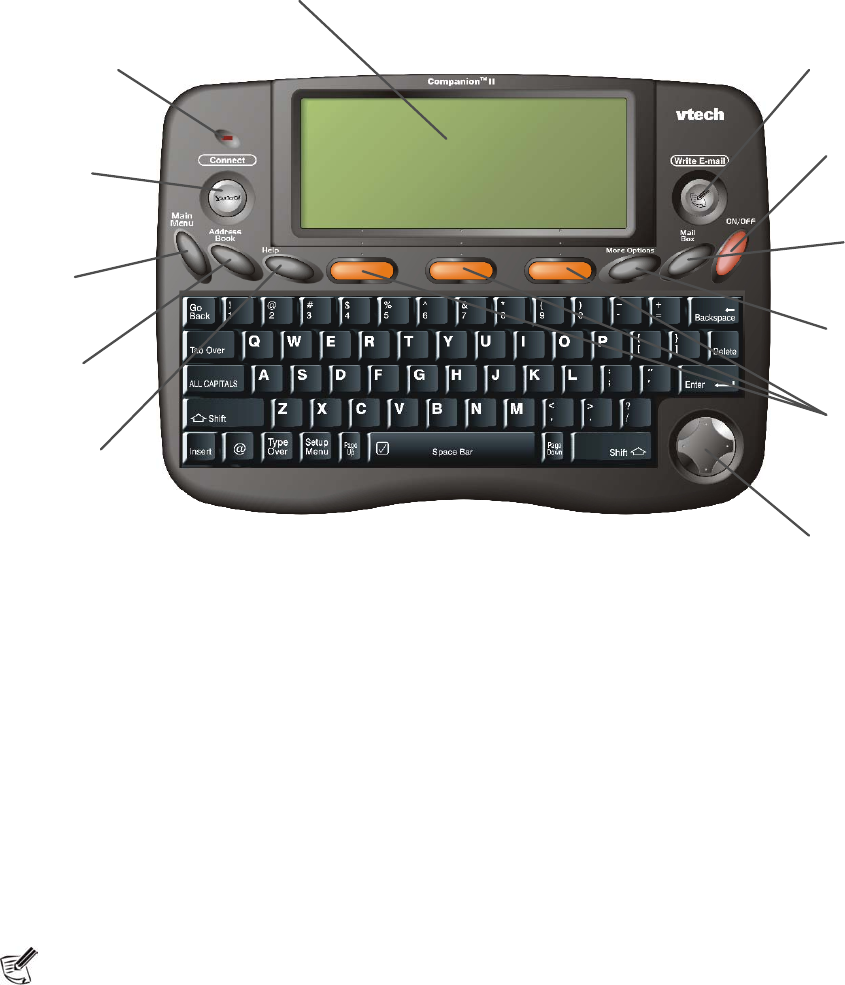
3 USING YOUR COMPANION II CORDLESS *** NEED NEW PICTURE
WITH YAHOO REMOVED***
Write Ema ilStatus Light
Main Menu
On/ Off
Cursor Control
Adjustable
Screen
Action Keys
Address Book
Help
More Options
Mail Box
Con n ect
3.1 General Information
Screen This screen is adjustable for easy viewing. The contrast and size of the letters on the screen
can all be adjusted based on your preferences.
Status Light The light above the Connect button lets you know the Companion™ II cordless is
connected to HomeRelay.
3.2 Quick keys
There are eight quick keys designed to let you get things done faster and they are located above the
keyboard.
Connect - Press this button to send and receive e-mail.
Write E-mail - Press this button to begin writing a new e-mail message from inside a user account.
Main Menu - Press this key to quickly return to the main menu of your Companion™ II cordless from
inside a user account.
Address Book - Press this key to quickly access your electronic address book from inside a user
account. When you are writing an e-mail message, press this key to open the Address Book and insert
an e-mail address into the message.
More Options - If a right arrow Î is displayed on the bottom right of the screen, press this button to
see additional options.
Help - Press this key to see additional help information, if applicable.
7
Mail Box – Every e-mail account on the Companion™ II cordlesscontains five mailboxes: Inbox,
Outbox, Draft, Sent Mail, and Mail Archive. These mailboxes help you organize your e-mail messages.
Each time you press this key, your Companion™ II cordless will cycle through each mailbox, starting
with your Inbox.
On/Off - Use this button to turn your Companion™ II cordless on or off.
Action Keys - Press any one of the three orange keys to activate the command displayed above each
key.
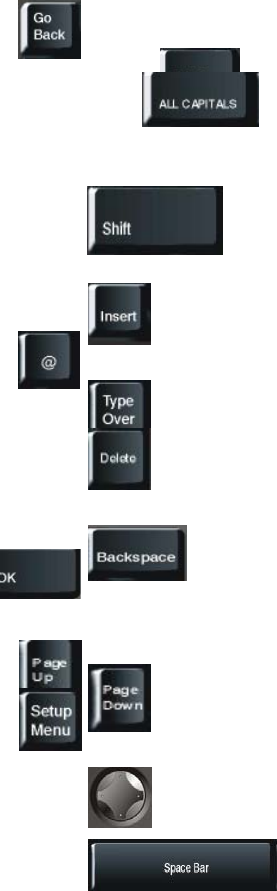
3.3 Keyboard
The layout of the keyboard on your Companion™ II cordless is very similar to the layout of a
typewriter or a computer keyboard.
Press this key to return to the previous screen or to clear a pop-up window from
the screen.
Press this key to move the cursor forward.
Press this key if you want to type using all capital letters. Press this key again to
return to typing lower case letters
This key is used in conjunction with other keys. For example, when typing, if you
hold down the “Shift” key and press a key with a character above it, the top
character on the key will be displayed. Also, holding down the “Shift” key allows
you to select multiple items, when applicable.
Press this key to insert any new text you type to the left of the cursor. The cursor
shape will change to blinking _.
Press this key to insert the @ symbol.
Press this key to and any text you type will replace the existing text. The cursor
shape will change to blinking .
Press this key to delete any character to the right of the cursor.
Press this key to delete any character to the left of the cursor.
Press this key to move the cursor to the next line in an e-mail message, select a
default option, or to confirm an action.
Use this key to move the cursor up one page on your screen.
Press this key to move the cursor down one page on your screen.
Use this key to quickly launch the Companion™ II cordless Settings menu.
These are your arrow keys to move the cursor up, down, left or right on the
screen. Use the up and down arrow keys to move to another field on a screen,
and use left and right arrow keys to see the options from a list.
Use this key to insert a space between words or letters. The Space Bar can also
be used to mark messages or Address Book contacts.
4 YOUR E-MAIL ACCOUNT
You can create up to five (5) e-mail accounts on your Companion™ II cordless. Each e-mail account
has its own set of mailboxes and address book. The first account you must create on your
Companion™ II cordless is referred to as the primary or guardian account. The remaining accounts
are referred to as secondary or child accounts. The following features are available only to the primary
account:
8
Add secondary accounts
Delete secondary accounts
Manage MailScreen
Change payment information
4.1 Creating your primary account
Before you can use your Companion™ II cordless, you need to set up your primary account. You will
be asked to provide the following information during the set up:
1. Contact information. If someone other than yourself will be the primary user of this
Companion™ II cordless, be sure to provide that person’s contact information instead of your
own.
2. Billing information. Specify how you want to pay for your e-mail service and the person
responsible for payment. Only major credit cards (Visa, MasterCard, American Express, and
Discover) is accepted. You will be asked to select one of the service plans available at the time
of registration.
3. A user ID for your e-mail address and a password. If the user ID you requested is not available,
you will be prompted to enter a new one.
The set up process typically takes 5 to 10 minutes to complete. Enter all the information requested in every
screen. Use up and down on the Cursor Control or Enter key to move between each line. Where applicable,
select Next to go to the next screen and Back to return to the previous screen. Be sure to monitor the progress
of your set up since a message may occur that requires you to respond. Verify your account information at the
end of the set up to make sure everything is correct.
How to create a primary account:
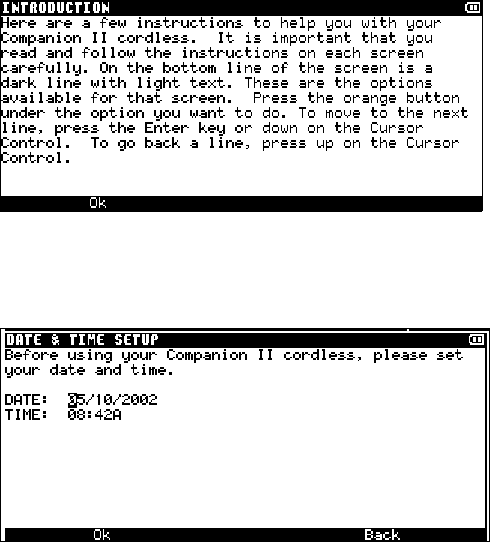
1. When you just turn your Companion™ II cordless on, you will see an Introduction screen (Figure
4-1) explaining the basic functionality of your Companion. Select OK to continue.
Figure 4-1
2. Set the date and time (Figure 4-).
Figure 4-2
3. After this, your Companion™ II cordless will display the Terms and Agreement screen (Figure 4-3).
If you agree with the terms, select Agree to continue.
9
Figure 4-3
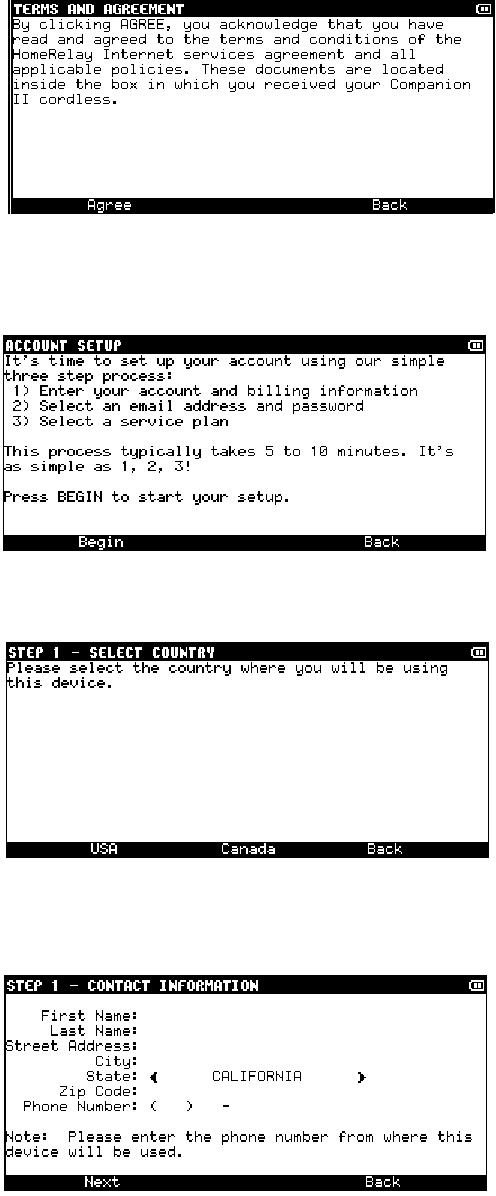
4. The next screen (Figure 4-4) outlines the steps it will take to set up your account on your
Companion™ II cordless. Select Begin to continue.
Figure 4-4
5. Select the country where you will be using the device (Figure 4-5).
Figure 3-5
6. Enter your or the primary user contact information. This will be used in the event we need to contact
you (Figure 4-6).
Figure 4-6
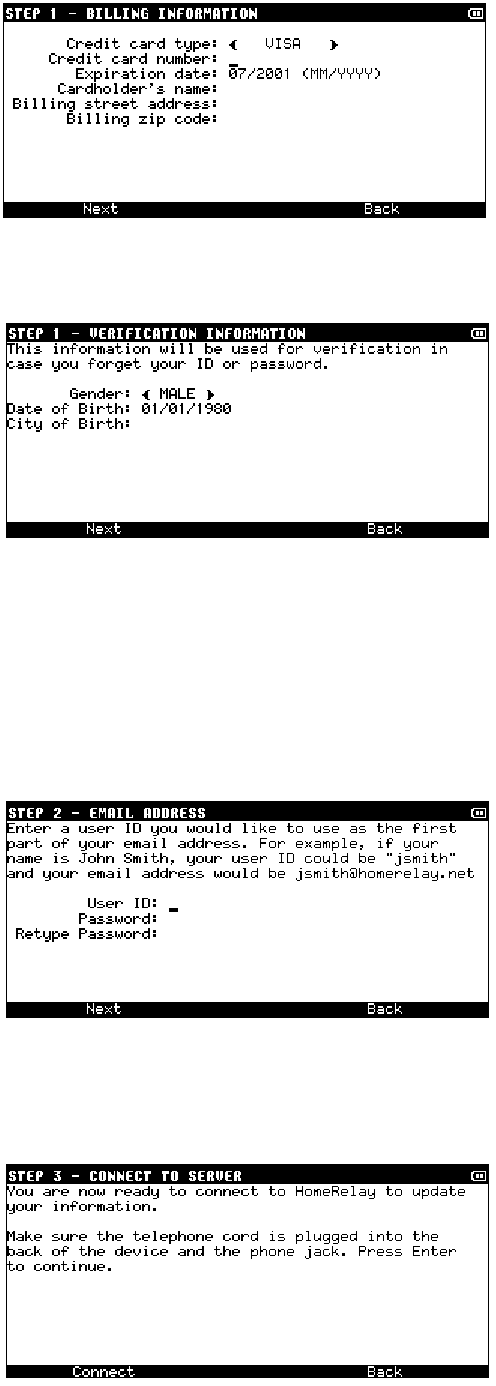
7. Enter the billing information of the person responsible for payment. Your address information is
needed for credit card validation (Figure 4-7).
10
Figure 4-7
8. Enter the additional information about yourself or the primary user (Figure 4-8).
Figure 4-8
9. Enter a user ID and password (Figure 4-9). The user ID must be between 3 and 32 characters;
password must be between 6 and 32 characters. The user ID can be any combination of upper and
lower case letters (A-Z, a-z), numbers (0-9), and the underscore (_), and it must begin with a letter.
If the user ID you requested is not available, you will be prompted to enter a new one.
The password must be between 6 and 32 characters and the rules are the same for the
password as they are for the user ID except a password allows some other characters including !, $,
#. To be sure you enter your password correctly, you will be asked to enter it twice.
Figure 4-9
10. You are ready to connect to HomeRelay to complete the registration process. Be sure your
telephone cord is plugged into the back of the device. Select Connect. This can take a few minutes
(Figure 4-10).
Figure 4-10

11
11. You will see several screens showing the status of your connection. Figure 4-11 is an example of
when your Companion™ II cordless is connecting to HomeRelay.
Figure 4-11
12. You will be asked to select a service plan. Use the left and right on the Cursor Control to see all
available plans. When you find the one you want, select Select to continue (Figure 4-12).
Figure 4-12
13. You will again see several screens showing the status of your connection. To insure proper set up
of your account, do not disconnect the phone line or press any keys on the keyboard.
Congratulations! Your device is now registered with HomeRelay. Figure 4-13 shows your account
information along with the service plan you are signed up for. Be sure to write your username and password
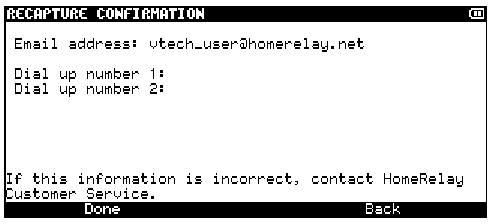
down and store in a safe place to review if necessary. Figure 4-14 shows the dial up numbers your
Companion™ II cordless will use to connect to our server to send and receive mail. Please review and
contact our customer service if any of the information is incorrect.
Figure 4-13
Figure 4-14
12
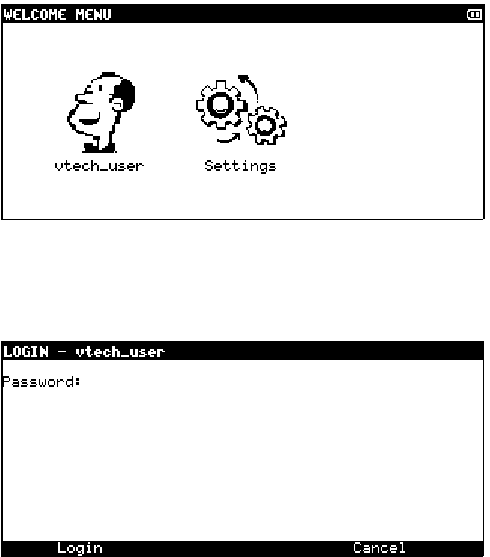
4.2 Logging into your account
To access your Mailboxes or Address Book, you first need to log in. Your Companion™ II cordless
uses the log in process to help identify which person is currently using the product.
How to log into your account:
1. On the Welcome screen, select your user ID. Press the More Options key if you don’t see your
user ID.
2. Enter your password, if necessary. If you did not type in the correct password, you will be
prompted to reenter the password. Select Login or press the Enter key. If you do not wish to
enter your password when you log into your account, see section 8.3, Your Password.
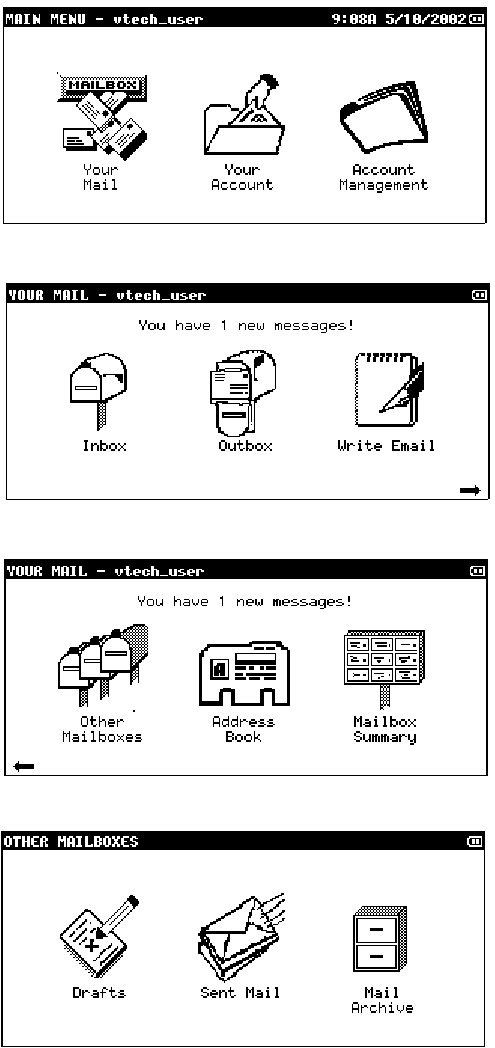
3. The next screen will be the Main Menu. You can select any of the programs in the Main Menu to
begin using your Companion™ II cordless.
4.3 Creating a secondary account
Once the primary account is created, you can create up to four secondary accounts. To create these
accounts, you will be asked to provide the following information:
Contact information.
A user ID and password.
How to create a secondary account:
1. Log in using the primary account.
2. Select
Account Management from the Main Menu screen.
3. Enter contact information. Select Next or press the Enter key to continue.
4. Enter verification information. Select Next or press the Enter key to continue.
5. Enter user ID and password.
6. Select
Connect.
Your Companion™ II cordless will connect to HomeRelay and create the account. Be sure to monitor
the progress of your connection since a message may appear on the screen that requires you to
respond.
13
4.4 Deleting a secondary account
You can delete any of the secondary accounts from your Companion™ II cordless. Please note that
all e-mail messages and address book contacts associated with that account would also be deleted.
How to delete a secondary account:
1. Log in using the primary account.
2. Select
Account Management from the Main Menu screen.
3. Select
Delete Account.
4. Select the e-mail user ID you wish to delete.
5. Select
Next or press the Enter.
6. Select
Connect to confirm your delete request.
Your Companion™ II cordless will connect to HomeRelay to delete the secondary account.
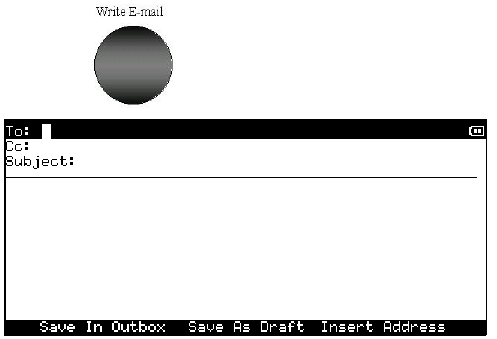
5 WRITE AN E-MAIL MESSAGE
You can write as many messages as you want and save them in the Outbox. When you press
Connect or if your Companion™ II cordless is set to automatically connect (see section 11.2,
Connection settings), all the messages in your Outbox will be sent.
How to write an e-mail message:
1. Log into your account.
2. Press the button to bring up the following screen:
3. Type in the recipient’s complete e-mail address in the “To:” line. To send the same e-mail to more
than one person, separate each e-mail address with a comma (e.g., jsmith@abc.com,
becky@xyz.com). You can also insert e-mail address(es) from your Address Book (see section 8,
Address Book).
4. Press the
Enter key or down on the Cursor Control to move to the “Cc:” line. The “Cc:” means
“carbon copy” and is typically used if the sender is not directing the message to a specific person.
To enter more than one e-mail address, separate each e-mail address with a comma.
5. Press the Enter key or down on the Cursor Control to move to the Subject line. A subject lets the
recipient know what the e-mail message is going to be about. It’s always a good idea to enter a
subject.
6. Press the
Enter key or down on the Cursor Control to begin typing the e-mail message.
7. When you are done typing your message, select Save In Outbox to save the message in Outbox.
This will place the message in the Outbox so it can be sent the next time you connect.
8. If for some reason you cannot complete your message but want to save what you have typed so
far, select Save as Draft. This will place the incomplete message in your Drafts Mailbox.
14
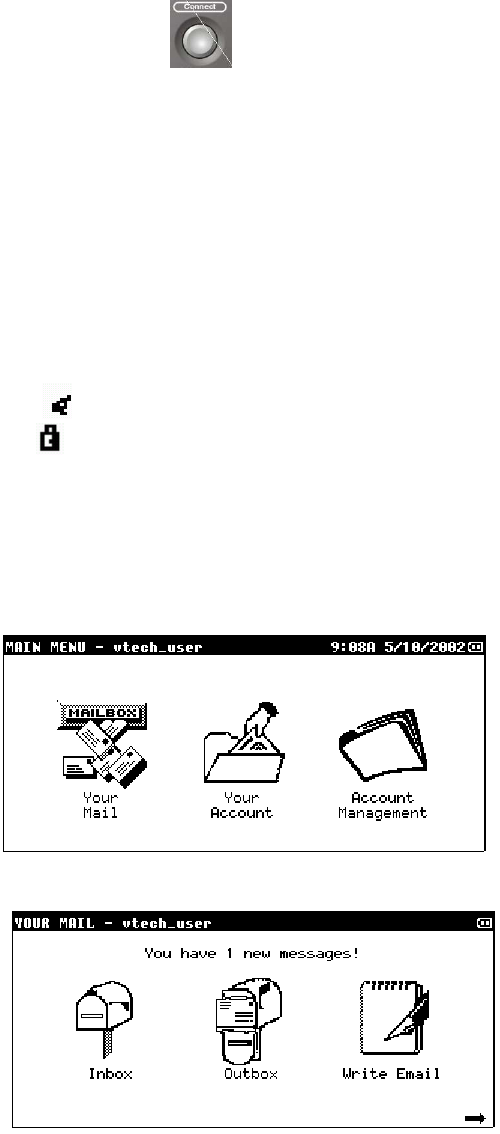
6 SEND AND RECEIVE AN E-MAIL
To send e-mail messages you have written and to receive new e-mail messages to your Companion™ II
cordless, simply press the button to connect to HomeRelay. HomeRelay will check for new e-mail
messages for all the e-mail accounts on your Companion™ II cordless. Once your e-mail message(s) have
been received, you will be disconnected from HomeRelay and a message will display telling you how many new
e-mail messages you have.
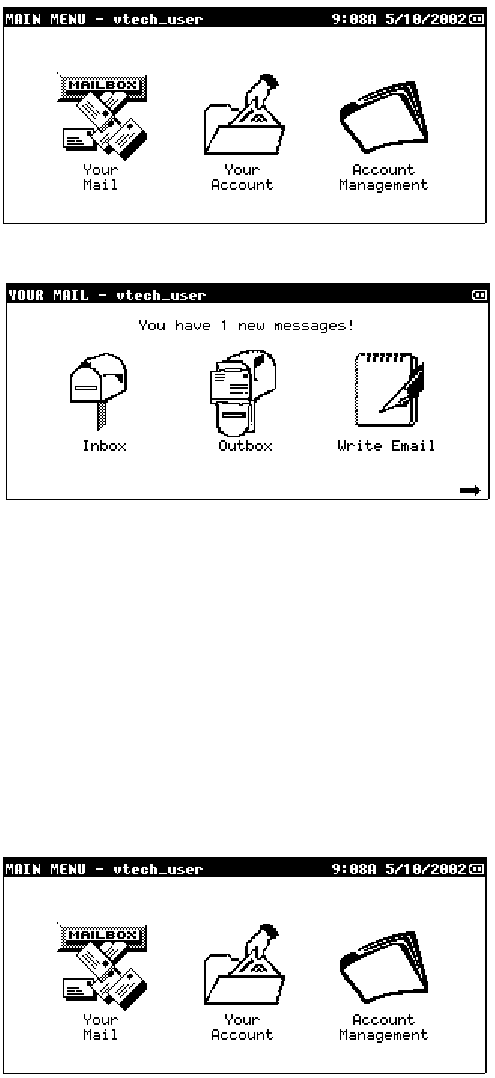
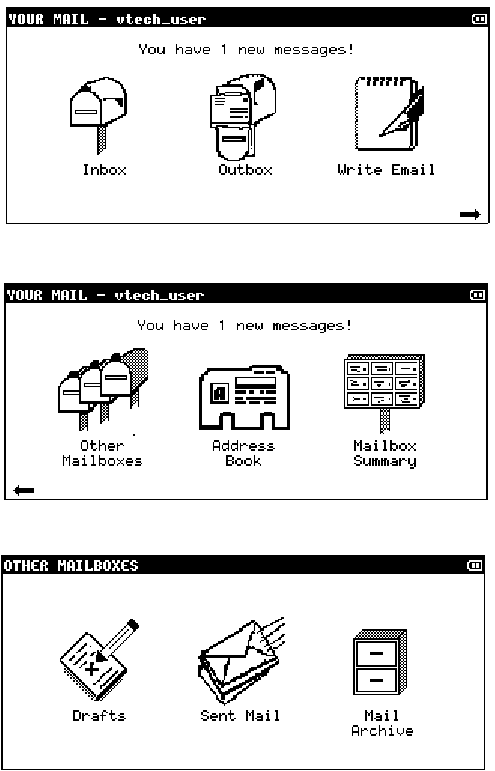
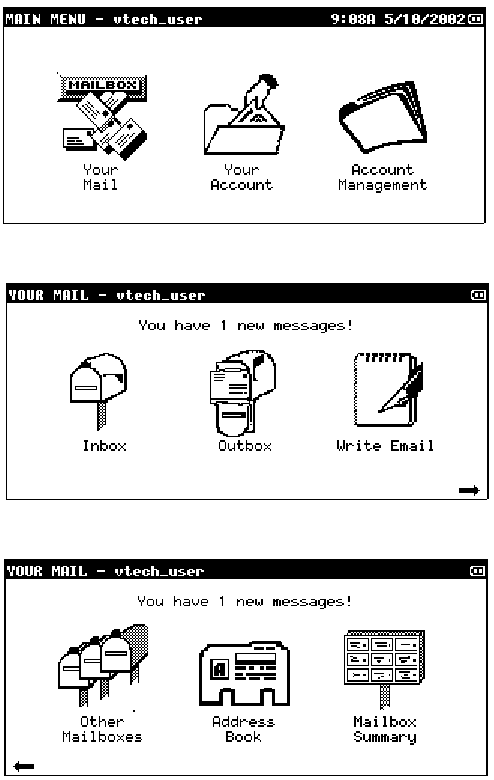
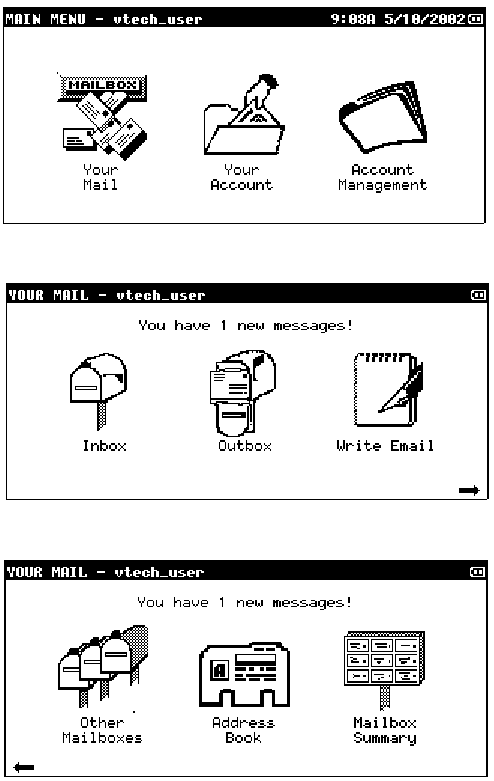
7 YOUR MAIL
7.1 Your Mailboxes
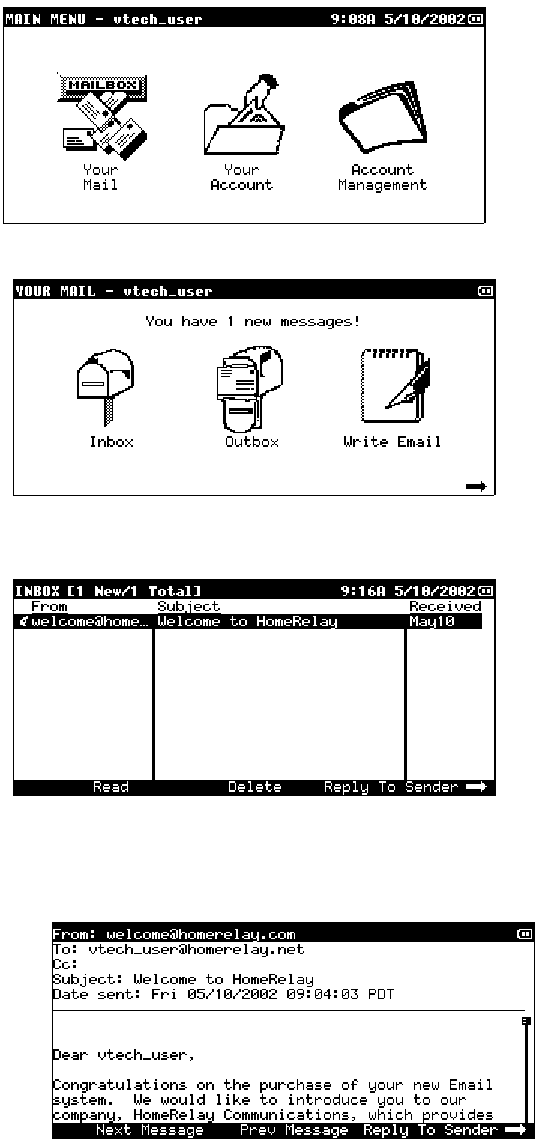
7.1.1 Inbox
All of the new e-mail messages you receive go directly to your Inbox. On the left side of the Inbox
screen, you may see one of two different pictures next to each message:
The e-mail message has not been opened or read.
The e-mail message is locked and requires approval from the primary user before it can be
read. The message is locked because the sender is not on your MailScreen (see section 10.2,
MailScreen Manager).
There are two ways to access your Inbox:
1. Log into your account.
2. From the Main Menu, select Your Mail.
3. Select
Inbox.
Or
1. Log into your account.
2. Press the
Mailbox key once.
15
7.1.2 Outbox
All of the messages you have written, but have not sent, are stored in your Outbox. For example, after
you finish typing a new message, you can select Save to Outbox to place the new message in your
Outbox for delivery. The next time you press the Connect, the message(s) in your Outbox will be sent.
There are two ways to access your Outbox:
1. Log into your account.
2. From the Main Menu, select Your Mail.
3. Select
Outbox.
Or
1. Log into your account.
2. Press the
Mailbox key twice.
7.1.3 Sent Mail
All of the messages you have sent successfully are stored in Sent Mail. If you want to refer to a
message you have sent, you can always check your Sent Mail mailbox.
There are two ways to access your Sent Mail:
1. Log into your account.
2. From the Main Menu, select Your Mail.
3. Press
More Options.
16
4. Select
Other Mailboxes.
5. Select
Sent Mail.
Or
1. Log into your account.
2. Press the
Mailbox key three times.
7.1.4 Drafts
If you want to save a message that you haven’t finished writing, use the Drafts mailbox. Example: If
you begin a new message and for some reason cannot finish it (i.e., the phone rings), select Save as
Draft to place the unfinished message in the your Drafts mailbox. To resume typing the message, just
press Mail Box until you see your Drafts mailbox. If you have more than one message in your Drafts
mailbox, use the up and down on the Cursor Control to select the message. Press Enter to open the
message you want to finish.
There are two ways to access your Drafts:
1. Log into your account.
2. From the Main Menu, select Your Mail.
17
3. Press
More Options.
4. Select
Other Mailboxes.
5. Select
Drafts.
Or
1. Log into your account.
2. Press the
Mailbox key four times.
7.1.5 Mail Archive
Use the Mail Archive folder to store your favorite or important e-mail messages.
There are two ways to access your Mail Archive:
1. Log into your account.
2. From the Main Menu, select Your Mail.

18
3. Press
More Options.
4. Select
Other Mailboxes.
5. Select
Mail Archive.
Or
1. Log into your account.
2. Press the
Mailbox key five times.
7.2 Reading an e-mail message
1. Log into your account.
2. From the Main Menu, select Your Mail.
19
3. Select
Inbox or press the Mail Box key.
4. Select the message you want to read by using the up and down on the Cursor Control. Select Read or
press the Enter key to read the message.
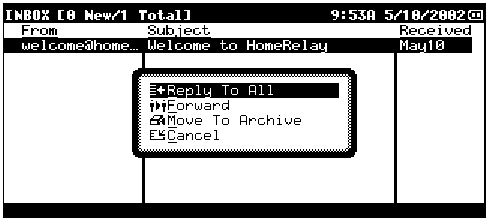
5. When you are done reading your message, you can do one of the following:
Select
Next Message to view the next message in the mailbox
Select
Prev Message to view the previous message in the mailbox
Select
Reply to Sender to reply to this message (see section 6.3, Replying to an e-mail message).
Press the
More Options key to view other options available. Use the up and down on the Cursor
Control to select one of the following options. Press Enter when you have made your selection.
Select
Reply to All to reply to everyone the message was sent to (see section 6.3, Replying to
an e-mail message).
Select
Forward to send the message to another person (see section 6.4, Forwarding an e-mail
message).
Select
Move to Archive to save the message.
Select
Add to Address Book to add the sender’s e-mail address to your Address Book (see
section 6.6, Adding a sender to the Address Book).
Select
Delete to erase the message from your Inbox (see section 6.7, Deleting an e-mail
message).
20
Select
Print to print out the message (see section 6.8, Printing an e-mail message).
Select
Cancel to exit this screen.
7.3 Replying to an e-mail message
If you would like to respond to the sender of an e-mail message, you can reply to the message without
re-typing what the sender wrote and without addressing the message all over again. This can save you
a great deal of time. Also, when there are multiple recipients to a message, you can send a reply to all
of them.
How to reply to an e-mail message:
1. Open an e-mail message from your Inbox or Sent Mail.
2. If you want to reply to the sender, select Reply to Sender.
3. If you want to reply to everyone the message was sent to originally:
a. Press
More Options.
b. Select
Reply To All.
c. Press
Enter.
4. Your
Companion™ II cordless will automatically address the message and copy the contents of
the original message to the bottom of your reply. You can add more e-mail addresses to either the
“To:” or “Cc:” fields.
5. When you are finished typing your reply, select Save In Outbox to have the message sent the next
time you connect.
7.4 Forwarding an e-mail message
If you have an e-mail message you would like to send to other people, you can forward the message
without re-typing it.
How to forward an e-mail message:
1. Open an e-mail message from your Inbox or Sent Mail.
2. Press
More Options.
3. Select
Forward.
4. Press
Enter and your Companion™ II cordless will automatically copy the contents of the original
message to the bottom of your forwarded message.
5. Type in the complete e-mail address in the “To:” line.
6. When you are finished typing, select Save in Outbox to have the message sent the next time you
connect.
7.5 Moving an e-mail message to the Mail
Use Mail Archive to store your favorite or important e-mail messages.
How to move an e-mail message to the Mail Archive:
1. Select the message from Inbox or Sent Mail. If you want to print multiple messages, first mark the
messages (see Section 6.9, Marking and unmarking messages).
2. Press
More Options.
3. Select
Move to Archive.
4. Press
Enter and the selected e-mail message will be moved to the Mail Archive.
21
7.6 Adding a Sender to the Address Book
A nice feature of your Companion™ II cordless is the ability to add the sender of an e-mail message
directly to your Address Book.
How to add a sender to your Address Book:
1. When reading your message, press More Options.
2. Select
Add to Address Book.
3. Press
Enter.
4. The e-mail address will automatically be added to your Address Book. You can go back to your
Address Book and fill in other information such as first name and last name.
7.7 Deleting an e-mail message
It’s a good idea to delete older messages in your mailboxes to create additional space for new
messages. Please note that once the message is deleted from your Companion™ II cordless, it is
gone for good.
How to delete a message:
1. Select the message you want to delete from any of your mailbox. If you want to delete multiple
messages, first mark the messages (see Section 6.9, Marking and unmarking messages)
2. Select
Delete.
3. Select
Yes to confirm the message to be deleted.
4. Press
Enter.
7.8 Printing an e-mail message
If you have a printer that is compatible with your Companion™ II cordless, you can print out any e-
mail message in any of your mailbox. Be sure your printer is plugged into your Companion™ II
cordless and is turned on.
How to print an e-mail message:
1. Open the e-mail message you want to print. If you want to print multiple messages, first mark the
messages (see Section 6.9, Marking and unmarking messages)
2. Press
More Options.
3. Select
Print.
4. Press
Enter and the selected message (s) will be printed.
7.9 Marking and Unmarking Messages
Marking items such as messages or contacts to perform the same operation on multiple items.
How to mark or unmark messages:
1. Use the up and down on the Cursor Control to select a message you want to mark.
2. Press the ‘Space Bar’. If the item is marked, a check mark (√) will display next to it.
3. To unmark a marked message, simply select that message with a check mark (√) next to it and
press the ‘Space Bar’.
7.10 Mailbox Summary
The Mailbox Summary lets you view storage information about your Companion™ II cordless. Since
there is limited space, it’s important to clean up your mailboxes every now and then.
How to access the Mailbox Summary:
1. Log into your account.
2. Select
Your Mail.
22
3. Press
More Options.
4. Select
Mailbox Summary.
The numbers in the top right corner tell you how much space is being used out of the total space
available. To the right of each mailbox name is the number of e-mail messages in that mailbox. To the
right of the Address Book is the number of contacts you have entered. You might consider deleting
some old messages or purchasing a memory card from Customer Care by calling toll-free 1-888-GO-
VTECH. For more information on how to use memory cards, see section 8.4, Memory Card.
How to empty a mailbox or Address Book:
1. Log into your account.
2. Select
Your Mail.
3. Press
More Options.
4. Select
Mailbox Summary.
5. Select the mailbox or Address Book using the up and down on the Cursor Control.
6. Select
Empty.
7. Select
Yes to confirm.
8. Press
Enter.
8 ADDRESS BOOK
The Address Book on your Companion™ II cordless is a way for you to store your friends and family
contact information, including street address, phone numbers, and e-mail address. Use the Address
Book to quickly access a phone number of a contact you have entered or insert their e-mail address
into an e-mail message you are writing.
8.1 Opening your Address Book
There are two ways to open your Address Book:
23
1. Log into your account.
2. Press the
Address Book quick key.
OR
1. Log into your account.
2. From the
Main Menu, select Your Mail.
3. Press More Options.
4. Select Address Book.
8.2 Creating an Individual Address Book Contact
1. Open your Address Book.
2. Select
New Contact. This will open the ADDRESS BOOK - NEW CONTACT screen
3. Enter the information. It is not necessary to enter all the information. You can always add more
information later.
4. Select
Save.
8.3 Updating an Individual Address Book Contact
1. Open your Address Book.
2. Select
View. This will open the ADDRESS BOOK - VIEW CONTACT screen.
3. Select
Change Contact. This will open the ADDRESS BOOK – EDIT CONTACT screen.
4. Update the information.
5. Select
Save.
8.4 Deleting Individual Address Book Contact
1. Open your Address Book.
24
2. Use the up and down on the Cursor Control to select the contact you want to delete. If you want
to delete multiple contacts, first mark the contacts (see section 6.9, Marking and unmarking
messages)
3. Select
Delete. This will open the ADDRESS BOOK – DELETE CONTACT.
4. Select
Delete again to confirm. Please note that this will not delete a contact from a group. For
information on how to remove a contact from a group, see section 7.6.3, Deleting contacts from an
Address Book group.
8.5 Insert e-mail address from Address Book into an e-mail message
You can easily insert an e-mail address from your Address Book into the “To:” or “Cc:” line.
1. When writing, replying, or forwarding an e-mail message, select Insert Address.
2. Use the up and down on the Cursor Control to select the e-mail address you want. If you want to
select more than one e-mail address, use the ‘Space Bar’ to mark each address.
3. When you are finished selecting e-mail addresses, select Insert.
8.6 Address Book Groups
You can also group your contacts together to make it easier for you to access or send e-mail to. If you
frequently send e-mail messages to the same group of people, such as your family, you can create a
group contact named “Family”, which contains your family members’ e-mail addresses. When you want
to send an e-mail to your family, instead of typing each person’s e-mail address, you can select the
‘Family’ group from your Address Book.
8.6.1 Creating an Address Book Group
1. Open your Address Book.
2. Press
More Options and select New Group. This will open the ADDRESS BOOK – NEW
GROUP screen.
3. Press
Enter. Type in the name of the group you want to create (up to 10 characters).
4. Select
Save. For more information on how to add a contact to a group, see section 7.6.2, Adding
contacts to an Address Book group.
8.6.2 Adding Contacts to an Address Book Group
1. Open your Address Book.
2. Select the group you want to add contacts to then press Enter. This will open the ADDRESS
BOOK – ADD TO GROUP screen.
3. Select
Insert Contact to insert an existing contact. Select the contact you want to add then select
Insert.
4. Select
New Contact to create a new contact then add to this group. Fill in contact information
then select Save. This will save the new contact in your Address Book as well as in the group.
5. Repeat steps 3-4 to add more contacts. Note: A maximum of 7 e-mail addresses can be added to
each group.
6. Select
Save when you are done adding contacts to this group.
8.6.3 Deleting Contacts from an Address Book Group
1. Open your Address Book.
2. Select the group you want to update then press Enter.
3. Use the up and down on the Cursor Control to highlight the contact you want to delete. If you want
to delete more than one contact, mark the contacts by pressing the ‘Space Bar’.
4. Press
More Options
5. Select
Delete Contact. You will be asked to confirm if you want to delete the selected contacts.
6. Select
Yes to continue with the delete, or No to cancel the delete.
8.6.4 Deleting an Address Book Group
1. Open your Address Book.
2. Highlight the group you want to delete.
3. Select
Delete. You will be asked to confirm if you want to delete the selected group.
4. Select
Yes to delete. Please note that the contacts in this group will not be deleted from your
Address Book.
25
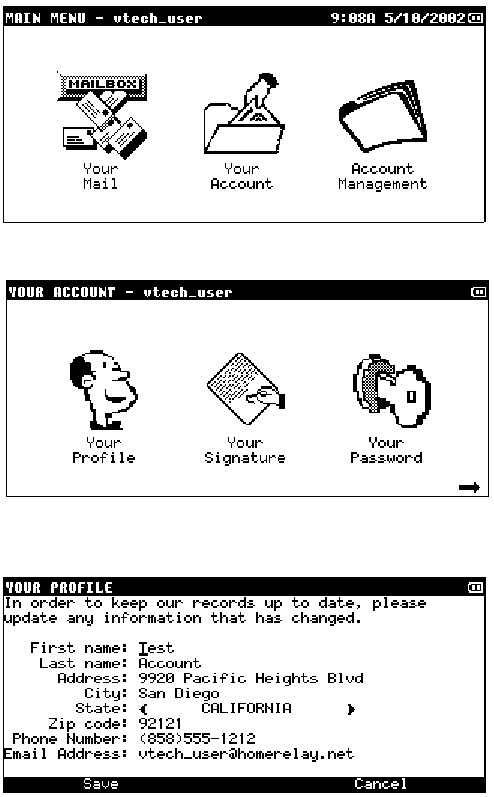
9 YOUR ACCOUNT
9.1 Your Profile
Your Profile is your contact information you provided when you set up your e-mail account. It’s
important to keep this information current so we know how to contact you in the future. Your
information is used solely by us. We do not share your information with anyone else.
How to or update your profile:
1. Log into your account.
2. Select
Your Account.
3. Select
Your Profile.
4. Update any information. When you are done, select Save. Your updated information will be sent
to HomeRelay on your next connection.
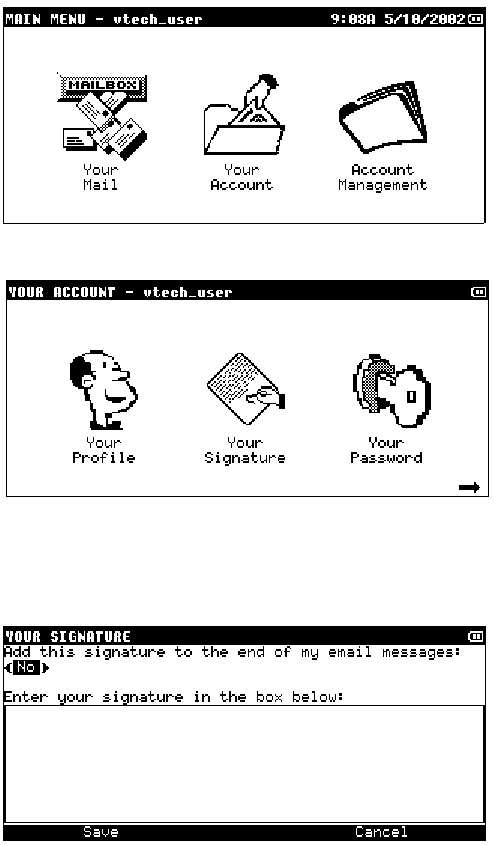
9.2 Your Signature
Many users like to add a unique touch to the bottom of every e-mail message they send to personalize
their messages. This could be a famous quote, a design, or just the sender’s contact information. The
text that is added to the bottom of a message is called a ‘signature’. Instead of typing your ‘signature’
every time you send a message, you can easily set it up so that it is added automatically to the end of
your message.
How to set up Your Signature:
1. Log into your account.
2. Select
Your Account.
26
3. Select
Your Signature.
4. In the “Add this signature to the end of each outgoing e-mail message:” field, select Yes or No
using the left and right on the Cursor Control. Use the Down on the Cursor Control to move to the
signature box field and enter your signature in the box. When you are done, select Save.
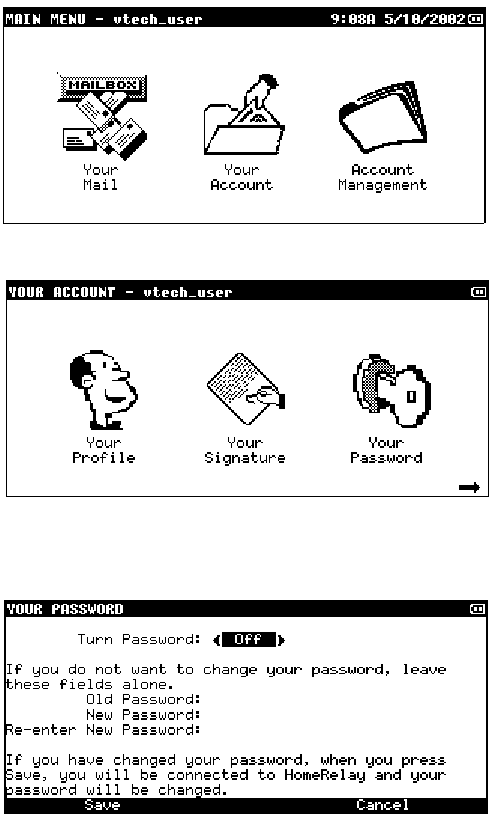
9.3 Your Password
To keep others from accessing your e-mail, a password is required to log into your e-mail account on
your Companion™ II cordless. However, you can turn this feature OFF so that you don’t have to
enter your password to access your account. Remember, if you turn off your password, anyone who
has access to your Companion™ II cordless can read your e-mail and send messages using your e-
mail address. Be sure to remember your password in case you turn this feature back to ON. Our
customer service representatives do not have access to your password.
You can change your e-mail account password at any time after your account has been created.
Note: We recommend that you do not change your password using a computer. If you would like to
change your password, we recommend that you follow the directions given in your user’s manual. If
you have already changed your password using a computer and are experiencing difficulty receiving e-
mail, you will need to change your password back to the original password you were using on your
Companion. You can then use your Companion to change your password.
How to turn your password OFF or ON or change your password:
1. Log into your account.
2. Select
Your Account.
27
3. Select
Your Password.
4. To turn the password off or on, in the Turn Password: field, select ON or OFF using the left and
right on the Cursor Control. To change your password, type in your current password and your
new password.
5. Select
Connect. If you changed your password, you will be connected to HomeRelay to update
your password.
9.4 Memory Card
Your Companion™ II cordless has a limited amount of memory available to store your e-mail
messages and Address Book. You can extend the amount of memory by purchasing a Memory Card
by calling Customer Care at 1-888-GO-VTECH.
A Memory Card allows you to add Mailbox folders to store and organize your e-mail messages. Once a
Memory Card is installed, you can copy e-mail messages from your Mail Archive to a Memory Card
folder you have created (see section 8.4.6, Copying e-mail messages to a Memory Card folder).
9.4.1 Installing a Memory Card
1. Turn off your Companion™ II cordless and insert the memory card into the slot on the left side.
Be sure to push firmly to insure it is firmly inserted.
2. If your Memory Card is installed successfully and it is a new card, you will be asked to format the
new memory card.
3. If your Memory Card is not installed successfully, repeat step 1.
9.4.2 Opening your Memory Card Manager
1. Install memory card.
2. Log into your account.
28
3. Select
Your Account.
4. Press
More Options.
5. Select
Memory Card.
9.4.3 Creating a new Memory Card folder
1. Install memory card.
2. Open
Memory Card manager.
3. Select
New.
4. Enter the name of the folder.
5. Select
Save.
9.4.4 Renaming a Memory Card folder
1. Install memory card.
2. Open
Memory Card manager.
3. Select
Rename.
4. Enter the name of the folder.
5. Select
Save.
9.4.5 Deleting a Memory Card folder
1. Install memory card.
2. Open
Memory Card manager.
3. Select
Delete.
9.4.6 Copying e-mail messages to Memory Card folder
1. Install memory card.
2. Before you can copy your messages to a Memory Card folder, you must first create a folder. See
section 8.4.3, Creating a new Memory Card folder.
3. Copy the message(s) you want to copy to the Mail Archive.
4. Open
Mail Archive (see section 6.1.5, Mail Archive).
5. Select the message you want to move to a Memory Card folder. If you want to move multiple
messages, first mark the messages (see Section 6.9, Marking and unmarking messages).
6. Press
More Options. You will see the folders you have previously created.
7. Select the folder you want to move the e-mail message to.
8. Press
Enter and the selected e-mail message will be moved to the selected folder.
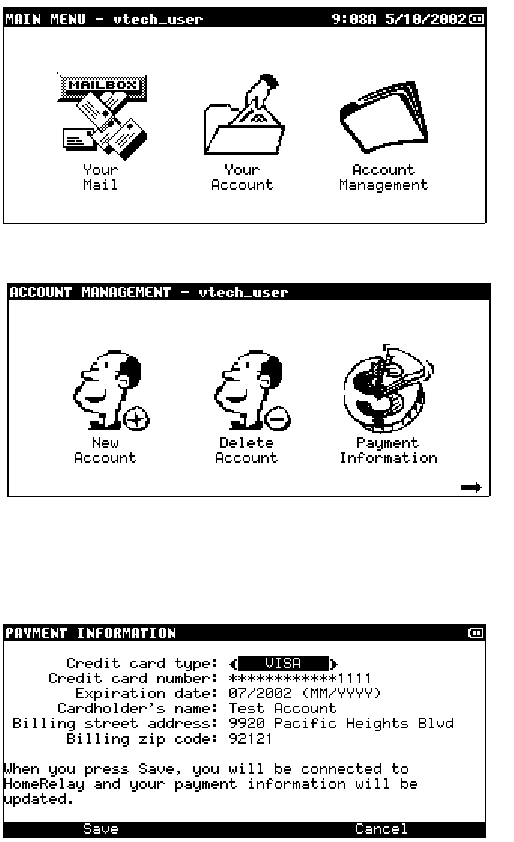
10 ACCOUNT MANAGEMENT
10.1 Change payment information
If your credit card information or your billing address has changed since you initially signed up, you will
need to update our server with the new information. Note: Only the primary user can change the
payment information.
How to change your payment information:
1. Log in as the primary user.
2. Select
Account Management.
29
3. Select
Payment Information.
4. Enter your credit card information. For security purposes, we do not store the credit card
information you provided during your initial set up. Update the billing address, if necessary. When
you are done, select Connect. You will be connected to HomeRelay to update your billing
information.
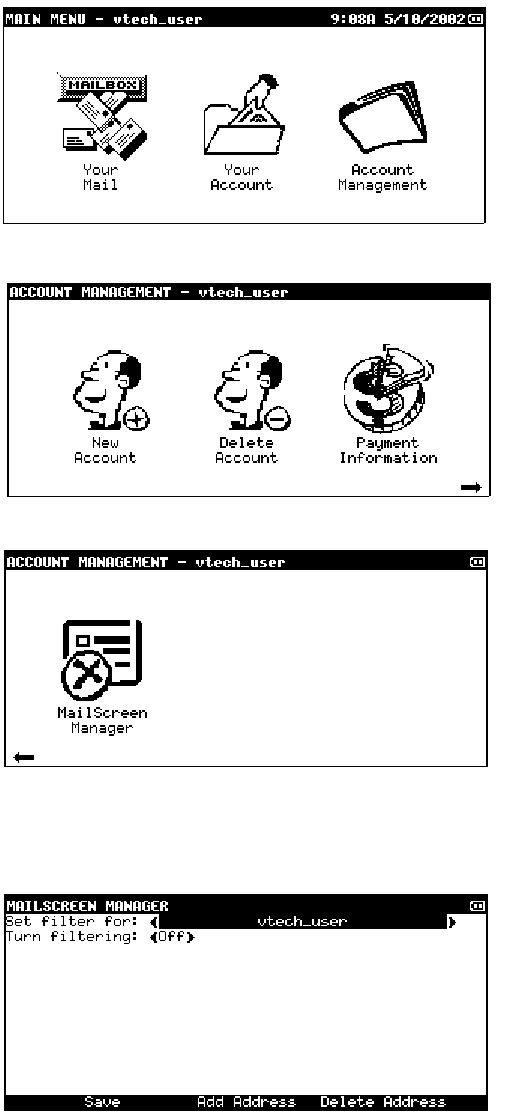
10.2 MailScreen Manager
MailScreen is a list of approved e-mail addresses a secondary account can receive e-mail from or send
e-mail to. If a message is addressed to or from someone not on the MailScreen, the primary user must
approve the message before it is read or sent by the secondary user. Messages addressed to or from
a person not on the MailScreen will be ”locked” and cannot be read or sent out until the primary user
unlocks the message. Note: Only the primary user can manage the MailScreen.
10.2.1 Turning MailScreen On/Off
There may be times when you don’t want the MailScreen to be active. If you turn it OFF, it does not
delete your list. It can be activated again simply by turning it on.
How to turn your MailScreen ON or OFF:
1. Log into the primary user’s account.
2. Select
Account Management.
30
3. Press
More Options.
4. Select
MailScreen Manager.
5. Select the e-mail account you want to set up MailScreen for using the left and right on the Cursor
Control. Select ON or OFF using the left and right on the Cursor Control. For more information on
how to add e-mail address to the MailScreen, see section 9.2.2, Adding and deleting e-mail
addresses from an MailScreen.
10.2.2 Adding and Deleting e-mail Addresses from MailScreen
You can add up to 64 e-mail addresses per e-mail account.
How to add to the MailScreen:
1. Log into the primary user’s account.
2. Select
Account Management.
3. Press
More Options.
4. Select
MailScreen Manager.
5. Select the e-mail account of the MailScreen to add e-mail addresses.
6. Select
Add Address. Type in the e-mail address (e.g., joe_smith@abc.com)

31
7. Select
Save.
8. To add more e-mail addresses, repeat steps 6 and 7.
9. Select
Save when done adding all your e-mail addresses.
How to delete from the MailScreen:
1. Log into the primary user’s account.
2. Select
Account Management.
3. Press
More Options.
4. Select
MailScreen Manager.
5. Select the e-mail account of the MailScreen to delete e-mail addresses from.
6. Select the e-mail address to delete using the up and down on the Cursor Control. If you want to
delete more than one address, mark the address by pressing the ‘Space Bar’.
7. Select
Delete.
8. Select
Yes to confirm the delete.
9. Press the
Enter key.
10.2.3 Unlocking an E-mail Message
If a secondary user has received a message from a person not on the MailScreen or if a user places a
message in the Outbox where the e-mail address in the “To:” or “Cc:” field is not in the MailScreen, then
that message is locked. The message will have a lock icon to the left of it.
How to unlock an e-mail message:
1. The secondary user must alert the primary user of the locked message.
2. The primary user selects the locked e-mail message in the secondary user’s Inbox (for incoming e-
mail messages) or the Outbox (for outgoing messages) by using the up and down on the Cursor
Control and presses Enter.
3. The primary user will be prompted for their password.
4. The e-mail message is displayed with the following options:
Approve – Unlocks the message
Approve and Add – Unlocks the message and automatically adds the sender to the MailScreen.
Don’t Approve. Does not unlock the message.
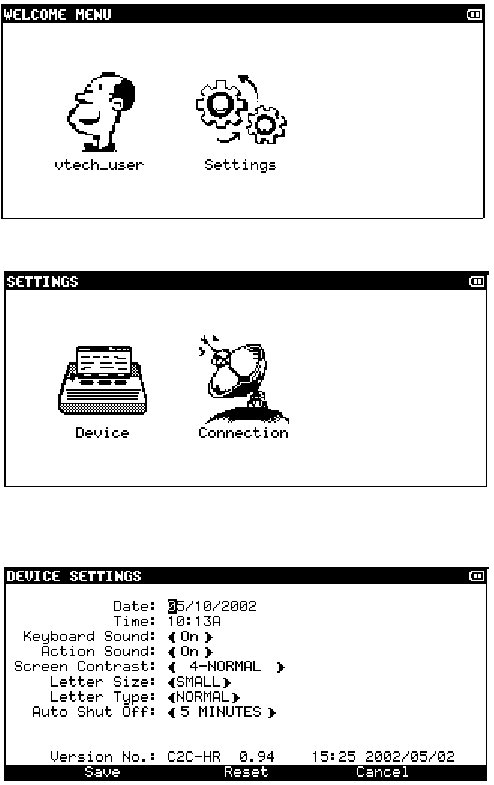
11 YOUR SETTINGS
11.1 Device Settings
The following are the device settings on your Companion™ II cordless:
Date and time – sets the current date and time
Keyboard sound – if on, beeps every time a key is pressed
Action sound – if on, plays a short tune when an action such as connecting to server occurs.
Screen - sets the brightness of the screen
Letter size (large or small). If large, enlarges the text on the mailboxes, e-mail messages, and
Address Book.
Auto shut off - allows you to select a time to have your Companion™ II cordless shut off if it is
not being used.
How to change your device settings:
1. Select
Settings from the Welcome Menu.
32
2. Select
Device.
3. Use the left and right on the Cursor Control to select the different options within each field and the
up and down on the Cursor Control to move up or down.
4. Select
Save.
11.2 Connection Settings
Using your Companion II Cordless, you can access your e-mail account anywhere in the United
States and Canada. With one of the nation’s largest dial-up access network, HomeRelay will keep you
connected at home or on the road. You can specify your connection settings so your Companion™
II cordless can connect successfully to HomeRelay:
Dialing type (Touch tone or Pulse tone). Specify the type of line your phone connects to. Most
phone lines are Touch tone.
Outside line access code. This field is usually required when you are using your Companion™
II cordless from an office or a hotel. For example, if you want to send and receive e-email from
your office and you need to dial a 9 to get an outside line, enter 9 in this field.
Call waiting disable code. This field is usually required when you need to turn off call waiting
while your Companion™ II cordless is connected. This will keep an incoming call from
interrupting your connection. Note: This code will only disable call waiting for that connection.
Once disconnected, call waiting will be enabled. For example, if you need to dial *79 to disable
call waiting, enter *79 in this field.
Your location. Specify the location where you will be connecting to HomeRelay. Your
Companion can be set up to send and receive e-mail from two different locations, HOME and
OTHER. By default, Your Location is set to HOME. If you use your Companion in different

33
locations, we highly recommend you change Your Location to OTHER or vice versa so your
Companion™ II cordless can connect to HomeRelay successfully.
Home phone number. This is the number you specified during registration. If you move or
change your home phone number, make sure the new number is entered in this field.
HomeRelay will determine the local dial up phone number(s) available in your area based on
your home phone number.
Other phone number. You will need to specify this number if you will be connecting to
HomeRelay from a location that is different from your home. For example, if you use your
Companion at home as well as your office, enter your office phone number in this field.
HomeRelay will determine another set of local dial up phone number(s) available in your area
based on your other phone number.
Dial up number 1. If local number(s) are available in your area, the number displayed in this
field is the number your Companion will dial first when connecting to HomeRelay. This field is
updated automatically so do not modify this field unless instructed by a customer service
representative. *
Dial up number 2. If this field is populated, your Companion will only dial this number if dial up
number 1 does not work. Again, do not modify this field unless instructed. *
Connect automatically. If this field is set to ON, your Companion™ II cordless will
automatically dial and connect to HomeRelay to send and receive e-mail messages.
HomeRelay will determine the connect time. You can still check for mail manually by pressing
the CONNECT button.
*NOTE: It is highly recommended that you verify with your local phone provider whether the phone
number(s) are local and no additional charges will incur. In addition, the local phone number currently
in use may actually be a valid residential local phone number in another part of the country. If this rare
event occurs, contact HomeRelay customer service.
How to change your connection settings:
1. Select
Settings from the Welcome Menu.
2. Select
Connection.
3. Use the left and right on the Cursor Control to select the different options within each field and the
up and down on the Cursor Control to move up or down.

34
4. Select
Save.
12 RECAPTURE YOUR ACCOUNT
If for some reason your account information (e-mail accounts, Address Books, MailScreen) is
accidentally deleted or incorrect on your Companion™ II cordless, you can restore your account
information by connecting to HomeRelay and “recaptures” the most recent account information. All of
your account information, including e-mail accounts, MailScreen, Address Book (individual contacts
only), and dial up numbers will be restored. Unfortunately, mail messages cannot be restored. There is
no charge for recapturing your account.
How to recapture your e-mail account information:
1. Hold down the ON/OFF key and insert the end of a paperclip into the small hole labeled “RESET”
on the back of the product. Type Y to reset the unit.
2. Your Companion II cordless will display the Terms and Agreement screen. If you agree with the
terms, select Agree to continue.
3. The next screen outlines the steps it will take to set up your account on your Companion™ II cordless.
Press the middle key to access Recapture.

35
4. This will display the RECAPTURE – INTRODUCTION screen. Select Next to continue.
5. Enter the primary user ID and password. Select Next to continue.
6. Select
Connect. You will be connected to begin the recapture process of downloading all
information for the primary and secondary accounts.
7. Once the download is complete, verify the recaptured information provided. Follow the instructions
on the screen to complete this process. Select Next to continue.
Congratulations! Your account has been recaptured. Please review and contact our customer service if
any of the information is incorrect.
36
13 BATTERIES
13.1 Charge the Handset Battery Pack
Your Companion II cordless unit comes packed with a 1300mAH, 3.6volt NiMH rechargeable battery.
When you first install the battery into your Companion II cordless unit you will need to charge the
battery for at least 16 hours initially.
This battery should remain charged up to 6.5 hours with continuous use. When the unit is idle, the
battery should remain charged for up to 18 days.
The battery pack needs charging when:
A new battery is installed.
The screen displays half or low power in the top right corner
The Low Battery Message is displayed while attempting to retrieve your e-mail
To charge the unit, insert the A/C adapter in the back of your Companion II cordless and plug the
adapter into an electrical outlet. The battery is typically charged in 16 hours. To keep your battery fully
charged, follow the charging process when the unit is not in use.
If you repeatedly get a low battery indication, even after charging overnight, the battery should be
replaced. Use only the AT&T Replacement Battery 2414 (SKU#23403).
Caution: Charge the battery provided with or identified for use with this product only in accordance
with the instructions and limitations specified here.
37
14 GETTING HELP
If you are having problems with your Companion, please refer to the following sections for help:
Section 15 – Frequently Asked Questions
Section 16 – Troubleshooting
If you need additional assistance, you can contact us in one of the following ways:
Telephone Support
For general information 1-888-GO-VTECH
For technical assistance or billing questions 1-866-520-1581
E-mail support
For general information or technical assistance customer-service@homerelay.com
For billing questions billing@homerelay.com
38
15 FREQUENTLY ASKED QUESTIONS
Q: Can I send e-mail to anyone using this Companion II cordless?
A: This Companion II cordless can be used in the U.S. and Canada to exchange e-mail messages with
anyone in the world, as long as they also have an e-mail account.
Q: Can I access my e-mail wirelessly?
A: The Companion II cordless plugs into any active phone jack for easy on-the-go use. It is not
designed to send and receive e-mail wirelessly.
Q: How do I subscribe to the service?
A: Upon receiving your e-mail appliance, you will need to complete the account set up process, which
includes providing your personal credit card information. During this procedure, you will set up your e-
mail address and select an e-mail service rate plan.
Q: Can I use another Internet service provider with this Companion II cordless?
A: Our Companion II cordless is all-inclusive, so we provide the e-mail service.
Q: Why do I need to subscribe to your e-mail service?
A: Our products are designed to work with our e-mail service so you can set up your account and begin
using e-mail easily. Our service allows you to correspond with any e-mail address (such as an AOL
address) and we offer various options for your convenience.
Q: Are you offering a guarantee?
A: Yes, we are. In fact, we offer a 30-day, no-risk, money-back guarantee that is good for both the
device and the service. We are making this offer because we're confident you will be completely
satisfied. We also offer a one-year limited warranty on the hardware.
Q: How many e-mail addresses can I establish?
A: You can create up to five individual e-mail addresses.
Q: Can I access my e-mail while traveling?
A: Yes. With one of the nation’s largest dial-up access network, HomeRelay will keep you connected –
at home or on the road. Refer to section 11.2, Connection Settings, to set up your Companion when
you travel.
Q: What's the local telephone access coverage?
A: HomeRelay determines the local phone number(s) available in your area based on the home phone
number you provided during registration. If local access numbers are not available, then your calls
automatically will be transferred to a toll-free number. It's that simple.
Q: Why am I being charged for accessing my mail?
A: HomeRelay makes every attempt to get the best local phone numbers that are free of charge to you.
However, with many different plans around the nation and dial up numbers changing constantly, you
may get charged for accessing your mail. It is recommended that you check with your local telephone
provider whether the number we provided is free of charge.
Q: Can I receive files such as pictures, word processing documents, and spreadsheets through
my e-mail account?
A: The Companion II cordless is designed to be text-only device and these types of attachments are
deleted from your e-mail messages.
Q: How can I protect myself and my family from unwanted e-mail and SPAM?
A: The Companion II cordless has a built-in safety feature called MailScreen, allowing you to specify
the e-mail addresses with which you would like to correspond. If a message is received from an
address not on the MailScreen, the primary user must approve opening the message before the e-mail
can be opened and read.
39
Q: Can I access the World Wide Web with this Companion II cordless?
A: This Companion II cordless is designed to give you portable, affordable, easy access to the world of
e-mail. However, it is not designed to access the Web.
Q: Can I use the Companion II cordless overseas?
A: The Companion II cordless cannot be used overseas. At this time, our products are operable only in
the United States and Canada.
Q: Can I change my e-mail address?
A: Unfortunately, you can't change your e-mail address. You can, however, create a secondary
account that can use your preferred e-mail address. See section 3.3, Creating a secondary account, for
information on how to create a secondary account.
Q: What is the largest e-mail message I can receive?
A: You can receive a message of any size; however, if the message is larger than 4K (kilobytes), the
message will be split into smaller messages.
Q: Is there a limit on how many e-mail messages I can send and receive?
A: There is no limit on how many e-mail messages you can send or receive.
Q: How do I know if messages are sent out?
A: Sent messages can be found in the Sent Mail folder.
Q. I forgot my password.
A. For security, we do not have access to your password. We can, however, change the password
upon your request. To change your password, please call our technical support between 6 am and 6
pm (Pacific), Monday through Friday.
Q. Where can I get a memory card for archiving and how do I use it?
A. Contact Vtech directly at 1-888-GO-VTECH. The instructions included with the card will guide you
through the process of configuring and preparing the card for archiving your mail. Refer to section 8.4
for more information on memory cards.

40
16 TROUBLESHOOTING
PROBLEM SOLUTION
I pressed the Write E-mail button,
but it doesn’t go to the e-mail
screen. Why?
The Write E-mail button is a shortcut that will take you to a
screen where you can compose an e-mail message. This
button is only active when you are logged into an account.
Why am I not receiving e-mail
messages?
You should be able to receive any messages if the sender
used the correct e-mail ID. However, if you have turned
the MailScreen feature on, you will not be able to receive
messages from those NOT on the MailScreen list.
I’ve added addresses in
MailScreen. Why is my mail not
being filtered?
You must also turn the filter to ON for mail to be filtered.
See section 9.2 for instructions on how to use MailScreen.
I can’t get the e-mail name I want
no matter what I try.
E-mail IDs have to be at least three characters and should
not exceed 32 characters. Each e-mail ID must be unique
and if the name you want is taken, you will be prompted to
enter a new e-mail ID.
I have a multi-line phone line in my
house. Why doesn’t my
Companion work?
The Companion should not be used with a business PBX
line or any form of multi-signal phone line. The additional
voltage on these lines can cause severe damage to your
modem. You should use only a single signal analog
phone line, ideally using a cord running directly into the
wall (6’ or less in length).
I keep getting Communication
Error when trying to connect to
HomeRelay.
Many factors cause Communication Errors. Try the
following:
Make sure the battery is fully charged, or connect the
AC adaptor.
Position the Companion II Cordless keyboard closer
to the base unit
Refer to the SAFETY INFORMATION section for more
information regarding interference.
41
17 SAFETY INFORMATION
Always follow basic safety precautions when using this product to reduce the risk of injury, fire, or
electric shock.
1 Read all instructions in the user’s manual. Observe all markings on the product.
2 Avoid using this product during a thunderstorm. There may be a slight chance of electric shock
from lightning.
3 Do not use the product in the vicinity of a gas leak. If you suspect a gas leak, report it
immediately, but use a telephone away from the area where gas is leaking. If this product is a cordless
model, make sure the base is also away from the area.
4 Do not use this product near water, or when you are wet. For example, do not use it in a wet
basement or shower, or next to a swimming pool, bathtub, kitchen sink, or laundry tub. Do not use
liquids or aerosol sprays for cleaning. If the product comes in contact with any liquids, unplug any line
or power cord immediately. Do not plug the product back in until it has dried thoroughly.
5 Install this product in a protected location where no one can trip over any line or power cords.
Protect cords from damage or abrasion.
6 If this product does not operate normally, read the Trouble Shooting section in the user’s
manual. If you cannot solve the problem, or if the product is damaged, refer to the Warranty Statement.
Do not open this product except as may be directed in your user’s manual. Opening the product or
reassembling it incorrectly may expose you to hazardous voltages or other risks.
7 If this product has user-replaceable batteries, replace batteries only as described in your
user’s manual. Do not burn or puncture batteries — they contain caustic chemicals.
8 If this product has a three-prong (grounding) plug or a polarized plug with one wide prong, it
may not fit in non-polarized outlets. Do not defeat the purpose of these plugs. If they do not fit in your
outlet, an electrician should replace the outlet.
CAUTION: Use only the power adapter provided with this product. To obtain a replacement, call 1-888-
GO VTECH.
Especially About Cordless Devices
Electrical Power: The base unit of this Companion II cordless must be connected to a working
electrical outlet. The electrical outlet should not be controlled by a wall switch.
E-mails cannot be sent or received if the base unit is unplugged or switched off, or if the
electrical power is interrupted.he
Potential TV Interference: Some cordless devices operate at frequencies that may cause interference
to TVs and VCRs. To minimize or prevent such interference, do not place the base of the product near
or on top of a TV or VCR. If interference is experienced, moving the base of the product farther away
from the TV or VCR will often reduce or eliminate the interference.
Rechargeable Batteries: This product contains a Nickel-Metal Hydride rechargeable battery. Exercise
care in handling batteries in order not to short the battery with conducting material such as rings,
bracelets, and keys. The battery or conductor may overheat and cause harm. Observe proper polarity
between the battery and the battery charger.
Nickel-Metal Hydride Rechargeable Batteries: Dispose of these batteries in a safe manner. Do not burn
or puncture. Like other batteries of this type, if burned or punctured, they could release caustic material,
which could cause injury.
Precautions for Users of Implanted Cardiac Pacemakers Cardiac:
Wireless Technology Research, LLC (WTR), an independent research entity, led a multidisciplinary
evaluation of the interference between portable wireless telephones and implanted cardiac pacemakers.
Supported by the U.S. Food and Drug Administration, WTR had recommended to physicians that:
Should keep wireless devices at least six inches from the pacemaker
Should
NOT place wireless devices directly over the pacemaker, such as in a breast pocket, when it
is turned ON
Should use the wireless devices at the ear opposite the pacemaker. WTR’s evaluation did not
identify any risk to bystanders with pacemakers from other persons using wireless devices.
Interference Information:
VTech Telecommunications Ltd.
FCC ID: EW780-1005-00
MH9110securitycodedoc 1 07/19/02
SECURITY CODE INFORMATION
The cordless telephone uses a digital coding security system to prevent unauthorized use of
telephone line by other cordless phones nearby. It has 65,536 possible security code combinations.
Each combination of the code is randomly generated every time the terminal is working.
42
Part 15 of FCC Rules
Some telephone equipment generates, uses, and can radiate radio-frequency energy and, if not
installed and used properly, may cause interference to radio and television reception.
This product has been tested and found to meet the standards for a Class B digital device, as specified
in Part 15 of the FCC Rules. These specifications are designed to provide reasonable protection
against such interference in a residential installation. However, there is no guarantee that interference
will not occur in a particular installation. If this product causes interference to radio, VCR or television
reception when it is in use, you might correct the interference with any one or all of these measures:
Where it can be done safely, re-orient the receiving radio, VCR, or television antenna.
To the extent possible, relocate the radio, VCR, television, or other receiver with respect to the
device.
If this device product runs on AC power, plug your product into an AC outlet that’s not on the
same circuit as one used by your radio, VCR, or television.
Modifications to this product, not expressly approved by the manufacturer, could void the
user’s authority to operate the equipment.
43
18 WARRANTY STATEMENT
Internet Appliance Limited Warranty
This product from VTech is warranted to only the original purchaser for a period of one (1) year from the
original purchase date, under normal use and service, against defective workmanship and material.
This warranty is void if the product has been damaged by accident, misuse, abuse, or other
unreasonable use, neglect, battery leakage or improper installation, improper service or other causes
not arising out of defects in workmanship or materials.
Repair or replacement as provided under this warranty is the exclusive remedy of the consumer.
Except for its obligations to repair or replace this product, VTech makes no warranties of any kind,
express, or implied, concerning this product.
WITHOUT LIMITING THE GENERALITY OF THE FOREGOING, AND EXCEPT FOR ITS
OBLIGATION TO REPAIR OR REPLACE THIS PRODUCT, UNDER NO CIRCUMSTANCES SHALL
VTECH BE LIABLE TO PURCHASER OR ANY OTHER PERSON FOR DIRECT, INDIRECT,
INCIDENTAL, SPECIAL OR CONSEQUENTIAL DAMAGES, INCLUDING BUT NOT LIMITED TO
DAMAGES FOR LOSS OF PROFITS, GOODWILL, OR USE, OR FOR ANY MISTAKES, ERRORS,
OMISSIONS, DELAYS OR INTERRUPTIONS, INTERCEPTIONS OR MIS-DIRECTIONS IN THE
RECEIPT, TRANSMISSION OR STORAGE OF ANY DATA, MESSAGES, SIGNALS, OR OTHER
INFORMATION, EVEN IF VTECH HAS BEEN ADVISED OF THE POSSIBILITY OF SUCH DAMAGES,
WHETHER RESULTING OR ARISING FROM BREACH OF ITS OBLIGATIONS UNDER THIS
AGREEMENT, THE USE OF THIS PRODUCT, OR OTHERWISE.
EXCEPT AS EXPRESSLY WARRANTED, VTECH COMMUNICATIONS, INC. DISCLAIMS ALL
WARRANTIES OF ANY KIND, INCLUDING BUT NOT LIMITED TO IMPLIED WARRANTIES OF
MERCHANTABILITY AND FITNESS FOR A PARTICULAR PURPOSE.
SOME STATES DO NOT ALLOW EXCLUSIONS OR LIMITATIONS OF INCIDENTAL OR
CONSEQUENTIAL DAMAGES, OR ON IMPLIED WARRANTIES, SO THE ABOVE LIMITATIONS OR
EXCLUSIONS MAY NOT APPLY TO YOU. THIS WARRANTY GIVES YOU SPECIFIC LEGAL
RIGHTS AND YOU MAY ALSO HAVE OTHER RIGHTS, WHICH VARY FROM STATE TO STATE.
VTech has no ability to control material accessible via the Internet beyond the control provided by a
properly used MailScreen™ e-mail filter. While VTech believes that MailScreen™ will provide an
effective filter to block access to e-mail sent by someone not on a user’s MailScreen™, VTech does not
warrant that MailScreen™ cannot be circumvented under any circumstances, or will not prevent or
delay the delivery of properly sent mail. You also understand that by using the product you may be
exposed to content that is offensive, indecent, false, misleading, or objectionable. Furthermore,
communications sent or received via this product may not be secure and may be subject to interception
or loss. VTech does not control the content accessible by this product and, as such, does not
guarantee the accuracy, integrity, or quality of any such content. Under no circumstances will VTech be
liable in any way for any content, including, but not limited to, for any errors or omissions in any content,
or for any loss or damage of any kind incurred as a result of receiving or otherwise using any content
posted, e-mailed or otherwise transmitted via this product. Purchaser agrees that it uses this product
and the Internet solely at its own discretion and risk. Purchaser acknowledges that any VTech wireless
product uses public airwaves and therefore any wireless communication is susceptible to interception
and such communications should not be considered secure and private.
During the warranty period, your product will either be repaired or replaced at the option of VTech when
returned, shipping prepaid and with proof of purchase date. In the event that your product is replaced,
the replacement will be continued on the original warranty or for thirty (30) days, whichever is longer.
IMPORTANT: Before returning this product for any reason, notify the VTech Customer Care
Department of the problem at 1-888-GO-VTECH.
44
19 FCC NOTICE
This equipment complies with Part 68 of the FCC rules. On the bottom of this equipment is a label that
contains, among other information, the FCC registration number and ringer equivalence number (REN)
for this equipment. If requested, this information must be provided to the telephone company.
The REN is used to determine the quantity of devices that may be connected to the telephone line.
Excessive REN’s on the telephone line may result in the devices not ringing in response to an incoming
call. In most, but not all areas, the sum of the REN’s should not exceed five (5.0). To be certain of the
number of devices that may be connected to the line, as determined by the total REN’s contact the
telephone company to determine the maximum REN for the calling area.
If the terminal equipment causes harm to the telephone network, the company will notify you in advance
that temporary discontinuance of service may be required. If advance notice is not practical, the
telephone company will notify the customer as soon as possible. Also, you will be advised of your right
to file a complaint with the FCC if you believe it is necessary.
The company may change its facilities, equipment, operations, or procedures that could effect the
operation of the equipment. If this happens, the company will provide advance notice in order for you to
make the necessary modifications in order to maintain uninterrupted service.
If trouble is experienced with this equipment, please contact Vtech at 1-888-GO-VTECH for repair and
(or) warranty information.
If the trouble is causing harm to the telephone network, the telephone company may request you
remove the equipment from the network until the problem is resolved. This equipment cannot be used
on public coin service provided by the telephone company. Connection to Party Line Service is subject
state tariffs.
45
20 INDEX
A
Account
delete .................................................................13
primary ................8, 10, 13, 15, 29, 30, 31, 35, 39
secondary ........................8, 13, 14, 30, 31, 35, 40
Account Management .........................13, 29, 30, 31
Address Book6, 8, 12, 14, 20, 21, 23, 24, 25, 28, 32,
34
add to group .......................................................25
create contact......................................................24
create group........................................................25
delete contact......................................................24
delete from group ...............................................25
delete group........................................................25
open...................................................................23
opening ..............................................................23
update contact.....................................................24
B
Battery.........................................................3, 36, 37
charging.......................................................36, 37
Billing......................................................................8
change ...........................................................8, 29
service plan..............................................8, 11, 12
C
call waiting disable code .......................................33
contact information ...................8, 10, 13, 23, 25, 26
country ...............................................................9, 33
credit card..............................................8, 10, 29, 39
Cursor Control8, 11, 14, 17, 19, 20, 22, 23, 24, 25,
26, 27, 31, 32, 34
D
dial up number.......................................................33
E
email account
password........8, 10, 11, 12, 13, 27, 28, 31, 35, 40
user ID...................................8, 10, 11, 12, 13, 35
e-mail account .............3, 7, 8, 14, 25, 27, 31, 34, 39
password..............8, 10, 11, 12, 13, 27, 28, 31, 35
user ID...................................8, 10, 11, 12, 13, 35
email message
Forward .......................................................20, 21
mark and unmark...............................................22
Move to Archive .........................................20, 21
Reply to All.......................................................20
Reply to Sender .................................................20
e-mail message
delete............................................................20, 21
Forward........................................................20, 21
insert address......................................................24
mark and unmark ............................................... 22
Move to Archive .......................................... 20, 21
print................................................................... 22
Print............................................................. 20, 22
read.................................................................... 19
Reply to All ....................................................... 20
Reply to Sender.................................................. 20
unlock................................................................ 31
H
Help........................................................................ 6
M
Mail Box..................................................... 7, 17, 19
Draft........................................................ 7, 14, 17
Inbox..................................... 7, 15, 19, 20, 21, 31
Mail Archive......................... 7, 18, 19, 21, 28, 29
Outbox .................................. 7, 14, 15, 16, 21, 31
Sent Mail............................... 7, 16, 17, 20, 21, 40
Mailbox Summary............................................ 22, 23
MailScreen................................................ 15, 30, 31
add email address.............................................. 31
add e-mail address ............................................ 31
delete email address.......................................... 31
delete e-mail address......................................... 31
turn On/Off ........................................................ 30
Main Menu ................... 6, 13, 15, 16, 17, 18, 19, 23
Memory Card............................................ 23, 28, 29
copy................................................................... 29
create ........................................................... 28, 29
delete ................................................................. 28
folders ............................................................... 28
install................................................................. 28
open................................................................... 28
purchase ............................................................ 28
rename ............................................................... 28
More Options6, 12, 16, 17, 18, 20, 21, 22, 23, 25,
28, 29, 30, 31
O
outside line access code........................................ 33
P
password
e-mail account.......... 10, 11, 12, 13, 27, 28, 31, 35
pulse tone.............................................................. 33
R
recapture ............................................................... 34
recipient ................................................................ 14
S
sender................................ 14, 15, 20, 21, 26, 31, 41
Settings
46
connection....................................................32, 39
device.................................................................32
Setup
phone line...............................................12, 33, 41
power.....................................................36, 42, 43
printer ........................................................3, 4, 22
telephone ...........................3, 4, 11, 39, 42, 43, 45
subject ...................................................................14
T
touch tone..............................................................33
Travel ..............................................................33, 39
U
user ID
e-mail account....................... 8, 10, 11, 12, 13, 35
Y
Your location ........................................................ 33
Your Password................................................ 13, 27
change......................................................... 27, 40
turn OFF ........................................................... 27
turn ON............................................................. 27
Your Profile ..................................................... 25, 26
Your Signature....................................................... 26

47
NOTES

48