VTech Telecommunications 80-6044-00 Digital Modulation Cordless Phone - Handset User Manual 91 001402 010 100SL82X08 CIB FR HW
VTech Telecommunications Ltd Digital Modulation Cordless Phone - Handset 91 001402 010 100SL82X08 CIB FR HW
Contents
- 1. Users Manual Part 1
- 2. Users Manual
- 3. Users Manual Part I
- 4. Users Manual Part II
- 5. Users Manual Part III
Users Manual Part II
3
Getting started
Quick reference guide
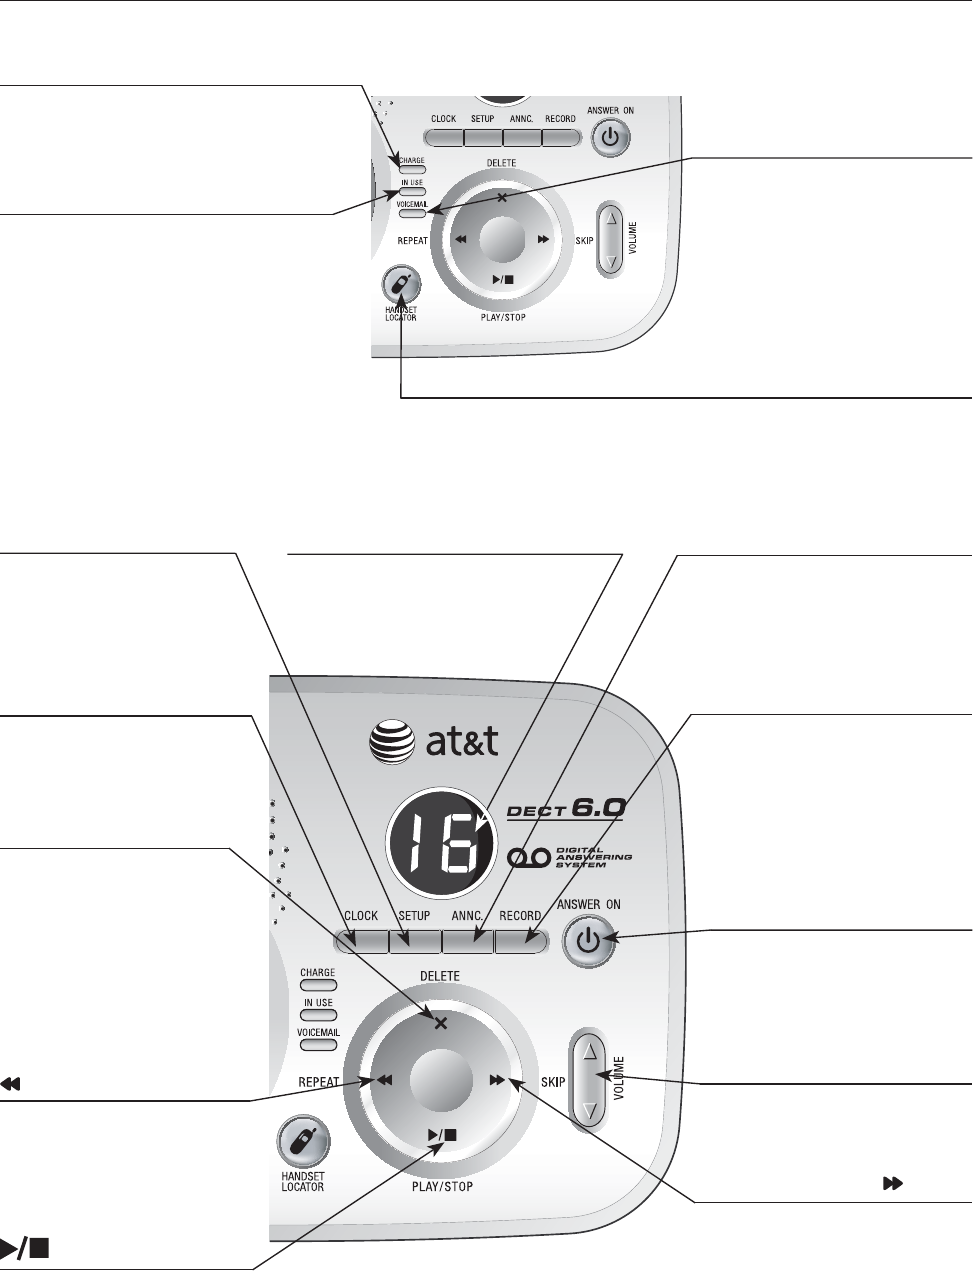
Telephone base
HANDSET LOCATOR
Press to initiate beeping
to locate misplaced hand-
sets (page 10).
VOICEMAIL
Flashes when you have
new voice mail. This
service is provided by
your local telephone
company, (different from
the answering system on
the telephone base).
CHARGE
On when the handset is charging
in the telephone base.
IN USE
• On when one of the handsets is
in use or when the answering
system is answering an incoming
call.
• Flashes when another telephone
is on the same line.
• Flashes quickly when there is an
incoming call.
Press to hear setup
options (page 35).
Press to delete
message currently
playing; press and you
will hear a voice prompt
to direct you to press
the button again to
delete all old messages
(page 36).
Press to review or record
announcement; press
again to quit (page 34).
Press to record a memo
(page 37) or after press-
ing ANNC to record an
outgoing announcement
(page 34).
Press to turn answering
system on or off (page
39).
Press to repeat mes-
sage; press twice to
play previous message
(page 36).
Press to start or stop
message playback (page
36).
Press to adjust playback
volume (page 36).
Press to skip message
(page 36).
/SKIP
VOLUME
ANSWER ON
RECORD
X/DELETE
PLAY/STOP
ANNC
CLOCK
/REPEAT
Press to review or set
clock (page 33).
SETUP
Displays number of messages
(or during playback, message
number currently playing)
(page 36).
MESSAGE COUNTER

4
Getting started
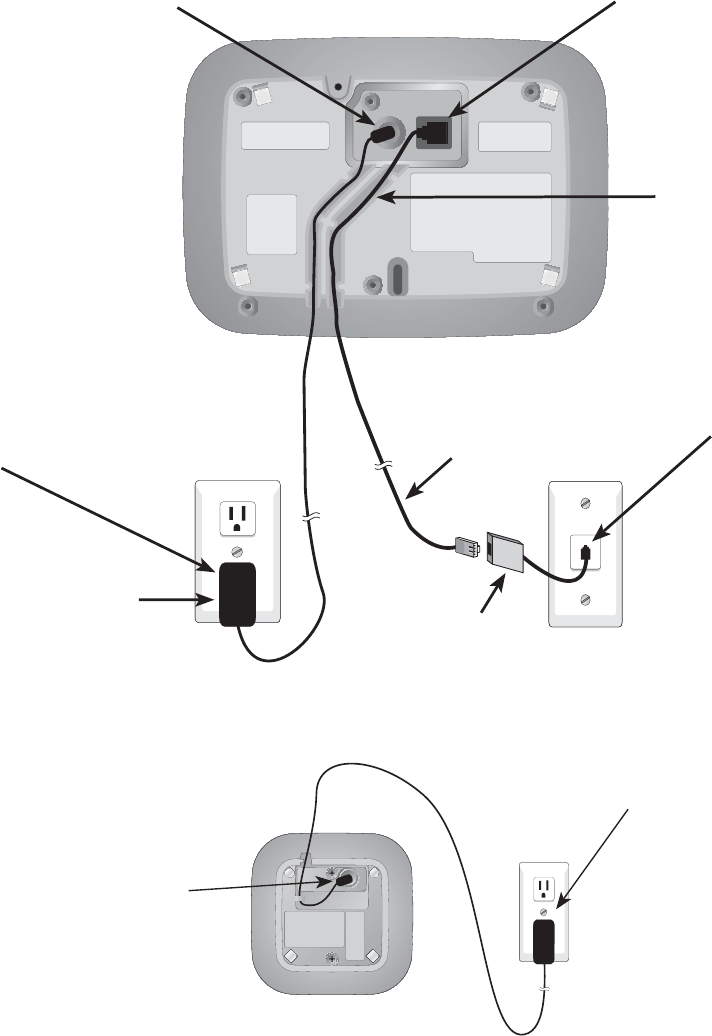
Installation
Your product may be shipped with a protective sticker covering the handset or
base display, remove it before use.
Install the telephone base close to a telephone jack and a power outlet not
connected to a wall switch. The telephone base can be placed on a flat sur-
face. For optimum range and better reception, place the telephone base in a
high and open location.
Avoid placing the telephone base too close to:
• Communication devices such as: television sets, VCRs, or other cordless
telephones.
• Excessive heat sources.
• Noise sources such as a window with traffic outside, motors, microwave ovens,
refrigerators, or fluorescent lighting.
• Excessive dust sources such as a workshop or garage.
• Excessive moisture.
• Extremely low temperature.
• Mechanical vibration or shock such as on top of the washing machine or work
bench.
STOP! See page 6
for easy instructions.
You must install and charge
the battery before using the
telephone.
5
Getting started
IMPORTANT INFORMATION
1. Use only the power adapter supplied with this product. To order a replacement power adapter,
visit our website at www.telephones.att.com or call 1 (800) 222-3111. In
Canada dial 1 (866) 288-4268.
2. This power adapter is intended to be correctly oriented in a vertical or floor mount position.
3. If you receive high speed internet through your telephone line (commonly referred to as DSL),
and you are experiencing interference during telephone conversations and/or your caller ID
features are not functioning properly, install a DSL filter to the telephone line between the
telephone base and the telephone wall jack. Contact your DSL provider for a DSL filter.
Telephone base and charger installation
1. Plug the small end of
the smaller power adapter
into the jack on the under-
side of the charger, then
route the cord through the
slot as shown.
2. Plug the large end of
the smaller power adapter
into an electrical outlet.
Charger installation
Telephone base installation
4. Plug the other end of
the telephone line cord
into a telephone jack.
1. Plug the small end of
the larger power adapter
into the power jack at
the bottom of the tel-
ephone base.
3. Route cords
through slots.
5. Plug the large end of
the larger power adapter
into an electrical outlet
not controlled by a wall
switch.
Power
adapter
2. Plug one end of the tele-
phone line cord into the tel-
ephone jack at the bottom
of the telephone base.
DSL filter
(not included)
Telephone
line cord
6
Getting started
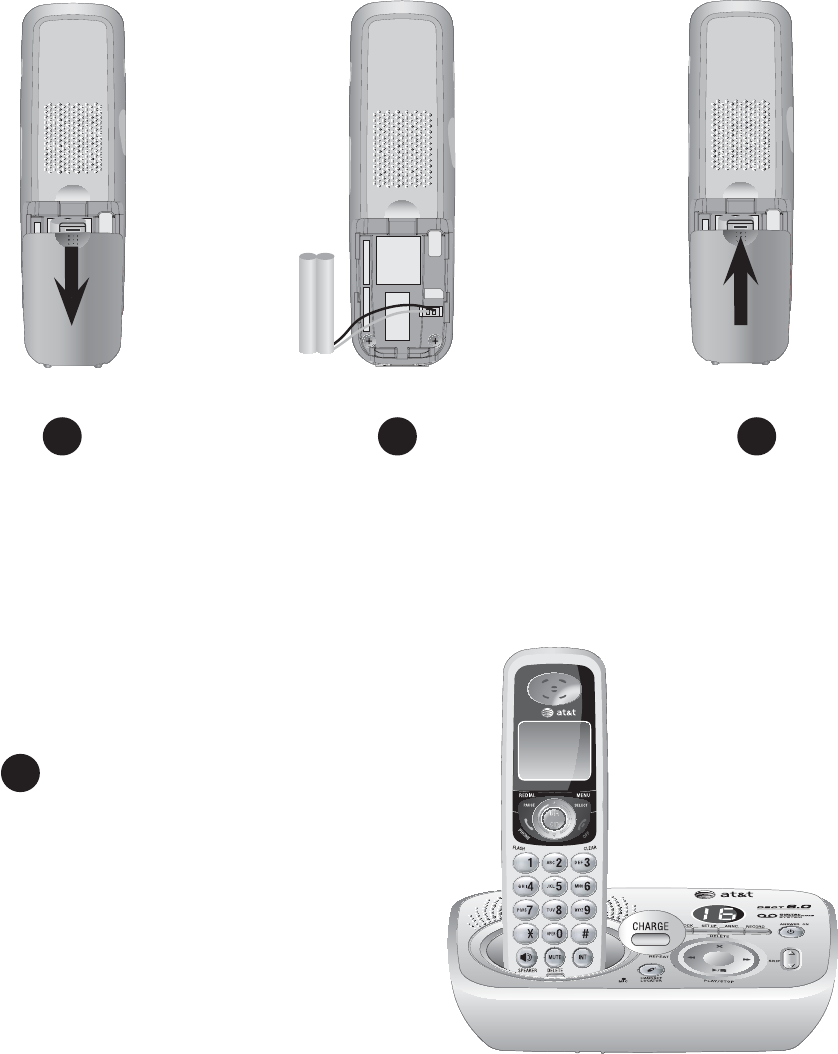
Battery installation & charging
Install the battery as shown below. After installing the battery, you can make and
receive short calls. For optimal performance, charge the handset battery for at least
16 hours before use. When fully charged, the handset battery provides approximately
five hours of talk time and three days of standby time.
Step 1
Press the tab and
slide the battery
compartment cover
downwards
Step 2Step 3
Plug the battery securely
into the plug inside
the handset battery
compartment, matching
the color-coded label.
Align the cover flat
against the battery
compartment
cover, then slide
it upwards until it
clicks into place
Charge the handset, by placing the
handset face up in the telephone base or
in the additional charger. The CHARGE
light will be on when charging.
Step 4
IMPORTANT INFORMATION
1. Use only the supplied rechargeable battery or replacement battery (model BT8001). To order, visit
our website at www.telephones.att.com or call 1 (800) 222-3111. In
Canada dial 1 (866) 288-4268.
2. See the Troubleshooting section on page 44 for charging issues.
7
Getting started
Belt clip & optional headset
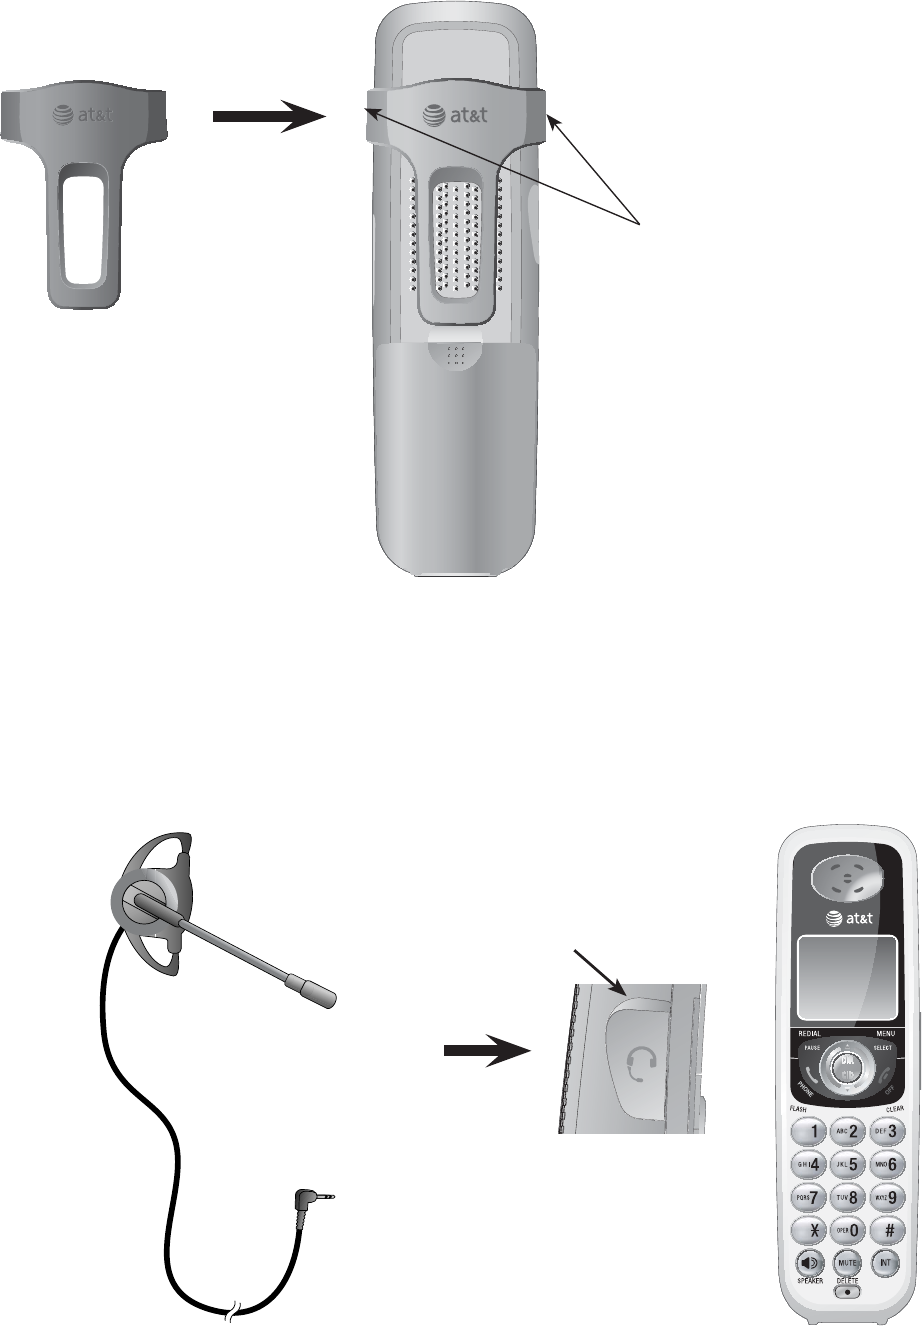
Installation
Snap belt clip into
notches on both
sides of handset.
Plug 2.5 mm headset
into jack on side of
handset (beneath small
rubber flap).
Removal
Pull and unlock one flap
from the notch first before
detaching the whole belt clip
from handset.
For hands-free telephone conversations, you can use any indus-
try standard 2.5 mm headset (purchased separately). For best results, use
an AT&T 2.5 mm headset. To purchase a headset, visit our website atvisit our website at
www.telephones.att.com or call 1 (800) 222-3111. In Canada dial
1 (866) 288-4268.
Lift the rubber
flap here.
Side of handset