VTech Telecommunications 80-7264-00 1.9GHz Cordless Phone (Base Bluetooth Portion) User Manual DS6311 2 CIB UT Talk 070609 ITS
VTech Telecommunications Ltd 1.9GHz Cordless Phone (Base Bluetooth Portion) DS6311 2 CIB UT Talk 070609 ITS
Contents
- 1. Manual
- 2. Users Manual
Manual
![User’s manualwww.vtechphones.comModel: DS6311-2Congratulationson purchasing your new VTech product. Before using this telephone, please read the Important safety instructions on page 72 of this manual.This manual has all the feature operations and troubleshooting necessary to install and operate your new VTech telephone. Please review this manual thoroughly to ensure proper installation and operation of this innovative and feature rich VTech product. For support, shopping, and everything new at VTech, visit our website at www.vtechphones.com. The ENERGY STAR® program (www.energystar.gov) recognizes and encourages the use of products that save energy and help protect our environment. We are proud to mark this product with the ENERGY STAR® label indicating it OGGVUVJGNCVGUVGPGTI[GHſEKGPE[IWKFGNKPGUThe Bluetooth® word mark and logos are registered trademarks owned by Bluetooth SIG, Inc. and any use of such marks by VTech Holdings Limited is under license. VTech Holdings Limited is a member of Bluetooth SIG, Inc. Other trademarks and trade names are those of their respective owners.](https://usermanual.wiki/VTech-Telecommunications/80-7264-00.Manual/User-Guide-1144546-Page-1.png)
![Table of contentsiGetting started .........................1Parts checklist............................1Installation ..................................2Telephone base and charger installation ...............................3Battery installation .....................4Battery charging.........................5Installation options .....................6Tabletop to wall mount installation ..............................6Wall mount to tabletop installation ...............................7Handset layout ...........................8Telephone base layout ...............10Handset main menu ...................11Bluetooth ..................................12Introducing Bluetooth .................12Glossary of terms ......................13Bluetooth setup ..........................14Pair a cell phone.........................14Auto connection .........................15Pair a headset ............................16Auto connection .........................17Paired devices............................18Rename a paired device ............18Remove a paired device ............19Active devices ............................20Review the active devices list ....20Connect/Disconnect an active device......................................20Replace an active device ...........21Add an active device ..................22Remove an active device ...........23Change PIN................................23Download directory ....................24Interruption occurs while downloading a directory..........25View the information of the downloaded directory .............25Telephone settings ..................26Settings ......................................26LCD language ............................26Clear voicemail...........................27Key tone .....................................28Set date/time ..............................28Dial mode ...................................29Home area code.........................30Ringers (handset).......................31Ringer volume (handset)............31Ringer tone.................................32Telephone operation................33Make, answer or end a home call ................................33Call waiting on the home line .....34Make, answer or end a cell call .34Call waiting on the cell line.........34Answer a cell call while on a home call..............................35Answer a home call while on a cell call .................................35Conference home and cell calls.........................................36Handset speakerphone ..............37Volume control ...........................37Mute ...........................................37Temporary tone dialing...............37Hold ............................................38Handset locator ..........................38Chain dialing...............................39Redial list....................................40Review the redial list ..................40Dial a redial entry .......................40Save a redial entry to the directory ..................................40Delete a redial entry ...................40Intercom .....................................41Answer an incoming call during an intercom call.......................42Share an outside call..................43Transfer a call.............................43Directory.....................................44Create a new entry in the home directory ..................................45iiiTable of contentsCharacter chart ..........................46Review the directory...................473-character alphabetical search 47Dial a directory entry ..................48Edit a directory entry ..................48Edit the type of a directory entry 49Delete a directory entry..............49Remove a downloaded directory ..................................49About caller ID............................50Caller ID history..........................51Missed calls indicator ................51Memory match ..........................52Review the call log ....................52Make a call log entry ready to dial ......................................53Dial a call log entry ....................53Save a call log entry to the directory ..................................54Delete from the call log ..............55Call log display screen messages................................55Appendix...................................56Screen display messages ..........56Handset and telephone base indicators ................................58Battery........................................60Expand your telephone system..61Add and register a handset ........61Replace a handset .....................62Troubleshooting..........................63Important safety instructions......72Operating range .........................73Maintenance...............................73About cordless telephones.........74The RBRC® seal.........................74Warranty.....................................75FCC, ACTA and IC regulations ..776GEJPKECNURGEKſECVKQPU .............79Index ..........................................80](https://usermanual.wiki/VTech-Telecommunications/80-7264-00.Manual/User-Guide-1144546-Page-2.png)
![1Telephone line cordParts checklistYour telephone contains the following items. Save your sales receipt and original packaging in the event warranty service is necessary.Handsets (2)Telephone baseUser’s manualTo purchase a replacement battery or power adapter, visit our website at www.vtechphones.com or call 1 (800) 595-9511. Getting startedBatteries (2)Quick start guideBattery compartment covers (2)Charger and power adapterWall bracketTelephone base power adapter2Getting startedInstallationInstall the telephone base close to a telephone jack and a power outlet not connected to a wall switch. For optimum range and better reception, place the telephone base in a central and open location.Depending on the environmental conditions, make sure that your Bluetoothwireless technology enabled cell phone is within 12 feet of where you install the telephone base in order to maintain a reliable connection between your Bluetooth wireless technology enabled cell phone, telephone base, and cell tower.This product may be shipped with a protective sticker covering the handset and/or telephone base display. Remove it before use.Avoid placing the telephone base too close to:Communication devices such as: personal computers, computer routers, television sets, VCRs, wireless routers (wireless broadband, Wi-Fi, or 802.11) or other cordless telephones.Excessive heat sources.0QKUGUQWTEGUUWEJCUCYKPFQYYKVJVTCHſEQWVUKFGOQVQTUOKETQYCXGQXGPUTGHTKIGTCVQTUQTƀWQTGUEGPVNKIJVKPIExcessive dust sources such as a workshop or garage.Excessive moisture.Extremely low temperature.Mechanical vibration or shock such as on top of a washing machine or work bench.•••••••](https://usermanual.wiki/VTech-Telecommunications/80-7264-00.Manual/User-Guide-1144546-Page-3.png)
![3Getting startedTelephone base and charger installationInstall the telephone base and charger(s) as shown below.Make sure that the electrical outlet is not controlled by a wall switch. If you subscribe to digital subscriber line (DSL) high-speed Internet service through your telephone line, you must install a &5.ſNVGTDGVYGGPVJGVGNGRJQPGNKPGEQTFCPFVJGVGNGRJQPGYCNNLCEM6JGſNVGTRTGXGPVUPQKUGCPFcaller ID problems caused by DSL interference. Contact your DSL service RTQXKFGTHQTOQTGKPHQTOCVKQPCDQWV&5.ſNVGTUUse only the power adapters supplied with this product. To order a replacement, visit our website at www.vtechphones.com orcall 1 (800) 595-9511.The power adapters are intended to be correctly oriented in a vertical or ƀQQTOQWPVRQUKVKQP6JGRTQPIUCTGPQVFGUKIPGFVQJQNFVJGRNWIKPRNCEGKHit is plugged into a ceiling, under-the-table or cabinet outlet.••Telephone line cordDSL filter (not included) is required if you have DSL high speed Internet serviceTelephone base power adapterElectrical outlet not controlled by a wall switchTelephone wall jackTelephone basePower adapterCharger4Getting startedIf the handset will not be used for a long time, disconnect and remove the battery to prevent possible leakage.To purchase a replacement battery, visit our website at www.vtechphones.com or call 1 (800) 595-9511. ••Battery installation Install the battery as shown below. If the battery compartment cover is on the handset, press the indentation and slide the cover to remove.Plug the battery connector securely into the socket inside the handset battery compartment, matching the color-coded label.Place the battery with the label THIS SIDE UP facing up and the wires inside the battery compartment.#NKIPVJGEQXGTƀCVCICKPUVVJGDCVVGT[EQORCTVOGPVVJGPUNKFGKVVQYCTFUthe center of the handset until it clicks into place.Charge the handset by placing it in the telephone base. The CHARGElight is on when the handset charges.1.2.3.4.5.13245CHARGE light](https://usermanual.wiki/VTech-Telecommunications/80-7264-00.Manual/User-Guide-1144546-Page-4.png)
![5Getting startedBattery chargingOnce you have installed the battery, the screen indicates the battery status (see the table below). If necessary, place the handset in the telephone base to charge the battery. For best performance, keep the handset in the telephone base or charger when not in use. The battery is fully charged after 16 hours of continuous charging. See the table on page 60 for battery operating times.If the screen is blank, you need to charge the handset without interruption for at least 10 minutes to give the handset enough charge to use the telephone for a short time. The handset beeps and shows Low battery. If you are on a call in low battery mode, the handset beeps every minute.The following table summarizes the battery charge indicators and actions to take.Battery indicators Battery status ActionThe screen is blank. Battery has no charge and the handset cannot be used.Charge without interruption until the screen shows HANDSET X (at least 10 minutes).The screen shows Place in charger and ƀCUJGUBattery has very little charge and the handset cannot be used.Charge without interruption until the screen shows HANDSET X (at least four minutes).The screen shows Low battery,ƀCUJGUCPFVJGhandset beeps.Battery has enough charge to be used for a short time.Charge without interruption until the screen shows HANDSET X (at least 30 minutes).The screen shows HANDSET X.Battery is charged. To keep the battery charged, place it in the telephone base when not in use.6Getting startedInstallation optionsYour telephone base is ready for tabletop use. If you want to mount yourIf you want to mount your telephone on a wall, use the provided wall bracket to connect with a standard dual-stud telephone wall mounting plate. If you do not have this mounting plate, you can purchase one from many hardware or consumer electronics retailers. You may need a professional to install the mounting plate.Tabletop to wall mount installation Position the telephone base as shown below. Insert the extended tabs (marked B) of the wall bracket into the slots on the back of the telephone base (marked B). Push the telephone base down until it is securely in place.+H[QWCTGWUKPIC&5.ſNVGTRNWIVJGNKPGEQTFKPVQVJGſNVGTPQY4QWVGVJGVGNGRJQPGNKPGEQTFQT&5.ſNVGTVJTQWIJVJGYCNNDTCEMGVJQNG4QWVGVJGpower cord out of the bottom of the telephone.2NWIVJGVGNGRJQPGNKPGEQTFQT&5.ſNVGTKPVQVJGYCNNLCEM2NWIVJGpower adapter into a power outlet not controlled by a wall switch.Align the holes on the bracket with the standard wall plate and slide the bracket down until it locks securely. Bundle the telephone line cord and power adapter cord neatly with a twist tie.1.2.3.4.1 234](https://usermanual.wiki/VTech-Telecommunications/80-7264-00.Manual/User-Guide-1144546-Page-5.png)
![7Getting startedWall mount to tabletop installationIf the telephone line cord and power adapter cord are bundled, untie VJGOſTUVLift the telephone base up to detach it from the black plastic wall bracket. 7PRNWIVJGVGNGRJQPGNKPGEQTFQT&5.ſNVGTHTQOVJGYCNN7PRNWIVJGpower adapter from the power outlet.See Telephone base and charger installation on page 3.1.2.3.8Getting startedHandset layout1While reviewing a call log entry, press repeatedly to add or remove 1 in front of the telephone number before dialing or saving it in the directory./TALK/FLASHPress to make or answer a HOME call.Flashes slowly when a HOME call is on hold.During a HOME call, press to receive an incoming call when you receive a call waiting alert./CELLPress to make or answer a CELL call.Flashes quickly when there is an incoming CELL call. Flashes slowly when a CELL call is on hold.During a CELL call, press to receive an incoming call when you receive a call waiting alert. Press to make or answer a HOME call.During a HOME call, press to switch between speakerphone and handset.HOLDPress to put a HOME or CELL call on hold.TONEPress to activate the keypad lock manually.CHARGE lightOn when the handset is charging in the telephone base or charger.REDIAL/PAUSEPress to review the redial list. While dialing or entering numbers into the directory, press and hold to insert a dialing pause.](https://usermanual.wiki/VTech-Telecommunications/80-7264-00.Manual/User-Guide-1144546-Page-6.png)
![9Getting startedHandset layout (continued)VOL/CID/When the handset is not in use, press to review the call log.During a call, press to lower the listening volume.While in a menu, press to scroll down.OFF/CLEARDuring a call, press to hang up.While the handset is ringing, press to silence the ringer temporarily.Press and hold while the telephone is not in use to erase the missed calls indicator.While in a menu, press to exit without making changes or press and hold to return to idle mode.While entering or editing a directory entry, press to erase a digit or character./VOL/While in a menu, press to scroll up.During a call, press to raise the listening volume.When the handset is not in use, press to enter the directory.#Press repeatedly to show other dialing options when reviewing a call log entry.MENU/SELECTPress to show the menu.While in a menu, press to select an item, or save an entry or setting.MUTE/REMOVEWhile on a call, press to mute the microphone.While reviewing the call log, directory or redial list, press to delete an individual entry.Press to delete digits when predialing.10Getting startedTelephone base layoutIN USE lightFlashes when there is an incoming call, or another telephone sharing the same line is in use.On when the handset is in use.VOICEMAIL lightFlashes when you have new voicemail. Voicemail service is offered by your local telephone company, and is different from answering system messages.DEVICE1/DEVICE2 lightsOn when the telephone base is paired and connected with a Bluetooth device./FIND HANDSETPress to page all system handsets.](https://usermanual.wiki/VTech-Telecommunications/80-7264-00.Manual/User-Guide-1144546-Page-7.png)
![11Getting startedDirectory - store and search for names and numbers.Call log - review the caller ID history or delete all call log entries.Bluetooth - set up and manage your Bluetooth enabled devices. Handset main menuTo enter the main menu:Press MENU/SELECT when the handset is not in use.Press or to select a handset feature menu, then press MENU/SELECTto enter that menu.To return to idle mode, press and hold OFF/CLEAR. To return to the previous menu, press OFF/CLEAR.1.2.Ringers - set up ringers for the home and cell lines.Ans. system Directory Call logIntercomBluetoothAns. system Directory Call logIntercomBluetoothIntercom - intercom call with a system handset.Ans. system Directory Call logIntercomBluetoothAns. system Directory Call logIntercomBluetoothDirectory Call logIntercomBluetoothRingersSettings - change your telephone settings.Call logIntercomBluetoothRingersSettings12Introducing BluetoothYour new DS6311 telephone system with Bluetooth wireless technology has the following features:Pair up to four Bluetooth enabled cell phones with the telephone base.Connect a maximum of two cell phones to make and receive cell calls. Only one cell phone can be active on a call at a time.Connect a Bluetooth enabled headset for making and receiving home calls.Conference cell and home calls.Make and receive calls using your cell phone plan while utilizing the ease and comfort of your home telephone system. IMPORTANT INFORMATIONAfter plugging in the telephone base, wait at least 20 seconds before connecting a Bluetooth device. The screen shows Bluetooth system busyif you try to connect too soon.Refer to the user's manual of your Bluetooth enabled cell phone or headset for more information.Bluetooth wireless technology operates within a short range (about 30 feet). When using a cell phone with the DS6311, it is best to place [QWTEGNNRJQPGDGVYGGPQPGCPFſHVGGPHGGVHTQOVJGVGNGRJQPGDCUGWhen using a Bluetooth headset with the DS6311, you are limited to the range of your headset (see the user’s manual of your headset for more information)./CMGUWTGVJCV[QWTEGNNRJQPGJCUUWHſEKGPVUKIPCNUVTGPIVJ;QWOC[need to move the cell phone and telephone base to a location where the cell phone signal strength is stronger.Charge your cell phone while it is connected to the telephone base. Your cell phone's battery will discharge faster while it is connected to the telephone base via Bluetooth wireless technology.Monitor your cell phone's usage because airtime is deducted from your cellular plan for the duration of all cell calls.Refer to the Bluetooth setup section (page 14) to learn how to set up and manage your Bluetooth enabled device(s). Refer to the Telephone operationsection (page 33) on how to operate your Bluetooth devices with your new DS6311 telephone system with Bluetooth wireless technology. Refer to the Troubleshooting section (page 63KH[QWGZRGTKGPEGFKHſEWNV[WUKPIVJGtelephone system.The Bluetooth® word mark and logos are owned by Bluetooth SIG, Inc. and any use of such marks by VTech Holdings Limited is under license. VTech Holdings Limited is a member of Bluetooth SIG, Inc. Other trademarks and trade names are those of their respective owners.•••••••••••Bluetooth](https://usermanual.wiki/VTech-Telecommunications/80-7264-00.Manual/User-Guide-1144546-Page-8.png)
![13BluetoothGlossary of terms Below are some terms used in this user’s manual to help you become familiar with using your Bluetooth enabled devices and your new DS6311telephone system.Active devices - a maximum of two paired devices (two cell phones, or one cell phone and one headset) on the active devices list can be connected to the telephone base, but only one cell phone or headset can be on a call at a time. Bluetooth cell phone - refers to a Bluetooth enabled cell telephone.Cell line - the communication service provided through your Bluetooth enabled cell telephone.Connected - a Bluetooth enabled device (cell phone or headset) can only be used when it is connected to the telephone base. When a Bluetooth enabled device is connected to the telephone base and active on the active devices list, it will be ready for use.Disconnected - a diagonal line appears across devices 1 and/or 2 when the corresponding Bluetooth enabled device is disconnected from the telephone base.Discoverable mode - before a Bluetooth enabled device can be paired, it must be set to this mode. When pairing your cell phone, the telephone base will be set to this mode. When pairing a headset, the headset must be set to this mode. Depending on the manufacturer, this mode is sometimes referred to as Find Me or Visibility.Home line - your conventional telephone land line.Paired devices - once Bluetooth enabled devices have been paired with the telephone base, they will appear on the paired devices list. A maximum of four devices can be paired with the telephone base, but only two can be on the active devices list.Pairing - this refers to the process of Bluetooth enabled devices registering device information with each other. The telephone base must be paired with a Bluetooth enabled cell phone or headset before the Bluetooth device can be used. Depending on the manufacturer, this is also referred to as Bonding.PIN - by default, the PIN is 0000 for the telephone base and for most Bluetooth devices. PIN information must be exchanged between Bluetooth devices before they can be used. This is also known as a Passkey or Passcode.14BluetoothBluetooth setupTo use a Bluetooth enabled cell phone or headset with your DS6311, you OWUVſTUVRCKTCPFEQPPGEV[QWT$NWGVQQVJFGXKEGUYKVJVJGVGNGRJQPGDCUGPair a cell phoneBefore you begin, make sure that your Bluetooth enabled cell phone is not connected to any other Bluetooth device. Refer to your cell phone user's manual to learn how to search for or add new Bluetooth devices.To pair and connect a cell phone:Press MENU/SELECT on the handset when it is not in use.Press or to highlight Bluetooth, then press MENU/SELECT.Press or to highlight Add cellular, then press MENU/SELECT. The screen displays ADD CELLULAR Place cell phone next to base. Press SELECT.If there are already four paired devices on the paired devices list, the screen will show Maximum of 4 devices can be paired and prompt you to replace an existing paired device (page 21).Press MENU/SELECT. The screen displays Please set your cell phone to search for devices, then press SELECT.If a device is already connected to the telephone base, the screen displays Connected device will be temporarily disconnected. Press SELECT.Press MENU/SELECT to temporarily disconnect the device and continue the pairing process.Press MENU/SELECT to set the telephone base to discoverable mode.Turn on the Bluetooth feature of your cell phone and search for or add new devices.1PEG[QWTEGNNRJQPGſPFUVTech DS6311, press MENU/SELECT.Enter the PIN of the telephone base (the default PIN is 0000) into your cell phone to continue the pairing process.1.2.3.•4.•5.6.7.8.Ans. system Directory Call logIntercomBluetoothADD CELLULAR Plac e c ellphone next tobase. Press SELECTBLUETOOTHDowload dir Add cellular Add headsetActive devicesBase name:VTech DS6321PIN:0000Please set your cell phone to search for devices, then press SELECT](https://usermanual.wiki/VTech-Telecommunications/80-7264-00.Manual/User-Guide-1144546-Page-9.png)
![15BluetoothCellular setup completedDeviceconnectedPair a cell phone (continued)When a device is successfully connected, the handset displays Paired with cellular and then Cellular setup completed Device connected. The corresponding status icon ( 1or 2) displays. The corresponding device light (DEVICE1 or DEVICE2) turns on.When you already have two devices on the active devices list, the handset shows Maximum of 2 devices can be connected. You are prompted to replace an existing device on the active devices list (page 21).Auto connectionWhen a device is successfully paired with the telephone base but not connected, the handset displays Cellular setup completed Device not connected and then Auto-connect function enabled. Press SELECT.You can press MENU/SELECT to enable auto-connection function.If you do not enable auto-connection function, you can connect a device manually (page 20).9.•The pairing process may take up to one minute. If the pairing process fails, try again.If you put the handset back in the telephone base during the pairing process, the process discontinues and the handset returns to the idle mode.••Cellular setup completedDevice notconnectedAuto-connect function ebabled. Press SELECT16BluetoothPair a headsetBefore you begin, make sure that your Bluetooth enabled headset is not connected to any other Bluetooth device. Refer to your headset user's manual to learn how to search for or add new Bluetooth devices.To pair and connect a headset:Press MENU/SELECT on the handset when it is not in use.Press or to highlight Bluetooth, then press MENU/SELECT.Press or to highlight Add headset, then press MENU/SELECT. The screen displays ADD HEADSET Place Bluetooth headset next to base. Press SELECT.If there are already four paired devices on the paired devices list, the screen will show Maximum of 4 devices can be paired and prompt you to replace an existing paired device (page 21).Press MENU/SELECT. The screen displays Please set your headset to discoverable mode, then press SELECT.If a device is already connected to the telephone base, the screen displays Connected device will be temporarily disconnected. Press SELECT.Press MENU/SELECT to temporarily disconnect the device and continue the pairing process.Set your headset to discoverable mode.Press MENU/SELECT to set your telephone base to discoverable mode and search for your headset.1PEGVJGVGNGRJQPGDCUGſPFU[QWTJGCFUGVRTGUUMENU/SELECT.Enter the PIN of your headset (the PIN for most Bluetooth devices is 0000), then press MENU/SELECT.1.2.3.•4.•5.6.7.8.Ans. system Directory Call logIntercomBluetoothADD HEADSET Place Bluetooth headset next tobase. Press SELECTBLUETOOTHDowload dir Add cellular Add headsetActive devicesPlease set your headset to discoverable mode, then press SELECTADD HEADSETEnter PIN: ----Searching forBluetooth headsets...FOUND DEVICESHeadset AHeadset B](https://usermanual.wiki/VTech-Telecommunications/80-7264-00.Manual/User-Guide-1144546-Page-10.png)
![17BluetoothHeadset A paired to base. Connect now?Press SELECTPair a headset (continued)When the handset displays Headset A paired to base. Connect to headset? Press SELECT, press MENU/SELECT.When you already have two devices on the active devices list, the handset shows Maximum of 2 devices can be connected. You are prompted to replace an existing device on the active devices list (page 21).When you already have one headset on the active devices list, the handset shows Only 1 headset can be connected. You are prompted to replace an existing device on the active devices list (page 21).When a device is successfully connected, the handset displays Headset setup completed Device connected and the corresponding status icon ( 1or 2). The corresponding light (DEVICE1 or DEVICE2)turns on. Auto connectionWhen a device is successfully paired with the telephone base but not connected, the handset displays Headset setup completed Device not connected and then Auto-connect function enabled. Press SELECT. You can press MENU/SELECT to enable auto-connection function.If you do not enable auto-connection function, you can connect a device manually (page 20).9.••10.Headset setup completedDeviceconnectedThe pairing process may take up to one minute. If the pairing process fails, try again.If you put the handset back in the telephone base during the pairing process, the process discontinues and the handset returns to the idle mode.••Headset setup completedDevice notconnectedAuto-connect function ebabled. Press SELECT18BluetoothPaired devicesAll paired devices are stored on the paired devices list. Up to four devices (one headset only) can be paired with the telephone base.To use a paired device, it must be connected and on the active devices list (page 20).Once you have paired a device with the telephone base, you do not need to repeat the pairing procedure again unless you delete the device from the paired devices list.Rename a paired deviceYou can change the name of a paired device on the paired devices list.Press MENU/SELECT on the handset when it is not in use.Press or to highlight Bluetooth, then press MENU/SELECT.Press or to highlight Paired devices, then press MENU/SELECT.Press or to highlight a selected device when necessary, then press MENU/SELECT.Press or to highlight Rename, then press MENU/SELECT softkey. The screen displays ENTER NEW NAME.Use the dialing keys to edit the name (see step 6 of Edit a directory entry on page 48).Press MENU/SELECTVQEQPſTO6JGJCPFUGVFKURNC[UDevice renamed.1.2.3.4.5.6.7.1PN[VJGſTUVEJCTCEVGTUQHVJGFGXKEGPCOGCTGUJQYPQPVJGpaired devices list.Ans. system Directory Call logIntercomBluetoothBLUETOOTHAdd cellular Add headsetActive devicesPaired devicesSELECT DEVICEHeadset ACell Phone ACENTER NEW NAMEHeadset A _ConnectRenameRemove paired](https://usermanual.wiki/VTech-Telecommunications/80-7264-00.Manual/User-Guide-1144546-Page-11.png)
![19BluetoothRemove a paired deviceIf you already have the maximum of four paired devices on the paired devices NKUVYJGP[QWYCPVVQCFFCPQVJGTFGXKEG[QWOWUVſTUVFGNGVGCRCKTGFdevice from the paired devices list.Press MENU/SELECT on the handset when it is not in use.Press or to highlight Bluetooth, then press MENU/SELECT.Press or to highlight Paired devices, then press MENU/SELECT.Press or to highlight a selected device when necessary, then press MENU/SELECT.Press or to highlight Remove paired, then press MENU/SELECT. The handset displays Remove device from paired list? Press SELECT.Press MENU/SELECT VQEQPſTO6JGJCPFUGVFKURNC[UDevice removed from paired list.1.2.3.4.5.6.Ans. system Directory Call logIntercomBluetoothBLUETOOTHAdd cellular Add headsetActive devicesPaired devicesSELECT DEVICEHeadset ACell Phone ACConnectRenameRemove pairedRemove device from paired list?Press SELECTDevice removedfro mpaired list20BluetoothActive devicesOnly devices on the active devices list can establish a Bluetooth connection with the telephone base. Although two paired devices can be connected to the telephone base, only one Bluetooth cell phone or a headset can be on a call at a time. Review the active devices listPress MENU/SELECT on the handset when it is not in use.Press or to highlight Bluetooth, then press MENU/SELECT.Press or to highlight Active devices, then press MENU/SELECT.Connect/Disconnect an active deviceWhile in the active devices menu, you may connect or disconnect your active device.Press MENU/SELECT on the handset when it is not in use.Press or to highlight Bluetooth, then press MENU/SELECT.Press or to highlight Active devices, then press MENU/SELECT.Press or to highlight Connect/Disconnect(whichever applicable) and then press MENU/SELECT to EQPſTO6JGJCPFUGVFKURNC[UDevice disconnected.1.2.3.1.2.3.4.When your active device is connected, you will be prompted to select Disconnect. When your active device is disconnected, you will be prompted to select Connect.When adding, removing, or replacing a Bluetooth device on the active devices list, all connected devices will be temporarily disconnected until the procedure is complete. It may take up to two minutes to reconnect.Ans. system Directory Call logIntercomBluetoothSELECT DEVICE1 Headset A2 Cell Phone ACDisconnectRemove activeBLUETOOTHDownload dir Add cellular Add headsetActive devices](https://usermanual.wiki/VTech-Telecommunications/80-7264-00.Manual/User-Guide-1144546-Page-12.png)
![21BluetoothReplace an active deviceWhen you already have two devices on the active devices list, you can replace an active device with a device on the paired devices list.To replace an active device:Press MENU/SELECT on the handset when it is not in use.Press or to highlight Bluetooth, then press MENU/SELECT.Press or to highlight Paired devices, then press MENU/SELECT.Press or to highlight a selected device, then press MENU/SELECT.Press or to highlight Connect,then press MENU/SELECT. The handset displays Maximum of 2 devices can be connected and then Replace an existing active device with cellular? Press SELECT.Press MENU/SELECT. You are prompted to select a device on the paired devices list.Press or to highlight the device to be replaced, then press MENU/SELECT. The handset displays Device removed from active list and then Connecting Cell Phone B to the base.Press the appropriate button on your cell phone VQEQPſTOVJGEQPPGEVKQPKHPGEGUUCT[9JGP[QWsuccessfully replace and connect an active device with a paired device, the handset displays Device connected.1.2.3.4.5.6.7.8.Ans. system Directory Call logIntercomBluetoothSELECT DEVICE1 Headset A2 Cell Phone ACBLUETOOTHAdd cellular Add headsetActive devicesPaired devicesConnectRenameRemove pairedREPLACE DEVICE1 Cell Phone A2 Cell Phone BCRepla ce a n existing active device with cellular?Press SELECT22BluetoothAdd an active deviceYou can have a maximum of two devices on the active devices list. To add an active device:Press MENU/SELECT on the handset when it is not in use.Press or to highlight Bluetooth, then press MENU/SELECT.Press or to highlight Active devices, then press MENU/SELECT.Press or to highlight an empty position and then press MENU/SELECT.When Add displays, press MENU/SELECT. You are prompted to select a device from the paired devices list.Press or to select one paired device, then press MENU/SELECT. The handset displays Device added to active list and then Connecting Cell Phone B to the base.Press the appropriate button on your cell phone VQEQPſTOVJGEQPPGEVKQPKHPGEGUUCT[9JGP[QWsuccessfully add and connect an active device, the handset displays Device connected.1.2.3.4.5.6.7.Ans. system Directory Call logIntercomBluetoothSELECT DEVICE1 Cell Phone B2 Cell Phone CCSELECT DEVICE1 Cell Phone A2 EmptyBLUETOOTHDowload dir Add cellular Add headsetActive devicesAdd](https://usermanual.wiki/VTech-Telecommunications/80-7264-00.Manual/User-Guide-1144546-Page-13.png)
![23BluetoothRemove an active deviceYou can remove an active device from the active devices list.To remove an active device:Press MENU/SELECT on the handset when it is not in use.Press or to highlight Bluetooth, then press MENU/SELECT.Press or to highlight Active devices, then press MENU/SELECT.Press or to highlight the desired device and then press MENU/SELECT.Press or to highlight Remove active, then press MENU/SELECT. The handset displays Device removed from active list.Change PINYou are required to enter a PIN when establishing a Bluetooth connection. The default PIN of your telephone base is 0000.To change the PIN:Press MENU/SELECT on the handset when it is not in use.Press or to highlight Bluetooth, then press MENU/SELECT.Press or to highlight Change PIN, then press MENU/SELECT. The handset displays ENTER NEW PIN and the existing PIN.Use the dialing keys to enter a new four-digit code.Press MUTE/REMOVE to erase a digit.Press and hold MUTE/REMOVE to erase the entire number.Press to move the cursor to the right or to the left.Press MENU/SELECT to save.1.2.3.4.5.1.2.3.4.•••5.Ans. system Directory Call logIntercomBluetoothBLUETOOTHDownload dir Add cellular Add headsetActive devicesSELECT DEVICE1 Cell Phone B2 Cell Phone CCDisconnectRemove activeEven the active device is removed from the active devices list, it is still on the paired devices list.Device removedfro mactive listBLUETOOTHAdd headsetActive devicesPaired devicesChange PINENTER NEW PIN000024BluetoothDownload directoryYou can download up to four cell phone directories (phonebooks) to your DS6311 telephone system via Bluetooth wireless technology. Each of the downloaded directory can store up to 1,500 entries with up to 30 digits for each phone number and 15 characters for each name.Before downloading the directory, make sure the cell phone is paired to your DS6311 and on the active devices list.To download a cell phone directory:Press MENU/SELECT on the handset when it is not in use.Press or to highlight Bluetooth, then press MENU/SELECT.Press or to highlight Download dir, then press MENU/SELECT.If there is no cell phone paired to the system, the handset displays No cellular device paired. Press SELECT to add cellular.Press or to select a desired device, then press MENU/SELECT.If the selected device is on the paired devices list but not on the active devices list, the handset displays No cellular on active devices list. Press SELECT to add.If the selected device is on the active devices list but disconnected, the handset displays Not connected. To connect cell by placing it next to base. Press SELECT.If the selected device’s directory has already been downloaded to DS6321 before, the handset displays Directory Cell Phone A will be erased. To download press SELECT. If you press MENU/SELECT to continue the downloading process, the entire previously downloaded directory will be erased.If you already have four existing downloaded directories, the handset displays Memory is full. Replace current directory? Press SELECT when you try to download another cell phone directory. Press MENU/SELECT and the system prompts you to replace an existing directory.1.2.3.•4.••••BLUETOOTHDownload dir Add cellular Add headsetActive devicesAns. system Directory Call logIntercomBluetoothSELECT DEVICECell Phone ACell Phone BC](https://usermanual.wiki/VTech-Telecommunications/80-7264-00.Manual/User-Guide-1144546-Page-14.png)
![25BluetoothCell phone A Downloadingentry #XXXX...Download finish Total #XXXXentries savedPress SELECTDOWNLOAD FROMPhone memory SIM card onlyPhone and SIMsDownload directory (continued)Press or to highlight one of the following options:Phone memory - download all contacts stored in your phone memory.SIM card only - download all contacts stored in your SIM card.Phone and SIM - download all contacts stored in both your phone memory and SIM card.Press MENU/SELECT.When the downloading process is complete, the handset displays &QYPNQCFſPKUJ6QVCN::::entries saved Press SELECT. Press MENU/SELECT orOFF/CLEAR to return to the download directory menu.Interruption occurs while downloading a directoryWhen you move out of range or the handset battery is fully depleted while downloading a directory, the handset displays Download dir aborted. However, the downloading process continues.You can go to the Directory menu to view the information of the downloaded directory.View the information of the downloaded directoryPress MENU/SELECT on the handset when it is not in use.Press or to highlight Directory, then press MENU/SELECT.Press or to choose the desired downloaded directory, then press MENU/SELECT.Press or to highlight Last update, then press MENU/SELECT.5.•••6.1.2.3.4.Certain cell phone do not support SIM card download. If this is the case, try transferring the contacts from your 5+/ECTFVQ[QWTEGNNRJQPGOGOQT[ſTUVVJGPFQYPNQCFfrom your cell phone memory. For more information on how to transfer contacts from your SIM card to your cell phone memory, see the user’s manual of your cell phone.HANDSET XDownload diraborted12:30pm 12/251Cell Phone ALast update:12/25/09Total #XXXXentries saved.26Telephone settingsSettingsIn the setting menu, you can change and edit the settings for LCD language, voicemail indicator, key tone, date and time and dial mode.LCD languageYou can select English,Français or Español to be used in all screen displays.To select a language:Press MENU/SELECT on the handset when it is not in use.Press or to highlight Settings, then press MENU/SELECT.Press or to highlight LCD language, then press MENU/SELECT.Press or to choose from English,Français or Español, then press MENU/SELECTVQEQPſTO1.2.3.4.SETTINGSLCD languageClr voicemailKey toneSet date/timeLCD LANGUAGE3English Francais Espanol,](https://usermanual.wiki/VTech-Telecommunications/80-7264-00.Manual/User-Guide-1144546-Page-15.png)
![27Telephone settingsClear voicemailIf you subscribe to voicemail service offered by your telephone service provider, New voicemail and appear on the handset, and the VOICEMAIL light on the VGNGRJQPGDCUGƀCUJGUYJGP[QWJCXGPGYXQKEGOCKNmessages. Contact your local telephone service provider for more information and assistance about using your voicemail service.After you have listened to all new voicemail messages, the indicators on the handset and telephone base turn off automatically.Use the clear voicemail feature when the telephone indicates that there is new voicemail but there is none (for example, when you have accessed your voicemail while away from home). Clearing the voicemail waiting indicator only turns off the indicators; it does not delete your voicemail messages. As long as you have new voicemail messages, your telephone provider continues to send the signal that turns on the indicators. To manually turn off these indicators:Press MENU/SELECT on the handset when it is not in use.Press or to highlight Settings, then press MENU/SELECT.Press or to highlight Clr voicemail, then press MENU/SELECT. The handset displays Turn off KPFKECVQT!2TGUU5'.'%6VQEQPſTO.Press MENU/SELECTVQEQPſTO1.2.3.4.Your telephone service provider may alert you to new messages with a stutter (broken) dial tone. Contact your service provider for details.Voicemail is different from answering system messages recorded in your answering system. For more information about the difference, see page 56.••HANDSET XNew voicemail12:30pm 12/251Tur n o ffindicator?Press SELECTto confirmSETTINGSLCD languageClr voicemailKey toneSet date/time28Telephone settingsYou can use or to select the desired value for the month, date, year, hour and minute. Every time a desired value is selected, press MENU/SELECT to advance until the date and time are set. If the date and time are not set, the system announces, “Time and day not set,” before each message plays.••Key toneYou can turn the key tone feature on or off.To change the setting:Press MENU/SELECT on the handset when it is not in use.Press or to highlight Settings, then press MENU/SELECT.Press or to highlight Key tone, then press MENU/SELECT.Press or to choose On or Off, then press MENU/SELECTVQEQPſTOSet date/timeThe answering system announces the day and time of the message prior to playing it. Before using the answering system, set the date and time as follows. If you subscribe to caller ID service, the day, month and time are set automatically with each incoming call. However, the year must be correct so that the day of the week can be calculated from the caller ID information.To change the setting:Press MENU/SELECT on the handset when it is not in use.Press or to highlight Settings, then press MENU/SELECT.Press or to highlight Set date/time, then press MENU/SELECT.Use the dialing keys (0-9) to enter the month, date and year. To enter a single digit number, you must add a zero before that number. For example, if the month is February, you must enter 02. Press the MENU/SELECTto continue to set the time.Use the dialing keys (0-9) to enter the hour and minute. To enter a single digit number, you must add a zero before that number. For example, if the time is 6:08, you must enter 0608. Press the MENU/SELECT.Press or to AM or PM, then press MENU/SELECT.1.2.3.4.1.2.3.4.5.6.SETTINGSLCD languageClr voicemailKey toneSet date/timeKEY TONE3On OffSETTINGSLCD languageClr voicemailKey toneSet date/timeSET DATE 01/01/09 MM/DD/YY SET TIME 06:08 PM](https://usermanual.wiki/VTech-Telecommunications/80-7264-00.Manual/User-Guide-1144546-Page-16.png)
![29Telephone settingsDial modeThe dial mode is preset to tone dialing. If you have pulse (rotary) service, you must change the dial mode to pulse dialing.To change the setting:Press MENU/SELECT on the handset when it is not in use.Press or to highlight Settings, then press MENU/SELECT.Press or to highlight Dial mode, then press MENU/SELECT.Press or to choose Tone or Pulse, then press MENU/SELECTVQEQPſTO1.2.3.4.SETTINGSClr voicemailKey toneSet date/timeDial modeDIAL MODE3Ton e Pulse30Telephone settingsHome area codeIf you dial your local calls using only seven digits (area code not required), you can program your home area code so that when you receive a call within your local area, the telephone number is automatically stored without the area code in the call log.To change the setting:Press MENU/SELECT on the handset when it is not in use.Press or to highlight Directory, then press MENU/SELECT.Press or to highlight Home, then press MENU/SELECT.Press or to highlight Home area code, then press MENU/SELECT.Use the dialing keys to enter the desired home area code.Press MENU/SELECTVQEQPſTO1.2.3.4.5.6.If, in the future, your telephone service provider requires you to dial the area code when making a local call, delete the home area code you have already programmed. After you have deleted the programmed home area code, ___ appears.](https://usermanual.wiki/VTech-Telecommunications/80-7264-00.Manual/User-Guide-1144546-Page-17.png)
![31Telephone settingsRingers (handset)In the ringers menu, you can select the ringer tones and adjust the ringer volume for incoming calls to the home and cell lines.Ringer volume (handset)You can adjust the ringer volume for the incoming home and cell calls.To adjust the handset ringer volume:Press MENU/SELECT on the handset when it is not in use.Press or to highlight Ringers, then press MENU/SELECT.Press or to highlight Ringer volume, then press MENU/SELECT.Press or to select Home, Cellular 1, Cellular 2 or All home & cell, then press MENU/SELECTVQEQPſTOPress or to adjust the ringer volume. A sample of each ringer volume plays as you scroll through the choices.Press MENU/SELECTVQEQPſTO1.2.3.4.5.6.RINGERSRinger volumeRinger toneRINGER VOLUMEHomeCellular 1Cellular 2All home & cellWhen the ringer volume for all are set to off, a ringer off icon appears steady. When only one or two of the ringer volume is set to off, a ringer off icon ƀCUJGUSee ? to set the telephone base ringer.••RINGER VOLUMEH32Telephone settingsRinger toneYou can select the ringer tones for the incoming home and cell calls.To select a ringer tone:Press MENU/SELECT on the handset when it is not in use.Press or to highlight Ringers, then press MENU/SELECT.Press or to highlight Ringer tone, then press MENU/SELECT.Press or to select Home, Cellular 1 or Cellular 2,then press MENU/SELECTVQEQPſTOPress or to select a ringer tone. A sample of each ringer tone plays as you scroll through the choices.Press MENU/SELECTVQEQPſTO1.2.3.4.5.6.RINGERSRinger volumeRinger toneRINGER TONEHomeCellular 1Cellular 2RINGER TONE3Ton e 1 Tone 2 Tone 3 Tone 3When you turn off the ringer volume, you will not hear ringer tone samples. •](https://usermanual.wiki/VTech-Telecommunications/80-7264-00.Manual/User-Guide-1144546-Page-18.png)
![33Make, answer or end a home call Using a handset:To make a home call:Press /TALK/FLASH or , then enter the telephone number.To predial a home call:Enter the telephone number, then press /TALK/FLASH or .To answer a home call:Press /TALK/FLASH or .To end a home call:Press OFF/CLEAR or put the handset in the telephone base.Using a Bluetooth headset:You can use a Bluetooth headset on home calls. However, you will need to stay within 30 feet from the telephone base to maintain the Bluetooth signal.To switch between the headset and handset while on a call:Press MENU/SELECT.Press MENU/SELECT to select Use headset/Use handset (whichever applicable).To answer a home call:Press the call button on your headset.To end a home call:Press the call button on your headset if you are using it or press OFF/CLEAR on the handset.••••1.2.••The screen shows the elapsed time as you talk (in hours, minutes and seconds).When predialing (preview numbers before dialing), press MUTE/REMOVEor OFF/CLEAR to backspace and delete; press and hold REDIAL/PAUSE to insert a dialing pause (a p appears).••Telephone operationWhile you are using your Bluetooth headset and you move too far away from the telephone base or the battery of your headset is fully depleted, the call will be transferred to the originating handset automatically.34Telephone operationCall waiting on the home lineIf you subscribe to call waiting service with your telephone service provider, you hear a beep if someone calls while you are already on a call.Press /TALK /FLASH on the handset to put your current call on hold and take the new call.Press /TALK /FLASH on the handset at any time to switch back and forth between calls.Make, answer or end a cell call You can connect a maximum of two Bluetooth enabled cell phones to the telephone base, but only one cell phone can be used on a cell call at a time.If you have only one cell phone connected to the telephone base and is on the active devices list, it is automatically selected to make or answer cell calls. If you have two cell phones connected to the telephone base and are on the active devices list, the telephone system prompts you to select a cell phone before you make a cell call.To make a cell call:Enter the telephone number, then press /CELL.To answer a cell call:Press /CELL.To end a cell call:Press OFF/CLEAR or put the handset in the telephone base.Call waiting on the cell lineIf you subscribe to call waiting service with your cell phone service provider, you hear a beep if someone calls while you are already on a call.Press /CELL on the handset to put your current call on hold and take the new call.Press /CELL on the handset at any time to switch back and forth between calls.•••••••](https://usermanual.wiki/VTech-Telecommunications/80-7264-00.Manual/User-Guide-1144546-Page-19.png)
![35Telephone operationAnswer a cell call while on a home callWhile you are on a home call and there is an incoming cell call, 1 or 2displays on the handset the telephone rings.To answer the incoming cell call:Press /CELL on the handset. The home call is automatically placed on hold and the handset displays Home call on hold.To end the cell call:Press OFF/CLEAR on the handset. The home line is still on hold.To resume the home call on hold:Press /TALK/FLASH on the handset.Answer a home call while on a cell callWhile you are on a cell call and there is an incoming home call, displays on the handset and the telephone rings.To answer the incoming home call:Press /TALK/FLASH on the handset. The cell call is automatically placed on hold and the handset displays Cell call on hold.To end the home call:Press OFF/CLEAR on the handset. The cell line is still on hold.To resume the cell call on hold:Press /CELL on the handset.••••••If you have voicemail service active on your cell phone, and you do not answer the incoming CELL call, the call will be answered by your cell phone’s voicemail. Contact your cell phone service provider for more information about voicemail service.If you have turned on your answering system and you do not answer the incoming home call, the call will be answered by your answering system.36Telephone operationConference home and cell callsWhen you have calls established on the home and cell lines, you can create a 3-way conference using the handset or telephone base.To conference both home and cell calls:Press MENU/SELECT.Press or to highlight Conf. with home/Conf. with cell (whichever applicable).Press MENU/SELECT.To select an option while on a conference call:PressMENU/SELECT.Press or to select one of the following options:End home callEnd cell callPress MENU/SELECT.To end a conference call:Press OFF/CLEAR or put the handset back in the telephone base.1.2.3.1.2.••3.•](https://usermanual.wiki/VTech-Telecommunications/80-7264-00.Manual/User-Guide-1144546-Page-20.png)
![37Telephone operationHandset speakerphoneDuring a call, press to switch between speakerphone and normal handset use.Volume controlDuring a call, press /VOL or /VOL to adjust the listening volume.MuteThe mute function turns off the microphone. You can hear the caller, but the caller cannot hear you.To mute a call:Press MUTE/REMOVE to turn off the microphone. The screen shows Muted for a few seconds and MUTE appears until the mute function is turned off.To un-mute a call:Press MUTE/REMOVE again to resume the conversation. The screen temporarily shows Microphone ON.Temporary tone dialingIf you have pulse (rotary) service only, you can switch from pulse to touch tone dialing temporarily during a call. This is useful if you need to send touch tone signals to access your telephone banking or long distance services.During a call:Press TONE .Use the dialing keys to enter the relevant number. The telephone sends touch tone signals.The telephone automatically returns to pulse dialing mode after you end the call.••1.2.3.38Telephone operationHoldYou can place a home or cell call on hold. You will hear an alert tone if you have not taken the call off of hold after 14 minutes. You will hear another alert tone 30 seconds later. At 15 minutes on hold, the call on hold automatically disconnects.To place a home call on hold:Press HOLD on the handset. Home call on hold appears and /TALK/FLASHƀCUJGUTo resume a home call on hold:Press /TALK/FLASH.To place a cell call on hold:Press HOLD on the handset. Cell call on hold appears and /CELLƀCUJGUTo resume a cell call on hold:Press /CELL.Handset locator6JKUHGCVWTGJGNRU[QWſPFCOKURNCEGFJCPFUGVTo start paging:Press FIND HANDSET on the telephone base when it is not in use. All idle handsets ring and display ** Paging **.To end paging:Press FIND HANDSET on the telephone base.- OR -Press /TALK/FLASH,or any dialing keys (0-9,#,TONE) on the handset.•••••••](https://usermanual.wiki/VTech-Telecommunications/80-7264-00.Manual/User-Guide-1144546-Page-21.png)
![39Telephone operationChain dialingUse this feature to initiate a dialing sequence from numbers stored in the directory, call log or redial while you are on a call. Chain dialing can be useful if you wish to access other numbers (such as bank account numbers or access codes) from the directory, call log or redial list.To access a number in the directory while on a call:Press MENU/SELECT.Press or to highlight Directory, then press MENU/SELECT.Press MENU/SELECT to select Home directory. Press or to scroll to the desired entry or perform an alphabetical search (page xx).Press MENU/SELECT to dial the displayed number. To access a number in the call log while on a call:Press MENU/SELECT.Press or to highlight Call log, then press MENU/SELECT.Press or to scroll to the desired entry.Press MENU/SELECT to dial the displayed number.To access the redial list while on a call:Press REDIAL/PAUSE.Press , or REDIAL/PAUSE until the desired number displays, then press MENU/SELECT. If you do not press MENU/SELECT within two seconds, the number displayed will be dialed automatically.1.2.3.4.5.1.2.3.4.1.2.You cannot edit a directory entry while on a call. For more details about the directory, see page 44.You cannot copy a call log entry into the directory while on a call. For more details about call log, see page 51.You can only view the numbers in the directory, call log or redial while on a call and cannot erase any entries.Press and hold OFF/CLEAR to exit redial, directory or call log while on a call.••••40Telephone operationRedial listThe redial list stores up to 20 most recently dialed numbers. When there are already 20 entries, the oldest entry is deleted to make room for the new entry. Entries are shown in reverse chronological order.Review the redial listPress REDIAL/PAUSE when the handset is not in use.Press , or REDIAL/PAUSE to browse. You hear a double beep when you reach the beginning or end of the redial list.Dial a redial entryPress REDIAL/PAUSE when the handset is not in use.Press , or REDIAL/PAUSE to browse until the desired number displays.Press /TALK/FLASH or to use the home line.- OR -Press /CELL to use the cell line.Press MENU/SELECT to dial the displayed number. If you do not press press MENU/SELECT within two seconds, the number displayed will be dialed automatically.Save a redial entry to the directoryPress REDIAL/PAUSE when the handset is not in use.Press , or REDIAL/PAUSE to browse until the desired number displays.Press MENU/SELECT twice.The handset displays ENTER NUMBER. Use the dialing keys to edit the number, if necessary.Press MENU/SELECT to move to the name.The handset displays ENTER NAME. Use the dialing keys to enter a name (see step 6 of Create a new directory entry on page 45).Press MENU/SELECT and then Saved displays.Delete a redial entryPress REDIAL/PAUSE when the handset is not in use.Press , or REDIAL/PAUSE to browse until the desired number displays.Press MUTE/REMOVE to delete the displayed number.1.2.1.2.3.4.1.2.3.4.5.6.7.1.2.3.](https://usermanual.wiki/VTech-Telecommunications/80-7264-00.Manual/User-Guide-1144546-Page-22.png)
![41Telephone operationIntercomUse the intercom feature for conversations between two system handsets.You can buy additional expansion handsets (DS6301) for this telephone system. You can register up to 12 handsets to the telephone base.To initiate an intercom call with a handset:Press MENU/SELECT on the handset when it is not in use.Press or to highlight Intercom, then press MENU/SELECT.If you have a two-handset system, your handset displays Calling other handset. The destination handset rings and displays Other handset is calling.If you have more than two handsets, your handset displays INTERCOM TO: and a list of registered handsets. Press or to select a destination handset and then press MENU/SELECT. Your handset displays Calling handset X. The destination rings and displays Handset X is calling.To answer an intercom at the destination handset:Press /TALK /FLASH or .Both screens show Intercom.To silence an intercom call:Press OFF/CLEAR or MUTE/REMOVE on the destination handset. Its screen displays Ringer mute for a few seconds.To end an intercom call:Press OFF/CLEAR or place either handset back in the telephone base or charger. Both handsets display Intercom ended.1.2.•••••You can cancel the intercom call before it is answered by pressing OFF/CLEAR on your originating handset.If the destination handset does not answer the intercom call within 100 seconds, is in the directory or call log, or is out of range, the originating handset displays Unable to call try again and returns to the idle mode.;QWECPWUGCOCZKOWOQHſXGJCPFUGVUCVCVKOG9JGPHQWTJCPFUGVUCTGused on intercom calls, use another handset for an outside call.•••Ans. system Directory Call logIntercomBluetoothINTERCOM TO:Handset 2Handset 3Handset 4Handset 542Telephone operationIntercom (continued)Answer an incoming call during an intercom callWhen you receive an incoming home call during an intercom call, there is an alert tone and Incoming call appears on screens.Press /TALK/FLASH to answer the home call and the intercom call ends automatically.Press OFF/CLEAR to end the intercom call with answering the incoming call. The telephone continues to ring.When you receive an incoming cell call during an intercom call, there is an alert tone and Incoming call appears on screens.Press /CELL to answer the cell call and the intercom call ends automatically.Press OFF/CLEAR to end the intercom call with answering the incoming call. The telephone continues to ring.••••](https://usermanual.wiki/VTech-Telecommunications/80-7264-00.Manual/User-Guide-1144546-Page-23.png)
![43Telephone operationShare an outside callAnother handset can join you on an outside call in a three-way conversation. That call continues until all people hang up. Up to four handsets can join an outside call.Press /TALK/FLASH on another handset to join the call.Transfer a callYou can use the intercom feature to transfer an outside call to another system handset.When on an outside call, press MENU/SELECT.Press or to highlight Intercom, then press MENU/SELECT.If you have a two-handset system, your handset displays Calling other handset. The destination handset rings and displays Other handset is calling.If you have more than two handsets, your handset displays INTERCOM TO: and a list of registered handsets. Press or to select a destination handset and then press MENU/SELECT. Your handset displays Calling Handset X. The destination rings and displays Handset X is calling.When the destination handset answers the intercom call, both screens show Intercom.Press OFF/CLEAR on the originating handset. Both screens show Intercom ended.The destination handset screen shows Home call on hold or Cell call on hold. Press /TALK/FLASH to answer a home call or /CELL to answer a cell call.•1.2.••3.4.5.Use headset IntercomDirectoryCall logINTERCOM TO:Handset 2Handset 3Handset 4Handset 5If you want to cancel an intercom call and reconnect to the outside call before the destination handset answers, press /TALK/FLASH on the originating handset.If the destination handset does not answer the intercom call within 100 seconds, is in the directory or call log, or is out of range, the originating handset displays Unable to call try again. Press /TALK/FLASH on the originating handset to reconnect to the outside call.••44Telephone operationDirectoryYour phone directory consists of a home directory and up to four downloaded directories. The home directory stores up to 50 entries with up to 30 digits for each phone number and 15 characters for each name. Each of the downloaded directory stores up to 1,500 entries with up to 30 digits for each phone number and 15 characters for each name.Directory entries are stored at the telephone base and shared by all system handsets. Any changes made on one handset apply to all.Only one handset can review the directory at a time. If another handset tries to enter the directory, its screen shows Not available at this time.When there are no records in the directory, the screen shows Directory empty.When the directory is full and you try to save an entry, the screen shows List full.When you try to save a number already stored in the directory, the screen shows Already saved.•••••](https://usermanual.wiki/VTech-Telecommunications/80-7264-00.Manual/User-Guide-1144546-Page-24.png)
![45Telephone operationCreate a new entry in the home directoryPress MENU/SELECT on the handset when it is not in use.Press or to highlight Directory, then press MENU/SELECT.Press MENU/SELECT to select Home.Press or to highlight Add contact, then press MENU/SELECT. The screen displays ENTER NUMBER.Use the dialing keys to enter a telephone number.Press MUTE/REMOVE to erase a digit.Press and hold MUTE/REMOVE to erase the entire number.Press to move the cursor to the right or to the left.Press REDIAL/PAUSE to insert a dialing pause (a p appears).- OR -Copy a number from the redial list.1. Press REDIAL/PAUSE and then , or REDIAL/PAUSE to browse to select a number.2. Press MENU/SELECT to copy the displayed number.Press MENU/SELECT.Press or to select one of the following types:HomeCellWorkOtherPress MENU/SELECT. The screen displays ENTER NAME.Use the dialing keys (see page 46) to enter the name. Press MUTE/REMOVE to erase a character.Press and hold MUTE/REMOVE to erase all characters.Press to move the cursor to the right or to the left.Press MENU/SELECT VQEQPſTOCPFVJGUETGGPUJQYUSaved.1.2.3.4.5.••••6.7.••••8.9.•••10.You cannot create new entries in your downloaded directories.46Telephone operationCharacter chartUse the dialing keys and the chart below to enter a name (up to 15 characters). Each press of a particular key causes the characters to be displayed in the following order:9JGPGPVGTKPICPCOGKPVJGFKTGEVQT[VJGſTUVNGVVGTQHGCEJYQTFKUautomatically capitalized.Number keyCharacters by number of key presses12345678910111.-,( ) *#&/ ,12ABCabc23DEF d e f 34GHIghi45JKLjkl56MNOmno67PQRS p q r s 78TUVtuv89WXYZwxyz90Space 0*#](https://usermanual.wiki/VTech-Telecommunications/80-7264-00.Manual/User-Guide-1144546-Page-25.png)
![47Telephone operationReview the directoryEntries are sorted alphabetically.To review the directory:Press / when the handset is not in use.Press or to choose a directory, then press MENU/SELECT.Press or to highlight Review, then press MENU/SELECT.Press or to browse.- OR -Press MENU/SELECT on the handset when it is not in use.Press or to highlight Directory, then press MENU/SELECT.Press or to choose a directory, then press MENU/SELECT.Press or to highlight Review, then press MENU/SELECT.Press or to browse.3-character alphabetical search;QWECPWUGVJKUGPJCPEGFEJCTCEVGTUGCTEJVQſPF[QWTEQPVCEVUeven faster.To start the search:Follow the steps in Review the directory above to enter the directory.When an entry appears, use the dialing keys to enter the letters associated with the name. You can enter up to three letters for the search. If there is no name matching the letter(s) entered, the next closest match in alphabetical order appears. If necessary, use or to browse.1.2.3.4.1.2.3.4.5.1.2.48Telephone operationDial a directory entryYou can dial a directory entry on either a home or cell line.To dial a directory entry:Search for the desired entry in the directory (see Review the directory or Alphabetical search on page 47).When the desired entry appears, press /TALK/FLASH or to use the home line,or /CELL to use the cell line.Edit a directory entrySearch for the desired entry in the directory (see Review the directory or Alphabetical search on page 47).When the desired entry appears, press MENU/SELECT. The screen shows EDIT NUMBER.Use the dialing keys to edit the number.Press MUTE/REMOVE to erase a digit.Press and hold MUTE/REMOVE to erase the entire number.Press to move the cursor to the right or to the left.Press REDIAL/PAUSE to insert a dialing pause (a p appears).Press MENU/SELECT.Press or to select one of the following types:HomeCellWorkOtherPress MENU/SELECT. The screen displays EDIT NAME.Use the dialing keys (see page 46) to edit the name. Press MUTE/REMOVE to erase a character.Press and hold MUTE/REMOVE to erase all characters.Press to move the cursor to the right or to the left.Press MENU/SELECT VQEQPſTOCPFVJGUETGGPUJQYUSaved.1.2.1.2.3.••••4.5.••••6.7.•••10.](https://usermanual.wiki/VTech-Telecommunications/80-7264-00.Manual/User-Guide-1144546-Page-26.png)
![49Telephone operationEdit the type of a directory entryIf you only want to edit the type of a directory entry:Search for the desired entry in the directory (see Review the directory or Alphabetical search on page 47).When the desired entry appears, enter the corresponding shortcut keys shown in the below table.Type: Press:Home 1Cell 2Work 3Other 4Delete a directory entryOnce a directory entry is deleted, it cannot be retrieved.To delete an entry:Search for the desired entry in the directory (see Review the directory or Alphabetical search on page 47).When the desired entry appears, press the MUTE/REMOVE. The screen displays &GNGVGEQPVCEV!2TGUU5'.'%6VQEQPſTOPress MENU/SELECT. The screen displays Contact deleted and then shows the next alphabetical entry in the directory.Remove a downloaded directoryOnce a directory entry is deleted, it cannot be retrieved.To delete an entry:Search for a desired downloaded directory in the directory menu (see Review the directory on page 47).When the desired downloaded directory is chosen, press or to highlight Remove dir and then press MENU/SELECT.The screen displays Directory Cell Phone A will be erased. Press 5'.'%6VQEQPſTO. Press MENU/SELECT and then the screen displays Directory removed.1.2.1.2.3.1.2.3.50Telephone operationAbout caller IDThis product supports caller ID services provided by most telephone service providers. Depending on your service subscription, you may see the caller’s number, or the caller’s name and number from the telephone service provider CHVGTVJGſTUVQTUGEQPFTKPI%CNNGT+&HTQOVJGJQOGNKPGCNNQYU[QWVQUGGthe name, number, date and time of the incoming calls. However, caller ID from the cell line only shows the number of the incoming caller and the name of the paired Bluetooth cell phone; date and time of the call is not shown.Information about caller ID with call waitingCaller ID with call waiting lets you see the name and telephone number of the caller before answering the telephone, even while on another call. It may be necessary to change your telephone service to use this feature. Contact your telephone service provider and cell phone service provider if:You have both caller ID and call waiting, but as separate services (you may need to combine these services).You have only caller ID service, or only call waiting service.You do not subscribe to any caller ID or call waiting services.There are fees for caller ID services. In addition, services may not be available in all areas.Caller ID information is available only if both you and the caller are in areas offering caller ID service, and if both telephone service providers use compatible equipment.Caller ID information may not be available for every incoming call. Callers may intentionally block their names and/or telephone numbers. To view call log entries with numbers between 16 and 24 digits, you must save the entry to the directory (see page 54).•••You can use this product with regular caller ID service, or you can use this product’s other features without subscribing to caller ID or combined caller ID with call waiting service.](https://usermanual.wiki/VTech-Telecommunications/80-7264-00.Manual/User-Guide-1144546-Page-27.png)
![51Telephone operationCaller ID historyIf you subscribe to caller ID service provided by your local telephone company and/or cell phone service provider, information about each caller CRRGCTUCHVGTVJGſTUVQTUGEQPFTKPI+H[QWCPUYGTCECNNDGHQTGVJGECNNGTinformation appears on the screen, it will not be saved in the call log.The call log stores up to 100 entries. Each entry has up to 24 digits for the phone number and 15 characters for the name. If the name has more VJCPEJCTCEVGTUQPN[VJGſTUVEJCTCEVGTUCTGUJQYPCPFUCXGFKPthe call log.You can review, redial, and copy an entry into the directory.Entries are in reverse chronological order.When the call log is full, the oldest entry is deleted to make room for new incoming call information.XX Missed call(s) shows when there are new call log entries (including missed and unreviewed calls).Call log empty shows when there are no records in the call log.Only one handset or the telephone base can review the call log at a time. If a handset tries to enter the call log while another handset or the telephone base is already in it, Not available at this time appears.•••••••If the phone number has more than 24 digits, it will not saved or shown in the call log.Missed calls indicator When there are unreviewed calls in the call log, the handset and the telephone base show XX Missed call(s).Each time you review a call log entry marked NEW, the number of missed calls decreases by one.When you have reviewed all the missed calls, the missed calls indicator no longer shows.If you do not want to review the missed calls one by one, press and hold OFF/CLEAR to erase the missed calls indicator. All the entries are then considered old and kept in the call log. HANDSET XXX Missed calls3:45am 12/25VTech800-595-95113:45am 12/25NEW52Telephone operationMemory match When the incoming telephone number exactly matches a telephone number in your directory, the name appears on the screen will match the corresponding name in your directory.For example, when Linda Jones calls, her name will appear as Linda if this is how you entered it into your directory.Review the call log Press CID/ when the handset is not in use.Press or to browse.- OR -Press MENU/SELECT on the handset when it is not in use.Press or to highlight Call log, then press MENU/SELECT.Press or to highlight Review, then press MENU/SELECT.Press or to browse.The name (if available), telephone number, date and time of all incoming calls are shown on the screen.You will hear a double beep when you reach the beginning or end of the call log.1.2.1.2.3.4.••The number shown in the call log will be in the format sent by the telephone company. The telephone company usually delivers ten-digit phone numbers (area code plus phone number). If the telephone number of the caller does not exactly match a number in your directory, the name will appear as it is delivered by the telephone company. For example, if the telephone company includes the area code but your directory number does not, the name will appear as delivered by the telephone company.](https://usermanual.wiki/VTech-Telecommunications/80-7264-00.Manual/User-Guide-1144546-Page-28.png)
![53Telephone operationMake a call log entry ready to dialAlthough the call log entries received have 10 digits (the area code plus the seven-digit number), in some areas, you may need to dial only the seven digits, or 1 plus the seven digits, or 1 plus the area code plus the seven digits. You can change the number of digits that you dial from the call log or store to the directory. While reviewing the call log, press # repeatedly to show different dialing options for local and long distance numbers before dialing or saving the telephone number in the directory.Press 1 repeatedly if you need to add or remove 1 in front of the telephone number before dialing or saving it in the directory. Dial a call log entry Using a handset:Search for the desired entry in the call log (see Review the call log on page 52).When the desired entry appears and is in the correct format for dialing, press /TALK/FLASH or to use the home line,or /CELL to use the cell line. 1.2.800-595-95111-800-595-9511595-95111-595-9511800-595-95111-800-595-9511595-95111-595-951154Telephone operationSave a call log entry to the directorySelect a desired entry in the call log (see Review the call log on page 52).When the desired entry appears, press the SAVE softkey. The screen shows EDIT NUMBER.Use the dialing keys to edit the number.Press MUTE/REMOVE to erase a digit.Press and hold MUTE/REMOVE to erase the entire number.Press to move the cursor to the right or to the left.Press REDIAL/PAUSE to insert a dialing pause (a p appears).Press MENU/SELECT.Press or to select one of the following types:HomeCellWorkOtherPress MENU/SELECT. The screen displays EDIT NAME.Use the dialing keys (see page 46) to edit the name. Press MUTE/REMOVE to erase a character.Press and hold MUTE/REMOVE to erase all characters.Press to move the cursor to the right or to the left.Press MENU/SELECT VQEQPſTOCPFVJGUETGGPUJQYUSaved.1.2.3.••••4.5.••••6.7.•••10.](https://usermanual.wiki/VTech-Telecommunications/80-7264-00.Manual/User-Guide-1144546-Page-29.png)
![55Telephone operationDelete from the call logTo delete a single entry:Select a desired entry in the call log (see Review the call log on page 52).When the desired entry appears, press MENU/SELECT. The screen shows the previous call log entry.To delete all entries:Press MENU/SELECT on the handset when it is not in use.Press or to highlight Call log, then press MENU/SELECT.Press or to highlight Del all calls, then press MENU/SELECT.The screen displays &GNGVGCNNECNNU!2TGUU5'.'%6VQEQPſTO.Press MENU/SELECT.Call log display screen messages1.2.1.2.3.4.Displays WhenPrivate name The caller is blocking the name.Private number The caller is blocking the telephone number.Private caller The caller is blocking the name and number. Unknown name This caller’s name is unavailable. Unknown number This caller’s number is unavailable.Unknown caller No information is available about this caller.Long distance ORL (before the caller’s number) It is a long distance call.56AppendixScreen display messagesAlready saved The telephone number entered is already stored in the directory.Bluetooth system busy You are trying to use a handset to make a cell call while another handset is already in cell call predial mode.C a ll lo g e m p t y There are no call log entries.Calling Handset X(for models with two or more handsets)The telephone base or the handset is calling another handset.Cell The cell line is in use.C ell c all o n h ol d A call on the cell line has been put on hold.Cell line in use A system handset on the cell line is in use.Charging The handset with low battery is recharging.Directory empty There are no directory entries.Ended You have just ended a call.Handset X is calling (for models with two or more handsets)Another system handset is calling.Home The home line is in use.Home call answered The answering system has answered the incoming home call.Home call on hold A call on the home line has been put on holdHome & cell calls on hold Calls on the home and cell lines have been put on hold.Home line in use A system handset, the telephone base or another telephone on the same home line is in use.Incoming call There is an incoming call.Intercom The handset or the telephone base is on an intercom call.Intercom ended You have just ended an intercom call.Appendix](https://usermanual.wiki/VTech-Telecommunications/80-7264-00.Manual/User-Guide-1144546-Page-30.png)
![57AppendixScreen display messages (continued)List full The directory is full.Low battery The battery needs to be recharged.Microphone on MUTE is turned off and the person on the other end can hear you. Muted You have turned off the handset microphone. The other party cannot hear you but you can hear the other party.New voicemail There are new voicemail message(s) from your local telephone company.No connected cellular phonesThere is no cell phone connected when you tries to make a call on the cell line.No home line There is no telephone line connected.No messages There ar no old messages at the answering system when you try to delete all old messages with a handset.NO signal, call endedCommunication between handset and telephone base is lost during a call.Not available at this time One handset or the telephone base is already viewing the call log or directory and another handset/telephone base attempts to review it.** Paging ** The system handset is paged.Place in charger The battery is very low. Place the handset in the telephone base for recharging.Rec time full The answering system has no recording time left.Ringer mute The ringer is muted temporarily during an intercom call.Saved Your selection has been saved.Searching for BASE The cordless handset is searching for the telephone base.Unable to call try again You try to make an intercom call, but the handset you are calling is in the directory, in the call log, out of range or on an outside call, or the telephone base is in the directory or call log or on an outside call.Unable to save You try to save a caller ID entry with no name or number.XX Missed calls There are unreviewed calls in your call log.58AppendixHandset and telephone base indicatorsHandset lightsOn when the handset speakerphone is in use./CELL On when the cell line is in use.Flashes quickly when there is an incoming cell call.Flashes slowly when the cell line is on hold./TALK/FLASH Flashes quickly when there is an incoming home call.Flashes slowly when the home line is on hold.CHARGE On when the handset is charging in the telephone base.Telephone base lightsDEVICE1/DEVICE2 On when a Bluetooth device is connected to the base.VOICEMAIL Flashes when you have new voicemail from your voicemail service provider.IN USE On when the telephone line is in use.Flashes quickly when there is an incoming call.Flashes slowly when the line is on hold.](https://usermanual.wiki/VTech-Telecommunications/80-7264-00.Manual/User-Guide-1144546-Page-31.png)
![59AppendixHandset iconsHOME line - on steadily when the home line is in use or there is an incoming home call. 12CELL line - on steadily when the cell line is in use or there is an incoming cell call.1 2 Bluetooth connected device(s) - indicates that there are Bluetooth connected devices on the active devices list. 1 2 Bluetooth disconnected device(s) - indicates that there are Bluetooth disconnected devices on the active devices list.Wireless Bluetooth headset - on steadily when a wireless Bluetooth headset is in use on the home line.Speakerphone - the speakerphone is in use.Ringer off - on steadily when all the ringers of Home,Cellular 1 and Cellular 2 are turned off. Flashes when only one or two of the ringers are turned off.New voicemail - indicates you have new voicemail message(s) from the telephone service provider .Battery status - animates when the battery is charging. Becomes solid when the battery is fully charged. Battery statusƀCUJGUYJGPVJGDCVVGT[KUNQYCPFPGGFUcharging.NEW New call log - indicates that the missed call is new.MUTE Mute - the microphone is muted.60AppendixBatteryIt takes up to 16 hours for the battery to be fully charged. When it is fully charged, you can expect the following performance:Operation Operating timeWhile in handset use (talking*) Up to seven hoursWhile in speakerphone mode (talking*) 7RVQſXGJQWTUWhile not in use (standby**) Up to seven days*Operating times vary depending on your actual use and the age of the battery. **Handset is not charging or in use.The battery needs charging when:A new battery is installed in the handset.The handset beeps every minute while on a call.The handset beeps and Low battery displays on the handset.Place in charger displays on the handset.A battery is properly installed but the screen is blank.CAUTION:6QTGFWEGVJGTKUMQHſTGQTKPLWT[TGCFCPFHQNNQYVJGUGKPUVTWEVKQPUUse only the battery(ies) provided or equivalent. To order a replacement, visit our website at www.vtechphones.com or call 1 (800) 595-9511.&QPQVFKURQUGQHVJGDCVVGT[KGUKPCſTG%JGEMYKVJNQECNYCUVGOCPCIGOGPVcodes for special disposal instructions.Do not open or mutilate the battery(ies). Released electrolyte is corrosive and might cause burns or injury to the eyes or skin. The electrolyte might be toxic if swallowed.Exercise care in handling batteries in order not to create a short circuit with conductive materials.%JCTIGVJGDCVVGT[KGURTQXKFGFYKVJQTKFGPVKſGFHQTWUGYKVJVJKURTQFWEVQPN[KPCEEQTFCPEGYKVJVJGKPUVTWEVKQPUCPFNKOKVCVKQPUURGEKſGFKPVJKUOCPWCNObserve proper polarity orientation between the battery and metallic contacts.6QRTGXGPVſTGQTUJQEMJC\CTFFQPQVGZRQUGVJKURTQFWEVVQYCVGTQTCP[V[RGof moisture.••••••••••••](https://usermanual.wiki/VTech-Telecommunications/80-7264-00.Manual/User-Guide-1144546-Page-32.png)
![61AppendixExpand your telephone systemThe handset provided with your telephone system is pre-registered as HANDSET. Additional handsets registered to the telephone system are assigned in sequential order. If you register another new handset to your telephone system, the new registered handset is assigned HANDSET 2.This telephone system accommodates up to 12 handsets.Add and register a handset (optional)You can add new handsets (DS6301, purchased separately) to your telephone system, but each handset must be registered with the telephone DCUGDGHQTGWUG9JGPſTUVRWTEJCUGFGCEJGZRCPUKQPJCPFUGVUJQYUPress and hold FIND HANDSET on base for 4 sec, then press # on handset after a battery is installed. You may need to charge the handset before registering to the telephone base. For more details on battery charging, see the table on page 4.To register a handset:Press and hold FIND HANDSET on the telephone base for about four seconds until the red IN USE light turns on.Press # on the handset. Its screen shows Registering...Please wait and it takes up to 60 seconds to complete the registration. The handset shows HANDSET X Registered (X represents the handset number assigned) and you hear a beep when the registration completes.1.2.If the registration fails, the handset shows Registration failed for a few seconds and then Press and hold FIND HANDSET on base for 4 sec, then press # on handset. Try the registration process again.You cannot register a handset if any other system handset is in use.••62AppendixReplace a handsetIf you want to replace a handset or re-assign the designated handset number of a registered handset, you must deregister all the handsets and then individually register each handset.To make deregistration easier, read all of the instructions on this page before you begin. To deregister all handsets:Press and hold FIND HANDSET on the telephone base for about 10 seconds until the IN USENKIJVƀCUJGUVJGPTGNGCUGFIND HANDSET.Press FIND HANDSET again at once. You must press FIND HANDSETwhile the IN USENKIJVKUUVKNNƀCUJKPI6JGIN USENKIJVƀCUJGUHQTCDQWVseven seconds. All system handsets show Press and hold FIND HANDSET on base for 4 sec, then press # on handset when the deregistration completes. The deregistration process takes about 10 seconds to complete.If deregistration fails, you may need to reset the telephone and try again.To reset:Pick up the regisered handset and then press /TALK/FLASH.Press OFF/CLEAR and place the handset back in the telephone base. -OR-Unplug the power from the telephone base, then plug it back in.1.2.3.1.2.•You cannot deregister a handset if any system handset is in use.](https://usermanual.wiki/VTech-Telecommunications/80-7264-00.Manual/User-Guide-1144546-Page-33.png)
![63Appendix+H[QWJCXGFKHſEWNV[YKVJ[QWTVGNGRJQPGRNGCUGVT[VJGUWIIGUVKQPUDGNQYFor Customer Service, visit our website at www.vtechphones.com or call 1 (800) 595-9511.I cannot pair my cell phone to the telephone base.Make sure the Bluetooth function of your cell phone is turned on. See the user’s manual of your cell phone for more information.Remove VTech DS6321 from your cell phone’s handsfree device history list (see the user’s manual of your cell phone for more information).Carefully follow the pairing instructions on page 14 and make sure that your cell phone is not connected to any other Bluetooth device.Turn off your cell phone, then turn it on again.Reset the telephone base. Unplug the unit’s electrical power. Wait for approximately 15 seconds, then plug it back in. Repeat the above suggestions.I cannot pair my headset to the telephone baseMake sure that your Bluetooth headset is in discoverable mode when pairing with the telephone base. See the user’s manual of your headset for more information on how to set your headset in discoverable mode.Carefully follow the pairing instructions on page 16 and make sure that your headset is not connected to any other Bluetooth device.Reset the telephone base. Unplug the unit’s electrical power. Wait for approximately 15 seconds, then plug it back in. Repeat the above suggestions.I cannot connect my cell phone with the telephone base.Make sure that the Bluetooth function of your cell phone is turned on. See the user’s manual of your cell phone for more information.Make sure that your Bluetooth cell phone is not connected to any other Bluetooth device.Turn off your cell phone, then turn it on again.Make sure that your cell phone is connected and on the active devices list.For some cell phones, you must authorize VTech DS6321 device in your cell phone’s Bluetooth feature. See the user’s manual of your cell phone for more information.Manually connect your cell phone to VTech DS6321. Refer to the user’s manual of your cell phone for more information.I cannot connect my headset with the telephone base.Make sure that your Bluetooth headset is not connected to any other Bluetooth device.Make sure that your headset is connected and on the active devices list.••••••••••••••••Troubleshooting64AppendixI cannot put my headset in discoverable mode.Refer to the user’s manual of your headset for information on how to set your headset in discoverable mode.Make sure that the headset is not connected to any other Bluetooth device in order to successfully pair and connect to the telephone base.Carefully follow the pairing process on page 16.Reset the telephone base. Unplug the unit’s electrical power. Wait for approximately 15 seconds, then plug it back in. Repeat the above suggestions.+ECPPQVſPF86GEJ&5QPO[EGNNRJQPGMake sure that the telephone base is in discoverable mode. Carefully follow the setup instructions.Make sure that you manually set your cell phone to search for devices.Remove VTech DS6321 from your cell phone’s handsfree device history list (see the user’s manual of your cell phone).Turn off your cell phone, then turn it on again.Reset the telephone base. Unplug the unit’s electrical power. Wait for approximately 15 seconds, then plug it back in. Repeat the above suggestions.I don’t know how to search for or add new devices on my cell phone.Most cell phones have the Bluetooth feature in the connection or setup menus. Please refer to the user’s manual of your cell phone.In general, press the menu key on your cell phone, then look for the Bluetooth menu in the settings or connection menu. In the Bluetooth menu, select the option to search for or add new devices.My cell phone disconnects with the telephone base.Turn off your cell phone, then turn it on again.Make sure that you are not using your cell phone when on a cell call.My cell phone is connected to the telephone base, but I cannot make a cell call.Make sure that your cell phone is not in use when you are trying to make a cell call.Make sure that your cell phone is compatible.For some smartphones, make sure that the cellular function is turned on.••••••••••••••••Troubleshooting](https://usermanual.wiki/VTech-Telecommunications/80-7264-00.Manual/User-Guide-1144546-Page-34.png)
![65AppendixBluetooth system busy appears on the display.Make sure that your cell phone is not in use when connected and on the active devices list.Make sure that your cell phone or headset is not connected to any other Bluetooth device.DS6321 can only use one Bluetooth device at a time.The PIN on the telephone base does not work.The default PIN is 0000.If you have changed the PIN, it will appear on the telephone base in the pairing process.I cannot hear any audio on my telephone system when on a cell call.Reset the telephone base. Unplug the unit’s electrical power. Wait for approximately 15 seconds, then plug it back in.Turn off your cell phone, then turn it on again.I cannot download contacts from my cell phone to DS6321.Make sure that your cell phone is paired and connect to the base.I see duplicate entries in my downloaded directoryIf you see duplicate directory entries, you can delete them manually. Another option is to download again either your SIM card or phone memory, but not both.Some of my cell phone contacts were not imported to DS6321Make sure to try transferring the contacts from your SIM card to your phone OGOQT[ſTUVVJGPFQYPNQCFHTQO[QWTRJQPGOGOQT[+HVJCVFQGUPŏVYQTMtry transferring the contacts from your phone memory to your SIM card, then download from your SIM card. For more information on how to transfer contacts between your SIM card and your phone memory, refer to the user’s manual of your cell phone. ••••••••••Troubleshooting66AppendixMy telephone does not work at all.Make sure the battery is installed and charged correctly (page 4). For optimum daily performance, return the handset to the telephone base or charger after use.Make sure the power adapter is securely plugged into an outlet not controlled by a wall switch./CMGUWTGVJGVGNGRJQPGNKPGEQTFKURNWIIGFſTON[KPVQVJGVGNGRJQPGDCUGCPFthe telephone wall jack.Unplug the electrical power to the telephone base. Wait for approximately 15 seconds, then plug it back in. Allow up to one minute for the cordless handset and telephone base to synchronize.Charge the battery in the handset for up to 16 hours.If the battery is completely depleted, it can take up to 10 minutes to charge the handset before HANDSET X appears on the screen (page 4).Remove and re-insert the battery. If that still does not work, it might be necessary to purchase a new battery.Disconnect the telephone base from the telephone wall jack and plug in a working telephone. If the other telephone does not work, the problem is probably in the wiring or the local service. Call the local telephone company.Low battery shows on screen.Place the handset in the telephone base for recharging.Remove and re-install the battery and use it until fully depleted, then recharge the handset in the telephone base for up to 16 hours.If the above measures do not correct the problem, replace the battery.The battery does not charge in the handset or the handset battery does not accept charge.Make sure the handset is placed in the telephone base correctly. The CHARGElight on the handset should be on.Remove and reinstall the battery, then charge for up to 16 hours.If the handset is in the telephone base but the CHARGE light on the handset is not on, refer to The CHARGE light is off in this section.If the battery is completely depleted, it can take up to 10 minutes to charge the handset before HANDSET X appears on the screen (page 4).Purchase a new battery. Refer to the Battery section (page 60).The CHARGE light is off.Clean the charging contacts on the handset and telephone base each month with a pencil eraser or a dry non-abrasive fabric.Make sure the power adapter and telephone line cord are plugged in correctly and securely.Unplug the power adapter. Wait for 15 seconds before plugging it back in. Allow up to one minute for the handset and telephone base to reset.•••••••••••••••••••Troubleshooting](https://usermanual.wiki/VTech-Telecommunications/80-7264-00.Manual/User-Guide-1144546-Page-35.png)
![67AppendixTroubleshootingThere is no dial tone.First, try all the above suggestions.Move the handset closer to the telephone base. It may be out of range.The telephone line cord might be malfunctioning. Install a new telephone line cord.Disconnect the telephone base from the telephone wall jack and connect a different telephone. If there is no dial tone on this telephone either, the problem is in your wiring or local service. Contact your local telephone company.The telephone does not ring when there is an incoming call.Make sure the handset ringer volume is not set to off or the lowest level and the telephone base ringer volume is not set to off or the lowest level. Make sure the telephone line cord and power adapter are plugged in properly (page 3).The handset may be too far from the telephone base. Move it closer to the telephone base.There may be too many extension phones on the telephone line to allow all of them to ring simultaneously. Unplug some of them.If the other telephones in your home are having the same problem, the problem is in the wiring or local service. Contact the local telephone company (charges might apply).Other electronic products may cause interference to your cordless telephone. Install your telephone as far away as possible from electronic devices such as: wireless routers, radios, cellular telephones, digital telephones, intercoms, room monitors, televisions, VCRs, personal computers, kitchen appliances, and other cordless telephones.Test a working telephone at the telephone wall jack. If another telephone has the same problem, the problem is in the telephone wall jack. Contact your local telephone company (charges may apply).The telephone line cord may be malfunctioning. Install a new telephone line cord.Re-install the battery and place the handset in the telephone base.Wait for the handset to synchronize with the telephone base. Allow up to one minute for this to take place.I cannot dial out.First, try all the above suggestions.Make sure there is a dial tone before dialing. It is normal if the handset takes a second or two to synchronize with the telephone before producing a dial tone. Wait an extra second before dialing.If the other telephones in your home are having the same problem, the problem is in the wiring or local service. Contact your local telephone company (charges may apply).Eliminate any background noise. Mute the cordless handset before dialing, or dial from another room in your home with less background noise.••••••••••••••••••68AppendixTroubleshootingMy handset beeps and is not performing normally.Make sure the power cord is securely plugged into the telephone base. Plug the telephone base into a different working electrical outlet not controlled by a wall switch.Move the handset closer to the telephone base. It may be out of range.Reset the telephone base by unplugging the electrical power to the base. Wait for 15 seconds and plug it back in again. Allow up to one minute for the cordless handset and the telephone base to synchronize.Other electronic products may cause interference to your cordless telephone. Install your telephone as far away from these electronic devices as possible: wireless routers, radios, radio towers, pager towers, cellular telephones, intercoms, room monitors, televisions, personal computers, kitchen appliances and other cordless telephones.There is interference during a telephone conversation.My calls fade out when I am using the cordless handset.The handset may be out of range. Move it closer to the telephone base.If you subscribe to high-speed Internet service (digital subscriber line - DSL) VJTQWIJ[QWTVGNGRJQPGNKPGU[QWOWUVKPUVCNNC&5.ſNVGTDGVYGGPVJGVGNGRJQPGDCUGCPFVJGVGNGRJQPGYCNNLCEM6JGſNVGTRTGXGPVUPQKUGCPFECNNGT+&RTQDNGOUcaused by DSL interference. Please contact your DSL service provider for more KPHQTOCVKQPCDQWV&5.ſNVGTUAppliances or other cordless telephones plugged into the same circuit as the telephone base can cause interference. Try moving the appliance or telephone base to another outlet.Other electronic products may cause interference to your cordless telephone. Install your telephone as far away as possible from the following electronic devices: wireless routers, radios, radio towers, pager towers, cellular telephones, digital telephones, intercoms, room monitors, televisions, VCRs, personal computers, kitchen appliances, and other cordless telephones.If your telephone is plugged in with a modem or a surge protector, plug the telephone (or modem/surge protector) into a different location. If this doesn’t solve the problem, re-locate your telephone or modem farther apart from each other, or use a different surge protector. The location of your telephone base can impact the performance of your cordless phone. For better reception, install the telephone base in a centralized location YKVJKP[QWTJQOGQTQHſEGCYC[HTQOYCNNUQTQVJGTQDUVTWEVKQPU+POCP[environments, elevating the telephone base improves overall performance.Disconnect the telephone base from the telephone wall jack and plug in a corded telephone. If calls are still not clear, the problem is probably in the wiring or local service. Contact your local service company (charges might apply).If the other telephones in your home are having the same problem, the problem is in the wiring or local service. Contact the local telephone company (charges may apply).••••••••••••](https://usermanual.wiki/VTech-Telecommunications/80-7264-00.Manual/User-Guide-1144546-Page-36.png)
![69AppendixTroubleshootingI hear other calls when using the telephone.Disconnect the telephone base from the telephone wall jack. Plug in a different telephone. If you still hear other calls, the problem is probably in the wiring or local service. Call your local telephone company.I hear noise on the cordless handset and the keys do not work.Make sure the telephone line cord is plugged in securely.Registration failed appears on the handset.Only one handset can be registered at a time. If you have multiple handsets to register, please follow the instructions on page 61HQTVJGſTUVJCPFUGV1PEGChandset has been successfully registered, repeat the steps for each handset that needs to be registered.Make sure that the telephone base and handset(s) are in idle mode when registering a handset.Follow the steps on page 87 for the common cure for electronic equipment, then try again to register a handset.My caller ID features are not working properly.Caller ID is a subscription service. You must subscribe to this service from your local telephone company for this feature to work on your telephone.The caller may not be calling from an area which supports caller ID.Both you and the caller’s telephone companies must use equipment compatible with the caller ID service.6JGECNNGT+&KPHQTOCVKQPUJQYUCHVGTVJGſTUVQTUGEQPFTKPIIf you subscribe to high-speed Internet service (digital subscriber line - DSL) VJTQWIJ[QWTVGNGRJQPGNKPGU[QWOWUVKPUVCNNC&5.ſNVGTDGVYGGPVJGVGNGRJQPGDCUGCPFVJGVGNGRJQPGYCNNLCEM6JGſNVGTRTGXGPVUPQKUGCPFECNNGT+&RTQDNGOUcaused by DSL interference. Contact your DSL service provider for more KPHQTOCVKQPCDQWV&5.ſNVGTUThe telephone does not receive caller ID or the telephone does not show caller ID during call waiting.Make sure you subscribe to caller ID with call waiting features provided by the local telephone company. The caller may not be calling from an area which supports caller ID.Both you and the caller’s telephone companies must use equipment compatible with caller ID service.If you subscribe to high-speed Internet service (digital subscriber line - DSL) VJTQWIJ[QWTVGNGRJQPGNKPGU[QWOWUVKPUVCNNC&5.ſNVGTDGVYGGPVJGVGNGRJQPGDCUGCPFVJGVGNGRJQPGYCNNLCEM6JGſNVGTRTGXGPVUPQKUGCPFECNNGT+&RTQDNGOUcaused by DSL interference. Contact your DSL service provider for more KPHQTOCVKQPCDQWV&5.ſNVGTU••••••••••••••70AppendixTroubleshootingCaller ID entries do not match the numbers I need to dial.Caller ID service delivers 10 digits (the area code plus the seven-digits number). If you need to dial something other 10 digits, see page 53 for instructions on changing the number. If you dial seven digits for local calls, you may want to use the Home area codefeature.Searching for BASE shows in the handset screen.The handset may be out of range. Move it closer to the telephone base.Make sure the power cord is securely plugged into the telephone base. Use a working electrical outlet not controlled by a wall switch.Reset your telephone by unplugging the power adapter from the telephone base. Disconnect the battery from the cordless handset. Wait for 15 seconds, then plug in the power adapter and re-install the battery. Place the handset in the telephone base and allow up to one minute for the handset and telephone base to synchronize.Other electronic products may prevent your handset and telephone base from communicating with each other. Install your telephone base as far away from these electronic devices as possible: wireless routers, radios, cellular telephones, intercoms, room monitors, televisions, personal computers, kitchen appliances and other cordless telephones.answering system stops recording and disconnects the call.If the caller’s voice is very soft, the answering system may stop recording and disconnect the call.The answering system does not respond to remote commands.Make sure your remote code is correct.Make sure you are calling from a touch-tone telephone. When dialing a number, there should be tones. If there are clicks, then it is not a touch-tone telephone and cannot activate the answering system.The answering system may not detect the remote access code when your announcement is playing. Wait until the announcement is over before entering the code.There may be interference on the telephone line you are using. Press the dial pad MG[UſTON[YJGPFKCNKPI••••••••••••](https://usermanual.wiki/VTech-Telecommunications/80-7264-00.Manual/User-Guide-1144546-Page-37.png)
![71AppendixTroubleshootingCommon cure for electronic equipment.If the telephone is not responding normally, put the cordless handset in the telephone base. If it does not respond, try the following (in the order listed):Disconnect the power to the telephone base.Disconnect the battery on the cordless handset.Wait a few minutes before connecting power to the telephone base.Re-install the battery and place the cordless handset in the telephone base.Wait for the cordless handset to synchronize with the telephone base. Allow up to one minute for this to take place.••••••72AppendixImportant safety instructionsWhen using your telephone equipment, basic safety precautions should always be followed to TGFWEGVJGTKUMQHſTGGNGEVTKEUJQEMCPFKPLWT[KPENWFKPIVJGHQNNQYKPIRead and understand all instructions. Follow all warnings and instructions marked on the product.Unplug this product from the wall outlet before cleaning. Do not use liquid or aerosol cleaners. Use a dry non-abrasive cloth for cleaning. Do not use this product near water.Do not place this product on an unstable table, shelf, stand or other unstable surfaces.Slots and openings in the back or bottom of the telephone base and handset are provided for ventilation. To protect them from overheating, these openings must not be blocked by placing the product on a soft surface such as a bed, sofa or rug. This product should never be placed near or over a radiator or heat register. This product should not be placed in any area where proper ventilation is not provided. This product should be operated only from the type of power source indicated on the marking label. If you are not sure of the type of power supply in your home, consult your dealer or local power company. Do not allow anything to rest on the power cord. Do not install this product where the cord may be walked on. Never push objects of any kind into this product through the slots in the telephone base or handset because they may touch dangerous voltage points or create a short circuit. Never spill liquid of any kind on the product. To reduce the risk of electric shock, do not disassemble this product, but take it to an authorized service facility. Opening or removing parts of the telephone base or handset other VJCPURGEKſGFCEEGUUFQQTUOC[GZRQUG[QWVQFCPIGTQWUXQNVCIGUQTQVJGTTKUMU+PEQTTGEVreassembling can cause electric shock when the product is subsequently used. Do not overload wall outlets and extension cords. Unplug this product from the wall outlet and refer servicing to an authorized service facility under the following conditions:When the power supply cord or plug is damaged or frayed.If liquid has been spilled onto the product. If the product has been exposed to rain or water.If the product does not operate normally by following the operating instructions. Adjust only those controls that are covered by the operation instructions. Improper adjustment of other controls may result in damage and often requires extensive work by an authorized technician to restore the product to normal operation.If the product has been dropped and the telephone base and/or handset has been damaged.If the product exhibits a distinct change in performance.Avoid using a telephone (other than cordless) during an electrical storm. There is a remote risk of electric shock from lightning.Do not use the telephone to report a gas leak in the vicinity of the leak.Only put the handset of your telephone next to your ear when it is in normal talk mode.6JGRQYGTCFCRVGTKUKPVGPFGFVQDGEQTTGEVN[QTKGPVGFKPCXGTVKECNQTƀQQTOQWPVRQUKVKQPThe prongs are not designed to hold the plug in place if it is plugged into a ceiling or an under-the-table/cabinet outlet.SAVE THESE INSTRUCTIONS1.2.3.4.5.6.7.8.9.10.11.12.A.B.C.D.E.F.13.14.15.16.](https://usermanual.wiki/VTech-Telecommunications/80-7264-00.Manual/User-Guide-1144546-Page-38.png)
![73AppendixOperating rangeThis cordless telephone operates with the maximum power allowed by the Federal Communications Commission (FCC). Even so, this handset and telephone base can communicate over only a certain distance - which can vary with the locations of the telephone base and JCPFUGVVJGYGCVJGTCPFVJGNC[QWVQH[QWTJQOGQTQHſEGWhen the handset is out of range, the handset displays Searching for BASE.If there is a call while the handset is out of range, it might not ring, or if it does ring, the call might not connect well when you press /TALK/FLASH. Move closer to the telephone base, then press /TALK/FLASH to answer the call. If the handset moves out of range during a telephone conversation, there might be interference.To improve reception, move closer to the telephone base.MaintenanceTaking care of your telephoneYour cordless telephone contains sophisticated electronic parts, so it must be treated with care. Avoid rough treatmentPlace the handset down gently. Save the original packing materials to protect your telephone if you ever need to ship it. Avoid waterYour telephone can be damaged if it gets wet. Do not use the handset outdoors in the rain, or handle it with wet hands. Do not install the telephone base near a sink, bathtub or shower.Electrical stormsElectrical storms can sometimes cause power surges harmful to electronic equipment. For your own safety, take caution when using electrical appliances during storms. Cleaning your telephoneYour telephone has a durable plastic casing that should retain its luster for many years. Clean it only with a soft cloth slightly dampened with water or mild soap. Do not use excess water or cleaning solvents of any kind.Remember that electrical appliances can cause serious injury if used when you are wet or standing in the water. If the telephone base should fall into the water, DO NOT RETRIEVE IT UNTIL YOU UNPLUG THE POWER CORD AND TELEPHONE LINE CORD FROM THE WALL. Then remove the telephone by the unplugged cords.74AppendixAbout cordless telephonesPrivacy: The same features that make a cordless telephone convenient create some limitations. Telephone calls are transmitted between the telephone base and the cordless handset by radio waves, so there is a possibility that the cordless telephone conversations could be intercepted by radio receiving equipment within range of the cordless handset. For this reason, you should not think of cordless telephone conversations as being as private as those on corded telephones.Electrical power: The telephone base of this cordless telephone must be connected to a working electrical outlet. The electrical outlet should not be controlled by a wall switch. Calls cannot be made from the cordless handset if the telephone base is unplugged, switched off, or if the electrical power is interrupted. Potential TV interference: Some cordless telephones operate at frequencies that may cause interference to televisions and VCRs. To minimize or prevent such interference, do not place the telephone base of the cordless telephone near or on top of a TV or VCR. If interference is experienced, moving the cordless telephone farther away from the TV or VCR often reduces or eliminates the interference. Rechargeable batteries: Exercise care in handling batteries in order not to create a short circuit with conducting material such as rings, bracelets, and keys. The battery or conductor may overheat and cause harm. Observe proper polarity between the battery and the battery charger.Nickel-metal hydride rechargeable batteries: Dispose of these batteries in a safe manner. Do not burn or puncture the battery. Like other batteries of this type, if burned or punctured, they could release caustic material which could cause injury.•••••The RBRC® sealThe RBRC® seal on the nickel-metal hydride battery indicates that VTech Communications, Inc. is voluntarily participating in an industry program to collect and recycle these batteries at the end of their useful lives, when taken out of service within the United States and Canada. The RBRC® program provides a convenient alternative to placing used nickel-metal hydride batteries into the trash or municipal waste, which may be illegal in your area.VTech’s participation in RBRC®makes it easy for you to drop off the spent battery at local retailers participating in the RBRC® program or at authorized VTech product service centers. Please call 1-800-8-BATTERYTM for information on Ni-MH battery recycling and disposal bans/restrictions in your area. VTech’s involvement in this program is part of its commitment to protecting our environment and conserving natural resources.RBRC® is a registered trademark of Rechargeable Battery Recycling Corporation.](https://usermanual.wiki/VTech-Telecommunications/80-7264-00.Manual/User-Guide-1144546-Page-39.png)
![75AppendixWarrantyWhat does this limited warranty cover?The manufacturer of this VTech Product warrants to the holder of a valid proof of purchase (“Consumer” or “you”) that the Product and all accessories provided in the sales package (“Product”) are free from defects in material and workmanship, pursuant to the following terms and conditions, when installed and used normally and in accordance with the Product operating instructions. This limited warranty extends only to the Consumer for Products purchased and used in the United States of America and Canada.What will VTech do if the Product is not free from defects in materials and workmanship during the limited warranty period (“Materially Defective Product”)?During the limited warranty period, VTech’s authorized service representative will repair or replace at VTech’s option, without charge, a Materially Defective Product. If we repair the Product, we may use new or refurbished replacement parts. If we choose to replace the Product, we may replace it with a new or refurbished Product of the same or similar design. We will retain defective parts, modules, or equipment. Repair or replacement of the Product, at VTech’s option, is your exclusive remedy. VTech will return the repaired or replacement Products to you in working condition. You should expect the repair or replacement to take approximately 30 days.How long is the limited warranty period?The limited warranty period for the Product extends for ONE (1) YEAR from the date of purchase. If VTech repairs or replaces a Materially Defective Product under the terms of this limited warranty, this limited warranty also applies to repaired or replacement Product for a period of either (a) 90 days from the date the repaired or replacement Product is shipped to you or (b) the time remaining on the original one-year warranty; whichever is longer.What is not covered by this limited warranty?This limited warranty does not cover:Product that has been subjected to misuse, accident, shipping or other physical damage, KORTQRGTKPUVCNNCVKQPCDPQTOCNQRGTCVKQPQTJCPFNKPIPGINGEVKPWPFCVKQPſTGYCVGTQTQVJGTliquid intrusion; or2TQFWEVVJCVJCUDGGPFCOCIGFFWGVQTGRCKTCNVGTCVKQPQTOQFKſECVKQPD[CP[QPGQVJGTVJCPan authorized service representative of VTech; orProduct to the extent that the problem experienced is caused by signal conditions, network reliability, or cable or antenna systems; orProduct to the extent that the problem is caused by use with non-VTech accessories; orProduct whose warranty/quality stickers, product serial number plates or electronic serial numbers have been removed, altered or rendered illegible; orProduct purchased, used, serviced, or shipped for repair from outside the United States of America or Canada, or used for commercial or institutional purposes (including but not limited to Products used for rental purposes); orProduct returned without a valid proof of purchase (see item 2 below); orCharges for installation or set up, adjustment of customer controls, and installation or repair of systems outside the unit.1.2.3.4.5.6.7.8.76AppendixWarrantyHow do you get warranty service?To obtain warranty service in the United States of America, please call 1 (800) 595-9511. In Canada, please call 1 (800) 267-7377. NOTE: Before calling for service, please review the user’s manual - a check of the Product’s controls and features may save you a service call.Except as provided by applicable law, you assume the risk of loss or damage during transit and transportation and are responsible for delivery or handling charges incurred in the transport of the Product(s) to the service location. VTech will return repaired or replaced Product under this limited warranty. Transportation, delivery or handling charges are prepaid. VTech assumes no risk for damage or loss of the Product in transit. If the Product failure is not covered by this limited warranty, or proof of purchase does not meet the terms of this limited warranty, VTech will notify you and will request that you authorize the cost of repair prior to any further repair activity. You must pay for the cost of repair and return shipping costs for the repair of Products that are not covered by this limited warranty.What must you return with the Product to get warranty service?Return the entire original package and contents including the Product to the VTech service NQECVKQPCNQPIYKVJCFGUETKRVKQPQHVJGOCNHWPEVKQPQTFKHſEWNV[CPFInclude a “valid proof of purchase” (sales receipt) identifying the Product purchased (Product model) and the date of purchase or receipt; andProvide your name, complete and correct mailing address, and telephone number.Other limitationsThis warranty is the complete and exclusive agreement between you and VTech. It supersedes all other written or oral communications related to this Product. VTech provides no other warranties for this Product. The warranty exclusively describes all of VTech’s responsibilities regarding the 2TQFWEV6JGTGCTGPQQVJGTGZRTGUUYCTTCPVKGU0QQPGKUCWVJQTK\GFVQOCMGOQFKſECVKQPUVQVJKUNKOKVGFYCTTCPV[CPF[QWUJQWNFPQVTGN[QPCP[UWEJOQFKſECVKQP5VCVG2TQXKPEKCN.CY4KIJVU6JKUYCTTCPV[IKXGU[QWURGEKſENGICNTKIJVUCPF[QWOC[CNUQJCXGother rights, which vary from state to state or province to province..KOKVCVKQPU+ORNKGFYCTTCPVKGUKPENWFKPIVJQUGQHſVPGUUHQTCRCTVKEWNCTRWTRQUGCPFOGTEJCPVCDKNKV[CPWPYTKVVGPYCTTCPV[VJCVVJG2TQFWEVKUſVHQTQTFKPCT[WUGCTGNKOKVGFVQQPGyear from the date of purchase. Some states/provinces do not allow limitations on how long an implied warranty lasts, so the above limitation may not apply to you. In no event shall VTech be liable for any indirect, special, incidental, consequential, or similar damages (including, but not NKOKVGFVQNQUVRTQſVUQTTGXGPWGKPCDKNKV[VQWUGVJG2TQFWEVQTQVJGTCUUQEKCVGFGSWKROGPVVJGcost of substitute equipment, and claims by third parties) resulting from the use of this Product. Some states/provinces do not allow the exclusion or limitation of incidental or consequential damages, so the above limitation or exclusion may not apply to you.Please retain your original sales receipt as proof of purchase.1.2.3.](https://usermanual.wiki/VTech-Telecommunications/80-7264-00.Manual/User-Guide-1144546-Page-40.png)
![77AppendixFCC, ACTA and IC regulationsFCC Part 15This equipment has been tested and found to comply with the requirements for a Class B digital device under Part 15 of the Federal Communications Commission (FCC) rules. These requirements are intended to provide reasonable protection against harmful interference in a residential installation. This equipment generates, uses and can radiate radio frequency energy and, if not installed and used in accordance with the instructions, may cause harmful interference to radio communications. However, there is no guarantee that interference will not occur in a particular installation. If this equipment does cause harmful interference to radio or television reception, which can be determined by turning the equipment off and on, the user is encouraged to try to correct the interference by one or more of the following measures:Reorient or relocate the receiving antenna.Increase the separation between the equipment and receiver.Connect the equipment into an outlet on a circuit different from that to which the receiver is connected.Consult the dealer or an experienced radio/TV technician for help.%JCPIGUQTOQFKſECVKQPUVQVJKUGSWKROGPVPQVGZRTGUUN[CRRTQXGFD[VJGRCTV[TGURQPUKDNGHQTcompliance could void the user’s authority to operate the equipment.This device complies with Part 15 of the FCC rules. Operation is subject to the following two conditions: (1) this device may not cause harmful interference, and (2) this device must accept any interference received, including interference that may cause undesired operation. Privacy of communications may not be ensured when using this telephone.To ensure safety of users, the FCC has established criteria for the amount of radio frequency energy that can be safely absorbed by a user or bystander according to the intended usage of the product. This product has been tested and found to comply with the FCC criteria. The handset may be safely held against the ear of the user. The telephone base shall be installed and used such that parts of the user’s body other than the hands are maintained at a distance of approximately 20 cm (8 inches) or more.This Class B digital apparatus complies with Canadian ICES-003.FCC Part 68 and ACTAThis equipment complies with Part 68 of the FCC rules and with technical requirements adopted by the Administrative Council for Terminal Attachments (ACTA). The label on the back or DQVVQOQHVJKUGSWKROGPVEQPVCKPUCOQPIQVJGTVJKPIUCRTQFWEVKFGPVKſGTKPVJGHQTOCV75###'36::::6JKUKFGPVKſGTOWUVDGRTQXKFGFVQ[QWTNQECNVGNGRJQPGEQORCP[WRQPTGSWGUVThe plug and jack used to connect this equipment to premises wiring and the telephone network must comply with applicable Part 68 rules and technical requirements adopted by ACTA. A compliant telephone cord and modular plug is provided with this product. It is designed to be connected to a compatible modular jack that is also compliant. An RJ11 jack should normally be used for connecting to a single line and an RJ14 jack for two lines. See Installation Instructions in the user’s manual.The Ringer Equivalence Number (REN) is used to determine how many devices you may connect to your telephone line and still have them ring when you are called. The REN for this product is GPEQFGFCUVJGVJCPFVJEJCTCEVGTUHQNNQYKPIVJG75KPVJGRTQFWEVKFGPVKſGTGIKHKUVJG4'0KU+POQUVDWVPQVCNNCTGCUVJGUWOQHCNN4'0UUJQWNFDGſXGQTNGUU(QTmore information, please contact your local telephone company.This equipment may not be used with Party Lines. If you have specially wired alarm dialing equipment connected to your telephone line, ensure the connection of this equipment does not disable your alarm equipment. If you have questions about what will disable alarm equipment, EQPUWNV[QWTVGNGRJQPGEQORCP[QTCSWCNKſGFKPUVCNNGT••••78AppendixFCC, ACTA and IC regulationsIf this equipment is malfunctioning, it must be unplugged from the modular jack until the problem has been corrected. Repairs to this telephone equipment can only be made by the manufacturer or its authorized agents. For repair procedures, follow the instructions outlined under the Limited Warranty.If this equipment is causing harm to the telephone network, the telephone company may temporarily discontinue your telephone service. The telephone company is required to notify [QWDGHQTGKPVGTTWRVKPIUGTXKEG+HCFXCPEGPQVKEGKUPQVRTCEVKECN[QWYKNNDGPQVKſGFCUUQQPCUpossible. You will be given the opportunity to correct the problem and the telephone company is TGSWKTGFVQKPHQTO[QWQH[QWTTKIJVVQſNGCEQORNCKPVYKVJVJG(%%;QWTVGNGRJQPGEQORCP[OC[make changes in its facilities, equipment, operation, or procedures that could affect the proper functioning of this product. The telephone company is required to notify you if such changes are planned.If this product is equipped with a corded or cordless handset, it is hearing aid compatible.If this product has memory dialing locations, you may choose to store emergency telephone PWODGTUGIRQNKEGſTGOGFKECNKPVJGUGNQECVKQPU+H[QWFQUVQTGQTVGUVGOGTIGPE[PWODGTUplease:4GOCKPQPVJGNKPGCPFDTKGƀ[GZRNCKPVJGTGCUQPHQTVJGECNNDGHQTGJCPIKPIWRPerform such activities in off-peak hours, such as early morning or late evening.Industry CanadaOperation is subject to the following two conditions: (1) this device may not cause harmful interference, and (2) this device must accept any interference, including interference that may cause undesired operation.6JGVGTOŎŏ+%ŎŏDGHQTGVJGEGTVKſECVKQPTGIKUVTCVKQPPWODGTQPN[UKIPKſGUVJCVVJG+PFWUVT[%CPCFCVGEJPKECNURGEKſECVKQPUYGTGOGVThe Ringer Equivalence Number (REN) for this terminal equipment is 0.1. The REN is an indication of the maximum number of devices allowed to be connected to a telephone interface. The termination on an interface may consist of any combination of devices subject only to the TGSWKTGOGPVVJCVVJGUWOQHVJG4'0UQHCNNVJGFGXKEGUFQGUPQVGZEGGFſXG6JKURTQFWEVOGGVUVJGCRRNKECDNG+PFWUVT[%CPCFCVGEJPKECNURGEKſECVKQPU](https://usermanual.wiki/VTech-Telecommunications/80-7264-00.Manual/User-Guide-1144546-Page-41.png)
![79AppendixFrequency controlCrystal controlled PLL synthesizerTransmit frequencyHandset: 1921.536-1928.448 MHzTelephone base: 1921.536-1928.448 MHzChannels 5Nominal effective rangeMaximum power allowed by FCC and IC. Actual operating range might vary according to environmental conditions at the time of use.Size Handset: 6.45 X 1.81 X 1.17 in (163.8 X 46 X 29.8 mm)Telephone base: 2.67 X 5.53 X 4.04 in (68 X 140.5 X 102.5 mm)Charger: 2.02 X 3.03 X 3.77 in (51.4 X 76.9 X 95.7 mm) Weight Handset: 4.44oz (126g) (including battery)Telephone base: 6oz (170g)Charger: 2.43oz (69g)Power requirementsHandset: 2.4V 500mAh Ni-MH batteryTelephone base: 6V DC @ 400mACharger: 6V AC @300mAMemory Handset directory: 50 memory locations; up to 30 digits and 15 charactersFour download directories: 1,500 memory locations (each); up to 30 digits and 15 charactersHandset call log: 50 memory locations; up to 24 digits and 15 characters6GEJPKECNURGEKſECVKQPU80AActive devices 20Add a handset 61Add an active device 22Alphabetical search 47Answer a CELL call 34Answer a CELL call while on a HOME call 35Answer a HOME call 33Answer a HOME call while on a CELL call 35Answer an incoming call during an intercom call 42Appendix 56BBattery 4,5,60Bluetooth 12Bluetooth Setup 14CCaller ID 50Caller ID history 51Call log 51Call log display screen messages 55Call waiting on the CELL line 34Call waiting on the HOME line 34Chain dialing 39Change PIN (Bluetooth) 23Character chart 46Charging 5Clear voicemail 27Connect an active device 20Create a new directory entry 45DDe-register handsets 62Delete a directory entry 49Delete a redial entry 40Delete from the call log 55Dial a call log entry 53Dial a directory entry 48Dial a redial entry 40Directory 24,44Disconnect an active device 20Download directory 24&5.ſNVGT3EEdit a directory entry 48End a CELL call 34End a HOME call 33Expand your telephone system 61FFCC, ACTA and IC regulations 77HHandset icons 59Handset layout 8Handset lights 58Handset locator 38Handset main menu 11Handset speakerphone 37Hold 38IIcons 59Indicators 58Installation 2,4Intercom 41KKey Tone 26LLCD Language 26MMaintenance 73Make a call log entry ready to dial 53Make a CELL call 34Make a HOME call 33Memory match 52Missed calls indicator 51Mute 37OOperating range 73PPaging 38Paired devices 18Parts checklist 1Phonebook (directory) 44Predial a HOME call 33Index](https://usermanual.wiki/VTech-Telecommunications/80-7264-00.Manual/User-Guide-1144546-Page-42.png)
![81IndexRRedial list 40Register a handset 61Remove an active device 23,24,25Remove a paired device 19Rename a paired device 18Replace a handset 62Replace an active device 21Review the Active Devices list 20Review the call log 52Review the directory 47Review the redial list 40Ringer volume 31,32SSafety instructions 72Save a call log entry to the directory 54Save a redial entry to the directory 40Screen display messages 56Setup Headset 16Share an outside call 42Speakerphone 37T6GEJPKECNURGEKſECVKQPU79Telephone base installation 3Telephone base lights 58Telephone operation 33Transfer a call 43Troubleshooting 63UUsing a Bluetooth headset 33VView information of an active device 23Voicemail 27Volume 31,32,37WWall mounting 6Wall mount installation 6Warranty 75VTECH TELECOMMUNICATIONS LTD.A member of THE VTECH GROUP OF COMPANIES.Distributed in the U.S.A. by VTech Communications, Inc. Beaverton, Oregon 97008Distributed in Canada by VTech Technologies Canada, Ltd., Richmond, B.C. V6W 1L5Copyright © 2009 for VTECH TELECOMMUNICATIONS LTD.Printed in China.91-002522-010-100The Bluetooth® word mark and logos are owned by Bluetooth SIG, Inc. and any use of such marks by VTech Holdings Limited is under license. VTech Holdings Limited is a member of Bluetooth SIG, Inc. Other trademarks and trade names are those of their respective owners.](https://usermanual.wiki/VTech-Telecommunications/80-7264-00.Manual/User-Guide-1144546-Page-43.png)
![User’s manualwww.vtechphones.comModels: DS6321-2/DS6321-3/DS6321-4/DS6322-3/DS6322-4Congratulationson purchasing your new VTech product. Before using this telephone, please read the Important safety instructions on page 83 of this manual.This manual has all the feature operations and troubleshooting necessary to install and operate your new VTech telephone. Please review this manual thoroughly to ensure proper installation and operation of this innovative and feature rich VTech product. For support, shopping, and everything new at VTech, visit our website at www.vtechphones.com. The ENERGY STAR® program (www.energystar.gov) recognizes and encourages the use of products that save energy and help protect our environment. We are proud to mark this product with the ENERGY STAR® label indicating it OGGVUVJGNCVGUVGPGTI[GHſEKGPE[IWKFGNKPGUThe Bluetooth® word mark and logos are registered trademarks owned by Bluetooth SIG, Inc. and any use of such marks by VTech Holdings Limited is under license. VTech Holdings Limited is a member of Bluetooth SIG, Inc. Other trademarks and trade names are those of their respective owners.](https://usermanual.wiki/VTech-Telecommunications/80-7264-00.Manual/User-Guide-1144546-Page-44.png)
![Table of contentsiGetting started .........................1Parts checklist............................1Installation ..................................2Cleaning tips for your touch screen telephone ....................2Telephone base installation .......3Battery installation and charging ..................................4Handset layout ...........................5Telephone base layout ...............6Handset main menu ...................8Telephone base main menu.......9Bluetooth ..................................10Introducing Bluetooth .................10Glossary of terms ......................11Bluetooth at a glance .................12Bluetooth setup ..........................13Setup cell....................................13Setup headset ............................14Paired devices............................15Rename a paired device ............15Remove a paired device ............16View information of a paired device......................................16Active devices ............................17Review the Active Devices list ...17Connect/Disconnect an active device......................................17Replace an active device ...........18Add an active device ..................18Remove an active device ...........19View information of an active device......................................19Change PIN................................19Handset settings ......................20Settings ......................................20LCD language ............................20Clear voicemail...........................21Auto keylock ...............................22Key tone .....................................22Set date/time ..............................23Home area code.........................24Ringers .......................................25Ringer volume ............................25Ringer tone.................................26Telephone base settings .........27Settings ......................................27Set date/time ..............................27Key tone .....................................27LCD language ............................28Clear voicemail...........................29Home area code.........................30Ringers .......................................31Ringer volume ............................31Ringer tone.................................32Answering system settings ....33Answering system setup ............33Answer ON/OFF.........................33Call screening ............................34Announcement ...........................35Play your announcement ...........35Record your own announcement .......................36Delete your announcement ........37Number of rings..........................38Remote code .............................39Message alert tone.....................40Telephone operation................41Make, answer or end a HOME call ..............................41Call waiting on the HOME line ...42Make, answer or end a CELL call ................................43Call waiting on the CELL line .....44Answer a CELL call while on a HOME call...............................44Answer a HOME call while on a CELL call.................................45Handset speakerphone ..............45Volume control ...........................45Silence the ringer .......................46Mute ...........................................46iiiTable of contentsInfrared sensor ...........................46Hold ............................................47Handset locator ..........................47Chain dialing...............................48Redial list....................................49Review the Redial list.................49Dial a redial entry .......................49Save a redial entry to the directory ..................................49Delete a redial entry ...................50Intercom .....................................51Answer an incoming call during an intercom call.......................52Share an outside call..................53Directory.....................................54Create a new directory entry......54Character chart ..........................56Review the directory...................57Alphabetical search....................57Dial a directory entry ..................58Edit a directory entry ..................58Delete a directory entry..............59About caller ID............................60Caller ID history..........................61Missed calls indicator ................61Memory match ..........................62Review the call log ....................62Make a call log entry ready to dial ..........................................63Dial a call log entry ....................63Save a call log entry to the directory ..................................64Delete from the call log ..............65Call log display screen messages................................65Answering system operation..66Answering system and voicemail .................................66Message capacity ......................66New message indication ............66Call intercept ..............................66Message playback .....................67Delete all old messages .............68Record and play memos ............69Remote access ..........................70Appendix...................................71Screen display messages ..........71Handset and telephone base indicators ................................73Battery........................................76Expand your telephone system..77Add and register a handset (optional) .................................77Replace a handset .....................78Troubleshooting..........................79Important safety instructions......88Operating range .........................89Maintenance...............................89About cordless telephones.........90The RBRC® seal.........................90Warranty.....................................91FCC, ACTA and IC regulations ..936GEJPKECNURGEKſECVKQPU .............95Index ..........................................96](https://usermanual.wiki/VTech-Telecommunications/80-7264-00.Manual/User-Guide-1144546-Page-45.png)
![1Telephone line cordParts checklistYour telephone contains the following items. Save your sales receipt and original packaging in the event warranty service is necessary.Handsets(2 for DS6321-2, 3 for DS6321-3 and DS6322-3,4 for DS6321-4 and DS6322-4)Telephone baseUser’s manualTo purchase a replacement battery or power adapter, visit our website at www.vtechphones.com or call 1 (800) 595-9511. Getting startedBatteries(2 for DS6321-2, 3 for DS6321-3 and DS6322-3, 4 for DS6321-4 and DS622-4)Quick start guideBattery compartment covers(2 for DS6321-2, 3 for DS6321-3 and DS6322-3,4 for DS6321-4 and DS6322-4)Charger and power adapter(1 for DS6321-2, 2 for DS6321-3 and DS6322-3, 3 for DS6321-4 and DS6322-4)Wall bracketTelephone base power adapter2Getting startedInstallationInstall the telephone base close to a telephone jack and a power outlet not connected to a wall switch. For optimum range and better reception, place the telephone base in a central and open location.Depending on the environmental conditions, make sure that your Bluetoothwireless technology enabled cell phone is within 12 feet of where you install the telephone base in order to maintain a reliable connection between your Bluetooth wireless technology enabled cell phone, telephone base, and cell tower.This product may be shipped with a protective sticker covering the handset and/or telephone base display. Remove it before use.Avoid placing the telephone base too close to:Communication devices such as: personal computers, computer routers, television sets, VCRs, wireless routers (wireless broadband, Wi-Fi, or 802.11) or other cordless telephones.Excessive heat sources.0QKUGUQWTEGUUWEJCUCYKPFQYYKVJVTCHſEQWVUKFGOQVQTUOKETQYCXGQXGPUTGHTKIGTCVQTUQTƀWQTGUEGPVNKIJVKPIExcessive dust sources such as a workshop or garage.Excessive moisture.Extremely low temperature.Mechanical vibration or shock such as on top of a washing machine or work bench.•••••••](https://usermanual.wiki/VTech-Telecommunications/80-7264-00.Manual/User-Guide-1144546-Page-46.png)
![3Getting startedTelephone base and charger installationInstall the telephone base and charger(s) as shown below.Make sure that the electrical outlet is not controlled by a wall switch. If you subscribe to digital subscriber line (DSL) high-speed Internet service through your telephone line, you must install a &5.ſNVGTDGVYGGPVJGVGNGRJQPGNKPGEQTFCPFVJGVGNGRJQPGYCNNLCEM6JGſNVGTRTGXGPVUPQKUGCPFcaller ID problems caused by DSL interference. Contact your DSL service RTQXKFGTHQTOQTGKPHQTOCVKQPCDQWV&5.ſNVGTUUse only the power adapters supplied with this product. To order a replacement, visit our website at www.vtechphones.com orcall 1 (800) 595-9511.The power adapters are intended to be correctly oriented in a vertical or ƀQQTOQWPVRQUKVKQP6JGRTQPIUCTGPQVFGUKIPGFVQJQNFVJGRNWIKPRNCEGKHit is plugged into a ceiling, under-the-table or cabinet outlet.••Telephone line cordDSL filter (not included) is required if you have DSL high speed Internet serviceTelephone base power adapterElectrical outlet not controlled by a wall switchTelephone wall jackTelephone basePower adapterCharger4Getting startedIf the handset will not be used for a long time, disconnect and remove the battery to prevent possible leakage.To purchase a replacement battery, visit our website at www.vtechphones.com or call 1 (800) 595-9511. ••Battery installation Install the battery as shown below. If the battery compartment cover is on the handset, press the indentation and slide the cover to remove.Plug the battery connector securely into the socket inside the handset battery compartment, matching the color-coded label.Place the battery with the label THIS SIDE UP facing up and the wires inside the battery compartment.#NKIPVJGEQXGTƀCVCICKPUVVJGDCVVGT[EQORCTVOGPVVJGPUNKFGKVVQYCTFUthe center of the handset until it clicks into place.Charge the handset by placing it in the telephone base. The CHARGElight is on when the handset charges.1.2.3.4.5.13245CHARGE light](https://usermanual.wiki/VTech-Telecommunications/80-7264-00.Manual/User-Guide-1144546-Page-47.png)
![5Getting startedBattery chargingOnce you have installed the battery, the screen indicates the battery status (see the table below). If necessary, place the handset in the telephone base to charge the battery. For best performance, keep the handset in the telephone base or charger when not in use. The battery is fully charged after 16 hours of continuous charging. See the table on page 71 for battery operating times.If the screen is blank, you need to charge the handset without interruption for at least 10 minutes to give the handset enough charge to use the telephone for a short time. The handset beeps and shows Low battery. If you are on a call in low battery mode, the handset beeps every minute.The following table summarizes the battery charge indicators and actions to take.Battery indicators Battery status ActionThe screen is blank. Battery has no charge and the handset cannot be used.Charge without interruption until the screen shows HANDSET X (at least 10 minutes).The screen shows Place in charger and ƀCUJGUBattery has very little charge and the handset cannot be used.Charge without interruption until the screen shows HANDSET X (at least four minutes).The screen shows Low battery,ƀCUJGUCPFVJGhandset beeps.Battery has enough charge to be used for a short time.Charge without interruption until the screen shows HANDSET X (at least 30 minutes).The screen shows HANDSET X.Battery is charged. To keep the battery charged, place it in the telephone base when not in use.6Getting startedInstallation optionsYour telephone base is ready for tabletop use. If you want to mount yourIf you want to mount your telephone on a wall, use the provided wall bracket to connect with a standard dual-stud telephone wall mounting plate. If you do not have this mounting plate, you can purchase one from many hardware or consumer electronics retailers. You may need a professional to install the mounting plate.Tabletop to wall mount installation Position the telephone base as shown below. Insert the extended tabs (marked B) of the wall bracket into the slots on the back of the telephone base (marked B). Push the telephone base down until it is securely in place.+H[QWCTGWUKPIC&5.ſNVGTRNWIVJGNKPGEQTFKPVQVJGſNVGTPQY4QWVGVJGVGNGRJQPGNKPGEQTFQT&5.ſNVGTVJTQWIJVJGYCNNDTCEMGVJQNG4QWVGVJGpower cord out of the bottom of the telephone.2NWIVJGVGNGRJQPGNKPGEQTFQT&5.ſNVGTKPVQVJGYCNNLCEM2NWIVJGpower adapter into a power outlet not controlled by a wall switch.Align the holes on the bracket with the standard wall plate and slide the bracket down until it locks securely. Bundle the telephone line cord and power adapter cord neatly with a twist tie.1.2.3.4.1 234](https://usermanual.wiki/VTech-Telecommunications/80-7264-00.Manual/User-Guide-1144546-Page-48.png)
![7Getting startedWall mount to tabletop installationIf the telephone line cord and power adapter cord are bundled, untie VJGOſTUVLift the telephone base up to detach it from the black plastic wall bracket. 7PRNWIVJGVGNGRJQPGNKPGEQTFQT&5.ſNVGTHTQOVJGYCNN7PRNWIVJGpower adapter from the power outlet.See Telephone base and charger installation on page 3.1.2.3.8Getting startedHandset layout1While reviewing a call log entry, press repeatedly to add or remove 1 in front of the telephone number before dialing or saving it in the directory (page 57)./HOME/FLASHPress to make or answer a home call (page 37).Flashes quickly when there is an incoming home call.Flashes slowly when a home call is on hold.During a HOME call, press to receive an incoming call when you receive a call waiting alert (page 38).Press to make or answer a home call (page 37),During a call, press to switch between speakerphone and handset (page 41).HOLDPress to put a call on hold (page 42).TONEPress to switch to tone dialing temporarily during a call while you have pulse service (page 23).CHARGE lightOn when the handset is charging in the telephone base or charger.MENU/SELECTPress to show the menu.While in a menu, press to select an item, or save an entry or setting.REDIAL/PAUSEPress to review the redial list (page 27). While dialing or entering numbers into the directory, press and hold to insert a dialing pause (page 19).](https://usermanual.wiki/VTech-Telecommunications/80-7264-00.Manual/User-Guide-1144546-Page-49.png)
![9Getting startedVOL/CID/While in a menu, press to scroll down.During a call, press to decrease the listening volume (page 41).When the handset is not in use, press to review the call log (page 56).OFF/CLEARDuring a call, press to hang up (page 37).While the handset is ringing, press to silence the ringer temporarily (page 41).Press and hold while the telephone is not in use to erase the missed calls indicator (page 55).While in a menu, press to exit without making changes or press and hold to return to idle mode.While entering or editing a directory entry, press to erase a digit or character./VOL/While in a menu, press to scroll up.During a call, press to increase the listening volume (page 41).When the handset is not in use, press to enter the directory (page 51)./CELLPress to make or answer a cell call (page 38).Flashes quickly when there is an incoming cell call. Flashes slowly when a cell call is on hold.#Press repeatedly to show other dialing options when reviewing a call log entry (page 57).Handset layout (continued)MUTE/REMOVEWhile on a call, press to mute the microphone (page 14).While reviewing the call log, directory or redial list, press to delete an individual entry (page 26, page 22 and page 27,respectively).Press to delete digits when predialing (page 13).10Getting startedTelephone base layoutMessage windowShows the number of messages and other answering system information (page 64).IN USE lightFlashes when there is an incoming call, or another telephone sharing the same line is in use.On when the handset is in use.VOICEMAIL lightFlashes when you have new voicemail. Voicemail service is offered by your local telephone company, and is different from answering system messages (page 10).DEVICE1/DEVICE2 lightsOn when the telephone base is paired and connected with a Bluetooth device./FIND HANDSETPress to page all system handsets./REPEATPress to repeat a message or press twice to play previous message (page 30).X/DELETEPress to delete the message currently playing (page 30).When the phone is not in use, press twice to delete all previously reviewed messages (page 63)./ANS ON/OFFPress to turn the answering system on or off (page 29)./PLAY/STOPPress to play messages (page 30).Press to stop message playback (page 30). VOL Press to adjust the volume during playback (page 30).When the phone is not in use, press to adjust the telephone base ringer volume (page 62)./SKIPPress to skip to the next message (page 30).](https://usermanual.wiki/VTech-Telecommunications/80-7264-00.Manual/User-Guide-1144546-Page-50.png)
![11Getting startedDirectory - store and search for names and numbers.Ans. system - play messages, record memos and change your answering system settings.Call log - review the caller ID history or delete all call log entries.Bluetooth - set up and manage your Bluetooth enabled devices. Handset main menuTo enter the main menu:Press MENU/SELECT when the handset is not in use.Press or to select a handset feature menu, then press MENU/SELECTto enter that menu.To return to idle mode, press and hold OFF/CLEAR. To return to the previous menu, press OFF/CLEAR.1.2.Ringers - set up ringers for the home and cell lines.Ans. system Directory Call logIntercomBluetoothAns. system Directory Call logIntercomBluetoothAns. system Directory Call logIntercomBluetoothIntercom - intercom call with a system handset.Ans. system Directory Call logIntercomBluetoothAns. system Directory Call logIntercomBluetoothDirectory Call logIntercomBluetoothRingersSettings - change your telephone settings.Call logIntercomBluetoothRingersSettings12Introducing BluetoothYour new DS6321 telephone system with Bluetooth wireless technology has the following features:Pair up to four Bluetooth enabled cell phones with the telephone base.Connect a maximum of two cell phones to make and receive cell calls. Only one cell phone can be active on a call at a time.Connect a Bluetooth enabled headset for making and receiving home calls.Conference cell and home calls.Make and receive calls using your cell phone plan while utilizing the ease and comfort of your home telephone system. IMPORTANT INFORMATIONAfter plugging in the telephone base, wait at least 20 seconds before connecting a Bluetooth device. The screen shows Bluetooth system busyif you try to connect too soon.Refer to the user's manual of your Bluetooth enabled cell phone or headset for more information.Bluetooth wireless technology operates within a short range (about 30 feet). When using a cell phone with the DS6321, it is best to place [QWTEGNNRJQPGDGVYGGPQPGCPFſHVGGPHGGVHTQOVJGVGNGRJQPGDCUGWhen using a Bluetooth headset with the DS6321, you are limited to the range of your headset (see the user’s manual of your headset for more information)./CMGUWTGVJCV[QWTEGNNRJQPGJCUUWHſEKGPVUKIPCNUVTGPIVJ;QWOC[need to move the cell phone and telephone base to a location where the cell phone signal strength is stronger.Charge your cell phone while it is connected to the telephone base. Your cell phone's battery will discharge faster while it is connected to the telephone base via Bluetooth wireless technology.Monitor your cell phone's usage because airtime is deducted from your cellular plan for the duration of all cell calls.Refer to the Bluetooth setup section (page 14) to learn how to set up and manage your Bluetooth enabled device(s). Refer to the Telephone operationsection (page 37) on how to operate your Bluetooth devices with your new DS6321 telephone system with Bluetooth wireless technology. Refer to the Troubleshooting section (page 74KH[QWGZRGTKGPEGFKHſEWNV[WUKPIVJGtelephone system.The Bluetooth® word mark and logos are owned by Bluetooth SIG, Inc. and any use of such marks by VTech Holdings Limited is under license. VTech Holdings Limited is a member of Bluetooth SIG, Inc. Other trademarks and trade names are those of their respective owners.•••••••••••Bluetooth](https://usermanual.wiki/VTech-Telecommunications/80-7264-00.Manual/User-Guide-1144546-Page-51.png)
![13BluetoothGlossary of terms Below are some terms used in this user’s manual to help you become familiar with using your Bluetooth enabled devices and your new DS6321telephone system.Active devices - a maximum of two paired devices (two cell phones, or one cell phone and one headset) on the active devices list can be connected to the telephone base, but only one cell phone or headset can be on a call at a time. Bluetooth cell phone - refers to a Bluetooth enabled cell telephone.Cell line - the communication service provided through your Bluetooth enabled cell telephone.Connected - a Bluetooth enabled device (cell phone or headset) can only be used when it is connected to the telephone base. When a Bluetooth enabled device is connected to the telephone base and active on the active devices list, it will be ready for use.Disconnected - a diagonal line appears across devices 1 and/or 2 when the corresponding Bluetooth enabled device is disconnected from the telephone base.Discoverable mode - before a Bluetooth enabled device can be paired, it must be set to this mode. When pairing your cell phone, the telephone base will be set to this mode. When pairing a headset, the headset must be set to this mode. Depending on the manufacturer, this mode is sometimes referred to as Find Me or Visibility.Home line - your conventional telephone land line.Paired devices - once Bluetooth enabled devices have been paired with the telephone base, they will appear on the paired devices list. A maximum of four devices can be paired with the telephone base, but only two can be on the active devices list.Pairing - this refers to the process of Bluetooth enabled devices registering device information with each other. The telephone base must be paired with a Bluetooth enabled cell phone or headset before the Bluetooth device can be used. Depending on the manufacturer, this is also referred to as Bonding.PIN - by default, the PIN is 0000 for the telephone base and for most Bluetooth devices. PIN information must be exchanged between Bluetooth devices before they can be used. This is also known as a Passkey or Passcode.14BluetoothBluetooth setupTo use a Bluetooth enabled cell phone or headset with your DS6321, you OWUVſTUVRCKTCPFEQPPGEV[QWT$NWGVQQVJFGXKEGUYKVJVJGVGNGRJQPGDCUGPair a cell phoneBefore you begin, make sure that your Bluetooth enabled cell phone is not connected to any other Bluetooth device. Refer to your cell phone user's manual to learn how to search for or add new Bluetooth devices.To pair and connect a cell phone:Press MENU/SELECT on the handset when it is not in use.Press or to highlight Bluetooth, then press MENU/SELECT.Press or to highlight Add cellular, then press MENU/SELECT. The screen displays ADD CELLULAR Place cell phone next to base. Press SELECT.If there are already four paired devices on the paired devices list, the screen will show Maximum of 4 devices can be paired and prompt you to replace an existing paired device (page 21).Press MENU/SELECT. The screen displays Please set your cell phone to search for devices, then press SELECT.If a device is already connected to the telephone base, the screen displays Connected device will be temporarily disconnected. Press SELECT.Press MENU/SELECT to temporarily disconnect the device and continue the pairing process.Press MENU/SELECT to set the telephone base to discoverable mode.Turn on the Bluetooth feature of your cell phone and search for or add new devices.1PEG[QWTEGNNRJQPGſPFUVTech DS6321, press MENU/SELECT.Enter the PIN of the telephone base (the default PIN is 0000) into your cell phone to continue the pairing process.1.2.3.•4.•5.6.7.8.Ans. system Directory Call logIntercomBluetoothADD CELLULAR Plac e c ellphone next tobase. Press SELECTBLUETOOTHDowload dir Add cellular Add headsetActive devicesBase name:VTech DS6321PIN:0000Please set your cell phone to search for devices, then press SELECT](https://usermanual.wiki/VTech-Telecommunications/80-7264-00.Manual/User-Guide-1144546-Page-52.png)
![15BluetoothCellular setup completedDeviceconnectedPair a cell phone (continued)When a device is successfully connected, the handset displays Paired with cellular and then Cellular setup completed Device connected. The corresponding status icon ( 1or 2) displays. The corresponding device light (DEVICE1 or DEVICE2) turns on.When you already have two devices on the active devices list, the handset shows Maximum of 2 devices can be connected. You are prompted to replace an existing device on the active devices list (page 21).Auto connectionWhen a device is successfully paired with the telephone base but not connected, the handset displays Cellular setup completed Device not connected and then Auto-connect function enabled. Press SELECT.You can press MENU/SELECT to enable auto-connection function.If you do not enable auto-connection function, you can connect a device manually (page 20).9.•The pairing process may take up to one minute. If the pairing process fails, try again.If you put the handset back in the telephone base during the pairing process, the process discontinues and the handset returns to the idle mode.••Cellular setup completedDevice notconnectedAuto-connect function ebabled. Press SELECT16BluetoothPair a headsetBefore you begin, make sure that your Bluetooth enabled headset is not connected to any other Bluetooth device. Refer to your headset user's manual to learn how to search for or add new Bluetooth devices.To pair and connect a headset:Press MENU/SELECT on the handset when it is not in use.Press or to highlight Bluetooth, then press MENU/SELECT.Press or to highlight Add headset, then press MENU/SELECT. The screen displays ADD HEADSET Place Bluetooth headset next to base. Press SELECT.If there are already four paired devices on the paired devices list, the screen will show Maximum of 4 devices can be paired and prompt you to replace an existing paired device (page 21).Press MENU/SELECT. The screen displays Please set your headset to discoverable mode, then press SELECT.If a device is already connected to the telephone base, the screen displays Connected device will be temporarily disconnected. Press SELECT.Press MENU/SELECT to temporarily disconnect the device and continue the pairing process.Set your headset to discoverable mode.Press MENU/SELECT to set your telephone base to discoverable mode and search for your headset.1PEGVJGVGNGRJQPGDCUGſPFU[QWTJGCFUGVRTGUUMENU/SELECT.Enter the PIN of your headset (the PIN for most Bluetooth devices is 0000), then press MENU/SELECT.1.2.3.•4.•5.6.7.8.Ans. system Directory Call logIntercomBluetoothADD HEADSET Place Bluetooth headset next tobase. Press SELECTBLUETOOTHDowload dir Add cellular Add headsetActive devicesPlease set your headset to discoverable mode, then press SELECTADD HEADSETEnter PIN: ----Searching forBluetooth headsets...FOUND DEVICESHeadset AHeadset B](https://usermanual.wiki/VTech-Telecommunications/80-7264-00.Manual/User-Guide-1144546-Page-53.png)
![17BluetoothHeadset A paired to base. Connect now?Press SELECTPair a headset (continued)When the handset displays Headset A paired to base. Connect to headset? Press SELECT, press MENU/SELECT.When you already have two devices on the active devices list, the handset shows Maximum of 2 devices can be connected. You are prompted to replace an existing device on the active devices list (page 21).When you already have one headset on the active devices list, the handset shows Only 1 headset can be connected. You are prompted to replace an existing device on the active devices list (page 21).When a device is successfully connected, the handset displays Headset setup completed Device connected and the corresponding status icon ( 1or 2). The corresponding light (DEVICE1 or DEVICE2)turns on. Auto connectionWhen a device is successfully paired with the telephone base but not connected, the handset displays Headset setup completed Device not connected and then Auto-connect function enabled. Press SELECT. You can press MENU/SELECT to enable auto-connection function.If you do not enable auto-connection function, you can connect a device manually (page 20).9.••10.Headset setup completedDeviceconnectedThe pairing process may take up to one minute. If the pairing process fails, try again.If you put the handset back in the telephone base during the pairing process, the process discontinues and the handset returns to the idle mode.••Headset setup completedDevice notconnectedAuto-connect function ebabled. Press SELECT18BluetoothPaired devicesAll paired devices are stored on the paired devices list. Up to four devices (one headset only) can be paired with the telephone base.To use a paired device, it must be connected and on the active devices list (page 20).Once you have paired a device with the telephone base, you do not need to repeat the pairing procedure again unless you delete the device from the paired devices list.Rename a paired deviceYou can change the name of a paired device on the paired devices list.Press MENU/SELECT on the handset when it is not in use.Press or to highlight Bluetooth, then press MENU/SELECT.Press or to highlight Paired devices, then press MENU/SELECT.Press or to highlight a selected device when necessary, then press MENU/SELECT.Press or to highlight Rename, then press MENU/SELECT softkey. The screen displays ENTER NEW NAME.Use the dialing keys to edit the name (see step 6 of Edit a directory entry on page 52).Press MENU/SELECTVQEQPſTO6JGJCPFUGVFKURNC[UDevice renamed.1.2.3.4.5.6.7.1PN[VJGſTUVEJCTCEVGTUQHVJGFGXKEGPCOGCTGUJQYPQPVJGpaired devices list.Ans. system Directory Call logIntercomBluetoothBLUETOOTHAdd cellular Add headsetActive devicesPaired devicesSELECT DEVICEHeadset ACell Phone ACENTER NEW NAMEHeadset A _ConnectRenameRemove paired](https://usermanual.wiki/VTech-Telecommunications/80-7264-00.Manual/User-Guide-1144546-Page-54.png)
![19BluetoothRemove a paired deviceIf you already have the maximum of four paired devices on the paired devices NKUVYJGP[QWYCPVVQCFFCPQVJGTFGXKEG[QWOWUVſTUVFGNGVGCRCKTGFdevice from the paired devices list.Press MENU/SELECT on the handset when it is not in use.Press or to highlight Bluetooth, then press MENU/SELECT.Press or to highlight Paired devices, then press MENU/SELECT.Press or to highlight a selected device when necessary, then press MENU/SELECT.Press or to highlight Remove paired, then press MENU/SELECT. The handset displays Remove device from paired list? Press SELECT.Press MENU/SELECT VQEQPſTO6JGJCPFUGVFKURNC[UDevice removed from paired list.1.2.3.4.5.6.Ans. system Directory Call logIntercomBluetoothBLUETOOTHAdd cellular Add headsetActive devicesPaired devicesSELECT DEVICEHeadset ACell Phone ACConnectRenameRemove pairedRemove device from paired list?Press SELECTDevice removedfro mpaired list20BluetoothActive devicesOnly devices on the active devices list can establish a Bluetooth connection with the telephone base. Although two paired devices can be connected to the telephone base, only one Bluetooth cell phone or a headset can be on a call at a time. Review the active devices listPress MENU/SELECT on the handset when it is not in use.Press or to highlight Bluetooth, then press MENU/SELECT.Press or to highlight Active devices, then press MENU/SELECT.Connect/Disconnect an active deviceWhile in the active devices menu, you may connect or disconnect your active device.Press MENU/SELECT on the handset when it is not in use.Press or to highlight Bluetooth, then press MENU/SELECT.Press or to highlight Active devices, then press MENU/SELECT.Press or to highlight Connect/Disconnect(whichever applicable) and then press MENU/SELECT to EQPſTO6JGJCPFUGVFKURNC[UDevice disconnected.1.2.3.1.2.3.4.When your active device is connected, you will be prompted to select Disconnect. When your active device is disconnected, you will be prompted to select Connect.When adding, removing, or replacing a Bluetooth device on the active devices list, all connected devices will be temporarily disconnected until the procedure is complete. It may take up to two minutes to reconnect.Ans. system Directory Call logIntercomBluetoothSELECT DEVICE1 Headset A2 Cell Phone ACDisconnectRemove activeBLUETOOTHDownload dir Add cellular Add headsetActive devices](https://usermanual.wiki/VTech-Telecommunications/80-7264-00.Manual/User-Guide-1144546-Page-55.png)
![21BluetoothReplace an active deviceWhen you already have two devices on the active devices list, you can replace an active device with a device on the paired devices list.To replace an active device:Press MENU/SELECT on the handset when it is not in use.Press or to highlight Bluetooth, then press MENU/SELECT.Press or to highlight Paired devices, then press MENU/SELECT.Press or to highlight a selected device, then press MENU/SELECT.Press or to highlight Connect,then press MENU/SELECT. The handset displays Maximum of 2 devices can be connected and then Replace an existing active device with cellular? Press SELECT.Press MENU/SELECT. You are prompted to select a device on the paired devices list.Press or to highlight the device to be replaced, then press MENU/SELECT. The handset displays Device removed from active list and then Connecting Cell Phone B to the base.Press the appropriate button on your cell phone VQEQPſTOVJGEQPPGEVKQPKHPGEGUUCT[9JGP[QWsuccessfully replace and connect an active device with a paired device, the handset displays Device connected.1.2.3.4.5.6.7.8.Ans. system Directory Call logIntercomBluetoothSELECT DEVICE1 Headset A2 Cell Phone ACBLUETOOTHAdd cellular Add headsetActive devicesPaired devicesConnectRenameRemove pairedREPLACE DEVICE1 Cell Phone A2 Cell Phone BCRepla ce a n existing active device with cellular?Press SELECT22BluetoothAdd an active deviceYou can have a maximum of two devices on the active devices list. To add an active device:Press MENU/SELECT on the handset when it is not in use.Press or to highlight Bluetooth, then press MENU/SELECT.Press or to highlight Active devices, then press MENU/SELECT.Press or to highlight an empty position and then press MENU/SELECT.When Add displays, press MENU/SELECT. You are prompted to select a device from the paired devices list.Press or to select one paired device, then press MENU/SELECT. The handset displays Device added to active list and then Connecting Cell Phone B to the base.Press the appropriate button on your cell phone VQEQPſTOVJGEQPPGEVKQPKHPGEGUUCT[9JGP[QWsuccessfully add and connect an active device, the handset displays Device connected.1.2.3.4.5.6.7.Ans. system Directory Call logIntercomBluetoothSELECT DEVICE1 Cell Phone B2 Cell Phone CCSELECT DEVICE1 Cell Phone A2 EmptyBLUETOOTHDowload dir Add cellular Add headsetActive devicesAdd](https://usermanual.wiki/VTech-Telecommunications/80-7264-00.Manual/User-Guide-1144546-Page-56.png)
![23BluetoothRemove an active deviceYou can remove an active device from the active devices list.To remove an active device:Press MENU/SELECT on the handset when it is not in use.Press or to highlight Bluetooth, then press MENU/SELECT.Press or to highlight Active devices, then press MENU/SELECT.Press or to highlight the desired device and then press MENU/SELECT.Press or to highlight Remove active, then press MENU/SELECT. The handset displays Device removed from active list.Change PINYou are required to enter a PIN when establishing a Bluetooth connection. The default PIN of your telephone base is 0000.To change the PIN:Press MENU/SELECT on the handset when it is not in use.Press or to highlight Bluetooth, then press MENU/SELECT.Press or to highlight Change PIN, then press MENU/SELECT. The handset displays ENTER NEW PIN and the existing PIN.Use the dialing keys to enter a new four-digit code.Press MUTE/REMOVE to erase a digit.Press and hold MUTE/REMOVE to erase the entire number.Press to move the cursor to the right or to the left.Press MENU/SELECT to save.1.2.3.4.5.1.2.3.4.•••5.Ans. system Directory Call logIntercomBluetoothBLUETOOTHDownload dir Add cellular Add headsetActive devicesSELECT DEVICE1 Cell Phone B2 Cell Phone CCDisconnectRemove activeEven the active device is removed from the active devices list, it is still on the paired devices list.Device removedfro mactive listBLUETOOTHAdd headsetActive devicesPaired devicesChange PINENTER NEW PIN000024BluetoothDownload directoryYou can download up to four cell phone directories (phonebooks) to your DS6321 telephone system via Bluetooth wireless technology. Each of the downloaded directory can store up to 1,500 entries with up to 30 digits for each phone number and 15 characters for each name.Before downloading the directory, make sure the cell phone is paired to your DS6321 and on the active devices list.To download a cell phone directory:Press MENU/SELECT on the handset when it is not in use.Press or to highlight Bluetooth, then press MENU/SELECT.Press or to highlight Download dir, then press MENU/SELECT.If there is no cell phone paired to the system, the handset displays No cellular device paired. Press SELECT to add cellular.Press or to select a desired device, then press MENU/SELECT.If the selected device is on the paired devices list but not on the active devices list, the handset displays No cellular on active devices list. Press SELECT to add.If the selected device is on the active devices list but disconnected, the handset displays Not connected. To connect cell by placing it next to base. Press SELECT.If the selected device’s directory has already been downloaded to DS6321 before, the handset displays Directory Cell Phone A will be erased. To download press SELECT. If you press MENU/SELECT to continue the downloading process, the entire previously downloaded directory will be erased.If you already have four existing downloaded directories, the handset displays Memory is full. Replace current directory? Press SELECT when you try to download another cell phone directory. Press MENU/SELECT and the system prompts you to replace an existing directory.1.2.3.•4.••••BLUETOOTHDownload dir Add cellular Add headsetActive devicesAns. system Directory Call logIntercomBluetoothSELECT DEVICECell Phone ACell Phone BC](https://usermanual.wiki/VTech-Telecommunications/80-7264-00.Manual/User-Guide-1144546-Page-57.png)
![25BluetoothCell phone A Downloadingentry #XXXX...Download finish Total #XXXXentries savedPress SELECTDOWNLOAD FROMPhone memory SIM card onlyPhone and SIMsDownload directory (continued)Press or to highlight one of the following options:Phone memory - download all contacts stored in your phone memory.SIM card only - download all contacts stored in your SIM card.Phone and SIM - download all contacts stored in both your phone memory and SIM card.Press MENU/SELECT.When the downloading process is complete, the handset displays &QYPNQCFſPKUJ6QVCN::::entries saved Press SELECT. Press MENU/SELECT orOFF/CLEAR to return to the download directory menu.Interruption occurs while downloading a directoryWhen you move out of range or the handset battery is fully depleted while downloading a directory, the handset 5.•••6.Certain cell phone do not support SIM card download. If this is the case, try transferring the contacts from your 5+/ECTFVQ[QWTEGNNRJQPGOGOQT[ſTUVVJGPFQYPNQCFfrom your cell phone memory. For more information on how to transfer contacts from your SIM card to your cell phone memory, see the user’s manual of your cell phone.HANDSET XDownload diraborted12:30pm 12/25126Telephone settingsSettingsIn the setting menu, you can change and edit the settings for LCD language, voicemail indicator, key tone, date and time and dial mode.LCD languageYou can select English,Français or Español to be used in all screen displays.To select a language:Press MENU/SELECT on the handset when it is not in use.Press or to highlight Settings, then press MENU/SELECT.Press or to highlight LCD language, then press MENU/SELECT.Press or to choose from English,Français or Español, then press MENU/SELECTVQEQPſTO1.2.3.4.SETTINGSLCD languageClr voicemailKey toneSet date/timeLCD LANGUAGE3English Francais Espanol,](https://usermanual.wiki/VTech-Telecommunications/80-7264-00.Manual/User-Guide-1144546-Page-58.png)
![27Telephone settingsClear voicemailIf you subscribe to voicemail service offered by your telephone service provider, New voicemail and appear on the handset, and the VOICEMAIL light on the VGNGRJQPGDCUGƀCUJGUYJGP[QWJCXGPGYXQKEGOCKNmessages. Contact your local telephone service provider for more information and assistance about using your voicemail service.After you have listened to all new voicemail messages, the indicators on the handset and telephone base turn off automatically.Use the clear voicemail feature when the telephone indicates that there is new voicemail but there is none (for example, when you have accessed your voicemail while away from home). Clearing the voicemail waiting indicator only turns off the indicators; it does not delete your voicemail messages. As long as you have new voicemail messages, your telephone provider continues to send the signal that turns on the indicators. To manually turn off these indicators:Press MENU/SELECT on the handset when it is not in use.Press or to highlight Settings, then press MENU/SELECT.Press or to highlight Clr voicemail, then press MENU/SELECT. The handset displays Turn off KPFKECVQT!2TGUU5'.'%6VQEQPſTO.Press MENU/SELECTVQEQPſTO1.2.3.4.Your telephone service provider may alert you to new messages with a stutter (broken) dial tone. Contact your service provider for details.Voicemail is different from answering system messages recorded in your answering system. For more information about the difference, see page 60.••HANDSET XNew voicemail12:30pm 12/251Tur n o ffindicator?Press SELECTto confirmSETTINGSLCD languageClr voicemailKey toneSet date/time28Telephone settingsYou can use or to select the desired value for the month, date, year, hour and minute. Every time a desired value is selected, press MENU/SELECT to advance until the date and time are set. If the date and time are not set, the system announces, “Time and day not set,” before each message plays.••Key toneYou can turn the key tone feature on or off.To change the setting:Press MENU/SELECT on the handset when it is not in use.Press or to highlight Settings, then press MENU/SELECT.Press or to highlight Key tone, then press MENU/SELECT.Press or to choose On or Off, then press MENU/SELECTVQEQPſTOSet date/timeThe answering system announces the day and time of the message prior to playing it. Before using the answering system, set the date and time as follows. If you subscribe to caller ID service, the day, month and time are set automatically with each incoming call. However, the year must be correct so that the day of the week can be calculated from the caller ID information.To change the setting:Press MENU/SELECT on the handset when it is not in use.Press or to highlight Settings, then press MENU/SELECT.Press or to highlight Set date/time, then press MENU/SELECT.Use the dialing keys (0-9) to enter the month, date and year. To enter a single digit number, you must add a zero before that number. For example, if the month is February, you must enter 02. Press the MENU/SELECTto continue to set the time.Use the dialing keys (0-9) to enter the hour and minute. To enter a single digit number, you must add a zero before that number. For example, if the time is 6:08, you must enter 0608. Press the MENU/SELECT.Press or to AM or PM, then press MENU/SELECT.1.2.3.4.1.2.3.4.5.6.SETTINGSLCD languageClr voicemailKey toneSet date/timeKEY TONE3On OffSETTINGSLCD languageClr voicemailKey toneSet date/timeSET DATE 01/01/09 MM/DD/YY SET TIME 06:08 PM](https://usermanual.wiki/VTech-Telecommunications/80-7264-00.Manual/User-Guide-1144546-Page-59.png)
![29Telephone settingsDial modeThe dial mode is preset to tone dialing. If you have pulse (rotary) service, you must change the dial mode to pulse dialing.To change the setting:Press MENU/SELECT on the handset when it is not in use.Press or to highlight Settings, then press MENU/SELECT.Press or to highlight Dial mode, then press MENU/SELECT.Press or to choose Tone or Pulse, then press MENU/SELECTVQEQPſTO1.2.3.4.SETTINGSClr voicemailKey toneSet date/timeDial modeDIAL MODE3Ton e Pulse30Telephone settingsRingers (handset)In the ringers menu, you can select the ringer tones and adjust the ringer volume for incoming calls to the home and cell lines.Ringer volume (handset)You can adjust the ringer volume for the incoming home and cell calls.To adjust the handset ringer volume:Press MENU/SELECT on the handset when it is not in use.Press or to highlight Ringers, then press MENU/SELECT.Press or to highlight Ringer volume, then press MENU/SELECT.Press or to select Home, Cellular 1, Cellular 2 or All home & cell, then press MENU/SELECTVQEQPſTOPress or to adjust the ringer volume. A sample of each ringer volume plays as you scroll through the choices.Press MENU/SELECTVQEQPſTO1.2.3.4.5.6.RINGERSRinger volumeRinger toneRINGER VOLUMEHomeCellular 1Cellular 2All home & cellWhen the ringer volume for all are set to off, a ringer off icon appears steady. When only one or two of the ringer volume is set to off, a ringer off icon ƀCUJGUSee page 61 to set the telephone base ringer.••RINGER VOLUMEH](https://usermanual.wiki/VTech-Telecommunications/80-7264-00.Manual/User-Guide-1144546-Page-60.png)
![31Telephone settingsRinger toneYou can select the ringer tones for the incoming home and cell calls.To select a ringer tone:Press MENU/SELECT on the handset when it is not in use.Press or to highlight Ringers, then press MENU/SELECT.Press or to highlight Ringer tone, then press MENU/SELECT.Press or to select Home, Cellular 1 or Cellular 2,then press MENU/SELECTVQEQPſTOPress or to select a ringer tone. A sample of each ringer tone plays as you scroll through the choices.Press MENU/SELECTVQEQPſTO1.2.3.4.5.6.RINGERSRinger volumeRinger toneRINGER TONEHomeCellular 1Cellular 2RINGER TONE3Ton e 1 Tone 2 Tone 3 Tone 3When you turn off the ringer volume, you will not hear ringer tone samples. •32Answering system settingsAnswering system setupYou can change the settings of the answering system in the answering system setup menu with a system handset. Answer ON/OFFIf you turn the answering system on, it answers calls and records messages only on the home line.When the answering system is turned on, the /ANS ON/OFF light on the telephone base is on and the handset displays ANS ON.To turn the answering system on or off:Using the telephone base:Press /ANS ON/OFF to turn the answering system on or off. When the answering system is turned on, it announces, “Calls will be answered.” When the answering system is turned off, it announces, “Calls will not be answered.”Using the handset:Press MENU/SELECT on the handset when it is not in use.Press or to highlight Ans. system, then press MENU/SELECT.Press or to highlight Ans sys setup, then press MENU/SELECT.Press or to highlight Answer ON/OFF, then press MENU/SELECT.Press or to choose On or Off, then press MENU/SELECTVQEQPſTO•1.2.3.4.5.Answering system settingsAns. system Directory Call logIntercomBluetoothANS. SYSTEMPlay messagesDelete all oldRecord memoAns sys setupANS SYS SETUPAnswer ON/OFFCall screeningAnnouncement# of ringsANSWER ON/OFF3On Off](https://usermanual.wiki/VTech-Telecommunications/80-7264-00.Manual/User-Guide-1144546-Page-61.png)
![33Answering system settingsCall screeningThe call screening feature lets you listen to a caller leaving a message at the telephone base. You may turn this feature on or off with a system handset.To change the setting:Press MENU/SELECT on the handset when it is not in use.Press or to highlight Ans. system, then press MENU/SELECT.Press or to highlight Ans sys setup, then press MENU/SELECT.Press or to highlight Call screening , then press MENU/SELECT.Press or to choose On or Off, then press MENU/SELECTVQEQPſTO1.2.3.4.5.ANS. SYSTEMPlay messagesDelete all oldRecord memoAns sys setupANS SYS SETUPAnswer ON/OFFCall screeningAnnouncement# of ringsCALL SCREENING3On Off34Answering system settingsAnnouncementThe telephone is preset with a greeting that answers calls with “Hello, please leave a message after the tone.” You can use this preset announcement, or replace it with your own. Play your announcementPress MENU/SELECT on the handset when it is not in use.Press or to highlight Ans. system, then press MENU/SELECT.Press or to highlight Ans sys setup, then press MENU/SELECT.Press or to highlight Announcement, then press MENU/SELECT.The handset announces, “To play, press 2. To record, press 7.” Press 2 to play.Record your own announcementPress MENU/SELECT on the handset when it is not in use.Press or to highlight Ans. system, then press MENU/SELECT.Press or to highlight Ans sys setup, then press MENU/SELECT.Press or to highlight Announcement, then press MENU/SELECT.The handset announces, “To play, press 2. To record, press 7.” Press 7 to record.The handset announces, “Record after the tone. Press 5 when you are done.” After the tone, speak towards the microphone of the handset.Press 5YJGP[QWſPKUJTGEQTFKPIThe handset automatically plays back the newly recorded announcement. Press 5 to stop the playback at any time; 2 to replay the recorded announcement; or 7 to record again if desired.1.2.3.4.5.1.2.3.4.5.6.7.8.Your announcement can be up to 90 seconds in length.Announcements shorter than two seconds will not be recorded.••ANNOUNCEMENT2- Play3-Delete5-Stop7-RecordANS SYS SETUPAnswer ON/OFFCall screeningAnnouncement# of ringsRecordingannouncement...5-StopAnnouncement play ba c k](https://usermanual.wiki/VTech-Telecommunications/80-7264-00.Manual/User-Guide-1144546-Page-62.png)
![35Answering system settingsDelete your announcementPress MENU/SELECT on the handset when it is not in use.Press or to highlight Ans. system, then press MENU/SELECT.Press or to highlight Ans sys setup, then press MENU/SELECT.Press or to highlight Announcement, then press MENU/SELECT.The handset announces, “To play, press 2. To record, press 7.” Press 3 to delete your own recorded announcement. The handset announces, “Announcement deleted.”Number of ringsWhen the answering system is turned on, it answers all incoming home calls after the number of rings set. You can choose from two, four, or six rings; or toll saver. With toll saver selected, the answering system answers after two rings when you have new messages, and after four rings when you have no new messages. This enables you to check for new messages and avoid paying unnecessary long distance charges if you are calling from out of your local area.To change the setting:Press MENU/SELECT on the handset when it is not in use.Press or to highlight Ans. system, then press MENU/SELECT.Press or to highlight Ans sys setup, then press MENU/SELECT.Press or to highlight # of rings, then press MENU/SELECT.Press or to choose from 2,4,6 or Toll saver, then press MENU/SELECT VQEQPſTO.1.2.3.4.5.1.2.3.4.5.When your announcement is deleted, calls are answered with the preset announcement.ANNOUNCEMENT2- Play3-Delete5-Stop7-RecordANS SYS SETUPAnswer ON/OFFCall screeningAnnouncement# of ringsANS SYS SETUPAnswer ON/OFFCall screeningAnnouncement# of rings# OF RINGS32 4 6 Toll saver36Answering system settingsRemote access code A two-digit security code is required to access the answering system remotely from any touch tone telephone. The preset code is 19. You can change the code to any number from 10 to 99.To change the setting:Press MENU/SELECT on the handset when it is not in use.Press or to highlight Ans. system, then press MENU/SELECT.Press or to highlight Ans sys setup, then press MENU/SELECT.Press or to highlight Remote code, then press MENU/SELECT.Use the dialing keys (0-9) to enter a two-digit number from 10-99, then press MENU/SELECT VQEQPſTO.Press MUTE/REMOVE to erase a digit.Press and hold MUTE/REMOVE to erase the entire number.Press to move the cursor to the right or to the left.Message alert toneWhen the answering system is turned on, the telephone beeps every 10 seconds to alert you of new messages. The tone stops when all new messages have been reviewed. The message alert tone is preset to off.To change the setting:Press MENU/SELECT on the handset when it is not in use.Press or to highlight Ans. system, then press MENU/SELECT.Press or to highlight Ans sys setup, then press MENU/SELECT.Press or to highlight Remote code, then press MENU/SELECT.Press or to choose from On or Off, then press MENU/SELECT VQEQPſTO.1.2.3.4.5.•••1.2.3.4.5.The answering system must be turned on for the message alert tone to function. ANS SYS SETUPCall screeningAnnouncement# of ringsRemote codeREMOTE CODE 19ANS SYS SETUPAnnouncement# of ringsRemote codeMsg alert toneMSG ALERT TONE3On Off](https://usermanual.wiki/VTech-Telecommunications/80-7264-00.Manual/User-Guide-1144546-Page-63.png)
![37Make, answer or end a home call Using a handset:To make a home call:Press /HOME/FLASH or , then enter the telephone number.To predial a home call:Enter the telephone number, then press /HOME/FLASH or .To answer a home call:Press /HOME/FLASH or .To end a home call:Press OFF/CLEAR or put the handset in the telephone base.Using a Bluetooth headset:You can use a Bluetooth headset on home calls. However, you will need to stay within 30 feet from the telephone base to maintain the Bluetooth signal.To switch between the headset and handset while on a call:Press MENU/SELECT.Press MENU/SELECT to select Use headset/Use handset (whichever applicable).To answer a home call:Press the call button on your headset.To end a home call:Press the call button on your headset if you are using it or press OFF/CLEAR on the handset.••••1.2.••The screen shows the elapsed time as you talk (in hours, minutes and seconds).When predialing (preview numbers before dialing), press MUTE/REMOVEor OFF/CLEAR to backspace and delete; press and hold REDIAL/PAUSE to insert a dialing pause (a p appears).••Telephone operationWhile you are using your Bluetooth headset and you move too far away from the telephone base or the battery of your headset is fully depleted, the call will be transferred to the originating handset automatically.38Telephone operationCall waiting on the home lineIf you subscribe to call waiting service with your telephone service provider, you hear a beep if someone calls while you are already on a call.Press /HOME/FLASH on the handset to put your current call on hold and take the new call.Press /HOME/FLASH on the handset at any time to switch back and forth between calls.Make, answer or end a cell call You can connect a maximum of two Bluetooth enabled cell phones to the telephone base, but only one cell phone can be used on a cell call at a time.If you have only one cell phone connected to the telephone base and is on the active devices list, it is automatically selected to make or answer cell calls. If you have two cell phones connected to the telephone base and are on the active devices list, the telephone system prompts you to select a cell phone before you make a cell call.To make a cell call:Enter the telephone number, then press /CELL.To answer a cell call:Press /CELL.To end a cell call:Press OFF/CLEAR or put the handset in the telephone base.Call waiting on the cell lineIf you subscribe to call waiting service with your cell phone service provider, you hear a beep if someone calls while you are already on a call.Press /CELL on the handset to put your current call on hold and take the new call.Press /CELL on the handset at any time to switch back and forth between calls.•••••••](https://usermanual.wiki/VTech-Telecommunications/80-7264-00.Manual/User-Guide-1144546-Page-64.png)
![39Telephone operationAnswer a cell call while on a home callWhile you are on a home call and there is an incoming cell call, 1 or 2displays on the handset the telephone rings.To answer the incoming cell call:Press /CELL on the handset. The home call is automatically placed on hold and the handset displays Home call on hold.To end the cell call:Press OFF/CLEAR on the handset. The home line is still on hold.To resume the home call on hold:Press /HOME/FLASH on the handset.Answer a home call while on a cell callWhile you are on a cell call and there is an incoming home call, displays on the handset and the telephone rings.To answer the incoming home call:Press /HOME/FLASH on the handset. The cell call is automatically placed on hold and the handset displays Cell call on hold.To end the home call:Press OFF/CLEAR on the handset. The cell line is still on hold.To resume the cell call on hold:Press /CELL on the handset.••••••If you have voicemail service active on your cell phone, and you do not answer the incoming CELL call, the call will be answered by your cell phone’s voicemail. Contact your cell phone service provider for more information about voicemail service.If you have turned on your answering system and you do not answer the incoming home call, the call will be answered by your answering system.40Telephone operationConference home and cell callsWhen you have calls established on the home and cell lines, you can create a 3-way conference using the handset or telephone base.To conference both home and cell calls:Press MENU/SELECT.Press or to highlight Conf. with home/Conf. with cell (whichever applicable).Press MENU/SELECT.To select an option while on a conference call:PressMENU/SELECT.Press or to select one of the following options:End home callEnd cell callPress MENU/SELECT.To end a conference call:Press OFF/CLEAR or put the handset back in the telephone base.1.2.3.1.2.••3.•](https://usermanual.wiki/VTech-Telecommunications/80-7264-00.Manual/User-Guide-1144546-Page-65.png)
![41Telephone operationHandset speakerphoneDuring a call, press to switch between speakerphone and normal handset use.Volume controlDuring a call, press /VOL or /VOL to adjust the listening volume.MuteThe mute function turns off the microphone. You can hear the caller, but the caller cannot hear you.To mute a call:Press MUTE/REMOVE to turn off the microphone. The screen shows Muted for a few seconds and MUTE appears until the mute function is turned off.To un-mute a call:Press MUTE/REMOVE again to resume the conversation. The screen temporarily shows Microphone ON.Temporary tone dialingIf you have pulse (rotary) service only, you can switch from pulse to touch tone dialing temporarily during a call. This is useful if you need to send touch tone signals to access your telephone banking or long distance services.During a call:Press TONE .Use the dialing keys to enter the relevant number. The telephone sends touch tone signals.The telephone automatically returns to pulse dialing mode after you end the call.••1.2.3.42Telephone operationHoldYou can place a home or cell call on hold. You will hear an alert tone if you have not taken the call off of hold after 14 minutes. You will hear another alert tone 30 seconds later. At 15 minutes on hold, the call on hold automatically disconnects.To place a home call on hold:Press HOLD on the handset. Home call on hold appears and /HOME/FLASHƀCUJGUTo resume a home call on hold:Press /HOME/FLASH.To place a cell call on hold:Press HOLD on the handset. Cell call on hold appears and /CELLƀCUJGUTo resume a cell call on hold:Press /CELL.Handset locator6JKUHGCVWTGJGNRU[QWſPFCOKURNCEGFJCPFUGVTo start paging:Press FIND HANDSET on the telephone base when it is not in use. All idle handsets ring and display ** Paging **.To end paging:Press FIND HANDSET on the telephone base.- OR -Press /HOME/FLASH,or any dialing keys (0-9,#,TONE) on the handset.•••••••](https://usermanual.wiki/VTech-Telecommunications/80-7264-00.Manual/User-Guide-1144546-Page-66.png)
![43Telephone operationChain dialingUse this feature to initiate a dialing sequence from numbers stored in the directory, call log or redial while you are on a home call. This feature is available only for home calls.Chain dialing can be useful if you wish to access other numbers (such as bank account numbers or access codes) from the directory, call log or redial list.To access a number in the directory while on a home call:Press MENU/SELECT.Press or to highlight Directory, then press MENU/SELECT.Press MENU/SELECT to select Home directory. Press or to scroll to the desired entry or perform an alphabetical search (page xx).Press MENU/SELECT to dial the displayed number. To access a number in the call log while on a home call:Press MENU/SELECT.Press or to highlight Call log, then press MENU/SELECT.Press or to scroll to the desired entry.Press MENU/SELECT to dial the displayed number.To access the redial list while on a home call:Press REDIAL/PAUSE.Press , or REDIAL/PAUSE until the desired number displays, then press MENU/SELECT. If you do not press MENU/SELECT within two seconds, the number displayed will be dialed automatically.1.2.3.4.5.1.2.3.4.1.2.You cannot edit a directory entry while on a call. For more details about the directory, see page 48.You cannot copy a call log entry into the directory while on a call. For more details about call log, see page 55.You can only view the numbers in the directory, call log or redial while on a call and cannot erase any entries.Press and hold OFF/CLEAR to exit redial, directory or call log while on a call.••••44Telephone operationRedial list6JGTGFKCNNKUVUVQTGUVJGſXGOQUVTGEGPVN[FKCNGFPWODGTU9JGPVJGTGCTGCNTGCF[ſXGGPVTKGUVJGQNFGUVGPVT[KUFGNGVGFVQOCMGTQQOfor the new entry. Entries are shown in reverse chronological order.Review the redial listPress REDIAL/PAUSE when the handset is not in use.Press , or REDIAL/PAUSE to browse. You hear a double beep when you reach the beginning or end of the redial list.Dial a redial entryPress REDIAL/PAUSE when the handset is not in use.Press , or REDIAL/PAUSE to browse until the desired number displays.Press /HOME/FLASH or to use the home line.- OR -Press /CELL to use the cell line.Press MENU/SELECT to dial the displayed number. If you do not press press MENU/SELECT within two seconds, the number displayed will be dialed automatically.Save a redial entry to the directoryPress REDIAL/PAUSE when the handset is not in use.Press , or REDIAL/PAUSE to browse until the desired number displays.Press MENU/SELECT twice.The handset displays ENTER NUMBER. Use the dialing keys to edit the number, if necessary.Press MENU/SELECT to move to the name.The handset displays ENTER NAME. Use the dialing keys to enter a name (see step 6 of Create a new directory entry on page 49).Press MENU/SELECT and then Saved displays.Delete a redial entryPress REDIAL/PAUSE when the handset is not in use.Press , or REDIAL/PAUSE to browse until the desired number displays.Press MUTE/REMOVE to delete the displayed number.1.2.1.2.3.4.1.2.3.4.5.6.7.1.2.3.](https://usermanual.wiki/VTech-Telecommunications/80-7264-00.Manual/User-Guide-1144546-Page-67.png)
![45Telephone operationIntercomUse the intercom feature for conversations between two system handsets.You can buy additional expansion handsets (DS6301) for this telephone system. You can register up to 12 handsets to the telephone base.To initiate an intercom call with a handset:Press MENU/SELECT on the handset when it is not in use.Press or to highlight Intercom, then press MENU/SELECT.If you have a two-handset system, your handset displays Calling other handset. The destination handset rings and displays Other handset is calling.If you have more than two handsets, your handset displays INTERCOM TO: and a list of registered handsets. Press or to select a destination handset and then press MENU/SELECT. Your handset displays Calling handset X. The destination rings and displays Handset X is calling.To answer an intercom at the destination handset:Press /HOME/FLASH or .Both screens show Intercom.To silence an intercom call:Press OFF/CLEAR or MUTE/REMOVE on the destination handset. Its screen displays Ringer mute for a few seconds.To end an intercom call:Press OFF/CLEAR or place either handset back in the telephone base or charger. Both handsets display Intercom ended.1.2.•••••You can cancel the intercom call before it is answered by pressing OFF/CLEAR on your originating handset.If the destination handset does not answer the intercom call within 100 seconds, is in the directory or call log, or is out of range, the originating handset displays Unable to call try again and returns to the idle mode.You can use a maximum of four handsets at a time. When two handsets are used on an intercom call, use two other system handsets for an outside call.•••Ans. system Directory Call logIntercomBluetoothINTERCOM TO:Handset 2Handset 3Handset 4Handset 546Telephone operationIntercom (continued)Answer an incoming call during an intercom callWhen you receive an incoming home call during an intercom call, there is an alert tone and Incoming call appears on screens.Press /HOME/FLASH to answer the home call and the intercom call ends automatically.Press OFF/CLEAR to end the intercom call with answering the incoming call. The telephone continues to ring.When you receive an incoming cell call during an intercom call, there is an alert tone and Incoming call appears on screens.Press /CELL to answer the cell call and the intercom call ends automatically.Press OFF/CLEAR to end the intercom call with answering the incoming call. The telephone continues to ring.••••](https://usermanual.wiki/VTech-Telecommunications/80-7264-00.Manual/User-Guide-1144546-Page-68.png)
![47Telephone operationShare an outside callAnother handset can join you on an outside call in a three-way conversation. That call continues until all people hang up.Press /HOME/FLASH on another handset to join the call.Transfer a callYou can use the intercom feature to transfer an outside call to another system handset.When on an outside call, press MENU/SELECT.Press or to highlight Intercom, then press MENU/SELECT.If you have a two-handset system, your handset displays Calling other handset. The destination handset rings and displays Other handset is calling.If you have more than two handsets, your handset displays INTERCOM TO: and a list of registered handsets. Press or to select a destination handset and then press MENU/SELECT. Your handset displays Calling handset X. The destination rings and displays Handset X is calling.When the destination handset answers the intercom call, both screens show Intercom.Press OFF/CLEAR on the originating handset. Both screens show Intercom ended.The destination handset screen shows Home call on hold or Cell call on hold. Press /HOME/FLASH to answer a home call or /CELL to answer a cell call.•1.2.••3.4.5.Use headset IntercomDirectoryCall logINTERCOM TO:Handset 2Handset 3Handset 4Handset 5If you want to cancel an intercom call and reconnect to the outside call before the destination handset answers, press /HOME/FLASH on the originating handset.If the destination handset does not answer the intercom call within 100 seconds, is in the directory or call log, or is out of range, the originating handset displays Unable to call try again and reconnects to the outside call automatically.••48Telephone operationDirectoryYour phone directory consists of a home directory and up to four downloaded directories. The home directory stores up to 50 entries with up to 30 digits for each phone number and 15 characters for each name. Each of the downloaded directory stores up to 1,500 entries with up to 30 digits for each phone number and 15 characters for each name.Directory entries are stored at the telephone base and shared by all system handsets. Any changes made on one handset apply to all.Only one handset can review the directory at a time. If another handset tries to enter the directory, its screen shows Not available at this time.When there are no records in the directory, the screen shows Directory empty.When the directory is full and you try to save an entry, the screen shows List full.When you try to save a number already stored in the directory, the screen shows Already saved.•••••](https://usermanual.wiki/VTech-Telecommunications/80-7264-00.Manual/User-Guide-1144546-Page-69.png)
![49Telephone operationCreate a new entry in the home directoryPress MENU/SELECT on the handset when it is not in use.Press or to highlight Directory, then press MENU/SELECT.Press MENU/SELECT to select Home.Press or to highlight Add contact, then press MENU/SELECT. The screen displays ENTER NUMBER.Use the dialing keys to enter a telephone number.Press MUTE/REMOVE to erase a digit.Press and hold MUTE/REMOVE to erase the entire number.Press to move the cursor to the right or to the left.Press REDIAL/PAUSE to insert a dialing pause (a p appears).- OR -Copy a number from the redial list.1. Press REDIAL/PAUSE and then , or REDIAL/PAUSE to browse to select a number.2. Press MENU/SELECT to copy the displayed number.Press MENU/SELECT.Press or to select one of the following types:HomeCellWorkOtherPress MENU/SELECT. The screen displays ENTER NAME.Use the dialing keys (see page 50) to enter the name. Press MUTE/REMOVE to erase a character.Press and hold MUTE/REMOVE to erase all characters.Press to move the cursor to the right or to the left.Press MENU/SELECT VQEQPſTOCPFVJGUETGGPUJQYUSaved.1.2.3.4.5.••••6.7.••••8.9.•••10.You cannot create new entries in your downloaded directories.50Telephone operationCharacter chartUse the dialing keys and the chart below to enter a name (up to 15 characters). Each press of a particular key causes the characters to be displayed in the following order:9JGPGPVGTKPICPCOGKPVJGFKTGEVQT[VJGſTUVNGVVGTQHGCEJYQTFKUautomatically capitalized.Number keyCharacters by number of key presses12345678910111.-,( ) *#&/ ,12ABCabc23DEF d e f 34GHIghi45JKLjkl56MNOmno67PQRS p q r s 78TUVtuv89WXYZwxyz90Space 0*#](https://usermanual.wiki/VTech-Telecommunications/80-7264-00.Manual/User-Guide-1144546-Page-70.png)
![51Telephone operationReview the directoryEntries are sorted alphabetically.To review the directory:Press / when the handset is not in use.Press or to choose a directory, then press MENU/SELECT.Press or to highlight Review, then press MENU/SELECT.Press or to browse.- OR -Press the MENU softkey when the handset is not in use.Press /VOL+/or CID/VOL-/ to highlight DIRECTORY, then press the SELECT softkey.Press /VOL+/or CID/VOL-/ to highlight Review, then press the SELECT softkey. Press /VOL+/or CID/VOL-/ to browse the entries.Using the telephone base:Press the MENU softkey when the telephone base is not in use.Press /VOL+ or VOL-/ to highlight Directory, then press the SELECT softkey.Press /VOL+ or VOL-/ to highlight Review, then press the SELECT softkey. Press /VOL+ or VOL-/ to browse the entries.Alphabetical searchTo start an alphabetical search:Follow the steps in Review the directory above to enter the directory.Use the dialing keys to enter the letters associated with the name. For example, if you have name entries Jenny,Jessie,Kristen and Laurain your directory, press 5 (JKL) once to see Jenny, twice to see Jessie,three times to see Kristen, or four times to see Laura. If there is no name OCVEJKPIVJGſTUVNGVVGTGPVGTGFVJGPGZVENQUGUVOCVEJKPCNRJCDGVKECNorder appears. If necessary, use /VOL+/or CID/VOL-/ to browse.1.2.3.4.1.2.3.4.1.2.3.4.1.2.52Telephone operationDial a directory entryYou may dial a directory entry on either a HOME or CELL line.To dial a directory entry:Using a handset:Search for the desired entry in the directory (see Review the directoryon page 51 or Alphabetical search on page 51).Press /TALK/FLASH or , or /CELL.Using the telephone base:Search for the desired entry in the directory (see Review the directoryon page 51 or Alphabetical search on page 51).Press /HOME or /CELL.Edit a directory entryUsing a handset:Search for the desired entry in the directory (see Review the directoryon page 51 or Alphabetical search on page 51).When the desired entry appears, press the EDIT softkey. The screen shows EDIT NUMBER.Use the dialing keys to edit the number.Press OFF/CLEAR to backspace and erase a digit.Press the PAUSE softkey to insert a dialing pause (a p appears).Press /VOL+/to move the cursor to the right or CID/VOL-/ to the left.Press and hold OFF/CLEAR to exit and return to idle mode.Press the NEXT softkey to move to the name. The screen shows EDIT NAME.Use the dialing keys (see page 50) to edit the name. Press OFF/CLEAR to backspace and erase a character.Press /VOL+/to move the cursor to the right or CID/VOL-/ to the left.Press and hold OFF/CLEAR to exit and return to idle mode.Press the SAVE softkey, then the screen shows the saved directory.1.2.1.2.1.2.3.••••5.6.•••7.](https://usermanual.wiki/VTech-Telecommunications/80-7264-00.Manual/User-Guide-1144546-Page-71.png)
![53Telephone operationEdit a directory entry (continued)Using the telephone base:Search for the desired entry in the directory (see Review the directoryon page 51 or Alphabetical search on page 51).When the desired entry appears, press the EDIT softkey. The screen shows EDIT NUMBER.Use the dialing keys to enter a telephone number.Press CANCEL/ to backspace and erase a digit.Press the PAUSE softkey to insert a dialing pause (a p appears).Press /VOL+ to move the cursor to the right or VOL-/ to the left.Press and hold CANCEL/ to exit and return to idle mode.Press the NEXT softkey to move to the name. The screen shows ENTER NAME.Use the dialing keys (see page 50) to enter the name. Press CANCEL/ to backspace and erase a character.Press /VOL+ to move the cursor to the right or VOL-/ to the left.Press and hold CANCEL/ to exit and return to idle mode.Press the SAVE softkey, then the screen shows the saved directory.Delete a directory entryYou may delete a directory entry using a handset or the telephone base. Once a directory entry is deleted, it cannot be retrieved.To delete an entry:Search for the desired entry in the directory (see Review the directoryon page 51 or Alphabetical search on page 51).When the desired entry appears, press the DELETE softkey. The screen then shows the next alphabetical entry in the directory.1.2.3.••••5.6.•••7.1.2.54Telephone operationAbout caller IDThis product supports caller ID services provided by most telephone service providers. Depending on your service subscription, you may see the caller’s number, or the caller’s name and number from the telephone service provider CHVGTVJGſTUVQTUGEQPFTKPI%CNNGT+&HTQOVJGJQOGNKPGCNNQYU[QWVQUGGthe name, number, date and time of the incoming calls. However, caller ID from the cell line only shows the number of the incoming caller and the name of the paired Bluetooth cell phone; date and time of the call is not shown.Information about caller ID with call waitingCaller ID with call waiting lets you see the name and telephone number of the caller before answering the telephone, even while on another call. It may be necessary to change your telephone service to use this feature. Contact your telephone service provider and cell phone service provider if:You have both caller ID and call waiting, but as separate services ( you may need to combine these services).You have only caller ID service, or only call waiting service.You do not subscribe to any caller ID or call waiting services.There are fees for caller ID services. In addition, services may not be available in all areas.Caller ID information is available only if both you and the caller are in areas offering caller ID service, and if both telephone service providers use compatible equipment.Caller ID information may not be available for every incoming call. Callers may intentionally block their names and/or telephone numbers. To view call log entries with numbers between 16 and 24 digits, you must save the entry to the directory (see page 65).•••You can use this product with regular caller ID service, or you can use this product’s other features without subscribing to caller ID or combined caller ID with call waiting service.](https://usermanual.wiki/VTech-Telecommunications/80-7264-00.Manual/User-Guide-1144546-Page-72.png)
![55Telephone operationCaller ID historyIf you subscribe to caller ID service provided by your local telephone company and/or cell phone service provider, information about each caller CRRGCTUCHVGTVJGſTUVQTUGEQPFTKPI+H[QWCPUYGTCECNNDGHQTGVJGECNNGTinformation appears on the screen, it will not be saved in the call log.The call log stores up to 100 entries. Each entry has up to 24 digits for the phone number and 15 characters for the name. If the name has more VJCPEJCTCEVGTUQPN[VJGſTUVEJCTCEVGTUCTGUJQYPCPFUCXGFKPthe call log.You can review, redial, and copy an entry into the directory.Entries are in reverse chronological order.When the call log is full, the oldest entry is deleted to make room for new incoming call information.XX new call(s) shows when there are new call log entries (including missed and unreviewed calls).Call log empty shows when there are no records in the call log.Only one handset or the telephone base can review the call log at a time. If a handset tries to enter the call log while another handset or the telephone base is already in it, Not available at this time appears.•••••••If the phone number has more than 24 digits, it will not saved or shown in the call log.Missed calls indicator When there are unreviewed calls in the call log, the handset and the telephone base show XX new call(s).Each time you review a call log entry marked NEW, the number of missed calls decreases by one.When you have reviewed all the missed calls, the missed calls indicator no longer shows.If you do not want to review the missed calls one by one, press and hold OFF/CLEAR on the handset or CANCEL/on the telephone base to erase the missed calls indicator. All the entries are then considered old and kept in the call log. HANDSET XXX new calls3:45am 12/25MENUREDIAL NEWVTech800-595-95113:45am 12/25SAVEDELETE56Telephone operationMemory match When the incoming telephone number exactly matches a telephone number in your directory, the name appears on the screen will match the corresponding name in your directory.For example, when Linda Jones calls, her name will appear as Linda if this is how you entered it into your directory.Review the call log Using a handset:Press CID/VOL-/ when the handset is not in use.Press /VOL+/or CID/VOL-/ to browse the entries.-OR-Press the MENU softkey when the handset is not in use.Press /VOL+/or CID/VOL-/ to highlight CALL LOG, then press the SELECT softkey.Press /VOL+/or CID/VOL-/ to highlight Review, then press the SELECT softkey. Press /VOL+/or CID/VOL-/ to browse the entries.The name (if available), telephone number, date and time of all incoming calls are shown on the screen.You will hear a double beep when you reach the beginning or end of the call log.1.2.1.2.3.4.••The number shown in the call log will be in the format sent by the telephone company. The telephone company usually delivers ten-digit phone numbers (area code plus phone number). If the telephone number of the caller does not exactly match a number in your directory, the name will appear as it is delivered by the telephone company. For example, if the telephone company includes the area code but your directory number does not, the name will appear as delivered by the telephone company.](https://usermanual.wiki/VTech-Telecommunications/80-7264-00.Manual/User-Guide-1144546-Page-73.png)
![57Telephone operationMake a call log entry ready to dialAlthough the call log entries received have 10 digits (the area code plus the seven-digit number), in some areas, you may need to dial only the seven digits, or 1 plus the seven digits, or 1 plus the area code plus the seven digits. You can change the number of digits that you dial from the call log or store to the directory. While reviewing the call log, press # repeatedly to show different dialing options for local and long distance numbers before dialing or saving the telephone number in the directory.Press 1 repeatedly if you need to add or remove 1 in front of the telephone number before dialing or saving it in the directory. Dial a call log entry Using a handset:Search for the desired entry in the call log (see Review the call log on page 56).When the desired entry appears and is in the correct format for dialing, press /TALK/FLASH or using the HOME line,or /CELL using the CELL line. 1.2.800-595-95111-800-595-9511595-95111-595-9511800-595-95111-800-595-9511595-95111-595-951158Telephone operationSave a call log entry to the directorySelect a desired entry in the call log (see Review the call log on page 56).When the desired entry appears, press the SAVE softkey. The screen shows EDIT NUMBER.Use the dialing keys to edit the number.Press OFF/CLEAR to backspace and erase a digit.Press the PAUSE softkey to insert a dialing pause (a p appears).Press /VOL+/to move the cursor to the right or CID/VOL-/ to the left.Press and hold OFF/CLEAR to exit and return to idle mode.Press the NEXT softkey to move to the name. The screen shows EDIT NAME.Use the dialing keys (see page 50) to edit the name. Press OFF/CLEAR to backspace and erase a character.Press /VOL+/to move the cursor to the right or CID/VOL-/ to the left.Press and hold OFF/CLEAR to exit and return to idle mode.Press the SAVE softkey, then the screen shows the saved directory.1.2.3.••••5.6.•••7.](https://usermanual.wiki/VTech-Telecommunications/80-7264-00.Manual/User-Guide-1144546-Page-74.png)
![59Telephone operationDelete from the call logYou may use a handset or the telephone base to delete from the call log.To delete a single entry:Select a desired entry in the call log (see Review the call log on page 56).When the desired entry appears, press the DELETE softkey. The screen shows the previous call log entry.To delete all entries:Using a handset:Press the MENU softkey when the handset is not in use.Press /VOL+/or CID/VOL-/ to highlight CALL LOG, then press the SELECT softkey.Press /VOL+/or CID/VOL-/ to highlight Del All Calls, then press the SELECT softkey. The screen displays Delete all calls?Press the YESUQHVMG[VQEQPſTOQTVJGNO softkey to abort.Call log display screen messages1.2.1.2.3.4.Displays WhenPrivate name The caller is blocking the name.Private number The caller is blocking the telephone number.Private caller The caller is blocking the name and number. Unknown name This caller’s name is unavailable. Unknown number This caller’s number is unavailable.Unknown caller No information is available about this caller.Long distance ORL (before the caller’s number) It is a long distance call.60Answering system and voicemailYour telephone has separate indicators for two different types of voice messages: those left on its built-in answering system and those left at your service provider’s voicemail (fees may apply). Your telephone’s built-in answering system messages and voicemail messages are separate. Each alerts you to new messages differently. If displays and the voicemail light on the telephone base turns on, your telephone service provider is indicating that it has new voicemail for you. To listen to your voicemail, you typically dial an access number provided by your telephone service provider, followed by a security code or PIN. To listen to messages recorded on your digital answering system, press /PLAY/STOP on the telephone base (page 62).Some service providers bundle or combine multiple services like voicemail and call waiting, so you may not be aware that you have voicemail. To check what services you have and how to access them, contact your telephone service provider.You can use your telephone answering system and voicemail together by setting your built-in answering system to answer before voicemail answers. To learn how to program your voicemail settings, contact your telephone service provider. Set your answering system to answer calls at least two rings earlier than your voicemail is set to answer. For example, if your voicemail answers after six rings, set your answering system to answer after four rings. Some voicemail providers may program the delay before answering calls in seconds instead of rings. In this case, allow six seconds per ring when determining the appropriate setting. By doing this, if you are on a call, or if the answering system is busy recording a message and you receive another call, the second caller can leave a voicemail message.Message capacityThe answering system can record and store up to 99 messages. Each message can be up to four minutes in length. The total storage capacity for the announcement, messages and memos is approximately 14 minutes. The actual recording time depends on individual message characteristics. Messages remain available for replay until you delete them.Answering system operation](https://usermanual.wiki/VTech-Telecommunications/80-7264-00.Manual/User-Guide-1144546-Page-75.png)
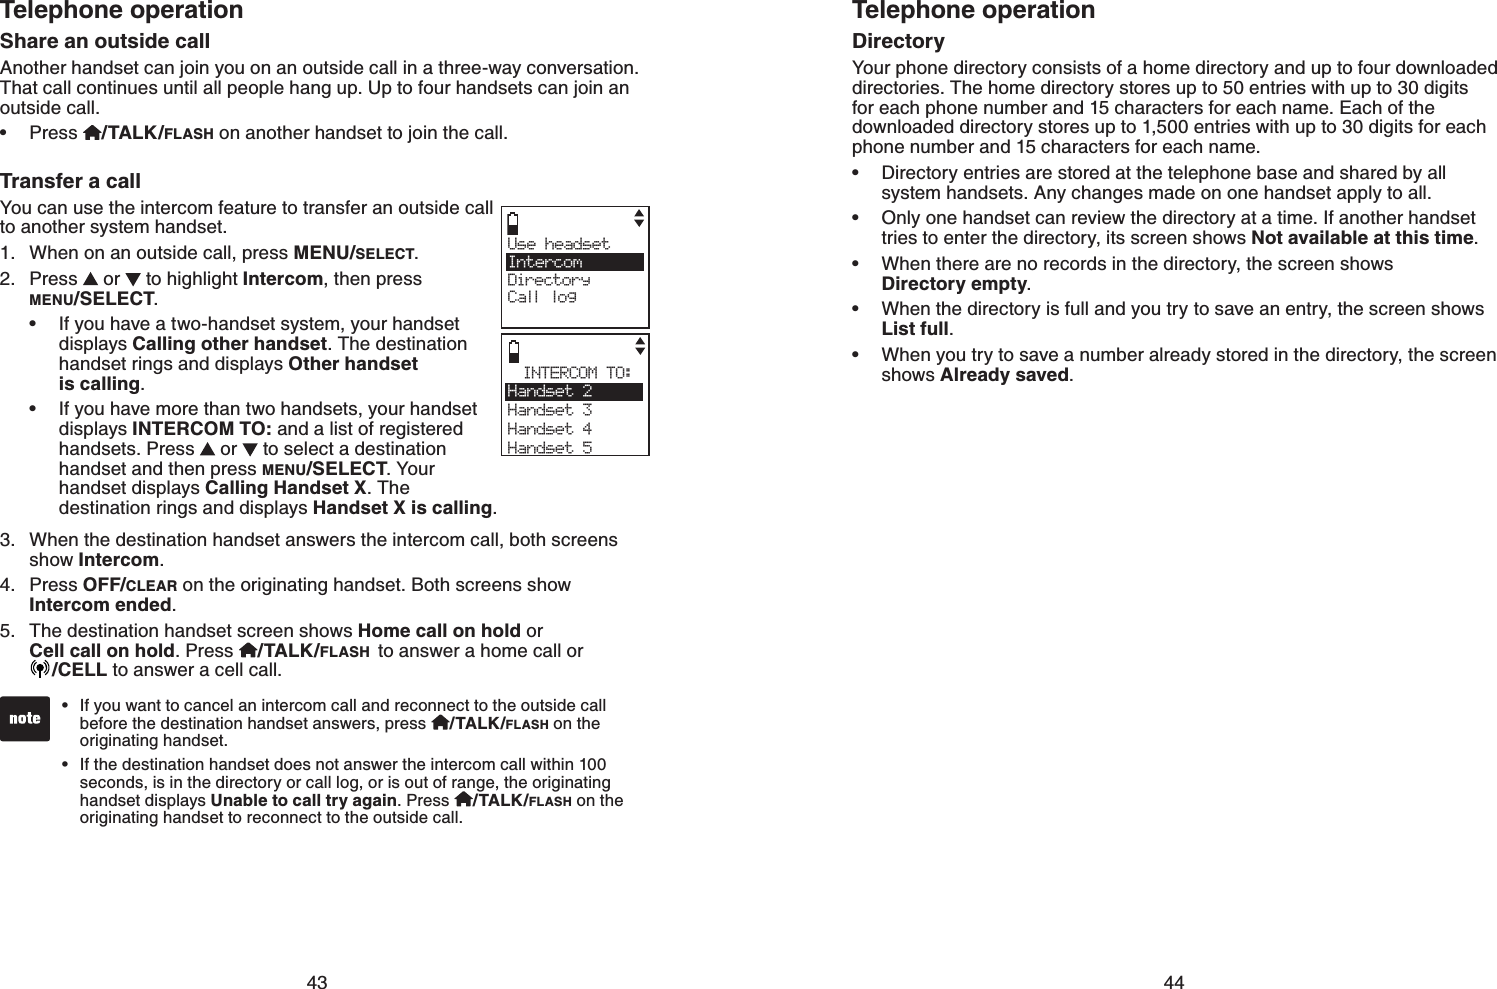
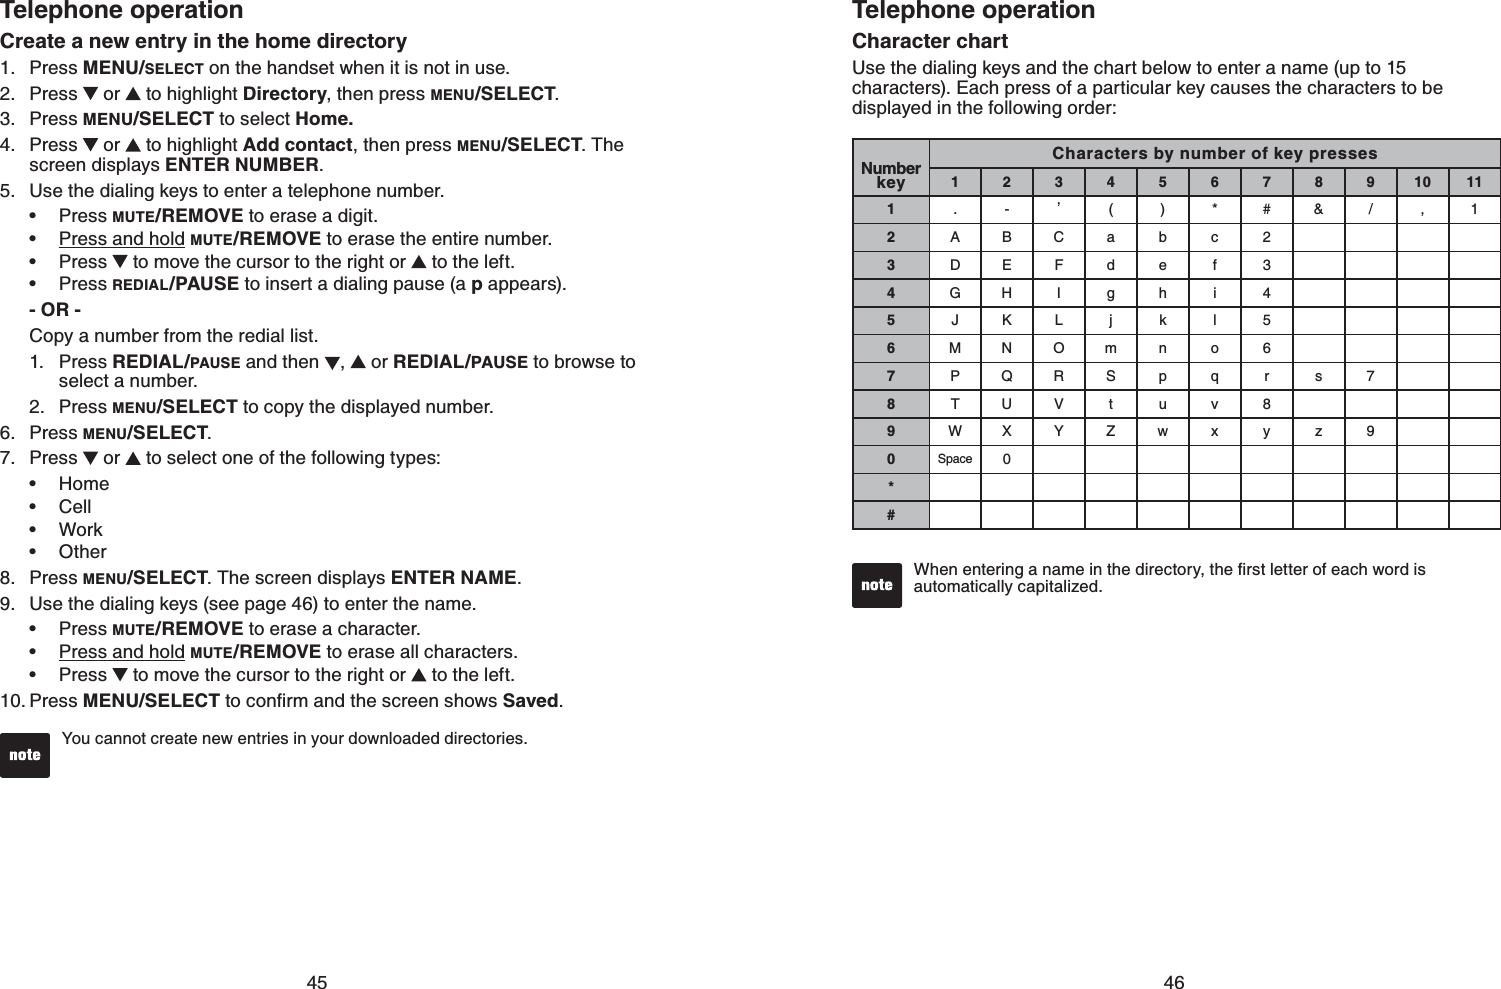
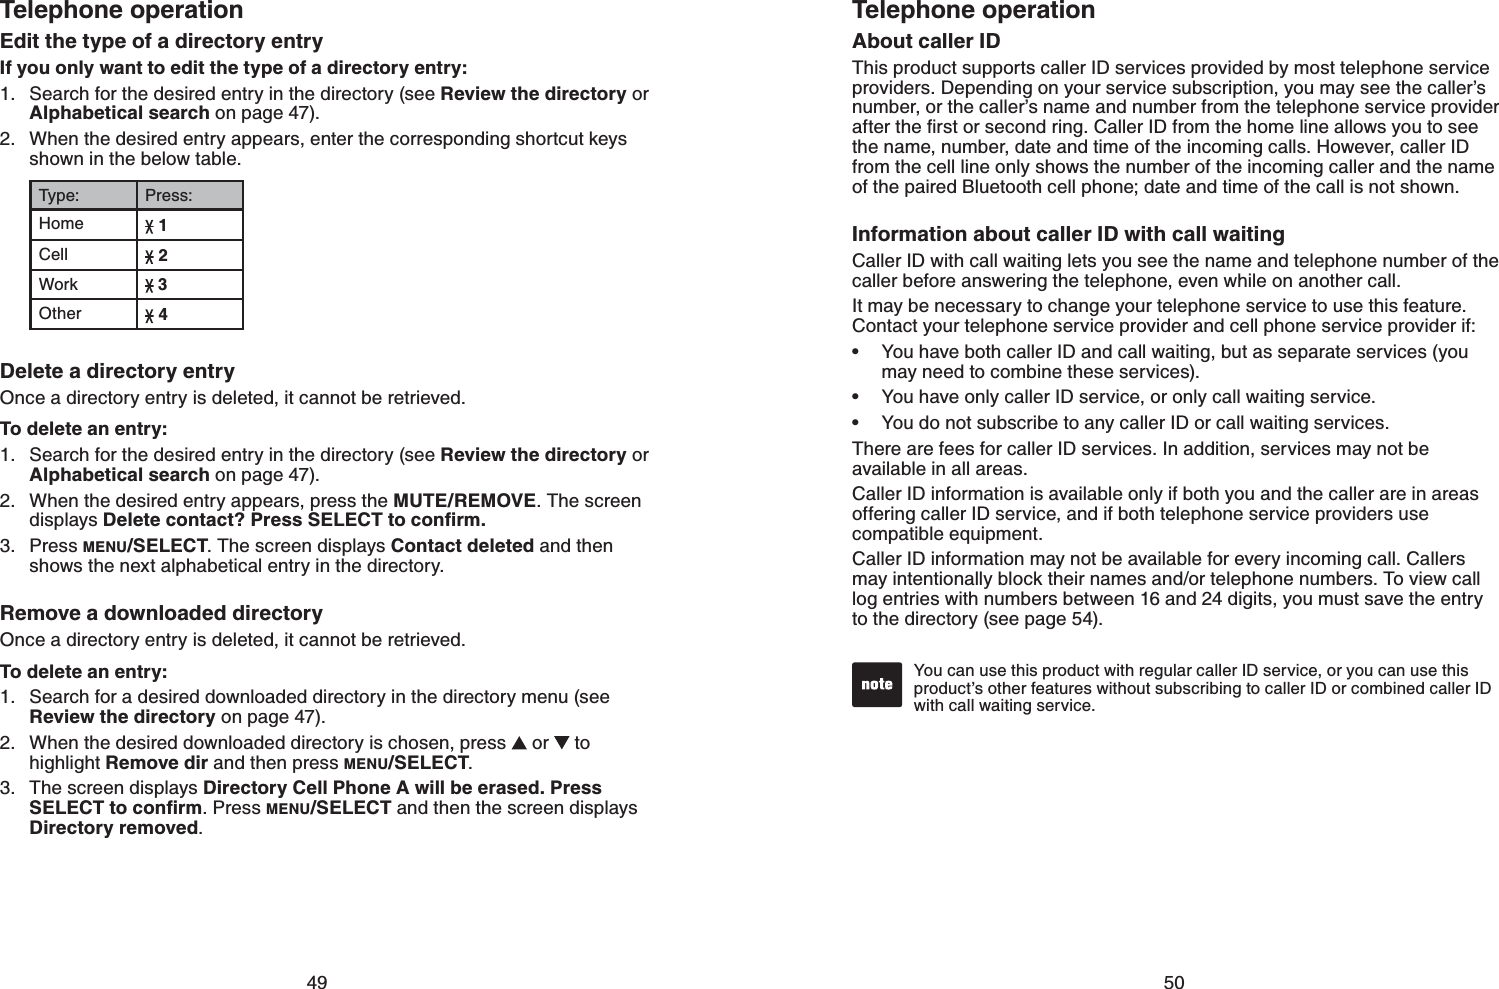
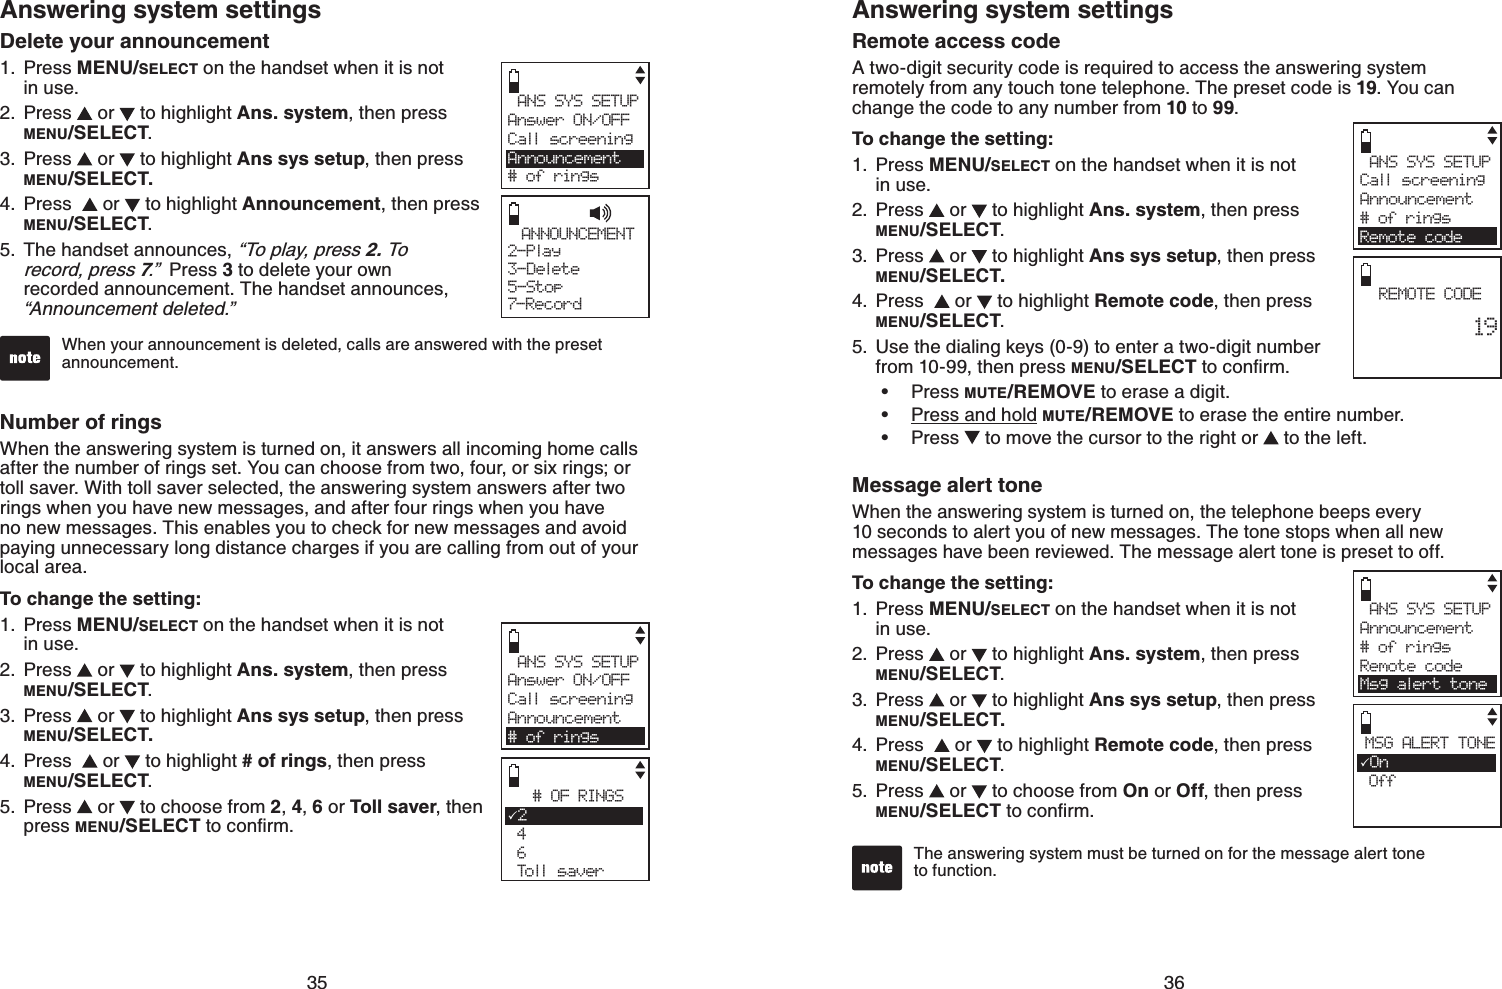
![61Answering system operationNew message indication6JGOGUUCIGYKPFQYQPVJGVGNGRJQPGDCUGƀCUJGUCPFVJGJCPFUGVUJQYU and New messages when there are new answering system messages.If the new message alert tone is turned on, the telephone base beeps every 10 seconds when there are unreviewed messages.Call interceptWhen a caller is leaving a message on your answering system, you can stop recording and talk to the caller by pressing /TALK/FLASH or on the handset.Telephone base ringer volumePress /VOL+or /VOL- on the telephone base to adjust the ringer volume when the telephone is not in use. When you set the ringer volume to zero, the base ringer is off and the system announces, “Base ringer is off.”See page 30 to set the handset ringer volume.62Answering system operationMessage playbackIf you have new messages, the telephone plays only the PGYOGUUCIGUQNFGUVſTUV+HVJGTGCTGPQPGYOGUUCIGUVJGVGNGRJQPGRNC[UDCEMCNNOGUUCIGUQNFGUVſTUVWhen playback begins, the screen displays PLAYING MESSAGES and you hear the total number of messages followed by the day and time of the message. After the last message, the telephone announces, “End of messages.” and the screen displays End of messages.To play messages with the telephone base:Press /PLAY/STOP to listen to messages.Options during playback:Press /VOL+or /VOL- to adjust the speaker volume.Press /SKIP to skip to the next message. Press /REPEAT to repeat the message currently playing. Press /REPEAT twice to listen to the previous message.Press X/DELETE to delete the current message. The system advances to the next message.Press /PLAY/STOP to stop.To play messages with a handset:Press MENU/SELECT to show the menu when the handset is not in use. Press or to highlight Ans. system, then press MENU/SELECT.Press or to highlight Play msgs, then press MENU/SELECT.Options during playback:Press /VOL+or /VOL- to adjust the speaker volume.Press 6 to skip to the next message.Press 4 to repeat the message currently playing. Press 4 twice to listen to the previous message.Press 3 to delete the current message. The system advances to the next message.Press 5 to stop.1.•••••1.2.3.•••••9JGPVJGCPUYGTKPIU[UVGOJCUNGUUVJCPſXGOKPWVGUQHTGEQTFKPIVKOGleft, the remaining time is announced. When the answering system has no recording time left, it announces “Memory is full,” and Rec time full displays.You have:3 Old messagesPLAYING MESSAGE3-Delete 5-Stop4-Repeat 6-Skip Msg#[ 2/3 ]](https://usermanual.wiki/VTech-Telecommunications/80-7264-00.Manual/User-Guide-1144546-Page-76.png)
![63Answering system operationDelete all old messagesUsing the telephone base:Press X/DELETE when the phone is not in use. The telephone announces, “To delete all old messages, press DELETE again.” Press X/DELETE again. All previously heard messages are erased and the telephone announces, “All old messages deleted.”Using a handset:Press MENU/SELECT to show the menu when the handset is not in use.Press or to highlight Ans. system, then press MENU/SELECT.Press or to highlight Del all old, then press MENU/SELECT.The handset displays Delete all old messages? Press MENU/SELECT to confirm. Record and play memosMemos are your own recorded messages used as reminders for yourself or others using the same answering system. You can record your own memos using a system handset. Playback and delete them the same way as incoming messages.To record a memo:Press MENU/SELECT to show the menu when the handset is not in use.Press or to highlight Ans. system, then press MENU/SELECT.Press or to highlight Record memo, then press MENU/SELECT.The system announces, “Recorded after the tone. Press 5 when you are done.” After the tone, speak towards the microphone.Press 5YJGPſPKUJGFTGEQTFKPI6JGJCPFUGVCPPQWPEGUőRecorded”and then return to the previous menu.1.2.3.4.1.2.3.4.5.You can only delete old messages, which are messages you have played.The system announces “Memory is full,” if you record a memo when the memory is full.Each memo can be up to four minutes in length.Memos shorter than one second are not recorded.•••64Answering system operationWhen the memory is full, the answering system answers incoming calls after 10 rings and announces, “Memory is full. Enter the remote access code.” Message window displaysWindow display Description0No messages.1-9 9 Total number of old messages recorded.0-99ƀCUJKPI Total number of messages recorded.The telephone base might have lost and regained power. The clock needs to be set.1-9 9 & F (alternating) Memory is full with total number of messages recorded.1-9 9ƀCUJKPI Current message number during new message playback.1-9 9 Current message number during old message playback.1-8 Telephone base speaker volume level while adjusting.-- The system is answering a call, or recording a memo or announcement.Telephone is answering a call or being accessed remotely.The answering system is being programmed.0-6 Telephone base ringer level while adjusting.](https://usermanual.wiki/VTech-Telecommunications/80-7264-00.Manual/User-Guide-1144546-Page-77.png)
![65Answering system operationIf you do not press any keys after you enter the remote access code, all new messages play. If there are no new messages, all old messages play.Once the new messages have played, the telephone announces the help menu options. If you do not press any key within 20 seconds, the remote access call automatically disconnects.When the answering system is turned off, the telephone answers after 10 rings, and announces, “Please enter your remote access code.”When the memory is full, the answering system answers incoming calls after 10 rings and announces, “Memory is full. Enter the remote access code.” ••••Remote accessA two-digit security code is required to access the answering system remotely from any touch tone telephone. The preset code is 19. See Remote code on page 36 to change it. Dial your telephone number from any touch tone telephone.When the system plays your announcement, enter the two-digit security code. You can also enter one of the following remote commands.Hang up or press 8 to end the call.1.2.3.4.Command Function1Play all messages.2Play only new messages.3Delete the current message (during playback).33 Delete all old messages.4Repeat the current message (during playback).5Stop.*5 Hear a list of remote commands.6Skip to the next message (during playback).*7 Record a new announcement.8End the call.0Turn the answering system on or off.66AppendixScreen display messagesAlready saved The telephone number entered is already stored in the directory.Bluetooth system busy You are trying to use a handset to make a CELL call while another handset is already in CELL call predial mode.C a ll lo g e m p t y There are no call log entries.Calling Handset X(for models with two or more handsets)The telephone base or the handset is calling another handset.Cell The CELL line is in use.C ell c all o n h ol d A call on the CELL line has been put on hold.Cell line in use A system handset or the telephone base on the CELL line is in use.Charging The handset with low battery is recharging.Directory empty There are no directory entries.Ended You have just ended a call.Handset X is calling (for models with two or more handsets)Another system handset is calling.Home The HOME line is in use.Home call answered The answering system has answered the incoming HOME call.Home call on hold A call on the HOME line has been put on holdHome & cell calls on hold Calls on the HOME and CELL lines have been put on hold.Home line in use A system handset, the telephone base or another telephone on the same HOME line is in use.Incoming call There is an incoming call.Intercom The handset or the telephone base is on an intercom call.Intercom ended You have just ended an intercom call.Appendix](https://usermanual.wiki/VTech-Telecommunications/80-7264-00.Manual/User-Guide-1144546-Page-78.png)
![67AppendixScreen display messages (continued)List full The directory is full.Low battery The battery needs to be recharged.Microphone on MUTE is turned off and the person on the other end can hear you. Muted You have turned off the handset microphone. The other party cannot hear you but you can hear the other party.New voicemail There are new voicemail message(s) from your local telephone company.No connected cellular phonesThere is no cell phone connected when you tries to make a call on the CELL line.No home line There is no telephone line connected.No messages There ar no old messages at the answering system when you try to delete all old messages with a handset.NO signal, call endedCommunication between handset and telephone base is lost during a call.Not available at this time One handset or the telephone base is already viewing the call log or directory and another handset/telephone base attempts to review it.Paging all Handsets The telephone base is paging handset(s).** Paging ** The system handset is paged.Place in charger The battery is very low. Place the handset in the telephone base for recharging.Rec time full The answering system has no recording time left.Ringer mute The ringer is muted temporarily during an incoming call.Saved Your selection has been saved.Searching for BASE The cordless handset is searching for the telephone base.Unable to call try again You try to make an intercom call, but the handset you are calling is in the directory, in the call log, out of range or on an outside call, or the telephone base is in the directory or call log or on an outside call.Unable to save You try to save a caller ID entry with no name or number.68AppendixHandset and telephone base indicatorsHandset lightsOn when the handset speakerphone is in use./CELL On when the CELL line is in use.Flashes quickly when there is an incoming CELL call.Flashes slowly when the CELL line is on hold./TALK/FLASH Flashes quickly when there is an incoming HOME call.Flashes slowly when the HOME line is on hold.CHARGE On when the handset is charging in the telephone base.Telephone base lights/CELL On when the CELL line is in use.Flashes quickly when there is an incoming CELL call.Flashes slowly when the CELL line is on hold./HOME On when the HOME line is in use.Flashes quickly when there is an incoming HOME call.Flashes slowly when the HOME line is on hold.](https://usermanual.wiki/VTech-Telecommunications/80-7264-00.Manual/User-Guide-1144546-Page-79.png)
![69AppendixHandset iconsHOME line - on steadily when the HOME line is in use or there is an incoming HOME call. 12CELL line - on steadily when the CELL line is in use or there is an incoming CELL call.1 2 Bluetooth connected device(s) - indicates that there are Bluetooth connected devices on the Active Devices list. 1 2 Bluetooth disconnected device(s) - indicates that there are Bluetooth disconnected devices on the Active Deviceslist.Wireless Bluetooth headset - on steadily when a wireless Bluetooth headset is in use on the HOME line.Speakerphone - the speakerphone is in use.Ringer off - on steadily when all the ringers of HOME,CELL 1 and CELL 2 are turned off. Flashes when only one or two of the ringers are turned off.New voicemail - indicates you have new voicemail message(s) from the local telephone company.New answering system message - indicates you have a new answering system message(s).Battery status - animates when the battery is charging. Becomes solid when the battery is fully charged. Battery statusƀCUJGUYJGPVJGDCVVGT[KUNQYCPFPGGFUcharging.ANSONAnswering system on - indicates that the answering system is turned on to answer incoming HOME calls.NEW New call log - indicates that the missed call is new.MUTE Mute - the microphone is muted.70AppendixHOME line - on steadily when the HOME line is in use or there is an incoming HOME call. 12CELL line - on steadily when the CELL line is in use or there is an incoming CELL call.1 2 Bluetooth connected device(s) - indicates that there are Bluetooth connected devices on the Active Devices list. 1 2 Bluetooth disconnected device(s) - indicates that there are Bluetooth disconnected devices on the Active Deviceslist.Bluetooth wireless headset - on steadily when a Bluetooth wireless headset is in use on the HOME line.Ringer off - on steadily when all the ringers of HOME,CELL 1 and CELL 2 are turned off. Flashes when only one or two of the ringers are turned off.New voicemail - indicates you have new voicemail message(s) from the local telephone company.New answering system message - indicates you have a new answering system message(s).ANSONAnswering system on - indicates that the answering system is turned on to answer incoming HOME calls.NEW New call log - indicates that the missed call is new.MUTE Mute - the microphone is muted.Telephone base icons](https://usermanual.wiki/VTech-Telecommunications/80-7264-00.Manual/User-Guide-1144546-Page-80.png)
![71AppendixBatteryIt takes up to 16 hours for the battery to be fully charged. When it is fully charged, you can expect the following performance:Operation Operating timeWhile in handset use (talking*) Up to seven hoursWhile in speakerphone mode (talking*) 7RVQſXGJQWTUWhile not in use (standby**) Up to seven days*Operating times vary depending on your actual use and the age of the battery. **Handset is not charging or in use.The battery needs charging when:A new battery is installed in the handset.The handset beeps every minute while on a call.The handset beeps and Low battery displays on the handset.Place in charger displays on the handset.A battery is properly installed but the screen is blank.CAUTION:6QTGFWEGVJGTKUMQHſTGQTKPLWT[TGCFCPFHQNNQYVJGUGKPUVTWEVKQPUUse only the battery(ies) provided or equivalent. To order a replacement, visit our website at www.vtechphones.com or call 1 (800) 595-9511.&QPQVFKURQUGQHVJGDCVVGT[KGUKPCſTG%JGEMYKVJNQECNYCUVGOCPCIGOGPVcodes for special disposal instructions.Do not open or mutilate the battery(ies). Released electrolyte is corrosive and might cause burns or injury to the eyes or skin. The electrolyte might be toxic if swallowed.Exercise care in handling batteries in order not to create a short circuit with conductive materials.%JCTIGVJGDCVVGT[KGURTQXKFGFYKVJQTKFGPVKſGFHQTWUGYKVJVJKURTQFWEVQPN[KPCEEQTFCPEGYKVJVJGKPUVTWEVKQPUCPFNKOKVCVKQPUURGEKſGFKPVJKUOCPWCNObserve proper polarity orientation between the battery and metallic contacts.6QRTGXGPVſTGQTUJQEMJC\CTFFQPQVGZRQUGVJKURTQFWEVVQYCVGTQTCP[V[RGof moisture.••••••••••••72AppendixExpand your telephone systemThe handset provided with your telephone system is pre-registered as HANDSET. Additional handsets registered to the telephone system are assigned in sequential order. If you register another new handset to your telephone system, the new registered handset is assigned HANDSET 2.This telephone system accommodates up to 12 handsets.Add and register a handset (optional)You can add new handsets (DS6301, purchased separately) to your telephone system, but each handset must be registered with the telephone DCUGDGHQTGWUG9JGPſTUVRWTEJCUGFGCEJGZRCPUKQPJCPFUGVUJQYUPress and hold FIND HANDSET on base for 4 sec, then press # on handset after a battery is installed. You may need to charge the handset before registering to the telephone base. For more details on battery charging, see the table on page 4.To register a handset:Press and hold FIND HANDSET on the telephone base for about four seconds until the red IN USE light turns on.Press # on the handset. Its screen shows Registering...Please wait and it takes up to 60 seconds to complete the registration. The handset shows HANDSET X Registered (X represents the handset number assigned) and you hear a beep when the registration completes.1.2.If the registration fails, the handset shows Registration failed for a few seconds and then Press and hold FIND HANDSET on base for 4 sec, then press # on handset. Try the registration process again.You cannot register a handset if any other system handset is in use.••](https://usermanual.wiki/VTech-Telecommunications/80-7264-00.Manual/User-Guide-1144546-Page-81.png)
![73AppendixReplace a handsetIf you want to replace a handset or re-assign the designated handset number of a registered handset, you must deregister all the handsets and then individually register each handset.To make deregistration easier, read all of the instructions on this page before you begin. To deregister all handsets:Press and hold FIND HANDSET on the telephone base for about 10 seconds until the IN USENKIJVƀCUJGUVJGPTGNGCUGFIND HANDSET.Press FIND HANDSET again at once. You must press FIND HANDSETwhile the IN USENKIJVKUUVKNNƀCUJKPI6JGIN USENKIJVƀCUJGUHQTCDQWVseven seconds. All system handsets show Press and hold FIND HANDSET on base for 4 sec, then press # on handset when the deregistration completes. The deregistration process takes about 10 seconds to complete.If deregistration fails, you may need to reset the telephone and try again.To reset:Pick up the regisered handset and then press /TALK/FLASH.Press OFF/CLEAR and place the handset back in the telephone base. -OR-Unplug the power from the telephone base, then plug it back in.1.2.3.1.2.•You cannot deregister a handset if any system handset is in use.74Appendix+H[QWJCXGFKHſEWNV[YKVJ[QWTVGNGRJQPGRNGCUGVT[VJGUWIIGUVKQPUDGNQYFor Customer Service, visit our website at www.vtechphones.com or call 1 (800) 595-9511.I cannot pair my cell phone to the telephone base.Make sure the Bluetooth function of your cell phone is turned on. See the user’s manual of your cell phone for more information.Remove VTech DS6321 from your cell phone’s handsfree device history list (see the user’s manual of your cell phone for more information).Carefully follow the pairing instructions on page 14 and make sure that your cell phone is not connected to any other Bluetooth device.Turn off your cell phone, then turn it on again.Reset the telephone base. Unplug the unit’s electrical power. Wait for approximately 15 seconds, then plug it back in. Repeat the above suggestions.I cannot pair my headset to the telephone baseMake sure that your Bluetooth headset is in discoverable mode when pairing with the telephone base. See the user’s manual of your headset for more information on how to set your headset in discoverable mode.Carefully follow the pairing instructions on page 16 and make sure that your headset is not connected to any other Bluetooth device.Reset the telephone base. Unplug the unit’s electrical power. Wait for approximately 15 seconds, then plug it back in. Repeat the above suggestions.I cannot connect my cell phone with the telephone base.Make sure that the Bluetooth function of your cell phone is turned on. See the user’s manual of your cell phone for more information.Make sure that your Bluetooth cell phone is not connected to any other Bluetooth device.Turn off your cell phone, then turn it on again.Make sure that your cell phone is connected and on the Active Devices list.For some cell phones, you must authorize VTech DS6321 device in your cell phone’s Bluetooth feature. See the user’s manual of your cell phone for more information.Manually connect your cell phone to VTech DS6321. Refer to the user’s manual of your cell phone for more information.I cannot connect my headset with the telephone base.Make sure that your Bluetooth headset is not connected to any other Bluetooth device.Make sure that your headset is connected and on the Active Devices list.••••••••••••••••Troubleshooting](https://usermanual.wiki/VTech-Telecommunications/80-7264-00.Manual/User-Guide-1144546-Page-82.png)
![75AppendixI cannot put my headset in discoverable mode.Refer to the user’s manual of your headset for information on how to set your headset in discoverable mode.Make sure that the headset is not connected to any other Bluetooth device in order to successfully pair and connect to the telephone base.Carefully follow the pairing process on page 16.Reset the telephone base. Unplug the unit’s electrical power. Wait for approximately 15 seconds, then plug it back in. Repeat the above suggestions.+ECPPQVſPF86GEJ&5QPO[EGNNRJQPGMake sure that the telephone base is in discoverable mode. Carefully follow the setup instructions on page 14.Make sure that you manually set your cell phone to search for devices.Remove VTech DS6321 from your cell phone’s handsfree device history list (see the user’s manual of your cell phone).Turn off your cell phone, then turn it on again.Reset the telephone base. Unplug the unit’s electrical power. Wait for approximately 15 seconds, then plug it back in. Repeat the above suggestions.I don’t know how to search for or add new devices on my cell phone.Most cell phones have the Bluetooth feature in the connection or setup menus. Please refer to the user’s manual of your cell phone.In general, press the menu key on your cell phone, then look for the Bluetooth menu in the settings or connection menu. In the Bluetooth menu, select the option to search for or add new devices.My cell phone disconnects with the telephone base.Turn off your cell phone, then turn it on again.Make sure that you are not using your cell phone when on a CELL call.My cell phone is connected to the telephone base, but I cannot make a CELL call.Make sure that your cell phone is not in use when you are trying to make a CELL call.Make sure that your cell phone is compatible.For some smartphones, make sure that the cellular function is turned on.••••••••••••••••Troubleshooting76AppendixBluetooth system busy appears on the display.Make sure that your cell phone is not in use when connected and on the Active Devices list.Make sure that your cell phone or headset is not connected to any other Bluetooth device.DS6321 can only use one Bluetooth device at a time.The PIN on the telephone base does not work.The default PIN is 0000.If you have changed the PIN, it will appear on the telephone base in the pairing process.I cannot hear any audio on my telephone system when on a CELL call.Reset the telephone base. Unplug the unit’s electrical power. Wait for approximately 15 seconds, then plug it back in.Turn off your cell phone, then turn it on again.My telephone does not work at all.Make sure the battery is installed and charged correctly (page 4). For optimum daily performance, return the handset to the telephone base or charger after use.Make sure the power adapter is securely plugged into an outlet not controlled by a wall switch./CMGUWTGVJGVGNGRJQPGNKPGEQTFKURNWIIGFſTON[KPVQVJGVGNGRJQPGDCUGCPFthe telephone wall jack.Unplug the electrical power to the telephone base. Wait for approximately 15 seconds, then plug it back in. Allow up to one minute for the cordless handset and telephone base to synchronize.Charge the battery in the handset for up to 16 hours.If the battery is completely depleted, it can take up to 10 minutes to charge the handset before HANDSET X appears on the screen (page 4).Remove and re-insert the battery. If that still does not work, it might be necessary to purchase a new battery.Disconnect the telephone base from the telephone wall jack and plug in a working telephone. If the other telephone does not work, the problem is probably in the wiring or the local service. Call the local telephone company.Low battery shows on screen.Place the handset in the telephone base for recharging.Remove and re-install the battery and use it until fully depleted, then recharge the handset in the telephone base for up to 16 hours.If the above measures do not correct the problem, replace the battery.••••••••••••••••••Troubleshooting](https://usermanual.wiki/VTech-Telecommunications/80-7264-00.Manual/User-Guide-1144546-Page-83.png)
![77AppendixThe battery does not charge in the handset or the handset battery does not accept charge.Make sure the handset is placed in the telephone base correctly. The CHARGElight on the handset should be on.Remove and reinstall the battery, then charge for up to 16 hours.If the handset is in the telephone base but the CHARGE light on the handset is not on, refer to The CHARGE light is off in this section.If the battery is completely depleted, it can take up to 10 minutes to charge the handset before HANDSET X appears on the screen (page 4).Purchase a new battery. Refer to the Battery section (page 71).The CHARGE light is off.Clean the charging contacts on the handset and telephone base each month with a pencil eraser or a dry non-abrasive fabric.Make sure the power adapter and telephone line cord are plugged in correctly and securely.Unplug the power adapter. Wait for 15 seconds before plugging it back in. Allow up to one minute for the handset and telephone base to reset.There is no dial tone.First, try all the above suggestions.Move the handset closer to the telephone base. It may be out of range.The telephone line cord might be malfunctioning. Install a new telephone line cord.Disconnect the telephone base from the telephone wall jack and connect a different telephone. If there is no dial tone on this telephone either, the problem is in your wiring or local service. Contact your local telephone company.••••••••••••Troubleshooting78AppendixTroubleshootingThe telephone does not ring when there is an incoming call.Make sure the handset ringer volume is not set to off or the lowest level (page 22)and the telephone base ringer volume is not set to off or the lowest level (page 26). Make sure the telephone line cord and power adapter are plugged in properly (page 3).The handset may be too far from the telephone base. Move it closer to the telephone base.There may be too many extension phones on the telephone line to allow all of them to ring simultaneously. Unplug some of them.If the other telephones in your home are having the same problem, the problem is in the wiring or local service. Contact the local telephone company (charges might apply).Other electronic products may cause interference to your cordless telephone. Install your telephone as far away as possible from electronic devices such as: wireless routers, radios, cellular telephones, digital telephones, intercoms, room monitors, televisions, VCRs, personal computers, kitchen appliances, and other cordless telephones.Test a working telephone at the telephone wall jack. If another telephone has the same problem, the problem is in the telephone wall jack. Contact your local telephone company (charges may apply).The telephone line cord may be malfunctioning. Install a new telephone line cord.Re-install the battery and place the handset in the telephone base.Wait for the handset to synchronize with the telephone base. Allow up to one minute for this to take place.I cannot dial out.First, try all the above suggestions.Make sure there is a dial tone before dialing. It is normal if the handset takes a second or two to synchronize with the telephone before producing a dial tone. Wait an extra second before dialing.If the other telephones in your home are having the same problem, the problem is in the wiring or local service. Contact your local telephone company (charges may apply).Eliminate any background noise. Mute the cordless handset before dialing, or dial from another room in your home with less background noise.••••••••••••••](https://usermanual.wiki/VTech-Telecommunications/80-7264-00.Manual/User-Guide-1144546-Page-84.png)
![79AppendixTroubleshootingMy handset beeps and is not performing normally.Make sure the power cord is securely plugged into the telephone base. Plug the telephone base into a different working electrical outlet not controlled by a wall switch.Move the handset closer to the telephone base. It may be out of range.Reset the telephone base by unplugging the electrical power to the base. Wait for 15 seconds and plug it back in again. Allow up to one minute for the cordless handset and the telephone base to synchronize.Other electronic products may cause interference to your cordless telephone. Install your telephone as far away from these electronic devices as possible: wireless routers, radios, radio towers, pager towers, cellular telephones, intercoms, room monitors, televisions, personal computers, kitchen appliances and other cordless telephones.There is interference during a telephone conversation.My calls fade out when I am using the cordless handset.The handset may be out of range. Move it closer to the telephone base.If you subscribe to high-speed Internet service (digital subscriber line - DSL) VJTQWIJ[QWTVGNGRJQPGNKPGU[QWOWUVKPUVCNNC&5.ſNVGTDGVYGGPVJGVGNGRJQPGDCUGCPFVJGVGNGRJQPGYCNNLCEM6JGſNVGTRTGXGPVUPQKUGCPFECNNGT+&RTQDNGOUcaused by DSL interference. Please contact your DSL service provider for more KPHQTOCVKQPCDQWV&5.ſNVGTUAppliances or other cordless telephones plugged into the same circuit as the telephone base can cause interference. Try moving the appliance or telephone base to another outlet.Other electronic products may cause interference to your cordless telephone. Install your telephone as far away as possible from the following electronic devices: wireless routers, radios, radio towers, pager towers, cellular telephones, digital telephones, intercoms, room monitors, televisions, VCRs, personal computers, kitchen appliances, and other cordless telephones.If your telephone is plugged in with a modem or a surge protector, plug the telephone (or modem/surge protector) into a different location. If this doesn’t solve the problem, re-locate your telephone or modem farther apart from each other, or use a different surge protector. The location of your telephone base can impact the performance of your cordless phone. For better reception, install the telephone base in a centralized location YKVJKP[QWTJQOGQTQHſEGCYC[HTQOYCNNUQTQVJGTQDUVTWEVKQPU+POCP[environments, elevating the telephone base improves overall performance.Disconnect the telephone base from the telephone wall jack and plug in a corded telephone. If calls are still not clear, the problem is probably in the wiring or local service. Contact your local service company (charges might apply).If the other telephones in your home are having the same problem, the problem is in the wiring or local service. Contact the local telephone company (charges may apply).••••••••••••80AppendixTroubleshootingI hear other calls when using the telephone.Disconnect the telephone base from the telephone wall jack. Plug in a different telephone. If you still hear other calls, the problem is probably in the wiring or local service. Call your local telephone company.I hear noise on the cordless handset and the keys do not work.Make sure the telephone line cord is plugged in securely.Registration failed appears on the handset.Only one handset can be registered at a time. If you have multiple handsets to register, please follow the instructions on page 72HQTVJGſTUVJCPFUGV1PEGChandset has been successfully registered, repeat the steps for each handset that needs to be registered.Make sure that the telephone base and handset(s) are in idle mode when registering a handset.Follow the steps on page 87 for the common cure for electronic equipment, then try again to register a handset.My caller ID features are not working properly.Caller ID is a subscription service. You must subscribe to this service from your local telephone company for this feature to work on your telephone.The caller may not be calling from an area which supports caller ID.Both you and the caller’s telephone companies must use equipment compatible with the caller ID service.6JGECNNGT+&KPHQTOCVKQPUJQYUCHVGTVJGſTUVQTUGEQPFTKPIIf you subscribe to high-speed Internet service (digital subscriber line - DSL) VJTQWIJ[QWTVGNGRJQPGNKPGU[QWOWUVKPUVCNNC&5.ſNVGTDGVYGGPVJGVGNGRJQPGDCUGCPFVJGVGNGRJQPGYCNNLCEM6JGſNVGTRTGXGPVUPQKUGCPFECNNGT+&RTQDNGOUcaused by DSL interference. Contact your DSL service provider for more KPHQTOCVKQPCDQWV&5.ſNVGTUThe telephone does not receive caller ID or the telephone does not show caller ID during call waiting.Make sure you subscribe to caller ID with call waiting features provided by the local telephone company. The caller may not be calling from an area which supports caller ID.Both you and the caller’s telephone companies must use equipment compatible with caller ID service.If you subscribe to high-speed Internet service (digital subscriber line - DSL) VJTQWIJ[QWTVGNGRJQPGNKPGU[QWOWUVKPUVCNNC&5.ſNVGTDGVYGGPVJGVGNGRJQPGDCUGCPFVJGVGNGRJQPGYCNNLCEM6JGſNVGTRTGXGPVUPQKUGCPFECNNGT+&RTQDNGOUcaused by DSL interference. Contact your DSL service provider for more KPHQTOCVKQPCDQWV&5.ſNVGTU••••••••••••••](https://usermanual.wiki/VTech-Telecommunications/80-7264-00.Manual/User-Guide-1144546-Page-85.png)
![81AppendixTroubleshootingCaller ID entries do not match the numbers I need to dial.Caller ID service delivers 10 digits (the area code plus the seven-digits number). If you need to dial something other 10 digits, see page 57 for instructions on changing the number. If you dial seven digits for local calls, you may want to use the Home area codefeature (page 25 and page 26).Searching for BASE shows in the handset screen.The handset may be out of range. Move it closer to the telephone base.Make sure the power cord is securely plugged into the telephone base. Use a working electrical outlet not controlled by a wall switch.Reset your telephone by unplugging the power adapter from the telephone base. Disconnect the battery from the cordless handset. Wait for 15 seconds, then plug in the power adapter and re-install the battery. Place the handset in the telephone base and allow up to one minute for the handset and telephone base to synchronize.Other electronic products may prevent your handset and telephone base from communicating with each other. Install your telephone base as far away from these electronic devices as possible: wireless routers, radios, cellular telephones, intercoms, room monitors, televisions, personal computers, kitchen appliances and other cordless telephones.The answering system does not answer after the number of rings that I programmed it.Make sure the answering system is on. When the answering system is on, ANS ON should show on the handset and telephone base.If toll saver is selected, the number of rings changes to two when there are new messages waiting (page 35).If the memory is full or if the answering system is off, the answering system answers after 10 rings.In some cases, the answering system is affected by the ringing system used by the local telephone company.The outgoing announcement is not clear.When recording the announcement, make sure you speak in a normal tone of voice towards the microphone of the handset.Make sure there is no background noise when recording.6JGOGUUCIGUQPVJGCPUYGTKPIU[UVGOCTGXGT[FKHſEWNVVQJGCTPress /VOL+ on the telephone base or handset to increase the speaker volume.•••••••••••••82AppendixThe answering system does not record messages.Make sure the answering system is on.When the answering machine memory is full, it does not record new messages until some old messages are deleted.The messages on the answering system are incomplete.If a caller leaves a very long message, part of it may be lost when the answering system disconnects the call after four minutes.If the memory on the answering system becomes full during a message, the answering system stops recording and disconnects the call.If the caller’s voice is very soft, the answering system may stop recording and disconnect the call.The answering system does not respond to remote commands.Make sure your remote code is correct (page 36).Make sure you are calling from a touch-tone telephone. When dialing a number, there should be tones. If there are clicks, then it is not a touch-tone telephone and cannot activate the answering system.The answering system may not detect the remote access code when your announcement is playing. Wait until the announcement is over before entering the code.There may be interference on the telephone line you are using. Press the dial pad MG[UſTON[YJGPFKCNKPICommon cure for electronic equipment.If the telephone is not responding normally, put the cordless handset in the telephone base. If it does not respond, try the following (in the order listed):Disconnect the power to the telephone base.Disconnect the battery on the cordless handset.Wait a few minutes before connecting power to the telephone base.Re-install the battery and place the cordless handset in the telephone base.Wait for the cordless handset to synchronize with the telephone base. Allow up to one minute for this to take place.•••••••••••••••Troubleshooting](https://usermanual.wiki/VTech-Telecommunications/80-7264-00.Manual/User-Guide-1144546-Page-86.png)
![83AppendixImportant safety instructionsWhen using your telephone equipment, basic safety precautions should always be followed to TGFWEGVJGTKUMQHſTGGNGEVTKEUJQEMCPFKPLWT[KPENWFKPIVJGHQNNQYKPIRead and understand all instructions. Follow all warnings and instructions marked on the product.Unplug this product from the wall outlet before cleaning. Do not use liquid or aerosol cleaners. Use a dry non-abrasive cloth for cleaning. Do not use this product near water.Do not place this product on an unstable table, shelf, stand or other unstable surfaces.Slots and openings in the back or bottom of the telephone base and handset are provided for ventilation. To protect them from overheating, these openings must not be blocked by placing the product on a soft surface such as a bed, sofa or rug. This product should never be placed near or over a radiator or heat register. This product should not be placed in any area where proper ventilation is not provided. This product should be operated only from the type of power source indicated on the marking label. If you are not sure of the type of power supply in your home, consult your dealer or local power company. Do not allow anything to rest on the power cord. Do not install this product where the cord may be walked on. Never push objects of any kind into this product through the slots in the telephone base or handset because they may touch dangerous voltage points or create a short circuit. Never spill liquid of any kind on the product. To reduce the risk of electric shock, do not disassemble this product, but take it to an authorized service facility. Opening or removing parts of the telephone base or handset other VJCPURGEKſGFCEEGUUFQQTUOC[GZRQUG[QWVQFCPIGTQWUXQNVCIGUQTQVJGTTKUMU+PEQTTGEVreassembling can cause electric shock when the product is subsequently used. Do not overload wall outlets and extension cords. Unplug this product from the wall outlet and refer servicing to an authorized service facility under the following conditions:When the power supply cord or plug is damaged or frayed.If liquid has been spilled onto the product. If the product has been exposed to rain or water.If the product does not operate normally by following the operating instructions. Adjust only those controls that are covered by the operation instructions. Improper adjustment of other controls may result in damage and often requires extensive work by an authorized technician to restore the product to normal operation.If the product has been dropped and the telephone base and/or handset has been damaged.If the product exhibits a distinct change in performance.Avoid using a telephone (other than cordless) during an electrical storm. There is a remote risk of electric shock from lightning.Do not use the telephone to report a gas leak in the vicinity of the leak.Only put the handset of your telephone next to your ear when it is in normal talk mode.6JGRQYGTCFCRVGTKUKPVGPFGFVQDGEQTTGEVN[QTKGPVGFKPCXGTVKECNQTƀQQTOQWPVRQUKVKQPThe prongs are not designed to hold the plug in place if it is plugged into a ceiling or an under-the-table/cabinet outlet.SAVE THESE INSTRUCTIONS1.2.3.4.5.6.7.8.9.10.11.12.A.B.C.D.E.F.13.14.15.16.84AppendixOperating rangeThis cordless telephone operates with the maximum power allowed by the Federal Communications Commission (FCC). Even so, this handset and telephone base can communicate over only a certain distance - which can vary with the locations of the telephone base and JCPFUGVVJGYGCVJGTCPFVJGNC[QWVQH[QWTJQOGQTQHſEGWhen the handset is out of range, the handset displays Searching for BASE.If there is a call while the handset is out of range, it might not ring, or if it does ring, the call might not connect well when you press /TALK/FLASH. Move closer to the telephone base, then press /TALK/FLASH to answer the call. If the handset moves out of range during a telephone conversation, there might be interference.To improve reception, move closer to the telephone base.MaintenanceTaking care of your telephoneYour cordless telephone contains sophisticated electronic parts, so it must be treated with care. Avoid rough treatmentPlace the handset down gently. Save the original packing materials to protect your telephone if you ever need to ship it. Avoid waterYour telephone can be damaged if it gets wet. Do not use the handset outdoors in the rain, or handle it with wet hands. Do not install the telephone base near a sink, bathtub or shower.Electrical stormsElectrical storms can sometimes cause power surges harmful to electronic equipment. For your own safety, take caution when using electrical appliances during storms. Cleaning your telephoneYour telephone has a durable plastic casing that should retain its luster for many years. Clean it only with a soft cloth slightly dampened with water or mild soap. Do not use excess water or cleaning solvents of any kind.Remember that electrical appliances can cause serious injury if used when you are wet or standing in the water. If the telephone base should fall into the water, DO NOT RETRIEVE IT UNTIL YOU UNPLUG THE POWER CORD AND TELEPHONE LINE CORD FROM THE WALL. Then remove the telephone by the unplugged cords.](https://usermanual.wiki/VTech-Telecommunications/80-7264-00.Manual/User-Guide-1144546-Page-87.png)
![85AppendixAbout cordless telephonesPrivacy: The same features that make a cordless telephone convenient create some limitations. Telephone calls are transmitted between the telephone base and the cordless handset by radio waves, so there is a possibility that the cordless telephone conversations could be intercepted by radio receiving equipment within range of the cordless handset. For this reason, you should not think of cordless telephone conversations as being as private as those on corded telephones.Electrical power: The telephone base of this cordless telephone must be connected to a working electrical outlet. The electrical outlet should not be controlled by a wall switch. Calls cannot be made from the cordless handset if the telephone base is unplugged, switched off, or if the electrical power is interrupted. Potential TV interference: Some cordless telephones operate at frequencies that may cause interference to televisions and VCRs. To minimize or prevent such interference, do not place the telephone base of the cordless telephone near or on top of a TV or VCR. If interference is experienced, moving the cordless telephone farther away from the TV or VCR often reduces or eliminates the interference. Rechargeable batteries: Exercise care in handling batteries in order not to create a short circuit with conducting material such as rings, bracelets, and keys. The battery or conductor may overheat and cause harm. Observe proper polarity between the battery and the battery charger.Nickel-metal hydride rechargeable batteries: Dispose of these batteries in a safe manner. Do not burn or puncture the battery. Like other batteries of this type, if burned or punctured, they could release caustic material which could cause injury.•••••The RBRC® sealThe RBRC® seal on the nickel-metal hydride battery indicates that VTech Communications, Inc. is voluntarily participating in an industry program to collect and recycle these batteries at the end of their useful lives, when taken out of service within the United States and Canada. The RBRC® program provides a convenient alternative to placing used nickel-metal hydride batteries into the trash or municipal waste, which may be illegal in your area.VTech’s participation in RBRC®makes it easy for you to drop off the spent battery at local retailers participating in the RBRC® program or at authorized VTech product service centers. Please call 1-800-8-BATTERYTM for information on Ni-MH battery recycling and disposal bans/restrictions in your area. VTech’s involvement in this program is part of its commitment to protecting our environment and conserving natural resources.RBRC® is a registered trademark of Rechargeable Battery Recycling Corporation.86AppendixWarrantyWhat does this limited warranty cover?The manufacturer of this VTech Product warrants to the holder of a valid proof of purchase (“Consumer” or “you”) that the Product and all accessories provided in the sales package (“Product”) are free from defects in material and workmanship, pursuant to the following terms and conditions, when installed and used normally and in accordance with the Product operating instructions. This limited warranty extends only to the Consumer for Products purchased and used in the United States of America and Canada.What will VTech do if the Product is not free from defects in materials and workmanship during the limited warranty period (“Materially Defective Product”)?During the limited warranty period, VTech’s authorized service representative will repair or replace at VTech’s option, without charge, a Materially Defective Product. If we repair the Product, we may use new or refurbished replacement parts. If we choose to replace the Product, we may replace it with a new or refurbished Product of the same or similar design. We will retain defective parts, modules, or equipment. Repair or replacement of the Product, at VTech’s option, is your exclusive remedy. VTech will return the repaired or replacement Products to you in working condition. You should expect the repair or replacement to take approximately 30 days.How long is the limited warranty period?The limited warranty period for the Product extends for ONE (1) YEAR from the date of purchase. If VTech repairs or replaces a Materially Defective Product under the terms of this limited warranty, this limited warranty also applies to repaired or replacement Product for a period of either (a) 90 days from the date the repaired or replacement Product is shipped to you or (b) the time remaining on the original one-year warranty; whichever is longer.What is not covered by this limited warranty?This limited warranty does not cover:Product that has been subjected to misuse, accident, shipping or other physical damage, KORTQRGTKPUVCNNCVKQPCDPQTOCNQRGTCVKQPQTJCPFNKPIPGINGEVKPWPFCVKQPſTGYCVGTQTQVJGTliquid intrusion; or2TQFWEVVJCVJCUDGGPFCOCIGFFWGVQTGRCKTCNVGTCVKQPQTOQFKſECVKQPD[CP[QPGQVJGTVJCPan authorized service representative of VTech; orProduct to the extent that the problem experienced is caused by signal conditions, network reliability, or cable or antenna systems; orProduct to the extent that the problem is caused by use with non-VTech accessories; orProduct whose warranty/quality stickers, product serial number plates or electronic serial numbers have been removed, altered or rendered illegible; orProduct purchased, used, serviced, or shipped for repair from outside the United States of America or Canada, or used for commercial or institutional purposes (including but not limited to Products used for rental purposes); orProduct returned without a valid proof of purchase (see item 2 below); orCharges for installation or set up, adjustment of customer controls, and installation or repair of systems outside the unit.1.2.3.4.5.6.7.8.](https://usermanual.wiki/VTech-Telecommunications/80-7264-00.Manual/User-Guide-1144546-Page-88.png)
![87AppendixWarrantyHow do you get warranty service?To obtain warranty service in the United States of America, please call 1 (800) 595-9511. In Canada, please call 1 (800) 267-7377. NOTE: Before calling for service, please review the user’s manual - a check of the Product’s controls and features may save you a service call.Except as provided by applicable law, you assume the risk of loss or damage during transit and transportation and are responsible for delivery or handling charges incurred in the transport of the Product(s) to the service location. VTech will return repaired or replaced Product under this limited warranty. Transportation, delivery or handling charges are prepaid. VTech assumes no risk for damage or loss of the Product in transit. If the Product failure is not covered by this limited warranty, or proof of purchase does not meet the terms of this limited warranty, VTech will notify you and will request that you authorize the cost of repair prior to any further repair activity. You must pay for the cost of repair and return shipping costs for the repair of Products that are not covered by this limited warranty.What must you return with the Product to get warranty service?Return the entire original package and contents including the Product to the VTech service NQECVKQPCNQPIYKVJCFGUETKRVKQPQHVJGOCNHWPEVKQPQTFKHſEWNV[CPFInclude a “valid proof of purchase” (sales receipt) identifying the Product purchased (Product model) and the date of purchase or receipt; andProvide your name, complete and correct mailing address, and telephone number.Other limitationsThis warranty is the complete and exclusive agreement between you and VTech. It supersedes all other written or oral communications related to this Product. VTech provides no other warranties for this Product. The warranty exclusively describes all of VTech’s responsibilities regarding the 2TQFWEV6JGTGCTGPQQVJGTGZRTGUUYCTTCPVKGU0QQPGKUCWVJQTK\GFVQOCMGOQFKſECVKQPUVQVJKUNKOKVGFYCTTCPV[CPF[QWUJQWNFPQVTGN[QPCP[UWEJOQFKſECVKQP5VCVG2TQXKPEKCN.CY4KIJVU6JKUYCTTCPV[IKXGU[QWURGEKſENGICNTKIJVUCPF[QWOC[CNUQJCXGother rights, which vary from state to state or province to province..KOKVCVKQPU+ORNKGFYCTTCPVKGUKPENWFKPIVJQUGQHſVPGUUHQTCRCTVKEWNCTRWTRQUGCPFOGTEJCPVCDKNKV[CPWPYTKVVGPYCTTCPV[VJCVVJG2TQFWEVKUſVHQTQTFKPCT[WUGCTGNKOKVGFVQQPGyear from the date of purchase. Some states/provinces do not allow limitations on how long an implied warranty lasts, so the above limitation may not apply to you. In no event shall VTech be liable for any indirect, special, incidental, consequential, or similar damages (including, but not NKOKVGFVQNQUVRTQſVUQTTGXGPWGKPCDKNKV[VQWUGVJG2TQFWEVQTQVJGTCUUQEKCVGFGSWKROGPVVJGcost of substitute equipment, and claims by third parties) resulting from the use of this Product. Some states/provinces do not allow the exclusion or limitation of incidental or consequential damages, so the above limitation or exclusion may not apply to you.Please retain your original sales receipt as proof of purchase.1.2.3.88AppendixFCC, ACTA and IC regulationsFCC Part 15This equipment has been tested and found to comply with the requirements for a Class B digital device under Part 15 of the Federal Communications Commission (FCC) rules. These requirements are intended to provide reasonable protection against harmful interference in a residential installation. This equipment generates, uses and can radiate radio frequency energy and, if not installed and used in accordance with the instructions, may cause harmful interference to radio communications. However, there is no guarantee that interference will not occur in a particular installation. If this equipment does cause harmful interference to radio or television reception, which can be determined by turning the equipment off and on, the user is encouraged to try to correct the interference by one or more of the following measures:Reorient or relocate the receiving antenna.Increase the separation between the equipment and receiver.Connect the equipment into an outlet on a circuit different from that to which the receiver is connected.Consult the dealer or an experienced radio/TV technician for help.%JCPIGUQTOQFKſECVKQPUVQVJKUGSWKROGPVPQVGZRTGUUN[CRRTQXGFD[VJGRCTV[TGURQPUKDNGHQTcompliance could void the user’s authority to operate the equipment.This device complies with Part 15 of the FCC rules. Operation is subject to the following two conditions: (1) this device may not cause harmful interference, and (2) this device must accept any interference received, including interference that may cause undesired operation. Privacy of communications may not be ensured when using this telephone.To ensure safety of users, the FCC has established criteria for the amount of radio frequency energy that can be safely absorbed by a user or bystander according to the intended usage of the product. This product has been tested and found to comply with the FCC criteria. The handset may be safely held against the ear of the user. The telephone base shall be installed and used such that parts of the user’s body other than the hands are maintained at a distance of approximately 20 cm (8 inches) or more.This Class B digital apparatus complies with Canadian ICES-003.FCC Part 68 and ACTAThis equipment complies with Part 68 of the FCC rules and with technical requirements adopted by the Administrative Council for Terminal Attachments (ACTA). The label on the back or DQVVQOQHVJKUGSWKROGPVEQPVCKPUCOQPIQVJGTVJKPIUCRTQFWEVKFGPVKſGTKPVJGHQTOCV75###'36::::6JKUKFGPVKſGTOWUVDGRTQXKFGFVQ[QWTNQECNVGNGRJQPGEQORCP[WRQPTGSWGUVThe plug and jack used to connect this equipment to premises wiring and the telephone network must comply with applicable Part 68 rules and technical requirements adopted by ACTA. A compliant telephone cord and modular plug is provided with this product. It is designed to be connected to a compatible modular jack that is also compliant. An RJ11 jack should normally be used for connecting to a single line and an RJ14 jack for two lines. See Installation Instructions in the user’s manual.The Ringer Equivalence Number (REN) is used to determine how many devices you may connect to your telephone line and still have them ring when you are called. The REN for this product is GPEQFGFCUVJGVJCPFVJEJCTCEVGTUHQNNQYKPIVJG75KPVJGRTQFWEVKFGPVKſGTGIKHKUVJG4'0KU+POQUVDWVPQVCNNCTGCUVJGUWOQHCNN4'0UUJQWNFDGſXGQTNGUU(QTmore information, please contact your local telephone company.This equipment may not be used with Party Lines. If you have specially wired alarm dialing equipment connected to your telephone line, ensure the connection of this equipment does not disable your alarm equipment. If you have questions about what will disable alarm equipment, EQPUWNV[QWTVGNGRJQPGEQORCP[QTCSWCNKſGFKPUVCNNGT••••](https://usermanual.wiki/VTech-Telecommunications/80-7264-00.Manual/User-Guide-1144546-Page-89.png)
![89AppendixFCC, ACTA and IC regulationsIf this equipment is malfunctioning, it must be unplugged from the modular jack until the problem has been corrected. Repairs to this telephone equipment can only be made by the manufacturer or its authorized agents. For repair procedures, follow the instructions outlined under the Limited Warranty.If this equipment is causing harm to the telephone network, the telephone company may temporarily discontinue your telephone service. The telephone company is required to notify [QWDGHQTGKPVGTTWRVKPIUGTXKEG+HCFXCPEGPQVKEGKUPQVRTCEVKECN[QWYKNNDGPQVKſGFCUUQQPCUpossible. You will be given the opportunity to correct the problem and the telephone company is TGSWKTGFVQKPHQTO[QWQH[QWTTKIJVVQſNGCEQORNCKPVYKVJVJG(%%;QWTVGNGRJQPGEQORCP[OC[make changes in its facilities, equipment, operation, or procedures that could affect the proper functioning of this product. The telephone company is required to notify you if such changes are planned.If this product is equipped with a corded or cordless handset, it is hearing aid compatible.If this product has memory dialing locations, you may choose to store emergency telephone PWODGTUGIRQNKEGſTGOGFKECNKPVJGUGNQECVKQPU+H[QWFQUVQTGQTVGUVGOGTIGPE[PWODGTUplease:4GOCKPQPVJGNKPGCPFDTKGƀ[GZRNCKPVJGTGCUQPHQTVJGECNNDGHQTGJCPIKPIWRPerform such activities in off-peak hours, such as early morning or late evening.Industry CanadaOperation is subject to the following two conditions: (1) this device may not cause harmful interference, and (2) this device must accept any interference, including interference that may cause undesired operation.6JGVGTOŎŏ+%ŎŏDGHQTGVJGEGTVKſECVKQPTGIKUVTCVKQPPWODGTQPN[UKIPKſGUVJCVVJG+PFWUVT[%CPCFCVGEJPKECNURGEKſECVKQPUYGTGOGVThe Ringer Equivalence Number (REN) for this terminal equipment is 0.1. The REN is an indication of the maximum number of devices allowed to be connected to a telephone interface. The termination on an interface may consist of any combination of devices subject only to the TGSWKTGOGPVVJCVVJGUWOQHVJG4'0UQHCNNVJGFGXKEGUFQGUPQVGZEGGFſXG6JKURTQFWEVOGGVUVJGCRRNKECDNG+PFWUVT[%CPCFCVGEJPKECNURGEKſECVKQPU90AppendixFrequency controlCrystal controlled PLL synthesizerTransmit frequencyHandset: 1921.536-1928.448 MHzTelephone base: 1921.536-1928.448 MHzChannels 5Nominal effective rangeMaximum power allowed by FCC and IC. Actual operating range might vary according to environmental conditions at the time of use.Size Handset: 6.45 X 1.81 X 1.17 in (163.8 X 46 X 29.8 mm)Telephone base: 2.67 X 6.10 X 4.04 in (67.9 X 155 X 102.5 mm)Charger: 2.02 X 3.03 X 3.77 in (51.4 X 76.9 X 95.7 mm) Weight Handset: 4.44oz (126g) (including battery)Telephone base: 8.15oz (231g)Charger: 2.43oz (69g)Power requirementsHandset: 2.4V 500mAh Ni-MH batteryTelephone base: 6V DC @ 400mACharger: 6V AC @300mAMemory Handset directory: 50 memory locations; up to 30 digits and 15 charactersFour download directories: 1,500 memory locations (each); up to 30 digits and 15 charactersHandset call log: 50 memory locations; up to 24 digits and 15 characters6GEJPKECNURGEKſECVKQPU](https://usermanual.wiki/VTech-Telecommunications/80-7264-00.Manual/User-Guide-1144546-Page-90.png)
![91AActive devices 17Add a handset 77Add an active device 18Alphabetical search 57Announcement 35Answer a CELL call 43Answer a CELL call while on a HOME call 44Answer a HOME call 41Answer a HOME call while on a CELL call 45Answer an incoming call during an intercom call 52Answering system and voicemail 66Answering system operation 66Answering system settings 33Answering system setup 33Answer ON/OFF 33Appendix 71Auto keylock 22BBattery 4,76Bluetooth 10Bluetooth setup 13CCaller ID 60Caller ID history 61Call intercept 66Call log 61Call log display screen messages 65Call screening 34Call waiting on the CELL line 44Call waiting on the HOME line 42Chain dialing 48Change PIN (Bluetooth) 19Character chart 56Charging 4Cleaning tips 2Clear voicemail 21,29Connect an active device 17Create a new directory entry 54DDate 23,27De-register handsets 78Delete a directory entry 59Delete all old messages 68Delete a message 67Delete announcement 37Delete a redial entry 50Delete from the call log 65Dial a call log entry 63Dial a directory entry 58Dial a redial entry 49Directory 54Disconnect an active device 17&5.ſNVGT3EEdit a directory entry 58End a CELL call 43End a HOME call 41Expand your telephone system 77FFCC, ACTA and IC regulations 93HHandset icons 74Handset layout 5Handset lights 73Handset locator 47Handset main menu 8Handset settings 20Handset speakerphone 45Hold 47Home area code 24,30IIcons 74,75Indicators 73Infrared sensor 46Installation 2Intercom 51KKeylock 22Key tone 22,27LLCD language 20,28Index92IndexMMaintenance 89Make a call log entry ready to dial 63Make a CELL call 43Make a HOME call 41Memory match 62Message alert tone 40Message capacity 66Message playback 67Missed calls indicator 61Mute 46NNew message indication 66Number of rings 38OOperating range 89PPaging 47Paired devices 15Parts checklist 1Phonebook (see Directory) 54Play announcement 35Play memos 69Play messages 67Predial a CELL call 43Predial a HOME call 41RRecord announcement 36Record memos 69Redial 49Register a handset 77Remote access 70Remote code 39Remove an active device 19Remove a paired device 16Rename a paired device 15Repeat messages 67Replace a handset 78Replace an active device 18Review the Active Devices list 17Review the call log 62Review the directory 57Review the Redial list 49Ringer mute 46Ringers 25,31Ringer tone 26,32Ringer volume 25,31SSafety instructions 88Save a call log entry to the directory 64Save a redial entry to the directory 49Screen display messages 71Setup cell 13Setup headset 14Share an outside call 53Silence the ringer 46Skip messages 67Speakerphone 45Stop messages 67T6GEJPKECNURGEKſECVKQPU95Telephone base icons 75Telephone base installation 3Telephone base layout 6Telephone base lights 73Telephone base main menu 9Telephone base settings 27Telephone operation 41Time 23,27Toll saver 38Tone 26, 32Troubleshooting 79Turn on or off the answering system 33UUsing a Bluetooth headset 42VView information of an active device 19View information of a paired device 16Voicemail 21,29Volume 25,31,45WWarranty 91](https://usermanual.wiki/VTech-Telecommunications/80-7264-00.Manual/User-Guide-1144546-Page-91.png)
![VTECH TELECOMMUNICATIONS LTD.A member of THE VTECH GROUP OF COMPANIES.Distributed in the U.S.A. by VTech Communications, Inc. Beaverton, Oregon 97008Distributed in Canada by VTech Technologies Canada, Ltd., Richmond, B.C. V6W 1L5Copyright © 2009 for VTECH TELECOMMUNICATIONS LTD.Printed in China.91-002527-010-100The Bluetooth® word mark and logos are owned by Bluetooth SIG, Inc. and any use of such marks by VTech Holdings Limited is under license. VTech Holdings Limited is a member of Bluetooth SIG, Inc. Other trademarks and trade names are those of their respective owners.](https://usermanual.wiki/VTech-Telecommunications/80-7264-00.Manual/User-Guide-1144546-Page-92.png)