VTech Telecommunications 80-7540-00 1.9GHz CORDLESS PHONE User Manual Retro EN
VTech Telecommunications Ltd 1.9GHz CORDLESS PHONE Retro EN
Users Manual

Grand Cordless Phone
Instruction manual
www.pbteen.com
Retro_EN.book Page 1 Thursday, September 3, 2009 9:50 AM
English
1
IMPORTANT SAFETY INSTRUCTIONS
When using your telephone equipment, basic safety precautions should always be followed to reduce
the risk of fire, electric shock and injury to persons, including the following:
1. Read and understand all instructions.
2. Follow all warnings and instructions marked on the product.
3. Unplug this product from the wall outlet before cleaning. Do not use liquid cleaners or aerosol
cleaners. Use a damp cloth for cleaning.
4. Do not place this product on an unstable cart, stand or table. The product may fall, causing
serious damage to the product.
5. Slots and openings in the cabinet and the back or bottom are provided for ventilation, to protect it from
overheating, these openings must not be blocked or covered. The openings should never be blocked
by placing the product on a bed, sofa, rug or other similar surface. This product should never be placed
near or over a radiator or heater. This product should not be placed in a built-in installation.
6. Never push objects of any kind into this product through cabinet slots as they may touch
dangerous voltage points or short out parts that could result in a risk of fire or electric shock.
Never spill liquid of any kind on the product.
7. To reduce the risk of electric shock, do not disassemble this product, but take it to a qualified
serviceman when service or repair work is required. Opening or removing covers may expose
you to dangerous voltages or other risks. Incorrect re-assembly can cause electric shock when the
appliance is subsequently used.
8. Unplug this product from the wall outlet and refer servicing to qualified service personnel in the
following cases:
A. When the power supply cord or plug is damaged or frayed.
B. If liquid has been spilled into the product.
C. If the product has been exposed to rain or water.
D. If the product does not operate normally by following the operating instructions.
Adjust only those controls that are covered by the operating instructions as an improper
adjustment of other controls may result in damage and will often require extensive work by a
qualified technician to restore the product to normal operation.
E. If the product has been dropped or the cabinet has been damaged.
F. If the product exhibits a distinct change in performance.
9. Do not allow anything to rest on the power cord. Do not locate this product where the cord will
be damaged by persons walking on it.
10. Do not use this product near water, for example, near a bathtub, washbowl, kitchen sink, or
laundry tub, in a wet basement, or near a swimming pool.
11. Avoid using a telephone (other than a cordless type) during an electrical storm. There may be a
remote risk of electric shock from lightning.
12. Do not use the telephone to report a gas leak in the vicinity of the leak.
13. Use only the power cord and batteries indicated in this manual. Do not dispose of batteries in a
fire. They may explode. Check with local codes for possible special disposal instructions.
14. CAUTION: Risk of explosion if battery is replaced by an incorrect type. Use only the provided
2xAAA battery pack.
15. Use only the power adapters supplied with this product.
16. Plug the adaptor to the socket-outlet which near the equipment and shall be easily accessible.
SAVE THESE INSTRUCTIONS
INSTALLATION INSTRUCTIONS
1. Never install telephone wiring during a lightning storm.
2. Never install telephone jacks in wet locations unless the jack is specifically designed for wet locations.
3. Never touch uninstalled telephone wires or terminals unless the telephone line has been
disconnected at the network interface.
4. Use caution when installing or modifying telephone lines.
Retro_EN.book Page 1 Thursday, September 3, 2009 9:50 AM

English
2
CONSUMER INFORMATION
This equipment complies with Part 68 of the FCC rules and with technical requirements adopted by the
Administrative Council for Terminal Attachments (ACTA). The label on the back or bottom of this
equipment contains, among other things, a product identifier in the format US:AAAEQ##TXXXX.
This identifier must be provided to your local telephone company upon request.
The plug and jack used to connect this equipment to premises wiring and the telephone network must
comply with the applicable Part 68 rules and technical requirements adopted by ACTA. A compliant
telephone cord and modular plug is provided with this product. It is designed to be connected to a
compatible modular jack that is also compliant. An RJ11 jack should normally be used for connecting
to a single line and an RJ14 jack for two lines. See Installation Instructions in the user’s manual.
The Ringer Equivalence Number (REN) is used to determine how many devices you may connect to
your telephone line and still have them ring when you are called. The REN for this product is
encoded as the 6th and 7th characters following the US: in the product identifier (e.g., if ## is 03, the
REN is 0.3). In most, but not all areas, the sum of all RENs should be five (5.0) or less. For more
information, please contact your local telephone company.
This equipment may not be used with Party Lines. If you have specially wired alarm dialing
equipment connected to your telephone line, ensure the connection of this equipment does not
disable your alarm equipment. If you have questions about what will disable the alarm equipment,
consult your telephone company or a qualified installer.
Repairs to this telephone equipment can only be made by the manufacturer or its authorized agents.
For repair procedures, follow the instructions outlined under the Limited Warranty.
If this equipment is causing harm to the telephone network, the telephone company may temporarily
discontinue your telephone service. The telephone company is required to notify you before
interrupting service. If advance notice is not practical, you will be notified as soon as possible. You
will be given the opportunity to correct the problem and the telephone company is required to inform
you of your right to file a complaint with the FCC. Your telephone company may make changes in its
facilities, equipment, operation, or procedures that could affect the proper functioning of this
product. The telephone company is required to notify you if such changes are planned.
If this product is equipped with a corded or cordless handset, it is hearing aid compatible.
NOTICE:
If your home has specially wired alarm equipment connected to the telephone line, ensure the
installation of this [equipment ID] does not disable your alarm equipment. If you have questions
about what will disable alarm equipment, consult your telephone company or a qualified installer.
NOTICE:
According to telephone company reports, AC electrical surges, typically resulting from lighting
strikes, are very destructive to telephone equipment connected to AC power sources. To minimize
damage from these types of surges, a surge arrestor is recommended.
Should you experience trouble with this equipment, please Contact PBteen Customer Service, by
calling Toll Free: 1-866-472-0500 for repair or warranty information. If the equipment is causing
harm to the telephone network, the telephone company may request that you disconnect the
equipment until the problem is resolved.
WARNING:
Changes or modifications to this unit not expressly approved by the party responsible for compliance
could void the user's authority to operate the equipment.
NOTE:
To ensure safety of users, the FCC has established criteria for the amount of radio frequency energy that
can be safely absorbed by a user or bystander according to the intended usage of the product. This
product has been tested and found to comply with the FCC criteria. The handset may be safely held
against the ear of the user. The telephone base shall be installed and used such that parts of the user’s
body other than the hands are maintained at a distance of approximately 20 cm (8 inches) or more.
Privacy of communications may not be ensured when using this telephone.
This Class B digital apparatus complies with Canadian ICES-003.
Retro_EN.book Page 2 Thursday, September 3, 2009 9:50 AM
English
3
This equipment has been tested and found to comply with the limits for a Class B digital device,
pursuant to Part 15 of the FCC Rules. These limits are designed to provide reasonable protection
against harmful interference in a residential installation. This equipment generates, uses and can
radiate radio frequency energy and, if not installed and used in accordance with the instructions, may
cause harmful interference to radio communications.
However, there is no guarantee that interference will not occur in a particular installation. If this
equipment does cause harmful interference to radio or television reception, which can be determined
by turning the equipment off and on, the user is encouraged to try to correct the interference by one
or more of the following measures:
• Reorient or relocate the receiving antenna.
• Increase the separation between the equipment and receiver.
• Connect the equipment into an outlet on a circuit different from that to which the receiver is connected.
• Consult the dealer or an experienced radio/TV technician for help.
EQUIPMENT LIMITATIONS NOTICE
NOTICE:
This equipment meets the applicable Industry Canada Terminal Equipment Technical Specifications.
Before installing this equipment, users should ensure that it is permissible to be connected to the
facilities of the local telecommunications company. The equipment must also be installed using an
acceptable method of connection. The customer should be aware that compliance with the above
conditions may not prevent degradation of service in some situations.
Repairs to certified equipment should be coordinated by a representative designated by the supplier.
Any repairs or alterations made by the user to this equipment, or equipment malfunctions, may give
the telecommunications company cause to request the user to disconnect the equipment.
Users should ensure for their own protection that the electrical ground connections of the power
utility, telephone lines and internal metallic water pipe system, if present, are connected together.
This precaution may be particularly important in rural areas.
CAUTION:
Users should not attempt to make such connections themselves, but should contact the appropriate
electric inspection authority, or electrician, as appropriate.
NOTICE:
The Ringer Equivalence Number (REN) for this terminal equipment is 0.1. The REN is an indication
of the maximum number of devices allowed to be connected to a telephone interface. The
termination on an interface may consist of any combination of devices subject only to the
requirement that the sum of the RENs of all the devices does not exceed five.
This product meets the applicable Industry Canada technical specifications.
TECHNICAL SPECIFICATIONS
AC Adaptor SMPS Adaptor; Input: 100-120V AC,
60Hz; Output: 6V DC, 400mA
Telephone Base Voltage 6V DC, 400mA
Handset Battery 2.4V DC, 500mA, Ni-MH
Frequency Band 1921.536 - 1928.448 MHz
Operation Temperature +5 to -40ºC
Channels 5
Retro_EN.book Page 3 Thursday, September 3, 2009 9:50 AM
English
4
Retro_EN.book Page 4 Thursday, September 3, 2009 9:50 AM
English
5
Retro_EN.book Page 5 Thursday, September 3, 2009 9:50 AM

English
6
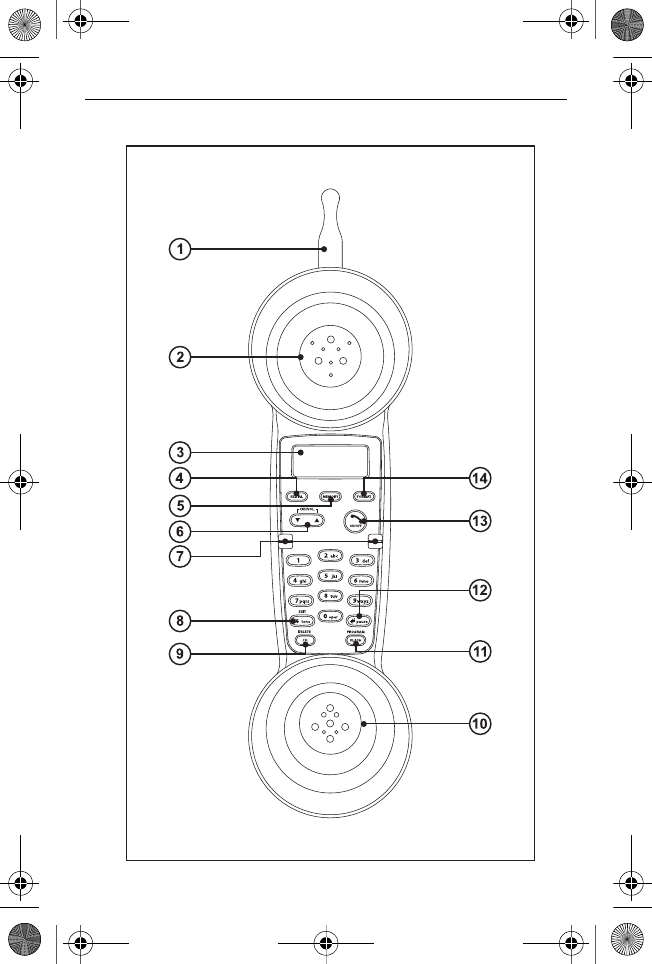
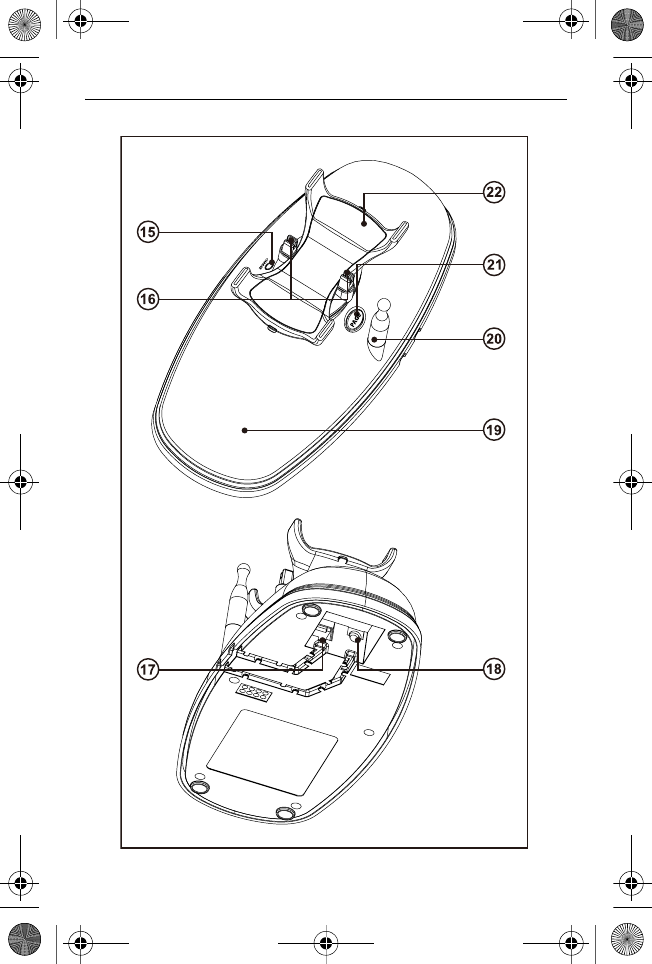
CONTROLS
1. Handset Antenna 12. Pause Button
2. Ear Piece Cover 13. Talk Button
3. LCD Display 14. Format Button
4. Redial Button 15. Charge Indicator
5. Memory Button 16. Charging Contact Plate
6. Caller ID/Volume (D and E) Button 17. Telephone Line in Jack
7. Battery Contact Plate 18. DC Jack
8. Tone/Exit Button 19. Base
9. Channel/Delete Button 20. Antenna
10. Mouth Piece Cover 21. Page Button
11. Flash/Program Button 22. Cradle
IMPORTANT
Charge the handset battery pack for 24 continuous hours prior to first use. The initial battery
charge is important for best performance.
INTRODUCTION
• Your DECT 6.0 Cordless Retro Phone is a fine-quality home communications product. It is care-
fully designed and produced by a world leader of consumer and industrial electronics equipment.
With proper maintenance and care, it will provide you with years of enjoyment and convenience.
MAIN FEATURES
DECT 6.0 Technology
Extended Range - The use of DECT 6.0 frequency band for signal transmission
between base and handset means greater communication range
compared to conventional cordless telephones.
Ultra-Low Noise - The high frequency communication also features significantly
reduced noise levels.
5-Channel Auto Scan - Your new telephone uses one of 5 channels in the DECT 6.0
frequency band.
COMPANDER PLUS Noise Reduction
The noise reduction technology now filters out more background noise.
• Caller ID* and Caller ID with Call Waiting*
(*Each feature works with your telephone company. A subscription is required.)
• 30-number Caller ID list
• 30-name/number directory
• Receiver volume control
• Trilingual display (English/French/Spanish)
• Low battery warning
Important: To use all of the features of this phone, you must subscribe to either the standard Name/
Number Caller ID Service or Caller ID with Call Waiting Service. To know who is
calling while you are on the phone, you must subscribe to Caller ID with Call Waiting
Service.
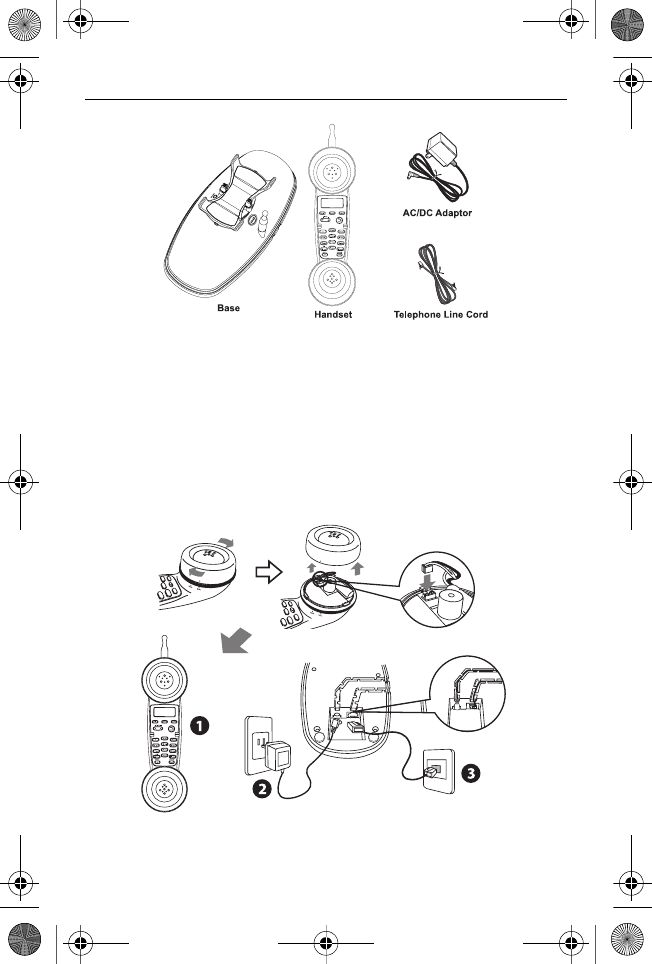
GETTING STARTED
Checking the package contents
• Make sure your package includes the items shown here.
Retro_EN.book Page 6 Thursday, September 3, 2009 9:50 AM
English
7
INSTALLATION
Modular Jack
• To properly connect your phone to your analog (non digital) telephone lines, you will need an
RJ11 type modular phone jack. If you do not have a modular jack, call your local phone company
to find out how to get one installed.
Installation Note: Avoid places near electrical equipment such as refrigerators, computers, TVs
or fluorescent lamps. These may cause interference or reduce the operation
range of the cordless telephone.
Connections
• Battery pack must be connected to the handset before charging the phone. See drawings below
for details.
1. Place the handset on the base.
2. Plug the AC/DC adaptor into the DC Jack (18) on the bottom of the base and the other end into
an electrical outlet. The Charge Indicator (15) lights, verifying the battery is charging.
Retro_EN.book Page 7 Thursday, September 3, 2009 9:50 AM
English
8
Important:- Do not connect the telephone line to the modular jack until the phone has been
charged for 24 continuous hours.
- Charge the handset battery for 24 continuous hours prior to first use. The initial
battery charge is important for best performance.
- The power unit is intended to be correctly orientated in a vertical or floor mount
position.
3. Plug the telephone line cord into the Telephone Line in Jack (17) on the bottom of the base and
into a modular jack.
Caution: Use the original AC/DC adaptor, that came with this phone. Using other adaptors
may damage the phone.
NOTE: The phone automatically defaults to touch tone dialing. To change to pulse (rotary)
dialing, see Tone/Pulse dialing. If you do not know which type of service you have,
check with your telephone company.
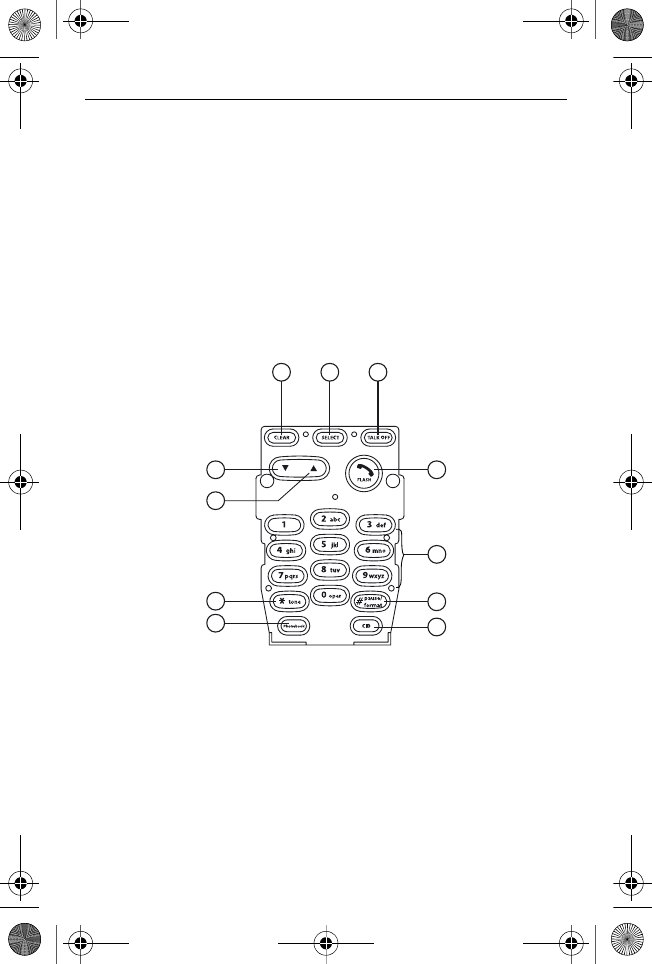
GETTING TO KNOW YOUR PHONE
Overview of your handset keypad
1 Mute/ Clear/ Delete
In pre-dial/editing mode: press to delete one character/digit. Long press to delete all
characters/digits.
During a call: press to mute/unmute the call.
In calls list/phonebook entry: press to delete the entry.
1 2 3
4
10
9
8
6
7
5
11
Retro_EN.book Page 8 Thursday, September 3, 2009 9:50 AM

English
9
2Menu/ Select
In idle mode: press to access menu list.
In menu/editing mode: press to confirm and save the settings.
During a call: press to hold a call.
In calls list entry: press to save the entry to the phonebook.
In phonebook entry: press to go to phonebook editing mode.
3 Talk off/ Back
In menu/editing mode/phonebook entry: press to exit to previous level.
In pre-dial mode/calls list/redial list entry mode: press to exit to idle.
During a call: press to end a call.
4 Talk on/ Flash
In idle/menu/pre-dial mode: press to make a call.
Call List/phonebook/redial list entry: press to make a call to the selected entry.
During a call: press to make a flash.
During ringing: press to answer a call.
5 Alphanumeric keypad
In idle/pre-dial/editing mode/during a call: press to enter characters/numbers. Long press to
activate speed dial.
6 #/ Pause/ ABC/ Format
In idle/pre-dial/number editing mode/during a call: press to insert a #, press and hold to
insert a pause.
In name editing mode: toggle ABC/Abc/abc.
In calls list entry: press to toggle the Caller ID display format between 7, 8, 10 and 11 digits.
7 Calls list
In idle mode/during a call: press to access calls list.
8 Phonebook
In idle mode/during a call: press to access the phonebook.
9*/ Tone
In idle/pre-dial/editing mode: press to insert a *.
During a call: press to switch from pulse to tone dialing temporarily if pulse mode was
selected before. After the call has ended, the dial mode will change back to pulse.
10 Scroll up/ Volume up
In menu mode: press to scroll up.
In editing mode: press to move cursor to the left.
During a call: press to increase volume.
Calls list/phonebook/redial list entry: press to scroll up the list.
11 Scroll down/ Volume down/ Redial list
In idle/pre-dial mode: press to access redial list.
In menu mode: press to scroll down.
In editing mode: press to move cursor to the right.
During a call: press to decrease volume.
Calls list/phonebook/redial list entry: press to scroll down the list.
Retro_EN.book Page 9 Thursday, September 3, 2009 9:50 AM
English
10
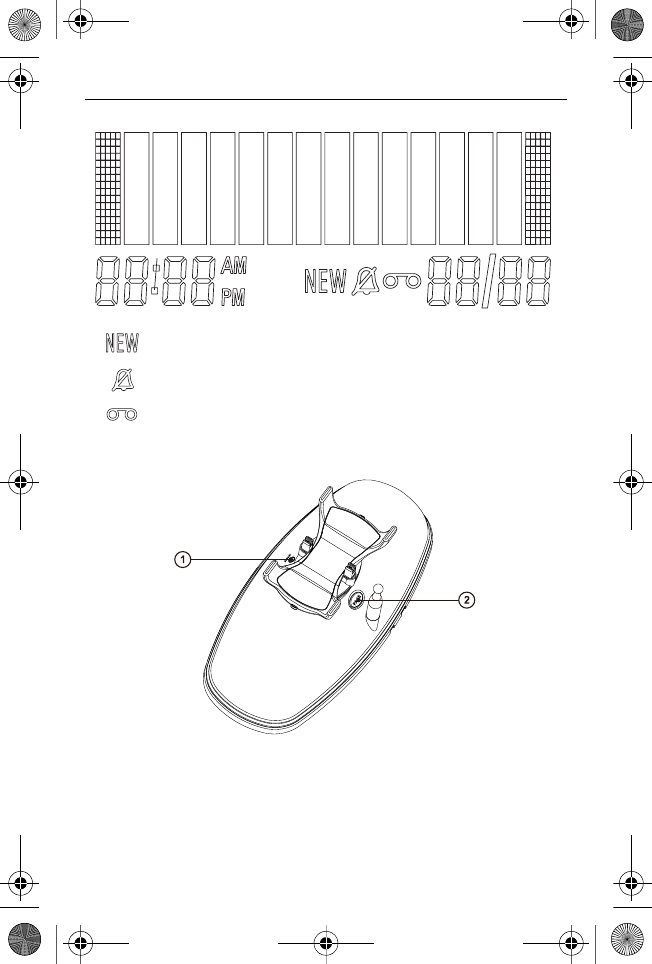
Handset LCD display
Overview of the base
Indicates when new call is received.
Off when new call has been viewed.
On when ringer volume is turned off.
On when there is received new voice mail not yet listened to.
Off when new voice mail has been listened to.
1 CHARGING LED
Steadily On: when the handset is put into base cradle for charging.
2PAGE
Press to page the registered handset.
12 34 56 78
COL
Retro_EN.book Page 10 Thursday, September 3, 2009 9:50 AM
English
11
Paging is a useful way of finding lost handsets.
1. Press A on the base.
- All handsets ring.
2. To stop the paging call, press A again, or place the handset on the cradle or press any key on
the handset.
Navigating the menus
1. Press S.
2. Press E and D to scroll through the menu.
3. Press S to open a sub-menu or validate an option.
Press T to go back to previous menu level or cancel an action.
If you do not press any button on the handset for 30 seconds the display will automatically return
to standby. It will also return to standby when the handset is placed on the base or charger.
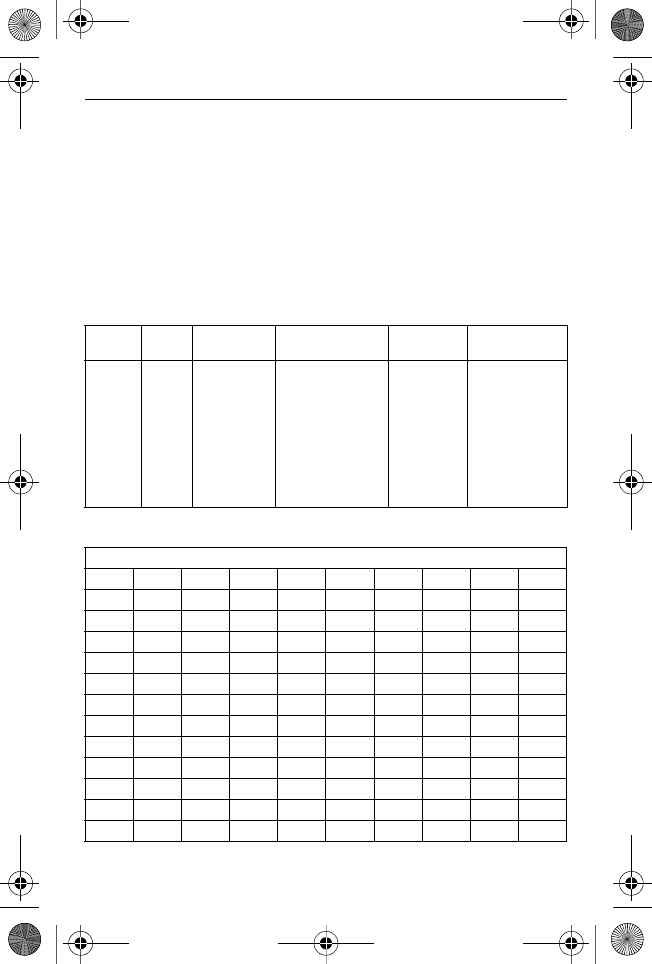
Menu map
Character map
Uppercase
Main
Menu
DATE
& TIME
PHONE
BOOK
SETUP HS SETUP BS RESET
SETTINGS
Sub
menu
YEAR
DATE
VIEW
ADD
EDIT
DELETE
DELETE ALL
PB CAPACITY
SPEED DIAL
RINGER TONE
RINGER VOLUME
KEY TONE
LOW BATT TONE
OUT RANGE TONE
HANDSET NAME
LANGUAGE
LCD CONTRAST
AUTO TALK
REGISTRATION
DIAL MODE
FLASH TIME
AREA CODE
CLR VOICE MAIL
ALL SETTINGS
Key Character versus key press number
123456789
1space1#‘,-.&
2ABC2
3DEF3
4GHI 4
5JKL5
6MNO6
7PQRS7
8TUV8
9WXYZ 9
00
**? ! / ( )@
#
Retro_EN.book Page 11 Thursday, September 3, 2009 9:50 AM

English
12
Lowercase
USING THE PHONE
Calls
Make a call
1. Press F.
2. Dial the phone number.
Predial
1. Enter the phone number (maximum 32 digits). If you make a mistake, press C to delete a digit.
2. Press F to dial the phone number entered.
Dial one touch numbers 1 to 9
1. Press and hold a key from 1 to 9 until the number is displayed and dialed.
NOTE: You need to set the one touch number first.
- If no number is stored, you hear a beep.
Call from the phonebook
1. Press P. The first entry in the phonebook is displayed.
2. Scroll E and D to the entry you want.
3. Press F to dial the number.
TIPS: Instead of scrolling to browse the phonebook entries, press the numeric key
corresponding to the first letter of the entry you wish to locate. For example, pressing
2 will show the entries starting with A. Pressing 2 again will show the entries
starting with B, etc.
Call from the calls list
NOTE: You need to subscribe to your network's Caller ID service to be able to see the caller's
number in the calls list. See "CALLER ID" section for more details.
1. Press I. The first entry in the call list is displayed.
2. Scroll E and D to the entry you want.
3. Press F to dial the number.
Key Character versus key press number
123456789
1space1#‘,-.&
2abc2
3de f 3
4ghi 4
5jkl5
6mn o 6
7pqr s7
8tuv8
9wx y z 9
00
**? ! / ( )@
#
Retro_EN.book Page 12 Thursday, September 3, 2009 9:50 AM
English
13
Call from the redial list
The last five numbers called are saved and can be redialed later.
1. Press D. The first entry in the redial list is displayed.
2. Scroll E and D to the entry you want.
3. Press F to dial the number.
Answer a call
1. When the phone rings, press F to answer the call.
WARNING: When the phone is ringing, avoid holding the earpiece too close to your ear as it may
damage your hearing.
TIPS: If Auto Talk mode (See "Auto Talk On/Off" section for more details) is on, simply lift up
the handset from its base to answer the call. The default setting is Off.
NOTE: An incoming call has priority over other events. Whenever there is an incoming call,
other operations in progress such as phone settings, menu navigation, etc. will be ended.
Adjust volume
1. During a call, press E and D to adjust the earpiece volume.
- The level is shown in the handset display, as VL1 up to VL5.
Mute
Mute the microphone so that you can talk to someone else in the room without your caller hearing you.
1. During a call, press C.
- The microphone is muted.
2. Press C again to turn the microphone back on.
End a call
1. During a call, press T or put the handset on the cradle.
After you hang up, the duration of your call is displayed for around 2 seconds.
Voi c ema il
Voice Mail Waiting Indication is an indication given to you when a new voice mail message is
waiting on the network service provider. This feature is available if you have subscribed to the
voicemail service from you network service provider.
Clear voice mail
1. Press S and E and D to select RESET SETTINGS.
2. Press S to select CLR VOICE MAIL.
3. Press S to select YES.
4. Press S to clear voice mail.
PHONEBOOK
The handset phonebook can store up to 30 names and numbers.
NOTE: Numbers can be up to 24 digits long and names up to 16 characters long. Entries are
stored in alphabetical order.
View an Entry
1. Press P.
2. Press E and D to the entry you want.
3. Press S to select VIEW.
4. Press S to view the entry.
NOTE: If the number is more than 15 digits, press # to view the next page of remaining digits.
Retro_EN.book Page 13 Thursday, September 3, 2009 9:50 AM

English
14
Add an Entry
1. Press P.
2. If the list is empty, LIST EMPTY is displayed. Press S to select ADD.
If there are entries in the phonebook, press E and D to the entry you want. Press S and E and
D to select ADD.
3. Press S and enter the number.
4. Press S and enter the name.
5. Press S to save settings.
NOTE Cancel storing an entry by pressing T at any time during the process.
Entering names
Use the alphanumeric keypad to enter names in the phonebook.
For instance to enter the name Paul
P Press 7 once
A Press 2 once
U Press 8 twice
L Press 5 three times
To enter a space, press 1.
Press C to delete a character or press and hold C to delete all characters.
Enter a pause
If your phone is connected to a switchboard, you may need to enter a pause in a stored number. This
gives the switchboard time to get an outside line. A Pause is normally stored after the switchboard
access code (e.g. 9).
When storing a number, press and hold # and the display shows P. You can then continue storing
the phone number.
Edit an Entry
1. Press P.
2. Press E and D to the entry you want.
3. Press S and E and D to select EDIT.
4. Press S and edit the number.
5. Press S and edit the name.
6. Press S to save the entry.
NOTE: Press C to delete a digit/character or press and hold C to delete all digits/
characters.
Delete an Entry
1. Press P.
2. Press E and D to the entry you want.
3. Press S and E and D to select DELETE.
4. Press S to delete the entry.
Delete all Entries
1. Press P.
2. Press S and E and D to select DELETE ALL.
3. Press S. DELETE ALL PH.BOOK RECORDS? is displayed.
4. Press S to delete all the entries.
View Phonebook Capacity
1. Press P.
2. Press S and E and D to select PB CAPACITY.
3. Press S.
Retro_EN.book Page 14 Thursday, September 3, 2009 9:50 AM
English
15
Store a Phonebook Entry as a One Touch Number
1. Press P.
2. Press S and E and D to select SPEED DIAL.
3. Press S and E and D to select the speed dial key 1 to 9.
4. Press S and E and D to the entry you want.
5. Press S to save.
Edit a Phonebook Entry in a One Touch Number
1. Follow steps 1 to 3 in Store a Phonebook Entry as a One Touch Number.
2. Press S and the stored number is displayed.
3. Press S to select ADD.
4. Press S and E and D to the entry you want.
5. Press S to save.
Delete a One Touch Number
1. Follow steps 1 to 3 in Store a Phonebook Entry as a One Touch Number.
2. Press S and the stored number is displayed.
3. Press S and E and D to select DELETE.
4. Press S to delete the stored number.
CALLER ID
If you have subscribed to Caller ID, and provided the identity of the caller is not withheld, the number
of the caller will be displayed together with the date and time of the call (if provided by the network).
NOTE • If the telephone number is not available for incoming calls, the handset will display
U N AVA I L A B L E .
•If the incoming call is from a withheld telephone number, the handset will display
PRIVATE.
•Information about incoming calls will vary by country and network operator. Some
operators may charge a subscription for their Caller ID service.
Calls List
The calls list contains details of missed and received call. Details include the date and time of the
call. Entries are displayed in chronological order with the most recent call at the top of the list.
NOTE • When the calls list is full, a new call replaces the oldest in the list.
•The received and missed calls log holds details of up to 30 calls.
•If you receive more than one call from the same number, only the most recent call is
kept in the calls list. When you have missed calls (incoming calls that you haven't
answered) the will be displayed in the display on all handsets registered to the
base. If one handset is used to view the calls log, the icon on the other handsets
remains on (For multi-pack use only).
View the calls list
1. Press I to enter calls list.
2. Scroll E and D through the calls list.
NOTE • When reviewing an entry from the calls list, press # repeatedly to display
the number in different format. For example, if a caller number is displayed as
123-456-7890, the various formats will be:
456-7890
1- 456-7890
123- 456-7890
1-123- 456-7890
User can choose the desired number format for local and long distance numbers
before dialing or saving it into the phonebook.
•The is removed once the new call has been viewed.
Retro_EN.book Page 15 Thursday, September 3, 2009 9:50 AM

English
16
Save a number from the calls list to the phonebook
1. Press I to enter calls list.
2. Press E and D to the entry you want.
3. Press S and enter the name.
4. Press S and edit the number.
5. Press S to save.
Delete a calls list entry
1. Press I to enter calls list.
2. Press E and D to the entry you want.
3. Press C to delete the entry.
Delete entire calls list
1. Press I to enter calls list.
2. Press and hold C. DELETE ALL CALL LOG ENTRIES? is displayed.
3. Press S to confirm and all entries are deleted.
REDIAL
Your phone lets you redial any of the last 5 numbers called. Numbers can be up to 32 digits long.
View the redial list
1. Press D to enter the redial list. The last number dialed is displayed.
2. Scroll E and D through the redial list.
Copy a redial number to the phonebook
1. Press D to enter the redial list.
2. Press E and D to select the entry you want.
3. Press S to select SAVE TO PB.
4. Press S and enter the name.
5. Press S and edit the number.
6. Press S to save.
Delete a redial list entry
1. Press D to enter the redial list.
2. Press E and D to select the entry you want.
3. Press C to delete the entry.
OR
4. Press S and E and D to select DELETE. Press S again to delete the entry.
Delete entire redial list
1. Press D to enter the redial list.
2. Press S and E and D to select DELETE ALL.
3. Press S and DELETE ALL? is displayed.
4. Press S to confirm and all entries are deleted.
PERSONAL SETTINGS
Set Date & Time
Providing you have subscribed to your network's Caller ID service, the date and time is set
automatically for all handsets every time a call is received. If you do not have a Caller ID service you
can set the date and time manually.
1. Press S to select DATE & TIME.
2. Press S and edit the year and date.
TIPS: You can press E and D to move the cursor between the input fields YEAR and DATE.
3. Press S and edit the time in 12hr format. Press E and D to toggle AM/PM settings.
4. Press S to save the settings.
Retro_EN.book Page 16 Thursday, September 3, 2009 9:50 AM

English
17
Handset Tones
WARNING: When the phone is ringing, avoid holding the earpiece too close to your ear as it may
damage your hearing.
Set the ringer tone
1. Press S and E and D to select SETUP HS.
2. Press S to select RINGER TONE.
3. Press S and E and D to select a ringer melody. The current ringer melody is played for
around 5 seconds.
4. Press S to save.
Set the ringer volume
1. Press S and E and D to select SETUP HS.
2. Press S and E and D to select RINGER VOLUME.
3. Press E and D to increase or decrease the volume level. (6 levels are available, including ringer
off. The corresponding volume effect will be played while browsing the volume option.)
4. Press S to save.
Key tones on/off
When you press a key on the handset you hear a beep. You can switch these beeps on or off.
1. Press S and E and D to select SETUP HS.
2. Press S and E and D to select KEY TONE.
3. Press S and E and D to turn on/off the key tone.
4. Press S to save.
Battery low tone on/off
1. Press S and E and D to select SETUP HS.
2. Press S and E and D to select LOW BATT TONE.
3. Press S and E and D to turn on/off the battery low tone.
4. Press S to save.
No coverage tone on/off
1. Press S and E and D to select SETUP HS.
2. Press S and E and D to select OUT RANGE TONE.
3. Press S and E and D to turn on/off the no coverage tone.
4. Press S to save.
Handset Name
Personalize your handset, with a name or location for example Peter or Bedroom. Maximum 14 characters.
1. Press S and E and D to select SETUP HS.
2. Press S and E and D to select HANDSET NAME.
3. Press S and enter the handset name.
4. Press S to save.
NOTE: Handset name will be displayed in idle screen. A space and a handset number are
automatically added after the name set.
Set the Display Language
You can change the display language.
1. Press S and E and D to select SETUP HS.
2. Press S and E and D to select LANGUAGE.
3. Press S and E and D to the language you want.
4. Press S to save.
Set the LCD Contrast
1. Press S and E and D to select SETUP HS.
2. Press S and E and D to select LCD CONTRAST.
3. Press S and E and D to increase or decrease the contrast level. (Five levels are available)
4. Press S to save.
Retro_EN.book Page 17 Thursday, September 3, 2009 9:50 AM
English
18
Auto Talk On/Off
With auto talk is turned on, you can answer a call just by lifting the handset off the base or charger. If
turned off, you will have to press F to answer a call. The default setting is Off.
1. Press S and E and D to select SETUP HS.
2. Press S and E and D to select AUTO TALK.
3. Press S and E and D to turn on/off auto talk.
4. Press S to save.
Registration
The original handset is pre-registered with base station to use.
Although one base station can be registered with more than one handset, this feature is not
recommended.
To register an additional handset,
1. Press S and E and D to select SETUP HS.
2. Press S and E and D to select REGISTRATION.
3. Press S and E and D to select YES or NO.
4. Select YES and press A to enter the registration procedure as below:
• Place the unregistered cordless handset on the charger.
• Press and hold A for 4 seconds on base. And then release A.
• A confirmation tone is generated if registration is successful. HANDSET X is displayed
where X denotes the number of handsets and the phone goes back to idle.
ADVANCED SETTINGS
Set the Dial Mode
The default dialing mode is suitable for your country and network operator. It is unlikely that you
should need to change this setting unless advised to do so.
1. Press S and E and D to select SETUP BS.
2. Press S to select DIAL MODE.
3. Press S and E and D to select TONE or PULSE.
4. Press S to save.
NOTE: If pulse mode is selected, press * to switch from pulse to tone dialing temporarily
when dialing out. After the call is ended, the dial mode will resume to pulse.
Set the Flash Time
The default dialing mode is suitable for your country and network operator. It is unlikely that you
should need to change this setting unless advised to do so.
1. Press S and E and D to select SETUP BS.
2. Press S and E and D to select FLASH TIME.
3. Press S and E and D to the flash time you want. (8 options are available: 90, 100, 110, 250,
300, 400, 600 and 700MS)
4. Press S to save.
Set the Area Code
1. Press S and E and D to select SETUP BS.
2. Press S and E and D to select AREA CODE.
3. Press S and enter the area code.
4. Press S to save.
Reset All Settings
All personalized settings will be reset to default. Phonebook entries, calls list and redial list will
remain unchanged.
1. Press S and E and D to select RESET SETTINGS.
2. Press S and E and D to select ALL SETTINGS.
3. Press S to select YES.
4. Press S to reset all settings to default.
Retro_EN.book Page 18 Thursday, September 3, 2009 9:50 AM

English
19
DEFAULT SETTINGS
HELP
Calls
No dial tone
• No base power - check the connections. Reset the phone: unplug and plug back in the electrical outlet.
• Handset batteries are empty - charge the battery pack for at least 24 hours.
• Handset may be too far from the base - move closer to the base.
• Wrong telephone line cord - use the telephone line cord provided.
Poor audio quality
The base is too close to electrical appliances, reinforced concrete walls or metal doorframes - move
the base away from any electrical appliances.
No ring tone
• The ring tone is deactivated.
• Increase the volume.
Caller ID service does not work
• Check your subscription with your network operator.
• If you subscribe to high-speed internet service (Digital Subscriber Line - DSL) through your tele-
phone lines, you must install a DSL filter between the telephone base and the telephone wall jack.
The filter will prevent noise and caller ID problems caused by DSL interference. Please contact
your DSL service provider for more information about DSL filters.
Phonebook
A phonebook entry cannot be stored
The phonebook is full. Delete an entry to free memory.
Display
No display
• Try recharging or replacing the battery pack.
• Reset the telephone base. Unplug the unit's electrical power, then plug it back in.
• If LED is not lit up, then try to unplug the unit's electrical power, then plug it back in.
Items Default values
Date & Time YEAR: 2009
DATE: 01/01
TIME: 12:00 AM
Ringer tone MELODY 1
Key tone ON
Battery low tone ON
No coverage tone ON
Handset name HANDSET
Language ENGLISH
LCD contrast Level 3
Auto talk Off
Dial mode TONE
Flash time 600 MS
Retro_EN.book Page 19 Thursday, September 3, 2009 9:50 AM

English
20
Registration
When the handset lost its link with the base during a call
• Check the power cord is connected properly into the base.
• Check the power adapter is connected properly into an electrical outlet.
• Move the handset closer to the base. It may be out of range.
• Reset the base by unplugging the unit's electrical power. Wait for around 15 seconds and plug it
back in again. Allow up to one minute for the handset and the base to synchronize.
Interference
Noise interference on your radio or television
Your base or charger may be too close. Move it as far away as possible.
RECYCLING NICKEL-METAL HYDRIDE
BATTERIES
Please recycle battery according to state and local laws. It is illegal to dispose of this battery into
municipal waste stream. Please call 1-800-822-8837 for information on how to recycle this battery.
NICKEL-METAL HYDRIDE BATTERIES MUST BE DISPOSED OF PROPERLY
• Please take the used battery to a store that recycles Ni-MH batteries.
MAINTENANCE
To keep your telephone working, follow these guidelines:
• Avoid putting the phone near heating appliances and devices which generate electrical noise (for
example, motors or fluorescent lamps).
• Do not expose to direct sunlight or moisture.
• Avoid dropping and other rough treatment of the phone.
• Clean with a soft cloth.
• Never use a strong cleaning agent or abrasive powder because this will damage the finish.
• Retain the original packaging in case you need to ship the phone at a later date.
Causes of poor reception
• Aluminum siding.
• Foil backing on insulation.
• Heating ducts and other metal construction.
• The phone is too close to appliances such as microwaves, stoves, computers, etc.
• Atmospheric conditions, such as severe storms.
• Base is installed in the basement or lower floor of the house.
• Base is plugged into an AC outlet with other electronic devices.
• Other device is using the same frequency.
• Handset battery is low.
• Handset is out of range.
TO SERVICE YOUR UNIT, CONTACT:
PBteen Customer Service,
Phone: 1-866-472-0500
Retro_EN.book Page 20 Thursday, September 3, 2009 9:50 AM
www.pbteen.com
Ref. PBTRCP(0809)-M4
Retro_EN.book Page 1 Thursday, September 3, 2009 9:50 AM