VTech Telecommunications 80-9103-00 1.9GHz Digital Modulation Cordless Phone_DECT Portion User Manual
VTech Telecommunications Ltd 1.9GHz Digital Modulation Cordless Phone_DECT Portion
UserManual.wiki
>
VTech Telecommunications
>
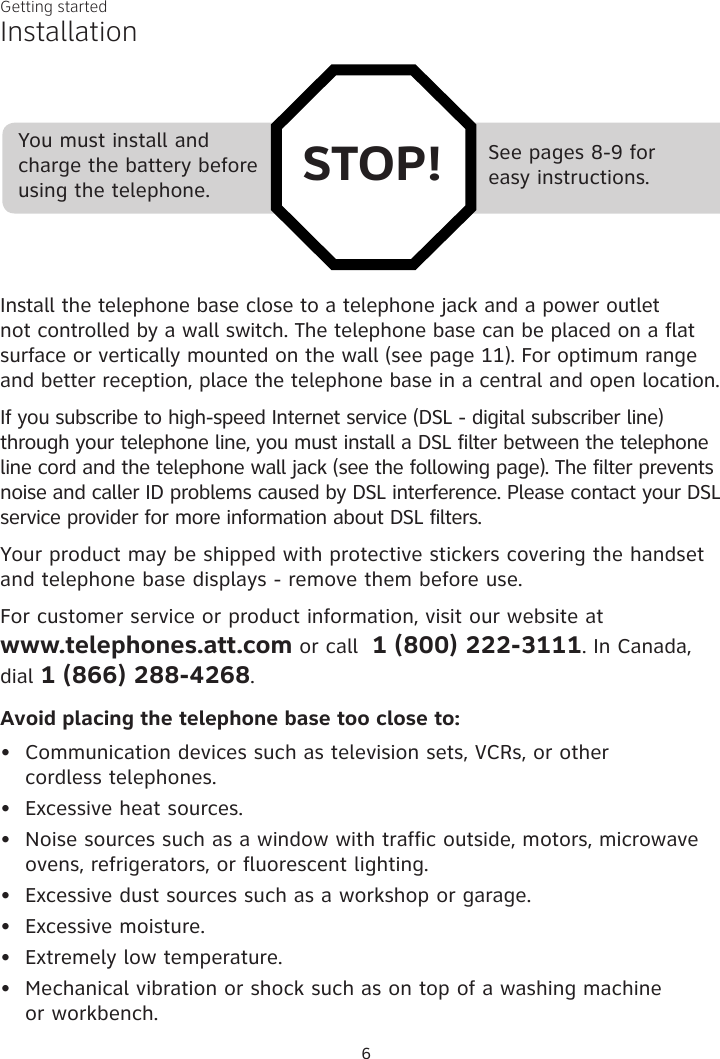
80 9103 00 User Manual
User Manual
Navigation menu
Upload a User Manual
Namespaces
Wiki Guide
HTML
PDF
Info
Views
User Manual
Discussion / Help
Navigation


![Multiple handset use56Push-to-talk (PTT)PTT call to a single deviceUsing a cordless handset:1. There are a few ways to begin a PTT call to a single device. When the handset is not in use:If you have one handset, press and hold PUSH TO TALK.If you have more than one handset:w Press PUSH TO TALK on the handset, then use the dialing keys to enter the destination device number.-OR-w Press PUSH TO TALK on the handset. Press qCID or pDIR to highlight the destination device number, then press SELECT or PUSH TO TALK.The handset shows Connecting to HANDSET X... (HANDSET represents the handset name, X represents the destination handset number) or Connecting to BASE 0... (BASE represents the base name) for a few seconds. When the connection is made, both your and the destination device screens display Press and hold [PTT] to talk. 2. Press and hold PUSH TO TALK. A chirp indicates your microphone is on. Speak towards the device. Your voice is broadcast to the destination device.While you are speaking, your handset shows PTT To HANDSET X or PTT To BASE 0.3. Release PUSH TO TALK after speaking. Both devices beep once again and the screens show Press and hold [PTT] to talk, then you can press and hold PUSH TO TALK to continue speaking or the destination device can respond (see Answer a PTT call on page 60).4. To end the PTT call, press OFF/CANCEL or END, or place the handset in the telephone base or charger. The handset shows Push to talk ended.••56](https://usermanual.wiki/VTech-Telecommunications/80-9103-00/User-Guide-1913433-Page-56.png)
![Multiple handset use57Push-to-talk (PTT)Using the telephone base:1. There are a few ways to begin a PTT call to a single handset. When the telephone base is not in use:If you have one handset, press and hold PTT.If you have more than one handset:w Press PTT, then use the dialing keys to enter the destination handset number. -OR-w Press qCALLER ID or pDIRECTORY to highlight the destination handset number, then press SELECT or PTT.The telephone base shows Connecting to HANDSET X... (HANDSET represents the handset name, X represents the destination handset number) for a few seconds. When the connection is made, both the telephone base and destination handset display Press and hold [PTT] to talk. 2. Press and hold PTT. A chirp indicates your microphone is on. Speak towards the telephone base. Your voice is broadcast to the destination handset.While you are speaking, the telephone base shows PTT To HANDSET X.3. Release PTT after speaking. Both devices beep once again and the screens show Press and hold [PTT] to talk, then you can press and hold PTT to continue speaking or the destination device can respond (see Answer a PTT call on page 60).4. To end the PTT call, press CANCEL or END. The telephone base shows Push to talk Ended for a few seconds.••57](https://usermanual.wiki/VTech-Telecommunications/80-9103-00/User-Guide-1913433-Page-57.png)
![Multiple handset usePush-to-talk (PTT)Answer a PTT callYou can respond to a PTT call as described below.When your device receives a PTT call, it beeps and shows Press and hold [PTT] to talk. When the other party is speaking, your speakerphone light is on, and your device shows:PTT From HS X To devices: X (the first X represents the initiating handset number, and the second X represents your handset number; a maximum of four handset numbers appear).-OR-PTT From Base 0 To devices X (the X represents your handset number; a maximum of four handset numbers appear).When your speakerphone light is off (the screen shows Press and hold [PTT] to talk), press and hold PUSH TO TALK on your handset or PTT on your telephone base. You will hear a chirp. Speak towards the device.While you are speaking, your device shows PTT To Handset: X (X represents the handset numbers of one or more destination handsets; a maximum of four handset numbers appear) or PTT To devices: X (X represents the handset numbers of one or more destination handsets; a maximum of four handset numbers appear).Your voice is broadcast to all destination devices.After speaking, release PUSH TO TALK on your handset or PTT on your telephone base. Your device will beep. After the beep, if your speakerphone light is off, you can press and hold PUSH TO TALK on your handset or PTT on your telephone base to continue speaking, or the destination device can respond.1.2.••3.••60](https://usermanual.wiki/VTech-Telecommunications/80-9103-00/User-Guide-1913433-Page-60.png)