VTech Telecommunications 80-9153-00 1.9GHz DECT Cordless Phone - Base BT Portion User Manual 1 6
VTech Telecommunications Ltd 1.9GHz DECT Cordless Phone - Base BT Portion 1 6
Contents
- 1. User Manual 1-6
- 2. User Manual 7-16
- 3. User Manual
User Manual 1-6
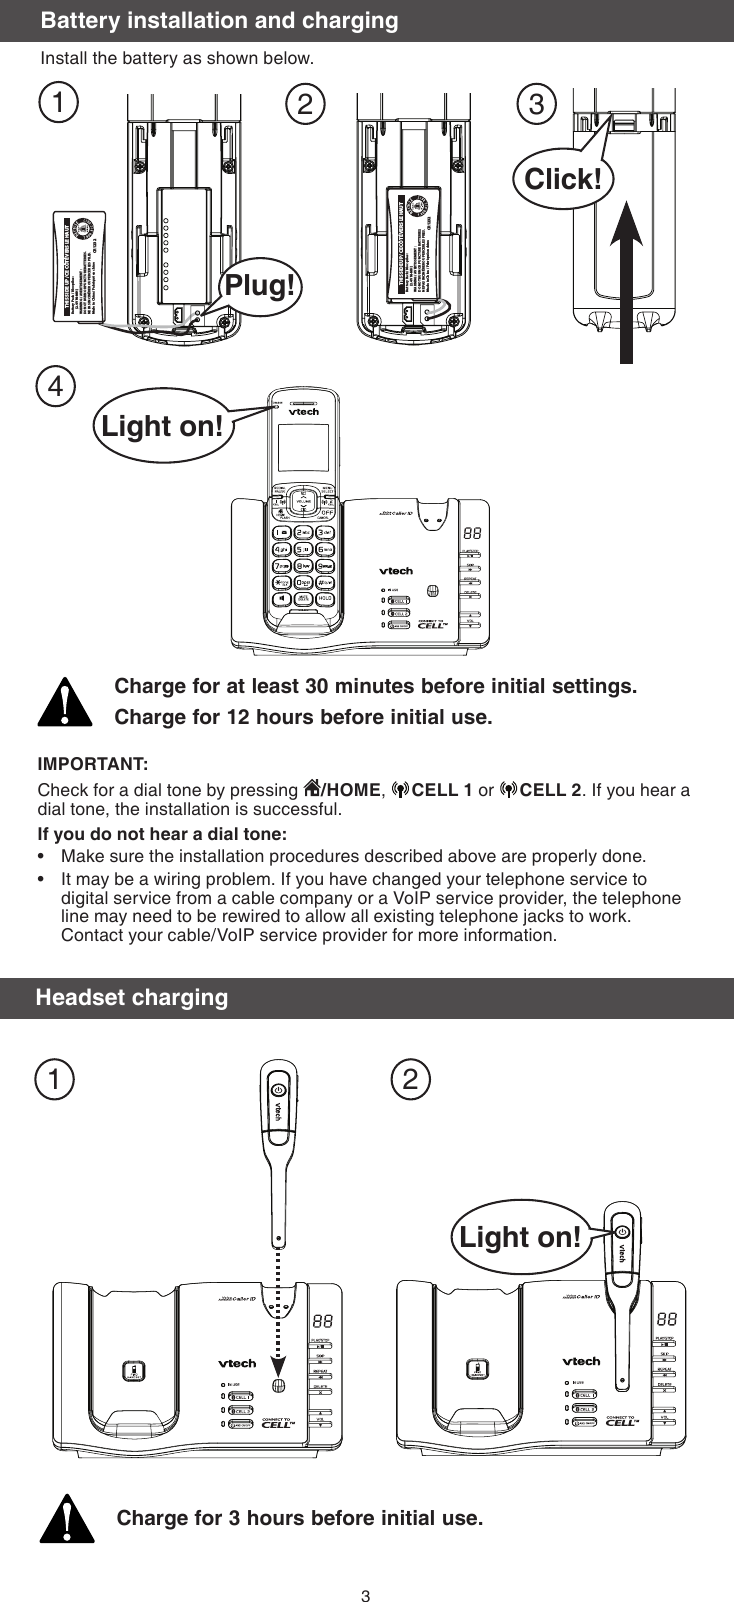
![5To attach the earbud to the headset earpiece:Choose an appropriate earbud.Press the earbud towards the earpiece until it clicks into place. Move the earbud around so that the protruding bump on the earbud is pointing towards your mouth when placed on your ear. The protruding bump on the earbud holds the headset securely in your ear. 1.2.Headset attachmentsEarbudTo remove the earbud from the headset earpiece:Hold both sides of the earbud and then pull the earbud until it separates from the earpiece. 1. Hold the headset with one hand. Lift the ear hook upward.2. Twist the ear hook 180 o clockwise.3. Push the ear hook downward. 4. Hook the headset on your left ear. Adjust the angle of the headset until the microphone is pointing towards your mouth.Ear hookTo attach the ear hook to the headset:Remove any headset attachment (earbud excluded) connected to the headset.Insert the ear hook [A] into the rotating clip [B] on the headset until it clicks into place.Hook the headset on your right ear. Adjust the angle of the headset until the microphone is pointing towards your mouth. Firmly grip the earpiece with one hand whenever adjusting the headset microphone up or down.1.2.3.To adjust the headset to wear on your left ear:Protruding bump[A] [B]](https://usermanual.wiki/VTech-Telecommunications/80-9153-00.User-Manual-1-6/User-Guide-1917876-Page-5.png)
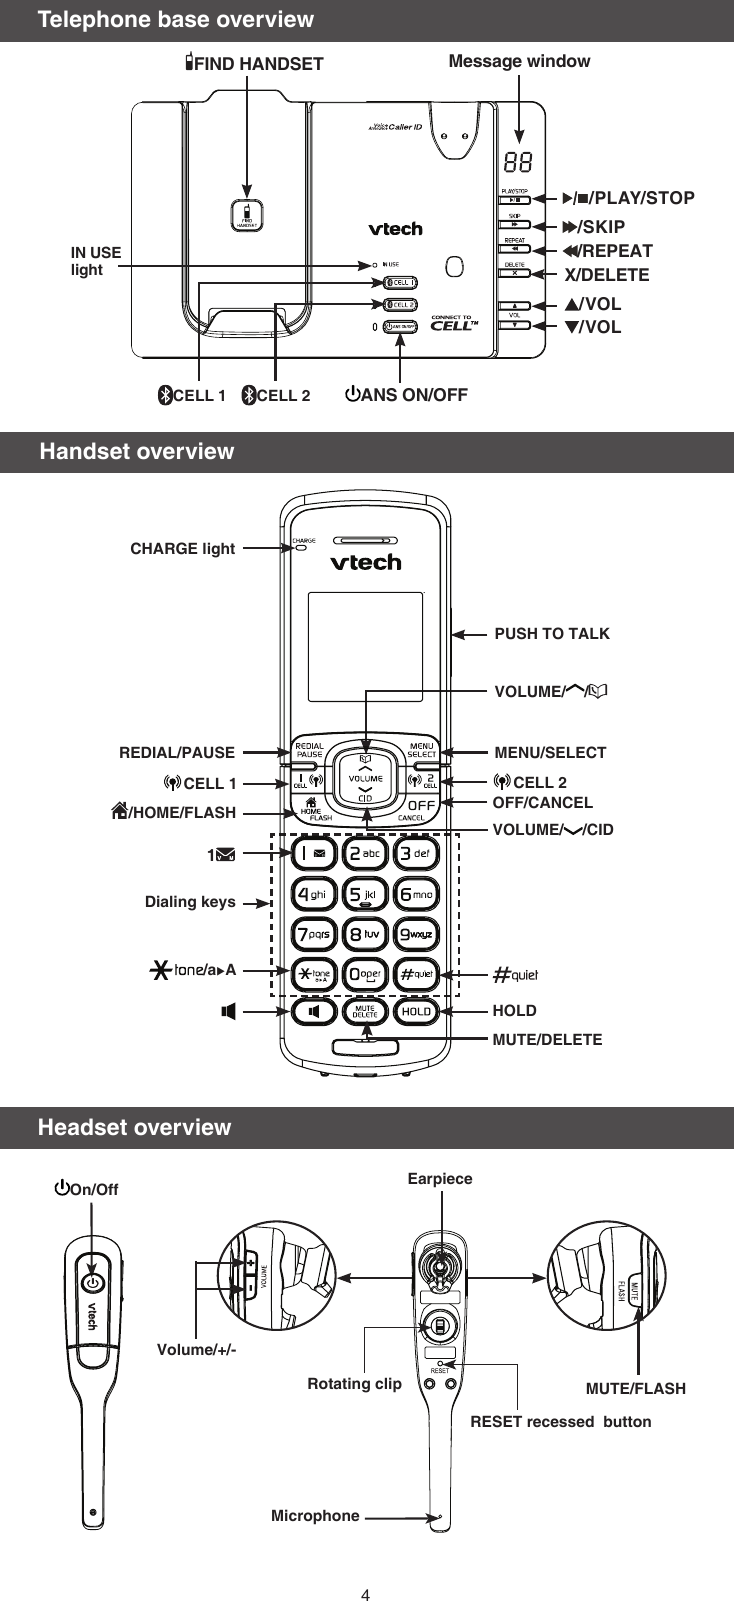
![6BluetoothTo use a Bluetooth enabled cell phone with your DS6673, you must rst pair and connect your Bluetooth cell phone(s) with the telephone base. All DS6673 handsets can be used to make or answer calls on the cell lines. Bluetooth wireless technology operates within a short range (a maximum of approximately 30 feet). When you pair a Bluetooth cell phone to the telephone base, place your Bluetooth cell phone closer to the telephone base to maintain sufcient signal strength. For optimal performance, keep your cell phone within 15 feet of the telephone base while using the cell line.Pair and connect your rst Bluetooth cell phonePress and hold CELL 1/CELL 2 on the telephone base for about four seconds. You hear a tone and the CELL 1/CELL 2 light blinks.Turn on the Bluetooth feature of your cell phone. Once your cell phone nds your VTech phone (VTech DS6673), press the appropriate key on your cell phone to continue the pairing process.Your cell phone may prompt you to enter the PIN of the telephone base. The default PIN of the telephone base is 0000.1.2.•To remove the head band from the headset:Hold the headset with one hand and the head band with your other hand.Pull the end of the head band until it separates from the rotating clip on the headset.1.2.HeadbandTo attach the head band to the headset:>%@>$@To wear on your left ear, hold the headset with one hand and the head band with your other hand. Rotate the head band within the rotating clip on the headset.•Attach the ear pad to the headset earpiece.2.To wear the headset on your right ear, insert the end [A] of the head band into the rotating clip [B] on the headset until it clicks into place.3.Remove any headset attachment connected to the headset.1.Adjust the head band to t your head. Adjust and rotate the angle of the headset until the microphone is pointing towards your mouth. Firmly grip the earpiece with one hand whenever adjusting the headset microphone up or down.4.To remove the ear hook from the headset:Hold the headset with one hand and the ear hook with your other hand. Pull the end of the ear hook up until it separates from the rotating clip on the headset.1.2.](https://usermanual.wiki/VTech-Telecommunications/80-9153-00.User-Manual-1-6/User-Guide-1917876-Page-6.png)