VTech Telecommunications 80-9423-00 1.9GHz DECT Cordless Phone with BT - Base Bluetooth User Manual DS6611 X ACIB V2 APPROVAL 20140211

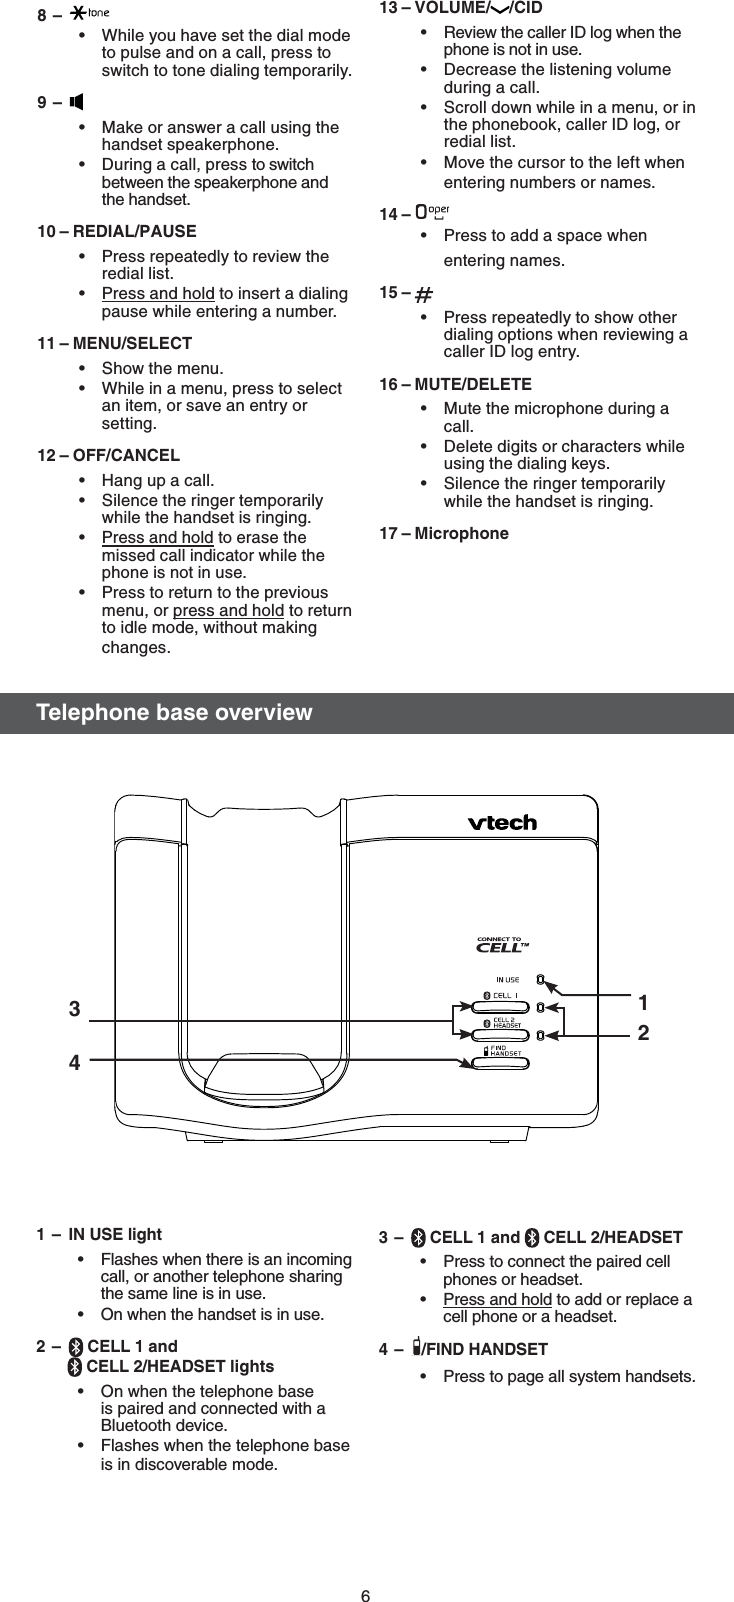
VTech Telecommunications Ltd 1.9GHz DECT Cordless Phone with BT - Base Bluetooth DS6611 X ACIB V2 APPROVAL 20140211

Contents

User Manual (DS6611)

1%4%4%4#$DECT 6.0 cordless telephone with  BLUETOOTH® wireless technology"CSJEHFEVTFSmTNBOVBM$POHSBUVMBUJPOTon purchasing your new VTech product. Before using this telephone, please read *NQPSUBOUTBGFUZJOTUSVDUJPOT.To protect our environment and conserve natural resources, this Abridged user’s manual provides you with the basic installation and use instructions.  A limited set of features are described in abbreviated form. Please refer to the online Complete user’s manual for a full set of installation and operation instructions at XXXWUFDIQIPOFTDPN.3FHJTUFSPOMJOFUPHFUBOBEEJUJPOBMNPOUIXBSSBOUZ7JTJUXXXWUFDIQIPOFTDPN3FHJTUSBUJPORegister your product online for enhanced warranty support.  1SPEVDUOFXTLearn about the latest VTech products.The ENERGY STAR® program (www.energystar.gov) recognizes  and encourages the use of products that save energy and help protect our environment. We are proud to mark this product with  the ENERGY STAR® label indicating it meets the latest energy efficiency guidelines.Telephones identified with this logo have reduced noise and interference when used with most T-coil equipped hearing aids and cochlear implants. The TIA-1083 Compliant Logo is a trademark of the Telecommunications Industry Association. Used under license.TCompatible withHearing Aid T-CoilTIA-1083
2Telephone line cordTelephone baseHandset (1 for DS6611) (2 for DS6611-2) (3 for DS6611-3)Abridged user’s manualWall mount bracketCharger and charger adapter (1 for DS6611-2) (2 for DS6611-3)Battery (1 for DS6611) (2 for DS6611-2) (3 for DS6611-3)Telephone base power adapterBattery Pack / Bloc-piles : (2.4V Ni-MH)WARNING / AVERTISSEMENT :DO NOT BURN OR PUNCTURE BATTERIES.NE PAS INCINÉRER OU PERCER LES PILES.Made in China / Fabriqué en chine THIS SIDE UP / CE CÔTÉ VERS LE HAUTCR12321BSUTDIFDLMJTUQuick Start Guide*NQPSUBOU4BGFUZ*OTUSVDUJPOTWhen using your telephone equipment, basic safety precautions should always be followed to reduce the risk of fire, electric shock and injury, including the following:Read and understand all instructions.Follow all warnings and instructions marked on the product.Unplug this product from the wall outlet before cleaning. Do not use liquid or aerosol cleaners. Use a damp cloth for cleaning.Do not use this product near water such as near a bath tub, wash bowl, kitchen sink, laundry tub or swimming pool, or in a wet basement or shower.Do not place this product on an unstable table, shelf, stand or other unstable surfaces.Slots and openings in the back or bottom of the telephone base and handset are provided for ventilation. To protect them from overheating, these openings must not be blocked by placing the product on a soft surface such as a bed, sofa or rug. This product should never be placed near or over a radiator or heat register. This product should not be placed in any area where proper ventilation is not provided.This product should be operated only from the type of power source indicated on the marking label. If you are not sure of the type of power supply in your home or office, consult your dealer or local power company.Do not allow anything to rest on the power cord. Do not install this product where the cord may be walked on.Never push objects of any kind into this product through the slots in the telephone base or handset because they may touch dangerous voltage points or create a short circuit. Never spill liquid of any kind on the product.To reduce the risk of electric shock, do not disassemble this product, but take it to an authorized service facility. Opening or removing parts of the telephone base or handset other than specified access doors may expose you to dangerous voltages or other risks. Incorrect reassembling can cause electric shock when the product is subsequently used.Do not overload wall outlets and extension cords. Unplug this product from the wall outlet and refer servicing to an authorized service facility under the following conditions:When the power supply cord or plug is damaged or frayed.If liquid has been spilled onto the product.If the product has been exposed to rain or water.If the product does not operate normally by following the operating instructions. Adjust only those controls that are covered by the operation instructions. Improper adjustment of other controls may result in damage and often requires extensive work by an authorized technician to restore the product to normal operation.If the product has been dropped and the telephone base and/or handset has been damaged.If the product exhibits a distinct change in performance.Avoid using a telephone (other than cordless) during an electrical storm. There is a remote risk of electric shock from lightning.Do not use the telephone to report a gas leak in the vicinity of the leak. Under certain circumstances, a spark may be created when the adapter is plugged into the power outlet, or when the handset is replaced in its cradle. This is a common event associated with the closing of any electrical circuit. The user should not plug the phone into a power outlet, and should not put a charged handset into the cradle, if the phone is located in an environment containing concentrations of flammable or flame-supporting gases, unless there is adequate ventilation. A spark in such an environment could create a fire or explosion. Such environments might include: medical use of oxygen without adequate ventilation; industrial gases (cleaning solvents; gasoline vapors; etc.); a leak of natural gas; etc.Only put the handset of your telephone next to your ear when it is in normal talk mode.The power adapters are intended to be correctly oriented in a vertical or floor mount position. The prongs are not designed to hold the plug in place if it is plugged into a ceiling, under-the-table or cabinet outlet.4"7&5)&4&*/4536$5*0/41.2.3.4.5.6.7.8.9.10.11.12.••••••13.14.15.16.1SFDBVUJPOTGPSVTFSTPGJNQMBOUFEDBSEJBDQBDFNBLFSTCardiac pacemakers (applies only to digital cordless telephones):Wireless Technology Research, LLC (WTR), an independent research entity, led a multidisciplinary evaluation of the interference between portable wireless telephones and implanted cardiac pacemakers. Supported by the U.S. Food and Drug Administration, WTR recommends to physicians that:1BDFNBLFSQBUJFOUTShould keep wireless telephones at least six inches from the pacemaker.Should NOT place wireless telephones directly over the pacemaker, such as in a breast pocket, when it is turned ON.Should use the wireless telephone at the ear opposite the pacemaker. WTR’s evaluation did not identify any risk to bystanders with pacemakers from other persons using wireless telephones.WTR’s evaluation did not identify any risk to bystanders with pacemakers from other persons using wireless telephones.•••Abridged user’s manual Quick S tart Guid e
3"CPVUDPSEMFTTUFMFQIPOFT1SJWBDZ The same features that make a cordless telephone convenient create some limitations. Telephone calls are transmitted between the telephone base and the cordless handset by radio waves, so there is a possibility that the cordless telephone conversations could be intercepted by radio receiving equipment within range of the cordless handset. For this reason, you should not think of cordless telephone conversations as being as private as those on corded telephones.&MFDUSJDBMQPXFSThe telephone base of this cordless telephone must be connected to a working electrical outlet. The electrical outlet should not be controlled by a wall switch. Calls cannot be made from the cordless handset if the telephone base is unplugged, switched off or if the electrical power is interrupted.1PUFOUJBM57JOUFSGFSFODFSome cordless telephones operate at frequencies that may cause interference to televisions and VCRs. To minimize or prevent such interference, do not place the telephone base of the cordless telephone near or on top of a TV or VCR. If interference is experienced, moving the cordless telephone farther away from the TV or VCR often reduces or eliminates the interference.3FDIBSHFBCMFCBUUFSJFT Exercise care in handling batteries in order not to create a short circuit with conducting material such as rings, bracelets, and keys. The battery or conductor may overheat and cause harm. Observe proper polarity between the battery and the battery charger./JDLFMNFUBMIZESJEFSFDIBSHFBCMFCBUUFSJFTDispose of these batteries in a safe manner. Do not burn or puncture the battery. Like other batteries of this type, if burned or punctured, they could release caustic material which could cause injury.pppppUse only the power adapters supplied with this product.Even if you do not subscribe to any conventional telephone service, you can pair a Bluetooth enabled cell phone to your telephone base (see #MVFUPPUI), and use the cell line alone without plugging in a telephone line cord.If you subscribe to telephone service from a cable company or a VoIP service provider, contact your cable/VoIP service provider for more information.•••$POOFDU$POOFDUUIFUFMFQIPOFCBTFBOEIBOETFUDIBSHFS123*OTUBMMUIFCBUUFSZBattery Pack / Bloc-piles : (2.4V Ni-MH)WARNING / AVERTISSEMENT :DO NOT BURN OR PUNCTURE BATTERIES.NE PAS INCINÉRER OU PERCER LES PILES.Made in China / Fabriqué en chine THIS SIDE UP / CE CÔTÉ VERS LE HAUTDSL filterClick!Click!Plug! Plug!Plug!Battery Pack / Bloc-piles : (2.4V Ni-MH)WARNING / AVERTISSEMENT :DO NOT BURN OR PUNCTURE BATTERIES.NE PAS INCINÉRER OU PERCER LES PILES.Made in China / Fabriqué en chine THIS SIDE UP / CE CÔTÉ VERS LE HAUTUse only the battery provided or equivalent.If the handset will not be used for a long time, disconnect and remove the battery to prevent possible leakage.To purchase a replacement battery, visit our website at XXXWUFDIQIPOFTDPN or call . In Canada, go to XXXWUFDIDBOBEBDPN or call  .•••$)"3(& light remains on when charging.$IBSHFUIFCBUUFSZ
4If you place the handset in the telephone base or charger without plugging in the battery, the screen displays /PCBUUFSZ.•#BUUFSZJOEJDBUPST #BUUFSZTUBUVT "DUJPOThe screen is blank, or shows 1VUJODIBSHFS and  flashes.The battery has no charge or very little charge. The handset cannot be used.Charge without interruption (at least 30 minutes).The screen shows  -PXCBUUFSZ and   flashes. The battery has enough charge to be used for a  short time.Charge without interruption (at least 30 minutes).The screen shows )"/%4&59.The battery is charged. To keep the battery charged, place it in the telephone base or charger when not in use.5BCMFUPQUPXBMMNPVOUJOTUBMMBUJPOThe telephone comes ready for tabletop use. If you have already installed the telephone for tabletop use, unplug the telephone line cord from the telephone wall jack, and unplug the telephone base power adapter from the wall outlet before mounting your telephone on a wall. Follow the steps below to mount your telephone on a wall. Once you have installed the battery, the screen indicates the battery status (see the table below).For best performance, keep the handset in the telephone base or charger when not in use. The battery is fully charged after 12 hours of continuous charging. ••2  Align the holes on the bracket with the standard wall plate and slide the bracket down until it clicks securely  in place.Route the telephone line cord through the rectangular hole on the wall mount bracket. Then plug the two ends of the telephone line cord into the telephone base and the wall outlet as shown.1.Connect the power adapter to the telephone base and an electrical  outlet not controlled by a wall switch.4.3.  Align the grooves on the telephone base with the tabs on the wall mount bracket, and then slide it down until it clicks securely in place.A
5#FGPSFVTFCheck for a dial tone by pressing  )0.&. If you hear a dial tone, the installation is successful.*GZPVEPOPUIFBSBEJBMUPOFMake sure the installation procedures described above are properly done.It may be a wiring problem. If you have changed your telephone service to digital service from a cable company or a VoIP service provider, the telephone line may need to be rewired to allow all existing telephone jacks to work. Contact your cable/VoIP service provider for more information.0QFSBUJOHSBOHFThis cordless telephone operates with the maximum power allowed by the Federal Communications Commission (FCC). Even so, this handset and telephone base can communicate over only a certain distance - which can vary with the locations of the telephone base and handset, the weather, and the layout of your home or office. When the handset is out of range, the handset displays 0VUPGSBOHFandOPQXSBUCBTF alternately.If there is a call while the handset is out of range, it may not ring, or if it does ring, the call may not connect well when you press  )0.& or  $&--. Move closer to the telephone base, and then press  )0.& or  $&-- to answer the call. If the handset moves out of range during a telephone conversation, there may be interference. To improve reception, move closer to the telephone base.••)BOETFUPWFSWJFXq$)"3(& MJHIU•  On when the handset is charging.q)BOETFUFBSQJFDFq-$%EJTQMBZq70-6.&  •  Review the phonebook when the phone is not in use.•  Increase the listening volume during a call.•  Scroll up while in a menu, or in the phonebook, caller ID log, or redial list.•  Move the cursor to the right when entering numbers or names. q $&--•  Make or answer a cell call.•  Answer an incoming cell call when you hear a call waiting alert.q )0.&'-"4)•  Make or answer a home call.•  Answer an incoming home call when you hear a call waiting alert.q•  Press repeatedly to add or remove 1 in front of the caller ID log entry before dialing or saving it to the phonebook.•  Press and hold to set or dial your voicemail number.
65FMFQIPOFCBTFPWFSWJFXq*/64&MJHIU•  Flashes when there is an incoming call, or another telephone sharing the same line is in use.•  On when the handset is in use.q $&--BOE $&--)&"%4&5MJHIUT•  On when the telephone base is paired and connected with a Bluetooth device.•  Flashes when the telephone base is in discoverable mode.q $&--BOE $&--)&"%4&5•  Press to connect the paired cell phones or headset.•  Press and hold to add or replace a cell phone or a headset.q '*/%)"/%4&5•  Press to page all system handsets. 4 3 12q•  While you have set the dial mode to pulse and on a call, press to switch to tone dialing temporarily.q   •  Make or answer a call using the handset speakerphone.•  During a call, press to switch between the speakerphone and the handset.q3&%*"-1"64&•  Press repeatedly to review the redial list.•  Press and hold to insert a dialing pause while entering a number.q.&/64&-&$5•  Show the menu.•  While in a menu, press to select an item, or save an entry or setting.q0''$"/$&-Hang up a call.Silence the ringer temporarily while the handset is ringing.Press and hold to erase the missed call indicator while the phone is not in use.Press to return to the previous menu, or press and hold to return to idle mode, without making changes. ••••q70-6.& $*%Review the caller ID log when the phone is not in use.Decrease the listening volume during a call.Scroll down while in a menu, or in the phonebook, caller ID log, or redial list.Move the cursor to the left when entering numbers or names.qPress to add a space when entering names.q Press repeatedly to show other dialing options when reviewing a caller ID log entry.q.65&%&-&5&Mute the microphone during a call.Delete digits or characters while using the dialing keys.Silence the ringer temporarily while the handset is ringing.q.JDSPQIPOF•••••••••
7#MVFUPPUI1BJSBOEDPOOFDUZPVS#MVFUPPUIFOBCMFEDFMMQIPOFTo use a Bluetooth enabled cell phone with your %4, you must first pair and connect your Bluetooth cell phone(s) with the telephone base. All %4 handsets can be used to make or answer calls on the cell line.            Bluetooth wireless technology operates within a short range (a maximum of approximately 30 feet). When you pair a Bluetooth cell phone to the telephone base, place your Bluetooth cell phone closer to the telephone base to maintain sufficient signal strength. For optimal performance, keep your cell phone within  15 feet of the telephone base while using the cell line.Choose a slot to pair the cell phone. Press and hold   $&--or   $&--)&"%4&5 on the telephone base until the   $&--or   $&--)&"%4&5 light flashes.Turn on the Bluetooth feature of your cell phone. Once your cell phone finds your VTech phone (75FDI%4), press appropriate key on your cell phone to continue the pairing process.Your cell phone may prompt you to enter the PIN of the telephone base.  The default PIN of the telephone base is .When the cell phone is connected to the telephone base, the corresponding  status icon ( or  ) displays. The corresponding device light (  $&-- or   $&--)&"%4&5) turns on.If the pairing fails, turn off the Bluetooth feature on your cell phone and on the %4 by pressing   $&-- or   $&--)&"%4&5. Then repeat the steps above to pair and connect again. In some cases, it may take you a few attempts to complete the pairing process.1BJSBOEDPOOFDUZPVS#MVFUPPUIFOBCMFEIFBETFUPress .&/6 on the phone when it is not in use.Press   or   to scroll to #MVFUPPUI, and then press 4&-&$5.Press   or   to scroll to "EE#5IFBETFU, and then press 4&-&$5. The screen displays 4FBSDIIFBETFU 4.  Set your headset to discoverable mode. Once your handset finds your headset,  press 4&-&$5. Enter the PIN of your headset if required. The PIN for most Bluetooth devices is  (refer to the user’s manual of your headset), and then press 4&-&$5.When the headset is successfully paired and connected to the telephone base, the  icon displays. The   $&--)&"%4&5 light turns on.75FDI$POOFDUUP$FMM5.BQQMJDBUJPOThis application helps you integrate your Android phones with  your %4. For more information and application download, go to  IUUQXXXWUFDIQIPOFTDPNBQQ@DPOOFDU@UP@DFMM%PXOMPBEDPOUBDUTGSPNZPVS#MVFUPPUIDFMMQIPOFPress .&/6 when the phone is not in use.Scroll to #MVFUPPUI, and then press 4&-&$5.Scroll to %PXOMPBE1#, and then press 4&-&$5.Scroll to select the desired cell phone, and then press 4&-&$5.For certain cell phones, you may need to press a key on your cell phone to confirm the phonebook download.The performance of phonebook download feature depends on the compatibility of your Bluetooth cell phone. Refer to the user’s manual of your cell phone for more information about how that device uses Bluetooth connectivity.Certain cell phones do not support SIM card download. If this is the case, transfer the contacts from your SIM card to your cell phone memory first. Then download from your cell phone memory. For more information on how to transfer contacts from your SIM card to your cell phone memory, see the user’s manual of your cell phone.For Android cell phones, you may also download your cell phone  contactsto your %4 via the VTech Contact Share application.  Scan the QR code on the right, or go to  XXXWUFDIQIPOFTDPNBQQTDPOUBDU@TIBSF for  application download.1.2.•1.2.3.•1.2.3.4.••••
86TJOHUIFIBOETFUNFOVPress .&/6 when the phone is not in use.Press  or  until the screen displays the desired  feature menu.Press 4&-&$5 to enter that menu.To return to the previous menu, press $"/$&-.To return to idle mode, press and hold $"/$&-.5FMFQIPOFTFUUJOHT Default settings are indicated by asterisks(*).4FUUJOHTNFOV %FTDSJQUJPO 0QUJPOT-$%MBOHVBHF Set the screen display language. &OHMJTI'SBO¿BJT&TQBñPM7PJDFNBJM Save the speed dial voicemail number to  .7PJDFNBJM@$MSWPJDFNBJM Turn off the voicemail indicators (see the  note below)./",FZUPOF Turn an audible beep on or off whenever a key is pressed.,FZUPOF0O,FZUPOF0GG)PNFBSFBDPEF Enter your home area code if you dial only seven digits for local calls.)PNFBSFBDPEF@@@%JBMNPEF Set the telephone to be touch-tone or  pulse dialing.5PVDIUPOF1VMTFUse the $MSWPJDFNBJM feature when the telephone indicates there is new voicemail but there is none. For example, when you have accessed your voicemail while away from home. The $MSWPJDFNBJM feature only turns off the indicators; it does not delete your voicemail messages. As long as you have new voicemail messages, your telephone service provider continues to send the signal that turns on the indicators.The following are some of the telephone features you may wish to set. 3JOHFSWPMVNFYou can adjust the ringer volume level, or turn the ringer off.Press .&/6 when the handset is not in use.Scroll to 3JOHFST, and then press 4&-&$5.Scroll to choose )PNFWPMVNF or $FMMWPMVNF, and then  press 4&-&$5.Press   or   to adjust the volume, and then press  4&-&$5 to save.If the handset ringer volume is set to off, that handset is silenced for all incoming calls except paging tone.3JOHFSUPOFYou can choose from different ringer tones.Press .&/6 when the handset is not in use.Scroll to 3JOHFST, and then press 4&-&$5.Scroll to choose )PNFSJOHUPOF or $FMMSJOHUPOF, and then press 4&-&$5.Press   or   to sample each ringer tone, and then press 4&-&$5 to save.If you turn off the ringer volume, you will not hear ringer tone samples.4FUEBUFBOEUJNFIf you subscribe to caller ID service, the day, month, and time are set automatically with each incoming call. You can also set the date and time manually.Press .&/6 when the handset is not in use.Scroll to 4FUEBUFUJNF, and then press 4&-&$5.Use the dialing keys (-) to enter the month, date, and year, and then  press 4&-&$5.Use the dialing keys (-) to enter the hour and minute.Press   or   to choose ". or 1., and then press 4&-&$5 to save. 1.2.3.••1.2.3.4.1.2.3.4.1.2.3.4.5.
95FMFQIPOFPQFSBUJPO.BLFBIPNFDBMMPress  )0.& or  , and then dial the telephone number..BLFBDFMMDBMMPress  $&--. Enter the telephone number and then press  $&-- to dial.03Enter the telephone number and then press  $&-- to dial.After first pressing  $&--, you may need to choose a cell device. Scroll to select the desired cell device when necessary, and then press 4&-&$5.While using the cell line, place your cell phone closer to the telephone base, and make sure that there are no physical obstacles between the telephone base and the cell phone, such as large furniture or thick walls."OTXFSBIPNFDFMMDBMMPress  )0.&,  $&--,, or any dialing key.&OEBIPNFDFMMDBMMPress0'', or put the handset to the telephone base or charger.4QFBLFSQIPOFDuring a call, press   to switch between speakerphone and normal handset use.7PMVNFDuring a call, press 70-6.& or 70-6.&  to adjust the listening volume.The handset earpiece volume setting and speakerphone volume setting are independent..VUFThe mute function allows you to hear the other party but the other party cannot hear you.During a call, press .65&. The handset displays .VUFE.Press .65& again to resume the conversation. The handset displays .JDSPQIPOFPO.$BMMXBJUJOHWhen you subscribe to call waiting service from your telephone service provider,  you hear an alert tone if there is an incoming call while you are on another call. $BMMXBJUJOHPOUIFIPNFMJOFPress '-"4) to put the current call on hold and take the new call.Press '-"4) to switch back and forth between calls.$BMMXBJUJOHPOUIFDFMMMJOFPress  $&-- to put the current call on hold and take the new call.Press  $&-- to switch back and forth between calls.5FNQPSBSZSJOHFSTJMFODJOHWhen the telephone is ringing, you can temporarily silence the ringer of the handset without disconnecting the call. The next call rings normally at the preset volume.Press 0'' or .65&on the handset. The handset displays  5FNQPSBSZUPOFEJBMJOHIf you have pulse (rotary) service only, you can switch from pulse to tone dialing temporarily during a call.During a call, press  .Use the dialing keys to enter the relevant number. The telephone sends touch-tone signals. It automatically returns to pulse dialing mode after you end the call.'JOEIBOETFUUse this feature to find all system handsets.5PTUBSUQBHJOHPress  '*/%)"/%4&5 on the telephone base. All idle handsets ring and display 1BHJOH.5PFOEQBHJOHPress  '*/%)"/%4&5 again on the telephone base.03Press  )0.&,  $&--,  , $"/$&-, or any dialing key on the handset.03Place the handset in the telephone base or charger.Do not press and hold  '*/%)"/%4&5 for more than four seconds. It may lead to handset deregistration. •••••••••1.2.•••••1.2.••••
103FEJBMMJTUEach handset stores the last 10 telephone numbers dialed. When there are already 10 entries, the oldest entry is deleted to make room for the new entry.5PSFWJFXBOEEJBMBOVNCFSGSPNUIFSFEJBMMJTUPress 3&%*"- when the handset is not in use.Press  ,  , or 3&%*"- repeatedly until the desired entry displays.Press  )0.&,  $&--, or   to dial.5PEFMFUFBSFEJBMFOUSZWhen the desired redial entry displays, press %&-&5&.+PJOBDBMMJOQSPHSFTTYou can use up to two system handsets at a time on a home line call. You can buy additional expansion handsets (%4) for this telephone base. You can register up to five handsets to the telephone base.When a handset is on a home call, press  )0.&oron another handset to join the call.Press 0'' to exit the call. The call continues until all handsets hang up.*OUFSDPNUse the intercom features for conversations between two devices.Press.&/6 on your handset when not in use. Press  or to scroll to *OUFSDPN, and then press 4&-&$5. Use the dialing keys to enter a destination device number.To answer the intercom call, press  )0.&,  $&--,  , or any dialing key on the destination handset.To end the intercom call, press 0'' or place the handset back in the telephone base or charger.5SBOTGFSBDBMMWhile on an outside call, you can use the intercom feature to transfer the call from one handset to another.Press.&/6 on your handset during a call.Press  or to scroll to *OUFSDPN, and then press 4&-&$5. The current call is put on hold. Use the dialing keys to enter a destination device number.To answer the intercom call, press  )0.&,  $&--,  , or any dialing key on the destination handset. You can now have a private conservation before transferring the call.To transfer the call, press 0'' on the initiating handset or place the initiating handset back in the telephone base or charger.To end the call, press 0'' on the destination handset or place the destination handset back in the telephone base or charger."OTXFSBOJODPNJOHDBMMEVSJOHBOJOUFSDPNDBMMIf you receive an incoming call during an intercom call, there is an alert tone.To answer a home call, press  )0.&. The intercom call ends automatically.To end the intercom call without answering the outside call, press0''. The intercom call ends and the telephone continues to ring.To answer a cell call, press 0'' to end the intercom call. The telephone continues to ring. Then press  $&--. 1IPOFCPPL The phonebook can store up to 1000 entries and are shared by all system handsets.5PBEEBQIPOFCPPLFOUSZPress .&/6 when the phone is not in use.Scroll to 1IPOFCPPL then press 4&-&$5.Press 4&-&$5 again to choose "EEOFXFOUSZ. Enter the number.Use the dialing keys to enter the number (up to 30 digits).5. Press 4&-&$5 to move to the name.6.  Use the dialing keys to enter the name (up to 15 characters). Additional key presses show other characters of that particular key.7. Pres s 4&-&$5 to save.While entering numbers and names, you can:Press%&-&5& to erase a digit or character.Press and hold %&-&5& to erase the entire entry.Press  or  to move the cursor to the left or right.Press and hold 1"64& to insert a dialing pause (for entering phone numbers only).Press  to add a space (for entering names only).Press   to add   (  appears) or   to add ( appears) (for entering phone numbers only).1.2.3.••1.2.3.4.1.2.3.4.5.•••1.2.3.4.•••••••
115PSFWJFXBOEEJBMGSPNUIFQIPOFCPPLEntries are sorted alphabetically.Press   when the phone is not in use.Scroll to browse through the phonebook, or use the dialing keys to start a  name search (you can enter up to 3 characters for the search).When the desired entry appears, press  )0.&,$&--, or   to dial.5PFEJUBQIPOFCPPLFOUSZWhen the desired entry displays, press 4&-&$5.Use the dialing keys to edit the number, and then press 4&-&$5.Use the dialing keys to edit the name, and then press 4&-&$5 to save.5PEFMFUFBQIPOFCPPLFOUSZWhen the desired entry displays, press %&-&5&.When the screen displays %FMFUFFOUSZ , press4&-&$5.5PEFMFUFBMMQIPOFCPPLFOUSJFTPress .&/6 when the phone is not in use.Scroll to 1IPOFCPPL, and then press 4&-&$5. Scroll to %FMFUFBMM, and then press 4&-&$5When the screen displays %FMFUFBMM , press 4&-&$5.$BMMFS*% This product supports caller ID services provided by most telephone service providers. Depending on your service subscription, you may see the caller’s name, number, date and time of calls that are sent by your telephone service provider after the first or second ring.$BMMFS*%MPHThe caller ID log stores up to 50 entries. If you answer a call before the caller information appears, it will not be saved in the caller ID log.The handset displays 99NJTTFEDBMMT when there are calls that have not been reviewed in the caller ID log.If you want to erase the missed call indicator, press and hold $"/$&-on the  idle handset.5PSFWJFXBOEEJBMBOVNCFSJOUIFDBMMFS*%MPHPress $*% when the phone is not in use.Scroll to browse through the caller ID log. When the desired entry appears:Press   repeatedly to show different dialing options.Press  repeatedly if you need to add or remove 1 in front of the  phone number.Press  )0.&,  , or  $&-- to dial the displayed number.5PTBWFBDBMMFS*%MPHFOUSZUPUIFQIPOFCPPLWhen the desired caller ID log entry displays, press 4&-&$5.2. Scroll to 5P1IPOFCPPL then press 4&-&$5.3.  Use the dialing keys to modify the number, and then press 4&-&$5.4.  Use the dialing keys to modify the name, and then press 4&-&$5 to save.5PEFMFUFBDBMMFS*%MPHFOUSZWhen the desired caller ID log entry displays, press %&-&5&.5PEFMFUFBMMDBMMFS*%MPHFOUSJFTPress .&/6 when the phone is not in use. Scroll to $BMMFS*%MPHand then press 4&-&$5. Scroll to %FMFUFBMM and then press 4&-&$5 twice.$BMMCMPDL If you have subcribed to Caller ID service, you can use the call block feature to reject certain calls automatically. The caller block list stores up to 20 entries. Automatic call rejection can be applied to:numbers saved into the call block list•  incoming calls without numbers5PBEEBDBMMCMPDLFOUSZ1. Press .&/6 when the phone is not in use.2. Scroll to $BMMCMPDL, and then press 4&-&$5.3. Scroll to #MPDLMJTU, and then press 4&-&$5. 4. Scroll to "EEOFXFOUSZ, and then press 4&-&$5. 5.  Enter the number.•  Use the dialing keys to enter the number (up to 30 digits).6. Press 4&-&$5 to move to the name.7.  Use the dialing keys to enter the name (up to 15 characters). Additional key presses show other characters of that particular key.8. Press 4&-&$5 to save.1.2.3.1.2.3.1.2.1.2.3.4.••1.2.••3.1.•••
125PSFWJFXDBMMCMPDLMJTUPress .&/6 when the phone is not in use.Scroll to $BMMCMPDL, and then press 4&-&$5.Scroll to #MPDLMJTU, and then press 4&-&$5.Press 4&-&$5 to choose 3FWJFX.5PFEJUBDBMMCMPDLFOUSZWhen the desired entry displays, press 4&-&$5.Use the dialing keys to edit the number, and then press 4&-&$5.Use the dialing keys to edit the name, and then press 4&-&$5 to save.5PTBWFBDBMMFS*%MPHFOUSZUPDBMMCMPDLMJTU1.  When the desired caller ID log entry displays, press 4&-&$5.2. Scroll to 5P$BMMCMPDL then press 4&-&$5.3.  Use the dialing keys to modify the number, and then press 4&-&$5.4.  Use the dialing keys to modify the name, and then press 4&-&$5 to save.5PEFMFUFBDBMMCMPDLMJTUFOUSZWhen the desired call block list entry displays, press %&-&5&.5PTFUnCMPDLDBMMTXJUIPVUOVNCFSoPQUJPOPress .&/6 when the phone is not in use.Scroll to $BMMCMPDL, and then press 4&-&$5.Scroll to $BMMTXPOVN, and then press 4&-&$5.Scroll to choose /PUCMPDL or #MPDL, and then press 4&-&$5. &YQBOEZPVSUFMFQIPOFTZTUFN "EEBOESFHJTUFSBIBOETFUYou can add new cordless handsets (%4), DECT 6.0 cordless headset, speakerphone, or speaker box to your telephone system (purchased separately). Your telephone system supports a maximum of five devices. Additional devices registered to the telephone system are assigned numbers in the sequential order. Register each device with the telephone base before use. When first purchased and properly charged, each expansion handset shows 5PSFHJTUFS)4and TFFNBOVBM alternately. Charge the handset before registering it to the telephone base.To register a DECT 6.0 cordless headset, speakerphone, or speaker box to this telephone system, please refer to the user’s manual of the respective product for more details. To register a cordless handset, see below.5PSFHJTUFSBIBOETFUPlace the new/non-registered handset in the telephone base. The handset shows 3FHJTUFSJOH The handset shows 3FHJTUFSFE and you hear a beep when the registration process completes. The registration process takes about 90 seconds to complete.%FSFHJTUFSBMMEFWJDFT To replace a handset or reassign the designated handset number of a registered handset, you must deregister all devices and then individually register each handset.5PEFSFHJTUFSBMMEFWJDFTPress and hold  '*/%)"/%4&5 on the telephone base for about 10 seconds until the */64& light on the telephone base flashes.Immediately press  '*/%)"/%4&5 again.All handsets show5PSFHJTUFS)4and TFFNBOVBM alternately when the deregistration process completes. The deregistration process takes about  10 seconds to complete.1.2.3.4.1.2.3.•1.2.3.4.•1.2.Do not place the handset in the charger.
13'SFRVFOUMZBTLFERVFTUJPOT If you have difficulty with your telephone, please try the suggestions below.  If you cannot find the answer to your question, contact customer service by visiting our website at XXXWUFDIQIPOFTDPN or calling . In Canada, go to XXXWUFDIDBOBEBDPN or call .*DBOOPUBEEBOEDPOOFDUNZDFMMQIPOFPSIFBETFUUPUIFUFMFQIPOFCBTFMake sure you have cellular coverage and the Bluetooth function of your cell phone or headset is turned on. See the user’s manual of your cell phone or headset for more information.Make sure that the telephone base is in discoverable mode.Carefully follow the pairing instructions on page 7. Make sure that your Bluetooth cell phone or headset is not connected to any other Bluetooth device, and is connected to the telephone base and active on the device list.Remove 75FDI%4 from your cell phone’s handsfree device history list (see the user’s manual of your cell phone for more information).Turn off your cell phone or headset, and then turn it on again.For some cell phones, you must authorize 75FDI%4 device in your cell phone’s Bluetooth feature. See the user’s manual of your cell phone for  more information.Most cell phones have the Bluetooth feature in the connection or setup menus. Please refer to the user’s manual of your cell phone.In general, press the menu key on your cell phone, and then look for the Bluetooth menu in the settings  or connection menu. In the Bluetooth menu, select the option to search for or  add new devices.Reset the telephone base. Unplug the unit’s electrical power. Wait  for approximately 15 seconds, and then plug it back in. Repeat the  above suggestions5IF1*/POUIFUFMFQIPOFCBTFEPFTOPUXPSLMake sure you enter the correct PIN. The default PIN is .$BOUIF%4IFMQUIFQPPSDFMMQIPOFSFDFQUJPOJONZIPVTF If your cell phone has poor reception in your home, the %4 cannot improve the reception. However, if there is a location in your house with better reception, you can leave your cell phone at that location while you use the %4 cell line. In order for this to work, the telephone base must be within 30 feet of the cell phone..ZUFMFQIPOFEPFTOPUXPSLBUBMMMake sure the battery is installed and charged correctly. For optimum daily performance, return the handset to the telephone base or charger after use.Make sure the power adapter is securely plugged into an outlet not controlled by a wall switch.Make sure the telephone line cord is plugged firmly into the telephone base and the wall jack.Unplug the electrical power to the telephone base. Wait for approximately  15 seconds, and then plug it back in. Allow up to one minute for the cordless handset and telephone base to synchronize.Charge the battery in the handset for up to 12 hours.If the battery is completely depleted, charge the handset for at least 30 minutes  before use.Remove the battery and then install it again. If that still does not work, it may be necessary to purchase a new battery.Disconnect the telephone base from the telephone wall jack and plug in a working telephone. If the other telephone does not work, the problem is probably in the wiring or telephone service. Contact your telephone service provider.Make sure there is a dial tone before dialing. It is normal if the handset takes a second or two to synchronize with the telephone base before producing a dial tone. Wait an extra second before dialing.Eliminate any background noise. Mute the cordless handset before dialing, or dial from another room in your home with less background noise.If you have changed your telephone service to digital service from a cable company or a VoIP service provider, the telephone line may need to be rewired to allow all existing telephone jacks to work. Contact your service provider for more information.*BDDJEFOUBMMZDIBOHFEUIF-$%MBOHVBHFUP'SFODIPS4QBOJTIBOE*EPOmULOPXIPXUPDIBOHFJUCBDLUP&OHMJTIWhile the phone is not in use, press .&/6, and then enter    to reset the LCD language to English.While the phone is on a call, press .&/6, and then enter    to reset the LCD language to English. Then the call ends.•••••••••••••••••••••••
14$PNNPODVSFGPSFMFDUSPOJDFRVJQNFOUIf the telephone is not responding normally, put the cordless handset in the telephone base. If this does not fix the problem, do the following (in the order listed):1. Disconnect the power to the telephone base.2. Disconnect the battery on the cordless handset.3. Wait a few minutes before connecting power to the telephone base.4. Install the battery again and place the cordless handset in the telephone base .5. Wait for the cordless handset to synchronize with the telephone base. Allow up one minute for this to take place.&$0NPEF This power conserving technology reduces power consumption for optimal  battery performance.The ECO mode activates automatically whenever the handset is synchronized  with the telephone base. The handset shows &$0 when the ECO mode activates.&OFSHZTBWJOHDIBSHJOHNPEF When this mode is activated, all telephone functions, except handset battery charging, will  be disabled.5PBDUJWBUFUIFFOFSHZTBWJOHDIBSHJOHNPEF1. Unplug the telephone base power adapter from the power outlet. Make sure all handsets are plugged with charged batteries before proceeding. 2. While you press and hold  '*/%)"/%4&5, plug the telephone base power adapter back to the power outlet.3. After about 20 seconds, when the */64& light starts flashing, release  '*/%)"/%4&5and then press it again within 2 seconds.When the phone successfully enters the energy-saving charging mode, the */64& light turns off and all handsets display 5PSFHJTUFS)4andTFFNBOVBMalternately.When the phone fails to enter this mode, repeat Step 1 through Step 3 above.The telephone base will be powered up as normal if you fail to press  '*/%)"/%4&5 within 2 seconds in Step 3. 5PEFBDUJWBUFUIFFOFSHZTBWJOHDIBSHJOHNPEF1. Unplug the telephone base power adapter from the power outlet, and then plug it back in. Then the telephone base is powered up as normal.2. Register your handsets back to the telephone base. See page 12 for handset registration instructions.(FOFSBMQSPEVDUDBSFRemember that electrical appliances can cause serious injury if used when you are wet or standing in water. If the telephone base should fall into water, DO NOT RETRIEVE IT UNTIL YOU UNPLUG THE POWER CORD AND TELEPHONE LINE CORD FROM THE WALL. Then remove the telephone by the unplugged cords. 5BLJOHDBSFPGZPVSUFMFQIPOFYour cordless telephone contains sophisticated electronic parts, so it must be treated with care."WPJESPVHIUSFBUNFOUPlace the handset down gently. Save the original packing materials to protect your telephone if you ever need to ship it."WPJEXBUFSYour telephone can be damaged if it gets wet. Do not use the handset outdoors in the rain, or handle it with wet hands. Do not install the telephone base near a sink, bathtub or shower.&MFDUSJDBMTUPSNTElectrical storms can sometimes cause power surges harmful to electronic equipment. For your own safety, take caution when using electrical appliances during storms.$MFBOJOHZPVSUFMFQIPOFYour telephone has a durable plastic casing that should retain its luster for many years. Clean it only with a soft cloth slightly dampened with water or mild soap. Do not use excess water or cleaning solvents of any kind.5IF3#3$TFBM The RBRC® seal on the nickel-metal hydride battery indicates that VTech Communications, Inc. is voluntarily participating in an industry program to collect and recycle these batteries at the end of their useful lives, when taken out of service within the United States and Canada.The RBRC® program provides a convenient alternative to placing used  nickel-metal hydride batteries into the trash or municipal waste, which may be illegal in your area.VTech’s participation in RBRC® makes it easy for you to drop off the spent battery at local retailers participating in the RBRC® program or at authorized VTech product service centers. Please call #"55&3:TM for information on Ni-MH battery recycling and disposal bans/restrictions in your area. VTech’s involvement in this program is part of its commitment to protecting our environment and conserving natural resources.3#3$JTBSFHJTUFSFEUSBEFNBSLPG3FDIBSHFBCMF#BUUFSZ3FDZDMJOH$PSQPSBUJPO•
15-JNJUFEXBSSBOUZ8IBUEPFTUIJTMJNJUFEXBSSBOUZDPWFS The manufacturer of this VTech Product warrants to the holder of a valid proof of purchase (“Consumer” or “you”) that the Product and all accessories provided in the sales package (“Product”) are free from defects in material and workmanship, pursuant to the following terms and conditions, when installed and used normally and in accordance with the Product operating instructions. This limited warranty extends only to the Consumer for Products purchased and used in the United States of America  and Canada.8IBUXJMM75FDIEPJGUIF1SPEVDUJTOPUGSFFGSPNEFGFDUTJONBUFSJBMTBOEXPSLNBOTIJQEVSJOHUIFMJNJUFEXBSSBOUZQFSJPEn.BUFSJBMMZ%FGFDUJWF1SPEVDUo During the limited warranty period, VTech’s authorized service representative will repair or replace at VTech’s option, without charge, a Materially Defective Product. If we repair the Product, we may use new or refurbished replacement parts. If we choose to replace the Product, we may replace it with a new or refurbished Product of the same or similar design. We will retain defective parts, modules, or equipment. Repair or replacement of the Product, at VTech’s option, is your exclusive remedy. VTech will return the repaired or replacement Products to you in working condition. You should expect the repair or replacement to take approximately 30 days.)PXMPOHJTUIFMJNJUFEXBSSBOUZQFSJPE The limited warranty period for the Product extends for ONE (1) YEAR from the date of purchase. If VTech repairs or replaces a Materially Defective Product under the terms of this limited warranty, this limited warranty also applies to the repaired or replacement Product for a period of either (a) 90 days from the date the repaired or replacement Product is shipped to you or (b) the time remaining on the original one-year warranty; whichever is longer.8IBUJTOPUDPWFSFECZUIJTMJNJUFEXBSSBOUZ This limited warranty does not cover:1.  Product that has been subjected to misuse, accident, shipping or other physical damage, improper installation, abnormal operation or handling, neglect, inundation, fire, water or other liquid intrusion; or2.  Product that has been damaged due to repair, alteration or modification by anyone other than an authorized service representative of VTech; or3.  Product to the extent that the problem experienced is caused by signal conditions, network reliability, or cable or antenna systems; or4.  Product to the extent that the problem is caused by use with non-VTech accessories; or5.  Product whose warranty/quality stickers, product serial number plates or electronic serial numbers have been removed, altered or rendered illegible; or6.  Product purchased, used, serviced, or shipped for repair from outside the United States of America or Canada, or used for commercial or institutional purposes (including but not limited to Products used for rental purposes); or7.  Product returned without a valid proof of purchase (see item 2 below); or8.  Charges for installation or set up, adjustment of customer controls, and installation or repair of systems outside the unit.)PXEPZPVHFUXBSSBOUZTFSWJDF To obtain warranty service in the USA, please visit our website at XXXWUFDIQIPOFTDPN or call  . In Canada, go to XXXWUFDIDBOBEBDPN or call . /05&: Before calling for service, please review the user’s manual - a check of the Product’s controls and features may save you a service call.Except as provided by applicable law, you assume the risk of loss or damage during transit and transportation and are responsible for delivery or handling charges incurred in the transport of the Product(s) to the service location. VTech will return repaired or replaced Product under this limited warranty. Transportation, delivery or handling charges are prepaid. VTech assumes no risk for damage or loss of the Product in transit. If the Product failure is not covered by this limited warranty, or proof of purchase does not meet the terms of this limited warranty, VTech will notify you and will request that you authorize the cost of repair prior to any further repair activity. You must pay for the cost of repair and return shipping costs for the repair of Products that are not covered by this limited warranty.8IBUNVTUZPVSFUVSOXJUIUIF1SPEVDUUPHFUXBSSBOUZTFSWJDF 1.  Return the entire original package and contents including the Product to the VTech service location along with a description of the malfunction or difficulty; and2.  Include a “valid proof of purchase” (sales receipt) identifying the Product purchased (Product model) and the date of purchase or receipt; and3.  Provide your name, complete and correct mailing address, and telephone number.0UIFSMJNJUBUJPOTThis warranty is the complete and exclusive agreement between you and VTech. It supersedes all other written or oral communications related to this Product. VTech provides no other warranties for this Product. The warranty exclusively describes all of VTech’s responsibilities regarding the Product. There are no other express warranties. No one is authorized to make modifications to this limited warranty and you should not rely on any such modification.State/Provincial Law Rights: This warranty gives you specific legal rights, and you may also have other rights, which vary from state to state or province to province.Limitations: Implied warranties, including those of fitness for a particular purpose and merchantability (an unwritten warranty that the Product is fit for ordinary use) are limited to one year from the date of purchase. Some states/provinces do not allow limitations on how long an implied warranty lasts, so the above limitation may not apply to you. In no event shall VTech be liable for any indirect, special, incidental, consequential, or similar damages (including, but not limited to lost profits or revenue, inability to use the Product or other associated equipment, the cost of substitute equipment, and claims by third parties) resulting from the use of this Product. Some states/provinces do not allow the exclusion or limitation of incidental or consequential damages, so the above limitation or exclusion may not apply to you.1MFBTFSFUBJOZPVSPSJHJOBMTBMFTSFDFJQUBTQSPPGPGQVSDIBTF'$$"$5"BOE*$SFHVMBUJPOT'$$1BSUThis equipment has been tested and found to comply with the requirements for a Class B digital device under Part 15 of the Federal Communications Commission (FCC) rules. These requirements are intended to provide reasonable protection against harmful interference in a residential installation. This equipment generates, uses and can radiate radio frequency energy and, if not installed and used in accordance with the instructions, may cause harmful interference to radio communications. However, there is no guarantee that interference will not occur in a particular installation. If this equipment does cause harmful interference to radio or television reception, which can be determined by turning the equipment off and on, the user is encouraged to try to correct the interference by one or more of the following measures:Reorient or relocate the receiving antenna.Increase the separation between the equipment and receiver.Connect the equipment into an outlet on a circuit different from that to which the receiver is connected.Consult the dealer or an experienced radio/TV technician for help.••••
16Changes or modifications to this equipment not expressly approved by the party responsible for compliance could void the user’s authority to operate the equipment.This device complies with Part 15 of the FCC rules. Operation is subject to the following two conditions:  (1) this device may not cause harmful interference, and (2) this device must accept any interference received, including interference that may cause undesired operation. Privacy of communications may not be ensured when using this telephone.To ensure safety of users, the FCC has established criteria for the amount of radio frequency energy that can be safely absorbed by a user or bystander according to the intended usage of the product. This product has been tested and found to comply with the FCC criteria. The handset may be safely held against the ear of the user. The telephone base shall be installed and used such that parts of the user’s body other than the hands are maintained at a distance of approximately 20 cm (8 inches) or more.This Class B digital apparatus complies with Canadian requirement:       CAN ICES-3 (B)/NMB-3(B)'$$1BSUBOE"$5"This equipment complies with Part 68 of the FCC rules and with technical requirements adopted by the Administrative Council for Terminal Attachments (ACTA). The label on the back or bottom of this equipment contains, among other things, a product identifier in the format US:AAAEQ##TXXXX. This identifier must be provided to your telephone service provider upon request.The plug and jack used to connect this equipment to premises wiring and the telephone network must comply with applicable Part 68 rules and technical requirements adopted by ACTA. A compliant telephone cord and modular plug is provided with this product. It is designed to be connected to a compatible modular jack that is also compliant. An RJ11 jack should normally be used for connecting to a single line and an RJ14 jack for two lines. See the installation instructions in the user’s manual.The Ringer Equivalence Number (REN) is used to determine how many devices you may connect to your telephone line and still have them ring when you are called. The REN for this product is encoded as the 6th and 7th characters following the US: in the product identifier (e.g., if ## is 03, the REN is 0.3). In most, but not all areas, the sum of all RENs should be five (5.0) or less. For more information, please contact your telephone service provider.This equipment may not be used with Party Lines. If you have specially wired alarm dialing equipment connected to your telephone line, ensure the connection of this equipment does not disable your alarm equipment. If you have questions about what will disable alarm equipment, consult your telephone service provider or a qualified installer.If this equipment is malfunctioning, it must be unplugged from the modular jack until the problem has been corrected. Repairs to this telephone equipment can only be made by the manufacturer or its authorized agents. For repair procedures, follow the instructions outlined under the Limited warranty.If this equipment is causing harm to the telephone network, the telephone service provider may temporarily discontinue your telephone service. The telephone service provider is required to notify you before interrupting service. If advance notice is not practical, you will be notified as soon as possible. You will be given the opportunity to correct the problem and the telephone service provider is required to inform you of your right to file a complaint with the FCC. Your telephone service provider may make changes in its facilities, equipment, operation, or procedures that could affect the proper functioning of this product. The telephone service provider is required to notify you if such changes are planned.If this product is equipped with a corded or cordless handset, it is hearing aid compatible.If this product has memory dialing locations, you may choose to store emergency telephone numbers  (e.g., police, fire, medical) in these locations. If you do store or test emergency numbers, please:Remain on the line and briefly explain the reason for the call before hanging up.Perform such activities in off-peak hours, such as early morning or late evening.*OEVTUSZ$BOBEBThis device complies with Industry Canada licence-exempt RSS standard(s).Operation is subject to the following two conditions: (1) this device may not cause harmful interference, and (2) this device must accept any interference, including interference that may cause undesired operation.The term ‘’IC:‘’ before the certification/registration number only signifies that the Industry Canada technical specifications were met.The Ringer Equivalence Number (REN) for this terminal equipment is 0.1. The REN is an indication of the maximum number of devices allowed to be connected to a telephone interface. The termination on an interface may consist of any combination of devices subject only to the requirement that the sum of the RENs of all the devices does not exceed five.This product meets the applicable Industry Canada technical specifications.5FDIOJDBMTQFDJGJDBUJPOTTransmit frequency DECT frequency: 1921.536-1928.448 MHzBluetooth frequency: 2402.000-2480.000 MHzChannels DECT: 5Bluetooth: 79Nominal effective range Maximum power allowed by FCC and IC. Actual operating range may vary according to environment conditions at the  time of use.Power requirements Handset: 2.4V Ni-MH batteryTelephone base: 6V DC @ 400mACharger: 6V AC @ 300mAMemory Phonebook:  1000 memory locations (shared between home and cell lines); up to 30 digits and 15 charactersCaller ID log:  50 memory locations; up to 24 digits and 15 charactersThe#MVFUPPUIword mark and logos are owned by Bluetooth SIG, Inc. and any use of such marks by VTech Holdings Limited is under license. VTech Holdings Limited is a member of Bluetooth SIG, Inc. Other trademarks and trade names are those of their respective owners.Specifications are subject to change without notice.© 2014 for VTECH TELECOMMUNICATIONS LTD.All rights reserved. 01/14. DS6611_ACIB_V2.0 Document order number: 91-007310-020-100

Navigation menu