VTech Telecommunications 80-9648-00 1.9GHz DECT Cordless Phone with Garage sensor / Contact Sensor User Manual VC7151 US ACIB V1 20150401
VTech Telecommunications Ltd 1.9GHz DECT Cordless Phone with Garage sensor / Contact Sensor VC7151 US ACIB V1 20150401
User Manual

Abridged
User’s manual
VC7151
VC7151-101
VC7151-109
VC7152-201
VC7152-301
Wireless Monitoring
System with
Cordless Telephone
Go to
www.vtechphones.com
to register your product
for enhanced warranty
support and the latest
VTech product news.
BC

$POHSBUVMBUJPOT
on purchasing your new VTech product. Before using this product,
please read *NQPSUBOUTBGFUZJOTUSVDUJPOT.
This abridged user’s manual provides you with basic operational
instructions. A limited set of features are described in abbreviated
form. For installation instructions, please refer to the *OTUBMMBUJPO
(VJEF.
Please refer to the online User’s manual for a full set of installation
and operation instructions at XXXWUFDIQIPOFTDPN. In Canada,
visit XXXWUFDIDBOBEBDPN.
Telephones identified with this logo have reduced
noise and interference when used with most T-coil
equipped hearing aids and cochlear implants. The
TIA-1083 Compliant Logo is a trademark of the
Telecommunications Industry Association. Used
under license.
T
Compatible with
Hearing Aid T-Coil
TIA-1083
3FHJTUFSPOMJOFUPHFUBOBEEJUJPOBMNPOUIXBSSBOUZ
7JTJUXXXWUFDIQIPOFTDPN
3FHJTUSBUJPO
Register your product online for enhanced
warranty support.
1SPEVDUOFXT
Learn about the latest VTech products.
*OUSPEVDUJPO
8IBUmTJOUIFCPY
0WFSWJFX
Handset overview ..................... 5
Telephone base overview ......... 9
Garage door status sensor
overview .............................. 13
Open/closed sensor overview ...14
Sensor unit overview .............. 14
Display icons overview ........... 15
Lights overview ....................... 17
)BOETFUCBUUFSZ
#FGPSFVTF
Set date and time ................... 20
Set answering system
through voice guide .............20
Check for dial tone ..................21
Operating range ......................21
4FOTPS
Access an individual sensor
menu ................................... 23
Set alert schedule as always
on ........................................ 24
Set a time range for alerts ...... 25
Turn off the alert .....................26
Rename the sensor ................ 26
Sensor mode .......................... 27
Sensor alerts type .................. 29
Sensor log .............................. 30
Test sensor signal strength ....31
$POGJHVSFZPVS
UFMFQIPOF
Using the handset menu .........32
Set language .......................... 32
Temporary tone dialing ........... 33
Quiet mode ............................. 33
Caller ID announce ................. 34
Use caller ID to automatically
set date and time ................ 34
5FMFQIPOFPQFSBUJPOT
Make a call ............................. 35
Answer a call .......................... 35
End a call ................................ 35
Handset speakerphone .......... 35
Volume .................................... 36
Mute ........................................36
Call waiting ............................. 36
Find handset ........................... 37
Redial list ............................... 37
Join a call in progress ............. 38
Push-to-talk (PTT) .................. 38
Intercom ..................................39
Transfer a call ......................... 39
Answer an incoming call
during an intercom call ........ 39
1IPOFCPPL
Add a phonebook entry ..........40
Review and dial from the
phonebook .......................... 41
Edit a phonebook entry .......... 41
Delete a phonebook entry ......41
$BMMFS*%
Caller ID log ............................ 42
5BCMFPG$POUFOUT
Save a caller ID log entry to
the phonebook .................... 43
Delete a caller ID log entry .....43
Delete all caller ID log entries ...43
$BMMCMPDL
Block unknown calls ............... 44
Add a call block list entry ........ 44
Review the call block list ......... 45
Edit a call block list entry ........ 45
Save a caller ID log entry to
call block list ........................ 45
Delete a call block list entry .... 45
Key tone .................................. 46
Ringer tone ............................. 46
Ringer volume ........................ 47
Temporary ringer silencing ..... 47
"CPVUUIFCVJMUJO
BOTXFSJOHTZTUFNBOE
WPJDFNBJMTFSWJDF
4FUZPVSCVJMUJO
BOTXFSJOHTZTUFN
Turn the answering system
on or off ............................... 49
Default announcement ...........50
Record your own
announcement .................... 50
Play the announcement .......... 50
Reset the announcement ....... 51
Set number of rings ................ 51
Message alert tone ................. 52
Recording time ....................... 52
Voice guide .............................53
6TFZPVSCVJMUJO
BOTXFSJOHTZTUFN
New message indication ......... 53
Message playback .................. 54
Delete all old messages ......... 55
Call intercept ........................... 55
3FNPUFBDDFTT
Listen to messages from
remote access ..................... 57
Change sensor mode from
remote access ..................... 58
Remote access code .............. 58
6TFUIFCVJMUJO
BOTXFSJOHTZTUFNBOE
WPJDFNBJMTFSWJDF
3FUSJFWFWPJDFNBJMGSPN
UFMFQIPOFTFSWJDF
Retrieve voicemail .................. 60
Set your voicemail number .....60
Turn off the new voicemail
indicators ............................. 61
&YQBOEZPVSUFMFQIPOF
TZTUFN
&$0NPEF
(FOFSBMQSPEVDUDBSF
4UPSBHF
'SFRVFOUMZBTLFE
RVFTUJPOT
-JNJUFE8BSSBOUZ
5FDIOJDBM4QFDJGJDBUJPOT
%JTDMBJNFS
1
*OUSPEVDUJPO
This Wireless Monitoring System with VTech ULE consists of the
telephone system, garage door status sensor, open/closed sensor,
and motion detection sensor. The telephone system is also sold
separately or as:
Telephone system and garage door status sensor;
Telephone system and open/closed sensor;
A garage door status sensor;
A open/closed sensor; or
A motion detection sensor.
5FMFQIPOFTZTUFN - Includes a telephone base and cordless
handset (some models include additional handsets). The base
and handset screens show call information and sensor alerts. The
sensor sends alerts to the phone system or sends remote alert calls
to other numbers you have specified.
0QFODMPTFETFOTPS - Apply this magnetic open/closed sensor to a
door, window, or medicine cabinet to know if it is open or closed, or
if someone has accessed an area that is off-limits.
(BSBHFEPPSTUBUVTTFOTPS - Detects when the garage door is open.
.PUJPOEFUFDUJPOTFOTPS - Lets you know when there are visitors,
intruders, or pets moving around your home.
•
•
•
•
•
2
4FOTPSBMFSU
When someone has arrived home, or you have forgotten to close the
door, you will receive audible and text sensor alerts, for example,
“%003JTPQFO”, on the handset and telephone base.
You can also program the phone system to make remote alert calls
to up to three other telephone numbers. When you receive the
remote alert call from the telephone base, you can choose to listen
to the sound in your house; or you can choose to speak through the
telephone base to the visitor or intruder. See pages 27 to 28.
1SPHSBNNBCMFBMFSUT
Customize when and how you receive alerts.
8IFOZPVSFDFJWFBMFSUT
A garage door, in-house door, window, medicine cabinet opens;
Open more than 15, 30, or 60 minutes if you have set a reminder
for alerts;
Open during a certain period of time if you have set a time range
for alerts.
)PXZPVSFDFJWFBMFSUT
Audible and text sensor alerts on handset and telephone base;
Receive a remote alert call on your cell phone or at other remote
numbers you have programmed. See pages 27 to 28.
•
•
•
•
•
3
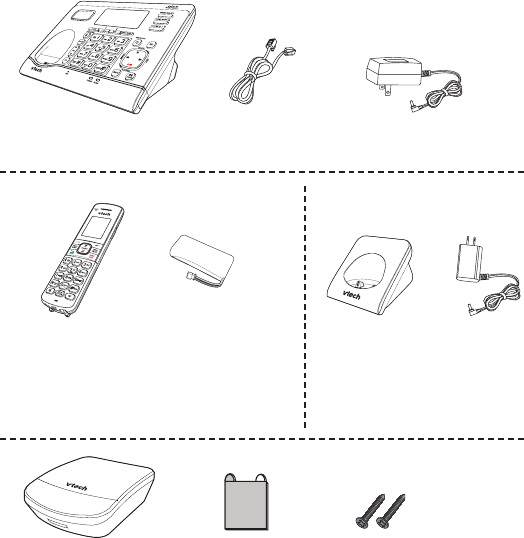
Double-sided
adhesive sticker
Garage door status
sensor
Screws
1 set for VC7151-101/
VC7151-109/
VC7152-201/
VC7152-301
8IBUmTJOUIFCPY
Your telephone package contains the following items. Save your
sales receipt and original packaging in case it is necessary to ship
your telephone for warranty service.
Telephone base Telephone line cord Telephone base adapter
Handset Battery Charger
1 set for VC7151/VC7151-101/VC7151-109;
2 sets for VC7152-201;
3 sets for VC7152-301
1 set for VC7152-201;
2 sets for VC7152-301
Charger
adapter
4
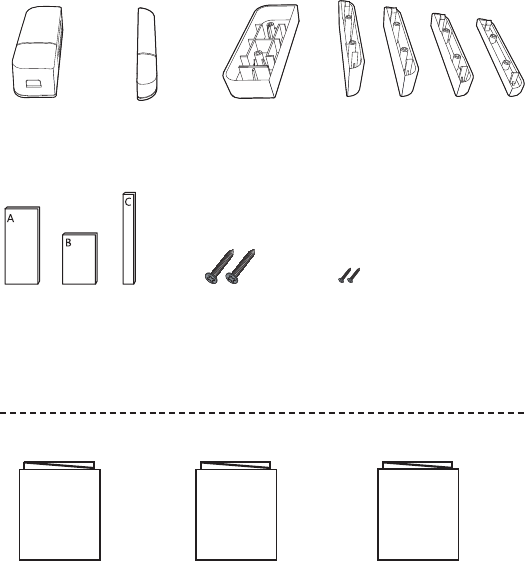
Abridged user’s
manual
Abridged user’s
manual
Installation guide
Installation guide
Open/closed
Sensor unit
Magnet unit Spacer for
sensor unit
Double-sided
adhesive stickers
Screws Small
screws
Spacers for magnet unit
Important safety
Instructions
Important safety
Instructions
1 set for VC7151-109
5
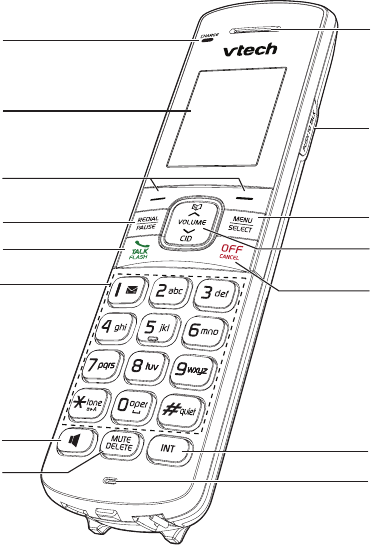
0WFSWJFX
)BOETFUPWFSWJFX
q$)"3(&MJHIU
q-$%EJTQMBZ
a
b
i
k
l
m
c
d
e
f
g
h
j
n
o

6
q3JHIU4PGULFZ
• Press to review the sensor status when the phone is not in
use.
• While in a menu, press to select a menu item; or save an
entry or setting.
-FGU4PGULFZ
• Press to enter the sensor mode menu when the phone is not
in use.
• Press to return to the previous menu.
q3&%*"-1"64&
• Press repeatedly to review the redial list.
• Press and hold to insert a dialing pause while entering a
number.
q 5"-,'-"4)
• Make or answer a call.
• Press to put the current call on hold when you receive an
incoming call.
• Answer an incoming call when you hear a call waiting alert.
q%JBMJOHLFZT
• Press to enter numbers or characters.
• Press repeatedly to add or remove in front of the caller ID
log entry before dialing or saving it to the phonebook.
• Press and hold to set or dial your voicemail number.
• While you have set the dial mode to pulse and on a call,
press to switch to tone dialing temporarily.
• Press to add a space when entering names.

7
• Press and hold to enter quiet mode setting menu.
• Press repeatedly to show other dialing options when
reviewing a caller ID log entry.
q
• Make or answer a call using the handset speakerphone.
• During a call, press to switch between the speakerphone
and the earpiece.
q.65&%&-&5&
• Mute the microphone during a call.
• While editing names or numbers, press to delete a digit
or character, or press and hold to delete all digits or
characters.
• Delete the playing message on the handset.
• Silence the ringer temporarily while the handset is ringing.
q&BSQJFDF
q164)505"-,
• Press to display the 164)505"-, (PTT) menu to begin a
PTT call when the phone is not in use.
• Press and hold to begin a one-to-group PTT call.
• Press and hold while talking in a PTT call.
q.&/64&-&$5
• While in a menu, press to select an item; or save an entry or
setting.
q70-6.&
• Review the phonebook when the phone is not in use.
• Increase the listening volume during a call or message
playback.
• Scroll up while in a menu, or in the phonebook, caller ID log,
or redial list.
• Move the cursor to the right when entering numbers or names.

8
70-6.& $*%
• Review the caller ID log when the phone is not in use.
• Decrease the listening volume during a call or message
playback.
• Scroll down while in a menu, or in the phonebook,
caller ID log, or redial list.
• Move the cursor to the left when entering numbers or
names.
q0''$"/$&-
• Hang up a call.
• Silence the ringer temporarily while the handset is ringing.
•
Press and hold to erase the missed call indicator while the
phone is not in use.
• Press to return to the previous menu, or press and hold to
return to idle mode, without making changes.
q*/5
• Press to display the intercom menu to initiate an intercom
call when the phone is not in use.
q.JDSPQIPOF
9
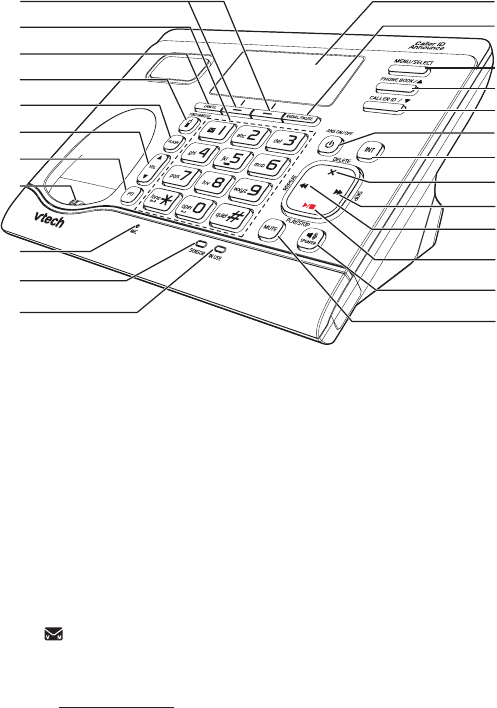
5FMFQIPOFCBTFPWFSWJFX
q3JHIU4PGULFZ
• Press to review the sensor status when the phone is not in use.
• While in a menu, press to select a menu item; or save an
entry or setting.
-FGU4PGULFZ
• Press to enter the sensor mode menu when the phone is not
in use.
• Press to return to the previous menu.
q%JBMJOHLFZT
• Press to enter numbers or characters.
• Press repeatedly to add or remove in front of the caller ID
log entry before dialing or saving it to the phonebook.
• Press and hold to set or dial your voicemail number.
i
j
k
r
q
n
o
p
l
m
t
u
v
w
s
x
a
b
c
d
e
f
g
h

10
• While you have set the dial mode to pulse and on a call,
press to switch to tone dialing temporarily.
• Press to add a space when entering names.
• Press and hold to enter quiet mode setting menu.
• Press repeatedly to show other dialling options when
reviewing a caller ID log entry.
q$"/$&-
• Silence the ringer temporarily while the telephone base is
ringing.
•
Press and hold to erase the missed call indicator while the
phone is not in use.
• Press to return to the previous menu, or press and hold to
return to idle mode, without making changes.
q '*/%)"/%4&5
• Press to page all system handsets.
q'-"4)
• Press to put the current call on hold when you receive an
incoming call.
• Answer an incoming call when you hear a call waiting alert.
q 70-
• Adjust the volume during a call or message playback.
• Adjust the telephone base ringer volume when the phone is
not in use.
q1551VTIUPUBML
• Press to display the PTT menu to begin a PTT call.
• Press and hold to begin a one-to-group PTT call.
• Press and hold while talking in a PTT call.

11
q$IBSHJOHQPMF
q.*$.JDSPQIPOF
q4&/403MJHIU
• On when a sensor detects that one or more of the monitored
garage door, in-house door, window, or medicine cabinet is
opened.
q*/64&MJHIU
• On when the telephone line is in use.
• On when the answering system is answering a call.
• On when you are registering a handset.
• Flashes quickly when there is an incoming call.
• Flashes quickly when you are deregistering all handsets.
• Flashes slowly when another telephone sharing the same
line is in use.
q-$%EJTQMBZ
q3&%*"-1"64&
• Press repeatedly to review the redial list.
• Press and hold to insert a dialing pause while entering a
number.
q.&/64&-&$5
• While in a menu, press to select an item; or save an entry or
setting.
q1)0/�,
• Review the phonebook when the phone is not in use.
• Scroll up while in a menu, or in the phonebook, caller ID log,
or redial list.
• Move the cursor to the right when entering numbers or names.
q$"--&3*%
• Review the caller ID log when the phone is not in use.

12
• Scroll down while in a menu, or in the phonebook, caller ID
log, or redial list.
• Move the cursor to the left when entering numbers or names.
q "/40/0''
• Turn the answering system on or off.
q*/5
• Press to display the intercom menu to initiate an intercom
call when the phone is not in use.
q9%&-&5&
• While editing names or numbers, press to delete a digit
or character, or press and hold to delete all digits or
characters.
• Delete the playing message.
• Press twice to delete all previously reviewed messages when
the phone is not in use.
q 4,*1
• Skip to the next message.
q 3&1&"5
• Press to repeat a message.
• Press twice to play the previous message.
q 1-":4501
• Play messages.
• Stop playing messages.
q 41&",&3
• Make or answer a call using the speakerphone.
• Hang up a call.
q.65&
• Mute the microphone during a call.
• Silence the ringer temporarily while the telephone base is
ringing.
13
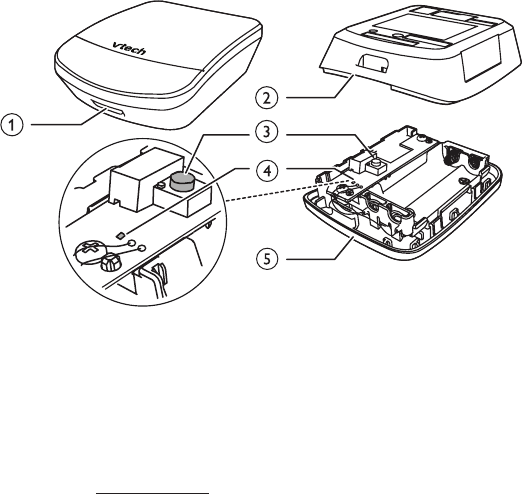
(BSBHFEPPSTUBUVTTFOTPSPWFSWJFX
q-BUDICVUUPO
Press to open the battery compartment case.
q#BDLDPWFS
q1BJSCVUUPO
When the sensor has been deregistered from the telephone
base, press and hold to enter the registration mode.
q-&%MJHIU
Flashes red when the sensor is in the registration mode.
q#BUUFSZDPNQBSUNFOUDBTF
•
•
•

14
0QFODMPTFETFOTPSPWFSWJFX
q.BHOFUVOJU
q4FOTPSVOJU
4FOTPSVOJUPWFSWJFX
q-BUDICVUUPO
Press to open the battery compartment case.
q#BDLDPWFS
q1BJSCVUUPO
When the sensor has been deregistered from the telephone
base, press and hold to enter the registration mode.
q-&%MJHIU
Flashes red when the sensor is in the registration mode.
q#BUUFSZDPNQBSUNFOUDBTF
•
•
•
P
P
15
%JTQMBZJDPOTPWFSWJFX
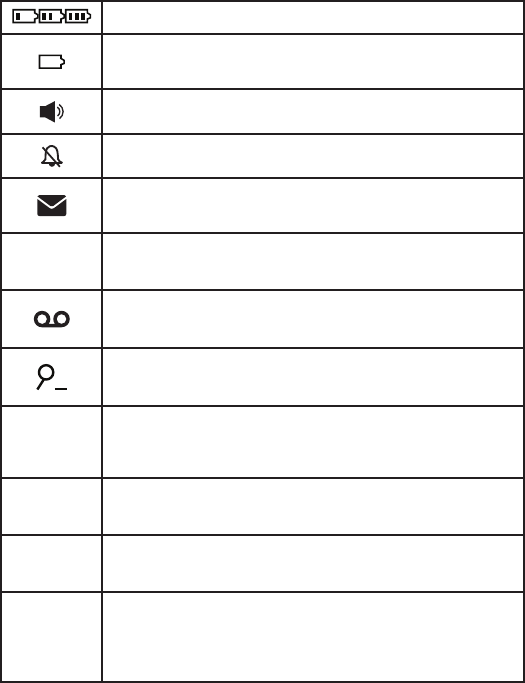
)BOETFUJDPOT
#BUUFSZTUBUVT - battery is charging (animated display).
#BUUFSZTUBUVT - the battery icon flashes when the
battery is low and needs charging.
4QFBLFSQIPOF- the handset speakerphone is in use.
3JOHFSPGG - the handset ringer is off.
/FXWPJDFNBJM - you have new voicemail from your
telephone service provider.
"/4
0/
"OTXFSJOHTZTUFNPO - the answering system is
turned on to answer calls.
.FTTBHF - you have new message in the built-in
answering system.
4FBSDICBSJDPO - appears when in the phonebook
menu.
&$0
&$0NPEF - activates automatically to reduce power
consumption when the handset is within range from
the telephone base.
/&8 /FXDBMMFS*%MPH - displays in caller ID log when
there are new missed calls.
.*44&% .JTTFEBMFSUTJOTFOTPSMPH - displays in sensor log
when there are new missed alerts from sensors.
*OEFYTIPXTUIFFOUSZOVNCFSPGUIFTFOTPSTUBUVT
PSJOUIFTFOTPSMPHQIPOFCPPLPSDBMMCMPDLMJTUUIBU
JTDVSSFOUMZCFJOHWJFXFEPVUPGUIFUPUBMOVNCFSPG
FOUSJFT
16
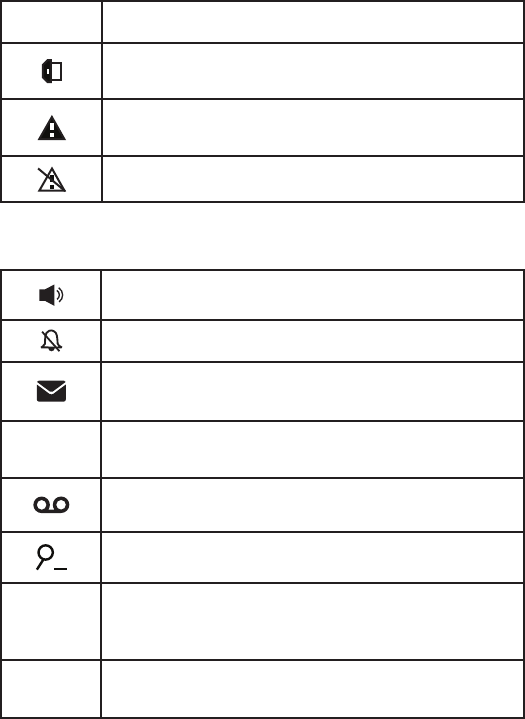
.65& .65& - the handset microphone is off.
4FOTPS - the garage door, in-house door, window, or
medicine cabinet is opened.
.JTTFEBMFSUTJOJEMFNPEF - displays in idle mode
when there are new missed alerts from sensors.
"MMBMFSUTPGG - all sensor-related alerts are turned off.
5FMFQIPOFCBTFJDPOT
4QFBLFSQIPOF- the telephone base speakerphone
is in use.
3JOHFSPGG - the telephone base ringer is off.
/FXWPJDFNBJM - you have new voicemail from your
telephone service provider.
"/4
0/
"OTXFSJOHTZTUFNPO - the answering system is
turned on to answer calls.
.FTTBHF - you have new message in the built-in
answering system.
4FBSDICBSJDPO - appears when in the phonebook
menu.
&$0
&$0NPEF - activates automatically to reduce power
consumption when the handset is within range from
the telephone base.
/&8 /FXDBMMFS*%MPH - displays in caller ID log when
there are new missed calls.
17
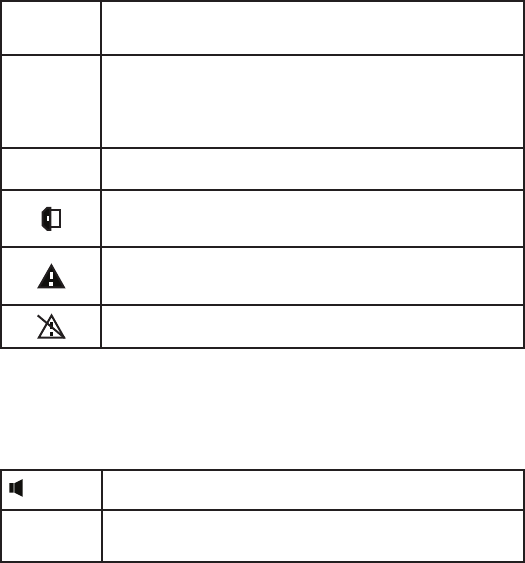
.*44&% .JTTFEBMFSUTJOTFOTPSMPH - displays in sensor log
when there are new missed alerts from sensors.
*OEFYTIPXTUIFFOUSZOVNCFSPGUIFTFOTPSTUBUVT
PSJOUIFTFOTPSMPHQIPOFCPPLPSDBMMCMPDLMJTUUIBU
JTDVSSFOUMZCFJOHWJFXFEPVUPGUIFUPUBMOVNCFSPG
FOUSJFT
.65& .65& - the telephone base microphone is off.
4FOTPS - the garage door, in-house door, window, or
medicine cabinet is opened.
.JTTFEBMFSUTJOJEMFNPEF - displays in idle mode
when there are new missed alerts from sensors.
"MMBMFSUTPGG - all sensor-related alerts are turned off.
-JHIUTPWFSWJFX
)BOETFUMJHIUT
On when the handset speakerphone is in use.
$)"3(& On when the handset is charging in the telephone
base or handset charger.
18
5FMFQIPOFCBTFMJHIUT
4&/403 On when the garage door, in-house door,
window, or medicine cabinet is opened.
*/64& On when:
the telephone line is in use;
the answering system is answering a call; or
you are registering a handset.
Flashes quickly when:
there is an incoming call; or
you are deregistering all handsets.
Flashes slowly when:
another telephone sharing the same line is
in use.
•
•
•
•
•
•
"/40/0'' On when the answering system is turned on.
.65& On when the telephone base microphone is
muted.
41&",&3 On when the speakerphone is on.
1-":4501 On when the answering system is playing a
message.
Flashes slowly when there is a new message.
4FOTPSMJHIU
-&%MJHIU On for five seconds when the sensor is
successfully registered to the telephone base.
Flashes slowly when the sensor is registering
to the telephone base.

19
)BOETFUCBUUFSZ
Once you have installed the battery, the battery indicators show the
battery status (see the table followed).
NOTES
For best performance, keep the handset in the telephone base or charger
when not in use.
The battery is fully charged after 12 hours of continuous charging.
#BUUFSZJOEJDBUPST #BUUFSZTUBUVT "DUJPO
The screen is
blank, or shows
1MBDFJODIBSHFS
and flashes.
The battery has
no charge or very
little charge. The
handset cannot be
used.
Charge without
interruption
(at least
30 minutes).
The screen shows
-PXCBUUFSZ and
flashes.
The battery has
enough charge to
be used for a short
time.
Charge without
interruption
(at least
30 minutes).
The screen shows
)"/%4&59.
The battery is
charged.
To keep the battery
charged, place it in
the telephone base
or charger when not
in use.
•
•

20
#FGPSFVTF
After you install your telephone, or power returns following a power
outage, the telephone system will prompt you to set the date and time
first. Then, it will ask you to set the answering system through voice
guide.
4FUEBUFBOEUJNF
Make sure you set the date and time including the year correctly;
otherwise the answering system does not announce the correct day of the
week for your recorded messages time stamp.
1. Use the dialing keys (-) to enter the month, date, and year, and
then press /&95 .
2. Use the dialing keys (-) to enter the hour and minute.
3. Scroll to choose ". or 1., and then press 4"7& to save.
After the setting for the date and time, the screen will display 4UBSU
WPJDFHVJEFUPTFUVQ"OTXFSJOHTZTUFNOPX .
4FUBOTXFSJOHTZTUFNUISPVHIWPJDFHVJEF
This feature assists you to do the basic setup of the answering
system. You can follow the voice guide to record your own
announcement, set the number of rings and the message alert tone.
1. Press :&4 to start the voice guide for the answering system
setup. You hear the voice prompt “)FMMP5IJTWPJDFHVJEFXJMM
BTTJTUZPVXJUIUIFCBTJDTFUVQPGZPVSBOTXFSJOHTZTUFN”
2. Setup your answering system by inputting the designated
numbers as instructed in the voice guide.
•

21
$IFDLGPSEJBMUPOF
Press or on the handset, or on the telephone base. If you
hear a dial tone, the installation is successful.
*GZPVEPOPUIFBSBEJBMUPOF
Make sure the installation procedures described above are
properly done.
It may be a wiring problem. If you have changed your telephone
service to digital service from a cable company or a VoIP service
provider, the telephone line may need to be rewired to allow all
existing telephone jacks to work. Contact your cable/VoIP service
provider for more information.
0QFSBUJOHSBOHF
This cordless telephone operates with the maximum power allowed
by the Federal Communications Commission (FCC). Even so, this
handset and telephone base can communicate over only a certain
distance - which can vary with the locations of the telephone base
and handset, the weather, and the layout of your home or office.
When the handset is out of range, the handset displays 0VUPGSBOHF
03 OPQPXFSBUCBTF and 1VU)4POCBTFUPQPXFSCBTF alternately.
If there is a call while the handset is out of range; it may not ring, or if
it does ring, the call may not connect well when you press or .
Move closer to the telephone base, and then press or to answer
the call. If the handset moves out of range during a telephone
conversation, there may be interference. To improve reception, move
closer to the telephone base.
•
•
22
4FOTPS
The sensor helps you to monitor your garage door, in-house door,
window, or medicine cabinet. This keeps you notified if it is open,
closed, or someone has accessed an area that is off-limits.
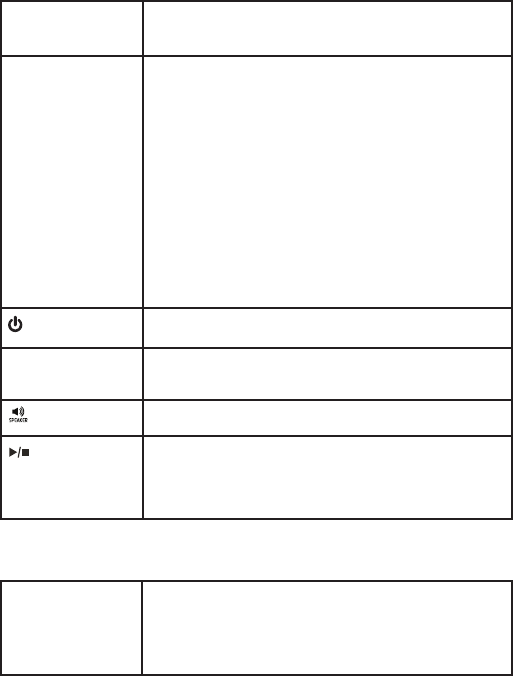
When any of the monitored garage door,
in-house door, window, or medicine cabinet
opens, the sensor sends an alert to your
telephone. Both the base and handsets
announce and display alert messages.
The telephone system has a sensor log. It
stores the latest 50 alert messages from all
sensors. You can review when and which
sensor was opened. You can also use
the individual sensor’s menu to check the
current sensor status.
You can choose to receive alert calls at
other telephones. Store up to three desired telephone numbers, for
example your cell phone number and office phone number, into the
telephone base. You will be notified even when you are away from
home. When you receive the remote alert call from the telephone
base, you can choose to listen to the sound in your house; or you
can choose to speak through the telephone base to the visitor or
intruder.
Follow the instructions in this section to change alert settings, to
rename the sensor, and to review the sensor log.
NOTE
When there are more than four DECT devices registered, the telephone
system supports sensor alerts for the first four registered DECT devices
only.
•

23
"DDFTTBOJOEJWJEVBMTFOTPSNFOV
Press 4&/4034 on the handset or telephone base when idle,
and then scroll to the desired sensor.
03
i. Press .&/6 when the phone is not in use.
ii. Scroll to 4FOTPST, and then press 4&-&$5.
iii. Scroll to the desired sensor, and then press 4&-&$5.
2. Press 015*0/4 to enter the individual sensor menu.
3. Scroll until the screen displays the desired feature menu.
4. Press 4&-&$5 to enter that menu.
To return to the previous menu, press $"/$&-.
To return to idle mode, press and hold $"/$&-.
1.
•
•
24
4FUBMFSUTDIFEVMFBTBMXBZTPO
The default setting of sensors’ alert
schedule is "MXBZTPO. You will receive
an announcement alert - “4&/4039
JTPQFO”, every time a monitored garage
door, in-house door, window, or medicine
cabinet is opened.
You can also set a reminder in case you
forget to close it. You can choose to
receive an alert once again if it remains
open after 15, 30, or 60 minutes.
Press 4&/4034 on the handset or
telephone base when idle, and then
scroll to the desired sensor.
03
i. Press .&/6 when the phone is not in use.
ii. Scroll to 4FOTPST, and then press 4&-&$5.
iii. Scroll to the desired sensor, and then press 4&-&$5.
2. Press 015*0/4 to enter the individual sensor menu.
3. Press 4&-&$5 to select 4FUTDIFEVMF.
4. Press 4&-&$5 to select "MXBZTPO. The reminder menu
appears.
5. Scroll to choose 0GG,NJOVUFT, NJOVUFT, or NJOVUFT,
and then press 4&-&$5 to save.
NOTE
When you received the alert tone and announcement, the handset and the
telephone base will also display “4&/4039JTPQFO”, and then . The
4&/403 light on the telephone base will turn red.
1.
•
Set schedule
Open/closed 1
4&/4039 refers to the sensor’s name.9 refers to the systemassigned
number of the sensor. You can edit the sensor’s name to yourpreferred
name. See 3FOBNFUIFTFOTPS on page 26.

25
4FUBUJNFSBOHFGPSBMFSUT
You can choose to receive an announcement alert - “4&/4039JT
PQFO”, when a monitored garage door, in-house door, window, or
medicine cabinet is opened during a preset time period of the day.
For example, you can set to receive alert only from 10:00 PM to
06:00 AM during bedtime.
You can also set a reminder in case you forget to close it. You can
also choose to receive an alert once again if it remains open after
15, 30, or 60 minutes.
Press 4&/4034 on the handset or telephone base when idle,
and then scroll to the desired sensor.
03
i. Press .&/6 on the handset or telephone base when idle.
ii. Scroll to 4FOTPST, and then press 4&-&$5.
iii. Scroll to the desired sensor, and then press 4&-&$5.
2. Press 015*0/4 to enter the individual sensor menu.
3. Press 4&-&$5 to select 4FUTDIFEVMF.
4. Scroll to choose 5JNFSBOHF, and then press 4&-&$5.
• If time range has been set previously, press &%*5 to edit.
5. Use the dialing keys (-) to enter the hour and minute for the
start time. Scroll to choose ". or 1., and then press 4"7&.
6. Use the dialing keys (-) to enter the hour and minute for the
end time. Scroll to choose ". or 1., and then press 4"7&. The
reminder menu appears.
7. Scroll to choose 0GG,NJOVUFT, NJOVUFT, or NJOVUFT,
and then press 4&-&$5 to save.
NOTE
Suppose you have set the time range from 10pm to 6am. When the time
reaches 10:00 PM, you will receive the alert once if the garage door,
in-house door, window, or medicine cabinet is already open.
1.
•
26
5VSOPGGUIFBMFSU
You can choose not to receive an
announcement alert when a monitored
garage door, in-house door, window, or
medicine cabinet is opened.
The icon will still display on the handset
and telephone base. The 4&/403 light on
the telephone base will also remain on.
Press 4&/4034 on the handset or
telephone base when idle, and then
scroll to the desired sensor.
03
i. Press .&/6 on the handset or telephone base when idle.
ii. Scroll to 4FOTPST, and then press 4&-&$5.
iii. Scroll to the desired sensor, and then press 4&-&$5.
2. Press 015*0/4 to enter the individual sensor menu.
3. Press 4&-&$5 to select 4FUTDIFEVMF.
4. Scroll to choose 0GG, and then press 4&-&$5 to save.
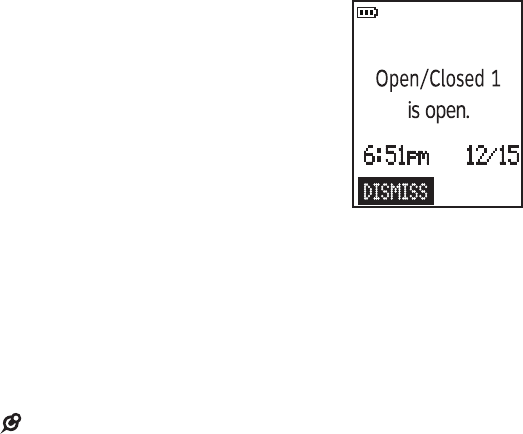
3FOBNFUIFTFOTPS
You can create a customized name of up to 15 characters for each
sensor. The new name will also be announced in announcement alerts.
Press 4&/4034 on the handset or telephone base when idle,
and then scroll to the desired sensor.
03
i. Press .&/6 when the phone is not in use.
ii. Scroll to 4FOTPST, and then press 4&-&$5.
iii. Scroll to the desired sensor, and then press 4&-&$5.
2. Press 015*0/4 to enter the individual sensor menu.
3. Scroll to 3FOBNF, and then press 4&-&$5.
4. Use the dialing keys to edit the name, and then press 4"7&
to save.
1.
1.
27
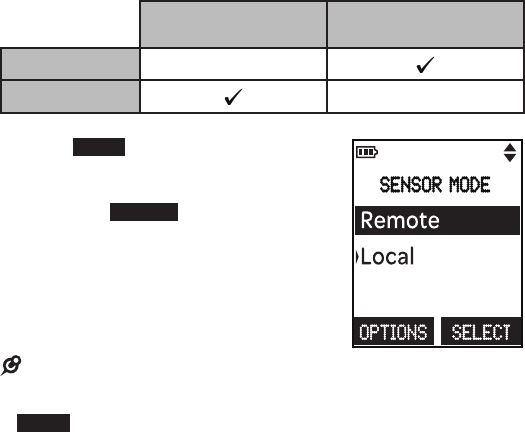
4FOTPSNPEF
You can choose to receive alerts at the telephone system, or receive
calls at other numbers you have specified. It allows you to get notified
when you are away from home. The preset sensor mode is -PDBM.
When you receive the remote alert call from the telephone base, you
can choose to listen to the sound in your house; or you can choose
to speak through the telephone base to the visitor or intruder.
3FDFJWFBMFSUTBUUIF
UFMFQIPOFTZTUFN
3FDFJWFDBMMTBUVQUP
EFTJSFEQIPOFT
3FNPUF --
-PDBM --
Press .0%& on the handset or
telephone base when idle.
Scroll to choose 3FNPUF or -PDBM, and
then press 4&-&$5 to select or save.
When 3FNPUF is chosen, and
no telephone number has been
previously set, you will be prompted
to set the telephone numbers for
remote calls.
NOTES
Once 3FNPUF mode is selected, the idle screen will display 1SFTT-0$"-
UPDIBOHFCBDLUPMPDBMNPEF. To switch back to -PDBM mode, press
-0$"- on the handset or telephone base when idle.
In 3FNPUFmode, the stored telephone numbers will ring in sequence. If
the first telephone number is busy or does not pick up the remote call, the
telephone system will call the second telephone number, and so on.
1.
2.
•
•
•
SENSOR MODE
28
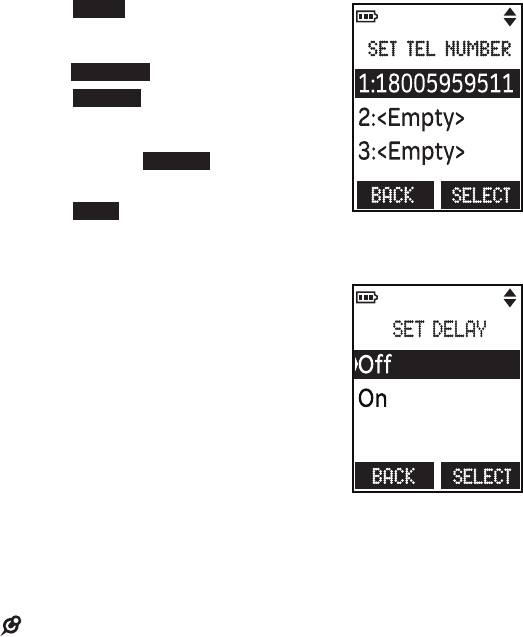
&EJUOVNCFSTGPSSFNPUFDBMMT
You can add, edit, or delete a telephone number for remote calls.
Press .0%& on the handset or
telephone base when idle.
Scroll to choose 3FNPUF, and then
press 015*0/4.
Scroll 4&-&$5 to select 4FUUFM
OVNCFS.
Scroll to the desired slots (, , or ),
and then press 4&-&$5.
Use the dialing keys to enter the number.
Press 4"7& to save.
4FUUJNFEFMBZGPSSFNPUFDBMMT
You can choose to set the exit or entrance
delay time for the remote calls, so that
when the sensor is triggered upon you
exit or enter your home within the delay
time, you will not receive the unnecessary
remote call.
For example, if you are about to leave
home, you can set the exit delay time to
NJOVUFT. Once the delay is set, you will
not receive any remote call even when
you open the door within the following five
minutes.
As for the entrance delay time, if you set it to NJOVUF, you will not
receive any remote call unless the door is opened for more than one
minute. If you want to be notified immediately whenever a door is
opened, we recommend you to set it as NJOVUFT.
NOTES
When a delay time has been set, there will not be any local or remote call
alerts when a monitored garage door, in-house door, window, or medicine
cabinet is open during the delay time.
1.
2.
3.
4.
5.
6.
•
29
Press .0%& on the handset or telephone base when idle.
Scroll to choose 3FNPUF, and then press 015*0/4.
Scroll to choose 4FUEFMBZ and then press 4&-&$5.
Scroll to choose 0O, and then press 4&-&$5 to proceed to
choose the exit delay time.
To skip time delay setting, scroll to choose 0GG, and then
press 4&-&$5.
5. Scroll to choose NJOVUFT, NJOVUFTor NJOVUFT, and then
press 4&-&$5 to proceed to choose the entrance delay time.
6. Scroll to choose NJOVUFT, NJOVUFor NJOVUFT, and then
press 4&-&$5 to save the delay time.
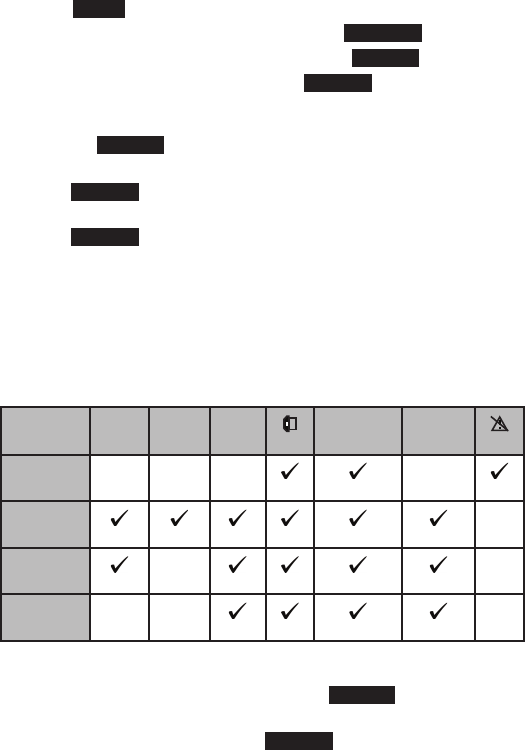
4FOTPSBMFSUTUZQF
You can choose whether you will receive alert tone, voice
announcement, or text message at the telephone system, and
whether the alert will be logged into the sensor log. The preset alert
announcement setting is "MMBMFSUTPO.
"MFSUT
UZQF
"MFSU
UPOF
7PJDF
BOOD
5FYU
NTH
4&/403
-&%
4FOTPS
MPH
"MMBMFSUT
PGG
-- -- -- --
"MMBMFSUT
PO
--
.TH
UPOF
-- --
.FTTBHF
POMZ
-- -- --
Press .&/6 on the handset or telephone base when idle.
Scroll to 4FOTPSBOOD, and then press 4&-&$5.
Scroll to choose "MMBMFSUTPGG, "MMBMFSUTPO, .THUPOFor
.FTTBHFPOMZ, and then press 4&-&$5 to save.
1.
2.
3.
4.
•
1.
2.
3.

30
4FOTPSMPH
The sensor log menu appears when there
is at least one sensor registered to the
telephone base.
The sensor log stores a maximum of
50 entries for sensor activities from all
sensors.
Press .&/6 on the handset or
telephone base when idle.
Scroll to 4FOTPSMPH, and then press
4&-&$5.
To delete a sensor log entry, press
%&-&5&.
To delete all sensor log entries, press %&-"--, and then
:&4 to confirm delete.
1.
2.
•
•
Open/Closed 1
Open/Closed 1
31
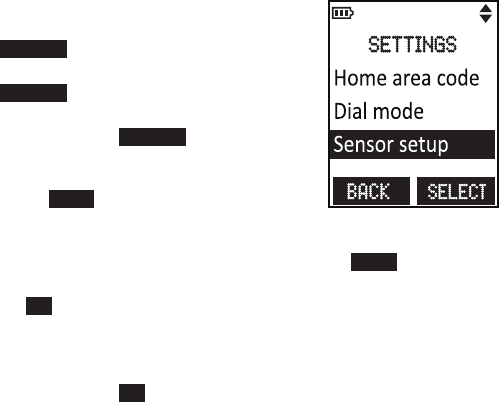
5FTUTFOTPSTJHOBMTUSFOHUI
Before you mount the sensor, follow the instructions below to check
the signal strength between the sensor and the telephone base.
Make sure you mount the sensor in a location where the signal
strength is good.
Press .&/6 on the handset when idle.
Scroll to 4FUUJOHT, and then press
4&-&$5.
Scroll to 4FOTPSTFUVQ, and then press
4&-&$5.
Scroll to the sensor you want to test,
and then press 4&-&$5.
The screen displays 5FTUTJHOBM
TUSFOHUICFUXFFOCBTFBOETFOTPS.
Press /&95.
The screen displays 1MFBTFUSJHHFS
ZPVSTFOTPSOPX. Trigger your sensor (refer to *OTUBMMBUJPO
(VJEF to trigger your sensor), and then press /&95.
If the screen displays /PTJHOBM1MFBTFUSZBHBJO. Press
0,, and then return to step 3 to test again.
If the screen displays 8FBLTJHOBM.PWFTFOTPSDMPTFSUP
CBTF, adjust the sensor’s location to improve the signal.
7. When the screen displays (PPETJHOBM(PPEMPDBUJPOGPS
TFOTPS. Press 0,. The testing is complete.
1.
2.
3.
4.
5.
6.
•
•
32
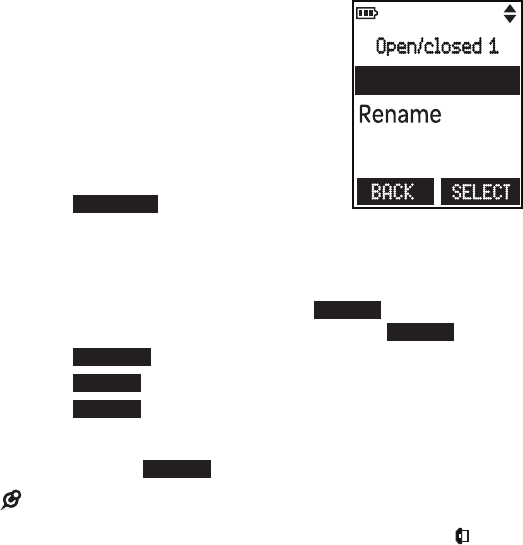
$POGJHVSFZPVSUFMFQIPOF
6TJOHUIFIBOETFUNFOV
1. Press .&/6 on the handset or
telephone base when idle.
2. Scroll until the screen displays the
desired feature menu.
3. Press 4&-&$5 to enter that menu.
To return to the previous menu, press
$"/$&-.
To return to idle mode, press and hold
$"/$&-.
4FUMBOHVBHF
The LCD language is preset to English. You can select English,
French, or Spanish to be used in all screen displays.
1. Press .&/6 on the handset or telephone base when idle.
2. Scroll to 4FUUJOHT, then press 4&-&$5.
3. Press 4&-&$5 to select -$%MBOHVBHF.
4. Scroll to highlight &OHMJTI, 'SBO¿BJT, or &TQBñPM, then press
4&-&$5.
5. Press :&4 to save your preference.
03
Press /0 to cancel the operation.
NOTE
If you accidentally changed the LCD language to French or Spanish, you
can reset it to English easily by pressing .&/6 and then entering .
•
•
•
33
4FUEBUFBOEUJNF
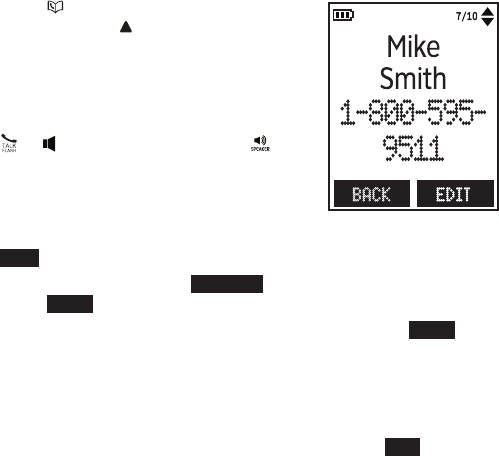
NOTE
Make sure you set the date and time including the year correctly;
otherwise the answering system does not announce the correct day of the
week for your recorded messages time stamp.
1. Press .&/6 on the handset or telephone base when idle.
2. Scroll to 4FUEBUFUJNF, and then press 4&-&$5.
3. Use the dialing keys (-) to enter the month, date, and year, and
then press /&95.
4. Use the dialing keys (-) to enter the hour and minute. Scroll to
choose ". or 1., and then press 4"7& to save.
5FNQPSBSZUPOFEJBMJOH
If you have pulse (rotary) service only, you can switch from pulse to
tone dialing temporarily during a call.
1. During a call, press .
2. Use the dialing keys to enter the relevant number.
The telephone sends touch-tone signals.
It automatically returns to pulse dialing mode after you end the call.
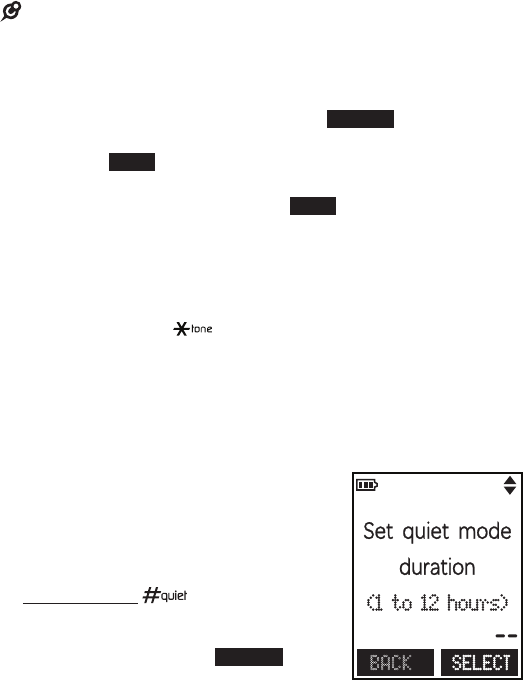
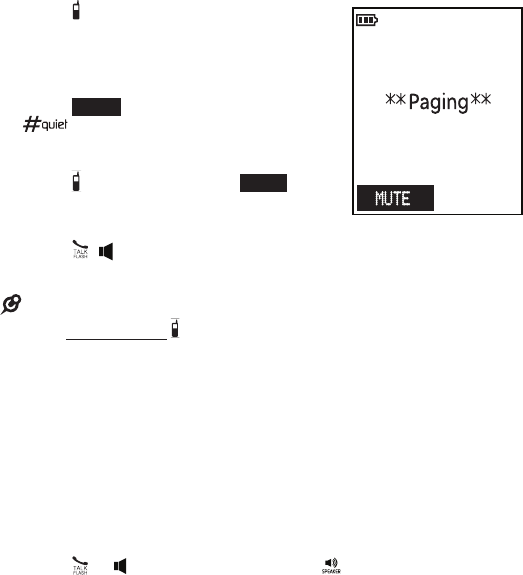
2VJFUNPEF
You can turn on the quiet mode for a
period of time. During this period, all tones
(except paging tone) and call screening
are muted. When you turn on the quiet
mode, the answering system turns on
automatically.
1. Press and hold on the handset or
telephone base when idle.
2. Use the dialing keys (-) to enter the
duration, and then press 4&-&$5 to
save.
•
BACK
34
NOTES
5PUVSOPGGUIFRVJFUNPEFQSFTTBOEIPME POUIFIBOETFUPS
UFMFQIPOFCBTFXIFOJEMF
4FOTPSBMFSUUPOFBOEBOOPVODFEBMFSUXJMMOPUCFTJMFODFEJORVJFUNPEF
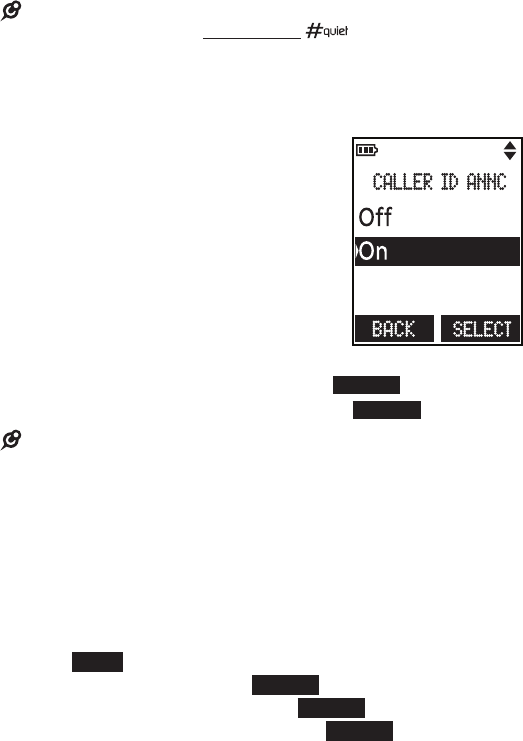
$BMMFS*%BOOPVODF
The caller ID announce feature lets you
know who’s calling without having to look
at the display. When you have an incoming
call, the handset speaks n$BMMGSPNo
and the name of the caller based on the
phonebook or caller ID information. If
the caller’s name is private or unknown,
the phone number up to the last 11 digits
will be announced. If the caller’s phone
number is also private or unknown, no
information will be announced.
1. Press .&/6 on the handset or
telephone base when idle.
2. Scroll to $BMMFS*%BOOD, and then press 4&-&$5.
3. Scroll to choose 0Oor 0GG, and then press 4&-&$5 to save.
NOTES
To use the caller ID announce feature, you must subscribe to caller ID
service from your telephone service provider.
When there are more than four DECT devices registered, the telephone
system the system supports caller ID announce for the first four registered
DECT devices only.
6TFDBMMFS*%UPBVUPNBUJDBMMZTFUEBUFBOEUJNF
If you subscribe to caller ID service, the month, day, and time are set
automatically with each incoming call. Follow the steps below to turn
the $*%UJNFTZOD feature on or off. The default setting is 0O.
1. Press .&/6 in idle mode to enter the main menu.
2. Scroll to 4FUUJOHT, then press 4&-&$5.
3. Scroll to $*%UJNFTZOD, then press 4&-&$5.
4. Scroll to highlight 0O or 0GG, then press 4&-&$5 to save. There is
a confirmation tone and the screen returns to the previous menu.
p
p
•
•
35
5FMFQIPOFPQFSBUJPOT
.BLFBDBMM
Press or on the handset, or press
on the base, and then dial the
telephone number.
03
Enter the telephone number on the
handset or base, and then press or
on the handset, or press on the
base, to dial.
"OTXFSBDBMM
Press or on the handset, on the
base, or any dialing key.
&OEBDBMM
Press0'' on the handset, or put the handset to the base or
charger.
03
Press on the base.
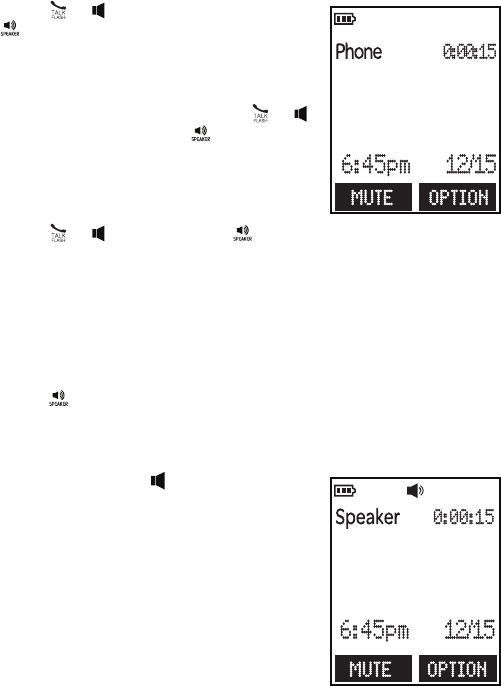
)BOETFUTQFBLFSQIPOF
During a call, press on the handset
to switch between speakerphone and
normal handset use.
•
•
•
•
•
•
ECO

36
7PMVNF
During a call, press 70-6.& on the handset or 70-
on the telephone base to adjust the listening volume.
NOTE
The volume settings of handset earpiece, handset speakerphone, and base
speakerphone are independent.
.VUF
The mute function allows you to hear the other party but the other
party cannot hear you.
1. During a call, press .65& on the handset or telephone base.
The screen displays .VUFE.
2. Press .65& again to resume the conversation. The screen
displays .JDSPQIPOF0/.
$BMMXBJUJOH
When you subscribe to call waiting service from your telephone
service provider, you hear an alert tone if there is an incoming call
while you are on another call.
Press '-"4) to put the current call on hold and take the new
call.
Press '-"4) to switch back and forth between calls.
•
•
•
•
37
'JOEIBOETFU
Use this feature to find all system handsets.
5PTUBSUQBHJOH
Press '*/%)"/%4&5 on the base.
All idle handsets ring and display
1BHJOH.
5PNVUFQBHJOH
Press .65&, .65&, $"/$&-, or
on the handset.
5PFOEQBHJOH
Press '*/%)"/%4&5 or 4501 on
the base.
03
Press , , or any dialing key on the
handset.
NOTE
Do not press and hold '*/%)"/%4&5 for more than four seconds. It
may lead to handset deregistration.
3FEJBMMJTU
The base and each handset store the last 10 telephone numbers
dialed. When there are already 10 entries, the oldest entry is deleted
to make room for the new entry.
5PSFWJFXBOEEJBMBOVNCFSGSPNUIFSFEJBMMJTU
1. Press 3&%*"- on the handset or telephone base when idle.
2. Scroll or press 3&%*"- repeatedly until the desired entry displays.
3. Press or on the handset, or press on the base, to dial.
5PEFMFUFBSFEJBMFOUSZ
When the desired redial entry displays, press %&-&5&.
•
•
•
•
•
38
+PJOBDBMMJOQSPHSFTT
You can use up to two devices plus the base at a time on a call. You
can buy additional expansion handsets for this telephone base. You
can register up to 5 handsets to the telephone base.
When a device is on a call, press or on another device to
join the call.
Press 0'' on the handset or on the base to exit the call. The
call continues until all devices hang up.
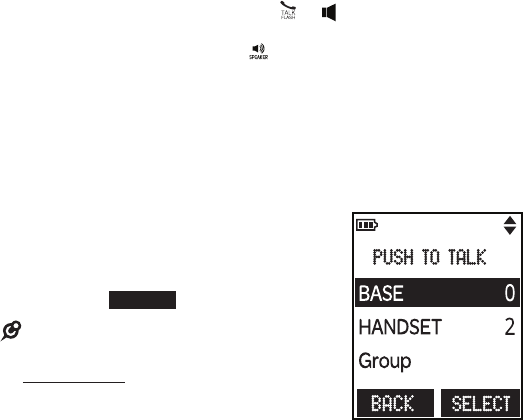
1VTIUPUBML155
You can directly broadcast messages from one device to the
speakerphone of one or multiple devices. Up to four devices can join
in a PTT call.
5PTUBSUB155DPNNVOJDBUJPO
1. Press 164)505"-, on the handset
or 155 on the base when idle.
2. Scroll to a desired device or (SPVQ, and
then press 4&-&$5.
NOTES
Only one device can talk at a time.
Press and hold 164)505"-, while you
are talking. Release 164)505"-, to let
the other party respond.
•
•
•
•
39
*OUFSDPN
Use the intercom features for conversations between two devices.
1. Press*/5 on then handset or telephone base when idle.
2. Use the dialing keys to enter a destination device number.
3. To answer the intercom call, press or on the handset, on
the base, or any dialing key on the destination device.
4. To end the intercom call, press &/%.
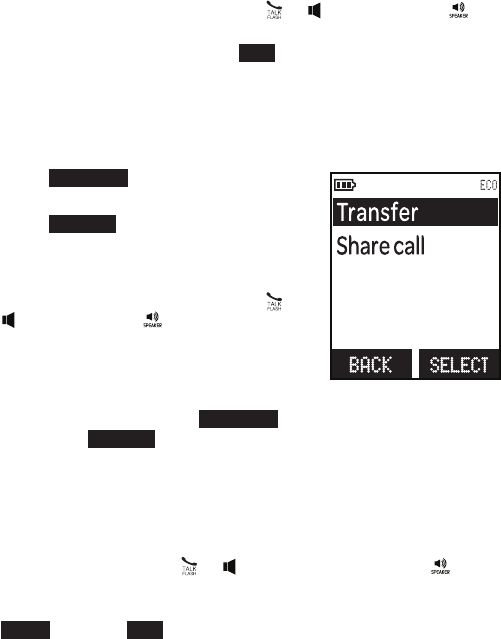
5SBOTGFSBDBMM
While on an outside call, you can use the intercom feature to
transfer the call from one handset to another.
1. Press015*0/4 on the handset or
telephone base during a call.
2. Press 4&-&$5 to choose *OUFSDPN.
Use the dialing keys to enter a
destination device number. The current
call is put on hold.
3. To answer the intercom call, press or
on the handset, on the base, or
any dialing key on the destination
handset. You can now have a private
conservation before transferring the
call.
4. To transfer the call, press 015*0/4 on the initiating device, and
then press 4&-&$5 to select 5SBOTGFS.
"OTXFSBOJODPNJOHDBMMEVSJOHBOJOUFSDPNDBMM
If you receive an incoming call during an intercom call, there is an
alert tone.
To answer a call, press or on the handset, or press on the
base. The intercom call ends automatically.
To end the intercom call without answering the outside call, press
#"$, and then &/%. The intercom call ends and the telephone
continues to ring.
•
•
40
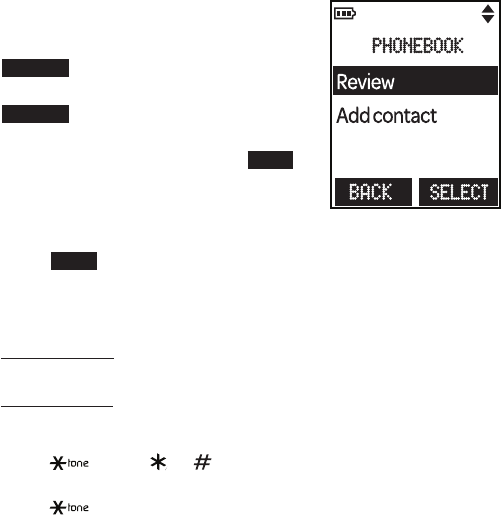
1IPOFCPPL
The phonebook stores up to 50 entries with up to 30 digits for each
phone number and 15 characters for each name.
"EEBQIPOFCPPLFOUSZ
1. Press .&/6 on the handset or
telephone base when idle.
2. Scroll to 1IPOFCPPL, and then press
4&-&$5.
3. Scroll to "EEDPOUBDU, and then press
4&-&$5.
4. Use the dialing keys to enter the number
(up to 30 digits), and then press /&95.
5. Use the dialing keys to enter the name
(up to 15 characters). Additional key
presses show other characters of that
particular key.
6. Press 4"7& to save.
8IJMFFOUFSJOHOVNCFSTBOEOBNFTZPVDBO
Press%&-&5& to erase a digit or character.
Press and hold %&-&5& to erase the entire entry.
Scroll to move the cursor to the left or right.
Press and hold 1"64& to insert a dialing pause (for entering
phone numbers only).
Press to add a space (for entering names only).
Press to add or to add
(for entering phone numbers
only)
.
Press to change the next letter to upper or lower case.
•
•
•
•
•
•
•
41
3FWJFXBOEEJBMGSPNUIFQIPOFCPPL
Entries are sorted alphabetically.
1. Press on the handset or
1)0/�, on the telephone
base when idle.
2. Scroll to browse through the
phonebook, or use the dialing keys to
start a name search
3. When the desired entry appears, Press
or on the handset, or press on
the base to dial.
&EJUBQIPOFCPPLFOUSZ
1. When the desired entry displays, press
&%*5.
2. Use the dialing keys and #"$,41 to edit the number, and then
press /&95.
3. Use the dialing keys to edit the name, and then press 4"7& to
save.
%FMFUFBQIPOFCPPLFOUSZ
1. When the desired entry displays, press %&-&5&.
2. When the screen displays %FMFUFDPOUBDU , press:&4 to
confirm delete.
BACK
42
$BMMFS*%
This product supports caller ID services
provided by most telephone service
providers. Depending on your service
subscription, you may see the caller’s
name, number, date and time of calls that
are sent by your telephone service provider
after the first or second ring.
$BMMFS*%MPH
The caller ID log stores up to 50 entries.
If you answer a call before the caller
information appears, it will not be saved in
the caller ID log.
The screens display 99.JTTFEDBMMT
when there are new missed calls in the
caller ID log.
If you want to erase the missed call
indicator, press and hold $"/$&-or
press $*%when idle.
•
•
43
3FWJFXBOEEJBMBOVNCFSJOUIFDBMMFS*%MPH
1. Press $*% or $"--&3*% when idle.
2. Scroll to browse through the caller ID
log. When the desired entry appears:
Press repeatedly to show different
dialing options.
Press repeatedly if you need to
add or remove 1 in front of the phone
number.
3. Press or on the handset, or press
on the base to dial the displayed
number.
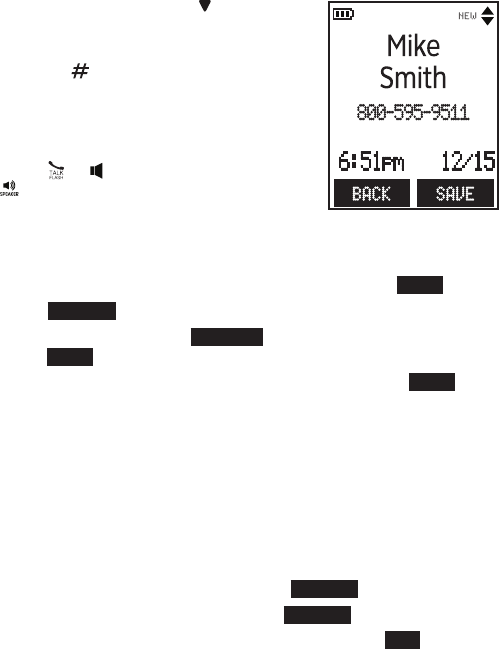
4BWFBDBMMFS*%MPHFOUSZUPUIFQIPOFCPPL
1. When the desired caller ID log entry displays, press 4"7&.
2. Press 4&-&$5 to select 1IPOFCPPL.
3. Use the dialing keys and #"$,41 to edit the number, and then
press /&95.
4. Use the dialing keys to edit the name, and then press 4"7& to
save.
%FMFUFBDBMMFS*%MPHFOUSZ
When the desired caller ID log entry displays, press %&-&5&.
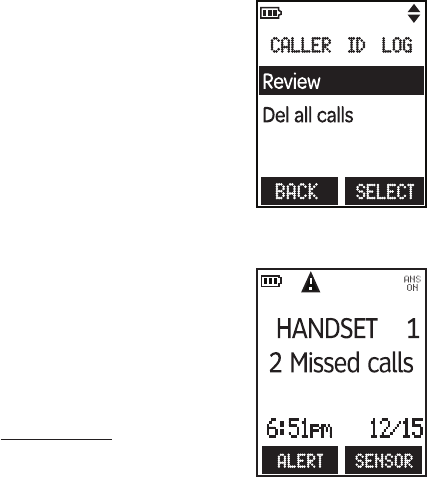
%FMFUFBMMDBMMFS*%MPHFOUSJFT
1. Press .&/6 on the handset or telephone base when idle.
2. Scroll to $BMMFS*%MPHand then press 4&-&$5.
3. Scroll to %FMBMMDBMMT and then press 4&-&$5.
4. When the screen displays %FMFUFBMMDBMMT , press:&4 to
confirm delete.
•
•
•
44
$BMMCMPDL
If you subscribe to caller ID service, you
can set the telephone to block unknown
calls and certain undesired calls.
The call block list stores up to 20 entries.
#MPDLVOLOPXODBMMT
Press .&/6 when the phone is not in
use.
Scroll to $BMMCMPDL, and then press
4&-&$5.
Scroll to $BMMTXPOVN, and then
press 4&-&$5.
Scroll to choose #MPDL or 6OCMPDL,
and then press 4&-&$5.
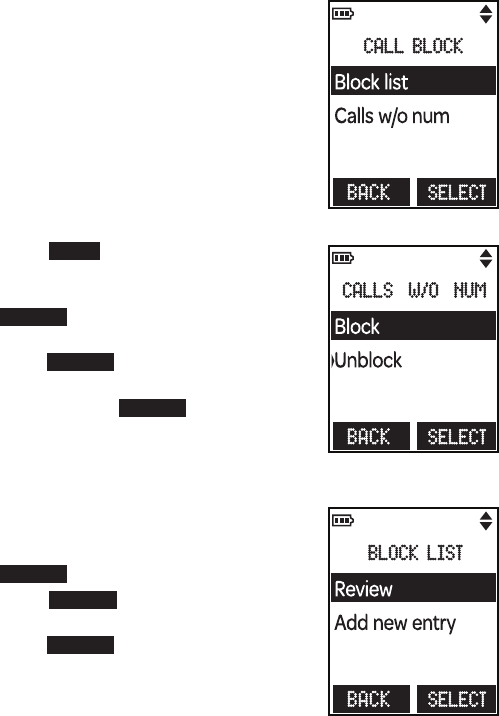
"EEBDBMMCMPDLMJTUFOUSZ
Press .&/6 when the phone is not in
use.
Scroll to $BMMCMPDL, and then press
4&-&$5.
Press 4&-&$5 to select #MPDLMJTU.
Scroll to "EEOFXFOUSZ, and then
press 4&-&$5.
Enter the number.
• Use the dialing keys to enter the
number (up to 30 digits).
1.
2.
3.
4.
1.
2.
3.
4.
5.

45
6. Press /&95 to move to the name.
7. Use the dialing keys to enter the name (up to 15 characters).
Additional key presses show other characters of that particular
key.
8. Press 4"7& to save.
3FWJFXUIFDBMMCMPDLMJTU
Press .&/6 when the phone is not in use.
Scroll to $BMMCMPDL, and then press 4&-&$5.
Press 4&-&$5 to select #MPDLMJTU.
Press 4&-&$5 to choose 3FWJFX.
Scroll to browse through the call block list.
&EJUBDBMMCMPDLMJTUFOUSZ
When the desired entry displays, press &%*5.
Use the dialing keys to edit the number, and then press /&95.
Use the dialing keys to edit the name, and then press 4"7& to
save.
4BWFBDBMMFS*%MPHFOUSZUPDBMMCMPDLMJTU
When the desired caller ID log entry displays, press 4"7&.
Scroll to $BMMCMPDL then press 4&-&$5.
Use the dialing keys and #"$,41 to edit the number, and then
press /&95.
4. Use the dialing keys to edit the name, and then press 4"7& to
save.
%FMFUFBDBMMCMPDLMJTUFOUSZ
When the desired call block list entry displays, press %&-&5&.
2. When the screen displays %FMFUFFOUSZ , press:&4 to confirm
delete.
1.
2.
3.
4.
5.
1.
2.
3.
1.
2.
3.
1.
46
4PVOETFUUJOHT
,FZUPOF
You can adjust the key tone volume, or turn the key tone off.
Press .&/6 when the handset is not in use.
Scroll to 4FUUJOHT, and then press 4&-&$5.
Scroll to choose ,FZUPOF, and then press 4&-&$5.
Scroll to choose the desired volume or 0GG, and then press 4&5
to save.
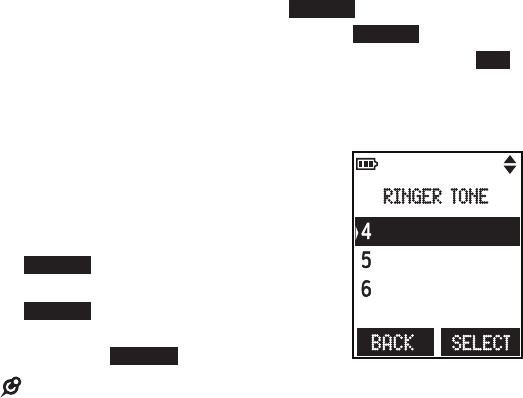
3JOHFSUPOF
You can choose from different ringer
tones.
Press .&/6 on the handset or
telephone base when idle.
Scroll to 3JOHFST, and then press
4&-&$5.
Scroll to 3JOHFSUPOF, and then press
4&-&$5.
Scroll to sample each ringer tone, and
then press 4&-&$5 to save.
NOTE
If you turn off the ringer volume, you will not hear ringer tone samples.
1.
2.
3.
4.
1.
2.
3.
4.
•
47
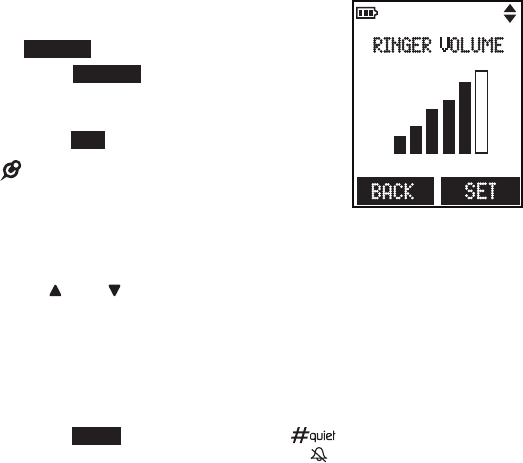
3JOHFSWPMVNF
You can adjust the ringer volume level, or turn the ringer off.
5PBEKVTUUIFIBOETFUSJOHFSWPMVNF
Press .&/6 on the handset when idle.
Scroll to 3JOHFST, and then press
4&-&$5.
Press 4&-&$5 to select 3JOHFS
WPMVNF.
Scroll to adjust the volume, and then
press 4&5 to save.
NOTE
If the handset ringer volume is set to off, that
handset is silenced for all incoming calls
except paging tone.
5PBEKVTUUIFUFMFQIPOFCBTFSJOHFSWPMVNF
Press 70- on the telephone base when idle.
5FNQPSBSZSJOHFSTJMFODJOH
When the telephone is ringing, you can temporarily silence the ringer
without disconnecting the call. The next call rings normally at the
preset volume.
Press .65&, .65&, $"/$&-, or on the handset or
telephone base. The screen displays
1.
2.
3.
4.
•
•
48
"CPVUUIFCVJMUJOBOTXFSJOHTZTUFNBOEWPJDFNBJM
TFSWJDF
For message recording, your telephone has a built-in answering
system, and it also support voicemail service offered by your
telephone service provider (subscription is required, and fee
may apply).
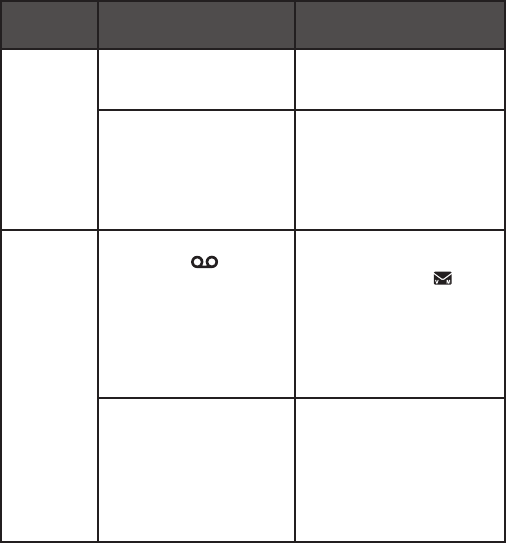
The main differences between them are as follows:
$BUFHPSZ #VJMUJOBOTXFSJOH
TZTUFN
7PJDFNBJMGSPN
UFMFQIPOFTFSWJDF
Storage Messages are stored in
the telephone base.
Messages are stored in a
server or system provided
by your telephone service.
Your messages
will not be deleted
automatically.
You have to delete your
messages manually.
Your messages may be
automatically deleted after
a period of time.
Contact your telephone
service provider for more
details.
Method
to retrieve
messages
When you received new
messages, displays
on both the handset
and telephone base,
99/FXNTHTdisplays
on the handset, and
99/FXNFTTBHFT
displays on the
telephone base.
When you received
new messages, thethe
handset displays
and /FXWPJDFNBJM.
To retrieve messages,
usually there are two
ways:
Press a button on the
telephone base; or
Access remotely with
an access code.
•
•
To retrieve messages,
you need an access
number and/or a
passcode provided by
your telephone service
provider.

49
4FUZPVSCVJMUJOBOTXFSJOHTZTUFN
Your answering system has various features, read below for the
basic settings.
The answering system can record and store up to 99 messages.
Each message can be up to three minutes in length. The total
storage capacity for the announcement, messages and memos is
approximately 22 minutes. The actual recording time depends on
individual message characteristics.
Your answering system allows you to set your announcement, to save
and delete messages, activate call screening, to set number of rings
before pick up, to access remotely, and to control the recording time.
5VSOUIFBOTXFSJOHTZTUFNPOPSPGG
The answering system must be turned on to answer and record
messages.
6TJOHUIFUFMFQIPOFCBTF
Press "/40/0'' on the telephone base to turn the built-in
answering system on or off.
03
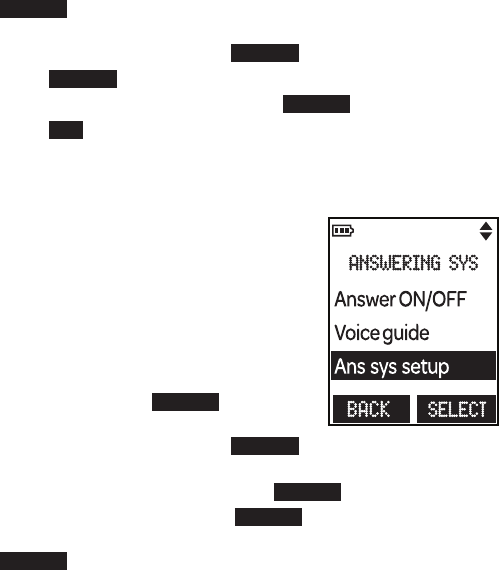
Press .&/6 when the phone is not in use.
Press 4&-&$5 to select "OTXFSJOHTZT.
Scroll to highlight "OTXFS0/0'',
and then press 4&-&$5.
Scroll to highlight 0Oor0GG, and then
press 4&-&$5 to save. You hear a
confirmation tone.
6TJOHUIFIBOETFU
Press .&/6 when the phone is not in use.
Scroll to highlight "OTXFSJOHTZT, and
then press 4&-&$5.
Scroll to highlight "OTXFS0/0'', and then press 4&-&$5.
Scroll to highlight 0Oor0GG, and then press 4&-&$5 to save.
You hear a confirmation tone.
•
1.
2.
3.
4.
1.
2.
3.
4.
50
%FGBVMUBOOPVODFNFOU
The telephone is preset with a greeting that answers calls with
“)FMMPQMFBTFMFBWFBNFTTBHFBGUFSUIFUPOF” You can use this
preset announcement, or replace it with your own.
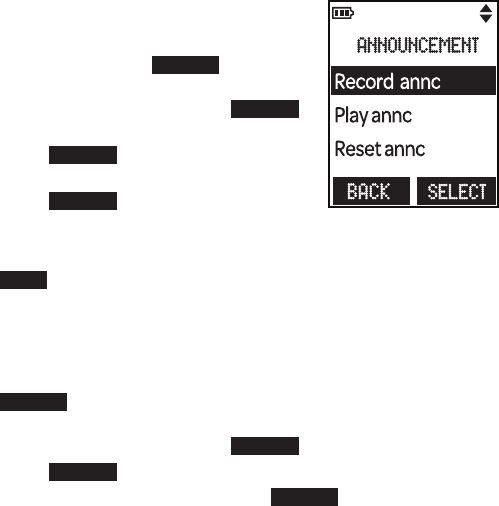
3FDPSEZPVSPXOBOOPVODFNFOU
You can use the preset announcement to answer calls, or replace it
with your own recorded announcement. It can be up to 90 seconds
in length.
Press .&/6 on the handset or
telephone base when idle.
On the handset, scroll to "OTXFSJOH
TZT and then press 4&-&$5.
03
On the telephone base, press 4&-&$5
to select "OTXFSJOHTZT.
Press 4&-&$5 to select
"OOPVODFNFOU.
Press 4&-&$5 to select 3FDPSEBOOD.
The handset or telephone base
announces
n3FDPSEBGUFSUIFUPOF1SFTT4501XIFOZPVBSF
EPOFo After the tone, speak towards the microphone. Press
4501 when done.
1MBZUIFBOOPVODFNFOU
Press .&/6 on the handset or telephone base when idle.
On the handset, scroll to "OTXFSJOHTZT and then press
4&-&$5.
03
On the telephone base, press 4&-&$5 to select "OTXFSJOHTZT.
Press 4&-&$5 to select "OOPVODFNFOU.
Scroll to 1MBZBOODand then press 4&-&$5.
1.
2.
3.
4.
5.
1.
2.
3.
4.
51
3FTFUUIFBOOPVODFNFOU
Press .&/6 on the handset or telephone base when idle.
On the handset, scroll to "OTXFSJOHTZT and then press
4&-&$5.
03
On the telephone base, press 4&-&$5 to select "OTXFSJOHTZT.
Press 4&-&$5 to select "OOPVODFNFOU.
Scroll to 3FTFUBOODand then press 4&-&$5.
Press :&4 to reset to the default announcement.
4FUOVNCFSPGSJOHT
You can set the answering system to
answer an incoming call after 2, 3, 4, 5 or
6 rings; or toll saver. If you choose toll
saver, the answering system answers after
2 rings when you have new messages,
or after 4 rings when you have no new
messages.
Press .&/6on the handset or
telephone base when idle.
On the handset, scroll to "OTXFSJOH
TZT and then press 4&-&$5.
03
On the telephone base, press 4&-&$5
to select "OTXFSJOHTZT.
Scroll to "OTTZTTFUVQ then press 4&-&$5.
Scroll to PGSJOHT then press 4&-&$5.
Scroll to choose , , , , or 5PMMTBWFS, and then press
4&-&$5.
1.
2.
3.
4.
5.
1.
2.
3.
4.
5.

52
.FTTBHFBMFSUUPOF
When the message alert tone is set to on, and there is at least one
new message, the telephone base beeps every 10 seconds. The
message alert tone is preset to off.
Press .&/6when the phone is not in use.
On the handset, scroll to "OTXFSJOHTZT and then press
4&-&$5.
03
On the telephone base, press 4&-&$5 to select "OTXFSJOHTZT.
Scroll to "OTTZTTFUVQ then press 4&-&$5.
Scroll to.THBMFSUUPOF then press 4&-&$5.
Scroll to choose 0Oor 0GG.
Press 4&-&$5 to save and you hear a confirmation tone.
3FDPSEJOHUJNF
You can set the recording time limit for each incoming message.
Press .&/6when the phone is not in use.
On the handset, scroll to "OTXFSJOHTZT and then press
4&-&$5.
03
On the telephone base, press 4&-&$5 to select "OTXFSJOHTZT.
Scroll to "OTTZTTFUVQ then press 4&-&$5.
Scroll to3FDPSEJOHUJNF then press 4&-&$5.
Scroll to choose NJOVUFT, NJOVUFTor NJOVUF.
Press 4&-&$5 to save and you hear a confirmation tone.
1.
2.
3.
4.
5.
6.
1.
2.
3.
4.
5.
6.
53
7PJDFHVJEF
This feature is an alternative way for you to do the basic setup
of the answering system. You can follow the voice guide to
record your own announcement, set the number of rings and the
message alert tone.
Press .&/6 when the phone is not in use.
On the handset, scroll to "OTXFSJOHTZT and then press
4&-&$5.
03
On the telephone base, press 4&-&$5 to select "OTXFSJOHTZT.
Scrollto highlight 7PJDFHVJEF, and then press 4&-&$5. You
hear the voice prompt n)FMMP5IJTWPJDFHVJEFXJMMBTTJTUZPVXJUI
UIFCBTJDTFUVQPGZPVSBOTXFSJOHTZTUFNo
Setup your answering system by inputting designated numbers as
instructed in the voice guide.
6TFZPVSCVJMUJOBOTXFSJOHTZTUFN
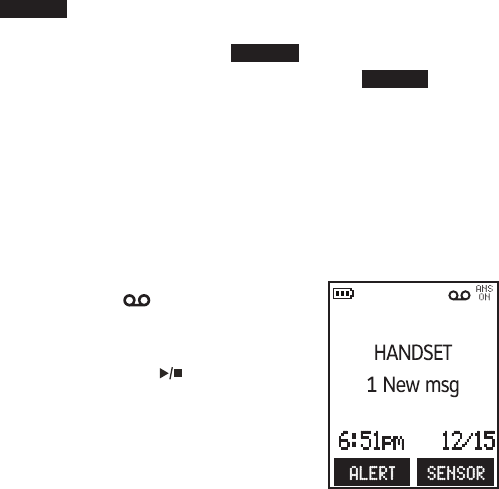
/FXNFTTBHFJOEJDBUJPO
When you received a message on your
answering system, displays on both
the handset and telephone base, 99/FX
NTHTdisplays on the handset, and 99
/FXNFTTBHFT displays on the telephone
base. To retrieve, press 1-":when
the phone is not in use.
1.
2.
3.
4.
54
.FTTBHFQMBZCBDL
5PQMBZNFTTBHFTBUUIFUFMFQIPOFCBTF
Press 1-":when the phone is not in use.
0QUJPOTEVSJOHQMBZCBDL
Press 70- to adjust the speaker volume.
Press 4,*1 to skip to the next message.
Press 3&1&"5 to repeat the message currently playing. Press
3&1&"5 twice to listen to the previous message.
Press 9%&-&5& to delete the playing message. The system
advances to the next message.
Press 4501 to stop.
Press to call back the caller if the message contains caller ID
information. The telephone base screen displays $BMMCBDL with
the caller ID information.
Press %*"- to call back the caller.
Press #"$, to restart the message playback.
5PQMBZNFTTBHFTBUUIFIBOETFU
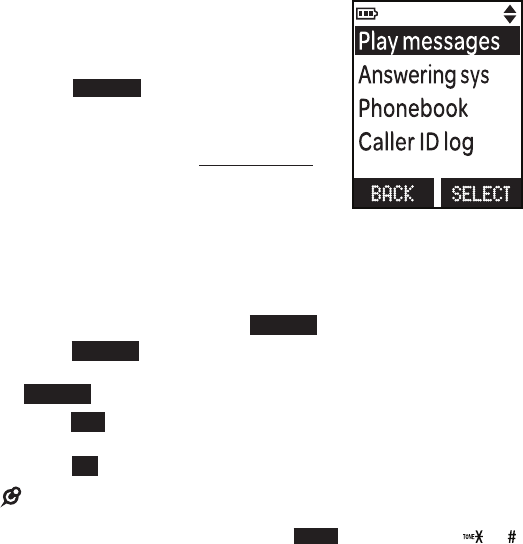
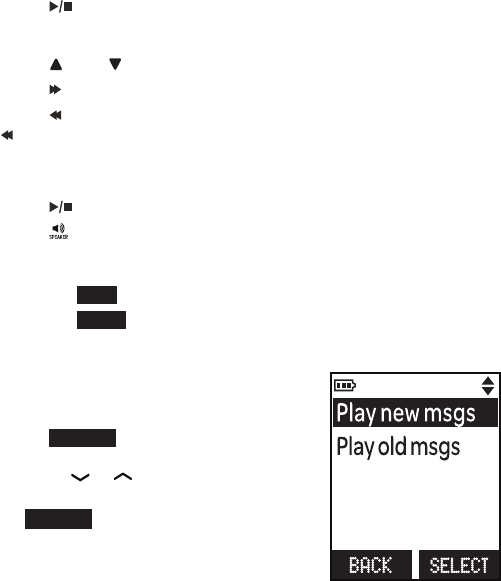
1. Press .&/6when the handset is not in
use.
2. Scroll to 1MBZNFTTBHFT, and then
press 4&-&$5.
If there are new and old messages,
press or to select 1MBZOFX
NTHT or 1MBZPMENTHT, then press
4&-&$5.
If there are only new or only
old messages, they will play
automatically.
The system announces the number of
messages, then begins playback. The message sequence is shown
on the handset. If there are no recorded messages, the handset
shows /PNFTTBHFT and you hear, “You have no messages.”
•
•
•
•
•
•
•
•
•
•
•

55
0QUJPOTEVSJOHQMBZCBDL
Press 70-6.& or 70-6.& to adjust the message
playback volume.
Press 4,*1 to skip to the next message.
Press 3&1&"5 to repeat the message. Press 3&1&"5 twice to
listen to the previous message.
Press %&-&5& to delete the message.
Press to call back the caller if the message contains caller ID
information. The telephone base screen displays $BMMCBDL with
the caller ID information.
Press %*"- to call back the caller.
Press #"$, to restart the message playback.
NOTES
Only one handset or the telephone base can access the answering system
at a time.
During message playback, if there is an incoming call or another handset
makes a call, message playback will be stopped.
%FMFUFBMMPMENFTTBHFT
5PEFMFUFBMMPMENFTTBHFTBUUIFUFMFQIPOFCBTF
Press 9%&-&5& twice when the phone is not in use.
5PEFMFUFBMMPMENFTTBHFTPOBIBOETFU
Press .&/6 when the phone is not in use.
On the handset, scroll to "OTXFSJOHTZT and then press
4&-&$5.
03
On the telephone base, press 4&-&$5 to select "OTXFSJOHTZT.
Scroll to %FMFUFBMMPME, and then press 4&-&$5 twice. You hear
a confirmation tone.
$BMMJOUFSDFQU
If you want to talk to the person whose message is being recorded,
press or on the handset, or press on the base.
•
•
•
•
•
•
•
•
•
1.
2.
3.

56
3FNPUFBDDFTT
A two-digit security code is required to access the messages, or
change the sensor mode setting remotely, from any touch-tone
telephone. The preset code is . You can use this preset code, or
set your own.
Dial your telephone number from any touch-tone telephone.
When the system plays your announcement, enter the two-digit
security code.
Enter the one of the remote commands, or , to listen to
message or change the sensor mode .
$PNNBOE %FTDSJQUJPO
To listen to messages (see page 57).
To change the sensor mode (see page 58).
1.
2.
3.

57
-JTUFOUPNFTTBHFTGSPNSFNPUFBDDFTT
Follow steps 1 and 2 in 3FNPUFBDDFTT section on page 56 to
enter remote access mode.
Press on your remote touch-tone telephone to enter the
answering system operations command session.
You can enter one of the following remote commands to do the
answering system operations.
$PNNBOE %FTDSJQUJPO
Play all messages.
Play new messages.
Delete the current message (during playback).
Delete all old messages.
Repeat the current message (during playback).
Stop.
Hear a list of remote commands.
Skip to the next message (during playback).
Record a new announcement.
End the call.
Turn the answering system on or off.
Hang up or press to end the call.
1.
2.
3.
4.
58
$IBOHFTFOTPSNPEFGSPNSFNPUFBDDFTT
Follow steps 1 and 2 in 3FNPUFBDDFTT section on page 56 to
enter remote access mode.
Press on your remote touch-tone telephone to enter the sensor
mode command session.
You can enter one of the following remote commands to change
to the respective sensor mode.
$PNNBOE %FTDSJQUJPO
Change to -PDBMmode.
Change to 3FNPUFmode.
Turn off all alerts in local mode.
NOTES
The sensor mode command session in remote access is only for changing
the sensor mode settings.
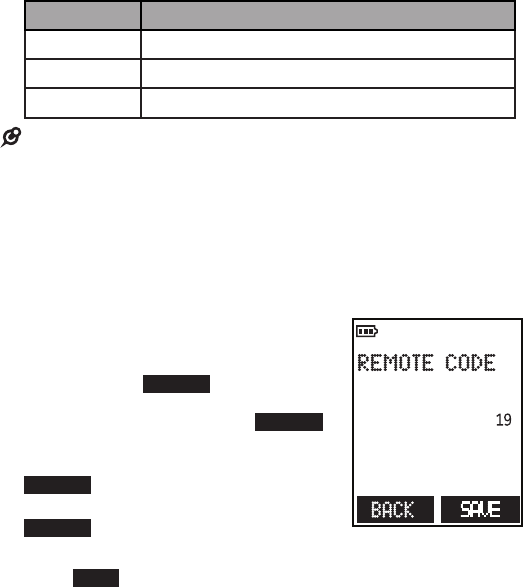
3FNPUFBDDFTTDPEF
A two-digit security code is required to access the answering system
remotely from any touch-tone telephone. The preset code
is . You can set the code from to .
Press .&/6when the phone is not in
use.
On the handset, scroll to "OTXFSJOHTZT
and then press 4&-&$5.
03
On the telephone base, press 4&-&$5
to select "OTXFSJOHTZT.
Scroll to "OTTZTTFUVQ then press
4&-&$5.
Scroll to3FNPUFDPEF, and then press
4&-&$5.
Use the dialing keys to enter a two-digit number.
Press 4"7& to save and you hear a confirmation tone.
1.
2.
3.
•
1.
2.
3.
4.
5.
6.
59
6TF UIF CVJMUJO BOTXFSJOH TZTUFN BOE WPJDFNBJM
TFSWJDF
You can use your answering system and voicemail service together
by setting your answering system to answer before voicemail
service answers as described below. To learn how to program your
voicemail settings, contact your telephone service provider.
If you are on a call, or if the answering system is busy recording a
message and you receive another call, the second caller can leave a
voicemail message.
Set your answering system to answer calls at least two rings earlier
than your voicemail service is set to answer. For example, if your
voicemail service answers after six rings, set your answering system
to answer after four rings.
Some voicemail service providers may program the delay before
answering calls in seconds instead of rings. In this case, allow six
seconds per ring when determining the appropriate setting.
60
3FUSJFWFWPJDFNBJMGSPNUFMFQIPOFTFSWJDF
3FUSJFWFWPJDFNBJM
When you received a voicemail, the handset displays and
/FXWPJDFNBJM. To retrieve, you typically dial an access number
provided by your telephone service provider, and then enter a
security code. Contact your telephone service provider for instructions
on how to configure the voicemail settings and listen to messages.
NOTE
After you have listened to all new voicemail messages, the indicators on
the handset turn off automatically.
4FUZPVSWPJDFNBJMOVNCFS
You can save your access number on each
handset for easy access to your voicemail.
After you saved the voicemail number, you
can press and hold to retrieve voicemail.
Press .&/6 when the handset is not
in use.
Scroll to 4FUUJOHT, and then press
4&-&$5.
Scroll to 7PJDFNBJM, and then press
4&-&$5.
Use the dialing keys to enter the
voicemail number (up to 30 digits).
Press 4"7& to save.
•
1.
2.
3.
4.
5.

61
5VSOPGGUIFOFXWPJDFNBJMJOEJDBUPST
If you have retrieved your voicemail while away from home, and the
handset still displays the new voicemail indicators, use this feature
to turn off the indicators.
NOTE
This feature turns off the indicators only, it does not delete your voicemail
messages.
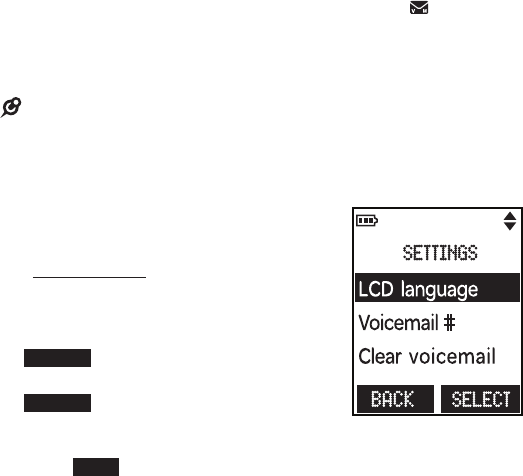
Press .&/6 when the handset is not in use.
Scroll to 4FUUJOHT, and then press 4&-&$5.
Scroll to $MFBSWPJDFNBJM, and then press 4&-&$5.
Press :&4 to confirm.
•
1.
2.
3.
4.
62
&YQBOEZPVSUFMFQIPOFTZTUFN
You can add new DECT 6.0 cordless handsets (7$), headsets,
speakerphones, or speaker boxes (all purchased separately) to your
telephone system. This telephone system accommodates up to five
DECT 6.0 devices.
For more details, refer to the user’s manual that comes with
your 7$ new cordless handset and your cordless devices
respectively.
You can also add new garage door status sensor (7$) or open/
closed sensor (7$) to your telephone system (both purchased
separately).
For more details, refer to the user’s manual that comes with your
7$ garage door status sensor and 7$ open/closed sensor
respectively.
63
&$0NPEF
This power conserving technology reduces power consumption for
optimal battery performance. The ECO mode activates automatically
whenever the handset is synchronized with the telephone base.
(FOFSBMQSPEVDUDBSF
5BLJOHDBSFPGZPVSUFMFQIPOF
Your cordless telephone contains sophisticated electronic parts, so it
must be treated with care.
"WPJESPVHIUSFBUNFOU
Place the handset down gently. Save the original packing materials to
protect your telephone if you ever need to ship it.
"WPJEXBUFS
Your telephone can be damaged if it gets wet. Do not use the handset
outdoors in the rain, or handle it with wet hands. Do not install the
telephone base near a sink, bathtub or shower.
&MFDUSJDBMTUPSNT
Electrical storms can sometimes cause power surges harmful to
electronic equipment. For your own safety, take caution when using
electrical appliances during storms.
$MFBOJOHZPVSUFMFQIPOF
Your telephone has a durable plastic casing that should retain its
luster for many years. Clean it only with a dry non-abrasive cloth. Do
not use dampened cloth or cleaning solvents of any kind.
4UPSBHF
When you are not going to use the handset for some time, remove
the rechargeable battery from the handset. Store the handset, the
charger and the adapter in a cool and dry place.

64
'SFRVFOUMZBTLFERVFTUJPOT
Below are the questions most frequently asked about the cordless
telephone. If you cannot find the answer to your question, visit our
website at XXXWUFDIQIPOFTDPN or call for
customer service.
My telephone does
not work at all.
Make sure the telephone base is installed
properly, and battery is installed and charged
correctly. For optimum daily performance, return
the handset to the telephone base after use.
Make sure the handset has registered to the
telephone base.
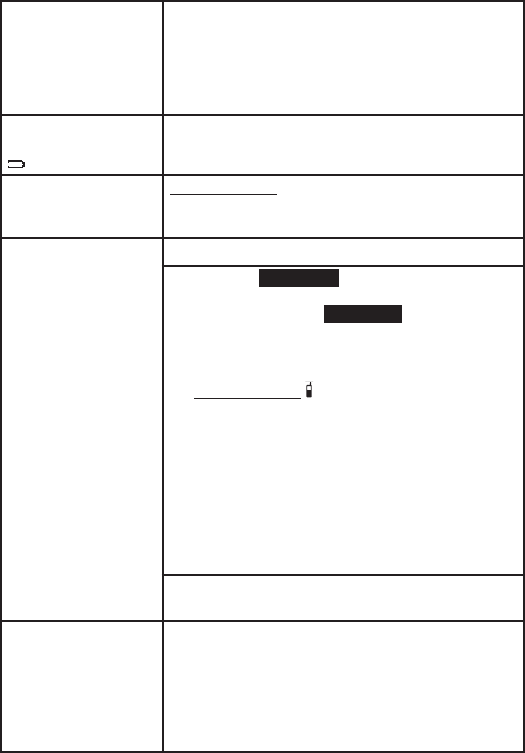
The display shows
/PMJOF.
I cannot get a dial
tone.
Disconnect the telephone line cord from your
telephone and connect it to another telephone.
If there is no dial tone on that other telephone
either, then the telephone line cord may be
defective. Try installing a new telephone line
cord.
If changing telephone line cord does not help,
the wall jack (or the wiring to this wall jack) may
be defective. Contact your telephone service
provider.
You may be using a new cable or VoIP service,
the existing telephone jacks in your home may
no longer work. Contact your service provider for
solutions.
I get noise, static, or
weak signals even
when I’m near the
telephone base.
Move your phone to a higher location. The
phone may have better reception in a high area.
If you subscribe to digital subscriber line (DSL)
high-speed Internet service through your
telephone line, make sure you install a %4-
GJMUFS (not included) between the telephone line
cord and telephone wall jack. Contact your DSL
service provider for more information.
If other phones in your home are having the
same problem, contact your telephone service
provider (charges may apply).
65
The display shows
5PSFHJTUFS)4TFF
NBOVBM to register.
The handset does
not work at all.
The handset is deregistered from the telephone
base. Place the handset in the telephone
base to register it back. The handset shows
)"/%4&593FHJTUFSFE and you hear a beep
when the registration process completes. This
process takes about 60 seconds to complete.
The display shows
-PXCBUUFSZ and
flashes.
Place the handset in the telephone base or
charger for charging.
The display shows
4&/4039-PX
CBUUFSZ.
Press and hold $"/$&- on the handset or
telephone base to erase the message.
Replace the batteries with new ones.
The sensor does not
work at all.
Make sure two AAA batteries are installed.
Check if the 4&/4034 softkey is displayed
in the idle screen of the telephone base or
handset. If yes, press 4&/4034 and then scroll
to check if the desired sensor is on the sensor
list. If the desired sensor is not found, then it may
be deregistered from the telephone base.
Press and hold '*/%)"/%4&5 on the
telephone base for about 4 seconds when
the phone is not in use. The telephone base
shows 3FHJTUFSJOH1MFBTFXBJU.
Press the pair button on the sensor to enter
the registration mode.
The handset shows 4&/40393FHJTUFSFE and
you hear a beep when the registration process
completes. This process takes about 90 seconds
to complete.
1.
2.
The sensor may be out of range. Move the
sensor closer to the telephone base.
The answering
system does not
announce the
correct day of the
week for recorded
messages time
stamp.
Make sure you have set the date and time. See
$POGJHVSFZPVSUFMFQIPOF section.

66
The answering
system does not
answer after correct
number of rings
or does not record
messages.
Make sure the answering system is on. When
the answering system is on, the telephone base
and handset show "/40/ and the "/40/
light on the telephone base is on.
If toll saver is selected, the number of rings
changes to two when there are new messages.
I accidentally set my
LCD language to
Spanish or French,
and I don’t know
how to change it
back to English.
While the handset is not in use, press .&/6
and then enter to change the handset
LCD language back to English.
67
-JNJUFE8BSSBOUZ
8IBUEPFTUIJTMJNJUFEXBSSBOUZDPWFS
The manufacturer of this VTech Product warrants to the holder of a
valid proof of purchase (“Consumer” or “you”) that the Product and
all accessories provided in the sales package (“Product”) are free
from defects in material and workmanship, pursuant to the following
terms and conditions, when installed and used normally and in
accordance with the Product operating instructions. This limited
warranty extends only to the Consumer for Products purchased and
used in the United States of America and Canada.
8IBUXJMM75FDIEPJGUIF1SPEVDUJTOPUGSFFGSPNEFGFDUTJO
NBUFSJBMTBOEXPSLNBOTIJQEVSJOHUIFMJNJUFEXBSSBOUZQFSJPE
n.BUFSJBMMZ%FGFDUJWF1SPEVDUo
During the limited warranty period, VTech’s authorized service
representative will repair or replace at VTech’s option, without
charge, a Materially Defective Product. If we repair the Product,
we may use new or refurbished replacement parts. If we choose to
replace the Product, we may replace it with a new or refurbished
Product of the same or similar design. We will retain defective parts,
modules, or equipment. Repair or replacement of the Product, at
VTech’s option, is your exclusive remedy. VTech will return the
repaired or replacement Products to you in working condition. You
should expect the repair or replacement to take approximately 30 days.
)PXMPOHJTUIFMJNJUFEXBSSBOUZQFSJPE
The limited warranty period for the Product extends for ONE (1)
YEAR from the date of purchase. If VTech repairs or replaces a
Materially Defective Product under the terms of this limited warranty,
this limited warranty also applies to the repaired or replacement
Product for a period of either (a) 90 days from the date the repaired
or replacement Product is shipped to you or (b) the time remaining
on the original one-year warranty; whichever is longer.
8IBUJTOPUDPWFSFECZUIJTMJNJUFEXBSSBOUZ
This limited warranty does not cover:
Product that has been subjected to misuse, accident, shipping or
other physical damage, improper installation, abnormal operation
or handling, neglect, inundation, fire, water or other liquid
intrusion; or
1.
68
Product that has been damaged due to repair, alteration or
modification by anyone other than an authorized service
representative of VTech; or
Product to the extent that the problem experienced is caused
by signal conditions, network reliability, or cable or antenna
systems; or
Product to the extent that the problem is caused by use with non-
VTech accessories; or
Product whose warranty/quality stickers, product serial number
plates or electronic serial numbers have been removed, altered
or rendered illegible; or
Product purchased, used, serviced, or shipped for repair from
outside the United States of America or Canada, or used for
commercial or institutional purposes (including but not limited to
Products used for rental purposes); or
Product returned without a valid proof of purchase (see item 2 on
the next page); or
Charges for installation or set up, adjustment of customer
controls, and installation or repair of systems outside the unit.
)PXEPZPVHFUXBSSBOUZTFSWJDF
To obtain warranty service in the United States of America, please
visit our website at XXXWUFDIQIPOFTDPN or call .
In Canada, go to XXXWUFDIDBOBEBDPN or dial .
/05& Before calling for service, please review the user’s manual - a
check of the Product’s controls and features may save you a service
call.
Except as provided by applicable law, you assume the risk of loss
or damage during transit and transportation and are responsible
for delivery or handling charges incurred in the transport of the
Product(s) to the service location. VTech will return repaired or
replaced Product under this limited warranty. Transportation, delivery
or handling charges are prepaid. VTech assumes no risk for damage
or loss of the Product in transit. If the Product failure is not covered
by this limited warranty, or proof of purchase does not meet the terms
of this limited warranty, VTech will notify you and will request that
you authorize the cost of repair prior to any further repair activity. You
must pay for the cost of repair and return shipping costs for the repair
of Products that are not covered by this limited warranty.
2.
3.
4.
5.
6.
7.
8.
69
8IBUNVTUZPVSFUVSOXJUIUIF1SPEVDUUPHFUXBSSBOUZTFSWJDF
Return the entire original package and contents including the
Product to the VTech service location along with a description of
the malfunction or difficulty; and
Include a “valid proof of purchase” (sales receipt) identifying the
Product purchased (Product model) and the date of purchase or
receipt; and
Provide your name, complete and correct mailing address, and
telephone number.
0UIFSMJNJUBUJPOT
This warranty is the complete and exclusive agreement between you
and VTech. It supersedes all other written or oral communications
related to this Product. VTech provides no other warranties for
this Product. The warranty exclusively describes all of VTech’s
responsibilities regarding the Product. There are no other express
warranties. No one is authorized to make modifications to this
limited warranty and you should not rely on any such modification.
State/Provincial Law Rights: This warranty gives you specific legal
rights, and you may also have other rights, which vary from state to
state or province to province.
Limitations: Implied warranties, including those of fitness for a
particular purpose and merchantability (an unwritten warranty that
the Product is fit for ordinary use) are limited to one year from the
date of purchase. Some states/provinces do not allow limitations
on how long an implied warranty lasts, so the above limitation may
not apply to you. In no event shall VTech be liable for any indirect,
special, incidental, consequential, or similar damages (including, but
not limited to lost profits or revenue, inability to use the Product or
other associated equipment, the cost of substitute equipment, and
claims by third parties) resulting from the use of this Product. Some
states/provinces do not allow the exclusion or limitation of incidental
or consequential damages, so the above limitation or exclusion may
not apply to you.
1MFBTFSFUBJOZPVSPSJHJOBMTBMFTSFDFJQUBTQSPPG
PGQVSDIBTF
1.
2.
3.

70
5FDIOJDBM4QFDJGJDBUJPOT
Frequency control Crystal controlled PLL synthesizer
Transmit frequency 1921.536-1928.448 MHz
Channels 5
Sensor operating
temperature
-18°C (0°F) to 55°C (130°F)
Nominal effective
range
Maximum power allowed by FCC and IC.
Actual operating range may vary according to
environment conditions at the time of use.
Power
requirements
Handset: 2.4V 400mAH 2xAAA Ni-MH battery
Telephone base: 6V DC @ 600mA
Charger: 6V DC @ 400mA
Sensor: 2xAAA batteries
Memory Phonebook:
50 memory locations, up to 30 digits and
15 characters
Caller ID log:
50 memory locations; up to 24 digits and
15 characters
71
%JTDMBJNFS
This product is not designed for security purposes. The user of this
product is hereby informed that this product, when properly installed
and maintained, may in some cases reduce the risk of burglary, fire,
robbery or other events occurring without providing an alarm, but it
is not insurance and it is not a guarantee that such losses will not
occur, and it is not a guarantee that there will be no personal injury
or property loss or damage incurred by the user. The user of this
product should not rely on this product as a security measure for
prevention of accident, burglary, robbery or fire. Every location and
set of conditions is unique, and VTech is not responsible for losses,
injury, or damage resulting from the user’s use of this product.
This product is covered by U.S. Patent #8,825,043. Other patents
may be pending.

Specifications are subject to change without notice.
© 2015 for VTech Communications, Inc.
All rights reserved. 04/15. VC715X_ACIB_V1.0
Document order number: 91-007931-010-100