ValuePlus VPSPIO-02 USB External HDD KIT User Manual 1
ValuePlus, Inc. USB External HDD KIT 1
UserManual.wiki
>
ValuePlus
>
VPSPIO 02 User Manual
users manual
Navigation menu
Upload a User Manual
Namespaces
Wiki Guide
HTML
PDF
Info
Views
User Manual
Discussion / Help
Navigation
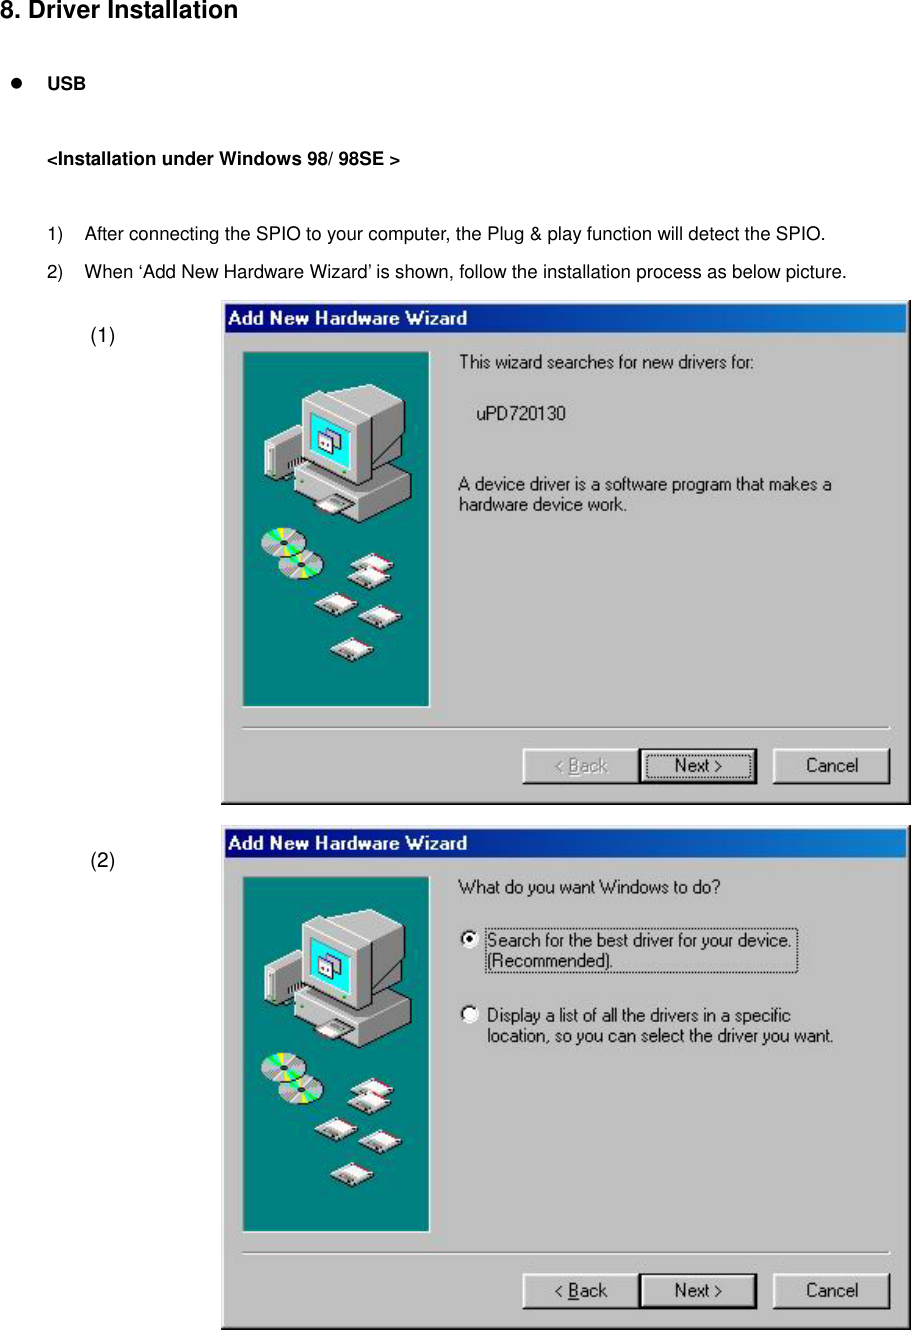
![User’s Manual 1. Product Introduction Super slim & light mobile storage device using 2.5” HDD Supporting both USB2.0 and IEEE1394 with lightning speed One touch assembly without screws Blue LED for operation indicator No external power required Plug & Play and Hot Plugging Scheduling auto back-up software Aluminum for heat management & deluxe case 2. Specification Interface USB 2.0 USB 2.0 + IEEE 1394 Model SPIO 252 SPIO 255 Transfer Rate 480Mbps 480Mbps / 400Mbps Hard Disk 2.5”, 9.5mm IDE Hard Disk Domension 128 x 75 x 145 (D x W x H) Weight 180g (HDD included) Power Source Bus Power Windows 98 / 98SE / ME / 2000 / XP (IEEE1394 is supported from Win98SE) OS Mac OS 8.6 Higher Contents SPIO, Cable, Driver & Auto backup Software CD, Manual, Leather Bag 3. System Environment [ Windows PC ] USB 2.0 / 1.1 - System : Pentium or higher IBM compatible PC or Mac - Memory : Over 32MB - OS : Windows 98 / ME / 2000 / XP, Mac OS 8.6 & higher - Interface : USB2.0 / 1.1 port (For USB2.0 support, USB2.0 based main board or USB 2.0 PCI card, or PCMCIA cards are required) - CD Drive for driver installation or internet connection for download of installation driver IEEE 1394 - System : Pentium or higher IBM compatible PC or Mac - Memory : Over 32MB](https://usermanual.wiki/ValuePlus/VPSPIO-02/User-Guide-331002-Page-1.png)
![- OS : Windows 98 / ME / 2000 / XP, Mac OS 8.6 & higher (IEEE1394 is not available under Win98) - Interface : IEEE1394 port (If the port is not exist in the PC, IEEE1394 PCI card, or PCMCIA cards are required) - CD Drive for driver installation or internet connection for download of installation driver [Macintosh] USB 2.0/1.1 - System : PC that has USB port - Memory : Over 32MB - OS : Mac OS 8.6 & higher - CD Drive for driver installation or internet connection for download of installation driver IEEE 1394 - System : iMAC, G3 higher (PC that has IEEE1394 port) - Memory : Over 32MB - OS: Mac OS 8.6 & higher - CD Drive for driver installation or internet connection for download of installation driver 4. Caution New hard disk requires FDISK and Formatting. SPIO can’t be detected in the computer without this process. Do not drop or aggressively handle the SPIO. It may cause damage to the hard disk. Avoid exposing the SPIO to the magnetic like a speaker and humidity. It may cause damage to the hard disk.. Do not remove or disconnect the SPIO from PC while the SPIO is transferring the data. It may cause damage to hard disk. <On the data loss resulted from ignoring above notes, Valueplus Inc. is not responsible for it.> 5. Name of each part Power / Blue LED for operation indicator IEEE1394 port Switch USB port](https://usermanual.wiki/ValuePlus/VPSPIO-02/User-Guide-331002-Page-2.png)
![< Driver Installation under Windows ME / 2000 / XP > SPIO is automatically detected without driver installation under Windows ME, 2000, XP. < Driver Installation under Mac OS 8.x ~ 9.x > SPIO is automatically detected without driver installation under Mac OS 8.6 higher. IEEE 1394 < Driver Installation under Windows 98 SE > Driver installation is not required at Windows98SE. However, sometimes when you use at the Windows98 SE system, you can get the message “Insert Windows CD”. Please insert Windows 98SE CD in CD-Rom. Required driver will be installed automatically. * Windosw 98 does not support IEEE1394 interface. < Driver Installation under Windows ME / 2000 / XP > SPIO is automatically detected without driver installation under Windows ME, 2000, XP. < Driver Installation under Mac OS 8.6 ~ 9.0 > Please down load “Firewire enabler” at Macintosh Homepage (http://www.apple.com) and install it. SPIO will be detected after rebooting the system. < Driver Installation under Mac OS 9.0 higher > SPIO is automatically detected without driver installation under Mac OS 9.0 higher. 9. Safe way to remove SPIO Windows 1) Finish all operation of SPIO before removing. Click the left button of mouse on the USB icon in the system tray, and select the message “Stop – [DiskDrive]HDD Model name”. 2) When you get the pop up message “You can unplug the USB storage device as safely”, click “OK”. SPIO can be removed safely. Mac Drag & Drop the SPIO icon to the trash icon on Desktop.](https://usermanual.wiki/ValuePlus/VPSPIO-02/User-Guide-331002-Page-10.png)
![10. HardCopy(Auto Backup Program) Installation Insert the program into CD-ROM Drive. There is a directory of [Hardcopy]. Double click on the “Hardcopy.exe” icon. Click OK to install the Hardcopy under the default directory. Don’t need to restart your computer. You are ready to use Hardcopy. You can find Hardcopy icon on the desktop To back up the data for the first time 1. Backup List: List Job name, update time, and status. (A) Status * “Start” – Start copy. * “Enable” – Active state. Regular backup will be done with specified period * “Disable” – Inactive state. No more regular backup activity. * “Copy” – Under backup processing. (B) To change the active status, click “the name of status”. 2. Menu: [New Job- Make a new job] [Open- open the activated job] [Delete- remove the job] [Stop- disable the job] Option for backup operation 3. Basic: You can see the left window after select New Job or Open. (A) Job name: Make a new job name. (B) Period: Set up the regular backup schedule (default is 10min.) (C) Drive: Select the object folder and backup destination. (D) Create folder: Make a new backup folder name. 4. Advanced: (A) Execute a. File/Folder: backup file and folder. b. File: backup only file. (B) Folder option: Separate backup time folder is created for each task. (C) Copy option: Can backup hidden file, or backup with filecompression. (D) File option: You can backup specific file with selection of file name and file extension. (E) Schedule Time: IF you have chosen a daily schedule, you can specify an exact time of the day when it runs. After this schedule time setting, previous general period setting is disregarded. You can change the property of job after open the specific job.](https://usermanual.wiki/ValuePlus/VPSPIO-02/User-Guide-331002-Page-11.png)