ValuePlus VPSPIO-04 Portable Hard Disk Drive User Manual 1
ValuePlus, Inc. Portable Hard Disk Drive 1
UserManual.wiki
>
ValuePlus
>
VPSPIO 04 User Manual
Users Manual
Navigation menu
Upload a User Manual
Namespaces
Wiki Guide
HTML
PDF
Info
Views
User Manual
Discussion / Help
Navigation

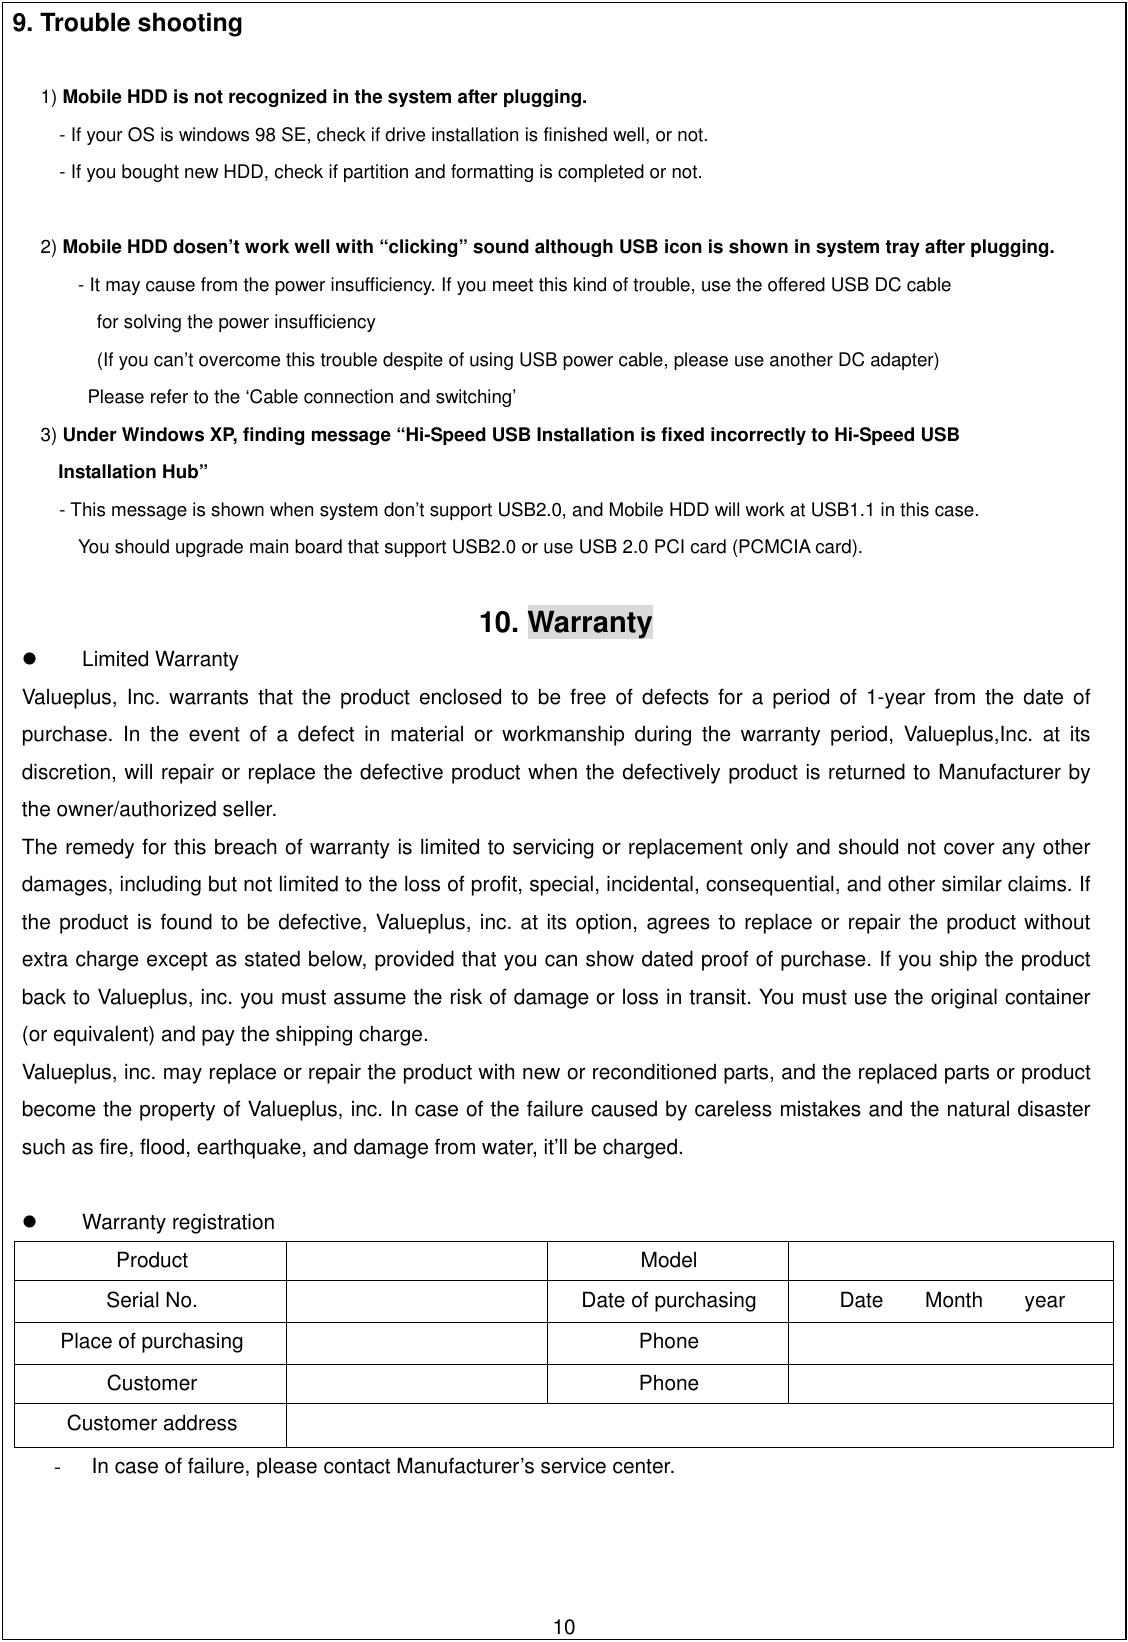
![1. Name of parts and contents 2. Specification Interface USB 2.0 Model SPIO 182 / SPIO 185 Transfer Rate 480Mbps Hard Disk 1.8 INCH, 5mm/8mm IDE Hard Disk Dimension 103mm x 61mm x 17mm (D x W x H) Weight 120g (HDD included) Power Source Bus Power Windows 98 / 98SE / ME / 2000 / XP OS Mac OS 8.6 higher 3. System Environment [ Windows PC ] USB 2.0 / 1.1 - System : Pentium or higher IBM compatible PC or Mac - Memory : Over 32MB - OS : Windows 98 / ME / 2000 / XP, Mac OS 8.6 & higher - Interface : USB2.0 / 1.1 port (For USB2.0 support, USB2.0 based main board or USB 2.0 PCI card, or PCMCIA cards are required) - CD Drive for driver installation or internet connection for download of installation driver [Macintosh] USB 2.0/1.1 - System : PC that has USB port - Memory : Over 32MB - OS : Mac OS 8.6 & higher 4- CD Drive for driver installation or internet connection for download of installation driver](https://usermanual.wiki/ValuePlus/VPSPIO-04/User-Guide-519074-Page-4.png)
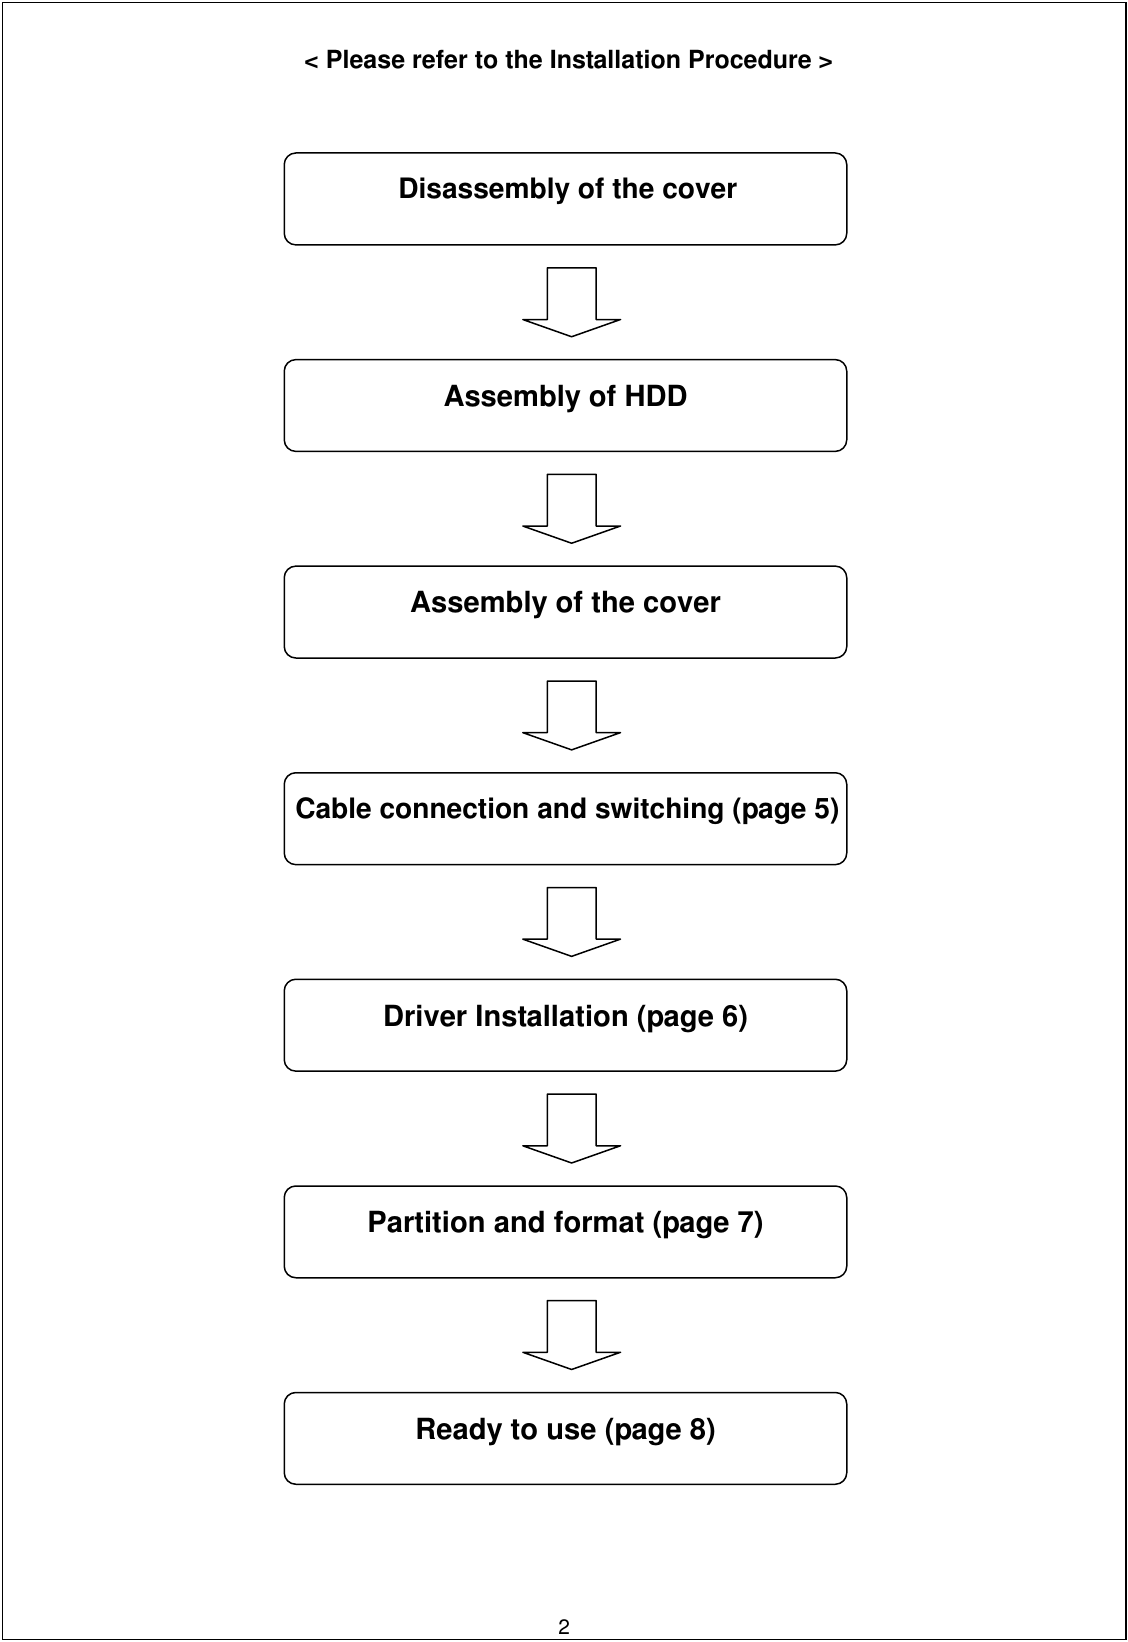
![3) For MAC * Caution : The driver should be Installed before “partition and Format”. 1) MAC OS 8.6 Higher 2) Mobile HDD can’t be detected in the computer without this process.. Install the driver first and then initialize it. 3) If you want to use Mobile HDD in both MAC and IBM system, do fdisk and format in IBM computer. a. First, install the driver in USB folder of MAC OS folder. b. Restart the computer. c.Connect Mobile HDD to the computer. d.The driver Icon will be generated in the screen. 7. Ready to use (1) How to check if Mobile HDD is installed well in the system ? If the new driver is generated in [My computer], you can use Mobile HDD right away. (2)How to remove Mobile HDD safely from your system ? Windows 1) Finish all operation of Mobile HDD before removing. Click the left button of mouse on the USB icon in the system tray, and select the message “Stop – [DiskDrive]HDD Model name”. 2) When you get the pop up message “You can unplug the USB storage device as safely”, click “OK”. Mobile HDD can be removed safely. Mac Drag & Drop the Mobile HDD icon to the trash icon on Desktop. 8. How to use HardCopy (Auto-scheduling backup software) ? Insert the program into CD-ROM Drive. There is a directory of [Hardcopy]. Double click on the “Hardcopy.exe” icon. Click OK to install the Hardcopy under the default directory. Don’t need to restart your computer. You are ready to use Hardcopy. You can find Hardcopy icon on the desktop 8](https://usermanual.wiki/ValuePlus/VPSPIO-04/User-Guide-519074-Page-8.png)
![To back up the data for the first time 2. Menu: [New Job- Make a new job] [Open- open the activated job] [Delete- remove the job] [Stop- disable the job] Option for backup operation (D) File option: You can backup specific file with selection of file name and file extension. (E) Schedule Time: IF you have chosen a daily schedule, you can specify an exact time of the day when it runs. After this schedule time setting, previous general period setting is disregarded. You can change the property of job after openning the specific job. 94. Advanced: (A) Execute a. File/Folder: backup file and folder. b. File: backup only file. (B) Folder option: Separate backup time folder is created for each task.(C) Copy option: Can backup hidden file, or backup with file compression. 3. Basic: You can see the left window after select New Job or Open. (A) Job name: Make a new job name. (B) Period: Set up the regular backup schedule (default is 10min.) (C) Drive: Select the object folder and backup destination. (D) Create folder: Make a new backup folder name. 1. Backup List: List Job name, update time, and status. (A) Status * “Start” – Start copy. * “Enable” – Active state. Regular backup will be done with specified period * “Disable” – Inactive state. No more regular backup activity. * “Copy” – Under backup processing. (B) To change the active status, click “the name of status”.](https://usermanual.wiki/ValuePlus/VPSPIO-04/User-Guide-519074-Page-9.png)