Vantiva USA DWI219COM IP Set Top Box User Manual user guide 2
Technicolor Connected Home USA LLC IP Set Top Box user guide 2
Contents
- 1. user guide
- 2. user guide 2
user guide 2
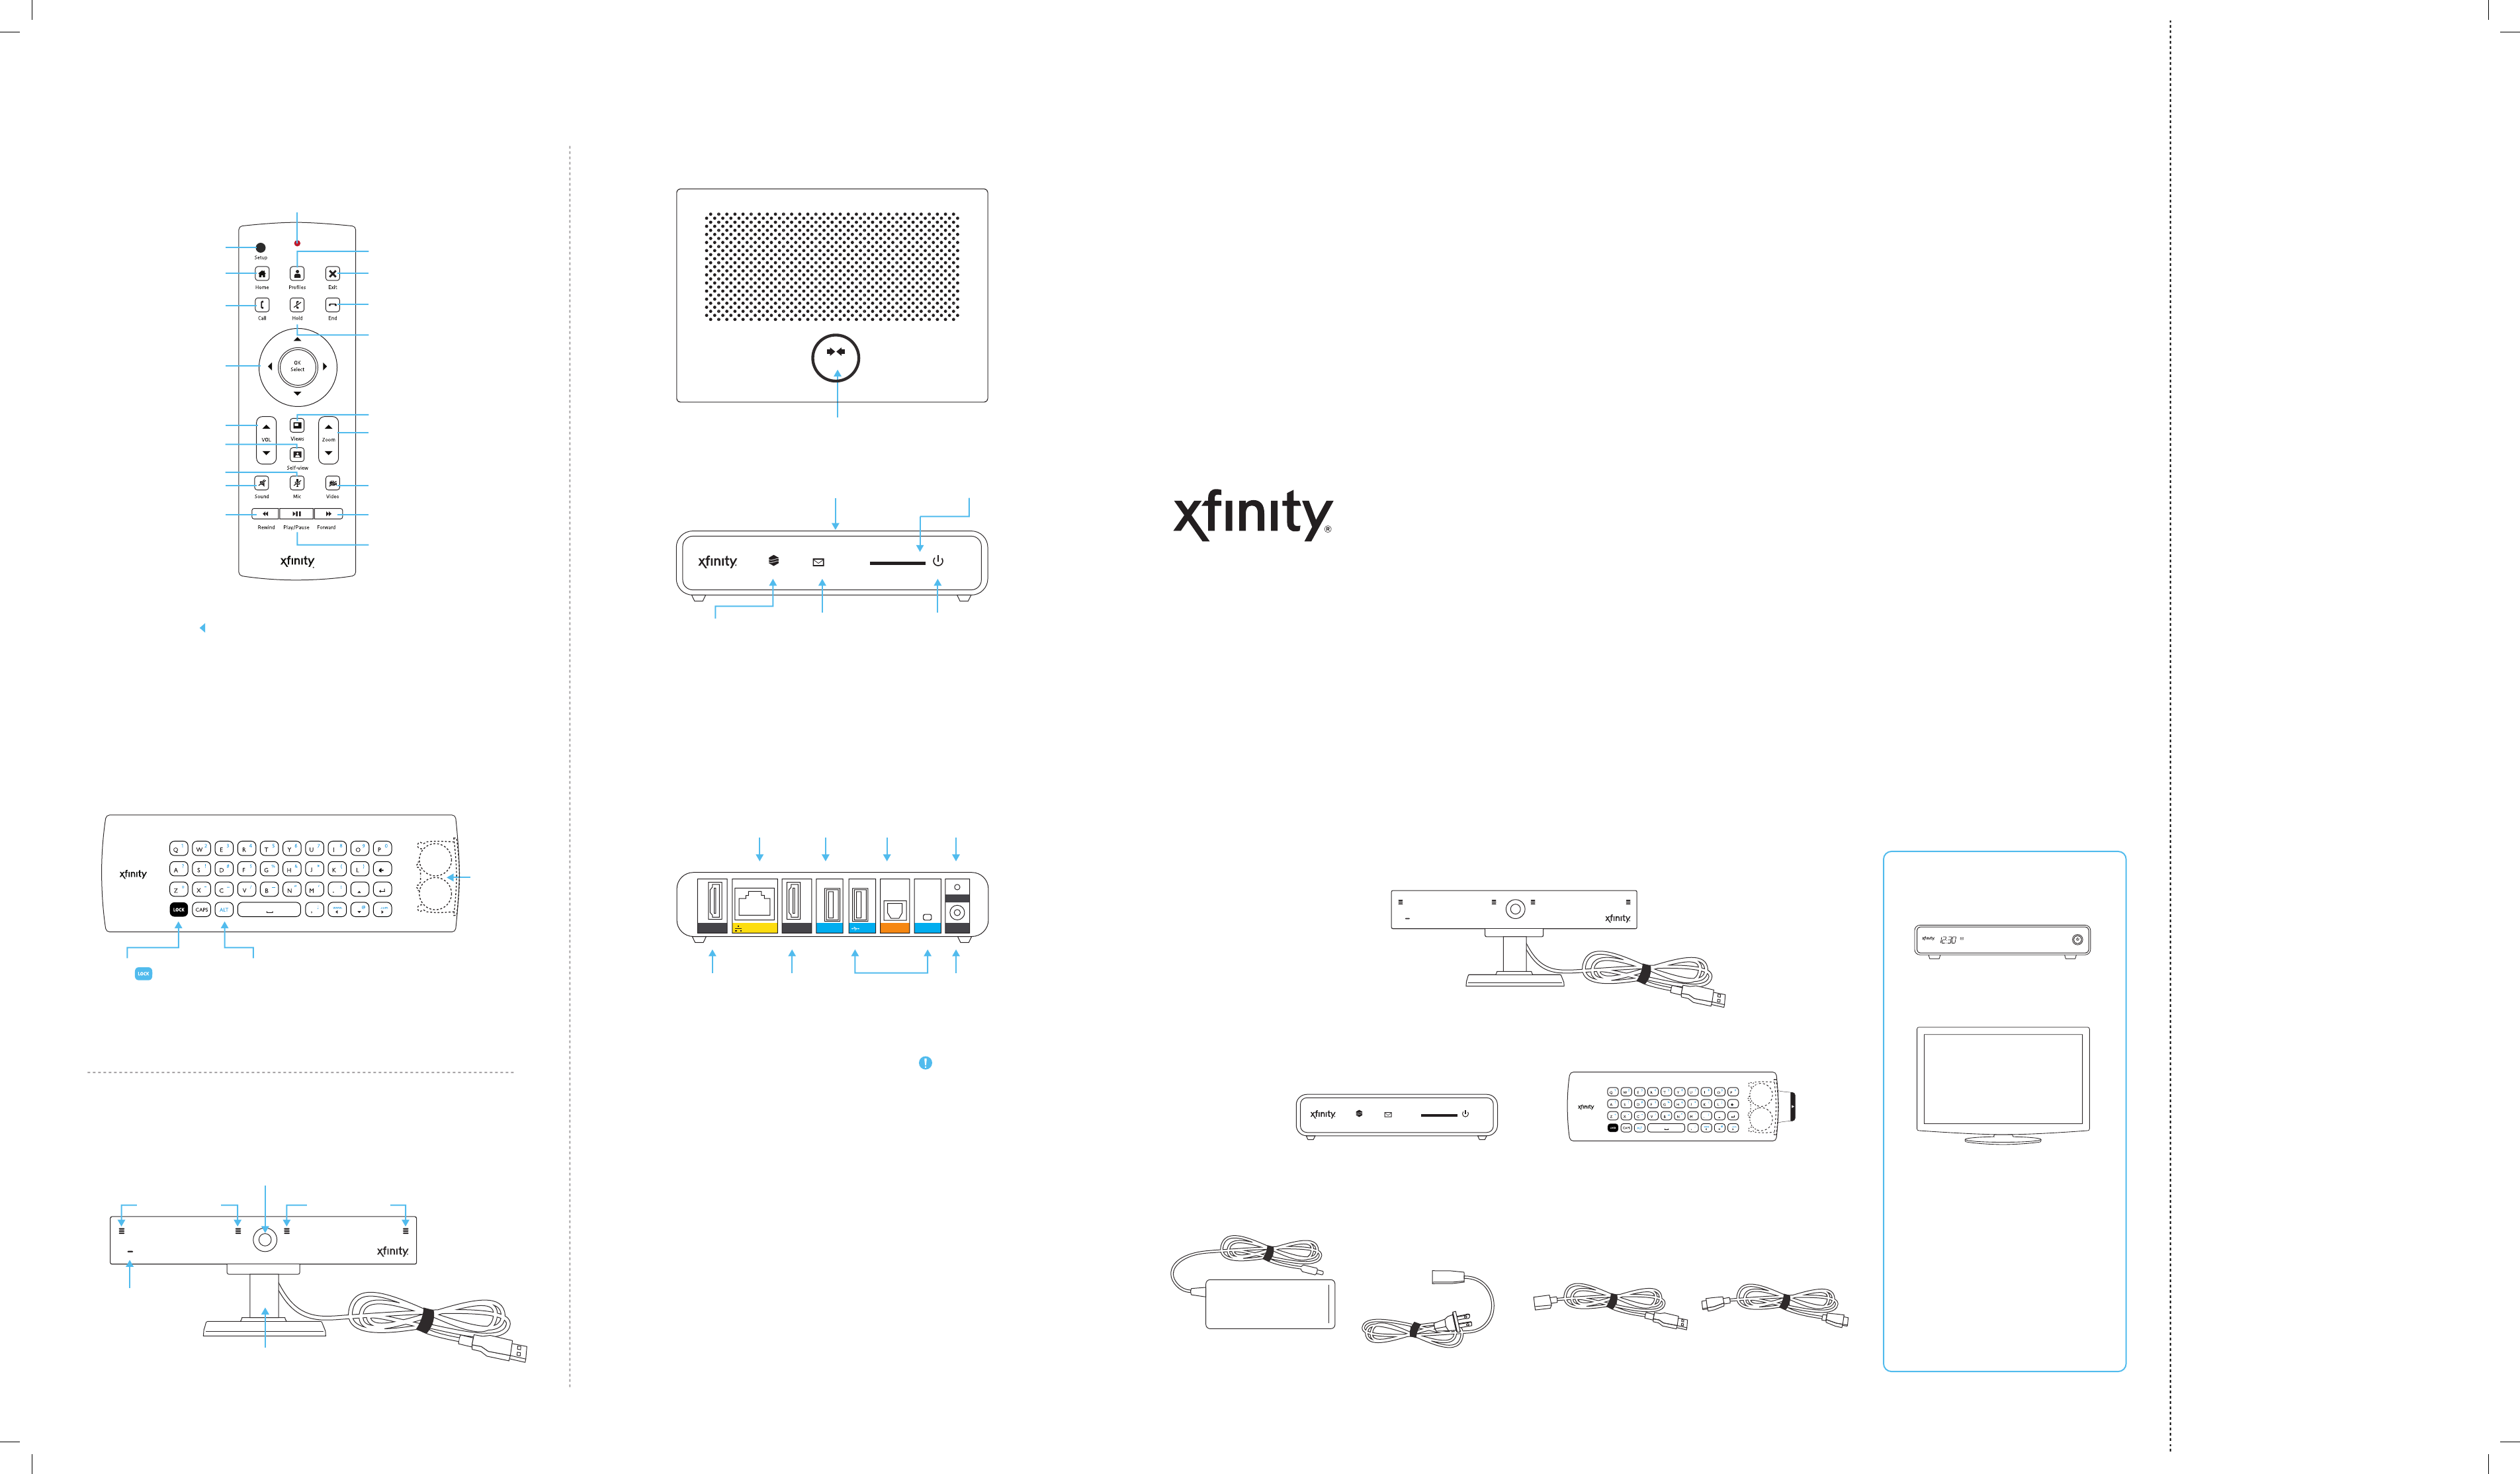
Cable In
HDMI
TV Out
HDMI Camera USB IRAudioEthernet
Reset
Power
Lock
Press to prevent
accidental typing while
using front of remote.
Back of remote
On/O
Indicator
Glowing LED
indicates camera
is on.
Lens with
Shutter
Shutter closes
when camera is
o.
Clip
Adjust for
placement.
Front of camera
NetworkMessages Power
SD Card
WPS
Use for wireless setup
with WPS capable
routers.
(Currently not available)
SD Slot
Use for viewing media
(Currently not available)
Message Indicator
Glowing LED indicates
new messages.
Network Indicator
Glowing LED
indicates connection
to home network.
Power
Glowing LED indicates
adaptor is on.
Front of adaptor box
Top of adaptor box
HDMI
Cable In
HDMI
TV Out
USB/IR
(Currently not
available)
Power
Ethernet Camera Audio Reset
Back of adaptor box
LED indicates
key press
Use to pair remote
Return home Close and return to TV
End call and ignore
incoming call
Zoom self-view and
pan/scan to adjust
video
Pause camera
Fast forward
Switch profiles
Change screen layout
Place call on hold,
mute mic and pause
camera
Play and pause
Battery
compartment
See self-view
Mute microphone
Accept incoming calls
and access contacts
Select current option
and navigate
left/right/up/down
Adjust volume
Mute call
Rewind
ALT
Press ALT for characters in
blue—i.e. press ALT then Q
for 1. You will need to
press ALT for each
character.
Front of remote
WPS
Get to Know the Parts
NetworkMessagesPower
SD Card
Remote (1)
Pull the tab from the remote’s battery
compartment before using
Adaptor box (1)
Camera with clip (1)
If anything is missing, please
for assistance.
What’s in the Box
You’ll Also Need:
XFINITY® is your interface to a growing number
of new products, services and features that will
become available to you on your HDTV.
Getting Started Guide
The Reset button
has two functions,
depending on the
length of time held:
Normal Reset
Insert a thin object and
hold the Reset button
for 2-5 seconds to
reboot the adaptor and
keep your personal
settings.
Factory Reset
Insert a thin object and
hold the Reset button
for 15 or more seconds
to delete ALL personal
settings and restore the
adaptor to the default
factory settings.
PULL
jale
Use the Left arrow
to go back to the
previous screen.
Play/Pause/Forward/
Rewind are not available
at this time.
Important Information
Microphones Microphones
Messages
Power
• HDMI-capable Comcast
set-top box
• HDTV
http://speedtest.comcast.net)
• Internet connection with at
least 1.5 Mbps simultaneous
upload and download speeds
(check your speeds at
• Comcast ID
• Skype™ account
Power adaptor cable (1) HDMI cable (2)Power adaptor (1) USB extension cable (1)
Note: This packaging has been specially designed using sustainable materials. Be kind to the
environment and re-use this box.
call Comcast at 877-70 4-7713
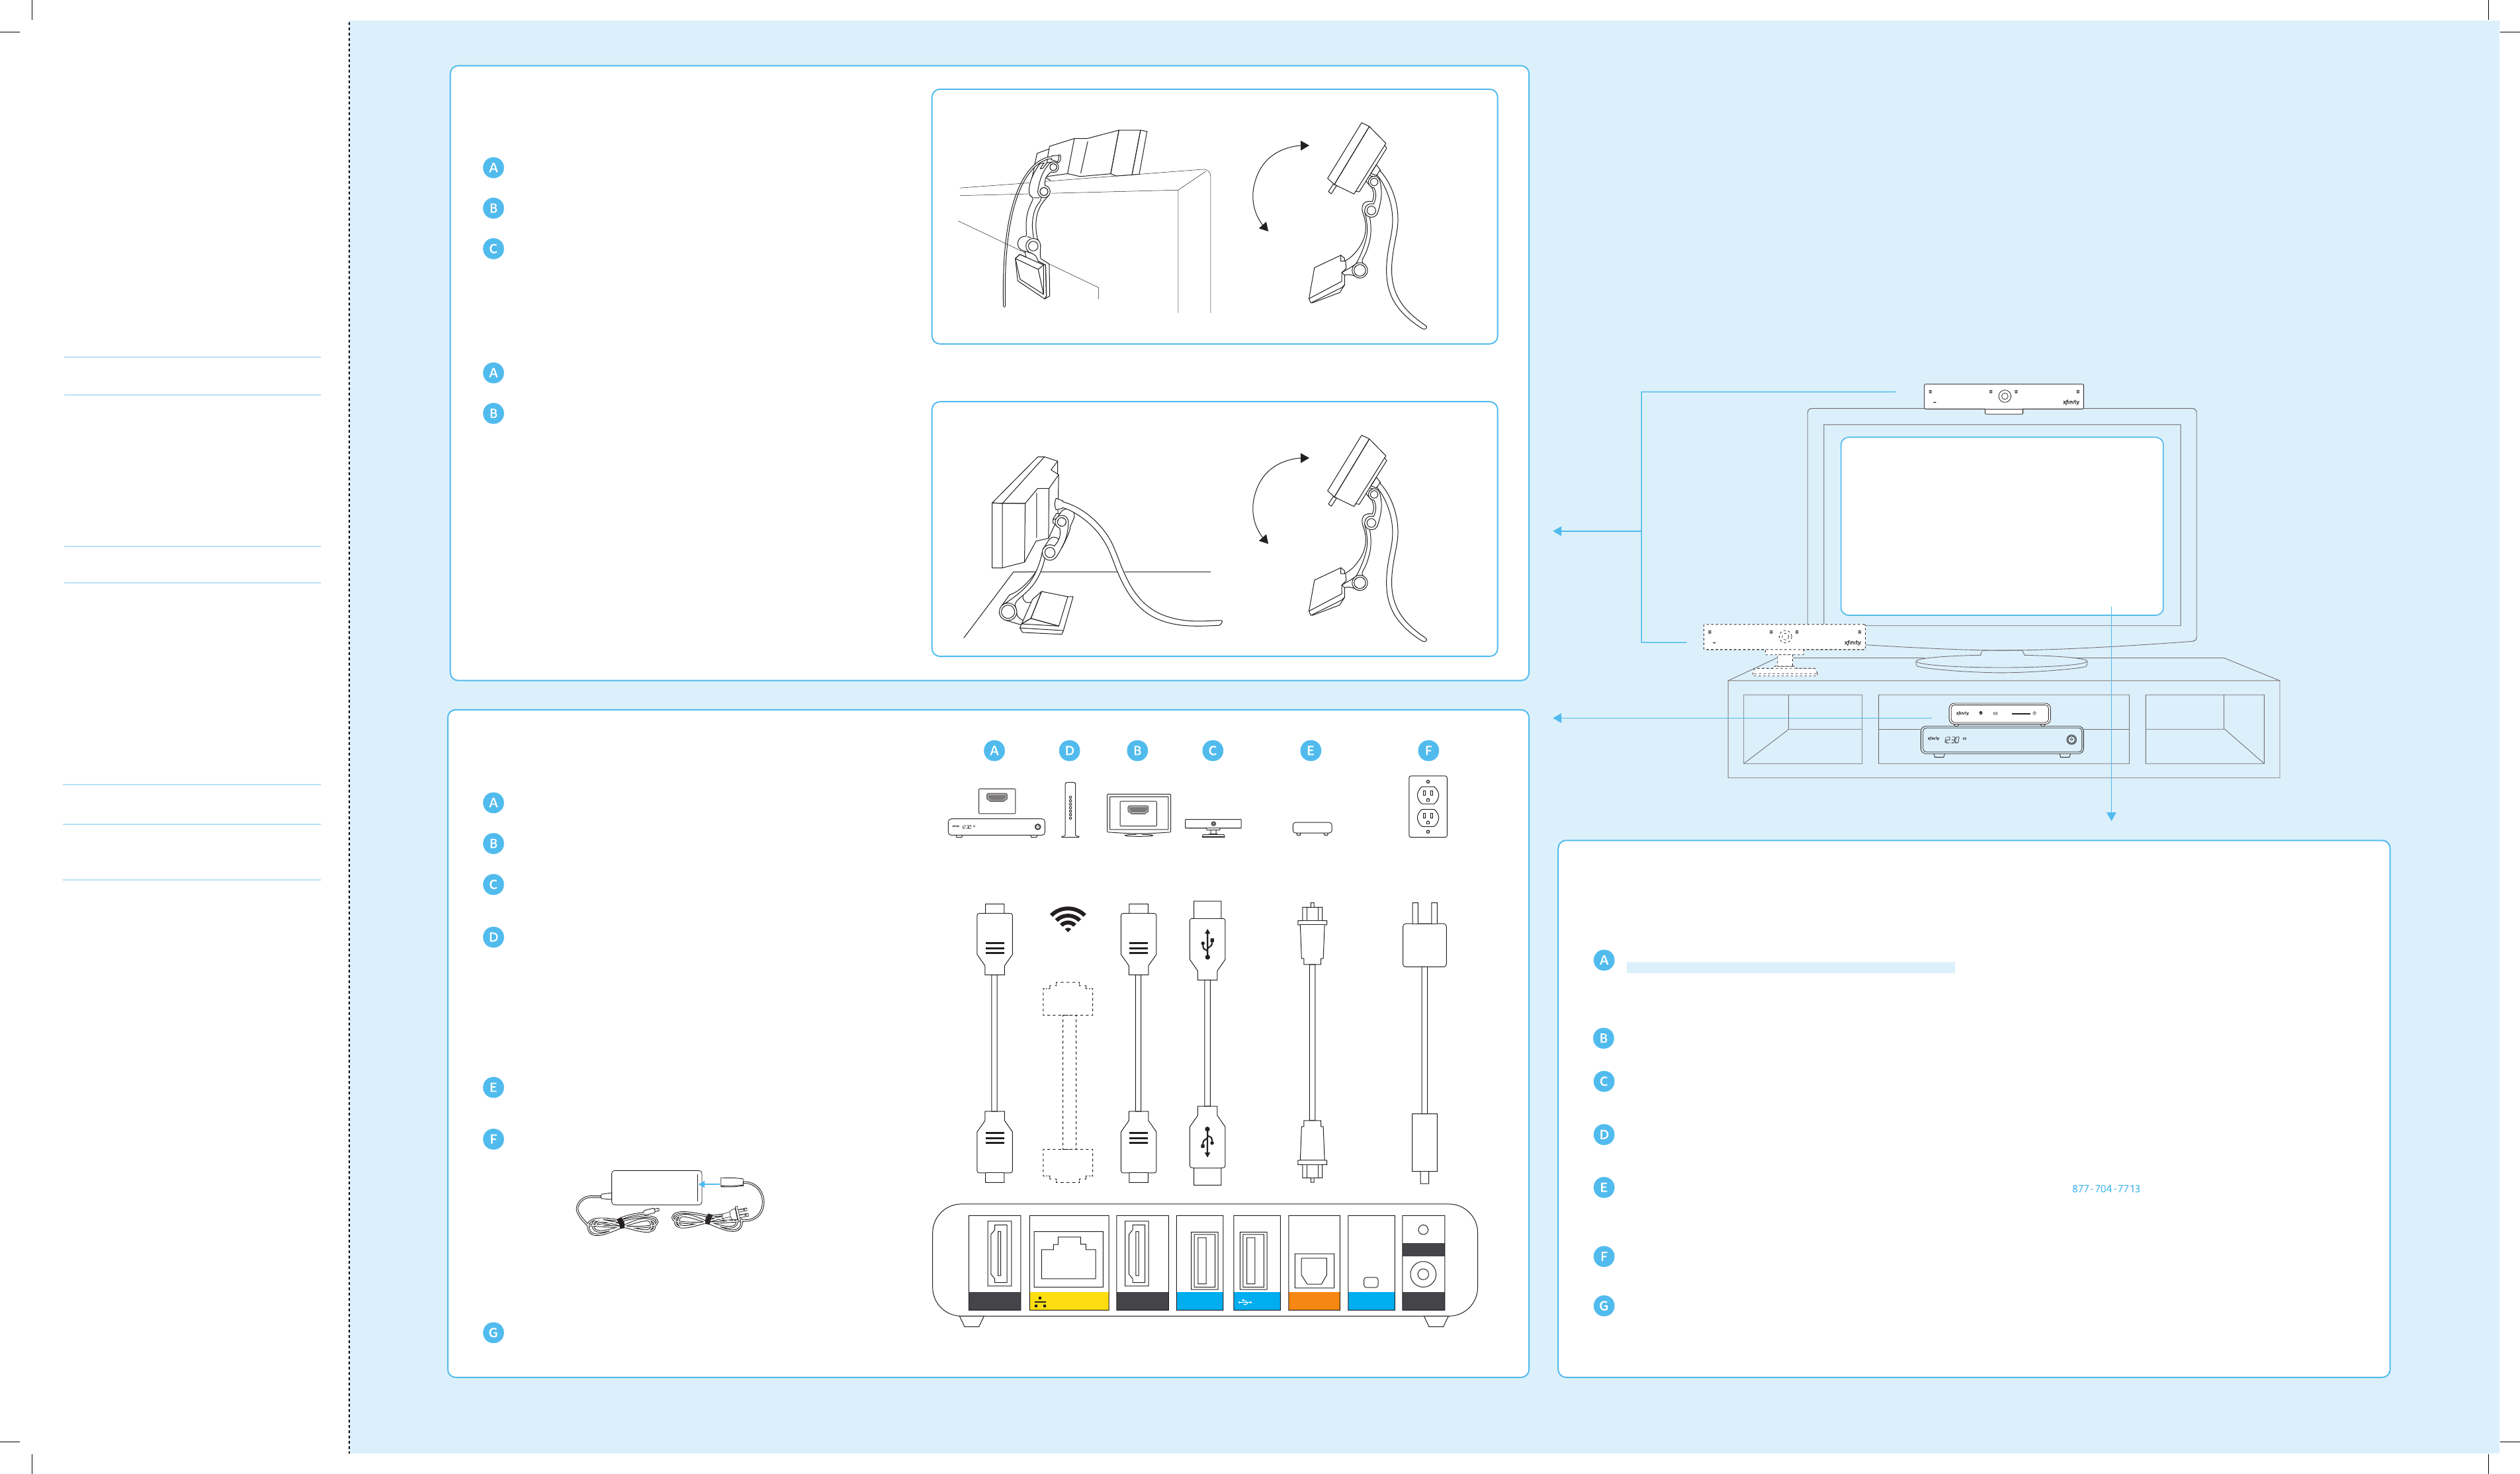
TV Top
Set Up
1
Flat Surface
OR
TV Top
Set Up
1
OR
Place the front of the camera on top of your TV, with the bottom lip
resting just below the top of the screen.*
Push the clip down until it touches the back of the TV and the camera
is secured.
Pivot the angle of the camera and adjust to capture your preferred
viewing area.
Place the camera on your level surface with the lens facing the viewing
area.*
Hold the rubber bottom in place while pivoting the angle of the camera
to capture your preferred viewing area.
*The recommended viewing distance is 5' - 12'. Camera should not be used
near strong magnetic fields.
*The recommended viewing distance is 5' - 12'. Camera should not be used
near strong magnetic fields.
Important Note for Wall-Mounted TVs
Make sure the combined weight of the camera (8.81 oz.) and TV does not
exceed the maximum rating for your wall mount. Check the wall mount
manufacturer’s manual for the maximum rating. The camera clip is not
compatible with all TV wall mounts. For wall-mounted TVs that have been
installed flush with the wall, camera placement on your TV is not
recommended due to space constraints which may result in damage to your
TV or the camera.
Important Note for Fireplace-Mounted TVs
The camera is not intended for use in high-temperature locations, such as
above fireplaces.
Flat Surface
Plug in one of the provided HDMI cables to your set-top box and the
other end to the HDMI Cable In port on your adaptor box.
Plug the second HDMI cable to the HDMI TV Out port on your adaptor
box and the other end to one of the available HDMI ports on your TV.
Plug the camera cable into the Camera port. If the camera cable is not
long enough to reach the Camera port, connect the provided USB
extension cable to the camera cable.
Decide if you want to connect to your home network using a wired
Ethernet cable or wireless connection.
Ethernet connection:
Plug a CAT- 6 Ethernet cable (not provided) to the Ethernet port on the
adaptor box and the other end to an available port on your modem or
router.
Wireless connection:
Skip this step and follow the instructions during TV activation.
If you’re using an audio receiver, disconnect the SPDIF (Optical Digital
Audio) cable from your set-top box and plug it into the Audio port on
the adaptor box instead.
Connect the power adaptor to the power adaptor cable.
Plug the power adaptor into the Power port on the adaptor box and
the power adaptor cable to an electrical outlet. There is no actual
power button on your adaptor box so this power cable is the only way
to turn the system on and o.
Using your TV remote, select the same HDMI input to which you
connected the adaptor box.
Connect and Power Up
2
Cable In
HDMI
TV Out
HDMI Camera USB IRAudioEthernet
Reset
Power
Digital Audio
Receiver
OutletCameraBack of TVBack of
Modem if
using Ethernet
OR
Not
available
at this
time
Not
available
at this
time
NetworkMessagesPower
SD Card
Activate
3
Messages
Power
1698397A Printed in China
Please keep for future reference, but if you decide to toss, please recycle. Getting Started Guide v.1.0
Back of TV
HDMI
HDMI
Messages
Power
Back of adaptor box
TV Top:
OR
Flat Surface:
Once you’ve connected the devices, you’ll see an XFINITY screen.
In a few minutes (up to 15), you’ll be greeted with a Welcome screen.
Please don’t unplug or reset the adaptor box before you see this
screen. If you do unplug or reset before activation is complete, the
system will restart from the beginning of the setup process.
If you haven’t already done so, pull the tab from the remote’s battery
compartment before using.
Flip the remote to the keyboard side. See Get to Know the Parts for
keyboard tips. Complete the activation by following the directions on your
TV screen.
You’ll need the Important Information section (for your Comcast
account, Skype account/password, and home network info) to complete
some steps.
You have several options for network connectivity:
1. Wired connection using an Ethernet cable
2. Wireless connection to an available or hidden network
3. WPS for WPS-capable routers only (WPS is currently not available)
A short series of diagnostic tests will run automatically to ensure
everything is working properly and you'll have the choice to merge your
XFINITY and Skype contacts.
Click FINISH to jump right in!
Activate
3
If you need help during setup or activation, please call Ready to Connect with Family and Friends?
First, make sure you’re signed in.
If you already have an existing Skype account with contacts:
•
•
If you’ve just set up your Skype account and don’t have any contacts yet:
•
•
•
Support Information
Please visit www.comcast.com/skype for additional online support information.
For setup or activation-related questions, please call
assistance.
For questions following activation, please contact our customer care sta
24-hours a day at We are here to assist with all of your service
needs.
Go to Home > Contacts and select from the list.
Click VIDEO CALL, AUDIO CALL or MESSAGE to connect.
Go to Home > Contacts and select Add Contact.
Flip the remote and use the keyboard (see Get to Know the Parts for tips)
to enter a Skype Name or email address. Once your invitation to connect is
accepted, the person will appear in your Contacts. Select the person.
Click VIDEO CALL, AUDIO CALL or MESSAGE to connect.
In a few minutes (up to 15), you’ll be greeted with a Welcome screen.
Comcast Account
You will link your Comcast ID to a Skype account during
the TV activation process. If you don’t have a Skype
account or need to create a new one, you can do so
during activation.
Skype Account
You must use your Comcast ID to activate. To add more
Comcast email addresses (up to six) to your account,
please visit http://customer.comcast.com.
@comcast.net
Password:
Skype Name
Password:
Network Password (Key)
If you choose to use your wireless home network, you’ll
need the following information during the TV
activation. If you have a compatible router with WiFi
Protected Setup (WPS), this will be detected and you’ll
automatically connect to your wireless network. (WPS
is currently not available)
If you need help during setup or activation, please call
.
(for hidden wireless networks only)
Home Network
Network Name (SSID)
Security Encryption Method
Save time during activation by completing the
information below.
Important Information
.
877-70 4-7713
877-70 4-7713 for
877-70 4-7713