Vecima Networks LMS3000 Transceiver User Manual Guide
Vecima Networks Inc. Transceiver Guide
Contents
- 1. users guide 1
- 2. users guide 2
- 3. Guide
Guide
EUM3000
Quick Start Guide
Version D
— This page is intentionally left blank —

APCD–LM013–Diii
Contents
1 Opening the Box . . . . . . . . . . . . . . . . . . . . . . . . . . . . . . . . . . . . 1
2 Choosing a Location . . . . . . . . . . . . . . . . . . . . . . . . . . . . . . . . 5
3 Connecting Kit Components . . . . . . . . . . . . . . . . . . . . . . . . . . 7
4 Testing Your EUM3000 . . . . . . . . . . . . . . . . . . . . . . . . . . . . . . 11
5 Mounting the Antenna . . . . . . . . . . . . . . . . . . . . . . . . . . . . . . 13
6 Troubleshooting . . . . . . . . . . . . . . . . . . . . . . . . . . . . . . . . . . . 17
7 Regulatory Notices . . . . . . . . . . . . . . . . . . . . . . . . . . . . . . . . . 19
— This page is intentionally left blank —

APCD–LM013–Dv
Tables
Table 1 User Connectivity LED Status Displays . . . . . . . . 12
Table 2 RSSI LED Status Displays . . . . . . . . . . . . . . . . . . 12
Table 3 Antenna Mount Guidelines . . . . . . . . . . . . . . . . . . 14
Table 4 Surface Mounting Options for the Antenna . . . . . . 15
— This page is intentionally left blank —

APCD–LM013–Dvii
Figures
Figure 1 EUM3000 Components . . . . . . . . . . . . . . . . . . . . . . 2
Figure 2 Connecting the EUM3000 Components . . . . . . . . . 7
Figure 3 Connect the DC Power Cord to the EUM3000 . . . . 8
Figure 4 Connect the AC Power Cord . . . . . . . . . . . . . . . . . . 9
Figure 5 EUM3000 Front Panel LEDs . . . . . . . . . . . . . . . . . 11
Figure 6 Rear View of Antenna Bracket . . . . . . . . . . . . . . . 13
Figure 7 Mounting the Antenna in the Bracket . . . . . . . . . . 16
— This page is intentionally left blank —

APCD-LM013-D 1
1 Opening the Box
Before you install the EUM3000, verify that your kit includes the
following items:
•End user modem
•Antenna with pre-connected 3-metre cable
•Flush-mountable antenna bracket
•Two antenna-mount suction cups, two drywall plugs and two
screws
•DC converter with 2-metre DC power cable
•2-metre AC power cable
•Crossover Ethernet cable
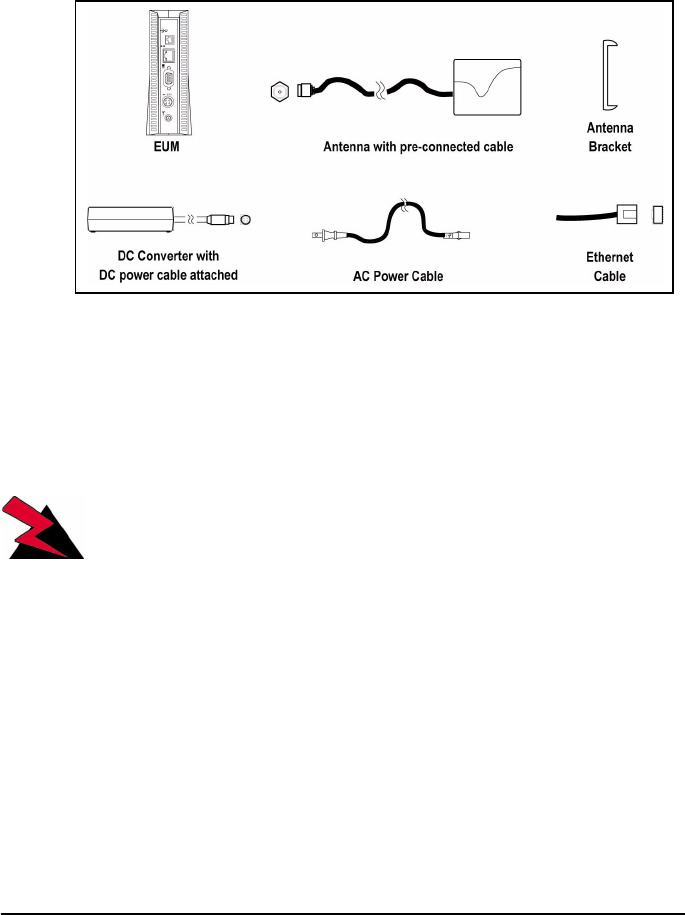
Refer to Figure 1 for an illustration of each EUM3000 component.
Opening the Box
2APCD-LM013-D
Figure 1 EUM3000 Components
NOTE: The antenna-mount suction cups, drywall
plugs and screws are not shown in Figure
1.
WARNING!
Before installing or operating an
EUM3000 modem, you must familiarize
yourself with the contents of this guide.
WaveRider assumes no liability for
problems resulting from a failure to
adhere to these procedures, or other
recognized general safety precautions.

Opening the Box
APCD-LM013-D 3
WARNING!
The RF connector on the EUM carries a
DC voltage, and permanent equipment
damage may occur without the use of a
DC blocking device. For the EUM3000, the
WaveRider proprietary antenna acts as a
DC blocking device. Connect the antenna
to the EUM unit before operating the
EUM3000 system.
— This page is intentionally left blank —

APCD-LM013-D 5
2 Choosing a Location
The location of the EUM and the antenna directly affects the
performance of your EUM3000 system. Before you connect all the
components, follow the guidelines in this section to choose the best
position for the EUM and the antenna.
To Choose the Best Location for the EUM
1. Ensure that the EUM is:
•upright;
•on a stable, flat surface;
•in a position where its air vents are unobstructed.
NOTE: Avoid placing the EUM near sources of
heat (such as an electric heater).
To Choose the Best Location for the Antenna
1. Ensure that the Antenna is:
•indoors.
•near an entrance or window.
•as high off the floor as possible.
•a minimum of 20 cm (8 in.) from people or animals.
— This page is intentionally left blank —
APCD-LM013-D 7
3 Connecting Kit Components
Now that you have chosen a suitable location, use the instructions in
this section to connect the following components to the EUM:
•The Antenna
•Your Home Computer
•The DC converter
When you have completed the above tasks, connect the DC
converter to the AC power supply.
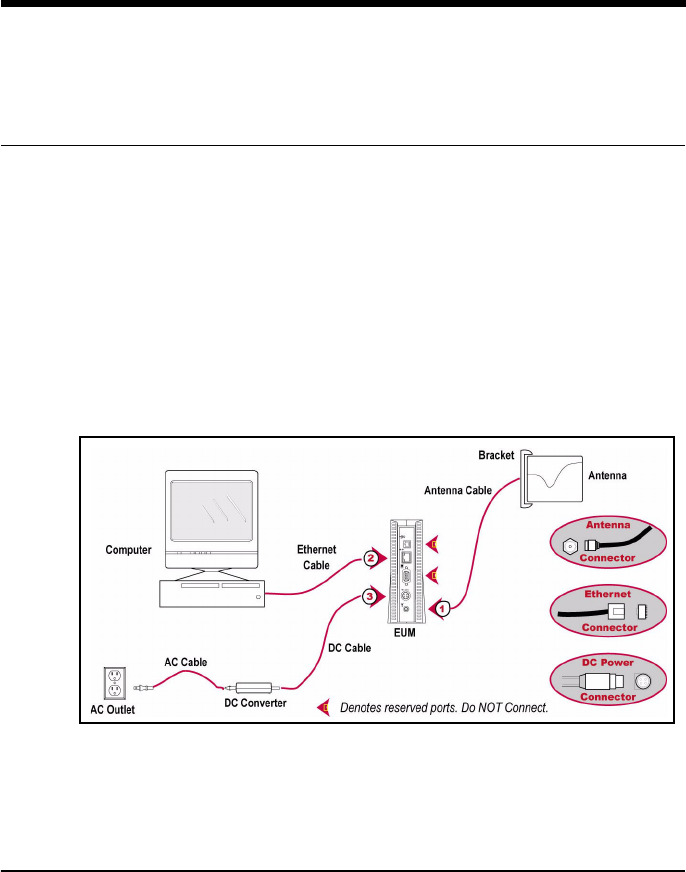
Figure 2 Connecting the EUM3000 Components
Connecting Kit Components
8APCD-LM013-D
To Connect the EUM3000 Components
1. Hand-screw the antenna cable onto the corresponding
connector at the back of the EUM3000 (refer to pointer 1 in
Figure 2). Do not use wrenches or pliers. Do not cross-thread
or overtighten.
2. If you are connecting the EUM3000 directly to your computer,
attach the crossover Ethernet cable that is included with your
kit to the Ethernet port on your computer and the Ethernet port
on the EUM3000 (refer to pointer 2 in Figure 2). If you are
connecting the EUM to your computer through a hub, use the
Ethernet cable recommended by the hub manufacturer.
3. Connect the DC converter to the EUM3000. To do this, press
firmly at the base of the DC connector on the power cord, and
attach to the corresponding DC connector on the EUM3000
(Figure 3).
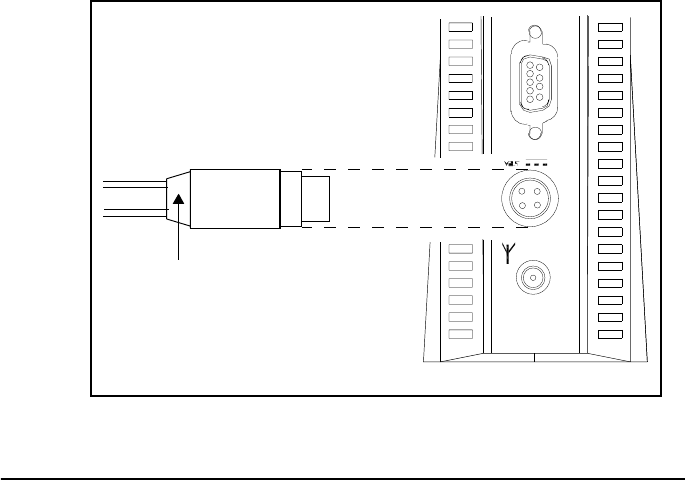
Figure 3 Connect the DC Power Cord to the EUM3000
Press firmly at the base of
the DC connector
EUM
Connecting Kit Components
APCD-LM013-D 9
NOTE: The DC power cable features a secure
locking connector. To disconnect the
cable, pull the collar back on the
connector, then continue pulling to detach
the DC power cable from the EUM.
Your EUM3000 uses a custom antenna cable and connector. If you
need to extend this cable, contact your Wireless Internet Service
Provider (WISP).
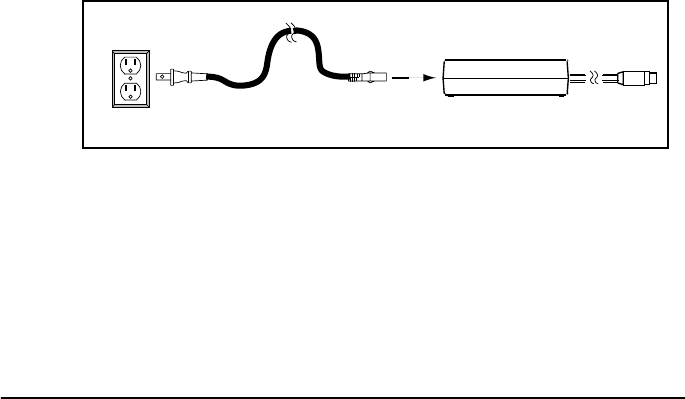
4. Connect the AC-power cord between the DC converter and an
AC outlet (Figure 4). Your EUM3000 will power-up; there is no
ON/OFF switch on the modem.
NOTE: WaveRider recommends that you use a
power bar with surge protection (instead
of connecting the AC-power cord directly
to an AC outlet) to avoid potential
damage to the EUM3000 components in
the event of a power surge.
Figure 4 Connect the AC Power Cord
AC Power Cable
AC Outlet
DC Converter
— This page is intentionally left blank —
APCD-LM013-D 11
4 Testing Your EUM3000
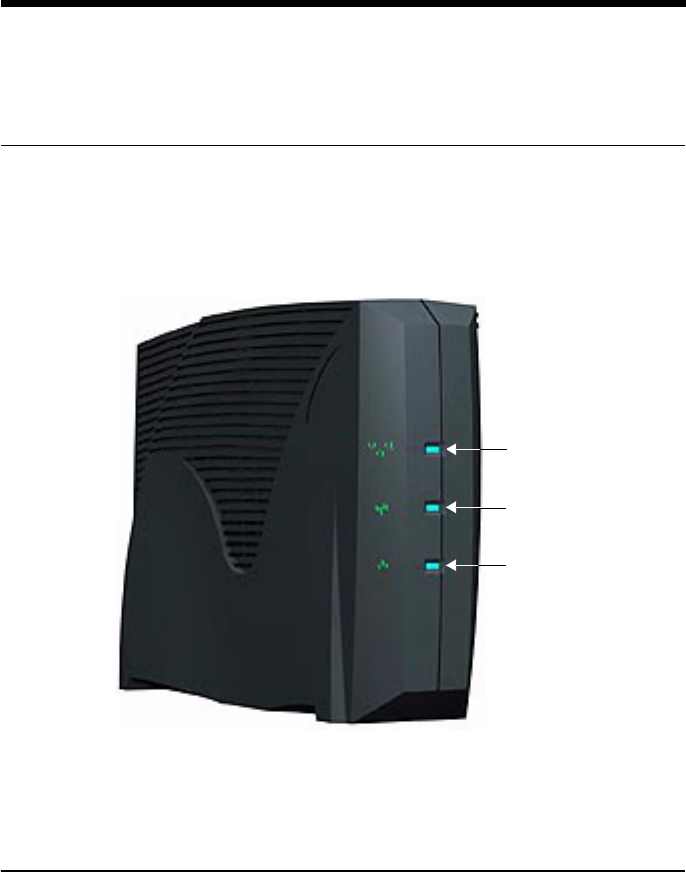
Check the the LED (Light Emitting Diode) indicators on the front of
the modem to ensure that your EUM3000 is functioning properly and
receiving an adequate signal.
Figure 5 EUM3000 Front Panel LEDs
User Connectivity LED
RSSI LED
Power LED

Testing Your EUM3000
12 APCD-LM013-D
To Verify Proper EUM3000 Function
1. Check the User Connectivity LED to test the link to between
the EUM3000 and your computer. Refer to Table 1 for an
explanation of the different User Connectivity status displays.
Table 1 User Connectivity LED Status Displays
2. Check the Received Signal Strength Indicator (RSSI) LED to
ensure that the antenna is receiving an optimum signal in its
current location. Refer to Table 2 for an explanation of the
different RSSI LED status displays.
Table 2 RSSI LED Status Displays
Off The link to your computer is not
functioning.
Solid On The link to your computer is functioning
and the radio is receiving data.
Flashing The EUM3000 is sending data.
Off No signal is detected. The antenna is
disconnected or is not aligned with your
wireless internet service provider’s
antenna.
Slow Flash The signal strength is poor.
Fast Flash The signal strength is good.
Solid On The signal strength is very good.
APCD-LM013-D 13
5 Mounting the Antenna
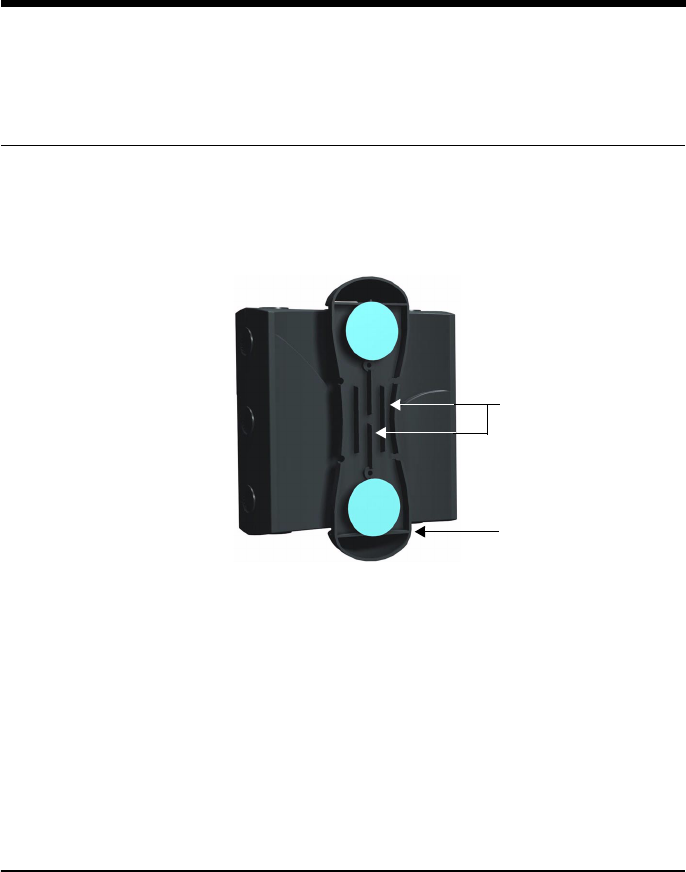
1. Thread the pre-attached antenna cable through the guides in
the back of the antenna bracket, if required.
Figure 6 Rear View of Antenna Bracket
NOTE: Bending the antenna cable too sharply
can degrade your EUM3000
performance. Never allow more than a
1.25 cm (0.5 in.) bend radius. If a quarter
(25-cent piece) fits into the curve, the
bend is acceptable.
Antenna Bracket
Bracket Guides

Mounting the Antenna
14 APCD-LM013-D
Your EUM3000 Kit includes suction cups, drywall plugs, and
screws to allow a variety of mounting options:
Table 3 Antenna Mount Guidelines
2. Insert the suction cups or screws into the base of the antenna
bracket and mount onto the desired surface.
Suction Cups Use on flat, smooth surfaces, such as
glass, plastic, laminates or metal. Remove
all grease, oil and grit before attaching
suction cups.
Drywall Plugs Use on all commercial drywall and other
plaster surfaces. For a secure grip, drill
the smallest hole possible for the drywall
plug.
Screws Use on hardwood surfaces.
Mounting the Antenna
APCD-LM013-D 15
Table 4 Surface Mounting Options for the Antenna
WARNING!
The EUM3000 has been designed and
manufactured to meet FCC RF exposure
standards for mobile transmitting
devices. To comply with these standards
during normal operation, WaveRider
recommends maintaining a minimum
distance of 20 cm (8 inches) between the
antenna and human beings or animals.
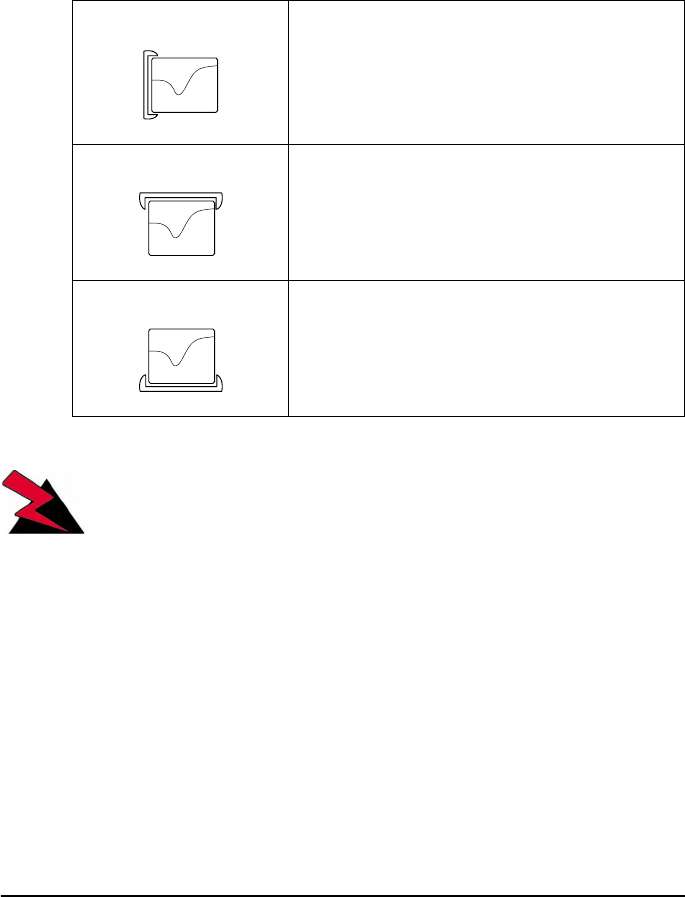
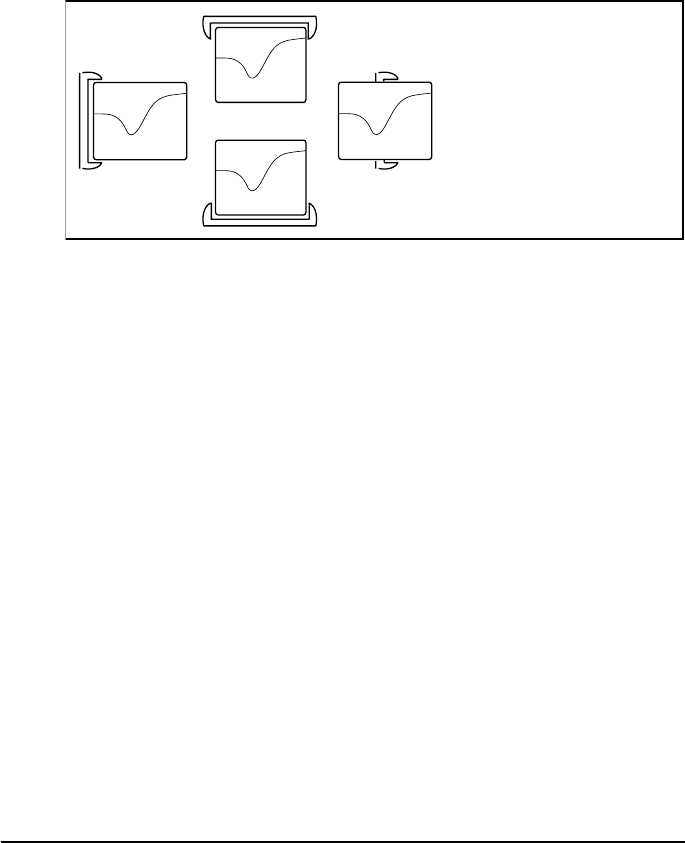
3. Position the antenna in the bracket according to one of the
configurations illustrated in Figure 7. Click and lock the
antenna in place. For maximum signal reception, ensure that
Side Mount Mount the antenna on a wall, window,
window frame, or solid furniture.
Top Mount Hang the antenna from a ceiling or the
shelf of a bookcase.
Bottom Mount Mount the antenna on solid furniture (a
desk or shelf) or on a window sill.
Mounting the Antenna
16 APCD-LM013-D
the concave surface of the antenna points toward the WISP
antenna and the TOP marker on the opposite side points up.
Figure 7 Mounting the Antenna in the Bracket
NOTE: The location, position and orientation of
the EUM3000 affects the strength and
stability of your Internet connection.
Pointing the antenna at buildings or other
obstacles often impedes
communications, but some surfaces may
provide desirable ’signal bounce’. For
optimal reception, try various positions
before fix-mounting your antenna.
- concave service pointing
towards WISP antenna
- TOP marker on opposite
side pointing up.

APCD-LM013-D 17
6 Troubleshooting
Q: I cannot receive a signal, regardless of where I place my
antenna. What should I do?
A: Move the antenna outside, and check the received signal strength
indicator (RSSI) LED on the EUM3000 modem.
•If you are receiving a strong signal, then your modem and
antenna are both functioning properly. To improve your
reception indoors, choose a better antenna location (see
Choosing a Location, on page 5, and Mounting the Antenna,
on page 13).
•If no signal is detected, your EUM3000 is either not
functioning properly, or you may require a special outdoor
antenna to receive an adequate signal from your location. For
more information, contact your WISP.
Q: I have found a great location for my antenna, but the cable
included with the kit will not reach between my modem and
antenna. Can I use a longer cable?
A: Yes. Contact your WISP for more information.
Q: My EUM3000 keeps shutting off automatically. How can I
prevent this?
A: Your unit may be overheating due to inadequate ventilation. Lightly
touch the casing of your EUM3000. If the casing is hot, find a new
location where the EUM can stand upright and away from other

Troubleshooting
18 APCD-LM013-D
objects that may block airflow through its vents. If these measures
have no effect, discontinue using the EUM3000, and contact your
WISP.

APCD-LM013-D 19
7 Regulatory Notices
Industry Canada
The EUM3000 has been designed and manufactured to comply with
IC RSS-210.
The IC certification number for the EUM3000 is TBD (certification
pending).
Federal Communications Commission
The EUM3000 has been designed and manufactured to comply with
FCC Part 15.
The FCC ID for the EUM3000 is OOX-LMS3000 (certification
pending).
Interference Environment
Operation of the EUM3000 is subject to the following conditions:
•This device may not cause harmful interference.
•This device must accept any interference received, including
interference which might cause undesirable operation.

Telephone: +1 416–502–3161
Fax: +1 416–502–2968
Email: techsupport@waverider.com
URL: www.waverider.com