Ventana Medical Systems 2160000 Symphony Staining System User Manual 14886a2
Ventana Medical Systems, Inc. Symphony Staining System 14886a2
Contents
- 1. Compliance Info
- 2. Users Manual
Users Manual
S
Sy
ym
mp
ph
ho
on
ny
y
O
Op
pe
er
ra
at
to
or
r
M
Ma
an
nu
ua
al
l

SYMPHONYTM
Operator Manual
A User’s Guide to Installing, Configuring,
Operating, and Troubleshooting the
SYMPHONY System
Part Number 1488600
Revision A
Ventana Medical Systems
Copyright © 2006 Ventana Medical Systems, Inc., 1910 Innovation Park Drive, Tucson, Arizona 85755
All rights reserved. Ventana Medical Systems’ technical documentation and its product(s) described herein
are protected by one or more U.S. copyrights, patents, foreign patents, or pending applications. No part of
this publication may be reproduced or transmitted into any human or computer language in any form, or by
any means stored in a retrieval system, transmitted, redistributed, translated or disclosed to third parties, or
de-compiled in any way including, but not limited to, photocopy, photograph, electronic, mechanical,
magnetic or manual means without the expressed written permission of Ventana Medical Systems, Inc., or
its licensors, if any. All copies of this publication, so authorized, shall include the full text of this copyright
notice.
Civilian Agencies Restricted Rights: Use, reproduction or disclosure is subject to restrictions set forth in
subparagraph (a) through (d) of the Commercial Computer Software Restricted Rights clause at 52.227-19,
as applicable, and the limitations set forth in Ventana Medical Systems’ standard license agreements for
software and technical documentation.
U.S. Government Users Restricted Rights: Use, duplication, or disclosure by the Government is subject to
restrictions set forth in FAR 52.227.19(c)(2) or subparagraph (c)(1)(ii) of the Rights in Technical Data and
Computer Software clause at DFARS 252.227-7013 and/or in similar or successor clauses in the FAR or
the DOD or NASA FAR Supplement. Unpublished rights reserved under the copyright laws of the United
States.
Ventana Medical Systems products are licensed products and are protected by one or more U.S. or foreign
patents or pending applications. The product licenses convey the right to use only those specific products,
components, modules, features and/or functions specified in the license agreement or contract. This
publication may mention or reference products, components, modules, features and/or functions that are not
part of the base product, package of products, or particular license agreement. The customer is not entitled
to the receipt of, or use of, any other products, components, modules, features and/or functions that may be
referenced in any documentation provided to customer unless the appropriate license fees are paid and an
appropriate license agreement is duly executed. Ventana Medical Systems' obligations with respect to its
products and services are governed solely by the contracts and/or agreements under which they are
provided.
This publication is furnished for informational use only and should not be construed as a commitment by
Ventana Medical Systems, Inc. The information contained in this publication could include inaccuracies,
obsolete information, or typographical errors. Every effort has been made to make this publication as
complete and accurate as possible, but it is provided "as is" without warranty of any kind, either expressed
or implied, including but not limited to the implied warranties of merchantability, fitness for a particular
purpose, or non-infringement. Ventana Medical Systems may make improvements and/or changes in the
program(s), product(s), and/or applications described in this publication at any time and without notice and,
as such, information published in this document may be or may become obsolete.
The trademarks or registered trademarks of Ventana Medical Systems are listed in the chapter of this
manual that covers Intellectual Property. Third-party products, services, or company names referenced in
this document may be trademarked or copyrighted by their respective owners, and are for identification
purposes only. Copyrights, trademarks and license agreements shall be governed and construed in
accordance with the laws of the State of Arizona and the Federal Arbitration Act, and shall benefit Ventana
Medical Systems, its successors, and assigns.
Ventana Medical Systems
SYMPHONY System Operator Manual
Page 1
Table of Contents
PREFACE........................................................................................................................................7
SAFETY INFORMATION .............................................................................................................9
SYMPHONY SYSTEM SAFETY COMPLIANCE...................................................................................................9
SAFETY TRAINING ...........................................................................................................................................9
REAGENT HANDLING .....................................................................................................................................10
SAFETY LABELS .............................................................................................................................................11
Caution: Hot Surface—Do Not Touch...............................................................................................11
Caution: Refer to Accompanying Documents .................................................................................11
Caution: Laser .......................................................................................................................................11
Caution: Risk of Electric Shock.........................................................................................................11
INTRODUCING THE SYMPHONY PROCESS™ AND SOLUTIONS.....................................13
SYMPHONY INSTRUMENT AND OPERATION OVERVIEW...............................................17
SYSTEM OPERATION .....................................................................................................................................17
SLIDE PROCESSING .......................................................................................................................................17
Portal ......................................................................................................................................................17
IntelliQue™ ............................................................................................................................................17
Slide Detect/Bar Code Reader ...........................................................................................................17
Slide Drying Module.............................................................................................................................17
Staining Module....................................................................................................................................18
Slide Prep Module................................................................................................................................18
OPTISURE™ Coverslipper...................................................................................................................18
Slide Curing Module.............................................................................................................................18
SYSTEM FEATURES........................................................................................................................................19
Component Overview, Closed View of SYMPHONY .......................................................................19
Component Overview with Labels, Open View of SYMPHONY.....................................................20
INSTALLATION REQUIREMENTS...........................................................................................21
INSTRUMENT SPECIFICATIONS ......................................................................................................................21
Dimensions............................................................................................................................................21
Weight....................................................................................................................................................21
Installation Environment......................................................................................................................21
Altitude...................................................................................................................................................21
Temperature..........................................................................................................................................21
Electrical Supply...................................................................................................................................21
SPACE REQUIREMENTS .................................................................................................................................21
Ventana Medical Systems
SYMPHONY System Operator Manual
Page 2
Clearance .............................................................................................................................................. 22
Delivery Access ................................................................................................................................... 22
WATER REQUIREMENTS................................................................................................................................22
De-ionized Water Quality.................................................................................................................... 22
Water Flow Rate................................................................................................................................... 22
Supply Location and Connection....................................................................................................... 22
ELECTRICAL REQUIREMENTS ......................................................................................................................... 23
Voltage/Amperage............................................................................................................................... 23
Plug Type............................................................................................................................................... 23
NEMA 6-20R Plug Illustration......................................................................................................................... 23
Location ................................................................................................................................................. 23
WASTE MANAGEMENT REQUIREMENTS ....................................................................................................... 23
Effluent Disposal Connections ........................................................................................................... 23
System Waste Connection ............................................................................................................................. 23
Venting................................................................................................................................................... 24
Laboratory exhaust Specifications ............................................................................................................... 24
COMMUNICATION REQUIREMENTS................................................................................................................ 24
Printer Connection............................................................................................................................... 24
Network Connection............................................................................................................................ 24
INSTRUMENT LEVELING................................................................................................................................. 24
CONSUMABLE REQUIREMENTS............................................................................................................ 25
Catalogue Numbers for SYMPHONY Consumables and Accessories ........................................ 25
SYMPHONY Solutions ..................................................................................................................................... 25
Alcohol ............................................................................................................................................................... 25
OPTISURE Coverslips ...................................................................................................................................... 25
Accessories ...................................................................................................................................................... 26
STORAGE REQUIREMENTS............................................................................................................................. 26
Flammable Storage.............................................................................................................................. 26
Refrigerated Solution Storage ........................................................................................................... 26
Room Temperature Solution Storage ...............................................................................................27
OPTISURE Coverslip Cassette Storage ............................................................................................ 27
REQUIRED ACCESSORIES............................................................................................................................... 27
Universal Slide Tray............................................................................................................................. 27
Desiccant Filter .................................................................................................................................... 27
MICROSCOPE SLIDE SPECIFICATIONS ........................................................................................................... 28
FIXATIVE SPECIFICATIONS............................................................................................................................. 28
INSTRUMENT SETUP.................................................................................................................29
USER SETUP.................................................................................................................................................. 30
User Privileges ..................................................................................................................................... 30
Setting Operator Privileges ............................................................................................................................ 31
Setting up a New User ........................................................................................................................ 33
Deleting a User..................................................................................................................................... 35
INSTITUTION SETUP ...................................................................................................................................... 35
Institution Setup Screen ................................................................................................................................. 36
ALARM SETUP .............................................................................................................................................. 36
SETTING A DEFAULT PROTOCOL .................................................................................................................... 38
CUSTOMIZED PROTOCOLS ............................................................................................................................. 39
Ventana Medical Systems
SYMPHONY System Operator Manual
Page 3
Staining Protocol Options ...................................................................................................................40
AUTOSTART...................................................................................................................................................41
Using the Autostart Feature................................................................................................................41
INSTRUMENT OPERATION ......................................................................................................43
PREPARING TO USE SYMPHONY SOLUTIONS...................................................................................................43
Continuous Access Reagents ............................................................................................................43
SYMPHONY Status View Screen ...................................................................................................................44
LOADING AND UNLOADING SYMPHONY SOLUTIONS ..................................................................................44
Loading Bag-in-Box SYMPHONY Solutions .....................................................................................45
Loading Bag in Box (Pull yellow seal) ...........................................................................................................45
Aligning plastic top ...........................................................................................................................................46
Unloading Bag-in-Box SYMPHONY Solutions .................................................................................46
Recycling Information..........................................................................................................................47
Opening SYMPHONY Clear Solution .................................................................................................47
SYMPHONY clear bottle and Straw with tool ..............................................................................................47
Removing the cap with Ventana-Supplied tool............................................................................................48
Loading SYMPHONY Clear Solution ..................................................................................................49
Loading the SYMPHONY Clear Bottle............................................................................................................49
Loading SYMPHONY Clear bottle...................................................................................................................50
SYMPHONY Clear Bottle installed .................................................................................................................50
Uninstalling the SYMPHONY Clear Bottle ........................................................................................51
Removing the SYMPHONY Clear Bottle ........................................................................................................51
FILLING THE ALCOHOL RESERVOIR .................................................................................................................52
Alcohol Reservoir and Reservoir Fill Indicator ............................................................................................52
Filling the Alcohol Reservoir ...........................................................................................................................53
PREPARING TO USE THE OPTISURE COVERSLIPPER .....................................................................................54
Loading OPTISURE Cassettes ............................................................................................................54
OPTISURE Coverslip Cassette ........................................................................................................................54
Loading the OPTISURE Cassette ....................................................................................................................55
LOADING SLIDES AND SLIDE TRAYS ...............................................................................................................55
Loading Slides into the Universal Slide Tray....................................................................................55
loading a slide into tray....................................................................................................................................56
Loading and Running Slide Trays ......................................................................................................57
Load Tray Icon...................................................................................................................................................57
loading a tray into SYMPHONY.......................................................................................................................58
Run Start Screen...............................................................................................................................................59
Selecting the Protocol......................................................................................................................................60
Default Protocol Screen ..................................................................................................................................61
Unloading Slide Trays..........................................................................................................................62
Tray Unload Icon...............................................................................................................................................62
Tray Unload Selection Screen........................................................................................................................63
removing a tray from SYMPHONY..................................................................................................................64
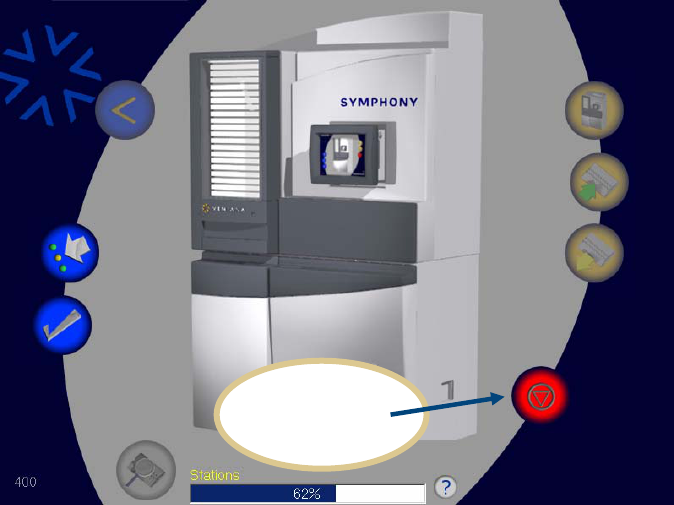
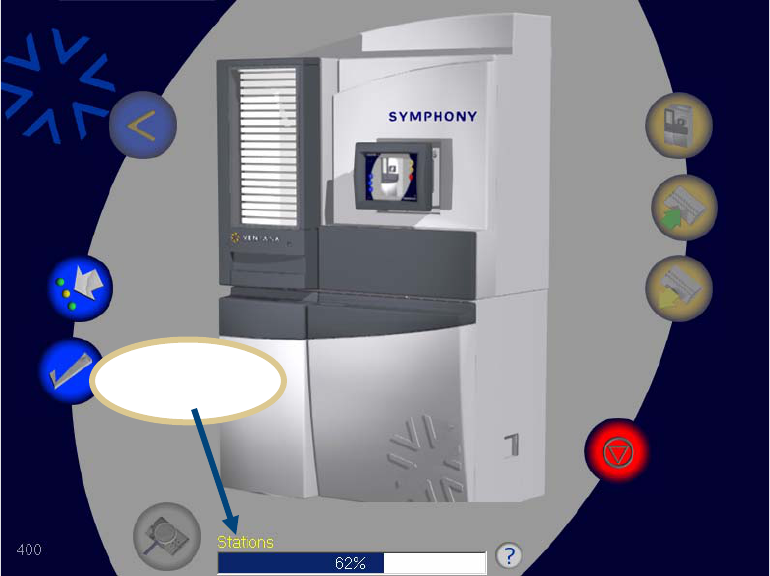
PUTTING SYMPHONY INTO STANDBY.........................................................................................................65
Stop Icon ............................................................................................................................................................65
Status Text Area................................................................................................................................................66
DISPLAYING SYMPHONY INFORMATION.....................................................................................................67
System and Status Icons in Status View Screen ........................................................................................67
System/Fluid Information Screen...................................................................................................................68
Entry Portal in Status View Screen................................................................................................................69
Ventana Medical Systems
SYMPHONY System Operator Manual
Page 4
Entry Portal Tray/Station Information Screen............................................................................................. 70
Slide Detect/Bar Code Read in Status View Screen.................................................................................. 71
Slide Detect/Bar Code Read Tray/Station Information.............................................................................. 72
Coverslipper in Status View Screen ............................................................................................................. 73
Coverslipper Tray/Station Information Screen ........................................................................................... 74
Fluids Region in Status View Screen............................................................................................................ 75
System Fluid Information Screen .................................................................................................................. 76
Status View with Errors Screen..................................................................................................................... 77
FINDING A TRAY IN THE SYSTEM ................................................................................................................... 78
Find Tray Screen .............................................................................................................................................. 78
Find Tray Screen with Virtual Clock.............................................................................................................. 79
QA/QC OPTIONS .......................................................................................................................................... 80
Main Screen...................................................................................................................................................... 80
QC Screen.......................................................................................................................................................... 81
Select Reports Screen .................................................................................................................................... 82
Solutions Inventory Report Screen............................................................................................................... 83
Tray Usage Report Screen ............................................................................................................................. 84
Slide and Tray Report Screen........................................................................................................................ 85
Operators Report Screen................................................................................................................................ 86
Logs ........................................................................................................................................................ 87
QC Screen.......................................................................................................................................................... 87
Runtime Log Screen......................................................................................................................................... 88
ON-LINE HELP............................................................................................................................................... 89
Main Screen...................................................................................................................................................... 89
Help Screen....................................................................................................................................................... 89
MAINTENANCE ..........................................................................................................................91
GENERAL CLEANING...................................................................................................................................... 91
DAILY MAINTENANCE ................................................................................................................................... 91
DESICCANT FILTER ........................................................................................................................................ 92
Dessicant Filter................................................................................................................................................. 92
Disengaging the Left Quick Release Tab ..................................................................................................... 93
Disengaging the Right Quick Release Tab................................................................................................... 93
Removing the Cartridge................................................................................................................................... 94
Installing a New Cartridge.............................................................................................................................. 94
CHECK ALL SYMPHONY SOLUTIONS........................................................................................................... 95
Status View Screen ......................................................................................................................................... 95
REMOVING BROKEN COVERSLIPS.................................................................................................................. 96
Coverslip Drawer.............................................................................................................................................. 96
Removing Empty OPTISURE Cassettes............................................................................................. 97
Cassette Discard Bin....................................................................................................................................... 97
RECOVERY PROCEDURES.......................................................................................................99
REMOVING A COVERSLIP............................................................................................................................... 99
REMOVING TRAYS FROM MODULES ............................................................................................................ 100
Hole in Access Door...................................................................................................................................... 100
Pushing Special Tool to Release Latch ...................................................................................................... 101
Manually Moving the Elevator/Transport Table for Access to Stations ................................... 102
Elevator Hand Crank...................................................................................................................................... 102
Elevator Lead Screw...................................................................................................................................... 103
Ventana Medical Systems
SYMPHONY System Operator Manual
Page 5
Removing a Slide Tray from the Transport Table..........................................................................104
Tray on Transport Table.................................................................................................................................104
Lifting the Slide Tray off the Rear Hooks.....................................................................................................105
Removing a Slide Tray from the Slide Drying Module..................................................................105
Warning Labels on Slide Drying Module Door...........................................................................................105
Tray in Slide Drying Module..........................................................................................................................106
Removing a Slide Tray from the Staining Module.........................................................................107
Tray in Staining Module.................................................................................................................................107
Removing drained Tray from Staining Module ..........................................................................................107
Removing Slide Tray from Slide Prep Module and Slide Curing Module ..................................108
Tray in Slide Curing Module..........................................................................................................................108
Removing a Slide Tray from the Coverslipper................................................................................109
Tray in Coverslipper........................................................................................................................................109
Brackets Pulled Out Before Removing Tray...............................................................................................109
Removing a Slide Tray from the Portal............................................................................................110
Tray in Portal....................................................................................................................................................110
TROUBLESHOOTING...............................................................................................................111
ERROR MESSAGES GENERATED DURING SYSTEM OPERATION ....................................................................111
POWER FAILURE ..........................................................................................................................................116
TRADEMARKS..........................................................................................................................117
SUPPORT CONTACT INFORMATION……………………………………………..Back Cover

Ventana Medical Systems
SYMPHONY System Operator Manual
Page 7
PREFACE
The VENTANA® SYMPHONY™ System has been designed to provide Ventana
customers with a new generation of H&E and PAP∗ slide preparation automation.
SYMPHONY is a high throughput staining system with the capability to fully automate
the process of drying, paraffin removal, staining, glass coverslipping, and slide curing.
SYMPHONY Solutions are biologic stains intended for standard histology laboratory use
and are specifically designed to be used in conjunction with the SYMPHONY System.
∗ PAP application under development.

Ventana Medical Systems
SYMPHONY System Operator Manual
Page 9
SAFETY INFORMATION
SYMPHONY SYSTEM SAFETY COMPLIANCE
All users of the Ventana SYMPHONY System must read and understand this user
manual. For optimal user safety and operational benefit, the SYMPHONY System should
be used only in an environment where good clinical practice guidelines are followed.
All safety related regulations, local codes, and instructions that appear in the manual or
on equipment must be observed to ensure personal safety and to prevent damage to either
the instrument or equipment connected to it. If equipment is used in a manner not
specified by the manufacturer, the protection provided by the equipment may be impaired
or otherwise compromised.
Note:
No operator serviceable parts are behind the door that houses the Touchscreen.
SAFETY TRAINING
All operators must be trained in safe use of the instrument. After such training, operators
should understand the following before attempting to use the system:
The equipment must be connected to a grounded outlet.
The equipment must be connected to a voltage source that is in agreement
with the rating label.
Instruments not used in a manner specified by Ventana may impair protection
provided by the equipment.
Replacement of internal fluid filters and tubing is performed by Ventana
service personnel.
Operators must keep their hands clear of the moving parts of the instrument.
Operators must keep their hands clear of potential pinch points.
Operators must keep their hands clear of all internal hot surfaces.
Operators must consult the Material Safety Data Sheets for safe handling and
disposal of reagents used with the instrument.
Operators must comply with local and state codes for safe handling and
disposal of reagents used with the instrument.
WARNING!
Good electrical safety practice should be observed at all times.
Make sure the unit is unplugged before relocating it or attempting to move it. It is
recommended that mats be placed around the system to avoid risk of slipping or electrical
shock in the event of reagent spills or leaks.
Ventana Medical Systems
SYMPHONY System Operator Manual
Page 10
REAGENT HANDLING
Some, but not all, reagents to be used in the SYMPHONY System are flammable and/or
may be considered an irritant. Use good clinical practice guidelines when handling
reagents.
CAUTION!
Flammable Environment.
Some, but not all, reagents to be used in the SYMPHONY System are flammable. The
system must be connected to a dedicated ventilation system and situated in a well-
ventilated area per CLIA guidelines, free from any ignition sources in the area.
WARNING!
Do not squeeze or tilt the Bag-in-Box reagents after removing from the system as a small
amount of fluid may leak through the pierced septum.

Ventana Medical Systems
SYMPHONY System Operator Manual
Page 11
SAFETY LABELS
The following safety labels are affixed to the instrument. Labels are not to scale.
Caution: Hot Surface—Do Not Touch
Caution: Refer to Accompanying Documents
Caution: Laser
Caution: Risk of Electric Shock

Ventana Medical Systems
SYMPHONY System Operator Manual
Page 13
INTRODUCING THE SYMPHONY PROCESS™ AND SOLUTIONS
Ventana’s SYMPHONY and SYMPHONY Solutions are designed and optimized to
bring exceptional productivity, safety, and quality to your laboratory. The SYMPHONY
System greatly improves efficiency, user safety, and accuracy for greater productivity,
higher quality biologic slides, and a better user experience.
Exceptional Productivity
SYMPHONY is an advanced, completely automated solution for H&E slide preparation.
SYMPHONY is the only truly “One-Touch H&E” slide-staining system and provides…
An Improved Workflow
All-in-one system, completely automating H&E processing including drying,
paraffin removal, staining, and coverslipping.
Greater walk-away time than any other system—at least 2.5 hours.
Unattended operation for up to 500 slides.
Faster time to first result than current methods.
Improved over all turn around time.
Less labor, higher productivity.
SmartTrack automated tracking for reagents and consumables.
Error reduction through better information management.
Ease of Use
Easy to use software and an intuitive graphic user interface require minimal
training and/or re-training.
Fast and easy consumable management and ready to use reagents.
Error reduction through reagent tracking, automated reporting, and ready-to-
use reagents.
Maximum Flexibility
Automation of all steps in the process.
Flexibility in workflow design and ability to streamline processes.
Information flow and management through connectivity.

Ventana Medical Systems
SYMPHONY System Operator Manual
Page 14
Exceptional Safety
SYMPHONY is designed to improve the safety of the working environment in the
histology laboratory.
Environmentally Friendly
No xylene.
Non-toxic reagents.
Safe and Ergonomic Design
Lower exposure to reagents.
No handling of open reagents.
No toxic fumes.
Ergonomically designed.
No waste handling—direct to drain disposal.
Exceptional Quality
Ventana’s SYMPHONY System sets a new standard of quality!
The usual methods for H&E have remained unchanged for nearly 40 years. Reagent
degradation, sample carryover, and labeling errors seriously compromise stain quality,
laboratory productivity and ultimately, patient care.
Ventana’s SYMPHONY Process™ integrates unique
reagent and automation technology to produce a high
definition H&E stain of exceptional quality.
The Ventana High Definition H&E™ offers improved diagnostic visualization with
superior clarity and discrimination of micro anatomic detail especially prominent in:
Cytoplasmic membranes
Nuclear detail
Collagen fibers
Keratin
Nuclear membranes
Sub-cellular structures including;
Cilia
Brush borders
Squamous intercellular bridges
Nuclear grooves
Vacuoles
Apoptotic bodies
Ventana Medical Systems
SYMPHONY System Operator Manual
Page 15
Beyond Acceptable to Exceptional
The Ventana HDH&E is the ultimate product of the unique SYMPHONY Process—six
attributes that work together to deliver exceptional results.
Improved Diagnostic Visualization
Cross Contamination Protection
Unique Slide Identification and Tracking
Consistent Reagent Quality
Reproducible Results
Image Quality Glass Coverslips
The exceptionally high quality of Ventana’s HIGH DEFINITION H&E slide offers the
potential to expand the diagnostic value beyond the ordinary “dip and dunk” H&E.

Ventana Medical Systems
SYMPHONY System Operator Manual
Page 17
SYMPHONY INSTRUMENT AND OPERATION OVERVIEW
SYSTEM OPERATION
SYMPHONY is designed as a series of modules. This modular design allows the system
to carry out many different operations at the same time. The modules are:
Entry Portal
IntelliQue™
Slide Detect/Bar Code Reader
Slide Drying Module
Staining Module (Up to three staining modules can be installed in the system.)
Slide Prep Module
OPTISURE™ Coverslipper
Slide Curing Module
SLIDE PROCESSING
The sections that follow describe the slide processing modules.
PORTAL
The Portal is where the operator loads and unloads slide trays.
INTELLIQUE™
The IntelliQue, including the Elevator/Transport Table, manages the movement of
slide trays into and out of modules as required. The IntelliQue is located in the left
half of the instrument. The Elevator/Transport Table is located in the IntelliQue.
The Elevator moves the slide trays vertically within the IntelliQue. The Transport
Table moves the slide trays horizontally from the IntelliQue to and from each
slide processing station.
SLIDE DETECT/BAR CODE READER
The slide sensors gather information on the placement of the slides in the slide
tray, and the Bar Code Reader scans and decodes bar code labels affixed to slides.
SLIDE DRYING MODULE
The Slide Drying Module removes excess moisture from the slides and heats the
slides so that the paraffin sections are well adhered.
Ventana Medical Systems
SYMPHONY System Operator Manual
Page 18
STAINING MODULE
The Staining Module performs the following processes:
Deparaffinization
All steps necessary for staining
Hydration and dehydration
Clearing and preparation for coverslipping
SLIDE PREP MODULE
The Slide Prep Module completes the dehydration and clearing process in
preparation for coverslipping.
OPTISURE™ COVERSLIPPER
The OPTISURE Coverslipper applies glass coverslips to the slides using a
combination of the SYMPHONY E reagent and SYMPHONY Clear prior to the
application of the OPTISURE coverslip.
SLIDE CURING MODULE
The Slide Curing Module is used to cure the coverslip mounting media and to
ensure that a clean, dry tray of slides is ready for presentation to the pathologist.
Ventana Medical Systems
SYMPHONY System Operator Manual
Page 19
SYSTEM FEATURES
COMPONENT OVERVIEW, CLOSED VIEW OF SYMPHONY
Bag-in-
Box
Reagent
Door
SYMPHONY
Clear and
Alcohol Door
OPTISURE
Door
Touchscreen
Entry
Ventana Medical Systems
SYMPHONY System Operator Manual
Page 20
COMPONENT OVERVIEW WITH LABELS, OPEN VIEW OF SYMPHONY
16L Alcohol
Reservoir
Staining
Modules
Slide Prep
Module
Slide Curing
Module
OPTISURE
Coverslipp
SYMPHONY
Clear
Solution
Slide Drying Module
IntelliQue
SYMPHONY
Bag-in-Box
Solutions
Slide Detect/
Bar Code
Reader

Ventana Medical Systems
SYMPHONY System Operator Manual
Page 21
INSTALLATION REQUIREMENTS
This section details the facility requirements for installation of SYMPHONY.
WARNING!
Ensure the unit is disconnected from the power source before moving it.
INSTRUMENT SPECIFICATIONS
DIMENSIONS
Size = height x weight x depth.
74” x 49” x 28” (187.9 cm x 124.46 cm x 71.12 cm)
WEIGHT
683 lbs.
INSTALLATION ENVIRONMENT
Pollution Degree 2 (office and laboratory).
Installation Category II (equipment connected to a wall outlet).
Instrument intended for indoor use only.
ALTITUDE
0 to 6,000 ft.
TEMPERATURE
15° C to 30° C
ELECTRICAL SUPPLY
208-240 V., 60 Hz
SPACE REQUIREMENTS
SYMPHONY requires a prescribed amount of space for optimal use.
Minimum width 65” (door open 90°) to 98” (door open 180°)
(165 cm to 249 cm)
Height must be greater than 86” (219 cm)
Depth must be greater than 51” (130 cm) spaced 5” (12.7 cm) from wall
Ventana Medical Systems
SYMPHONY System Operator Manual
Page 22
CLEARANCE
SYMPHONY requires minimum clearances as follows:
Rear of instrument: 5” (12.7 cm)
Front of instrument: 18.5” (47 cm)
Left side of instrument: 8” (20.32 cm)
Right side of instrument: 8” (20.32 cm)
Top of instrument: 10” (25.4 cm)
DELIVERY ACCESS
The entry way must be greater than 28” (71 cm) wide and 75” (190.5 cm) high to
bring SYMPHONY into the facility. If access requirements cannot be met,
SYMPHONY’s top and bottom sections may be disassembled (call Ventana
Services).
WATER REQUIREMENTS
SYMPHONY requires a direct connection to de-ionized water.
DE-IONIZED WATER QUALITY
Water quality must be NCCLS Type III or Type II or equivalent
WATER FLOW RATE
The DI water source must have its own independent pressure regulation. The
static pressure must to be set in the range of 24 psi to 30 psi.
The flow requirements of the system at the NPT connection are 22 oz./min (600
ml/min).
SUPPLY LOCATION AND CONNECTION
The water supply must be located within 15 ft. (457 cm) of the right side of the
instrument and must be outfitted with a female ¼” NPT (National Pipe Thread)
connection. Ventana installation personnel will thread a ¼” NPT x 3/8” hose
barbed fitting into this female NPT at the source.
Ventana Medical Systems
SYMPHONY System Operator Manual
Page 23
ELECTRICAL REQUIREMENTS
VOLTAGE/AMPERAGE
SYMPHONY requires a 208-240 VAC, 60 Hz, 20 amp dedicated/isolated circuit.
PLUG TYPE
The electrical plug must be a 220 volt NEMA 6-20R standard receptacle.
NEMA 6-20R PLUG ILLUSTRATION
LOCATION
The power outlet must be located within 8 ft. (244 cm) of the left side of the
instrument.
WASTE MANAGEMENT REQUIREMENTS
All waste from the system must be managed in accordance with local facility regulations.
EFFLUENT DISPOSAL CONNECTIONS
SYMPHONY is designed to be directly connected to the waste water system.
Location of drain must be within 15’ (457 cm) of right side of instrument and not
exceed 3’ (91.4 cm) in height.
SYSTEM WASTE CONNECTION
Ventana Medical Systems
SYMPHONY System Operator Manual
Page 24
The best way to plumb the system is using a dishwasher tailpiece between the trap
and the wall of the facility. The tailpiece must be 3/8” OD (outside diameter) with
an HB (hose barb) connection on it.
As an option, Ventana Medical Systems can provide catalogue number 2234900
to plumb the system.
Ventana Medical Systems supplies catalogue number 2234900 which consists of a
sink p-trap with a modified tail piece. The modified tail piece has a quick-
disconnect fitting that is to be used to connect the instrument waste line. This
fitting has a shut-off valve so that sewer gases will not escape when the waste line
is disconnected.
VENTING
LABORATORY EXHAUST SPECIFICATIONS
SYMPHONY must be connected to a dedicated ventilation system. The
SYMPHONY Vent Kit, catalogue number 900-303, is designed to be
connected directly to the exhaust system of the facility. The ventilation
connection should be within 15 ft. of the top of the instrument.
COMMUNICATION REQUIREMENTS
SYMPHONY is equipped with network communication ports for printing and
exchanging information.
PRINTER CONNECTION
The printer connection is located on the left side of the instrument. The system
includes a stand-alone printer and is connected to the USB port.
NETWORK CONNECTION
The network connection is located on the left side of the instrument.
INSTRUMENT LEVELING
The SYMPHONY hardware must be leveled after:
It has been placed in the planned footprint area
Clearance requirements have been met
The instrument has been connected to the water supply
Venting requirements have been met
Ventana installation personnel will ensure proper instrument leveling at the time the
system is installed.

Ventana Medical Systems
SYMPHONY System Operator Manual
Page 25
CONSUMABLE REQUIREMENTS
CATALOGUE NUMBERS FOR SYMPHONY CONSUMABLES AND ACCESSORIES
SYMPHONY SOLUTIONS
Reagents for the SYMPHONY System are called SYMPHONY Solutions.
They can be ordered individually using the following catalogue numbers.
SYMPHONY SOLUTION NAME CATALOGUE NO.
SYMPHONY N1 900-201
SYMPHONY N2 900-205
SYMPHONY C 900-202
SYMPHONY B 900-204
SYMPHONY W 900-203
SYMPHONY D 900-210
SYMPHONY E 900-212
SYMPHONY Clear 900-209
ALCOHOL
Required, but not supplied by Ventana, is ethanol-based, anhydrous, reagent
grade alcohol (SDA formula 3A). The approximate usage rate for alcohol is
14.0 liters per 500 slides processed, but varies with the staining protocol
selected.
WARNING!
Reagents other than those listed above may damage some components of the
instrument. Methanol-based alcohol solutions are not supported.
OPTISURE COVERSLIPS
OPTISURE coverslips are specifically designed for use with SYMPHONY.
Coverslips are preloaded into cassettes, each of which contains 120 coverslips.
SYMPHONY CONSUMABLE CATALOGUE NO.
OPTISURE Coverslip (12 cassettes) 900-501

Ventana Medical Systems
SYMPHONY System Operator Manual
Page 26
ACCESSORIES
ACCESSORY CATALOGUE NO.
SYMPHONY Tray Kit (5 trays) 900-301
SYMPHONY Accessory Kit 900-302
SYMPHONY Vent Kit 900-303
SYMPHONY Desiccant Filter 209-4800
STORAGE REQUIREMENTS
The following storage conditions are required for SYMPHONY Solutions and
OPTISURE coverslips.
FLAMMABLE STORAGE
Certain flammable materials used with SYMPHONY require specific flammable-
storage at room temperature (between 15° and 30° C).
REAGENT CONTAINER QUANTITY
SYMPHONY Clear 2 liter bottle
SYMPHONY C 1 liter box
REFRIGERATED SOLUTION STORAGE
The following SYMPHONY Solutions require refrigerated storage (between 2°
and 8° C).
REAGENT CONTAINER QUANTITY
SYMPHONY N1 1 liter box
SYMPHONY N2 1 liter box
Note:
SYMPHONY N1 and N2 Reagents must be brought to room temperature prior to
use.

Ventana Medical Systems
SYMPHONY System Operator Manual
Page 27
ROOM TEMPERATURE SOLUTION STORAGE
The following SYMPHONY Solutions require storage and use at room
temperature (between 15° and 30° C).
REAGENT CONTAINER QUANTITY
SYMPHONY B 1 liter box
SYMPHONY D 1 liter box
SYMPHONY E 250 ml box
SYMPHONY W 1 liter box
OPTISURE COVERSLIP CASSETTE STORAGE
The OPTISURE coverslip cassettes require storage at room temperature (between
15° and 30° C).
REQUIRED ACCESSORIES
The accessories described below are required for SYMPHONY.
UNIVERSAL SLIDE TRAY
The Universal Slide Tray is used to transport slides through the “one-touch”
SYMPHONY process. Each slide tray will hold up to 20 slides. Five slide trays
are provided with SYMPHONY. Additional slide trays can be ordered as a kit of
five trays. The catalogue number for the SYMPHONY Slide Tray Kit is 900-301.
DESICCANT FILTER
SYMPHONY’s desiccant filter (part number 2094800) is located on the
Coverslipper module, adjacent to the coverslip loading belt. SYMPHONY’s
desiccant filter must be replaced once the purple beads inside the desiccant filter
have turned pink.
Ventana Medical Systems
SYMPHONY System Operator Manual
Page 28
MICROSCOPE SLIDE SPECIFICATIONS
The following slide types have been evaluated and are suitable for use with
SYMPHONY.
Uncharged (Erie Scientific Superfrost)
Charged (Erie Scientific Superfrost Plus)
Some slide types may be too large to fit in the universal slide tray. The user must validate
other slide types prior to use.
FIXATIVE SPECIFICATIONS
Tissue should be fixed according to the laboratory’s current process. The following
fixatives are acceptable.
NBF (Neutral Buffered Formalin)
Zinc formalin
Bouins
Hollande’s
Streck
NoTox
B5
Ventana Medical Systems
SYMPHONY System Operator Manual
Page 29
INSTRUMENT SETUP
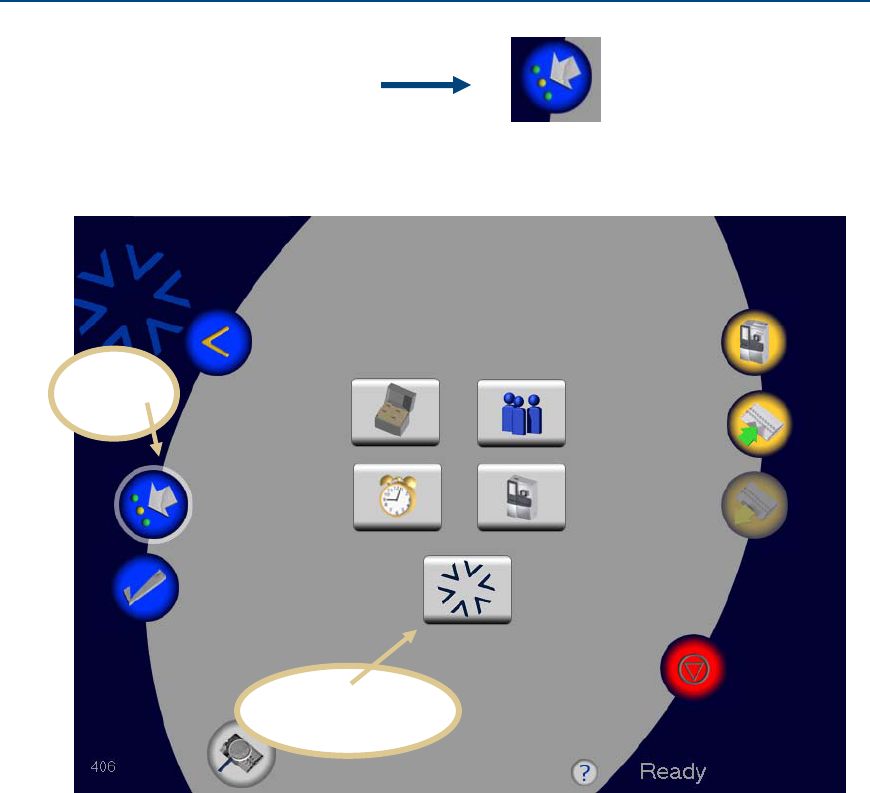
To begin system setup, on the Main
Setup screen touch the Setup icon:
Touching the Setup icon will display the five icons shown in the center of the screen
shown below:
Touching the Ventana logo icon shown above will display the About SYMPHONY screen.
Ventana Logo
Icon
Setup
Icon
Ventana Medical Systems
SYMPHONY System Operator Manual
Page 30
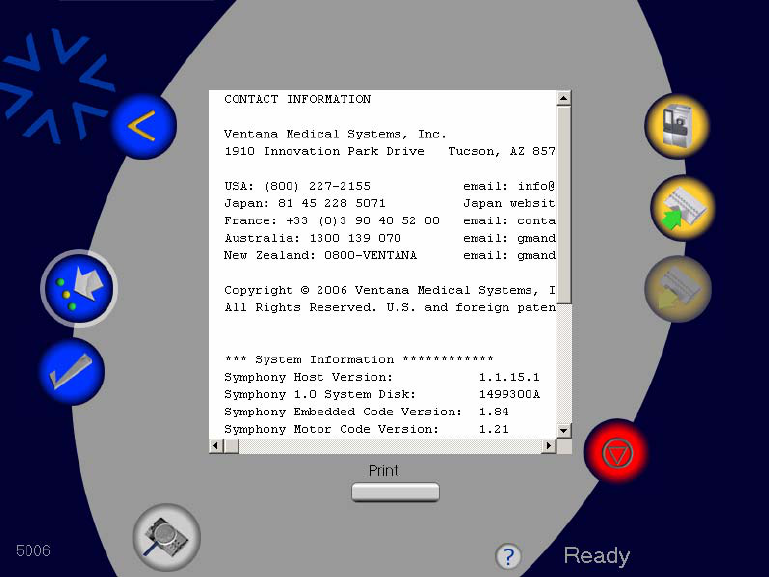
The About SYMPHONY screen, shown below, displays contact information for all Ventana
locations. It also provides system information such as the software version and serial
numbers of internal components.
USER SETUP
USER PRIVILEGES
There are two levels of users: Administrator users and Operator users.
Administrators by default have full system privileges.
Note:
Upon completion of installation, the first user entered must be assigned full
administrator privileges to be able to assign appropriate permissions to all other
users of the system.
Operators can be assigned different levels of privileges by an administrator.
User Maintenance: allows the operator user to delete, edit, and add users.
Protocol Maintenance: allows the operator user to delete, edit, and add
protocols.
System Maintenance: allows the operator user to access system level
settings.
Ventana Medical Systems
SYMPHONY System Operator Manual
Page 31
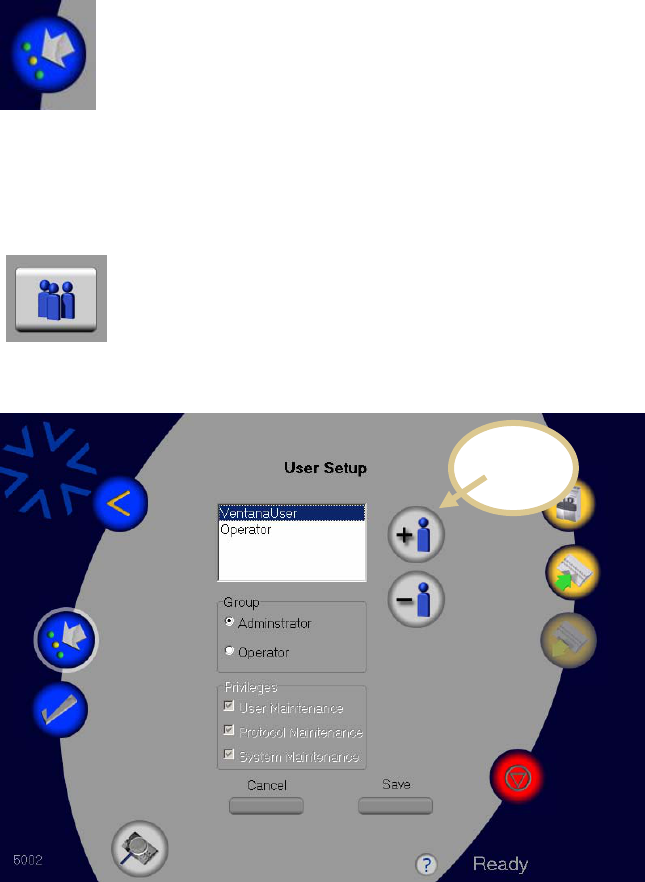
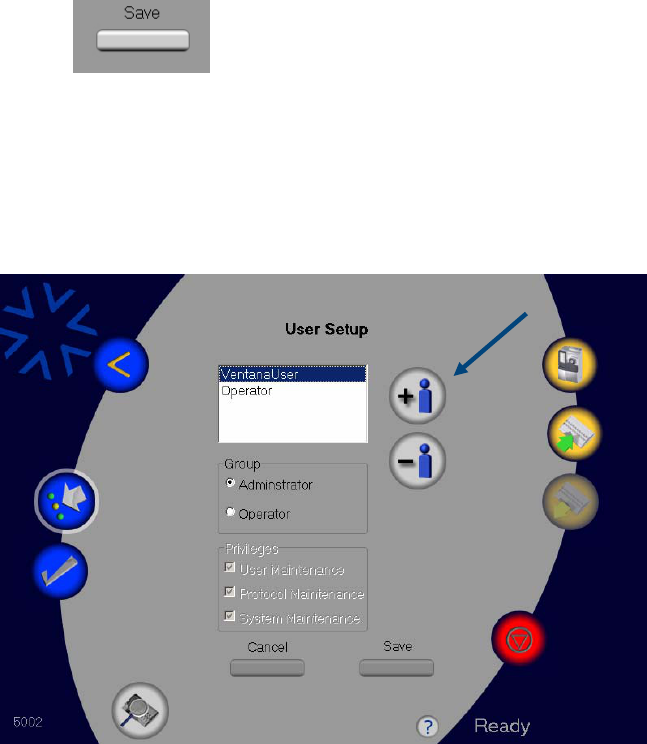
SETTING OPERATOR PRIVILEGES
To set operator privileges…
1. From the Main screen, touch the Setup icon shown below.
Five icons will display in the center of the Touchscreen as described
earlier.
2. Touch the Operators Setup icon shown below.
The User Setup screen will display:
Add
User
Ventana Medical Systems
SYMPHONY System Operator Manual
Page 32
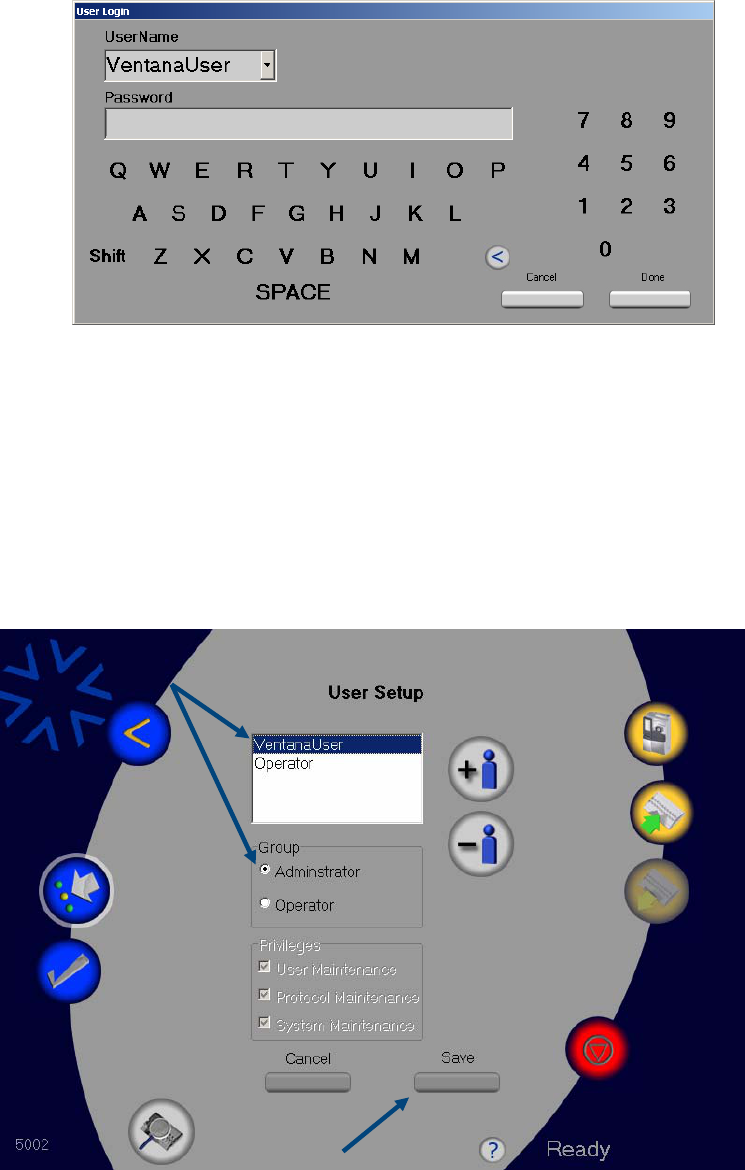
If users already exist, the User Login screen shown immediately below
will display before the User Setup screen displays.
a. Log in by touching the dropdown arrow of the User Name field and
selecting the user name.
b. In the Password field enter the user password using the virtual
“touch keypad.”
c. Touch the Done icon. The User Login screen will close and the User
Setup screen will reappear.
3. On the User Setup screen select a user from the list of user names
displayed.
Ventana Medical Systems
SYMPHONY System Operator Manual
Page 33
4. Select the type of user, Administrator or Operator, in the Group group box.
5. Select the appropriate type of privileges for the user in the Privileges group
box.
6. Touch the Save icon to save the settings.
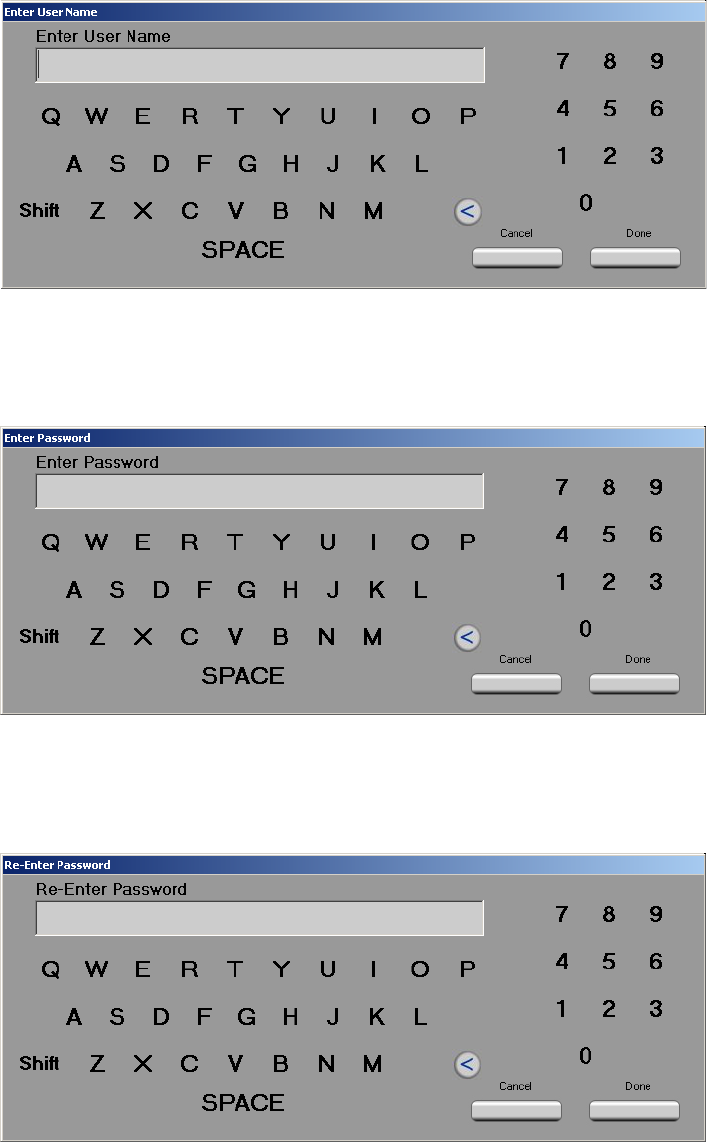
SETTING UP A NEW USER
To set up a new user in the system…
1. Touch the Add User icon on the User Setup screen.
Ventana Medical Systems
SYMPHONY System Operator Manual
Page 34
The Enter User Name screen, shown below, displays.
2. Enter the new user’s name using the touch pad.
3. Touch Done to display the Enter Password screen shown below.
4. Enter a password for the new user.
5. Touch Done to display the Re-Enter Password screen shown below.
6. Enter the new user’s password again in the Re-Enter Password field.
Ventana Medical Systems
SYMPHONY System Operator Manual
Page 35
7. Touch Done to re-display the User Setup screen.
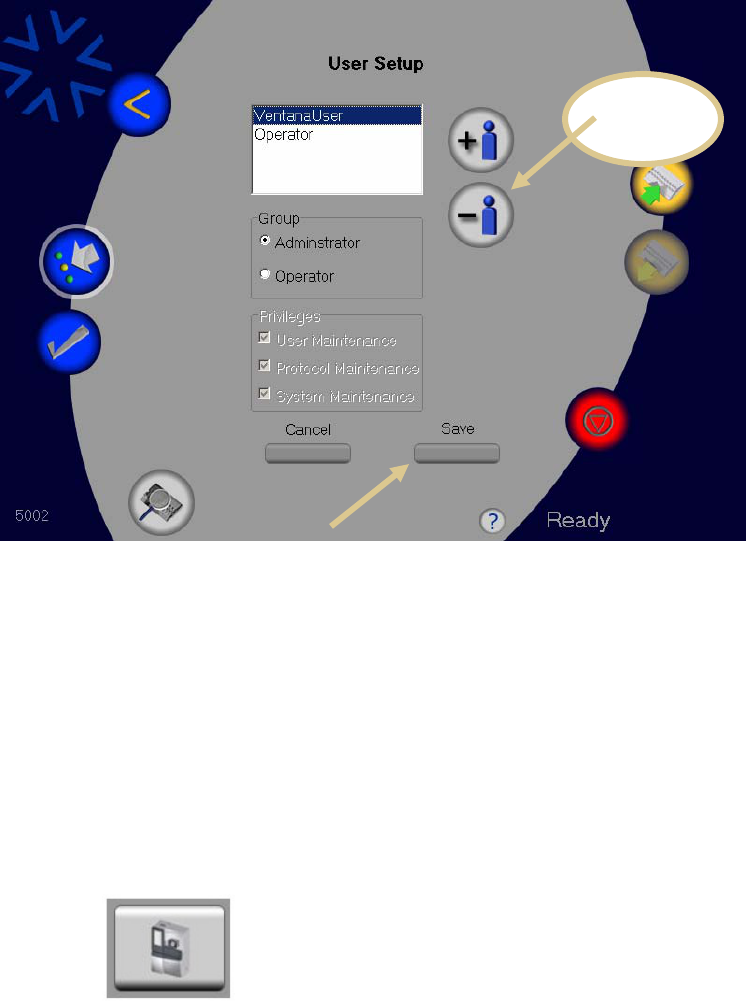
DELETING A USER
To delete a user from the system…
1. On the User Setup screen, select the user to be deleted.
2. Touch the Delete User icon shown below.
3. Touch the Save icon to save the settings.
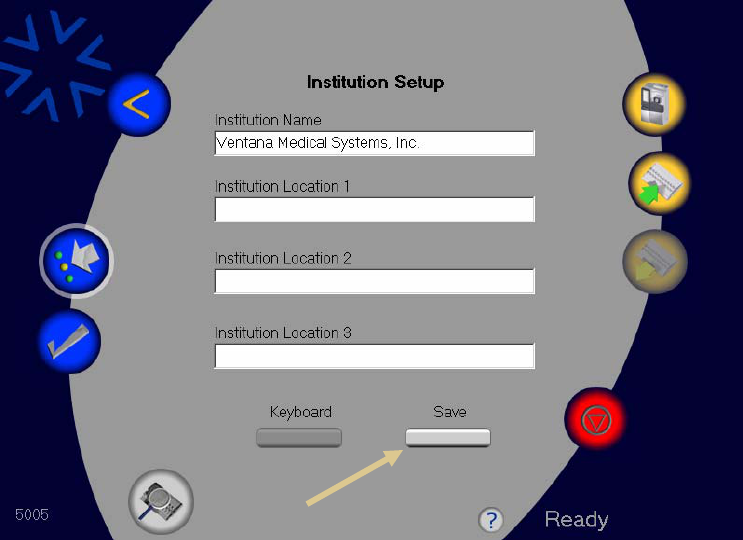
INSTITUTION SETUP
The Institution Setup screen is used to enter the institution name and location information
that is to appear on reports.
To enter institution name and location…
1. Touch the Institution Setup icon to display the Institution Setup screen.
Delete
User Icon
Delete
User Icon
Ventana Medical Systems
SYMPHONY System Operator Manual
Page 36
The Institution Setup screen, shown below, displays.
INSTITUTION SETUP SCREEN
2. Type the appropriate institution information in the available fields.
3. Touch the Save button to store the information.
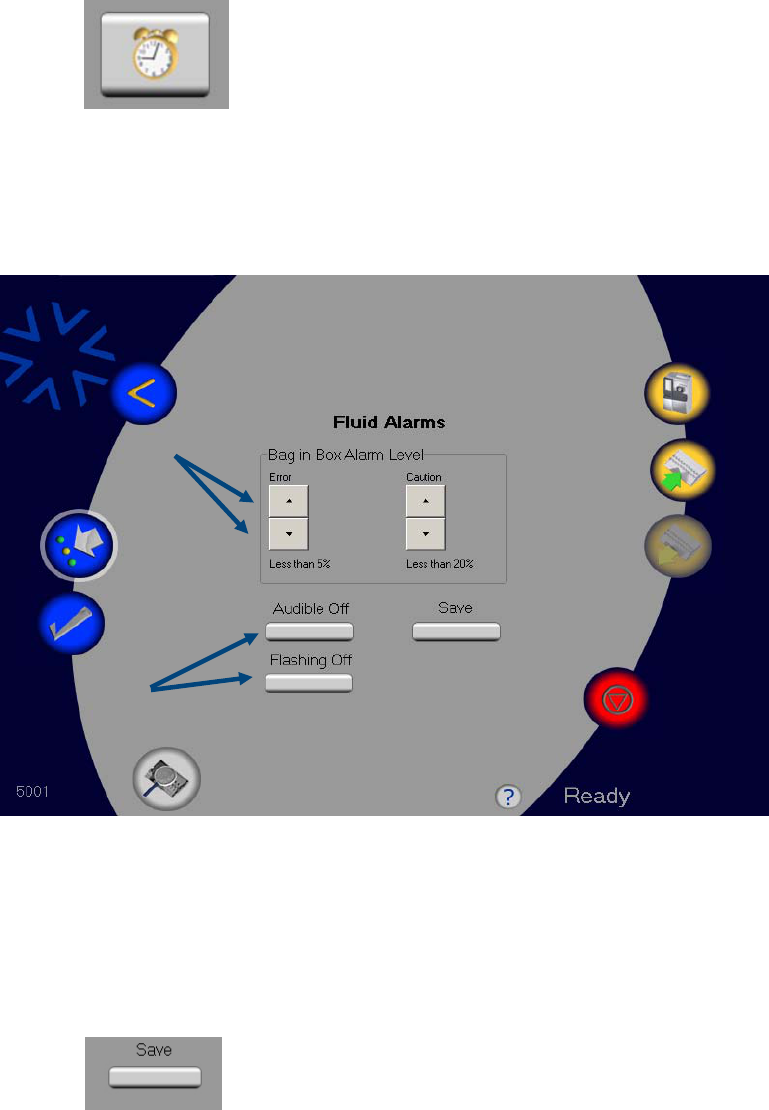
ALARM SETUP
The fluid alarm levels determine when the user will be notified that the reagents will soon
be exhausted. There are two different warning levels that indicate fluids need attention:
The user may set an alarm threshold by touching the Caution arrows on the Fluid Alarms
screen, and the user also may set an alarm threshold by touching the Error arrows in the
Fluid Alarms screen.
In the status view, yellow indicates fluids that are approaching low levels. Red indicates
fluids that will soon need replacement. (See the Continuous Access Reagents section under
the Instrument Operation section for information on accessing the status view.)
Ventana Medical Systems
SYMPHONY System Operator Manual
Page 37
To set the fluid alarm levels…
1. From the Main screen, touch the Setup icon to display the Fluid Alarms icon
shown below.
2. Touch the Fluid Alarms icon shown above to display the Fluid Alarms screen
shown below.
The Audible icon toggles the alarm sound.
The Flashing icon toggles the flashing of the images.
3. Touch the Up or Down arrows in the Bag in Box Alarm Level group box to
set the alarms for the fluid levels. The Less than % information shown
under the alarm level arrows will change as the arrows are pressed to
change the fluid level alarm settings.
4. Touch the Save icon to save settings.
Ventana Medical Systems
SYMPHONY System Operator Manual
Page 38
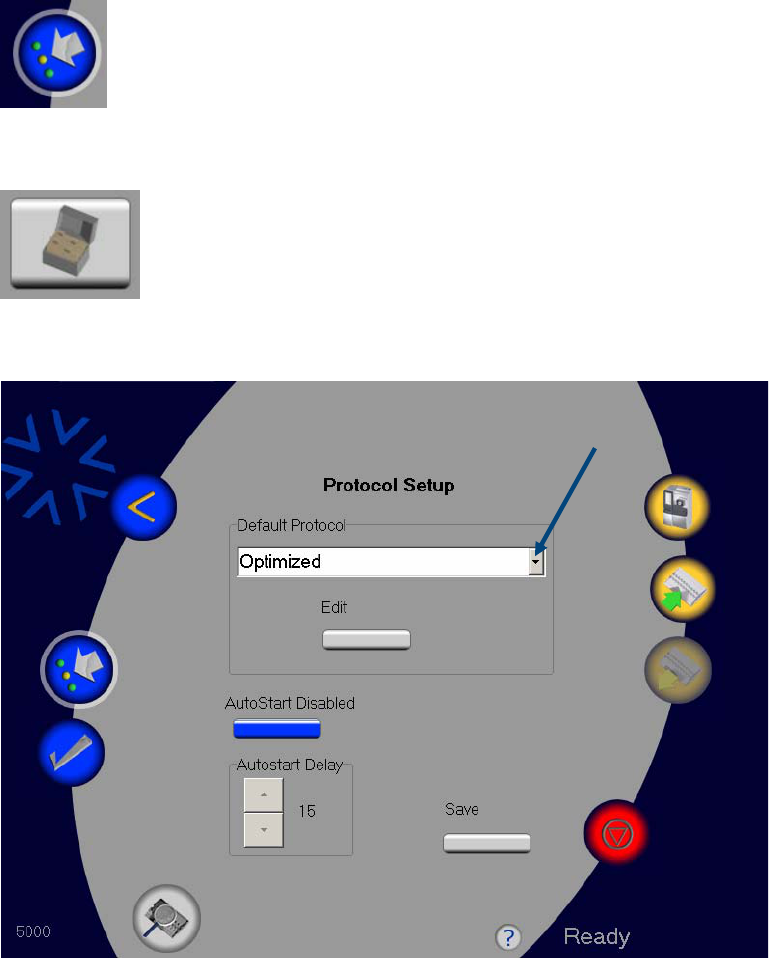
SETTING A DEFAULT PROTOCOL
The user has the option of selecting the protocol that will be displayed when a tray is
placed in the Portal (run is initiated). The SYMPHONY System comes with the
preprogrammed “Optimized” protocol as the staining default.
To set a default protocol…
1. From the Main screen, touch the Setup icon shown below.
The Protocol Setup icon shown below will display.
2. Touch the Protocol Setup icon to display the Protocol Setup screen below.

Ventana Medical Systems
SYMPHONY System Operator Manual
Page 39
3. Touch the arrow next to the Default Protocol group box to display available
protocols.
4. Select the desired default protocol
5. Touch the Save icon shown below to confirm and save the selection.
CUSTOMIZED PROTOCOLS
A custom protocol can be created by editing an existing protocol.
To create a customized protocol…
1. In the Default Protocol group box shown below touch the field’s down
arrow to select a protocol to edit.
2. Touch the Edit button to begin the task. Touching the Edit icon will display
the User Login screen, described earlier, if users are already set up.
3. Enter the user’s name and password.
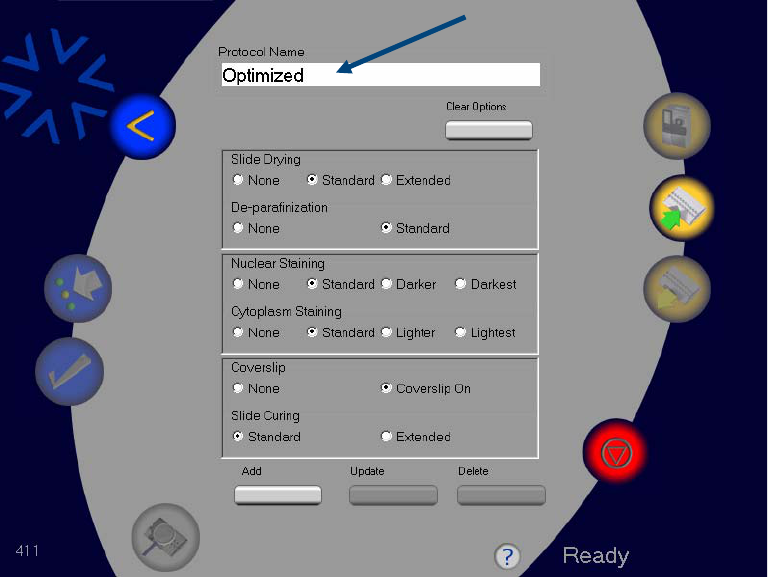
Ventana Medical Systems
SYMPHONY System Operator Manual
Page 40
4. Touch Done. The Edit Protocol screen, shown below, displays.
5. Touch in the Protocol Name field. A virtual touch-pad keyboard, similar to
the User Login screen, will display.
6. Using the keyboard, rename the protocol.
Important!
If the user fails to rename the protocol, the protocol that appears in the
Protocol Name field will be edited.
7. After naming the new protocol, select appropriate options in each of the
three group boxes.
8. Touch the Add icon to add the newly named protocol and save its
configuration settings. The new, custom protocol will now display in the
Protocol Name dropdown box the next time it is accessed.
STAINING PROTOCOL OPTIONS
The SYMPHONY System provides for up to three different nuclear staining
intensities, in addition to three different cytoplasmic staining intensities.

Ventana Medical Systems
SYMPHONY System Operator Manual
Page 41
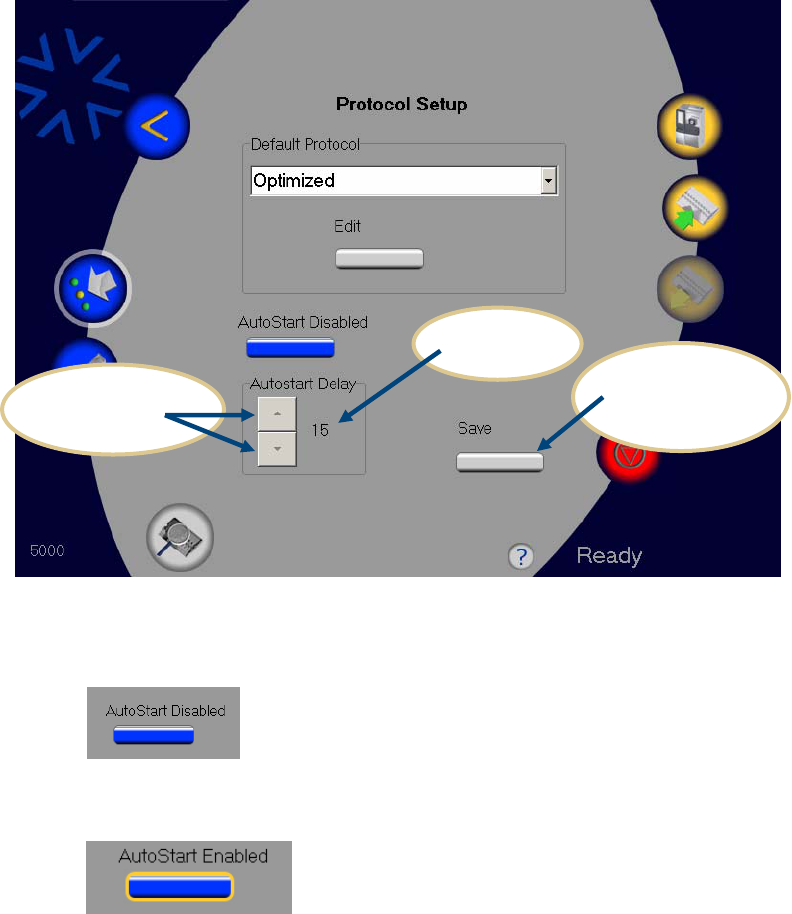
AUTOSTART
SYMPHONY has an autostart feature that enables the system to operate in “one touch”
mode. The Autostart Delay is the amount of time (in seconds) that the user is given to
select a protocol other than the Default protocol. The autostart delay time (or “seconds to
start”) is specified by the user.
USING THE AUTOSTART FEATURE
When the Autostart feature is enabled, the default protocol is automatically
selected to run when a tray is loaded.
To change the delay time…
1. On the Main screen, touch the Setup icon.
The Protocol Setup icon, shown below, displays.
Ventana Medical Systems
SYMPHONY System Operator Manual
Page 42
2. Touch the Protocol Setup icon. The Protocol Setup screen shown below
displays.
3. Touch the Autostart icon, shown below, to toggle the autostart feature to
on.
The AutoStart icon will change to AutoStart Enabled.
4. In the Autostart Delay group box change the number of seconds for the
delay of the autostart feature by pressing the up or down arrows to
increase or decrease the autostart delay period. The delay seconds selected
are displayed in the group box.
5. Touch the Save icon to confirm and save the delay selection.
Touch the Save
icon to keep the
changes.
Seconds to
autostart.
Press to change
delay period.

Ventana Medical Systems
SYMPHONY System Operator Manual
Page 43
INSTRUMENT OPERATION
PREPARING TO USE SYMPHONY SOLUTIONS
SYMPHONY Solutions are all ready-to-use and come in two formats, a two liter plastic
bottle for SYMPHONY Clear and Bag-in-Box packaging for the other SYMPHONY
Solutions.
CONTINUOUS ACCESS REAGENTS
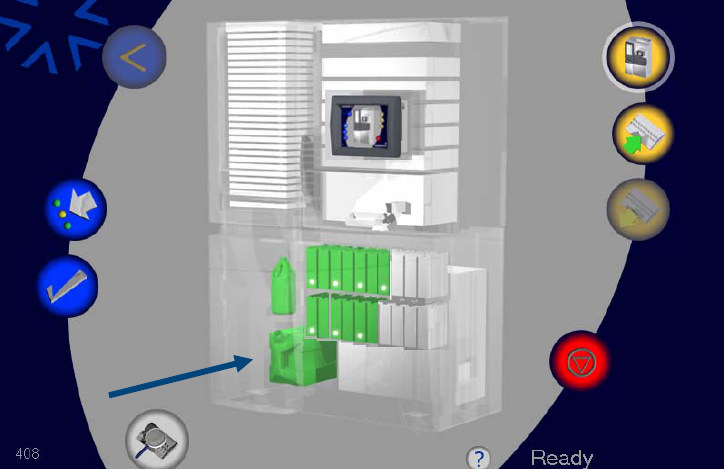
The SYMPHONY System’s Touchscreen user interface will display the status of
the reagents on the main status screen.
Green reagent containers indicate adequate amounts of reagent
A dot on a reagent container indicates that reagent is being drawn from
that container.
If a reagent is low, the reagent box icon will appear “yellow” as a
notification that the reagent is approaching low levels (see the Alarm
Setup section).
When a reagent needs replenishing, the icon will appear “red” on the
screen.
The SYMPHONY fluidics module can accommodate two of each of the Bag-in-Box
reagents (SYMPHONY N1, N2, C, B, D, W), and it has the capacity to hold internally
two of the 2L SYMPHONY Clear bottles.
Ventana Medical Systems
SYMPHONY System Operator Manual
Page 44
SYMPHONY STATUS VIEW SCREEN
Note:
SYMPHONY E is limited to one container, as shown in the illustration above.
When any container is empty, SYMPHONY will automatically switch to drawing
from the second container, and the white “in use” dot will switch to the next
container. Empty containers can be replaced at any time during system operation,
however they should not be removed until the white dot has transferred to the next
full container. There is no need to pause SYMPHONY to replenish reagents.
LOADING AND UNLOADING SYMPHONY SOLUTIONS
WARNING!
It is important to note that some, but not all, of the reagents for use in the
SYMPHONY System are flammable and/or may be considered an irritant.
Therefore, it is strongly recommended that good clinical practice guidelines are
closely followed when handling the reagents.
Wear appropriate gloves (nitrile-based)
Ventana Medical Systems
SYMPHONY System Operator Manual
Page 45
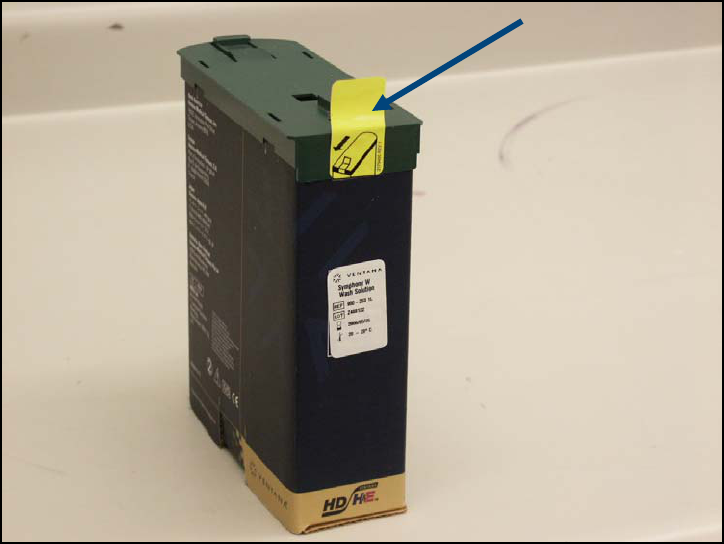
LOADING BAG-IN-BOX SYMPHONY SOLUTIONS
The protective seal shown in the figure below must be removed prior to loading
SYMPHONY Solutions Bag-in-Box reagents onto the system.
Pull the yellow protective seal off of the container by pulling on the loose end of
the tab.
LOADING BAG IN BOX (PULL YELLOW SEAL)
Ventana Medical Systems
SYMPHONY System Operator Manual
Page 46
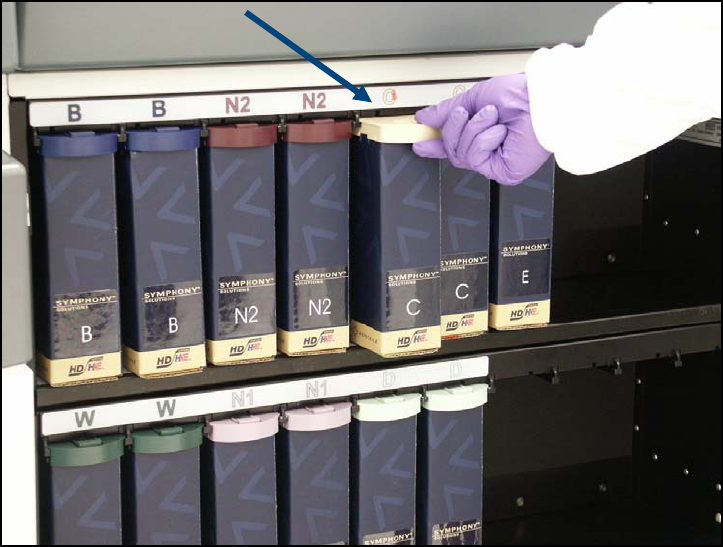
Each top of a SYMPHONY Solutions Bag-in-Box is color coded. The color
corresponds to the location labels on the instrument. The reagents cannot be
loaded in the incorrect location because each color has a unique “key.”
ALIGNING PLASTIC TOP
To load Bag-in-Box reagents…
1. Align the plastic cap on the reagent box with the appropriate location on
the system.
2. Push the reagent along the guide rails until it snaps into place.
SYMPHONY’s SmartTrack label will automatically relay the lot number,
expiration date, and volume of the SYMPHONY reagent into the database
and record the date that the reagent was loaded.
Note:
All SYMPHONY Solutions N1 and N2 expire three months after they have been
loaded in the instrument or on the labeled expiration date, whichever is earlier.
UNLOADING BAG-IN-BOX SYMPHONY SOLUTIONS
To unload Bag-in-Box reagents…
1. Press down on the tab on the colored top
Ventana Medical Systems
SYMPHONY System Operator Manual
Page 47
2. Slide the reagent from its position
RECYCLING INFORMATION
The SYMPHONY Solutions Bag-in-Box packaging is designed to minimize
waste generated by the system and to facilitate recycling. The reagent box can be
separated from the plastic components for recycling where available.
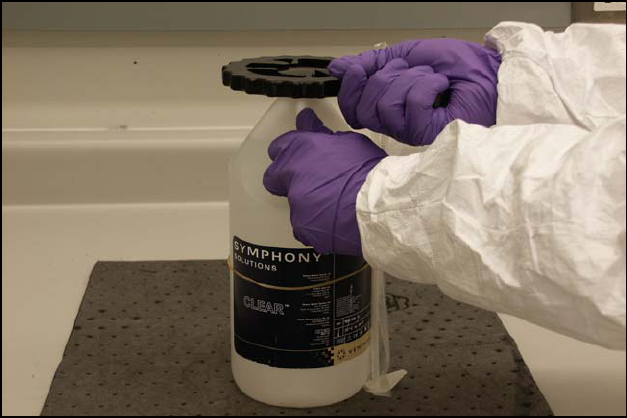
OPENING SYMPHONY CLEAR SOLUTION
Remember to wear appropriate safety gloves (nitrile-based) when handling
SYMPHONY Solutions.
SYMPHONY CLEAR BOTTLE AND STRAW WITH TOOL
To open a SYMPHONY Clear two-liter bottle place the Ventana-provided tool,
shown above and below, over cap and turn it counterclockwise.
Straw….
and cap
removal tool.
Ventana Medical Systems
SYMPHONY System Operator Manual
Page 48
REMOVING THE CAP WITH VENTANA-SUPPLIED TOOL
Note:
Do not re-use an old “straw.” Unwrap a new “straw” and insert it into the bottle
Ventana Medical Systems
SYMPHONY System Operator Manual
Page 49
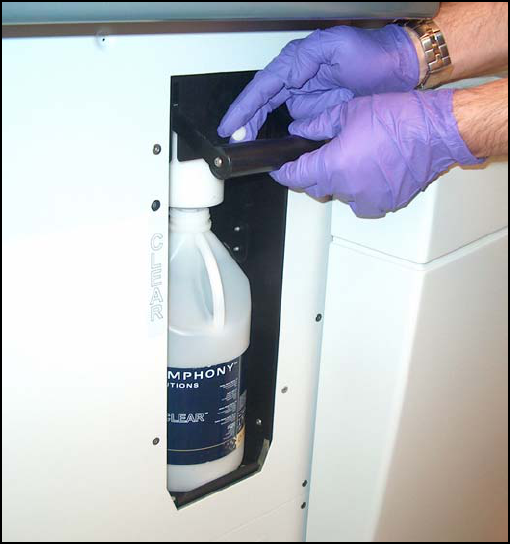
LOADING SYMPHONY CLEAR SOLUTION
To load a SYMPHONY Clear two-liter bottle…
1. Pull and hold the white knob out.
2. While holding the white knob out, pull up the black lever until it locks into
position.
LOADING THE SYMPHONY CLEAR BOTTLE
Ventana Medical Systems
SYMPHONY System Operator Manual
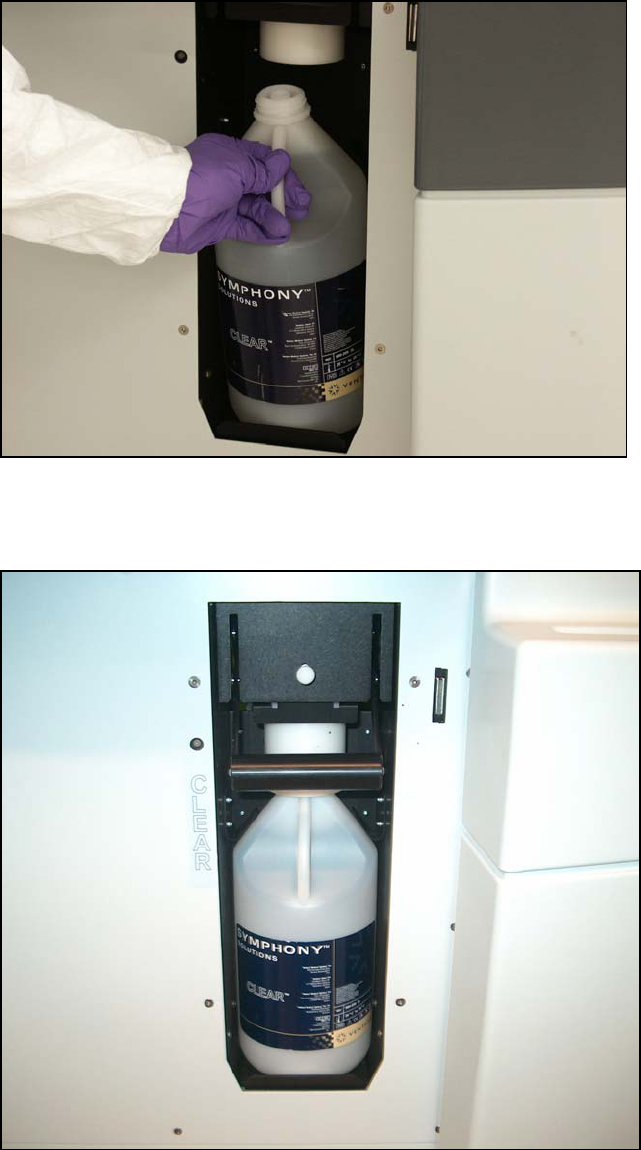
Page 50
3. Install the bottle, bottom first.
LOADING SYMPHONY CLEAR BOTTLE
SYMPHONY CLEAR BOTTLE INSTALLED

Ventana Medical Systems
SYMPHONY System Operator Manual
Page 51
UNINSTALLING THE SYMPHONY CLEAR BOTTLE
To uninstall and remove the SYMPHONY Clear solution bottle…
1. Pull and hold the white knob above the black handle.
REMOVING THE SYMPHONY CLEAR BOTTLE
2. While holding the white knob out, lift up the black lever. The lever will
lock in the up position.
3. Grasp the bottle handle and carefully begin to pull the bottle, top first and
then out.
4. Fully remove the bottle. The “straw” should remain in the bottle.
Note:
Pull the straw down if it remains in the white collar before removing
bottle.
Ventana Medical Systems
SYMPHONY System Operator Manual
Page 52
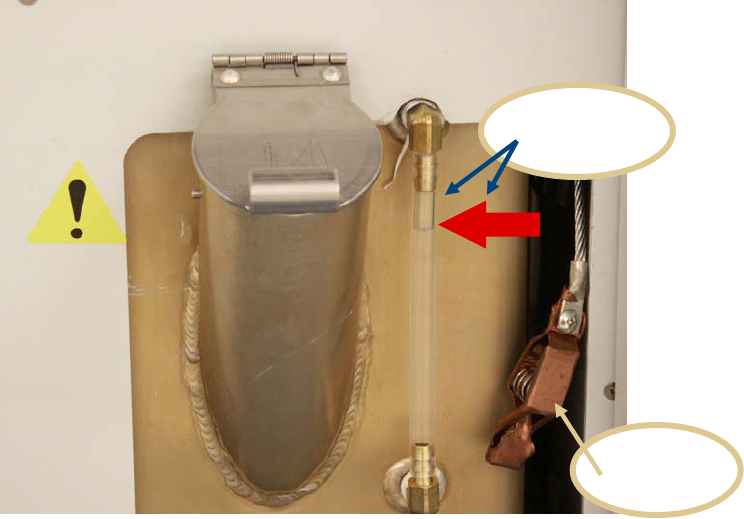
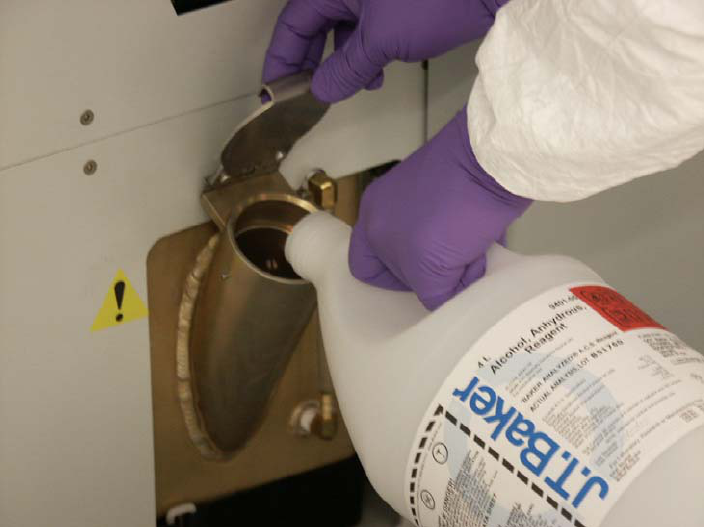
FILLING THE ALCOHOL RESERVOIR
WARNING!
Alcohol is Flammable.
Good clinical practices should be followed when handling alcohol to ensure user safety.
Note:
In the event that your laboratory procedures require a safety can for transfer of alcohol, a
grounding strap (shown below) is provided. Remember to wear appropriate safety gloves
(nitrile-based) when handling solutions.
To fill the alcohol reservoir…
1. Open the lower left door to expose the alcohol reservoir compartment.
ALCOHOL RESERVOIR AND RESERVOIR FILL INDICATOR
2. Lift alcohol reservoir’s cap.
3. Fill the 16-liter alcohol reservoir until the fluid reaches near the top of the
sight glass indicator as shown in photo above.
CAUTION:
Do not fill the reservoir beyond the level indicated by red arrow next to
sight glass indicator.
Grounding
Strap
Sight Glass
Indicator
Ventana Medical Systems
SYMPHONY System Operator Manual
Page 53
FILLING THE ALCOHOL RESERVOIR
Ventana Medical Systems
SYMPHONY System Operator Manual
Page 54
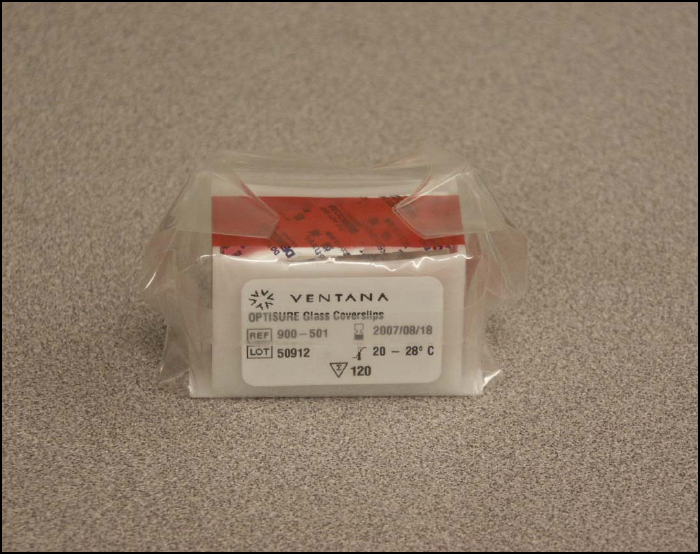
PREPARING TO USE THE OPTISURE COVERSLIPPER
The OPTISURE coverslipper uses proprietary coverslips that come preloaded into ready-
to-use cassettes. There is no need to handle the glass at all.
The cassettes should be stored in a clean dry area and should remain sealed in the plastic
bag until they are to be loaded into the instrument.
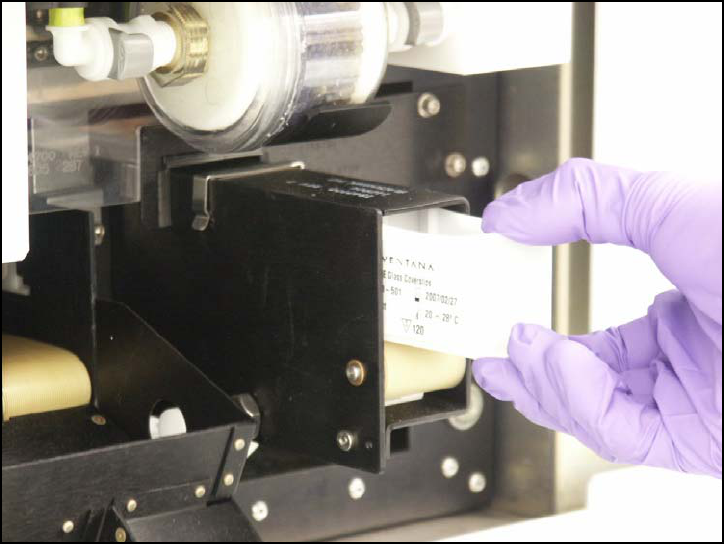
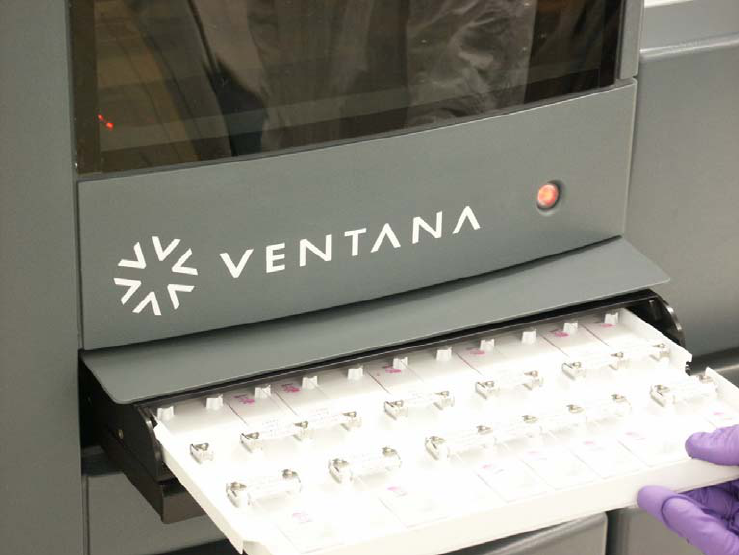
LOADING OPTISURE CASSETTES
To load SYMPHONY with OPTISURE coverslip cassettes…
1. First remove the cassettes from their plastic bags.
OPTISURE COVERSLIP CASSETTE
2. Next, remove the tape covering the open end of the cassette. Make sure
the desiccant pouches are removed with the tape.
Ventana Medical Systems
SYMPHONY System Operator Manual
Page 55
3. Place the cassettes on the entry belt (right belt) with the label side to the
left side of the instrument. The cassette is keyed so that it can be inserted
only one way.
LOADING THE OPTISURE CASSETTE
The belt will start moving once the cassette reaches the inside sensor and will
be positioned automatically for use inside the instrument.
Empty coverslip cassettes are ejected into the tray to the left of the entry belt
and should be removed and discarded whenever new coverslips are loaded.
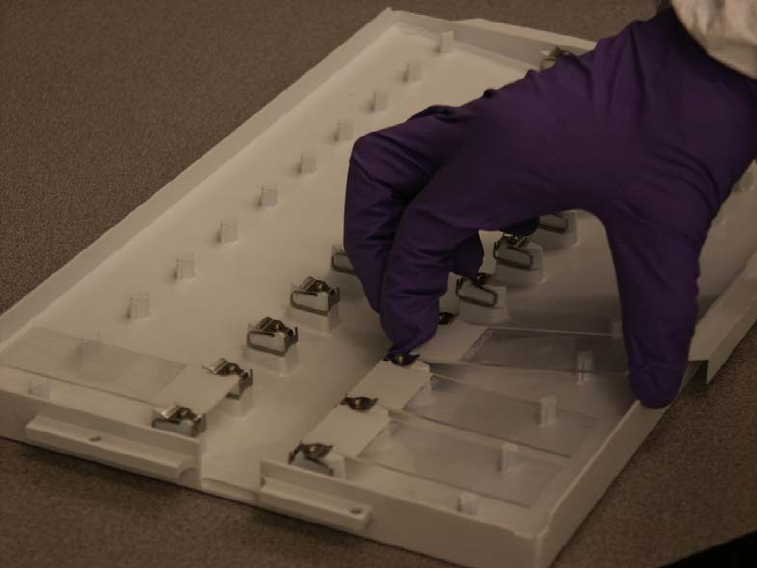
LOADING SLIDES AND SLIDE TRAYS
Up to 20 slides can be loaded into each slide tray. Slide trays need not be completely
filled in order for the system to operate correctly.
LOADING SLIDES INTO THE UNIVERSAL SLIDE TRAY
To load slides into the tray hold the slide at top and bottom (as shown) below and
slip the label end of the slide under the metal slide clips. The slide should be
pushed in until it “clicks.”
Ventana Medical Systems
SYMPHONY System Operator Manual
Page 56
Important!
Make sure that the slide is seated securely against the clips and between the
alignment posts. The label ends of the slides should always be inserted into the
clips towards the center of the tray.
LOADING A SLIDE INTO TRAY
The instrument will detect the number and location of slides in each tray.
Therefore, any number of slides, between 1 and 20 slides, can be loaded into any
location.
Ventana Medical Systems
SYMPHONY System Operator Manual
Page 57
LOADING AND RUNNING SLIDE TRAYS
To load a slide tray…
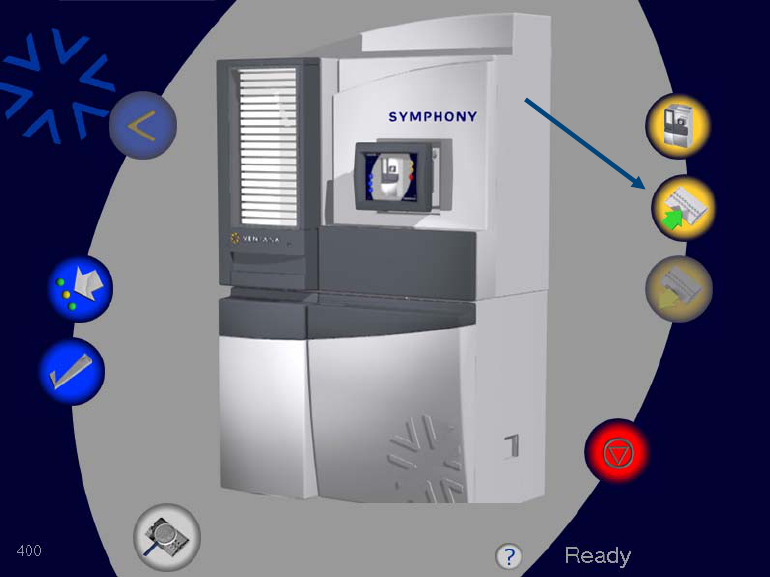
1. Touch the Load Tray icon on the Touchscreen interface shown below to
display the Load Tray screen.
LOAD TRAY ICON
Ventana Medical Systems
SYMPHONY System Operator Manual
Page 58
The tray loading portal door will open if the portal is clear and ready to accept
a tray. If the indicator light beside the portal is red, the portal is busy and the
portal will open as soon as the portal is clear.
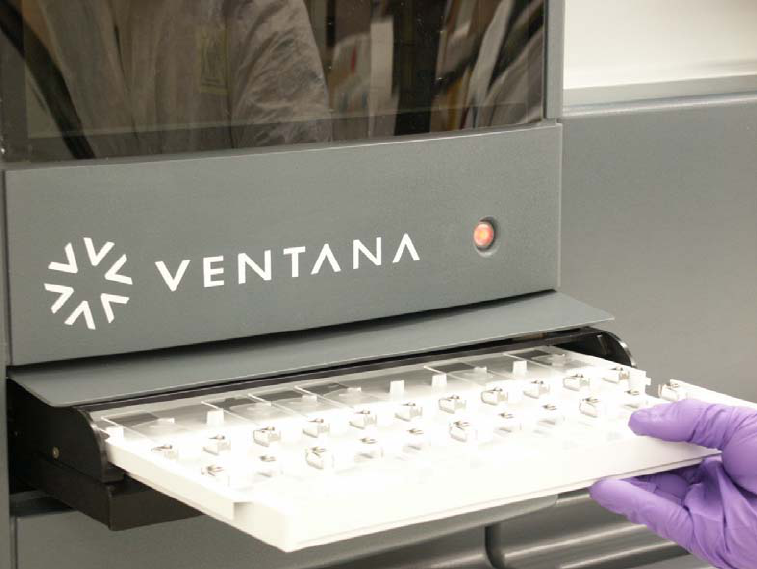
LOADING A TRAY INTO SYMPHONY
2. Orient the slide tray with the long axis parallel to the front of the
instrument with the “hook” end towards the back of the instrument and the
open end towards the right. Slide trays are designed so that they can only
be loaded one way.
Ventana Medical Systems
SYMPHONY System Operator Manual
Page 59
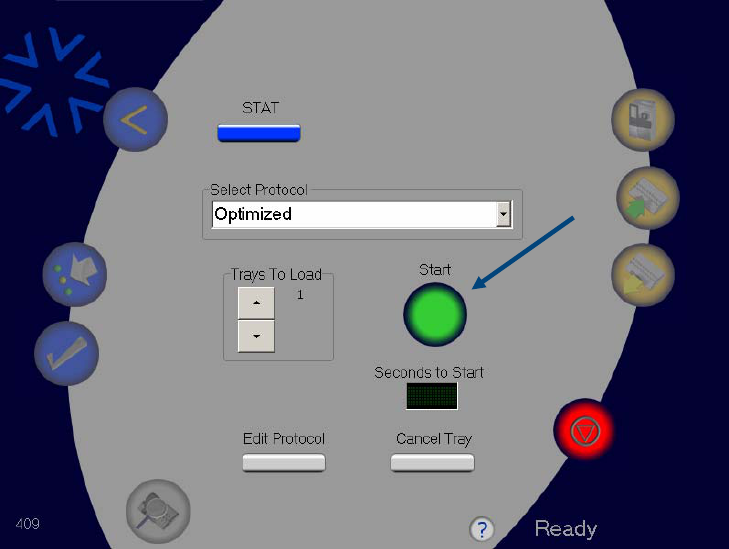
3. Push the slide tray until it hits the internal stop. The tray will be retracted
automatically by the instrument. The Run Start Screen, shown below, will
be displayed.
RUN START SCREEN
To run the default protocol, simply touch the Start icon shown above.
Ventana Medical Systems
SYMPHONY System Operator Manual
Page 60
To run a protocol other than the default protocol…
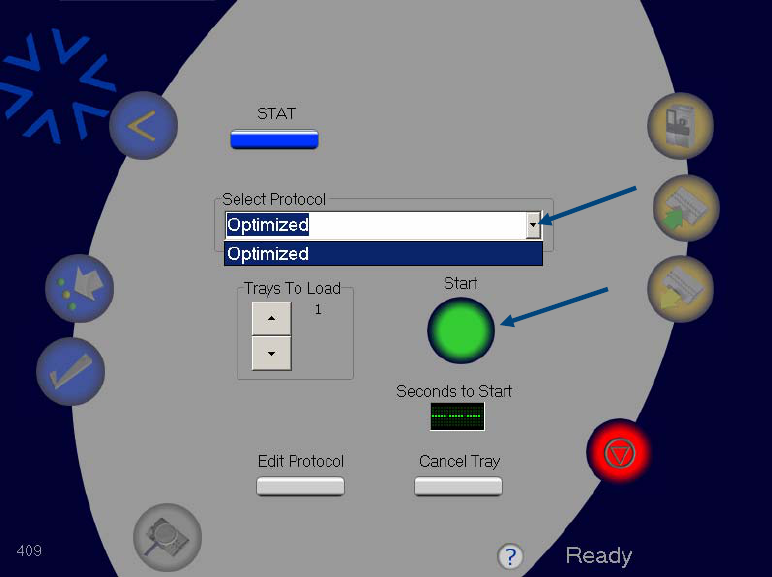
1. Touch the drop down arrow at the right of the Select Protocol field to
display the dropdown protocol menu shown below.
SELECTING THE PROTOCOL
2. From the list of names displayed in the drop down list, select the protocol
to run by touching it. The selected protocol’s name will appear in the
Select Protocol field as shown below.
3. Touch the Start icon, shown in illustration above, to initiate the protocol
run.
Ventana Medical Systems
SYMPHONY System Operator Manual
Page 61
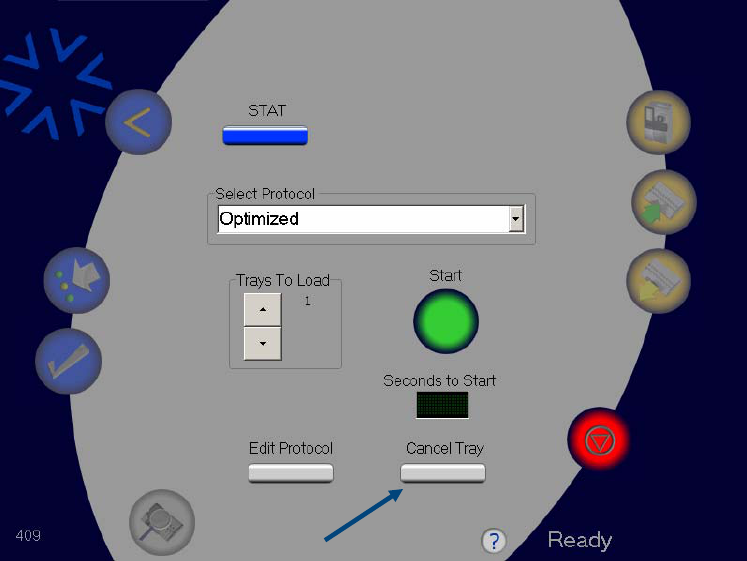
DEFAULT PROTOCOL SCREEN
If necessary, touch the Cancel Tray icon to cancel the run and unload the tray
from the entry portal.
Ventana Medical Systems
SYMPHONY System Operator Manual
Page 62
UNLOADING SLIDE TRAYS
When a tray of slides has completed all processing steps in a protocol, it is placed
in the instrument’s IntelliQue to cool. When it is cool enough to remove, the icon
for unloading trays will become active and the trays on the Status screen will turn
green.
TRAY UNLOAD ICON
Ventana Medical Systems
SYMPHONY System Operator Manual
Page 63
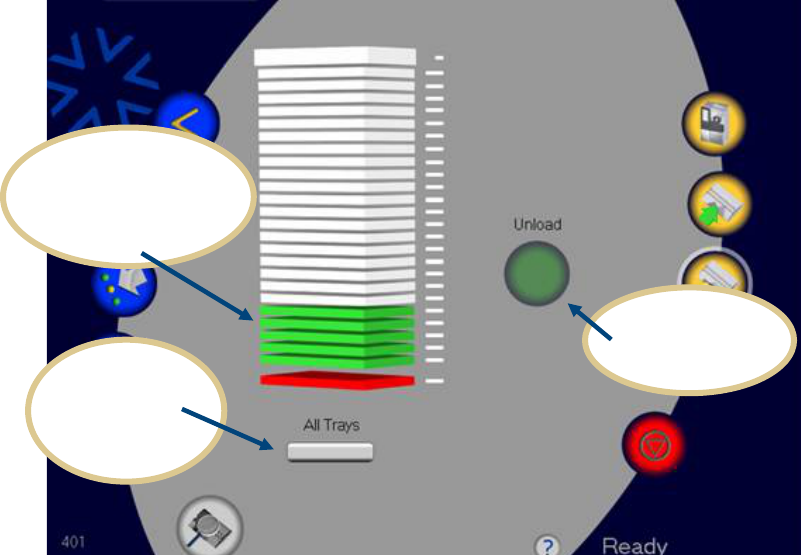
To unload completed trays…
1. Touch the Tray Unload icon indicated above to display the Tray Unload
Selection screen shown below. The screen will show a display of all trays
available to be unloaded.
TRAY UNLOAD SELECTION SCREEN
2. Select one or more trays to be unloaded by touching individual trays or
touch the All Trays icon to unload all trays. The selected tray or trays will
begin to flash as confirmation.
3. Touch the green Unload icon to remove completed trays from the
SYMPHONY System.
Touch individual
tray(s) here to
select for
unloading, or…
touch the All
Trays button
to select all
trays at once.
After tray
selection,
touch Unload
Ventana Medical Systems
SYMPHONY System Operator Manual
Page 64
4. Pull the tray from the instrument.
REMOVING A TRAY FROM SYMPHONY
Ventana Medical Systems
SYMPHONY System Operator Manual
Page 65
PUTTING SYMPHONY INTO STANDBY
An operator can place the SYMPHONY System in Standby mode. In this mode
compressor and other hardware components can be in a standby state while software
functions continue to be usable. Touch the Stop icon two times in rapid succession to put
the system into Standby mode.
STOP ICON
Touch twice
quickly to
pause s
y
stem.
Ventana Medical Systems
SYMPHONY System Operator Manual
Page 66
Touch DOUBLE-CLICK HERE TO RESTART in the Status Text area to remove the system from
Standby mode. A brief re-initialization will occur automatically to put the system into a
Ready state.
STATUS TEXT AREA
Status Text
A
rea
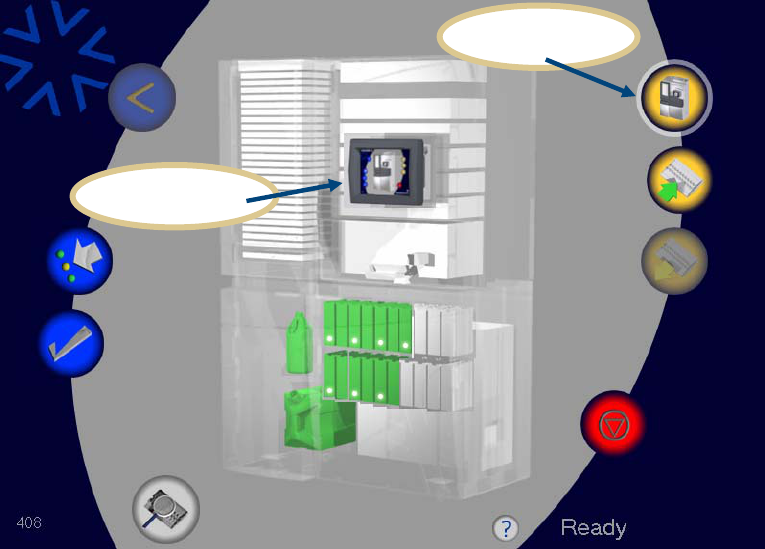
Ventana Medical Systems
SYMPHONY System Operator Manual
Page 67
DISPLAYING SYMPHONY INFORMATION
Information about any of SYMPHONY’s functions can be displayed by touching the
appropriate region/module in the Status View screen.
To display the Status View screen touch the Status icon shown below.
SYSTEM AND STATUS ICONS IN STATUS VIEW SCREEN
Touch the System icon shown above to display the System/Fluid Information.
Status icon
System icon
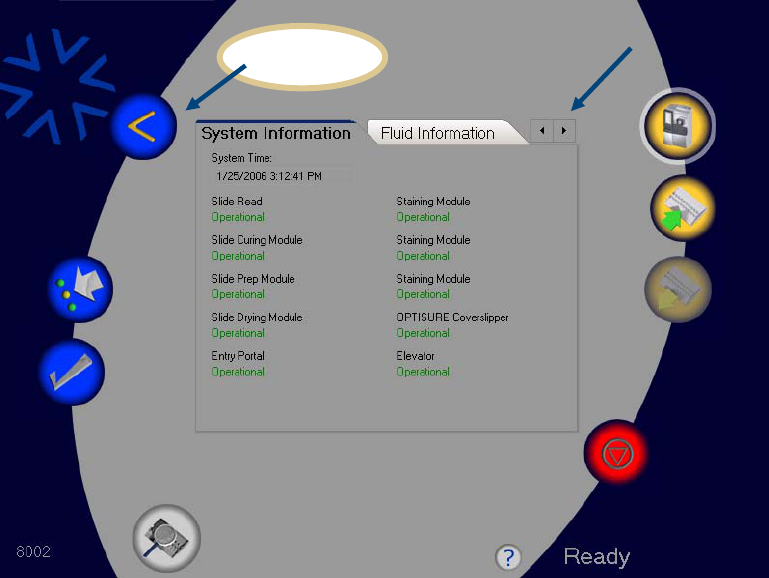
Ventana Medical Systems
SYMPHONY System Operator Manual
Page 68
System and Fluid information is shown on the screen below. Toggle between System
Information and Fluid Information by touching the corresponding tab or left and right
arrows.
SYSTEM/FLUID INFORMATION SCREEN
Touch the Back icon shown above to re-display the Status View screen shown
below.
Back icon
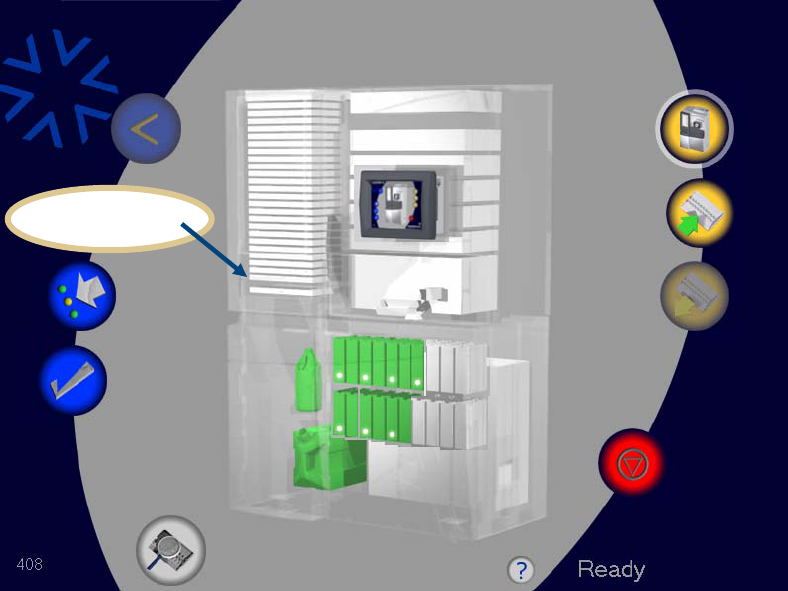
Ventana Medical Systems
SYMPHONY System Operator Manual
Page 69
ENTRY PORTAL IN STATUS VIEW SCREEN
Touch the Entry Portal region shown above to display the Entry Portal Tray/Station
Information screen.
Entry Portal
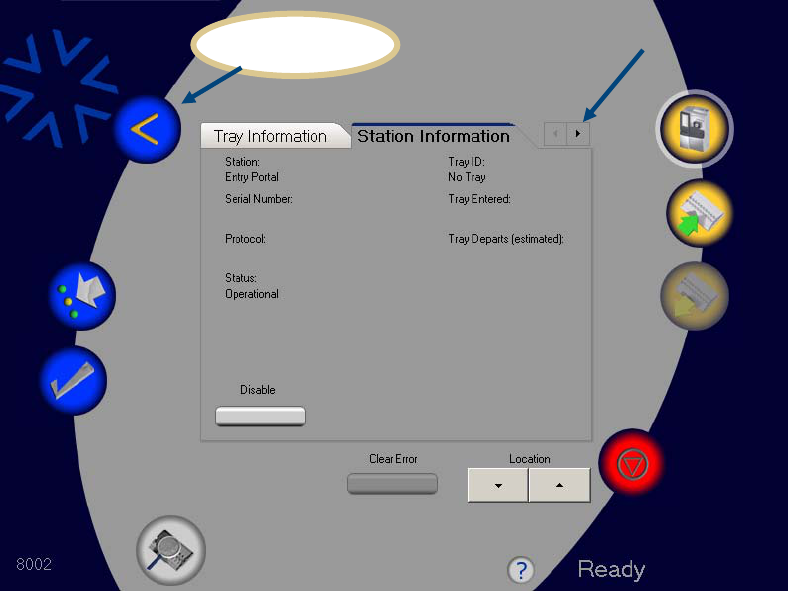
Ventana Medical Systems
SYMPHONY System Operator Manual
Page 70
Toggle between Tray Information and Station Information by touching the
corresponding tab or left and right arrows.
ENTRY PORTAL TRAY/STATION INFORMATION SCREEN
Touch the Back icon shown above to re-display the Status View screen.
Back icon
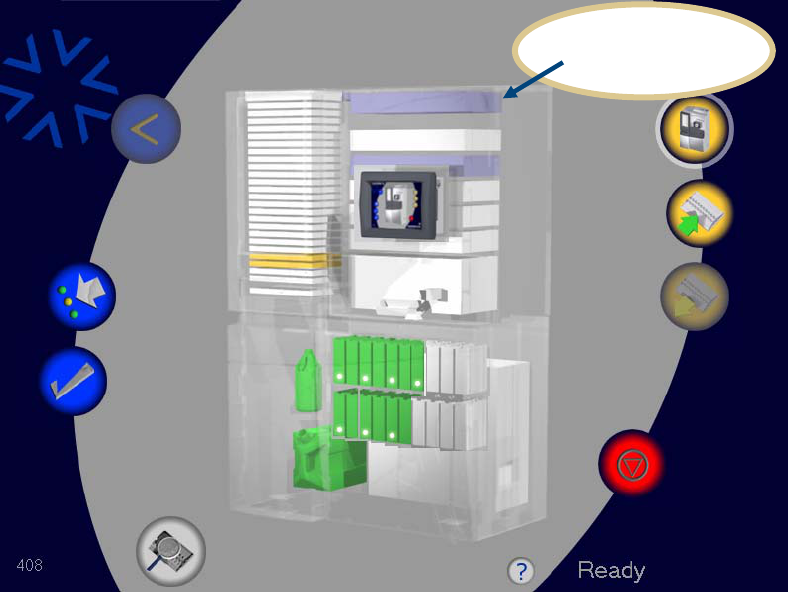
Ventana Medical Systems
SYMPHONY System Operator Manual
Page 71
Touch the Slide Detect/Bar Code Read region shown below to display the Slide
Detect/Bar Code Read Tray/Station Information.
SLIDE DETECT/BAR CODE READ IN STATUS VIEW SCREEN
Slide Detect/
Bar Code Read
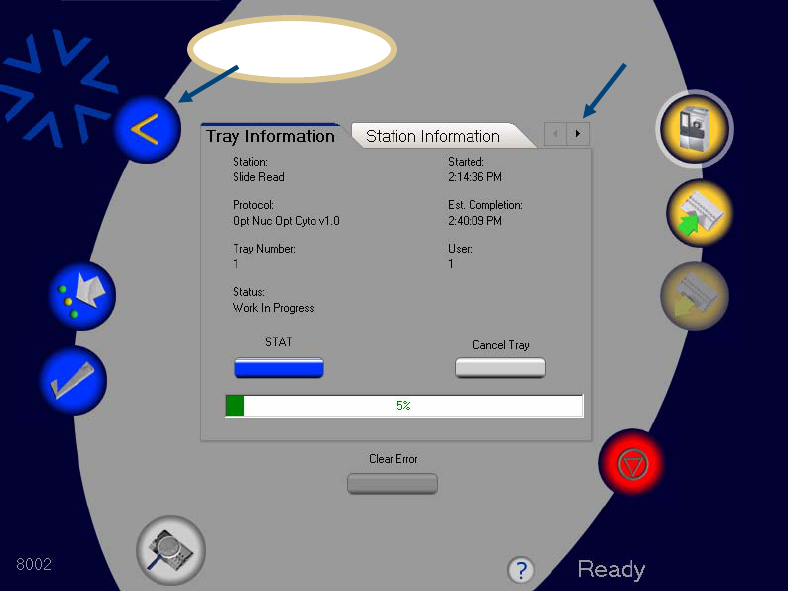
Ventana Medical Systems
SYMPHONY System Operator Manual
Page 72
The Slide Detect/Bar Code Read Tray/Station Information screen provides information about
the tray and the station where the tray is located.
SLIDE DETECT/BAR CODE READ TRAY/STATION INFORMATION
Toggle between Tray Information and Station Information by touching the
corresponding tab or the left and right arrows.
Touch the Back icon to re-display the Status View.
Back icon
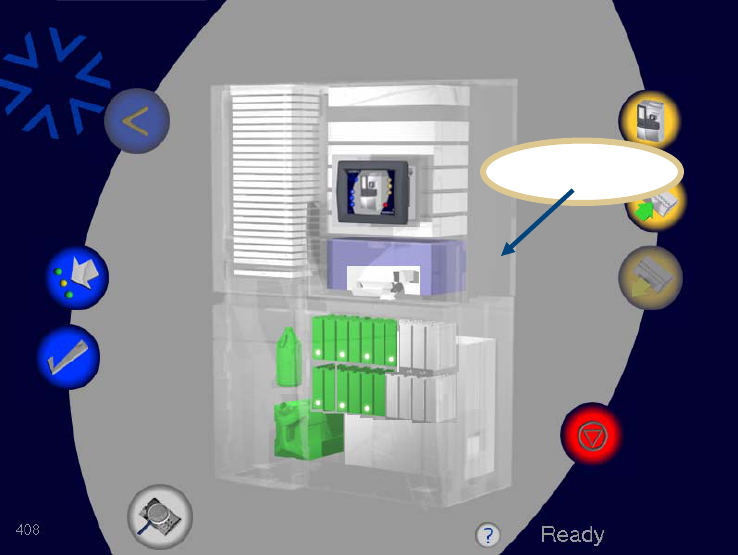
Ventana Medical Systems
SYMPHONY System Operator Manual
Page 73
Touch the Coverslipper region shown below to display the Coverslipper Tray/Station
Information screen.
COVERSLIPPER IN STATUS VIEW SCREEN
Coverslipper
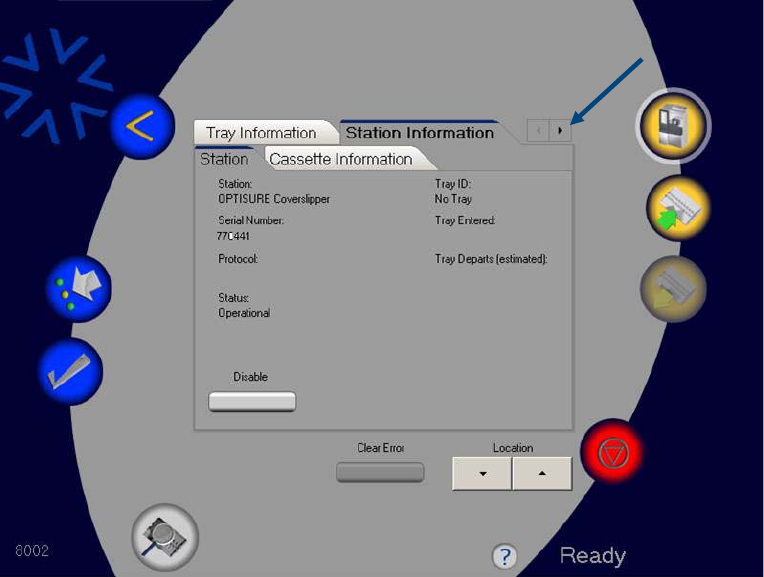
Ventana Medical Systems
SYMPHONY System Operator Manual
Page 74
Toggle between Coverslipper Tray Information, Station Information, and Cassette
Information by touching the corresponding tab or the left and right arrows.
COVERSLIPPER TRAY/STATION INFORMATION SCREEN
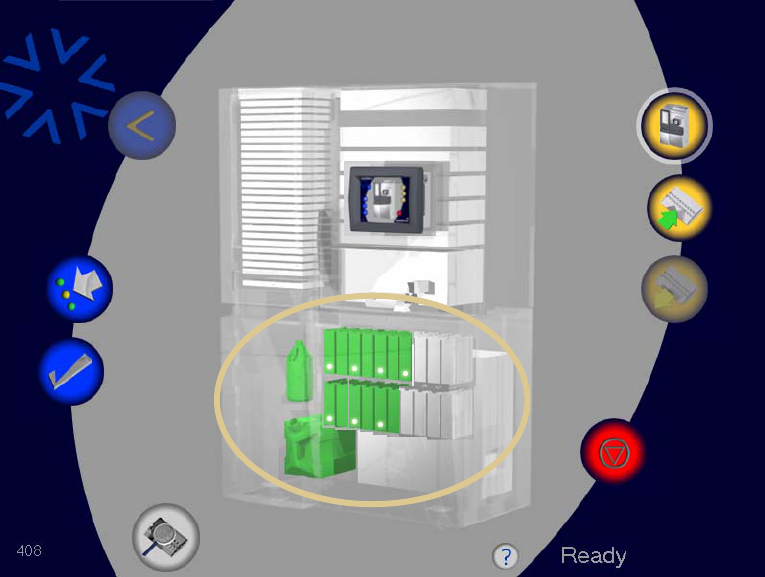
Ventana Medical Systems
SYMPHONY System Operator Manual
Page 75
Touch the Fluids region shown above to display the System/Fluid Information screen
below.
FLUIDS REGION IN STATUS VIEW SCREEN
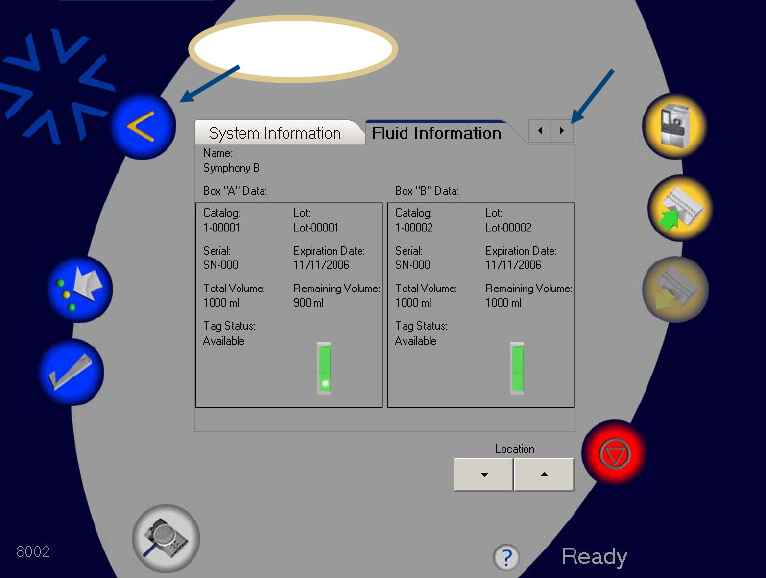
Ventana Medical Systems
SYMPHONY System Operator Manual
Page 76
SYSTEM FLUID INFORMATION SCREEN
Toggle between System Information and Fluid Information by touching the
corresponding tab or the left and right arrows.
Touch the Back icon shown above to re-display the Status View screen.
Back icon
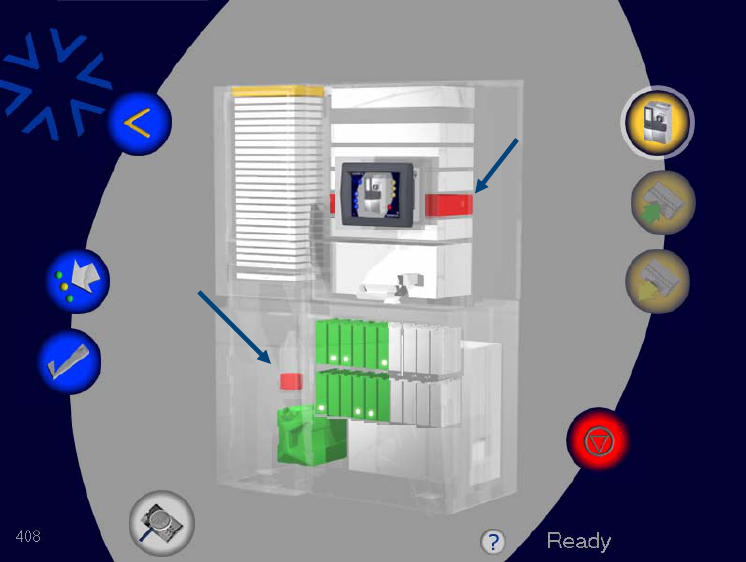
Ventana Medical Systems
SYMPHONY System Operator Manual
Page 77
Modules that are shown in red on the Status screen indicate that an error has occurred.
STATUS VIEW WITH ERRORS SCREEN
See the Troubleshooting and Recovery Procedures sections for more information.
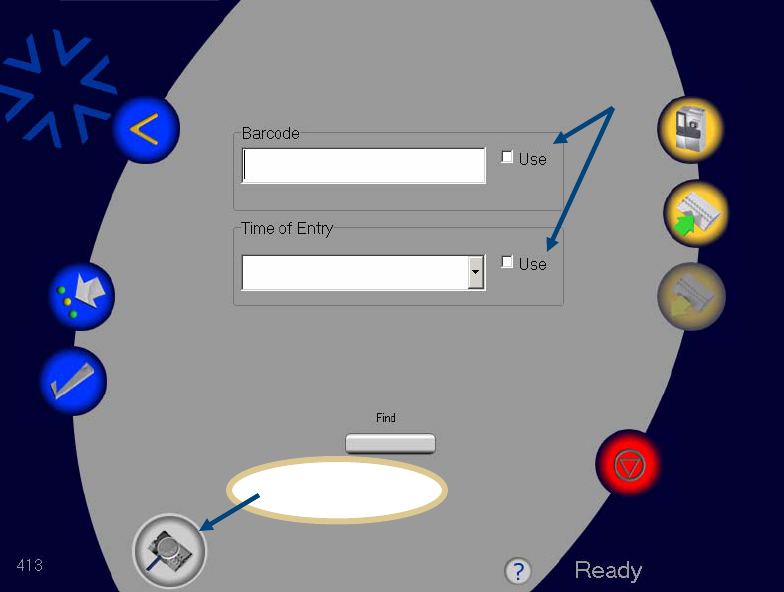
Ventana Medical Systems
SYMPHONY System Operator Manual
Page 78
FINDING A TRAY IN THE SYSTEM
To find a particular tray in the system touch the Find Tray icon shown on the screen below
to display the Find Tray screen.
There are two ways to find any tray(s) and slide(s) in the system:
FIND TRAY SCREEN
Touch the Use box in the Barcode field to activate the Barcode field and
display the virtual keyboard. On the virtual keyboard enter the barcode of the
slide of interest.
Find Tray icon
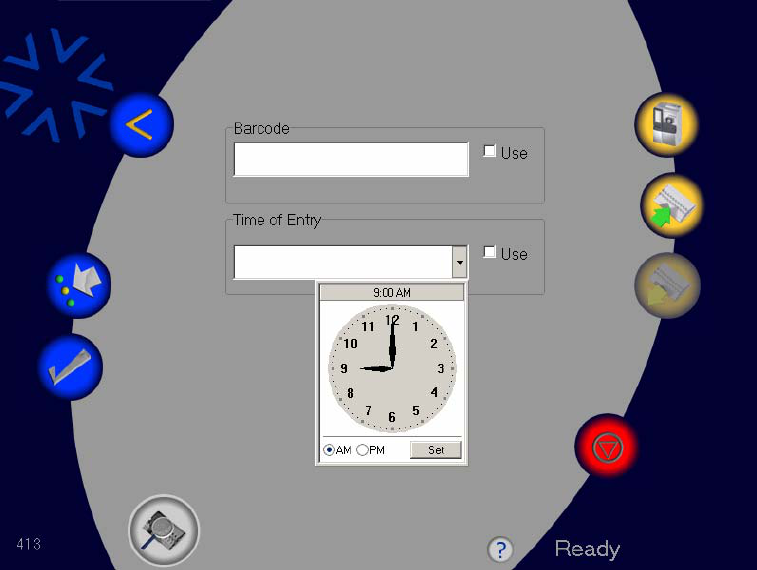
Ventana Medical Systems
SYMPHONY System Operator Manual
Page 79
Or, touch the Use box in the Time of Entry field to activate the Time of Entry field
and display the virtual clock shown below.
FIND TRAY SCREEN WITH VIRTUAL CLOCK
Choose the time that the tray was entered into the system. The system will
look for the entered time in five-minute increments.
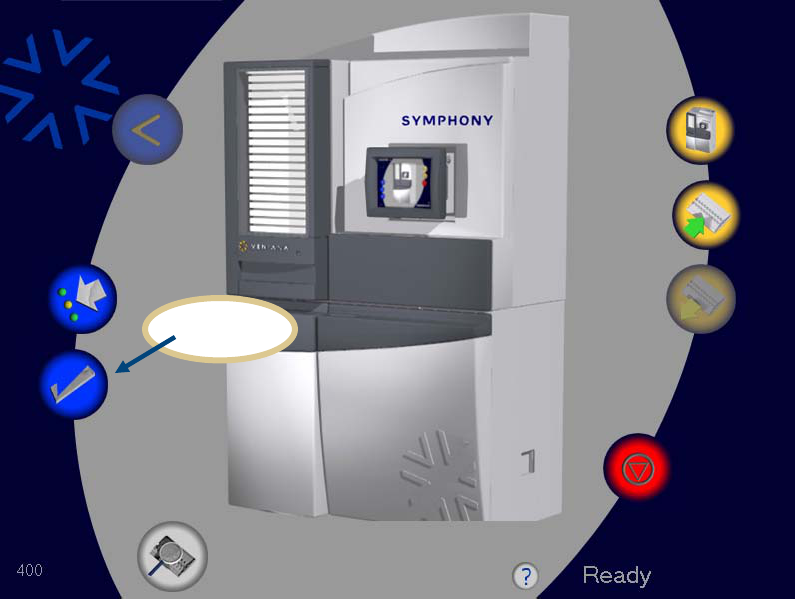
Ventana Medical Systems
SYMPHONY System Operator Manual
Page 80
QA/QC OPTIONS
Display Quality Control information by touching the QC icon shown below to display the
QC screen.
MAIN SCREEN
The QC screen has icons for displaying
Runtime log
Reports
Solutions inventory
Slide and Tray
Tray usage
Operators
Reports
QC icon
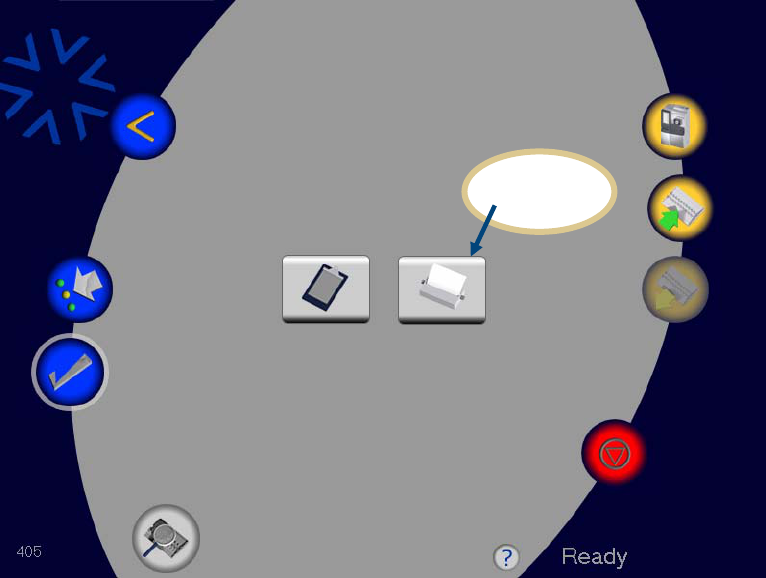
Ventana Medical Systems
SYMPHONY System Operator Manual
Page 81
Touch the Reports icon to display the Select Reports screen.
QC SCREEN
Reports
icon
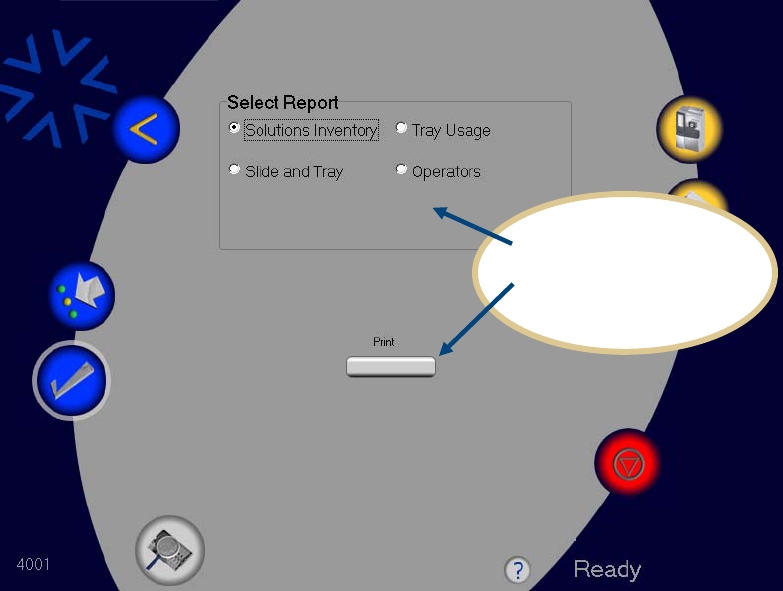
Ventana Medical Systems
SYMPHONY System Operator Manual
Page 82
Select any of the four reports shown above by touching an option in the Select Report
group box.
SELECT REPORTS SCREEN
Touch a report name
to select it, and then
touch the Print icon
to print it.
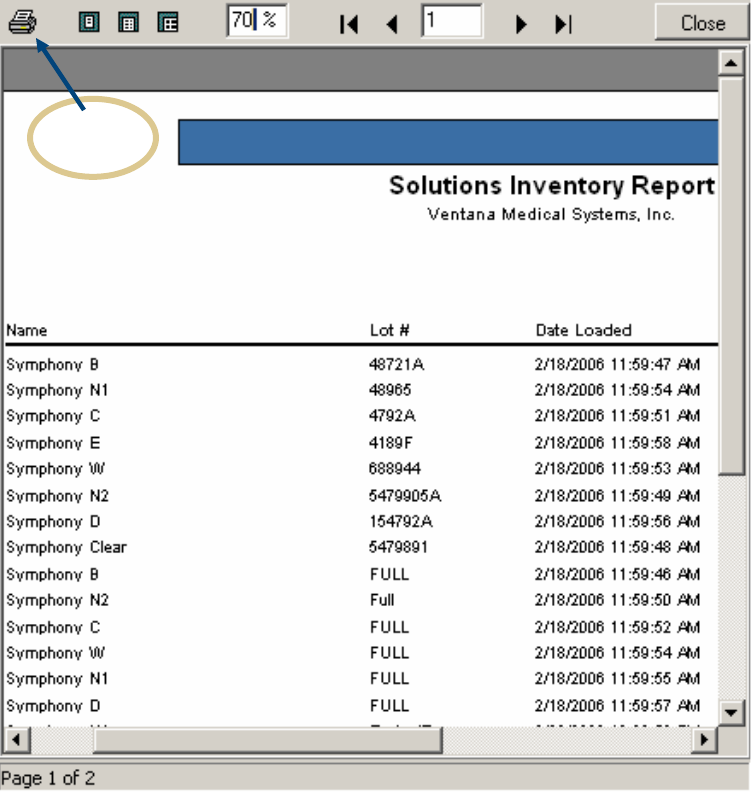
Ventana Medical Systems
SYMPHONY System Operator Manual
Page 83
On the Select Reports screen touch the Print button icon to display the report on screen as
shown in the Solutions Inventory Report example below.
SOLUTIONS INVENTORY REPORT SCREEN
Touch the Printer icon to print a hard (paper) copy of the report.
Examples of the remaining reports follow.
Printer
icon
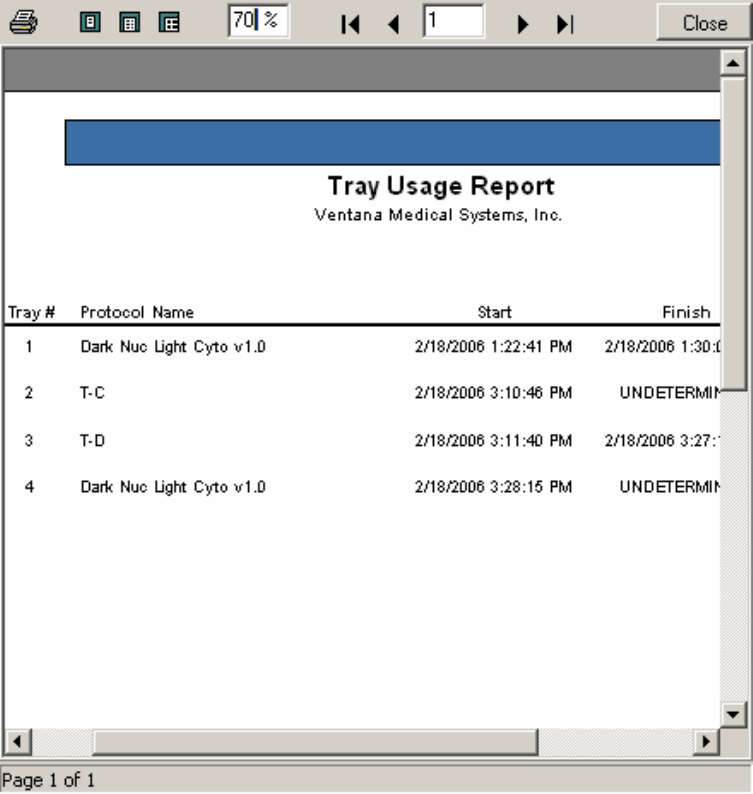
Ventana Medical Systems
SYMPHONY System Operator Manual
Page 84
TRAY USAGE REPORT SCREEN
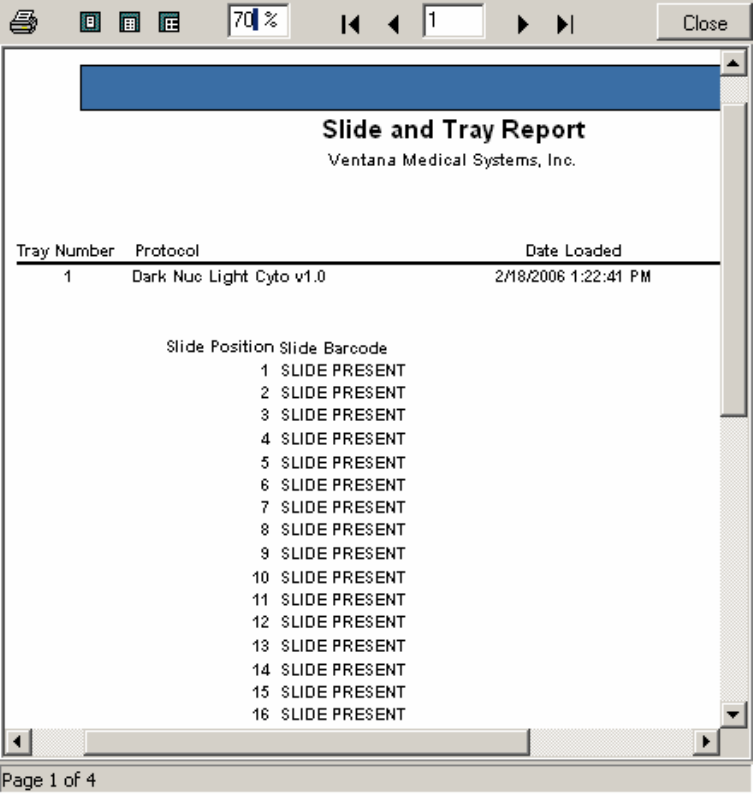
Ventana Medical Systems
SYMPHONY System Operator Manual
Page 85
SLIDE AND TRAY REPORT SCREEN

Ventana Medical Systems
SYMPHONY System Operator Manual
Page 86
OPERATORS REPORT SCREEN
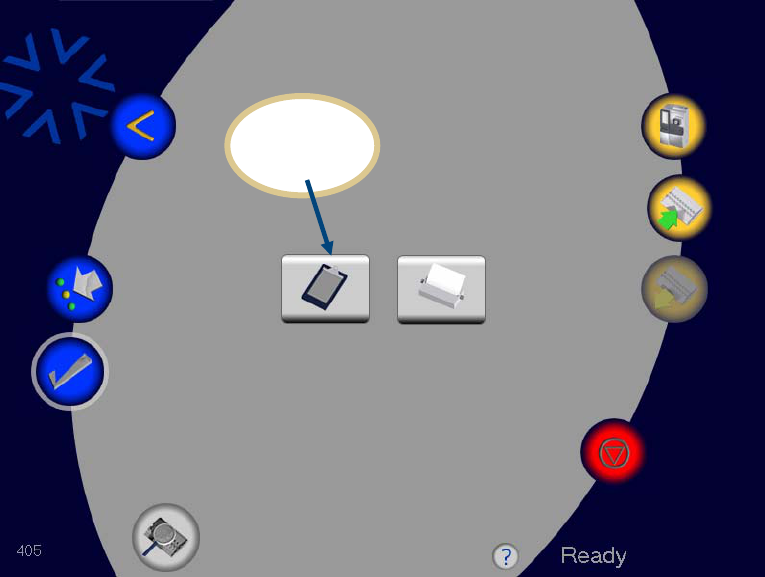
Ventana Medical Systems
SYMPHONY System Operator Manual
Page 87
LOGS
QC SCREEN
Touch the Runtime Log icon to display the Runtime Log screen shown on the page
that follows.
Runtime
Log icon
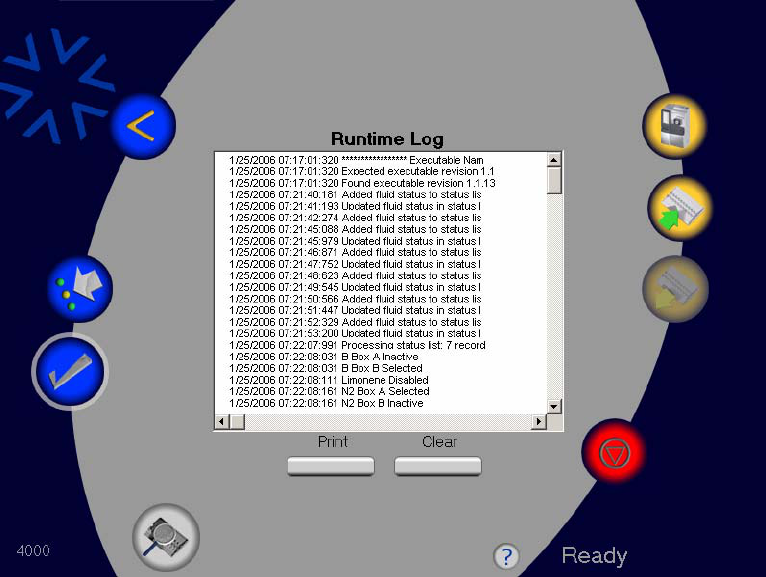
Ventana Medical Systems
SYMPHONY System Operator Manual
Page 88
RUNTIME LOG SCREEN
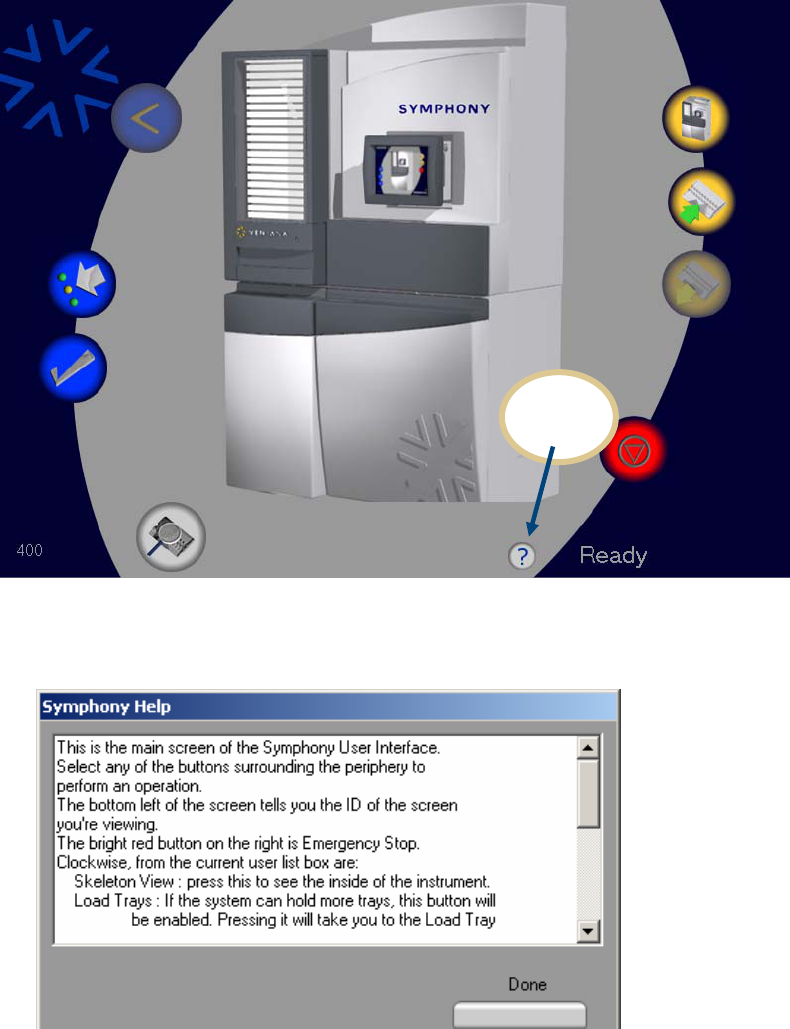
Ventana Medical Systems
SYMPHONY System Operator Manual
Page 89
ON-LINE HELP
MAIN SCREEN
Touch the Help icon to display the Help screen shown below
HELP SCREEN
Help
icon

Ventana Medical Systems
SYMPHONY System Operator Manual
Page 91
MAINTENANCE
GENERAL CLEANING
Clean the instrument cover by wiping with a damp cloth. Use a mild solution of tap water
and Dawn® liquid detergent. Periodically clean the slide trays. The trays will discolor
with use, but staining can be minimized with regular cleaning. The trays are dishwasher
safe.
Important!
Do not use detergents, solvents, or bleach on the computer Touchscreen.
DAILY MAINTENANCE
Perform the following procedures daily. Detailed instructions for these procedures follow
the table shown below.
PROCEDURE DATE TIME
INITIALS
Check the desiccant filter and replace it if necessary.
(See Desiccant Filter in this section below.)
Refill the alcohol reservoir with ethanol-based,
anhydrous, reagent grade alcohol (SDA formula 3A).
(See Filling the Alcohol Reservoir in the Instrument
Operation section.)
Set out any needed N1 or N2 solutions and let them
come to room temperature prior to use.
(See Note under Check All SYMPHONY Solutions in
this section.)
Check the fluid levels for all SYMPHONY Solutions
and replace them if necessary.
(See Check All SYMPHONY Solutions in this section.)
Remove any broken or unused OPTISURE
coverslips.
(See Removing Broken Coverslips in this section.)
Remove any empty OPTISURE cassettes.
(See Removing Empty OPTISURE Cassettes in this
section.)
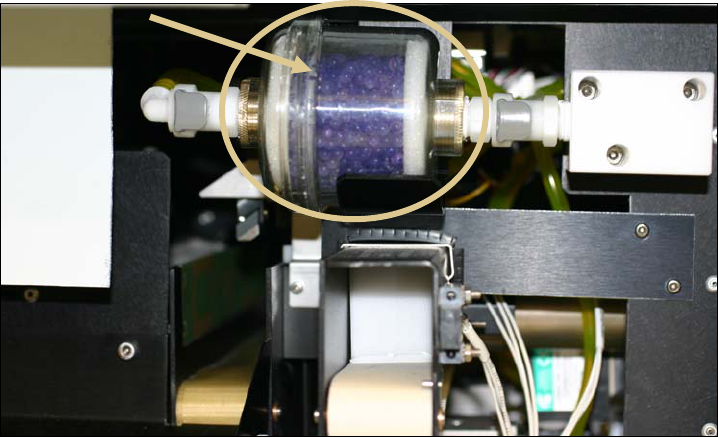
Ventana Medical Systems
SYMPHONY System Operator Manual
Page 92
DESICCANT FILTER
The desiccant filter is located on the coverslipper module directly above the OPTISURE
coverslip input area. The catalogue number for the desiccant filter is 2094800.
DESSICANT FILTER
The desiccant filter should be visually inspected on a daily basis. When the internal beads
turn from purple to pink in color the filter needs changing.
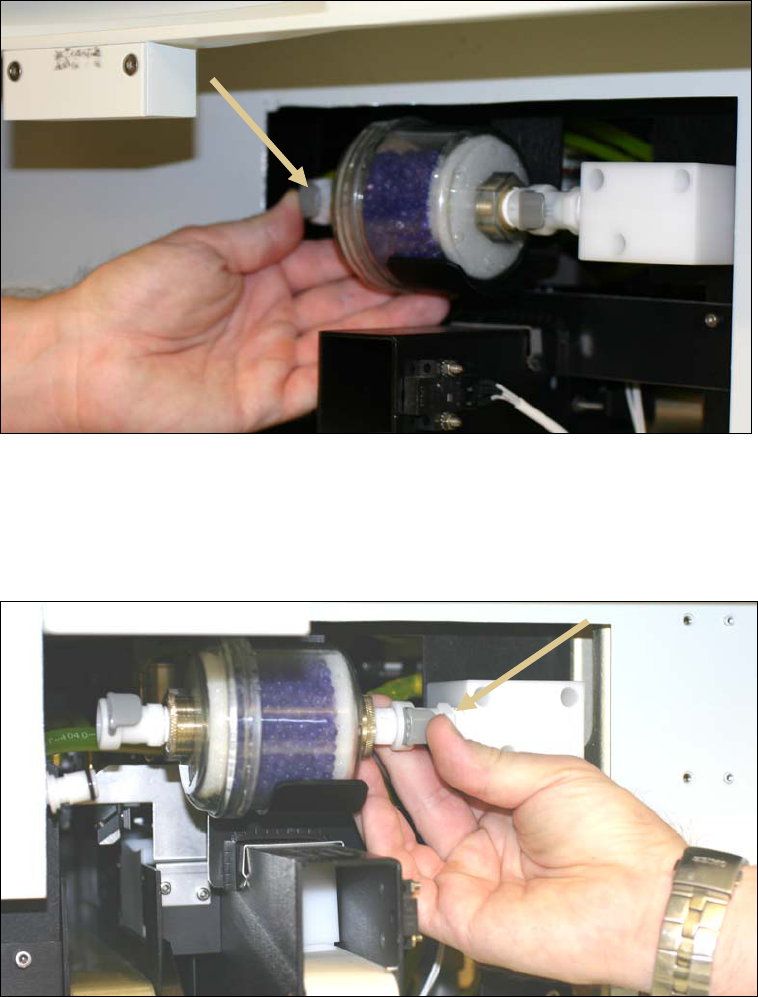
Ventana Medical Systems
SYMPHONY System Operator Manual
Page 93
To remove the used filter…
1. Disengage the cartridge’s left quick release tab (shown below by arrow),
and pull the hose’s fitting from the cartridge.
DISENGAGING THE LEFT QUICK RELEASE TAB
2. Disengage the cartridge’s right quick release tab (shown below by arrow),
and pull the cartridge to the left to remove it from the other fitting.
DISENGAGING THE RIGHT QUICK RELEASE TAB
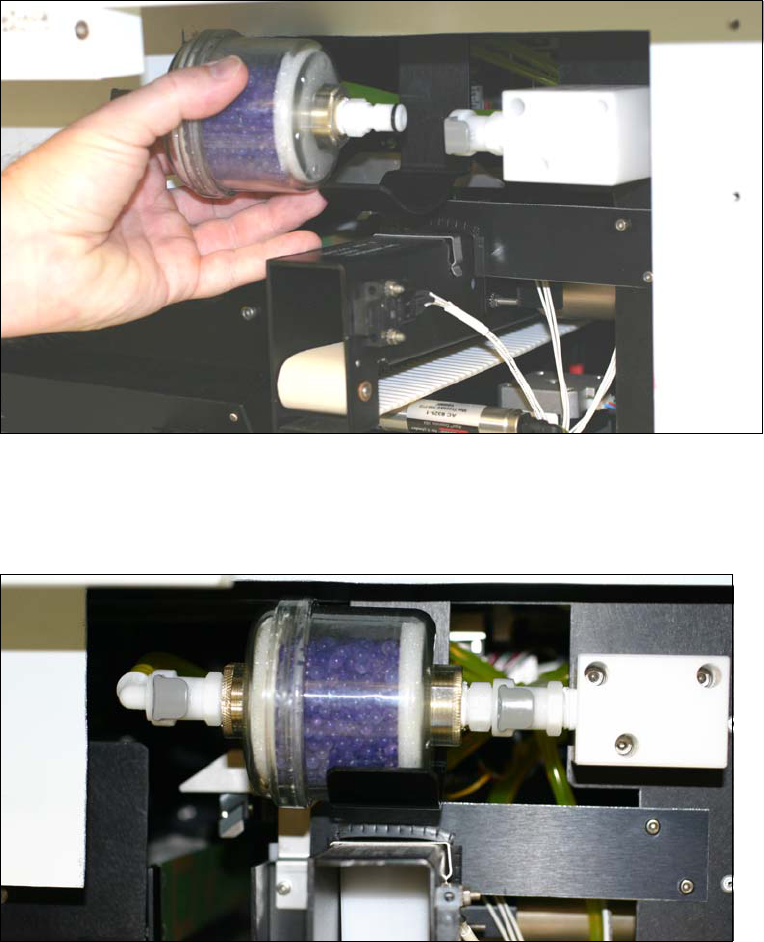
Ventana Medical Systems
SYMPHONY System Operator Manual
Page 94
3. Pull the cartridge out.
REMOVING THE CARTRIDGE
Reverse the procedure to install a new cartridge.
INSTALLING A NEW CARTRIDGE
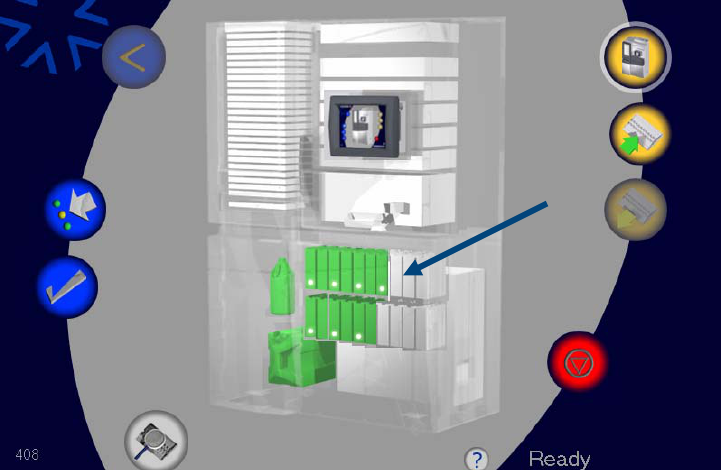
Ventana Medical Systems
SYMPHONY System Operator Manual
Page 95
CHECK ALL SYMPHONY SOLUTIONS
Check all SYMPHONY Solutions and replace them if necessary.
Important!
Set out Needed N1 or N2 Solutions and allow them to come to room temperature prior
to use.
STATUS VIEW SCREEN
In the Status View screen shown above, green reagent containers indicate
adequate amounts of reagent.
A white dot on a reagent container indicates that reagent is being drawn
from that container.
When a reagent needs replenishing, it will appear “red” on the screen.
If a reagent is low, it will appear “yellow” as a notification that the reagent
is approaching low levels (see Alarm Setup).
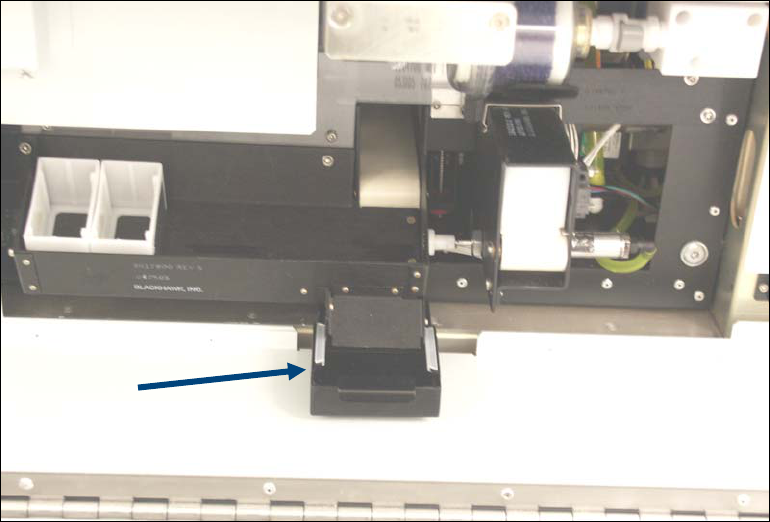
Ventana Medical Systems
SYMPHONY System Operator Manual
Page 96
REMOVING BROKEN COVERSLIPS
Daily remove the small drawer located at the base of the coverslip module adjacent to the
right side of the empty cassette tray. Dispose of broken glass according to the facility
procedures for handling broken glass.
COVERSLIP DRAWER

Ventana Medical Systems
SYMPHONY System Operator Manual
Page 97
REMOVING EMPTY OPTISURE CASSETTES
The SYMPHONY System automatically discards empty OPTISURE cassettes.
Daily remove any empty OPTISURE cassettes from the discard bin.
CASSETTE DISCARD BIN

Ventana Medical Systems
SYMPHONY System Operator Manual
Page 99
RECOVERY PROCEDURES
In the event the SYMPHONY System delivers a slide with air bubbles or other
coverslipping faults follow the procedure below to manually remove and recover the
slide. Contact Ventana if coverslipping faults are occurring often.
REMOVING A COVERSLIP
WARNING!
Use caution while performing this procedure. The glass will be hot.
To remove the coverslip…
1. Set a laboratory hot plate to a setting of at least 150° C and allow the hot
plate to warm up.
2. Place the slide on the hot plate to warm up and, with one hand, hold the
slide in place while using forceps to push the glass coverslip off.
Note:
Not more than 20 to 30 seconds should be required for the coverslip to
begin moving with ease.
3. Allow the slide to come to room temperature before placing the slide into
any solvents.
4. Place the slide into 95% ethanol for one minute with agitation.
5. Remove the slide and place it into a second jar of 95% ethanol for one
minute.
6. Place the slide through 100% ethanol for one minute, twice.
7. Place the slide in xylene or equivalent for two minutes with agitation.
8. Remove the slide and excess xylene, add a few drops of mounting medium
and slowly place a new glass coverslip on the slide without allowing
excess air bubbles to form.
9. Air dry the slide and have it re-read by the pathologist.
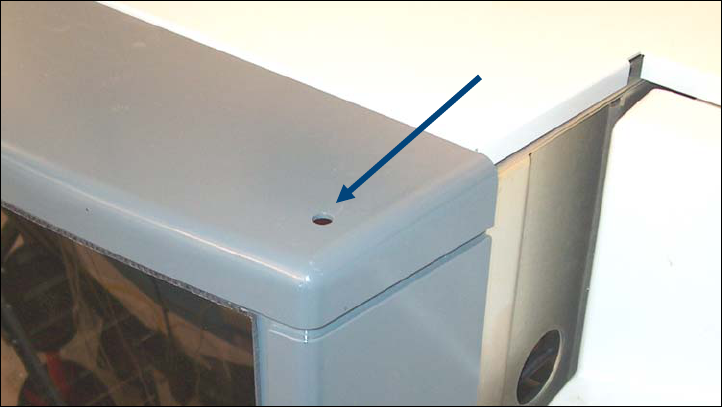
Ventana Medical Systems
SYMPHONY System Operator Manual
Page 100
REMOVING TRAYS FROM MODULES
Certain precautions are required to prevent injury to operators and damage to the
instrument when clearing jammed trays.
WARNING!
Allow slide trays in the slide drying module and in the slide curing module to cool before
removing them by hand. Do this by powering off the system and then waiting 10 minutes.
Unplug the unit from the wall socket before removing slide trays by hand.
To open the Tray Access door…
1. Open the tray access door by inserting the special tool in the hole on the
top of the door’s upper right corner shown below.
HOLE IN ACCESS DOOR
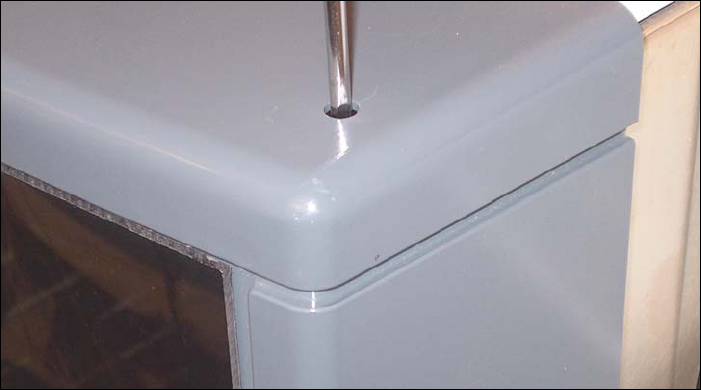
Ventana Medical Systems
SYMPHONY System Operator Manual
Page 101
2. Insert the special tool in the hole as shown below, then push the tool down
to unlatch the door.
PUSHING SPECIAL TOOL TO RELEASE LATCH
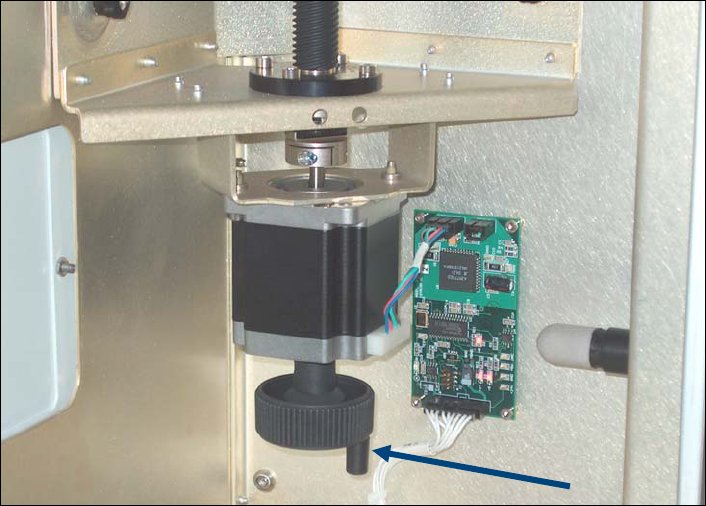
Ventana Medical Systems
SYMPHONY System Operator Manual
Page 102
MANUALLY MOVING THE ELEVATOR/TRANSPORT TABLE FOR ACCESS TO STATIONS
If the Elevator/Transport Table is blocking access to a station, turn the Elevator
Hand Crank to raise or lower the Elevator/Transport Table, preferably to the top
of the IntelliQue.
Moving the Elevator/Transport Table to the top of the IntelliQue will ensure that
its vertical cable does not block the slide tray when it is removed from the station.
ELEVATOR HAND CRANK
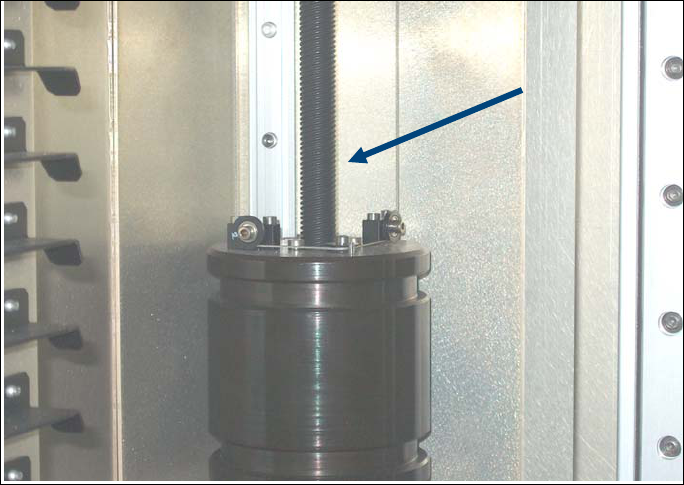
Ventana Medical Systems
SYMPHONY System Operator Manual
Page 103
If the Transport Table is blocking the Elevator Hand Crank, turn the Elevator
Lead Screw by hand.
ELEVATOR LEAD SCREW
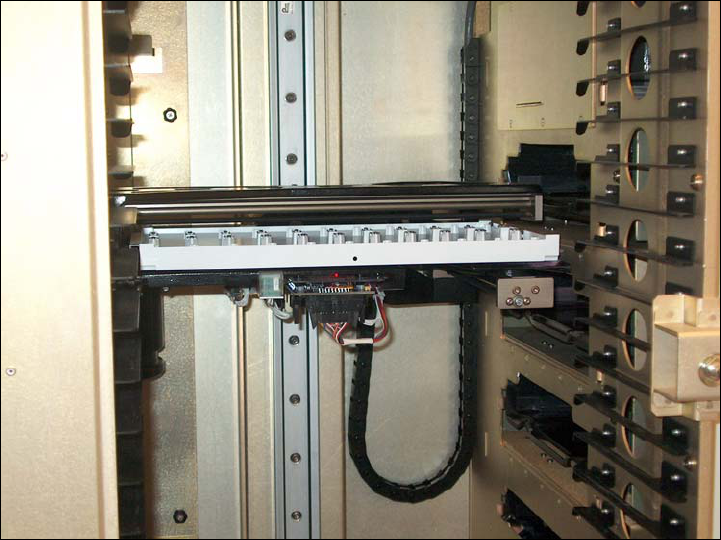
Ventana Medical Systems
SYMPHONY System Operator Manual
Page 104
REMOVING A SLIDE TRAY FROM THE TRANSPORT TABLE
In the event of a power failure, a slide tray may remain on the Transport Table.
TRAY ON TRANSPORT TABLE
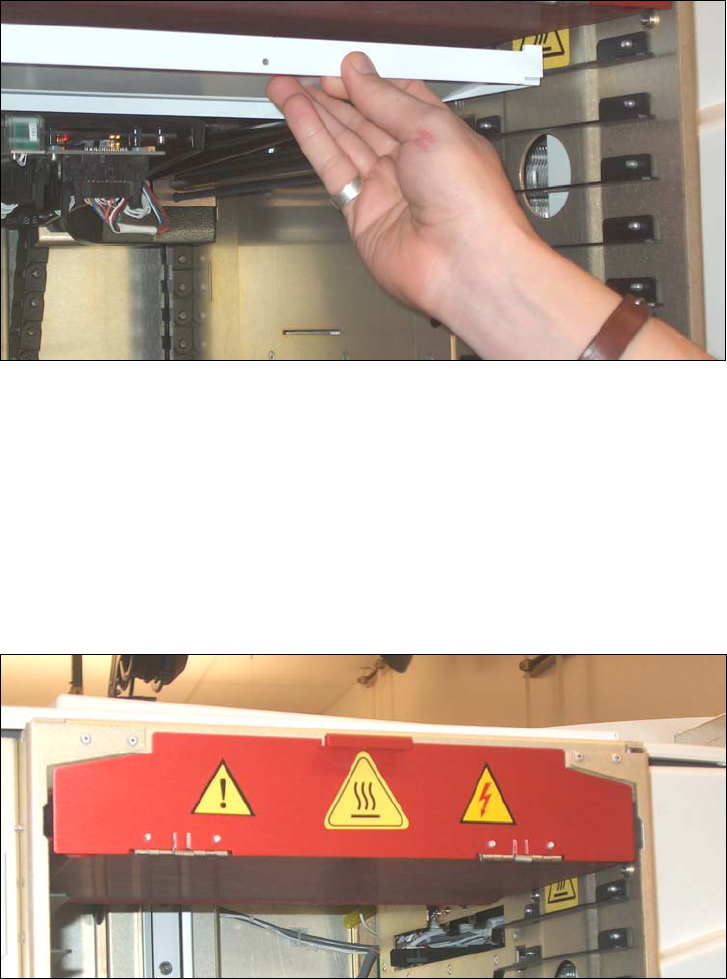
Ventana Medical Systems
SYMPHONY System Operator Manual
Page 105
Lift the slide tray off the rear hooks of the Transport Table before pulling it out.
CAUTION!
Slide trays may be hot.
LIFTING THE SLIDE TRAY OFF THE REAR HOOKS
REMOVING A SLIDE TRAY FROM THE SLIDE DRYING MODULE
WARNING!
Allow slide trays in the slide drying module and in the slide curing module to cool
before removing them by hand. Do this by powering off the system and then
waiting 10 minutes.
WARNING LABELS ON SLIDE DRYING MODULE DOOR
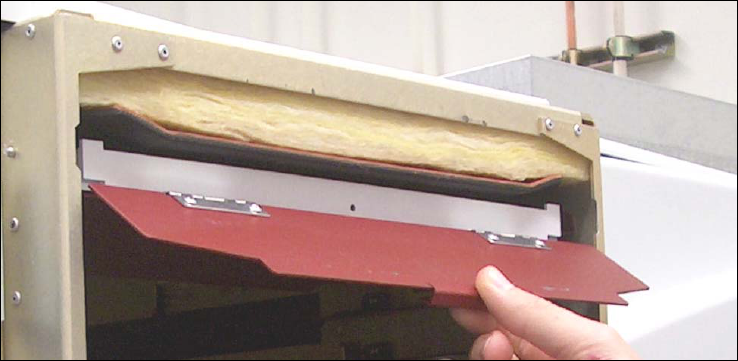
Ventana Medical Systems
SYMPHONY System Operator Manual
Page 106
After the slide tray in the Slide Drying Module has cooled, open the Slide Drying
Module door and pull out the tray.
TRAY IN SLIDE DRYING MODULE
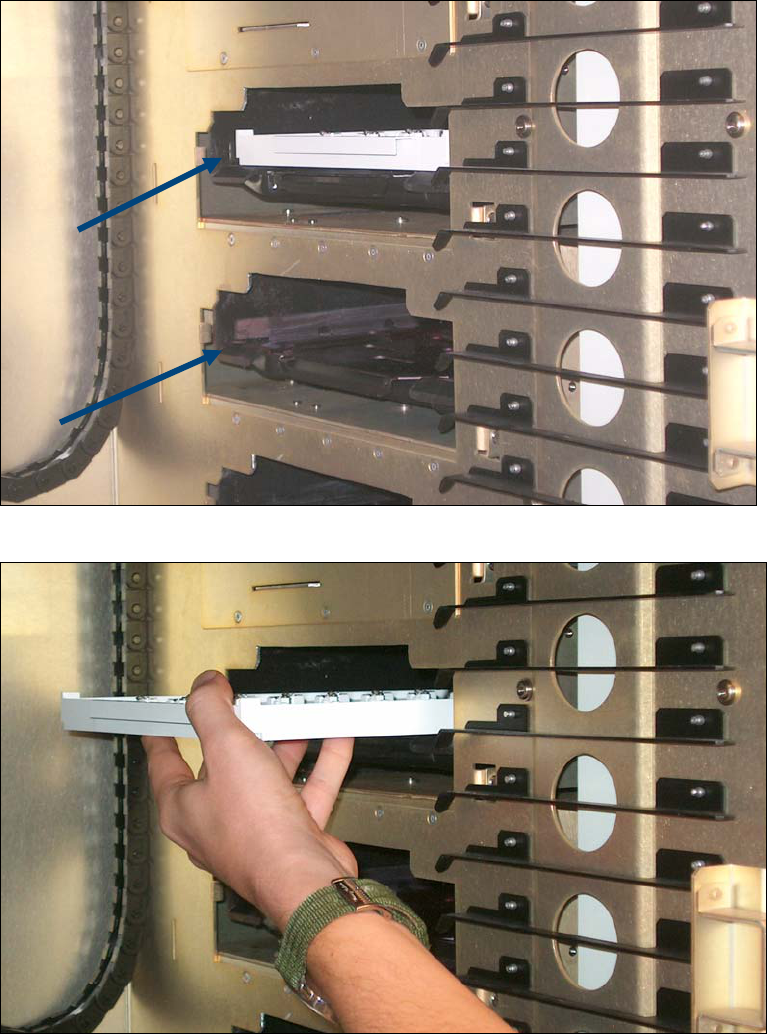
Ventana Medical Systems
SYMPHONY System Operator Manual
Page 107
REMOVING A SLIDE TRAY FROM THE STAINING MODULE
Before removing the tray, lift the black lift pan to lift the left side of the tray for
30 seconds to allow any fluid in it to drain.
TRAY IN STAINING MODULE
REMOVING DRAINED TRAY FROM STAINING MODULE
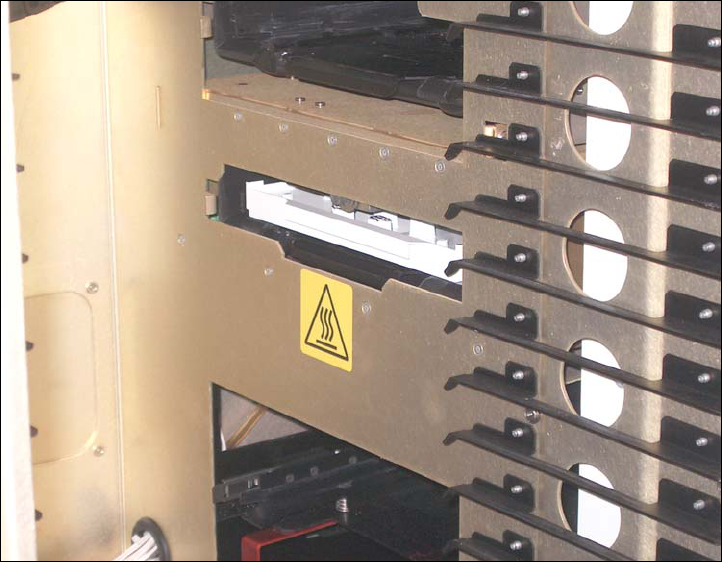
Ventana Medical Systems
SYMPHONY System Operator Manual
Page 108
REMOVING SLIDE TRAY FROM SLIDE PREP MODULE AND SLIDE CURING MODULE
WARNING!
Allow the Slide Tray in the Slide Prep and Slide Curing Modules to cool before
removing it by hand. Do this by powering off the system and then waiting 10
minutes.
After the slide tray in the Slide Curing Module has cooled, pull out the tray.
TRAY IN SLIDE CURING MODULE
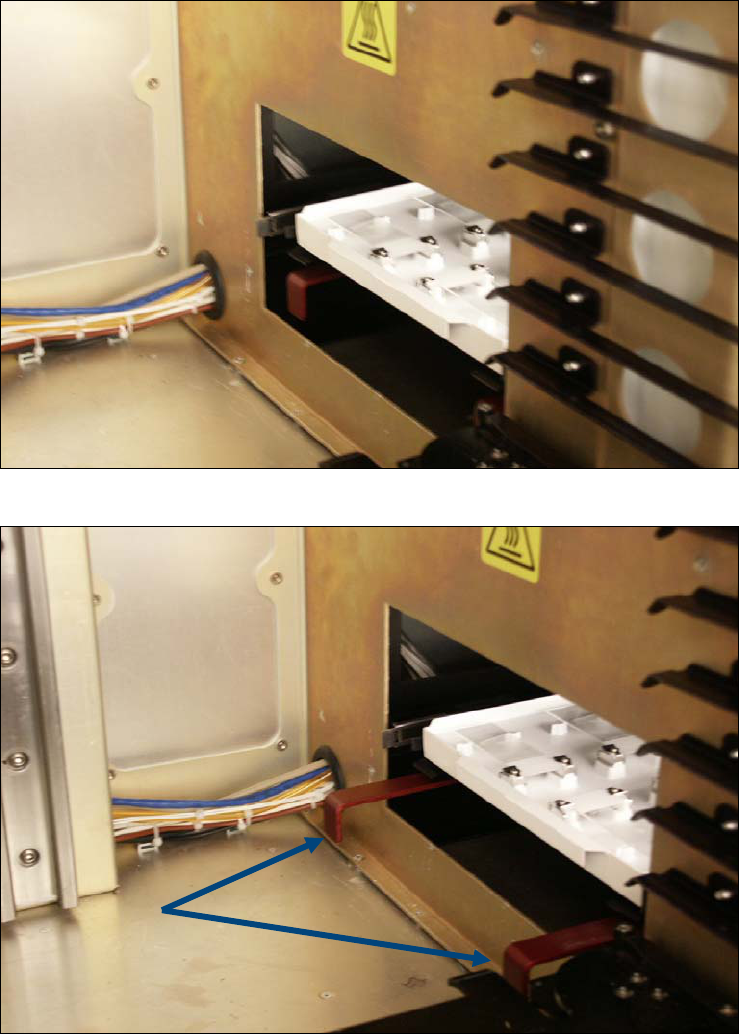
Ventana Medical Systems
SYMPHONY System Operator Manual
Page 109
REMOVING A SLIDE TRAY FROM THE COVERSLIPPER
Pull the red brackets out before removing the tray.
TRAY IN COVERSLIPPER
BRACKETS PULLED OUT BEFORE REMOVING TRAY
Important!
Return the red brackets to their original position after removing the tray.
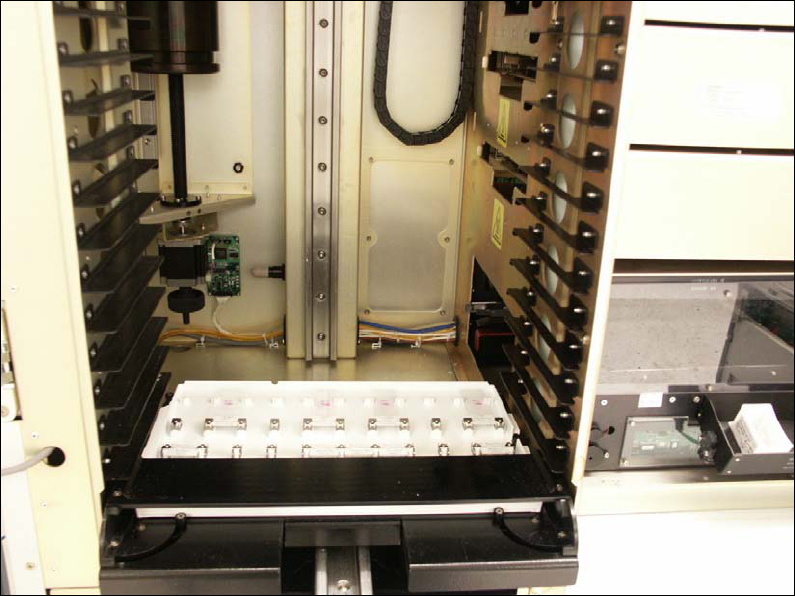
Ventana Medical Systems
SYMPHONY System Operator Manual
Page 110
REMOVING A SLIDE TRAY FROM THE PORTAL
Pull the straight out from the Portal.
TRAY IN PORTAL
Note:
In the event a complete re-installation is necessary contact Ventana Medical Systems.

Ventana Medical Systems
SYMPHONY System Operator Manual
Page 111
TROUBLESHOOTING
ERROR MESSAGES GENERATED DURING SYSTEM OPERATION
The following tables provide a comprehensive list of error messages that might display
on the SYMPHONY Touchscreen. Error messages indicate a problem with the hardware
or software.
Wherever possible, solutions are suggested that should be tried first. Check the tables
below for corrective actions that can be taken to resolve the issue. If this fails, call the
Ventana Technical Consultation Center (TCC). Before calling Ventana TCC, please
record the error number of the message that was generated.
Note:
Normal operational messages are not included in this listing, since they are self-
explanatory and do not require attention.
System Issues Without a System Error Message
Symptom Description Action
Tray Loading
Tray loaded with
wrong protocol. The tray was inadvertently loaded
with the wrong protocol.
Cancel and unload the tray.
Reload the tray with the correct
protocol.
Staining
Hematoxylin staining
too light or too dark. The tissue thickness or fixation may
require a different protocol.
Create additional protocols using
the alternative hematoxylin
options: standard, darker or
darkest.
Hematoxylin staining
too light.
Hematoxylin may have been placed
on the system cold instead of
reaching room temperature.
Ensure hematoxylin Bag-in-Box
containers are allowed to warm
to room temperature prior to
loading reagent on the system.
Eosin staining too light
or too dark. The tissue thickness or fixation may
require a different protocol.
Create additional protocols using
the alternative eosin options:
standard, lighter or lightest.
Non-staining event. The slide may have been placed in
the tray upside down. Verify tissue is on top of the
slide. If problem persists call TCC

Ventana Medical Systems
SYMPHONY System Operator Manual
Page 112
System Issues Without a System Error Message
Symptom Description Action
Inappropriate staining.
A system failure may have caused
the slides to not stain appropriately
for an H&E stain, e.g., pink blotchy
staining with little hematoxylin
staining.
Call TCC.
Tissue lifting or loss.
The tissue may be sensitive to the
system processing. The Optimized
protocol setting for tissue drying is
standard.
Create or modify the protocol
with the extended slide drying
option to improve tissue
adherence.
Reagents
The Clear bottle is
difficult to open; the
cap is very tight.
The cap is a tight fit to prevent
leakage during shipping.
Use the tool provided in the
Accessory kit to open the Clear
bottle.
When removing the
empty SYMPHONY
Clear reagent the
straw remains in the
white collar on the
system.
The straw can occasionally remain
seated in the system.
Wearing nitrile gloves pull down
on the straw with your fingers.
Discard the empty bottle and
straw.
Bag-in-box containers
have large amounts of
fluid after the system
transfers to the other
container.
The system could not detect fluid
being transferred from the Bag-in-
Box container and marked the
container as empty in the software
and on the Smart Track tag.
Call TCC for replacement Smart
Track tags.
Slide and Trays
Clips on the trays are
skewed making
loading the slides
awkward.
The clips can twist on the posts. Twist the metal clips to better
accommodate slide loading, or
call TCC.
Slides are too wide to
fit in the Universal
Slide Tray.
The tray is designed to
accommodate 1" x 3" slides. Some
slide types such as Mercedes
StarFrost and Thermo Shandon
SuperFrost may be too wide and/or
too long to fit properly due to
different tolerances.
Switch to charged or uncharged
slides of the appropriate size
(Superfrost or Superfrost Plus
from Erie).
Universal Slide Tray
jams in Portal or in
System.
Universal Slide Tray hook(s) may
have been damaged by being
dropped or hit.
Inspect Universal Slide Tray.
Remove from service if
damaged.
Note: Coating will not flake even
if metal has been bent.

Ventana Medical Systems
SYMPHONY System Operator Manual
Page 113
System Issues Without a System Error Message
Symptom Description Action
OPTISURE Coverslipper
Trays stop processing
and part of the
coverslipper on the
screen turns red.
The output queue for the OPTISURE
Cassettes is full. Remove empty cassettes from
the output queue.
OPTISURE Coverslips
are not adhered to the
slides.
Coverslips may be upside down in
the OPTISURE Cassette.
Confirm by scratching on the top
surface. If the coverslip is
upside down the glue can be
scratched off. Call TCC for a
replacement OPTISURE
Cassette.
OPTISURE Coverslips
are misaligned on the
slide or multiple
OPTISURE
CoverSlips were
applied.
OPTISURE Coverslips may be
sticking together in the OPTISURE
Cassette due to high humidity or
other conditions.
Open the OPTISURE Cassettes
immediately before use.
Recover any affected slides, if
needed, by using the Removing
Coverslip procedure.
OPTISURE Cassettes
on the output queue
still have significant
quantities of
OPTISURE Coverslips
left.
Glass shards may have prevented
full utilization of all the OPTISURE
Coverslips.
Hold the coverslips in place and
turn the OPTISURE cassette
over to discard any glass shards
or other debris. Feed the
OPTISURE Cassette through the
OPTISURE Coverslipper again
(the inventory will still be
accurate).
OPTISURE Cassettes
on the output queue
are still full of
OPTISURE
Coverslips.
The Smart Track tag may be
defective or on the wrong side of the
OPTISURE Cassette.
Call TCC for a replacement
Smart Track tag.
Computer and Touchscreen Interface
Touchscreen is hard
to use.
Selecting items on the Touchscreen
Interface can be difficult for
individuals with long fingernails or
larger fingers.
Use the stylus included in the
accessory kit for selecting items
on the Touchscreen.
Touchscreen is gray
or black when the
system is powered up.
The Touchscreen Interface may
have failed. Power cycle the system and call
TCC if the problem persists.

Ventana Medical Systems
SYMPHONY System Operator Manual
Page 114
System Issues With a System Error Message
(System stops operating and displays an error message)
Symptom Error
Msg # Description Action
Motor Error 501
A motor in the system
could not move or did
not move as far as
expected. The affected
module will be red on
the skeleton view.
Let the system finish processing any trays that
are not affected by the error. Use the
Removing Trays from Modules procedure to
recover any trays that could not finish
processing.
Trays that have not yet had fluid dispensed in
the Staining Module may be reloaded and run.
Trays that have completed the Staining
process (i.e., stained and covered with
SYMPHONY Clear) may be coverslipped
using the Coverslip (Recovery) protocol listed
in the drop down list on the Run Start Screen.
Trays that stopped processing in the middle of
the Staining process will need to be recovered
using the lab's manual processes.
Trays that have processed beyond the
Staining process may be manually
coverslipped or may be coverslipped using the
Coverslip (Recovery) protocol.
Let trays cool before handling. Call TCC.
Motor Home
Seek Error 504
A motor in the system
could not home as
expected. The affected
module will be red on
the skeleton view.
If the Staining Module produced the error,
check the slide positioning in the tray. Slides
that are not completely seated in the spring
and posts can obstruct the splash guards
inside the Staining Module. If problem
persists call TCC.
Motor Home
Failure Error 505 See Error 504. See Error 504.
Motor Move
Failure Error 506 See Error 501. See Error 501.

Ventana Medical Systems
SYMPHONY System Operator Manual
Page 115
System Issues With a System Error Message
(System stops operating and displays an error message)
Symptom Error
Msg # Description Action
Homing Failure
Error 507 The motor controlling
the elevator could not
home as expected.
Let the system finish processing any trays that
are not affected by the error. Check for any
obstructions in the elevator. Use the
Removing Trays from Modules procedure to
recover any trays that could not finish
processing.
Trays that have not yet had fluid dispensed in
the Staining Module may be reloaded and run
Trays that have completed the Staining
process (i.e. stained and covered with
SYMPHONY Clear) may be coverslipped
using the Coverslip and Cure (Recovery Only)
protocol listed in the drop down list on the Run
Start Screen.
Trays that stopped processing in the middle of
the Staining process will need to be recovered
using the lab's manual processes.
Trays that have processed beyond the
Staining process may be manually
coverslipped or may be coverslipped using the
Coverslip and Cure (Recovery Only) protocol.
Let trays cool before handling. Call TCC.
Tray Missing 601 The system has lost
track of a tray. Check for the presence of the magnet in the
tray and if absent use another tray. Call TCC.
No Slides in
Tray 604
A tray was loaded with
no slides. The system
will place the tray in the
IntelliQue.
Unload the tray. If slides are present call TCC.
Tray In
Elevator Shaft 605 See Error 601. See Error 601.
User Aborted
Tray 606 The user cancelled a
tray in process. Unload the tray.
IntelliQue Door
is Open 612 The IntelliQue door was
opened while the
system was running.
Use the procedure described for Error 501 to
remove any trays and process slides that
could not be completed. If problem persists
call TCC.
Ventana Medical Systems
SYMPHONY System Operator Manual
Page 116
POWER FAILURE
In the event of a power failure, SYMPHONY will stop processing slides. The slide trays
can be safely removed by following the procedure in the section Removing Trays from
Modules for processing by hand, or for later sending the trays to the processing stations
where they have not yet been processed.

Ventana Medical Systems
SYMPHONY System Operator Manual
Page 117
TRADEMARKS
The following are trademarks of Ventana Medical Systems, Inc., or trademarks of other
companies mentioned in this publication:
SYMPHONYTM is a trademark of Ventana Medical Systems, Inc.
IntelliQueTM is a trademark of Ventana Medical Systems, Inc.
OPTISURETM is a trademark of Ventana Medical Systems, Inc.
HDH&E® is a registered trademark of Ventana Medical Systems, Inc.
Ventana High Definition H&E TM is a trademark of Ventana Medical Systems,
Inc.
VENTANA® is a registered trademark of Ventana Medical Systems, Inc.
WINDOWS® is a registered trademark of Microsoft Corporation.

SUPPORT CONTACT INFORMATION
For system support, contact Ventana Medical Systems using the numbers below.
Ventana Medical Systems, Inc.
1910 Innovation Park Drive
Tucson, Arizona 85755
U.S.A.
Telephone
FAX
(520) 887-2155
(800) 227-2155
(520) 887-2558
Ventana Medical Systems, S.A.
Parc d’Innovation
Rue G. de Kayserberg – BP 144
F - 67404 Illkirch Cedex
France
Telephone
FAX
+33 3 90 40 52 00
+33 3 90 40 52 40
Ventana Japan K.K.
Landmark Tower, 35F
2-2-1, Minatomirai, Nishi-Ku
Yokohama, 220-8135
Japan
Telephone
FAX
81-45-228-5071
81-45-228-5070
Ventana Medical Systems, PTY Ltd.
5/39 Grand Blvd.
Montmorency, VIC 3094
Australia
Telephone
FAX
+ 61 (0)3 9431 6064
1300 139 070
(local call within
Australia)
0800-VENTANA (free
call from NZ)
+ 61 (0)3 9439 6741
Visit Ventana on the Web at www.ventanamed.com.