Venture Global DWA-800 Driveway Alert Receiver User Manual 2
Venture Global Limited Driveway Alert Receiver 2
User Manual

USER MANUAL
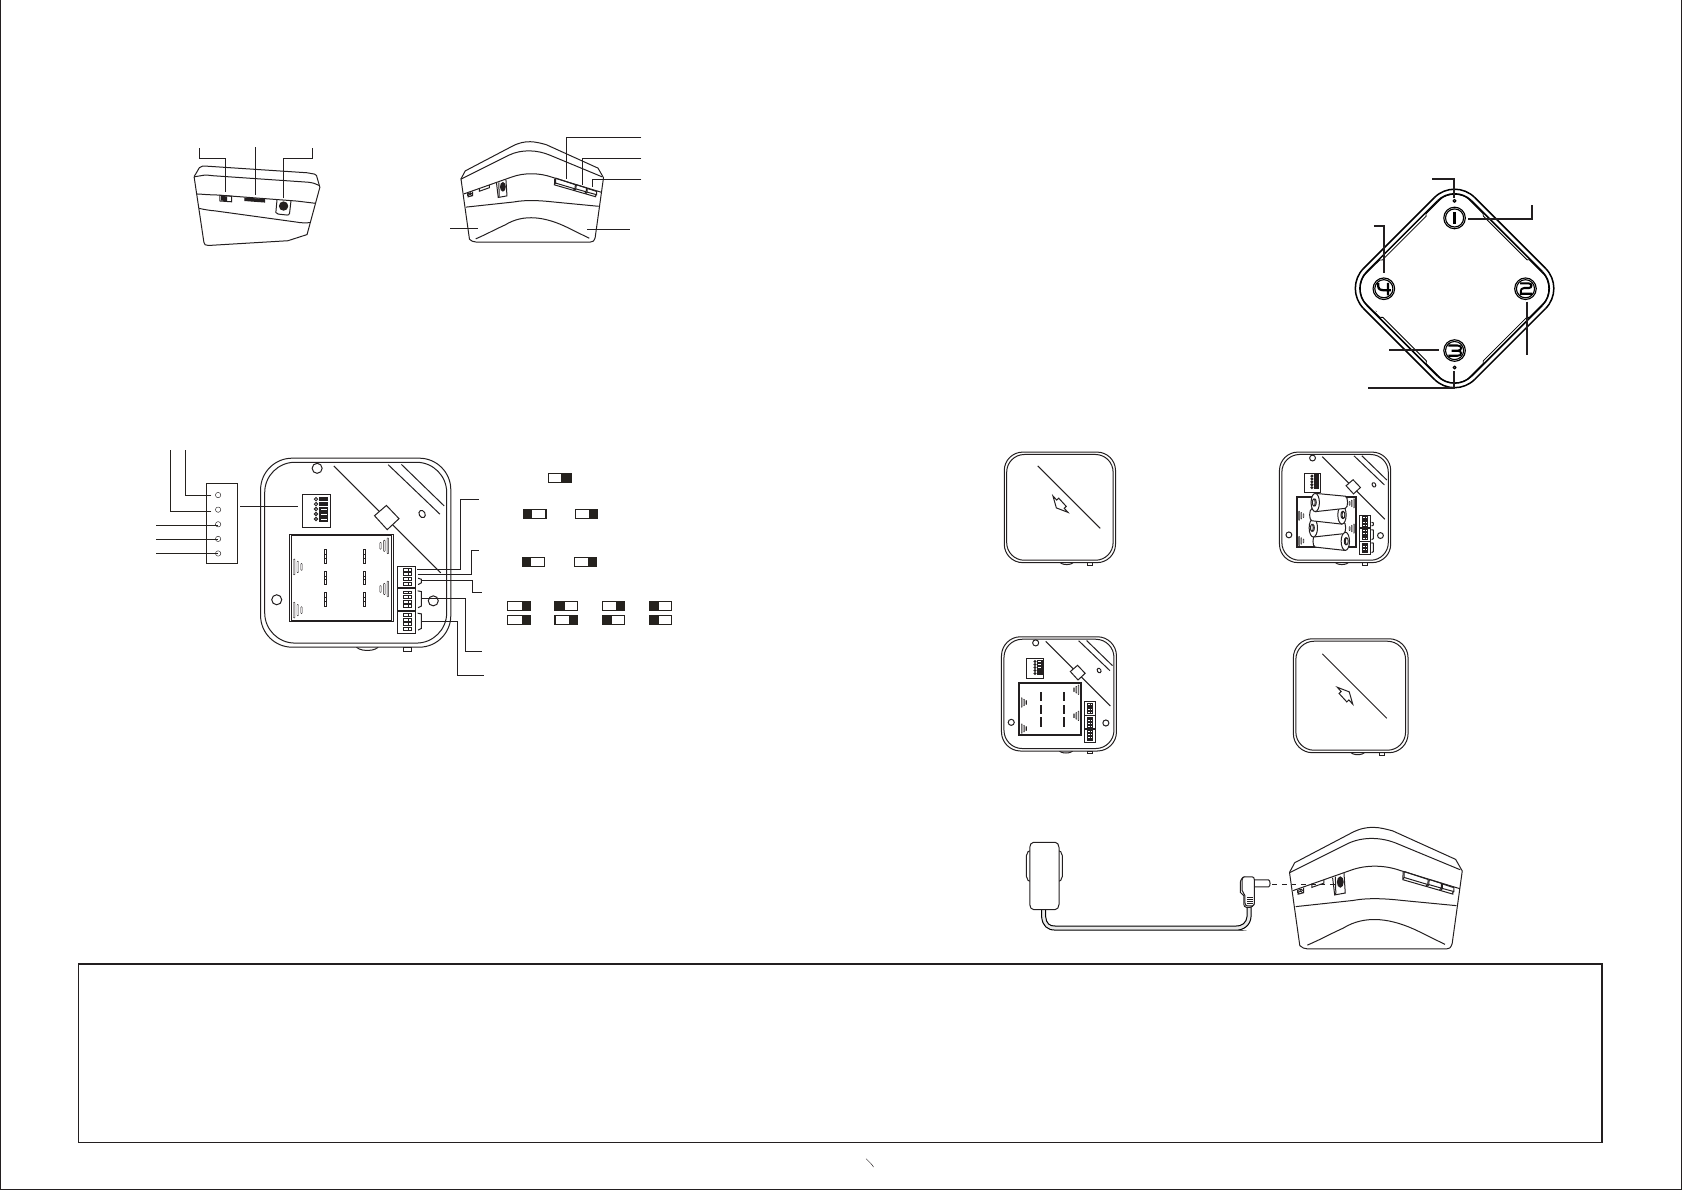
Key Function On Receiver
Power
On/Off DC jack
Volume
Indications on Receiver
* AC Power Operate: Light up blur LED while using
AC adaptor
* Back up Battery Operate: Light red LED while
operated by battery
* RX Battery Low: Flashs red LED with 0.3 sec. On /
5 sec. Off and sounds "beep" every half minute
* Remote Sensor Battery low: Flash red LED with 0.3
sec. On / 5 sec. Off and sound "beep"
AC Power on/
RX Batt. Low #1 Zone/ Sensor
#2 Zone/ Sensor
#3 Zone/ Sensor
Remote sensor
battery low
#4 Zone/
Learn/Next
Melody/Batt.Chk
Pause/Reset
Cable come out
from Relay
Battery Cover
Power on/off : To switch on or switch off the receiver using this switch.
Volume: To adjust the volume level by rotating volume
DC jack: The AC/DC adaptor plug to this jack
Pause/Reset: Pause - Temporarily stop the receiver bypress and hold this button 3 sec.
Reset - Clear the sound and light on the receiver by press this button once
Melody / Batt. chk: See the chapter of learn and Check which sensor in battery low
Learn/Next: See the chapter of learn and Check which sensor in battery low
Bottom on Receiver
Remove the battery cover for setting the connection / time delay.
12V out
NO
NC
COM
+ -
Pause Time Setting
Pause mode
12V output control
1 S 5 S 10 S 60 S
Delay time setting
NO/NC control
30 min
US
60 min
Off On
EU
A
B
C
D
E
F
A Output terminal: Connect to the device that you wanted control, such as Gate opener, Door
release or external alarm speaker .....
--- : this terminal output 12v 300mA when the select zone has been 12V out
trigger. (This terminal can not output 12V when using the backup battery.)
This output cooperate with "E". you can select which zone relayed to this
output by slide the DIP witch 1,2,3,4 on or off.
--- NO (Normal Open): this terminal output short circuit when the select zone
has been trigger.
--- NC (Normal Close): this terminal output open circuit when the select zone
has been trigger.
The NO and NS outputs cooperate with "F". you can select which zone
relayed to these output by slide the DIP witch 1,2,3,4 on or off.
B. Pause timer setting: Select the pause time 30 min or 60 min
C. Pause mode: EU mode: auto turn on when the pause time is over.
US mode: the receiver generat a beep tone when the pause time is over.
D. Delay time setting: These switch adjust the output time of the output terminal.
E. 12V output control: To choose which zone connect to the 12V output.
F. NC/NO output control: To choose which zone connect to NO/NC output.
Power & Setting
AA
AA
AA
Install the 4 AAA batteries
into the battery compartment
as the indication on the
compartment
Although this receiver operate with AC/DC adaptor, we still need to install battery for backup.
AA
Slide to open the battery cover
Replace the battery cover
Adjust the dip switch as you need and
Connect the wire to the device that you
want to control
The main power of this unit is 12V/500mA AC/DC adaptor
FCC Statement:
This equipment has been tested and found to comply with the limits for a Class B digital device, pursuant to part 15 of the FCC Rules. These limits are designed to provide reasonable protection against harmful interference in a residential
installation. This equipment generates, uses and can radiate radio frequency energy and, if not installed and used in accordance with the instructions, may cause harmful interference to radio communications.
However, there is no guarantee that interference will not occur in a particular installation. If this equipment does cause harmful interference to radio or television reception, which can be determined by turning the equipment off and on, the
user is encouraged to try to correct the interference by one or more of the following measures:
* Reorient or relocate the receiving antenna.
* Increase the separation between the equipment and receiver.
* Connect the equipment to an outlet on a circuit different from that to which the receiver is connected.
This device complies with part 15 of the FCC rules. Operation is subject to the following two conditions: (1) This device may not cause harmful interference, and (2) this device must accept any interference received, including interference
that may cause undesired operation.
Note: Modifications to this product will void the user's authority to operate this equipment.
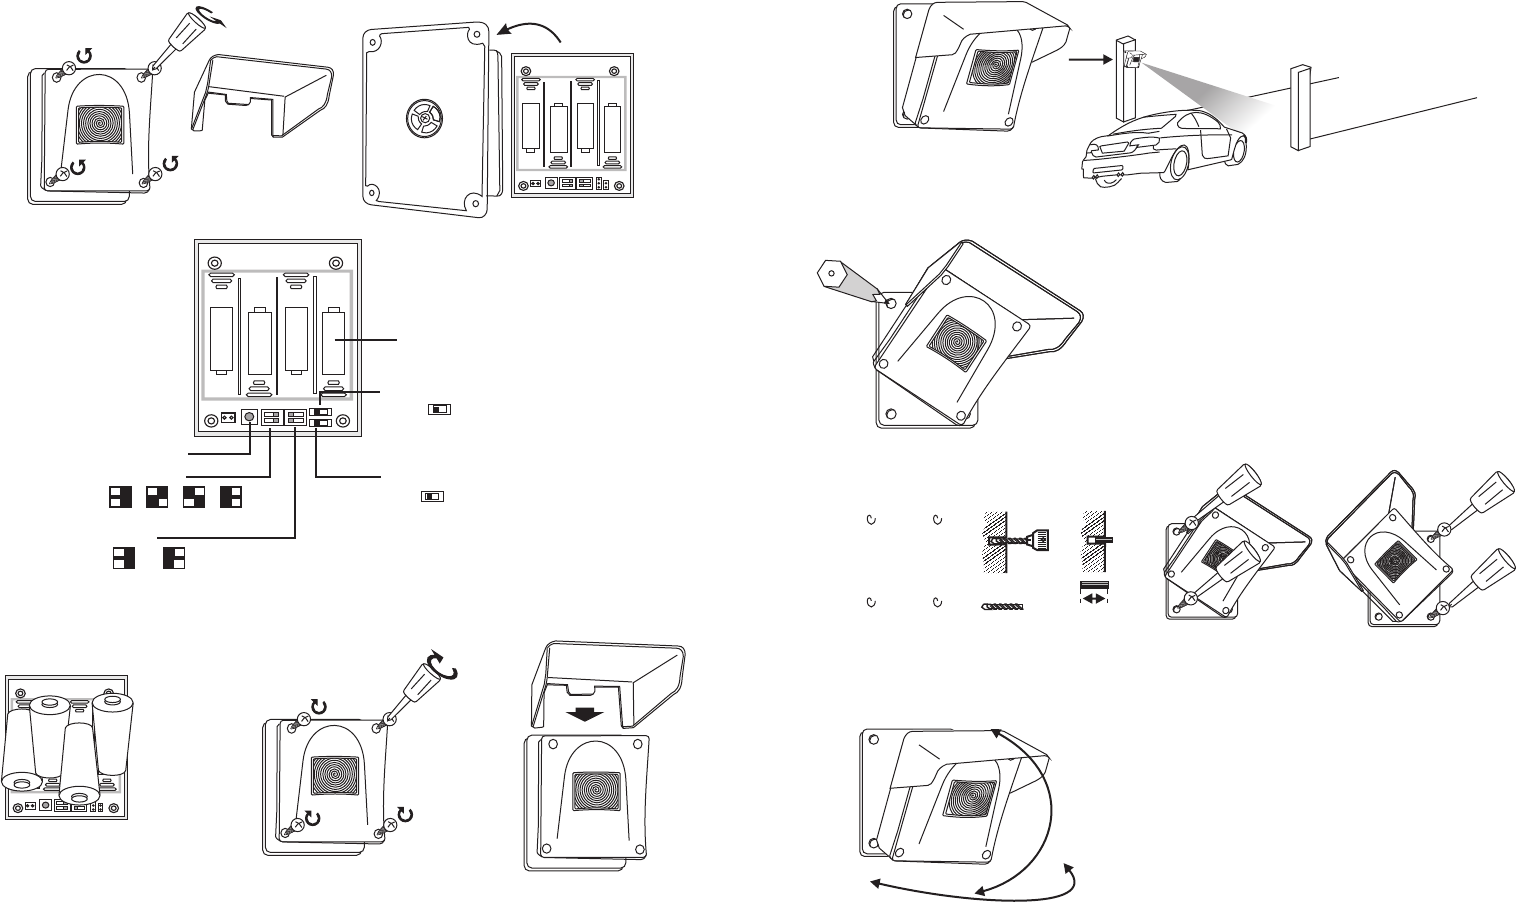
Sensor

Switch inside the transmitter
Sensitivity
Filter
Photo sensor On/Off
Test Button
12m
1-2m/sec 0.5-1m/sec
8m 7m 4m
7 sec 30 sec
After detect an intrude the sensor will
sleep 7 seconds or 30 seconds.
Battery Installation
Interval Timer
Battery compartment
AA
AA
AA
AA
Install the 4 AA batteries
into the battery compartment
as the indication on the
compartment
Replace the cover and l
ock screw Replace the sun blocker
Installation
Mount the transmitter on the wall 1.5m from the ground and slightly toward the ground and
point to the target sensing area.
Mark the 4 hole on the wall using a pencil.
o
/ 7mm 25mm
Requires an electric drill for holes to fix the Sensor with the provided ram plug and screws.
Adjust the sensor to make a good operation angle
Remove the screw from the top cabinet.
OnOff

AC Power on (Blue)/
RX Batt. Low (Red)
Remote sensor
battery low
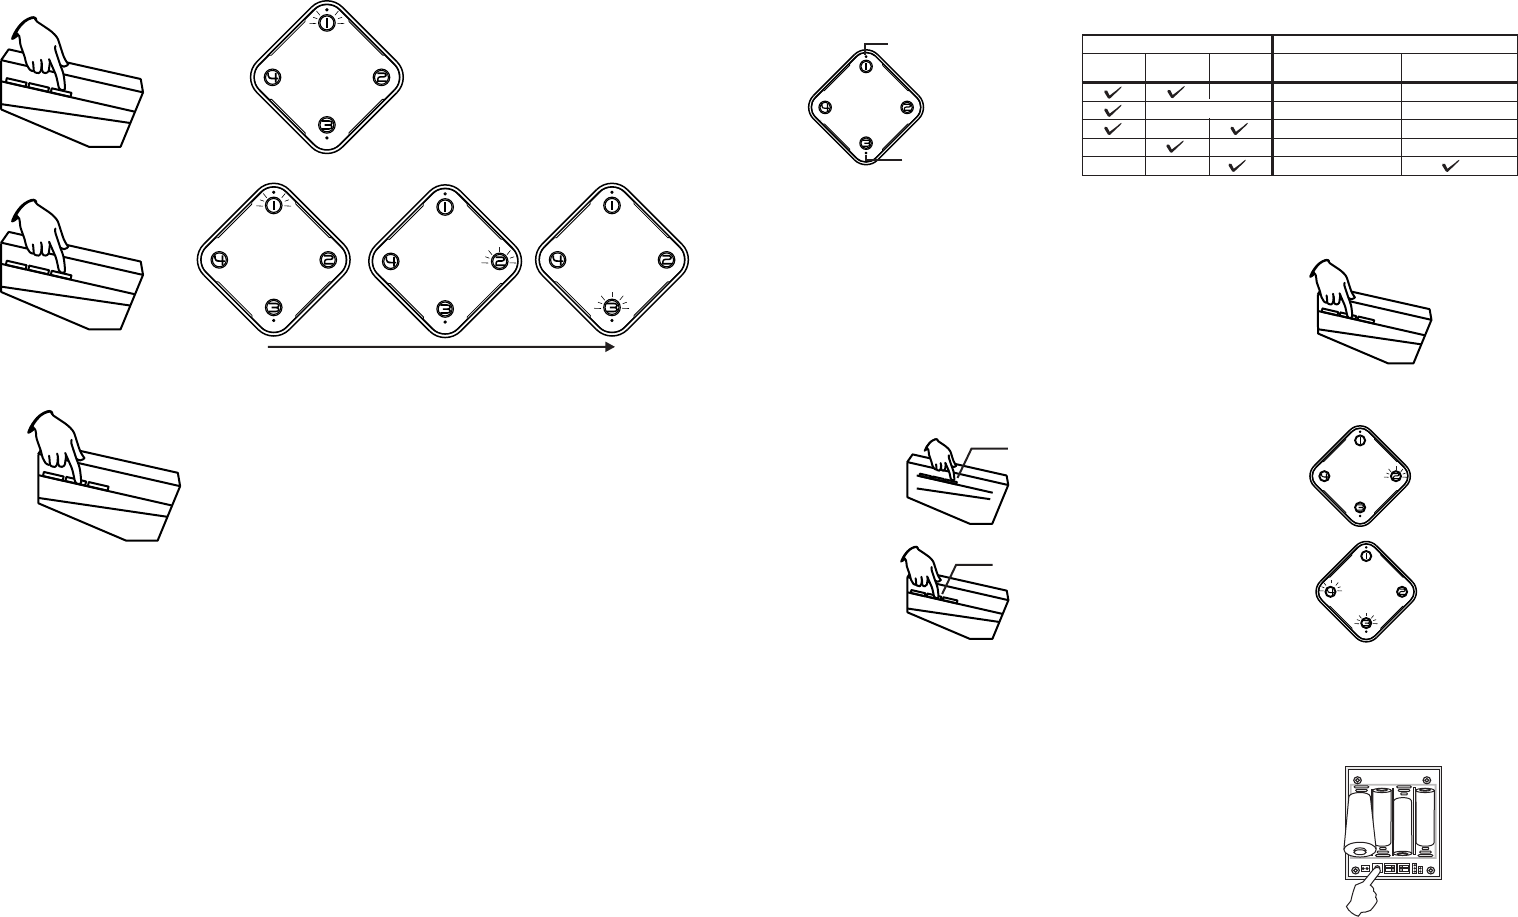
Learn (Pairing with remote sensor)
1. Press "learn" button and hold 3 second to entering to "learn mode"
2. Press "learn" button to select the preferred zone
3. After select the zone then press "melody" button to select the preferred melody for the sensor
going to be paired
4. Trigger the sensor which going to be paired.
* Sounds "Beep" whiled sussfully
* If the Sensor paired with other Zone: there will not sound and show the Zone paired with
the sensor for 3 sec., Then goes back to the selected Zone.
* If all the space were occupied. 1,2,3,4 zone's LED flash 3 time.
Melody select sequence
Melody#1 >> Melody#2>> ....>>Melody#32 >> Melody#1
How to Pause the system
Clean all the sensor in a zone
1. Press "Learn: button and hold 3 second to enter "learn mode"
2. Press "next button" to select which zone going to unpair the sensors.
3. Press "Pause/Reset" button for 3 sec. To unpair all the sensors in the zone.
4. Press "Next button" untill exit the mode.
Check which sensor in battery low
Battery low
1. Press "Battery Check" button and hold 3 second to entering to
2. Press "Next button" button to switch between the zones, light up Zone 1 first,
Press again the "Next button" to switch zone 2 > zone 3 > zone4
If going to chk, zone 2.
Press 2 time "next button"
make the LED stop at Zone2
Press and hold "battery chk" button
The LED 1,2,3,4 will show which
sensor/sensors are battery low.
* Release "battery chk" button and press "Next" to check next zone.
* zone 1 >> zone 2 >> zone 3 >> zone 4 >> exit the battery mode
How to clearn the battery low signal
BATT. LOW alert will not off until replace the battery.
Code Conflict
If the PIR sensor coding is the same as another transmitter you must
change the code. When you have changed the code, you need to re-
pair the PIR sensor.
AA
AA
AA
AA
Press and hold the test button, insert
the battery and hold the button 5
seconds. The LED will flash 5 time
when a new code is generated
2. Press "Pause" button and hold 3 second and release while the four zone LED lit.
3. The four zone LED will lit up in succession to indicate the receiver is in pause mode.
4. Press the pause button again to exit the pause mode.
The receiver will not receive any signal while the receiver is in pause mode
Pause mode: EU mode: auto turn on (Exit the pause mode) when the pause time is over.
US mode: the receiver generat a beep tone when the pause time is over.
Press the pause button to exit the pause mode
If you want to disable the system Temporary:
1. Choose the pause time (30 or 60 minutes)
"check mode". The sensor battery low LED will light up after
enter the battery check mode.
Receiver
Sensors
The " RX Batt. Low" LED (Red) will blink every 5 second and beep every 15 minute
to indicate the backup batter low or no battery installed
The " Remote sensor battery Low" LED will blink every 5 second and beep every 30 minute
to indicates sensor(s) batter low.
BatteryLowIndication
Power Indication
ACPower Battery
Normal
Battery
Low LED Indication Beepsound every
30 minutes
Blue
Red
Blue + Red Flash
Blue + Red Flash
Red Flash
NoBatteryinstalled