Venture Global SPX1000 Wireless Sensor Pad Transmitter User Manual 1
Venture Global Limited Wireless Sensor Pad Transmitter 1
User Manual

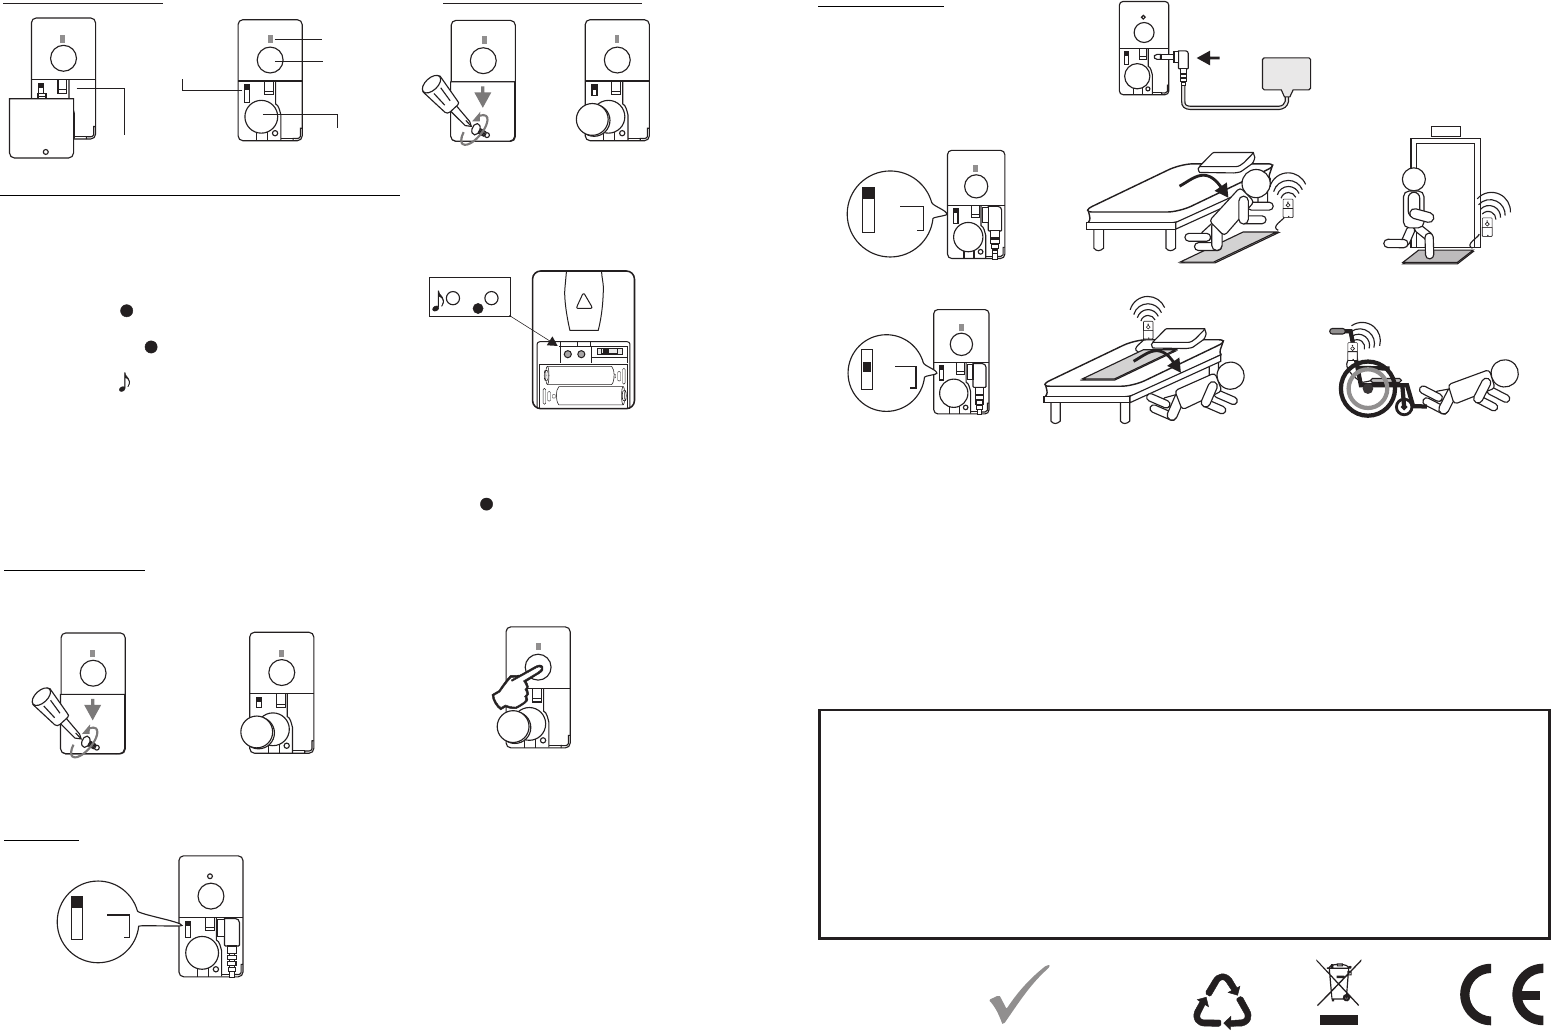
Part & Function Battery installation
Mono jack for
External sensor
Battery
compartment * Unlock the screw
* Slide to open the
cover
Insert a CR2032
Battery "+" face up
Mode Switch
for bed pad
or Fall Mat
Code Conflict
Setting
If the sensor pad l transmitter coding is the same as another transmitter you must change
the code. When you have changed the code re-pair the sensor pad transmitter.
Open the cover Remove the battery
Press and hold the test button, insert
the battery whilst holding the button
for 5 seconds. The LED will flash 5 times
when a new code is generated
USER MANUAL
Step 1: Insert battery to the transmitter to be used (Sensor Pad Transmitter).
Step 2: Insert batteries to the pager
Step 3: Enter pairing mode for
receiver (pager unit).
Press and hold the zone select
button for 3 seconds.
The LED #1 will flash.
Step 4: Press the button again to move to
the zone you wish to pair with.
Press melody selector to scroll
through the melodies. Once you hear
your preferred melody, do not press
again as it is now selected.
Step 5: Once the zone and melody are selected with the zone icon flashing, trigger
the transmitter by pressing the test button once to pair. If successful, the
receiver (pager) will generate a short tone. Press the button to exit
pairing mode, the system is ready to use.
CODE PAIRING & MELODY SELECTION
OPERATION
Pad
Connection
Mat
when the patient left the mat, the transmitter will send an alert signal to the receiver.
Pad Delay Mode
To prevent false trigger. you can slide the mode switch to Pad+3S or Pad + 10min position.
When the sensor is triggered, The delay timer will start..When timer is over, the sensor will send
the alert signal to ring the receiver .
Press the Call/Test button once can stop the timer after trigger. That mean the sensor will return
to standby mode and do not ring the receiver.
** The sensor pad transmitter can be connected to other type of sensor such as a switch.
The transmitter will send out the alert signal to the receiver, when some step on (fall on) the mat
1. open the battery cover
2. Connect the pressure
pad to the transmitter
3. close the battery cover
FCC Statement:
This equipment has been tested and found to comply with the limits for a Class B digital device, pursuant to part 15 of the FCC
Rules. These limits are designed to provide reasonable protection against harmful interference in a residential installation. This
equipment generates, uses and can radiate radio frequency energy and, if not installed and used in accordance with the
instructions, may cause harmful interference to radio communications.
However, there is no guarantee that interference will not occur in a particular installation. If this equipment does cause harmful
interference to radio or television reception, which can be determined by turning the equipment off and on, the user is
encouraged to try to correct the interference by one or more of the following measures:
* Reorient or relocate the receiving antenna.
* Increase the separation between the equipment and receiver.
* Connect the equipment to an outlet on a circuit different from that to which the receiver is connected.
This device complies with part 15 of the FCC rules. Operation is subject to the following two conditions: (1) This device may not
cause harmful interference, and (2) this device must accept any interference received, including interference that may cause
undesired operation.
Note: Modifications to this product will void the user's authority to operate this equipment.
EXIT
SPX-1000
+
+
+
+
+
+
+
+
Open the battery cover and slide the switch to pad or mat position
Mat: for fall mat (normal open)
Pad: for Bed pad or chair pad (normal close)
+3S: Pad mode with 3 seconds delay
+10min: Pad mode with 10 minutes delay.
o 2.5 mono plug
/
Mat
Mat
Mat
Pad
Pad
Pad
+3S
+3S
+3S
+10min
+10min
+10min
Call/Test
button
Temporarily cancel the CALL function
Press and hold the Call/Test button for 6 seconds, the LED will blink 4 time to indicate the call
function is cancelled. To recall the call function press and hold Call/Test button 6 seconds
again, the LED will blink 2 time to indicate the call function is recalled.
Replace the batteries will recall the test function.
LED
RoHS
20 02/ 9 5/E C