Verifone Mx800 Users Manual Series Installation Guide
MX800 to the manual 37ad62d9-e21d-4cf1-ba06-14e08194e654
2015-02-03
: Verifone Verifone-Mx800-Users-Manual-469710 verifone-mx800-users-manual-469710 verifone pdf
Open the PDF directly: View PDF ![]() .
.
Page Count: 40
MX800 Series
Installation Guide

MX800 SERIES INSTALLATION GUIDE

MX800 SERIES INSTALLATION GUIDE
MX800 Series Installation Guide
Part Number 23752, Revision C
April 25, 2008
VeriFone®, Inc.
2099 Gateway Place
Suite 600
San Jose, CA 95110
Telephone: 408-232-7800
http://www.verifone.com
Printed in the United States of America.
© 2008 by VeriFone, Inc.
No part of this publication covered by the copyrights herein may be reproduced or copied in any form or by
any means — graphic, electronic, or mechanical, including photocopying, taping, or information storage and
retrieval systems — without written permission of the publisher.
The content of this document and all features and specifications are subject to change without notice. The
information contained herein does not represent a commitment on the part of VeriFone, Inc.
Publications are not stocked at the address given above. Requests for VeriFone publications should be
made to your VeriFone representative.
VeriFone, the VeriFone logo, and Ruby SuperSystem are registered trademarks of VeriFone, Inc. Sapphire,
Topaz, HPV-20, Ruby Manager, Everest, EASY ID, Electronic Journal On-site, Ruby Card, MX870, MX860,
MX850, MX830, Omni, Verix, ZONTALK, VeriTalk, VeriShield, TXO, and VisualPayments Suite are
trademarks of VeriFone, Inc. in the U.S. and/or other countries. All other trademarks or brand names are the
properties of their respective holders.

MX800 SERIES INSTALLATION GUIDE

MX800 SERIES INSTALLATION GUIDE I
CONTENTS
PREFACE . . . . . . . . . . . . . . . . . . . . . . . . . . . . . . . . . . . . . . . 1
Intended Audience . . . . . . . . . . . . . . . . . . . . . . . . . . . . . . . . . . . . . . . . . . . . . . . . 1
Document Organization . . . . . . . . . . . . . . . . . . . . . . . . . . . . . . . . . . . . . . . . . . . . 1
Conventions Used in This Document . . . . . . . . . . . . . . . . . . . . . . . . . . . . . . . . . . 2
Acronyms . . . . . . . . . . . . . . . . . . . . . . . . . . . . . . . . . . . . . . . . . . . . . . . . . . . . . . . 2
CHAPTER 1
Features Overview of the MX800 Series Terminal . . . . . . . . . . . . . . . . . . . . . . . . . . . . . . . 3
Modular Design. . . . . . . . . . . . . . . . . . . . . . . . . . . . . . . . . . . . . . . . . . . . . . . . 3
Display Features . . . . . . . . . . . . . . . . . . . . . . . . . . . . . . . . . . . . . . . . . . . . . . . 3
Features and Benefits . . . . . . . . . . . . . . . . . . . . . . . . . . . . . . . . . . . . . . . . . . . . . 4
Factory Options . . . . . . . . . . . . . . . . . . . . . . . . . . . . . . . . . . . . . . . . . . . . . . . . . . 5
Speakers. . . . . . . . . . . . . . . . . . . . . . . . . . . . . . . . . . . . . . . . . . . . . . . . . . . . . 5
Optional Modules . . . . . . . . . . . . . . . . . . . . . . . . . . . . . . . . . . . . . . . . . . . . . . 5
Applications . . . . . . . . . . . . . . . . . . . . . . . . . . . . . . . . . . . . . . . . . . . . . . . . . . . . . 6
Total Cost of Ownership . . . . . . . . . . . . . . . . . . . . . . . . . . . . . . . . . . . . . . . . . . . . 6
CHAPTER 2
Installation Installing the Device . . . . . . . . . . . . . . . . . . . . . . . . . . . . . . . . . . . . . . . . . . . . . . . 7
Unpacking. . . . . . . . . . . . . . . . . . . . . . . . . . . . . . . . . . . . . . . . . . . . . . . . . . . . 7
Selecting a Location . . . . . . . . . . . . . . . . . . . . . . . . . . . . . . . . . . . . . . . . . . . . 9
Stand Mount . . . . . . . . . . . . . . . . . . . . . . . . . . . . . . . . . . . . . . . . . . . . . . . . . . 9
PIN Protection Measures . . . . . . . . . . . . . . . . . . . . . . . . . . . . . . . . . . . . . . . . . . 10
Installing Optional Components . . . . . . . . . . . . . . . . . . . . . . . . . . . . . . . . . . . . . 11
Installing Countertop Wedge. . . . . . . . . . . . . . . . . . . . . . . . . . . . . . . . . . . . . 11
Installing I/O Modules . . . . . . . . . . . . . . . . . . . . . . . . . . . . . . . . . . . . . . . . . . 12
Installing MSAM Cards . . . . . . . . . . . . . . . . . . . . . . . . . . . . . . . . . . . . . . . . . 13
Installing the Trimplate . . . . . . . . . . . . . . . . . . . . . . . . . . . . . . . . . . . . . . . . . 15
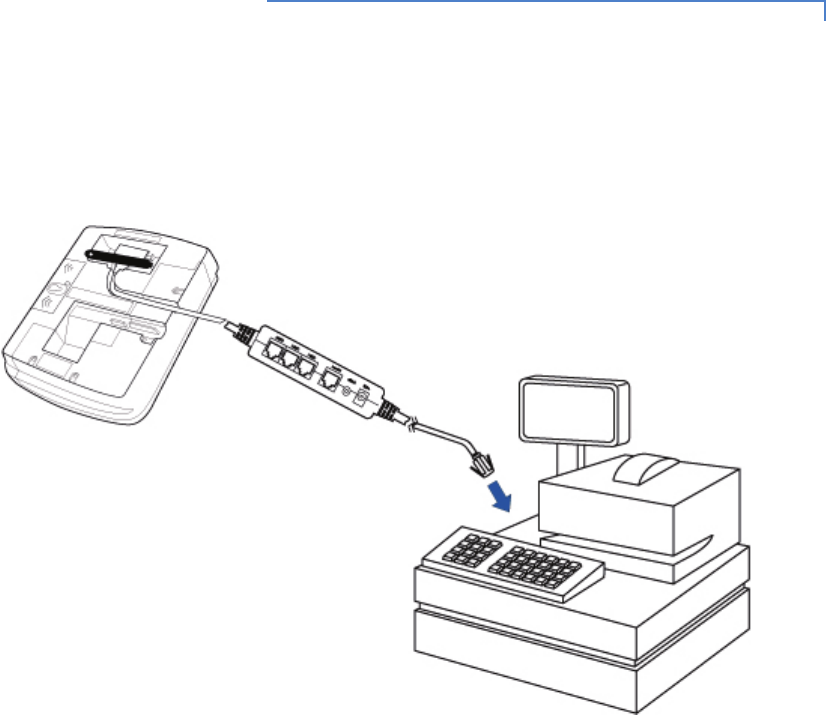
Connecting the Device . . . . . . . . . . . . . . . . . . . . . . . . . . . . . . . . . . . . . . . . . . . . 15
Multiport Cable . . . . . . . . . . . . . . . . . . . . . . . . . . . . . . . . . . . . . . . . . . . . . . . 16
Connecting ECR in Tailgate Mode . . . . . . . . . . . . . . . . . . . . . . . . . . . . . . . . 17
Connecting to a Host PC . . . . . . . . . . . . . . . . . . . . . . . . . . . . . . . . . . . . . . . 18
Connecting to the Ethernet LAN . . . . . . . . . . . . . . . . . . . . . . . . . . . . . . . . . . 18
Connecting to USB Host or Hub . . . . . . . . . . . . . . . . . . . . . . . . . . . . . . . . . . 18
Power Up with the Multiport Cable . . . . . . . . . . . . . . . . . . . . . . . . . . . . . . . . . . . 19
Calibrate Touch Screen . . . . . . . . . . . . . . . . . . . . . . . . . . . . . . . . . . . . . . . . . . . 20
CHAPTER 3
Maintenance Cleaning the Terminal . . . . . . . . . . . . . . . . . . . . . . . . . . . . . . . . . . . . . . . . . . . . 21
Smart Card Reader . . . . . . . . . . . . . . . . . . . . . . . . . . . . . . . . . . . . . . . . . . . . . . 21
CHAPTER 4
Troubleshooting Display is Blank. . . . . . . . . . . . . . . . . . . . . . . . . . . . . . . . . . . . . . . . . . . . . . . 23
Serial Port Does Not Work . . . . . . . . . . . . . . . . . . . . . . . . . . . . . . . . . . . . . . 23
Transaction Fails to Process. . . . . . . . . . . . . . . . . . . . . . . . . . . . . . . . . . . . . 24
No Response From the Stylus . . . . . . . . . . . . . . . . . . . . . . . . . . . . . . . . . . . 24

ii MX800 SERIES INSTALLATION GUIDE
Gap in Captured Signature . . . . . . . . . . . . . . . . . . . . . . . . . . . . . . . . . . . . . . 25
No Response From the Touch Screen . . . . . . . . . . . . . . . . . . . . . . . . . . . . . 25
CHAPTER 5
VeriFone Service
and Support
Return a Terminal for Service. . . . . . . . . . . . . . . . . . . . . . . . . . . . . . . . . . . . . . . 27
CHAPTER 6
Specifications Terminal Specifications . . . . . . . . . . . . . . . . . . . . . . . . . . . . . . . . . . . . . . . . . . . 29
INDEX . . . . . . . . . . . . . . . . . . . . . . . . . . . . . . . . . . . . . . . . .31

MX800 SERIES INSTALLATION GUIDE 1
PREFACE
This guide is your primary source of information for setting up and installing the
MX800 Series terminals, the MX870™, MX860™, MX850™, and MX830™.
Intended
Audience
This guide is useful for anyone installing and configuring the MX800 Series
terminals. A basic description of terminal features is also provided.
Document
Organization
The following chapters are included:
Chapter 1, Features, explains the features of and factory options for the MX800
Series terminals.
Chapter 2, Installation, explains how to install the MX800 Series terminals.
Chapter 3, Maintenance, explains how to maintain your MX800 Series terminals.
Chapter 4, Troubleshooting, provides guidelines for troubleshooting.
Chapter 5, VeriFone Service and Support, provides information for contacting
your VeriFone representative or service provider.
Chapter 6, Specifications, provides information on power, environment, and
dimensions of the hardware.
2MX800 SERIES INSTALLATION GUIDE
Conventions
Used in This
Document
The following table describes the conventions used:
Acronyms The following table describes the acronyms used:
Table 1 Document Conventions
Convention Meaning
Blue Text in blue indicates terms that are cross referenced.
Courier Courier font is used when specifying text that you would enter at
a command prompt.
Italic Italic font style indicates book titles or emphasis.
SCREENTEXT Used when specifying on-screen text that is tapped or selected,
and for keys to be pressed.
The pencil symbol is used to highlight important information.
The caution symbol indicates possible hardware or software
failure, or loss of data.
The lightning symbol is used as a warning when bodily injury
might occur.
NOTE
CAUTION
WARNING
Table 2 Acronyms
Convention Meaning
ECR Electronic Cash Register
DUKPT Derived Unique Key Per Transaction
MRA Merchandise Return Authorization
LAN Local Area Network
PED PIN Entry Device
RFID Radio Frequency Identification
SAM Security Access Module
MSAM Micromodule-Size Security Access Module
TIFF Tagged Image File Format
USB Universal Serial Bus
VGA Video Graphics Array

MX800 SERIES INSTALLATION GUIDE 3
CHAPTER 1
Features
This chapter presents an overview and feature list for the MX800 Series terminals.
MX800 Series terminals are designed to offer customers outstanding flexibility
with the help of the terminals' unique modular design that supports a full line of
payment and value-added applications such as loyalty or prepaid cards. In
addition, they are easy to use, secure, and highly reliable–backed by two decades
of VeriFone leadership in electronic payment.
Overview of the
MX800 Series
Terminal
The MX800 Series offers customers the opportunity to efficiently mix terminals
within the same store or chain of stores–saving time and money on
implementation, maintenance, and training. The MX870, MX860, MX850, and
MX830 share the following:
•Architecture — Linux, similar printed circuit boards, many of the same
applications.
•Upgrade modules — Terminals in different locations can be equipped with
different modules, as needed. Built-in upgradability protects investment,
allowing stores to adapt to changing trends.
•Multifunction connector — Accepts all available cables, reduces cost by
simplifying implementation and allowing cable upgrades.
•Mounting stands and wedges — Share the same keyhole pattern for secure
mounting.
•Footprint and “look and feel” — Offers consistency and simplifies training.
Modular Design MX800 Series terminals offer outstanding flexibility due to their modular design.
Modules that can be added include contactless smart cards that use radio
frequency identification (RFID) based on ISO 14443 standards.
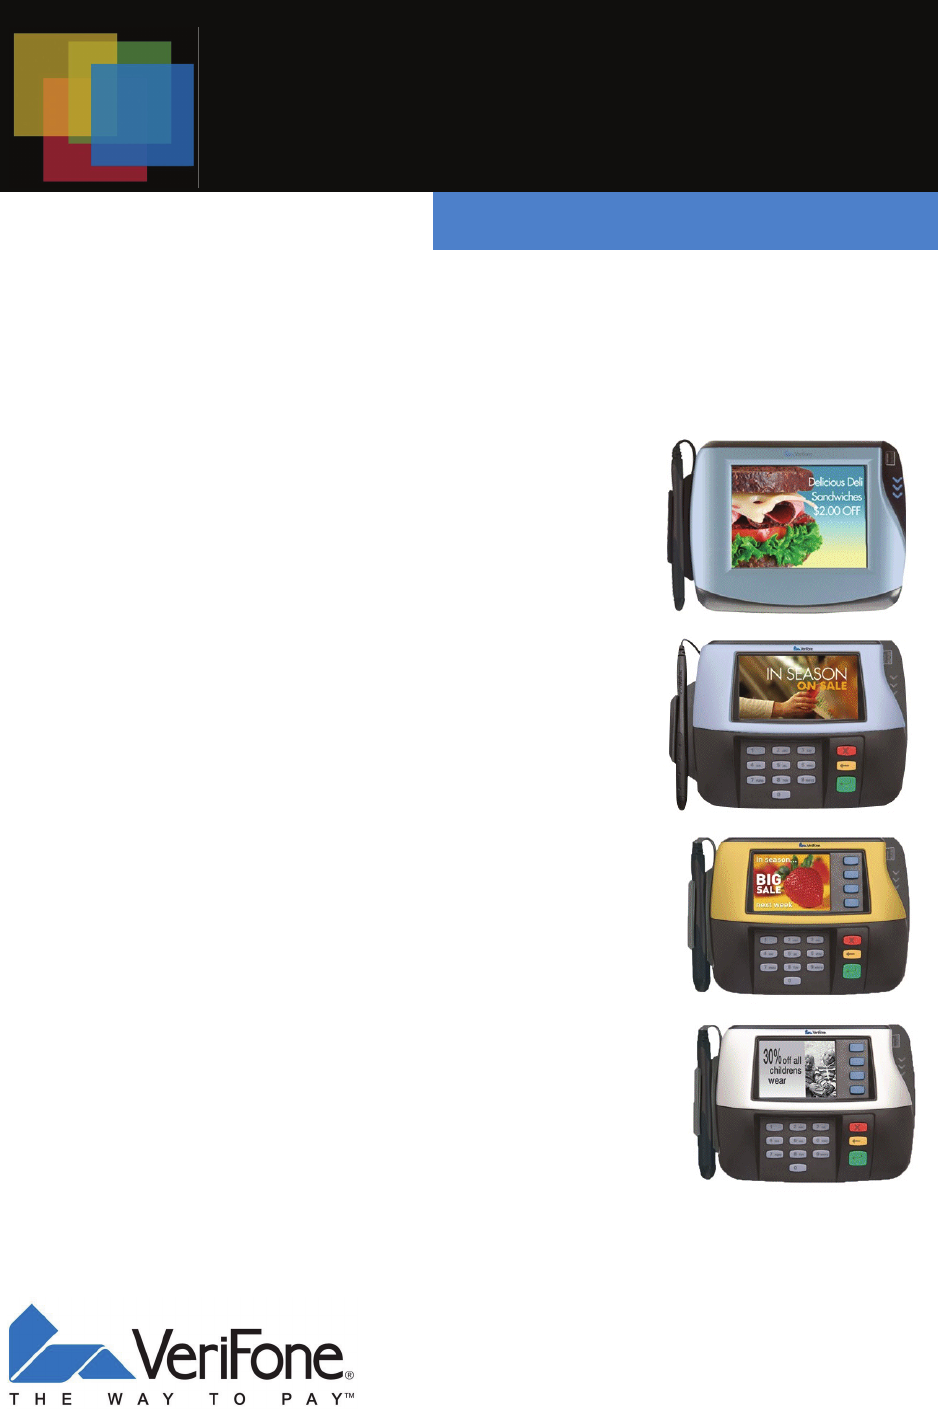
Display Features MX870
The MX870 is a color 1/4 VGA payment device with a 5.6-inch display, and is
operated exclusively by touch screen.
MX860
The MX860 has a 4.3-inch color display, touch screen, and numeric keypad.
MX850
The MX850 has a 3.5-inch color 1/4 VGA display, touch screen, and ATM-style
screen-addressable keys.

4MX800 SERIES INSTALLATION GUIDE
MX830
The MX830 has a 3.5-inch backlit, 16-shade grayscale display with optional touch
screen and ATM-style screen-addressable keys.
Stylus
The signature capture stylus is available for any MX800 Series terminal with a
touch screen. Signature capture capability allows capture of virtual signatures,
which can be stored as tagged image file format (TIFF) files using capacitive
touch technology.
Features and
Benefits
Following are the features and benefits of the MX800 Series terminals:
Table 3 Features and Benefits
Features Benefit
Optional upgradable modules Lets customers economically address today's needs,
while adding capabilities as desired; protects
investment.
Ethernet/USB (Universal Serial
Bus) connectivity
Allows LAN connections for high-speed data
transfer, back-end clearing, and settlement.
Supports connections to electronic cash registers
(ECRs) and PCs using USB or Ethernet. USB Host
functionality supports other USB devices such as
USB memory drives.
Note: Ethernet is optional on the MX830 terminal.
Safety glass touch screen The capacitive and electrostatic technology is highly
effective; provides better response with fingertip and
stylus; scratch-resistant.
Note: Touch screen is optional on the MX830
terminal.
Signature capture capability Speeds customers through lanes; allows digital
storage and retrieval, lowers costs.
Triple-track magnetic card
reader
Logically oriented for improved read rates; handles
magnetic stripe cards, including drivers’ licenses.
Smart card reader/writer Accepts chip cards conforming to the latest global
standards.
PCI PED-compliant PINpad Virtual PINpad complies with PCI regulations for
improved security.
High Resolution Display Supports sophisticated applications with full-motion
video.
Privacy Filter (Optional) PED-compliant privacy screen, protecting the
consumer's PIN entry.

MX800 SERIES INSTALLATION GUIDE 5
Factory
Options
Factory options are available for the MX800 Series terminals, depending on your
needs.
Speakers The MX870 terminal is the only terminal with built-in speakers for tones and
prompts. A line-out port is available to drive externally powered speakers for some
models of the MX860 and MX850, but not for the MX830.
Optional Modules The MX800 Series offers upgradable modules that can be installed in the factory
or upgraded after distribution to the field. All modules can be installed easily and
efficiently. Complete installation instructions are found in the Installing Optional
Components section.
Contactless Reader Module
The optional contactless smart card module incorporates RFID technology based
on the ISO 14443 standard. The “tap-and-go” design conforms to industry
specifications. A smart card is read when it is placed in close proximity
(1 in. to 3.9 in. or 2.5 to 10 cm) to the reader, reducing wear and tear on card
readers and cards. Contactless readers can be used to support any number of
payment and value-added applications. See Installing Optional Components for
more information.
Sophisticated security Includes 3DES encryption, Master Key/Session Key
and Derived Unique Key Per Transaction (DUKPT)
key management; also incorporates VeriShield file
authentication and tampering safeguards.
32-bit microprocessor Streamlines processing, even on complex
transactions.
Flash and RAM Ample memory to support multiple payment and
value-added applications simultaneously.
RS-232/RS-485 ports Provides connectivity for ECRs in tailgate mode
using RS-485, and for peripherals using RS-232.
Audio MX870 — Internal speakers. Includes output jacks
for external speakers.
MX860 and MX850 — Audio is optional.
MX830 — No audio.
Table 3 Features and Benefits (Continued)
Features Benefit

6MX800 SERIES INSTALLATION GUIDE
Applications Standard payment applications are available from VeriFone to interface with most
ECRs. Applications for the terminals are written using a C-based programming
language. These programs can be downloaded directly from an ECR, another
terminal, or a development PC using the MX800 Series terminal System Mode.
Terminal System Mode can also be used for diagnostics, changing the password,
and Master Key injection. For further information on System Mode, see the
MX800 Series Reference Manual.
Total Cost of
Ownership
The MX800 Series terminals have been designed to be flexible and future proof,
delivering a low total cost of ownership.
The modular terminals can be configured at the factory or in the field by a trained
technician. The flexibility and versatility of the terminals allow use of the terminals
with different capabilities in different stores or locations. The terminals can be
purchased with the modules that meet today's requirements, and other
capabilities can be added as and when needed.

MX800 SERIES INSTALLATION GUIDE 7
CHAPTER 2
Installation
This chapter describes the MX800 Series installation procedures and includes
connection examples.
Installing the
Device
This section presents installation guidelines for the MX800 Series terminal.
Unpacking Open the shipping carton and carefully inspect the contents for possible
tampering or shipping damage.
WARNING
Do not use a damaged terminal.
8MX800 SERIES INSTALLATION GUIDE
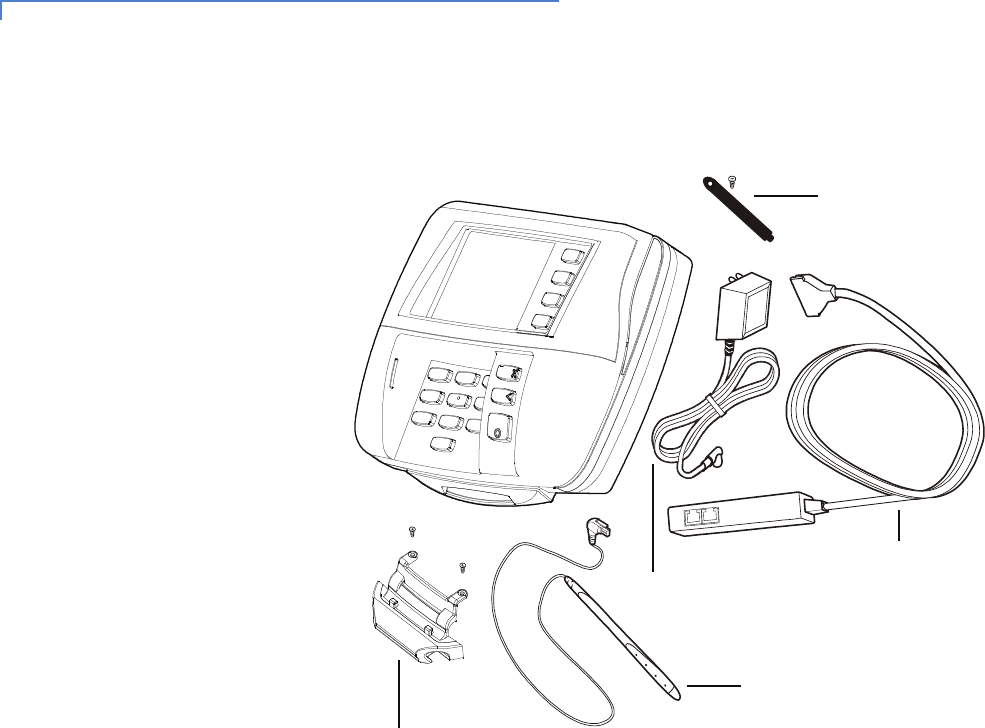
Figure 1 Example of Terminal Product Components
To unpack the
shipping carton
1With the shipping carton right side up, open the top and remove all items from
the carton:
•Terminal unit
•Cable tie-down strap and screw
•Power pack (power supply)
•Multiport cable
•Stylus and tether (optional)
•Mounting holster (optional)
2Remove the protective plastic wrap from the display and other components.
3Place the components on a table or countertop.
4Save the shipping carton and packing material for repacking or moving in the
future.
Cable Tie-down
Strap and Screw
Multiport Cable
Power Pack
Stylus and Tether
(Optional)
Stylus Mounting
Holster (Optional)

MX800 SERIES INSTALLATION GUIDE 9
Selecting a
Location
Use the following guidelines to select a location for the MX800 Series terminal.
1Select a location for the terminal that offers adequate ventilation and
protection and is convenient for the user and merchant.
2Place the MX800 Series terminal on a flat surface, such as a table or
countertop, or mount it on a mounting stand supplied by VeriFone.
Avoid areas with:
•Excessive heat or dust
•Oil or moisture
•Devices that cause excessive voltage fluctuations or electrical noise, such
as air conditioners, fans, electric motors, neon signs, or high-frequency
security devices
•Direct sunlight or objects that radiate heat
3Position the terminal conveniently in relation to power and ECR or LAN
connections.
4Before connecting the terminal to the power pack, complete the installation
by connecting all the cables (see Connecting the Device and Power Up with
the Multiport Cable).
Stand Mount In most retail spaces, the terminal is positioned on a stand mount. To install the
terminal on the stand mount:
1Install the stand mount on the countertop in the desired lane over an
appropriate hole through which the wiring connections can be threaded.
2Thread all wiring connections through the center of the stand mount.
3Make all wiring connections.
4Attach the cable tie-down strap with the supplied screw.
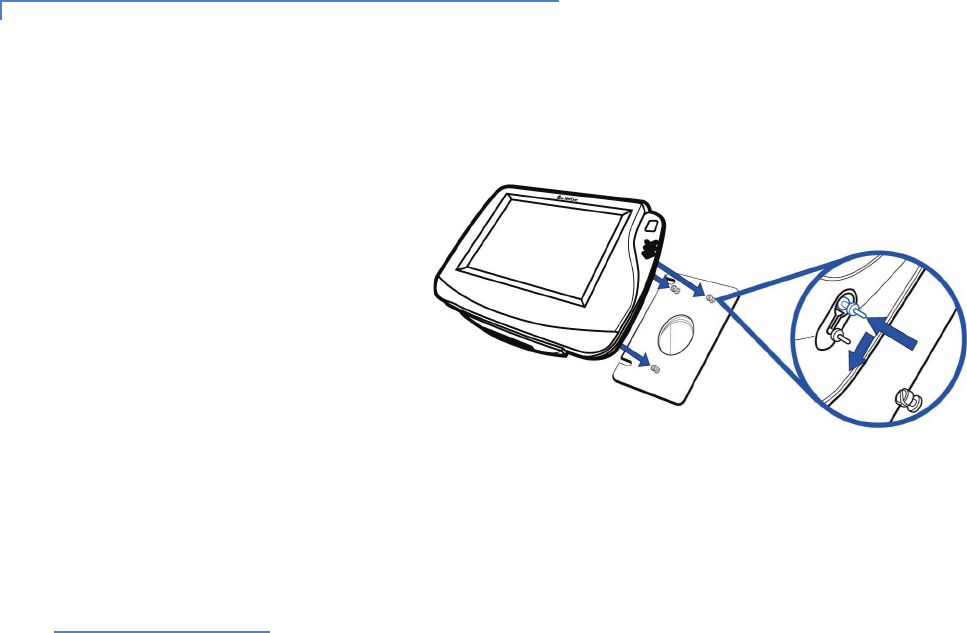
5Align and seat the three pins on the top plate of the stand mount platform with
the three key-hole slots on the bottom of the terminal (Figure 2).
WARNING
The MX800 Series terminal is designed for indoor use only.
WARNING
Do not use the MX800 Series terminal near water, including a bathtub, wash
bowl, kitchen sink, or laundry tub. Do not use in a wet basement or near a
swimming pool.
10 MX800 SERIES INSTALLATION GUIDE
6Slide the terminal down until the unit seats securely.
Figure 2 Aligning MX800 Series Terminal with the Typical Mounting
Plate
PIN Protection
Measures
The following techniques can be employed to provide for effective screening of
the PIN-entry keypad during the PIN entry process. These methods would
typically be used in combination, though in some cases a method might be used
singly.
•Positioning of terminal on the check-stand in such a way as to make visual
observation of the PIN-entry process infeasible. Examples include:
•Visual shields designed into the check-stand. The shields may be solely
for shielding purposes, or may be part of the general check-stand design.
•Position the PED so that it is angled in such a way that PIN spying is
difficult.
•Installing PED on an adjustable stand that allows consumers to swivel the
terminal sideways and/or tilt it forwards/backwards to a position that makes
visual observation of the PIN-entry process difficult.
•Positioning of in-store security cameras so that the PIN-entry keypad is not
visible.
The following table describes the two preferred mounting methods and the
recommended measure to protect from PIN capture in four observation corridors:
MX800 SERIES INSTALLATION GUIDE 11
VeriFone also recommends instruction of the cardholder regarding safe PIN-entry.
This can be done with a combination of:
•Signage on the PED
•Prompts on the display, possibly with a “click-through” screen
•Literature at the point of sale
•A logo for safe PIN-entry process
Installing
Optional
Components
This section discusses the installation procedures for the optional components
available for the MX800 Series terminal. Your terminal may already have some of
these options, as modules can be installed at the factory or in the field.
Installing
Countertop Wedge
The countertop wedge raises the rear section of the MX800 Series terminal by an
angle of 10 degrees to facilitate use of the screen (Figure 3).
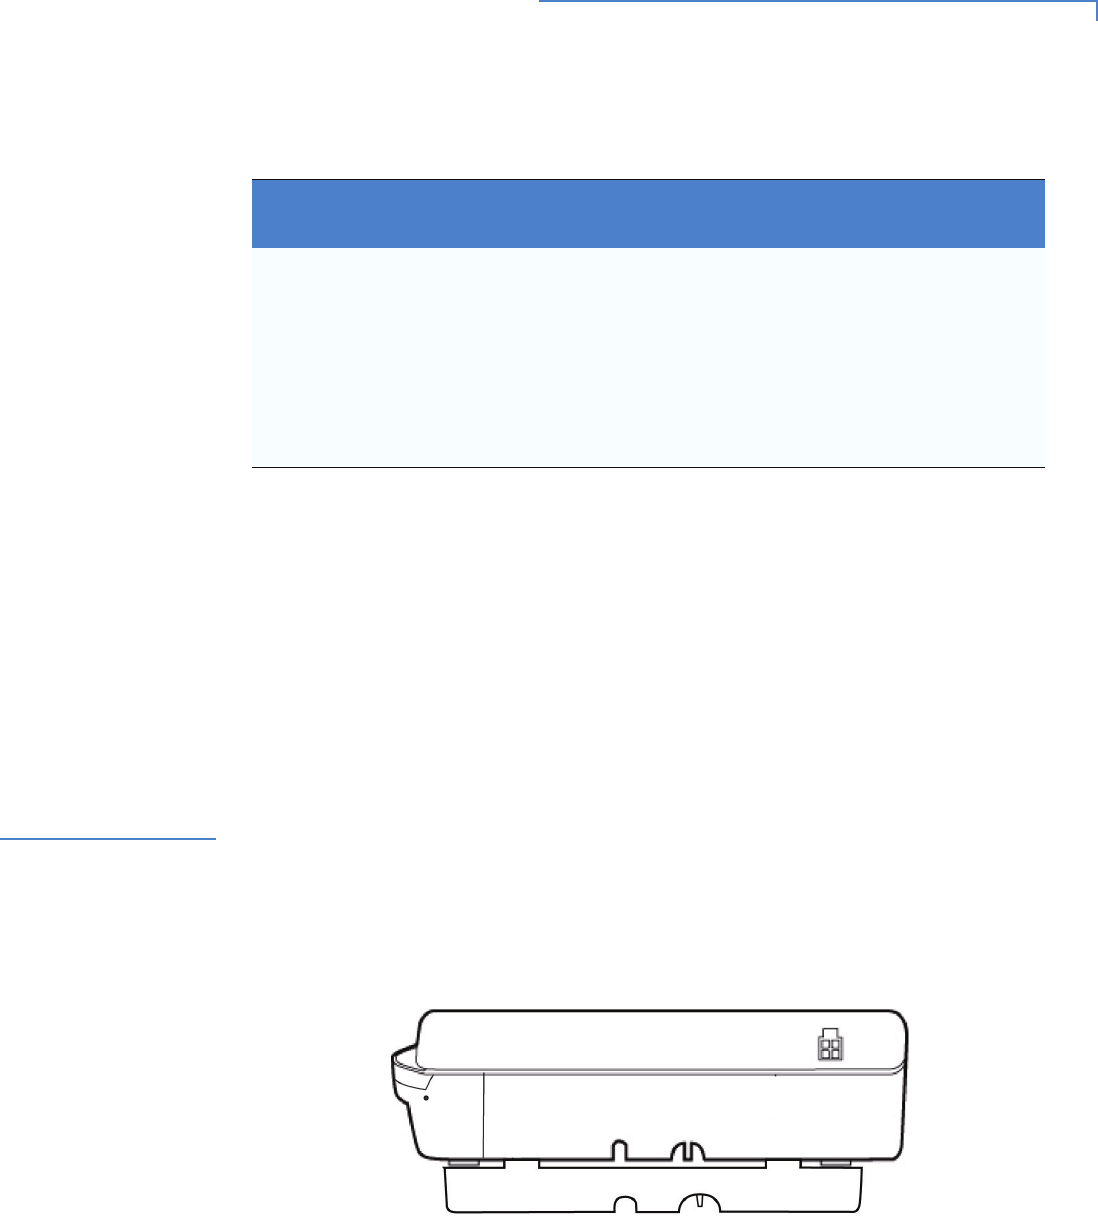
Figure 3 Countertop Wedge: Rear View of the MX800 Series Terminal
To install the
countertop wedge
1Align the pins in the countertop wedge with the two key holes on the bottom
of the MX800 Series terminal (Figure 4).
2Slide the countertop wedge firmly into position.
Table 4 Mounting Methods and Protection Measures
Method Cashier Customer In
Queue
Customers
Elsewhere
On-Site
Cameras
Countertop
without stand
Use signage
behind the
PED
Install so that
customer is
between PED and
next in queue
No action
needed
Do not install
within view of
cameras
Countertop
with stand
No action
needed
Install so that
customer is
between PED and
next in queue
No action
needed
Do not install
within view of
cameras
12 MX800 SERIES INSTALLATION GUIDE
3Route the multiport cable through the races in the countertop wedge or
through the races underneath the wedge.
Figure 4 Installing the Countertop Wedge
.
Installing I/O
Modules
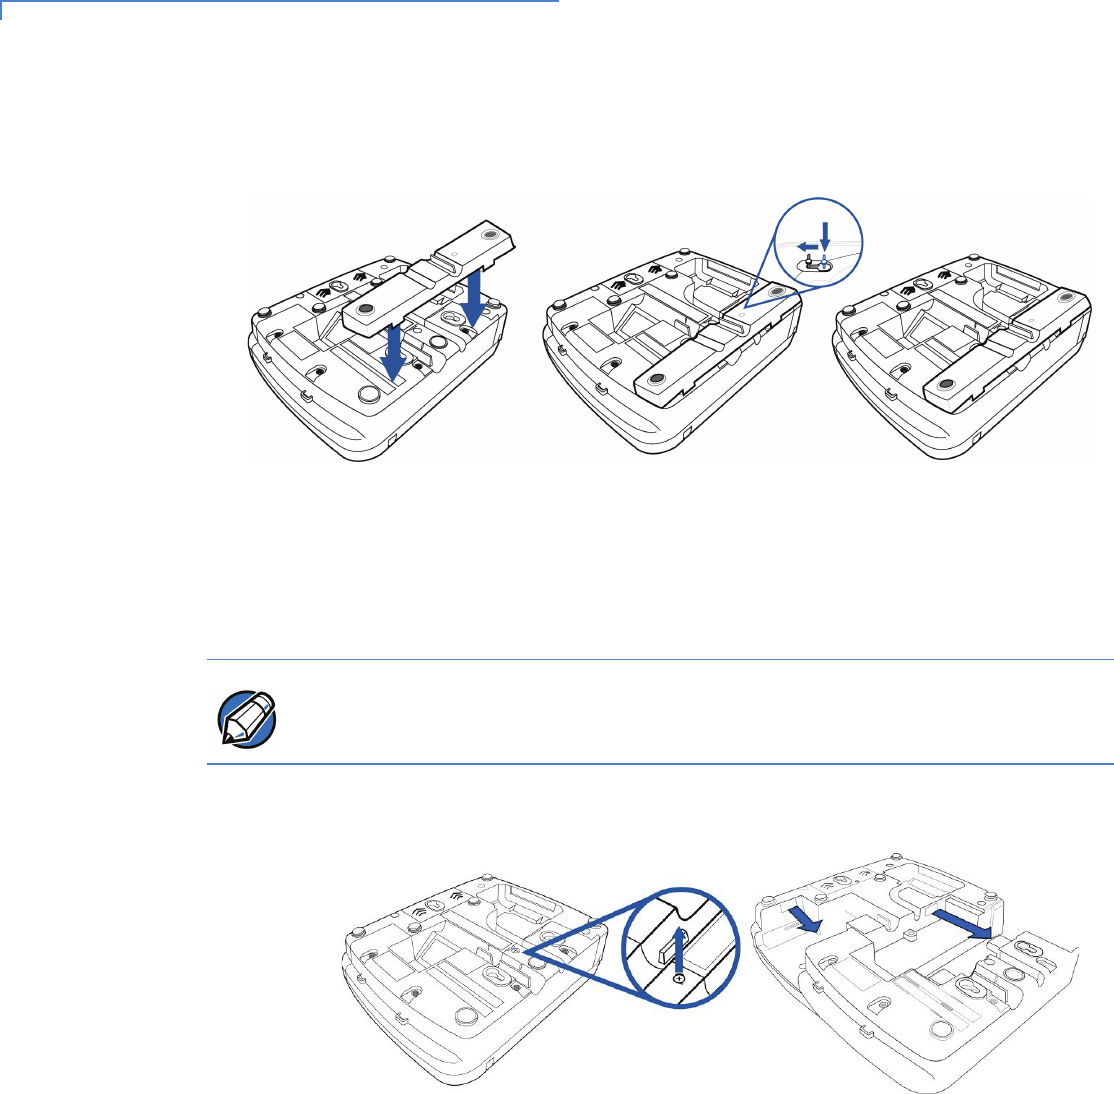
Use the following steps to install optional I/O modules:
1Loosen the module retaining screw on the bottom of the terminal (Figure 5)
until the old module can slide out.
Figure 5 Removing the old I/O Module
NOTE
The retaining screws are captive, which means they do not actually separate
from their seats, but only from the mounting hole.
MX800 SERIES INSTALLATION GUIDE 13
2Slide the module into place (Figure 6) and secure the retaining screw.
Figure 6 Installing the Module
Installing MSAM
Cards
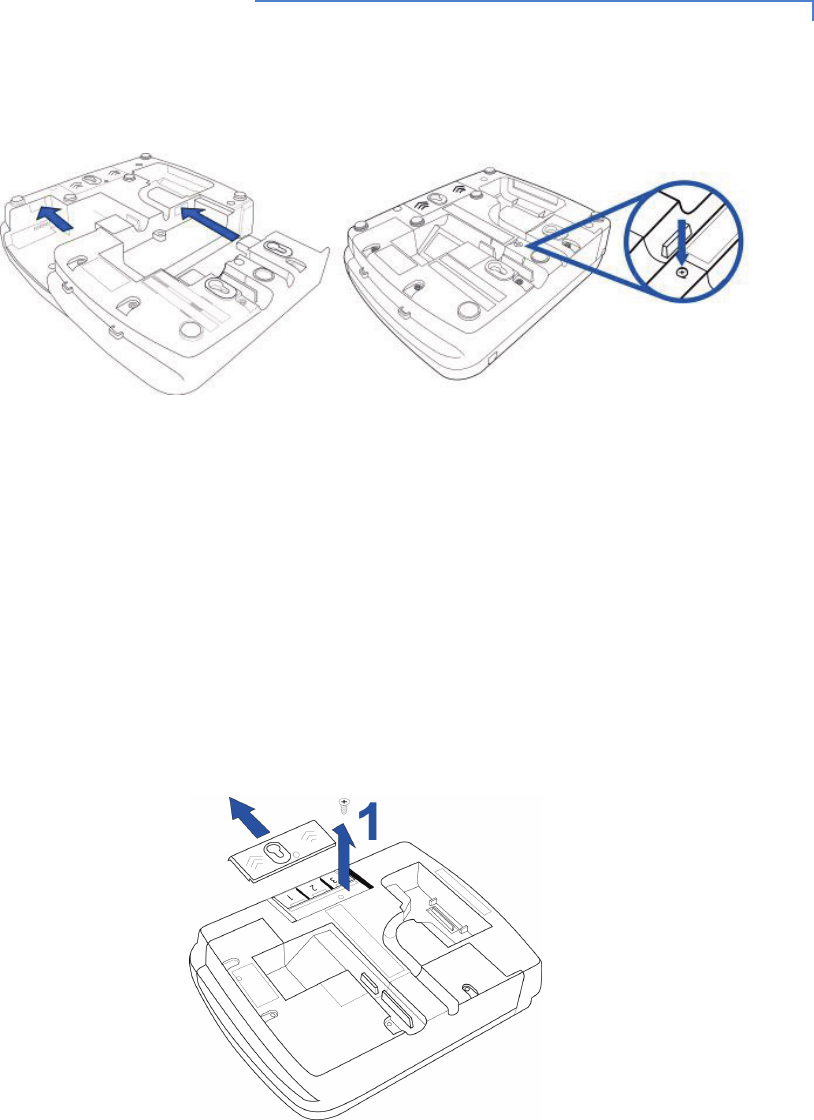
Follow the steps below to install smart cards (MSAM cards).
Often merchants are issued MSAM cards to run small applications, such as loyalty
programs. MSAM cards are used only with MX800 Series terminal smart card
configurations.
1Unplug the power pack from the multiport cable.
2Place the terminal upside down on a soft, clean surface to protect the lens
from scratches.
3Remove the MSAM compartment door screw and rotate the door up and
back to access the MSAM cardholders.
Figure 7 Removing the MSAM Compartment Screw and Door
14 MX800 SERIES INSTALLATION GUIDE
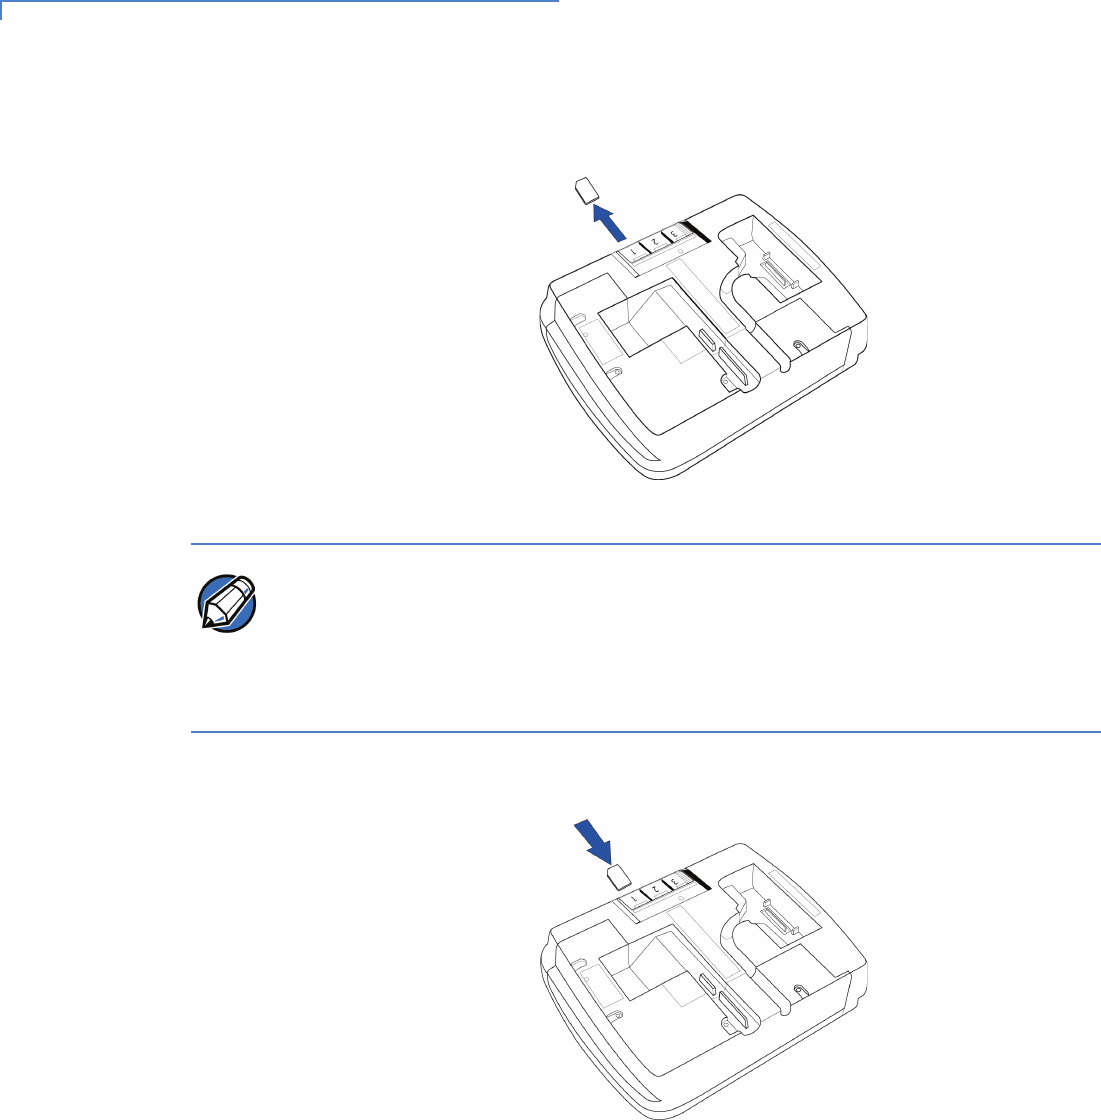
4Remove any previously installed MSAM card by sliding the card from the
MSAM cardholder.
Figure 8 Removing Installed MSAM Card
5Install an MSAM card by aligning the card and carefully sliding it within the
guides on the cover until it is fully inserted.
Figure 9 Inserting the MSAM Card
NOTE
Before inserting the MSAM card, position it with the card’s gold contacts facing the
smart card reader end of the terminal. The cardholder connector base has a set of
contacts and a notch on one corner to ensure the MSAM card is positioned
correctly. The MSAM card has a notch on one corner to ensure that it fits into the
connector base in only one way. The MSAM compartment door will not close
properly if the MSAM cards are installed incorrectly.

MX800 SERIES INSTALLATION GUIDE 15
6Reinstall the compartment cover and door screw.
Figure 10 Reinstalling the Compartment Door and Screw
Installing the
Trimplate
The MX800 Series terminal can be fitted with interchangeable trimplates to
customize the appearance of the terminal. MX870 trimplate installation is
explained below. Trimplates for the MX860, MX850, and MX830 are snapped
straight down and are not rocked into place.
1Insert the trimplate by lining up the three notches of the face plate into the
unit.
2Firmly snap the top part of the trimplate to secure it.
Figure 11 Installing the Trimplate
Connecting the
Device
This section provides brief descriptions of possible MX800 Series terminal device
connections and the power pack connection. For complete information about
installing and using an optional device, see the user documentation supplied with
that device.
WARNING
Ensure that the multiport cable is not connected to a power pack before attaching
the multiport cable to the MX800 Series terminal.
16 MX800 SERIES INSTALLATION GUIDE
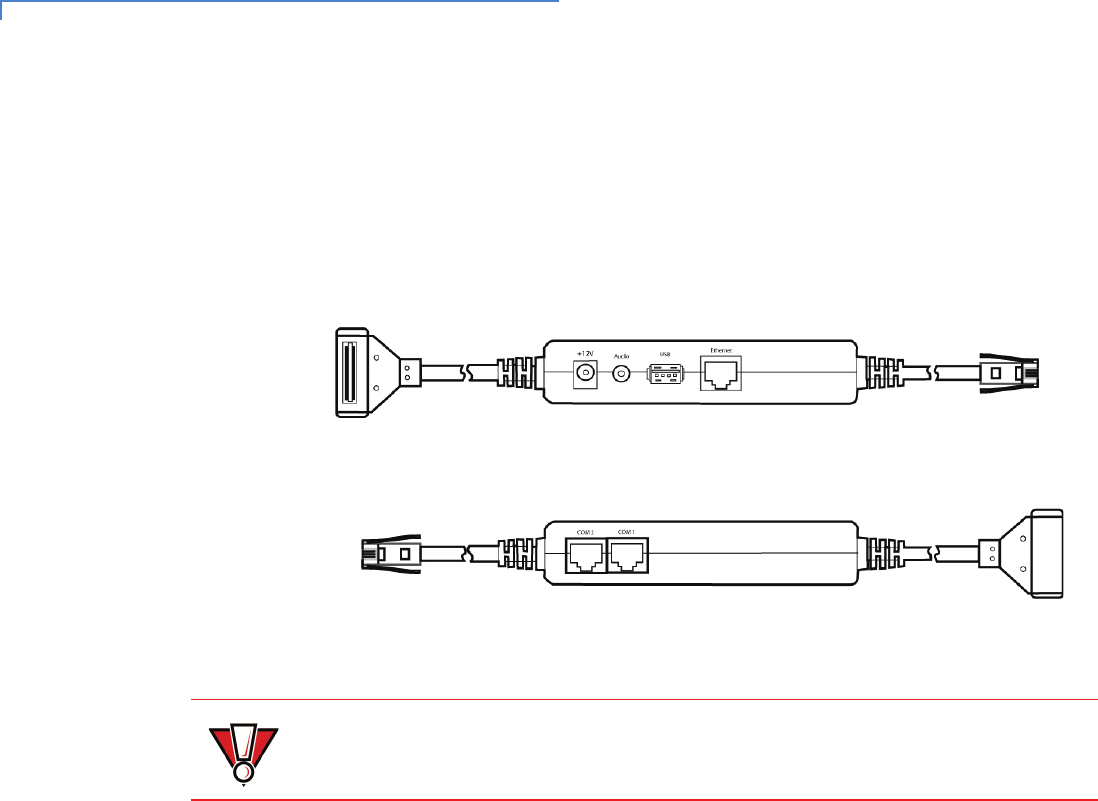
Multiport Cable The MX800 Series terminals use a multiport cable (Figure 12) to make most
connections, including connections to:
•an ECR
•an Ethernet LAN
•a development/host PC
Figure 12 Sample Multiport Cable: Front and Rear
The following precautions must be taken with multiport cables:
•Do not force the terminal connector into place.
•Always make sure that all of the pins are lined up in correct parallel fashion
before applying light pressure to snap the terminal connector into place.
•Do not attempt to remove the terminal connector by pulling directly on the
cable. Instead, firmly grasp the sides of the terminal connector with thumb
and forefinger, then pull out at the same angle the connector on the
terminal is facing.
•Disconnecting the power source during transaction processing may cause
loss of transaction data.
CAUTION
Improper installation or removal of the terminal connector may permanently
damage the MX800 Series terminal.
18 MX800 SERIES INSTALLATION GUIDE
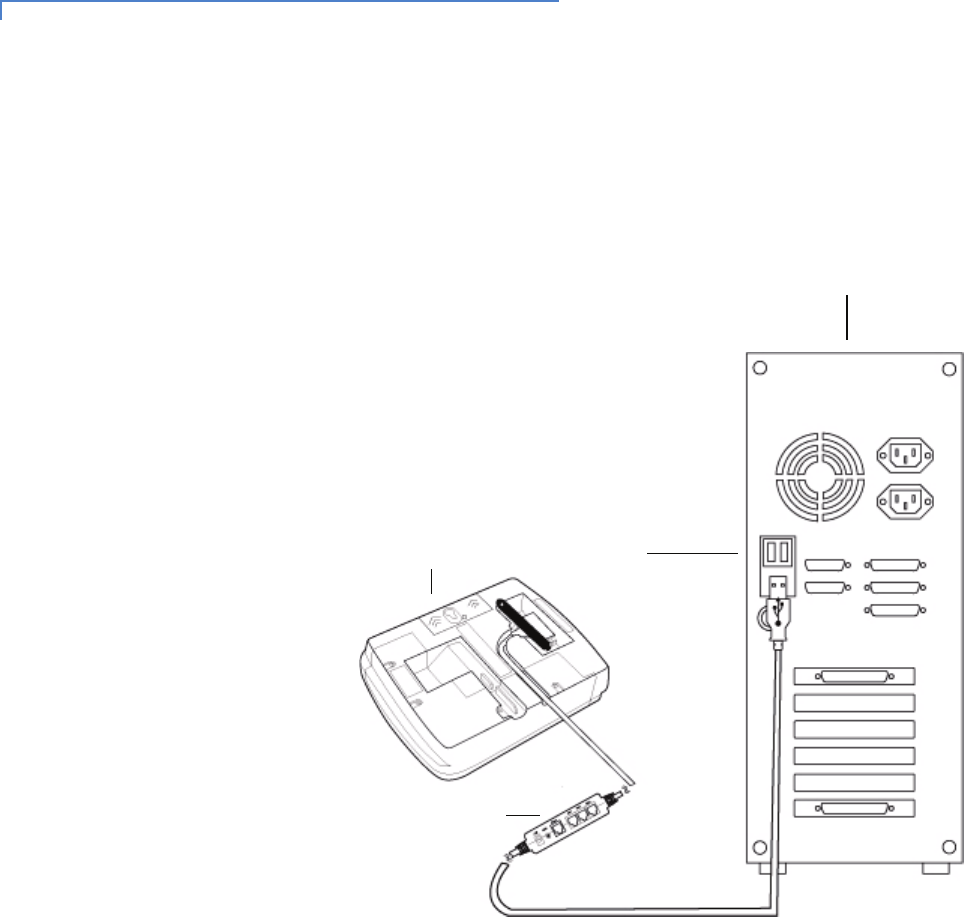
Connecting to a
Host PC
To connect the MX800 Series terminal to a development PC, see Figure 14, which
shows a USB connection with the 23741-02-R multiport cable.
Figure 14 Host PC Connection
Connecting to the
Ethernet LAN
To connect the MX800 Series terminal to an Ethernet LAN through the Ethernet
port using a standard Ethernet cable, insert the LAN cable from the LAN router or
hub into the Ethernet port on the multiport cable.
Connecting to
USB Host or Hub
Connecting to a USB host or hub requires VeriFone USB cable (P/N 23741-02-R).
To connect to a USB host or hub:
1Insert the multiport cable plug into the bottom socket on the terminal and
route the cable through the slots to the desired exit side.
2Plug the USB connector of the multiport cable into the USB host or hub.
HOST COMPUTER FOR
USB PORT
MX800
TERMINAL
MULTIPORT
CONNECTOR
DOWNLOADS OR DEBUGGING

MX800 SERIES INSTALLATION GUIDE 19
Power Up with
the Multiport
Cable
This section describes how to connect the MX800 Series terminal to a power
source using the multiport cable.
1Make all other connections before connecting the power pack.
2Insert the multiport cable connector into the port on the back of the terminal
(see Figure 15).
3Route the cable through the slots to the desired exit side.
4Insert the plug from the power pack into the +12V receptacle on the multiport
cable.
5Plug the power pack into an indoor electrical power outlet (Figure 15).
Figure 15 Power Pack Connection
NOTE
If connected to an ECR, the MX800 Series terminal can receive power from the
ECR.
WARNING
Do not plug the power pack into an outdoor outlet or operate the terminal
outdoors.

20 MX800 SERIES INSTALLATION GUIDE
Calibrate
Touch Screen
The MX800 Series terminal requires a touch screen calibration at the time of
installation. The terminal should be powered on and allowed to stabilize at normal
operating temperature; usually this takes no longer than 30 minutes, even if the
terminal was previously in a cooler or warmer location. The touch screen
calibration procedure (below) should then be performed.
To perform a touch screen (panel) calibration, follow this procedure:
1Press the recessed button near the top of the Magnetic Stripe Reader with a
straightened paper clip and hold while three LEDs in the MSR track turn on.
Release the button when the middle LED turns off. Keep hands away from
the display until the prompt appears for password entry.
2Enter the password.
3In System Mode, perform a manual touch screen compensation. Tap
CONFIGURE > right blue arrow > CALIBRATE > CALIBRATE. Follow the directions
on the display.
MX800 SERIES INSTALLATION GUIDE 21
CHAPTER 3
Maintenance
The MX800 Series terminal has no user-maintainable parts.
The smart card implementation is a proprietary hardware solution that has no
serviceable parts.
Cleaning the
Terminal
To clean the terminal, use a clean cloth slightly dampened with water and a drop
or two of mild soap. For stubborn stains, use alcohol or an alcohol-based cleaner.
For best results, use the VeriFone Cleaning Kit (P/N 02746-01).
Smart Card
Reader
Do not attempt to clean the smart card reader. Doing so may void the warranty.
For smart card reader service, contact your VeriFone distributor or service
provider.
CAUTION
Never use thinner, trichloroethylene, or ketone-based solvents as they may
deteriorate plastic or rubber parts. Do not spray cleaners or other solutions
directly onto the display.

22 MX800 SERIES INSTALLATION GUIDE
MX800 SERIES INSTALLATION GUIDE 23
CHAPTER 4
Troubleshooting
During normal, day-to-day operation of your MX800 Series terminal, it is possible
for minor malfunctions to occur. Following are some examples of possible
problems, and steps to resolve them.
VeriFone follows stringent quality control standards in the manufacture of
MX800 Series terminals. Each unit that leaves the factory has been rigorously
tested to ensure quality and reliable operation. However, should you encounter a
problem in operation, read this section for possible causes and solutions.
The troubleshooting guidelines provided in this section identify various problems
and suggest the appropriate corrective action(s). If you have problems operating
your MX800 Series terminal, please read through these troubleshooting
examples. If the problem persists, or if it is not described below, contact your local
VeriFone representative for assistance.
Display is Blank If the terminal display does not show correct or readable information, check all
cable connections. If the problem persists, contact your local VeriFone
representative for assistance.
Serial Port Does
Not Work
The following are the corrective steps to be taken if the serial port does not work.
1Check whether the device connected to the serial port of the multiport cable
of the MX800 Series terminal has power and is functioning correctly. If
possible, perform a self-test on the device.
2The cable connecting the optional device to the MX800 Series terminal’s
serial port may be defective. Try a different serial cable.
3If the problem persists, contact your local VeriFone representative for
assistance.
CAUTION
Perform only the procedures specified in this guide. For all other services, contact
your local VeriFone distributor or service provider. Service conducted by parties
other than authorized VeriFone representatives may void the product warranty.
Each MX800 Series terminal is equipped with tamper-evident labels. Do not,
under any circumstances, attempt to disassemble the terminal.

24 MX800 SERIES INSTALLATION GUIDE
Transaction Fails
to Process
The following are the corrective steps to be taken if the terminal does not process
the transaction.
There are several possible reasons why the terminal may not be operating
correctly or processing transactions. To check the most likely causes, follow the
steps below.
Step 1: Check the
magnetic card
reader
1Make sure that you are swiping cards correctly with the MX800 Series
terminal. For the MX800 Series terminal reader, the black, magnetic stripe on
the card should face down and towards the screen.
2Perform a test transaction using several different magnetic stripe cards to
ensure that the problem is not a defective card.
3Process a transaction manually using the screen instead of the card reader. If
the manual transaction works, the problem may be a defect in the card
reader. Contact your VeriFone distributor or service provider.
4If the manual transaction does not work, proceed to Step 3: Check the cable
connections.
Step 2: Check the
smart card reader
1Make sure you are inserting the cards correctly with the MX800 Series
terminal smart card reader. The chip on the card should face down and
inward.
2Perform a test transaction using several different smart cards to ensure that
the problem is not with the card.
3Ensure any MSAM cards are correctly inserted and that the cardholders are
properly secured.
4If the problem persists, contact your VeriFone distributor or service provider.
Step 3: Check the
cable connections
1Ensure that all cables are correctly connected.
2If cables are connected properly, check that the cable is in working order by
connecting a known good cable. If transactions process with this cable,
replace the defective cable.
3If the problem persists, contact your local VeriFone representative for
assistance.
No Response
From the Stylus
The following are the corrective steps to be taken if the terminal does not respond
to the stylus inputs. (This procedure does not apply to the MX830 terminal without
touch screen.)
1Check the documentation to ensure that the terminal supports this stylus.
2Unplug the stylus that does not respond and connect a known working stylus.
3If the problem persists, contact your local VeriFone representative for
assistance.

MX800 SERIES INSTALLATION GUIDE 25
Gap in Captured
Signature
The following are the corrective steps to be taken if there is a gap in captured
signature. (This procedure does not apply to the MX830 terminal without touch
screen.)
1Ensure that the stylus is pressed hard during signature capture.
2If the problem persists, contact your local VeriFone representative for
assistance.
No Response
From the Touch
Screen
The following are the corrective steps to be taken if the touch screen does not
respond or displays the incorrect response. (This procedure does not apply to the
MX830 terminal without touch screen.)
To perform a touch screen (panel) calibration, follow this procedure:
1Press the recessed button near the top of the Magnetic Stripe Reader with a
straightened paper clip and hold while three LEDs in the MSR track turn on.
Release the button when the middle LED turns off. Keep hands away from
the display until the prompt appears for password entry.
2Enter the password.
3In System Mode, perform a manual touch screen compensation. Tap
CONFIGURE > right blue arrow > CALIBRATE > CALIBRATE. Follow the directions
on the display.
4If the problem persists, contact your VeriFone representative for assistance.
NOTE
The MX800 Series terminal requires a touch screen calibration at the time of
installation. The terminal should be powered on and allowed to stabilize at normal
operating temperature; usually this takes no longer than 30 minutes, even if the
terminal was previously in a cooler or warmer location. The touch screen
calibration procedure (below) should then be performed.

26 MX800 SERIES INSTALLATION GUIDE
MX800 SERIES INSTALLATION GUIDE 27
CHAPTER 5
VeriFone Service and Support
For MX800 Series terminal problems, contact your local VeriFone representative
or service provider.
For MX800 Series product service and repair information:
•USA – VeriFone Service and Support Group, 1-800-834-9133,
Monday - Friday, 8 A.M. - 7 P.M., EST.
•International – Contact your VeriFone representative.
Return a
Terminal for
Service
Before returning the MX800 Series terminal to VeriFone, obtain a Merchandise
Return Authorization (MRA) number. The following procedure describes how to
return one or more MX800 Series terminals for repair or replacement
(U.S. customers only).
1Gather the following information from the printed labels on the bottom of each
MX800 Series terminal to be returned:
•Product ID, including the model and part number.
•Serial number (S/N xxx-xxx-xxx).
2Within the United States, call VeriFone toll-free at 1-800-834-9133.
3Select the MRA option from the automated message. The MRA department
is open Monday–Friday, 8 A.M.–7 P.M., EST.
NOTE
For International customers, please contact your local VeriFone representative
for assistance with your service, return, or replacement.
WARNING
Do not, under any circumstances, attempt any service, adjustments, or repairs on
this equipment, other than the simple cleaning processes discussed in Chapter 3
and the troubleshooting procedures explained in Chapter 4. Instead, contact your
local VeriFone distributor or service provider for assistance. Failure to comply
can invalidate the product warranty.
WARNING
This terminal comes equipped with a tamper-evident label. This Tamper Warning
label covers a screw hole on the case bottom and indicates if an unauthorized
party has opened the terminal case. Opening the case will make the terminal
inoperable and void the product warranty.

28 MX800 SERIES INSTALLATION GUIDE
4Give the MRA representative the information gathered in step 1.
If the list of serial numbers is long, fax the list, along with the information
gathered in step 1, to the MRA department at 727-953-4172.
•Please address the fax clearly to the attention of the “VeriFone MRA
Dept.”
•Include a telephone number where you can be reached, as well as your
fax number.
•You will be issued an MRA number(s) and the fax will be returned to you.
5Describe the problem(s).
6Provide the shipping address where the repaired or replacement unit must be
returned.
7Keep a record of the following items:
•Assigned MRA number(s).
•VeriFone serial number assigned to the MX800 Series terminal you are
returning for service or repair (terminal serial numbers are located on the
bottom of the unit).
•Shipping documentation, such as air bill numbers used to trace the
shipment.
•Model(s) returned (model numbers are located on the VeriFone label on
the bottom of the MX800 Series terminal).
NOTE
One MRA number must be issued for each MX800 Series terminal returned to
VeriFone.

MX800 SERIES INSTALLATION GUIDE 29
CHAPTER 6
Specifications
Terminal
Specifications
This chapter discusses power requirements, dimensions, and other specifications
of the MX800 Series terminals.
Shipping weight: 1.08 kg (2.38 lb); includes terminal, cable tie-down strap and
screw, and the MX800 Series Quick Installation Guide.
Table 5 MX800 Series Terminal Specifications
Power •Peripheral power requirements: DC power pack: 12 V DC at
1.0 A
•Power pack requirements:120 V AC at 60 Hz (U.S.)
Environmental •Operating temperature: 0° to 40° C (32° to 104° F)
•Storage temperature: – 18° to + 66° C (0° to 150° F)
•Humidity: 15% to 95% relative humidity; no condensation
Dimensions MX870
•Height: 153 mm (6.0 inches)
•Width: 192 mm (7.5 inches)
•Depth: 57 mm (2.24 inches)
MX860
•Height: 153 mm (6.0 inches)
•Width: 192 mm (7.5 inches)
•Depth: 71 mm (2.8 inches)
MX850
•Height: 153 mm (6.0 inches)
•Width: 192 mm (7.5 inches)
•Depth: 71 mm (2.8 inches)
MX830
•Height: 153 mm (6.0 inches)
•Width: 192 mm (7.5 inches)
•Depth: 71 mm (2.8 inches)
Weight MX870: 1.68 lbs. (.77kg)
MX860: 1.62 lbs. (.74 kg)
MX850: 1.62 lbs. (.74 kg)
MX830: 1.62 lbs. (.74 kg)

30 MX800 SERIES INSTALLATION GUIDE

MX800 SERIES INSTALLATION GUIDE 31
INDEX
A
acronyms, Installation Guide 2
applications 6
audience, Installation Guide 1
C
captured signature, troubleshooting 25
connecting
ECR Tailgate 17
Ethernet LAN 18
multiport cables 16
to Host PC 18
to USB host or hub 18
contactless smart cards 5
conventions, documentation 2
countertop wedge, installing 11
D
Display
features 3
troubleshooting 23
E
ECR connection, tailgate mode 17
Ethernet LAN connection 18
F
factory options 5
speakers 5
features 3
and benefits 4
Display 3
overview 3
total cost of ownership 6
H
Host PC 18
I
installation
I/O modules 12
MSAM cards 13
MX800 Series 7
optional components 11
selecting a location 9
stand mount 9
trimplate 15
I/O modules 12
L
location for MX800 Series 9
M
maintenance
cleaning a terminal 21
returning a terminal 27
smart card reader 21
Merchandise Return Authorization 27
MSAM cards, installing 13
multiport cables
connecting 16
disconnecting 16
power up with 19
MX800 Series
applications 6
factory options 5
features and benefits 4
installation 7
service and support 27
specifications 29
trimplate, installing 15
O
optional components
contactless reader 5
countertop wedge 11
installation 11
I/O modules 12
MSAM cards 13
trimplate 15
optional modules 5
overview

32 MX800 SERIES INSTALLATION GUIDE
features 3
troubleshooting 23
P
PC connection 18
PIN protection measures 10
power up with multiport cable 19
product ID 27
S
serial number 27
serial port, troubleshooting 23
service
MX800 Series 27
returning a terminal 27
smart cards, contactless 5
specifications, MX800 Series 29
stand mount for MX800 Series 9
stylus, troubleshooting 24
T
terminal
repair 27
replacement 27
service and support 27
touch screen, troubleshooting 25
transaction failure, troubleshooting 24
trimplate, installing 15
troubleshooting
captured signature 25
Display 23
overview 23
serial port connection 23
stylus 24
touch screen 25
transaction failure 24
U
USB connection 18

MX800 SERIES REFERENCE MANUAL 33