Vernier Software and Technology LABQUEST2 LABQUEST2 User Manual
Vernier Software & Technology LABQUEST2 Users Manual
Users Manual
Measure Analyze Learn
Vernier Software & Technology
13979 SW Millikan Way
Beaverton, OR 97005-2886
Toll free 888.837.6437 | fax 503.277.2440
What is included with your LabQuest 2
LabQuest 2 unit
Rechargeable battery
Power adapter
USB cable
This Quick-Start Guide
Stylus (in unit)
Stylus tether
Logger Lite CD
Get the complete user guide at www.vernier.com/labquest/guide
Warranty Information
LabQuest 2 – Vernier warrants this product to be free from defects in
materials and workmanship for a period of five years from the date of
shipment to the customer.
LabQuest 2 Battery – Vernier warrants this product to be free from
defects in materials and workmanship for a period of one year from the
date of shipment to the customer.
This warranty does not cover damage to the product caused by abuse or
improper use.
Vernier LabQuest is a registered trademark of Vernier Software & Technology. Logger Pro, Vernier,
Vernier Software & Technology, and Vernier.com are our registered trademarks.
All other marks not owned by us that appear herein are the property of their respective owners, who may
or may not be affiliated with, connected to, or sponsored by us.
Quick Start Guide
www.vernier.com | info@vernier.com
Before you use your
LabQuest 2
Install the battery
Connect the power
adapter
Charge for at least 8
hours
Read the safety
information and
operating instructions
found in this guide
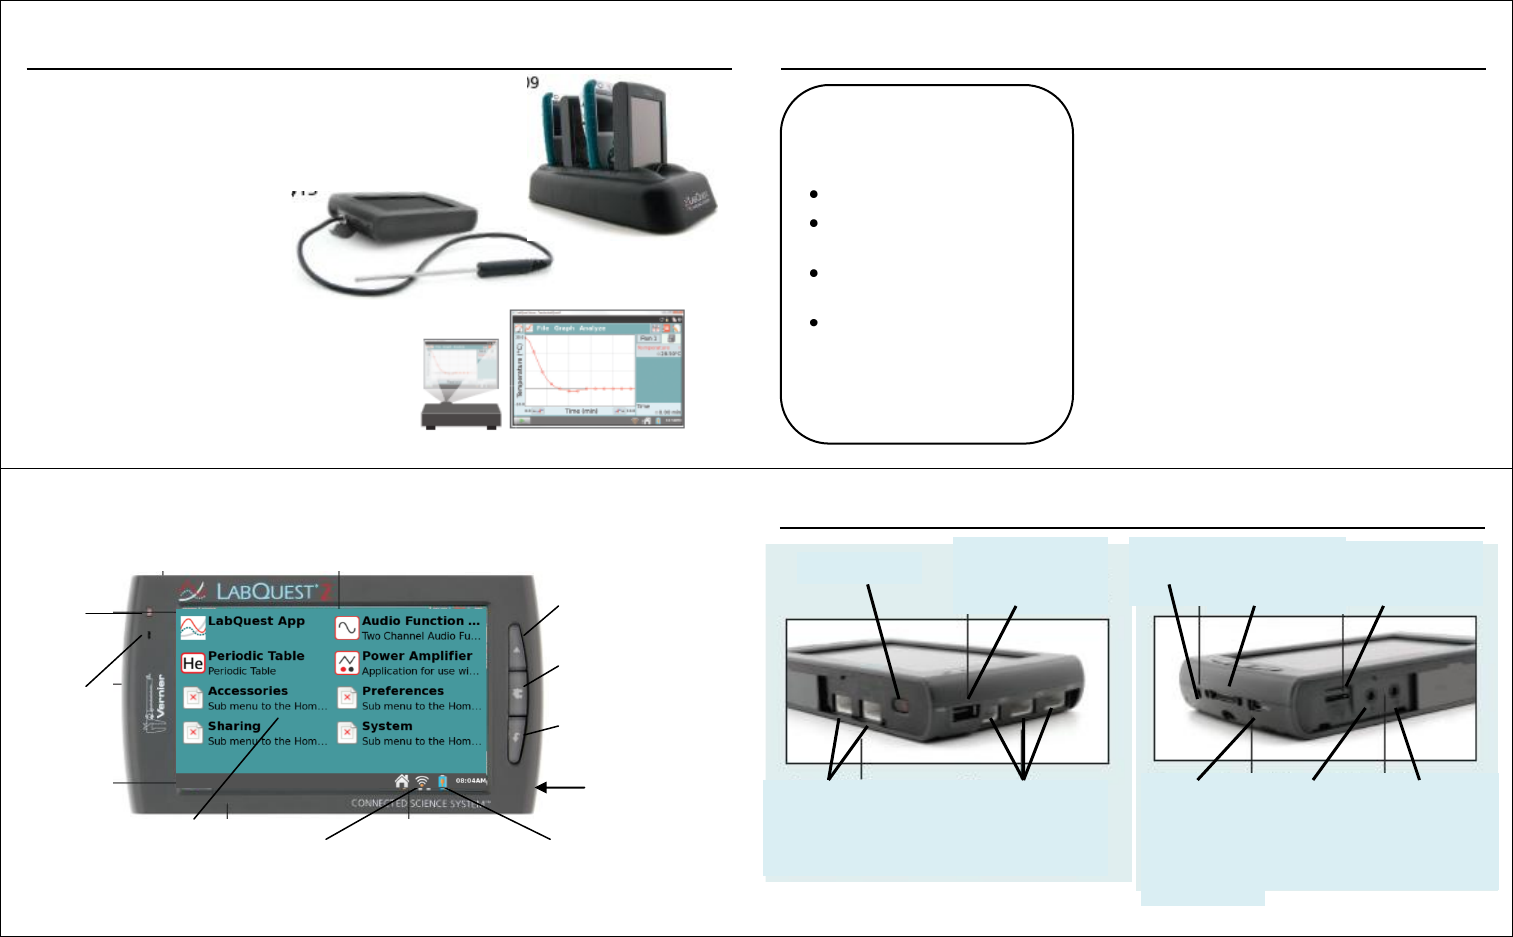
LabQuest Charging Station
Charge four LabQuest units at a time.
www.vernier.com/lq-crg
LabQuest 2 Lab Armor
Molded rubber material protects
LabQuest from spills and falls.
www.vernier.com/lq2-armor
LabQuest Viewer Software
Remotely monitor student progress
or project the LabQuest screen.
www.vernier.com/lq-view
Hardware Overview ….…….….…………….. 2
LabQuest App …………………………….…….. 4
Quick Data Collection ………………….. 5
Meter Screen ……………………………….. 6
Graph Screen ……………………………….. 8
Data Analysis ………………………………. 10
Table Screen ………………………………… 12
Printing …………………………………..….. 14
Other Screens …..………………………... 16
Using with Computers and Tablets..…. 18
Other Applications …………………………… 20
Care of LabQuest …………………………….. 22
Accessories …………………………...………… 24
Accessories
Table of Contents
24
1
Key Features of your LabQuest 2 Hardware
Hardware Overview
2
3
Power Button
Digital Sensor Ports
for Motion Detectors
and other digital
sensors
Analog Sensor Ports
for temperature,
pH, CO2, and other
analog sensors
USB 2.0 Port
for USB sensors
and flash drives
Internal
Microphone
Internal
Light
Sensor
Collect
Control data collection
Home
Access applications
Escape
Exit menus/applications
Stylus storage
Wi-Fi Status
Battery Level/Charge indicator
Resistive Touch Screen
For touch or stylus
AC
Power
Computer
Connectivity
transfer data
or use as a
computer
interface
Docking Port
for LabQuest
charging station
Micro SD/MMC
Card Slot
Audio In
For external
microphone
Audio Out
For speakers,
headphones,
and Power
Amplifier
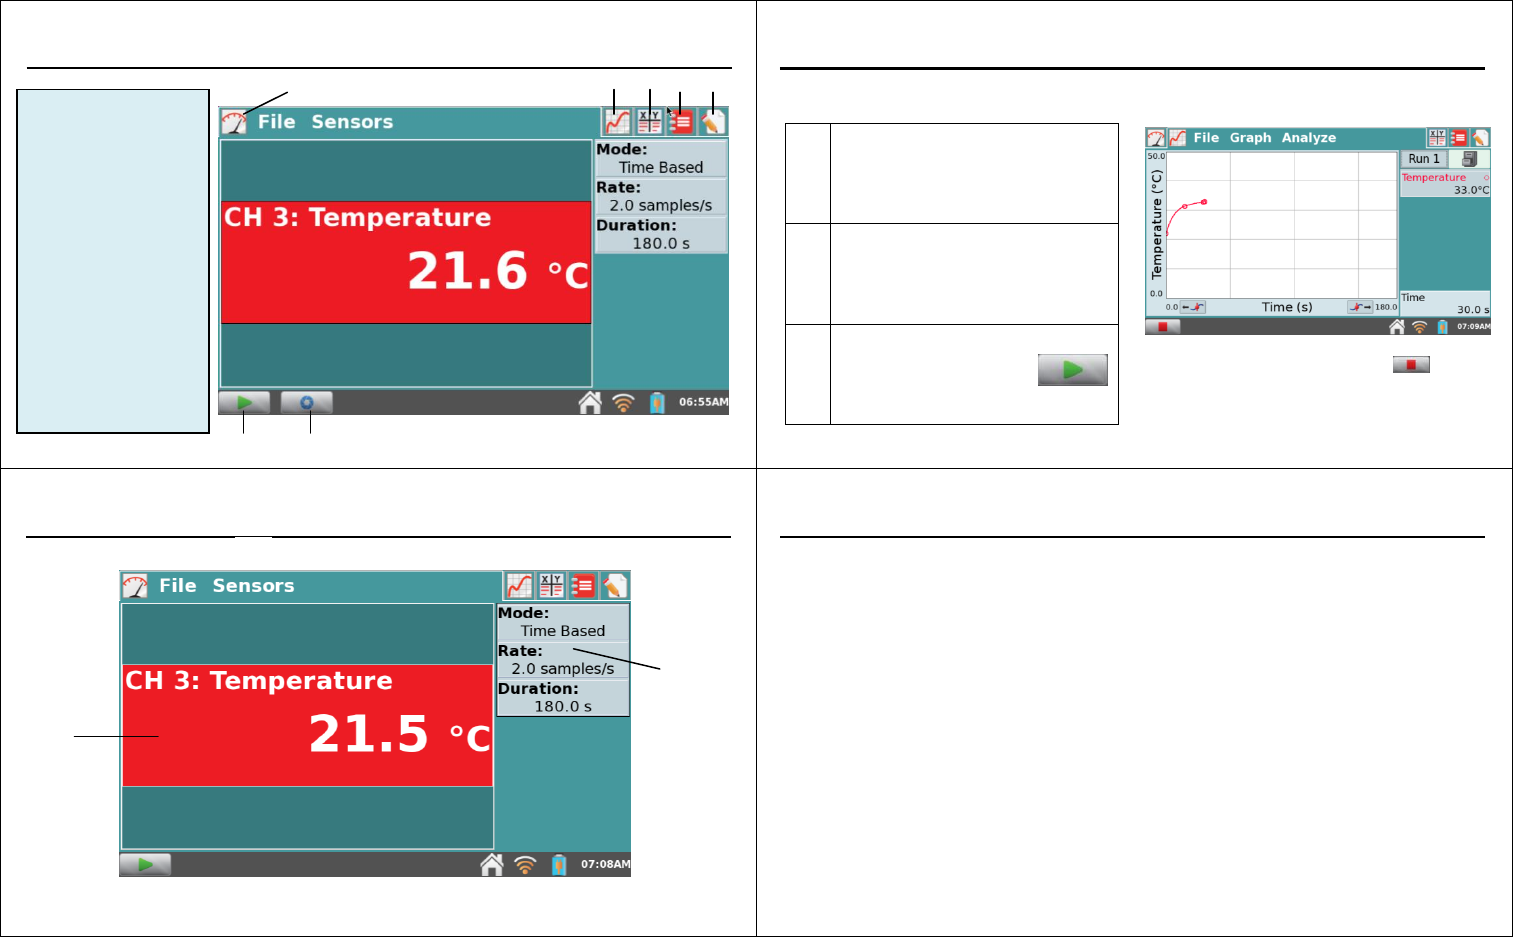
Three steps to collect data:
1
Turn on LabQuest
LabQuest App launches automatically.
2
Connect a sensor
The sensor will auto-ID. The default
collection rate for the sensor is set up.
3
Tap Collect
You are now collecting data.
A. Digital Meter – The Meter screen displays a digital meter for each
connected sensor. Tap on a meter to change units, calibrate, zero, or
reverse the sensor.
B. Data-collection details – A summary of the data-collection setup is shown.
Tap anywhere on the details box to modify the settings.
C. Sensors Menu – You can access all of the setup options using the Sensors
menu. Use the Sensor Setup option to activate internal sensors or to set up
sensors that do not auto-ID.
D. File Menu – This menu is available from every screen. Use this menu to
save files for analysis at a later time, print, or open an existing file.
4
5
LabQuest App – Navigation
LabQuest App – Quick Data Collection
LabQuest App – Meter Screen
LabQuest App – Meter Screen
6
7
Tap the tabs to access
different screens of
the LabQuest App
A – Meter
B – Graph
C – Table
D – Lab Instructions
E – Notes
Tap the buttons to
collect data
F – Start/Stop
G – Keep
(not always shown)
A
B
C
D
E
G
LabQuest App switches to the Graph screen
when data collection begins. Tap to end
collection early
A
B
C
F
C
Use the meter screen to set up your experiment
D
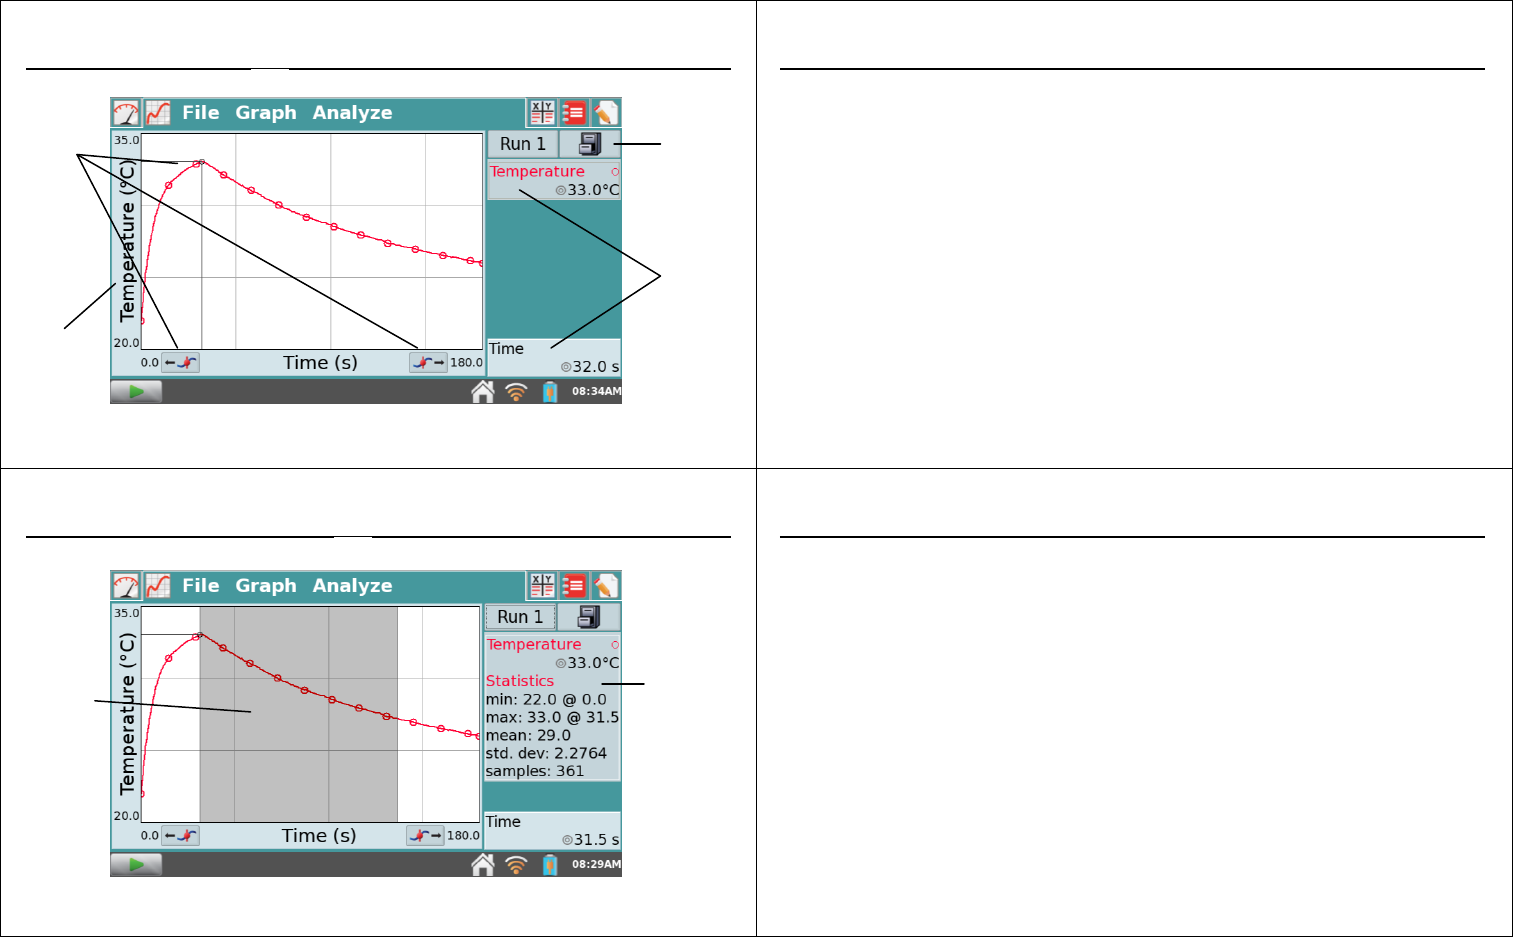
A. Axis Label – The Graph is set to display your sensor data. When you have
more than one sensor or run, you can change what is plotted on the axis
by tapping on the label and selecting the desired data column.
B. Examine Point – Tap any point to activate the examine cursor. Tap a
different point or use the Examine buttons to move to a new point.
C. Current Reading – The coordinates of your examine point are displayed to
the right of the graph. During collection, the live sensor reading is shown.
D. Store Run – To collect multiple trials of an experiment, store the run
before collecting more data.
E. Graph Menu – Use the Graph menu for even more graph options.
A. Analyze Menu – Tap this menu to access the analysis tools. Your options
include tangent lines, statistics, integrals, curve fits, models, and more.
Select your analysis tool, then select the desired data column for analysis.
B. Select a region – You can analyze all the displayed data or just a portion of
it. To analyze only a portion of the data, tap and drag across the desired
region before selecting your analysis tool. If no region is selected, the
analysis will apply to all the displayed data.
C. Analysis details – The results of your analysis is displayed next to the
graph. To view a full screen display of the results, tap on this box. To
remove an analysis, tap the Analyze menu and select the tool again.
8
9
LabQuest App – Graph Screen
LabQuest App – Analyze Data
LabQuest App – Analyze Data
10
11
D
E
C
B
A
LabQuest App – Graph Screen
When data collection is complete, the graph autoscales to the data
A
C
B
Statistical analysis of your data is done on the Graph Screen
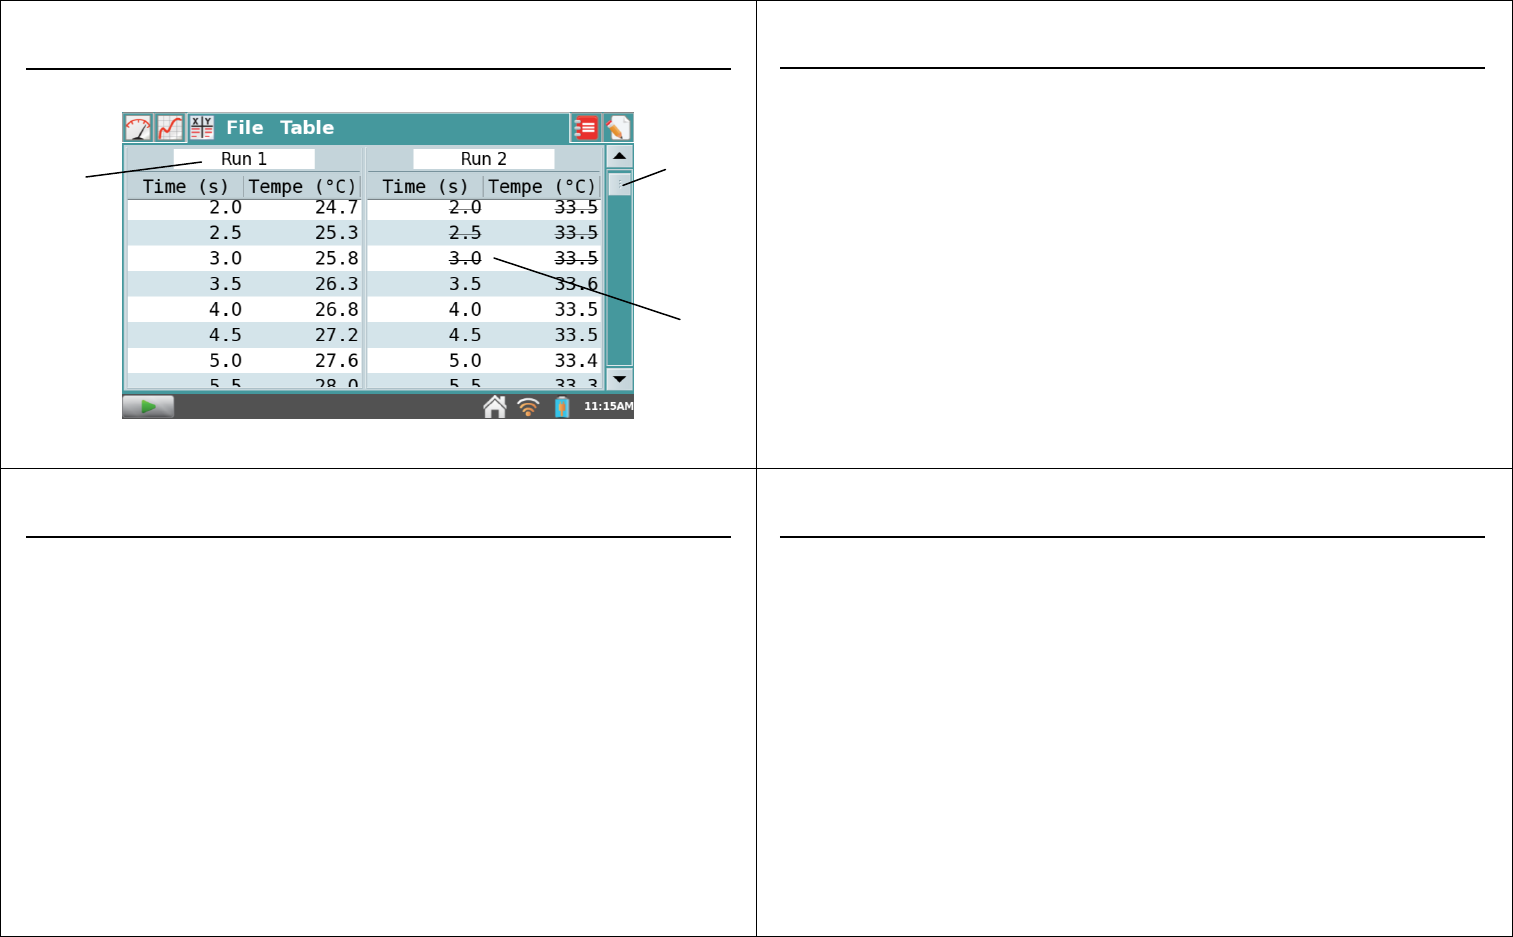
A. Scroll Bar – Use the scroll bar to view your data. Tap and drag the slider or
tap the arrow keys to scroll the table.
B. Table Menu – Use the Table menu to manage your data. You can also
create new manual or calculated columns to enhance your data analysis.
C. Run Name – Individual data sets can be renamed. Tap on the name and
enter the desired name. A keyboard will automatically launch.
D. Struck Data – You can non-destructively remove data points from your
graphs and statistical calculations using the Strike Through Data option.
First, select a region on the graph or in the table, then choose Strike
Through Data from your Table (or Graph) menu.
USB Printers
Connect a compatible HP printer (www.vernier.com/labqprinters) to
LabQuest using the standard USB port (USB cable not included with
LabQuest).
Network/Wi-Fi Printers
Tap the Wi-Fi icon and connect to the network to which your desired printer
is connected. Tap System on the Home screen, then tap Printers. Tap Add a
Printer and select your desired printer.
To print from a LabQuest, choose Print from the File menu. You can choose to
print a graph, table, lab instructions, notes, or the LabQuest screen as it is
currently displayed.
Computer Printing
You can print LabQuest files using your computer and our Logger Lite or
Logger Pro software. See the software documentation for more information.
Print a saved file – Connect a USB Flash drive to your LabQuest. Choose
Save As from the file menu and tap on the USB icon. Name the file as
desired and select OK. The file will be saved on your flash drive and can be
opened using Logger Lite or Logger Pro on your computer.
Import your data – Start the Logger Lite or Logger Pro software on your
computer. With your data displayed on the LabQuest, connect the LabQuest
to your computer using the USB cable that came with LabQuest. Follow the
computer software prompts to import the data to the software.
12
13
LabQuest App – Table Screen
LabQuest App – Table Screen
A
B
D
C
You can also manually enter data into the data table
Printing – Directly from a LabQuest
Printing – From Logger Lite or Logger Pro
14
15
LabQuest App – Other Screens
LabQuest App – Other Views
16
17
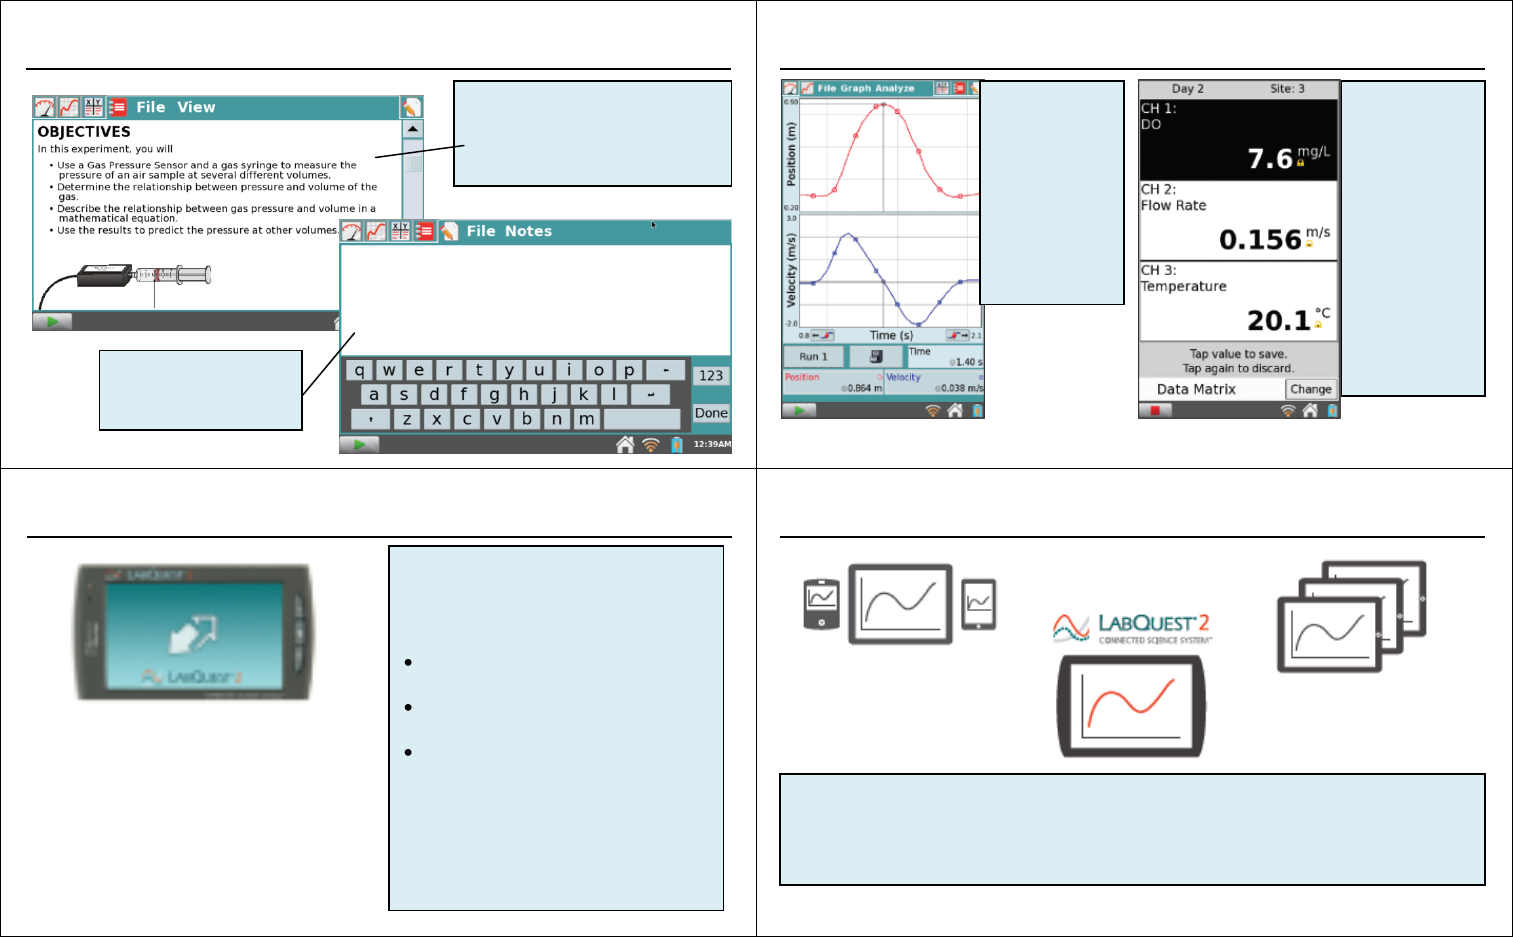
Notes
Enter notes about your
experiment.
Lab Instructions
Over 100 labs preloaded. Even more
are available online at
www.vernier.com/labquest/organizer
Portrait
orientation
Rotate LabQuest
to a portrait
orientation to
better view two
graphs , tables,
and lab
instructions.
High
Contrast
Mode
Use high
contrast mode
when viewing a
LabQuest in
bright light. To
access this
option, tap
Preferences on
the Home
Screen, then tap
Light and Power.
Using LabQuest with a Computer
Using LabQuest with Tablets and other Mobile Devices
18
19
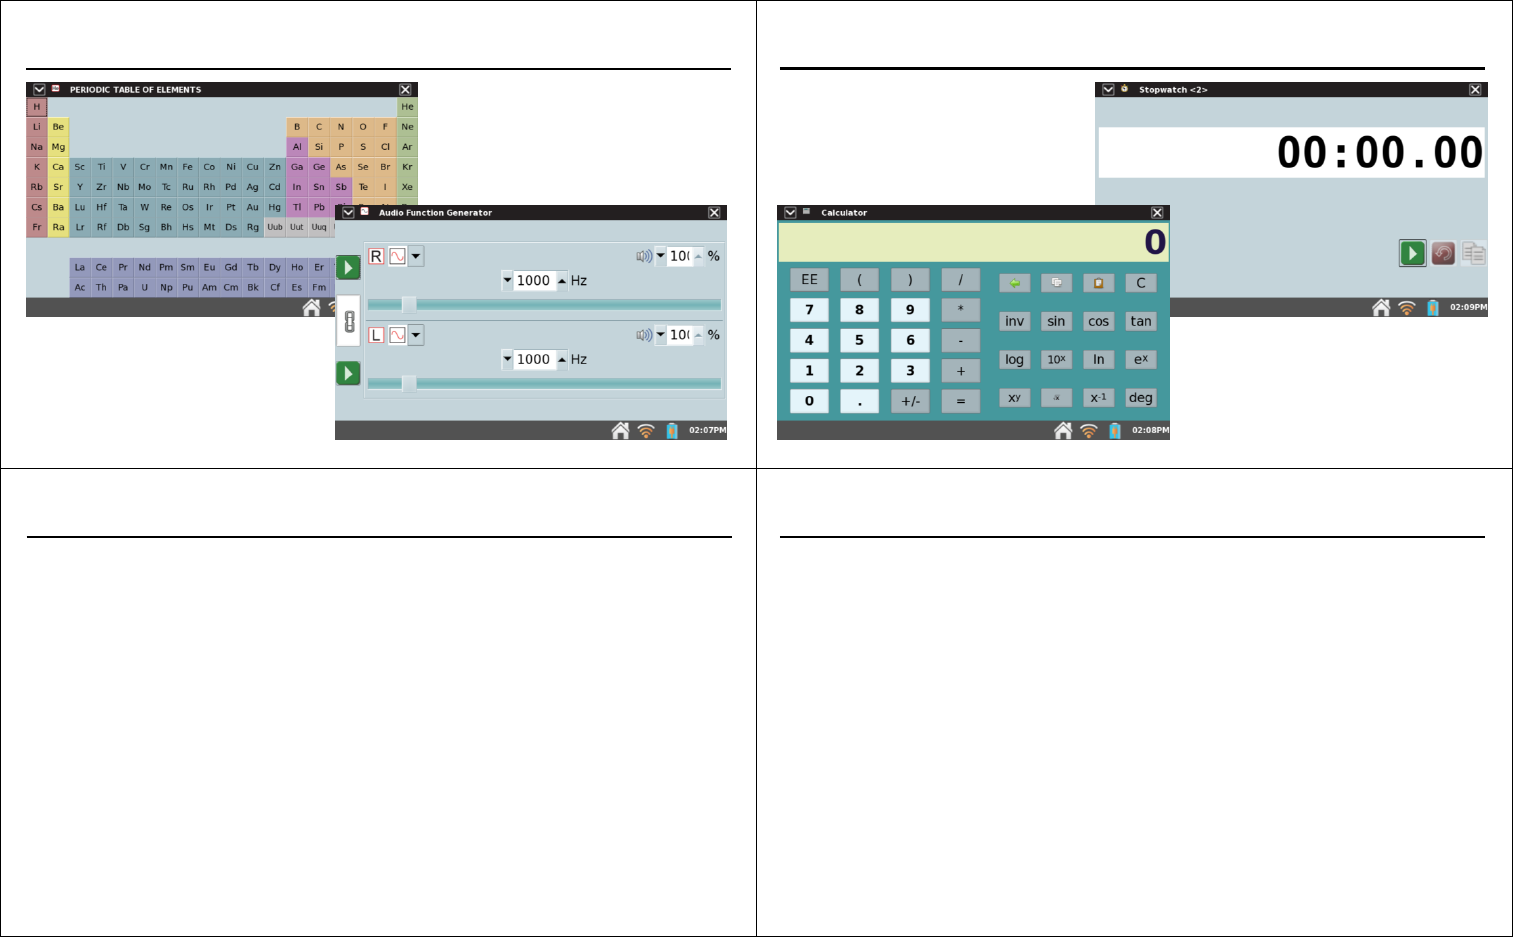
Connect LabQuest to a computer
running Logger Pro or Logger Lite
to:
Import data from LabQuest for
further analysis
Use LabQuest as a computer sensor
interface
Manage user data (Open, Save,
Delete, or Import) stored in the
LabQuest’s internal memory.
Software Requirements:
Logger Pro 3.8.5 or newer
Logger Lite 1.6 or newer
A double arrow indicates the
computer is in control of your
LabQuest
You can collect, view, analyze, and annotate data from a LabQuest 2 on an
iPad®, Android® tablet, or other mobile device that has a supported
browser.
For more information visit www.vernier.com/css
Software Updates – Software updates for LabQuest, as they are released, will be available at
www.vernier.com/labquest/updates. To determine what version of the software you are
using, tap System on the Home screen, then tap Information.
Screen Calibration – The screen may need to be recalibrated periodically. To access the calibration
tool, tap System on the Home screen, then tap Calibrate Screen. If you are unable to access
the Calibration tool, press and hold the power button until the LabQuest shutdown message is
displayed. Wait until the system shuts down then turn the unit back on. While the system is
rebooting, press the Home key to prompt the system to display the calibration tool. Tap the
calibration target in the five locations indicated to calibrate the screen.
System Reset – To reset the system, tap System on the Home screen, then tap Reboot. If you are
unable to access the Reboot tool, press and hold the power button until the LabQuest
shutdown message is displayed. Wait until the system shuts down then turn the unit back on.
Battery Life – Battery life will depend on the sensors and features used. To access power saving
options, tap Preferences on the Home Screen, then tap Light and Power.
Battery Maintenance – Use only the supplied AC adapter or optional charging station to charge the
LabQuest battery. A full charge can take eight hours. The battery cannot be overcharged,
and it can be safely recharged after a partial discharge.
Screen Maintenance – The LabQuest screen is water resistant. Wipe the screen clean with a cotton
cloth that is slightly dampened with water or ethanol. Do not use any other solvents. Do not
submerge your LabQuest in liquids.
Summer Storage – For long-term storage of your LabQuest, fully shutdown the unit by pressing and
holding the power button until the shutdown message is displayed. After the system shuts
down you can remove the battery, if desired. Store the LabQuest in a climate-controlled
environment. Excessive heat can significantly reduce battery life.
Periodic Table
20
Other Applications
21
Other Applications
Care of LabQuest
Care of LabQuest
22
23
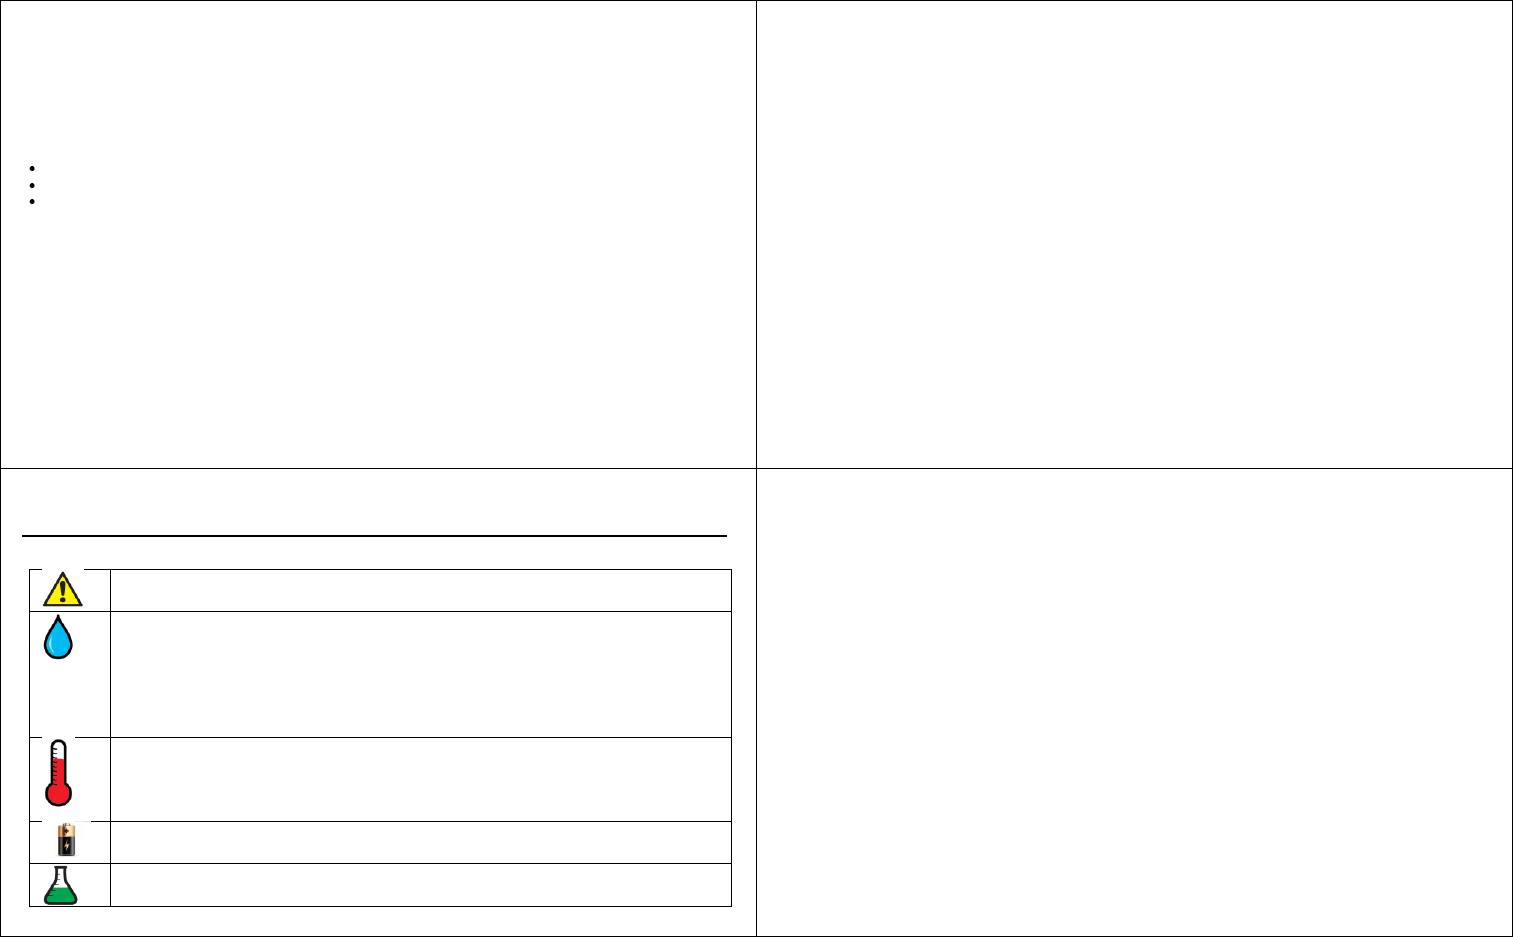
Audio Function
Generator
Periodic Table, Audio Function
Generator, and Power Amplifier
(not shown) are accessed via the
Home menu.
Stopwatch, Calculator, and Sound
Recorder (not shown) are accessed
via the Home> Accessories menu.
Calculator
Stopwatch
Federal Communication Commission interference statement
This equipment has been tested and found to comply with the limits for a Class B digital device, pursuant to part 15 of the FCC
rules. These limits are designed to provide reasonable protection against harmful interference in a residential installation. This
equipment generates, uses and can radiate radio frequency energy and, if not installed and used in accordance with the
instructions, may cause harmful interference to radio communications. However, there is no guarantee that interference will not
occur in a particular installation. If this equipment does cause harmful interference to radio or television reception, which can be
determined by turning the equipment off and on, the user is encouraged to try to correct the interference by one or more of the
following measures:
-Reorient or relocate the receiving antenna.
Increase the separation between the equipment and receiver.
Connect the equipment into an outlet on a circuit different from that to which the receiver is connected.
Consult the dealer or an experienced radio/TV technician for help.
FCC Caution
This device complies with Part 15 of the FCC Rules. Operation is subject to the following two conditions:
(1) this device may not cause harmful interference and
(2) this device must accept any interference received, including interference that may cause undesired operation
RF Exposure Warning
The equipment complies with RF exposure limits set forth for an uncontrolled environment. The antenna(s) used for this
transmitter must not be co-located or operating in conjunction with any other antenna or transmitter.
You are cautioned that changes or modifications not expressly approved by the party responsible for compliance could void your
authority to operate the equipment.
IC Statement
This device complies with Industry Canada license-exempt RSS standard(s). Operation is subject to the following two conditions: (1)
this device may not cause interference, and (2) this device must accept any interference, including interference that may cause
undesired operation of the device.
Le présent appareil est conforme aux CNR d'Industrie Canada applicables aux appareils radio exempts de licence. L'exploitation est
autorisée aux deux conditions suivantes : (1) l'appareil ne doit pas produire de brouillage, et (2) l'utilisateur de l'appareil doit
accepter tout brouillage radioélectrique subi, même si le brouillage est susceptible d'en compromettre le fonctionnement.
Industry Canada - Class B This digital apparatus does not exceed the Class B limits for radio noise emissions from digital apparatus
as set out in the interference-causing equipment standard entitled “Digital Apparatus,” ICES-003 of Industry Canada.
Cet appareil numérique respecte les limites de bruits radioélectriques applicables aux appareils numériques de Classe B prescrites
dans la norme sur le matérial brouilleur: “Appareils Numériques,” NMB-003 édictée par l’Industrie.
Operation is subject to the following two conditions: (1) this device may not cause interference, and (2) this device must accept
any interference, including interference that may cause undesired operation of the device.
L'opération est soumise aux deux conditions suivantes: (1) cet appareil ne peut causer d'interférences, et (2) cet appareil doit
accepter toute interférence, y compris celles susceptibles de provoquer fonctionnement du dispositif.
To reduce potential radio interference to other users, the antenna type and its gain should be so chosen that the equivalent
isotropically radiated power (e.i.r.p.) is not more than that permitted for successful communication.
L'opération est soumise aux deux conditions suivantes: (1) cet appareil ne peut causer d'interférences, et (2) cet appareil doit
accepter toute interférence, y compris celles susceptibles de provoquer fonctionnement du dispositif.
RF exposure warning: The equipment complies with RF exposure limits set forth for an uncontrolled environment. The antenna(s)
used for this transmitter must not be co-located or operating in conjunction with any other antenna or transmitter.
Avertissement d'exposition RF: L'équipement est conforme aux limites d'exposition aux RF établies pour un incontrôlés
environnement. L'antenne (s) utilisée pour ce transmetteur ne doit pas être co-localisés ou fonctionner en conjonction avec toute
autre antenne ou transmetteur.
Read all safety information and operating instructions included in this Quick Start
Guide prior to using your LabQuest 2.
LabQuest is designed to be splash resistant. However, avoid water immersion and
standing liquid on the display. If water gets in the device, immediately shutdown the
device (tap System on the Home screen, then tap Shutdown, or hold down the power
button until the shutdown sequence begins). Remove battery, connected cables, SD
card, and any other accessories. Allow to dry thoroughly before restarting. Do not
attempt to dry using an external heat source.
Safe operating temperatures are from 0 °C to 45 °C. Storage temperature are -30 °C to
60°C. Exposures to low or high extreme temperatures will temporarily reduce battery
life. Avoid rapid temperature changes as condensation may form inside the device.
Do not leave in a car as temperatures can exceed the maximum storage range.
Contains a Lithium Ion battery. Use only supplied battery for this device. Do not
puncture or expose to excessive heat or flame.
Do not store in chemical closet or in areas of concentrated chemical gasses.
Safety Information